cells and living things...
TRANSCRIPT

Cells and Living Things (Standard) All living things share the characteristics described in MRS C GREN
Biology is the study of living things. A living object is an object that carries out life functions. A non-living
object is an object that has not been alive. A dead object is an object that was once alive.
All living organisms are composed of one or more cells. A cell is a small, living unit that contains all the
chemicals and molecules that help support an organism's life.
Classifying objects as living or non-living
How would we know if a car or cow is living? They both move and need “feeding” to keep them going. So why
is only the cow living?
All living things share the characteristics described in MRS C GREN
We use the acronym MRS C GREN to remind us living objects show ALL of the life processes, not just some,
and are made up of CELLS.
Living things are classified into groups based on similarities /
features
Biologists classify all living things into overall groups, called
Kingdoms. The members of each kingdom are alike in key ways,
such as the nature of their cells, their body features or the way they
obtain energy. Classification keys are used to identify living things
(and other objects) in each group.
The main groups that living things are classified into; Bacteria
(Monera), Protista, Animals, Plants, Fungi
Traditional classification of organisms into five kingdoms is based
on differences in body structure

What is a dichotomous identification key?
The Dichotomous keys are used as tools to help identify unknown organisms using careful observations and
matching those observations in an organised manner against choices given at each step. Each two choices are
known as a couplet. Dichotomous means branched.
All living organisms are made up of cells.
All living organisms are made up of cells, the smallest structural (how it looks) and functional (How it works)
unit. Organisms can be Unicellular – consisting of one independent cell, or be multicellular – organised
networks of cells with different functions and structures; humans have over 100 trillion cells.
The structure of a typical plant cell includes a cell membrane, cytoplasm, nucleus, cell wall, vacuole, and
chloroplast.
Rules for Using Dichotomous Keys:
1. Read both choices in a couplet (pair) carefully.
2. When reading a couplet, make sure you understand all of
the terms used.
3. If you are unsure of which choice to make in a couplet,
follow both forks (one at a time). After working through a
couple of more couplets, it may become apparent that one
fork does not fit your sample at all.
4. Work with more than one sample if possible. This will
allow you to compare.
5. When a measurement is given make sure that you take
the measurement and do not take a guess.
Making a simple dichotomous identification key.
If we are making a key based on observations of physical
features that we can see, the first step must be a feature that
can divide all of the living organisms into two groups.
For example below, we could divide the birds into those that
have tuffs of feathers on their heads (spotted shag and
crested penguin) and those that do not (wax-eye, brown kiwi,
paradise duck, kingfisher, yellow head, spotted dotterel).
Other features such as thickness of beak, tail or not, one
colour or many colours – can be used to further divide each
bird group.
The key is finished when each individual has its own path and
the key leads to a name for each.
Cell Wall - Gives the cell rigidity and a more angular
appearance.
Chloroplasts - The site of photosynthesis, gives the cell its
characteristic green colour
Vacuole - Assists with storage and structure

The structure of a typical animal cell includes a cell membrane, cytoplasm and nucleus
Plant and animal cells similarities and differences.
Similarities Differences
1. BOTH cells have a 'skin', called the membrane,
protecting it from the outside environment.
2. BOTH cells have a nucleus. The ‘information storage'
of the cell.
3. BOTH cells have Cytoplasm, a fluid that protects the
inside of the cell and carries nutrients
1. ONLY Plants have a cell wall that help define the
shape and give structure to the plant.
2. ONLY plant cells contains chloroplasts that helps in
the plants photosynthesis.
3. Plant cells are generally larger than animal cells.
4. Plants have a larger Vacuole.
Cell membrane - Surrounds cell and controls passage of nutrients and
chemicals. Flexible and allows cell to change shape.
Cytoplasm - A liquid filling the cell and containing all the chemicals
the cell needs to function
Using a Microscope
Most cells are too small to be clearly seen by eye and
require a microscope to view.
Definitions:
Magnification: the number of times the image is
enlarged
Resolution: the clarity (how clear) and ability to see
detail in the image

Microscope parts and function
Arm - this attaches the eyepiece and body tube to the base.
Base - this supports the microscope.
Coarse focus adjustment - a knob that makes large adjustments to the focus.
Eyepiece - where you place your eye.
Fine focus adjustment - a knob that makes small adjustments to the focus (it is often smaller than the coarse
focus knob).
High-power objective - a large lens with high magnifying power.
Low-power objective - a small lens with low magnifying power.
Mirror (or illuminator) - this directs light upwards onto the slide.
Stage - the platform on which a slide is placed.
Using a microscope safely
1. Make sure the lowest power objective lens (e.g. 4x) is clicked into position.
2. Place the microscope slide on the stage and fasten it with the stage clips.
3. Look at the objective lens and the stage from the side and turn the course focus knob so the stage moves
upward. Move it up as far as it will go without letting the objective touch the coverslip.
4. Look through the eyepiece and move the course focus knob down until the image comes into focus.
5. Adjust the mirror for the greatest amount of light.
6. Use the fine focus knob for the clearest image
7. When you have a clear image of your sample with the lowest power objective, you can change to the next
objective lenses. You might need to readjust the sample into focus
8. When finished, lower the stage, click the low power lens into position and remove the slide
Making a Microscope Slide
Onion Cell Slides
1. Collect onion, slide and cover slip, lamp and microscope.
2. Peel the epidermal cells (skin between layers) from the onion tissue.
3. Place the cell sample on your slide – spread it out and make sure it is not folded.
4. Add 2 drops of iodine (or other stain) to the onion slide.
5. Lower cover slip onto the slide one side at a time so there are no bubbles
6. Focus under the microscope – remember to start with low power!!
7. Draw 2-3 cells about 10 lines big into your books.
8. Return used slides and slips to the ice cream container with disinfectant.

Biological drawings are a useful way of recording information from your observations.
An ecosystem is the habitat and the community considered together.
An ecosystem includes all of the living organisms in a specific area. These systems consist of a living part called
the community made up of all the plants and animals, which interact with their non-living environments
(weather, Earth, Sun, soil, atmosphere) which determine the habitats available.
The niche is the way in which an organism interacts with its environment including its feeding role, type of
activity and habitat
The niche of a species describes how members “make a living” in the environment in which they are found.
Describing the niche of a species would include:
The habitat, which means where the species lives, feeds and reproduces.
When the organism is active (day or night)
The feeding role that the species has in the community. (producer, consumer or decomposer)
The adaptations the organism has to best survive.
Habitat examples
All birds form a separate group of animals that evolved from the same ancestor. Bird species are found all
across the world in many different habitats. Diversity in a bird adaptations help each type of species survive in
different habitats.
Rules for drawing a cell
1. Use unlined paper.
2. Draw in pencil.
3. Always print.
4. Give the drawing a title
5. Use a large area of the paper
6. Label all visible parts and never cross lines.
7. Name the specimen
8. Print your name and other Information such as scale
or magnification used on the microscope
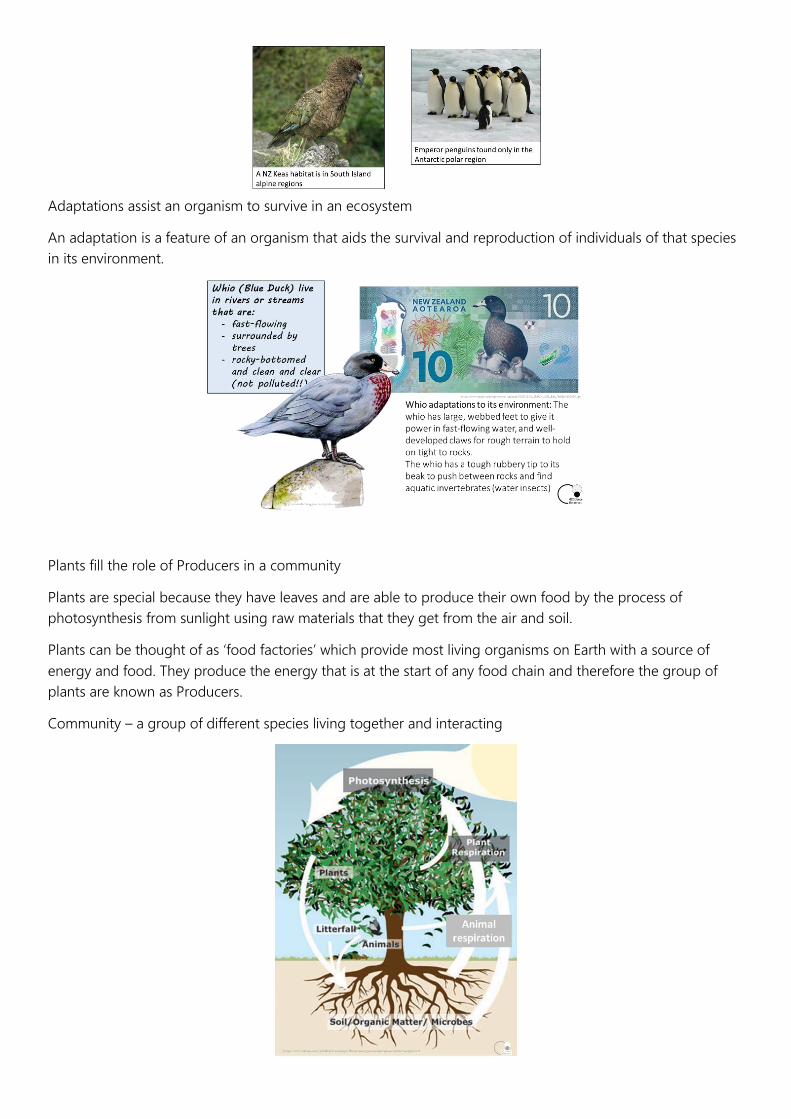
Adaptations assist an organism to survive in an ecosystem
An adaptation is a feature of an organism that aids the survival and reproduction of individuals of that species
in its environment.
Plants fill the role of Producers in a community
Plants are special because they have leaves and are able to produce their own food by the process of
photosynthesis from sunlight using raw materials that they get from the air and soil.
Plants can be thought of as ‘food factories’ which provide most living organisms on Earth with a source of
energy and food. They produce the energy that is at the start of any food chain and therefore the group of
plants are known as Producers.
Community – a group of different species living together and interacting

The importance of plants as producers.
Producers are at the beginning of a food chain. On land, Producers are plants. Plants are at the beginning of
every food chain that involves the Sun. All energy comes from the Sun and plants make food with that energy
using the process of photosynthesis. Energy in the form of nutrients and food are passed onto other
organisms when they eat (consume) the plants.
The role of producers, consumers and decomposers in food chains and webs.
The two main groups that organisms can be divided into as feeding groups are either producers or consumers.
Consumers can then be further dived into decomposers, herbivore, carnivores, omnivores and scavengers.
The role of producers in food chains.
A food chain is a series of organisms through which energy flows; first link is always a producer, such as a
plant. The producer stores energy from the Sun through the process of photosynthesis. Each organism above
the producer eats the one below it in the chain. Energy flows in one direction only.
Food Webs
In an ecosystem, there are many different food chains and many of these are cross-linked to form a food web.
Ultimately, all plants and animals in an ecosystem are part of this complex food web.
Herbivores Omnivores Carnivores
Herbivores are animals that eat plants only. (plant eaters) In a food web they are directly above the producers
Omnivores eat both plants and other consumers. They obtain their food from more than one source.
Carnivores eat only other living consumers (meat eaters). This also includes birds that eat only insects.
Decomposer Scavenger
Fungi and bacteria that break down the bodies of dead plants and animals
Consumers that eat dead animals
https://www.dkfindout.com/uk/animals-and-nature/hyenas/

If one species in the food web changes in numbers, it will affect all other species in the food web. For example,
if all the rabbits were removed the predators would need to start eating more of the birds, mice and rats. The
grass that the rabbits ate would increase and feed more of the other herbivores.
Energy enters an ecosystem in sunlight, which is transferred to energy in plants by photosynthesis and that this
energy is then passed along food chains.
Trophic levels are the feeding positions in a food chain such as primary producers, herbivore, primary
carnivore, etc. Green plants and phytoplankton form the first trophic level, the producers. Herbivores form the
second trophic level, while carnivores form the third and even the fourth trophic levels, all called the
consumers.
Energy is passed from one trophic level to another starting from the producers. Food webs and food chains
are used to show which species of organism is at each level and how energy moves between them.
The structure and functions of the plant
Many parts of the plant are involved with the process of photosynthesis, either by helping collect the
substances needed (roots, stem, leaves), storing products formed (roots, stem) or providing a place for the
process to take place (leaf cells).
The Shoot System - Above ground (usually)
Lifts the plant above the soil. Main functions include:
Leaves - photosynthesis
Flowers - reproduction
Fruit – seed dispersal
Stem - food and water transport
The Root System - Underground (usually)
Anchor the plant in the soil. Main functions include:
Absorb water and nutrients
Transport water and nutrients
Food Storage

Parts of a plant we eat
We use many types of plants for food. The fruit and vegetables that we eat, and grow for eating, come from
various parts of the plant. We often breed types of plant for food by exaggerating a part of a plant, such as
flowers of the plant to grow broccoli, to make better use of them.
The significance of photosynthesis in making food
Most living organisms depend on plants to survive. Plants convert (change) energy from sunlight into food
stored as carbohydrates through photosynthesis. Because animals cannot make their own food, they must eat
plants (producers) to gain nutrition. Plants produce oxygen, which is released during photosynthesis, which all
organisms need for respiration.
Photosynthesis transfers energy from sunlight into energy in
chemicals such as glucose and starch.
Light enters the leaf and is trapped by a green substance called
chlorophyll contained within structures called the chloroplasts
in the cells.
Water is transported via water tube cells called xylem, to the
leaf cell and the carbon dioxide enters through the stomata
and diffuses (spreads) to the leaf cells.
These substances react chemically within the chloroplasts;
powered by the light then glucose (a sugar) is produced along
with oxygen, which diffuses out. The sugar leaves the leaf via
sugar/food tube cells.
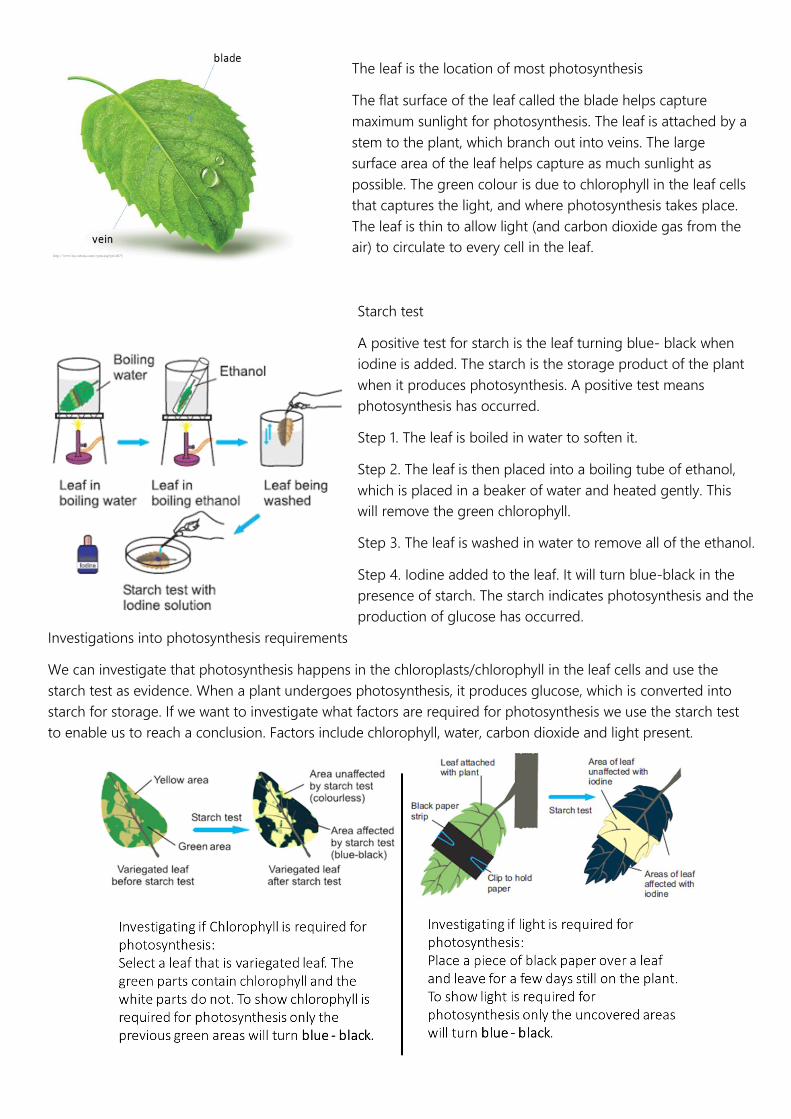
Investigations into photosynthesis requirements
We can investigate that photosynthesis happens in the chloroplasts/chlorophyll in the leaf cells and use the
starch test as evidence. When a plant undergoes photosynthesis, it produces glucose, which is converted into
starch for storage. If we want to investigate what factors are required for photosynthesis we use the starch test
to enable us to reach a conclusion. Factors include chlorophyll, water, carbon dioxide and light present.
The leaf is the location of most photosynthesis
The flat surface of the leaf called the blade helps capture
maximum sunlight for photosynthesis. The leaf is attached by a
stem to the plant, which branch out into veins. The large
surface area of the leaf helps capture as much sunlight as
possible. The green colour is due to chlorophyll in the leaf cells
that captures the light, and where photosynthesis takes place.
The leaf is thin to allow light (and carbon dioxide gas from the
air) to circulate to every cell in the leaf.
Starch test
A positive test for starch is the leaf turning blue- black when
iodine is added. The starch is the storage product of the plant
when it produces photosynthesis. A positive test means
photosynthesis has occurred.
Step 1. The leaf is boiled in water to soften it.
Step 2. The leaf is then placed into a boiling tube of ethanol,
which is placed in a beaker of water and heated gently. This
will remove the green chlorophyll.
Step 3. The leaf is washed in water to remove all of the ethanol.
Step 4. Iodine added to the leaf. It will turn blue-black in the
presence of starch. The starch indicates photosynthesis and the
production of glucose has occurred.

Water movement through a plant
Water is required for photosynthesis and it moves through the plant in one direction only.
Step one: Water uptake by the process of osmosis into the root hairs
Step two: water moves up through the xylem by molecules “sticking” together and being pulled upwards
Step three: water moves out of the plant by transpiration through the stomata on the underside of the leaf
Flowering Plants
Plants that produce flowers are known as Flowering Plants (angiosperms). The flowers are the reproductive
structures where fertilisation occurs and seeds are produced. Flowering plants include many of our common
New Zealand such as kōwhai, harakeke (flax) and pōhutakawa, as well as flowering grasses like toetoe. Many of
our New Zealand Flowering plants have been discovered by Māori to be useful for medicine, food, clothing
and housing.
Flowering Plant life cycle
All flowering plants develop flowers that produce male pollen and female eggs. The number and structure of
these depend on the species of plant.
The reproductive cycle involves the transfer of pollen to the egg in the flower (pollination), the joining of the
pollen and egg to make a seed (fertilisation) and the spreading of seeds to grow a new plant (seed dispersal)

The structure of a flower
Insect / bird -pollinated flowers have visible, often colourful petals that surround the flower's sexual
reproduction parts. The petals can "advertise" for specific pollinators through their shape, size, colour and
sometimes smell. The flowers are surrounded by sepals, which are small and usually green structures that
protect the flower as its developing.
The reproductive parts of an insect-pollinated flower
Drawing and labelling a flower
The main parts of a typical flower that are pollinated by
an animal such as a bird or insect, is shown beside in a
cross-section drawing. Many flowers often have many
anther/filaments surrounding one central stigma/style.
When labelling, one of each is required.
Reminders for Biological drawing:
Clean single lines
Label all parts
Do not cross over lines

Pollination
Pollination is the transfer of pollen from the male part of the flower to the female (stigma) part of another
flower. Flowers can be wind-pollinated or animal-pollinated. Animals that assist in pollinating a flower are
known as pollinators. Insect-pollinated flowers often contain nectar, a sweet sugar produced by the plant, to
attract an insect. As the insect reaches into the flower for the nectar, it may be brushed with pollen from the
anther. If the insect moves to another flower, it may brush the pollen against the stigma and therefore
pollinate the flower. Flowers ripen their male and female parts of the flower at different times to prevent self-
pollination.
1. The male parts of the flower are the anther and filament
2. The female parts of the flower are the stigma, style and ovary
3. Male gametes are found in Pollen Produced in the Anther
4. Pollen needs to be moved to the female part called the Stigma of the same species of plant to
reproduce
5. This process is called Pollination
6. Pollination can be helped by Wind Or Animal
7. An example of wind pollination is grass plants
8. A wind pollinated flower is most likely to look like - small, green, unscented
9. An example of animal pollination is a rose plant pollinated by insects
10. An animal pollinated flower is most likely to look like – colourful, with large petals, perhaps with a scent
Different ways pollen may be transferred.
Pollen grains are tiny and they are light enough to be carried by the wind or on the bodies of flying and
crawling animals. Plants and their flowers have adapted to transfer their pollen from one flower to another in
many different ways that include using wind, insects, birds, mammals and reptiles.

Examples of insect-pollinated flowers
Examples of wind-pollinated flowers
The differences in structure between insect-and wind-pollinated flowers
The differences in structure between insect-and wind-pollinated
flowers
Insect pollinated flowers are easily seen and often contain scent and
nectar to attract the insects. The male parts are adapted so they
make contact with the insect as it feeds from the flower.
Wind pollinated flowers are often small and green with no
scent. Male anthers protrude out from the flower to allow the
wind to pick up the pollen and disperse it away from the plant.
Male and female parts develop at different times.

Seed dispersal
Pollen is dispersed (or spread) from plant to plant so the flowers can be pollinated and fertilised seeds
produced. Once the seeds are mature they then also need to be dispersed so they are not competing with the
parent plant for space, light, water and nutrients. There are various ways that plants have evolved to disperse
their seeds; forming inside fruit that animals will eat and spread, forming structures on the seed so the wind
will carry them away, can float away, be forced away or tangle in the coat of an animal to be carried away.
Fertilisation in flowering plants
1. Pollen from either the same plant (self-pollination)
or another plant (cross-pollination) needs to arrive
on the flowers stigma
2. The pollen sends a tube down the style to reach the
ovule, and the male gametes (there are two in every
pollen grain) enter the ovule to fertilise the egg
(female gamete)
3. One male gamete joins with one female gamete to
form a zygote and the plant is fertilised. (The
fertilised ovule develops into a seed)

Seed structure is linked to Seed dispersal
The Structure of seeds
Stages of germination of seeds
A seed is a fertilised ovum (egg) containing a small
embryonic plant and a supply of food to help it germinate
and grow before it can start to photosynthesis and make
its own food. The seed consists of the seed coat or the
testa, which surrounds the cotyledons or the food storage
area. The embryo consists of the radicle which is the
embryonic root and the plumule, which forms the first
shoots and leaves of the plant. A small pore in the seed
may be seen called the micropyle. This is where the pollen
originally entered the ovule.
Water enters the seed through the micropyle and starts the
seed germinating.
The water also softens the testa to allow it to split.

Germination Investigation
By altering the conditions in containers with seeds, we are able to see what conditions are required for
germination. The range of conditions include light, water, oxygen and warmth. The seeds germinated when
seeds has warmth, water and oxygen - whether there was light or not did not affect germination.
Māori scientific knowledge and understanding of their use of plants - Tawa
Over a long period of time, Māori have built up their scientific knowledge and understanding of their use of
plants for medicine (Rongoa), food, clothing and housing. Many of these uses are still practiced today.
The rātā tree bark can be made into a lotion or
poultice, and the flower nectar can used for sore
throats.
Kawakawa can be made into a tea, poultice or
chewed for toothache, sore stomach, and pains