ceating online presentationsdownload.microsoft.com/download/a/e/c/aec6e9ee-e184-46da... · web...
TRANSCRIPT

Creating Online Presentations
Presenting ideas in a clear and concise manner is important when sharing information with others. For this reason Microsoft® PowerPoint® has become an indispensable tool for instruction. Originally, PowerPoint was used primarily for giving live slide presentations in front of groups of people; now it enables you to give Internet-based presentations that can transcend barriers of time and space. PowerPoint 2002 has several features that enable you to post presentations online for your students, parents or colleagues to view, and you don’t need to know HTML or other programming.
In this workbook, you will learn to use the new Web-based features of PowerPoint 2002 by doing the following:
Creating a simple presentation and enhancing it by adding graphics, spreadsheet data, and voice narration.
Saving your presentation as a Web document so that anyone with a capable browser can view your work.
Setting up and delivering an online broadcast of your presentation over your network or the Internet. In addition, your online broadcast will be automatically archived so that others can view your slides, and can also see and hear your presentation. This will enable students to easily review a lecture when studying for an exam, clarifying notes, or catching up on a missed class.
Before You Begin
What you will do:
Create a new presentation
Add graphics to your presentation
Add Excel data to your presentation
Add narration to your presentation
Schedule an online

Creating Online Presentations
PowerPoint is presentation software that enables visual organization and communication of concepts. You can customize your presentations with sound, animation, charts, graphics, narration, and video. The new online broadcast feature of PowerPoint 2002 allows the delivery of a presentation over a network in real time. In other words, the presentation can be viewed over the network as it is being given. You can also save your presentation as a Web page so you can view it in a browser.
2
Creating Online Presentations
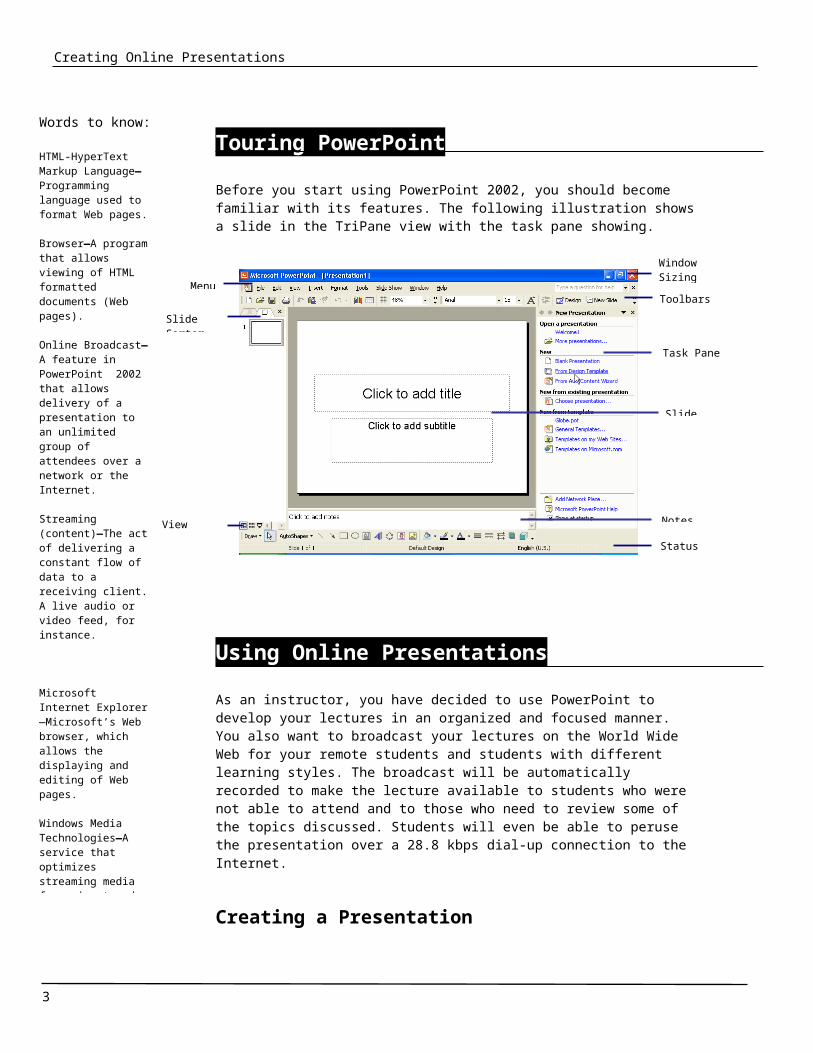
Touring PowerPointBefore you start using PowerPoint 2002, you should become familiar with its features. The following illustration shows a slide in the TriPane view with the task pane showing.
Using Online PresentationsAs an instructor, you have decided to use PowerPoint to develop your lectures in an organized and focused manner. You also want to broadcast your lectures on the World Wide Web for your remote students and students with different learning styles. The broadcast will be automatically recorded to make the lecture available to students who were not able to attend and to those who need to review some of the topics discussed. Students will even be able to peruse the presentation over a 28.8 kbps dial-up connection to the Internet.
Creating a Presentation
This section describes how to create a simple presentation using one of the templates included with PowerPoint. You will also incorporate graphics and spreadsheet data on slides in your presentation. This tutorial develops a presentation on the topic of Online Learning, but you can choose any subject matter you want.
3
Slide Sorter
View Buttons
Status Bar
Slide Pane
Menu Toolbars
Window Sizing Buttons
Notes
Words to know:
HTML-HyperText Markup Language—Programming language used to format Web pages.
Browser—A program that allows viewing of HTML formatted documents (Web pages).
Online Broadcast—A feature in PowerPoint 2002 that allows delivery of a presentation to an unlimited group of attendees over a network or the Internet.
Streaming (content)—The act of delivering a constant flow of data to a receiving client. A live audio or video feed, for instance.
Microsoft Internet Explorer —Microsoft’s Web browser, which allows the displaying and editing of Web pages.
Windows Media Technologies—A service that optimizes streaming media for unicast and multicast transmission.
Task Pane

Creating Online Presentations
To create a presentation1. Open PowerPoint. In the task pane under New select From
Design Template, and then click OK.
2. In the Slide Design task pane, click the design template you want to use by selecting the appropriate thumbnail (Global for this workshop). To see the name of the template, hover your cursor over the thumbnail and a Tool Tip will reveal the name of the template.
3. Click in the box that says Click to add title, and then type the title for your presentation (for example, Welcome to Your Online College).
4. Click the box that says Click to add subtitle, and then type the subtitle of your presentation (for example, A Global Educational Experience for Students in Your Career Area).
5. From the File menu, click Save, and then enter a file name for your presentation (for example, welcome1). Click Save again to save your file.
4
PowerPoint has a TriPane view that allows simultaneous viewing of slides, notes and the slide sorter. The outline and the slide sorter may be switched by clicking on the appropriate tab
You can create a new design template by saving a customized template. From the Save As list,

Creating Online Presentations
To add graphics to your presentation1. Click New Slide from the Insert menu.
-or-Click the New Slide button on the Formatting toolbar to add a new slide to your presentation.
2. In the Slide Layout pane, click Title and Text (formerly Bulleted List) on the New Slide dialog box if it isn’t already selected. Remember that a tool tip will divulge the auto layout name if hover on the object for a second.
3. Click the box that says Click to add title, and then type the title for that page (for example, Education to Fit Your Schedule).
4. Click the box that says Click to add text, and then type two or three bullets (for example, Access classes anytime anywhere, Convenient to your schedule, Education for people ON THE GO).
5. From the Insert menu, point to Picture and then click Clip Art to open the Insert Clip Art task pane.
6. Type the name of the type of clip art you want, for example, type Transporation in the box under Search For, and then click Search. (Note: All clip art may not appear unless you have access to the Office CD in your CD-ROM drive or internal network and you have cataloged the images on
5
You can import an outline for your presentation from an external file by selecting Slides from Outline from the Insert menu.

Creating Online Presentations
your local hard disks. This is a simple one time process that is initiated the first time you insert clip art.)
6

Creating Online Presentations
7. From the search results, click the thumbnail for the image you want to insert. The clip art will be inserted on the slide. To change the format of the graphic, double-click the image. From the Format Picture dialog box, you can adjust the size and position of the graphic. To undo automatic formatting, click the SmartTag in the lower right corner of the image, and select Undo Automatic Layout.
8. From the File menu, click Save to save your work.
To add Excel data to your presentation1. From the Insert menu click New Slide to add a new slide to
your presentation.
2. From the Slide Layout task pane, under Text Layouts, click Title Only to change the format of the new slide. To see the name of the slide layout, hover your mouse over the slide for a tool tip.
3. Click the box that says Click to add title, and then type the title for that page (for example, Annual Income in $K).
4. From the Insert menu, click Object, and then click Create from file. Browse to a pre-existing Excel file, like Annual_Income.xls and then click OK.
7

Creating Online Presentations
5. Position and resize the Excel worksheet as necessary, and then click Save to save your changes.
6. Click New Slide from the Insert menu to add a new page to your presentation.
7. From the Slide Layout task pane under Other Layouts, click Title and Chart.
8. Click the box that says Click to add title, and then type the title for the page (for example, Education Pays Off Over Time).
9. Double-click the box that says Double-click to add chart, and then click Import File from the Edit menu.
10. Browse to the same Excel worksheet that you used in step 4, and then click Open.
11. In the Import Data Options dialog box, select a sheet from the workbook, and then click OK.
12. Position and resize the chart as necessary, add any other pages that you want, and then select Save from the File menu to save your presentation.
Adding NarrationPowerPoint enables you to record yourself while giving a presentation. This allows others to both view and listen to your lecture at any time. It also enhances a presentation that has been saved in a Web format. If you want, you can have someone else provide the voice that will be recorded as the narration. Special hardware is not required for this, just a sound card and microphone. (Most computers now come with sound cards and microphones.)
It is best to start out with a script for a short presentation. This ensures that your finished product sounds professional without any stammering or fumbling for words.
You may also want to keep a copy of your presentation without narration, because the size of the file may increase dramatically depending on the sound quality you choose. Saving a copy of your presentation will enable you to give your slides to someone else to use the material. To save a copy of your presentation under a different name, click Save As from the File menu, and then type a new name for the file.
8
Add another dimension of meaning to your presentation by using narration. Students can hear your descriptions and ideas, as well

Creating Online Presentations
To record narration1. Click Record Narration from the Slide Show menu.
2. Select the audio quality for your presentation by clicking the Change Quality button and then choose the level you want. For this workshop we will use CD Quality; however, this level uses up memory quickly and is probably not practical for most projects.
3. Click OK to return to the Record Narration screen. Turn on Link Narrations in by selecting the box in the lower left-hand corner
4. Click OK in the Record Narration dialog box and the first slide will appear. Begin recording the narration. Speak normally and as clearly as possible.
5. Click OK to advance to the next slide when you are finished with each recording. When you have finished, click the last slide to terminate the recording process.
6. Click Save to save the slide timings and review the slide timings.
7. Return to the first slide by clicking it in the slide sorter view, and then select View Show, or click the View Show button at the lower left corner of the presentation window. This will play your presentation.
8. If you do not like your narration and want to rerecord it, select Undo Record Narration from the Edit menu and record the narration again. (Note: If you record the narration without clicking Undo Record Narration, you will record a second narration on top of the original one.)
9. Click Save from the File menu to save your presentation and narration.
Delivering Presentations OnlineYou can deliver your presentation over a network with the following features:
Save as Web Page-- converts your entire presentation into HTML based pages, which look exactly like your original slides, complete with narration.
Pack and Go Wizard-- leads you through the necessary steps that will compress your presentation exactly as is for
9
You can use features of Windows Media Technologies and the Windows operating platform to restrict access to presentations.

Creating Online Presentations
distribution over a network or CD-ROM. The main benefit of this method is that it allows the receiver to view the complete presentation. (You are required to have PowerPoint or the PowerPoint Animation Player to view Pack and Go presentations.)
10

Creating Online Presentations
Online Broadcast-- allows real time delivery of your presentation over a network as it is being given. The presentation is broadcast much like a television news program; if you have audio or video hardware, you can include your speech and camera footage in your slide show. Your broadcast can be archived for playback on demand; however, if you are planning to broadcast to more than 10 people, you will need to increase the power of your broadcast by using a Windows Media Server. Windows Media Technology is a streaming technology that allows information to be viewed as it is received, instead of through the download and play method.
No matter which method you choose, there are great benefits to delivering your presentation over a local area network (LAN) or the Internet.
To save your presentation as a Web page1. With the presentation open in PowerPoint, click Save As Web
Page from the File menu.
2. Browse to the location where you want to store your presentation, and then enter a file name and title.
3. Click Save to save your presentation.
4. If you want to make the presentation available on a Web server, click Publish in the Save As dialog box.
5. Choose what you would like to publish (for example, number of slides, speaker note, custom shows).
6. Click Web Options, and then select the check box for Show slide animation while browsing. This will display most of the animations and slide transitions you chose in your original presentation.
11

Creating Online Presentations
7. Click OK, and then select the browser you want to support. For best results, choose Microsoft Internet Explorer 4.0 or later (high fidelity).
8. Choose the location (Web server and full URL) where you want to publish your work, and then click Publish.
12

Creating Online Presentations
To save a presentation with Pack and Go1. Click Pack and Go from the File menu.
2. Step through the wizard. Make sure to choose whether you want to have the viewer included with the presentation. Keep in mind that this will make the two files larger.
Anyone who wants to view your presentation will be required to have the PowerPoint Animation Player, and they will have to run the setup program to unpack the slide show.
To set up an online broadcast1. Click Online Broadcast from the Slide Show menu, and then
click Schedule a Live Broadcast.
2. Fill out the information on the first page; keep in mind that this screen provides most of the data for the lobby page.
3. If you are new to this process you may want to click Tips for Broadcast to obtain pointers on your presentation broadcast.
13

Creating Online Presentations
4. Click the Settings button in the lower left hand side of the dialog box and make sure Video and audio is selected. If you do not have a camera or appropriate bandwidth, you can also select Audio only. Click Test to verify the operation of your equipment.
5. If you want the viewers to be able to see the speaker’s notes, select the appropriate check box.
6. Type a valid location for Save broadcast files in or browse for the location. The default location is My Broadcasts in the My Documents folder.
7. Click the Advanced tab and choose a remote encoding machine if applicable.
8. To allow the audience to give live feedback, you must specify a chat room URL under Audience feedback.
9. Also, specify a Windows Media Server, if one is available, and then click OK. (Your presentation will be limited to 10 attendees without the use of a Windows Media Server.)
10. Click Schedule…. An Outlook meeting request screen will appear. Typethe addresses of the users you want to attend your meeting.-or-Click To and select the users you want to attend the meeting from the list. (More information is available on meetings and Outlook in the “Collaborating with Others Using Outlook & Exchange” tutorial.)
11. Set the appropriate time for the presentation, and then click Send to send the message.
12. After a brief pause, you will receive a message indicating that the broadcast set up is complete. Click OK.
14

Creating Online Presentations
To deliver an online broadcast1. About 10 minutes before the presentation is supposed to
start, click Online Broadcast from the Slide Show menu, and then click Start Live Broadcast Now.
2. A few initialization actions will occur, and then you can recheck the operation of the microphone and camera. Now you are ready to begin the broadcast. You can preview the lobby page or send the audience a message by clicking the appropriate buttons.
3. Click Start when you are ready to broadcast.
Give your presentation normally and PowerPoint will handle the rest!
You may record a presentation for playback at a later time by selecting Record and Save a Broadcast from Online Broadcast under the Slide Show menu.
To replay an archived online broadcast1. Open your favorite browser and navigate to the lobby page
for the presentation. (You can provide links to the presentations on your class Web site.)
2. Click Replay Broadcast and the presentation will be replayed.
15
Using a wireless lapel microphone enables you to give a live presentation and have it automatically

Creating Online Presentations
That’s it! You can now broadcast your presentations to a group regardless of size or physical location.
16

Creating Online Presentations
Getting HelpYou can get help from the Help menu at any time while you are using PowerPoint. To open the online Help, select Microsoft PowerPoint Help from the Help menu. If you have an Internet connection, you can also point to Office on the Web on the Help menu and choose from several resources that may be of interest to you such as Product News, Frequently Asked Questions, and Online Support. You can also go to http://www.microsoft.com/powerpoint for all of the latest information.
Information in this document, including URL and other Internet Web site references, is subject to change without notice. Companies, names and data used in examples herein are fictitious unless otherwise noted.
© 2001 Microsoft Corporation. All rights reserved.
Microsoft Corporation retains sole ownership of all published In and Out of the Classroom materials. Microsoft grants permission for educational institutions and Microsoft OEMS and Solution Partners to reproduce these materials for staff development purposes (only). Altering materials or reselling materials is strictly prohibited.
Microsoft, BackOffice, FrontPage, Microsoft Internet Explorer, and the Microsoft Internet Explorer logo, the Microsoft Office logo, NetMeeting, Outlook, PowerPoint, Where do you want to go today?, Windows NT, Windows, the Windows logo, and the Windows Start logo are either registered trademarks or trademarks of Microsoft Corporation in the United States and/or other countries.
Other product and company names mentioned herein may be the trademarks of their respective owners.
AcknowledgmentsThis workshop was created in partnership with Scott Sample and S&T Consulting, an information design and development firm: www.sakson.com
is page left intentionally blank.
17