cdmnet desktop user guide 20150729 copy - precedence...
TRANSCRIPT
cdmNet Desktop User Guide
Version 4.2.0
© Precedence Health Care (2015)
cdmNet Desktop User Guide, Version 4.2.0
Table of Contents
1. Overview 2 ...............................................................................................................
2. Using cdmNet Desktop 3 ........................................................................................
2.1. Prac(ce So-ware 3 ...........................................................................................................
2.2. Reminders 3 ......................................................................................................................
2.3. Care Plan Recommenda(ons 4 .........................................................................................
2.4. cdmNet Desktop Ac(ons 4 ...............................................................................................
Appendix A – Installation and Configuration 14 ......................................................
1. Prerequisites 14 .................................................................................................................
2. Internet Connec(on 14 ......................................................................................................
3. cdmNet Accounts 14 ..........................................................................................................
4. Prac(ce So-ware Setup 14 ................................................................................................
5. Install and Configure cdmNet Desktop 18 .........................................................................
6. Install and Configure for Terminal Services or Citrix 25 .....................................................
7. For Further Informa(on 25................................................................................................
-‐� -‐1
cdmNet Desktop User Guide, Version 4.2.0
1. Overview
Precedence Health Care has developed cdmNet Desktop to facilitate effective use of the cdmNet system.
cdmNet is an online service that supports management of chronic conditions in primary care, by acting as a conduit for collaboration between health care providers. cdmNet allows General Practice staff to create, view and manage GP Management Plans and Team Care Arrangements. It also allows other members of the care team, including the patient, to access care plan details and collaborate in the care planning process.
cdmNet Desktop provides General Practice staff with access to four key features:
o Review the status of existing patient care plans, with prompts for appropriate action
o Update and create new individualised care plans for patients
o Direct access to patient care plans from the General Practice clinical software
o Automatic reminders for actions that are appropriate to the patient’s care plan.
This document is an installation and user guide for the cdmNet Desktop software, providing easy-to-follow steps for General Practice users.
For technical support related to cdmNet Desktop or cdmNet, please visit cdm.net.au/help.
-‐� -‐2
cdmNet Desktop User Guide, Version 4.2.0
2. Using cdmNet Desktop
2.1.Practice Software
cdmNet Desktop currently supports four practice software applications: Best Practice, Medical Director 3, Zedmed and Monet. To use cdmNet Desktop, you must be logged in to your practice software, with a patient medical record open.
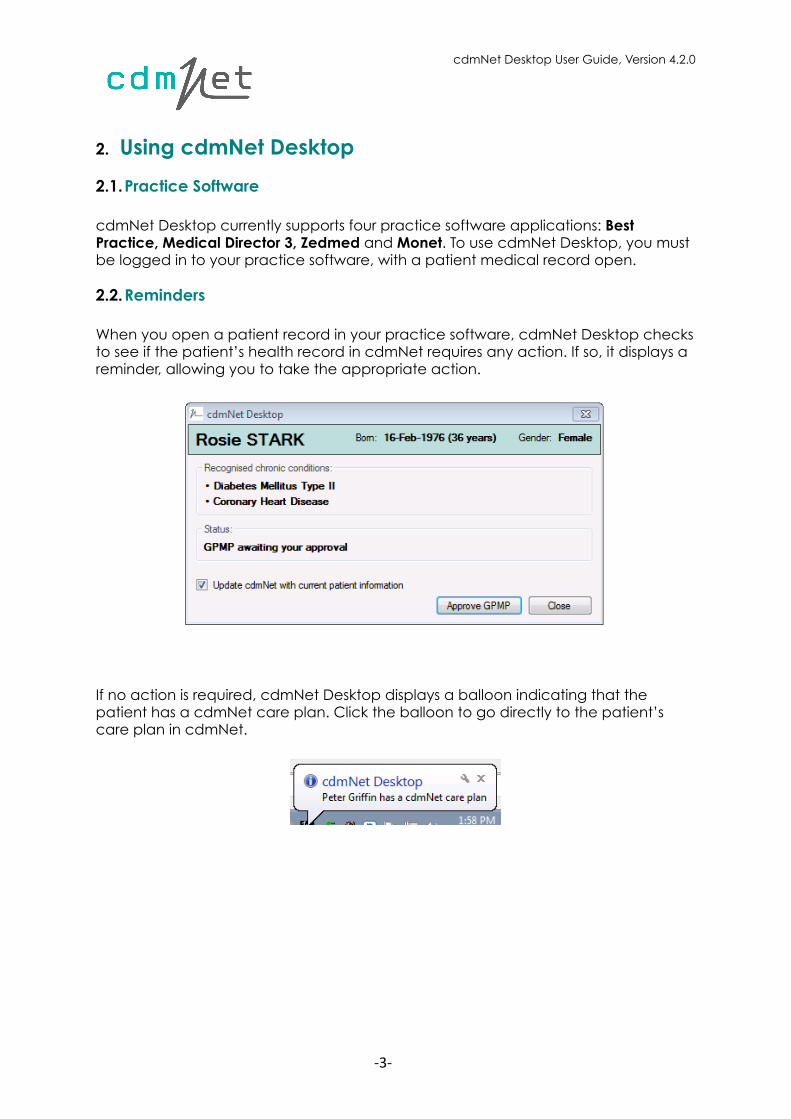
2.2.Reminders
When you open a patient record in your practice software, cdmNet Desktop checks to see if the patient’s health record in cdmNet requires any action. If so, it displays a reminder, allowing you to take the appropriate action.
If no action is required, cdmNet Desktop displays a balloon indicating that the patient has a cdmNet care plan. Click the balloon to go directly to the patient’s care plan in cdmNet.
-‐� -‐3
cdmNet Desktop User Guide, Version 4.2.0
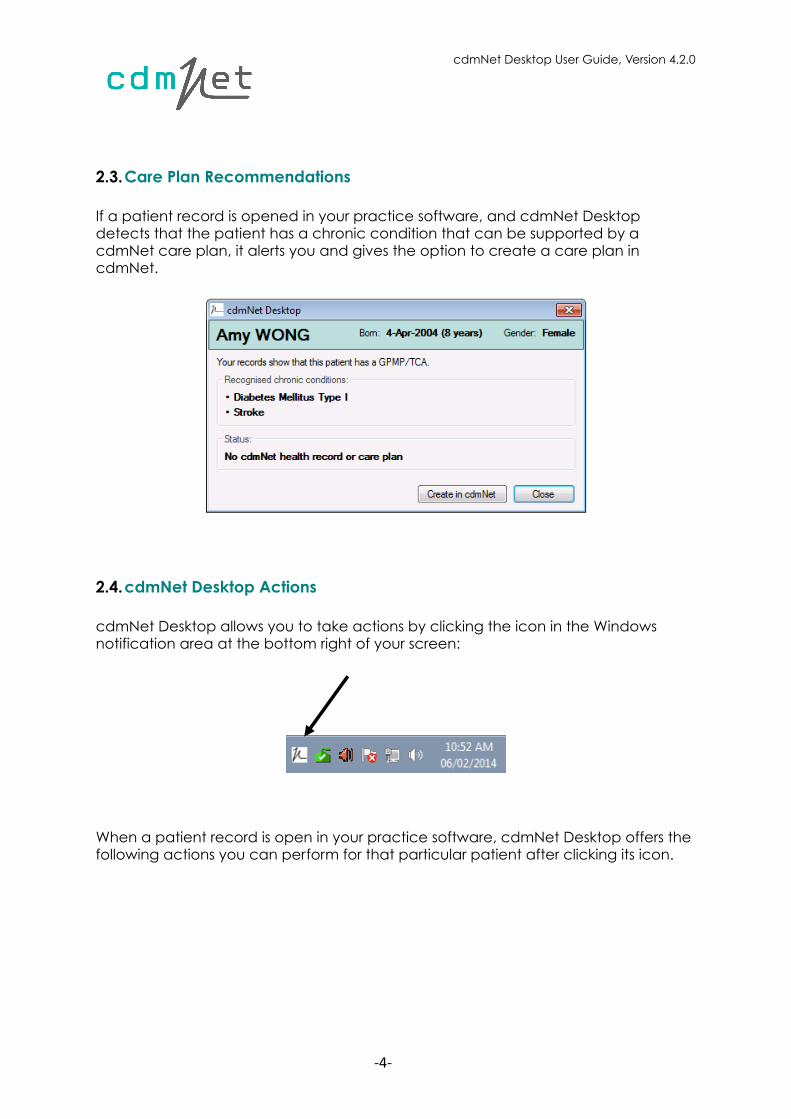
2.3.Care Plan Recommendations
If a patient record is opened in your practice software, and cdmNet Desktop detects that the patient has a chronic condition that can be supported by a cdmNet care plan, it alerts you and gives the option to create a care plan in cdmNet.
!
2.4.cdmNet Desktop Actions
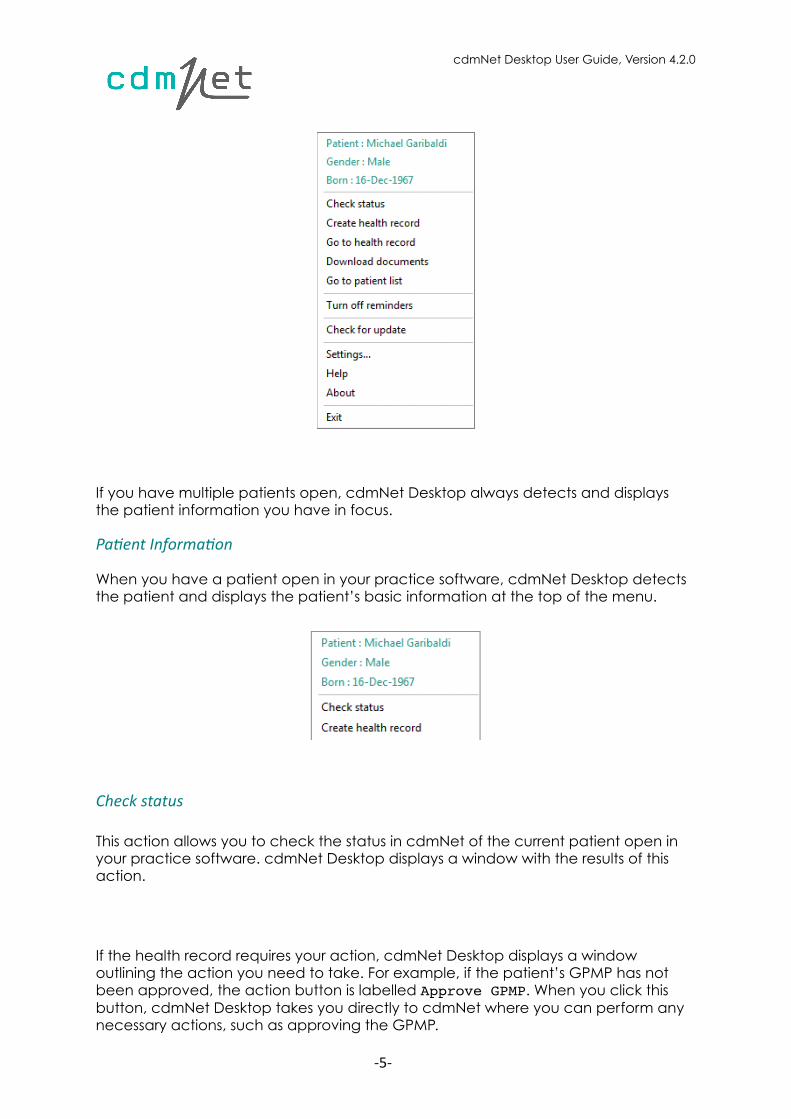
cdmNet Desktop allows you to take actions by clicking the icon in the Windows notification area at the bottom right of your screen:
When a patient record is open in your practice software, cdmNet Desktop offers the following actions you can perform for that particular patient after clicking its icon.
-‐� -‐4
cdmNet Desktop User Guide, Version 4.2.0
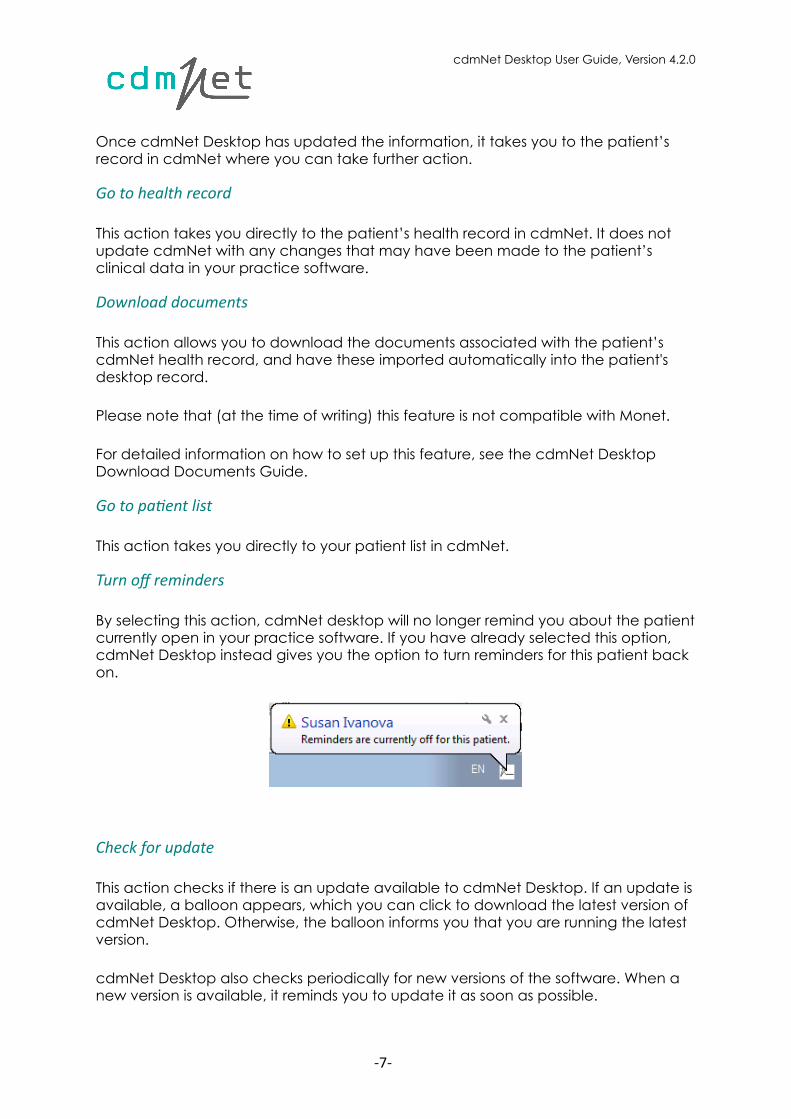
If you have multiple patients open, cdmNet Desktop always detects and displays the patient information you have in focus.
Pa#ent Informa#on
When you have a patient open in your practice software, cdmNet Desktop detects the patient and displays the patient’s basic information at the top of the menu.
Check status
This action allows you to check the status in cdmNet of the current patient open in your practice software. cdmNet Desktop displays a window with the results of this action.
If the health record requires your action, cdmNet Desktop displays a window outlining the action you need to take. For example, if the patient’s GPMP has not been approved, the action button is labelled Approve GPMP. When you click this button, cdmNet Desktop takes you directly to cdmNet where you can perform any necessary actions, such as approving the GPMP.
-‐� -‐5

cdmNet Desktop User Guide, Version 4.2.0
If there are any unseen notes on a patient’s cdmNet health record, cdmNet Desktop also displays in the status the number of notes, and who they are from.
The Update cdmNet with current patient information check box is ticked by default. This ensures that any changes to the patient’s clinical data in your practice software are updated in cdmNet whenever an action is taken.
Create or update health record
This action allows you to start the process of creating or updating a health record for the current patient open in your practice software. The labelling of this action is context sensitive. If the patient does not yet have a health record in cdmNet, the menu action will say Create health record and clicking this action initiates the creation of the patient’s health record in cdmNet. If the patient already has a health record, the menu action will say Update health record and clicking this action updates the patient’s clinical data in the health record.
-‐� -‐6
cdmNet Desktop User Guide, Version 4.2.0
Once cdmNet Desktop has updated the information, it takes you to the patient’s record in cdmNet where you can take further action.
Go to health record
This action takes you directly to the patient’s health record in cdmNet. It does not update cdmNet with any changes that may have been made to the patient’s clinical data in your practice software.
Download documents
This action allows you to download the documents associated with the patient’s cdmNet health record, and have these imported automatically into the patient's desktop record.
Please note that (at the time of writing) this feature is not compatible with Monet.
For detailed information on how to set up this feature, see the cdmNet Desktop Download Documents Guide.
Go to pa#ent list
This action takes you directly to your patient list in cdmNet.
Turn off reminders
By selecting this action, cdmNet desktop will no longer remind you about the patient currently open in your practice software. If you have already selected this option, cdmNet Desktop instead gives you the option to turn reminders for this patient back on.
Check for update
This action checks if there is an update available to cdmNet Desktop. If an update is available, a balloon appears, which you can click to download the latest version of cdmNet Desktop. Otherwise, the balloon informs you that you are running the latest version.
cdmNet Desktop also checks periodically for new versions of the software. When a new version is available, it reminds you to update it as soon as possible.
-‐� -‐7

cdmNet Desktop User Guide, Version 4.2.0
It is highly recommended that you always use the latest version so that you are up to date with the newest features and compatibility enhancements. If cdmNet Desktop is able to install an update automatically, it will do so without any prompting. If in doubt, click Check for update to ensure that you have the very latest version of cdmNet Desktop.
Please note that if you are not logged in with a Windows administrator accounts (on Terminal Services, for example), this message will suggest you have your system administrator update the software for you.
Se=ngs
The Settings action displays a window with six sections: cdmNet, Clinical Software, Billing Software, Download Options, Connectivity and Advanced.
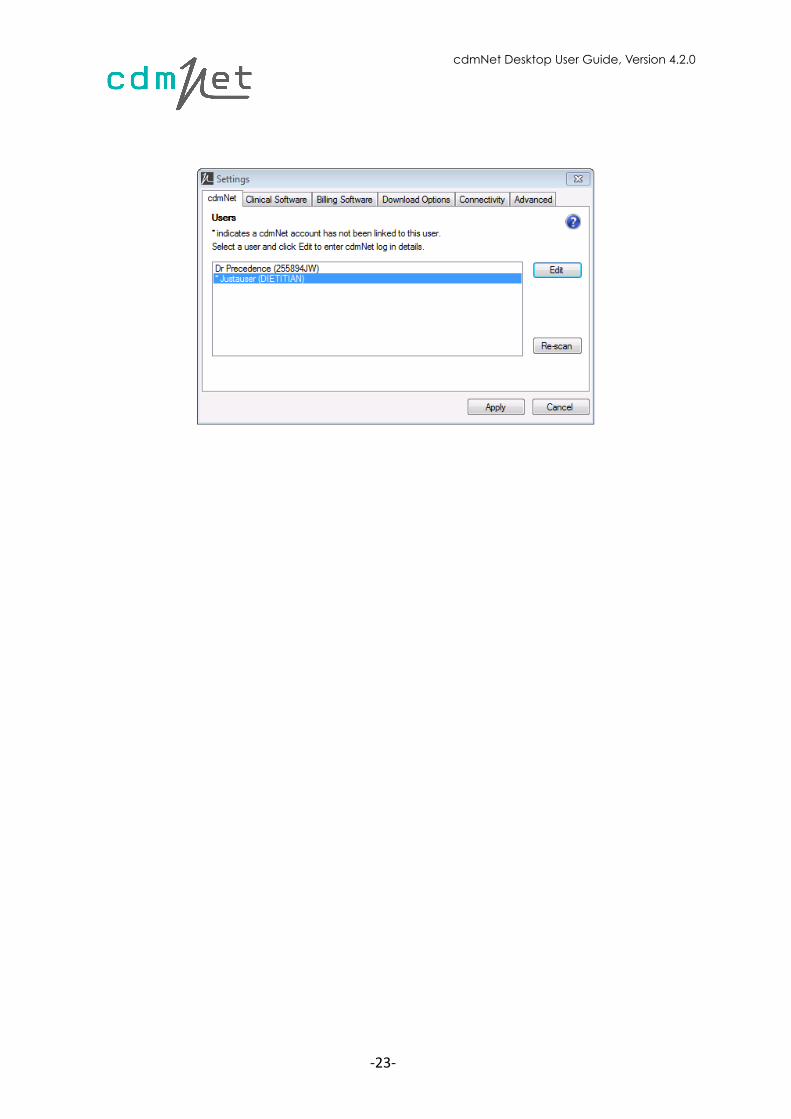
cdmNet: The cdmNet section lets you specify the cdmNet username and password of cdmNet Desktop users.
-‐� -‐8

cdmNet Desktop User Guide, Version 4.2.0
This screen lists every user account that exists in your chosen practice software. By selecting a user account and clicking Edit, you can enter the username and password for this user’s corresponding account in cdmNet. You should do this for every person in your practice who will use the computer on which this copy of cdmNet Desktop is installed. If the user does not have a cdmNet account, they can create one by clicking Register. This will direct them to the cdmNet registration page.
cdmNet Desktop automatically detects which user is currently logged in to the practice software in order to use the appropriate cdmNet username and password.
If the current practice software user does not have a cdmNet username and password entered (indicated by a * in the settings), cdmNet Desktop asks you to set up the user when trying to interact with cdmNet.
-‐� -‐9
cdmNet Desktop User Guide, Version 4.2.0
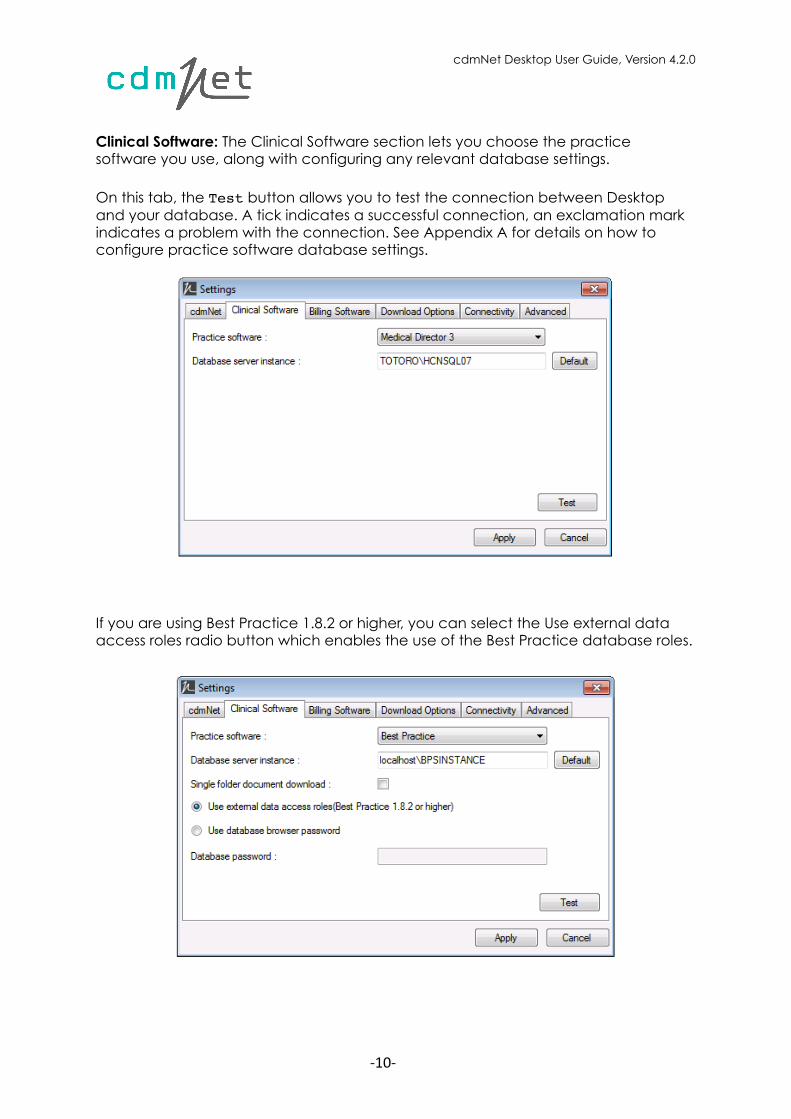
Clinical Software: The Clinical Software section lets you choose the practice software you use, along with configuring any relevant database settings.
On this tab, the Test button allows you to test the connection between Desktop and your database. A tick indicates a successful connection, an exclamation mark indicates a problem with the connection. See Appendix A for details on how to configure practice software database settings.
If you are using Best Practice 1.8.2 or higher, you can select the Use external data access roles radio button which enables the use of the Best Practice database roles.
-‐� -‐10
cdmNet Desktop User Guide, Version 4.2.0
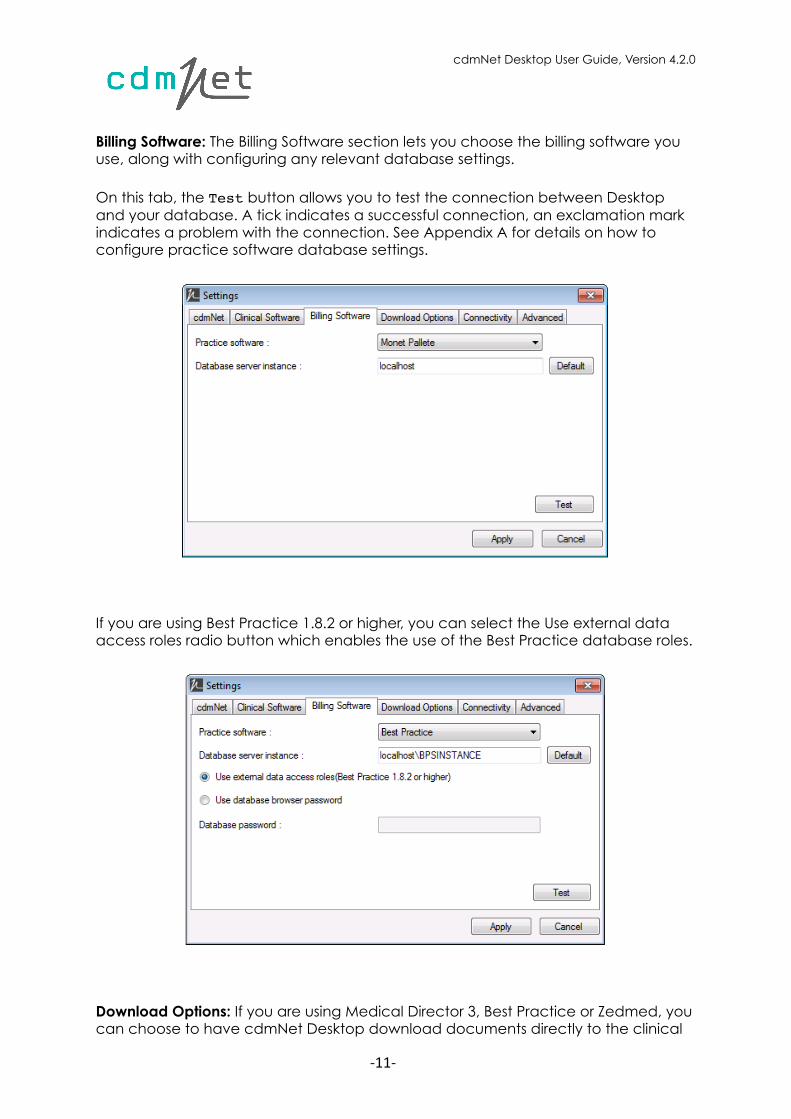
Billing Software: The Billing Software section lets you choose the billing software you use, along with configuring any relevant database settings.
On this tab, the Test button allows you to test the connection between Desktop and your database. A tick indicates a successful connection, an exclamation mark indicates a problem with the connection. See Appendix A for details on how to configure practice software database settings.
If you are using Best Practice 1.8.2 or higher, you can select the Use external data access roles radio button which enables the use of the Best Practice database roles.
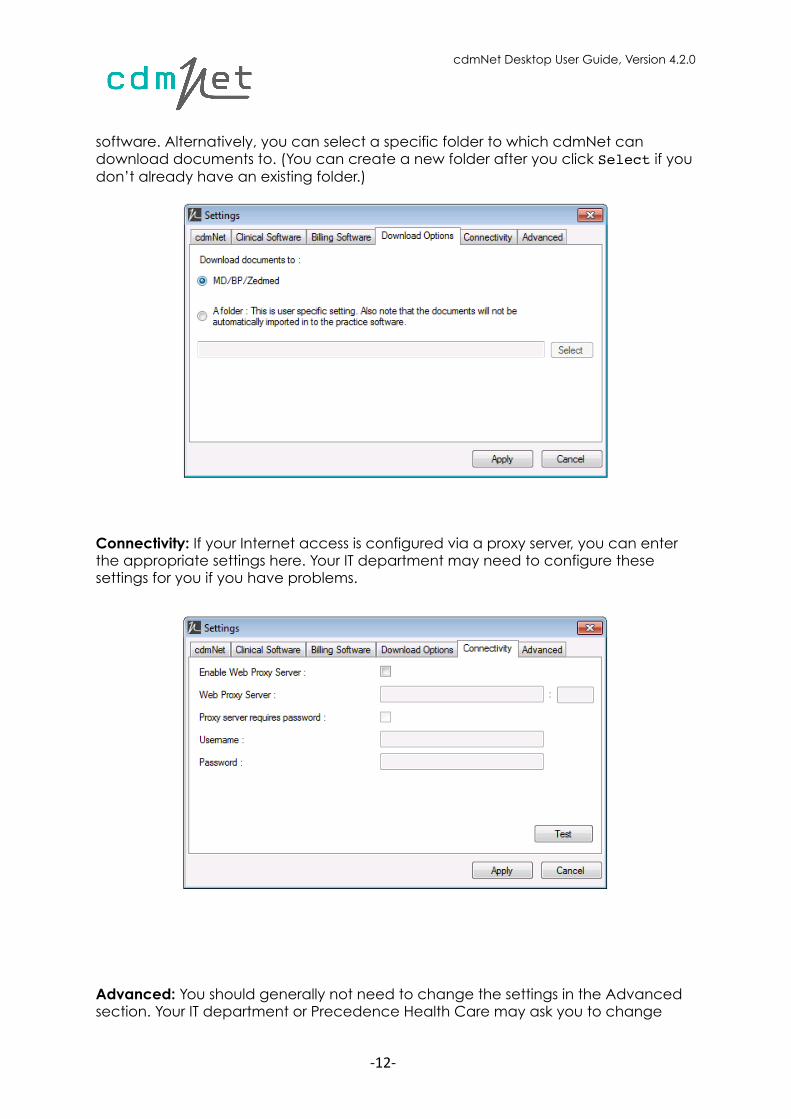
Download Options: If you are using Medical Director 3, Best Practice or Zedmed, you can choose to have cdmNet Desktop download documents directly to the clinical
-‐� -‐11
cdmNet Desktop User Guide, Version 4.2.0
software. Alternatively, you can select a specific folder to which cdmNet can download documents to. (You can create a new folder after you click Select if you don’t already have an existing folder.)
Connectivity: If your Internet access is configured via a proxy server, you can enter the appropriate settings here. Your IT department may need to configure these settings for you if you have problems.
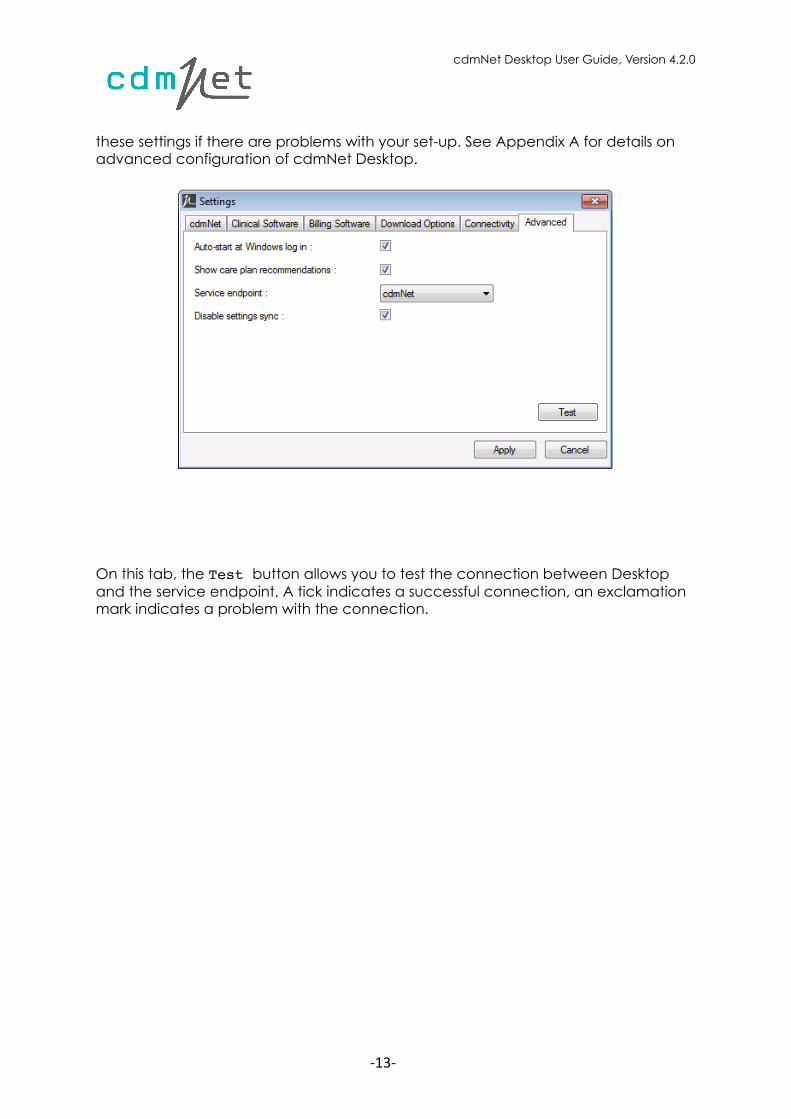
Advanced: You should generally not need to change the settings in the Advanced section. Your IT department or Precedence Health Care may ask you to change
-‐� -‐12
cdmNet Desktop User Guide, Version 4.2.0
these settings if there are problems with your set-up. See Appendix A for details on advanced configuration of cdmNet Desktop.
On this tab, the Test button allows you to test the connection between Desktop and the service endpoint. A tick indicates a successful connection, an exclamation mark indicates a problem with the connection.
-‐� -‐13
cdmNet Desktop User Guide, Version 4.2.0
Appendix A – Installation and Configuration
1. Prerequisites
To use cdmNet Desktop, you need three things.
o A broadband Internet connection.
o At least one current cdmNet user account.
o Best Practice, Medical Director 3, Zedmed or Monet practice software — cdmNet Desktop has been tested on Best Practice version 1.8.2.581, Monet 3.9, Zedmed 22.02 and Medical Director 3 version 3.14d (3.14).
These prerequisites are discussed below.
2. Internet Connection
cdmNet Desktop communicates over an Internet connection with the cdmNet web service. For this reason, an Internet connection is essential for using cdmNet Desktop.
3. cdmNet Accounts
To use cdmNet, and thus cdmNet Desktop, you must have at least one cdmNet account that matches your practice software user account details. You can register for an account via cdm.net.au/register.
4. Practice Software Setup
To use cdmNet Desktop, you need to set up the following information:
o The database server instance name (Best Practice, Zedmed, Monet and Medical Director 3) On the Practice Software tab of the Settings screen you will see an entry for Database server instance. The cdmNet Desktop installer makes a best guess at this setting, but in some cases it will need to be configured manually. For client-server setups, you may need to refer to your IT support for the correct server name.
o An example server instance name might be “server_01\BPSINSTANCE” for Best Practice or “MYHOSTSERVER\HCNSQL07” for Medical Director 3.
o For a standalone installation it might be “localhost\BPSINSTANCE” for Best Practice or “MYLOCALSERVER\HCNSQL07” for Medical Director 3.
o Role-based access (Best Practice version 1.8.2 or higher Only) If your Best Practice is version number 1.8.2 or higher, you can enable access to the Best Practice database without a password. In order to enable this, follow the steps below.
Step 1
-‐� -‐14
cdmNet Desktop User Guide, Version 4.2.0
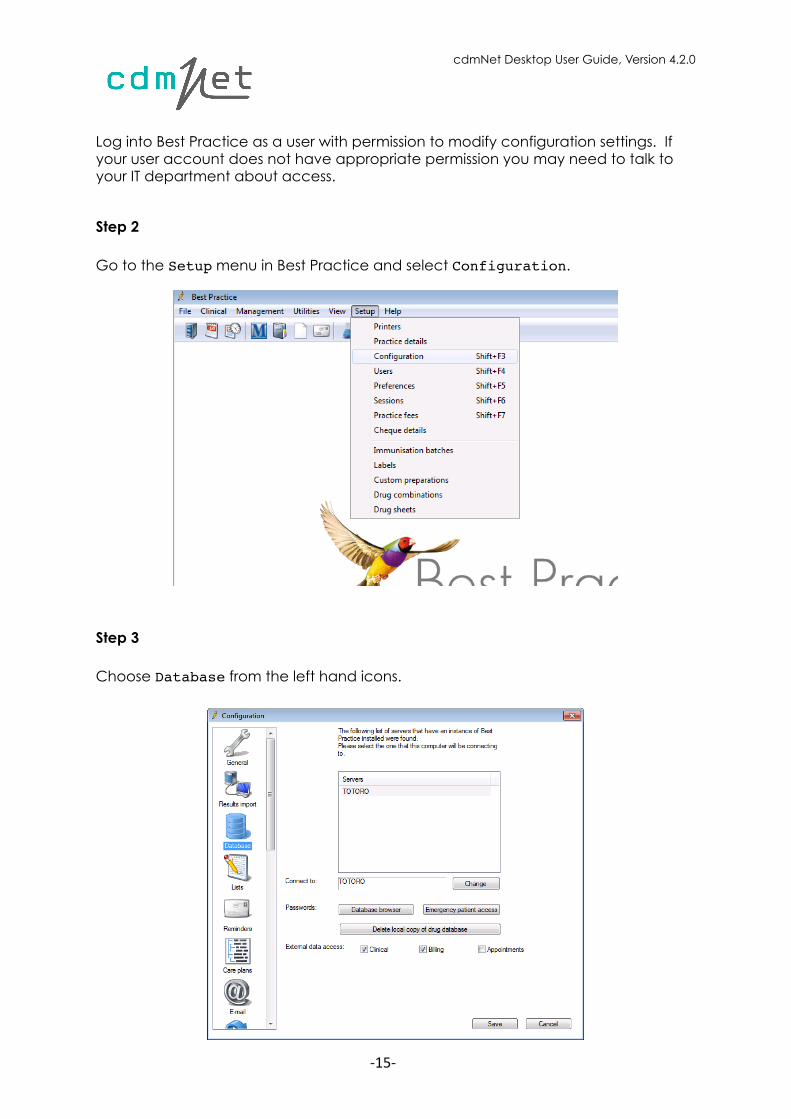
Log into Best Practice as a user with permission to modify configuration settings. If your user account does not have appropriate permission you may need to talk to your IT department about access.
Step 2
Go to the Setup menu in Best Practice and select Configuration.
Step 3
Choose Database from the left hand icons.
-‐� -‐15
cdmNet Desktop User Guide, Version 4.2.0
Next to External data access, tick the Clinical and Billing boxes if they are not already ticked. Click Save.
Step 4
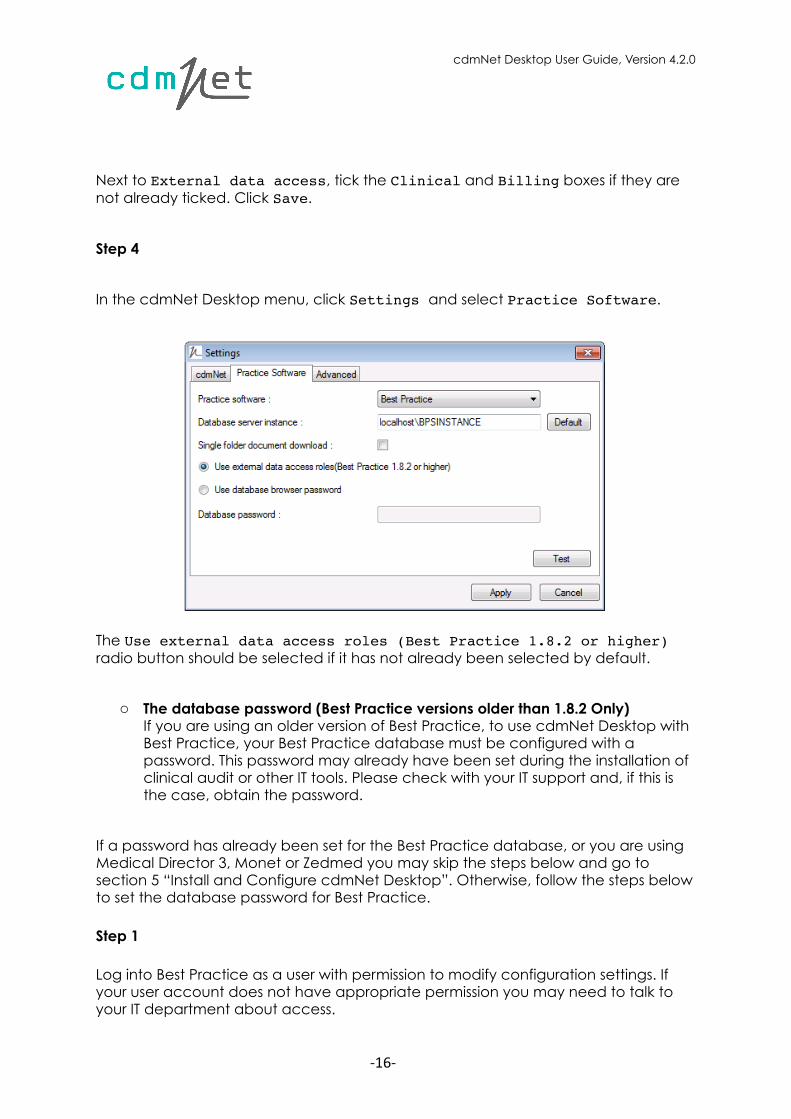
In the cdmNet Desktop menu, click Settings and select Practice Software.
The Use external data access roles (Best Practice 1.8.2 or higher) radio button should be selected if it has not already been selected by default.
o The database password (Best Practice versions older than 1.8.2 Only) If you are using an older version of Best Practice, to use cdmNet Desktop with Best Practice, your Best Practice database must be configured with a password. This password may already have been set during the installation of clinical audit or other IT tools. Please check with your IT support and, if this is the case, obtain the password.
If a password has already been set for the Best Practice database, or you are using Medical Director 3, Monet or Zedmed you may skip the steps below and go to section 5 “Install and Configure cdmNet Desktop”. Otherwise, follow the steps below to set the database password for Best Practice.
Step 1
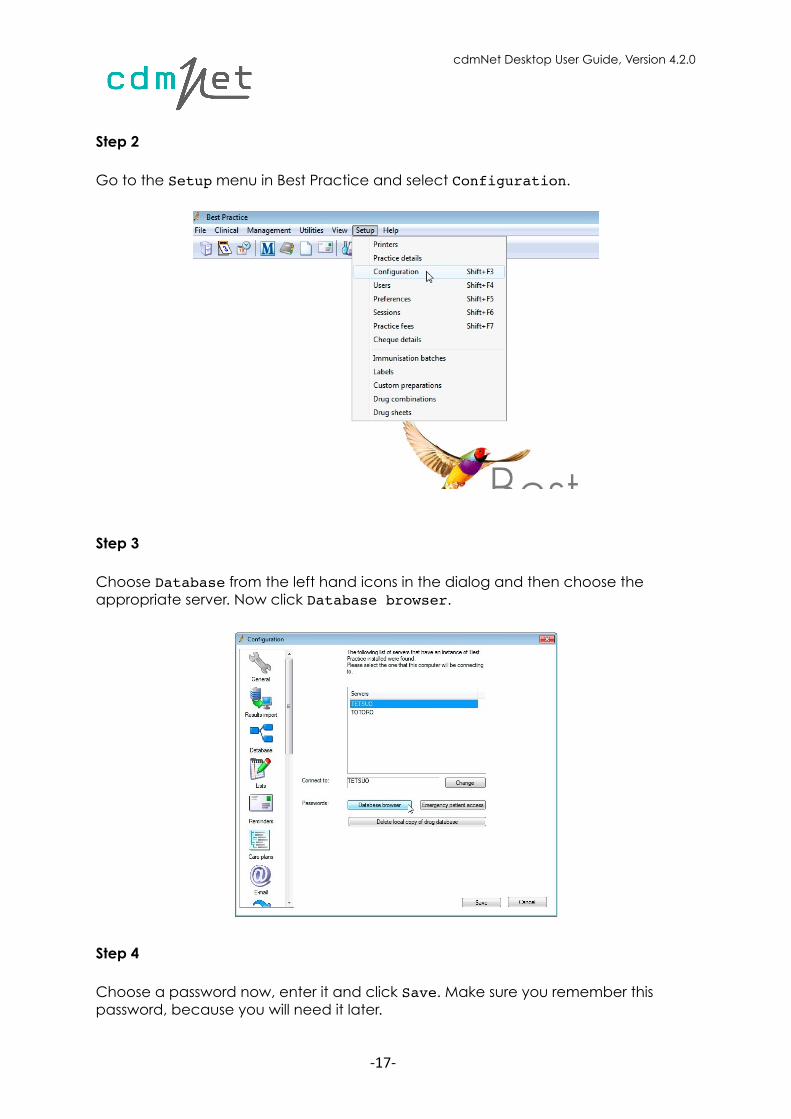
Log into Best Practice as a user with permission to modify configuration settings. If your user account does not have appropriate permission you may need to talk to your IT department about access.
-‐� -‐16
cdmNet Desktop User Guide, Version 4.2.0
Step 2
Go to the Setup menu in Best Practice and select Configuration.
Step 3
Choose Database from the left hand icons in the dialog and then choose the appropriate server. Now click Database browser.
!
Step 4
Choose a password now, enter it and click Save. Make sure you remember this password, because you will need it later.
-‐� -‐17
cdmNet Desktop User Guide, Version 4.2.0
Best Practice is now ready for use with cdmNet Desktop.
5. Install and Configure cdmNet Desktop
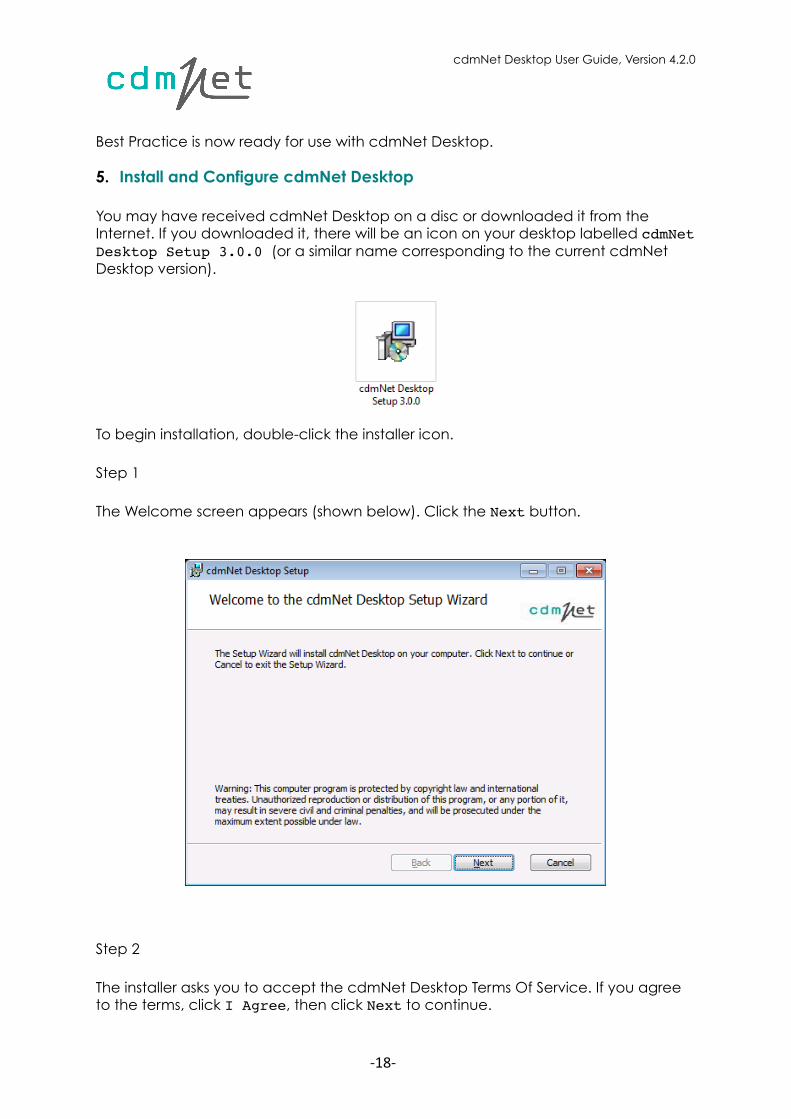
You may have received cdmNet Desktop on a disc or downloaded it from the Internet. If you downloaded it, there will be an icon on your desktop labelled cdmNet Desktop Setup 3.0.0 (or a similar name corresponding to the current cdmNet Desktop version).
To begin installation, double-click the installer icon.
Step 1
The Welcome screen appears (shown below). Click the Next button.
Step 2
The installer asks you to accept the cdmNet Desktop Terms Of Service. If you agree to the terms, click I Agree, then click Next to continue.
-‐� -‐18
cdmNet Desktop User Guide, Version 4.2.0
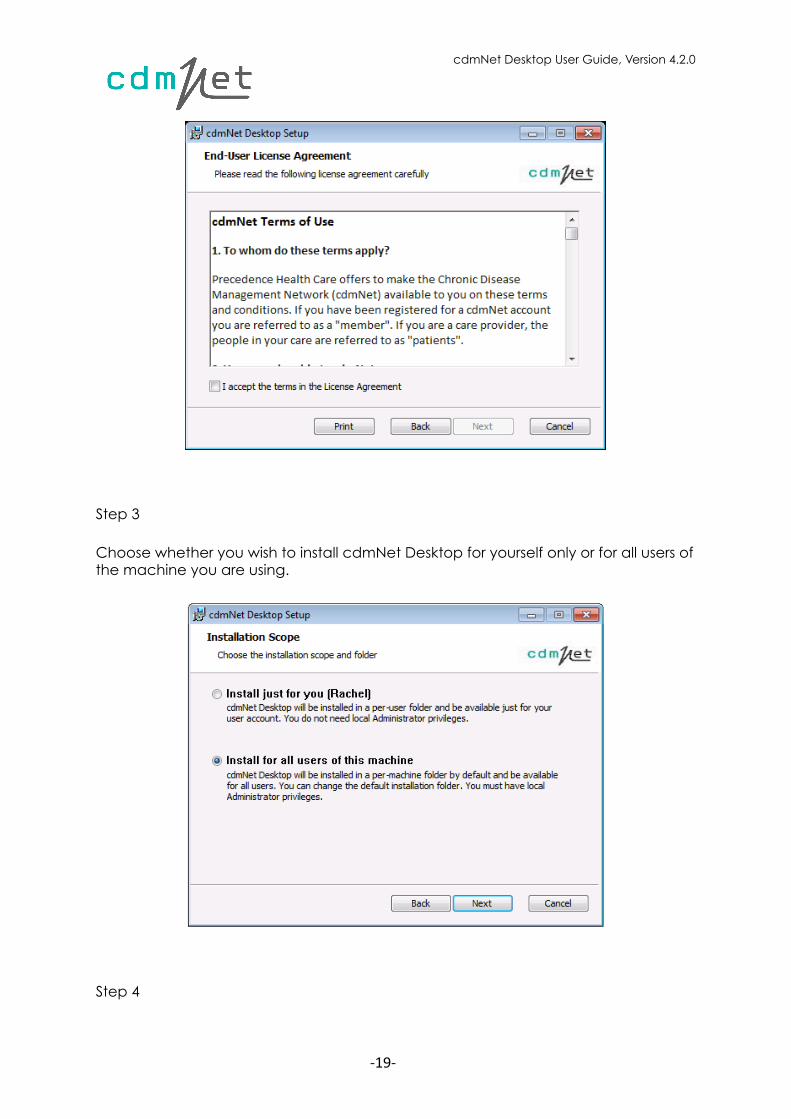
Step 3
Choose whether you wish to install cdmNet Desktop for yourself only or for all users of the machine you are using.
Step 4
-‐� -‐19
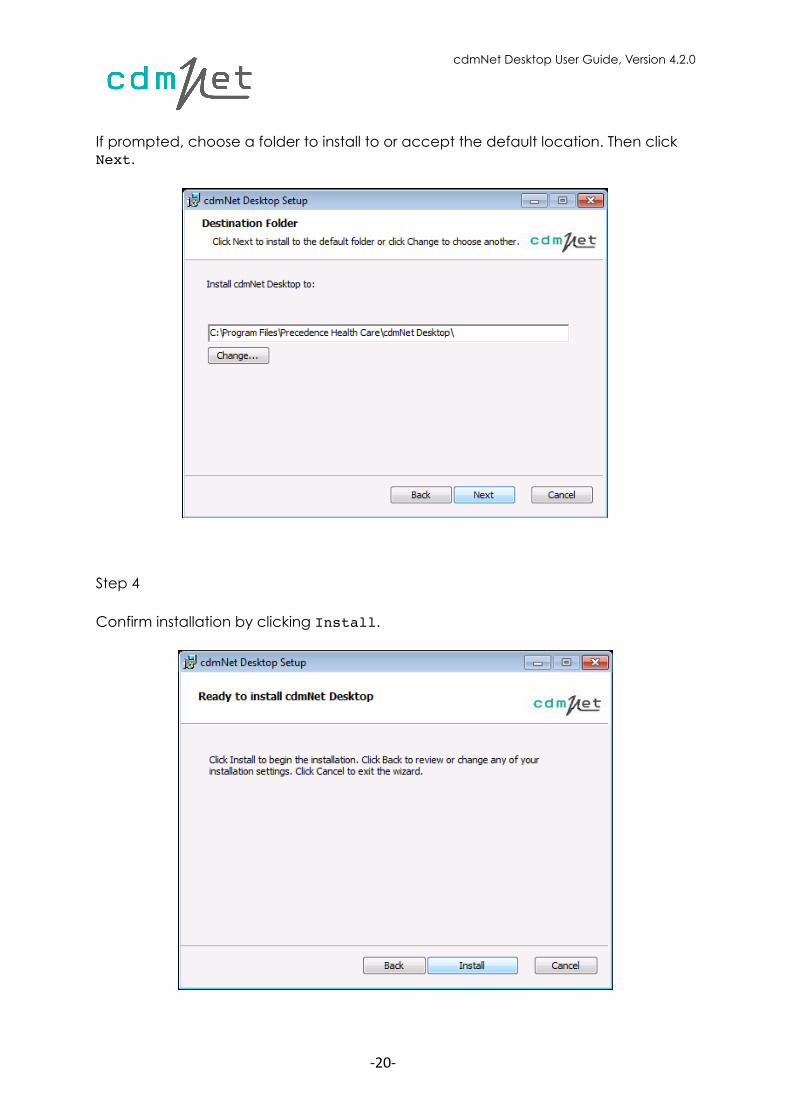
cdmNet Desktop User Guide, Version 4.2.0
If prompted, choose a folder to install to or accept the default location. Then click Next.
Step 4
Confirm installation by clicking Install.
-‐� -‐20
cdmNet Desktop User Guide, Version 4.2.0
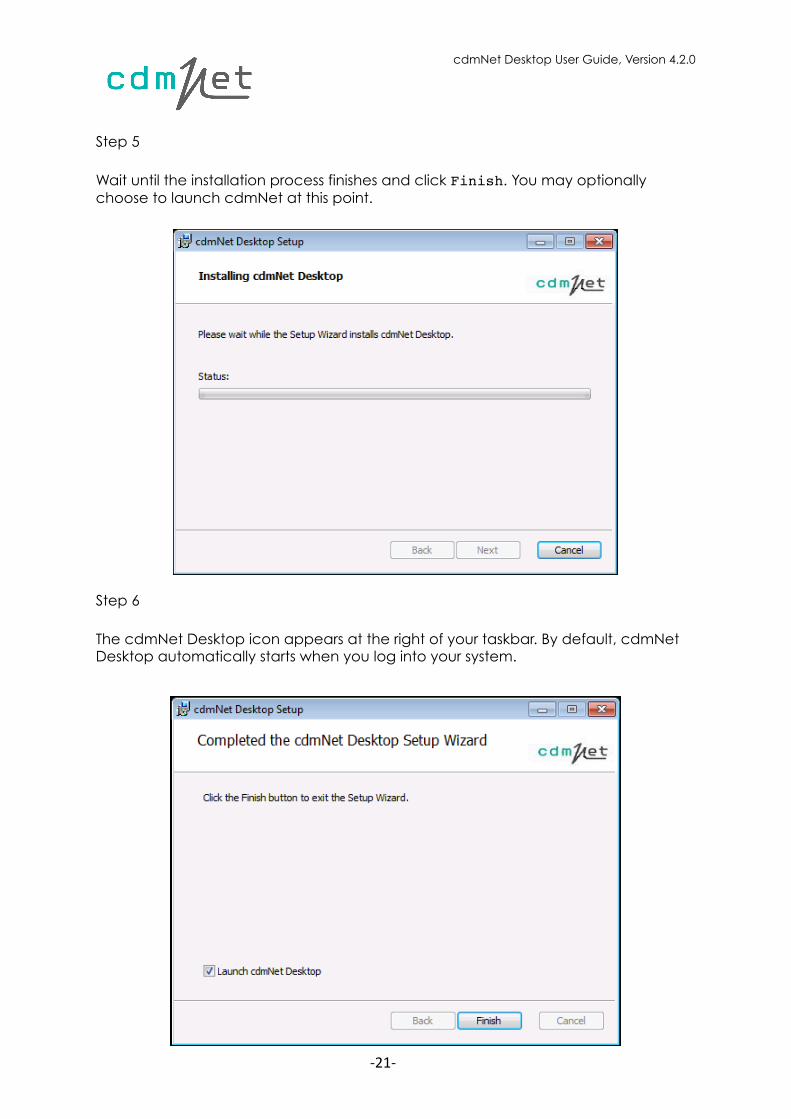
Step 5
Wait until the installation process finishes and click Finish. You may optionally choose to launch cdmNet at this point.
Step 6
The cdmNet Desktop icon appears at the right of your taskbar. By default, cdmNet Desktop automatically starts when you log into your system.
-‐� -‐21

cdmNet Desktop User Guide, Version 4.2.0
Step 7
(If you are not logged in to your clinical software if not already open, you may be prompted to open it in order to continue.)
If you are new to cdmNet, you can click Register for cdmNet when prompted (a window opens, taking you through the cdmNet registration process). Or if you already have a cdmNet username and password, enter them accordingly when prompted.
Once you have completed registration, or have entered your username and password correctly, you are ready to set up your practice software on cdmNet Desktop, if necessary.
As part of installation. cdmNet Desktop automatically detects your practice software. You can set up the intended users of cdmNet in your practice on the cdmNet tab in Settings.
-‐� -‐22
cdmNet Desktop User Guide, Version 4.2.0
-‐� -‐23
cdmNet Desktop User Guide, Version 4.2.0
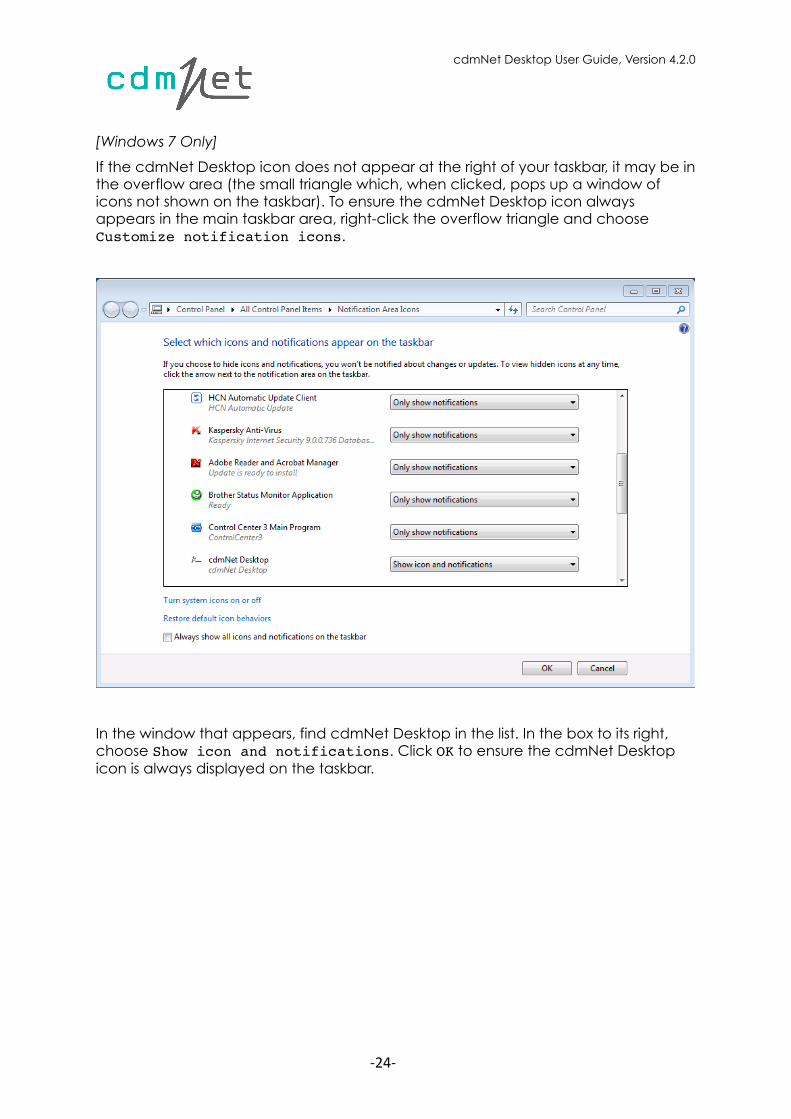
[Windows 7 Only]
If the cdmNet Desktop icon does not appear at the right of your taskbar, it may be in the overflow area (the small triangle which, when clicked, pops up a window of icons not shown on the taskbar). To ensure the cdmNet Desktop icon always appears in the main taskbar area, right-click the overflow triangle and choose Customize notification icons.
!
In the window that appears, find cdmNet Desktop in the list. In the box to its right, choose Show icon and notifications. Click OK to ensure the cdmNet Desktop icon is always displayed on the taskbar.
-‐� -‐24
cdmNet Desktop User Guide, Version 4.2.0
6. Install and Configure for Terminal Services or Citrix
The process for installing cdmNet Desktop in a Terminal Services or Citrix environment is similar to the process for installing on a standalone computer. However, when installing cdmNet Desktop for Terminal Services or Citrix, you must configure it separately for each user profile (user account) that will be using cdmNet Desktop.
Step 1
Install cdmNet Desktop on the Terminal Services or Citrix server as you would for a stand-alone computer installation. You must have permission to install software on the server, or a system administrator will need to do it for you.
Step 2
For each Terminal Services or Citrix account to be used with cdmNet Desktop, you will need to configure each associated cdmNet account.
Log in to each Terminal Services or Citrix account, run cdmNet Desktop, and for each cdmNet account holder who uses this Terminal Services or Citrix account, configure their:
• cdmNet account username;
• cdmNet account password;
• practice software (Best Practice, Medical Director 3, Monet and ZedMed);
• if using “Best Practice” a database password must be set. See Appendix A, section 4, Practice Software Setup.
Refer to section 2.4, cdmNet Desktop Actions for more details on configuring settings.
7. For Further Information
For further information on cdmNet Desktop or cdmNet, please visit the Precedence Health Care website at precedencehealthcare.com.
For all support requests, please visit cdm.net.au/help.
-‐� -‐25