ccna communication frameworkccna.com.au/home/en/sites/default/files/installation and... ·...
TRANSCRIPT

Copyright © 2010 CCNA Pty Ltd. All rights reserved.
No part of this document may be reproduced or transmitted in any form or by any means electronic or mechanical, for
any purpose without the express written permission of CCNA Pty Ltd. Information in this document is subject to change
without prior notice.
Certain names of program products and company names used in this document might be registered trademarks or
trademarks owned by other entities.
CCNA “Communication Framework”
“Patent Pending” - Australian Patent Application No. 2009904883
Installation and Configuration Guide
Version 1.7
Converged Communication Network Applications (CCNA) Pty Ltd
PO BOX 643
North Sydney
NSW 2059
Australia.
http://ccna.com.au
Technical Support:
http:/ccna.com.au/web/en/contact
This guide is frequently updated to reflect enhancements in the product. The latest version can always be
downloaded from http://ccna.com.au website. This guide is prepared for Communication Framework
Version 10

2 Copyright © 2010 CCNA Pty Ltd. All rights reserved.
Contents
Introduction ...................................................................................................................................... 3
Guidebook Conventions ................................................................................................................ 3
System Requirements........................................................................................................................ 4
Installation Pre-Requites ................................................................................................................... 6
Section 1: Configuration .................................................................................................................... 7
1. PBX configuration ................................................................................................................. 7
2. Dialling Rules ...................................................................................................................... 13
3. LDAP Configuration ............................................................................................................. 14
4. Active Directory Setup ........................................................................................................ 15
5. User Interface ..................................................................................................................... 17
Section 2: Web Server or Standalone Installation ........................................................................... 18
Installation Instructions ............................................................................................................... 18
Step ................................................................................................................................................. 18
Section 3: End User Installation ...................................................................................................... 19
Installation Instructions ............................................................................................................... 19
Configuration............................................................................................................................... 21
Inbound Caller Notification and Intelligence Setup .................................................................... 22
Section 4: Verify your installation and configuration ...................................................................... 23

3 Copyright © 2010 CCNA Pty Ltd. All rights reserved.
Introduction
Congratulations and thank you for downloading CCNA’s “Communication Framework” Suite of Applications.
Communication Framework is a suite of simple yet powerful desktop Unified Communication Applications
which enable you and your users the ability to Click 2 Communicate (Dial, Conference, Video* & SMS*) from
their desktop environment to individuals both internal and external of your organisation.
* Functionality is specific to vendor PBX and version.
Communication Framework Suite of Applications includes:
CF Client
CF Console - TBA
CF Companion Tools - A series of business tools to enhance the CF experience
* CF - Communication Framework
Supported applications of the Communication Framework Application include:
Microsoft and IBM Email and productivity applications,
Web browsers,
Google applications,
Instant Messaging Applications and more.
Communication Framework is simple to install and use. The following instructions will enable you to configure
the application with instructions to demonstrate how to use the application.
Guidebook Conventions
To highlight the most important points – we have used a set of simple icons which draw attention to key
information and settings
The Check Icon indicates a setting that we recommend you use or enable.
The information icon highlights important facts and information about Communication
Framework, to help you make better use of the program
The Hazard icon highlights areas where potential problems can arise, or
mis-configurations occur, to help you avoid damage or loss of data.
Use the icons as a guide – they will highlight the most important areas of configuration and usage so that you
get the best out of Communication Framework.
This document uses the following typographic convention: C:\type.exe
Used for text that must be typed exactly as shown Username
Used for items like menu options, or objects such as passwords and usernames

4 Copyright © 2010 CCNA Pty Ltd. All rights reserved.
System Requirements
Please make sure that the environment on which you plan to deploy Communication framework meets the
minimum system requirements for the program to run:
Operating System Windows XP SP3 (32 bit), Vista SP1 & Windows 7, Mac 10 & Linux
OS’s
Internet Explorer Version 6, or 8
Java Version Version 1.6 or higher
Microsoft Active Directory Windows Server 2003+,
Other Databases SQL, LDAP, Excel, Access, …
Nortel SCS 500 Version 3.0
Nortel SMC3455 Version 3.0
Nortel CS1K Version 4.5+
Avaya Enablement Services Version 3+
Avaya ACE TBA
Cisco Unified Call Manager Version 4.0+
Cisco CTI Server TBA
PBX Hardware, Software & Licensing Requirements
PBX Hardware &/or
Software
Requirements
Licensing for Outbound
Communications
Licensing for Inbound
Communications
Avaya & Nortel
Communication
Manager
AES 3+ TSAPI licensing are based on
concurrent outbound calls
CMAPI licensing are based per user
and is required for Advanced users
requiring inbound caller intelligence
and for Console Operators
CS1K Ver 4.5+
Requires SIP
Signalling
Server
SIP CTI licensing are based on
concurrent outbound calls.
For advanced outbound you
require the SIP CTI &TR87
Licensing
SIP CTI & TR87 (AST) licensing are
based per user and is required for
Advanced users requiring inbound
caller intelligence and for Console
Operators
SCS Ver 3+ N/A N/A
Cisco
CUCM Ver 4+ Web dialler (Free) CTI Server licensing are based per
user and is required for Advanced
users requiring inbound caller

5 Copyright © 2010 CCNA Pty Ltd. All rights reserved.
intelligence and for Console
Operators

6 Copyright © 2010 CCNA Pty Ltd. All rights reserved.
Installation Pre-Requites
Prior to installing Communication framework, ensure you have the following:
1. Latest version of Communication Framework Application for your organisation. Download from
www.ccna.com.au
2. Access to the internet for Communication Framework Application Registration and
Activation
3. A Registration key (Your administrator or Sales Partner shall provide)
4. Configuration settings.
a. Manual Settings (Your administrator shall provide)
b. Configuration File (You need to load to the application directory once installed)
5. Database and Communication Systems have been configured (Your administrator shall
complete)
6. Java Runtime engine version 1.6 or higher on the PC

7 Copyright © 2010 CCNA Pty Ltd. All rights reserved.
Section 1: Configuration
Installation and Configuration of Communication Framework Applications are quick and easy.
The first stage of Communication Framework Applications deployment is to create a Config file. This is
performed via the Configurator Tool for:
1. CF Client &
2. CF Console
Start the Configurator Tool and the following screen shall appear to configure the various elements and
systems, Communication Framework interfaces too.
PBX Settings and Dialling Rules are mandatory for successful user operation.
Configuration of the other elements are required for complete functionality of the
Communication Framework Applications
1. PBX configuration The first configuration step is to select the PBX vendor and or CTI server you shall be interfacing to for inbound
and outbound communication services.
Communication Framework operates with Avaya, Cisco and Nortel Systems.

8 Copyright © 2010 CCNA Pty Ltd. All rights reserved.

9 Copyright © 2010 CCNA Pty Ltd. All rights reserved.
Nortel SCS PBX Configuration
Select Nortel SCS 500 to initiate the call from your desk phone or soft-phone. This is only available to Nortel
SCS 500 3.0 above.
Enter the IP address or the FQDN of the Nortel SCS 500 server
Enter the SCS Server Port Number. Default Port number has been predefined
Select Apply to Save the settings

10 Copyright © 2010 CCNA Pty Ltd. All rights reserved.
Avaya ACM PBX Configuration
Integration with Avaya ACM is via the AES server version 3 or higher. The integration mode is either via TSAPI
or CMAPI licensing within AES. The number of CTI licenses is based on the number of concurrent inbound and
outbound communications requests and AES must be configured with a user for CF to connect to ACM
Select Avaya AES. You are requested to enter ALL the details below
Enter the IP address of the AES Server
Enter the AES Server Port Number
Enter Username and Password – Used for the Communication Framework Application to send
and receive information from the AES Server
Connection Group Name – Name of the CM system you are connecting too
AES User Setup
For CF to communicate to ACM, an AES user must be created. The diagram below shows the settings for the
AES user.
1. Add New User

11 Copyright © 2010 CCNA Pty Ltd. All rights reserved.
2. Configure User Details and Save Changes
User Details Summary Detailed User Configuration Screen

12 Copyright © 2010 CCNA Pty Ltd. All rights reserved.
Cisco UCM PBX Configuration
Integration with Cisco UCM is via the WebDialer Web Service or CTI Server. The WebDialer connector is free.
The CTI server requires per user licensing for integration to Communication Framework Applications. i.e.
Communication Framework CF Console
Select Cisco WebDialer
Enter the IP address of the Cisco UCM Server running the WebDialer Service
Click on the Apply button to save your configuration.
The Save button only save the setting in the selected tab, if you move to another tab,
you need click on the Save button to save the setting.

13 Copyright © 2010 CCNA Pty Ltd. All rights reserved.
3. Dialling Rules Configuration of the Dialling Rules creates country and location specific dialling profiles for error free dialling.
Communication Framework attempts to format numbers to a E.164 format which is passed to the PBX for
dialling.
Number formatting is achieved by entering accurate information for ALL the fields below. Extension length for
internal numbers is separated by a comma. E.g. 1, 4. This allows a user to type in a single digit for calling
reception 4 digit internal extension dialling.
Click on the Apply button to save your configuration.
The Save button only save the setting in the selected tab, if you move to another tab,
you need click on the Save button to save the setting.
14 Copyright © 2010 CCNA Pty Ltd. All rights reserved.
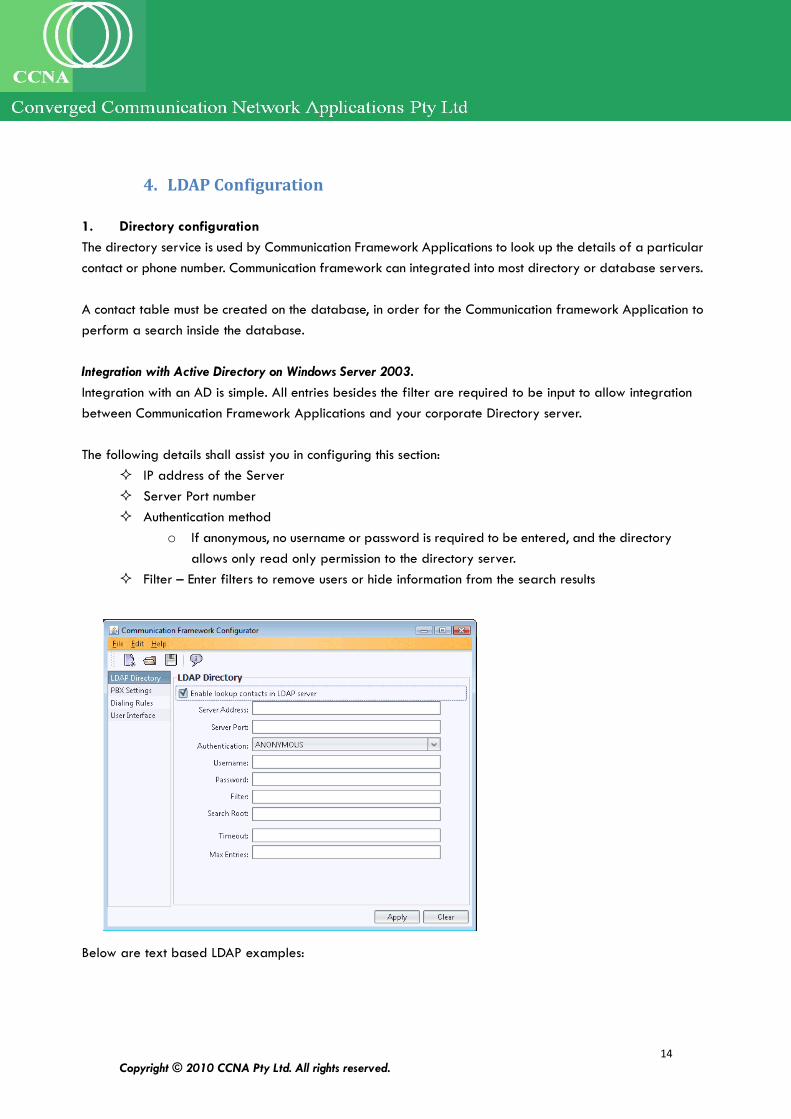
4. LDAP Configuration
1. Directory configuration
The directory service is used by Communication Framework Applications to look up the details of a particular
contact or phone number. Communication framework can integrated into most directory or database servers.
A contact table must be created on the database, in order for the Communication framework Application to
perform a search inside the database.
Integration with Active Directory on Windows Server 2003.
Integration with an AD is simple. All entries besides the filter are required to be input to allow integration
between Communication Framework Applications and your corporate Directory server.
The following details shall assist you in configuring this section:
IP address of the Server
Server Port number
Authentication method
o If anonymous, no username or password is required to be entered, and the directory
allows only read only permission to the directory server.
Filter – Enter filters to remove users or hide information from the search results
Below are text based LDAP examples:

15 Copyright © 2010 CCNA Pty Ltd. All rights reserved.
Need to add more information about the search
Click on the Apply button to save your configuration.
The Save button only save the setting in the selected tab, if you move to another tab,
you need click on the Save button to save the setting.
Test the directory configuration:
Click the Test button to test the connection between Communication Framework and Directory service. A
pop-up message shall indicate if the connection was successful or not. If the test fails, please review your
settings. Also request your administrator to ensure all the settings and components are installed successfully.
5. Active Directory Setup The Communication framework queries the following attributes from the active directory server.
Attribute Name Description
cn CN=Guy Thomas. Actually, this LDAP attribute is made up from givenName joined to
SN.
displayName displayName = Guy Thomas. If you script this property, be sure you understand which
field you are configuring. DisplayName can be confused with CN or description.
givenName Firstname also called Christian name
sn sn = Thomas. This would be referred to as last name or surname.
mail An easy, but important attribute. A simple SMTP address is all that is required
telephoneNumber Office Phone
mobile Mobile Phone
ipPhone IP Phone
homePhone Home Phone
Example 1
# LDAP SETTING
LDAP_SERVER_ENABLED=true
LDAP_SERVER_ADDRESS=ldap.company.com
LDAP_SERVER_PORT=389
LDAP_TIMEOUT=5000
LDAP_MAX_ENTRIES=50
LDAP_USERNAME=
LDAP_PASSWORD=
LDAP_SEARCH_ROOT=ou=People,o=company.com
LDAP_SEARCH_FILTER=
Example 2
# LDAP setting
LDAP_SERVER_ENABLED=true
LDAP_SERVER_ADDRESS=169.xxx.xxx.xxx
LDAP_SERVER_PORT=389
LDAP_SERVER_AUTH=simple
LDAP_USERNAME=test
LDAP_PASSWORD=test
LDAP_TIMEOUT=5000
LDAP_MAX_ENTRIES=50
LDAP_SEARCH_ROOT=OU=Company,DC=ms,DC=Company,DC=
com,DC=au
LDAP_SEARCH_FILTER=

16 Copyright © 2010 CCNA Pty Ltd. All rights reserved.
It is recommended to put the phone number in E164 format.
Communication framework is able to lookup contacts from selected databases. The following databases are
supported:
Microsoft SQL Server 2005 & MySql Server
The following details are required for configuration.
Database Server IP
Database Server
Port
Optional for SQL Server 2005
Username
Password
Database
Integration with SQL
Setup the database contact table (only for Administrator)
Create a database in Microsoft SQL Server 2005
The table should includes following columns,
sn givenname displayname mail ipphone telephonenumber mobile
The name of the columns can be any name, the column mapping shall be correct in the
Database Configuration.
The screenshot shows an example for Microsoft SQL Server.
Database Information
The directory database MUST have accurate information to ensure error free searching, inbound and
outbound communications, application sequencing and linkage. To check the database, perform the following
for a AD Directory.

17 Copyright © 2010 CCNA Pty Ltd. All rights reserved.
Step 1: Start the Active Directory Users and Computers administrative tool.
Step 2 : Expand the domain that contains your users.
Step 3: Open the organizational unit (OU) that contains your users.
Step 4: Check the following details for all users:
All users have valid email addresses.
All users are assigned to a group.
All the phone numbers for each user are in E.164 format, and can be correctly dialed within
the context of your PBX configuration
6. User Interface

18 Copyright © 2010 CCNA Pty Ltd. All rights reserved.
Section 2: Web Server or Standalone Installation
Installation Instructions Installation is quick and easy. The administrator may provide you a file to execute or direct you to a website.
Step

19 Copyright © 2010 CCNA Pty Ltd. All rights reserved.
Section 3: End User Installation
Installation Instructions Installation is quick and easy. The administrator may provide you a file to execute or direct you to a website.
Step 1: Click the link or double click on the setup.exe of Communication Framework Software Application
Step 2: Click on the Next button to select installation directory
If you need to change the installation path from the default (not recommended)
“C:\Program Files\CCNA\UCC”, click the Browse button to select a folder to install
within.

20 Copyright © 2010 CCNA Pty Ltd. All rights reserved.
Step 3: Click next to start installation
Step 4: Click on Close to exit upon successful installation.
To start the Communication Framework application, you need to
1. Register and Activate Communication Framework and then
2. Configure Communication Framework.
Registration and Activation of Communication Framework can be performed either by
double clicking the Communication Framework Application ICON in your desktop or
navigating the start menu as such
o Start All Programs CCNA Communication Framework

21 Copyright © 2010 CCNA Pty Ltd. All rights reserved.
Step 5: Activate your copy of Communication Framework.
Your system administrator shall provide you the Communication Framework License key.
Enter the License key, your name and email.
Your administrator or Sales partner shall provide the Product key.
The activation process requires Internet connections to complete.
Configuration Configuration is automatic. The user may be asked in enter their
Extension number or Login name based upon the PBX you are integration to and
Password
The extension number and or username and password should be the same as your phone login. Normally, the
username is your extension.
If you wish to incorporate Communication Framework with your locally installed soft-phone application, the

22 Copyright © 2010 CCNA Pty Ltd. All rights reserved.
path of softphone must be selected.
Select the Browse button and enter the location of the Softphone executable file. E.g. the softphone is located
at C:\Program Files\vendor_name\softphone_name\xxx.exe
Inbound Caller Notification and Intelligence Setup
TBA

23 Copyright © 2010 CCNA Pty Ltd. All rights reserved.
Section 4: Verify your installation and configuration
The Communication Framework Search Window should be displayed at the upper-right side of the desktop
window.
1. Initiate a call to someone by email
Open your email application
Select the sender’s email address and right click or copy “Cntl C” their name. The Dial
item should be appear in the context menu if your right mouse clicked.
Either Click on the Dial button or if CF Client came to the foreground, search the users
details, and click on the prefer number to dial the user. If the user is a corporate user, you
require to hit the enter button, otherwise choose the contacts or favourites tab.
2. Make a call by manually key in the number
3. Make call from Favourites and History
Click on the Favourites or History button; a list of contacts will be displayed.
Right click on the contact to Call.

24 Copyright © 2010 CCNA Pty Ltd. All rights reserved.
4. Initiate a call from Google Talk
If Google talk is installed on the Computer,
you can initiate a call from Google talk
(deskphone to deskphone).
The name of the contact in Google talk must
appear as the full name or the contact is
using a unique avatar.
5. Shortcut key
Ctrl+C to copy any text inside an
application
Ctrl+Alt+D to find a number to dial based on the text copied by Ctrl+C.