cchapterhapterhapter stridelinx platform
TRANSCRIPT

ChapterChapterChapter
222StrideLinx PLatform
In this Chapter...Overview .................................................................................................................... 2-4
Terms of Use ............................................................................................................ 2-4Data Fair Use Policy .................................................................................................. 2-4
Getting started .......................................................................................................... 2-5Create a User Account .............................................................................................. 2-5Login ........................................................................................................................ 2-5Choose Company ..................................................................................................... 2-5
User Interface ............................................................................................................ 2-6
Registering Your Device ............................................................................................ 2-6Login ........................................................................................................................ 2-7Generate a Configuration File ................................................................................... 2-7Register Your StrideLinx Router .............................................................................. 2-11Activate Your StrideLinx Router .............................................................................. 2-12Edit Router Info and Set Location ........................................................................... 2-12Save/Load Config Files for Router Transfer ............................................................. 2-13
Configure LAN as WiFi Access Point (Hotspot) ...................................................... 2-14
Configure Redundant WAN Access ......................................................................... 2-15
Installing VPN Client Software ................................................................................ 2-19Download Installer ................................................................................................. 2-19Run Setup .............................................................................................................. 2-19Run VPN Client ...................................................................................................... 2-19Confirm Windows TAP Ethernet Driver Installed ..................................................... 2-19Reconnect to StrideLinx Platform ........................................................................... 2-19Support .................................................................................................................. 2-19
Connect to Your Router by VPN ............................................................................. 2-20Regarding VPN Connections .................................................................................. 2-20Device Status .......................................................................................................... 2-21

StrideLinx™ Industrial VPN Routers User Manual 1st Edition, Rev. S2-2
12
3
4
5
6
7
8
9
10
11
12
13
14
A
B
C
D
Chapter 2: StrideLinx PlatformLinx
Connect to Devices Behind the StrideLinx Router ................................................. 2-22HTTP/VNC/Data Logging Services and Shortcuts ................................................... 2-22
Using StrideLinx on Your Mobile Device ................................................................ 2-25iOS Client ............................................................................................................... 2-25Android Client ........................................................................................................ 2-26Access via Web ....................................................................................................... 2-26
Reducing Router Bandwidth ................................................................................... 2-27
Organization: Companies, Device Categories & User Groups ............................... 2-28Overview ................................................................................................................ 2-28Companies ............................................................................................................. 2-28Device Categories................................................................................................... 2-28User Groups ........................................................................................................... 2-30
Access and Permissions ........................................................................................... 2-31
Two-factor Authentication ...................................................................................... 2-32Setting Up Two-factor Authentication .................................................................... 2-32Backup Codes ........................................................................................................ 2-35Logging In ............................................................................................................. 2-35Disabling Two-factor Authentication ...................................................................... 2-36User Access Token .................................................................................................. 2-36
Transfer a Device ..................................................................................................... 2-36To Assign a Device Key........................................................................................... 2-37

StrideLinx™ Industrial VPN Routers User Manual 1st Edition, Rev. S 2-3
Chapter 2: StrideLinx Platform
1
2
3
4
5
6
7
8
9
10
11
12
13
14
A
B
C
D
This manual covers the StrideLinx platform available from 2017 through 2021.
For details covering the StrideLinx Cloud 2.0 platform available after April 2021, please click here to link to that manual.
The StrideLinx Cloud 2.0 manual includes details describing the Activation Code model of Data Logging, Cloud Notify and other add-on features.
For information on the migration wizard from the original platform to StrideLinx Cloud 2.0, click here.

StrideLinx™ Industrial VPN Routers User Manual 1st Edition, Rev. S2-4
12
3
4
5
6
7
8
9
10
11
12
13
14
A
B
C
D
Chapter 2: StrideLinx PlatformLinx
OverviewThe StrideLinx Platform is a secure and powerful platform based on a worldwide network of servers. It is focused on delivering and enhancing innovative remote service.
The following example illustrates how a typical StrideLinx setup might be configured.
As shown in the example above the StrideLinx router will isolate a local machine network (e.g., 192.168.140.x range) from the corporate network (e.g., 192.168.0.x range). To prevent network routing problems you must make sure the StrideLinx router’s IP address is in a different subnet than the company network.
Terms of UseThe StrideLinx platform is powered by IXON, B.V., And use of the service requires acceptance of IXON’s Terms of Use. A copy of the Terms of Use is included in Appendix M for your convenience.
Data Fair Use PolicyA StrideLinx user may access, program and monitor any device on the local machine network by VPN. The intended use of the StrideLinx platform is secure remote access to industrial control equipment for remote service. A monthly allowance of 5GB data traffic per company account is included, and is sufficient in most cases to accomplish remote service.
When the platform is used for other purposes, the data traffic may exceed the 5GB allowance. The StrideLinx platform includes optional Data Top-up subscriptions to increase the monthly limit. See “Add-on Subscriptions and Licenses” in Appendix A for more details.
If the data traffic for a company reaches the monthly limit, further data traffic will be throttled to 50kbit/sec. This is adequate to access and program a PLC.
StrideLinx PlatformStrideLinx
Client StrideLinx Router192.168.140.1
WAN Port192.168.0.2
LAN Ports192.168.140.x
PLCs(machine control)
Machine Network
Company NetworkWired, WiFi or 4G

StrideLinx™ Industrial VPN Routers User Manual 1st Edition, Rev. S 2-5
Chapter 2: StrideLinx Platform
1
2
3
4
5
6
7
8
9
10
11
12
13
14
A
B
C
D
Although data usage is affected by the number of users accessing the platform, we expect the most significant data usage to be from an IP camera connected on the platform.
Any Cloud Logging subscription data does not count toward the monthly data traffic allowance, and is not subject to throttling.
Getting startedThese steps will get you up and running with the StrideLinx Platform (https://www.StrideLinx.com).
1. Create a User AccountTo start using the StrideLinx Platform, you will need a user account. There are two ways of setting up an account.
• You can create a user account and a new company by filling out the registration form at https://www.StrideLinx.com.
• You can join an existing company by being invited by a user already in that company.
In both cases you will receive a confirmation e-mail. Complete your account registration by following the verification link inside.
NOTE: No e-mail? Be sure to check your spam folder if you haven’t received an e-mail in your inbox.
2. LoginOnce you have a user account, it’s very easy. Just go to the login page and log in with your e-mail address and password combination.
NOTE: Forgot your password? You can use the recovery form to request a password recovery e-mail. We will then send you instructions for setting up a new password.
3. Choose CompanyIf you have just created your user account, it is probably linked with only one company. In that case your company is automatically chosen and this step will not show up.
However, if your user account is linked to more than one company, you must choose the company you want to use. During login you will see a list of companies you are linked to.
That’s it! You are now logged in. The next section provides a brief overview of the StrideLinx platform user interface, and the subsequent section walks you through registering your router on the StrideLinx Platform.

StrideLinx™ Industrial VPN Routers User Manual 1st Edition, Rev. S2-6
12
3
4
5
6
7
8
9
10
11
12
13
14
A
B
C
D
Chapter 2: StrideLinx PlatformLinx
User InterfaceFor convenience we have named the areas of the platform as shown in the following graphic. When viewed on a device with a screen width less than 1280 pixels, the first-tier menu is hidden by default and accessible by clicking on the menu icon (≡) in the upper left corner.
Registering Your DeviceThese steps will guide you through the process of registering your StrideLinx router to the StrideLinx Platform. Videos to walk you through the process of setting up each type of router (wired, WiFi, and 4G LTE) are accessible by clicking the thumbnails below, or copying the URL to your browser. All routers can be configured as a wired router by using the Ethernet WAN port for connectivity.
Complete Setup of Wired Router (any model)https://www.AutomationDirect.com/VID-CM-0020
Complete Setup of Wireless Router (SE-SL3011-WF)https://www.AutomationDirect.com/VID-CM-0021
Complete Setup of 4G LTE Router (SE-SL3011-4G or SE-SL3011-4GG)https://www.AutomationDirect.com/VID-CM-0022
First tier
Second tier Third tier

StrideLinx™ Industrial VPN Routers User Manual 1st Edition, Rev. S 2-7
Chapter 2: StrideLinx Platform
1
2
3
4
5
6
7
8
9
10
11
12
13
14
A
B
C
D
1. LoginGo to the login page at www.StrideLinx.com and log in with your e-mail address and password.
A user account is required. If you don’t already have one, you need to create a user account before you can proceed.
The device you log in from (your PC or laptop) to configure your router must have an available USB port.
2. Generate a Configuration FileNote that a few details regarding the machine network internet connection will be needed to complete configuration of a new router. Please read through this section and make sure the relevant information is available before beginning a new configuration. Once you are successfully logged in and ready to proceed, choose “Tools” from the navigation menu. Click on the START CONFIGURATION button to open the configuration file wizard.
A dialog box will confirm that the new router will be registered to the company to which you are currently logged in. Click NEXT to continue.

StrideLinx™ Industrial VPN Routers User Manual 1st Edition, Rev. S2-8
12
3
4
5
6
7
8
9
10
11
12
13
14
A
B
C
D
Chapter 2: StrideLinx PlatformLinx
Configure the Internet SettingsSelect the method by which your router will connect to the internet (i.e., Wired, Wireless, or Cellular). After the router is configured and activated, a second connection method can be added for WAN redundancy. The WAN redundancy feature is intended to take advantage of two independent internet sources and will not failover automatically when the two connection types access the internet by the same modem/company router.
NOTE: All models can be configured to connect to the internet via wired connection. On the 4G models and WiFi model, set up your preferred primary internet connection method now; a fallback connection method for WAN redundancy can be configured through the StrideLinx platform after the initial setup is complete. If a WiFi model is configured to use a wired WAN connection, its WiFi connection may be configured as a wireless access point.
Configure a Wired WAN NetworkThe router will be configured by default to have its IP address and DNS server assigned via DHCP, and to disable the Digital Input control of the VPN. Usually these settings are appropriate and you may click NEXT and skip ahead to the “Configure LAN IP Address” subsection. Unlike the network settings for the devices connected behind this router, the router’s network settings usually function best when configured for DHCP. If your network conditions require static network settings on the WAN port, though, click SHOW MORE.
Manually Configure WAN IP Address
After clicking SHOW MORE on the WAN setup dialog box, click “Use the following IP address.”
Enter the desired static IP address for the WAN (internet) side of the router (IPv4 only).
The network mask defaults to 255.255.255.0. If this needs to change, click the dropdown arrow to the right of the network mask and select the correct mask from the list.
Enter the default gateway the router should use to access the internet.
CAUTION: The LAN IP address and WAN IP address need to be on separate subnets. The address range 10.3.x.x is reserved for communications between the server and the router. Addresses in this range may not be configured by the user.
NOTE: Configuring a static IP address will also require that you set a custom DNS server.

StrideLinx™ Industrial VPN Routers User Manual 1st Edition, Rev. S 2-9
Chapter 2: StrideLinx Platform
1
2
3
4
5
6
7
8
9
10
11
12
13
14
A
B
C
D
Manually Configure DNS Server
After clicking SHOW MORE on the WAN setup dialog box, click “Add a custom DNS server”. This radio button will already be selected if a static IP address has been entered.
Enter the IP address of the preferred DNS server (IPv4 only).
Configure Digital Input for Wired Connection
The Digital Input feature allows you to enable or disable the VPN connection based upon an external digital signal supplied to the router. Electrical details for the Digital Input can be found in the “Wiring” subsection of the “Hardware” chapter of this manual.
Disabling the VPN connection disables remote programming, but allows remote monitoring including data logging.
By default, the Digital Input is disabled. When creating the INITIAL configuration file, the user may choose to enable this feature. To use this feature, click the dropdown arrow to the right of the Digital Input field and select on option from the dropdown box. Available options are:
• Disabled (Digital Input state is ignored. VPN router functions normally.)
• Disable VPN connection when input is high
• Disable VPN connection when input is low
Configure Proxy Server
If your network requires the router to connect to the internet through a proxy server, please click the switch to enable this feature, and enter configuration information as follows.
Enter the IP address of the proxy server (IPv4 only), and enter the proxy server port number.
If authentication is required for the proxy server, click the dropdown arrow to the right of the Authentication field and select “Basic authentication” then enter a username and password for the proxy server.
Configure a WiFi WAN ConnectionAfter selecting “Wireless network” as the method to connect to the internet, enter the name (SSID) of the wireless network and enter the WiFi password if needed, then click NEXT.
The wireless router has its internet-facing IP address and DNS server assigned via DHCP.
The Digital Input control of the VPN is disabled by default. When creating the INITIAL configuration file, the user may choose to enable this feature. If you wish to enable the Digital Input, click SHOW MORE in the upper right corner of the dialog box. The available options are:
• Disabled (Digital Input state is ignored. VPN router functions normally.)
• Disable VPN connection when input is high
• Disable VPN connection when input is low

StrideLinx™ Industrial VPN Routers User Manual 1st Edition, Rev. S2-10
12
3
4
5
6
7
8
9
10
11
12
13
14
A
B
C
D
Chapter 2: StrideLinx PlatformLinx
Configure a 4G WAN NetworkAfter selecting “Cellular network” as the method to connect to the internet, enter the Access Point Name (APN) associated with the cellular network to which the SIM card is configured. The APN should be obtained from the cellular provider. Standard APNs for AT&T and T-Mobile are as follows:
• AT&T: m2m.com.attz
• T-Mobile: fast.t-mobile.com
Enter the PIN code for the SIM card if applicable, then click NEXT.
The mobile router has its internet-facing IP address and DNS server assigned by the mobile network.
The Digital Input control of the VPN is disabled by default. When creating the INITIAL configuration file, the user may choose to enable this feature. If you wish to enable the Digital Input, click SHOW MORE in the upper right corner of the dialog box. The available options are:
• Disabled (Digital Input state is ignored. VPN router functions normally.)
• Disable VPN connection when input is high
• Disable VPN connection when input is low
Configure LAN IP AddressThe VPN router creates a separate subnet on the LAN side. At this stage in the router setup, only the router’s IP address (IPv4 only) on the LAN subnet needs to be entered. After the router is connected to the StrideLinx platform, DHCP server, network mask, and internet access settings can be configured through the platform.
NOTE: The LAN IP address and WAN IP address need to be on separate subnets.
After entering the LAN IP address, click NEXT to continue.

StrideLinx™ Industrial VPN Routers User Manual 1st Edition, Rev. S 2-11
Chapter 2: StrideLinx Platform
1
2
3
4
5
6
7
8
9
10
11
12
13
14
A
B
C
D
Download the Configuration FileClick the DOWNLOAD button to download the configuration file (ixrouter.conf) to your computer. Save the file to the root directory of a USB memory stick after the download is complete.
We include a USB memory stick with your StrideLinx router, but you can use any USB stick you prefer.
Click the X beside DONE to close the dialog box after the download is complete.
NOTE: Make sure that the file is named ixrouter.conf and that it is placed in the root directory of the memory stick.
Problems downloading the configuration file? If nothing happens when you click on the download button, make sure you are using a supported browser and that your browser does not automatically block download prompts. If the browser directly opens the configuration file in a new page, you can save the configuration file by pressing ctrl + s and saving the page source as ixrouter.conf.
3. Register Your StrideLinx RouterTo register your router on the StrideLinx Platform, you must plug the USB stick with the configuration file into your StrideLinx router.
Next, make sure the router has the necessary hardware connected to allow internet access as specified in the configuration file (i.e., WAN port ethernet cable, WiFi antenna, or mobile network antennas and SIM card).
Finally, boot up the router by attaching the power cable.
The LED on the router will start blinking now, indicating that it’s running the registration procedure. This usually takes somewhere between 20-30 seconds to complete.
NOTE: It’s best practice to remove the config file from the USB after the router has been registered so that on power up the router boots from the current configuration rather than the initial configuration.

StrideLinx™ Industrial VPN Routers User Manual 1st Edition, Rev. S2-12
12
3
4
5
6
7
8
9
10
11
12
13
14
A
B
C
D
Chapter 2: StrideLinx PlatformLinx
4. Activate Your StrideLinx RouterOnce your router is registered it will show up as a new device on the devices page. Before you can start using the device, it must first be activated. You can trigger the activation form by clicking on the device’s status icon in the list view. From then, activating the router is as simple as giving it a name and clicking the ACTIVATE button.
Edit Router Info and Set LocationThe name, description, category,and physical location of the activated router can now be set by (1) clicking Devices, (2) selecting the desired router, (3) clicking the INFO tab, and (4) clicking the Edit (pencil) icon to the right of the device identifier in the third-tier panel.
The device name and description may be edited for user convenience in identifying the router. The device category is discussed later in this chapter.
If a physical location is entered, the StrideLinx platform will use that location to determine the closest StrideLinx platform server to connect to the router. If no location is entered, the platform server will be selected based on the WAN IP address of the router.

StrideLinx™ Industrial VPN Routers User Manual 1st Edition, Rev. S 2-13
Chapter 2: StrideLinx Platform
1
2
3
4
5
6
7
8
9
10
11
12
13
14
A
B
C
D
Save/Load Config Files for Router TransferIf you want to connect another StrideLinx router with the same router configuration settings, device connections and user permissions, you can do so by using the “Save as Template” and “Load from Template” features accessed from the ellipsis at the top of the device pane:
StrideLinx™ Industrial VPN Routers User Manual 1st Edition, Rev. S2-14
12
3
4
5
6
7
8
9
10
11
12
13
14
A
B
C
D
Chapter 2: StrideLinx PlatformLinx
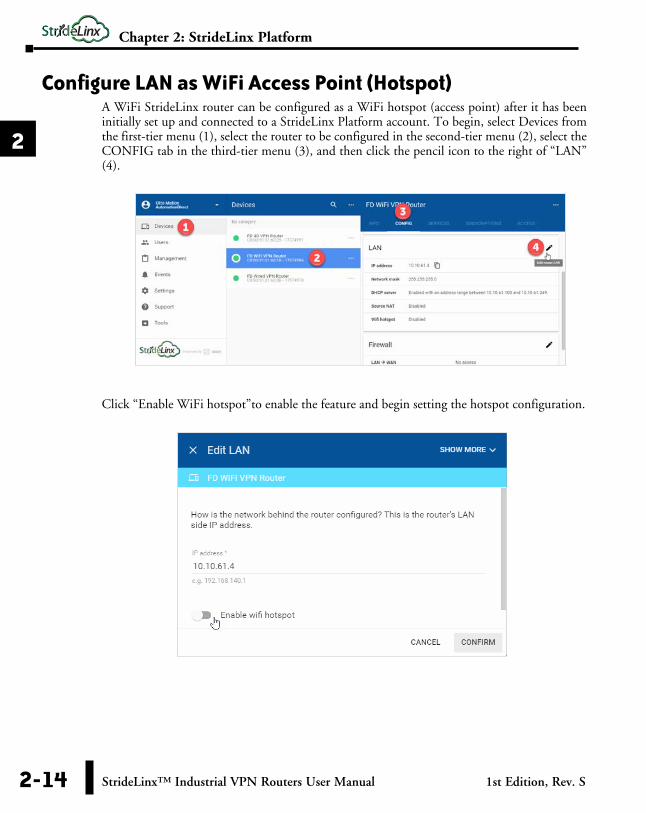
Configure LAN as WiFi Access Point (Hotspot)A WiFi StrideLinx router can be configured as a WiFi hotspot (access point) after it has been initially set up and connected to a StrideLinx Platform account. To begin, select Devices from the first-tier menu (1), select the router to be configured in the second-tier menu (2), select the CONFIG tab in the third-tier menu (3), and then click the pencil icon to the right of “LAN” (4).
Click “Enable WiFi hotspot”to enable the feature and begin setting the hotspot configuration.

StrideLinx™ Industrial VPN Routers User Manual 1st Edition, Rev. S 2-15
Chapter 2: StrideLinx Platform
1
2
3
4
5
6
7
8
9
10
11
12
13
14
A
B
C
D
Enter the Network name (SSID) and password for the WiFi hotspot. If you wish to specify a WiFi channel for the hotspot, click SHOW MORE and then enter the channel number (1–11).
The WiFi hotspot is now enabled. To disable the hotspot, begin the same procedure and deselect “Enable WiFi hotspot” then click CONFIRM.
Configure Redundant WAN AccessWiFi or cellular router models with internet access available via both the wireless network connection (WiFi or cellular) AND the wired WAN port may be configured with a primary internet (WAN) source and a secondary internet (WAN) source. When the router is configured with both sources, the secondary internet source will become active when the primary source becomes unavailable. This feature is intended to take advantage of two independent internet sources and will not failover automatically for WiFi routers when the two connection types access the internet by the same modem/company router.
To configure redundant WAN access, (1) click Devices, (2) select the router to be configured, (3) select the Config tab, then (4) click the Edit (pencil) icon in the WAN section of the display.

StrideLinx™ Industrial VPN Routers User Manual 1st Edition, Rev. S2-16
12
3
4
5
6
7
8
9
10
11
12
13
14
A
B
C
D
Chapter 2: StrideLinx PlatformLinx
The Edit WAN screen shows a summary of the current WAN configuration. Settings for each available WAN connection can be adjusted by clicking on the connection information in the lower section of the display.(Note that Digital Input can only be set up during initial configuration.)
The diagram at the top of the screen indicates the order of preference of each configured WAN connection from the device to the internet. Click on this diagram to open the Internet Priority screen.

StrideLinx™ Industrial VPN Routers User Manual 1st Edition, Rev. S 2-17
Chapter 2: StrideLinx Platform
1
2
3
4
5
6
7
8
9
10
11
12
13
14
A
B
C
D
On the Internet Priority screen, the order of preference can be adjusted by clicking the icon on the far right ( ) of one of the WAN entries and dragging it upward (higher priority) or downward (lower priority).
Click on the setup (gear) icon to open the Tracking Settings dialog and set up how each WAN connection tracks its connectivity.

StrideLinx™ Industrial VPN Routers User Manual 1st Edition, Rev. S2-18
12
3
4
5
6
7
8
9
10
11
12
13
14
A
B
C
D
Chapter 2: StrideLinx PlatformLinx
The router will periodically check up to four public IP addresses to determine that the preferred WAN connection is available. The default IP addresses to track are public DNS servers. Any public IP address may be entered, but should be an address that is always on and will respond to ping requests.
The default tracking interval is 5 seconds. The interval can be adjusted between 1 and 60 seconds.
Finally, the new configuration must be pushed to the router. While pushing the new configuration, the router will disconnect for up to one minute.
StrideLinx™ Industrial VPN Routers User Manual 1st Edition, Rev. S 2-19
Chapter 2: StrideLinx Platform
1
2
3
4
5
6
7
8
9
10
11
12
13
14
A
B
C
D
Installing VPN Client SoftwareBefore you can set up a VPN connection to your router, you must install the VPN client software.
For PC connections, the VPN client is a light-weight application that runs in the background on your PC. It creates a virtual Ethernet port on your PC and handles all communication between your PC, the StrideLinx Platform and your browser.
1. Download InstallerYou can find the download for the latest VPN client version for Windows, MacOS and Linux on the Tools page of the StrideLinx Platform website. The instructions here will focus on the Windows installer.
2. Run SetupDouble-click the Installer file (VPN_Client-x64_en-US.msi) to open the installation wizard and follow the installation steps.
3. Run VPN ClientThe VPN client will launch automatically after the installation has completed.
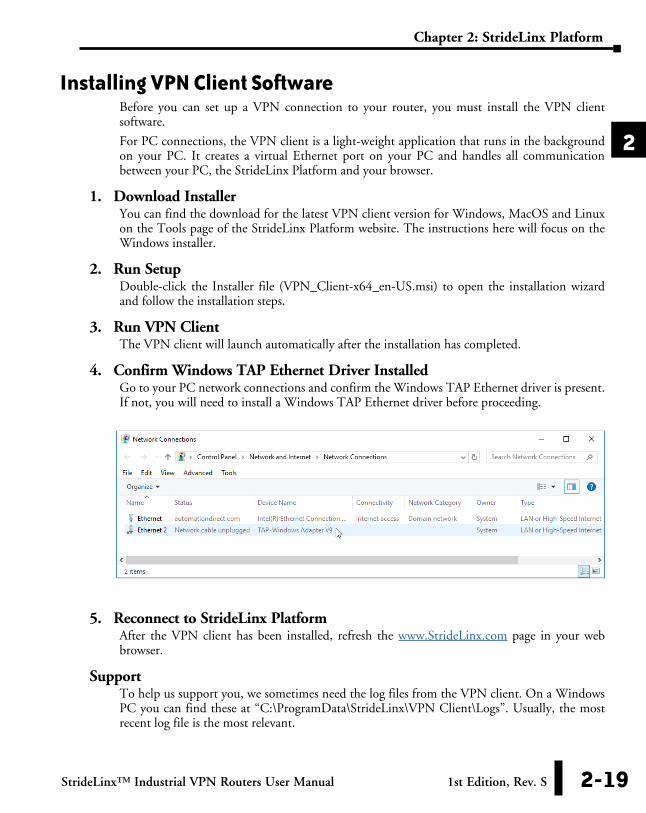
4. Confirm Windows TAP Ethernet Driver InstalledGo to your PC network connections and confirm the Windows TAP Ethernet driver is present. If not, you will need to install a Windows TAP Ethernet driver before proceeding.
5. Reconnect to StrideLinx PlatformAfter the VPN client has been installed, refresh the www.StrideLinx.com page in your web browser.
SupportTo help us support you, we sometimes need the log files from the VPN client. On a Windows PC you can find these at “C:\ProgramData\StrideLinx\VPN Client\Logs”. Usually, the most recent log file is the most relevant.

StrideLinx™ Industrial VPN Routers User Manual 1st Edition, Rev. S2-20
12
3
4
5
6
7
8
9
10
11
12
13
14
A
B
C
D
Chapter 2: StrideLinx PlatformLinx
Connect to Your Router by VPNOnce the VPN client is installed and running on your PC, you can set up a connection with your router by clicking on the CONNECT button in the StrideLinx Platform. The CONNECT button can be found on the device’s details panel, as shown below.
NOTE: Can’t click the connect button? Refer to the troubleshooting section of the manual.
When the connection is established the status icon will turn blue.
All traffic to the machine network will now be routed through the StrideLinx Platform and you will be able to access devices behind the router as if they were connected directly to your PC.
Regarding VPN Connections1. Keep in mind that a single TAP adapter (PC) is only able to make one VPN connection
at a time.
2. A single user account may be connected via VPN:
a. TO a single router at a time
b. FROM a single PC or mobile device at a time
3. Multiple users (each from its own PC or mobile device) may be connected via VPN to a single router at a time.
a. Typically, the software connecting to the devices behind the router, e.g. Do-more! Designer or Productivity Suite, restricts user connections to a single user.

StrideLinx™ Industrial VPN Routers User Manual 1st Edition, Rev. S 2-21
Chapter 2: StrideLinx Platform
1
2
3
4
5
6
7
8
9
10
11
12
13
14
A
B
C
D
Device StatusThe current status of a device is is indicated by the status-icon in the device list-view. It can also be found inside the info section on the device details page.
Device StatusIcon Label Description
Offline The device is offline. You can’t set up any kind of connection to the device.
Online The device is online. You can now set up a connection to the device.
Connecting The device is busy connecting.
Connected The device is connected through the VPN. Your PC now has access to the device’s machine network.

StrideLinx™ Industrial VPN Routers User Manual 1st Edition, Rev. S2-22
12
3
4
5
6
7
8
9
10
11
12
13
14
A
B
C
D
Chapter 2: StrideLinx PlatformLinx
Connect to Devices Behind the StrideLinx RouterWhen your PC is connected to a StrideLinx router, a VPN connection is established between the PC and the machine network behind the StrideLinx router. All devices on the machine network behave as though they are located on the PC’s local network.
Alternatively, specific services on the machine network can be configured for access via the StrideLinx Platform without requiring a VPN connection, as described below.
HTTP/VNC/Data Logging Services and ShortcutsOnce your device is registered and configured, you may want to set up a service that allows you to access your HTTP/VNC/Data Logging server(s) via the StrideLinx Platform.
Managing ServicesAdding a service is quite simple. Select a router and then select “services” in the third-tier panel. From there you can view and modify all the device’s existing services or add new ones. Shortcuts to services are displayed on a router’s Info page providing easy access to all of the services for a specific router.
When adding a service you first specify the target of the service you wish to add by entering a name and IP address. Next, you select the service type (HTTP/VNC/Data Logging), enter any remaining details (i.e. a password if required), and click ADD.
Please refer to Chapter 3 to configure the many device options from AutomationDirect.com.

StrideLinx™ Industrial VPN Routers User Manual 1st Edition, Rev. S 2-23
Chapter 2: StrideLinx Platform
1
2
3
4
5
6
7
8
9
10
11
12
13
14
A
B
C
D
Push Automatically Generated Port ForwardingWhen you add a service, a required port forwarding is automatically added to your router’s CONFIG tab. A dot appears below the CONFIG tab to indicate that changes have been made that have not yet been synchronized to the router. Please click the CONFIG tab, then click the ellipsis to the right of the configuration sync message and click “Push config to device” to update the router.
This is a secure VPN→LAN port forward inside the encrypted VPN tunnel so that StrideLinx users can access the HTTP server or VNC server of their control network devices by shortcut services in the StrideLinx platform.
Any change to the router configuration (for example, changes to network settings or WiFi client settings) will be identified with this dot and must be pushed to the router in the same way.

StrideLinx™ Industrial VPN Routers User Manual 1st Edition, Rev. S2-24
12
3
4
5
6
7
8
9
10
11
12
13
14
A
B
C
D
Chapter 2: StrideLinx PlatformLinx
Hypertext Transfer Protocol (HTTP or HTTPS)With an HTTP(S)-service you can remotely connect to any webserver hosted on your devices.
You can open the HTTP service in a new browser-window by clicking on the “open-in-new” icon in the top right corner or you can press-and-hold the CTRL key when you click on an HTTP service to directly open it in a new window.
Virtual Network Computing (VNC)With StrideLinx Platform you can remotely access your devices with a VNC server from within your browser. If you have a VNC server running on a computer, make sure you set your server’s encryption setting, if available, to also accept unencrypted connections.
Our in-browser VNC client has been optimized for use with smartphones or tablets. With two finger gestures you can pinch-zoom and pan around the screen.
Data LoggingDatalogging and monitoring is available as an add-on service, subscribed to from your StrideLinx account. Note that model SE-SL3001 does not support data logging.
The setup process requires:
1. Enter credit card information in the Billing section. (Click your username, then click “Billing” in the 1st-tier menu.)
2. Activate the Data logging subscription for the desired router under SUBSCRIPTIONS in the third-tier panel for that device. Select the desired service level (number of data points per hour). Note that a 30-day free trial of the data logging service for one router is available from the SUBSCRIPTIONS panel as well.
3. After the Data logging service is activated, click the ellipsis in the Data logging box to expose the menu that includes adding/editing a data report or live data monitor. Selections to Pause, Upgrade and Deactivate the datalogging subscription are also available here.
4. Configure your device for Datalogging – select the Protocol and enter the Data Tags.
5. Configure data reports (log/record historical data) and/or data monitors (display live data)
A more detailed example of setting up data logging is shown in Chapter 4.

StrideLinx™ Industrial VPN Routers User Manual 1st Edition, Rev. S 2-25
Chapter 2: StrideLinx Platform
1
2
3
4
5
6
7
8
9
10
11
12
13
14
A
B
C
D
Using StrideLinx on Your Mobile DeviceApps are available on the iTunes App Store and the Google Play Store. Android and iOS devices can access services set up for connection through the StrideLinx Platform, or may establish a direct VPN connection through the StrideLinx router. Mobile VPN access requires router firmware versions v3.13 or newer. After upgrading the router firmware from version v3.12 or older, power cycle the router or cycle the VPN on and off. To cycle the VPN, go to Device->Info->VPN & click the 3 ellipses->Edit VPN Access. Turn off the “Use VPN” button, confirm changes. Do this again, but turn on the “Use VPN” button.
The apps allow access to the following:• Connect to devices behind the router, for example, using the C-more Remote Access app.• Router configuration• User permission management• Access token management• Create & monitor data dashboards (note that model SE-SL3001 does not support
data logging)• View event logs
NOTE: The StrideLinx app may take an extended time to load, depending on the speed of the available data connection, when it is not already cached in your device’s memory.
iOS ClientThe VPN client for iOS devices is available in the iTunes App Store at https://itunes.apple.com/us/app/stride-sitelink/id1276487779?mt=8, or by scanning the QR code to the right.
A video walking you through setting up and using the iOS mobile app to access the StrideLinx Platform data logging is accessible by clicking the thumbnail at the right, or by copying the following URL to your browser:
https://www.AutomationDirect.com/VID-CM-0031

StrideLinx™ Industrial VPN Routers User Manual 1st Edition, Rev. S2-26
12
3
4
5
6
7
8
9
10
11
12
13
14
A
B
C
D
Chapter 2: StrideLinx PlatformLinx
Android ClientThe VPN client for Android devices is available in the Google Play Store at https://play.google.com/store/apps/details?id=co.ixon.stridesitelink&hl=us, or by scanning the QR code to the right.
A video walking you through setting up and using the Android mobile app to access the StrideLinx Platform data logging is accessible by clicking the thumbnail at the right, or by copying the following URL to your browser:
https://www.AutomationDirect.com/VID-CM-0030
Access via WebAlternatively, mobile devices not connected through a StrideLinx app can access services set up for connection through the StrideLinx Platform via the web at www.StrideLinx.com. You can also save the webpage as a WebApp on most devices.
Use as a WebAppThe StrideLinx website can be saved as an app on most mobile devices, allowing access to StrideLinx from your home screen.
On iOS Devices• Open the Safari browser
• Navigate to www.StrideLinx.com
• Tap the menu-icon
• In the menu, tap on the “Add to Home Screen” option
• Choose “Add”
• The StrideLinx WebApp will now be accessible from your home screen
On Android Devices• Open the Chrome browser
• Navigate to www.StrideLinx.com
• Tap the menu-icon (three dots)
• In the menu, tap on the “Add to Home Screen” option
• Choose “Ok”
• The StrideLinx WebApp will now be accessible from your home screen

StrideLinx™ Industrial VPN Routers User Manual 1st Edition, Rev. S 2-27
Chapter 2: StrideLinx Platform
1
2
3
4
5
6
7
8
9
10
11
12
13
14
A
B
C
D
Reducing Router BandwidthUsers can reduce the amount of StrideLinx router background data by turning off the router-to-cloud VPN so that the router operates in standby mode. In order to put the router in standby mode, log into your StrideLinx account and select the router. Click on the info tab, click the ellipses in the VPN section (to the right of the Connect button), and select “Edit VPN Access.”
Click the “Use VPN” toggle switch shown below to turn the router-to-cloud connection to standby mode. This will reduce the monthly bandwidth to about 5MB/mo. In order to access the router (by VPN or through the webserver/VNC server shortcuts) the user will have to turn this back on. This is a fairly simple step to save data if data consumption is of concern.

StrideLinx™ Industrial VPN Routers User Manual 1st Edition, Rev. S2-28
12
3
4
5
6
7
8
9
10
11
12
13
14
A
B
C
D
Chapter 2: StrideLinx PlatformLinx
Organization: Companies, Device Categories & User GroupsOverview
A video providing an overview of the tools for organizing companies, users and devices within the StrideLinx Platform is accessible by clicking the thumbnail at the right, or by copying the following URL to your browser:
https://www.AutomationDirect.com/VID-CM-0038
CompaniesA user account may be a associated with more than one company. The StrideLinx Platform will display the devices and settings for the currently active company, which can be changed at any time by selecting “Switch company” in the resultant 1st-tier menu after clicking your username.
Details about the current company, including the company name and location, can be edited by selecting “My company” from the 1st-tier menu. Click your username to expose the option. The company is identified by a unique code which is assigned by the StrideLinx system. This identifier is not configurable and is shown on the My Company page. The “Company name” is fully editable. It is possible, though not recommended, to configure multiple companies with the same or similar company names.
Device CategoriesRouters can be assigned to device categories. Categories allow you to manage employee or customer access with an initial setup saving time as additional users or routers are added. Users or user groups with access to a category will always be able to access all devices within that category. So if routers are removed from a category or a new router gets added, you don’t have to update the access rules.
In the example below you see a company with four routers (A, B, C and D) and three device categories (X, Y and Z) . The lines in between show the connections among them.
Routers can only be linked to one company and one category. For example routers A and B are linked to category X and router C is linked to category Y.
XCompany Y Z
A B C D

StrideLinx™ Industrial VPN Routers User Manual 1st Edition, Rev. S 2-29
Chapter 2: StrideLinx Platform
1
2
3
4
5
6
7
8
9
10
11
12
13
14
A
B
C
D
Routers don’t have to be linked to a category, and categories don’t have to contain any routers. For example router D is not assigned to any category, and category Z does not contain any routers.
A category is first created by selecting Management in the first-tier menu, then selecting DEVICE CATEGORIES in the second-tier menu. Finally, click CREATE A CATEGORY in the second-tier panel.
Once a category is created, routers may be assigned to it by (1) clicking Devices, (2) selecting the desired router, (3) clicking the INFO tab, and (4) clicking the Edit (pencil) icon to the right of the device identifier in the third-tier panel.
A device category can then be selected, along with editing the router name, description, and location.

StrideLinx™ Industrial VPN Routers User Manual 1st Edition, Rev. S2-30
12
3
4
5
6
7
8
9
10
11
12
13
14
A
B
C
D
Chapter 2: StrideLinx PlatformLinx
User GroupsWithin a company users can have specific access and permissions. User groups make it possible to better organize users within a company. This improves clarity, but more importantly makes it easier to set access rules for your company’s devices.
In the following example you see a company with four users (A, B, C and D) with three user groups (X, Y and Z) . The lines in between show the connections among them.
A user can be linked to more than one user group. For example user B is linked to both groups X and Y while user C is only linked to group Y.
Users don’t have to be linked to a user group. For example user D is not assigned to any user group. Users may be members of multiple companies, but user groups are only assigned on a per-company basis.
A user group is created by selecting Management in the first-tier menu, then selecting USER GROUPS in the second-tier menu. Finally, click the “Add User Group” button in the lower right to create a new user group.
To edit the assigned user groups for a user or selection of users, select Management in the first-tier menu, then select USERS in the second-tier menu. Select one or more users by clicking the check box beside each name. Finally, you can select the ‘Edit groups’ option. This will open a dialog with a list of all the available user groups.
For each user you can select user groups by toggling the input checkboxes. By clicking confirm the changes will get saved.
Company Y
A B C D
ZX

StrideLinx™ Industrial VPN Routers User Manual 1st Edition, Rev. S 2-31
Chapter 2: StrideLinx Platform
1
2
3
4
5
6
7
8
9
10
11
12
13
14
A
B
C
D
Access and PermissionsUsers and User groups may be assigned permissions restricted to a single device or a Category of devices. Access can also be given to a single router from the Devices – Router – Access tab.
Each user and user group has their own set of permissions within a company. Based on those permissions a user is allowed or not allowed to see and use specific modules of the platform. In combination with access rules you can very easily limit the functionality to the needs of a user.
For example, you might want to give a specific user permission to use the VNC connection, but not allow him to edit any configuration settings for the router.
Here is a brief description of each permission.
• Connect using HTTP: allows/disallows users to see HTTP server shortcuts on the router – Info page.
• Connect using VNC: allows/disallows users to see VNC server shortcuts on the router – Info page.
• Connect using VPN: allows/disallows user to connect by VPN to a router’s local area network to access field devices. Disallowing may be useful when you want to prevent a user from programming field devices.
• Access to all devices: allows access to all routers in a company’s account. If this box is unchecked no routers will be visible. Access to device categories or specific routers can be granted so that all devices are not blocked.
• Edit company info: allows/disallows the user to edit the My company page info.• Manage devices: allows/disallows the user to modify or edit router config settings and shortcuts
to HTTP/VNC servers, data logging tags & reports/monitors. Also allows/disallows data logging subscriptions to be modified.
• Manage users: allows/disallows user management (inviting other users, setting user permissions).

StrideLinx™ Industrial VPN Routers User Manual 1st Edition, Rev. S2-32
12
3
4
5
6
7
8
9
10
11
12
13
14
A
B
C
D
Chapter 2: StrideLinx PlatformLinx
Two-factor AuthenticationTwo-factor authentication is an additional security feature that requires a second, one-time-use password, in addition to your configured password, for every login. This protects your account from access by someone who has learned you login name and password.
These one-time passwords are generated by an authentication app on a smartphone, and are valid for a short amount of time. The passwords are based on a key shared by the StrideLinx platform and a time-based encryption algorithm. Thus, access to the enrolled phone device provides a second authentication of your identity.
Setting Up Two-factor Authentication
1. Download an Authentication ApplicationTo generate a valid one-time password, you need a mobile device with an authentication application installed on the device. Most commonly a mobile phone is used, but other devices like a tablet are also an option.
CHOOSING A DEVICE: You need access to your registered device to log in to your account, so choose a device you keep with you at all times. The authentication apps do not require a data connection to generate a valid one-time password and will continue to refresh their codes even in airplane mode.
There are a number of free authentication apps available for multiple device operating systems. Our examples show Google Authenticator.
2. Enable Two-factor AuthenticationTo enable two-factor authentication on the StrideLinx Platform, click your username at the top of the first-tier menu, then select “My profile.” find the Login and Security block under My Profile in the 1st-tier menu after clicking your username.

StrideLinx™ Industrial VPN Routers User Manual 1st Edition, Rev. S 2-33
Chapter 2: StrideLinx Platform
1
2
3
4
5
6
7
8
9
10
11
12
13
14
A
B
C
D
Click the ellipsis icon, then click “Two-factor authentication” in the pop-up dialog. A dialog will appear notifying you that two-factor authentication is currently disabled.
Click ENABLE to activate the feature.
In the resulting screen, a QR code is visible at the top of the dialog box. In the installed authentication app, choose to “Add a new account” or something similar. Google Authenticator allows you to scan a QR code with the camera of your device.
Point the device’s camera towards the screen so that the entire QR code falls in the window. After a few seconds, the application will notify that it has registered the QR code and will prompt you for a name for the account.

StrideLinx™ Industrial VPN Routers User Manual 1st Edition, Rev. S2-34
12
3
4
5
6
7
8
9
10
11
12
13
14
A
B
C
D
Chapter 2: StrideLinx PlatformLinx
If you can’t scan a QR code on your device you can also manually enter the code needed to register your device. Click on “I can’t scan a QR code” to display a 16-character code.
Afterward, by clicking on the name you gave this account, a 6-digit code (and often a timer) will be shown. Every 30 seconds, the timer resets and the code changes. After this time period, the previous code becomes invalid and the new code becomes valid.
In the dialog box on the website, enter the 6-digit one-time password visible on your device and enter a descriptive name for the device you registered.
Click on CONFIRM to verify if your device is registered properly and the one-time password is valid. If the one-time password provided during setup is valid, two-factor authentication is enabled for your account.

StrideLinx™ Industrial VPN Routers User Manual 1st Edition, Rev. S 2-35
Chapter 2: StrideLinx Platform
1
2
3
4
5
6
7
8
9
10
11
12
13
14
A
B
C
D
Problems Registering Your Device?If, after clicking “Confirm”, a message appears stating that the one-time password is incorrect, several things may have happened:
• You made a mistake entering the one-time password
• You waited too long after entering the one-time password before clicking CONFIRM. Note that these codes are only valid for a short amount of time.
• There was a problem in scanning the QR code or entering the 16-character code. In your app, remove the account. Then you can make a new account and scan the QR code or enter the code again.
Backup CodesOnce your two-factor authentication setup is completed, you will receive an e-mail which contains five one-time-use backup codes. If your authentication device becomes unavailable for any reason, you can still use a backup code to enter your account. After entering your username and password on www.StrideLinx.com, you can choose to enter a backup code instead of generating a one-time password. You will be notified by e-mail when a backup code is used.
When you have used your last backup code to log in, new backup codes will be automatically generated and sent to your e-mail.
LOSING YOUR DEVICE: If you have lost your phone, you should disable two-factor authentication by logging in with a backup code and following the steps under “Disabling two-factor authentication”. When you re-enable two-factor authentication, you can register a new device. If you lose both your device and your backup codes, you will have no way of entering your account!
LOSING YOUR BACKUP CODES: If you have lost your backup codes, you can disable two-factor authentication by following the steps under “Disabling two-factor authentication”. If you later re-enable two-factor authentication, new backup codes will be sent to your e-mail address. If you lose both your device and your backup codes, you will have no way of entering your account!
Logging InWhen two-factor authentication is enabled, after entering your username and password as usual, you will be prompted to generate a one-time password. Open the authentication application installed on the registered device and choose the correct account to generate a 6-digit code.
If you wish to log in using a backup code, click the device icon to the right of the input for the one-time password to enter a backup code. Clicking the icon again will revert back to entering a one-time password.

StrideLinx™ Industrial VPN Routers User Manual 1st Edition, Rev. S2-36
12
3
4
5
6
7
8
9
10
11
12
13
14
A
B
C
D
Chapter 2: StrideLinx PlatformLinx
Disabling Two-factor AuthenticationYou can disable two-factor authentication by going to “Two-factor Authentication” under “Login and security” on the “My Profile” page. After clicking DISABLE, an e-mail will be sent to your email address where you can confirm or reject the disabling of two-factor authentication.
You can always re-enable two-factor authentication later with the same or a new device.
User Access TokenA unique security access token is stored and valid for 7 days when a user has successfully logged in. A user is automatically logged in when returning to www.StrideLinx.com on the same browser and with the same IP address within that 7-day window. If the IP address has changed or the user uses a different browser, the user has to log in again.
The Access Token for a device you have previously used to access the StrideLinx Platform may be removed to prevent automatic login. Browse to the My Profile page:
Note that you cannot remove the access token for the device you are currently using to access the StrideLinx Platform.
Transfer a DeviceNOTE: If a Datalogging or other subscription is assigned to a device, you will not be able to transfer that device unless the destination company has a license for that subscription available. A Cloud Notify license though will transfer with the router to which it is activated if that router is transferred to another company. Note that model SE-SL3001 does not support data logging.
A router is assigned to a single company. To assign a router to a different company, the router may be reset to default and reconfigured, or, the Transfer device utility will change the company assignment without changing any other configuration settings.
The Transfer Device utility is found on the Tools page on the Device menu.

StrideLinx™ Industrial VPN Routers User Manual 1st Edition, Rev. S 2-37
Chapter 2: StrideLinx Platform
1
2
3
4
5
6
7
8
9
10
11
12
13
14
A
B
C
D
The serial number and Device key for the router must be known. The Device Key is assigned to the router while you are logged in to the company where the router currently resides.
Note that in the StrideLinx system, the company to which a router is assigned is identified by a unique code rather than the company name. It is possible to have a duplicate company name.
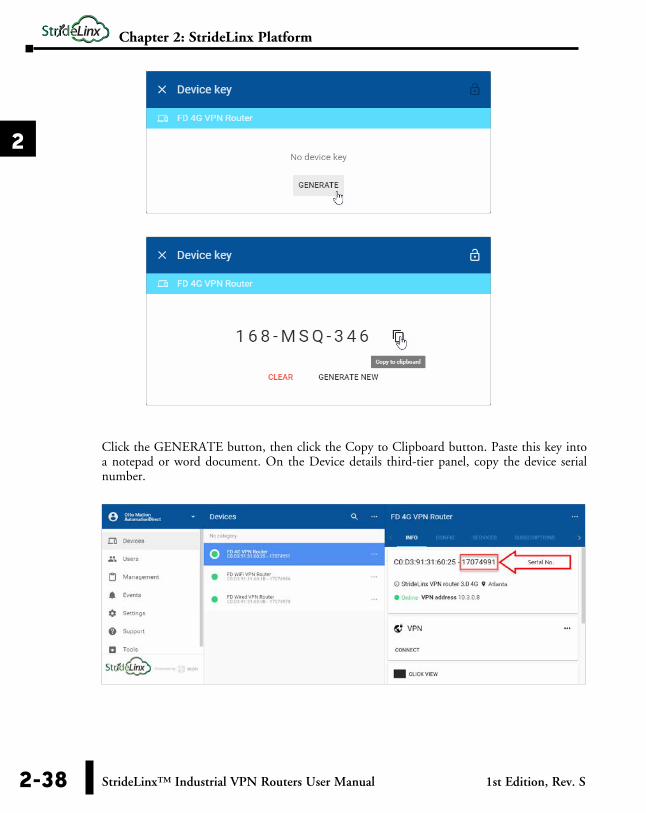
To Assign a Device KeyWhen logged in to the original company where the router resides, from the Devices menu list, (1) select Devices. Then (2) click on the target router in the second tier. (3) Click the ellipsis to the right of the router name in the third-tier panel, and (4) click “Device key”.
StrideLinx™ Industrial VPN Routers User Manual 1st Edition, Rev. S2-38
12
3
4
5
6
7
8
9
10
11
12
13
14
A
B
C
D
Chapter 2: StrideLinx PlatformLinx
Click the GENERATE button, then click the Copy to Clipboard button. Paste this key into a notepad or word document. On the Device details third-tier panel, copy the device serial number.

StrideLinx™ Industrial VPN Routers User Manual 1st Edition, Rev. S 2-39
Chapter 2: StrideLinx Platform
1
2
3
4
5
6
7
8
9
10
11
12
13
14
A
B
C
D
Now, change to the destination Company. Select Tools on the Devices menu list, then click the TRANSFER DEVICE in the second-tier menu and paste the serial number and device key.
If a Datalogging or other subscription is assigned to a device, you will not be able to transfer that device unless the destination company has a license for that subscription available. Note that model SE-SL3001 does not support data logging.
The device should now be successfully transferred to the new company. If a message indicates that the transfer failed, the device may have a data logging or other subscription assigned to it. The new company must have the same subscription service available to assign to the device, or the service must be removed from the device prior to transfer.