cch® prosystem fx® planning user guide · chapter 1 chapter1-introduction cchprosystem...
TRANSCRIPT

CCH® ProSystem fx® Planning
User Guide
December 2015

© 2000-2015, CCH Incorporated and its affiliates and licensors. All rights reserved. Material in this publication may not bereproduced or transmitted, in any form or by any means, without prior written permission. Requests for that permissionshould be directed to:
CCH Incorporated
20101 Hamilton Ave., Suite 200
Torrance, CA 90502
The contents of this publication are believed to be accurate. However, responsibility cannot be assumed for theinformation contained herein, and the consequences resulting from the use thereof. Material in this publication is subjectto change without notice.
This User Manual and the computer software it describes are designed to provide accurate and authoritative informationin regard to the subject matter covered. They are distributed with the understanding that the publisher is not engaged inrendering accounting, legal, or other professional service. If legal advice or other expert assistance is required, theservices of a competent professional should be sought.
“CCH ProSystem fx” is a registered trademark of CCH Incorporated.
"CCH Global fx" is a registered trademark of CCH Incorporated.
"CCH Axcess" is a trademark of CCH Incorporated.
“Windows” is a registered trademark of Microsoft Corporation.
All other brand, product, or company names are trademarks or registered trademarks of their respective owners.

Contents • iii
Chapter 1 - Introduction 1
Guide Usage 1
Features 1
System Requirements 3
Disk Space 3
Workstation/Standalone Installations 3
Network Software 4
File Server 4
Network Clients 4
LAN Processing 5
WAN Processing 5
Network Clients - WAN 5
Monitor Requirements 5
Required Components 5
Web Browser 5
Optional Components 6
Communications 6
Installation 6
Summary and Input Grids 10
Toolbar 11
Customizing the Toolbar 13
General Tax Capabilities 14
Chapter 2 - Configuring Planning 15
Setting up Federal and States 15
Setting Up Federal Options 15
Setting Up State and City Defaults 16
Planning Defaults 18
Print Defaults 18
Configuration Options 19
Setting Preferences 20
Printer Setup 20
Navigation Bar 20
Chapter 3 - Tax Plan File Operations 21
Contents

Contents • iv
Creating a New Plan 21
Opening an Existing Tax Plan 24
Securing a Tax Plan 25
Changing a Tax Plan’s Properties 26
Adding a Case to a Plan 26
Removing a Case from a Plan 26
Re-sequencing a Case 27
Saving a Tax Plan 27
Closing a Tax Plan 27
Importing Tax Data 28
Importing from a Tax Return to an Existing Plan 28
Importing from a Tax Return to a New Plan 29
Exporting Tax Data to Planning from CCH ProSystem fx Tax or CCH AxcessTax 30
Managing Tax Plans 31
Setting Up File Management Default Settings 31
Backing Up Client Data Files 31
Restoring Backed Up Data Files 33
Checking Client Files In/Out (Network Installation) 33
Checking In/Out Files Remotely 35
Abandoning a Checked-out File 36
Chapter 4 - Data Entry & Edit Functions 37
Edit Menu Tools 37
Move or Copy Cells 37
Clear Cells 37
Copy Case/Column 38
Detail Lists 38
Notes 39
Multiple Occurrence Grids Tools 39
Add Item 39
Insert Item 40
Delete Item 40
Expand to Detail 40
Contents

Contents • v
Overrides 41
AutoFlow 41
Calculator 41
Chapter 5 - Print & View Functions 43
Viewing Columns 43
Hiding and Showing Columns 43
Variance Columns 43
Print Functions 44
Creating/Editing a Print Set 45
Printing a Plan Summary 48
Printing a Worksheet 48
Printing a Graph 49
Printing a Letter 49
Printing Input Grids 49
Printing Estimates 49
Printing an Active Grid/Worksheet 50
Printing to a PDF File 50
Printing to Engagement 51
Appendix A - Standard Options 52
Help Options 52
CCH ProSystem fx Planning support on the Web 52
Tutorial 53
Navigation Bar 53
Status Bar 53
Toolbar 53
Tooltips 54
Window Views 54
Contents
Chapter 1
Chapter 1 - Introduct i on
CCH ProSystem fx Planning takes advantage of the features and functionality of Windows®,providing the power and flexibility to meet your tax planning needs efficiently and accurately.
Guide UsageThe following information can help you get the most out of this guide:
Bold words in a step-by-step procedure indicate an action you should take. These usually referto menu commands you use to initiate an operation.
Italics identify the names of dialog components.
Certain familiar operations such as using Help, checking status, and accessing theCustomer Support Web site are explained in the appendix.
The appendix also outlines how to create an export file in Tax Preparation for use with CCHProSystem fx Planning.
FeaturesThe following list can help you familiarize yourself with the system’s features and terminology so youcan use the system effectively:
Spreadsheet format. Working grids display in familiar spreadsheet format and utilize manystandard spreadsheet functions.
Summary grid. Federal and State summary grids display calculated amounts derivedfrom detail grid data, detail lists, or override amounts entered on the summary grid.
Input grid. A grid expanded for a row on the summary grid. Specific grids are availablefor different types of tax information such asAdjustments to Income orWages andBusiness Income.
Worksheets. Worksheets display the calculation of a certain tax amount such asItemized Deductions or Alternative Minimum Tax. These worksheets are a result of dataentered on input grids.
30 cases allowed per tax plan. A case is a scenario or projection, such as investigating theeffects of an IRA deduction or the sale of an asset. Thirty cases are available for each plan.
Chapter 1 - Introduction • 1
INTRODUCTION

Ten planning years available per case. One year prior, the current year, and eight futureyears. Each planning year displays in a column. The years for a case display in consecutivecolumns.
Automatic calculations. The system calculates totals as data is entered. This saves you timeand shows you the effects of a change immediately.
Multiple levels of detail. Fields can expand to further levels of detail to display multipleoccurrence/repeater data.
Grid list. Lists all input grids for easy selection and access. Grids display on the Select Griddialog, which is accessed from the Grids menu or by using the Input Grid button.
Worksheet list. Lists all worksheets for easy selection and access. Worksheets are displayedon the Select Worksheet dialog, which is accessed from the Worksheets menu or by using theWorksheets button.
Configurable reports. Select columns to be included in a report. Variance columns can beincluded and expressed in dollars or percentages.
Right-click pop-up menus. Saves you time by gathering the commands applicable to thecurrent activity into one easily accessible place.
Tooltips. Always available to jog your memory. When the cursor pauses on a toolbar button, atooltip displays the purpose of the button.
Variance grid. A way to compare data from two selected years with the variance expressed indollars or percentages. Data in a variance grid can be edited, and the change is reflected in theappropriate areas of the associated summary grid. Multiple variance grids comparing differentcolumns can be open simultaneously.
Detail lists. Totals automatically transfer to the originating numeric cell. Detail lists allow entryof descriptions and amounts and can be printed. Cells that have lists attached are indicated by agreen marker in the cell’s upper left corner.
Notes. Keep the notes you want for specific fields as field notes or for the plan as a whole as aplan note. Field notes can be printed in configurable reports. Cells that have field notesattached are indicated by a blue marker in the cell’s lower left corner.
Override ability. Amounts may be overridden on the summary grids. The data on associateddetail grids is retained in case an override is cleared. Override amounts display in magenta.
Extensive Help system. Includes system and row-level Help. These Help systems provide themost up-to-date information about system operations.
AutoFlow feature. Eliminates the need for duplicating entries across columns. When AutoFlowis activated, a number entered in a cell is automatically repeated in the same row for thesubsequent case years.
Note: The application retains amounts for subsequent years that are manually enteredwhen the AutoFlow feature is disabled.
Import ability. Saves time when entering data. Data can be imported directly from the CCH®
ProSystem fx® Tax application.
Export Ability. Export directly from CCH ProSystem fx Tax or CCH Axcess™ Tax applicationsas you are preparing returns.
Chapter 1 - Introduction • 2

Pre-configured state tax rates, deductions, exemptions and credits for all states thatallow state income tax. Additional state specific calculations for CA and NY.
Multi-user network access. Allows each workstation to set its own preferences. Files arelocked to prevent concurrent editing of a plan by two users.
Calculator. Ready to work at the click of a button. Totals can be transferred to the current cell,if desired.
Navigation Bar. This option allows you to have the list of input grids or worksheets displayedwhile entering data. The navigation bar can float or be docked vertically on the left or right sideof the window.
To turn the navigation bar on, select View and clickNavigation Bar. A check mark displaysnext to the option.
To display the list of input grids, select Grids from the menu bar, or select theGrid icon on thetoolbar.
To display the worksheet list, selectWorksheets from the menu bar, or select theWorksheets icon from the toolbar.
Only one list can be displayed at a time.
Print to Engagement Binder. Easily print plan forecasts such as worksheets, input grids, plansummaries, plan reports, and estimates to a CCH® ProSystem fx® Engagement or CCH®
ProSystem fx® Workpaper Manager binder.
System RequirementsTo enhance performance when you are running multiple CCH ProSystem fx Office applications, werecommend a PC, Pentium® 4 class or higher, with at least 4 GB of RAM.
Disk SpaceProgram Files - 78.5 MB
Tutorials - 3 MB
Workstation/Standalone Installations32-bit platforms - IBM® 100%-compatible PC, Pentium® 4 class or higher is required
64-bit platforms using AMD™ x86-64 or Intel® EM64T technology
Supported Operating Systems
Microsoft®Windows® 7 Professional or Ultimate SP1 (32-bit or 64-bit)
Microsoft®Windows® 8.1 Professional or Enterprise (32-bit or 64-bit)
Microsoft®Windows® 10 Professional or Enterprise (32-bit or 64-bit)
Chapter 1 - Introduction • 3

Notes:
Starter, Media Center, and Home editions of Windows® operating systems are notsupported.
Windows® 8.1 and Windows® 10 Basic and RT are not supported.
Pen and Touch interface will not be supported at this time.
RAM Requirements
2 GB+ recommended for 32-bit versions of Microsoft®Windows® 7, Microsoft®Windows® 8.1,or Microsoft®Windows® 10.
4 GB+ recommended for 64-bit versions of Microsoft®Windows® 7, Microsoft®Windows® 8.1,or Microsoft®Windows® 10.
Note: Using over 4 GB of RAM on a 32-bit Windows® operating system is not supported.
Network SoftwareMicrosoft®Windows Server® 2008 R2
Microsoft®Windows Small Business Server® 2011
Notes:
Server Core versions of Windows Server® systems are supported as file servers only.Installation must be performed from a compatible client/network operating system.
Domain Controllers are not supported.
Microsoft®Windows Server® 2012 R2
Novell® NetWare™ 5.1 or higher
Linux® (Kernel 2.4.2 or higher, Samba 2.2.3a or higher)
Peer-to-Peer environments (up to 8 workstations) running Microsoft®Windows® 7, Windows®
8.1, or Windows® 10
Note: When running in Peer-to-Peer environments, a dedicated server is required.
File Server100% IBM®-compatible PC, Pentium® III class or higher server required
Memory per network operating system recommendations
Network ClientsUsing the latest version of network clients is recommended:
Microsoft® Client for Microsoft® Networks
Microsoft® Client for NetWare™ Networks
Novell® NetWare™ clients for Windows® 7, Windows® 8.1, or Windows® 10
Chapter 1 - Introduction • 4

LANProcessing10 Mbps or greater (Ethernet)
Note: For optimum performance, 100 Mbps, Full Duplex is recommended throughout yournetwork, including workstation NIC cards, switches, and hubs, and server NIC cards. File cachingmust be turned off for Novell® clients.
WANProcessingMicrosoft®Windows Server 2008® R2 with Remote Desktop Services
Microsoft®Windows Small Business Server® 2011 with Remote Desktop Services
Microsoft®Windows Server® 2012 R2
Citrix® XenApp 6.0
Citrix® XenApp 6.5
Citrix® XenApp 7.5
Network Clients - WANRemote Desktop Connection version 5.2 or higher
Citrix®Online Plug-in version 11 or higher
Monitor RequirementsMulti Monitor display - Multi Monitor support requires the primary monitor to be on the left
Monitor display - small fonts with a minimum screen resolution of 1024 x 768
Colors - 16-bit Colors or greater
Note: To enhance performance when running multiple CCH ProSystem fx applications, werecommend a Pentium® 4 class PC or higher. 2 GB+ is recommended for 32-bit versions ofWindows®. 4 GB+ is recommended for 64-bit versions of Windows®.
Required ComponentsMDAC version 2.8 (or higher) is required on each workstation
Microsoft® Visual C++® 2005 Service Pack 1 Redistributable
Microsoft® Visual C++® 2010 Service Pack 1 Redistributable
Microsoft® Visual C++® 2013 Service Pack 1 Redistributable
Crystal Reports® version 9.0
WebBrowserMicrosoft® Internet Explorer® version 11.0 or higher
Firefox® version 3.0 or higher
Google® Chrome™ version 44.0 or higher
Chapter 1 - Introduction • 5

Opera version 9 or higher
Safari® (for Windows) version 3.0 or higher
Optional ComponentsAdobe® Acrobat® Reader® version 9.x or higher
Microsoft®Office 2010 SP2, Microsoft®Office 2013 SP1 (32-bit or 64-bit), or Microsoft®Office2016 (32-bit or 64-bit)
Microsoft®Office 360™ (must include a desktop version for the installation of CCH ProSystemfx Planning)
CommunicationsHigh-speed Internet connection (DSL or faster) is required for downloading program updates(Software Delivery Manager).
Virus Scan
If running Real Time virus scanning options, exclusion of all CCH ProSystem fx Planning directorystructures is required on workstations and servers.
Compression
CCH ProSystem fx files and folders must be excluded from any data compression.
Laser Printer
HP® III or higher with at least 2 MBRAM
Notes:
GDI/Host based printers are not supported in a Citrix®/Terminal Server environment.
Universal print drivers are not supported.
Installation
Permission Key
A permission key is necessary for your first installation of CCH ProSystem fx Planning and for theinstallation of the initial CCH ProSystem fx Planning release each year. For subsequent installations,the install program reads permission information from your hard drive or network server.
Permission keys are downloaded from our web site. For instructions, please see our Knowledge Basearticle: https://support.cch.com/answerdoc.aspx?id=kb159
Chapter 1 - Introduction • 6
Installing CCH ProSystem fx Planning
1. From the CCH ProSystem fx Planning install wizard welcome screen, clickNext.
2. Choose the type of install you need to complete and clickNext.
Network Install – Installs a version of the planning software to a network drive sothat multiple users can access the information and use shared defaults.
Standalone Install – Installs Planning on the local machine so that only this userwill have access.
Note: Laptop Install and Workstation Setup are used with a NetworkInstall to link additional workstations to the network. These will beused only after the initial network install is completed.
Laptop Install – The Laptop install is designed for users that need to be linked tothe network but also work remotely. When the laptop is connected to the network,it will link to the network install. When the laptop is working remotely, astandalone version is used. When the laptop is linked back to the network, thesystem will sync.
Workstation Setup – Used to connect multiple users to the existing networkinstall.
3. Select the destination Folder:
Select the drive you would like to have planning installed on.
For a standalone install it will likely be the C drive (C:\).
For a network install, click the browse button and locate the drive youneed to install on.
Note: It is recommended the install should be at theroot of the selected drive and on the same drive as thetax install.
If you already have a version of Planning installed, select the drive and thenAccuPlnr folder (For example, on a Network install – K:\AccuPlnr).
Once the drive is selected, clickNext.
4. Install the permission key using one of the following options:
Internet Download – This is the recommended method as well as mostcommon. You will be prompted to log in using your Single Sign On (SSO) user IDand password. These are the same credentials that you use to log into SoftwareDelivery Manager.
Once logged in, the system will pull the needed information.
Chapter 1 - Introduction • 7

Use previously installed permission key – If you are updating your Planningsoftware or re-installing, you can select this option rather than having to log in.
Permission key disk drive path – If you downloaded the permission file orsupport has provided you with a copy of the permission key, user the browserbutton to locate where the file is saved.
From the browse window, Select the FXPERM02 file.
Select Open.
For information on how to download the permission file, please see How do I downloadmy permission key? (Click here).
5. Select Features:
Check the features that you would like to include in the install.
Tutorial – A step-by-step presentation that helps explain how to useplanning.
User Guide – A detailed document that covers setup of planning.
Once you have chosen the features, clickNext.
6. If completing a Network Install, select Planning Default and clickNext:
Firm-Wide Default - Recommended. This option saves the defaults to the folderinstalled on the network. This enables users to have and share the same defaults.
For example, adding a state, modifying rates and setting starting defaults(number of cases, home state and number of years).
Workstation-Specific Default - This option allows users to have and share thesame defaults. These will be saved to the local workstation.
7. Setup Program Folder. By default the system will create a folder titled "CCH ProSystem fxPlanning"; however, you can change the folder name or add to a previously created folder. ClickNext.
8. Click Install to start the installation process.
Note: The install can take several minutes to complete. Since the install will needthe machine to reboot; please make sure that any unsaved items are saved andclosed prior to the next step.
9. Select the "Yes, I want to restart my computer now."
10. Click Finish.
If completing a network install, a workstation setup will need to be run from each of the machines thatneed to have planning installed. There are multiple ways to run a workstation setup, but these stepsensure that it is run from the correct drive.
Chapter 1 - Introduction • 8

1. Select Start > Run > Browse to your Network drive.
2. Select Accuplnr folder.
3. Select Setup.exe.
4. Select Install if you are prompted to install required files.
5. At the InstallationWizard dialog select Next.
6. SelectWorkstation Setup at the Type of Installation dialog.
7. Select Next.
8. Select a local folder for Print and Plan Configuration defaults (applies to Workstation-Specificsetting only.
9. Select Next.
10. Select desired features to include with the installation.
11. Select Next.
12. Select Firm-Wide orWorkstation-Specific Default.
13. Select Next.
14. Select Next button on Select Program Folder dialog.
15. Select Install.
16. Select "Yes, I want to restart my computer now".
17. Select Finish.
Uninstalling CCH ProSystem fx Planning
To uninstall CCH ProSystem fx Planning, complete the following steps:
1. From the Start menu, select Control Panel > Programs and Features.
2. On the Install/Uninstall tab, select CCH ProSystem fx Planning from the list of installedsoftware and clickAdd/Remove. If you are uninstalling a local installation, skip to step 4.
3. Do one of the following:
To uninstall the entire network installation, choose Uninstall Network.
To remove the local program group, icons, and registry entries, choose UninstallWorkstation.
4. A confirmation dialog displays. ClickYes to begin the uninstall program.
5. Click Finish.
Note: You may be prompted to restart your computer. You can choose to restart now or later, butthe computer must be restarted to completely remove Planning program files.
The uninstall program does not remove client data files or output folders.
Chapter 1 - Introduction • 9

Summary and Input GridsGrids display data in a familiar spreadsheet format with many standard spreadsheet capabilities.Refer to the picture below for clarification of each of the items, which explain the presentation ofinformation and functionality within the spreadsheet format.
Customizable case titles span the year columns that are associated with them.
Year columns display the year and the caption assigned to them in File > Plan Properties >Configuration.
The input grid displays the same case and column format as the summary grid.
Expanding columns allow you to view multiple levels of detail for repeater data.
Grid cells with a gray background are unavailable and cannot be edited, as in the case of aheader field.
The blue square in the expand column indicates that there is an input grid associated with thisitem.
The arrow symbol in the expand column indicates detail data is present on the associated inputgrid.
Cells that have lists attached are indicated by a green marker in the upper left portion of the cell.
Cells that have notes attached are indicated by a blue marker in the lower left portion of the cell.
All overridden fields display in magenta.
Negative amounts appear in red.
Chapter 1 - Introduction • 10

This is an example of a summary grid with two levels of input grids beneath it. The Federal Summarygrid expands to theWages and Business Income Summary grid, which in turn expands to theWageInformation grid.
In this example, 20Y1 indicates the start year, 20Y2 and 20Y3 are the subsequent years.
ToolbarThe toolbar’s default location is directly under the menu bar of the application window. It can beturned on or off, resized, moved, or docked vertically to any of the four window edges. In addition, thetoolbar can be customized by adding, removing, or reordering the buttons.
New. (Ctrl + N) Creates a new plan.
Open. (Ctrl + O) Opens an existing plan.
Save. (Ctrl + S) Saves changes without closing the plan.
Import. Imports return data from the CCH ProSystem fx Tax or CCH® Global fx Taxapplication into a new or existing plan.
Chapter 1 - Introduction • 11

Properties. (Ctrl + R) Displays the tax plan properties for the currently active plan.
Print. (Ctrl + P) Allows you to access print selections for printing summary, worksheets,graphs, letters, input grids, and estimates.
Undo. (Ctrl + Z) Reverses the last data entry action.
Cut. (Ctrl + X) Removes data from a selected cell and places it on the Clipboard.
Copy. (Ctrl + C) Copies data from a selected cell to the Clipboard to subsequently paste into acell.
Paste. (Ctrl + V) Inserts cut or copied data from the Clipboard into a selected cell.
Clear Contents. Deletes all contents of a selected cell except any associated notes.
Copy Case/Column. Copies the data from a case or column to another case or column.
Add Item. Adds a new item for entry of multiple occurrence data at the bottom of an existinglist.
Insert Item. Inserts a new item for entry of multiple occurrence data above the item currentlyselected.
Delete Item. Deletes the currently selected item.
List. (Ctrl + L) Allows you to enter a list of numeric entries with descriptions to be attached to acell.
Plan Note. Allows you to open a new note or edit an existing note for the whole plan.
Field Note. (Ctrl + F) Opens a note for the selected cell.
Expand to Detail. (Ctrl + E) Opens the input grid for the currently selected grid row.
View Supporting Worksheets. (Ctrl + W) Allows you to view worksheets that explain thecurrently selected amount.
Input Grids. Opens a list of available input grids from which you canmake your selection.
Worksheets. Opens a list of available worksheets from which you canmake your selection.
AutoFlow. (Ctrl + A) Activates or deactivates the AutoFlow feature.
Calculator. Allows you to access a calculator with the capability to apply calculated amountsto the current cell.
Help Topics. Accesses the system Help file.
Help for Current Row. (F1) Accesses Help specific to the currently active cell of detail grids.
Chapter 1 - Introduction • 12

Customizing the Toolbar
Enabling or Disabling the Toolbar
To turn the toolbar on or off, do the following:
1. Select View.
2. Click Toolbar. A check mark next to this option indicates that it is enabled. The absence of acheck mark indicates that the toolbar is turned off and does not appear on the interface window.
Moving or Resizing the Toolbar
To move or resize the toolbar, do the following:
1. Position the mouse pointer in an empty area on the toolbar.
2. Drag the toolbar to the location you want.
If you move the toolbar to any of the edges of the screen, it docks itself to the new location. Ifyou move the toolbar anywhere else, it becomes a floating toolbar that can be moved andresized as you would a window.
Adding Buttons and Separators to the Toolbar
To add buttons and separators to the toolbar, do the following:
1. Select Tools > Customize Toolbar. The Customize Toolbar dialog displays.
2. Select a button or separator from the Available toolbar buttons list and do one of the following:
ClickAdd. The toolbar dynamically updates itself as you make changes.
Drag the button or separator to the Current toolbar buttons list.
Note: Separators are the thin lines that separate groups of buttons on the toolbar.You can add multiple separators to group buttons as desired.
3. If you want to reposition the button or separator on the toolbar, select it and clickMove Up orMove Down. You can also drag them to a new position.
4. When you have added the desired buttons or separators, do either of the following:
ClickClose to exit and save your changes.
ClickReset and then clickClose to exit without saving your changes. The Reset featurerestores the toolbar to its settings before you opened the Customize Toolbar dialog.Reset does not restore the default toolbar configuration.
Removing Buttons from the Toolbar
To remove buttons from the toolbar, do the following:
1. Select Tools > Customize Toolbar to display the Customize Toolbar dialog.
2. Select an item from the Current toolbar buttons list and clickRemove.
3. Do either of the following:
Chapter 1 - Introduction • 13

ClickClose to exit and save changes.
ClickReset to exit without saving your changes, and then clickClose. The Resetfeature restores the toolbar to its settings before you opened the Customize Toolbardialog. Reset does not restore the default toolbar configuration.
Reordering Buttons on the Toolbar
To reorder toolbar buttons, do the following:
1. Select Tools > Customize Toolbar to display the Customize Toolbar dialog.
2. Select the button (or separator) to be moved in the Current toolbar buttons list and clickMoveUp orMove Down.
3. Do either of the following:
ClickClose to exit and save changes.
ClickReset to exit without saving your changes, and then clickClose. The Resetfeature restores the toolbar to its settings prior to being customized. Reset does notrestore the original default toolbar configuration.
General Tax CapabilitiesYou can rely on CCH ProSystem fx Planning for all of the following tax computations:
Alternative minimum tax
Passive loss limitations
Earned income credit
Self-employment tax
Capital gains tax
Taxable social security
Retirement deductions
Credit limitations
Lump-sum distributions
Kiddie tax
Tax on retirement plans
Estimated tax
Additional Medicare Tax
Net Investment Income Tax
Chapter 1 - Introduction • 14

Chapter 2
Chapter 2 - Conf i guri ng Pl anni ng
You can configure certain default options in CCH ProSystem fx Planning, eliminating the need to setup each tax plan individually.
The federal and state setup is configured at a global level for all users. The other configurationsexplained in this chapter are set up at a workstation level and can be overridden at the plan level ifneeded.
Setting up Federal and States(Tools > Setup Fed and States)
The Federal/State Setup dialog allows you to change preset federal and state parameters. Inaddition, you can add and delete user-defined state information.
Setting Up Federal Options
1. Select Tools > Setup Fed and States.
2. If it is not already selected, click Federal to select it.
3. ClickEdit Setup. The Federal Setup Options dialog opens.
Chapter 2 - Configuring Planning • 15
CONFIGURING PLANNING
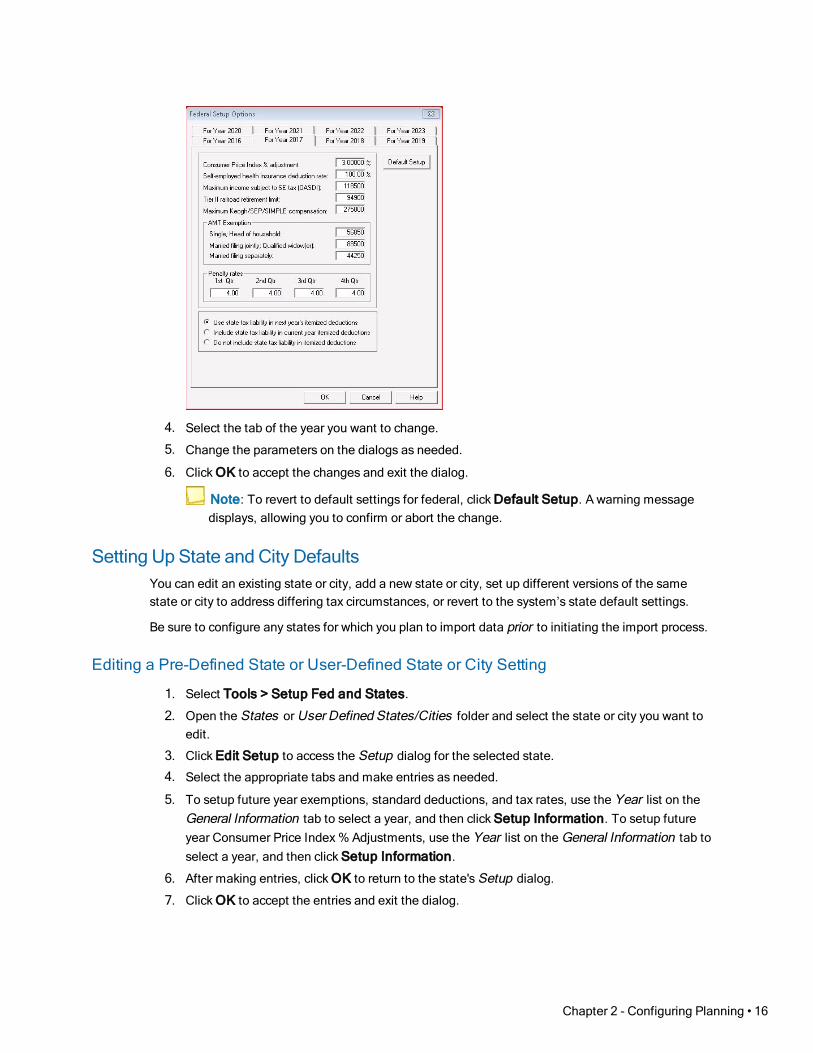
4. Select the tab of the year you want to change.
5. Change the parameters on the dialogs as needed.
6. ClickOK to accept the changes and exit the dialog.
Note: To revert to default settings for federal, clickDefault Setup. A warning messagedisplays, allowing you to confirm or abort the change.
Setting Up State and City DefaultsYou can edit an existing state or city, add a new state or city, set up different versions of the samestate or city to address differing tax circumstances, or revert to the system’s state default settings.
Be sure to configure any states for which you plan to import data prior to initiating the import process.
Editing a Pre-Defined State or User-Defined State or City Setting
1. Select Tools > Setup Fed and States.
2. Open the States orUser Defined States/Cities folder and select the state or city you want toedit.
3. ClickEdit Setup to access the Setup dialog for the selected state.
4. Select the appropriate tabs and make entries as needed.
5. To setup future year exemptions, standard deductions, and tax rates, use the Year list on theGeneral Information tab to select a year, and then clickSetup Information. To setup futureyear Consumer Price Index% Adjustments, use the Year list on theGeneral Information tab toselect a year, and then clickSetup Information.
6. After making entries, clickOK to return to the state'sSetup dialog.
7. ClickOK to accept the entries and exit the dialog.
Chapter 2 - Configuring Planning • 16

Note: You can revert to the default settings for the selected state by clicking DefaultSetup on theGeneral Information tab. A warning message displays, allowing you toconfirm or abort the change in settings. Default Setup is available only for states that arepredefined; any added states do not have this option.
Setting Up California
1. Select Tools > Setup Fed and States.
2. Open States folder.
3. Select CA and clickEdit Setup to access the California Setup dialog.
4. Change the Consumer Price Index % adjustment for each year, if necessary.
Note: You can revert to the system default settings for California by clicking DefaultSetup. A warning message displays, allowing you to confirm or abort the change.
5. ClickOK to accept the changes and exit the dialog.
Setting Up New York
1. Select Tools > Setup Fed and States.
2. Open States folder.
3. Select NY and clickEdit Setup to access the New York SetupOptions dialog.
4. Choose Setup New York State, Setup New York City, or Setup CPI and select OK.
Note: You can revert to system default settings for New York by clicking Default Setup. Awarning message displays, allowing you to confirm or abort the change.
5. On the dialog that displays, select the appropriate tabs and make changes as needed.
New York and New York City CPI % Adjustment Dialog
This dialog allows you to adjust the tax tables, standard deduction and exemption amounts for eachyear using a consumer price index percentage.
These values are cumulatively applied to the amounts entered in the New York and New York Citysetup tabs.
Adding a State or City
1. Select Tools > Setup Fed and States.
2. ClickAdd State to access the Add State/City dialog.
3. Do one of the following:
To add a state, use the Code list to select a state code. The states listed are states thatdo not currently have income tax. The system completes the Name box with the nameof the selected entity.
To add a user-defined state/city, enter a code and name of your choice.
Chapter 2 - Configuring Planning • 17
Note: You can delete a user-defined state or city by selecting the code on theFederal/State Setup dialog and clicking Delete State.
4. ClickOK to display the Setup dialog for the selected state.
5. Select the appropriate tabs and year input screens and make entries as needed.
6. After making entries, clickOK to return to the state'sSetup dialog.
7. ClickOK to accept the entries and exit the dialog.
Planning Defaults(Tools > Planning Defaults)
All planning defaults are established on a workstation level. There are two tabs available to setdefaults for all tax plans: Print Defaults and Configuration.
Print DefaultsPrint Default settings are used for the Plan Summary, Plan Report, and Print This Worksheet. Thesesettings can be overridden when reports are printed for each plan.
To set print defaults, do the following:
1. Select Tools > Planning Defaults. The Configure Planning Defaults dialog displays the PrintDefaults tab.
2. Select one of the following Format options:
Print the reports with a page border. Prints reports with a border. This option is notselected by default.
Print the reports with line references. Prints reference lines for Federal Form 1040and Schedule A, for California Form 540 and Schedule CA, and for New YorkForm IT 201. This option is not selected by default.
3. Select one of the following Footer options:
Customized text. Enter up to 36 characters of text for the footer.
Include date and time stamp. Choose one of the format options: None, Date only, orDate and time to be printed in the footer.
4. In Letter options, choose to use Custom letterhead or enter the information that you want toappear in the first four lines of the correspondence letter.
Notes:
Custom letterhead should be saved as letterhead.pdf in the accuplnr\reports directory.
Custom letterhead will not display in print preview.
5. ClickOK to save the settings and exit the dialog, clickCancel to exit the dialog without savingthe settings, or click the Configuration tab at the top to set the Configuration options.
Chapter 2 - Configuring Planning • 18
Configuration OptionsDefault options are used for all tax plans created after the defaults are set up. Use File > PlanProperties to override these defaults on a plan-by-plan basis.
Set up and configure any states you want to use before setting the default configuration options.
To set configuration options, do the following:
1. Select Tools > Planning Defaults. Click the Configuration tab on the Configure PlanningDefaults dialog.
2. Set the default Tax plan configuration.
No. of cases. The system default is 1. The maximum number allowed is 30. To changethe number of cases, clickAdd Case orRemove Case.
Start year. The system default is the current year.
The number of years available is based on the start year selected. For example, if thecurrent year is chosen as the start year, then nine years are available, which includes thecurrent year plus eight future years. If the prior year is chosen as the start year, then tenyears are available, which includes the prior year, the current year, and eight futureyears.
If the current year is chosen as the start year, then nine years are available, whichincludes the current year plus eight future years. If the prior year is chosen as the startyear, then ten years are available, which includes the prior year, the current year, andeight future years.
No. of years. The system default is 3. Use the drop-down list to select 1 through 10.
The number of years available is based on the start year selected. However, if thenumber of years chosen is greater than the number allowed by the start year entered, thesystem changes the start year to the appropriate year.
The system does not increase the number of years if the start year is changed to anearlier year.
3. Select a case folder. Enter a caption and case description for the case in the Case informationsection. The caption text displays as the case title on the grids.
4. To assign the same state to each year, select the first year and use the State/City list to select adefault state code. You will receive a message to assign the selected state to all subsequentyears in that case.
5. If you want to assign different states to each year, select No on the message and select adifferent state.
6. Enter a caption in the Case year information section. The caption text is used as the title of theyear column on grids and reports.
7. If you want the default number of cases to be more than the system default of one, click asmany times as needed. New cases are added consecutively to the bottom of the list. To removea case, select it and clickRemove Case.
Chapter 2 - Configuring Planning • 19

8. ClickOK to save the settings and exit the dialog, clickCancel to exit the dialog without savingthe settings, or click the Print Defaults tab at the top to set Print Defaults options. See PrintDefaults on page 18 for information.
Setting Preferences(Tools > Preferences)
By default, CCH ProSystem fx Planning plan files (.pln) are stored in the x:\Accuplnr\Plans directory,where x is the drive containing the plan files. You can change the default directory by doing thefollowing:
1. Select Tools > Preferences to display the Preferences dialog.
2. In the User Data Path box, enter the drive and directory where you want to store the plan filessuch as N:\ACCUPLNR\Plans\, or clickBrowse to access a dialog from which to select a driveand directory.
Note: If you enter a directory that does not exist, CCH ProSystem fx Planning prompts tocreate the directory for you.
3. ClickOK to save the setting and exit the dialog or clickCancel to exit the dialog without savingthe setting.
Printer Setup(File > Printer Setup)
CCH ProSystem fx Planning uses the standard Windows® printer setup. If you have questions aboutsetting up a printer, see the Windows® documentation.
Navigation Bar(View > Navigation Bar)
This option allows you to have the list of input grids or worksheets displayed while entering data. Thenavigation bar can float or be docked vertically on the left or right side of the window.
To turn the navigation bar on, select View and clickNavigation Bar. A check mark displays next tothe option.
To display the list of input grids, select Grids from the menu bar, or select theGrid icon on thetoolbar.
To display the worksheet list, selectWorksheets from the menu bar, or select theWorksheets iconfrom the toolbar.
Only one list can be displayed at a time.
Chapter 2 - Configuring Planning • 20
Chapter 3
Chapter 3 - Tax Pl an F i l e Operat i ons
You can create a new plan using File > New or by using File > Import. New plans are configured usingthe default case settings from Tools > Planning Defaults > Configuration and can be changed asneeded. See Chapter 2 - Configuring Planning on page 15 for information on configuring a defaulttax plan and setting federal and state default parameters.
For information on starting a plan by importing data from CCH ProSystem fx Tax or CCH Global fxTax, see Importing Tax Data on page 28.
Creating a New Plan(File > New)
Use this procedure to begin a new plan for a client. To save time, you can set tax plan default settingssuch as federal and state parameters and tax plan configurations before creating new plans. SeeChapter 2 - Configuring Planning on page 15 for detailed information.
To create a new plan, do the following:
1. ClickNew orCtrl + N to display the Tax Plan Properties dialog.
2. Enter plan information as needed. All fields are optional.
Plan name. Enter a name to be used to identify the plan, usually the taxpayer’s name.This name prints on the plan summary, plan report, and data listing.
Plan description. Enter text describing the tax facts and circumstances of the plan. Theplan description does not print on reports.
Prepared by. Enter the preparer’s name or initials. This prints on the first page of theprinted output.
Client ID. If you are creating a plan for a CCH ProSystem fx Tax client, clickSelect TaxClient to display the Select CCH ProSystem fx Tax Client dialog. If not, go to theTaxpayer/Spouse SSN field description below.
Chapter 3 - Tax Plan File Operations • 21
TAX PLAN FILE OPERATIONS

Notes:
Once you click the Select Tax Client button, choose an import location.
If prompted, enter your CCH ProSystem fx user ID and password and clickOK.
If you are importing from CCH Global fx Tax, the dialog box also displays TaxYear, Tax Product, and Office Account (only active for multi-office login).
You can enter a specific client ID or name and clickOK, or you can enter a partial ID or name, orselect an office group or preparer to display a list of clients matching the criteria. On the list thatdisplays, select the client and clickOK.
In either case, taxpayer data such as name and address is completed on the Tax PlanProperties dialog with data from the selected return. Only client data, not tax data, is importedin this operation.
Taxpayer/Spouse SSN. Enter the taxpayer’s and spouse’s Social Security numbers ifthey have not been provided through the Select Tax Client feature.
Taxpayer/Spouse name. Enter the taxpayer’s and spouse’s names if they have notbeen provided through the Select Tax Client feature.
Street address. Enter the street address if it has not been provided with the Select TaxClient feature.
City, state, ZIP. Enter the city, state, and ZIP code if it has not been provided with theSelect Tax Client feature.
Foreign country, province and postal code. Enter the foreign country, province andpostal code if it has not been provided with the Select Tax Client feature.
Primary and secondary email.. Enter the email addresses if they have not beenprovided with the Select Tax Client feature.
3. Click the Configuration tab. The Tax plan configuration options reflect the system defaults orthe defaults set in Tools > Planning Defaults (see Configuration Options on page 19 fordetails). Use the lists to change the options.
In the example, the Start year is indicated as 20Y1. Subsequent years, shown in the CaseYears, are indicated as 20Y2 and 20Y3.
Chapter 3 - Tax Plan File Operations • 22

Start year. The system default is the current year.
The number of years available is based on the start year selected. For example, if thecurrent year is chosen as the start year, then nine years are available, which includes thecurrent year plus eight future years. If the prior year is chosen as the start year, then tenyears are available, which includes the prior year, the current year, and eight futureyears.
Note: Using Option 2 on the Return Processing Options for the CCH ProSystem fxPlanning export method, the starting year should be one year following the currenttax year. For details, see Exporting Tax Data to Planning from CCH ProSystem fxTax or CCH Axcess Tax on page 30.
No. of years. The system default is 3. Use the drop-down list to select 1 through 10.
The number of years available is based on the start year selected. However, if thenumber of years chosen is greater than the number allowed by the start year entered, thesystem changes the start year to the appropriate year.
4. Select a case folder. Enter a caption and case description for the case in the Case informationsection. The caption text displays as the case title on the grids.
5. Click the first case year displayed for Case 1. The State/City box reflects any defaultestablished in the Planning Defaults. Accept the default or use the list to select a different state
Chapter 3 - Tax Plan File Operations • 23

or city code. You will receive a message to assign the selected state to all subsequent years inthat case.
6. Enter a caption in the Case year information section. The caption text is used as the title of theyear column on grids and reports. Repeat steps 5 and 6 for all years in the case.
7. Repeat steps 4 through 6 to customize additional cases.
Note: You can add a case by clicking Add Case. You can remove a case by selecting itand clicking Remove Case.
8. Select the Preparer tab, choose to use custom letterhead or enter the information that you wantto appear in the first four lines of the correspondence letter in the Heading 1 - 4 fields.
Notes:
Custom letterhead should be saved as letterhead.pdf in the accuplnr\reports directory.
Custom letterhead will not display in print preview.
9. ClickOK to exit the dialog and save the settings.
If you are not setting up a plan using CCH ProSystem fx Planning client data, the plan’s FederalSummary displays.
If you are setting up a plan using CCH ProSystem fx Planning client data, a message displaysasking if you want to import tax data.
If you clickNo, the plan’s Federal Summary displays. You can import the tax data laterby selecting File > Import.
If you clickYes, the Applicable Returns dialog displays. Select the appropriate returnfrom the list and clickOK. The import process begins. When the import is complete, theplan’s Federal Summary displays.
Note: The import process does not take place if the return has never been calculated and saved.
Opening an Existing Tax Plan(File > Open)
Tip: The four most recently accessed files are available from the file menu.
To open an existing tax plan, do the following:
1. ClickOpen orCtrl +O to display theOpen dialog.
2. Accept the default path or use the Look in box to select a different path. The Files of typedefaults to CCH ProSystem fx Planning files (.pln).
3. Select one of the listed plans or enter a file name in the File name box. When a plan is selected,the plan information displays in the lower portion of the dialog.
4. ClickOpen to accept a selected plan.
Chapter 3 - Tax Plan File Operations • 24

If another plan is currently open, it is closed and you are given the opportunity to save anychanges that have been made. Once it is closed, the new plan opens.
If the system detects that the plan was created in a prior year release of CCH ProSystem fxPlanning, a message displays, giving you an opportunity to make changes to the years.
If you clickYes, the plan’s Tax Plan Properties dialog opens. Click the Configurationtab to make changes to the years.
If you clickNo, the plan’s Federal Summary opens.
Note: If the plan being opened contains a year that is not supported in the current version of CCHProSystem fx Planning, a message displays, informing you that data in the unsupported planningyears will be deleted. You can make changes to the years in the plan by clicking Change PlanConfiguration on the message dialog.
Securing a Tax Plan(Tools > Security)
You can use a password to secure individual tax plans in CCH ProSystem fx Planning. If you assign apassword to a tax plan, anyone attempting to open the plan must enter the password before beingallowed to access the plan.
If you import data secured in CCH ProSystem fx Tax, you must enter the following information beforeyou can successfully complete the import:
A valid user ID for data secured by a user ID.
The correct password for return data protected by a password.
If you forget the password for a plan, contact CCH Planning Technical Support at1-800-739-9998; option 3; option 5, for assistance.
To secure a tax plan in CCH ProSystem fx Planning, do the following:
1. Select Tools > Security to display the Secure Tax Plan dialog.
2. Select the Secure this tax plan box.
3. Enter any combination of up to 12 alphanumeric characters as a password in the Passwordfield. Spaces are invalid.
Note: The password is case-sensitive.
4. Reenter the password in the Verify field.
5. ClickOK to accept the password.
To remove security from a plan, select Tools > Security and clear the Secure this tax plan box.
Chapter 3 - Tax Plan File Operations • 25

Changing a Tax Plan’s Properties(File > Plan Properties)
A tax plan’s properties are initially determined by default Planning Settings. You can use the followingprocedure to add, remove, or re-sequence cases, or to change captions, start years, or the number ofincluded years.
To change a tax plan’s properties, do the following:
1. From within the tax plan, clickProperties orCtrl +R to display the Tax Plan Properties dialog.
2. Click the appropriate tab to make changes.
3. ClickOK when finished to save the settings. If the changes result in deleting case data, awarning displays. Choose one of the following responses:
ClickYes to confirm your changes. All currently opened plan windows close, and thereconfigured Federal Summary window opens, reflecting the changes.
ClickNo to return to the Tax Plan Properties dialog, then clickCancel to exit withoutsaving the settings.
Adding a Case to a PlanA case added using the following procedure has no data in it. Use the Edit > Copy Case/Column(see Copy Case/Column on page 38) option to copy existing data in other cases/columns into thenew case.
To add a new case, do the following:
1. From within the tax plan, clickProperties orCtrl +R.
2. Click the Configuration tab.
3. ClickAdd Case. A new case is added to the bottom of the list as shown. You can reposition itby dragging it to the desired sequence in the list.
4. Select the case folder. Enter a caption and case description for the case in the Case informationsection. The caption text displays as the case title on the grids.
5. Click the case years and enter state or city codes and captions as needed in the Case yearinformation section. The caption text is used as the title of the year column on grids.
6. ClickOK.
Removing a Case from a PlanTo remove a case, do the following:
1. From within the tax plan, clickProperties orCtrl +R.
2. Click the Configuration tab.
3. Select the case you want to remove.
4. ClickRemove Case.
Chapter 3 - Tax Plan File Operations • 26

5. ClickOK. A confirmation message displays. ClickYes to confirm the deletion or clickNo toreturn to the Tax Plan Properties dialog without removing the case.
Re-sequencing a CaseTo re-sequence a case, do the following:
1. From within the tax plan, clickProperties orCtrl +R.
2. Click the Configuration tab.
3. Reposition cases in the list by dragging them to the desired sequence.
4. ClickOK. The cases are correspondingly re-sequenced in the grids.
Saving a Tax Plan(File > Save and File > Save As)
The Save and Save As options operate in the standard Windows®manner. Use Save to save a newor existing tax plan without closing it. Use Save As when you want to create a new version of anexisting plan.
To save a new or existing tax plan during operations, do the following:
1. Select File > Save or clickSave.
2. New tax plans prompt you with the Save As dialog. Accept the default path as set inTools > Preferences or enter a different path. Enter a file name with a .pln extension. ClickSave to save the plan. The plan remains open.
Existing plans are saved immediately.
To create a new version of an existing tax plan, do the following:
1. Select File > Save As.
2. Select a path and enter a file name. The extension must be .pln.
3. ClickSave to save the file.
Closing a Tax Plan(File > Close)
To close a tax plan file, do the following:
1. Select File > Close. If the file has had no changes made to it since the last save, the file closes.If you have made changes to the plan since your last save, a dialog prompts you to save yourchanges.
2. ClickNo to close the plan without saving changes. ClickYes to save and one of the followinghappens:
Chapter 3 - Tax Plan File Operations • 27

If the file has been saved previously, the plan closes.
If the file is new and has never been saved, the Save As dialog displays. Accept thedefault user data path or select another path. Enter a file name. The extension must be.pln. ClickSave to save and close the file.
Importing Tax Data(File > Import)
This feature allows you to import tax data from CCH ProSystem fx Tax or CCH Global fx Tax. Datacan be imported from a tax return into a new or existing tax plan.
Importing from a Tax Return to an Existing Plan
Note: Be sure to read Exporting Tax Data to Planning from CCH ProSystem fx Tax or CCHAxcess Tax on page 30 before importing files from a tax return.
To import tax data to an existing plan, do the following:
1. Open the plan to which you are importing tax data.
2. Select File > Import or click Import.
3. Amessage displays indicating that data in the columns of the starting tax year will beoverwritten. ClickYes to proceed with the import or clickNo to cancel.
4. Select the version of CCH ProSystem fx Tax that you want to use for the import process:
Note: Select Internet if you want to import from CCH Global fx Tax.
If prompted, enter your user ID and password. The Select CCH ProSystem fx Tax Clientdialog displays.
5. Do one of the following to select a return:
Select specific client. Choose eitherClient ID orClient name, enter the appropriateinformation in the box provided, and clickOK.
Select client by. Use the lists to select anOffice group or Tax preparer to generate alist of clients from which to choose and clickOK.
Note: If you are importing from a CCH Global fx Tax client, the Select CCH ProSystem fxTax Client dialog has additional menus for Tax Year, Tax Product (Individual is the onlychoice), and Office Account (unavailable unless you have multi-office login). You can selectwhich tax year to select clients from (choose from current tax year or previous tax year).
6. On the Applicable Clients dialog, select the appropriate client and clickOK.
7. On the Applicable Returns dialog, select the return and clickOK to initiate the import.
Chapter 3 - Tax Plan File Operations • 28

Notes:
To ensure that the imported data is complete and accurate, the system checks to see ifthe selected return has been calculated and saved. If the return has never beencalculated and saved, the import process is aborted. If the return has had data enteredafter a calculation, you are asked if you want to continue the import process.
If the selected return is protected by a password, the system prompts you to enter thepassword.
8. After the import is complete, select File > Plan Properties to enter plan information and makeany changes to the tax plan configuration.
Importing from a Tax Return to a NewPlan
Note: Be sure to read Exporting Tax Data to Planning from CCH ProSystem fx Tax or CCHAxcess Tax on the facing page before importing files from a tax return.
To import tax data to a new plan, do the following:
1. If a plan is not open or a plan is open but no CCH ProSystem fx Client ID has been identified,select File > Import or click Import.
2. Select the version of CCH ProSystem fx Tax that you want to use for the import process. SelectInternet if you want to import from CCH Global fx Tax.
If prompted, enter your user ID and password. The Select CCH ProSystem fx Tax Clientdialog displays.
3. Do one of the following to select a return:
Select specific client. Choose eitherClient ID orClient name, enter the appropriateinformation in the box provided, and clickOK.
Select client by. Use the lists to select anOffice group or Tax preparer to generate alist of clients from which to choose and clickOK.
If you are importing from a CCH Global fx Tax client, the Select CCH ProSystem fx Tax Clientdialog has additional lists for Tax Year, Tax Product (Individual is the only choice), and OfficeAccount (unavailable unless you have multi-office login). You can select which tax year to selectclients from (choose from current tax year or previous tax year).
4. On the Applicable Clients dialog, select the appropriate client and clickOK.
5. On the Applicable Returns dialog, select the return and clickOK to initiate the import.
Notes:
To ensure that the imported data is complete and accurate, the system checks to see ifthe selected return has been calculated and saved. If the return has never beencalculated and saved, the import process is aborted. If the return has had data enteredafter a calculation, you are asked if you want to continue the import process.
If the selected return is password protected, the system prompts you to enter thepassword.
Chapter 3 - Tax Plan File Operations • 29

6. After the import is complete, select File > Plan Properties to enter the plan information andmake any changes to the tax plan configuration.
Exporting Tax Data to Planning from CCH ProSystem fx Tax orCCH Axcess Tax
To create the export file, do the following:
1. Access the return in CCH ProSystem fx Tax Preparation.
2. Select the Planning export option to use on Return Processing Options.
The following two options control the type of data exported to CCH ProSystem fx Planning. Theselection is made in Return Processing Options, CCH ProSystem fx Planning export methodbox.
1 - Plan begins with the current tax year. This is the default option. Use this optionwhen the tax return year is the same as the start year in CCH ProSystem fx Planning.This export option is not available for CCH Global fx Tax.
Note: Carryovers include items such as capital losses, overpayments applied, netoperating losses (NOLs), estimate payments, passive losses, and state refunds.
2 - Plan begins with following tax year (recurring items and carryover amounts).When using this option, the recurring items and carryover amounts from the return areimported into the column year that would be after the tax return year. For example, whenan export is performed from the current year's tax return, the information will import intothe plan file for the following year (the future year in the case).
Examples of these types of items include:
Most government form line overrides
Self-employment income overrides
Non-aggregated real estate professional activities
Note: To decide which option serves your purposes best, consider the following.Certain input cannot be exported with accuracy and may create inconsistentcalculation comparisons when the return data is exported to the current tax yearcolumn of CCH ProSystem fx Planning.
3. Calculate the return.
4. Do one of the following:
CCH ProSystem fx Tax. Select File > Export > Planning Export. CCH ProSystem fxPlanning launches, creating a new tax plan file using the client's CCH ProSystem fx TaxID as the name. The client's data displays in the summary grid.
CCH Axcess Tax. Select Planning in the Export group on the Import/Export tab.
Chapter 3 - Tax Plan File Operations • 30

5. The system checks the return and does one of the following:
If the return has never been calculated and saved, the export process is canceled.
If the return has been calculated but data has changed since the last calculation, amessage displays asking if you want to continue the export process. Respond Yes orNo.
If the return has had no data changes since the last calculation, CCH ProSystem fxPlanning opens and the data is exported.
The export process begins immediately.
Note: You are prompted for a password when exporting data from a password protected return.
Managing Tax Plans(Tools > File Management)
File management allows you to back-up data files and check files in or out from a network installationof Planning.
Setting Up File Management Default SettingsDefault settings must be set up before you can access any of the file management options. To set upfile management default settings, do the following:
1. Select Tools > File Management > Setup. The File Management Setup dialog displays.
2. Edit the contents of the User ID field if needed.
Note: If this field is blank, it is recommended that you enter an ID. This information is usedfor tracking purposes in the file history maintained for tax plan files.
3. In the File Backup and Restore Paths section, enter a directory path for backup data in theBackup to field or clickBrowse.
4. Edit the contents of the Restore to field or clickBrowse. The default is the Planning datadirectory.
5. In the File Check-in and Check-out Paths section, edit the contents of the Check-in to field orclickBrowse. The default is the Planning data directory.
6. Enter a directory path in the Check-out to field or clickBrowse.
7. ClickOK.
Backing UpClient Data FilesWhen backing up large files it is recommended you use a large capacity storage device such as a harddrive, ZIP drive, CD-RW disk, or USB drive. The backup utility cannot save data for one file overmultiple removable storage mediums.
Chapter 3 - Tax Plan File Operations • 31

To back up client data files, do the following:
1. Select Tools > File Management > Backup. The File Management - Backup dialog displays.
2. In the Source section, the Current path field shows the default tax plan file directory. Edit thisinformation or clickBrowse, if necessary.
3. Select a file from the Files to backup list.
Click individual files to select them.
Hold the Shift key to select consecutive files.
Hold the Ctrl key to select non-consecutive files.
ClickNew/modified files to select all new or recently modified files.
ClickSelect all to select all listed files.
4. Select the Delete source after backup box if you want to delete selected files from the sourcedirectory during the backup process.
5. In the Destination section, the Current path field shows the default backup directory. Edit thisinformation or clickBrowse, if necessary.
6. If you are backing up to a removable media device, select the Removable media box. TheRemovableMedia Label dialog will display. Enter backup detail and clickOK.
Note: This allows you to enter descriptive detail, such as the type of storage device or adisk label, during the backup process.
7. ClickBackup.
Chapter 3 - Tax Plan File Operations • 32

8. ClickClose.
Note: When a file is deleted during the backup process, a History Link file is created. Thisfile contains descriptive detail such as the following:
Date of last modifications
User who backed up the file
Date and location of backup
To view the History Link file detail, select Tools > File Management > Backup, select thefile, and clickShow history. The File History dialog displays the file path, the type of Planningfile, any warnings, and when and by whom the file was last modified.
Restoring Backed UpData FilesTo restore backup files, do the following:
1. Select Tools > File Management > Restore. The File Management - Restore dialogdisplays.
2. In the Source section, the Current path field shows the default backup directory. Edit thisinformation or clickBrowse, if necessary.
3. Select a file from the Files to restore list.
Hold the Shift key to select consecutive files.
Hold the Ctrl key to select non-consecutive files.
ClickSelect all to select all listed files.
Note: ClickShow history to view a selected file’s backup details.
4. In the Restore destination section, the Current path field shows the default tax plan directory.Edit this information or clickBrowse, if necessary.
5. ClickRestore.
6. ClickClose to exit the dialog.
Checking Client Files In/Out (Network Installation)Use Planning’s Check in/out utility to copy data files to any location or storage device, such as a HardDrive, ZIP disk, CD-RW disk, or USB drive. This feature is useful if you need to edit files at a differentoffice location.
When a file is checked out, Planning creates an archive file (.pla) in the application’s data directory.This file can be opened in Read Only mode. You can save an archived file under a different nameusing File > Save As and then edit the content of the newly created file.
After the checked-out file has been checked in, it replaces the archive file and other users again haveaccess to it.
Chapter 3 - Tax Plan File Operations • 33
Checking Out Files to a Local Folder
To check out files to a local folder, do the following:
1. Select Tools > File Management > Check-out. The File Management - Check-out dialogdisplays.
2. In the Source section, the Current path field shows the default tax plan directory. Edit thisinformation or clickBrowse, if necessary.
3. To view a file’s check-in/out details, select it from the list and clickShow history. ClickCloseto return to the File Management - Check-out dialog.
4. Select files for check-out by doing any of the following:
Hold the Shift key to select consecutive files.
Hold the Ctrl key to select non-consecutive files.
ClickSelect all to select all listed files.
5. In the Destination work folder section, the Current path field shows the default check-outdirectory. Edit this information or clickBrowse, if necessary.
6. ClickCheck-out. The file is now checked out. An archive file (.pla) is created in the Planningdata directory. The archive file is Read Only and cannot be edited.
7. ClickClose.
Checking In Files from a Local Folder
To check in a file to a network installation of Planning, do the following:
1. Select Tools > File Management > Check-in. The File Management - Check-in dialogdisplays.
2. In the Source section, the Current path field shows the default check-out directory. Edit thisinformation or clickBrowse, if necessary.
3. To view a file's check-in/out details, select it from the list and clickShow History. ClickCloseto return to the File Management - Check-in dialog.
4. Select files for check-in by doing any of the following:
Hold the Shift key to select consecutive files.
Hold the Ctrl key to select non-consecutive files.
ClickSelect all to select all listed files.
Note: To abandon a checked-out file, see Abandoning a Checked-out File on page 36.
5. In the Destination folder section, the Current path field shows the default check-in directory.Edit this information or clickBrowse, if necessary.
6. ClickCheck-in. The file is now checked in. The updated file is copied back to the Planning datadirectory, replacing the archive file.
7. ClickClose.
Chapter 3 - Tax Plan File Operations • 34
Checking In/Out Files RemotelyThe following procedures are for users working with a remote installation of Planning, such as a laptopuser with a standalone install. This feature allows remote users to check out data from a networkinstallation to their local installation. Once their work is completed they can check in the updated filesto the network installation.
When a file is checked out from the network, it is replaced by an archive file (.pla) that contains theclient’s data. It can be opened in Read Only mode.
Checking Out Files from a Network
Note: Use these instructions only when checking files out from a network to your local installationof Planning.
To remotely check out files from a network installation of Planning, do the following:
1. Select Tools > File Management > Check-out. The File Management - Check-out dialogdisplays.
2. In the Source section, click the Browse button for the Current path field and locate the datadirectory of the Planning network install.
Note: The default directory for Planning client data is Plans (for example,N:\Accuplnr\Plans).
3. To view a file’s check-in/out details, select it from the list and clickShow history. ClickCloseto return to the File Management - Check-out dialog.
4. Select files for check-out by doing any of the following:
Hold the Shift key to select consecutive files.
Hold the Ctrl key to select non-consecutive files.
ClickSelect all to select all listed files.
5. Verify that the directory path of the Destination work folder section is targeted to your local taxplan folder. ClickBrowse, if necessary.
6. ClickCheck-out and then clickClose. You can now edit the file locally.
Checking In Files to a Network
Note: Use these instructions only when checking files in to a network from your local installationof Planning.
To remotely check in files to a network installation of Planning, do the following:
1. Select Tools > File Management > Check-in. The File Management - Check-in dialogdisplays.
Chapter 3 - Tax Plan File Operations • 35

2. Verify that the directory path of the Source section is targeted to your local tax plan folder. ClickBrowse, if necessary.
Note: The default directory for Planning client data is Plans (for example,N:\Accuplnr\Plans).
3. To view a file's check-in/out details, select it from the list and clickShow History. ClickCloseto return to the File Management - Check-in dialog.
4. Select files for check-in by doing any of the following:
Hold the Shift key to select consecutive files.
Hold the Ctrl key to select non-consecutive files.
ClickSelect all to select all listed files.
5. Verify that the directory path of the Destination folder section is targeted to the data directory ofthe Planning network install. ClickBrowse, if necessary.
6. ClickCheck-in. The local work file is copied to the Planning tax plan directory on the network,replacing the archive file.
7. ClickClose.
Abandoning a Checked-out FileUse the following procedure to delete a checked-out file without retaining any edits to it. Theassociated archive file, located in the Planning tax plan directory, is converted into a work file.
To abandon a checked-out file, do the following:
1. Select Tools > File Management > Check-in. The File Management - Check-in dialogdisplays.
2. In the Source section, the Current path field shows the default check-out directory. Edit thisinformation or clickBrowse, if necessary.
3. To view a file's check-in/out details, select it from the list and clickShow History. ClickCloseto return to the File Management - Check-in dialog.
4. Select files to abandon by doing any of the following:
Hold the Shift key to select consecutive files.
Hold the Ctrl key to select non-consecutive files.
ClickSelect all to select all listed files.
5. Select the Abandon check-out box and clickCheck-in.
6. A confirmation dialog displays. ClickYes.
7. ClickClose.
Chapter 3 - Tax Plan File Operations • 36
Chapter 4
Chapter 4 - Data Entry & Edi t Funct i ons
While entering data into a plan, you might find it necessary to add, change, or move someinformation. CCH ProSystem fx Planning uses standard Windows® editing functions for entering andmanipulating data. Some additional tools have been provided for your convenience.
Edit Menu ToolsThe edit features are designed with flexibility and efficiency in mind.
Move or Copy CellsCCH ProSystem fx Planning uses standard Windows® edit commands to cut, copy, paste, and undochanges to individual cells.
To move or copy a cell, do the following:
1. Select the cell you want to move.
2. To move the selection, select Edit > Cut, clickCut, orCtrl +X.
3. To copy the selection, select Edit > Copy, clickCopy, orCtrl +C.
4. Select the cell into which you want to place the cut or copied data.
5. Select Edit > Paste, clickPaste, orCtrl +V. Any existing data is replaced.
Clear Cells(Edit > Clear)
To clear elements from a grid cell, do the following:
1. Select the cell from which you want elements deleted.
2. Select Edit > Clear.
3. Select one of the following options:
All. All values, overrides, lists, and notes associated with the cell are removed.
Contents. All values, overrides, and lists associated with the cell are deleted.
Note: Only clears field note. Does not clear any plan notes.
Chapter 4 - Data Entry & Edit Functions • 37
DATA ENTRY & EDIT FUNCTIONS

Copy Case/Column(Edit > Copy Case/Column)
To facilitate data entry and eliminate redundant data entry, this option can be used to copy data fromone column to another column or from one case to another case. The source data is defined by thecurrent focus when the command is selected. Any calculated data on the detail grid is automaticallyrecalculated.
If the copying is done from a detail grid, only the data on that grid is copied. The data includes allentered input including lists and notes if selected in the dialog.
If the copying is done from the Federal Summary grid, all detail data from supporting detail grids iscopied including lists and notes if selected in the dialog.
To copy a case or column, do the following:
1. Select any cell within the case you want to copy.
2. Click the Copy Case/Column button or right-click and choose Copy Case/Column from themenu to display the Copy Case/Column dialog.
Choose the Current case button and select the Copy options you want included inthe copy operation, or
Choose the Current column button and select the Copy options (Lists and Notesboxes) you want to include in the copy operation.
3. Select the target case from the Copy to list.
4. ClickOK to begin the copy process.
Detail Lists(Edit > Detail List)
Detail lists are available for grid cells and provide a columnar format for recording detail items’descriptions and amounts. The total of the amount column in a detail list automatically transfers tothe originating cell. Lists can be printed from the Print > Print Input Grid option or from the active gridor active worksheet. Cells that have detail lists attached are indicated by a green marker in the upperleft portion of the cell.
To create a new detail list or edit an existing detail list, do the following:
1. Select the cell to which the list applies. Click List orCtrl + L to display the Detail List dialog.
2. Change the List caption if needed.
3. Enter or change items in the Description (up to 16 characters) and Amount fields as needed.PressEnter after every entry to accept the data and update the list total shown at the bottom ofthe dialog.
4. ClickOK to accept the list and have the Total transferred to the originating field orCancel toexit without accepting the list.
Chapter 4 - Data Entry & Edit Functions • 38
To delete a detail list, do the following:
1. Select the cell containing the list you want to delete and click List orCtrl + L.
2. ClickDelete List.
Notes(Edit > Field Notes and Edit > Plan Notes)
Field notes apply to a particular cell and are indicated by a blue marker in the lower left portion of thecell. Plan notes apply to the tax plan in general. Notes can be printed using the Print > Input Gridsoption or from the active grid/active worksheet.
To create a new note or edit an existing note, do the following:
1. To create or edit a field note, select the cell to which the note applies and click Field Note orCtrl + F to display the Field Note dialog.
To create or edit a plan note, select anywhere in the plan to which the note applies and clickPlan Note to display the Plan Note dialog.
2. Enter a caption in the space provided, if appropriate.
3. Enter the note text in the space provided.
4. ClickOK to accept the note or clickCancel to exit without saving the note.
To delete a note, do the following:
1. Access the note you want to delete by doing one of the following:
With the focus on a field to which the note applies, click Field Note orCtrl + F.
Select any cell in the plan to which the note applies, clickPlan Note.
2. ClickDelete Note.
Multiple Occurrence Grids ToolsThe Add, Insert, and Delete Item commands are available on the Edit menu when a multipleoccurrence grid (for example, Wage Information) is open. These functions add, insert, or delete rowsthat contain data, such as the names of employers or the names of dependents.
Add Item(Edit > Add Item)
To add an item, do the following:
1. With the cursor in the list to which you want to add an item, clickAdd Item or right-click andselect Add Item. If you are at the bottom of a list, press the Enter key to add a new item.
The new item is added to the bottom of the existing list and is assigned the next sequentialnumber.
2. Enter the data for the new item in the empty detail grid in the bottom pane of the screen.
Chapter 4 - Data Entry & Edit Functions • 39
Insert Item(Edit > Insert Item)
Insert Item works in the same manner as Add Item, except the inserted item is placed above thecurrently selected field.
To insert an item, do the following:
1. With the cursor immediately below where you want to insert the item, click Insert Item or right-click and select Insert Item. The list is automatically renumbered.
2. Enter the data for the new item in the empty detail grid in the bottom pane of the screen.
Delete Item(Edit > Delete Item)
To delete an item, do the following:
1. Select the item you want to delete and clickDelete Item or right-click and select Delete Item.A confirmation message displays.
2. ClickOK. The item is deleted and the remaining items are automatically renumbered.
Expand to Detail(View > Expand to Detail)
A square in the expand column indicates that you can expand to a detail grid.
This square has an arrow in it if data exists in the detail grid for that row.
To expand to detail, do any of the following:
ClickExpand orCtrl +E on the selected cell.
Click the square icon in the expand column.
Right-click and select Expand to Detail Input from the menu.
Click Input Grids or select Grids to access the Select Input Grid dialog from which you canclick the grid you want to open.
The icons to the left of the grid name indicate if a grid contains information.
Grid contains data.
Grid does not contain data.
Chapter 4 - Data Entry & Edit Functions • 40

OverridesTo override a cell amount derived from data entered on a detail grid, click the amount in the summarygrid’s cell and enter the new number. Override amounts display in magenta.
Note: Override amounts do not always calculate correctly.
If you clear an override, the amount defaults to the original amount. Detail grids associated with theoverridden cell are not deleted when you override an amount.
To remove overrides, do one of the following:
Select Tools > Remove All Overrides.
Select the cell and pressDelete.
Select the cell and select Edit > Clear > Contents.
AutoFlow(Tools > AutoFlow)
The AutoFlow feature copies information entered in a current column to consecutive years within thesame case. For example, if a case has four columns, starting with the first year in the case, anamount entered is automatically repeated for the next three years.
If AutoFlow is enabled when an import or copy column is initiated, the data is also imported or copiedacross all columns. The application retains amounts for subsequent years that are manually enteredwhen the AutoFlow feature is disabled.
To turn AutoFlow on and off, do one of the following:
ClickAutoFlow.
PressCtrl +A.
Select Tools > AutoFlow. A check mark indicates the option is enabled. The absence of acheck mark indicates the option is disabled.
Calculator(Tools > Calculator)
CCH ProSystem fx Planning provides a calculator for standard mathematical functions. Thecalculated totals can be transferred automatically to input fields in the Detail grid.
Chapter 4 - Data Entry & Edit Functions • 41

To use the calculator, do the following:
1. Select Tools > Calculator.
2. Enter your calculation, using the keyboard or mouse.
3. Click the input field to which you want to apply the results.
4. ClickApply and the results populate the input field.
Chapter 4 - Data Entry & Edit Functions • 42

Chapter 5
Chapter 5 - Pri nt & Vi ew Funct i ons
CCH ProSystem fx Planning provides a variety of ways to arrange tax plan data for viewing andprinting. You can do the following:
Hide and show columns.
Show variance columns expressed in dollars or percentages for the Federal Summary data.
View detail information for most fields with one click.
Edit report sets to create customized reports for each client plan.
Choose whether to print the lists and notes associated with the tax plan.
Viewing ColumnsThis feature includes the ability to hide and show columns and to view variance columns.
Hiding and Showing ColumnsTo hide a column, do the following:
1. Place the cursor in the column you want to hide.
2. Select View > Hide Column. Columns are only hidden in the active grid, not on any associateddetail grids.
To show hidden columns, select View > Show All Columns.
Variance Columns(View > Show Variance Columns)
Use this feature to compare the values in any two columns on the Federal Summary grid. Theresulting grid displays the two comparison columns along with the variance columns showing dollarand/or percentage differences. You can display more than one variance grid at a time.
If you make changes to the data in the detail and variance grids, the changes are made dynamically tothe Federal Summary grid.
Chapter 5 - Print & View Functions • 43
PRINT & VIEW FUNCTIONS
To set up variance columns, do the following:
1. Select View > Show Variance Columns to display the View Variances dialog. This dialoglists all the columns (years) in the active plan.
2. Select one or both of the Variance columns types:
Dollar. Calculated by subtracting column one from column two.
Percentage. Calculated by dividing the dollar variance by the column one amount.
3. Drag the two columns you want to compare from the list box to the comparison Column 1 andColumn 2 positions at the bottom of the dialog.
4. ClickOK to open a new window containing the variance grid with the comparison and variancecolumns requested. ClickCancel to exit without viewing the comparison.
Print Functions(File > Print)
The reports available are as follows:
Plan Summary. Prints a summarized version of the plan in a format similar to the Federal andState summary grids.
Worksheets. Prints a more detailed report of the Federal and State summary grids. Offers anoption to print custom worksheet selections.
Graphs. Prints the data points identified in the type of graph selected.
Letter. Prints the correspondence letter in the print output.
Input Grids. Prints the grid currently being viewed, a selection of grids in a plan, or all grids ingrid format.
Estimates. Prints Federal 1040-ES, state estimate forms for California and New York.
Active Grid/Worksheet. Prints the currently active grid or worksheet.
These reports can be configured in the print set. This includes, where applicable, whether to printassociated lists and notes and which case columns should print. With the exception of the Estimatesreport, a report can display up to five case columns. You can also override the Print defaults for pageborder, line references, and footer text that have been set in Tools > Planning Defaults > PrintDefaults.
Chapter 5 - Print & View Functions • 44

In the example, in Case-year selections preview, the Start year is indicated as 20Y1. Thesubsequent year is indicated as 20Y2.
Creating/Editing a Print SetA default set is present upon opening a plan.
The default set will print the plan summary, all worksheets that contain data, and thecorrespondence letter. The first two years of the first case will be printed as well as the dollarand percent variance analysis. The page border and footer options present in the default plansettings will also be applied.
If alternative print settings are desired, you can edit the default set or create a new set. Thedefault set can not be renamed, but new sets can be named whatever you choose.
New sets will start with the same settings as the default set.
To create a new print set or edit a print set, do the following:
1. Select File > Print. The Print Selected Items dialog is displayed.
2. Select either Edit orNew. If editing a print set, the set you want to edit needs to be in the setselection.
Make the appropriate selections on the following tabs on the Edit Print Content Set orCreate PrintContent Set dialog.
Chapter 5 - Print & View Functions • 45

In the example, the Start year is indicated as 20Y1. Subsequent years, shown in the Case Years, areindicated as 20Y2 to 20Y9.
Case-Year Tab
1. The name of the set you are editing will be displayed. If creating a new set, the set name willdefault to "Custom Selections #x". You may change it to anything meaningful to you.
Note: The "Default selections" set name cannot be changed.
2. Move the Case-years to print to the Case-year selections list.
3. Select the Percent and/or Dollar variance options to include in the reports.
Notes:
If you choose to have one type of variance column, you can print to three case-year selections. Ifyou choose to have both types of variance columns, you are limited to two case-year selections.
The option to include line references, located on the Worksheets tab, will also reduce thenumber of case-year selections that can be made. Both variance selections and the linereferences selections cannot be made in the same set.
Chapter 5 - Print & View Functions • 46
Worksheets Tab
1. Check Include plan summary to include the plan summary in the printed output.
2. Choose All with data, Custom selections, orNone to indicate the worksheets to include in theprinted output.
Note: Selected Worksheets will not print if None is selected.
3. CheckPrint page border to print a border around the report.
4. CheckPrint line references to print the tax form line references on each line for the followingforms:
Individual Tax, Page 1 & 2
California Tax, Pg. 1 & 2
New York State, Page 1 & 2
Itemized deductions worksheet, if applicable.
5. Check the Footer option to print a footer on every worksheet.
Enter the Custom footer text to include in the footer.
Select the date and time stamp option to include in the footer.
Graphs Tab
1. Select Include selected graph(s) to include the graphs in the printed output.
2. Choose theGraph(s) to print.
3. Review theGraph(s) type and Y Axis data selections.
Letter Tab
1. Select Include correspondence letter to include the correspondence letter in the printed output.
2. Choose the First projection year to identify the values to be referenced in the letter.
3. Enter desiredGreeting and Closing.
Note:The default greeting is 'Dear Taxpayer First Taxpayer Last and Spouse first Spouselast'. If an alternate greeting is desired, clickUse custom greeting and enter the desiredtext.
4. Select the paragraphs to include in the correspondence letter.
5. Check%Change from base year and/or $ Change from base year to include those values inthe letter text.
6. Select the Base year to use as the baseline when calculating the % and $ variances.
Note: Custom Letterhead will not display in print preview.
Chapter 5 - Print & View Functions • 47

Input Grids Tab
1. Choose All with data, Custom selections, orNone to indicate the Input Grids to include in theprinted output.
Note: Selected Input Grids will not print if None is selected.
2. Check the Print detail lists box to print lists associated with selected grids.
3. Check the Print notes box to print field and plan notes associated with selected grids.
Note: Detail Lists and Notes will not display in print preview.
Estimates Tab
1. Select the Federal estimate box to include the current year 1040ES in the output.
2. Select the California estimate box to include the current year 540ES in the output.
3. Select the New York estimate box to include the current year IT-2105 in the output.
Note: If a current estimate year is not present in the case-year selection on the case-year tab, theoptions will not be available.
Printing a Plan Summary(File > Print)
1. ClickPrint orCtrl +P.
2. Select Last print run orUse existing set in the Select print content section.
3. Verify that Summary is selected in theQuick print section.
4. Review the Case-year selections preview.
5. If necessary, select Edit orNew to modify the report content.
6. Select Preview, Print, To File, or To Engagement (if available).
Printing aWorksheet(File > Print)
1. ClickPrint orCtrl +P.
2. Select Last print run orUse existing set in the Select print content section.
3. Verify thatWorksheets is selected in theQuick print section.
4. Review the Case-year selections preview.
5. If necessary, select Edit orNew to modify the report content. Select theWorksheets tab toupdate the page options or footer options.
6. Select Preview, Print, To File, or To Engagement (if available).
Chapter 5 - Print & View Functions • 48

Printing aGraph(File > Print)
1. Select File >Print .
2. Select Last print run orUse existing set in the Select print content section.
3. Verify that Graphs is selected in theQuick print section.
4. If necessary, select Edit orNew to modify the report content. Select theGraphs tab to updatethe graph(s) to include.
5. Select Preview, Print, To File, or To Engagement (if available).
Printing a Letter(File > Print)
1. Select File > Print.
2. Select Last print run orUse existing set in the Select print content section.
3. Verify that Letter is selected in theQuick print section.
4. If necessary, select Edit orNew to modify the report content. Select the Letters tab to updatethe greeting and closing as well as the data you would like to include in the letter.
5. Select Preview, Print, To File, RTF, or To Engagement (if available).
Note: Custom Letterhead will not display in print preview.
Printing Input Grids(File > Print)
1. ClickPrint orCtrl +P.
2. Select Last print run orUse existing set in the Select print content section.
3. Verify that Input Grids is selected in theQuick print section.
4. Review the Case-year selections preview.
5. If necessary, select Edit orNew to modify the report content. To change your selections for listsand notes, select the Input Grids tab and check in the appropriate boxes in theOptions section.
6. Select Preview, Print, To File, or To Engagement (if available).
Note: Lists and Notes will not display in Print Preview.
Printing Estimates(File > Print)
1. ClickPrint orCtrl +P.
2. Select Last print run orUse existing set in the Select print content section.
3. Verify that Estimates is selected in theQuick print section.
Chapter 5 - Print & View Functions • 49

4. Review the Case-year selections preview.
Note: A current calendar year must exist in the file.
5. If necessary, select Edit orNew to modify the report content. Select the Estimates tab toconfigure which estimates you want to print.
Note: If the case selected is configured for California or New York, the state estimate box isavailable to be checked.
6. Select Preview, Print, To File, or To Engagement (if available).
Printing an Active Grid/Worksheet(File > Print)
To print the active grid/worksheet, do the following:
1. With a grid/worksheet open and active, clickPrint orCtrl +P.
2. Select Last print run orUse existing set in the Select print content section.
3. Select the Active grid/worksheet option in theQuick print section.
4. If detail lists and/or notes are desired, select a set with lists and notes defined on the InputGrids tab. See Printing Input Grids on the previous page for the order in which lists and notesprint. Edit a set or create a new set, if needed.
5. Review the Case-year selections preview.
6. Select Preview, Print, To File, or To Engagement (if available).
Note: Lists and Notes will not display in Print Preview.
Printing to a PDF FileTo print to a PDF file, do the following:
1. Select File > Print.
2. Select the desired print content.
3. Click To File.
4. Select PDF from the File format list.
5. ClickOK.
Chapter 5 - Print & View Functions • 50

Printing to EngagementAdd PDF files created from CCH ProSystem fx Planning reports to a workpaper tab in a CCHProSystem fx Engagement or CCH ProSystem fx Workpaper Manager binder.
To print reports to CCH ProSystem fx Engagement or CCH ProSystem fx Workpaper Manager, youneed to establish the following in Engagement:
You must have a valid Engagement user name and password.
You must be a team member assigned to the binder you want to store the file in.
You must be assigned the rights to create a new workpaper for the binder and the binder mustbe closed.
You must have a licensed version of Engagement for this process.
To export report data to Engagement, do the following:
1. Select File > Printer Setup.
2. Select CCH ProSystem fx Engagement PDF Converter orCCH ProSystem fxWorkpaper Manager PDF Converter.
3. In the Paper section, select a size from the Size drop-down list.
4. Select Portrait or Landscape in theOrientation section.
5. ClickOK.
6. Select File > Print, and then select print options.
7. Select To Engagement.
8. Enter your login information, if necessary, and clickOK.
9. Enter a PDF file name and clickOK.
10. ClickNext on the Insert WorkpaperWizard dialog.
11. Select the document to insert on the Select Documents to Insert dialog and clickNext.
12. In the Local File Room, select the client folder and then the binder where the report PDF file isto be placed.
13. ClickNext.
14. Enter an index number and name. You may keep the default name, which reflects the productname, or enter the PDF file name.
15. Click Finish to display a summary dialog listing the binder, binder tab, and workpaper indexnumber and name.
16. Click Insert if the information is correct. ClickBack to change any of your selections.
Chapter 5 - Print & View Functions • 51

Appendix A
Appendi x A - StandardOpti ons
Help OptionsThe Help system provided in CCH ProSystem fx Planning includes:
Online system Help
Detail grid cell-level tax Help
Access to the Customer Support Web site
Tutorial
To access the online system Help, do the following:
1. Select Help > Help Topics or clickHelp.
2. Use the Contents, Index, or Search tabs to find the topics for which you need help.
To access row Help, do the following:
1. Click a field within a detail grid row.
2. Press F1, click Field Help, or right-click and select Field Help from the menu that displays.
CCHProSystem fx Planning support on theWebThe Customer Support Web site can be accessed by selecting Help > CCH ProSystem fxPlanning support on the Web. The various areas accessible from the submenus are as follows:
Product Home Page
Browse our Knowledge Base
Contact Support
Start a Remote Support Session
My Account
Appendix A - Standard Options • 52
STANDARD OPTIONS
Supported Browsers
Access to the Customer Support Web site requires one of the following browsers:
Microsoft® Internet Explorer® version 11.0 or higher
Firefox® version 3.0 or higher
Google® Chrome™ version 44.0 or higher
Opera version 9 or higher
Safari® (for Windows) version 3.0 or higher
Alternate Access
You can also access the Web site using the following address: http://support.cch.com/.
TutorialTake advantage of the tutorial to get up and running with the program. To access the Tutorial, selectHelp > Tutorial.
Navigation BarThe navigation bar can float or be docked to the left or the right.
To turn the navigation bar on or off, do the following:
1. Select View.
2. ClickNavigation Bar. Select this option to enable the navigation bar or clear the checkmark to disable the navigation bar.
Status BarThe status bar, located in the lower border of the interface window, indicates which operations are inprogress.
To turn the status bar on and off, do the following:
1. Select View.
2. ClickStatus bar. Select this option to enable the status bar or clear the check mark to disablethe status bar.
ToolbarThe toolbar’s default location is directly under the menu bar of the application window. It can beturned on or off, resized, moved, or docked vertically to any of the four window edges.
Appendix A - Standard Options • 53
To turn the toolbar on and off, do the following:
1. Select View.
2. Click Toolbar. Select this option to enable the toolbar or clear the check mark to disable thetoolbar.
TooltipsTooltips are provided for the toolbar buttons. To display the button name, place the cursor on thebutton.
To turn tooltips on and off, do the following:
1. Select View.
2. Click Tooltips. Select this option to activate tooltips or clear the check mark to deactivatetooltips.
Window ViewsTo arrange windows, selectWindow and then one of the following options:
Cascade. Open windows display one on top of the other.
Tile. Arranges open windows according to the Windows® standard. That is, if two windows areopen, they appear one above the other.
Arrange Icons. Arranges minimized grid icons at the bottom of the screen.
To select an open window, select the Window menu and choose from the list of open windowsdisplayed at the bottom of the menu. The active window is indicated with a check mark. You canalso click anywhere on a window to make it the active window.
Appendix A - Standard Options • 54