catia team pdm - catia strona główna · catia team pdm preface ... catia is a mechanical cad...
TRANSCRIPT

CATIA Team PDM
Preface
Getting Started
Basic Tasks
Advanced Tasks
Index
© Dassault Systèmes 1994-99. All rights reserved.

Preface
Overview of PDM
The Need
Next to people, information is your company's most important resource. However, many companies arerealizing that they have become so overwhelmed with the volume of data that need to be stored andmanaged that they need to find comprehensive solutions to overcome their data disorganization. Thisproblem is particularly acute in CAD design shops, where many complex designs and documentsundergo several stages of revision as part of their development cycle. Incorrect revision of outdateddesigns results in the need for additional changes later in the design process.
As your company grows, so do the number of designs, specifications and proposals that are created inthe course of project development, and over a project's entire life cycle. Organizing and managingthese designs in a secure database is of primary importance. In addition, designers and engineersneed to ensure that the correct revision of a part is correctly identified and used during the designstages of a project.
What are the designer's Design Tasks?
The Design Engineer tasks are varied and manifold. The high-pressure world of marketplace deadlinesrequires the design engineer to work efficiently and effectively in accomplishing his or her engineeringgoals.
CATIA is a mechanical CAD application that provides the means to accomplish the design engineer'sprimary tasks:
To create new partsTo assemble component parts into a complete assemblyTo create drawings
What are the basic Data Management tasks?
The engineer designs, redesigns, and ultimately releases documents during the life cycle process. Allof these documents must be managed during all stages of their development and undergo three basicData Management tasks:
File Management: Any file transaction where you save or retrieve any information from a library,a file manager or a database.Revision Management: The tracking of the change process and maintenance of versions duringthe document's lifetime.Acceptance and Release: Accepting a design and authorizing its use for production.
The Solution: PDM
Product Data Management (PDM) enables engineers to manage their documents during all stages oftheir development. Using PDM, you should be able to manage your documents electronically tomaintain, access and modify designs and technical related documents quickly, securely and costeffectively. A PDM should include the following requirements:
Electronic data storage and managementFlexible file organizationSupport of multiple file formats

Document securityTimely access to informationWorkflow automation
CATIA - TeamPDM is a product data management solution that aids the engineer in integrating andsynthesizing the multitude of process events into two fundamental tasks:
Design TasksData Management Tasks
Design Tasks
As the engineer designs Parts, Products, Drawings, the engineer can use the CATIA - TeamPDMoptions to enhance the CATIA capabilities.
For example: The Insert Component option enables the engineer to insert an existing Part or Productinto a new Assembly as a component.
Data Management Tasks
During the Data Management Process, the designer is required to perform activities such as searching,copying, linking, or viewing documents. These sub-tasks are supported in CATIA - TeamPDM.
The example below illustrates CATIA - TeamPDM' convenient support for the various datamanagement sub-tasks. A designer can view, check revisions, and perform many other activities byclicking one of the tabs provided. He can then evoke the dropdown menu to begin the editing process.
Using CATIA - TeamPDM, the engineer functions within an open environment, that is, being able tomanage all engineering data within the CATIA environment.
The CATIA - TeamPDM functionality is deeply integrated and eliminates the time-consuming andbureaucratic process of opening and closing external software in order to perform design and datamanagement tasks.
The example below demonstrates the power of CATIA - TeamPDM functionality:

FIND
SELECT OPERATION

VIEW

What Is CATIA - TeamPDM?CATIA - TeamPDM is a seamless, integrated, "rapidly implementable" drawing and documentmanagement tool for users of CATIA. It gives you the power to manage your Parts, Products andDrawings easily, effectively and affordably, and provides powerful functions to assist you in buildingAssemblies. The CATIA - TeamPDM product data management solution (PDM) is designed to giveyou the tools to create, edit, view and control CATIA documents, in an intuitive and friendly way.
CATIA - TeamPDM is a revolutionary "rapidly implementable" PDM solution. This philosophy standsbehind the product and enables users to install, set up and implement a full fledged Product DataManagement solution very easily and rapidly, while maintaining a broad spectrum of functionality.
CATIA - TeamPDM streamlines the flow of documents through an organization's business process,thereby promoting communication, cooperation and teamwork. CATIA - TeamPDM provides aprocess-oriented approach which enables individuals to work together as a team throughout aproduct's life cycle.
CATIA - TeamPDM comes with a complete database structure designed specifically for CATIA. It alsoprovides CATIA users with the ability to perform advanced searches, maintain revisions and previewdocuments without opening the application that created them.

Features and Benefits
The seamless integration between CATIA and CATIA - TeamPDM enables the CATIA users tostreamline their workflow in the following manner:
Browse through any CATIA - TeamPDM window to view a hierarchical listing of CATIA -TeamPDM documents.View the Profile Card of any document. The Profile Card displays file information, revisioninformation, linked documents as well as thumbnail images of the Part, Product or Drawing.Perform searches to locate any document saved in the CATIA - TeamPDM databaseCreate and save Assemblies. Links are automatically created between the components of anAssembly to reflect their composition in CATIA. During revision management, the integrity of theAssembly and its components is easily maintained.You can view and access these links in the Links page of the Profile card.
Where Used links list all the parents of a document. These links are extremely useful inlocating all the Assemblies in which a specific Part is used.Composed of links list all the children of a document. For example, it lists all thesub-Assemblies (Parts and Drawings) of an Assembly.
Create and save Drawings. Links are automatically created between the Drawing and thePart/Product on which it is based. During revision management, the integrity of the revisions iseasily maintained.
CATIA - TeamPDM Design EnvironmentThe CATIA - TeamPDM design environment provides engineers with quick and easy access to thepowerful CATIA - TeamPDM tools.
The SmarTeam menu provides powerful functionality and enables you to perform the following CATIA -TeamPDM operations.Locate Component
Displays the Profile Card of the selected component.Where Used
Displays a list of the parents of the document.Check Out
Enables you to check out the document from the vault.Check In
Enables you to check in the document to the vault. A copy of the document remains at yourdesktop (in read-only mode).
ReleaseEnables you to release your document, thereby checking it into the Released vault. A copy of thedocument remains at your desktop (in read-only mode).
New ReleaseEnables you to check out a new release version of your document from the Released vault.
OpenOpens the selected Part or Product in a CATIA single Part/Product window.
CATIA - TeamPDM icons are displayed in various CATIA - TeamPDM windows. Each icon displaysthe state of the document and additional information as follows:

The following table describes the CATIA - TeamPDM icons:
Icon Name Description
New A document has been saved but not yet registered.New By Other A document has been saved, and it has not yet been
registered. The document is currently being modifiedChecked Out A document has been checked out. Its current state is
Being ModifiedChecked Out By Other A document has been checked out. Another user has
copied it to his or her desktopChecked In A document has been checked in to the vault. Its current
status is Being ModifiedChecked In, Not Latest A document has been checked in to the vault, but a later
version of the document existsChecked In, UnderOperation
A document has been checked in to the vault. Anotherversion of the document is being modified
Released A document has been checked in to the Released vault.Its current status is Released
Released, Not Latest A document has been checked in to the Released vault,but a later version of the document exists.
Released, Under Operation A document has been checked in to the Released vault.Another version of the document is being modified.
Obsolete A document has been moved to the Obsolete vault.

Preferred Road MapsThis book is intended to the user who needs to become quickly familiar with CATIA -TeamPDM product. The user should be familiar with basic CATIA Version 5 conceptssuch as document windows, standard and view toolbars.
To get the most out of this guide, we suggest you start reading Getting Started. Thenwe suggest you reading the Basic Tasks.

Where to Find More InformationPrior to reading this book, we recommend that you read the CATIA - InfrastructureUser's Guide

Getting StartedCATIA - TeamPDM provides the tools that allow the engineer to effortlessly add Parts and Products tothe engineering database. These tools are in-process and keep you in the design environment at alltimes. This chapter provides brief instructions for adding Parts and Products to the CATIA - TeamPDMdatabase, locating documents and launching them into CATIA.
In order to use the CATIA - TeamPDM features, don't forget to log in using your login name andpassword as registered by the system administrator. Demo users should log in as joe (case sensitive)with no password..
Task

Quick OverviewEach time you create a Part or Product in CATIA, the Part or Product should thenbe saved in the CATIA - TeamPDM database. After the Part or Product is savedin CATIA - TeamPDM, you can use all the CATIA - TeamPDM features to storeand control the documents.
The CATIA - TeamPDM (SmarTeam)integrated menu provides two methods forsaving documents:
Save: Saves the document into the CATIA - TeamPDM database.Save As: Saves the document into the CATIA - TeamPDM database.
and
Defines the project and the parent folder of the document. For example,you can save the new Part as a child of the Standard Parts folder in theConvoyer project.
After you save a new Part or Product:A CATIA - TeamPDM window is automatically displayed which shows thenew document that has been added to the CATIA - TeamPDM database.

Adding Parts and Products to theCATIA - TeamPDM Database
This section provides brief instructions for adding new and existingParts/Products to the CATIA - TeamPDM database.
The first time a Part/Product is added to the database, a Profile Card for thePart/Product is created, and you can fill in the attributes of the document. Eachsubsequent time that you save the Part/Product, the Profile Card is updatedaccordingly.
In order to use the CATIA - TeamPDM features, don't forget to log in usingyour login name and password as registered by the system administrator.Demo users should log in as joe (case sensitive) with no password.
After a Part/Product is added to the CATIA - TeamPDM database, you canuse the many CATIA - TeamPDM features to manage your documents.

Adding a New Part to CATIA - TeamPDMAfter you create a new Part in CATIA V5, you should save it to the CATIA -TeamPDM database.
Create a new Part in CATIA.1. From the SmarTeam menu, choose Save.2. A CATIA Save As window appears. Name the file and click Save.3. A CATIA - TeamPDM Save As window appears. In this window you candefine the project and the parent to which the document belongs.
4.
If this window is not displayed, your administrator has disabled it. Youcan define a project and parent for the document by choosing theSave As option.
Choose a project. The Part will be saved as a document in theselected project.
Choose a parent folder. The Part will be saved as a child of theselected folder in the selected project.
The CATIA file name is displayed.
Click Save.A Part Profile Card is displayed in which you can add relevant information.
Enter a name for the Part in the Description attribute.Select the tabs to review default information about the file.
5.
Click OK. CATIA - TeamPDM automatically saves your file into thedatabase, giving it a unique identity, where it can be easily found for lateruse.
6.
If you want to register the document:From the SmarTeam menu, choose Register. The Register windowis displayed.Fill in the fields (optional) and click OK.
7.

The CATIA window is closed and the document is registered andplaced into the SmarTeam vault.To check the document out or copy its file to your desktop, refer to"Checking Out and Checking In a Document".

Checking Out and Checking In aDocument
After a Part is registered, you must check it out in order to modify it. You maythen check it back into the vault for safekeeping.
You also have the option of copying the file to your desktop. You can view thePart, but you cannot modify it. You may then check it out at a later time (Refer to"Copying Documents To Your Project Desktop" for details).
From the SmarTeam menu, run a search to locate the document (Refer to"Where's the Right document ?" for details).
1.
Right-click on the document and click Edit. A window is displayedprompting you to check out the document. Click OK.
2.
In the displayed Check Out window, fill in the fields and click OK. Thedocument is then displayed at your desktop and you may modify it.
3.
When you have completed your modifications, choose the Save optionfrom the SmarTeam menu.
4.
Then, check the document back into the vault for safekeeping:From the SmarTeam menu, choose Check In.Fill in the fields and click OK. Your document is checked in to thevault and a copy of it remains at your desktop.
5.
If you wish to check out the document again, choose Check Out item fromthe SmarTeam menu.
6.

Copying Documents To Your ProjectDesktop
Instead of checking a document out of the vault, you can copy it to your projectdesktop. The document is then displayed at your desktop in read-only mode.
Run a search to locate your document. (Refer to "Where's the RightDocument ?" for details).
1.
Right-click on the document and choose Copy File. The file is copied toyour desktop in read-only mode.
2.
You can then check out the document in order to modify it, as follows:Select Check Out item from the SmarTeam menu.Fill in the fields in the Copy File window (optional) and click OK. Thedesktop is refreshed and you can now modify the document.
3.
Adding an Existing Part to CATIA -TeamPDM
You may just want to add a file that already exists in CATIA.
Open a Part into CATIA using the CATIA File menu or the folder icon onthe tool bar. The Part is displayed in the CATIA V5 window.
1.
From the SmarTeam menu, choose Save.2. A CATIA - TeamPDM Save As window appears. In this window you candefine the project and the parent to which the document belongs.
3.
A Part Profile Card is displayed in which you can add relevant information.It is recommended to enter a name for the Part in the Descriptionattribute.Select the tabs to review default information about the file.
4.
Click OK. CATIA - TeamPDM automatically saves your file into thedatabase, giving it a unique identity where it can be easily found for lateruse.
5.

Saving a Part AgainEach time you modify a Part in CATIA, you should save the Part using theCATIA - TeamPDM Save (or Save As) option:
Click Save: The Part is saved in the CATIA - TeamPDM database, with allits modifications. Its Profile Card is not displayed at this time.Click Save As: The CATIA - TeamPDM Save As window is displayed. Inthis window, you can define hierarchical links for the Part, namely theproject and parent to which the Part belongs. The Part (together with itsnew hierarchical links) is saved in the CATIA - TeamPDM database.
Open an existing Part in CATIA.1.
You can run a search to locate the Part and then launch it directly intoCATIA V5, as described in "Launching a Document".From the SmarTeam menu, choose Save. The Part is saved in CATIA -TeamPDM and its Profile Card is updated accordingly.
or
Choose Save As. The CATIA - TeamPDM Save As window is displayed.Choose a project. The Part will be saved as a document in theselected project.
Choose a parent folder. The Part will be saved as a child of theselected folder.Click Save. The Part (together with its hierarchical links) is saved inCATIA - TeamPDM and its Profile Card is updated accordingly.
2.
Adding a New Assembly to CATIA -TeamPDM
Adding an Assembly to the CATIA - TeamPDM database is similar to adding aPart.
Display the Assembly in CATIA.1. From the SmarTeam menu, choose Save.2. A CATIA Save As window appears. Name the file and click Save.3. A CATIA - TeamPDM Save As window appears. In this window you candefine the project and the parent to which the document belongs.
Choose a project. The Assembly will be saved as a document in theselected project.
Choose a parent folder. The Assembly will be saved as a child of theselected folder.
The CATIA file name is displayed.Click Save.
4.
A Product Profile Card is displayed in which you can add relevantinformation.
Enter a name for the Product in the Description attribute. Bydefault, this attribute is displayed in the Data Manager tree alongwith the ID number.Select the tabs to review default information about the file.
5.
Click OK. CATIA - TeamPDM automatically saves your Product into thedatabase, giving it a unique identity where it can be easily found for lateruse.In the CATIA - TeamPDM tree hierarchy, all the components of theAssembly are linked as components (children) of the Product. This
6.

hierarchical link reflects the structure of the Assembly as designed inCATIA.If the components of the Assembly have not yet been saved into CATIA -TeamPDM, a Profile Card for each component is displayed, one by one.In each Profile Card, name the component (in the Description field) andclick Add to save the new Parts/Products into the CATIA - TeamPDMdatabase.For example: If a Product has 3 Parts as its components, and thesecomponents have not yet been saved in CATIA - TeamPDM, a Profile Cardfor each Part is displayed.
7.

Adding a Product Using the BatchMethod
The above method could be very time consuming when saving large assemblies.For this reason, CATIA - TeamPDM provides you with a batch method for savingassemblies. The Batch Mode Save does not display a Profile Card during aSmarTeam Save operation. Instead, each component is saved in the CATIA -TeamPDM database with a unique ID number. At a later time, you can open aProfile Card for a component and enter information in the attribute fields.
Display the Assembly in CATIA.1. From the SmarTeam menu, choose Batch Mode Save. A checkmark isdisplayed to the left of the Batch Mode Save option. This action togglesbetween a Batch Mode Save and a regular Save.
2.
From the SmarTeam menu, choose Save. The Assembly and itscomponents are saved into the CATIA - TeamPDM database.
3.
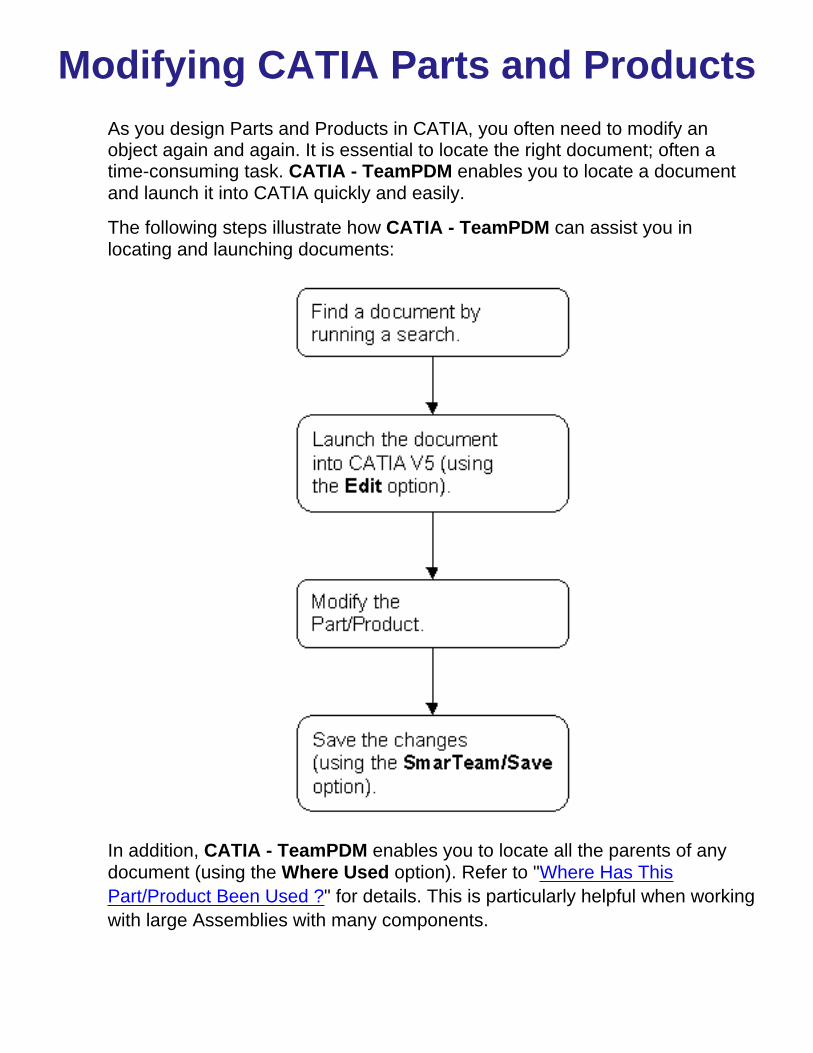
Modifying CATIA Parts and ProductsAs you design Parts and Products in CATIA, you often need to modify anobject again and again. It is essential to locate the right document; often atime-consuming task. CATIA - TeamPDM enables you to locate a documentand launch it into CATIA quickly and easily.
The following steps illustrate how CATIA - TeamPDM can assist you inlocating and launching documents:
In addition, CATIA - TeamPDM enables you to locate all the parents of anydocument (using the Where Used option). Refer to "Where Has ThisPart/Product Been Used ?" for details. This is particularly helpful when workingwith large Assemblies with many components.


Where's the Right Document ? Finding a DocumentCATIA - TeamPDM search tools enable you to find the exact Part or Product that you wish to modify.
From the SmarTeam menu, point to Find and choose Find Document....1. The Search Editor window is displayed. Select one of the predefined searches or create a new search.2. To create a new search:
Point to Add and choose By Attribute.In the displayed Search Details window:
Choose a class of documents
In the right side of the window, define search words in one or more attribute fields.Click Save As ....Enter a name for the search.
3.
Click Run. CATIA - TeamPDM searches for the documents that match the search criteria and displays thesedocuments in a list.
4.

Launching a DocumentNow that you've located the documents that match the search criteria, you can browse through the list ofdocuments. You can view the Profile Card for each document as well as a thumbnail image of each.
When you locate the exact document that you wish to modify, launch it into CATIA. Modify the Part/Productin CATIA and then save it again (using the SmarTeam Save option).
In the search results list, select a document to view its Profile Card.1. Right-click on a document to display a dropdown list of options and choose Edit. The document islaunched into CATIA.
2.
If the document is checked into a vault, you must check it out of the vault in order to open it inCATIA V5. A message is displayed prompting you to check out the document. Click OK.In the displayed Check Out window, click OK to check the document out of the vault. Thedocument is then launched into CATIA.Modify the Part/Product in CATIA.3. From the SmarTeam menu, choose Save to update the Profile Card and save the document in theCATIA - TeamPDM database.
4.

Where Has This Part/Product Been Used ?When you open a Part or Product in CATIA, it is essential to keep track of all the Assemblies that use thisparticular document as a component before you begin to modify the Part/Product. CATIA - TeamPDMenables you to locate all the parents of any document (using the Where Used option). This is particularlyhelpful when working with large Assemblies with many sub-Products and Parts as components.
When you choose the Where Used option, CATIA - TeamPDM displays a window which lists all the parentsof the document. You can then browse through the list to view the parents (Assemblies) of the Part/Product,and you can launch any of these documents into CATIA.
Display a Part/Product in CATIA. Remember you can launch any document using the CATIA -TeamPDM Edit option.
1.
Choose Where Used item in the SmarTeam menu.A Where Used window is displayed listing all the parents of the Part.
2.
You can browse through the list to view the Profile Card of each document. You can also right-click ona document and choose Edit to launch the document into CATIA.
3.

Basic TasksTheme

Working with ProjectsThe CATIA - TeamPDM data structure organizes all data around projects inorder to assist you to browse through the data and locate specific Parts,Drawings or Products. Projects are the highest class in the CATIA - TeamPDMdata structure and are used to represent a product idea or concept. Eachproject has its own Documents tree browser which displays all the documentsassociated with the project in a hierarchical structure, including the CATIAdocuments and related documentation (such as spreadsheets and Word files).

Organizing ProjectsIn general, projects are organized into folders to organize the documentation. When you begin aproject, you create folders and link these folders directly to the project. When you save CATIA Partsand Products, you can save these documents into specific folders.
The CATIA - TeamPDM Documents tree displays a visual representation of the hierarchy, as shownbelow:
In the example above, the folders are the highest level in the hierarchy, directly linked to a project. TheCATIA documents and associated documentation are linked as children of the folders. Each documentis represented by an icon.
As you save Parts, Products and Drawings into the CATIA - TeamPDM database, you can save eachdocument as a child of a specific folder. In this manner, all your documents are organized into foldersand all the folders are linked to a project.

Viewing Documents in a ProjectCATIA - TeamPDM enables you to save documents into a project desktop, thereby linking thesedocuments to the selected project.
Note: When you choose the SmarTeam Save option (or Save As option) check the Link to projectdesktop checkbox in the Object Attributes window.
When you choose the Locate Active Document option from the SmarTeam menu, the document isdisplayed in a Data Manager window.
The Project Desktop icon displayed to the left of the document name shows you that the document islinked to a project, as shown below.
You can then view the projects to which the document is linked by clicking the Projects tab in the Linkspage of the displayed Profile Card.


Saving DocumentsEach time you create a new CATIA Part or Product, the document should besaved into the CATIA - TeamPDM database. You can then use the manypowerful tools offered by CATIA - TeamPDM to properly manage yourdocuments.

CATIA - TeamPDM Save OptionsThe CATIA - TeamPDM integrated menu provides two methods for savingdocuments:
Save: Saves the document into the CATIA - TeamPDM database.Save As: Saves the document into the CATIA - TeamPDM database.andDefines the project and the parent folder of the document. For example,you can save a new Part as a child of the Standard Parts folder in theConvoyer project.
After you save a new Part or Product:A CATIA - TeamPDM window is automatically displayed showing the newdocument that has been added to the CATIA - TeamPDM database.
You do not need to fill in the description field in the Profile Card : by default, CATIA - TeamPDM will use the current name of the document.

Saving AssembliesWhen you save an Assembly into the CATIA - TeamPDM database, its components are automaticallysaved as children of the parent Product. The tree hierarchy changes to reflect the new documents andthe hierarchical links between them. Thus, the inherent relationship between a Product and itscomponents is automatically maintained in CATIA - TeamPDM.
A Products structure within CATIA V5...
... and the corresponding documents tree within CATIA - TeamPDM


Data Structure
CATIA - TeamPDM organizes all documents into classes. Each time you savea CATIA document, it is saved into a specific class. Each class of documentshas its own Profile Card to accurately represent the attributes of the class.
For example, when you save a CATIA drawing, it is saved into the CATIADrawing Class. The Profile Card for the Drawing Class displays attributes ofimportance to drawings.
CATIA - TeamPDM provides a fixed database structure:
Note: In addition to the CAD files class, some of the classes displayed abovemay have sub-classes.
By default, when you save CATIA documents, they are saved into the followingclasses:
When you save a new CATIA Part, the Part will be saved into theCATIA Part Class.When you save a new CATIA Drawing, the Drawing will be saved intothe CATIA Drawing Class.When you save a new CATIA Product, the Product is saved into theCATIA Product Class.

Working with ClassesYour administrator may modify the class structure to suit the needs of yourorganization, as follows:
Your administrator can create additional classes (along with appropriateProfile Cards). For example, your administrator can create a class calledBeta Parts.When you save a document, you can choose a class from a dropdown listof classes displayed in the Profile Card. A new Profile Card for theselected class is displayed, and the document is saved into theappropriate class.
The following scenario illustrates how you can work with several classes:Your administrator defines a new class called Beta Parts.1. You then create a new Part in CATIA V5 and save it by clicking theSmarTeam Save option.
2.
By default, the CATIA Part Profile Card is displayed. In this Profile Card,you can select a different class.
3.
If you select the Beta Parts class, the window refreshes to display a BetaParts Profile Card. When you click OK, the new Part is saved into the BetaParts class.
4.
Each time you create a search, you must select a CATIA - TeamPDM class.When you run the search, CATIA - TeamPDM locates the documents that meetthe search criteria from the specified CATIA - TeamPDM class.
For example: You create a search from the CATIA Parts class, and you definesearch criteria for the search. When you run the search, CATIA - TeamPDM willlocate all the CATIA Parts which meet the specified search criteria.

Finding and Working With Your DocumentsLocating Parts, Products and Drawings is an essential task, but it can be time-consuming when creating complexAssemblies. CATIA - TeamPDM provides a number of powerful functions which enable you to locate a document in theCATIA - TeamPDM data structure.
The following CATIA - TeamPDM tools work together to help you find and modify any CATIA V5 document:
Find Use the Find options to run a search and locate specific documents that match the search criteria. Thesedocuments are listed in a search results list.
Browse Browse through each document in the list. Each time you select a document, its Profile Card is displayed.You can view general attributes of the document as well as its revision history. In addition, you can view athumbnail image of the document in the Viewer page.
View When you locate the exact document that you were searching for, you can launch it directly into CATIAV5, for viewing and inspection.
Edit When you locate the exact document that you were searching for, you can launch it directly into CATIAV5, and modify it accordingly.
Save When you finish your modifications, save the document. The Profile Card (and appropriate revisionhistory) is updated accordingly.

Finding Your DocumentsCATIA - TeamPDM provides several searching tools:
Find Object: This option enables you to view the previously definedsearches. From the Search Editor window, you can:
Run a previously defined search.Modify a search.Create a new search.
Each search may contain numerous search criteria. The results of thesearch are listed in a search results list. You can browse through thedisplayed list and view the Profile Card for each one. You can also selecta document and launch it into CATIA V5.Find Object By Attribute option: This option enables you to create a newsearch. You must choose a CATIA - TeamPDM class and enter searchcriteria for it. You can then run the search to locate the documents in theselected class that match the search criteria.Find Object By Example option: This option enables you to create anadvanced search based on numerous search attributes. You can selecttwo CATIA - TeamPDM classes and define search criteria based on theclass attributes (and their link attributes). You can then run the search tolocate the documents in the selected classes that match the searchcriteria.


BrowsingAfter you run a search, the search results are listed in a search results list. You can then browsethrough the list to identify a specific document.
CATIA - TeamPDM enables you to view CATIA Parts, Drawings and Products in the Viewer page. Thisenables you to browse through the database and view the most recent image of a document, as it isdisplayed in CATIA V5.
Browsing through the Viewer page provides a means of searching and identifying a specific document.For example, after you run a search, the search results are displayed in a list. You can view the imageof each of these documents and launch one into CATIA V5, if you wish.

EditingAfter you locate a document, you can quickly launch it into CATIA V5, as described below:
To launch a document:From any CATIA - TeamPDM window, select a document.1. Right-click to display a drop-down menu and choose Edit.Shortcut: Double-click on the document to launch it into CATIA V5..
If the document is checked into the vault, you must check it out to launch it in CATIA V5.If the document is not saved in the vault, it is immediately launched into CATIA V5.
2.

SavingMake your modifications in CATIA V5 and choose one of the Save options fromthe SmarTeam menu. The document is saved into the CATIA - TeamPDMdatabase, and the Profile Card is updated accordingly.

Safekeeping: Securing Documents ina Vault
CATIA - TeamPDM enables you to maintain and manage any informationrelated to a document throughout its life cycle. By mirroring the physicalprocess of document management, CATIA - TeamPDM uses vaults, check in,check out, and approval functions to manage the life cycle of your Product,Part or Drawing. It creates new versions of a document and protects it fromunauthorized modifications.

Maintaining security and control overdocuments
Maintaining security and control over documents is of the utmost importance and CATIA -TeamPDM provides an electronic vault for this purpose. The electronic vault ensures thatonly those persons with access permission may access a document, and that a documentcannot be accessed by more than one person at a time.
The illustration below displays the life cycle flow of a document:
CATIA - TeamPDM revision management features enables you to:Automate the flow of documents through different stages of development.Control and access the many revisions of a document.Save and restrict access to documents through the use of an electronic vault.
As you revise a Part, Product or Drawing, you can:Check out the document from the vault (using the Check Out option) in order tomodify it and launch it in CATIA - TeamPDM. When a document is checked out of thevault, it can only be modified by the current user.You can also copy a file to your desktop in order to view it. In this case, you cannotmodify the document, and the document remains in the vault. This option is helpfulwhen another user is modifying a document, but you wish to view it in CATIA V5 atyour desktop.

Check in the document to the vault for safekeeping (using the Check In option). Whena document is checked into the vault, it is made publicly available.Release the document by placing the document into the Released vault (using theRelease option). The document can then be checked out for modification, (using theNew Release option) but only as a new revision.
CATIA - TeamPDM ensures that the integrity of the Product and its children is notjeopardized by disabling life cycle operations. The following examples show how CATIA -TeamPDM protects the integrity of a Product.
When you Release a Product, its children must be released as well. For example, if adocument has 10 children, each of these child documents must be assigned theReleased status.You can only move a sub-Product to the Obsolete vault if its parent Product is alsoObsolete. For example, if a Cog is a sub-Product of a Watch, you can only move theCog to the Obsolete vault if the Watch (and all its parents) are also obsolete.You can perform a revision operation on a Product and all its children simultaneously,using the Propagate Operation option. For example, if you wish to check out aWatch and all its 10 sub-Products, you can check them all out simultaneously.You have the option to perform a revision operation on a Product and not on itschildren, or perform a revision operation on a child and not on the parent Product.You can check out a Watch Product from the vault and leave the children in the vault.You can copy the children of a Product to your desktop so that you can view them butnot modify them. The status of the children remains Checked In, while the status ofthe Product is Being Modified.You can check a sub-Product out of the vault independently and leave the parentProduct in the vault.

Life Cycle Menu OptionsThe Life Cycle menu contains the life cycle options which enable you to manage a Part, Product and Drawing as newrevisions are created. From the Life Cycle menu, choose the appropriate operation in accordance with its status in the productlife cycle.
All life cycle operations are controlled and managed by CATIA - TeamPDM, by enabling and disabling different life cycleoptions in the Life Cycle menu. This provides for a logical flow of a Part, Product or Drawing through its life cycle.

When a new document is first saved into the CATIA - TeamPDM database, it has the New status. The document is notplaced into a vault. When you perform the Register operation on the document, it is placed in a vault and cannot be launchedinto CATIA V5 until it is checked out of the vault.
The table below lists the different life cycle operations, the status of the document resulting from each operation, and adescription of each status.Life Cycle Option Selected Resultant
StatusDescription
Click Register to check a newdocument into the vault.
or
Click Check In to place adocument that is being modifiedback in the vault.
Checked In The document is placed in the vault, and it cannot be launched intoCATIA V5. In order to launch it into CATIA V5, the document must bechecked out of the vault. You can copy the file to your desktop inorder to view (but not modify) the document in CATIA V5.
Click Check Out to check out adocument from the vault.
or
Click New Release to make a newcopy of a Released document thatwas placed in the Released vault.The resultant document is a newrevision of the source document.
Being Modified This is a temporary state assigned to a document that has beenchecked out. The document can be launched into CATIA V5 in orderto modify it. No other user can currently modify it, but other users canview it or copy the file to their desktop. After the document is checkedback in or released, the status is replaced by Checked In orReleased.
Click Release to transfer adocument to the Released status.
Released After a stage of development is completed, the document is saved inthe vault of released documents.

Click Obsolete to transfer adocument to the Obsolete status.
Obsolete The document can be accessed by any CATIA - TeamPDM user butcannot be modified. The document is saved in the vault for inactivedocuments.

Document Associations andDependencies

Dependencies/ReverseDependencies
CATIA V5 enables you to create a Drawing based on a Part or a Product. Whenyou save the Drawing into the CATIA - TeamPDM database, a general link isautomatically created between the Drawing and the Part/Product on which it wasbased. This enables you to manage the Drawing together with the Part/Productas you create revisions.
The Drawing and its associated Part/Product are called Associated Objects.CATIA - TeamPDM creates the following relationship between the twodocuments:
Dependency: The Part/Product is a dependency of the Drawing.Reverse Dependency: The Drawing is a reverse dependency of thePart/Product.
For example: In CATIA V5, you create a Drawing named Circuit Drawing basedon a Part named Metallic Circuit. CATIA - TeamPDM creates a link betweenthese two documents as follows:
The Metallic Circuit Part is a Dependency of the Circuit Drawing (sincethe Drawing is dependent on the Part).The Circuit Drawing is a Reverse Dependency of the Metallic CircuitPart.

Revising Associated ObjectsAs you revise your documents, CATIA - TeamPDM protects the relationshipbetween Associated Objects:
A Drawing and its associated Part/Product.
When you perform a life cycle operation on a document (such as Check In orCheck Out), you can display and manage the document's Associated Objects.Each Associated Object is color-coded for easy recognition.
To display Associated Objects:From any life cycle window, right-click to display a dropdown menu.1. Point to Associated Objects and choose the type of object you wish todisplay:
Each Associated Object is color-coded as follows:
2.
Dependencies are displayed in red.Reverse dependencies are displayed in blue.
CATIA - TeamPDM protects the relationship between these Associated Objectsas you make revisions:
Each time you check out a Drawing from a vault in order to revise it, itsdependency (Part/Product) is automatically checked out together with it.When you check out a Part/Product from a vault in order to revise it, youhave the option of viewing and checking out its associated Drawing.
Before you can work with associated documents (dependencies, reversedependencies), an administrator must enable them. The administrator can definedependencies based on a customized class structure.

Advanced Tasks

Managing PartsAfter you create a Part in CATIA V5, save it into the CATIA - TeamPDMdatabase by choosing one of the SmarTeam Save options. This enables youto manage all your Parts using the CATIA - TeamPDM tools.
After you save the Part, check the Part into the SmarTeam vault by choosingthe Life Cycle/Register option. The Part is placed into the Checked In vault.
In order to modify this Part in CATIA V5, you must launch the Part into CATIAV5 (by double-clicking on the Part name or choosing the Edit option). You areprompted to check the Part out of the vault, thereby creating a new version ofthe Part. When you wish to place the Part into the vault for safekeeping, youcan check it back into the vault (using the Life Cycle/Check In option).
In this manner, CATIA - TeamPDM manages and protects all revisions of aPart.
This section provides the following instructions:

Saving a PartEvery CATIA Part should be saved into the CATIA - TeamPDM database. After you create a new Part or modify an existingPart, choose one of the SmarTeam Save options.
The CATIA - TeamPDM integrated menu provides two methods for saving documents:Save: Saves the document into the CATIA - TeamPDM database.Save As: Saves the document into the CATIA - TeamPDM database.andDefines the project and the parent folder of the document. For example, you can save the new Part as a child of theBeta Parts Folder in the Drive Shaft project.
After you choose a SmarTeam Save option, a CATIA Part Profile Card is displayed in the Object Attributes window, as shownbelow. After you fill in the attribute fields and click OK, the Part is saved to the CATIA - TeamPDM database.Your administrator may customize the Profile Card. This window will reflect the appearance of the Profile Card used in yourCATIA - TeamPDM application.
If you choose to work in Batch Mode Save mode (by checking the Batch Mode Save option from the SmarTeam menu), anew Profile Card is not displayed. Instead, the Part is saved to the CATIA - TeamPDM database with the default attributes.You can update the Profile Card attributes at any time.In the Profile Card, the following information is displayed automatically:
ID number: This number is assigned by CATIA - TeamPDM and it must be unique.Values may be entered in some attributes, if your administrator defined default values for this class of Profile Cards.These attributes may be changed.If a file name already exists in CATIA V5, a thumbnail image is displayed.In the Details tab, CATIA file information is displayed.

CATIA - TeamPDM enables you to define the following information in the Profile Card:You can save the Part to a different CATIA - TeamPDM class. A new Profile Card for the selected class is displayed.You can link the Part directly to the CATIA - TeamPDM project desktop.You can define attributes for the Part.
Saving a Part for the First TimeThis process describes how to save a Part to the CATIA - TeamPDM database for the first time. Subsequent saves are

described below.
To save a Part to the CATIA - TeamPDM database:
In CATIA V5, create or open a Part.1. From the SmarTeam menu, choose Save.2. The CATIA V5 Save As window is displayed. Enter CATIA file information and click Save.3. the CATIA V5 Save As window is not displayed if the Part has already a file name.
A SmarTeam Save As window appears. In this window you can define the project and the parent folder to which thedocument belongs.
4.
You can define the level of sub-branches displayed in the project selection tree and/or the object selection tree.

Choose a project from the Project Tree. The Part will be saved as a document in the selected project.
Choose a parent folder from the Object Tree. The Part will be saved as a child of the selected parent folder.For example, you can save the new Part as a child of the Beta Parts folder.
The CATIA file name is displayed (if you already named the file in the CATIA V5 Save As window asdescribed in step 3).
Click Save.The Object Attributes window is displayed with a CATIA Parts Profile Card, as shown above.If you wish to save the Part to a different class, click the arrow to the right of the Select class box and choose a class.
A new Profile Card is displayed in the Object Attributes window.
5.
The classes displayed in the dropdown list are defined by your administrator.
Check the Save in Desktop checkbox to link the Part directly to a project:6.
This option is not displayed in the Object Attributes window if you selected a project and parent link in step 4.
Fill in attributes for the Part and click OK.7. By default, the text entered in the Description field is displayed in the tree browser next to the ID number. It isuseful to assign a meaningful name to the document in the Description field.

Saving a Part After ModificationsAfter a Part is added to the CATIA - TeamPDM database, you are likely to modify the Part in CATIA many times. Each timeyou modify the Part, you must save it using one of the SmarTeam Save options.
Click Save: The Part is saved in the CATIA - TeamPDM database, with all its modifications. Its Profile Card is notdisplayed at this time.Click Save As: The SmarTeam Save As window is displayed. In this window, you can define hierarchical links for thePart, namely the project and parent to which the Part belongs. The Part (together with its new hierarchical links) issaved in the CATIA - TeamPDM database.
To save a Part after modifications:
Open an existing Part in CATIA V5.1.
You can run a search to locate the Part and then launch it directly into CATIA V5
From the SmarTeam menu, choose Save. The Part is saved in CATIA - TeamPDM and its Profile Card is updatedaccordingly.orChoose Save As. The SmarTeam Save As window is displayed.
2.
You can define the level of sub-branches displayed in the project selection tree and/or the object selection tree.Click Options to display the Save Options window and click the Tree Setting tab. Check the appropriatecheckboxes.
Choose a project from the Project Tree. The Part will be saved as a document in the selected project.
Choose a parent folder from the Object Tree. The Part will be saved as a child of the selected parent. For example, youcan save the new Part as a child of the Beta Parts folder.Click Save. The Part (together with its hierarchical links) is saved in CATIA - TeamPDM and its Profile Card is updatedaccordingly.


Managing the Revisions of a PartThis section provides operating instructions for managing the revisions of aPart as follows:

Registering a PartWhen a Part is first saved into the CATIA - TeamPDM database, it is automatically assigned the New status. This means thatthe Part has not yet been checked into a SmarTeam vault.
To protect the Part from modifications, place the Part into the SmarTeam vault by registering it. After the Part is registered,its status is changed to Checked In.
What happens next?To launch the Part into CATIA V5 and modify it, the Part must be checked out. When it is checked out, a new revisionnumber is assigned to it.The Part can be copied to your desktop in read-only mode.
To register a Part
From the SmarTeam menu, point to Life Cycle and choose Register.1.

The Register window is then displayed, as shown below.2.

In the left side of the window, the Register icon appears to the left of the selected document. In the right side of thewindow, the Register window is displayed.Fill in the fields in the Register window, as described in the table below. These fields are optional, and you may keep thedefault.
3.
Click OK to register the Part and exit the Register view, or click Apply to perform the operation and remain in the view.4.
The Part is now placed in the Checked In vault. Note that the status of the document is now Checked In.
The following describes the attributes in the Register window:
Attribute Description

Revision The left revision field is the source revision identifier and the right field is the new revision. You mayenter a different revision identifier in this field although it is not mandatory.
ApplicationReference File Name
Automatically displays the file name as it was created in a CAD system.
File Name You may enter another file name that will be assigned to the file in the vault.Directory The directory path of the vault in which the document will be located is automatically displayed. If you
are using the vault server, the name of the generic server is displayed and the destination vaultdropdown menu enables you to specify the generic destination vault in which the document will belocated.
Phase Click an option from the dropdown list to define the phase of this revision. This field is descriptive onlyand does not affect revision status.
EffectiveFrom/Effective Until
Click the Date button to enter dates in these fields.
Notes You may enter a comment in this field.
Set As Default Click this option to assign the same registration information for all document revisions such as phase,effective dates, and notes.
If you wish to modify the Part and launch it into CATIA, it must be checked out, as described on the following page.
If you wish to copy the Part to your desktop in order to view it in CATIA as a read-only file, refer to "Copying Documents ToYour Project Desktop" for instructions
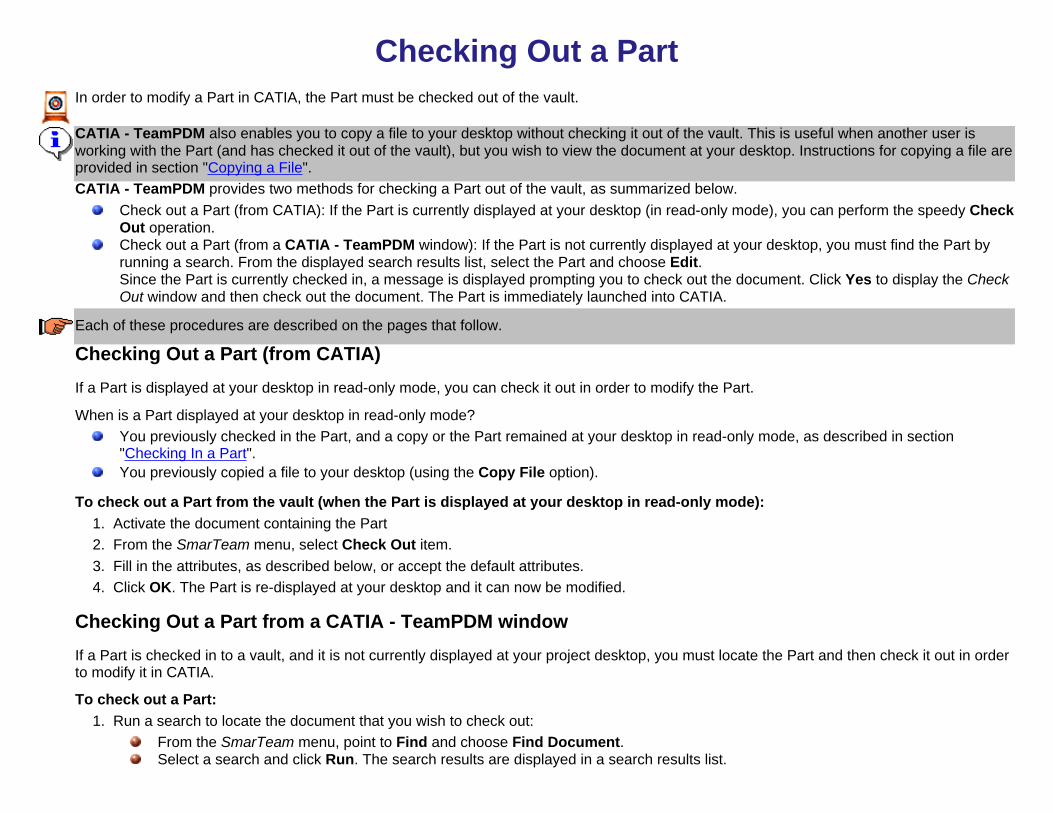
Checking Out a PartIn order to modify a Part in CATIA, the Part must be checked out of the vault.
CATIA - TeamPDM also enables you to copy a file to your desktop without checking it out of the vault. This is useful when another user isworking with the Part (and has checked it out of the vault), but you wish to view the document at your desktop. Instructions for copying a file areprovided in section "Copying a File".CATIA - TeamPDM provides two methods for checking a Part out of the vault, as summarized below.
Check out a Part (from CATIA): If the Part is currently displayed at your desktop (in read-only mode), you can perform the speedy CheckOut operation.Check out a Part (from a CATIA - TeamPDM window): If the Part is not currently displayed at your desktop, you must find the Part byrunning a search. From the displayed search results list, select the Part and choose Edit.Since the Part is currently checked in, a message is displayed prompting you to check out the document. Click Yes to display the CheckOut window and then check out the document. The Part is immediately launched into CATIA.
Each of these procedures are described on the pages that follow.
Checking Out a Part (from CATIA)
If a Part is displayed at your desktop in read-only mode, you can check it out in order to modify the Part.
When is a Part displayed at your desktop in read-only mode?You previously checked in the Part, and a copy or the Part remained at your desktop in read-only mode, as described in section"Checking In a Part".You previously copied a file to your desktop (using the Copy File option).
To check out a Part from the vault (when the Part is displayed at your desktop in read-only mode):Activate the document containing the Part1. From the SmarTeam menu, select Check Out item.2. Fill in the attributes, as described below, or accept the default attributes.3. Click OK. The Part is re-displayed at your desktop and it can now be modified.4.
Checking Out a Part from a CATIA - TeamPDM window
If a Part is checked in to a vault, and it is not currently displayed at your project desktop, you must locate the Part and then check it out in orderto modify it in CATIA.
To check out a Part:Run a search to locate the document that you wish to check out:
From the SmarTeam menu, point to Find and choose Find Document.Select a search and click Run. The search results are displayed in a search results list.
1.

Browse through the list to locate the document you wish to modify.Select the document, and right-click to display a dropdown menu. Choose Edit.2.
A message is displayed prompting you to check out the document.3.

Click OK to continue.The Check Out window is then displayed, as shown below:4.

This window is also displayed when you choose the Life Cycle/Check Out option from the SmarTeam menu.
In the left side of the window, the Check Out icon appears to the left of the selected document. In the right side of the window, therevision number is automatically proposed by CATIA - TeamPDM although you can assign a new revision to the document.Fill in the fields in the Check Out window (optional) and click OK. The status of the document is automatically changed to Being Modified.5. You may now work with the Part in CATIA V5 and modify it. Remember to choose the SmarTeam Save option to save thesechanges and update the Profile Card.
To check the document back into the vault for safekeeping, follow the instructions provided in section "Checking In a Part".
The following describes the fields in the Check Out window:
Attribute Description
Revision The left revision field is the source revision identifier and the right field is the new revision. You mayenter a different revision identifier in this field although it is not mandatory.
New Branch Click this option to enable you to create parallel branches of a revision based on the same file. Eachbranch will be assigned a different revision number consisting of 3 characters (a.0.1 and a.0.2 forexample) instead of the standard revision number consisting of 2 character (a.0 for example).
For example: You may have a document named Pump*55. If the Branching value is Yes, twoseparate users may check out the file and each can create a new revision of this file. Two differentrevision numbers will be assigned to these files respectively (a.0.1 and a.0.2) and they can both bemodified simultaneously.
Note: This field may be disabled according to the life cycle preferences defined by your administratorApplication Reference File Name Automatically displays the file name as it was created in a CAD systemFile Name You may enter another file name that will be assigned to the file in the vaultDirectory The directory path of the vault in which the document will be located is automatically displayed. If you
are using the vault server, the name of the generic server is displayed and the destination vaultdropdown menu enables you to specify the generic destination vault in which the document will belocated
Phase Click an option from the dropdown list to define the phase of this revision. This field is descriptive onlyand does not affect revision status
Notes You may enter a comment in this fieldCopy General links on CheckOut/New Release
Choose Yes from the dropdown list to copy general links from the previous to the newly createdrevision
Copy links to children on Check out Choose Yes from the dropdown list to copy all the links to children in the current revision to the newrevision

Replace local files on Check Outfrom vault
Choose an option from the dropdown list:Yes - to replace all local files that were copied during the Check Out operation.Yes for copied files - to replace the file if a copy was made of this file during an earlieroperation.Ask - to prompt the user before making a copy of the file.
Set As Default Click this option to assign the same check out information for all document revisions such as phase,effective dates, and notes.

Copying a FileYou may choose to copy a file to your desktop rather than checking it out of the vault for a number of reasons:
Another user may be modifying it and you wish to work with it at your desktop as well.You may wish to view it so that you can see how it works together with other documents at your desktop. For example, youmight copy the file of a Product to your desktop in order to view how it works together with various Parts. You can then checkthe Part out from the SmarTeam menu.
To copy a file:You can run a search to locate the document that you wish to copy to your desktop. The search results list displays thedocuments that match the search criteria.
1.
From any CATIA - TeamPDM window, right-click on the document and choose Copy File.2.

The Copy File window is displayed.3.

Fill in the fields in the window and click OK to copy the file to your desktop. The status of the drawing remains Checked In.

Checking In a PartAfter a Part has been checked out and perhaps modified, it must be placed backinto the vault. At this point, you can check the document back into the vault inone of two ways:
Check In, as described below, simply places the document back in theCheck In vault. You can later apply the Check Out operation on thedocument to make further changes.Release, as described in section "Releasing a Part", moves the documentto the Released vault. Thereafter, you can apply the New Releaseoperation on the document to carry out additional changes.
To check in a Part:Activate the document containing the Part you want to check-in1. In the SmarTeam, select Check In item. The Check In window is displayed,as shown below.
2.
You may add comments that will be linked to the part or changeconditions in the life cycle operations.Fill in the fields and click OK. The status of the document is automaticallychanged to Checked In.
3.
The Part is now checked into the vault for safekeeping. A copy of the file remainsat your desktop in read-only mode. You can check it out again in order to edit thePart, as described in section "Checking Out a Part".

Releasing a PartWhen a Part is ready to be moved to the next phase of development, choose theRelease option in order to place it in the Released vault. This is generally donewhen a supervisor releases a stage of development of the document. The Part isthen assigned the Released status. A Part can be Released from the Checked Instatus or the Being Modified status.
Once a Part is placed in the Released vault, it can only be released as a newrevision to ensure the safekeeping of this version of the document. The Part canbe checked out as a New Release with a new revision number.
To release a Part:Display the Part in CATIA.1. In the SmarTeam menu, select Release item.The Release window is then displayed.The fields in the Release window are the same as those in the Check Inwindow.
2.
Fill in the fields and click OK. The status of the document is automaticallychanged to Released in the State field.
3.
To check a Part out of the Released vault, you must use the NewRelease option, as described in section "Checking Out a NewRelease". A new revision of the document is created and thepreviously released revision remains in the vault.

Checking Out a New ReleaseWhen a document has the Released status it can only be taken out of the vaultby clicking the New Release option. This option automatically creates a newrevision of the document, thereby saving the previously Released revision.CATIA - TeamPDM also enables you to copy a file to your desktop withoutchecking it out of the vault. This is useful when another user is working with thePart (and has checked it out of the vault), but you wish to view the Part at yourdesktop. Instructions for copying a file are provided in section "CopyingDocuments To Your Project Desktop".CATIA - TeamPDM provides two methods for checking a New Release out of thevault:
Check out a New Release from CATIA: If the Part is currently displayed atyour desktop (in read-only mode), you can perform the New Releaseoperation from the SmarTeam menu.Check out a New Release (from a CATIA - TeamPDM menu): If the Partis not currently displayed at your desktop, you must find the Part byrunning a search. From the displayed search results window, select thePart and choose Edit.Since the Part is currently checked in, a message is displayed promptingyou to check out the document. Click Yes to display the New Releasewindow and then check out the document. The Part is immediatelylaunched into CATIA.

Moving a document to the ObsoleteVault
When a document becomes obsolete or inactive, you may move it to theObsolete section of the vault. An Obsolete document cannot be changed orreleased.
To move a document to the Obsolete vault:Select the Part document as active document1. In the SmarTeam menu, select Obsolete item. The Obsolete window isdisplayed. The fields in the Obsolete window are identical to the fields inthe Check In window.
2.
Fill in the fields and click OK. The status of the document is automaticallychanged to Obsolete.
3.

Managing AssembliesBuilding Assemblies can be very time-consuming, since much of your time isspent in searching for existing components and placing them in Assemblies.CATIA - TeamPDM provides powerful tools to assist you in building yourassemblies:
Find options: Use the SmarTeam Find options to locate Parts andProducts.Copy File option: As you build your Assembly, you can copyParts/Products to your desktop to view how they fit together with thecurrent Assembly.Insert Component options: When you wish to insert an existing Part orProduct as a component of the current Product, use the InsertComponent option. CATIA - TeamPDM inserts the component into thecurrent Product. When you save the Assembly, the components aresaved as children of the Assembly. In this way, CATIA - TeamPDMaccurately reflects the structure of your Assembly.Save option: If you created new Parts as components of the Assembly,CATIA - TeamPDM will save each of these Parts/Products into theCATIA - TeamPDM database when you save the Assembly. A ProfileCard for each document is displayed. After these components aresaved, the Profile Card for the Product is displayed. In this manner, youcan save the Product and its components.Batch Mode Save option: CATIA - TeamPDM provides you with abatch method for saving assemblies. The Batch Mode Save does notdisplay a Profile Card during a SmarTeam Save operation. Instead,each component is saved in the CATIA - TeamPDM database with aunique ID number. At a later time, you can open a Profile Card for acomponent and enter information in the attribute fields.
This section provides the following instructions:


Building an AssemblyThe Insert Component option enables you to insert existing Parts/Assemblies as components of the current Assembly.
To insert a component:Display an Assembly structure in CATIA V5.1. From the SmarTeam menu, choose Insert Component and point to Find Document.2.
The Search Editor window is displayed, as shown below:3.

Choose a search and click Run.4. You can also modify a search or define a new search. Refer to "Searching for Documents" for instructions

In the displayed window, choose a document and click OK.5.
The document is inserted into the assembly structure.6.

Saving a ProductEvery CATIA Assembly should be saved into the CATIA-TeamPDM database.After you create a new Assembly or modify an existing one, choose one of theSmarTeam Save options. Then, register the Assembly by choosing the LifeCycle/Register option. The Assembly is then placed into the Checked In vault.
The CATIA-TeamPDM integrated menu provides two methods for savingAssemblies:
Save: Saves the Assembly into the CATIA-TeamPDM database. Refer tosection "Saving a Part" for details.Save As: Saves the Assembly into the CATIA-TeamPDM database.andDefines the project and the parent folder of the document. For example,you can save the new Assembly as a child of the Technical Assembliesfolder in the Drive Shaft project.After you choose a SmarTeam Save option, a CATIA Product Profile Cardis displayed in the Object Attributes window. After you fill in the attributefields, click OK. The Assembly is saved to the CATIA-TeamPDMdatabase.Since the process of saving a Part is identical to that of saving anAssembly, refer to the following pages for detailed instructions:
To save a document for the first time, section "Saving a Part for theFirst Time"To save a document for subsequent saves, section "Saving a PartAfter Modifications"
Saving the Components of an Assembly
When you save an Assembly, CATIA-TeamPDM automatically saves thecomponents of the Assembly as well:
If the components of the Assembly are already saved into theCATIA-TeamPDM database, then the Save option updates the ProfileCards for all the components to reflect any modifications that were madeto the components as well as the hierarchical link between the Assemblyand its components.

If the components of the Assembly are new and have not yet been savedto the CATIA-TeamPDM database, then each of these components will besaved to CATIA-TeamPDM one by one.
A Profile Card for each component is displayed (in the ObjectAttributes window). Fill in the Profile Cards, and click OK.After each component is saved, a Profile Card for the Assembly isdisplayed (in the Object Attributes window). Fill in the Profile Card,and click OK.
CATIA-TeamPDM enables you to save the components of an Assembly withoutdisplaying each Profile Card. This can save you a great deal of time.CATIA-TeamPDM provides two methods for batch saving components:
From the SmarTeam menu, choose Batch Mode Save. Then, save theAssembly using the Save or Save As option. CATIA-TeamPDM saves allthe components but does not display a Profile Card for each one.From the SmarTeam menu, choose Save As. In the Save As window,click the Options tab to display the Save Option window. In the Save tab,check the checkboxes and click OK.

Managing the Revisions of a ProductThis section provides operating instructions for managing the revisions of anAssembly as follows:

OverviewAs you work with an Assembly, you can make continuous revisions to it. CATIA-TeamPDM protects and manages theserevisions in the same manner as a Part.
However, an Assembly is more complex than a Part since it consists of many components. It is essential to maintain theintegrity of an Assembly by performing life cycle operations on the Assembly and its children, in coordination with each other.CATIA-TeamPDM ensures that the integrity of the Assembly and its children is not jeopardized by disabling life cycleoperations.
In addition, CATIA-TeamPDM provides several life cycle options which can help you manage your Assembly. These life cycleoptions are described in section "Life Cycle Options for Managing an Assembly".
For example:You can choose the Propagate Operation option to check in or check out the Assembly and its components at thesame time.You can choose the Relatives Being Modified option to view the parents or children of the document that arecurrently being modified.You can choose the Show Parents option to display the parents of a document. You can then select parents andcheck them out as well
These life cycle options are only available when you choose Check Out or Check In from the SmarTeam menu.They are not available when you check out/in a document from the CATIA menu.
The following examples show how CATIA-TeamPDM protects the integrity of an Assembly.When you Release an Assembly, its children must be Released as well. For example, if an Assembly has 10sub-Assemblies, each of the sub-Assemblies must be assigned the Released status.You can only move a sub-Assembly to the Obsolete vault if its parent Assembly is also Obsolete.To perform a revision operation on an Assembly and all its children simultaneously, CATIA-TeamPDM provides thePropagate Operation option. For example, if you wish to check out a Stump Preacher Guitar and all its 10sub-Assemblies, you can check them all out simultaneously.You have the option to perform a revision operation on an Assembly and not on its children, or perform a revisionoperation on a child and not on the parent Assembly.For example, you can check out a Stump Preacher Guitar Assembly from the vault and leave the children in the vault.You can copy the children of an Assembly to your desktop so that you can view them but not modify them. The statusof the children remains Checked In, while the status of the Assembly is Checked Out.You can check a sub-Assembly out of the vault independently and leave the parent Assembly in the vault.


Registering a ProductWhen a Product is first saved into the CATIA-TeamPDM database, it is automatically assigned the New status. Thismeans that the Product has not yet been checked into a SmarTeam vault.
To protect the Product from modifications, place the Product into the SmarTeam vault by registering it. After the Productisregistered, its status is changed to Checked In.
When you register the Assembly, you can register the Product and all its components simultaneously using the PropagateOperation option. Refer to section "Propagate Operation" for details.
To register an Assembly:From the SmarTeam menu, point to Life Cycle and choose Register.
The Register window is then displayed, as shown below.
1.

In the left side of the window, the Assembly and its components are displayed with the Register icon to the left of theselected document. In the right side of the window, the Register window is displayed.To register the Assembly and all its components together, right-click on the Assembly to display a dropdown menuand choose Propagate Operation.
2.
Fill in the fields in the Register window (optional) and click OK. Refer to section "Registering a Part" for a descriptionof these fields.The Assembly is now placed in the Checked In vault. Note that the status of the Assembly is now Checked In.
3.


Checking In/Checking Out/Releasing a ProductSince the process of checking in and checking out an Assembly is quite similar to the life cycle operations on a Part, we will onlyprovide a brief description of each life cycle operation. Instead, we will describe the unique features provided byCATIA-TeamPDM which enable you to manage the Assembly, together with its components, as you create revisions.
For each life cycle operation, you can:Check out/in an Assembly and all its components together. For example, you can check out the Ski Draft Assembly and its10 components.You can check out/in an Assembly and handle each component individually. For example, you can check out an Assemblyand copy all its components to your desktop.
Handling Components
CATIA-TeamPDM enables you to manage an Assembly and its components.
You can:Check out an Assembly and copy all its components to the desktop.Perform the same life cycle operation (Check Out, Check In, Release) on the Assembly and all its children, by choosingthe Propagate Operation option, as described in section "Propagate Operation".Handle each component individually. For each component, you can:
Check in or check out the component together with its parent Assembly.Copy the component to the desktop. The child remains in its current state.Choose No Operation for the component. The No Operation option enables you to maintain a sub-Assembly in itspresent state while performing a revision operation on the Assembly (or vice versa).
For example: You wish to insert a new Part into an Assembly to replace an existing Part. You can check out the Assembly, andcopy all the Parts to your desktop, except the Part you wish to replace. For that Part, choose the No Operation icon.
When you click OK, the Assembly will be checked out of the vault, and all the children except one will be copied to your desktop.In CATIA-TeamPDM, you can replace the old Part with a new Part at your desktop to see how it affects the Assembly as awhole.
Checking Out an Assembly (from CATIA)
If an Assembly is displayed at your desktop in read-only mode, you can choose to check it out in order to modify it.CATIA-TeamPDM enables you to do so.
To check out an Assembly:Display the Assembly in SolidWorks (in read-only mode).1.

To check out a document: Select a document (Assembly or Part), in SmarTeam menu, select Life-Cycle then chooseCheck Out. In the displayed Check Out window, fill in the fields and click OK.
2.
At your desktop, you can view the assembly and its components. Those documents that were checked out may be modified.After you modify the document, remember to choose a SmarTeam Save option.
Checking Out an Assembly from a CATIA-TeamPDM window.
If an Assembly is checked in to a vault, and it is not currently displayed at your desktop (in read-only mode), you must locate theAssembly and then choose Edit in order to launch it into CATIA and modify it.
In the displayed Check Out window, you can right-click to display a dropdown menu which provides several life cycle options.These life cycle options can assist you in managing your Assembly. Refer to section "Life Cycle Options for Managing anAssembly" for details.
To check out an Assembly:Run a search to locate the Assembly that you wish to check out.1. Select the document, and right-click to display a dropdown menu. Choose Edit.2.

A message is displayed prompting you to check out the document. Click Yes to continue.3. The Check Out window is then displayed, as shown below:4.

This window is also displayed when you choose the Life Cycle/Check Out option from the SmarTeam menu.
In the left side of the window, the Check Out icon appears next to the Assembly and the Copy File icon appears nextto the components.
The default operation for the components (Check Out or Copy File) is determined by the administrator.

You can define an operation for each component as follows:Click on the icon of a document to display a list of options. This list differs for each life cycle operation, as shownbelow:
OrClick on the icon of the document to choose an operation. The icon toggles between three states:
5.
Fill in the fields in the displayed revision window, and click OK.The following example shows how sub-Assemblies are handled individually during the Check Out operation:
6.

Checking In/ Releasing an Assembly
CATIA-TeamPDM provides two methods for checking in or releasing an Assembly:Check in the Assembly and its components from any SmarTeam window. You must select each document one by one andcheck it in (or Release it).This method is identical to the checking in a Part as described in section "Checking In a Part". Below is a quick summary.
Select the Part or Assembly and choose SmarTeam/Check In or Release. The Check In (Release) window isdisplayed, as shown in section "Checking In a Part".
1.
Fill in the fields and click OK. The status of the document is automatically changed to Checked In. The Assembly isnow checked into the vault for safekeeping. A copy of the file remains at your desktop in read-only mode.
2.
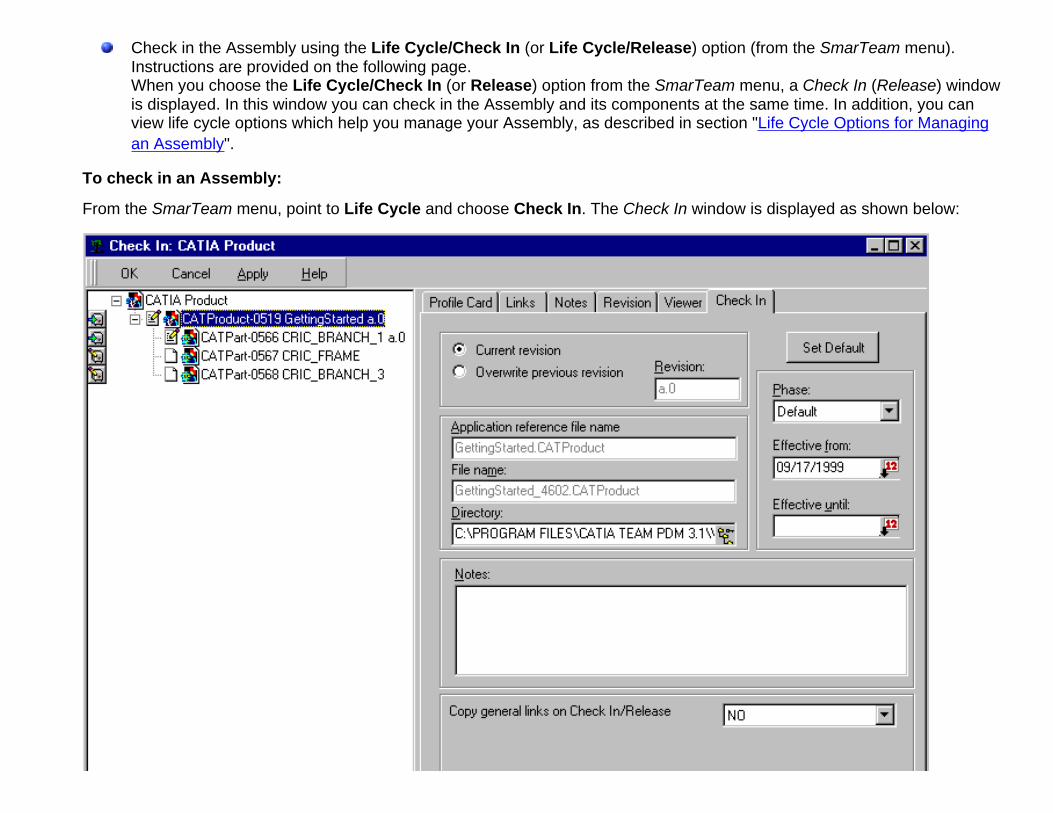
Check in the Assembly using the Life Cycle/Check In (or Life Cycle/Release) option (from the SmarTeam menu).Instructions are provided on the following page.When you choose the Life Cycle/Check In (or Release) option from the SmarTeam menu, a Check In (Release) windowis displayed. In this window you can check in the Assembly and its components at the same time. In addition, you canview life cycle options which help you manage your Assembly, as described in section "Life Cycle Options for Managingan Assembly".
To check in an Assembly:
From the SmarTeam menu, point to Life Cycle and choose Check In. The Check In window is displayed as shown below:

On the left side of the window, the Assembly and its components are displayed. You canCheck in all the documents together:
Right-click and choose Propagate Operation.1. The Check In icon is displayed next to each component in the tree.2. Fill in the fields in the Check In window (optional) and click OK.3. The Assembly and its components are checked in to the vault. A copy of these documents does not remain at yourdesktop.
4.
Handle each component individually:Click on the icon of a document to display a list of options. This list differs for each life cycle operation, as shownbelow:
OrClick on the icon of the document to choose an operation. The icon toggles between three states:
1.
Fill in the fields in the displayed window and click OK.2.

Life Cycle Options for Managing an AssemblyYour Assemblies are often complex with numerous sub-Assemblies. As you manage the revisions of the Assembly,you must keep track of the status of the revisions of the parents and children of each Assembly. CATIA-TeamPDMprovides several life cycle options that can assist you in this task.
Overview
From the SmarTeam menu, point to Life Cycle and choose a life cycle operation (Check Out for example). In thedisplayed window, right-click on a document to display a dropdown menu. A list of life cycle options is displayed. Thislist differs according to the life cycle window being displayed, as shown below:
These life cycle options are displayed in the Check Out/New Release Window.

These life cycle options are displayed in the Check In/Approve window.

These life cycle options are displayed in the Register window.
The life cycle menus include the following life cycle options:Feature Description Example
AssociatedObjects
Enables you to view those documents that arelinked as dependencies or reversedependencies to the selected document. Youcan then perform life cycle operations on theseAssociated Objects. Refer to the "Managingthe Revisions of a Drawing" section for acomplete description.
In CATIA-TeamPDM, a Drawing (StumpPreacher Guitar Drawing) was created basedon a Stump Preacher Guitar Drawing. Whenyou check out the Stump Preacher GuitarDrawing you can view and manage itsdependency (the Stump Preacher GuitarDrawing).
PropagateOperation
Performs the same life cycle operation on theAssembly and all its children. Refer to section"Propagate Operation" for operatinginstructions.
When you register an Assembly, you canregister all the children simultaneously.
Relatives CheckedOut
a document that are currently Checked Out.Refer to section "Relatives Being Modified" forinstructions.
When you manage an Assembly, you can viewa list of its parents or children that are currentlybeing modified (checked out) in the RelativesBeing Modified window. This is particularlyhelpful when you wish to release an Assembly,since all its documents must first be checkedin.
Show Parents Displays the parents of a document in aseparate window. You can then select theparents that you wish to check out as well.Refer to section "Show Parents" forinstructions.
When you check out a Part that is a child of afew different Assemblies, the Show Parentwindow displays the parents of the selecteddocument and their revision status. You canthen choose the Assemblies that you wish tocheck out together with the Part.
Switch to LatestRevision
Enables you to check out the latest revision ofa document. Refer to section "Switch to LatestRevision" for instructions.
When you check out a Part that has numerousrevisions, the Switch to Latest Revisionoption automatically checks out the mostrecent revision.
Replace Revision Enables you to choose a different revision of adocument and perform a life cycle operation onit. This option also enables you to link thelatest revision of the sub-Assemblies to theAssembly being checked out. Refer to section"Replace Revision" for instructions.
When you check out a Part that has threerevisions, you can replace the displayedrevision with a different one.
Also, when you check out an Assembly, youcan link it to the latest public revision of eachof its sub-Assemblies.
Link Parents ofPrevious Revision
Enables you to link the current Part/Assemblyto a different Parent (with a previous revisionnumber).
When you check in a Part after modifying it,you can link the Part to a previous revision ofthe parent Assembly (rather than the currentrevision of the parent Assembly).
Each of these life cycle options is described below.
Propagate Operation: Performs the same life cycle operation on the Assembly and all its children.
To propagate an operation:In any life cycle window, right-click on an Assembly and choose Propagate Operation. The icons of all thechildren change to reflect the revision operation to be performed.
1.
Fill in the fields in the revision window (optional). Click Apply to perform the operation and remain in the view,or click OK to perform the operation and exit the view.
2.
Relatives Being Modified: Displays the parents or children of a document that are currently Checked Out.
To show the relatives being modified:

From the Check Out/New Release window, right-click on a document (not its icon) to display a dropdown menu, andchoose the Relatives Being Modified option. The relatives (parents or children) that are currently in the Checked Outstate are displayed.
The icon represents a parent.
The icon represents a child.
Show Parents: Displays the parents of a document in a separate window. You can then select the parents that youwish to check out as well.
To show (and check out) the parents of a document:From any Check Out/New Release window, right-click on a document (not its icon) to display a dropdown menu,and choose the Show Parents option. The Select Parents window displays the parents of the selecteddocument.
1.
To check out the parents, select the parents in the Select Parents window and click OK.2.
Use the Shift Key to select multiple parents.
The parents are added to the list in the Check Out window and will be checked out together with thesource document.
Switch to Latest Revision: Checks out the latest revision of a document.
To switch to the latest revision:
In the Check Out/New Release window, the Switch to the Latest Revision option enables you to check out the latestrevision of a document.
A window opens displaying the newly created revision.
Replace Revision: Enables you to choose a different revision of a document and perform a life cycle operation on it.Enables you to link the latest revision of the sub-Assemblies to the Assembly being checked out
A document can have several revisions as it is checked in and checked out of the vault. If you are currentlyperforming a life cycle operation, such as Check Out, on one of the revisions, you can check out a different revisionof the document in its place.
During the development of an Assembly, its children may undergo several revisions. When you check out theAssembly, you can check out the latest revision of its children.
The Replace Revision option enables you to replace the following:
Replace the document selected for the Check Out/New Release operation, using the ReplaceRevision/Select option. For example, if you selected to check out the Part phone b.1, and then chooseReplace Revision/Select, you can check out a different revision of the Part, such as b.2 or b.3.Replace the children of the Assembly being checked out, using the Replace Revision/Revert to Last option.For example, if you selected to check out the Stump Preacher Guitar Assembly, and then choose ReplaceRevision/Revert to Last, all the children of the Assembly switch to the last public revision. The newly createdrevision of the Assembly will be linked to the last public revision of the children. This option is particularlyhelpful when you wish to work with the latest revision of all the children of an Assembly.
To replace a revision:From the Check Out/New Release window, right-click on a document (not its icon) to display a dropdown menuand choose Replace Revision.
1.
To replace the document selected for the current Check Out/New Release operation: Choose Select to displaya list of revisions. Choose a revision and click OK. In the Check Out window, the selected revision will replacethe original revision.orChoose Revert to Last to check out the last public revision of the children of the Assembly currently beingchecked out. The newly created revision of the Assembly will be linked to the latest public revision of all itschildren.
2.
Link Parent of Previous Revision: Enables you to link the current Part/Assembly to a different Parent (with a

previous revision number).
To link a Part to a previous revision of its parent:From the Check In/Release window, right-click on a document (not its icon) to display a dropdown menu andchoose Link Parent of Previous Revision.
1.
A window is displayed with a list of the previous revisions of the parent Assembly for the Part current beingchecked in.Select a parent and click OK. The Check In window is refreshed to display the selected parent Assembly. Whenyou check in the Part, it will be linked to the selected parent Assembly.
2.

Managing DrawingsCATIA - TeamPDM provides powerful tools to assist you in creating, savingand managing your Drawings.
When you save the Drawing into the CATIA - TeamPDM database, ageneral link is automatically created between the Drawing and thePart/Product. This enables you to manage the Drawing together with thePart/Product as you create revisions.In this manner, the status of the Drawing remains parallel with the statusof the document on which it was based and CATIA - TeamPDMprotects the integrity of the Drawing.
This section provides the following instructions:

Saving a DrawingWhen you save the Drawing, a general link is created between the Drawing and the Part/Assembly on which it was based:
From the SmarTeam menu, choose Save (or Save As).1. Refer to section "Saving a Part for the First Time" for detailed instructions on using the Save option, or to section"Saving a Part After Modifications" for detailed instructions on using the Save As option. This process is identicalto saving a Part.A CATIA Drawing Profile Card is displayed (in the Object Attributes window).2. Fill in the fields in the Profile Card and click OK.The Drawing is saved to the CATIA-TeamPDM database, and a general link is created linking the Drawing to thePart/Assembly on which it was based.In this way, CATIA-TeamPDM reflects the nature of the Drawing. As you manage the revisions of the Part/Assembly,you can manage the revisions of the Drawing in parallel.
3.

Managing the Revisions of a DrawingCATIA-TeamPDM manages the special relationship between a Drawing and thePart/Assembly on which it was based. When you create a Drawing by inserting aPart/Assembly and you then save it using the SmarTeam Save option, a link iscreated between these two documents in CATIA-TeamPDM. These linkeddocuments are called Associated Objects.
CATIA-TeamPDM provides three types of Associated Objects:Dependency: A CATIA-TeamPDM Part or a Product is a dependency of aCATIA-TeamPDM Drawing (since the Drawing is based on thePart/Assembly).Reverse Dependency: A CATIA-TeamPDM drawing is a reversedependency of a CATIA-TeamPDM Part/Product.
As you create revisions, you can view and manage these Associated Objects(dependencies or reverse dependencies), using the AssociatedObjects/Dependencies or Reverse Dependencies option.
In addition, CATIA-TeamPDM color indicates each of the Associated Objects, sothat you can clearly identify a document's dependencies and reversedependencies. The default color settings are:
Dependencies are displayed in red.Reverse dependencies are displayed in blue.
Working with Dependencies and Reverse Dependencies
Each time you perform a life cycle operation on a document, you can view itsAssociated Objects, meaning its dependencies and reverse dependencies. Youcan then manage the revisions of these Associated Objects by checking theAssociated Objects in or out of the vault or copying their files to your desktop.
When you check out (or check in) a Drawing, its dependency (the Part/Assembly)is automatically checked out together with the Drawing.If the administrator set the default to Copy File, then the dependencies will becopied to the desktop, not checked out.

You can view the dependencies of a document and choose a life cycle operationfor each dependency. If you do not view the dependencies of a Drawing, thedependencies will automatically be checked out/in together with theDrawing (if that is the default setting).
You can view the reverse dependencies of a document and choose a life cycleoperation for them. If you do not view the reverse dependencies of adocument, then no life cycle operation is performed on them.
For example: A Stump Preacher Explode A4 Drawing was created based on aStump Preacher Guitar Assembly. When you check out the Stump PreacherExplode A4 Drawing, its dependency, the Stump Preacher Guitar Assemblywill be checked out with it (unless you display the dependency and choose adifferent life cycle operation). When you check out the Stump Preacher GuitarAssembly, you may view and check out its reverse dependency, the StumpPreacher Explode A4 Drawing.
To view Associated Objects:From any life cycle window (such as Register or Check Out), right-click ona document to display the dropdown menu.
1.
Point to Associated Objects to display the list of view options. Acheckmark to the left of the option shows that the Associated Object isalready displayed in the tree.
2.
Click on an option to add or remove the checkmark. Removing thecheckmark will remove the display of the Associated Object from the tree.Adding a checkmark will display the Associated Objects in the tree.
3.

The default color settings can be changed, as described in section"To customize color settings for Associated Objects".
To manage Associated Objects:
When the Associated Objects are displayed in the tree browser, you can managethem in the same manner as any Assembly and its children. You can:
Copy the Associated Objects to the desktop, as shown above.Check Out/Check In all the Associated Objects, by choosing thePropagate Operation option.Handle each Associated Object individually. For each Associated Object,you can:
Check out or check in the document.Copy its file to the desktop. The state of the document is notchanged.Choose No Operation for the document.
Life cycle operations are always performed on dependencies, even if you do notdisplay them. This is not the case for reverse dependencies: You must choose todisplay reverse dependencies in order to perform life cycle operations on them.To customize color settings for Associated Objects:
CATIA-TeamPDM color indicates each of the Associated Objects, so that youcan clearly view a document's dependencies and reverse dependencies. Thedefault color settings are:
Dependencies are displayed in red.Reverse dependencies are displayed in blue.
You can change these default settings, as described below.In any life cycle window, right-click to display a dropdown menu andchoose Tree Properties.
1.
Click the Visual Settings tab to display the following window:2.

Click the button to the right of the color that you wish to change. A colorselection window is displayed, as shown below:
3.

Choose a new color and click OK.4. In the Visual Settings window, click OK.5.

Searching for DocumentsLocating Parts, Products and Drawings is an essential task, but it can betime-consuming when creating complex Assemblies. CATIA - TeamPDMprovides a number of powerful functions which enable you to locate andretrieve a document from the CATIA - TeamPDM data structure.
CATIA - TeamPDM provides several searching tools:
Find Document option: This option enables you to view the previouslydefined searches. From the Search Editor window, you can:
Run a previously defined search.Modify a search.Create a new search.
Each search may contain numerous search criteria. The results of thesearch are displayed in a search results list. You can browse throughthe displayed list and view the Profile Card for each one. You can alsoselect a document and launch it into CATIA.Find Document By Attributes option: This option enables you tocreate a new search. You must choose a CATIA - TeamPDM class andenter search criteria for it. You can then run the search to locate thedocuments in the selected class that match the search criteria.

Find Document By Example option: This option enables you to createan advanced search from multiple classes, based on the attributes inthese classes as well as the attributes in the relationship (link) betweenthese classes. You must choose CATIA - TeamPDM classes, selectattributes and define search criteria. You can then run the search tolocate the documents in the selected classes that match the searchcriteria.
This section provides the following instructions:

Running a Predefined SearchOnce a search is defined and saved, you can run it over and over again. This powerful search tool can help you find yourdocuments quickly and efficiently.
For example, you may have a search called New Parts whose search criteria is based on a specific Creation Date. Each timeyou run the search, you can locate the newest CATIA Parts.
After you run a search, the search results are displayed in a search results list. You can browse through the list to locate aspecific document. You can then launch the document right into CATIA (by right-clicking on the document and choosing Edit).
To run a search:From the SmarTeam menu, point to Find and choose Find Document.The Search Editor window is displayed, as shown below:
1.

From the Search Editor window, you can modify, delete or run a previous search, or create a new search.Click Run to run the selected search and display the search results, as described in step 2.Click Modify to modify the attributes of a previously defined search, as described in Modifying a Search.Click Add to create a new search, and point to By Attributes or By Example to define a new search. Refer toCreating a New Search for details.Click Delete to delete a previously created search.
Choose a search and click Run. The results are displayed in a search results list, as shown below:2.
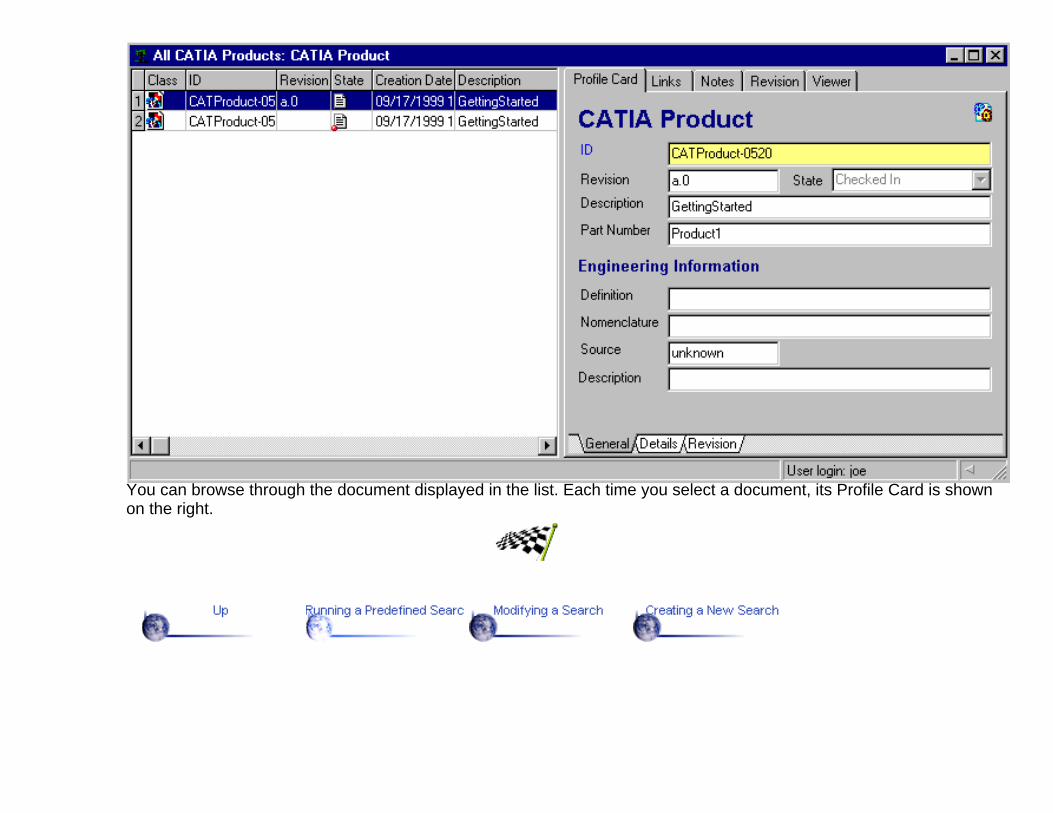
You can browse through the document displayed in the list. Each time you select a document, its Profile Card is shownon the right.

Modifying a SearchYou can modify a search by changing the search criteria. This enables you tocustomize searches to help you narrow down a search and find the exactdocuments that you need.
For example: A predefined search displayed in the Search Editor window iscalled All CATIA Parts. You can modify this search to locate all CATIA Partswith the word Cog in the Description attribute or that are Approved. In thismanner, you can narrow the search to locate the documents that you need.
To modify a search:From the SmarTeam menu, point to Find and choose Find Document.The Search Editor window displays the previously defined searches.
1.
Choose a search and click Modify. The Search by Attribute windowappears with the current search attributes.
2.
Modify the search attributes and click Run.3. You can save the modified search as a new search: In the Search byAttribute window, select the Save As button name, then enter thenew search in the Search name field and click Save.

Creating a New SearchCATIA - TeamPDM enables you to create your own search by defining searchattributes for a specific class of documents. CATIA - TeamPDM provides twooptions for creating new searches:
Find Document By Attributes option: This option enables you tocreate a search from one class of documents. You must define searchcriteria for it by entering search information in the attributes fields. Youcan then run the search to locate the documents in the selected classthat match the search criteria.Find Document By Example option: This option enables you to createan advanced search from multiple classes, based on the attributes inthese classes as well as the attributes in the relationship (link) betweenthese classes. You must choose CATIA - TeamPDM classes, selectattributes and define search criteria. You can then run the search tolocate the documents in the selected classes that match the searchcriteria.

Creating a Search by AttributeTo create a search (by attribute):
From the SmarTeam menu, point to Find and choose Find Document By Attributes. The Search Details window isdisplayed, as shown below:
1.
The Search Details window is also displayed when you click the Add button in the Search Editor window andchoose By Attribute.

Select a class. When you run the search, CATIA-TeamPDM will locate the documents that match the search criteriafrom the selected class.The window opens to display the Profile Card of the selected class, as shown below:
2.
Define search options by checking the appropriate checkboxes.In the Match Case field, check the checkbox if you want the search results to match cases (lower or upper case)with the information provided in the search criteria fields. This is important since database items are casesensitive.In the Retrieve Only Last Public field, check the checkbox if you want the search to display only the last pubicrevision of the documents that meet the search criteria (the latest documents that are checked in or released).
3.
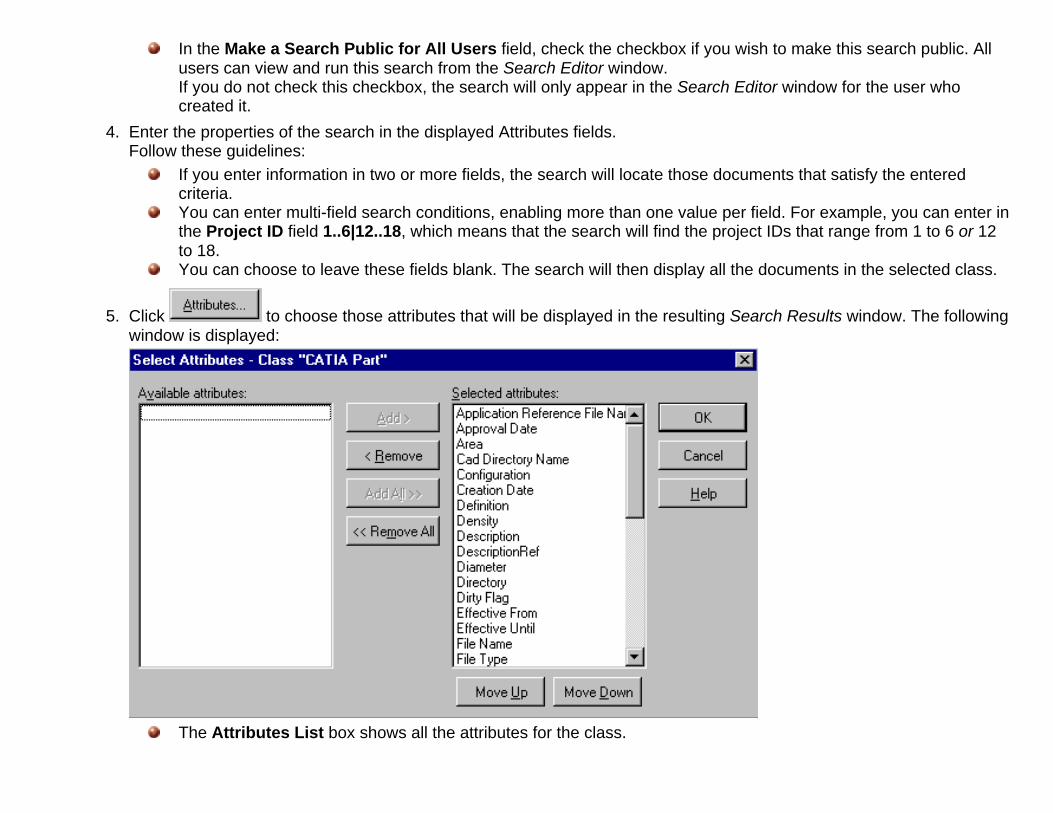
In the Make a Search Public for All Users field, check the checkbox if you wish to make this search public. Allusers can view and run this search from the Search Editor window.If you do not check this checkbox, the search will only appear in the Search Editor window for the user whocreated it.
Enter the properties of the search in the displayed Attributes fields.Follow these guidelines:
If you enter information in two or more fields, the search will locate those documents that satisfy the enteredcriteria.You can enter multi-field search conditions, enabling more than one value per field. For example, you can enter inthe Project ID field 1..6|12..18, which means that the search will find the project IDs that range from 1 to 6 or 12to 18.You can choose to leave these fields blank. The search will then display all the documents in the selected class.
4.
Click to choose those attributes that will be displayed in the resulting Search Results window. The followingwindow is displayed:
The Attributes List box shows all the attributes for the class.
5.

The Selected Attributes box shows the selected attributes that will be displayed in the search results list.Use the arrow buttons to move attributes into the Selected Attributes list.
Use the Move Up/Move Down buttons to determine the order in which these fields will be displayed.
Click OK.Click Run to run the search. The results are displayed in a Search Results window. However, the search definition hasnot yet been saved.
6.
To save the search:Click Save to save the search. This search (as it was named in step 2) will subsequently be displayed in theSearch Editor window.Click Close to exit without saving.
7.

Creating a Search by ExampleTo create a search (by example):
From the SmarTeam menu, point to Find and choose Find Document By Example. The Search By Example window isdisplayed, as shown below:
1.

Name the search in the Search Name field.2. Define search options by checking the appropriate checkboxes:
In the Match case field, check the checkbox if you want the search results to match cases (lower or upper case) with theinformation provided in the search criteria fields. This is important since database items are case sensitive.In the Retrieve only last public revisions field, check the checkbox if you want the search to display only the last pubicrevision of the documents that meet the search criteria (the latest documents that are checked in or released).In the Make search public for All users field, check the checkbox if you wish to make this search public. All users canview and run this search from the Search Editor window.If you do not check this checkbox, the search will only appear in the Search Editor window for the user who created it.
3.
From the tree on the left side of the window, choose a class.4. Drag the class to the work area, located at the top, right area of the window. The attributes of the class are displayed in a list.5.

You can select a second class as follows:From the tree on the left side of the window, choose a second class, and drag it to the work area. The attributes of the secondclass are displayed in the work area as well as the attributes of the link between the two classes.
6.

In the Link Attribute list, you can display general link attributes or the hierarchical link attributes: Right-click on the list andchoose the appropriate option.From an attribute list, select an attribute and drag it to the grid at the bottom, right area of the window.7.

The selected attribute is displayed in the Field row.Define search conditions for the attribute as follows:
Place a checkmark in the Sort row to sort the search results list according the selected attribute.Place a checkmark in the Show row to show the selected attribute in the search results list.Place a checkmark in the Unique row to filter the search results so that only unique documents are displayed: If more thanone document meets the specified conditions, only the first document is displayed.Enter search criteria in the Condition row for the selected attribute.For example: For the CATIA Product class, the State attribute is dragged to the grid. In the Condition field, you enterReleased. The search will find the Products whose state is Released.Enter additional search criteria in the Or field.For example: Enter Checked In in the Or field. The search will find those Products whose state is Released or CheckedIn.
8.
Select additional attributes and define search conditions for them. When you run the search, CATIA-TeamPDM will find thosedocuments that meet the search criteria for all the attributes displayed in the grid (meaning an And condition exists between eachcolumn of attributes).For example:
From the CATIA Product class, the State attribute is selected and dragged to the grid. In the Condition field, you enterReleased. In the Or field, you enter Checked In.From the CATIA Product class, the Description attribute is selected and dragged to the grid. In the Condition field, youenter *cog.When the search is run, the search results list will display those documents from the CATIA Product class whose state isReleased or whose state is Checked In and whose description includes the word cog.
If you select attributes from more than one class, the search will locate only those documents that meet the search conditions forboth classes.
For example:From the CATIA Product class, you drag the State attribute to the grid and define the Condition as Checked In. In the Orfield, you enter Released.From the CATIA Part class, you drag the State attribute to the grid and define the Condition as Checked In. In the Orfield, you enter Released.
9.

When the search is run, the search results list will display those Products that are released or checked in whose Parts arealso released or checked in.After the search is defined:10.

Click Run to run the search. The results are displayed in a search results list. You can browse through the documents inthe list to display the Profile Card for each document. You can also launch a document directly into CATIA.Click Save to save the search. This search (as it was named in step 2) will subsequently be displayed in the Search Editorwindow.Click Close to exit without saving.
Creating and Viewing LinksCATIA-TeamPDM enables you to create links between Parts, Drawings andProducts. You can view these links in the Links page and access the linkeddocuments. These links enable you to:
Define the hierarchical structure of a Part, Drawing or Product by linkingit to a project or parent.Locate related documents in order to view or modify them. For example,if you modify a Part, you can locate and modify all its parents as well asother documents linked to it (such as a spreadsheet or a proposal).Check a Product into and out of the vault for modification together withits sub-Products. The hierarchical links protect the integrity of theAssembly by reflecting the hierarchical CATIA structure.Check a Drawing into and out of the vault for modifications together withthe Part or Product on which it was based (and vice versa).
CATIA-TeamPDM automatically creates the following links:When you create a Product (using the Insert Component option) andsave it (using the SmarTeam/Save option), the Product and all itschildren are saved in a hierarchical structure. A parent-child link iscreated between the Product and each of its components.When you create a Drawing based on a specific Part or Product, theDrawing is linked to the Part or Product on which it was based.
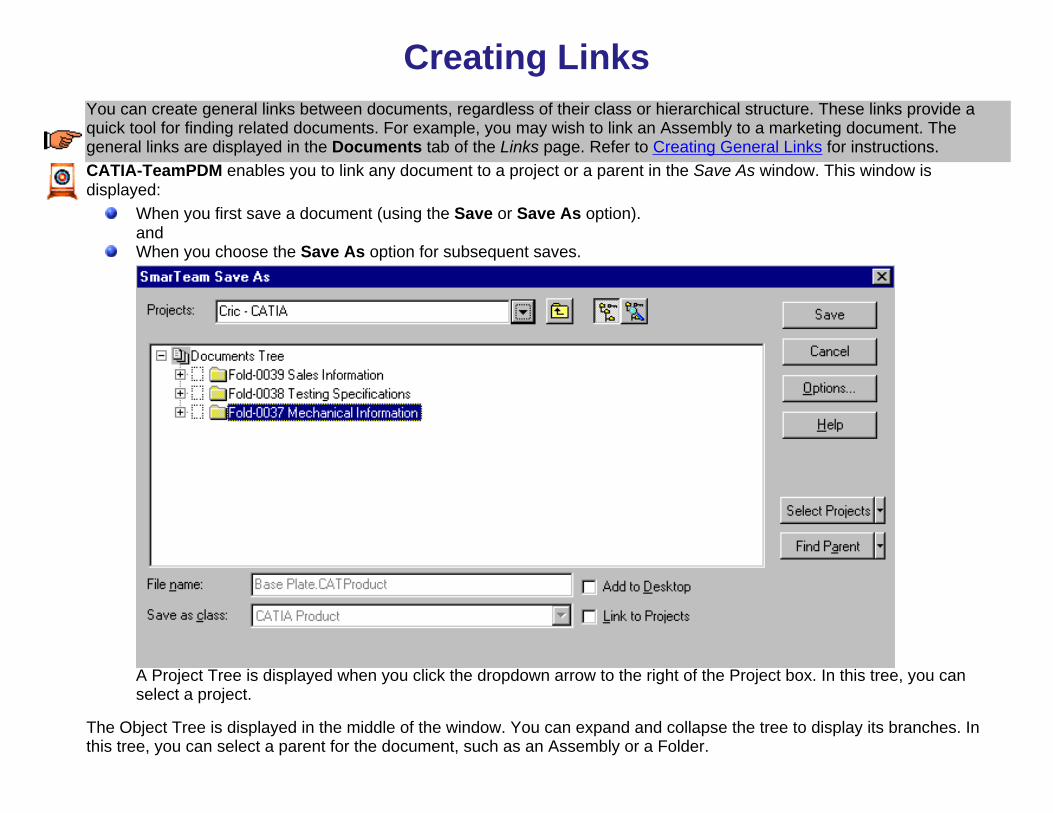
Creating Links You can create general links between documents, regardless of their class or hierarchical structure. These links provide a
quick tool for finding related documents. For example, you may wish to link an Assembly to a marketing document. Thegeneral links are displayed in the Documents tab of the Links page. Refer to Creating General Links for instructions.CATIA-TeamPDM enables you to link any document to a project or a parent in the Save As window. This window isdisplayed:
When you first save a document (using the Save or Save As option).andWhen you choose the Save As option for subsequent saves.
A Project Tree is displayed when you click the dropdown arrow to the right of the Project box. In this tree, you canselect a project.
The Object Tree is displayed in the middle of the window. You can expand and collapse the tree to display its branches. Inthis tree, you can select a parent for the document, such as an Assembly or a Folder.

CATIA-TeamPDM enables you to modify the displayed view of these trees in several ways:
Define the level of sub-branches displayed in the trees, as described below.Define the general tree properties, such as whether to display all revisions or the last public revisions. These propertiesare defined in the Documents tree of a project when you right-click and choose Tree Properties.
From the SmarTeam menu, choose Switch to SmarTeam and locate the Documents Tree for a specific project.
For example, in the Tree Filter tab of the Tree Property window, you can define whether to display all revisions ofthe documents in a tree, or only the last public revisions of the documents in a tree.
To define the level of sub-branches displayed in the Save As window:From the SmarTeam menu, choose Save As to display the Save As window.1. Click the Options menu to display the Save Options window. Click the Tree settings tab.2.
Define the level of branches that will be displayed in the Project Tree and the Object Tree.3.
Creating General Links
You can create general links between documents, regardless of their class or hierarchical structure. These links provide aquick tool for finding related documents. For example, you may wish to link a Product to a marketing document. The generallinks are displayed in the Document tabs of the Links page.

To create a general link:Display the document in a CATIA-TeamPDM window:
From CATIA, click on the SmarTeam menu and choose Locate Active Document.orRun a search to locate the document.
1.
Open the Links page of the document to which you want to link another document.2. In the Links page, select a tab (Projects or Documents for example) from the bottom of the window to display a specificLinks sub-page. This Links sub-page must display the same class as the document that you will choose in step 4.
3.
Open any CATIA-TeamPDM window, and select the document that you wish to link to the document selected in step 1.4. Drag and drop the selected document (selected in step 3) to the Links page of the document selected in step 1 to createa link.
5.
A message confirming the link is displayed.Click Yes to confirm a single link.Click All to confirm multiple links.The Links page is automatically updated to reflect these additional links.
6.

Viewing and Accessing LinksCATIA-TeamPDM enables you to view the various links of a document by clicking through the Links sub-pages. You can then access alinked document, view its Profile card and launch it into CATIA.
The Composed Of sub-page lists all the children (components) of a document.The Where Used sub-page for the Product lists all the parents (folders and Products) of a document.
The Where Used list is also displayed when you select the SmarTeam menu and then choose the Where Used option.
The various class tabs display the general links of a document (according to classes).
To view links:
In the Links page, you can view the links of any CATIA-TeamPDM document as follows:Select a document from any CATIA-TeamPDM window.1. If the document is currently displayed in a CATIA window, you can choose the Locate Active Document option from theSmarTeam menuClick the Links tab at the top of the Profile Card to display the Links page.2. Click the appropriate tab at the bottom of the page to display a sub-page of links:
The Composed of sub-page lists all the children of a document.3.

The Documents sub-page lists the link between a Drawing and a Part or Product. It also lists the general links for the Part,Drawing or Product classes. The remaining sub-pages list the links according to classes.The Where Used sub-page lists all the parents of a document. These links are extremely useful in locating all the documents towhich a specific document is linked as a child. For example, if you have modified a Part, you can quickly access all the Productswhich contain this Part as a sub-Assembly, and modify them accordingly.
You can also view the parents of a document by selecting the SmarTeam menu, then choosing the Where Usedoption, as shown below.
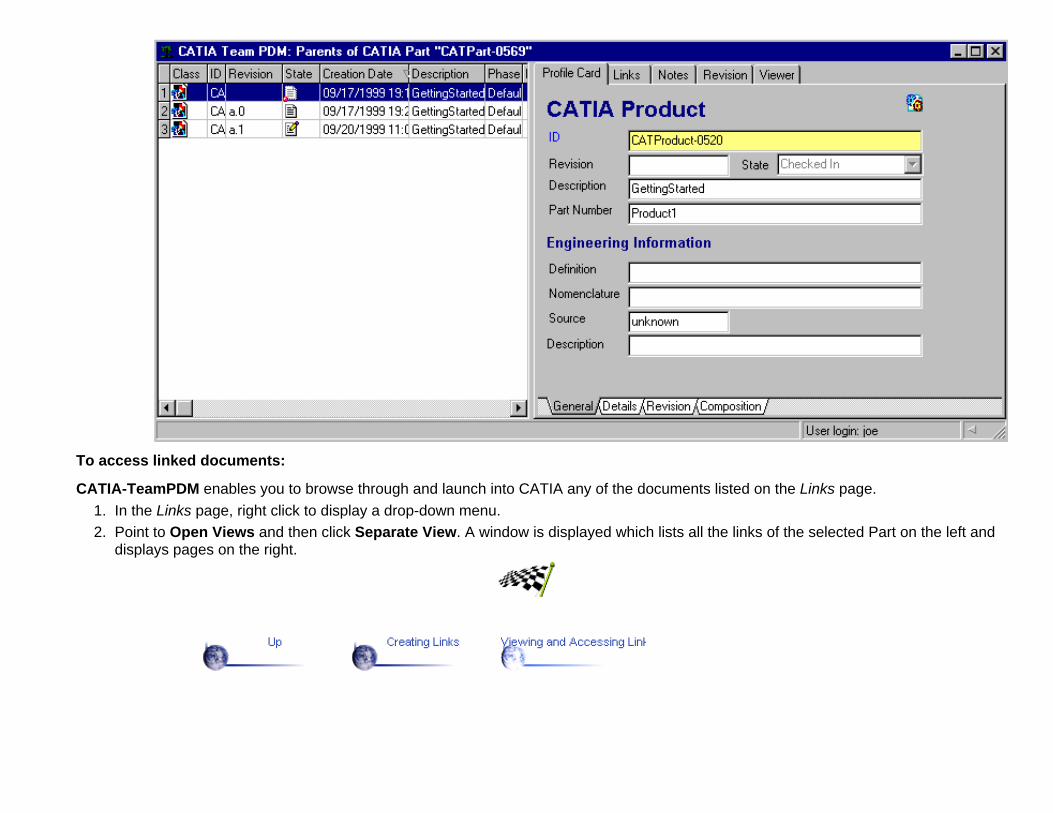
To access linked documents:
CATIA-TeamPDM enables you to browse through and launch into CATIA any of the documents listed on the Links page.In the Links page, right click to display a drop-down menu.1. Point to Open Views and then click Separate View. A window is displayed which lists all the links of the selected Part on the left anddisplays pages on the right.
2.