catia freestyle sketch traceryvonet.florent.free.fr/serveur/cours catia/catia shape...catia...
TRANSCRIPT
Instructor Notes:
Freestyle Sketch Tracer
Copyright DASSAULT SYSTEMES �
��������������
Cop
yrig
ht D
AS
SA
ULT
SY
STE
ME
S
CATIA Freestyle Sketch Tracer
CATIA V5 TrainingFoils
Version 5 Release 19September 2008
EDU_CAT_EN_FSK_FI_V5R19
Instructor Notes:
Freestyle Sketch Tracer
Copyright DASSAULT SYSTEMES �
��������������
Cop
yrig
ht D
AS
SA
ULT
SY
STE
ME
S
About this courseObjectives of the courseUpon completion of this course you will be able to:- Use an image as a background or as a basis for design- Import an image into CATIA V5 - Position an image in the CATIA V5 environment
Targeted audienceShape Designers
PrerequisitesStudents attending this course should have experience in the following domain(s): CATIA V5 fundamentals
0.5 day

Instructor Notes:
Freestyle Sketch Tracer
Copyright DASSAULT SYSTEMES �
��������������
Cop
yrig
ht D
AS
SA
ULT
SY
STE
ME
S
Table of Contents (1/2)
Introduction to CATIA Sketch Tracer 5Introduction 6Accessing the workbench 7User Interface: Sketch Tracer 8
Importing the Sketches 9What is Importing a Sketch 10Why Import a Sketch 11How to Create an Immersive Sketch 12How to Create an Immersive Sketch Using Screen Shot 14Modifying the Appearance of a Sketch 15Manipulating the Focus 16
Positioning the Sketches 17What is Positioning a Sketch ? 18How to Position a Sketch Using Cylindrical View 19How to Position a Sketch Using Conical View 21
Managing Views 22What is Managing Views ? 23How to Manage Interactive Views 24
Instructor Notes:
Freestyle Sketch Tracer
Copyright DASSAULT SYSTEMES �
��������������
Cop
yrig
ht D
AS
SA
ULT
SY
STE
ME
S
Table of Contents (2/2)
How to Manage Conical Views 25
Master Exercise: Sea Car 26Sea Car: Exercise Presentation 27Step 1: Creating the First Sketch 28Step 2: Creating the Second Sketch 29
Instructor Notes:
Freestyle Sketch Tracer
Copyright DASSAULT SYSTEMES �
��������������
Cop
yrig
ht D
AS
SA
ULT
SY
STE
ME
S
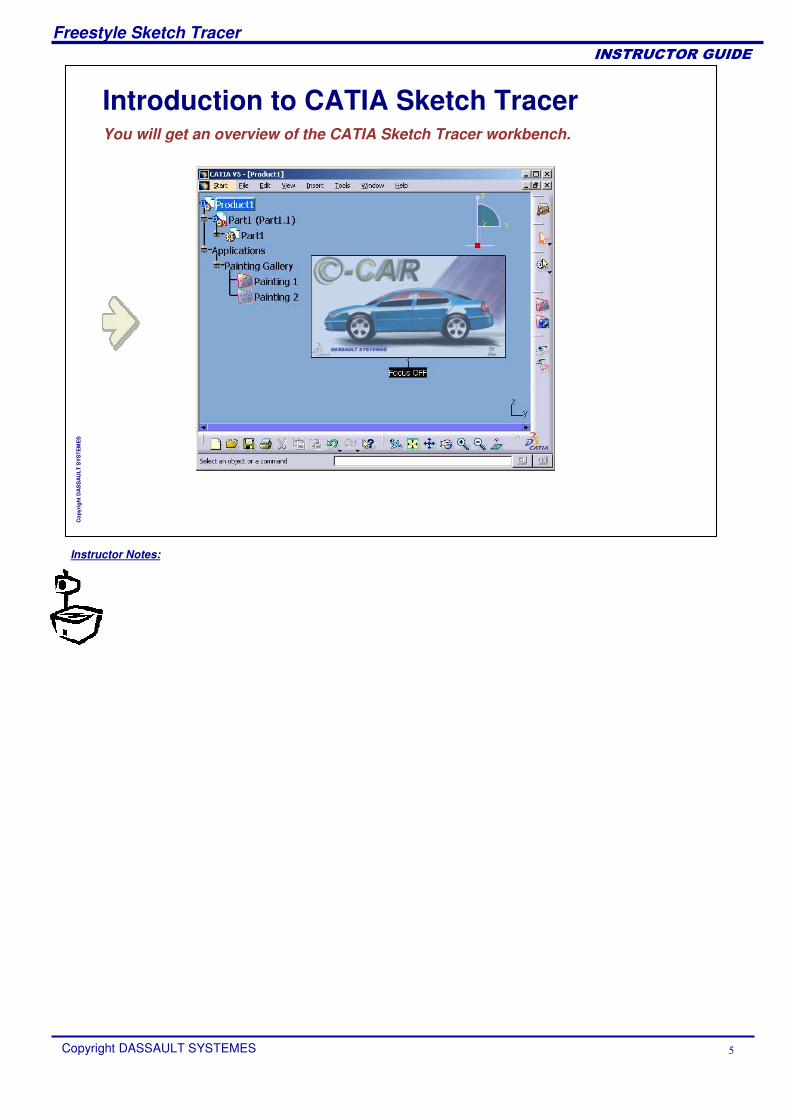
Introduction to CATIA Sketch TracerYou will get an overview of the CATIA Sketch Tracer workbench.
Instructor Notes:
Freestyle Sketch Tracer
Copyright DASSAULT SYSTEMES �
��������������
Cop
yrig
ht D
AS
SA
ULT
SY
STE
ME
S
Introduction
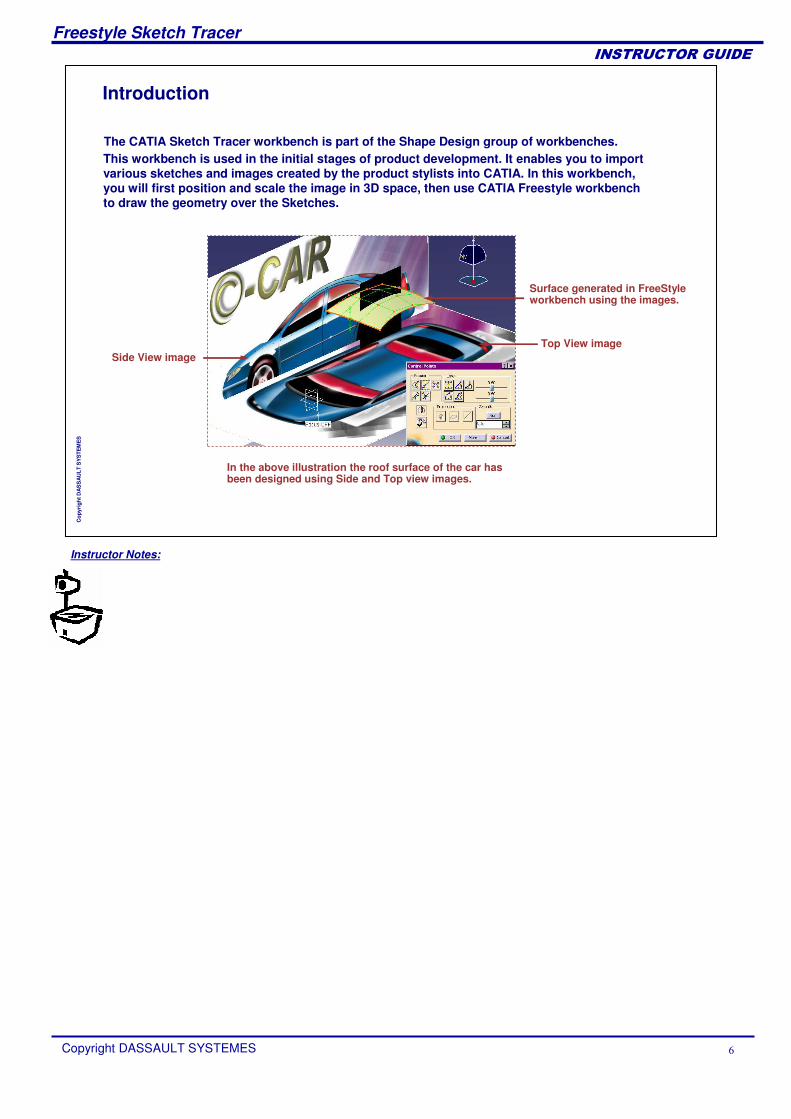
This workbench is used in the initial stages of product development. It enables you to import various sketches and images created by the product stylists into CATIA. In this workbench, you will first position and scale the image in 3D space, then use CATIA Freestyle workbench to draw the geometry over the Sketches.
In the above illustration the roof surface of the car has been designed using Side and Top view images.
The CATIA Sketch Tracer workbench is part of the Shape Design group of workbenches.
Top View imageSide View image
Surface generated in FreeStyle workbench using the images.
Instructor Notes:
Freestyle Sketch Tracer
Copyright DASSAULT SYSTEMES �
��������������
Cop
yrig
ht D
AS
SA
ULT
SY
STE
ME
S
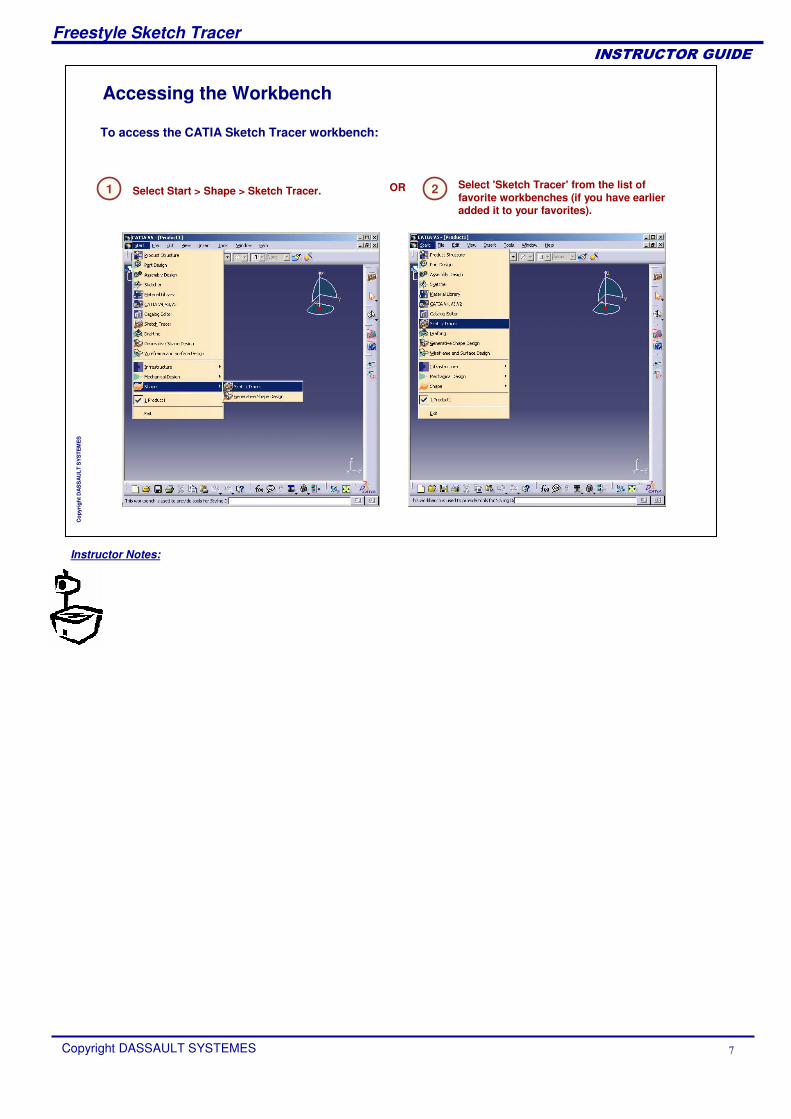
To access the CATIA Sketch Tracer workbench:
Accessing the Workbench
1 Select Start > Shape > Sketch Tracer. OR 2 Select 'Sketch Tracer' from the list of favorite workbenches (if you have earlier added it to your favorites).
Instructor Notes:
Freestyle Sketch Tracer
Copyright DASSAULT SYSTEMES �
��������������
Cop
yrig
ht D
AS
SA
ULT
SY
STE
ME
S
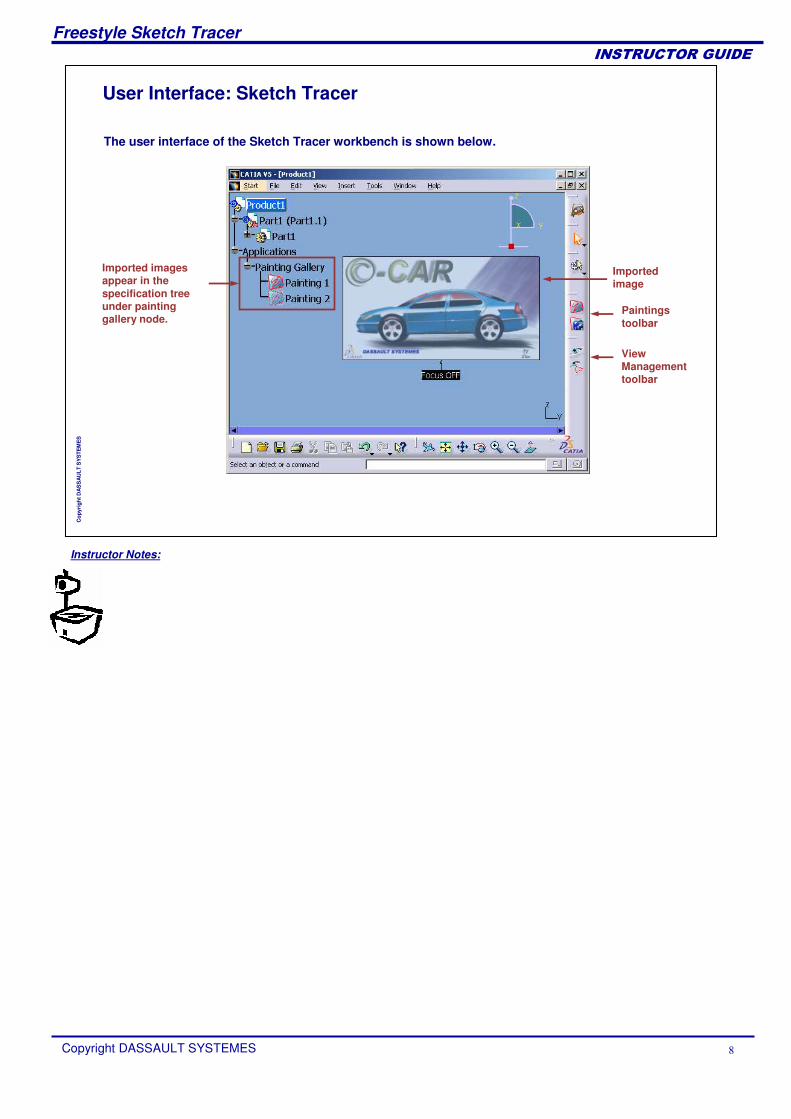
User Interface: Sketch Tracer
The user interface of the Sketch Tracer workbench is shown below.
Paintings toolbar
Imported image
Imported images appear in the specification tree under painting gallery node.
View Management toolbar

Instructor Notes:
Freestyle Sketch Tracer
Copyright DASSAULT SYSTEMES
��������������
Cop
yrig
ht D
AS
SA
ULT
SY
STE
ME
S
Importing the SketchesIn this lesson, you will learn how to import images and create images from existing components.
Instructor Notes:
Freestyle Sketch Tracer
Copyright DASSAULT SYSTEMES �
��������������
Cop
yrig
ht D
AS
SA
ULT
SY
STE
ME
S
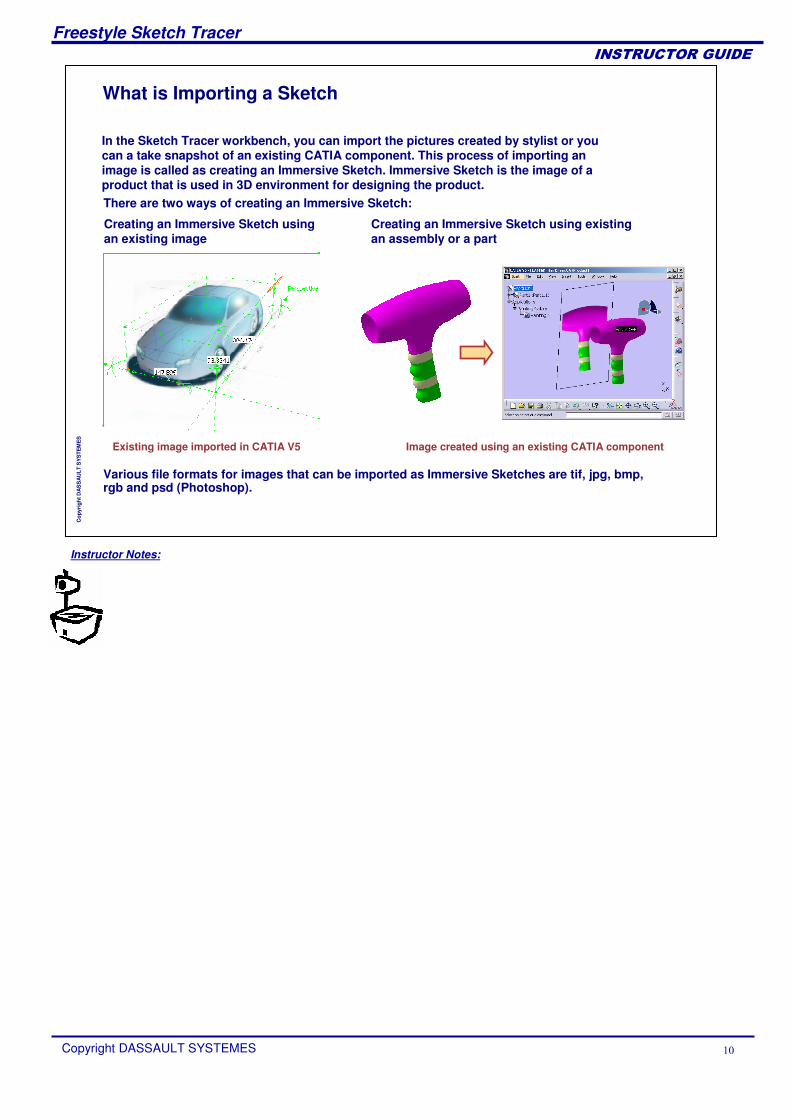
What is Importing a Sketch
There are two ways of creating an Immersive Sketch:
Creating an Immersive Sketch using an existing image
In the Sketch Tracer workbench, you can import the pictures created by stylist or you can a take snapshot of an existing CATIA component. This process of importing an image is called as creating an Immersive Sketch. Immersive Sketch is the image of a product that is used in 3D environment for designing the product.
Creating an Immersive Sketch using existing an assembly or a part
Existing image imported in CATIA V5
Various file formats for images that can be imported as Immersive Sketches are tif, jpg, bmp, rgb and psd (Photoshop).
Image created using an existing CATIA component
Instructor Notes:
Freestyle Sketch Tracer
Copyright DASSAULT SYSTEMES ��
��������������
Cop
yrig
ht D
AS
SA
ULT
SY
STE
ME
S
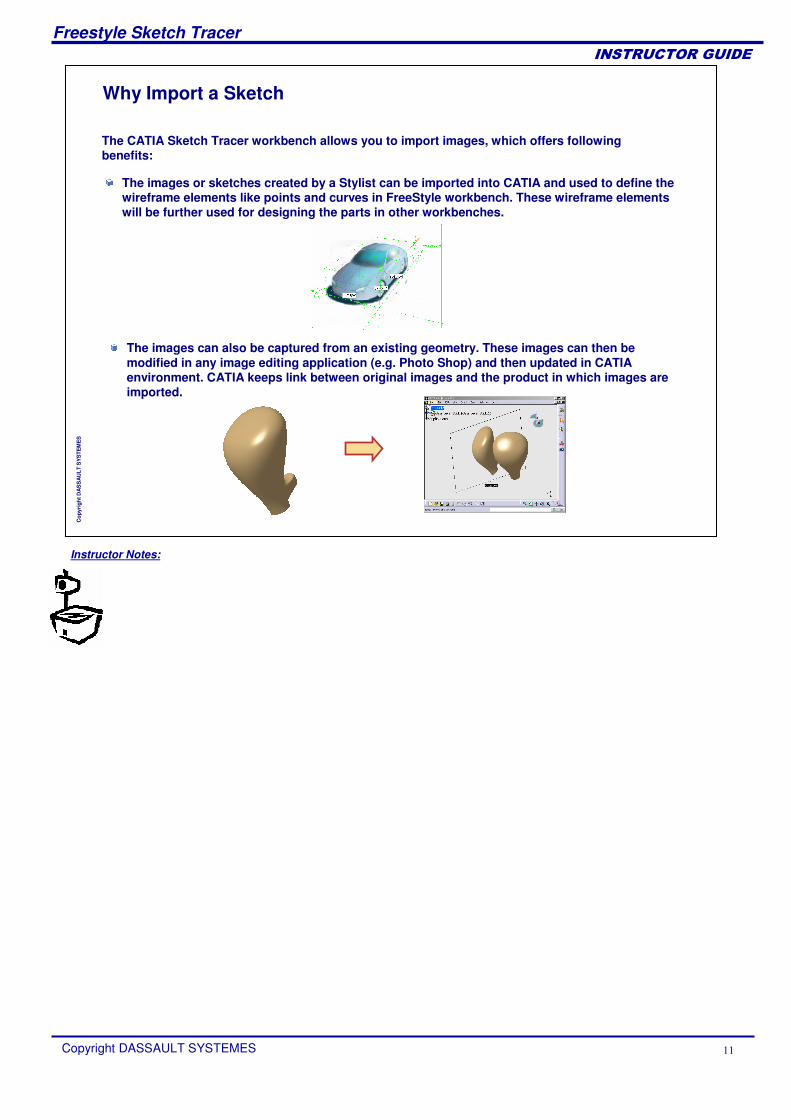
Why Import a Sketch
The images or sketches created by a Stylist can be imported into CATIA and used to define the wireframe elements like points and curves in FreeStyle workbench. These wireframe elements will be further used for designing the parts in other workbenches.
The CATIA Sketch Tracer workbench allows you to import images, which offers following benefits:
The images can also be captured from an existing geometry. These images can then be modified in any image editing application (e.g. Photo Shop) and then updated in CATIA environment. CATIA keeps link between original images and the product in which images are imported.
Instructor Notes:
Freestyle Sketch Tracer
Copyright DASSAULT SYSTEMES ��
��������������
Cop
yrig
ht D
AS
SA
ULT
SY
STE
ME
S
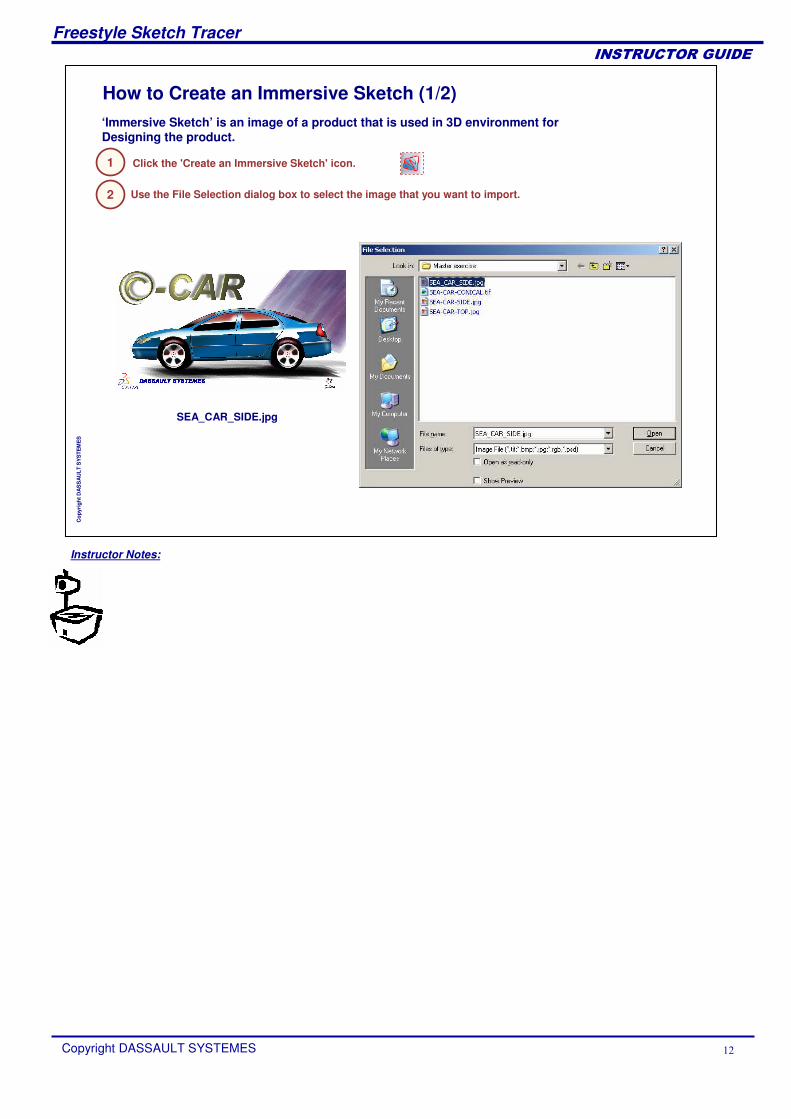
Click the 'Create an Immersive Sketch' icon.
How to Create an Immersive Sketch (1/2)
Use the File Selection dialog box to select the image that you want to import.
‘Immersive Sketch’ is an image of a product that is used in 3D environment for Designing the product.
SEA_CAR_SIDE.jpg
1
2
Instructor Notes:
Freestyle Sketch Tracer
Copyright DASSAULT SYSTEMES ��
��������������
Cop
yrig
ht D
AS
SA
ULT
SY
STE
ME
S
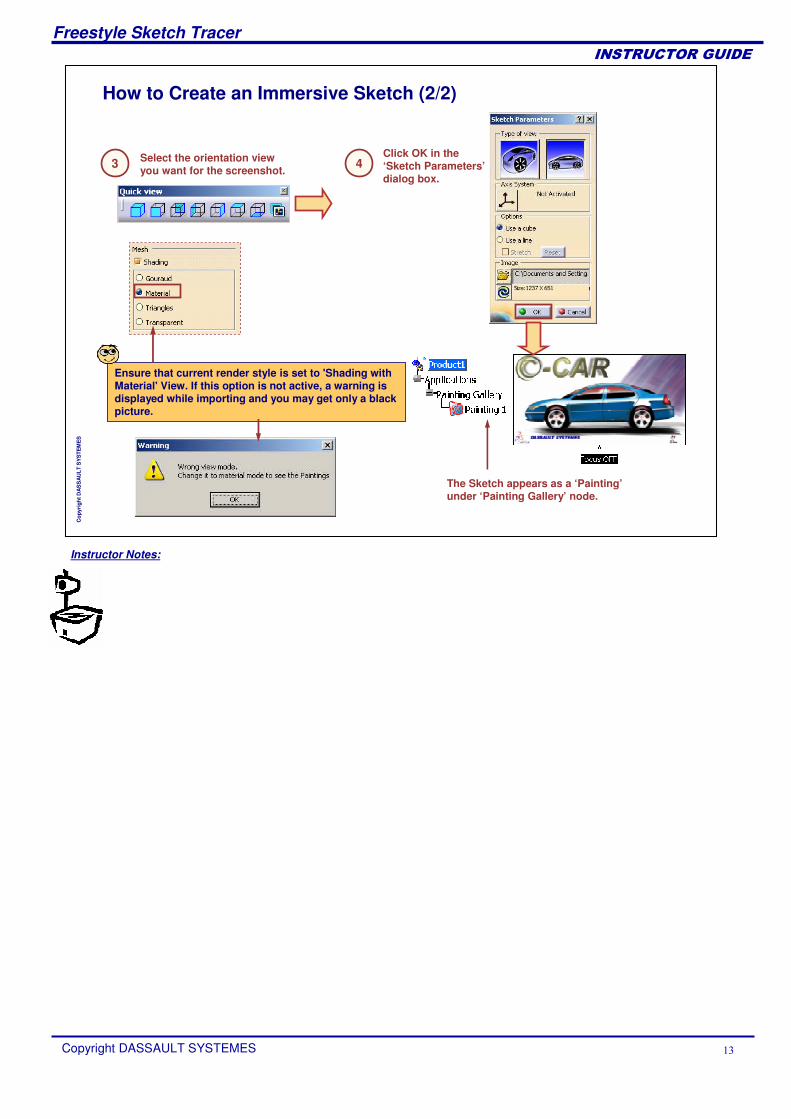
How to Create an Immersive Sketch (2/2)
Ensure that current render style is set to 'Shading with Material' View. If this option is not active, a warning is displayed while importing and you may get only a black picture.
Select the orientation view you want for the screenshot.
Click OK in the ‘Sketch Parameters’dialog box.
3 4
The Sketch appears as a ‘Painting’under ‘Painting Gallery’ node.
Instructor Notes:
Freestyle Sketch Tracer
Copyright DASSAULT SYSTEMES ��
��������������
Cop
yrig
ht D
AS
SA
ULT
SY
STE
ME
S
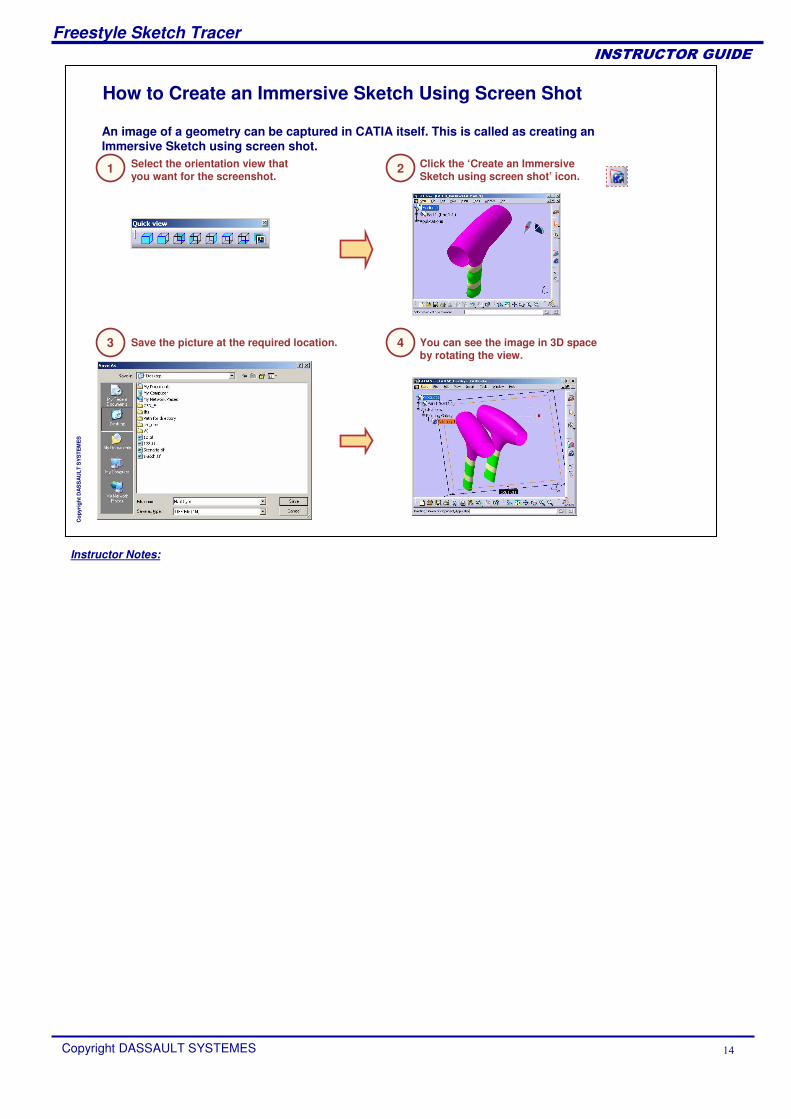
How to Create an Immersive Sketch Using Screen Shot
Select the orientation view thatyou want for the screenshot.
Click the ‘Create an Immersive Sketch using screen shot’ icon.
Save the picture at the required location. You can see the image in 3D space by rotating the view.
An image of a geometry can be captured in CATIA itself. This is called as creating an Immersive Sketch using screen shot.
1 2
3 4
Instructor Notes:
Freestyle Sketch Tracer
Copyright DASSAULT SYSTEMES ��
��������������
Cop
yrig
ht D
AS
SA
ULT
SY
STE
ME
S
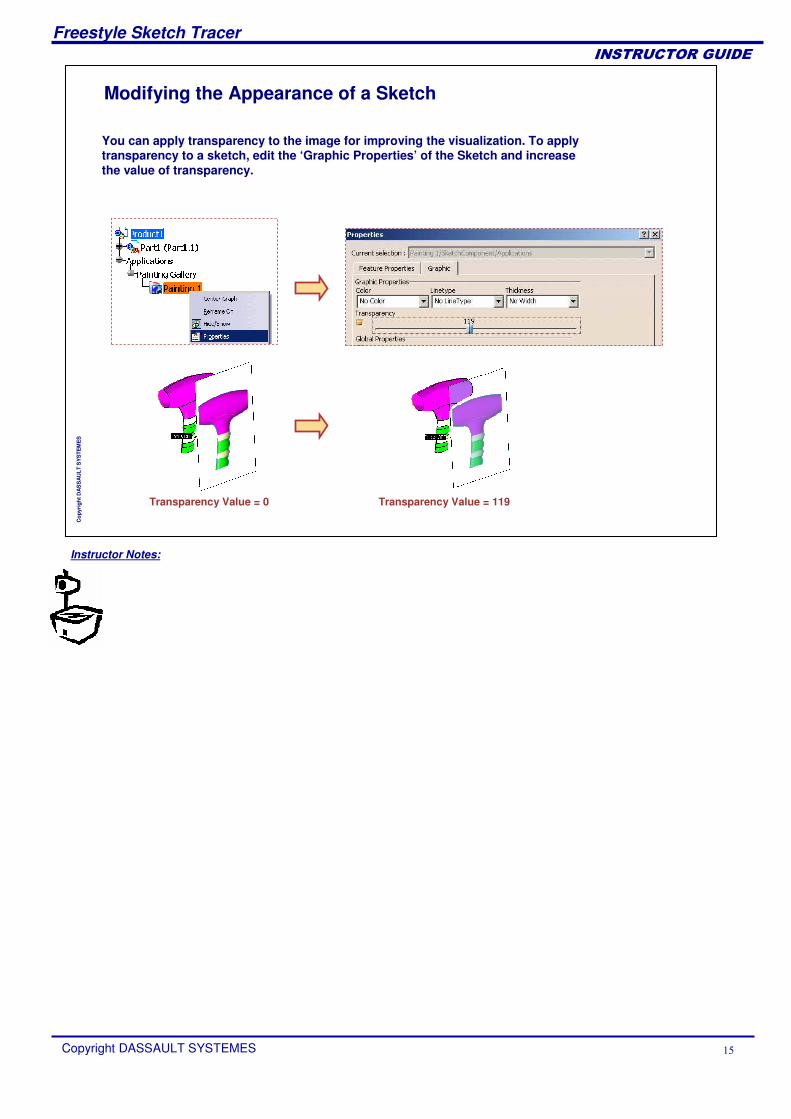
Modifying the Appearance of a Sketch
You can apply transparency to the image for improving the visualization. To apply transparency to a sketch, edit the ‘Graphic Properties’ of the Sketch and increase the value of transparency.
Transparency Value = 0 Transparency Value = 119
Instructor Notes:
Freestyle Sketch Tracer
Copyright DASSAULT SYSTEMES ��
��������������
Cop
yrig
ht D
AS
SA
ULT
SY
STE
ME
S
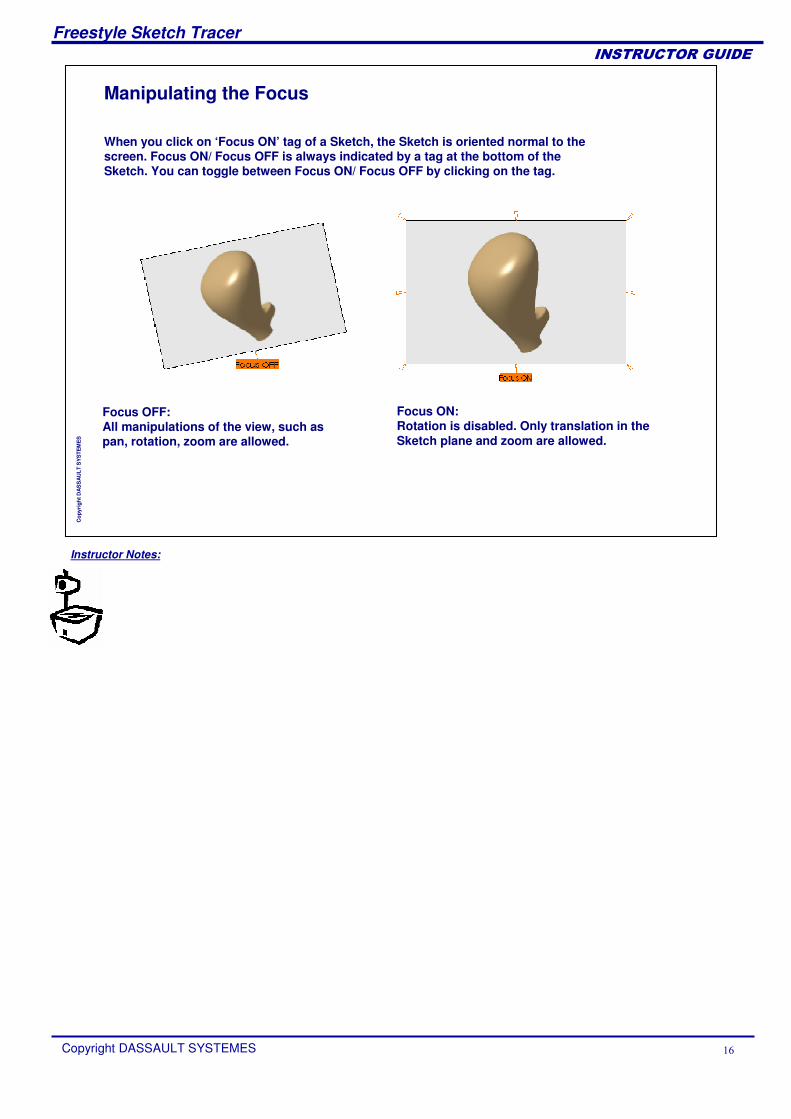
Manipulating the Focus
Focus OFF:All manipulations of the view, such as pan, rotation, zoom are allowed.
When you click on ‘Focus ON’ tag of a Sketch, the Sketch is oriented normal to the screen. Focus ON/ Focus OFF is always indicated by a tag at the bottom of the Sketch. You can toggle between Focus ON/ Focus OFF by clicking on the tag.
Focus ON:Rotation is disabled. Only translation in the Sketch plane and zoom are allowed.
Instructor Notes:
Freestyle Sketch Tracer
Copyright DASSAULT SYSTEMES ��
��������������
Cop
yrig
ht D
AS
SA
ULT
SY
STE
ME
S
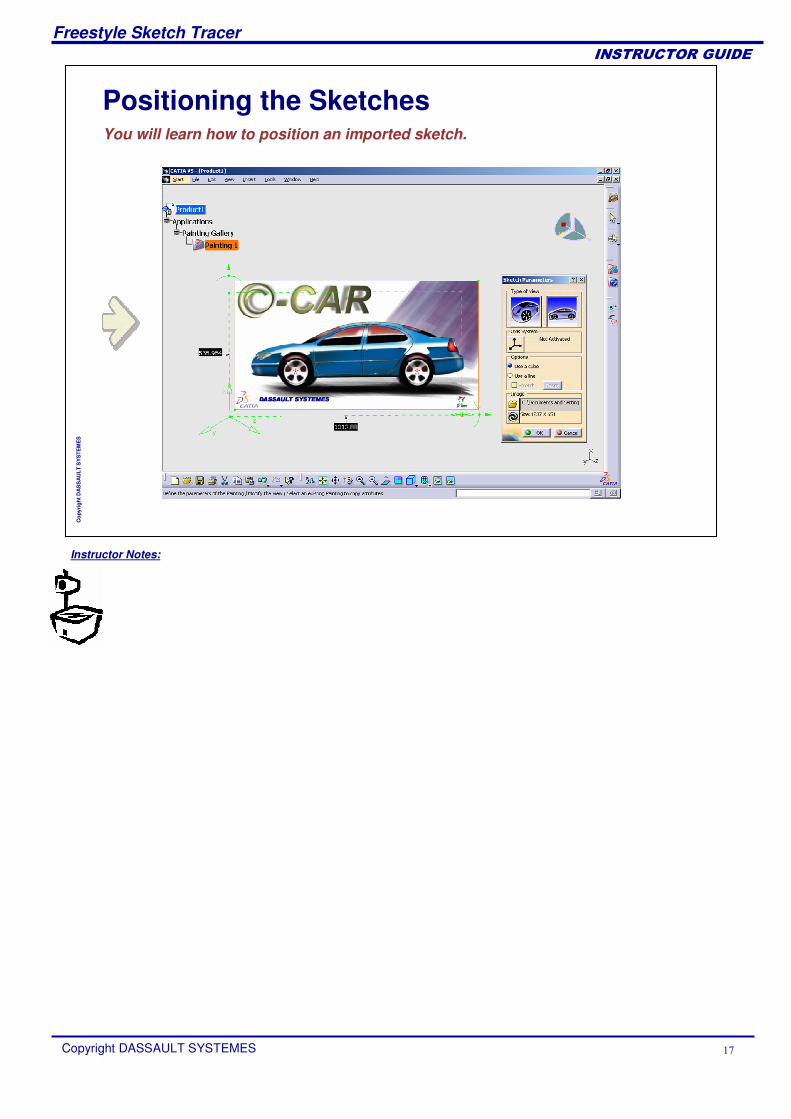
Positioning the SketchesYou will learn how to position an imported sketch.
Instructor Notes:
Freestyle Sketch Tracer
Copyright DASSAULT SYSTEMES ��
��������������
Cop
yrig
ht D
AS
SA
ULT
SY
STE
ME
S
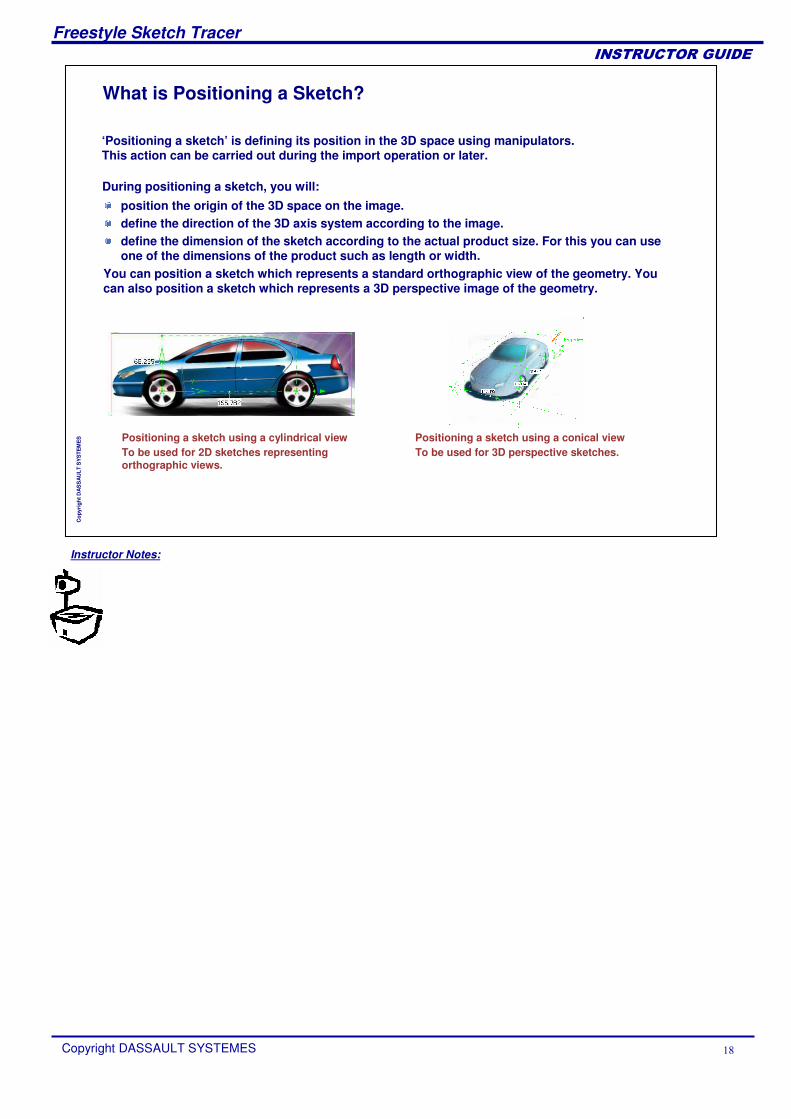
What is Positioning a Sketch?
You can position a sketch which represents a standard orthographic view of the geometry. You can also position a sketch which represents a 3D perspective image of the geometry.
‘Positioning a sketch’ is defining its position in the 3D space using manipulators. This action can be carried out during the import operation or later.
During positioning a sketch, you will:position the origin of the 3D space on the image.define the direction of the 3D axis system according to the image.define the dimension of the sketch according to the actual product size. For this you can use one of the dimensions of the product such as length or width.
Positioning a sketch using a cylindrical view Positioning a sketch using a conical viewTo be used for 3D perspective sketches.To be used for 2D sketches representing
orthographic views.
Instructor Notes:
Freestyle Sketch Tracer
Copyright DASSAULT SYSTEMES �
��������������
Cop
yrig
ht D
AS
SA
ULT
SY
STE
ME
S
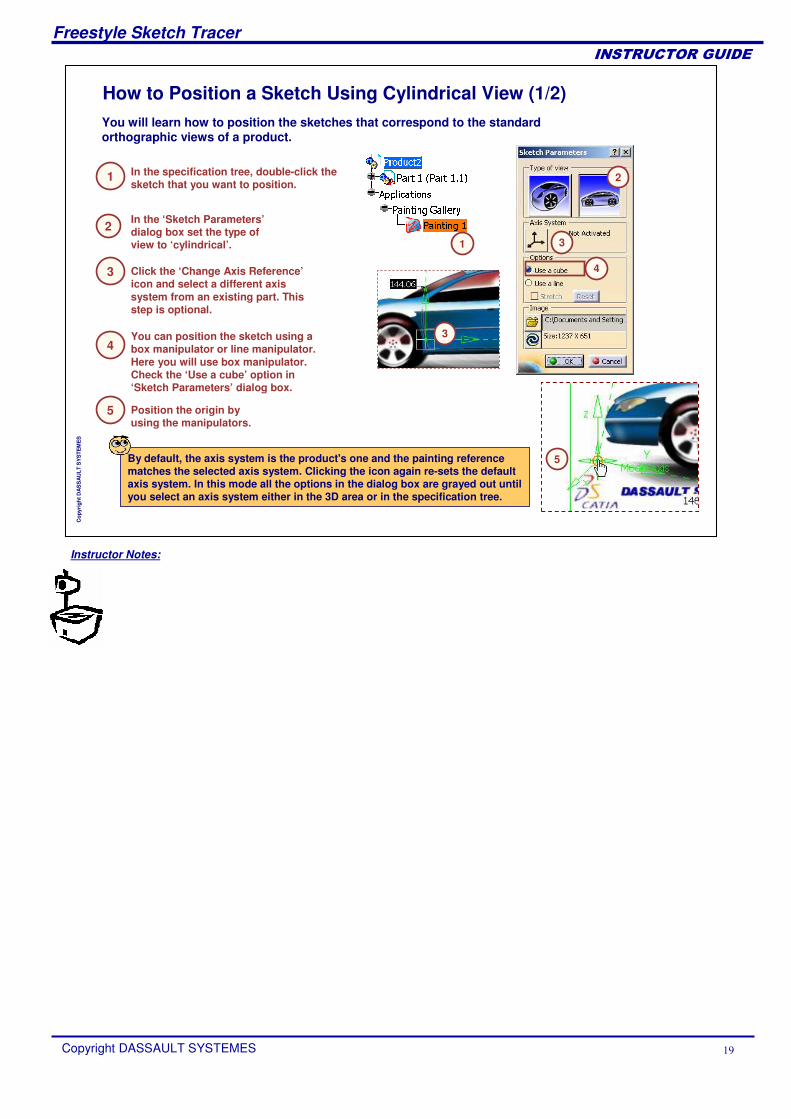
How to Position a Sketch Using Cylindrical View (1/2)
In the specification tree, double-click the sketch that you want to position.
In the ‘Sketch Parameters’dialog box set the type of view to ‘cylindrical’.
You can position the sketch using a box manipulator or line manipulator. Here you will use box manipulator. Check the ‘Use a cube’ option in ‘Sketch Parameters’ dialog box.
Position the origin by using the manipulators.
You will learn how to position the sketches that correspond to the standard orthographic views of a product.
1
2
3
4
5
Click the ‘Change Axis Reference’icon and select a different axis system from an existing part. This step is optional.
1 3
2
3
5
4
By default, the axis system is the product's one and the painting reference matches the selected axis system. Clicking the icon again re-sets the default axis system. In this mode all the options in the dialog box are grayed out until you select an axis system either in the 3D area or in the specification tree.
Instructor Notes:
Freestyle Sketch Tracer
Copyright DASSAULT SYSTEMES �
��������������
Cop
yrig
ht D
AS
SA
ULT
SY
STE
ME
S
How to Position a Sketch Using Cylindrical View (2/2)
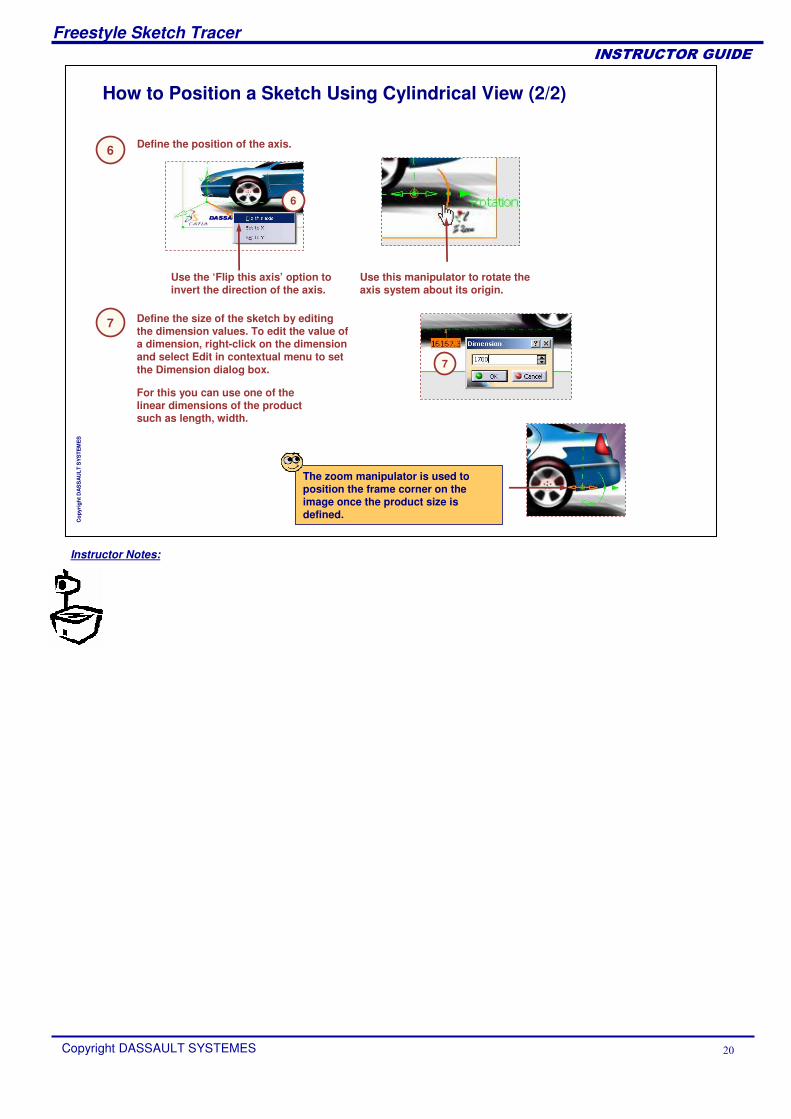
Define the position of the axis.
Use the ‘Flip this axis’ option to invert the direction of the axis.
Use this manipulator to rotate the axis system about its origin.
Define the size of the sketch by editing the dimension values. To edit the value of a dimension, right-click on the dimension and select Edit in contextual menu to set the Dimension dialog box.
For this you can use one of the linear dimensions of the product such as length, width.
The zoom manipulator is used to position the frame corner on the image once the product size is defined.
6
7
6
7
Instructor Notes:
Freestyle Sketch Tracer
Copyright DASSAULT SYSTEMES ��
��������������
Cop
yrig
ht D
AS
SA
ULT
SY
STE
ME
S
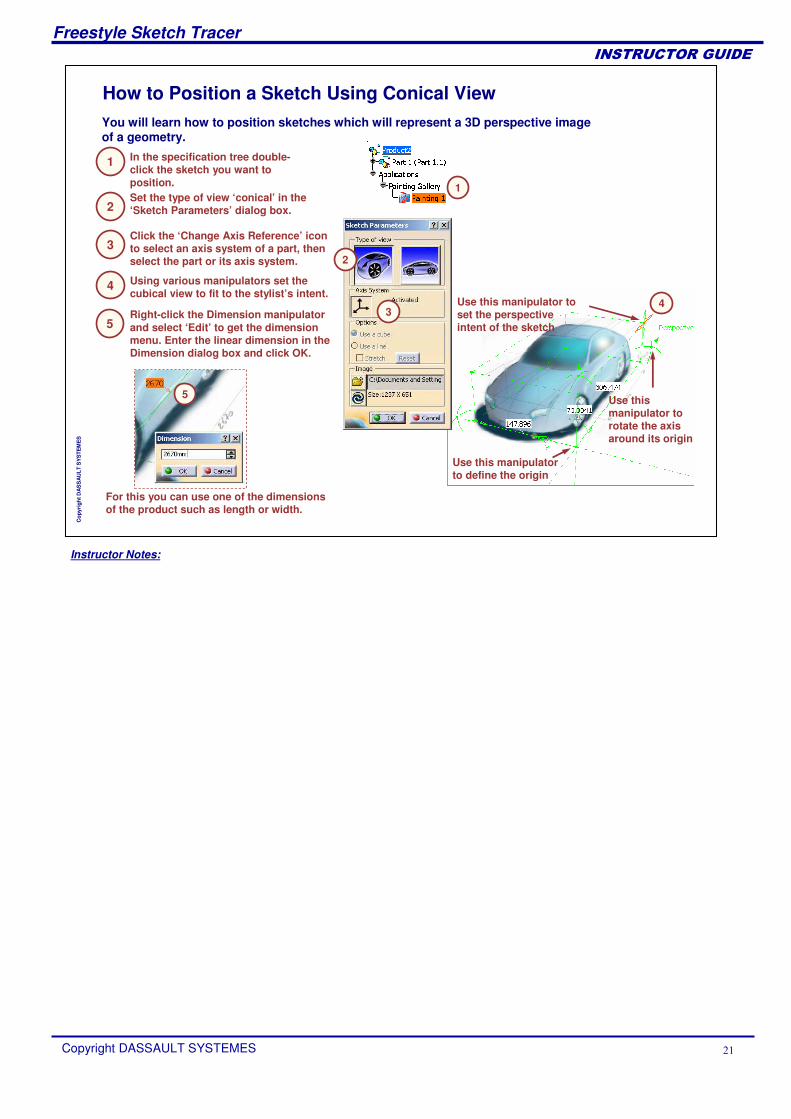
How to Position a Sketch Using Conical View
In the specification tree double-click the sketch you want to position.
Using various manipulators set the cubical view to fit to the stylist’s intent.
Right-click the Dimension manipulator and select ‘Edit’ to get the dimension menu. Enter the linear dimension in the Dimension dialog box and click OK.
For this you can use one of the dimensions of the product such as length or width.
Set the type of view ‘conical’ in the ‘Sketch Parameters’ dialog box.
You will learn how to position sketches which will represent a 3D perspective image of a geometry.
4
1
2
5
Use this manipulator to define the origin
Use this manipulator to rotate the axis around its origin
Use this manipulator to set the perspective intent of the sketch
Click the ‘Change Axis Reference’ icon to select an axis system of a part, then select the part or its axis system.
3
1
2
34
5
Instructor Notes:
Freestyle Sketch Tracer
Copyright DASSAULT SYSTEMES ��
��������������
Cop
yrig
ht D
AS
SA
ULT
SY
STE
ME
S
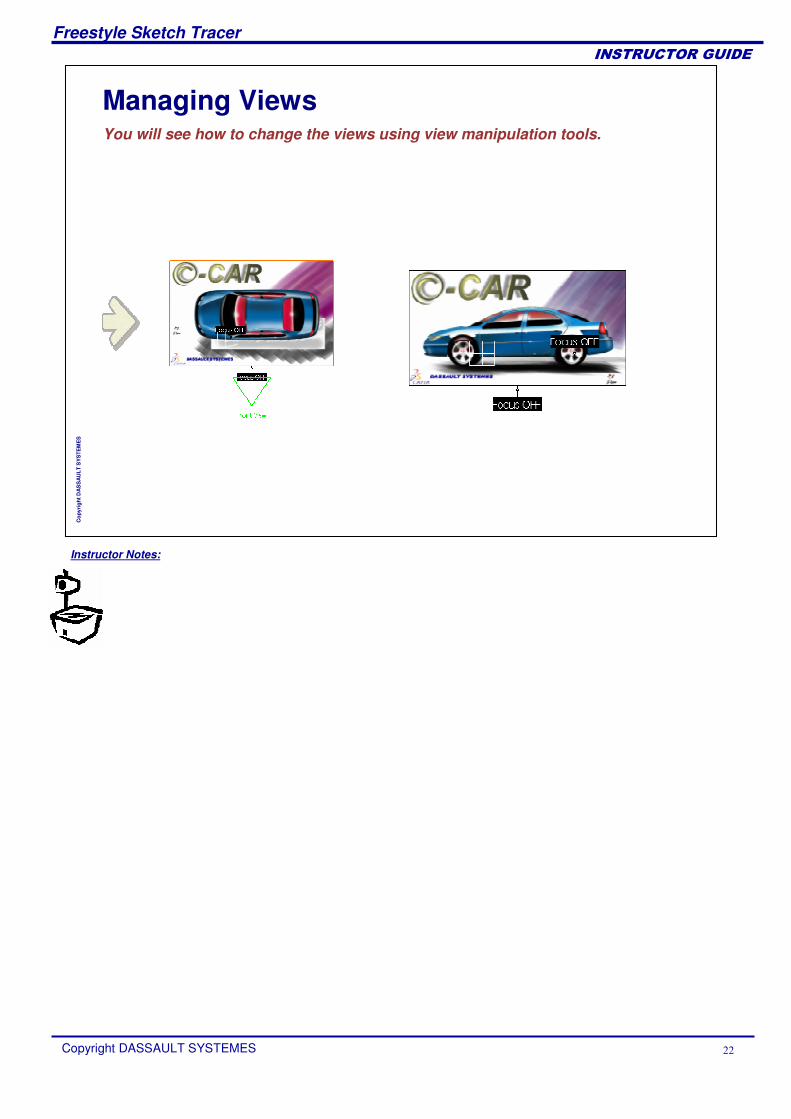
Managing ViewsYou will see how to change the views using view manipulation tools.
Instructor Notes:
Freestyle Sketch Tracer
Copyright DASSAULT SYSTEMES ��
��������������
Cop
yrig
ht D
AS
SA
ULT
SY
STE
ME
S
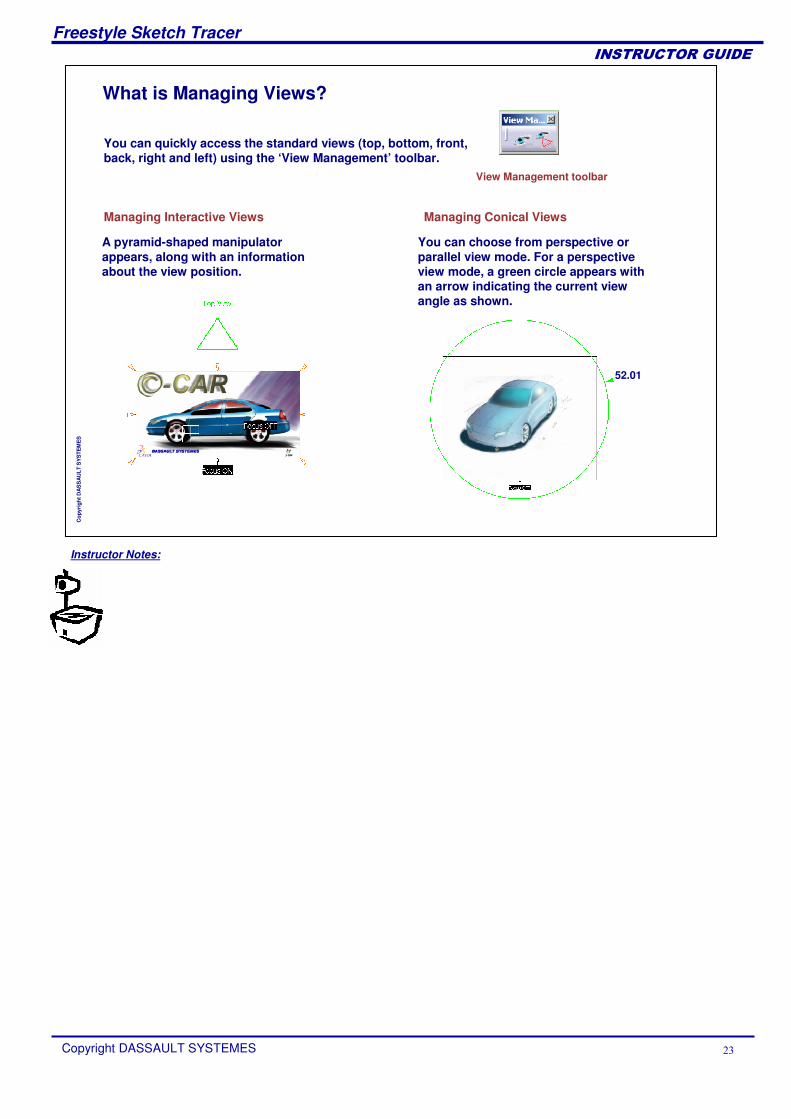
What is Managing Views?
You can quickly access the standard views (top, bottom, front, back, right and left) using the ‘View Management’ toolbar.
A pyramid-shaped manipulator appears, along with an information about the view position.
View Management toolbar
Managing Interactive Views Managing Conical Views
You can choose from perspective or parallel view mode. For a perspective view mode, a green circle appears with an arrow indicating the current view angle as shown.
52.01
Instructor Notes:
Freestyle Sketch Tracer
Copyright DASSAULT SYSTEMES ��
��������������
Cop
yrig
ht D
AS
SA
ULT
SY
STE
ME
S
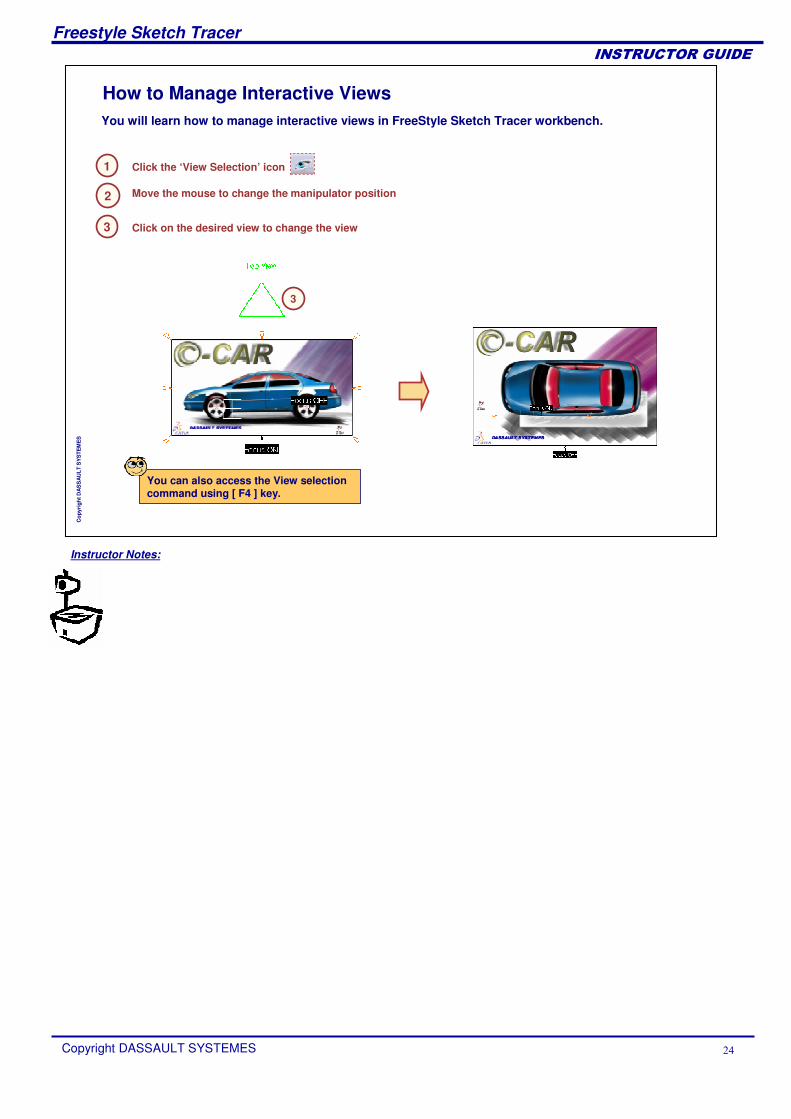
How to Manage Interactive Views
Click the ‘View Selection’ icon
Move the mouse to change the manipulator position
You will learn how to manage interactive views in FreeStyle Sketch Tracer workbench.
1
2
3 Click on the desired view to change the view
You can also access the View selection command using [ F4 ] key.
3
Instructor Notes:
Freestyle Sketch Tracer
Copyright DASSAULT SYSTEMES ��
��������������
Cop
yrig
ht D
AS
SA
ULT
SY
STE
ME
S
52.77
How to Manage Conical Views
Click the ‘View Modification’ icon
Select the View Render style, default style is ‘Perspective’
You will learn how to manage conical views in FreeStyle Sketch Tracer workbench.
1
For Perspective style, drag the green arrow to change the view angle
You can also access the View selection command using [ F2 ] key.
3
2
3
Click OK to accept the new angle4
Again click the ‘View Modification’ icon5
Set the View Render Style to ‘Parallel’ and click OK
6
Instructor Notes:
Freestyle Sketch Tracer
Copyright DASSAULT SYSTEMES ��
��������������
Cop
yrig
ht D
AS
SA
ULT
SY
STE
ME
S
Master Exercise: Sea CarIn this exercise you will create sketches which represent the side and top views of the Sea Car and then position the sketches.
Sea Car: Exercise PresentationStep 1: Creating the First SketchStep 2: Creating the Second Sketch
Instructor Notes:
Freestyle Sketch Tracer
Copyright DASSAULT SYSTEMES ��
��������������
Cop
yrig
ht D
AS
SA
ULT
SY
STE
ME
S
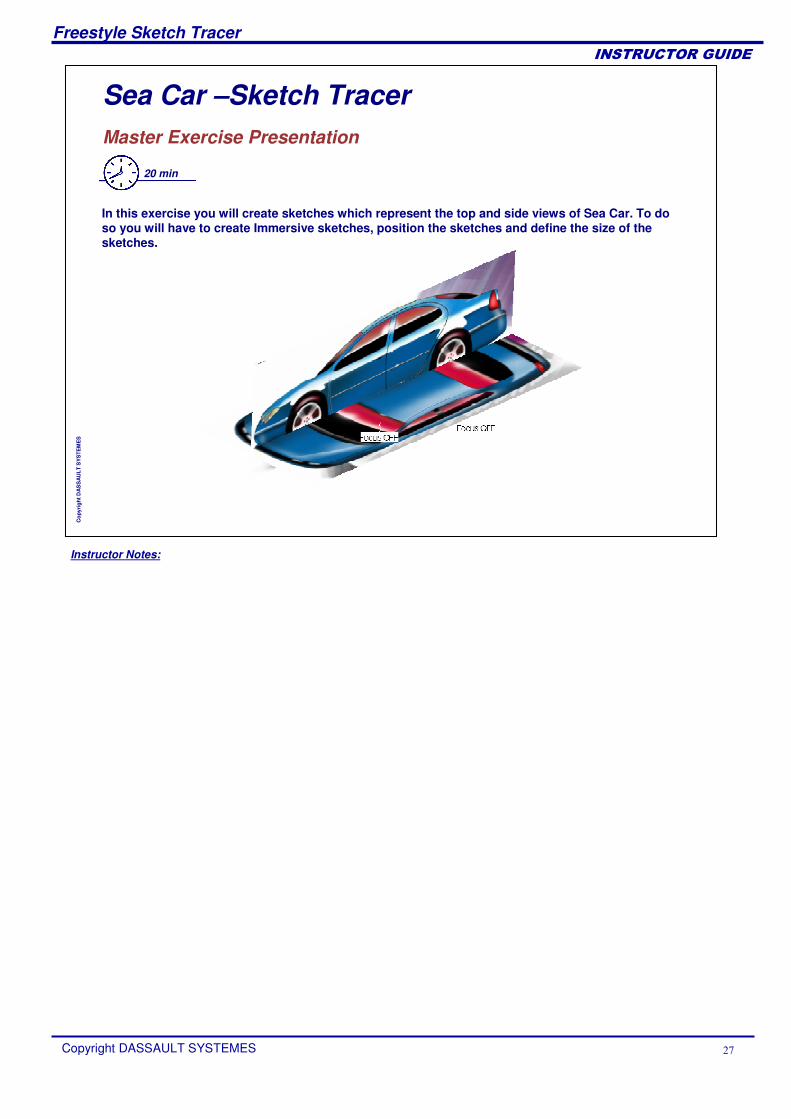
Sea Car –Sketch TracerMaster Exercise Presentation
20 min
In this exercise you will create sketches which represent the top and side views of Sea Car. To do so you will have to create Immersive sketches, position the sketches and define the size of the sketches.
Instructor Notes:
Freestyle Sketch Tracer
Copyright DASSAULT SYSTEMES ��
��������������
Cop
yrig
ht D
AS
SA
ULT
SY
STE
ME
S
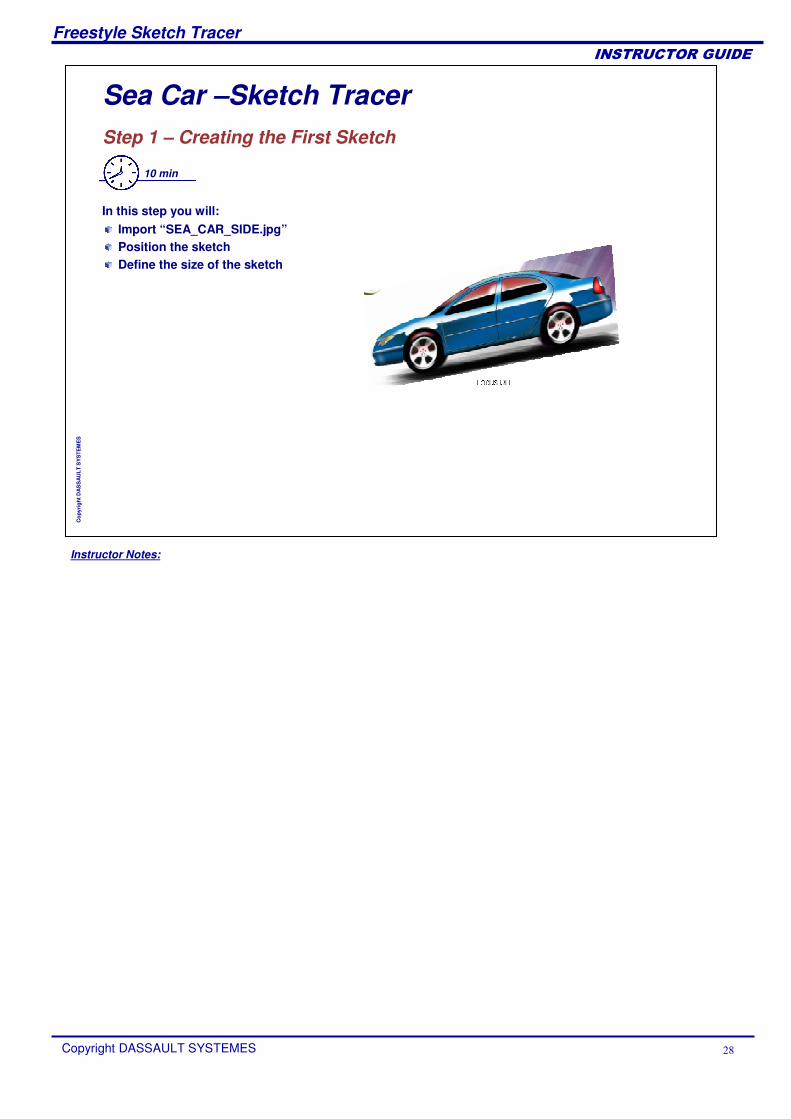
Sea Car –Sketch TracerStep 1 – Creating the First Sketch
10 min
Import “SEA_CAR_SIDE.jpg”Position the sketchDefine the size of the sketch
In this step you will:
Instructor Notes:
Freestyle Sketch Tracer
Copyright DASSAULT SYSTEMES �
��������������
Cop
yrig
ht D
AS
SA
ULT
SY
STE
ME
S
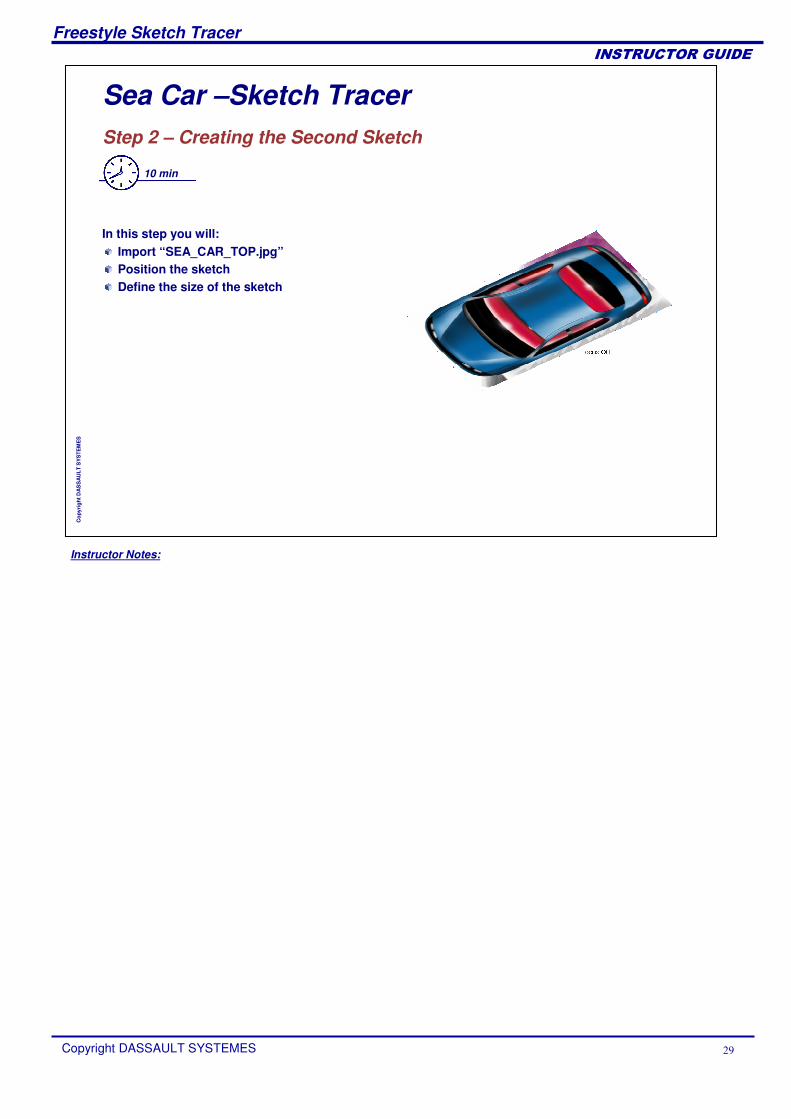
Sea Car –Sketch TracerStep 2 – Creating the Second Sketch
10 min
Import “SEA_CAR_TOP.jpg”Position the sketchDefine the size of the sketch
In this step you will: