caterpillar electronic technician getting started
TRANSCRIPT

Caterpillar Electronic
Technician Getting Started


Caterpillar Inc. Software License Agreement
IMPORTANT: THE MEDIA CONTAINING CATERPILLAR ELECTRONIC TECHNICIAN (THE "Program") THAT HAS BEEN PROVIDED TO YOU WILL ONLY RUN IN A TRAINING MODE. IF YOU DESIRE TO OBTAIN THE RIGHT TO USE THE PROGRAM, YOU MUST FIRST BECOME A LICENSED USER AND AGREE TO THE FOLLOWING TERMS AND CONDITIONS. TITLE: Title to this Program belongs to, and at all times shall remain the property of, Caterpillar Inc., Peoria, Illinois and/or its subsidiaries ("Caterpillar"), and is protected by copyright. By agreeing to this License Agreement, you do not become the owner of the Program or acquire any rights therein other than those specifically granted below. Use of the Program by anyone not a Licensed User is strictly prohibited. CONDITIONS PRECEDENT TO LICENSE: The Program includes protection mechanisms to prevent use of the Program until you become registered as a Licensed User and that prevent the use of certain functions of the Program without the appropriate license key. Your rights to use the Program are subject to your payment of all fees, your registration as a Licensed User on a Designated CPU, and our delivery of an appropriate license key to you to enable you to use the Program on the Designated CPU. As used herein, "Designated CPU" means the computer having the Caterpillar Electronic Technician serial number entered on the "Licensing" program screen in the Program. Caterpillar limits access to and use of certain functions of the Program to only authorized Caterpillar dealers, as Caterpillar, in its sole discretion, deems appropriate, and no rights to obtain passwords is granted to you herein. Your right to use the Program is also conditioned upon your assent to the terms and conditions of this License. THE PROGRAM REQUIRES THAT YOU ASSENT TO THESE TERMS AND CONDITIONS BY CLICKING ON THE "I AGREE" BUTTON DURING PROGRAM INSTALLATION. CLICKING ON THE “I AGREE” BUTTON, INDICATES YOUR ACCEPTANCE OF, AND AGREEMENT TO BE BOUND BY, THESE TERMS AND CONDITIONS.

LICENSE: You may: a. Use the Program only on the Designated CPU. Transfer of the Program to another computer must be accomplished in the manner set forth in the "Caterpillar Electronic Technician Software/Getting Started" information. b. Make a backup copy of the Program to support your use on the Designated CPU. The backup copy must include a reproduction of the copyright notice and other notices or legends as contained on the original Program and Program CD-ROM label(s). You may not: a. Transfer this License or otherwise provide or disclose the Program or any copy thereof to third parties; b. Grant sublicenses, leases, or other rights in the Program to third parties; c. Export or reexport the Program without the appropriate United States and/or foreign government license(s); d. Decompile, disassemble, or reverse engineer the Program or allow others to do the same; or e. Obtain or seek to obtain a PASSWORD to which you are not entitled or share any PASSWORDS obtained from Caterpillar with others. RESTRICTED PROGRAM FUNCTIONS: CERTAIN FUNCTIONS OF THE PROGRAM ARE LIMITED TO USE BY ONLY CATERPILLAR AND TEPS DEALERS AND OTHER AUTHORIZED USERS AND REQUIRE THE ENTRY OF SPECIFIC PASSWORDS IN ORDER TO ACCESS SUCH FUNCTIONS. Caterpillar Dealers, TEPS Dealers and those specifically authorized by Caterpillar to use such functions must obtain the passwords from Caterpillar’s Factory Password System. Unless you are authorized and provided with an appropriate password(s) by Caterpillar, access or use of such functions is prohibited and IMMEDIATELY TERMINATES YOUR LICENSE TO USE THE PROGRAM. LIMITED WARRANTIES: Caterpillar warrants that it is the sole owner of the Program or has full power and authority to grant the rights herein granted without the consent of any other party, and that the Program is delivered free of the rightful claim of any third party by way of infringement or the like. For a

period of ninety (90) days from your acceptance of this Agreement, Caterpillar also warrants that the media on which the Program is furnished will be free from defects in materials and workmanship under normal use. If a defect appears during the limited warranty period, you may return the media for free replacement. However, Caterpillar does not warrant that the Program will meet your requirements or that operation of the Program will be uninterrupted or error-free. EXCEPT FOR THE LIMITED WARRANTIES DESCRIBED ABOVE, THE PROGRAM IS PROVIDED "AS IS" WITHOUT OTHER WARRANTY OF ANY KIND, EITHER EXPRESSED OR IMPLIED, INCLUDING, BUT NOT LIMITED TO, THE IMPLIED WARRANTIES OF MERCHANTABILITY AND FITNESS FOR A PARTICULAR PURPOSE. YOU ASSUME RESPONSIBILITY FOR THE SELECTION OF THIS PROGRAM TO ACHIEVE YOUR INTENDED RESULTS, AND FOR THE INSTALLATION, USE, AND RESULTS OBTAINED FROM THIS PROGRAM. LIMITATION ON LIABILITY: In no event will Caterpillar be liable to you, in law or equity, for any special, indirect or consequential damages arising out of your use of the Program. Except for the warranty against infringement, you agree that regardless of the form of any claim you may have, Caterpillar’s liability will not exceed the license fee you paid for your rights to use the Program. TERM: This Agreement is effective until terminated as hereinafter provided. The license granted herein will automatically terminate without further action of Caterpillar if you fail to comply with the restrictions as recited herein. These restrictions are for the benefit of Caterpillar and/or applicable licensors of the copies thereof. Caterpillar may also terminate this License at any time upon thirty (30) days written notice to you. You may terminate this Agreement at any time by either returning the Program together with all copies thereof to Caterpillar or by destroying the same. Upon termination all of your rights to use Program shall cease and any further use by you is strictly prohibited. GENERAL: This Agreement will be governed by the laws of the State of Illinois, United States of America.

This Agreement may be modified only in a writing signed by the duly authorized representatives of Caterpillar. No action may be brought for any breach of warranty more than one year following the expiration of the warranty period. YOU ACKNOWLEDGE THAT YOU HAVE READ THIS AGREEMENT, UNDERSTAND IT AND AGREE TO BE BOUND BY ITS TERMS AND CONDITIONS. YOU FURTHER AGREE THAT IT IS THE COMPLETE AND EXCLUSIVE STATEMENT OF THE AGREEMENT BETWEEN US, WHICH SUPERSEDES ANY PROPOSAL OR PRIOR AGREEMENT, ORAL OR WRITTEN, AND ANY OTHER COMMUNICATIONS BETWEEN US RELATING TO THE SUBJECT MATTER OF THIS AGREEMENT. INQUIRIES: Should you have any questions concerning this Agreement, write to Caterpillar Inc., Intellectual Property Dept. 100 N.E. Adams St., Peoria, IL 61629-6490.

Table of Contents
INTRODUCTION....................................................................................1-1
WHAT YOU NEED TO RUN CATERPILLAR ELECTRONIC TECHNICIAN .........................................................................................2-1
SETTING UP CATERPILLAR COMMUNICATION ADAPTER II......................2-3 SETTING UP CATERPILLAR COMMUNICATION ADAPTER ........................2-6 SETTING UP PRO-LINK 9000 ............................................................2-11
INSTALLING CATERPILLAR ELECTRONIC TECHNICIAN ...............3-1 REMOVING CATERPILLAR ELECTRONIC TECHNICIAN ..........................3-12
LICENSING CATERPILLAR ELECTRONIC TECHNICIAN .................4-1 TRANSFERRING A LICENSE .................................................................4-6
CATERPILLAR ELECTRONIC TECHNICIAN DOCUMENTATION.....5-1
TRAINER ...............................................................................................6-1
WHAT’S NEW........................................................................................7-1
TROUBLESHOOTING NOTES/FREQUENTLY ASKED QUESTIONS8-1 DBSI WEBSITE ..................................................................................8-9
CATERPILLAR ELECTRONIC TECHNICIAN START MENU .............9-1 CHALLENGER TECHNICIAN..................................................................9-2 M300 TECHNICIAN.............................................................................9-3 ONLINE HELP.....................................................................................9-4 READ ME FILE ...................................................................................9-5 CAT ET TUTORIAL .............................................................................9-6
INFOCAST WEBSITE .........................................................................10-1
PC SOFTWARE SUPPORT HOTLINE ...............................................11-1 CATERPILLAR ELECTRONIC TECHNICIAN TROUBLESHOOTING TRACKING FORM ..............................................................................................11-2


1-1
Introduction
Caterpillar Electronic Technician (Cat ET) is a service tool designed to run on a personal computer (PC) under Microsoft Windows™. All service tool documentation assumes the user has some Microsoft Windows experience. If this does not describe you, please take some time to acquaint yourself with Windows 2000, or XP before installing your service tool. The data and menus displayed in the illustrations of this manual may be different from those displayed in your service tool. This is because there are many different Electronic Control Modules (ECMs) serviced with Caterpillar Electronic Technician.

2-1
What You Need To Run Caterpillar Electronic Technician
To run your service tool, you will need to meet the following PC Requirements, communication hardware, and cables. Note: The minimum PC Configurations should not be used as a standard when buying new personal computers to run the service tool. If you have existing equipment that meets these minimum requirements, it will run your service tool.
PC Requirements Recommended Configurations
• IBM® PC compatible with Pentium IV 2.4 GHz processor • 1GB RAM • 1GB available hard disk drive or higher • File transfer device • 15 inch XGA Screen (1280x1024) • Microsoft� Windows™ 2000 SP4, or XP SP2 operating
system • RS232 port with 16550AF UART or compatible • Built in pointing device or mouse • Microsoft� Internet Explorer 6.0 or later version
Minimum Configurations
• IBM® PC compatible with Pentium IV 1.8 GHZ processor • 512MB RAM • 1GB available hard disk drive or higher • File transfer device • 14.1 inch XGA screen (800x600) • Microsoft� Windows™ 2000 SP3, or XP operating system • RS232 port with 16550AF UART or compatible • Built in pointing device or mouse • Microsoft� Internet Explorer 6.0 or later version

2-2
Note: If your screen size is 640x480, press the maximize button to fill the screen.
Communication Hardware 171-4400 Tool Group - Caterpillar Communication Adapter II Note: For additional requirements, see "Setting up Caterpillar Communication Adapter II," section 2, page 3.
OR--
7X1700 Tool Group - Caterpillar Communication Adapter Note: For additional requirements, see "Setting up Caterpillar Communication Adapter," section 2, page 6.
OR--
MPSI Pro-Link® 9000 (only for On Highway Truck engines and certain commercial applications) Note: For additional requirements, see "Setting up MPSI Pro-Link 9000," section 2, page 8.
Exceptions The requirements for Challenger Technician (CT), M300 Technician (M300), and Hydraulic Excavators B-Series (HEX) are the following: CT: 1U9100 Cable Assembly - Challenger to PC Adapter cable M300: 126-7877 Cable Assembly - M300 to PC Adapter cable HEX: 127-9797 Cable Assembly - HEX to PC Adapter cable Note: For HEX, in the Communications tab of the Preferences dialog box, select the Communication Adapter option from the Communication Interface Device drop-down list. Then press the "Advanced" pushbutton. Select the 19200 baud rate radio button. Press "OK." Note: Engines that do not have a service connector may also require the 140-9442 ATA\CDL T-Adapter.

2-3
Setting up Caterpillar Communication Adapter II
Requirements 171-4400 - Caterpillar Communication Adapter II Group Included in this group is the following equipment: Part Number Description 171-4401 Caterpillar Communication Adapter II 207-6845 Data Link Cable (24 inch)
This cable must be used for J1939/11 communications.
196-0055 Serial PC Cable (25 foot) 6V-3072 Carrying Case 177-4595 Block/Foam for carrying case NEHS0758 Communication Adapter II CD-ROM and
User's Manual

2-4
Optional Cables: Part Number Description 7X-1686 In-Cab Adapter Cable for ATA 157-4829 In-Cab Adapter Cable for the J1939/11 160-0142 Serial PC Cable (10 foot)
This cable can only be used with the Caterpillar Communication Adapter II 171-4401
225-5985 Parallel PC Cable (25 foot) IEEE 1284 (male to male connector) This cable is for PCs that do not have a serial port. Cat ET version 2002A or later must be installed on the PC in order to have the LPT1 option available in the Communication Preferences dialog box. This cable can only be used with the Caterpillar Communication Adapter II 171-4401.
237-7547 USB to Serial Adapter Kit (16 inches) 139-4166 ATA/CDL Unicable from a Caterpillar
communication adapter to the service connector Note: You may also use the 7X1412 ATA or 7X1570 CDL cable. However, these are no longer available for purchase from Caterpillar Inc.
140-9442 ATA/CDL T-Adapter (not required for all applications)
167-9225 Cable Assembly used to connect your service tool directly to the ECM.
214-0113 Main Harness 214-0114 A3 & A4 E4 stub 224-4899 A4 E1 stub

2-5
Instructions To connect the Communication Adapter II to the PC, perform the following steps: Step 1 Align and attach one end of the PC cable to the PC
cable connection on the Communication Adapter II. Step 2 Connect the other end of the cable to the communication
port of your PC.
To connect the Communication Adapter II to the data link, perform the following steps: Step 1 After you have connected the Communication Adapter II
to your PC, connect one end of the data link cable to the data link connection on the Communication Adapter II.
Step 2 Connect the other end of the data link cable to the
service connector on the product you wish to test. If the data link is powered (machine power is on), the Power light on the Communication Adapter will glow and the diagnostic test will begin. The lights on the front of the Communication Adapter II will sequentially glow from the bottom to the top of the device. You are now ready to start the service tool.
Note: For more information on installation procedures, consult the Caterpillar Communication Adapter II Users Manual.

2-6
How to Update the Communication Adapter II Firmware to SIP
NOTE: Use the Comm Adapter II Toolkit version 1.1, 1.93 or greater drivers to update the Comm Adapter II. NOTE: Only use the serial port to upgrade the Comm Adapter II, do not use the Parallel port.
Instructions To update the Communication Adapter II Firmware, perform the following steps: Step 1 Make sure the Comm Adapter II is connected to the PC
and powered light is on. Step 2 Go to the Start menu on your computer. Choose
Programs -> Caterpillar Comm Adapter II -> Comm Adapter II Toolkit.
Step 3 The Toolkit application will start up and display the
Summary screen. Step 4 Choose the Application Firmware Flash icon (middle
icon). The Select Firmware Flash File dialog box displays.
Step 5 You should see these files listed on the left:
ca2v1i0.apf - v1.0 application firmware ca2v1i1.apf - v1.1 application firmware ca2v1i1b1.apf - v1.1-B1 application firmware ca2v2i2.apf - v2.2 application firmware ca2v2i2_26.apf - SIP application firmware
Note: Caterpillar Communication Adapter (7X1701) does not support J1939 data link. Step 6 Highlight the ca2v2i2_26.apf file and press the OK
button. Step 7 Press the Begin Flash button to start the download.

2-7
Step 8 A dialog box showing the download progress will appear. The download should take less than 1 minute.
Step 9 The protocol lights on the front of the Comm Adapter II
will all flash while flashing the firmware. Step 10 When the download is complete, a dialog box will appear
allowing you to return to the Summary screen, the Flash screen, or Exit.
Step 11 Press the Exit button. For further details on the Toolkit application and the Application Firmware Flash process, please refer to the Communication Adapter II User's Manual.

2-8
How to Configure Electronic Technician to use the Communication Adapter II
In order for Electronic Technician to work with the Communication Adapter II, you must change the Settings to select the Communication Adapter II as your Communication Interface Device:
Step 1 Start Caterpillar Electronic Technician Step 2 Press the "Stop Connect" button when it appears Step 3 Select the "Settings" menu (or the "Utilities" menu with
ET 2001A or later) Step 4 Choose "Preferences..." Step 5 Select the "Communications" tab Step 6 Change the Communication Interface Device to SIP Step 7 "COM1" should be selected. This application firmware
only supports Serial communications.

2-9
Setting up Caterpillar Communication Adapter
Requirements 7X1700 - Caterpillar Communication Adapter Group Note: You may use the 7X1701 Caterpillar Communication Adapter; however, it is no longer available for purchase from Caterpillar. Also requires: Part Number Description NEXG4523 Communication Adapter Software SPM
(Service Program Module) Version 1.2 or greater
7X-1425 RS232 Serial PC Cable This cable can only be used with the Caterpillar Communication Adapter 7X1701
139-4166 ATA/CDL Unicable from a Caterpillar communication adapter to the service connector Note: You may also use the 7X1412 ATA or 7X1570 CDL cable. However, these are no longer available for purchase from Caterpillar Inc.
140-9442 ATA/CDL T-Adapter (not required for all applications)
167-9225 Cable Assembly used to connect your service tool directly to the ECM

2-10
Instructions To set up the Communication Adapter, perform the following steps: Step 1 Connect the 7X-1425 RS232 cable to an available Serial
Port on your PC and to the Service Tool connector on the Communication Adapter.
Step 2 Connect the 139-4166 Unicable to the Control connector
on the Communication Adapter and to the service connector on the product that you are servicing. You are now ready to start your service tool.
Note: Caterpillar Communication Adapter (7X1701) does not support J1939 data link.

2-11
Setting up Pro-Link 9000
Requirements MPSI Pro-Link® 9000 (only for On Highway Truck engines and certain commercial applications) This package also requires the following equipment: Description MPSI PC/Terminal Cable MPSI Caterpillar Cartridge (version 1.07 or greater)
Note: If programming a 3126 HEUI, it is recommended you disconnect the power to the Allison transmission and re-connect with Pro-Link.
Instructions Perform the following steps to set up the Pro-Link 9000: Step 1 Insert the MPSI Caterpillar Cartridge in the Pro-Link®
9000. Step 2 Connect the Pro-Link 9000 to your PC’s serial port using
the MPSI PC/Terminal cable. Step 3 Connect the Pro-Link 9000 to the product and turn the
ignition key of the vehicle on to power the Pro-Link. Step 4 Select Pro-Link from the main menu or push the “Func”
key to recall data if no engine data is received. Step 5 Select the Com Adapter Link function from the Pro-Link
menu, and push “Enter” to initiate the Com Adapter Link mode. The Pro-Link will display a screen showing that the Com Adapter Link is active. You are now ready to start the service tool.

3-1
Installing Caterpillar Electronic Technician
Purpose The installation procedure described below is for installing your service tool. The installation program is designed to run under Microsoft Windows 98/NT/2000/ME/XP. The installation requires one Install CD-ROM. This installation process will upgrade your current service tool and preserve files created such as defined Status Groups or service tool report documents. Note: The service tool will not run from a server over a network.
Instructions Perform the following steps to install the service tool from the Install CD-ROM: Step 1 Close any applications you are running. This includes
any connections to mainframe computers or networks. Only Windows should be running.
Note: If you are running Windows NT, Windows 2000, or Windows XP, you must have administrative rights on your computer system to install the service tool. Step 2 Insert Caterpillar Electronic Technician Install CD-ROM
into your computer’s CD-ROM drive. Step 3 Press the “Start” pushbutton on the Task Bar. From the
menu, select “Run.” The Run dialog box is displayed (Refer to Illustration 3-1).

3-2
Illustration 3-1: Run dialog box
Step 4 In the text box type the following: z:\setup.exe If the CD is in a CD-ROM drive other than “z,” substitute “z” with the appropriate drive letter.
Step 5 Press “OK.” The “Setup is preparing…” status box is displayed (Refer to Illustration 3-2).
Illustration 3-2: "Setup is preparing…" status box
This status box shows the percentage status of the InstallShield Wizard setup. When it is finished, the Welcome dialog box is displayed (Refer to Illustration 3-3).

3-3
Illustration 3-3: Welcome dialog box
Step 6 Read through the welcome message. Press the “Next>” pushbutton to continue the setup. The Software License Agreement dialog box is displayed (Refer to Illustration 3-4). Press “Cancel” to abort the setup process.
Illustration 3-4: Software License Agreement dialog box
Step 7 Read through the license agreement. Press the “I Agree” pushbutton to accept the terms and conditions. The Select Components dialog box is displayed (Refer to Illustration 3-5).

3-4
Press “<Back” to return to the previous screen. Press “I Decline” to abort the setup process.
Internet Explorer information: You must have at least Internet Explorer version 5.5 installed on your PC to run the service tool. If you do not have Internet Explorer on your PC, you must install it. If you have an older version of Internet Explorer on your PC, it may not support the service tool, and you need to update your current version of Internet Explorer. Press “Yes” in the Install Internet Explorer dialog box to begin the installation. See “PC Requirements,” section 2, page 1.
Note: A message box may display asking you to reboot. Rebooting is required before continuing installation. Upgrade information: If you are upgrading from a previous version of the service tool, and if your current service tool is licensed, the License dialog box is displayed showing the current license number. Write down the license number and keep it in a safe place. Press “OK.” The Select Components to Install dialog box is displayed. Service Tool Serial Number___________________________ NOTICE: To keep your existing license, always install the service tool in the same folder as the previous installation.

3-5
Illustration 3-5: Select Components dialog box
Step 8 Select the check box corresponding to the components(s) you wish to install.
Browse To select a path different from the one
shown in the Destination Folder area, press the “Browse…” pushbutton. The Choose Folder dialog box will display. In this dialog box, you can change the directory path by selecting the drive and folder that you want to install to by typing the complete path in the Path text box.
Disk Space To check available hard disk drive space
for all available drives, press the “Disk Space…” pushbutton. The Available Disk Space dialog box will display.
Changing the drives in the Available Disk
Space dialog box changes the drive your destination folder is pointing to in the Select Components to Install dialog box.
Press the “Next>” pushbutton to continue the setup. The Select Languages dialog box is displayed (Refer to Illustration 3-6). Press “<Back” to return to the previous screen. Press “Cancel” to abort the setup process.

3-6
Illustration 3-6: Select Languages dialog box
Step 9 Select the check box next to the language(s) you wish to install. Press the “Next>” pushbutton to continue the setup. If more than one language is selected, the Select Default Language dialog box is displayed (Refer to Illustration 3-7). Press “<Back” to return to the previous screen. Press “Cancel” to abort the setup process.
Select All To select all language check boxes, press
the “Select All” pushbutton. Clear All Pressing the “Clear All” pushbutton clears
all checked languages except English, which is always checked.

3-7
Illustration 3-7: Select Default Language dialog box
Step 10 Select the radio button corresponding to the default language you want. You can change the language later in the service tool.
Press the “Next>” pushbutton to continue the setup. The Select Program Folder dialog box is displayed (Refer to Illustration 3-8). Press “<Back” to return to the previous screen. Press “Cancel” to abort the setup process.
Illustration 3-8: Select Program Folder dialog box

3-8
Step 11 Caterpillar ET is the default Program Folder name. If you want to change the Program Folder name, select a folder from the Existing Folders text box, or type a folder name in the Program Folders text box. Press the “Next>” pushbutton to begin copying files. The Setup screen is displayed. Press “<Back” to return to the previous screen. Press “Cancel” to abort the setup process.
Note: A dialog box displays the question, "Would you like this installation to put the service tool icon on your desktop?" Press "Yes" to place the icon on your desktop, or press "No" if you do not want the icon placed on your desktop. Once the service tool icon is placed on your desktop, this dialog will not display. Step 12 The setup process begins copying files. Press “Cancel”
to abort the setup/install procedure.
When the installation process is successfully completed, the Setup Complete dialog box is displayed. The Setup Complete dialog box varies depending upon whether or not the computer must be restarted to complete the installation or if you need to license your service tool.
Communication Adapter II information: When installing the Communication Adapter II, a message box is displayed with important instructions about the Communication Adapter II. Press "OK."

3-9
Warning for service tool user: If you are installing the service tool on Windows 2000 or XP, a warning box displays suggesting that anyone running Caterpillar Electronic Technician be a member of the “Power User” group (Refer to Illustration 3-9). Press “OK.”
Illustration 3-9: Warning box for Power User
Step 13 If the Setup Complete message box displays the following message: "Some files were locked – Must Reboot to Finish Setup" (Refer to Illustration 3-10), then you must restart your computer to complete the setup.
Illustration 3-10: Setup Complete dialog box
Note: If you do not install the Comm Adapter II software, the WARNING message does not display in this dialog box.
Select the “Yes, I want to restart…” radio button to restart your computer now, or select the “No…” radio button to restart your computer later. Press the “Finish” pushbutton to complete the setup. The “<Back” pushbutton is disabled.

3-10
Note: If you elect not to reboot at this time, the service tool will not operate correctly.
OR--
If upgrading from a licensed version, the Setup Complete dialog box is displayed with the following message: "Setup can launch the Read Me file and Caterpillar Electronic Technician." (Refer to Illustration 3-11).
Illustration 3-11: Setup Complete dialog box
Select the appropriate check box depending on whether you want to launch Read Me or start the service tool. Press the “Finish” pushbutton to complete the setup. The “<Back” pushbutton is disabled.
OR--
If the service tool is not already licensed, the Setup Complete dialog box is displayed with the message: "Setup can launch the Read Me file and License Caterpillar Electronic Technician" (Refer to Illustration 3-12).

3-11
Illustration 3-12: Setup Complete dialog box
Select the appropriate check box depending on whether you want to launch Read Me or License Caterpillar Electronic Technician. Press the “Finish” pushbutton to complete the setup. The “<Back” pushbutton is disabled.
Note: See "Licensing Caterpillar Electronic Technician," section 4, page 1.
3-12
Removing Caterpillar Electronic Technician
Purpose If you wish to remove the service tool, use the Add/Remove Program utility in the Control Panel program group. This will safely remove the service tool program without invalidating your current license. Deletion of the service tool directory invalidates your license. Note: If Caterpillar Electronic Technician version 2.x, had been installed on this computer the Remove All icon may display in the Caterpillar Electronic Technician group box. Do not uninstall Caterpillar Electronic Technician using this icon.
Instructions To Uninstall the service tool software, perform the following steps:
Step 1 Press the “Start” pushbutton on the Task Bar. From the
menu select “Settings” and then “Control Panel.” Step 2 Double click on Add/Remove Programs. The
Add/Remove Programs Properties dialog box is displayed (Refer to Illustration 3-13).

3-13
Illustration 3-13: Add/Remove Program Properties dialog box
Step 3 Select the Install/Uninstall tab. Select Caterpillar Electronic Technician in the text box.
Step 4 Press the “Add/Remove…” pushbutton. The Confirm File
Deletion message box displays, asking if you want to completely remove the software (Refer to Illustration 3-14).
Illustration 3-14: Confirm File Deletion message box
Step 5 Press “Yes” to completely remove the service tool and all of its components from your computer. The Remove Programs From Your Computer status box displays (Refer to Illustration 3-15).
3-14
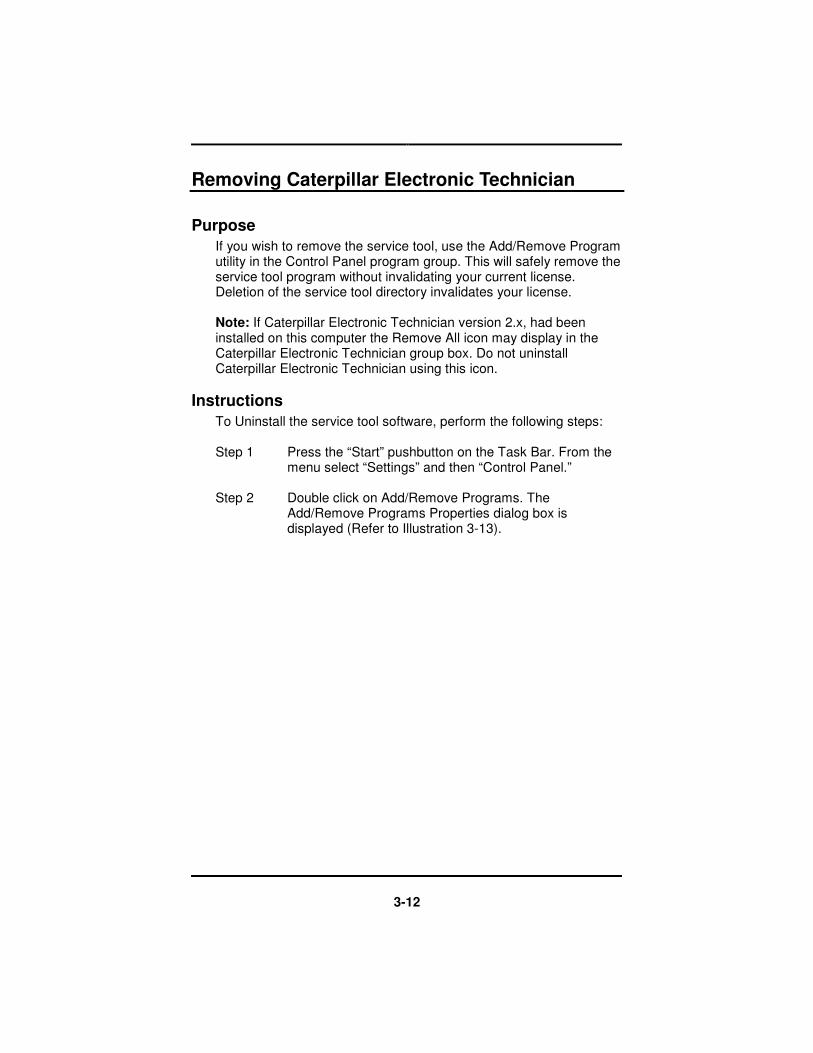
Illustration 3-15: Remove Programs From Your Computer status box
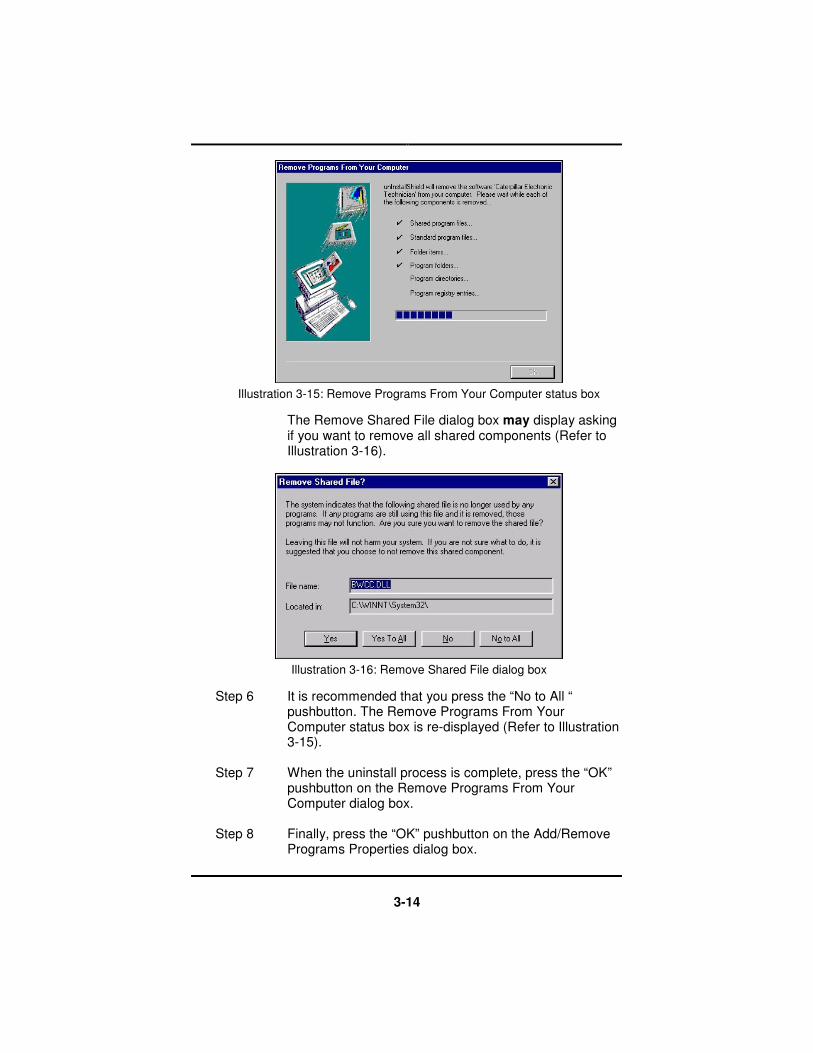
The Remove Shared File dialog box may display asking if you want to remove all shared components (Refer to Illustration 3-16).
Illustration 3-16: Remove Shared File dialog box
Step 6 It is recommended that you press the “No to All “ pushbutton. The Remove Programs From Your Computer status box is re-displayed (Refer to Illustration 3-15).
Step 7 When the uninstall process is complete, press the “OK”
pushbutton on the Remove Programs From Your Computer dialog box.
Step 8 Finally, press the “OK” pushbutton on the Add/Remove
Programs Properties dialog box.

4-1
Licensing Caterpillar Electronic Technician
Note: The contents of this chapter apply only to Dealer Coordinators. Contact your Dealer Coordinator for information on licensing your service tool.
Illustration 4-1: License dialog box
Accessing The Licensing dialog box allows you to register your service tool, or change your subscription type. There are three different opportunities to license your service tool: • During installation of the service tool • Running the service tool without an active license • Selecting “License” from the Utilities drop-down menu in the
service tool program
Hyperlink for online licensing

4-2
During installation of the service tool: Step 1: During installation of Caterpillar Electronic Technician,
the Setup Complete dialog box is displayed (Refer to Illustration 4-2).
Illustration 4-2: Setup Complete dialog box
Step 2 Select the License Electronic Technician check box. Press “Finish.” The Licensing dialog box is displayed (Refer to Illustration 4-1).
Running the service tool without an active license: Step 1 When you launch Caterpillar Electronic Technician and
have not licensed it yet, a message box displays asking if you want to license the program now (Refer to Illustration 4-3).
Illustration 4-3: Electronic Technician License message box

4-3
Step 2 Press the “Yes” pushbutton to license the service tool. The Licensing dialog box is displayed (Refer to Illustration 4-1).
Selecting License Cat ET… from the Utilities drop-down menu: In the service tool main screen, select “License Cat ET…” from the
Utilities menu (Refer to Illustration 4-4).
Illustration 4-4: Utilities drop-down menu functions
The Licensing dialog box is displayed (Refer to Illustration 4-1).
Notice Once your service tool is registered, write down the Serial Number and keep it in a safe place. You will need this number to transfer or re-license the service tool. Service Tool Serial Number___________________________
Note: If you have a licensed copy of the service tool, you do not need to re-license it.

4-4
Caterpillar Media and Product Information Logistics Fax: (309) 494-1348 or (309) 494-1345 Email: [email protected] or Media Logistics (Lotus Notes) Hours: Monday through Friday 7:30am to 4:30pm (Central Standard Time)
Licensing Caterpillar Electronic Technician To license Caterpillar Electronic Technician online: Step 1 Select the hyperlink in the Licensing dialog box. Your
Internet browser displays the Corporate Web Security page.
Step 2 Enter your CWS Logon ID and Password in the text
boxes. Note: If you do not have a CWS Logon ID, you cannot use this option. Step 3 Press the "Login" pushbutton. The Service Systems
Software Online Licensing screen displays. Step 4 Press the "License" pushbutton in the center of the
screen. A series of screens will guide you through the licensing procedure.
Perform these three steps to license Caterpillar Electronic Technician by FAX or email: Step 1 In the Licensing dialog box press the “Print to File”
pushbutton. The File Save As dialog box is displayed. Select a location to save this license.txt file.
Step 2 Open the “license.txt” file. The service tool License
Request form is displayed. Fill out this form as directed and email or FAX the information to Caterpillar Media and Product Information Logistics.

4-5
These mailing instructions are also included on the license.txt form. By default, this file is located in the service tool program folder.
Step 3 Press the “Close” pushbutton in the Licensing dialog box.
Step 4 When you receive the email or FAX from Caterpillar
Media and Product Information Logistics, open the Licensing dialog box from the service tool.
Step 5 Enter the License Key in the text box exactly as it
displays in the email or FAX. Step 6 Press the “Authorize!” pushbutton. The “License
granted” message box is displayed. Press “OK.”

4-6
Transferring a License
Illustration 4-5: About Caterpillar Electronic Technician message box
Important If you are transferring your service tool license from another computer, you must have the Serial Number from the original license. Service Tool Serial Number___________________________
Instructions To transfer your license, complete these two steps: Step 1 Obtain the Serial Number from the original service tool
program. If you do not know this number, select About Electronic Technician from the Help menu (Refer to Illustration 4-5). The Serial Number will display in the message box. Write down the Serial Number.
Step 2 Install the service tool onto the new computer (the
computer you are transferring your license to).
With the Licensing dialog box displayed in front of you, call Caterpillar Media and Product Information Logistics. Refer to “Licensing Caterpillar Electronic Technician,” section 4, page 4.

5-1
Caterpillar Electronic Technician Documentation
Overview An electronic copy of Caterpillar Electronic Technician Getting Started is included on the current service tool Install CD-ROM. To view or print this manual, you must first install Adobe Acrobat Reader version 4.0 or greater. Adobe Acrobat Reader version 4.0 is also included on the Caterpillar Electronic Technician Install CD-ROM.
Instructions To install Adobe Acrobat Reader: Step 1 Insert the Install CD-ROM into your computer’s CD-ROM
drive. Step 2 In Explorer, select your CD-ROM drive. Step 3 Select the Adobe Acrobat Reader file folder.
Step 4 Select the rs405eng.exe file. This installs Adobe
Acrobat Reader on your PC.
For more information about Adobe Acrobat Reader, view the Reader.pdf file.

6-1
Trainer
Illustration 6-1: Trainer menu functions
Purpose Trainer runs the service tool in a training mode. This allows you to become familiar with the service tool without needing to be connected to an Electronic Control Module (ECM) or Communications Adapter. There is no charge for Trainer, and authorization is not required.
Instructions Using Trainer: Step 1 Select Caterpillar ET from the Programs menu, and then
select Electronic Technician from the submenu. The Connection message box is displayed (Refer to Illustration 6-2).

6-2
Illustration 6-2: Connection message box
Step 2 Press the "Stop Connect" pushbutton. The service tool main screen is displayed.
Step 3 Select Trainer from the Help menu, and then select
Enable from the submenu, or push the Enable Trainer icon on the toolbar (if default is set). The Trainer dialog box is displayed (Refer to Illustration 6-3).
Illustration 6-3: Trainer dialog box
Step 4 Select a product from the Application drop-down list. Step 5 Press "OK.” The Connection message box is displayed.
The ECM Summary screen displays in the trainer mode (Refer to Illustration 6-4). Trainer simulates some of the service tool functions.

6-3
Press “Cancel” to exit Trainer. You will return to the service tool main screen.
Illustration 6-4: Trainer screen
Note: When you are in trainer mode, "Trainer Active" displays on the Title Bar.
To change the product simulated within Trainer: Step 1 Select Trainer from the Help menu, and then select
Properties from the submenu. The Trainer dialog box is displayed (Refer to Illustration 6-3).
Step 2 Select a different product from the Application
drop-down list. Step 3 Press "OK.” The Connection message box is displayed.
Then the new product is displayed. To exit Trainer: Select Trainer from the Help menu, and then select Disable on the
submenu, or push the Disable Trainer icon from the toolbar (if default is set).
"Trainer Active" displays on the Title Bar

7-1
What’s New
Illustration 7-1: What's New screen using a browser
Purpose What's New allows you to view a list of new functions and major enhancements available in the installed version of the service tool. What's New launches your browser when it is selected from the Help drop down. What's New is displayed in the language selected as default in the Select Default Language dialog box during the installation of your service tool.
Instruction To view the What's New screen, select What’s New from the Help
menu (Refer to Illustration 7-1).

8-1
Troubleshooting Notes/Frequently Asked Questions
Power Management Turn off Power Management (for example a screen saver or "sleep" mode) when using your service tool. Communication to the ECM might be interrupted if the PC "suspends."
Infrared Communication Problems If your computer supports infrared communication, you may experience some communication problems with the service tool. It is recommended that you disable the infrared option. If you need help with this procedure, please contact the computer manufacturer.
Disk Defragmentation/Disk Compression The service tool will remain unaffected by Disk Compression and/or Defragmentation programs as long as the compression/defragmentation programs do not move hidden or system files during the process.
Windows NT, 2000, and XP Installation Administrative rights are required to install Cat ET for the first time. Most upgrades do not require administrative rights.
Error Code LIC0102 The Windows NT driver appears not to be serving this directory. The CrypKey License service is not started, or the service is not protecting the Cat ET directory. To determine if the CrypKey License service is started, select Services from the Control Panel (in Windows 2000 or XP, select Administrative Tools from the Control Panel), then select services. CrypKey License should appear in the service list. If the CrypKey License service is not started, then the service needs to be started. If it is not there, then re-install the service tool. Note: The user must have administrative rights to add a directory.

8-2
To start the service: Run the SETUP_CK.EXE program located in the windows directory (i.e. C:\WINDOWS\ ). Once the CrypKey License service is started, it automatically starts every time the system starts (Any user can then log in and use the CrypKey License service.). If the CrypKey License service is running and you still get the LIC0102 error code, then the problem may be that the service tool path is not protected. Run the CKCONFIG.EXE program located in the windows directory (i.e. C:\WINDOWS\ ). The service tool directory must be listed in the CrypKey NT Server Configure window. If it is not, it must be added. To add the service tool directory, do the following: Press the "Add" pushbutton. The Open dialog box is displayed. Choose ETECH.EXE in the service tool directory (i.e. C:\Program Files\Caterpillar Electronic Technician\), and press "OK." Press the "Close" pushbutton. If you get an "Internal Error Open SC Manager" failure when the CrypKey NT Server Configure program was closed, you may not have Administrator privileges. Therefore, the CrypKey License server was not updated.
Installation Errors When calling for support, report the error code number to the support staff member. This aids in solving the installation problem. The chart below is a list of error codes and the possible solutions to those errors. Error Code
Error Description Suggestion
300 Unable to load DLL. Restart computer and run installation again.
301 License Validation Failed (bad checksum on the file).
A file may be damaged, try reinstalling the Cat ET Software.
302 License Validation Failed (Cat ET Version Check Failed).
A file may be damaged, try reinstalling the Cat ET Software.

8-3
Error Code
Error Description Suggestion
303 License Validation Failed (An old serial number has been detected on this computer and cannot be updated).
Need a new license before upgrading.
304 You must have administrative rights to install Crypkey Service.
Logon as an administrator and run setup again.
305 Crypkey Installation Failed.
Restart computer. Logon as an administrator and run setup again.
307 Unable to use the csutil.dll file.
Contact the PC Software Support Hotline.
400 Cat ET must be installed into a subdirectory.
Select a folder on the “Select Components” screen during setup (i.e. C:\Cat ET).
404 Cat ET cannot be installed onto a network drive. Please try again.
Select a local drive (i.e. c: or d:) on the “Select Components” screen during setup.
405 Cannot find the shared application folder.
Contact the PC Software Support Hotline.
--- “The ODBC Setup Library is being used and is locked. Make sure no other program is running. Setup cannot continue.”
Close all programs and run setup again. You may need to restart the computer and run setup again. When using Windows NT, 2000, or XP make sure there are no services using ODBC, such as "SQL Server." Make sure Control Panel is not open.

8-4
Selecting the Correct Port Select Preferences… on the Utilities menu. The Preferences dialog box is displayed. Select the Communications tab. Laptops: If you use the built-in pointing device on your laptop PC, your first available port is usually COM 1. Personal Computer (PC): If your PC has a mouse with a round plug, your first available port is usually COM 1. If your PC has a mouse that DOES NOT have a round plug, your first available port is usually COM 2. If your PC DOES NOT have a mouse, your first available port is usually COM 1.
Communication Errors Two types of error messages display when communication problems occur. Understanding these messages can help you correct the situation. “Unable to Communicate with an ECM!” This is a problem between the communication interface device and the ECM. The PC did detect the communication interface device. Make sure all connections between the communication interface device and the ECM are secure and intact. If the error displays again, verify that you are using the correct cables for your application. • Check all connections between the communication interface
device and the ECM. • Verify that you are using the correct cables for your application. • Verify that the ECM has power. “Unable to Communicate with the Caterpillar Communication Adapter!” This error refers to a problem between the PC and the Communication Adapter. • Check all connections between the PC and the ECM. • Check that the Communication Adapter is receiving external
power. The product being serviced must have the key switch on for power, unless it is connected directly to a battery.
• Verify in Preferences, under the Settings menu, that the correct port is selected.

8-5
• Verify in Preferences, under the Settings menu, that the correct Communication Interface Device is selected.
• If the error displays again, verify that you are using the correct cables for your application.
• If using a serial port, verify that your PC Comm Port is set up correctly and is not in use by another device (for example Palm Pilot Software). Try using another Comm Port, if it is available.
Caterpillar Communication Adapter II Error Codes: When calling for software support, report the error code number to the support staff member. This will aid in solving the communication problem. The chart below is a list of error codes and the possible solutions to those errors. Error Code
Error Description Suggestion
--- No initialization file present.
Install the Caterpillar Communication Adapter II software on the PC and reboot.
--- Unable to read Cat Communication Adapter (RP1210) Initialization File.
If the PC has Cat Comm Adapter II software installed, try rebooting the PC first. If this does not cure the problem, re-install the Cat Comm Adapter II software. Make sure you reboot the PC after the installation is complete.
--- Unable to load CA2RP32.DLL
If the PC has Cat Comm Adapter II software installed, try rebooting the PC first. If this does not cure the problem, re-install the Cat Comm Adapter II software. Make sure you reboot the PC after the installation is complete.
142* The interface hardware is not connected.
Check the cables. Make sure the data link cable and serial or parallel communication cables are properly connected.

8-6
Error Code
Error Description Suggestion
Verify the Cat Comm Adapter II “Power” light is on. Check that Caterpillar Electronic Technician is configured for the correct communications port.
202 A Required INI File Was Not Located.
Un-install and then re-install the Cat Comm Adapter II software. Make sure you reboot the PC after the installation is complete.
204 A required INI file section was not found.
Un-install and then re-install the Cat Comm Adapter II software. Make sure you reboot the PC after the installation is complete.
205 A necessary INI file key was not found.
Un-install and re-install the Cat Comm Adapter II software. Make sure you reboot the PC after the installation is complete.
206 A INI file value was invalid.
Un-install and then re-install the Cat Comm Adapter II software. Make sure you reboot the PC after the installation is complete.
230 Port not open
Another program or device is currently using the comm port or the comm port's resources. Identify the source and remove or disable it. Or, use a parallel port instead of a serial port. Palm Pilot software commonly causes this error.
231 Invalid Comm Port
The selected comm port is not set up properly in the PC’s BIOS or operating system.
301 Cannot open the configuration file.
Un-install and then re-install the Cat Comm Adapter II software. Make sure you reboot the PC after the installation is complete.

8-7
Error Code
Error Description Suggestion
302 The session identifier was not found in the configuration file.
Un-install and then re-install the Cat Comm Adapter II software. Make sure you reboot the PC after the installation is complete.
303 An error was found in the configuration file format.
Un-install and then re-install the Cat Comm Adapter II software. Make sure you reboot the PC after the installation is complete.
308 A 16-bit client application is trying to use the Comm Adapter II, but the APISRV32.EXE file is missing or not in the default Windows directory. This only applies to Windows 98.
Re-install the Comm Adapter II software. Make sure you reboot the PC after the installation is complete.
405 The PC had a problem while trying to establish the communication baud rate with the Comm Adapter II.
Power cycle the Comm Adapter II and reboot the PC. If the error persists, lower the communication baud rate.
406 The PC tried to establish a connection to the Comm Adapter II, but ran into a problem during the communication initialization phase.
This error code occurs during the communication initialization phase when the specific stage is not identified. Error codes 142, 405, 441, or 453 relate to specific stages in the initialization process.
441 The requested protocol is not compatible with an existing data link.
Cycle the power on the Cat Comm Adapter II and ECM. If this does not correct the problem, reboot the PC, and try again. Do not launch the Comm Adapter II Toolkit while Cat ET is running.

8-8
Error Code
Error Description Suggestion
443* The drivers software and the communiaction adapter Firmware are not compatible
Install the appropriate Firmware onto the Communications Adapter II.
453* The Communicaion Adapter has been detected but is not responding
The Serial.vdx file in your Windows/System folder may be corrupt. Reinstall the Serial vdx file provided with Windows.
*For more information on Error Codes 142, 443, and 453, consult the Comm Adapter II Read Me file located in the Caterpillar Comm Adapter II Group Box (select Caterpillar Comm Adapter II from the Programs menu, then select Read Me from the submenu).

8-9
DBSi Website
Purpose The DBSi website is a knowledge network. Many known troubleshooting issues are listed at this website. This site includes, but is not limited to, information about Cat ET, WinFlash, and communication adapters. Note: If you do not have a CWS Logon ID, you cannot use this website.
Instructions To access the DBSi website: Step 1 Connect to the DBSi website (https://dbsi.cat.com). Step 2 Enter your CWS Logon ID and Password in the text
boxes. Step 3 Select DCS Knowledge Database. (This is located on
the right side of the screen.) Step 4 Select Search All Products. Step 5 In the Enter a description of your problem here:
textbox, enter the error code number or a brief description of the problem.
Step 6 Select "Submit."

9-1
Caterpillar Electronic Technician Start Menu
Illustration 9-1: Caterpillar Electronic Technician Group Box
Overview The following items are available in the group box: Electronic Technician - The Caterpillar Electronic Technician program Challenger Technician - Services the 35/45/55 Challengers M300 Technician - Services M312, M315, M318, and M320 excavators and also the 5130 mining shovel Electronic Technician Online Help - Complete online help for Caterpillar Electronic Technician Read Me - Double click this icon to read additional release information before using your service tool Cat ET Tutorial - Double click this icon to view an index containing all of the Cat ET topics currently available in the tutorial.

9-2
Challenger Technician
Purpose The Challenger Technician program is used to service Challenger 35, 45, and 55. For more information on Challenger Technician, refer to Challenger Technician Online Help. Equipment: 1U9100 Cable Assembly - Challenger to PC Adapter cable
Instruction To connect your PC to the Challenger, do the following: Step 1 Connect the 1U9100 cable to the Diagnostic and
Maintenance (DAM) connector, located in the cab of the Challenger.
Step 2 Connect the remaining end of the 1U9100 cable to an
available serial communication port on the PC. Note: If your PC has a 25-pin connector (DB-25), use a 9-pin to 25-pin adapter. To start Challenger Technician: Select Caterpillar ET from the Programs menu, and then select
Challenger Technician from the submenu. The Challenger Technician screen is displayed.

9-3
M300 Technician
Purpose The M300 Technician program supports the M312, M315, M318, and M320 excavators. For more information on M300 Technician, refer to the M300 Technician Online Help. Equipment: 126-7877 Cable Assembly - M300 to PC Adapter cable
Instructions To connect your PC to the M300 series excavator: Step 1 Connect the 126-7877 cable to the service connector,
located in the cab of the excavator. Step 2 Connect the remaining end of the 126-7877 cable to an
available serial communication port on the PC. Note: If your PC has a 25-pin connector (DB-25), use a 9-pin to 25-pin adapter. To start M300 Technician: Select Caterpillar ET from the Programs menu, and then select
M300 Technician from the submenu. The M300 Technician screen is displayed.

9-4
Online Help
Purpose The Help Contents function allows you to access the online help file for your service tool. This file gives valuable information about each feature and provides step-by-step instructions for all service tool functions.
Instructions To access the Help contents either: • Select “Contents” from the Help menu. • Push the F1 key (content sensitive). • Press the Help icon on the toolbar, if the default is set. • Select Caterpillar ET from the Programs menu, and then select
Electronic Technician Online Help from the submenu. Note: The service tool online help is content sensitive. Push the F1 key to display help for the active service tool screen.

9-5
Read Me File
Purpose The readme.txt file can be found on the service tool Install CD-ROM. It is also displayed as an icon in the service tool Group Box. This file contains last minute information about your service tool.
Instructions Select Caterpillar ET from the Programs menu, then select Read
Me from the submenu. The readme.txt file is displayed.

9-6
Cat ET Tutorial
Instructions To view the service tool Tutorial: Step 1 Insert the service tool Install CD-ROM into your
computer's CD-ROM drive. Step 2 Select Caterpillar ET from the Programs menu, then
select ET Tutorial from the submenu. The service tool Tutorial index screen is displayed (Refer to Illustration 9-2).
Illustration 9-2: Caterpillar Electronic Technician Tutorial index screen
This index contains all of the Cat ET topics currently available in the tutorial.
Step 3 Select the topic you would like to view. Step 4 Use the buttons at the bottom of the screen to navigate
through the screens. Note: If the Cannot Locate Tutorial dialog box displays, insert the service tool Install CD-ROM, and press the "Browse" pushbutton and locate ET_Index.exe.

10-1
Infocast Website
Illustration 10-1: Caterpillar Electronic Technician Infocast Website
Overview Caterpillar Electronic Technician is available on the Infocast Website at the following locations: • NACD Infocast:
https://nacd.cat.com/infocast/frames/psfulfill/sfulfill/et/ • APDNet:
https://apd.cat.com/cda/layout/0,,m-17410_x-7,00.html • FlashNet:
https://cosa.cat.com/infocast/frames/prod_supp/serv_tech/et/ • Power Net:
https://truck.cat.com/cda/layout/0,,m-261_x-7,00.html

10-2
At this site you can: • Learn about Caterpillar Electronic Technician • Download Caterpillar Electronic Technician, it’s Service Packs,
and Communication Adapter II software • Obtain part numbers and media numbers to order Caterpillar
Electronic Technician • Review the PC Requirements to run Caterpillar Electronic
Technician • Obtain the latest support information for Caterpillar Electronic
Technician and Communication Adapter II

11-1
PC Software Support Hotline
Caterpillar Inc. provides a well trained technical support staff to assist you with any problems. If you need software support for your service tool and wish to contact the DCS Support Center, please completely fill out the information on the service tool Troubleshooting Tracking Form. These questions are necessary for the DCS Support Center to solve your problem. Also, be prepared to: • Give a brief explanation of the problem you are having • Include the exact wording of any error or warning messages
you have received • Give the sequence of steps you took before receiving the error or
warning message • Describe any recent changes made to your personal computer
(PC), and explain whether or not your service tool was running correctly in the past to help isolate the problem
DCS Support Center
Voice: (800) 765-0999 or (309) 675-4000 Fax: (309) 674-4080 Email: [email protected] or DCS Support Center (Lotus Notes) Hours: Monday through Friday 06:00am to 06:00pm (Central Standard Time)

11-2
Caterpillar Electronic Technician Troubleshooting Tracking Form
Required Information: Name:_________________________ Dealer:_________________________ Caterpillar Electronic Technician Serial Number:_________________________ Version of Caterpillar Electronic Technician:_________________________ Telephone Number:_________________________ Computer Make and Model:_________________________ Operating System:_________________________ Service Pack Number:_________________________ Communication Interface Device:_________________________ Exact Error Message:_________________________
Information for Installation Problem: Previous Version of Caterpillar Electronic Technician:_________________________ Subscription:_________________________ Selected Components:_________________________ Selected Languages:_________________________ If data move error - please specify the last file attempted to copy and the error number:

11-3
Additional Information, if available: Processor Type and Speed:_______________________ RAM Memory:_______________________ Selected Comm Port:_______________________ Baud Rate Setting:_______________________ Communication Cables Being Used:_______________________ Available Hard Drive Space:_______________________ Product Being Serviced:_______________________ ECM Serial Number:_______________________ Product/Engine Serial Number:_______________________ ECM Type:_______________________ Software/Personality Module Part Number & Date:_______________________