cashflow programming module cpm - nordic payment … · · 2016-06-16page 4 of 22 cashflow®...
TRANSCRIPT

REV G4 08/08/2006
CashFlow® Programming Module
CPM
Installation & User
GuideGB

Page 2 of 22
Table of ContentTable of Content ........................................................................................................................ 2
CashFlow® Programming Module (CPM).............................................................................. 4What is a CPM?................................................................................................................................. 4
CPM Identification ............................................................................................................................ 4
How does CPM work?....................................................................................................................... 4
System Requirements ................................................................................................................ 5Machine .............................................................................................................................................. 5
Operating System............................................................................................................................... 5
Before Installing WSM Software.............................................................................................. 6Upgrading from Previous Versions of WSM .................................................................................. 6
WSM V2.xx ........................................................................................................................................ 6
Final Check (WSM 2 & 3)................................................................................................................. 6
Installing WSM Software.......................................................................................................... 7Warning!............................................................................................................................................. 7
Installing WSM V3.02 ....................................................................................................................... 7
Non-Windows Installer Machines .................................................................................................... 7
Windows Installer Machines ............................................................................................................ 7
Installation Notes ............................................................................................................................... 8Windows NT and Windows 95 Machines....................................................................................................... 8Networked/ multi-user Machines .................................................................................................................... 8Windows NT/2000.......................................................................................................................................... 8Installing the USB Drivers .............................................................................................................................. 8
Connection and Set-up.............................................................................................................. 9Connecting the CPM to the PC ........................................................................................................ 9
Starting WSM Software........................................................................................................... 10The Launcher Bar Buttons: ............................................................................................................ 10
Changing WSM Software Language: ............................................................................................ 11
Changing & Setting the RS232 COM port:................................................................................... 11
Connecting the Dongle .................................................................................................................... 11
Starting Configuration Module:..................................................................................................... 12
Starting the Diagnostics Module: ................................................................................................... 12
Installation Trouble Shooting & Help.................................................................................... 13Manual Start Installation: .............................................................................................................. 13
Cannot Overwrite File/Update File: .............................................................................................. 13
Forced Uninstall: ............................................................................................................................. 13
Installing the USB Drivers .............................................................................................................. 13

Page 3 of 22
Getting Started......................................................................................................................... 14Starting CPM Manager................................................................................................................... 14
Error Log.......................................................................................................................................... 14
Firmware Update............................................................................................................................. 15
Firmware Download Error............................................................................................................. 15
Powering the CPM ON & OFF ...................................................................................................... 15
Changing the name of the CPM ..................................................................................................... 16
Transferring Credits to the CPM................................................................................................... 16
Resetting the Usage Counter........................................................................................................... 16
Launching Application Manager ........................................................................................... 17Transferring Files to the CPM ....................................................................................................... 17
Managing the Files........................................................................................................................... 17
CPM File Specifications ......................................................................................................... 18CPM Memory Management ........................................................................................................... 18
Types of Application........................................................................................................................ 18
Flash Application............................................................................................................................. 18
Specific Applications ....................................................................................................................... 18
General Application......................................................................................................................... 18
Understanding CPM file Management .......................................................................................... 18
Application Download Priority ...................................................................................................... 19
Examples 1........................................................................................................................................ 19
Examples 2........................................................................................................................................ 19
Launching Utilities Manager.................................................................................................. 20Utilities Menu................................................................................................................................... 20
Check Filing System ........................................................................................................................ 20
Format Filing System ...................................................................................................................... 20
WSM Configuration Wizard Tool........................................................................................... 21
Upgrading Products with the CPM ........................................................................................ 22
Warning!
This is a class A product. In domestic environments this product may cause radiointerference in which case the user may be required to take adequate measures.

Page 4 of 22
CashFlow® Programming Module(CPM)
What is a CPM?The CashFlow® Programming Module (CPM) is a small hand held device that allows products to beupgraded in the field rather than having to send products to a service depot or service centre.
To do this you will need the following tools.
1) Computer (PC)2) Work Shop Module (WSM) software V3.02 or above3) Data key (Dongle) plus credits4) CPM5) USB lead provided with the WSM6) HII Adaptor7) Application / Macros
CPM Identification
How does CPM work?Upgrading your products in the field is achieved by first downloading WSM applications from your PCdown the USB cable into the CPM memory. The CPM can then be connected to the product for theupgrade to be completed.
Credits from the dongle (attached to your PC) will need to be transferred on to the CPM before it canbe used to upgrade a product. The number of credits deducted will depend on the type of application.
When all required applications have been downloaded into the CPM, you will then be ready to visityour machines and upgrade the products.
To Upgrade the product simply connect the six-way HII lead from the CPM into the 6-way serviceconnector of the product. The LED’s on the CPM gives a visual indication on the performance of theupgrade. (Refer to the LED Code section).
HII LEAD
CPM
LED’s
HII LEADUSB
CONNECTOR

Page 5 of 22
System Requirements
MachineBefore installing WSM, ensure that the machine (PC) on which WSM is to be installed meets thefollowing specification:
� 233MHz Pentium II class processor, equivalent or higher (PIII recommended)� 32Mb or more of RAM (Windows 95(OSR2 and above)/98/NT)� 64Mb or more of RAM (Windows ME/2000) (Windows 2000 recommended)� Hard Disk with at least 80 Mb of free space� One free RS232 serial port (9-pin) for HII connections� One Parallel port for MEI dongle (credit store)� One free USB port (Windows 98/ME/2000)� Clock speed 233 MHz or higher� SVGA graphics card and SVGA monitor (minimum of 800 x 600 pixels and 256 colours)� Recommended SVGA monitor with 1024 x 768 and 32bit colour� Quad speed or higher CD ROM drive for CD install� Microsoft compatible pointing device (e.g. mouse)
Operating SystemWSM can be installed on any of the following Microsoft operating systems; however, there are somelimitations.
Operating System LimitationsWindows 95 (OSR2 and above) Will NOT support CPM products.Windows NT Will NOT support CPM products.Windows 98 NoneWindows ME NoneWindows 2000 None.

Page 6 of 22
Before Installing WSM Software
Upgrading from Previous Versions of WSMBefore installing WSM V3.02 all previous versions of WSM MUST BE REMOVED FROM THEMACHINE. If this is not done the new install may not complete correctly.
WSM V2.xxThe uninstall procedure is as follows:1. Open the control panel (Start Menu->Settings->Control Panel).2. Open "Add/Remove Programs"3. Select "WSM" and click the "Add/Remove" button.
The software should then remove all of the WSM2 components. The software may ask if a sharedcomponent should be removed, if this happens you should select yes (or Yes to all).
Final Check (WSM 2 & 3)Following this a check should be made to ensure that all components have been removed.For Windows 95,98,ME machines:Check that the following files DO NOT exist:1. <Windows directory>\System\HIILib32.dll2. <Windows directory>\System\HIILib32.vxd3. <Program Files directory>\MEI\WSM\<all files & directories>
E.g.: For UK machines with Windows installed in the C:\Windows directory, the files would be:C:\Windows\System\HIILib32.dllC:\Windows\System\HIILib32.vxdC:\Program Files\MEI\WSM
Germany: With Windows installed on drive C: in the Win directory the files would be:C:\Win\System\HIILib32.dllC:\Win\System\HIILib32.vxdC:\Programme\MEI\WSM
For Windows NT and 2000 machines:1. <Windows directory>\System32\HIILib32.dll2. <Windows directory>\System32\drivers\HIILib32.vxd3. <Program Files directory>\MEI\WSM\<all files & directories>E.g.: For UK machines with Windows installed in the C:\WinNT directory, the files would be:C:\WinNT\System32\HIILib32.dllC:\WinNT\System32\drivers\HIILib32.sysC:\Program Files\MEI\WSM
If any of these files (or the MEI\WSM directory) exist then delete them.
Now reboot the machine and it is ready for WSM V3.02 to be installed.

Page 7 of 22
Installing WSM Software
Warning!MEI will not be responsible for damage to a PC due to misuse or incorrect installation of this software.
Installing WSM V3.02WSM V3.01 now uses new installation software. The installer is the new Microsoft standard andprovides a safer installation mechanism. However, the new installer software must first be installed onthe system before WSM can be installed. The WSM V3.02 handles this.
Non-Windows Installer MachinesInsert the CD then select the language that you wish to install the software in. The "Windows Installer"software will then be installed and the machine rebooted. Once, the machine has restarted you mayneed to double click the CD icon in the "My Computer" folder.
In addition to the "Windows Installer" software the install may also upgrade some of the machinesdatabase components, if this occurs then the installer will perform an additional reset.
Now follow the instructions for "Windows Installer Machines".
Windows Installer MachinesInsert the CD then select the language that you wish to install the software in.Accept the license agreement and select "Next".
Enter the username and organisation details.For networked machines, the option exists for installing the softwarefor the above user or for all users of the machine.
NOTE: If "all users" is desired the software MUST be installedunder an "Administrator Account". Following this select "Next".
Select "Complete" set-up type and click on the "Next" button.
Select "Install" to start the installation process.
When the install has completed select "finish" and reboot themachine.

Page 8 of 22
Installation NotesWindows NT and Windows 95 MachinesA message box will appear during the install with the following title "MEI Driver Install Program" andthe following message "This version of windows is not supported".This is informing the user that Windows NT and 95 do not support CPM (due to limitations of theoperating system). This error does not affect the installation of WSM.
Networked/ multi-user MachinesA warning may occur during the installation with the message:"Warning 1909. Could not create shortcut MEI Workshop Module.lnk. Verify the destination folderexists and that you can access it". The resultant affect of this is that a "MEI Workshop Module" link willnot be created in the start menu.
This is due to many Systems Departments assigning the Windows licence to a phantom user account.This error does not affect the installation of WSM.
Windows NT/2000A message box may appear stating that the installation was not able to register a component, as"HIILib32" could not be located. This does not affect the installation of the software, simply ignore thismessage and continue with the installation.
Installing the USB DriversTo be able to use the USB port on the PC you must install the USB drivers found on the installationCD.
1. During the installation, Windows will detect the need for a USB driver; a prompt to install it will bedisplayed. Select “Yes”.
2. Click the “HAVE DISK” button. (The USB driver required will be found on the installation CD).
3. Select the CD directory and choose the only driver listed and click OK to run.
4. Reset the PC after the installation to ensure the DLL files and Registry settings are updated.

Page 9 of 22
Connection and Set-up1. Connect the HII Adapter to the RS232 Serial COM Port of the PC.
2. Connect the Dongle (Data Key) to the PC Parallel Port.If there is another Device on the Parallel Port, firstly connect the Dongle into the PCthen connect the other devices into the dongle. (E.g. Printers, Scanners etc).
3. Connect the 6-10 Way FIB lead into the HII Adapter.
4. Power up the product and connect the HII Loom provided to it.
You need to provide suitable power to the product.
Connecting the CPM to the PCThe CPM has 2 connection points.
Connector (1) allows you to connect the CPM directly to the computers Universal Serial Bus (USB)port. Do this by plugging one end of the USB lead in to the CPM and connecting the other end to thePC. You now have enabled communication between the PC and the CPM.
Connector (2) is a permanently fixed (HII) lead that allows the CPM to be connected into theproduct’s 6-way service connector.
(1)(2)
Connect this side to thePC USB port using theUSB lead provided.
Connect HII lead intothe acceptor 6-wayservice connector.

Page 10 of 22
Starting WSM Software1. Power Up the PC and login to Windows (if required).2. From the Desktop click on to the MEI Logo3. The following Login window will be displayed and you must enter the User Name and Password.
The Default User Name is admin and the Default Password is adminOnce the login has been accepted the following Launcher Bar will start.
The Launcher Bar Buttons:
Admin Manager – Clicking this button takes you to the Administration Function.
Configuration – Clicking this button starts the Product Configuration Function.
Diagnostics – Clicking this button starts the Product Diagnostic Function.
Credit Manager – Clicking this button lets you check and manage the credits on your dongle.
CPM – This takes you to the CPM manager program.
Launcher Position:The Launcher Bar on the desktop can be moved and re-sized. When you have modified it youwill need to logout and login again before the new position and size can be seen.
To launch the CPM manager programClick the CPM Button.

Page 11 of 22
Changing WSM Software Language:If you require the WSM software to use your local language follow the procedure below.
1. Click on the Admin Manager button to enter the Administration Screen.2. Click Language.3. Select required language.
Changing & Setting the RS232 COM port:The CPM uses the USB port on the PC for communication. When the CPM is connected to the PC it isautomatically detected.If you find that there is no communication between the CPM and PC, it may be that you have fitted theHII lead connector (RS232) to the wrong port on the PC. You can correct this by following thisprocedure.
1. Click on the Admin Manager button to enter the Administration Screen.
2. Click Tools.3. Select Configuration and Diagnostics Tool Settings.4. Select the required COM port.
Connecting the DongleWhen you get your WSM pack, you will find a Dongle.The dongle has to be connected to the back of the PC’s (parallel port) to allow fullfunctionality.
If the Dongle is not fitted or removed, limited functionality will be available and therefore no changescan be made to the product.
The following message may be displayed if the dongle is not connected to the PC. If you get thismessage Click OK.
Note: - For added security, If a Dongle is not fitted, product configuration functions are disabled.
Note: - A Dongle is not required for Flash Download and Diagnostics.
Fit Dongle
Page 12 of 22
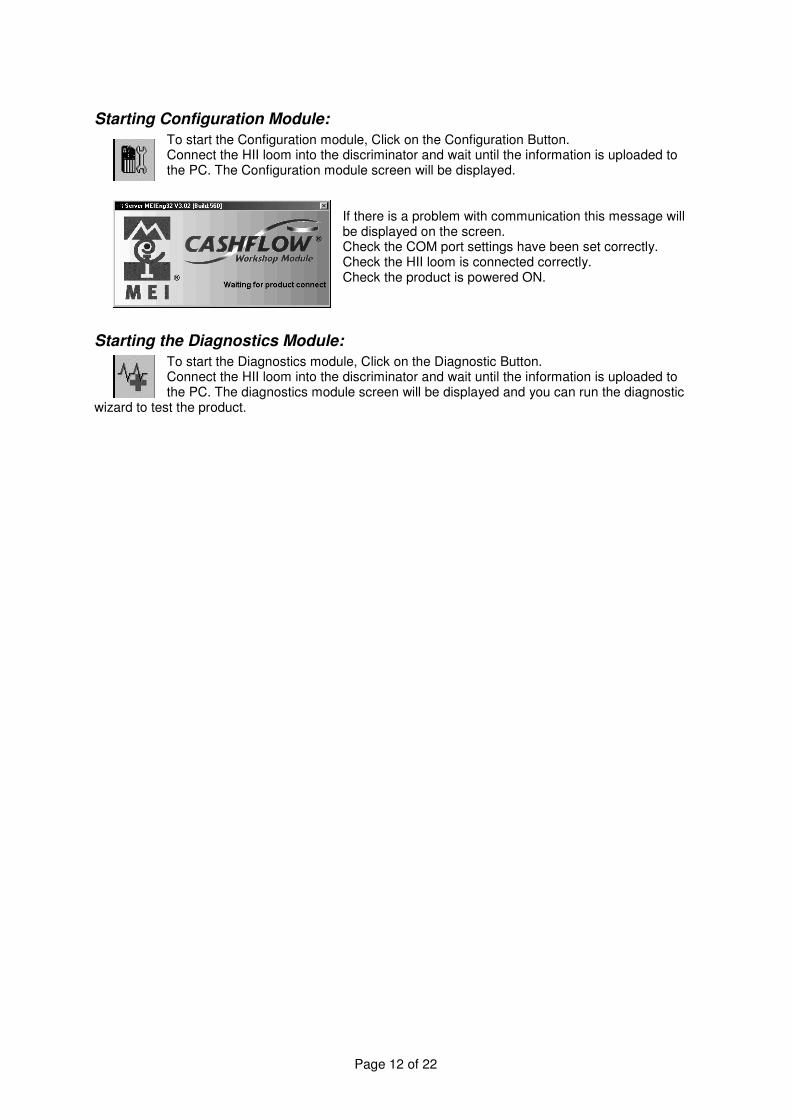
Starting Configuration Module:To start the Configuration module, Click on the Configuration Button.Connect the HII loom into the discriminator and wait until the information is uploaded tothe PC. The Configuration module screen will be displayed.
If there is a problem with communication this message willbe displayed on the screen.Check the COM port settings have been set correctly.Check the HII loom is connected correctly.Check the product is powered ON.
Starting the Diagnostics Module:To start the Diagnostics module, Click on the Diagnostic Button.Connect the HII loom into the discriminator and wait until the information is uploaded tothe PC. The diagnostics module screen will be displayed and you can run the diagnostic
wizard to test the product.

Page 13 of 22
Installation Trouble Shooting & HelpIf you are having any trouble with the installation please read the following section.
Manual Start Installation:The CD has an Auto run function. On some PC this functionality is disabled. In this event you will needto start the Install Process manually.
1. Insert the CD into the CD drive.2. Go to Start, then RUN3. Click on Browse4. Find the CD Drive and select SETUP.EXE5. Click OK to start Install
OR
1. Insert the CD into the CD drive.2. Go to My Computer3. Double click on CD Drive icon4. Double click on SETUP.EXE icon
Cannot Overwrite File/Update File:When installing software on the PC for the first time, the software may find some duplicate DLL files(resident in the windows \ systems directory) that may need to be overwritten, If any DLL files requireupdating a message will be displayed on the screen requesting you to accept this. Click the YESbutton to overwrite the files to a more recent version.
Forced Uninstall:Certain configurations may have problems uninstalling and therefore the following procedure shouldbe used to uninstall the software.
1. Go to My Computer2. Double Click on C:3. Double Click on Program Files4. Double Click on MEI5. Select all directories (Do not select the file called Uninst.isu)6. Press Delete Button7. Then follow the normal Uninstall Process
Installing the USB DriversTo be able to use the USB port on the PC you must install the USB drivers found on the installationCD.
1. During the installation, Windows will detect the need for a USB driver; a prompt to install it will bedisplayed. Select “Yes”.
2. Click the “HAVE DISK” button. (The USB driver required will be found on the installation CD).
3. Select the CD directory and choose the only driver listed and click OK to run.
Reset the PC after the installation to ensure the DLL files and Registry settings are updated.

Page 14 of 22
Getting StartedOnce you have completed a successful installation of the WSM V3.02 software and you haveconnected the Dongle and CPM leads required to the PC, you can then start to use the CPM managerto transfer credits and applications from your PC to the CPM.
The following section explains how you can use the CPM manager.
Starting CPM ManagerClick on to the CPM icon on the Launcher bar. The CPM Admin screen will be displayed.
The CPM Admin screen shows the following information:
� Name - User generated unit name.� Credits - Number of available credits remaining in the CPM.� Usage - The number of times the CPM has been powered up by the PC or product.� Serial number - Serial number of the CPM.� Error Log - Displays the last ten errors reported.
Note: - When the CPM has been detected the WSM will check the CPM firmware (software revision)is up to date. If the CPM firmware is out of date, WSM will automatically run the “Firmware Updateprogram”. (Refer to Firmware Update section).
Error LogHere is a list of errors that may be reported.
Error Description Comments/ActionInsufficient Credit No credit in CPM / Transfer more credits
Communications error CPM not communicating with product / Checkconnected leads, product power, product faulty.
Invalid product (i.e.) Application for product is not found in the CPM /Load correct application.
Product not recognised Unknown product connected / Application erroror product faulty.
Invalid signature version Unable to update the coin channels /Application error or product faulty
Block relocation failed Unable to update product / Faulty application orproduct.
Windows generation failed Application Error / Generate new application.Invalid memory or configuration item write Application Error / Generate new application.
Click this Button to startthe CPM manager.

Page 15 of 22
Firmware UpdateThe CPM firmware is checked automatically every time it is connected to the PC so that it is kept up todate with the WSM software.
If the CPM requires a firmware update the following screen message willbe displayed.The firmware directory screen will automatically open and the availableapplication will be listed.
Highlight the firmware application and click open.Firmware upgrade will now begin to download in to the CPM.
Note: - To manually update the firmware, you can access the Firmware Update menu by selectingAdmin, Utilities from the CPM Admin screen.
Firmware Download ErrorIf there is a fault downloading the firmware in to the CPM a message will be displayed.Click OK to restart the download.
Powering the CPM ON & OFFThe power for the CPM comes from the PC’s USB Comm port.Connect the USB lead from the PC into the CPM connector.The Green LED will come ON.The Admin screen will display the information stored in the CPM.
To remove power to the CPM, disconnect the USB lead.
Unit 1
100
5
123456789
No Errors
Highlight file
Click
Red LED
Green LED

Page 16 of 22
Changing the name of the CPMTo change the name of the CPM, Click the Change button. The “Change Unit Name” dialogue box willbe launched.Type your details in the box and click Save to end.
Transferring Credits to the CPMCredits from the dongle (connected to the PC) can be transferred directly in to the CPM.To do this, click the Transfer button to launch the Credit Transfer dialogue box.
This dialogue box has 3 text boxes fields.
PC = Displays the number of credits in the dongle.CPM = Displays the number of credits in the CPM.
The middle box allows you to enter the number ofcredits that you want to transfer. Type in or use thearrow buttons to equal the number of credits requiredtransferring. Click the Transfer button when done.
NOTE: - You cannot transfer credits back to thedongle from the CPM.
Resetting the Usage CounterThe usage counter monitors the number of times the CPMhas been connected to either the PC or the product.To clear this number displayed in the usage boxClick the Reset button and then select Yes to reset the countto zero.
Click Here

Page 17 of 22
Launching Application ManagerThe Application Manager can be started in the following way.Click on to the CPM icon on the launcher Bar and connect the USB lead to the CPM.
From the CPM Admin screen, click Adminon the title bar, then application managerfrom the drop-down list.
The following screen will be displayed.
Transferring Files to the CPMThe PC Files box shows all applications in the directory. Any files with the extension .cpm can betransferred from the PC directory in to the CPM.
To transfer an application to the CPM, highlight the file required from the PC files box (extension.cpm) then click the Transfer button. The selected file will now be displayed in the CPM files box.
Managing the FilesWhen a file in either the PC or CPM list is highlighted, full details are displayed in the description textbox.
When a file in the CPM list box is highlighted, the Delete button will be enabled, allowing files to beremoved from the CPM.
When a file in the PC list box is highlighted, the Transferbutton will be highlighted, allowing files to be copied to theCPM.
If a file of the same type already exists of the CPM, an errormessage will be displayed and the user must either abort theoperation or delete the duplicate file on the CPM.
Click Here
To transfer files to theCPM click this button
This box displaysthe directory tree onthe PC.
This box gives detailsabout the highlightedapplication.
Any files displayed inthis box are applicationsthat are stored in thePC. Only files endingwith (.cpm) can betransferred to the CPM
The Files that have beentransferred into the CPMare shown in this box.
To delete files from theCPM click this button.

Page 18 of 22
CPM File Specifications
CPM Memory ManagementEach CPM has a maximum internal memory size of 1MB. This means that you can do the following.
� You can store up to a maximum of 30-CPM applications. (Each application = approx. 10Kb).� You can store 1 Flash applications (Each application = approx. 0.5Mb).� In addition, you can transfer a maximum of 10,000 credits.
Types of ApplicationThe 3 types of application that can be transferred into a CPM are: -
� Flash Memory Software Upgrade Application� Specific Application - Coinset / Tube Payout Applications� General Application - Full Profile Applications
Flash ApplicationThe flash application allows CF69x product software revision to be upgraded.If a CPM has a flash application stored in it and the CPM is connected to CF69x product thisapplication will be downloaded first. Specific and General application will be dealt with there after.
Note: - This product software upgrade is irreversible with the CPM. To go back a software revisionyou need to use WSM.
Specific ApplicationsA specific application allows changes to be made only to a specific coin-mechanism.E.g. you may have a CF560 executive I/F changegiver with 1c, 2c, 5c & 10c Euro payout any othercoin-mechanism connected to the CPM that is not to this configuration will not be upgraded.
General ApplicationA General application allows changes to be made to a product group.E.g. If you wanted to change the Coinset and the Payout on all your CashFlow® changegivers youwould need to have a General application stored in the CPM.
Understanding CPM file ManagementOn any one CPM, you can have one “Flash” application, one "General" application for eachproduct group and one "Specific" application for each product. These are as follows.
Product Groups / General Products / SpecificCF1xx CF115/126/129/130
CF3xx
CF330CF340 (1 player)CF340 (4 player)CF350CF350Multi-Price
CF4xx CF420/430/44/450
CF5xx
CF5xx MDBCF5xx ExecCF5xx BDVCF5xx Micro-mech.CF5xx VCCS
CF6xx CF6xx

Page 19 of 22
Application Download PriorityBecause the CPM can store 3 types of application it is important to know which application will bedownloaded into the product.Example: - If the CPM has one of each application stored in it, the priority of the download will be asfollows: -
� Flash Application – 1st file type downloaded. Has up most priority over any other application.� Specific Application – 2nd file type downloaded.� General Application – 3rd file type downloaded.
However, if the CPM has one General application and two Specific applications the CPM (whenconnected to the product) will compare the product with the application stored.If the CPM finds a match for a Specific application it will download it to the product.If there is no match for a Specific the General application will be downloaded, provided the productgroup type matches.
Note: - Each time an application is successfully downloaded into the product credits will be deducted.Each application can be downloaded as many times as needed provided there are enough credits inthe CPM.
Examples 1For Example: - If you have 2 CPM’s, you can load the following types of applications.
CPM #1 could contain these Applications:
1. A Coinset Application for all 5xx changers (this is a General application for this product group)2. New Configuration for a 560 Executive changegiver (this is a Specific application for this product)3. New Configuration for a 560 MDB changegiver (this is a Specific application for this product)4. New Configuration for a 560 BDV changegiver (this is also a Specific application for this product)
� If you connect the CPM into a 560 Executive, the CPM would download the Specific application.� If you plugged the CPM into a 560 VCCS, the CPM would download the General application.
NOTE: - Specific Applications have priority over General Applications.
Examples 2CPM #2 could contain these Applications:
1. New configuration for a 560 Executive which has tubes 1F, 2F, 2F, 2F (Specific application)2. New configuration for a 560 Executive which has tubes 1F, 50c, 50c, 2F (Specific application)3. New configuration for a 560 MDB which has tubes 1F, 2F, 2F, 2F (Specific application)
� When the CPM is connected into a 560 Exec, this CPM would check the tubes of the productbefore downloading the correct application.
This means that before you can create the application (macro) with WSM, you need to know what tubeconfiguration is used in the vending machines.You may need to create a separate application for every variant by connecting to the relevant changertype to generate the macros).
Note: - If you wanted to update the entire field base to one configuration, regardless of existingcassettes, you would need a General Application from MEI.This could be (for example) an application to configure the Euro cassette relevant to that country.

Page 20 of 22
Launching Utilities Manager
Utilities MenuThe utility menu allows you to update the firmware of the CPM and also check and format the internalmemory.
Check Filing SystemThis allows you to check the condition of the CPM memory. Look at this operation as the check diskprogram on a PC. When using this all files in the CPM will still be available.
To check the filling system, connect the CPM to the PC.
From the CPM Admin screen, Click Admin on the title bar,then select Utilities followed by Check Filling System.
A message will be displayed showing the format progress.
Format Filing SystemThis option will format the CPM memory. (All files stored will be erased).
To Format the filling system, connect the CPM to the PC.
From the CPM Admin screen, Click Admin on the title bar,then select Utilities followed by Format Filling System.
A message will be displayed showing the format progress untilthe format completes.
Page 21 of 22
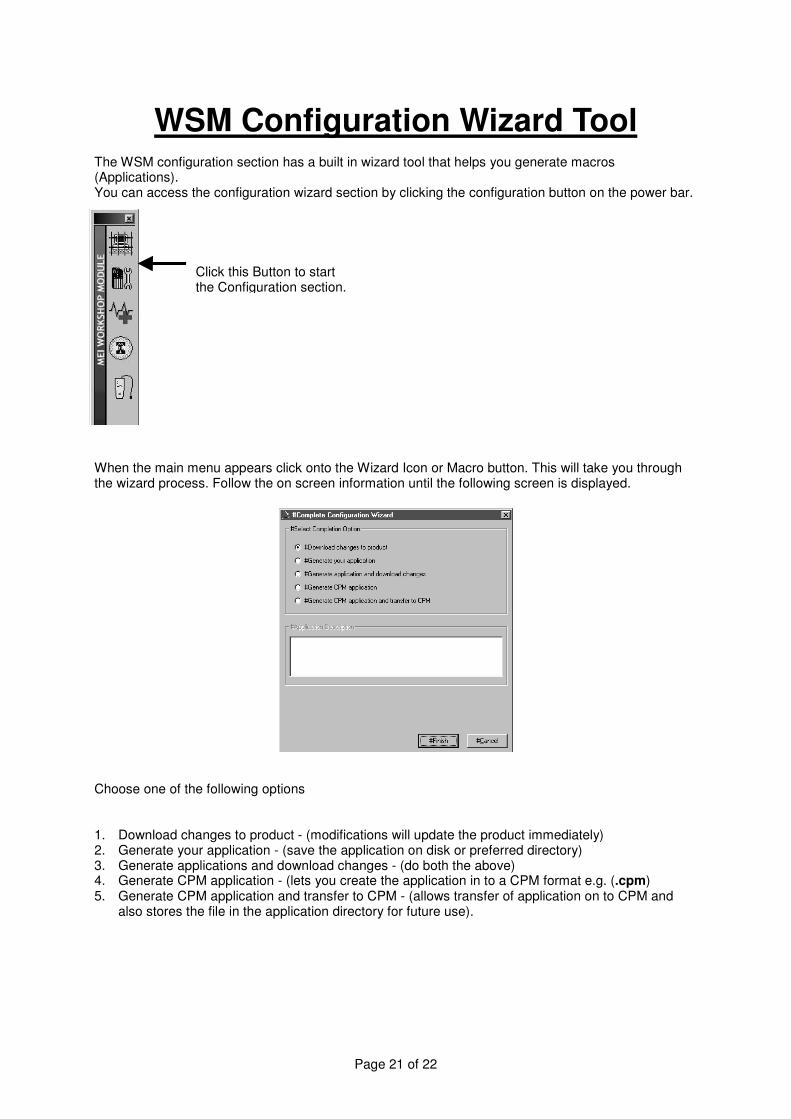
WSM Configuration Wizard ToolThe WSM configuration section has a built in wizard tool that helps you generate macros(Applications).You can access the configuration wizard section by clicking the configuration button on the power bar.
When the main menu appears click onto the Wizard Icon or Macro button. This will take you throughthe wizard process. Follow the on screen information until the following screen is displayed.
Choose one of the following options
1. Download changes to product - (modifications will update the product immediately)2. Generate your application - (save the application on disk or preferred directory)3. Generate applications and download changes - (do both the above)4. Generate CPM application - (lets you create the application in to a CPM format e.g. (.cpm)5. Generate CPM application and transfer to CPM - (allows transfer of application on to CPM and
also stores the file in the application directory for future use).
Click this Button to startthe Configuration section.

Page 22 of 22
Upgrading Products with the CPMOnce the required files have been transferred into the CPM you can take the CPM to the machinesrequiring the upgrade.To do this, follow these steps.
1. Connect the CPM HII lead to the acceptor.2. Wait until the download has completed. Both Green & Red
LED’s will be ON.3. Remove the HII lead from the product.
LED Codes
The CPM uses 2 LED’s that give you a clear indication on the status of both the CPM and theupgrade. The following table explains these.
LED INDICATIONS
Green LED Red LED Explanation
ON OFF Power is present on the CPM
ON Flashing CPM Active
Green & Red Alternating No files found in the CPM
Flashing OFF No Credits available in the CPM
ON Flashing x 1 Product Error
ON Flashing x 2 Internal CPM Error
ON Flashing x 3 Application File error
ON ON Upgrade Completed Successfully
Please NOTE:-To ensure a successful upgrade, it is advisable NOT to Disconnect the HII lead from theproduct until the programming has completed.
When download is complete, both the LED’s on the CPM will remain lit.
Red LED
Green LED