care manager guide spirit cmts - sharepoint · cmts helps clinicians structure their encounters...
TRANSCRIPT

Care Manager GuideSPIRIT CMTSCare Management Tracking System
© University of Washington • aims.uw.edu
rev. 12/4/2017

Table of Contents
TOP TIPS & TRICKS ........................................................................................................................................ 1
INTRODUCTION ............................................................................................................................................. 2
CARE MANAGER ACCOUNT ROLE ................................................................................................................. 2
ACCESSING CMTS .......................................................................................................................................... 2
SITE NAVIGATION OVERVIEW ....................................................................................................................... 3
SITE‐WIDE FEATURES .................................................................................................................................... 4
REMINDERS PAGE ......................................................................................................................................... 5
CASELOAD LIST PAGES .................................................................................................................................. 7
CASELOAD STATISTICS PAGE ......................................................................................................................... 9
PATIENT INFORMATION PAGE ...................................................................................................................... 9
MOBILE APP REGISTRATION PAGE .............................................................................................................. 10
MANAGING PROVIDER AND CLINIC ASSIGNMENTS ................................................................................... 10
CONTACT NOTES ......................................................................................................................................... 15
PATIENT SUMMARY PAGES ......................................................................................................................... 18
MESSAGE BOARD ........................................................................................................................................ 21
ACCOUNT PREFERENCES ............................................................................................................................. 21
SYSTEM TIMEOUT ....................................................................................................................................... 22
USING CMTS ALONGSIDE AN ELECTRONIC MEDICAL RECORD ................................................................... 22
EXPORTING AND PRINTING DATA ............................................................................................................... 23

1
TOP TIPS & TRICKS
1. You don’t need to answer every question. Only those marked with an asterisk (*) are required.
2. Choose which page appears first each time you log in. Navigate to Tools > Preferences, and set your “First Page after Login.”
3. Enter your notes while the patient is in the room with you. Concurrent documentation makes the process easier and more efficient!
4. While you are with your patients, remember to flag individuals who need discussion with your Psychiatric Consultant by clicking the “Discuss” checkbox in your contact note.
5. Print the Patient Summary page at the end of each visit to share a progress report with your patient.
6. On the Caseload List page, click the column headings to sort your caseload. You can easily see who has been in treatment longest, who is not improving, who hasn’t been seen for a while, etc.
7. Any blue bold text is a clickable link, and will take you to more information about that topic.
8. To transfer information between your EHR and CMTS, open both windows at the same time.
Use the “export to text” button to strip page formatting Select the text and right‐click, choose copy Paste into your EHR It should take less than 15 minutes PER DAY to port notes from CMTS to your EHR
9. Use the “Add Icon” to open new contact notes directly from your Caseload List page.
2
INTRODUCTION
The Care Management Tracking System (CMTS) is a population‐based care management registry designed to facilitate Collaborative Care by tracking treatment outcomes and prompting action founded on evidence‐based clinical algorithms. Collaborative Care requires the coordination of a primary care provider, care manager, and psychiatric consultant, and is by definition patient‐centered and accountable. In contrast to electronic health records that simply collect and store information, CMTS helps facilitate clinical decision making and program management.
CMTS helps clinicians structure their encounters with patients, identify those who are not improving as expected, prompt changes in treatment as needed, and monitor a large caseload. Because it is web‐based, the program has the ability to facilitate consultation from a mental health specialist even if the specialist is not on‐site, a useful feature in rural or other resource‐poor areas.
CMTS enables coordination of care across health care providers and organization and helps program managers track the effectiveness of treatments across different providers and caseloads.
CARE MANAGER ACCOUNT ROLE
The care manager account is given privileges to view and enter protected health information. Although CMTS patient data is not considered the legal medical record, this information should be treated with the same policies that apply to any other protected health information. Care manger accounts should be issued only to those who require this level of access to complete their duties.
TIP: You should never share your username and password with another care manager. CMTS accounts should be unique to each person.
On the login page, you will be prompted for your username and password. Your username and password will be issued to you by your Account Administrator. Account Administrators are responsible for setting and maintaining appropriate permissions for each account, including your care manager account.
If you are unable to log in to CMTS, but you have the correct login information, it is possible that your account has been disabled. User accounts can be disabled manually by Account Administrators, or they can be automatically disabled after 5 incorrect login attempts or after 90 days of non‐use.
ACCESSING CMTS
Because CMTS is a web‐based software application, it requires an internet connection (broadband is recommended), and one of the following internet browsers:

3
Internet Explorer (version 8 or higher) Mozilla Firefox (version 4 or higher) Google Chrome (version 4 or higher) Safari (version 4 or higher)
In the event that CMTS becomes unavailable, clinician will continue to see patients as usual. The screening tools and outcome measurement tools will be recorded on paper copies, or in the electronic medical record system. Data will be entered into CMTS when availability is reestablished. The screening tools are available at https://sharepoint.washington.edu/uwpsychiatry/SPIRIT/resources/.
SITE NAVIGATION OVERVIEW
The navigation toolbar is located in the black bar at the top of the screen. The toolbar is context‐dependent, so the options that are available in the menu will depend on which patient is currently selected (if any).
Basic patient information appears in a white box in the top‐right corner of the page when a patient is selected. The following options appear in the navigation toolbar: Patient Menu
These options are available only when a patient is selected:
New Contact Patient Information Encounter List Treatment History
Clinical Dashboard Patient Summary Provider & Clinic Lis
These options are always available:
Search Patient
Caseload Menu
CC Caseload Lists CC Caseload Statistics

4
Tools Menu
Reminders Message Board Print Preferences Password Providers
Logout
Sign out of your account when leaving your workstation to keep patient information secure.
Search Patient
This box is always visible in the navigation toolbar as a quick way to find patients using Study ID or name. All matching patient records will be returned for patients assigned to your organization(s).
SITE‐WIDE FEATURES
These features apply to all pages throughout CMTS.
Sortable Lists: You can sort reports by clicking on the column header. Clicking once will sort from least recent to most recent, or in alphabetical order, and clicking again will sort in the opposite order.
Tooltips: Hovering the cursor over the tooltip icons will display additional information about items and features throughout CMTS. Links to Patient Information: Clicking on a Study ID Number will display the Patient Information page and Patient Name will display the Clinical Dashboard page for that patient. These preferences can be changed by navigating to Tools > Preferences.
Required Fields: Indicated on questions with an asterisk (*). These questions must be answered before a form can be submitted.
“Add” icons: Green plus icons can be clicked to add a new note or a new item. “Delete” or “Remove icons: Clicking these icons ( or ) will permanently delete the associated data or item. Information that was carried forward from one note to the next without changing is marked with a dagger symbol (†).

5
REMINDERS PAGE
The Reminders page is the first page that appears each time you log in, and can also be accessed at any time by navigating to Tools > Reminders. There are two sections on this page: Autosaved Notes and Reminders.
Autosaved Notes
When entering information into clinical note templates, CMTS will automatically save a draft of the note every three minutes. If note entry is interrupted for any reason, the autosaved draft of the note can be retrieved by navigating to Tools > Reminders.
If you attempt to submit a note without completing all required fields, an alert message will appear with a prompt to complete the minimum information. This also triggers a draft of your note to be autosaved.
The Autosave section only appears if you have an autosaved note. Autosaved notes will be automatically deleted after 30 days of inactivity. The section includes this information:
Date and time the note was saved The ID number and name for the patient The type of contact note The “Action” column shows whether the note was an update to an existing
note, or the addition of a new note The “Expires” column shows the date (MM/DD/YYYY) that the note will be
deleted. Text will turn red 3 days before the expiration date.
TIP: Autosaved notes are not yet part of your patient’s treatment record, and cannot be seen by other people using CMTS. Pending autosaved notes will prevent other people from entering a new note for that patient, so be sure to clear your autosaved notes
frequently by deleting or finalizing each note.
Click on the date and time of the auto‐saved note to resume editing. Once the note is submitted, it will disappear from your Autosaved Notes section, and will become part of the patient’s treatment record.
To permanently discard your autosaved note, click the “Delete” icon next to the date and time information.

6
Reminders
The main Reminders section appears just below the Autosaved Notes section. These reminders provide alerts about important due dates. Hover your mouse over the blue tooltip icons in the column header to see complete descriptions of how each reminder is triggered.
TIP: Patients who have no reminders will not be listed on the Reminders Page.
1. Needs Care Manager: If the Study Manager has enrolled a patient into CMTS without a Care Manager assignment, a reminder will appear for all Care Managers at your site until a Care Manager is assigned. Click the link to add yourself to the patient’s care team and satisfy this reminder. See the “Managing Provider and Clinic Assignments” section of this guide for instructions. If a Care Manager hasn’t been assigned seven days after the patient’s randomization date, the reminder text will turn from blue to red.
2. Initial Assessment: If the Initial Assessment has not been entered seven days after the patient’s Enrollment Date, a reminder will appear. If the Initial Assessment is 14 or more days overdue, the reminder text will turn from black to red.
3. Follow Up: The frequency of Follow Up Note reminders will vary for each patient depending on their patient status. If the patient is on a Relapse Prevention Plan, Follow Up notes are due after 28 days. Otherwise, Follow Up notes are due every 14 days. If the Follow Up is 14 or more days overdue, the reminder text will turn from black to red.
4. Psychiatry Assessment: If the Psychiatry Assessment has not been entered seven days after the patient’s Initial Assessment, a reminder will appear. If the Psychiatry Assessment is seven or more days overdue, the reminder text will turn from black to red.
5. Discharge: The patient is required to be Discharged 12 months after their study Randomization Date. A reminder will appear 35 days prior to the Discharge Date, and the reminder text will turn from black to red when it is one or more days overdue.

7
CASELOAD LIST PAGES
The Caseload List pages display an overview of all patients on your caseload, allowing you to manage populations and prevent patients from ‘falling through the cracks.’ With these reports care managers can sort their caseload by score severity, identify which patients are not improving as expected, identify patients who may need discussion with a consultant, and find patients who are due for an appointment.
TIP: You can view the caseload for any provider at your organization by selecting a name from the drop‐down list located in the upper right‐hand corner.
To view the Caseload List pages, navigate to Caseload > CC Caseload Lists and choose one of the following categories:
1. CC New Patients: Displays all patients for the selected provider that have not yet had an Initial Assessment Note entered.
2. CC Active Patients: Displays all patients for the selected provider that are currently enrolled, including patients on a Relapse Prevention Plan.
3. CC Inactive Patients: Displays all patients for the selected provider that are currently discharged.
4. CC Custom Search: Displays a list of patients that can be filtered based on Study ID, Medical Record Number, Randomization Date, Discharge Date, First Name, Last Name, Care Manager, Psychiatric Consultant, Telepsychiatrist, Telepsychologist, Site, Clinic, Flag, or Population.
Each of the Caseload List pages shows a summary of information listed in columns:
1. Flags: Can be toggled on and off from the Caseload List page by clicking the flag icon. Flags can also be turned on/off from within contact notes, or from the Clinical Dashboard page.
Red Flag : Indicates that a patient has been flagged as a Safety Risk. Yellow Flag : Indicates that you wish to discuss this patient with a Psychiatrist
Consultant. When a new Psychiatrist Consultation Note is entered for the patient, this flag is automatically unchecked.
2. Study ID: Click to view the Patient Information page. You can customize this by navigating to Tools > Preferences.
8
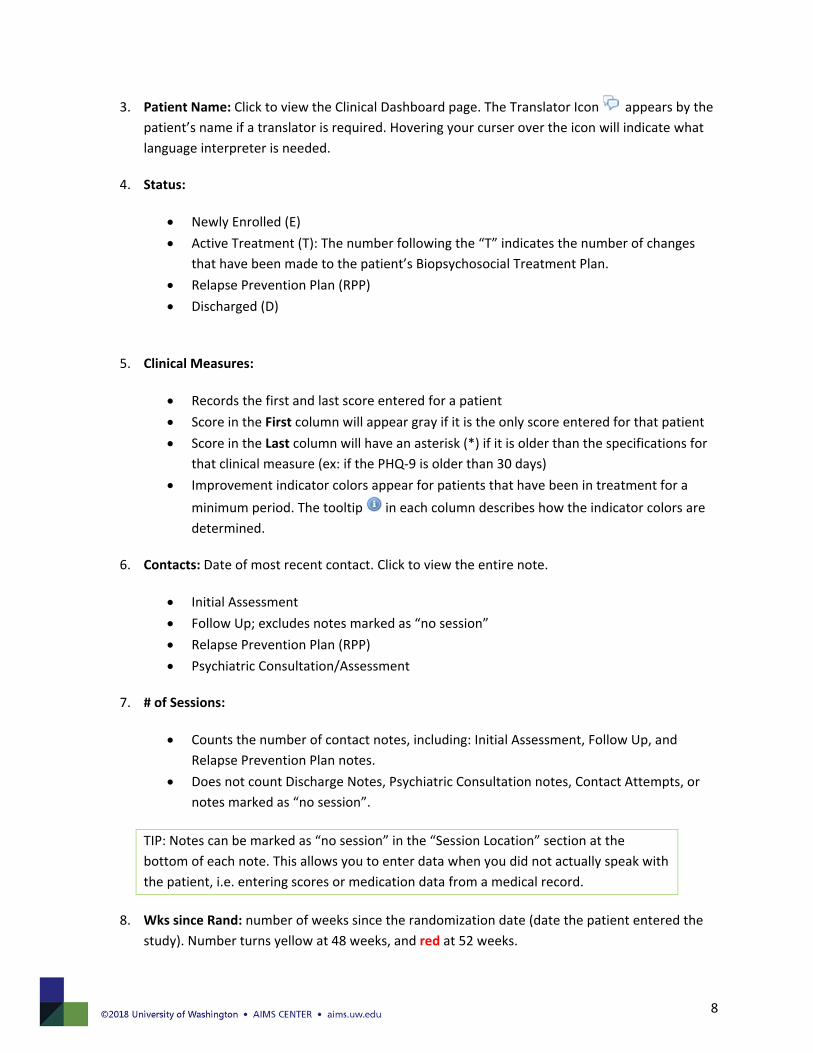
3. Patient Name: Click to view the Clinical Dashboard page. The Translator Icon appears by the patient’s name if a translator is required. Hovering your curser over the icon will indicate what language interpreter is needed.
4. Status:
Newly Enrolled (E) Active Treatment (T): The number following the “T” indicates the number of changes
that have been made to the patient’s Biopsychosocial Treatment Plan. Relapse Prevention Plan (RPP) Discharged (D)
5. Clinical Measures:
Records the first and last score entered for a patient Score in the First column will appear gray if it is the only score entered for that patient Score in the Last column will have an asterisk (*) if it is older than the specifications for
that clinical measure (ex: if the PHQ‐9 is older than 30 days) Improvement indicator colors appear for patients that have been in treatment for a
minimum period. The tooltip in each column describes how the indicator colors are determined.
6. Contacts: Date of most recent contact. Click to view the entire note.
Initial Assessment Follow Up; excludes notes marked as “no session” Relapse Prevention Plan (RPP) Psychiatric Consultation/Assessment
7. # of Sessions:
Counts the number of contact notes, including: Initial Assessment, Follow Up, and Relapse Prevention Plan notes.
Does not count Discharge Notes, Psychiatric Consultation notes, Contact Attempts, or notes marked as “no session”.
TIP: Notes can be marked as “no session” in the “Session Location” section at the bottom of each note. This allows you to enter data when you did not actually speak with the patient, i.e. entering scores or medication data from a medical record.
8. Wks since Rand: number of weeks since the randomization date (date the patient entered the study). Number turns yellow at 48 weeks, and red at 52 weeks.

9
9. Rand. Date: Displays the date the patient was randomized into the Collaborative Care study arm.
CASELOAD STATISTICS PAGE
To view the Caseload Statistics page, navigate to Caseload > CC Caseload Statistics. This report displays data summarized by Provider, Clinic, or Organization rather than by individual patient. With this information you can view the average status of patients at baseline, and at their most recent visits, make comparisons between clinic vs. phone encounters, and identify which patients are not improving AND have not yet had a Psychiatric Consultation note entered.
TIPS: Clicking any numbers that are blue links will allow you to drill‐down and see the list of patients included in that particular calculation.
Use the drop‐down menu in the top‐right corner to aggregate the report by provider, clinic, or organization.
The columns “# of Pt.” and “Mean #” under “Follow Up” do not count notes marked as “no session”.
The sum of all the rows in the “# Pts“ column may be more than the “All” total in the bottom row. This is because a patient may be assigned to multiple clinics or providers, but will not be counted more than once in the “All” total in the bottom row.
PATIENT INFORMATION PAGE
To view a patient’s enrollment information, navigate to Patient > Patient Information. The Patient Information page contains information collected during study enrollment. Some items may be edited by Care Managers.
Program Information
Contains patient data including SPIRIT study randomization date, clinic, MRN, and the SPIRIT Study ID number.
Patient Demographic Information
Contains information regarding patient’s name and language.

10
Eligibility Screenings
PCL‐6 and CIDI scales that were completed by the patient as part of the SPIRIT study eligibility screening were entered by the Study Manager upon enrollment.
MOBILE APP REGISTRATION PAGE
An app is available for SPIRIT patients to install on their mobile phone. The app contains psychoeducational material, symptom rating scales, and a medication adherence question. Patients can enter PHQ‐9, SPIRIT Mania Rating Scale, and PCL‐5 scores into their mobile phone. These scores and the patient’s report of their medication adherence are automatically imported into the SPIRIT CMTS registry so that you can view and monitor symptoms and medication adherence between visits.
Setting Up a Patient’s Account for the SPIRIT Mobile App
To register a patient for the SPIRIT mobile app, navigate to Patient > Mobile App Registration. Enter the patient’s cell phone number and select “Send Text Message”. Instructions on how to install the app and create an account will be sent via SMS text to the patient’s cell phone.
Activated SPIRIT Mobile App
To view a patient’s mobile app registration status, navigate to Patient > Mobile App Registration. Once a patient has been signed up for the app, this page will display their status with regards to app activation, when scale data has first been imported from the app, and the most recent date that scale data was imported.
Notifications for New Scores

11
When a patient enters in any new scores or a response to the medication adherence question within the app, the care manager will receive an alert message at the top of their Reminders page. If the PHQ‐9 item 9 suicide question was endorsed (answered anything except “Not at all”), a red message will also be displayed. The Mobile App Record List page described below displays patient responses to the 9th question.
Viewing Imported Scores
PHQ‐9, SPIRIT Mania Rating Scale, and PCL‐5 scores that the patient enters into the app will be imported into CMTS within one hour and displayed on the Caseload List, Clinical Dashboard (Clinical Measures section), Treatment History, Mobile App Record List, and Mobile App Record Detail pages. Scores imported from the app will be labeled as “Last updated by: Patient Mobile App”.
All scores that have ever been imported from the app for patients on your active caseload can be viewed on the Mobile App Record List. To view this list, navigate to Tools > Mobile App Record List.
The PHQ‐9 Item 9 column displays the patient’s response to the 9th question of the PHQ‐9: “Thoughts you would be better off dead or of hurting yourself in some way”. The Item 9 provides an indicator of risk of suicidal behaviors.
Clicking on any date in the Mobile App Record List will take you to the Mobile App Record Detail page, which shows the individual item answers for each scale.

12
Viewing Medication Adherence
Information around medication adherence that the patient enters into the app will be imported into CMTS within one hour and displayed on the Clinical Dashboard (Biopsychosocial Treatment Plan section), contact notes (when viewing history for the Biopsychosocial Treatment Plan: Current Psychotropic Medications section), Mobile App Record List, and Mobile App Record Detail pages. Medication adherence information imported from the app will be labeled as “Last updated by: Patient Mobile App”.
13
MANAGING PROVIDER AND CLINIC ASSIGNMENTS
Providers are people who provide care to patients, either directly or through consultation. Providers include care managers and psychiatric consultants.
A person may have a User Account, a Provider Account, or both. The User Account allows you to log in to CMTS. The Provider Account allows you to have patients on your own caseload and have patient contact notes attributed to you.
Assigning Patients to Providers and Clinics
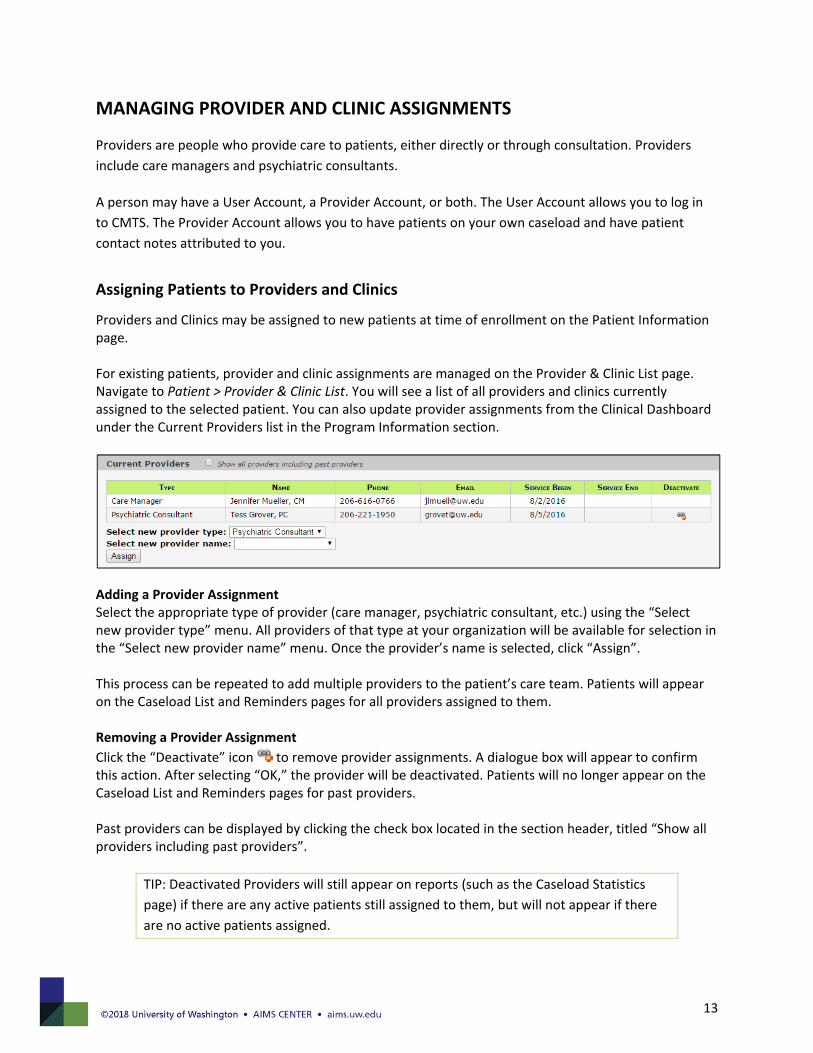
Providers and Clinics may be assigned to new patients at time of enrollment on the Patient Information page. For existing patients, provider and clinic assignments are managed on the Provider & Clinic List page. Navigate to Patient > Provider & Clinic List. You will see a list of all providers and clinics currently assigned to the selected patient. You can also update provider assignments from the Clinical Dashboard under the Current Providers list in the Program Information section.
Adding a Provider Assignment Select the appropriate type of provider (care manager, psychiatric consultant, etc.) using the “Select new provider type” menu. All providers of that type at your organization will be available for selection in the “Select new provider name” menu. Once the provider’s name is selected, click “Assign”. This process can be repeated to add multiple providers to the patient’s care team. Patients will appear on the Caseload List and Reminders pages for all providers assigned to them. Removing a Provider Assignment
Click the “Deactivate” icon to remove provider assignments. A dialogue box will appear to confirm this action. After selecting “OK,” the provider will be deactivated. Patients will no longer appear on the Caseload List and Reminders pages for past providers. Past providers can be displayed by clicking the check box located in the section header, titled “Show all providers including past providers”.
TIP: Deactivated Providers will still appear on reports (such as the Caseload Statistics page) if there are any active patients still assigned to them, but will not appear if there are no active patients assigned.

14
Transferring a Patient to a New Provider To transfer a patient from one provider’s caseload to another, remove the assignment for the existing provider, and add an assignment for the new provider following the instructions above.
Adding Clinic Assignment Current clinic assignments are automatically displayed on the Provider & Clinic List Page. To add a new clinic to this list, select an option from the Select New Clinic drop‐down menu. This menu displays all clinics within your organization. Once you select assign, the patient will appear on the list of patients for the new clinic.
Newly assigned clinics are automatically updated as the patient’s primary clinic. If this is incorrect, select the blue Update text for the clinic you would like to set as the patient’s primary clinic, and select the Set as Primary Box.
Removing Clinic Assignment
To remove a clinic from a patient, select the deactivate icon next to the clinic that is no longer active. This icon will only appear if a patient is assigned to multiple clinics, to avoid removing all clinic assignments. The inactive clinic will now appear in the Past Clinics list.
To view past clinic assignments, select the Show all clinics including past clinics check box. Inactive assignments will appear grey.

15
Reactivating Clinic Assignment To reactivate a clinic assignment, simply re‐add the clinic using the Select New Clinic drop down menu.
CONTACT NOTES
This section will review the different types of contact notes that can be entered.
Be sure the correct patient is selected by confirming their information in the white box on the upper‐right corner of the screen. Navigate to Patient > New Contact, and select the appropriate note type. The types of notes available will depend on the patient’s treatment status. For example, a Follow Up Note cannot be entered until an Initial Assessment note has been entered.
TIP: While you are in the process of entering a new contact note for a particular patient, nobody else will be able to simultaneously enter a new note for the same patient. CMTS will lock the patient’s record from editing to prevent conflicts.
You may open CMTS in multiple browser windows or tabs by right‐clicking any link. Just be sure to edit only one note at a time to prevent overwriting your own changes.
Notes must be added sequentially. You will receive error if you try to enter notes out of order.
Initial Assessment Note
TIP: It is NOT necessary to complete all areas of the Initial Assessment. Only questions with an asterisk (*) are required.
The Initial Assessment note is completed during the first encounter with the patient after enrollment. Be sure the correct patient is selected by confirming their information in the white box on the upper‐right corner of the screen. Navigate to Patient > New Contact > Initial Assessment.

16
The Initial Assessment Note contains sections for collecting information about a patient’s current mental health status and treatment plan.
TIP: Once the Initial Assessment is completed, different options will be visible in the Patient > New Contact navigation toolbar for adding Follow‐Up, Discharge, and Relapse Prevention Plan Notes.
Follow‐Up Note
Be sure the correct patient is selected by confirming their information in the white box on the upper‐right corner of the screen. Navigate to Patient > New Contact > Follow Up.
The Follow‐Up Note is similar to the Initial Assessment Note, and allows you to update patient treatment plans and monitor progress over time.
Relapse Prevention Plan
The Relapse Prevention Plan (RPP) should be completed when the patient is in maintenance phase and is ready for less frequent follow up visits OR when the patient is being discharged from treatment. Once an RPP note has been entered, Follow Up reminders will decrease from 14 days to 28 days. The length of time that a patient should be in maintenance varies based on clinical factors including severity of symptoms at treatment initiation, number of prior depressive episodes, and number of treatment changes necessary to achieve significant improvement. Most patients are followed in maintenance for 3‐6 months before being discharged from treatment. Be sure the correct patient is selected by confirming their information in the white box on the upper‐right corner of the screen. Navigate to Patient > New Contact > Relapse Prevention Plan.
Biopsychosocial Treatment Plan
The Biopsychosocial Treatment Plan sections collect information about patient medications, somatic treatment, psychotherapy, and social services for each visit. The Biopsychosocial Treatment Plan helps monitor how many treatment adjustments have been made for each patient over time. The number of treatment changes is displayed on both the Caseload List page and the Treatment History page. The following actions on contact notes will trigger a change in treatment:
1. Adding or removing a psychotropic medication. 2. Changing any medication dose. 3. Checking or unchecking a Somatic Treatment choice. Typing text into the “Other” box will not
count as a change. 4. Checking or unchecking a Psychotherapy choice. Typing text into the “Other” box will not count
as a change.

17
5. Checking or unchecking a Social Treatment choice. Typing text into the “Other” box will not count as a change.
Treatments that carried forward from the previous note without changing are marked with a dagger symbol (†).
Discharge Note
Patients should be discharged 12 months after the patient’s randomization date. You will see alerts as a patient’s 12 month discharge date approaches on the Reminders page and Caseload List page.
After a Discharge Note is entered by the Psychiatric Consultant, the patient will be removed from your Active Caseload List. All patient information and data is archived and retained, and the patient will be visible on your Inactive Caseload List. Reminders are not received for Inactive (Discharged) patients.
Submitting Your Note
Once the information is completed, click the “Add” or “Update” button at the bottom of the page. If there is a problem with any of the information you entered, you will see an alert message. Red arrows will point to sections with missing or incorrectly formatted information. Upon successful completion of the form, you will see a non‐editable version of the note. Here you can review the information that you just entered. If you need to make changes, click the “Update” button at the top of the page to update the entire note.
TIP: To make changes to a single section without leaving the page, click the “Update” button located in each section header.
For other options such as “Export as Text” and printing directly from CMTS, please refer to the Exporting and Printing Data section in this guide. Errors and Alert Messages Your Contact Note will not be accepted unless all required questions, indicated with an asterisk (*) have been completed. The AIMS Center has developed a minimum standard set of questions that require responses in order to facilitate the delivery of collaborative care. For each form, a response is required for the following questions:
1. Initial Assessment & Follow Up: Date of Contact, Medication Confirmation, Medication Adherence, Biopsychosocial Treatment Plan, Diagnoses, Primary Care Provider, Location of Session
2. Relapse Prevention Plan: Date of Contact, Medication Confirmation, Biopsychosocial Treatment Plan, Location of Session
3. Discharge: Date of Contact, Location of Session
18
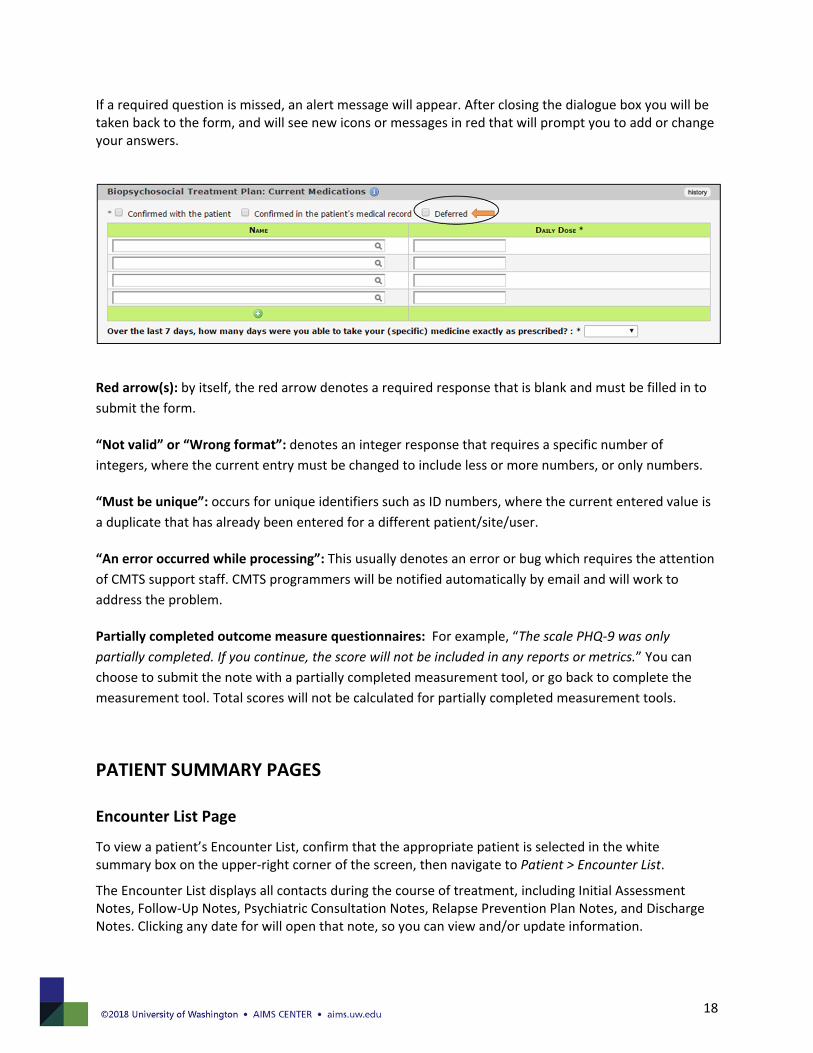
If a required question is missed, an alert message will appear. After closing the dialogue box you will be taken back to the form, and will see new icons or messages in red that will prompt you to add or change your answers.
Red arrow(s): by itself, the red arrow denotes a required response that is blank and must be filled in to submit the form.
“Not valid” or “Wrong format”: denotes an integer response that requires a specific number of integers, where the current entry must be changed to include less or more numbers, or only numbers.
“Must be unique”: occurs for unique identifiers such as ID numbers, where the current entered value is a duplicate that has already been entered for a different patient/site/user.
“An error occurred while processing”: This usually denotes an error or bug which requires the attention of CMTS support staff. CMTS programmers will be notified automatically by email and will work to address the problem.
Partially completed outcome measure questionnaires: For example, “The scale PHQ‐9 was only partially completed. If you continue, the score will not be included in any reports or metrics.” You can choose to submit the note with a partially completed measurement tool, or go back to complete the measurement tool. Total scores will not be calculated for partially completed measurement tools.
PATIENT SUMMARY PAGES
Encounter List Page
To view a patient’s Encounter List, confirm that the appropriate patient is selected in the white summary box on the upper‐right corner of the screen, then navigate to Patient > Encounter List.
The Encounter List displays all contacts during the course of treatment, including Initial Assessment Notes, Follow‐Up Notes, Psychiatric Consultation Notes, Relapse Prevention Plan Notes, and Discharge Notes. Clicking any date for will open that note, so you can view and/or update information.
19
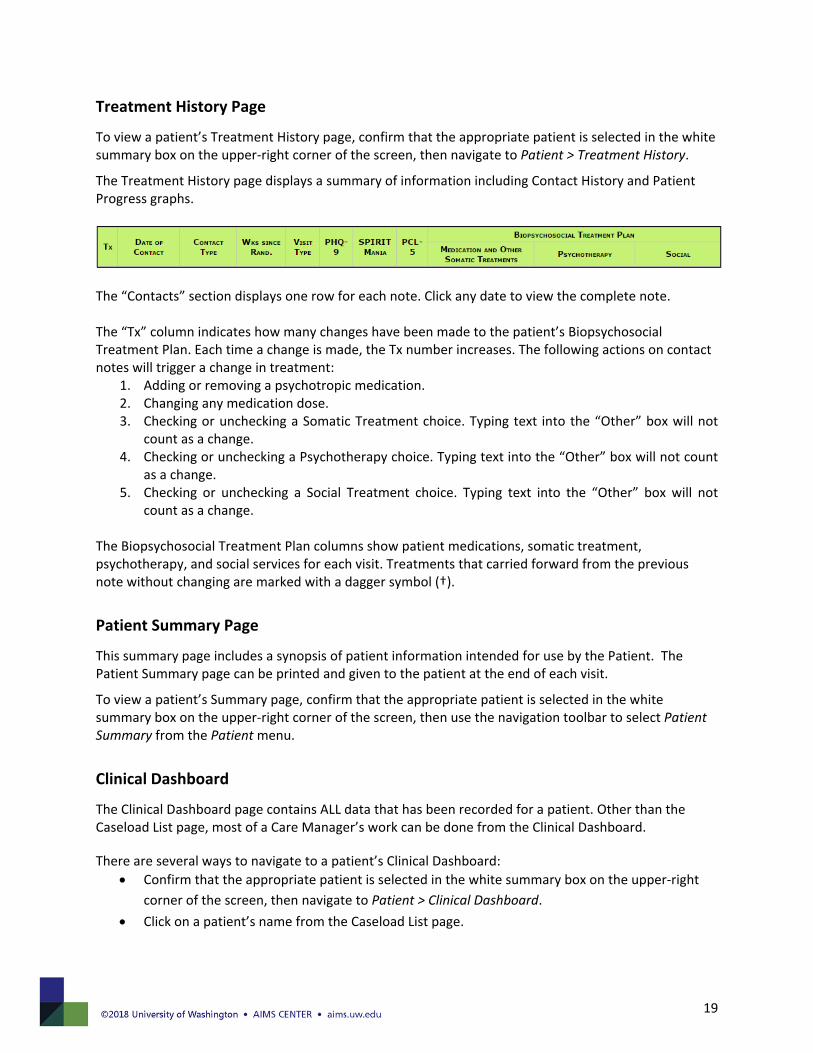
Treatment History Page
To view a patient’s Treatment History page, confirm that the appropriate patient is selected in the white summary box on the upper‐right corner of the screen, then navigate to Patient > Treatment History.
The Treatment History page displays a summary of information including Contact History and Patient Progress graphs.
The “Contacts” section displays one row for each note. Click any date to view the complete note. The “Tx” column indicates how many changes have been made to the patient’s Biopsychosocial Treatment Plan. Each time a change is made, the Tx number increases. The following actions on contact notes will trigger a change in treatment:
1. Adding or removing a psychotropic medication. 2. Changing any medication dose. 3. Checking or unchecking a Somatic Treatment choice. Typing text into the “Other” box will not
count as a change. 4. Checking or unchecking a Psychotherapy choice. Typing text into the “Other” box will not count
as a change. 5. Checking or unchecking a Social Treatment choice. Typing text into the “Other” box will not
count as a change. The Biopsychosocial Treatment Plan columns show patient medications, somatic treatment, psychotherapy, and social services for each visit. Treatments that carried forward from the previous note without changing are marked with a dagger symbol (†).
Patient Summary Page
This summary page includes a synopsis of patient information intended for use by the Patient. The Patient Summary page can be printed and given to the patient at the end of each visit.
To view a patient’s Summary page, confirm that the appropriate patient is selected in the white summary box on the upper‐right corner of the screen, then use the navigation toolbar to select Patient Summary from the Patient menu.
Clinical Dashboard
The Clinical Dashboard page contains ALL data that has been recorded for a patient. Other than the Caseload List page, most of a Care Manager’s work can be done from the Clinical Dashboard.
There are several ways to navigate to a patient’s Clinical Dashboard: Confirm that the appropriate patient is selected in the white summary box on the upper‐right
corner of the screen, then navigate to Patient > Clinical Dashboard. Click on a patient’s name from the Caseload List page.

20
Navigating the Clinical Dashboard To make this large amount of data more manageable, the page is divided into sections which can be toggled on and off using the buttons on the left‐hand side of the page.
The sections that are “on” are visible on the right side of the page. By default, the four sections visible each time you navigate to the Clinical Dashboard include: Current Concerns, Biopsychosocial Treatment Plan, Clinical Measures, and Diagnosis
TIP: You can customize the sections that are turned on by default each time you visit the Clinical Dashboard page by setting your preferences. Navigate to Tools > Preferences.
Viewing Patient History in the Clinical Dashboard As new notes are entered for a patient, historical information will remain available in the Clinical Dashboard, allowing you to track changes over time. To see the dated history log for most items, click on a ‘History’ button on the section heading. Reminders in the Clinical Dashboard Reminders and current patient status information appears in the bottom‐left side of the Clinical Dashboard.

21
Reminders: Appear if the patient is overdue to be seen. The same reminders appear on the Reminders page.
Last Contact: Information about the most recent Contact Note entered for the patient.
Flags: Indicates if any provider has flagged this patient for discussion during the next Psychiatric Consultation, and if the patient is a safety risk. These flags also appear on the Caseload List page and on Contact Notes.
Status: Indicates the current status of the patient as: Enrolled: If the patient has not yet had an Initial Assessment Note entered Treatment: If the patient is in treatment Relapse Prevention Plan: If the patient has a Relapse Prevention Plan note Discharged: If a Discharge Note has been entered
MESSAGE BOARD
Navigate to Tools > Message Board to view messages posted by your site manager. The message will be marked as “New” until you click “Show Message” to read each message.
ACCOUNT PREFERENCES
The Preferences page allows you to customize several options for your CMTS account.

22
To view the Account Preferences page, use the navigation toolbar to select Tools > Preferences. Customizable options include:
Number of Records per Page: how many patient records show on Caseload Lists pages First Page after Login: which page you see first each time you log in Page after Clicking on Study ID: which page you are directed to upon clicking on any Study ID
link Diagnosis Sort Method: determines how patient diagnoses are sorted on the Clinical
Dashboard: alphabetically, chronologically, or both Medication Sort Method: determines how the medication lists are sorted for Prior and Current
Medication sections – alphabetically, chronologically, or both
SYSTEM TIMEOUT
As a security measure, you will be automatically logged out of after 30 minutes of inactivity. Any partially completed note can be retrieved using the Autosave function described in the Autosave section of this document.
USING CMTS ALONGSIDE AN ELECTRONIC MEDICAL RECORD
CMTS is a standalone system, and does not have the ability to automatically port data back and forth with your existing electronic medical record (EMR) system. The AIMS Center recommends that Care Managers document directly in CMTS while the patient is in the room with them, and then port the essential information into the EMR afterwards.
Using “Export as Text”
After documenting a contact note in CMTS, you can export a summary of your note with all the formatting stripped out. This summary can easily be copy‐and‐pasted into an EMR encounter note or patient message. Follow these steps to transfer information between CMTS and your EMR:
1. Open windows for CMTS and your EMR at the same time. 2. In CMTS, navigate to the contact note you want to export. 3. Click the “export to text” button at the top of the note. 4. Highlight the text and right‐click, choose copy. 5. Switch to your EMR window and paste the text into your EMR.
Note: It should take less than 15 minutes per day to port notes from registry to your EMR.

23
Using Screen Capture
Images from CMTS can be pasted into an EMR. A simple method of doing this uses the Microsoft Windows Snipping Tool.
1. In CMTS, navigate to the page you want to take a screenshot of. 2. In the Windows Start menu, click on All Programs 3. Select Accessories. 4. Click on Snipping Tool. 5. The Snipping Tool will open and should automatically have “New” selected. 6. Use your cursor to select the portion of the screen you would like to take a screenshot of. (Note:
The Snipping Tool window will remain on your screen, but will not be in the screenshot.) 7. Once you have selected a rectangular portion of your screen, a new window will open with the
screenshot in it. Save the image by going to File > Save As or copy/paste the image by going to Edit > Copy and then pasting it into the desired location.
EXPORTING AND PRINTING DATA
Export as Text
While viewing (not editing) any Contact Note, the “Export as Text” button will appear at the top of the page. Click this button to strip all formatting from the note and display the information as unformatted text. This feature allows you to easily copy‐and‐ paste information from CMTS to an EMR or another platform.
Printing from CMTS
For best results when printing from CMTS, use the built‐in “Print” function, not the print function in your browser. To access the built‐in CMTS print function, navigate to Tools > Print.

24