care & maintenance - · pdf filemitre jig - forming mitre joints and position cut-outs for...
TRANSCRIPT

Care & Maintenance
Solid Surface WorksurfacesInstallation Instructions
Cleaning and CareEarthstone worksurfaces are easilymaintained and simply require a regularwipe down with a mild detergent and
water. With very little maintenance the surface canbe returned to its original condition and look newlonger than any other kitchen surface. Never cut anything directly on the worksurface andalways use a heat protective pad for any hot itemstaken directly from the oven or cooker.Clean Earthstone worksurfaces daily with a milddetergent and water, followed by rinsing with warmwater and a gentle buff to dry the surface.Once a week, after cleaning, apply a thin coat ofCountertop Magic to return the worksurface to itsoriginal, pristine condition. Wipe off any excesspolish using a clean microfibre cloth.
StainingEarthstone worksurfaces have a solid,non-porous surface resistant to stains,mould, mildew and bacteria growth.
We recommend normal everyday spills be wipedaway without delay using a damp cloth to avoid anypotential staining. If any discolouration appears dueto coffee, tea or fruit juices or marks caused bycigarette burns the following procedure should befollowed. Please Note: Depending on the nature of the stainthe treatment may become more intense. Ensureyou test the respective method before it isextensively applied.The first stage is to clean the surface using a milddetergent and water. If the stain remains try an even mix of domesticbleach and warm water making sure you protectyour hands with gloves.For more stubborn stains apply a non-abrasivecream cleaner to a non-abrasive nylon brush andrub gently over the stain.Finally, if the previous methods fail try rubbing thearea in a circular motion with a Scotchbrite pad inwarm, soapy water.At the end of each stage rinse with warm water,gently buff dry the surface and apply CountertopMagic across the whole surface.If the stain persists we recommend you contact aprofessional tradesman who will return theworksurface to its original installation condition andapply the full sanding and finishing treatment.
Scuffs and ScratchesOne of the main benefits of yourEarthstone worksurface is that it isrepairable.
Slight scratches or dents can be easily removedwith a moist Scotchbrite pad, applying pressure inuniform circular motions. To finish, follow the weekly clean regime, ensuringthe whole worksurface is polished.Severe scratches and deep dents can be removedby a simple sanding process. Please Note: Depending on your skill and ability thisprocedure may have to be performed by aprofessional tradesman.
Resistance to ChemicalsEarthstone worksurfaces are basicallyresistant to the effect of chemicalsalthough aggressive substances may
leave marks in the case of lengthy exposure. Suchdamaged finishes can easily be restored.However please always make sure that finishes donot come into constant contact with aggressivechemical substances such as paint thinner,turpentine, nail varnish remover (acetone) or ovenor drain cleaners for lengthy periods.
Resistance to HeatNever place any hot items directlyfrom the heat source directly on to theworksurface.
Earthstone worksurfaces can become damaged ifhot pans, earthenware or dishes are placed directlyfrom the oven or hob. To prevent surface damage from hot objects it isrecommended to use a heat resistant mat orstainless steel grating on the worksurface.We also recommend that pans match the size of thehotplate and do not extend beyond the heat sourcearound the hob.Should any accidental damage of the surface occurthis can be repaired by following the instructions. Slight discolouring can be easily removed with amoist Scotchbrite pad, applying pressure in auniform circular motion. More severe marks can be removed by a simplesanding process using a 240 grit sandpaper,applying pressure in a wide circular motion. Depending on the severity of the mark it may benecessary to request professional assistance fromyour installer.
Wilsonart InternationalLambton Street Industrial Estate, Shildon, County Durham. DL4 1PX. United Kingdom
Telephone +44 (0)1388 774661 Fax +44 (0)1388 770150For further information on availability, samples, care and maintenance
and other products in our range visit our website at www.wilsonart.co.uk
REF: A303
• Hand Held Circular Saw • Edge Clamps • Hand Router• Cleaning Solvent • Hand Plane • Seam Adhesive• Random Orbital Sander • Silicone Sealant • Palm Sander • Aluminium Tape • Electric Drill • Fibre Reinforced Tape• Mitre Jig • Jointing Bolts & Biscuits • Edge/Profile Trimmer• Finishing Polish & Cloth • 10mm Spanner
The following list of tools are recommended to produce the best results:
Hand Held Circular Saw - use a circularsaw with high quality TCT triple chip bladesfor a fine finish cut. A hand router must beused for the final sizing of exposed edges.Allow at least 5mm oversize for final pass.
Hand Router - with variable rotation speedand high quality double flute tungstencarbide tipped cutter is used for straightcuts, mitre joints and cut-outs.
Hand Plane - use for removing excessadhesive from joints once adhesive hashardened.
Random Orbital Sander - to sandEarthstone worksurface use a good qualityrandom orbital sander. Wilsonartrecommend Festool random orbitalsanders with dust extraction for anexcellent professional finish.(www.Festool.co.uk).
180 grit first stage to remove excessmaterial from joints
240 grit second stage to smooth over joints
Scotchbrite Pad - for final finish use anultra fine Scotchbrite pad.
Palm Sander - a good quality orbital palmsander is for finishing the front edge.
Electric Drill - use a good quality variablespeed drill with 1/2” chuck. Standard highspeed drill bits are suitable for Earthstoneworksurface.
Mitre Jig - forming mitre joints and positioncut-outs for connector bolts.
Edge/Profile Trimmer - trimmingoverhanging edges, use a fixed tip guidetrim cutter with a 3mm profile cutter.
Edge Clamps - A type clamps are used toapply edging, G type to secure jigs to theworksurface.
Cleaning Solvent - cleaning surfacesthoroughly prior to bonding.
Seam Adhesive - 50ml cartridges withcolour matched adhesive used to bondmitre joints and edging. Applicator gun with mixer tips also required.
Silicone Sealant - waterproof & mouldresistant sealant for all exposed raw coreagainst moisture.
Aluminium Tape - reflective tape used toreduce the heat transfer between the hoband internal cut-out.
Fibre reinforced Tape - to temporarilysecure the edging to the worksurface ifadditional edging is required. Tape isremoved when adhesive is set.
Jointing Bolts & Biscuits - bolts are used to clamp joints and the biscuit jointshelp to strengthen joints and produce alevel surface.
Finishing Polish & Cloth - CountertopMagic recommended for final surfacepolish.
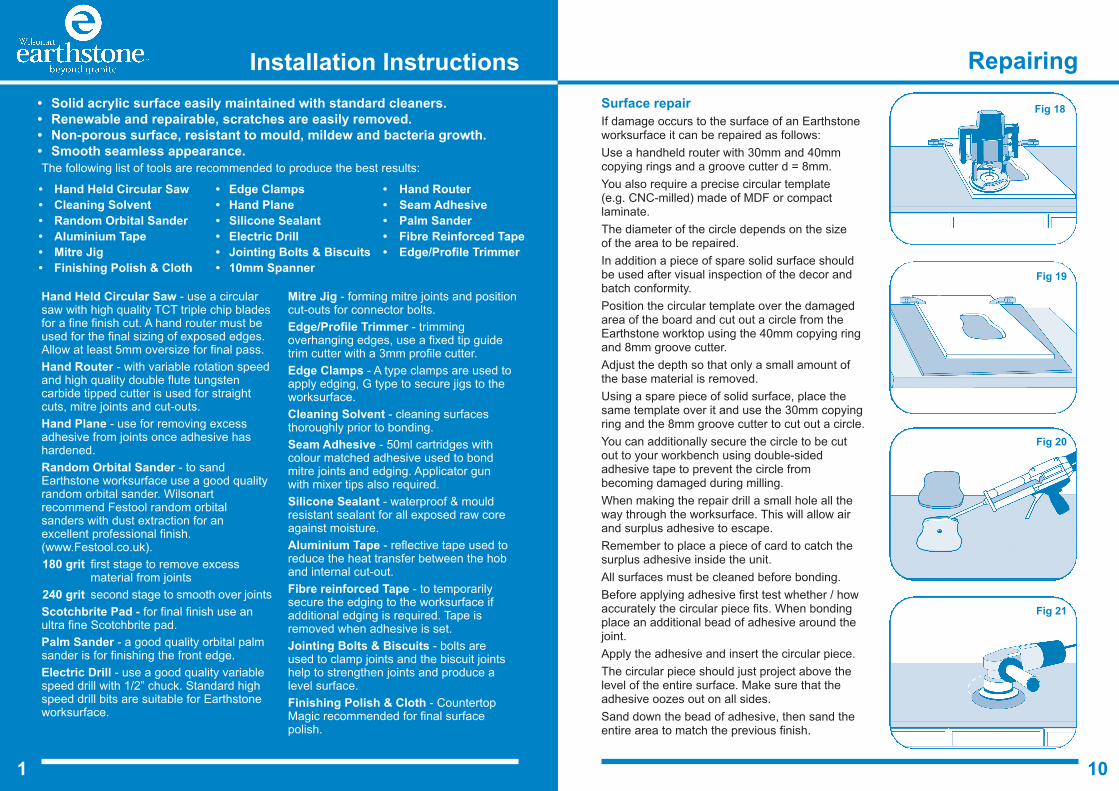
Surface repairIf damage occurs to the surface of an Earthstoneworksurface it can be repaired as follows:
Use a handheld router with 30mm and 40mmcopying rings and a groove cutter d = 8mm.
You also require a precise circular template (e.g. CNC-milled) made of MDF or compactlaminate.
The diameter of the circle depends on the size of the area to be repaired.
In addition a piece of spare solid surface shouldbe used after visual inspection of the decor andbatch conformity.
Position the circular template over the damagedarea of the board and cut out a circle from theEarthstone worktop using the 40mm copying ringand 8mm groove cutter.
Adjust the depth so that only a small amount ofthe base material is removed.
Using a spare piece of solid surface, place thesame template over it and use the 30mm copyingring and the 8mm groove cutter to cut out a circle.
You can additionally secure the circle to be cutout to your workbench using double-sidedadhesive tape to prevent the circle frombecoming damaged during milling.
When making the repair drill a small hole all theway through the worksurface. This will allow airand surplus adhesive to escape.
Remember to place a piece of card to catch thesurplus adhesive inside the unit.
All surfaces must be cleaned before bonding.
Before applying adhesive first test whether / howaccurately the circular piece fits. When bondingplace an additional bead of adhesive around thejoint.
Apply the adhesive and insert the circular piece.
The circular piece should just project above thelevel of the entire surface. Make sure that theadhesive oozes out on all sides.
Sand down the bead of adhesive, then sand theentire area to match the previous finish.
Installation Instructions
• Solid acrylic surface easily maintained with standard cleaners.• Renewable and repairable, scratches are easily removed. • Non-porous surface, resistant to mould, mildew and bacteria growth.• Smooth seamless appearance.
1 10
Repairing
Fig 18
Fig 19
Fig 20
Fig 21

Finishing Handling & Planning
9 2
Planning
One of the main design features ofEarthstone worksurfaces is the smooth,seamless appearance.
The positioning of the joints is veryimportant so careful planning is required to achieve the best results;
Joints should not extend across any hob orsink cut-outs and must not be formed overheat radiating appliances e.g. dishwashers& tumble driers and not over washingmachines.
Please refer to the Cutting & Jointingsection for more detailed installationinstructions.
Earthstone worksurfaces are balanced witha moisture resistant barrier to preventmoisture ingression into the core material.
As additional protection above dishwashersand washing machines it is recommendedto apply a 50mm wide bead of clearsilicone sealant to the underside of thefront edge of the worksurface.
Any excess material recovered from thesink or hob cut out should be placedunderneath the units or plinths for us in any future repair work.
This will ensure an exact colour match and eliminate any colour variance fromanother batch.
Handling and storage
Before handling ensure adequatemanpower is available to safely lift theworksurface.
When carrying manually, we advise that it is held vertically along the width.
Do not carry flat!
Earthstone worksurfaces must always bestored in a ventilated, dry, enclosed areawithin the recommended temperature, faceup, flat and supported on batons every1000mm, starting 100mm in from bothends.
During installation Earthstone worksurfacescan be stored vertically on the back longedge, not the finished edge, for shortperiods.
If not possible, ensure the edge touchingthe floor is protected against damage.
Conditioning
Prior to commencing installation ensure.Earthstone worksurfaces, splashbacks,upstands and adhesives are brought up toroom temperature of around 18°C (64.4°F).
Colour tolerances
Earthstone worksurfaces are factoryfinished to a 240 grit surface ready forimmediate installation.
Whilst manufactured to strict colourtolerances it is advisable to check allcomponents prior to commencinginstallation.
Lightly sand a small area of eachworksurface using a fine Scotchbrite pad.
Clean off any dust and compare colours.
Should there be an unacceptable colourvariance, please contact your supplierbefore commencing installation.
Claims for colour variation cannot be made after installation.
Sanding
The use of a good quality random orbitalsander is vital to produce a professionalfinish. Dust extraction is essential for healthand safety reasons and to ensure a cleanworking environment.
Please keep in mind that the entire surfacealways has to be sanded.
It is recommended that when any sandingis to be done the entire surface is sanded.Ensure you avoid just sanding up anddown the joint as this will cause a grooveor trenching.
A palm sander should be used on the frontedge keeping this flush and flat.
We recommend finishing to a matt surfaceas this offers maximum economy inregards to the amount of care required.
To obtain the best results, it is paramountto leave sanding until all joints are formed.Do not forget that the entire surface alwayshas to be sanded and not just the bondlines.
Ensure the sander is moved constantlyduring the complete sanding operationsand the worksurface is wiped clean with adamp cloth between each pass to removesurface contamination.
Please follow the specified grain sequenceto obtain a perfect finish.
180grit > 240 grit > ultra fine Scotchbritepad
Earthstone worksurfaces are alreadysupplied to a 240 grit finish, however whensanding away excess adhesive across thejoints you need to return to a 180 grit.
Ensure you don’t over-sand the joint andremove too much surface material eitherside of the joint line as this may lead to aslight unevenness across the joint.
Work up to a 240 grit across the wholeworksurface to ensure a smooth surfaceand an inconspicuous, seamlessappearance. This process also applies toany additional edges.
To provide a consistent all-over matt finish,use ultra fine Scotchbrite pads. This ismost suitable for darker colours.
Polishing
To achieve a rich, high quality finish useCountertop Magic, a unique polishingagent.
When completely installed the worksurfaceand edges can be polished by either lightlyhand-buffing or using a random orbitalsander with an ultra fine Scotchbrite pad.
Apply the Countertop Magic evenly in to the surface and leave for 10 minutes to absorb.
Apply a further coat of polish and buff untilit is fully absorbed.
Finally wipe off any excess using a cleanmicrofibre cloth.
Sanding Earthstone worksurfaces is simple and produces excellent results. IMPORTANT:
Please inspect this product fully prior to cutting, jointing or installation (incl. colour, texture,profile, visible imperfections and defects), as any consequential fitting costs in referenceto these visible discrepancies will not be accepted at a later stage.

Cutting & Jointing
3 8
Method 2
Remember if you select the plant on method thenew edge will increase the worktop length by6mm per edge.
Measure and cut the required length of edgingstrip.
Always router into the face edge and never router out of the front edge as this will reduce the possibility of chipping or flaking.
Using a straight edge and router, remove anyexcess material. Thoroughly clean the edge ofthe Earthstone worksurface (avoiding thechipboard) and the reverse of the edging stripusing industrial denatured alcohol and a lint-free bleached white cloth.
Allow to evaporate dry and apply four beads of colour matched adhesive along the length ofthe worksurface.
Apply beads to the top, centre, bottom and both short edges, 5mm from the edge.
Position the edging strip and secure in place withfibre reinforced tape leaving a 2 - 3mm overhangat the top and bottom of the edging strip.
Place the tape every 50 - 75mm making surethat an unbroken bead of adhesive has beensqueezed out along the top of the joint.
This is vital to achieve a clean, inconspicuousjoint.
This should be allowed to dry hard forapproximately 20 minutes then trimmed flush and profiled if necessary.
Using a profile trimmer hand trim the excessedge overhang and form a 3mm radius profile to match the factory finish.
Profiling may not be needed if the edge is to fit against a tall housing or wall.
Cutting Earthstone worksurfaces
Cutting of Earthstone worksurfaces can becarried out using a portable hand-heldcircular saw. Ensure a good quality sharptriple fine tooth tungsten carbide tippedblade is used and make two cuttingpasses:
1st cut set saw blade depth at 10mm,
2nd cut set saw blade depth at 40mm.
Final trimming should be made with arouter. Allow 5mm oversize to trim to thefinal size with the router.
Position the worksurface to begin cutting in from the factory fitted edge.
Never finish the cut through a fitted edge.Always proceed carefully when cuttingtowards and through the front edge, thiswill reduce the possibility of chipping orflaking. Ensure the cut is cleaned to allowfor a good bond and finish to the joint.
All joint edges and final finished ends must be cut using a hand router with asharp blade.
Straight & Mitre joints
To ensure a clean square edge use astraight edge guide offset to suit the router for both end and butt joints.
To minimise material waste we recommenda 90° mason’s mitre joint using a purposemade jig. Refer to jig manufacturer’sinstructions.
It is recommended to router through theworksurface in 3 incremental stages withthe worksurface positioned as follows:
• Left hand 90° joint- Female joint router face up- Male joint router face down
• Right hand 90° joint - Female joint router face down- Male joint router face up
Cut-outs - sinks & hobs
Cut-outs can be formed using a handrouter and a suitable jig or template.
Clamp the jig to the face of the Earthstoneworksurface and cut round in 3 stages of12mm depth increment. Similarly with atemplate mark out the desired cut-out usinga pencil again following the outline andcutting in 3 stages. Always ensure allinternal corners of the cut-out are roundedusing a drill with a minimum 10mm radius.
Thoroughly clean the edges of the cut-outand the surface ensuring all dust andshavings have been removed.
Sink cut-outs must be completely sealedusing a 2 mm thick bead of clear, waterresistant silicone.
All hob cut-outs require a 50mm wide heatreflective tape around all the raw edgesmaking sure the tape overhangs both thesurface and underside of the cut-out.
Earthstone worksurfaces are hardwearing and require good qualitymachinery and clean, sharp cutters to produce a good professional finishand ultimately save time and effort. (See recommended tools underinstallation tools).
Edging
Fig 15
Fig 16
Fig 17

Edging
7 4
JointingEarthstone worksurfaces can be jointed in twoways:
1) using a spline 2) traditional biscuit joints
It is advisable to carry out a dry fit prior tocommencing installation once all the componentshave been prepared.
Spline assembly (as illustrated)
When using this method do not cut straight infrom the face of the joint. Start or finish the cut 6 to 8 mm in from the front edge. This stops any work having to be done on the front edgeinternal corner at a later stage.
Rebate a groove (approx. 6.2 mm) with a depthof approx. 13mm directly underneath the top side.
Always mill from the top side.
Remember to allow the tongue to taper offtowards the front edge to prevent a visibletransition.
Cut out worktop jointing bolts (3 for 650mm, 4 for 900mm width).
Clean the surfaces to be joined using industrialdenatured alcohol (avoid applying cleaner tochipboard).
Allow to evaporate dry and assemble within ashort time to prevent recontamination.
Prepare the worktop bolt connectors.
Apply Earthstone colour match adhesive to oneof the grooves then insert the spline and slidebackwards and forwards to distribute theadhesive.
Apply two beads of adhesive along the entirelength of the joint, the first to run just above thespline, the second 5mm up from the bottom.
Apply adhesive to the second groove. Accuratelyapply the amount of adhesive in the grooves andleave sufficient space so that the adhesive or thetongue does not hinder the joining process.
Apply a final bead of adhesive along the edge of the top surface and front edge. This will helpcreate squeeze out and achieve aninconspicuous and secure joint.
Without delay pull the worksurfaces together.
Earthstone worksurfaces are supplied with3 sides factory edged, one long and twoshort. If additional edging is required thiscan be easily done prior to installation.
There are two methods to edge;
1 - router back the chipboard core as illustrated 2 - simply plant on the edge
Generally, it is easier to apply an edge on aworkbench before the worksurface is fully installed.
Method 1
Measure and cut the required length of edging strip.
With the worksurface placed face down and routedback it is recommended that on the final pass therouter is set to go into the surface material by 1mm.All of the chipboard is then removed. This will givea clean cut.
Note: Ensure all the excess material is removed asthis is critical in achieving a good, inconspicuous joint.
Thoroughly clean the edge of the Earthstoneworksurface (avoiding the chipboard) and thereverse of the edging strip using industrialdenatured alcohol and a lint-free bleached whitecloth.
Allow to evaporate dry and apply four beads ofcolour matched adhesive along the length of theedging strip. Apply beads to the top, centre, bottomand both short edges, 5mm from the edge.
Firmly apply edging strip and align flush to theoverhang material if core is routered back
Secure the edging using ‘A’ clamps, one at eachend and the others spaced approximately 100mmapart.
Allow at least 40 mins for the adhesive to curebefore commencing further finishing work.
Ensure that an unbroken bead of adhesive issqueezed out of the joint. This is vital to achieve a clean, inconspicuous joint.
Using a profile trimmer hand trim the excess edgeoverhang and form a 3mm radius profile to matchthe factory finish. Profiling may not be needed if the edge is to fit against a tall housing or wall.
Jointing
Fig 1
Fig 2
Fig 3
Fig 4
Fig 11
Fig 12
Fig 13
Fig 14

Jointing
5 6
Butt Joint assemblyTo join two straight lengths a similar method isapplied.
The worksurface edges to be bonded togetherhave to first be milled at right angles and thenstraight, ensuring both surfaces are exactlyparallel to secure a good inconspicuous joint.
Cut out the recesses for the underside boltconnectors. Using a biscuit jointing machine form pockets to suit No.20 biscuits.
Cut pockets 20mm down from the top facebetween bolt slots.
Do not cut pockets over bolt slots. Use one biscuit between each connector bolt.
Clean the surfaces to be joined using industrialdenatured alcohol (avoid applying cleaner tochipboard). Allow to evaporate dry and assemble within a short time to preventrecontamination.
Apply two beads of adhesive along the entire lengthof the joint, the first to run just above the line of thebiscuits, the second 5mm up from the bottom.
Apply adhesive to the biscuit grooves. Apply afinal bead of adhesive along the edge of the topsurface and front and back edge. This will helpcreate squeeze out and achieve an inconspicuousand secure joint.
Bring the two worksurfaces together and align thefront inner faces. Insert the connection bolts andtighten. Do not over tighten.
Allow adhesive to harden for between 30 to 45 minutes (finger-nail test).
Do not attempt to remove any excess squeezedout adhesive at this time as it will shrink duringdrying.
Adhesive overspill elsewhere on the surface may be wiped off using an industrial denaturedalcohol.
Using a good quality random orbital sanderensure the full surface is sanded evenly.
Do not only sand along the line of bonding butover a larger area.
Various sanding levels are applied according to surface finish required, (see sanding section).
Biscuit Joint assembly
Using a biscuit jointing machine form pockets tosuit No.20 biscuits. Cut pockets 20mm downfrom the top face between bolt slots.
Do not cut pockets over bolt slots. Use onebiscuit between each connector bolt.
Follow the same method of jointing with colourmatch adhesive.
Bring the two worksurfaces together and alignthe front inner faces. Insert the connection boltsand using a 10mm spanner draw the elementstogether.
Do not over tighten.
Allow adhesive to harden for between 30 to 45minutes (finger-nail test) and only then removefixing devices.
Do not attempt to remove any excess squeezedout adhesive at this time as it will shrink duringdrying.
Adhesive overspill elsewhere on the surface may be wiped off using an industrial denaturedalcohol.
Using a good quality random orbital sanderensure the full surface is sanded evenly.
Do not only sand along the line of bonding butover a larger area.
Various sanding levels are applied according tosurface finish required, (see sanding section).
Jointing
Working with Earthstone AdhesivesOnly Earthstone colour match adhesives should be used for jointing and edging. Otheradhesives will expose joints.The adhesive is a sealant and bonding agent for both the surface material and thechipboard core. It must be applied correctly with an applicator gun to ensure a controlledmix of adhesive and hardener.When using a new cartridge always purge and dispose of 3 - 5 ml of mixed adhesive.Earthstone colour match adhesive is normally fully cured in 40 minutes, with a joint opentime of 6 - 8 minutes. It is best plan on closing the joint within 5 - 6 minutes. This couldalter slightly depending on the temperature.
Fig 5
Fig 6
Fig 7
Fig 8
Fig 9
Fig 10