capsi general manual 2011 - personal homepage...
TRANSCRIPT

GENERAL MANUAL
for Courses Using CAPSI
(Computer-Aided Personalized System of Instruction)
Prepared by Joseph J. Pear
Gabriel J. Schnerch
Copyright © 2011 by 5797943 Manitoba Ltd.
1
TABLE OF CONTENTS
A. INSTRUCTOR ..........................................................................................2
B. COURSES WEBSITE*: WWW.WEBCAPSI.COM ...................................2
C. REQUIRED MATERIALS .........................................................................2
D. TEACHING METHOD & GOALS .............................................................2
E. ACCESSING THE CAPSI PROGRAM.......................................................2
F. USING THE CAPSI PROGRAM ...............................................................5
F.1. Main Menu Commands...............................................................................................................5 F.1.1. Changing Your Password .........................................................................................................5 F.1.2. Exiting the Program..................................................................................................................6
F.2. Communication with the Instructor through the CAPSI Messaging System ........................6 F.2.1. Receiving messages from the instructor .................................................................................6 F.2.2. Reading and Replying to a Message .......................................................................................7 F.2.3. Sending a New Message .........................................................................................................8 F.2.4. Deleting a Message .................................................................................................................9 F.2.5. Courses....................................................................................................................................9
F.3. Course Functions .........................................................................................................................9 F.3.1. Checking Course Standing......................................................................................................9 F.3.2. Peer Reviewing .....................................................................................................................10 F.3.3. Writing Unit Tests.................................................................................................................12 F.3.4. Writing Exams ......................................................................................................................14 F.3.5. Viewing a Marked Unit Test or Exam that You Wrote ........................................................14 F.3.6. Appealing a Unit Test or Exam Result .................................................................................14
G. RESEARCH ON CAPSI ...........................................................................16
H. PLEASE SEND YOUR SUGGESTIONS...................................................16
2
A. Instructor
See the COURSE SYLLABUS for the course (emailed to you shortly after enrollment, and also available for download from the course program once logged in; see Required Materials below).
B. Courses Website*: www.webcapsi.com
C. Required Materials For each course covered by this manual:
You will need this manual and the textbook(s) listed for the course in the University of Manitoba Book Store. You will also need the course SYLLABUS which is emailed to you shrortly after you register in the course (email your instructor if you haven’t received it within a few days prior to the course start date, or if you register late for the course) and the STUDY GUIDE, which you download from CAPSI when you access your course.
D. Teaching Method & Goals These courses use a teaching method known as Personalized System of
Instruction, which is based on principles of learning. Originally developed by the behavioural psychologist Fred S. Keller, PSI is also known as the “Keller Plan.” Since a computer program facilitates administration of these courses, the version of PSI used here is called Computer-Aided Personalized System of Instruction (CAPSI). The goal of teaching courses using CAPSI is that students are able to think, talk, and write knowledgeably about the course material. The question-answer mastery procedure is designed to help students achieve this type of proficiency. For further information about the teaching method, see the specific manual for your course.
** Please note that for each course offered online by CAPSI there is a technology lab fee of $26.25 which you will pay when you register for the course. When you register (online by Aurora or in person at your faculty) this will automatically be added to your tuition fees.**
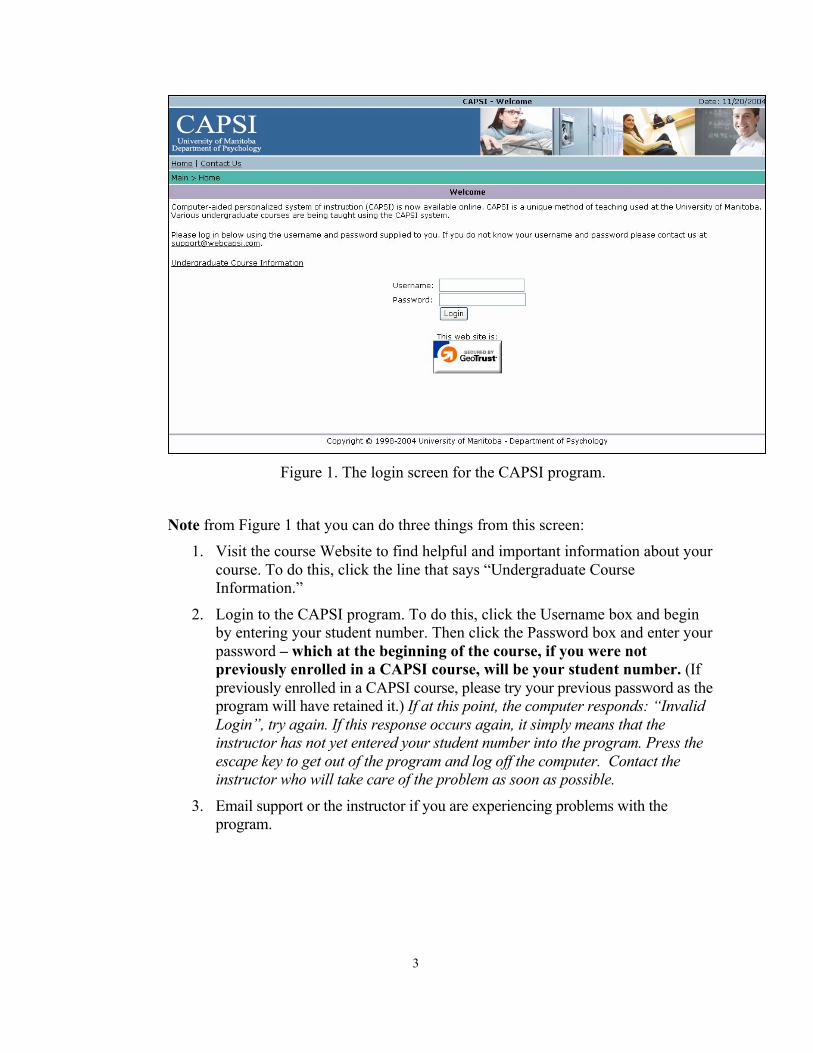
E. Accessing the CAPSI Program You may access the CAPSI program from any location (home, workplace, campus, etc.) with a personal computer that is connected to the Internet and that has an appropriate Web browser. (The display and other functions of the program work best on Microsoft Internet Explorer.) To access the program load your Web browser, click the address bar, type http://www.webcapsi.com into the address bar, and then push the enter key. The screen you will see is shown in Figure 1.
3
Figure 1. The login screen for the CAPSI program.
Note from Figure 1 that you can do three things from this screen: 1. Visit the course Website to find helpful and important information about your
course. To do this, click the line that says “Undergraduate Course Information.”
2. Login to the CAPSI program. To do this, click the Username box and begin by entering your student number. Then click the Password box and enter your password – which at the beginning of the course, if you were not previously enrolled in a CAPSI course, will be your student number. (If previously enrolled in a CAPSI course, please try your previous password as the program will have retained it.) If at this point, the computer responds: “Invalid Login”, try again. If this response occurs again, it simply means that the instructor has not yet entered your student number into the program. Press the escape key to get out of the program and log off the computer. Contact the instructor who will take care of the problem as soon as possible.
3. Email support or the instructor if you are experiencing problems with the program.
4
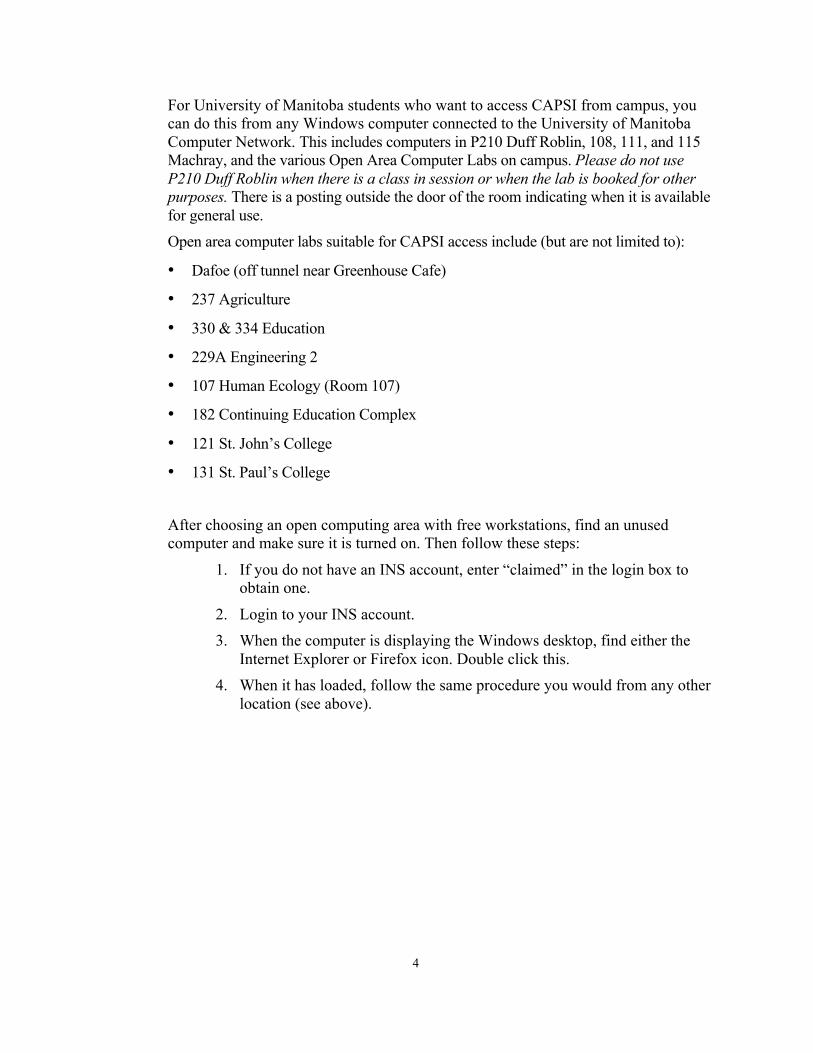
For University of Manitoba students who want to access CAPSI from campus, you can do this from any Windows computer connected to the University of Manitoba Computer Network. This includes computers in P210 Duff Roblin, 108, 111, and 115 Machray, and the various Open Area Computer Labs on campus. Please do not use P210 Duff Roblin when there is a class in session or when the lab is booked for other purposes. There is a posting outside the door of the room indicating when it is available for general use. Open area computer labs suitable for CAPSI access include (but are not limited to):
• Dafoe (off tunnel near Greenhouse Cafe)
• 237 Agriculture
• 330 & 334 Education
• 229A Engineering 2
• 107 Human Ecology (Room 107)
• 182 Continuing Education Complex
• 121 St. John’s College
• 131 St. Paul’s College
After choosing an open computing area with free workstations, find an unused computer and make sure it is turned on. Then follow these steps:
1. If you do not have an INS account, enter “claimed” in the login box to obtain one.
2. Login to your INS account. 3. When the computer is displaying the Windows desktop, find either the
Internet Explorer or Firefox icon. Double click this. 4. When it has loaded, follow the same procedure you would from any other
location (see above).
5
F. Using the CAPSI Program F.1. Main Menu Commands
When your instructor has entered your student number into the program and you follow the above procedure, you will see a menu bar at the top of your “home” screen. (We’ll call this the “main menu”.) You may select any of the items in the main menu (which are fairly self-explanatory) by simply clicking the chosen item. Do not be afraid to experiment with this just to see what will happen.
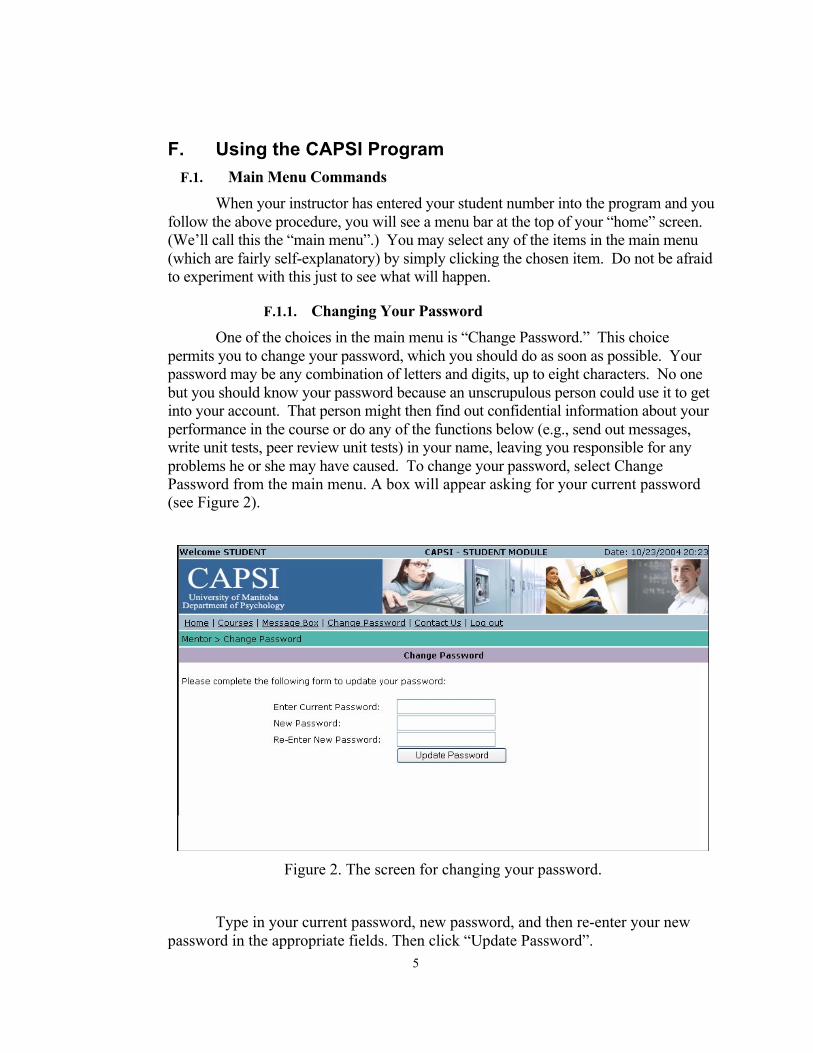
F.1.1. Changing Your Password One of the choices in the main menu is “Change Password.” This choice permits you to change your password, which you should do as soon as possible. Your password may be any combination of letters and digits, up to eight characters. No one but you should know your password because an unscrupulous person could use it to get into your account. That person might then find out confidential information about your performance in the course or do any of the functions below (e.g., send out messages, write unit tests, peer review unit tests) in your name, leaving you responsible for any problems he or she may have caused. To change your password, select Change Password from the main menu. A box will appear asking for your current password (see Figure 2).
Figure 2. The screen for changing your password.
Type in your current password, new password, and then re-enter your new password in the appropriate fields. Then click “Update Password”.

6
Passwords may have numbers, letters, and other characters such as punctuation marks, and it is a good idea to use a combination of these. You may use a mixture of upper and lowercase characters.
F.1.2. Exiting the Program
Note that one of the choices in the main menu is “Logout”. NOTE: You should always choose “Logout” before exiting the program. This is especially important if you are logged in at a computer in a public place (e.g., a university computer lab), because the next person who sits down at that computer may access your account. It is also important, as the program may have important information to give you before you logout; for example, a message from the instructor may have just arrived in your message box (see below).
F.2. Communication with the Instructor through the CAPSI Messaging System
F.2.1. Receiving messages from the instructor CAPSI has a simple messaging program that allows students to receive and send short messages from and to the instructor. To access this feature, choose “Message Box” from the main menu bar. A screen will appear listing all the messages you have in your message box (see Figure 3). The listing has five headings:
From - indicates who sent you the message. Date – indicates the date the message was sent. Time - the time the message was sent. Subject - the topic of the message. Read (Y/N) - indicates whether you have read the message.
7
Figure 3. Your Message Box screen.
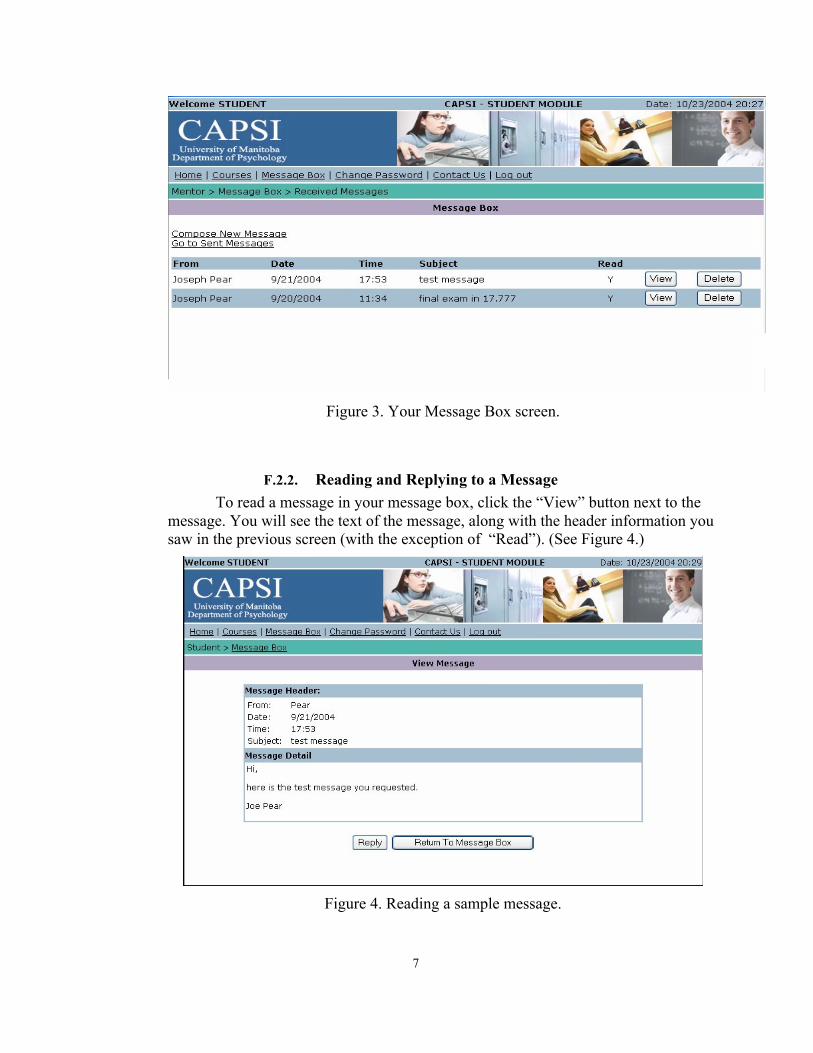
F.2.2. Reading and Replying to a Message To read a message in your message box, click the “View” button next to the message. You will see the text of the message, along with the header information you saw in the previous screen (with the exception of “Read”). (See Figure 4.)
Figure 4. Reading a sample message.

8
• After you have read a message, you can reply to it by clicking “Reply” in the View Message screen (the screen you should be currently at after reading your message).
• Click in the top left corner of the “Message Detail” box. You can now type in your response. When you are finished typing your reply, click the “Send Message” button.
• You should check you messages daily, as the Instructor may use this messaging system to send important information to students.
F.2.3. Sending a New Message To send a new message to the instructor click the “Compose New Message” button in the top left corner of the message screen. You should see the screen shown in Figure 5. (Another way to communicate with the instructor is through your Internet email account, as explained later in this manual. For long questions and answers, this is better than the CAPSI messaging system, which is intended only for relatively short communications.)
Figure 5. Screen for composing a message.
Now, perform the following steps:
• Click anywhere in the “Message Detail” window. Type in your message here.
9
• After you have finished typing your message, click anywhere on the drop-down box next to “To”. Select the user that you are sending to. Typically this will be your course instructor.
• Now click the “Subject” line. Type in the subject or topic of the message.
• Click the “Send Message” button when you are done if you are satisfied with how your message looks. Otherwise click the “Cancel” button.
• After you have done this, you are returned to the initial screen listing the messages in your message box.
F.2.4. Deleting a Message To delete a message from your message box, click the “Delete” button next to the appropriate message. A box will pop up asking if you are sure you want to delete the message. Click the “OK” button if you do, and the “Cancel” button if you do not. Either option will then return you to the message box screen.
F.2.5. Courses
Selecting the “Courses” option will take you to a screen that lists the CAPSI courses you are enrolled in. You will then be able to engage in the various functions of each of these courses (see below).
F.3. Course Functions Students can use the CAPSI program to check their current standing in the course, peer review unit tests in courses in which peer reviewing is an option, write unit tests and exams, view marked unit tests and exams, and appeal restudy results and exam marks. Select “Courses” from the main menu to perform course functions (the command is plural because you may be enrolled in more than one CAPSI course). You will see your course number(s), the academic session, and which section you are enrolled in. You will also see some choices across from each course listing. To make these choices, click the appropriate box.
F.3.1. Checking Course Standing
When you click the “View” button for a course. When you will see a screen displaying information regarding your performance in the course (see Figure 6).

10
Figure 6. Example of a view of current standing in a course.
F.3.2. Peer Reviewing
In CAPSI courses in which there is a peer-review option, a component of your mark is based on your peer reviewing unit tests written by other students (your peers) taking the same course you are taking. Because how you write a unit test depends largely on how it is going to be marked or reviewed, the procedure for peer reviewing unit tests is described before the procedure for writing unit tests. If your course does not have peer review as an option, disregard the following section on “Setting Your Availability”.
F.3.2.1. Setting Your Availability
To make yourself available for peer reviewing in courses in which this option is available, click the circle next to “Yes” or “No” next to where it says “Able to Peer Review”. If you clicked “Yes”, you may also go down to the next item and indicate the date and time at which you wish to become available. Don’t worry about whether or not you will have passed any unit tests by that time and date; the computer won’t select you to peer review a unit test unless you become eligible to peer review that unit test by having passed the corresponding unit. The program will begin assigning unit tests for you to peer review only after the date and time that you indicated. The computer uses a 24-hour clock, so a time like 3:00 PM is represented as 15:00. The time 00:00 represents midnight at the beginning of the date indicated, whereas 24:00 indicates midnight at the beginning of the following day. To avoid confusion, it is best not to use these times. The time 23:59 is the highest value that should be entered and 00:01 is the lowest value that should be entered. If you do not indicate a date or time at which you will become available, the program will assume that you are available right away, and may send you a unit test to review at any time.
11
Whenever you change your availability to peer review, be sure to check to see if a unit test was sent for you to peer review just before you changed your availability (or just as you were changing it). This is important, as students have sometimes missed unit tests assigned to them because a unit test was sent a moment or so after they checked for one. One very important point regarding changing your availability to peer review: You must click the “Save Changes” button or the change will not be saved. If you click any other choice, or simply close the program, you will leave the Current-Status screen but the change will not be made.
IMPORTANT: You are available to peer review continuously from the date and time on which you agreed to become available until you change your availability. You are not signed off automatically after 24 hours.
F.3.2.2. Checking for Unit Tests and Viewing Answers
If you signed on to be a peer reviewer in courses in which this option is available, you should check for a unit test to peer review at least once during the time 24-hour limit for marking unit tests. You can check for unit tests by clicking the “Review” button. By default, you will be brought to a screen that lists unit tests that you previously reviewed as well as current unit tests submitted to you to review. To restrict this view either just to current or just to previous unit tests, click the drop-down box at the far right of the screen and then select either “Current” or “Previous.”
If a unit test has been assigned to you to review, you will see the date and time it was submitted. To see the questions, click “Mark Test”. A screen will appear showing the questions. Select a question and click the “Comment” button next to it to view the full question and the student’s answer. There is also a window for entering your comments on the student’s answer.
F.3.2.3. How to Peer Review The comments made on individual answers and on the unit test as a whole must be respectful, constructive, and non-punitive. All answers must be complete and correct before a pass result can be given.
If the answer to a question is complete and correct, enter a comment and click the box next to “Displays Mastery.” A small checkmark will appear in the box. If the question is incorrect or incomplete in some way, do NOT click the “Displays Mastery” button (leave it unchecked). To save the comments that you have typed for a particular answer, and the status in terms of mastery displayed or not, click the “Save Comment” button. This will take you back to the previous screen showing the list of questions on the unit test. You review each question in this way until you have reviewed them all.
To enter a result for the unit test as a whole, scroll down the screen that shows the list of questions. There is a comment box that allows you to enter an overall comment for the unit test. Enter your comments here. Then click the drop-down box next to “Mark”. Choose either “Pass” (if “Displays Mastery” is checked for all answers) or “Restudy” (if any answer is marked “No” to “Displays Mastery”). When
12
you are done these steps, click the “Submit Mark” button at the bottom of this screen. If any answer is incorrect, the unit test must be given a restudy. When assigning a restudy, please be explicit about which answers did not display sufficient mastery, and suggest how the answer(s) should be changed in order to demonstrate mastery. When assigning a pass result, let the student know about anything that he or she did particularly well.
You may view any unit test that you have marked by clicking the “Review” button, and then selecting “Previous” on the drop-down box in the top right of the screen. This screen will also show you the submission date and time of any unit tests that you were late in reviewing. Thus, if you have been penalized points for late reviewing, you may check this screen to find out why.
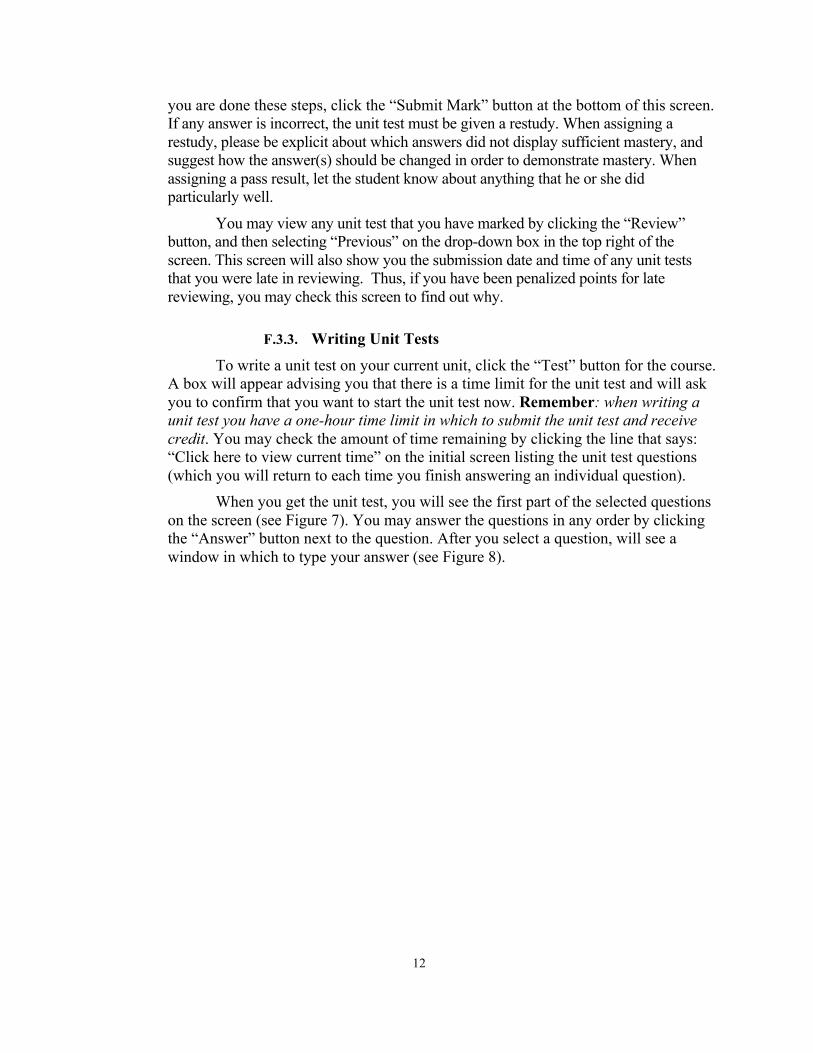
F.3.3. Writing Unit Tests
To write a unit test on your current unit, click the “Test” button for the course. A box will appear advising you that there is a time limit for the unit test and will ask you to confirm that you want to start the unit test now. Remember: when writing a unit test you have a one-hour time limit in which to submit the unit test and receive credit. You may check the amount of time remaining by clicking the line that says: “Click here to view current time” on the initial screen listing the unit test questions (which you will return to each time you finish answering an individual question).
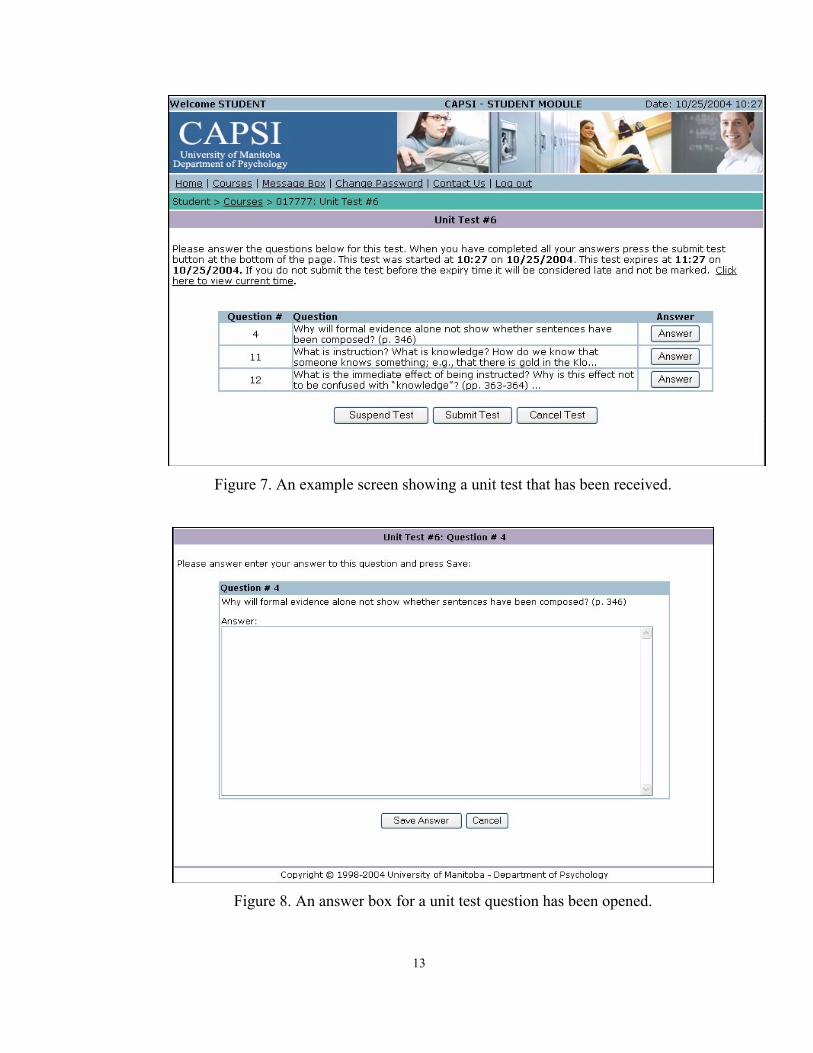
When you get the unit test, you will see the first part of the selected questions on the screen (see Figure 7). You may answer the questions in any order by clicking the “Answer” button next to the question. After you select a question, will see a window in which to type your answer (see Figure 8).
13
Figure 7. An example screen showing a unit test that has been received.
Figure 8. An answer box for a unit test question has been opened.

14
When you are finished typing your answer, click the “Save Answer” button at the bottom of the screen. After you have answered all the questions and have saved all of them, click the “Submit Test” button to submit the unit test. Alternatively, you can click “Cancel Test” or “Suspend Test”. Canceling a unit test should be done if you discover that you were not adequately prepared for the unit test. It is the same as giving yourself a “Restudy,” and you will not be able to write a new unit test on the unit until at least one hour restudy time has elapsed. Suspending your unit test should be done only in an emergency situation. This option will not re-set the timer, but it will allow you to save your unit test and re-start it after the emergency is over. If the unit test is submitted after the deadline, your instructor will have the option of marking or not marking it, depending on the nature of the emergency.
F.3.4. Writing Exams
You will write the midterm and final exams using a procedure similar to that for writing unit tests. On one of the scheduled examination dates, click the “Exam” button when you have the menu from the course on your screen, and the exam will be presented to you in a manner similar to that in which you receive unit tests. Write and submit the exam in the same way that you write and submit a unit test, keeping in mind that partial credit is given for partially correct answers and that it is not possible to cancel or rewrite an exam. Exams are marked by the instructor or teaching assistant.
F.3.5. Viewing a Marked Unit Test or Exam that You Wrote
To view a unit test or exam you have written after it has been marked, click the “Marks” button on the course menu. You will then be able to see if you passed the unit test and the comments the reviewer(s) made on it.
F.3.6. Appealing a Unit Test or Exam Result
If you disagree with a unit test restudy result, you may appeal it – provided that you have not written another unit test on the unit. Click the “Appeal” button next to the unit test, which will produce the screen shown in Figure 9. Be sure to state in detail your reasons for appealing. The success of your appeal, which will goes to your instructor, will depend on how well you argue the merits of your case. It will not help your appeal to make any of the following arguments:
• The marker was too picky. • Only one of the markers said the answer was wrong, the other said it was
fine. • I really do understand the material.
• I think that my answer was correct. • I gave this exact answer on a previous unit test, and it was marked correct.

15
To make a good appeal, you must defend your answer in terms of its content. That is, address each of the criticisms of the answer and argue why the answer meets all of the requirements of the question despite those criticisms – that is, why those criticisms are not valid.
Figure 9. Screen for appealing a unit test or exam result.
Type your reasons for the appeal in the box shown in Figure 9. When you are finished, click the “Submit Appeal” button to save your message and submit it to the instructor. Click the “Cancel” button if you wish to discard the message. The instructor will inform you of the result of the appeal through CAPSI program. You may also appeal an exam grade that you received. The procedure for appealing an exam grade is the same as appealing a restudy of a unit test, except that your argument would be directed to the number of points you received on one or more answers rather than on whether you demonstrated mastery of the material.
16
G. Research on CAPSI By taking a CAPSI course, you are helping to advance our knowledge of the
educational process. For research purposes, all data in CAPSI courses are archived for later analyses, and the findings from the research may be published or presented at scientific or educational meetings. The analyses and dissemination of the research findings will be done without revealing students’ names, student numbers, or other personal identifying information. Some course procedures may differ somewhat in the same course from term to term, or from course to course in the same or different terms. The purpose of these variations will be to determine the relative merits of different educational procedures.
After the course is over, students will be able to obtain information through the University of Manitoba JUMP portal (https://jump.umanitoba.ca) under “courses” about the major independent and dependent variables that will be or are being examined in the context of their courses and the results when they are available.
H. Please Send Your Suggestions This guide is intended to help you to know what is expected in a CAPSI course. However, you may find it beneficial to use the tips on studying in your other courses as well.
We would appreciate hearing what you think about this guide. At any time, please feel free to send us your comments and suggestions about what you liked, what you feel may be missing, and whether anything was not helpful at all. Our hope is to keep improving upon this guide so that future students may benefit from such information. Please send comments to [email protected]. Thank you.