camera user guide - ec1.images-amazon.comec1.images-amazon.com/media/i3d/01/a/man-migrate/... ·...
TRANSCRIPT

Camera User Guide
ENGLISHCDI-E081
• Please read the Read This First section (p. 7).• Please refer to the Software Starter Guide for
information on installing the software anddownloading images.
• Please also read the printer user guide included withyour Canon printer.

This Guide
Shooting with the Camera
Software Starter Guide
Installing the Software
This Guide
Connecting the Camera to a Computer
Software Starter Guide
Downloading Images to a Computer
Printer User Guide
Using the Printer and Printing
Precautions
This digital camera is designed to perform optimallywhen used with genuine Canon-brand digital cameraaccessories (“Canon Brand Accessories”).You may use non-Canon brand accessories with thisdigital camera. However, Canon makes no warrantiesconcerning, and is not responsible for damages resultingfrom, use of non-Canon brand accessories.
Flowchart and Reference Guides

1
Camera Body TemperatureIf your camera is used for prolonged periods, the camera body maybecome warm. Please be aware of this and take care when operatingthe camera for an extended period.
About the LCD MonitorThe LCD monitor is produced with extremely high-precisionmanufacturing techniques. More than 99.99% of the pixels operateto specification. Less than 0.01% of the pixels may occasionallymisfire or appear as red or black dots. This has no effect on therecorded image and does not constitute a malfunction.
Video FormatPlease set the camera’s video signal format to the one used in yourregion before using it with a TV monitor (p. 121).
Charging the Date/Time Battery• The camera has a built-in rechargeable lithium battery that maintains
the date, time and other camera settings. This battery recharges whenthe main battery pack is inserted into the camera. When you firstpurchase the camera, place a charged battery pack in it or use the ACadapter kit (sold separately) for at least 4 hours to charge the date/timebattery. It will charge even when the camera power is set to Off.
• If the Date/Time menu appears when the camera power is turned on,it means that the date/time battery charge is depleted. Recharge it asdescribed above.

2
Conventions Used in the Text
Icons on the right end of title bars show the applicable operatingmodes. As in the example below, the mode dial should be set to ,
, or .
Using the Self-timer
White buttons indicate the button thatwill be pushed in the particular procedure.In the example here, for instance, youshould press the MENU button.
This mark denotes issues that may affect the camera’s operation.
This mark denotes additional topics that complement the basicoperating procedures.
Question? Look Here First■ How do I navigate the Menu?
Selecting Menus and Settings (p. 38)■ What settings are available under each function?
andWill my settings remain in effect even after I’ve turned the camera off?
Functions Available in Each Shooting Mode (p. 160)■ How do I go about printing?
About Printing (p. 98)■ What functions are available through the menu?
FUNC. Menu (p. 126)Rec. Menu (p. 127)Play Menu (p. 129)Set up Menu (p. 130)My Camera Menu (p. 133)
About This Guide

3
Table of Contents
Items marked with ■ are lists or charts that summarize camerafunctions or procedures.
Read This First
Please Read .......................................................................... 7Safety Precautions ............................................................... 7Preventing Malfunctions ................................................... 11
Quick Start Section
Quick Start Section ............................................................ 12
Components Guide
Front View ......................................................................... 14Back View .......................................................................... 15Operation Panel ................................................................ 16Indicators ........................................................................... 17
Preparing the Camera
Charging the Battery Pack ................................................ 18Installing the Battery Pack ................................................ 20Installing a CF Card ........................................................... 22Setting the Date and Time ................................................ 23Setting the Language ....................................................... 25
Basic Functions
Turning the Power On/Off ............................................... 26Switching between Shooting/Replay ............................... 28Using the LCD Monitor ..................................................... 29Using the Viewfinder ........................................................ 34Pressing the Shutter Button .............................................. 35Using the Zoom ................................................................. 37Selecting Menus and Settings ........................................... 38Selecting Menus and Setting (Cont’d) .............................. 40Menu Settings and Factory Defaults ................................ 42

4 Table of Contents
Customizing the Camera (My Camera Settings)
Changing My Camera Settings ......................................... 45Registering My Camera Settings ....................................... 46
Shooting
Selecting a Shooting Mode ............................................... 49Reviewing an Image Right after Shooting ....................... 50Changing Resolution/Compression Settings ..................... 51
Using the Flash ............................................................. 53 / Shooting Close-Ups/Infinity Shots ......................... 55
Using the Digital Zoom ..................................................... 56 Continuous Shooting .................................................. 57 Using the Self-timer ..................................................... 58
Shooting in Stitch Assist Mode ......................................... 59Shooting a Movie .............................................................. 62Locking the Focus (AF Lock) .............................................. 64Locking the Exposure Setting (AE Lock) ........................... 66Locking the Flash Exposure Setting (FE Lock) .................. 67Switching between Autofocus Modes ............................. 68
Switching between Light Metering Modes ............... 69Adjusting the Exposure Compensation ............................ 70Shooting in Long Shutter Mode ....................................... 71Setting the White Balance ................................................ 73Changing the Photo Effect ............................................... 76Adjusting the ISO Speed ................................................... 77Setting the Auto Rotate Function .................................... 78Resetting the File Number ................................................ 79
Replaying
Displaying Images Individually ......................................... 80 Magnifying Images ...................................................... 81 Viewing Images in Sets of Nine (Index Replay) ........ 82
Viewing Movies ................................................................. 83Editing Movies ................................................................... 85

Table of Contents 5
Rotating Images in the Display ......................................... 87Attaching Sound Memos to Images ................................. 88Automated Playback (Slide Shows) .................................. 90Protecting Images ............................................................. 94
Erasing
Erasing Single Images ................................................. 95Erasing All Images ............................................................. 96Formatting CF Cards .......................................................... 97
Printing
About Printing ................................................................. 98Connecting a Printer ....................................................... 102Printing ............................................................................ 105Setting the Print Settings (Direct Print Function) ........... 107Setting the DPOF Print Settings ...................................... 111
Image Transmission Settings (DPOF Transfer Order)
Selecting Images for Transferring ................................... 119
Shooting/Replaying with a TV
Shooting / Replaying with a TV ....................................... 121
Downloading Images to a Computer
Connecting the Camera to a Computervia the USB Cable ......................................... 122
Downloading Directly from a CF Card ............................ 125
Lists of Menu Options and Messages
FUNC. Menu ................................................................... 126 Rec. Menu ....................................................................... 127 Play Menu ....................................................................... 129 Set up Menu ................................................................... 130 My Camera Menu ........................................................... 133Resetting Settings to Their Default Values ..................... 136List of Messages ............................................................... 137

6 Table of Contents
Appendices
Using an AC Adapter Kit (Sold Separately) .................... 141Using a Car Battery Charger (Optional) ......................... 142Camera Care and Maintenance ...................................... 143Troubleshooting .............................................................. 144
Specifications
Specifications ................................................................... 148
Index
Index ............................................................................ 154
List of Functions
Functions Available in Each Shooting Mode ................. 160

7
Please ReadTest ShotsBefore you try to photograph important subjects, we highly recommendthat you shoot several trial images to confirm that the camera is operatingand being operated correctly. Please note that Canon, its subsidiaries andaffiliates, and its distributors are not liable for any consequential damagesarising from any malfunction of a camera or accessory, includingCompactFlash™ cards, that results in the failure of an image to be recordedor to be recorded in a format that is machine readable.
Warning Against Copyright InfringementPlease note that Canon digital cameras are intended for personal use andshould never be used in a manner that infringes upon or contravenesinternational or domestic copyright laws and regulations. Please be advisedthat in certain cases the copying of images from performances, exhibitions, orcommercial properties by means of a camera or other device may contravenecopyright or other legal rights even if the image was shot for personal use.
Warranty LimitationsThis camera’s warranty is only effective in the country of sale. If a problemarises while the camera is in use abroad, please convey it back to the countryof sale before proceeding with a warranty claim to a Canon CustomerSupport Help Desk.
For Canon Customer Support contacts, please see the CanonLimited Warranty supplied with your camera.
Safety Precautions• Before using the camera, please ensure that you read and understand
the safety precautions described below. Always ensure that the camerais operated correctly.
• The safety precautions noted on the following pages are intended toinstruct you in the safe and correct operation of the camera and itsaccessories to prevent injuries or damage to yourself, other personsand equipment.
• In the next few pages, the term “equipment” refers primarily to thecamera and its power supply accessories, such as the battery chargerand optional compact power adapter or car battery charger.
Read This First

8 Read This First
Warnings• Do not aim the camera directly into the sun or at other intense light
sources that could injure your eyesight.
• Do not trigger the flash in close proximity to human or animal eyes.Exposure to the intense light produced by the flash may injure eyesight.In particular, remain at least one meter (39 inches) away from infantswhen using the flash.
• Store this equipment out of the reach of children and infants.Accidental damage to the camera or batteries by a child could result inserious injury. In addition, placement of the strap around the child’sneck could result in asphyxiation.
• Do not attempt to disassemble or alter any part of the equipment that isnot expressly described in this guide. Disassembly or alteration may resultin high-voltage electrical shock. Internal inspections, alterations andrepairs should be conducted by qualified service personnel authorized byyour camera distributor or a Canon Customer Support Help Desk.
• To avoid the risk of high-voltage electrical shock, do not touch the flashportion of the camera if it has been damaged. Similarly, never touchinternal portions of the equipment that become exposed as a result ofdamage. There is a risk of high-voltage electrical shock. Please take thefirst opportunity to consult your camera distributor or the closest CanonCustomer Support Help Desk.
• Stop operating the equipment immediately if it emits smoke or noxiousfumes. Failure to do so may result in fire or electrical shock. Immediatelyturn the camera’s power off, remove the camera battery or unplug thepower cable from the power outlet. Confirm that smoke or fumeemissions have ceased. Please consult your camera distributor or theclosest Canon Customer Support Help Desk.
• Stop operating the equipment if it is dropped or the casing is damaged.Failure to do so may result in fire or electrical shock. Immediately turn thecamera’s power off, remove the camera battery or unplug the powercable from the power outlet. Please consult your camera distributor orthe closest Canon Customer Support Help Desk.

Read This First 9
• Do not allow the equipment to come into contact with, or becomeimmersed in, water or other liquids. Do not allow liquids to enter theinterior. The camera has not been waterproofed. If the exterior comesinto contact with liquids or salt air, wipe it dry with a soft, absorbentcloth. If water or other foreign substances enter the interior, immedi-ately turn the camera’s power off and remove the camera battery orunplug the power cable from the power outlet. Continued use of theequipment may result in fire or electrical shock. Please consult yourcamera distributor or the closest Canon Customer Support Help Desk.
• Do not use substances containing alcohol, benzene, thinners or otherflammable substances to clean or maintain the equipment. The use ofthese substances may lead to fire.
• Remove the power cable on a regular periodic basis and wipe away thedust and dirt that collects on the plug, the exterior of the electricaloutlet and the surrounding area. In dusty, humid or greasy environ-ments, the dust that collects around the plug over long periods of timemay become saturated with humidity and short-circuit, leading to fire.
• Do not cut, damage, alter or place heavy items on the power adaptercable. Any of these actions may cause an electrical short circuit, whichmay lead to fire or electrical shock.
• Do not handle the power cable if your hands are wet. Handling it withwet hands may lead to electrical shock. When unplugging the cable,ensure that you hold the solid portion of the plug. Pulling on theflexible portion of the cable may damage or expose the wire andinsulation, creating the potential for fires or electrical shocks.
• Use of power sources not expressly recommended for this equipmentmay lead to overheating, distortion of the equipment, fire, electricalshock or other hazards. Use only the recommended power accessories.
• Do not place the batteries near a heat source or expose them to directflame or heat. Neither should you immerse them in water. Suchexposure may damage the batteries and lead to the leakage ofcorrosive liquids, fire, electrical shock, explosion or serious injury.
• Do not attempt to disassemble, alter or apply heat to the batteries.There is serious risk of injury due to an explosion. Immediately flushwith water any area of the body - including the eyes and mouth, orclothing - that comes into contact with the inner contents of a battery.If the eyes or mouth contact these substances, immediately flush withwater and seek medical assistance.

10 Read This First
• Avoid dropping or subjecting the batteries to severe impacts that coulddamage the casings. It could lead to leakage and injury.
• Do not short-circuit the battery terminals with metallic objects, such askey holders. It could lead to overheating, burns and other injuries. Usethe supplied terminal cover or battery case to transport or store thebattery pack.
• Before you discard a battery, cover the terminals with tape or otherinsulators to prevent direct contact with other objects. Contact withthe metallic components of other materials in waste containers maylead to fire or explosions. Discard the batteries in specialized wastefacilities if available in your area.
• Use of batteries not expressly recommended for this equipment maycause explosions or leaks, resulting in fire, injury and damage to thesurroundings. Use only recommended batteries and accessories.
• Use the specified battery charger to charge Battery Pack NB-1LH orNB-1L. Use of other chargers may lead to overheating, distortion of theequipment, fire or electrical shock.
• Disconnect the battery charger and compact power adapter from boththe camera and the power outlet after recharging and when they arenot in use to avoid fire and other hazards. Continuous use over a longperiod may cause a unit to overheat and distort, resulting in fire.
• The camera terminal of the supplied compact power cord is designedfor exclusive use with your camera. Do not use it with other productsor batteries. There is a risk of fire and other hazards.
Cautions• Avoid using, placing or storing the equipment in places subject to
strong sunlight or high temperatures, such as the dashboard or trunk(boot) of a car. Exposure to intense sunlight and heat may cause thebatteries to leak, overheat or explode, resulting in fire, burns or otherinjuries. High temperatures may also cause deformation of the casing.Ensure that there is good ventilation when using the compact poweradapter to charge the battery pack or power the camera.
• Do not store the equipment in humid or dusty areas. Storage in suchareas could lead to fire, electrical shock or other damage.
• Be careful not to bang the camera or subject it to strong impacts orshocks that could lead to injury or damage the equipment whenwearing or holding it by the strap.

Read This First 11
• Be careful not to cover the flash with your fingers when shooting. Inaddition, do not touch the surface of the flash after taking severalpictures in rapid succession. Either action could result in burns.
• Do not operate the flash with dirt, dust or other items stuck to its lens.The resulting heat build-up could damage the flash.
• If your camera is used for prolonged periods, the camera body maybecome warm. Please take care when operating the camera forextended periods as your hands may experience a burning sensation.
Preventing Malfunctions
Avoid Strong Magnetic FieldsNever place the camera in close proximity to electric motors or otherequipment generating strong electromagnetic fields. Exposure tostrong magnetic fields may cause malfunctions or corrupt image data.
Avoid Condensation Related ProblemsMoving the equipment rapidly between hot and cold temperaturesmay cause condensation (water droplets) to form on its external andinternal surfaces. You can avoid this by placing the equipment in anairtight, resealable plastic bag and letting it adjust to temperaturechanges slowly before removing it from the bag.
If Condensation Forms Inside the CameraStop using the camera immediately if you detect condensation.Continued use may damage the equipment. Remove the CF card andbattery or Compact Power Adapter (if connected) from the camera andwait until the moisture evaporates completely before resuming use.
Extended StorageWhen not using the camera for extended periods of time, remove thebattery pack and store the equipment in a safe place. Storing thecamera for extended periods with a battery pack installed will rundown the battery pack and may damage the camera. Please note,however, that the date, time and other camera settings may reset tothe default settings if the battery pack has been removed for morethan three weeks. Follow the instructions in this guide to reset thedesired settings.

12
Charge the Battery Pack (p. 18).Place the battery pack in the batterycharger and plug the charger into apower outlet. The charge indicator lightsred while charging and changes to greenwhen the battery pack is charged.
Install the Battery Pack (p. 20).Slide the battery cover open and press thebattery lock while you insert the batterypack. Insert the battery pack correctly byaligning the arrows on the camera andbattery pack.
Install the CF Card (p. 22).Slide the lock on the CF card cover toopen it and insert the CF card until theejection button fully extends.
Set the mode switch to and the shooting mode dialto (pp. 28, 49).
Turn on the Power (p. 26).Press the ON/OFF button until the powerlamp lights.
Quick Start Section
1
Lock for the CF Card Slot Cover
3
2
4
5
Charge Indicator
Battery Lock
Power Lamp
Quick Start Section 13
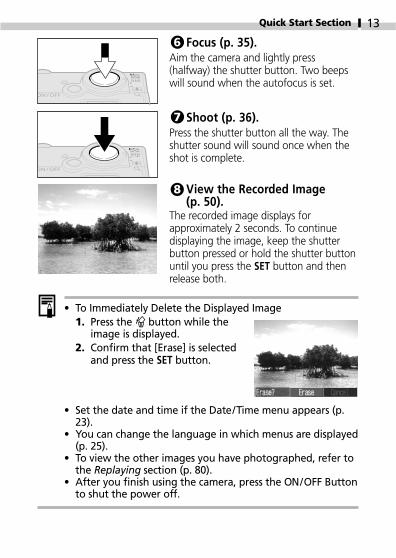
Focus (p. 35).Aim the camera and lightly press(halfway) the shutter button. Two beepswill sound when the autofocus is set.
Shoot (p. 36).Press the shutter button all the way. Theshutter sound will sound once when theshot is complete.
View the Recorded Image(p. 50).
The recorded image displays forapproximately 2 seconds. To continuedisplaying the image, keep the shutterbutton pressed or hold the shutter buttonuntil you press the button and thenrelease both.
• To Immediately Delete the Displayed Image1. Press the button while the
image is displayed.2. Confirm that [Erase] is selected
and press the button.
• Set the date and time if the Date/Time menu appears (p.23).
• You can change the language in which menus are displayed(p. 25).
• To view the other images you have photographed, refer tothe Replaying section (p. 80).
• After you finish using the camera, press the ON/OFF Buttonto shut the power off.
6
7
8

14
Components Guide
Front View
● Optical Viewfinder Window (p. 34)● AF-assist Beam (p. 36)● Red-Eye Reduction Lamp (p. 53)● Self - timer Lamp (p. 58)● Microphone (p. 88)
● Lens
The following cables are used to connect the camera to acomputer or printer.
- Computer (p. 123) USB Interface Cable IFC-300PCU (supplied with camera)
- Direct Print Function Compatible Printer (CP series, sold separately) (p. 102) Direct Interface Cable DIF-100 (supplied with printer)
- Direct Print Function Compatible Bubble Jet Printer(sold separately) (p. 103)
Please refer to your Bubble Jet printer Quick Start Guide.
Please refer to the System Map supplied with the camera for directprint function compatible printers.
● Flash (p. 53)
● DIGITAL Terminal (pp.103, 123)
● A/V OUT (Audio/VisualOUT) Terminal (p. 121)
● Terminal Cover
● Speaker

Components Guide 15
Back View
● Viewfinder (p. 34)
● Lock for the CF Card Slot Cover (p. 22)
● Battery Cover (p. 20)
● DC Coupler Terminal Cover (p. 141)
● CF Card Slot Cover (p. 22)
● Wrist Strap Mount
● LCD Monitor (p. 29)
● Tripod Socket
* Be careful not to wave the camera about or catch it on other itemswhen dangling it from the wrist strap.
Attaching the Wrist Strap*

16 Components Guide
Operation Panel
● Indicators (p. 17)● Power Lamp
Lights when the power is on or transmission preparationsare complete when connected to a computer
● Zoom Lever Shooting: (Telephoto)/
(Wide Angle) (p. 37) Replay: (Magnify) (p. 81)/ (Index) (p. 82)
● ON/OFF Button (p. 26)
● (Light Metering) (p. 69)/ Button ● (Flash) (p. 53) / Button ● (Continuous) (p. 57) / (Self-timer)(p. 58) / Button● (Macro) / (Infinity) (p. 55) / Button
● Mode Switch (p. 28)
● (Function) Button (p. 38) / (Single Image Erase)Button (p. 95)
● (Display) Button (p. 29)
● (Menu) Button (p. 39)
● (Set) Button
● Shutter Button (p. 35)
● Shooting mode dial (p. 49)

Components Guide 17
IndicatorsThe indicators light or blink when the ON/OFF Button or shutterbutton is pressed.
Upper Indicator
Green: Ready to shoot
Blinking Green: Recording to CF card / Reading CF card / Erasingfrom CF card/Transmitting data (during acomputer connection)
Orange: Ready to shoot (flash on)
Blinking Orange: Ready to shoot (camera shake warning)
Lower Indicator
Yellow: Macro mode / Infinity mode/Focus lock (Method 2,p. 64)
Blinking Yellow: Focusing difficulty (1 beep sounds).Although you can press the shutter button, you arerecommended to use the focus lock (p. 64).

18
Preparing the Camera
Charging the Battery PackUse the following procedures to charge the battery pack the first time youuse the camera or when the “Change the battery pack” message displays.
Battery charger model names and types vary by region.
• Insert the battery pack all the way into the battery charger as shown andinsert the charger’s plug into a power outlet.
• Align the battery pack correctly with the arrows on it and the charger.• The charge indicator will light red while the battery pack is charging. It
will change to green when the charge is complete.• After charging, unplug the battery charger and remove the battery pack.
To protect the battery pack and prolong its life, do not chargeit for longer than 24 hours continuously.
• Since this is a lithium ion battery pack, you need not completelydischarge it before recharging. It can be recharged at any point.
• It takes approximately 130 minutes to fully charge the batterypack from a fully discharged state (based on Canon’s testingstandard). Charging it within a temperature range of 5º to 40ºC (41º to 104º F) is recommended.
• Charge times may vary according to the ambient temperatureand the battery pack’s charge state.
• See Battery Capacity (p. 150).• You may hear a noise during charging. This is not a malfunction.
CB-2LSCharge Indicator
CB-2LSECharge Indicator

Preparing the Camera 19
Handling Precautions• Keep the battery pack terminals ( ) clean at all times. Dirty
terminals may cause poor contact between the battery pack andcamera. Polish the terminals with a tissue or a dry cloth before chargingor using the battery pack.
• Do not rapidly overturn or wave the battery charger around when itcontains the battery pack. The battery pack could fly out.
• At low temperatures, battery pack performance may be reduced and thelow battery icon may appear earlier than usual. Under these conditions,resuscitate the battery pack by warming it in a pocket immediatelybefore use. However, ensure that there are no metallic items in thepocket that could cause a short circuit, such as a key holder, etc.
• Do not place anything, such as tablecloths, carpets, bedding or cushions,on top of the battery charger while it is charging. Heat will build up andcould result in a fire.
• Do not charge batteries other than Battery Pack NB-1LH or NB-1L (soldseparately) in this charger.
• The battery pack continues to discharge a minimal portion of its powerwhile installed in the camera, even with the power off, or in the charger.This will shorten battery life.
• Do not allow any metal objects such as keyrings to touch the “+” and “-”terminals (Fig. A), as this can damage the battery pack. To carry thebattery pack or store it duringperiods of disuse, alwaysreplace the terminal cover(Fig.B) or place it in thesupplied case and store it in acool, dry place. Recharge itfully before using it again.
• Even charged battery packs continue to discharge naturally. You areadvised to charge the battery on the day of use, or one day before,to ensure a full charge.
• Since storing a fully charged battery pack for long periods of time(about 1 year) can shorten its life cycle or affect performance, you arerecommended to use the battery pack in the camera until it iscompletely discharged and to store it at normal temperature (23°C/73°F) or lower. If you do not use the battery pack for long periods oftime, charge it fully and discharge it fully in the camera at least oncea year before returning it to storage.
• If the performance of the battery pack diminishes substantially even whenit is fully charged, its life has been exceeded and it should be replaced.
Fig. A Fig. B

20 Preparing the Camera
Battery Lock
Installing the Battery PackInstall Battery Pack NB-1LH (supplied) as shown below. Battery PackNB-1L (optional) can also be used with the camera.
Please recharge the battery pack (p. 18) before you use it forthe first time.
• Slide the battery cover in the directionof the arrows.
• Press the battery lock while insertingthe battery pack all the way in until thelock clicks.
• Insert the battery pack correctly byaligning the arrows on the camera andthe battery pack.
• To remove the battery pack, press thebattery lock and pull the battery pack out.
• Slide the battery cover closed.
• Do not turn off the power or open the battery cover while thecamera’s indicator blinks green. The camera is writing, reading,erasing or transmitting an image to or from the CF card.
• Remove the battery pack when the camera is not in use.Please note, however, that the date, time and other camerasettings may reset to the default settings if the battery packhas been removed for more than three weeks.
1
2
1
2

Preparing the Camera 21
Battery Pack ChargeThe following icons and messages will display when the battery packcharge is low.
Battery pack charge is low. Recharge it as soon as possiblebefore it is required for an extended period.When the LCD monitor is off, this icon will display when youpress the , / , / , , or button
( mode).
Battery charge is insufficient to operate the camera. Replacethe battery pack immediately.
See Battery Capacity (p. 150).
Please use an AC Adapter Kit ACK500 (sold separately) forextended use of the camera (p. 141).
Change thebattery pack

22 Preparing the Camera
2
1
Installing a CF CardTurn the camera power off and insert the CF card with the followingprocedures.
• Slide the lock up and open the CF cardslot cover.
• Insert the CF card with its label facingupward until the CF card eject buttonfully extends. Close the CF card slotcover.
• To remove the CF card, push the ejectbutton and pull the CF card out.
CF Card Eject Button
• Since the camera is writing, reading, erasing or transmittingdata to or from the CF card when the indicator blinks green,never perform the following actions during this time. Itcould corrupt the image data. - Subject the camera body to vibration or shocks. - Turn the camera’s power off, or open the battery cover
or CF card slot cover.• Please note that CF cards formatted with other manufacturers’
cameras or a computer, or formatted or edited with applicationprograms, may not operate correctly in the camera.
• You are recommended to use CF cards that have beenformatted in your camera (p. 97). The card supplied with thecamera may be used without further formatting.
Label
Preparing the Camera 23
Handling Precautions for CF Cards• CF cards are high-precision electronic devices. Do not bend them,
apply force to them, or subject them to shocks or vibration.• Do not attempt to disassemble or alter a CF card.• Moving a CF card rapidly between temperature extremes will cause
condensation to form in the card and lead to a malfunction. To avoidcondensation, place the CF card in a sealed plastic bag before movingit into a different temperature zone and allow it to adjust slowly to thenew temperature. If condensation forms on the CF card, store it atroom temperature until the water droplets have evaporated naturally.
• Do not use or store CF cards in the following types of locations.- Locations subject to dust or sand- Locations subject to high humidity and high temperatures
See CF Cards and Estimated Capacities (p. 151).
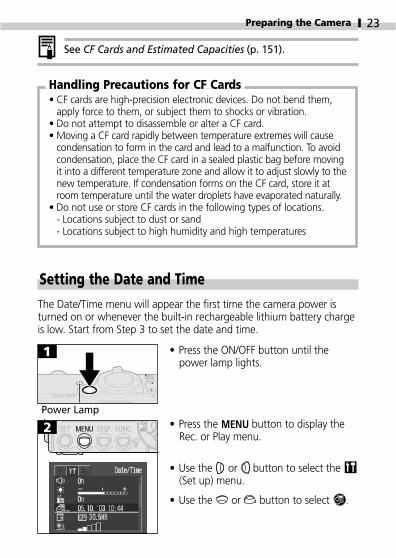
Setting the Date and TimeThe Date/Time menu will appear the first time the camera power isturned on or whenever the built-in rechargeable lithium battery chargeis low. Start from Step 3 to set the date and time.
• Press the ON/OFF button until thepower lamp lights.
• Press the button to display theRec. or Play menu.
• Use the or button to select the (Set up) menu.
• Use the or button to select .
Power Lamp

24 Preparing the Camera
• Use the or button to select a field(year, month, day, hour, minute anddate format), and the or buttonto change its value.
• To put the settings into effect, press the button after setting the date
format.
• Press the button to redisplay theRec. or Play screen.
• Please note that the date and time settings may reset tothe default settings if the camera battery has beenremoved for more than three weeks. Reset them when thisoccurs.
• Setting the date and time settings does not cause the date/time stamp to appear on images.
• Charging the Date/Time Battery - The camera has a built-in rechargeable lithium battery
for saving settings such as the date and time. Thisbattery is recharged by the battery pack while it is in thecamera. Right after purchasing the camera, leave acharged battery pack in the camera, or plug in ACAdapter Kit ACK500 (sold separately), for about 4 hoursto charge the date/time battery. It will charge evenwhen the camera’s power switch is off.
- If the Date/Time menu appears when the camera poweris turned on, the date/time battery charge is low. Usethe above method to recharge it.
• You can print the date on images (p. 107).

Preparing the Camera 25
Setting the LanguageThe language in which menus and messages are displayed can beselected with this function.
• Press the ON/OFF button until thepower lamp lights.
• Press the button to display theRec. or Play menu.
• Use the or button to select the (Set up) menu.
• Use the or button to select .
• Use the , , or button toselect a language.
• Press the button to redisplay theRec. or Play screen.
The Language menu can also be displayed in replay mode byholding down the button and pressing the button.(This function cannot be used while a direct print compatibleprinter (CP series, optional) or the direct print compatibleBubble Jet Printer (optional) is connected to the camera orwhile replaying movies.)
Power Lamp

26
Basic Functions
Turning the Power On/Off• Press the ON/OFF Button until the
green power lamp lights.- The lens extends outward when the
mode switch is set to .- The lens retracts approximately 1
minute after sliding the mode switchfrom to .
- When the mode switch is set to ,the upper indicator beside theviewfinder will flash green and theLCD monitor will turn on.
• Press the ON/OFF Button again to turnoff the power.
• The Date/Time menu will appear the first time the camerapower is turned on or whenever the charge of the built-inrechargeable lithium date/time battery is low. Reset thedate and time when this occurs (p. 23).
• If the Auto Power Down function activates, press the ON/OFF Button to restore power.
• The start-up sound will sound and the start-up image willdisplay in the LCD monitor when the power is turned on.(To change the start-up sound and image, see pp. 27, 45,133.)
• The start-up image does not display when the LCD monitoris turned off in shooting mode or when the camera isconnected to a TV via the A/V OUT terminal.
Power Lamp

27Basic Functions
• Turning Off the Start-Up Sound and Start-Up ImageHold the button down while turning on the power.
• Auto Power Down FunctionThis camera is equipped with an Auto Power Downfunction. The power will automatically shut down underthe following circumstances when this function is set to[On]. Press the ON/OFF Button to restore power.
Shooting ModePowers down approximately 3 minutes after the lastcontrol is accessed on the camera. (The LCD monitorautomatically turns off 3 minutes after the last control isaccessed even if this function is set to [Off]. Press anybutton except the ON/OFF Button to turn the LCDmonitor back on.)
Replay ModePowers down approximately 5 minutes after the lastcontrol is accessed on the camera.
Connected to a Printer (optional)Powers down approximately 5 minutes after the lastcontrol is accessed on the camera or something isprinted on a connected printer.
• The Auto Power Down function will not activate during aslide show or while the camera is connected to a computer.
• The camera’s settings can be changed to turn off the AutoPower Down function (p. 131).

28 Basic Functions
Switching between Shooting /Replay• To Shoot Still Images (Shooting Mode)
Slide the mode switch to .
• To Replay Images (Replay Mode)Slide the mode switch to . - Recorded images can be printed
when a printer (sold separately) isconnected (p. 105).
- Recorded images can be downloadedto and viewed with a computer whenit is connected (p. 123).
• The or icon displays on the LCD monitor when aconnection to a printer is opened.
• The LCD monitor shuts off while a computer is connected.

29Basic Functions
Using the LCD MonitorThe LCD monitor can be used to compose images while shooting,adjust settings menus and replay images.
The image in the LCD monitor will darken in strong sunlightor bright light. This does not constitute a malfunction.
Shooting Mode ( on the mode switch)
The LCD monitor turns on or changesthe display mode as follows with eachpress of the button.
Standard (No Information)
Detailed (Information View)
Off
• The LCD monitor setting (On or Off) is saved by the camerawhen the power is turned off so that the same setting isautomatically available when the power is turned on again.However, the setting may be lost when the power has beenturned off after the “Change the battery pack” message hasdisplayed, while the LCD monitor was on in shooting mode.
• In the or mode, the LCD monitor turns on regardlessof its On/Off setting.
▼
▼
▼

30 Basic Functions
Replay Mode ( on the mode switch)
• The LCD monitor will turn on when themode switch is set to the position.
• In replay mode, pressing the button cycles the information viewmode each time the button is pressed.
Single Image Replay (p. 80) Standard Detailed No Display
Multi Image Replay (9 Images) (p. 82) Standard No Display
▼ ▼▼
▼
▼

31Basic Functions
Information Displayed on the LCD MonitorShooting ModeWhen a shooting setting is changed, information about the settingsdisplays on the LCD monitor for approximately 6 seconds even if theLCD monitor is set to Off or to the No Display mode. (It may not displayunder some circumstances, depending on the selected settings.)
You may set the flash, continuous mode, self-timer, macro,infinity and metering mode settings while this informationis displayed.
• After you press the shutter button and take a shot, therecorded image appears on the LCD monitor for 2 to 10seconds (1-second increments). It will continue to display ifyou press the button while it is shown on the screen. SeeChanging the Review Duration (p. 50) .
• While a recorded image is displayed on the LCD monitor,you can check the exposure with the graph (see HistogramFunction, p. 33) that shows the distribution of the brightnessdata. (Press the button if the histogram and otherinformation is not shown) If the exposure requiresadjustment, set the exposure compensation and reshoot.
A slow shutter speed has likely been selected because ofinsufficient lighting if the upper indicator flashes orangeafter the metering preparations are complete and the camerashake icon displays in the LCD monitor. Set the flash to or , or affix the camera to a tripod to shoot.

32 Basic Functions
Information Displayed
Recordable Imagesor RecordableMovie Time (sec.)
In movie mode, only theresolution shows (notcompression).
p. 49p. 70p. 71p. 73p. 76p. 51p. 51
p. 77p. 78p. 64p. 66p. 67p. 53p. 57-58p. 55p. 69 p. 62p. 56p. 31p. 21
Shooting Mode
Exposure Compensation
Long Shutter Mode
White Balance
Photo Effects
Compression
Resolution
ISO Speed
Auto Rotate
Focus Lock
AE Lock
FE Lock
Flash
Shooting Method
Macro/Infinity
Metering Mode
Movie Recording
Digital Zoom
Camera Shake Warning
Low Battery
• The icons in the shaded boxes above displayregardless of the selected display mode.
• Zoom powers reflect the optical and digitalzoom functions in combination. These figuresdisplay when the digital zoom is activated.
Replay Mode (Standard Display)File Number
Image Number
The following information is displayed instandard display mode.
p. 51p. 51p. 88p. 62p. 94
Compression (Still images)Resolution (Still images)WAVE Format SoundMovieProtection Status
AF Frame(p. 68)
Spot AE Point Frame( mode)
Shooting Date

33Basic Functions
Replay Mode (Detailed Display)In detailed display mode, the followingsupplementary information is displayed.
The following information may also be displayed with some images.
A sound file in a format other than the WAVE format is attached or thefile format is not recognized.
JPEG file with format not conforming to Design rule for Camera FileSystem Standards
RAW format file
File with unrecognized format
• The image information may not display correctly if imagesshot with this camera are replayed on other cameras orimages from other cameras are replayed on this camera.
• Histogram FunctionThe histogram is a graph that allows you to judge thebrightness of the recorded image. The greater the bias towardthe left, the darker the image. The more it trends to the right,the brighter the image. If the image is dark, adjust theexposure to a positive value. Similarly, adjust the exposure to anegative value to darken a bright image (p. 70).
HistogramExamples
Histogram
Dark Image Balanced Image Bright Image
p. 71p. 49p. 70p. 73p. 76p. 77p. 53p. 55p. 69p. 51p. 62
Long Shutter ModeShooting ModeExposure CompensationWhite BalancePhoto EffectsISO SpeedFlash Macro/ InfinityMetering MethodResolution (Movie)
Movie Length Shown on Movie Files

34 Basic Functions
• About the Autofocus FunctionThis camera employs AiAF (artificial intelligence autofocus)technology which uses a broad metering field to calculatethe focal distance with high precision. It delivers a crisp focuseven when the photographic subject is slightly off-center.The AiAF function can be turned off so that the autofocusis metered from a fixed AF frame at the center of the fieldto accommodate difficult shooting conditions (p. 68).
• Image Seen in Viewfinder vs. Recorded ImagePlease note that the actual image may differ from theimage seen in the optical viewfinder due to the physicalseparation between the viewfinder and lens. This is calledthe parallax phenomenon and is more noticeable the closerthe subject is to the lens. In some cases, portions of imagesshot up close that appear in the viewfinder will not appearin the recorded image. Please use the LCD monitor to shootimages up close.
Using the ViewfinderThe optical viewfinder can be used to conserve power by setting theLCD monitor to Off (p. 29) while shooting.
Viewfinder
Shows the center of the image

35Basic Functions
Pressing the Shutter ButtonThe shutter button features a two-stage action.
Pressing HalfwayPressing halfway automatically sets the exposure, focus and whitebalance.
• Indicator StatusUpper Indicator - Green: Metering complete (two
beeps sound) - Orange: Flash will fire - Blinking Orange:
Camera shake warning/Insufficient exposure
Lower Indicator - Yellow: Macro mode/Infinity
mode/Focus lock(Method 2, p. 64)
- Blinking Yellow:Focusing difficulty*(single beep sounds)
* When the indicator blinks yellow, lockthe focus before shooting (p. 64).
• AF Frame Status (LCD Monitor On)AiAF On - Green Frame:
Metering complete (AFframe when focusachieved)
- No Frame: Focusing difficultyAiAF Off (Center AF Frame) - Green Frame:
Metering complete - Yellow Frame:
Focusing difficulty
Indicator

36 Basic Functions
Pressing FullyPressing the shutter button down fully activates the shutter and causesone shutter sound to sound.
While the image is being recorded tothe CF card, the indicator blinks green.
Shots cannot be taken while the flash is charging.
AF-assist Beam• The AF-assist Beam will sometimes emit when the shutter
button is pressed halfway to assist focusing in certainconditions, i.e., dark conditions.
• The AF-assist Beam can be turned off (p. 128).If animals are your subject, turn off the beam whenshooting in the dark to avoid startling them. However,please keep in mind the following facts.- Turning the AF-assist beam off may make it more
difficult for the camera to focus.- The red-eye reduction lamp may emit when the flash is
set to red-eye reduction auto or slow-synchro, even ifthe AF-assist beam is turned off.

37Basic Functions
Using the ZoomThe zoom can be adjusted from 36 mm to 108 mm in 35 mm filmequivalent terms.
Telephoto/ Wide Angle• Press the zoom lever toward to
zoom in (telephoto).
• Press the zoom lever toward tozoom out (wide angle).
Digital ZoomWhen the LCD monitor is on, you can shoot with a combined opticaland digital zoom factor of up to 11 (p. 56).
The digital zoom is unavailable in some modes (p. 161).
Please note that the image appears grainier, the more theimage is digitally zoomed.

38 Basic Functions
Selecting Menus and SettingsMenus are used to adjust shooting and replay settings, as well as othercamera settings like the Date/Time and sounds. Menus are displayed bypressing the or button according to the circumstances.Use the LCD monitor to perform the following procedures. See MenuSettings and Factory Defaults (p. 42) for the menu items and options.
Selecting Menu Settings with the FUNC. Button(Shooting Mode only)
Press the button.The icons of the items that can be adjusted appear at the LCDmonitor’s left edge.
Use the or buttons to select an item.
Use the or buttons to select an option.
• The icon changes to the icon of theselected option.
• Some menu items can only be selectedafter pressing the button to displaythe next menu. Press the buttonagain to confirm the setting.
You can shoot right after performing these steps. The menudisplays again after the shot, allowing you to change thesettings easily.
Press the button.The menu will close.

39Basic Functions
Selecting Menu Settings with the MENU ButtonPress the button.A menu will display.
Use the or buttons to select the Rec./Play, Set up, orMy Camera menu.
Use the or buttons to select a menu item.
• Use the or buttons to select anoption in the Rec. or Set up menu(some items only) and the My Cameramenu.
• In the Play or Set up menu (some itemsonly), you must press the button toaccess a submenu.
Press the button.The menu will close.
Mode Switch Set to Mode Switch Set to
*
*The menu will appear slightly different when the shootingmode dial is set to , or .

40 Basic Functions
Play Menu
Rec. Menu
Selectinga Mode
Selectinga Menu
Switching between the Rec.,Play, Set up and My Camera Menus
The menu will appear slightlydifferent when the shootingmode dial is set to , or .
*
Selecting Menus and Settings (Cont’d)
See Selecting Images for Printing (p. 111) for the proceduresfor the (Print Order) item in the Play menu.
The menu will appear slightlydifferent when the shootingmode dial is set to , or .
*

41Basic Functions
Set up Menu My Camera Menu
SettingOptions
Completingthe Procedure
Completingthe Procedure
* You can switch between menus at any timesimply by pressing the zoom lever toward or button.
* *

42 Basic Functions
Menu Settings and Factory DefaultsThis chart shows the options and default settings for each menu.
Items Set with the Button
Items Set with the Button
Menu Item Reference PageAvailable Settings
-2 to ±0* to +2
Off*/ 1 to 15 seconds
Auto*/ Daylight / Cloudy/ Tungsten
Fluorescent / Fluorescent H / Custom
Auto / 50* / 100 / 200 / 400
Effect Off*/ Vivid / Neutral /
Low Sharpening / Sepia / BW
Superfine / Fine* / Normal
2272 x 1704*/ 1600 x 1200 /
1024 x 768 / 640 x 480
320 x 240*/ 160 x 120
Exposure Compensation
Long Shutter
White Balance
ISO Speed
Photo Effect
Compression (Still images)
Resolution (Still images)
Resolution (Movie)
p. 70
p. 71
p. 73
p. 77
p. 76
p. 51
p. 51
p. 51
p. 68
p. 57
p. 58
pp. 36/128
p. 56
p. 50
p. 71
On*/ Off
*/
*/
On*/ Off
On / Off*
On / 2*to 10 sec.
On / Off*
AiAF
Cont. Shooting
Self-timer
AF-assist Beam
Digital Zoom
Image Review
Long Shutter
Menu Item Reference PageAvailable Settings
Rec. Menu(Red)

43Basic Functions
p. 94
p. 87
p. 88
p. 96
p. 90
p. 111
p. 119
p. 130
p. 130
p. 27
p. 23
p. 97
p. 131
p. 131
p. 132
p. 132
p. 132
p. 79
p. 78
p. 25
p. 121
Turns image protection On/Off.
Rotates the image in the display.
Adds a sound memo to the image in the display.
Erases all images on the CF card.
Replays selected images in a slide show.
Sets the print settings.
Sets the transfer settings.
On*/ Off
-7 to 0* to +7
On*/ Off
Sets the date and time.
Formats (initializes) the CF card.
Off / 1 / 2*/ 3 / 4 / 5
Off / 1 / 2*/ 3 / 4 / 5
Off / 1 / 2*/ 3 / 4 / 5
Off / 1 / 2*/ 3 / 4 / 5
Off / 1 / 2*/ 3 / 4 / 5
On / Off*
On*/ Off
English*/ Deutsch / Français / Nederlands / Dansk / Suomi /
Italiano / Norsk / Svenska / Español / Chinese / Japanese
NTSC*/ PAL
Protect
Rotate
Sound Memo
Erase all
Slide Show
Print Order
Transfer Order
Beep
LCD Brightness
Auto Power Down
Date / Time
Format
Shutter Volume
Playback Vol.
Start-up Vol.
Operation Vol.
Selftimer Vol.
File No. Reset
Auto Rotate
Language
Video System
Menu Item Reference PageAvailable Settings
Play Menu(Blue)
Set up Menu(Yellow)

44 Basic Functions
* Default setting. Default video system setting varies between regions.
• Some menu items are not available in certain shooting modes.• You can apply a desired image and sound to and in the My Camera
menu. For details, see Registering My Camera Settings (p. 46) or the SoftwareStarter Guide.
• With the exception of the [Date /Time], [Language] and [Video System]settings, all the other menu settings and changes made with the camerabuttons can be reset to the default values in a single operation (p. 136).
p. 45
p. 45
p. 45
p. 45
p. 45
p. 45
/ */ /
/ */ /
/ */ /
/ */ /
/ */ /
/ */ /
Theme
Start-up Image
Start-up Sound
Operation Sound
Selftimer Sound
Shutter Sound
Menu Item Reference PageAvailable Settings
My Camera Menu(Blue)

45
Customizing the Camera(My Camera Settings)
My Camera allows you to customize the start-up image and start-up,shutter, operation and self-timer sounds. Each menu item has threechoices.
Example: Start-up Image
The option features science fiction related images and sounds. The option features animals.
Changing My Camera Settings• See Selecting Menus and Settings (p.
38).
• Use the or buttons to select anoption.
• The display will return to the Rec. orPlay screen.
• If you select (Theme) in Step 1, you can select aconsistent theme for each of the My Camera Settings.
• If the Beep option in the (Set up) menu is set to [On],the beep sounds even if each sound item is individually setto [Off] in the My Camera menu (p. 135).
Select an item in theMy Camera menu.

46 Customizing the Camera (My Camera Settings)
Registering My Camera SettingsImages recorded onto the CF card and newly recorded sounds can beadded as My Camera settings to the and menu items. You canalso use the supplied software to upload your computer’s images andsounds to the camera.
Registering CF Card Images and Sounds
• See Selecting Menus and Settings(p. 38).
• Use the or buttons to select or .
• Use the or buttons to select animage or record a sound.
Select an item in theMy Camera menu.

47Customizing the Camera (My Camera Settings)
Start-up Image• Use the or button to select the
image you wish to register.
Start-up, Operation, Self-timer, andShutter Sounds• Use the or buttons to select
and press the button. Recordingwill start and automatically stop whenthe time is exceeded. After recording,use the or buttons to select .
• Use the or buttons to select [OK].• To cancel the change, select [Cancel].
• Sounds recorded with the movie and sound memofunctions cannot be added as My Camera settings.
• The prior setting is erased when a new My Camera settingis added.

48 Customizing the Camera (My Camera Settings)
File Format of My Camera SettingsMy Camera settings should conform to the below file formats.However, CF card images shot with this camera can be registered as MyCamera settings regardless of the below formats.
Start-up Image• Recording Format: JPEG (Baseline JPEG)• Sampling Rate: 4:2:0 or 4:2:2• Dimensions: 320 x 240 pixels• File Size: 20 KB or less
Start-up, Operation, Self-timer and Shutter Sounds• Recording format: WAVE (monaural)• Quantization Bits: 8 bit• Sampling Frequency: 11.025 kHz or 8.000 kHz• Recorded Length
* Any file formats other than those described above cannot be usedwith this camera.
An example of this function is to record “Say Cheese” as a self-timersound so that the camera will replay this sound 2 seconds before thephoto is taken. You could also record cheerful music to bring out thenatural smiles of your subjects, or so they can strike a pose fitting themusic. In these ways you can customize your camera by creating andadding new My Camera settings.
See the supplied Software Starter Guide for more informationon creating and adding to the My Camera files.
Start-up Sound 1.0 sec. or less 1.3 sec. or less Operation Sound 0.3 sec. or less 0.4 sec. or less Self-timer Sound 2.0 sec. or less 2.0 sec. or less Shutter Sound 0.3 sec. or less 0.4 sec. or less
11.025 kHz 8.000 kHz

49
Selecting a Shooting ModeThe camera features the following shooting modes.
Auto Most settings are automatically selected bythe camera.
Manual The exposure compensation, white balanceand other settings can be manually selected.
Stitch Assist Images are shot in overlapping series tocreate single panoramic images.
Movie Shoots movie clips.
Some settings selected in each shooting mode are saved when thepower is turned off (p. 161).
• Select a shooting mode with theshooting mode dial.
Shooting
In the descriptions of the shooting functions that follow, the iconsbeside the titles indicate the applicable shooting modes. Before youproceed with Step 1 in each case, set the camera to one of theshooting modes indicated by the icons in the title (p. 2).

50 Shooting
Reviewing an Image Right after ShootingRight after a shot is taken, the image appears in the LCD monitor for 2seconds even if you release the shutter button regardless of whetherthe LCD monitor is on or off.You can also review it with the following procedures.
• By keeping the shutter button pressed after a shot.• By pressing the button while the image is displayed on the LCD
monitor.Press the shutter button halfway to stop displaying it so that you canshoot the next frame.
You can do the following while the image is displayed.- Check the image brightness in the histogram (p. 33).- Erase the image (p. 95).- Magnify the image in the display (p. 81).
Changing the Review DurationThe default review time is 2 seconds.The review function can be set to [Off] or changed to any time in therange of 2 to 10 seconds in one-second increments.
• See Selecting Menus and Settings (p. 38).
• Use the or button to select [Off],or a time from [2 sec.] to [10 sec.].
• With the [Off] option, the image willnot automatically display. However, ifyou keep the shutter button fullypressed after a shot, the image willdisplay.
• In the [2 sec.] to [10 sec.] range, theimage will continue to display for thespecified time even if the shutterbutton is released. You can display theimage for longer than the set durationby keeping the shutter button pressedall the way.
• The display will return to the Rec. screen.
In the (Rec.) menu,select .

Shooting 51
- Print A4 size* 210 x 297 mm
(8.3 x 11.7 in.) or larger prints- Print Letter size* 216 x 279 mm
(8.5 x 11 in.) or larger prints- Print postcard size 148 x 100 mm
(6 x 4 in.) prints- Print L-size 119 x 89 mm (4.7 x
3.5 in.) prints- Print card size 86 x 54 mm (3.4 x
2.1 in.) prints- Send images as e-mail attachments- Shoot more images
(Large)
(Medium 1)
(Medium 2) (Small)
Large
Small
2272 x 1704 pixels
1600 x 1200 pixels
1024 x 768 pixels
640 x 480 pixels
Resolution Purpose
Changing Resolution / Compression SettingsYou can change the resolution and compression (excluding movies)settings to suit the purpose of the image you are about to shoot.
Movies can be shot with the following resolution.
320 x 240 pixels
160 x 120 pixels
Resolution
*Paper sizes vary according to region.
- Shoot higher quality images
- Shoot normal quality images
- Shoot more images
Superfine
Fine
Normal
High Quality
Normal
Compression Purpose

52 Shooting
• Use the or button to select *or *.*The current setting is displayed.
• Use the or buttons to select acompression or resolution option.
Compression (Excluding Movies)Select , or .
Resolution (Still Images)Select , , or .
Resolution (Movies)Select or .
• You can shoot right after selecting anoption. The menu displays again afterthe shot, allowing you to change thesettings easily.
• The display will return to the Rec.screen.
• See Functions Available in Each Shooting Mode (p. 160).• See Image File Sizes (p. 151).• See CF Cards and Estimated Capacities (p. 151).

Shooting 53
Auto The flash fires automatically as required by the light level.
Red-Eye The red-eye reduction lamp fires with each shot,Reduction automatically adjusting the intensity to suit lightingAuto levels.
Flash On The flash fires with every shot.
Flash Off The flash will not fire.
Slow-Synchro
The flash timing is adjusted to slow shutter speeds. Thisreduces the chance that the background will be darkwhen shots are taken at night or in rooms with artificiallighting. The red-eye reduction lamp fires with eachshot. Use of a tripod is recommended.
Using the Flash
● Setting available▲Can be selected for the first
image only.
• Press the button to cycle through theflash settings.
●
●
-
●
-
●
●
●
●
●
-
-
▲
▲
▲

54 Shooting
• When you use flash photography at higher ISO speeds, thechances of white streaks appearing in the image increasethe closer you approach to the subject.
• Since a slow shutter speed is selected in dark places whenthe flash is set to Off or Slow-Synchro, take care to avoidblurring the image.
- Shooting in ModeBe careful to hold the camera still to avoid camera shake.
- Shooting in or ModeFix the camera to a tripod to shoot in these modes sincethe shutter speed will be slower than in the mode. Ifan image is dark in mode, reshooting it in modewill make it brighter.
• The flash can be fired when the upper indicator lights a steadyorange after pressing the shutter button halfway (The flashwill not fire when it is set to Off).
• The flash may take up to approximately 10 seconds to charge.The recharging time will vary with such factors as the shootingconditions and battery charge. Shots cannot be taken whilethe flash is charging.
• The flash fires twice. The main flash follows a preparatory pre-flash. The exposure reading obtained from the subject with thepre-flash is used to set the optimal flash intensity for the mainflash, which is used to capture the image.
Red-Eye Reduction• Light reflecting back from eyes can make them appear red when
the flash is used in dark areas. Under these conditions, use the red-eye reduction mode. For this mode to be effective, the subjectmust be looking right at the red-eye reduction lamp. Try askingthem to look directly at the lamp. Even better results can beobtained by shooting with the lens set to a wide angle, increasingthe lighting in indoor settings or approaching closer to the subject.
• The shutter will not activate for approximately 1 second afterthe red-eye reduction lamp fires in order to improve theeffect. If you want a more immediate shutter response, set theflash to , or .

Shooting 55
• Display or .
/ Shooting Close-Ups/Infinity Shots
Macro
Use this mode to record subjects in the range of 5 to 46 cm(2 in. to 1.5 ft.) from the lens tip when at wide-angle endand in the range of 30 to 46 cm (11.8 in. to 1.5 ft.) whenat the telephoto end setting.
InfinityUse this mode to record landscapes and distant objects.It can also be used for compositions combining both nearand distant objects.
Distance from Image Area Lens to SubjectTelephoto End 30 cm (11.8 in.) 107 x 80 mm (4.2 x 3.1 in.)
Wide-Angle End 5 cm (1.5 in.) 58 x 43 mm (2.3 x 1.7 in.)
• Use the LCD monitor to compose close-ups in macro modesince the parallax phenomenon may cause images composedwith the optical viewfinder to be off-center (p. 34).
• The exposure may not be optimal when the flash is used inmacro mode in the range of 5 to 30 cm (1.5 to 11.8 in.).
Image Area in Macro Mode
● Setting available.▲ Selectable for first image only.
●
-
●
●
▲
▲
●
●

56 Shooting
Using the Digital ZoomWhen the LCD monitor is on, images can be zoomed to approximately4.3, 5.3, 6.7, 8.2 and 11 times with the combined optical and digitalzoom functions.
• Turn the LCD monitor on.
• See Selecting Menus and Settings (p. 38).
• Use the or button to select [On].
• The display will return to the Rec.screen.
• Press the zoom lever toward untilthe lens reaches the maximum opticaltelephoto setting and stops. Press itagain to activate the digital zoom andto advance through the settings.
• Press the button to zoom back out.
The combinedoptical anddigital zoomfactor displays.
The digital zoom cannot be used when the LCD monitor isturned off.
Images become coarser the more they are digitally zoomed.
In the (Rec.) menu,select .

Shooting 57
Continuous Shooting
In this mode, the camera shoots continuously while the shutter button isheld down. Recording ceases when the shutter button is released.
Use this mode to view images as you shootcontinuously. The shutter interval is longer inthis mode than in mode.
Use this mode to shoot continuously with ashort shutter interval. You cannot check imageswhile shooting continuously.
• See Selecting Menus and Settings (p. 38).
• Use the or button to select or.
• The display will return to the Rec.screen.
• or will display on the LCDmonitor depending upon the optionselected in the Rec. menu.
• The continuous shooting functionshoots at the following rates.*
Approximately 1.5 frames/sec. Approximately 2.5 frames/sec.
* Large/Fine, LCD monitor off mode. (Thesefigures reflect Canon’s testing standard.The actual figures will vary according tothe shooting conditions and settings.)
• The interval between shots may lengthen slightly when thecamera’s built-in memory fills.
• If the flash is firing, the interval between shots willlengthen to accommodate the flash’s chargingrequirements.
In the (Rec.)menu, select .
Standard ContinuousShooting
High-SpeedContinuous Shooting

58 Shooting
Using the Self-timer
• Display or .• When the shutter button is pressed, the
self-timer will activate and the self-timerlamp will blink.
Changing the Self-timer Countdown Time• See Selecting Menus and Settings (p. 38).
• Use the or button to select [(10 sec.)] or [ (2 sec.)]
• When [ (10 sec.)] is selected, the self-timer sound and the blinking gets faster2 second before the shutter activates.
• When [ (2 sec.)] is selected, the self-timer sounds at the same time as theshutter button is pressed. The shutteractivates in 2 seconds.
• The display will return to the Rec.screen.
The self-timer sound can be changed with the SelftimerSound item in the (My Camera) menu (p. 134).
In the (Rec.) menu,select .

Shooting 59
Shooting in Stitch Assist ModeStitch Assist mode can be used to shoot overlapping images that canlater be merged (stitched) to create one panoramic image on acomputer.
To merge the images on a computer, use PhotoStitch, one ofthe supplied programs.
Framing a SubjectThe PhotoStitch program detects the overlapping portions of adjoiningimages and merges them. When shooting, try to include a distinctiveitem (landmark) in the overlapping portions.
• Compose each frame so that it overlaps 30 - 50% of the adjoiningimage. Try to keep the vertical misalignment to less than 10% of theimage height.
• Do not include moving items in the overlap.
The overlapping seams ofseveral adjacent images can bejoined into a single panoramicimage.

60 Shooting
• Do not try to stitch images that include both distant and close items.These items may appear warped or doubled up in the merged image.
• Make the brightness in each image consistent. The final image willappear unnatural if the contrast in brightness is too great.
• To shoot landscapes, swivel (pan) the camera around its own verticalaxis.
• To shoot close-ups, slide the camera over the subject, keeping itparallel to the subject as you move it.
ShootingImages can be shot in two sequences in Stitch Assist mode.
• The LCD monitor turns on when theshooting mode dial is set to .
• Use the or buttons to select thesequence direction.
• Shoot the first frame in the sequence.• The exposure and white balance are set
and locked with the first image.
Left to right horizontally
Right to left horizontally
Left to righthorizontally

Shooting 61
• Compose the second image so that itoverlaps a portion of the first and shoot.
• Use the or button to check orretake the recorded images.
• Minor discrepancies in the overlappingportions can be corrected when theimages are stitched together.
• Repeat the procedure for additionalimages. A sequence may contain up to26 images.
• Press the button to close StitchAssist mode.
• A custom white balance setting cannot be set in mode.To use a custom white balance setting, first set it in anothershooting mode (p. 74).
• The settings for the first image are used to take subsequentimages in the sequence.
• It is not possible to display images on the TV when shootingin Stitch Assist mode.
See the Functions Available in Each Shooting Mode (p. 160).
Second Image
Third Image

62 Shooting
Shooting a Movie
Select the (320 x 240, default) resolution or (160 x 120)resolution (p. 51).
• Press the shutter button fully to startrecording images and sounds.
• During shooting the recording time (inseconds) and a red circle appear on theLCD monitor.
• Press the shutter button again to stoprecording.
• The maximum length of a movie clip (at15 frames/sec.) is 3 minutes. (Accordingto Canon’s standardized tests).These times may vary with the subjectand shooting conditions. Recording willautomatically stop when the maximumis reached or when the CF card runsout of free capacity.

Shooting 63
• You are recommended to use a CF card that has beenformatted in your camera to shoot movies (p. 97). The cardsupplied with the camera may be used without furtherformatting.
• Be careful not to touch the microphone while recording.• The AE, AF, white balance and zoom settings remained fixed
for subsequent frames at the values selected for the first frame.• After a clip is shot, the upper indicator will blink green while
the clip is being written to the CF card. You cannot shootagain until the blinking stops.
• See the Functions Available in Each Shooting Mode (p. 160).• Sound is recorded monaurally.• The shutter sound will not sound when you fully press the
shutter button to record a movie clip.• QuickTime 3.0 or later is required to replay movie files (AVI/
Motion JPEG) on a computer. QuickTime (for Windows) isincluded on the Canon Digital Camera Solution Disk. Onthe Macintosh platform, this program is generally bundledwith Mac OS 8.5 or later operating systems.

64 Shooting
Locking the Focus (AF Lock)It may be difficult to focus on the following types of subjects. Use thefocus lock in these situations.
• Subjects with extremely low contrast to the surroundings• Subjects with extremely bright objects at the center of the
composition• Subjects that are moving quickly• Subjects through glass :
Try to shoot as close to the glass as possible to reduce the chancesof light reflecting back off the glass.
Shooting with the Focus LockMethod 1
Aim the camera so that an object at the same focal distance asthe main subject is centered in the AF frame in the viewfinder orLCD monitor.Press the shutter button halfway and wait until two beeps sound.Re-aim the camera to compose the shot as desired and press theshutter button all the way.
Method 2• Turn the LCD monitor on.• Aim the camera so that an object at the
same focal distance as the main subjectis centered in the AF frame.
• Press and hold the shutter buttonhalfway until two beeps sound.Without releasing your finger, press the
/ button.
• The icon will display and the lowerindicator will light yellow.

Shooting 65
• Re-aim the camera to compose the shotas desired and press the shutter buttonall the way.
• Release the focus lock by pressing the / button.
• Method 2 is convenient because you can let go of theshutter button to recompose the image. Moreover, thefocus remains locked after the picture is taken, allowingyou to capture a second image with the same focus.
• In Method 2, pressing the zoom lever, button or button, or changing the shooting mode also releases thefocus lock.

66 Shooting
Locking the Exposure Setting (AE Lock)You can set the exposure and focus separately. This is effective whenthe contrast is too strong between the subject and background orwhen a subject is backlit.
You must set the flash to . The AE lock cannot be set if theflash fires.
• Turn on the LCD monitor.• Focus the camera on the subject on
which you wish to lock the exposuresetting.
• Press the shutter button halfway andwait until two beeps sound.
• Without releasing your finger, press the button.
• The icon will display.
• Re-aim the camera to compose the shot.• To release the AE lock, press the
button.
The AE lock may also release if you press any button otherthan the button.

Shooting 67
Locking the Flash Exposure Setting (FE Lock)You can lock the flash exposure so that the exposure settings arecorrectly set for a particular portion of your subject.
• Turn on the LCD monitor.• Set the flash to and focus on the
part of the subject on which you wishto lock the flash exposure setting.
• Press the shutter button halfway andwait until two beeps sound.
• Without releasing your finger, press the button.
• The flash will fire a pre-flash and lockthe flash exposure to the requiredintensity to illuminate the subject.
• The icon will display.
• Re-aim the camera to compose the shotand press the shutter button all theway.
• To release the FE lock, press the button.
The FE lock may also release if you press any button otherthan the button.

68 Shooting
• See Selecting Menus and Settings (p. 38).
• Use the or button to select [On] or[Off].
• A shot can be taken immediately after.
• The display will return to the Rec.screen.
The center AF frame mode is used when the digital zoom isactivated.
The camera detects the subject and highlights the AF frames, from 9 available points, that it will use to determine the focus.
The camera focuses using the center AF frame. This is convenient for focusing on a specific part of a subject with greater certainty.
On
Off
The symbol represents the AF frames as they appear in the LCD monitor.
No frame
Switching between Autofocus ModesAlthough the autofocus function is preset to the AiAF setting (nine AFframes), you can set it to the center AF frame. When the center AFframe is selected, the AF frame will appear in the LCD monitor if it isturned on (p. 29). The AF frame does not appear when AiAF is selected.
In the (Rec.) menu,select .

Shooting 69
Switching between Light Metering ModesYou can switch between metering modes to shoot.
Appropriate for standard shooting conditions,including backlit scenes. The camera divides imagesinto several zones for light metering. It evaluatescomplex lighting conditions, such as the position of thesubject, the brightness, the direct light, and thebacklighting, and adjusts the settings to the correctexposure for the main subject.
Averages the light metered from the entire frame, butgives greater weight to the subject matter at thecenter.
Meters the area within the spot AE point at the centerof the LCD monitor. Use this mode when the subject isbacklit or surrounded by strong light.
EvaluativeLightMetering
Spot AEPoint
• Display , or .
Center-WeightedAveraging

70 Shooting
Adjusting the Exposure CompensationAdjust the exposure compensation setting to avoid making the subjecttoo dark when it is backlit or shot against a bright background or toavoid making lights appear too bright in night shots.
• Use the or button to select *.* The current setting is displayed.
• Use the or buttons to adjust theexposure compensation.
• The settings can be adjusted in 1/3steps in the range –2 to +2.
• You can confirm the effect of thesetting in the LCD monitor when it ison.
• You can shoot right after selecting avalue. The menu displays again afterthe shot, allowing you to change thesettings easily.
• Reset the exposure compensation byreturning the setting to “0”.

Shooting 71
Shooting in Long Shutter ModeYou can set the shutter speed to a slow setting to make dark subjectsappear brighter.
• See Selecting Menus and Settings (p. 38).
• Use the or button to select [On].
• The display will return to the Rec.screen.
• The exposure compensation menu willdisplay in the LCD monitor.
• Use the or button to select *.* The current setting is displayed.
• The long shutter submenu will display.
In the (Rec.) menu,select .

72 Shooting
The nature of CCD image sensors is such that noise in therecorded image increases at long shutter speeds. This camera,however, applies special processing to images shot at shutterspeeds slower than 1.3 seconds to eliminate the noise,thereby producing high-quality images. Nevertheless, acertain amount of processing time may be required beforethe next image can be shot.
• Use the LCD monitor to confirm that the image wasrecorded at the desired brightness.
• Use of the flash may result in an over-exposed image. Ifthat occurs, shoot with the flash set to .
• The following are unavailable:- Exposure Compensation- Light Metering- AE Lock- FE Lock- ISO speed (AUTO)- Flash (Auto), (Red-Eye Reduction)
• Available Shutter SpeedsThe following shutter speeds (in seconds) are available.1, 1.3, 1.6, 2, 2.5, 3.2, 4, 5, 6, 8, 10, 13, 15
• Use the or button to select ashutter speed. The higher the value, thebrighter the image and the lower thevalue, the darker the image.
• You can shoot right after selecting avalue. The menu displays again afterthe shot, allowing you to change thesettings easily.
• To cancel the long shutter mode, pressthe button while the long shuttermenu is displayed.

Shooting 73
Setting the White BalanceWhen the white balance mode is set to match the light source, thecamera reproduces colors more accurately.
Auto The camera sets the white balance automaticallyaccording to shooting conditions.
Daylight For recording outdoors on a bright day.
Cloudy For recording under overcast, shady or twilight skies.
Tungsten For recording under tungsten and bulb-type 3-wavelength fluorescent lighting.
Fluorescent For recording under warm-white, cool-white or warm-white (3-wavelength) fluorescent lighting.
Fluorescent H For recording under daylight fluorescent, or daylightfluorescent-type (3-wavelength) fluorescent lighting.
Custom For setting a custom value with a white sheet of paper, etc.,to obtain the optimal white balance for the conditions.
• Use the or buttons to select *.* The current setting is displayed.
• Use the or buttons to select anoption. (See p. 74 for the option.)
• You can confirm the effect of the settingin the LCD monitor when it is on.
• You can shoot right after selecting anoption. The menu displays again afterthe shot, allowing you to change thesettings easily.

74 Shooting
Setting a Custom White BalanceYou can set a custom white balance to obtain the optimal setting forthe shooting conditions by having the camera evaluate an object, suchas a piece of white paper or cloth, or a photo-quality gray card that youwish to establish as the standard white color.
• Use the or buttons to select *.* The current setting is displayed.
• Use the or buttons to select .
This setting cannot be adjusted when the (Sepia) or (B/W) photo effects are selected.

Shooting 75
• You are recommended to set the shooting mode to and the exposure compensation setting to zero (±0) beforesetting a custom white balance. The correct white balancemay not be obtained when the exposure setting is incorrect(image appears completely black or white).
• It is also advisable to use the LCD monitor to compose theshot and to zoom in to the telephoto end setting.
• Since the white balance data cannot be read in mode,preset the white balance in another shooting mode firstbefore selecting the mode.
• Set the flash on or off when setting a custom white balance.The white balance may not be accurate if the settingconditions and shooting conditions are not the same.If the flash fires when setting a custom white balance withthe flash set to or , ensure that you also use the flashwhen you go to shoot.
• Aim the camera so that a piece of whitepaper, a cloth or a gray card completelyfills the frame at the center of the LCDmonitor or the entire optical viewfinder,then press the button. The camerareads the white balance data when youpress the button.
• You can shoot right after setting thewhite balance. The menu displays againafter the shot, allowing you to changethe settings easily.

76 Shooting
Changing the Photo EffectYou can shoot with different photo effects.
• Use the or button to select *.* The current setting is displayed.
• Use the or buttons to select aneffect.
• You can confirm the effect in the LCDmonitor when it is on.
• You can shoot right after selecting anoption. The menu displays again afterthe shot, allowing you to change thesettings easily.
Photo Effect Off Records with no effect.
Vivid Emphasizes the contrast and color saturation to recordbold colors.
Neutral Tones down the contrast and color saturation torecord neutral hues.
Low Sharpening Records subjects with softened outlines.
Sepia Records in sepia tones.
B/W Records in black and white.

Shooting 77
Adjusting the ISO SpeedRaise the ISO speed when you wish to reduce camera shake or turn theflash off when shooting in a dark area, or use a fast shutter speed.
• Use the or button to select *.* The current setting is displayed.
• Use the or buttons to select aspeed.
• You can shoot right after selecting anoption. The menu displays again afterthe shot, allowing you to change thesettings easily.
• Higher ISO speeds increase image noise. To take cleanimages, use as low an ISO speed as possible.
• Although the AUTO setting selects the optimal speed, itwill automatically raise the speed when the shootingcondition limits are reached. It will also raise the speedwhen the light from the flash is insufficient to illuminatethe subject matter.

78 Shooting
Setting the Auto Rotate FunctionYour camera is equipped with an Intelligent Orientation sensor thatdetects the orientation of an image shot with the camera on end andautomatically rotates it to the correct viewing orientation in the display.You can set this function on /off.
• See Selecting Menus and Settings (p. 38).
• Use the or button to select [On] or[Off].
• The display will return to the Rec. screen.• When the Auto Rotate function is set to
[On] and the LCD monitor is set to thedetailed display mode, the icon(normal), icon (right end is down) or
icon (left end is down) will appear inthe upper right of the display.
• When the camera is held on end to shoot, the IntelligentOrientation sensor judges the upper end to be “up” and thelower end to be “down.” It then regulates the optimal whitebalance, exposure and focus for vertical photography. Thisfunction operates regardless of the On/Off status of the AutoRotate function.
• When changing the camera’s orientation between the horizontaland vertical positions, you may hear noise coming from theorientation detection mechanism. This is not a malfunction.
• This function may not operate correctly when the camerais pointed straight up or down. Check that the arrow ispointing in the right direction and if it is not, then set theAuto Rotate function to [Off].
• Even if the Auto Rotate function is set to [On], theorientation of images downloaded to a computer willdepend upon the software used to download the images.
In the (Set up) menu,select .

Shooting 79
Resetting the File NumberYou can select the way file numbers are assigned.
• See Selecting Menus and Settings (p. 38).
• Use the or button to select [On] or[Off].
• The display will return to the Rec. screen.
• Setting the File No. Reset to [Off] is useful for avoiding filename duplication when images are downloaded to acomputer.
• About File and Folder NumbersImages are assigned file numbers from 0001 to 9900, andfolders are assigned folder numbers from 100 to 998(Folder numbers cannot contain 99 in the last two digits).
• Folder File CapacityEach folder usually contains up to 100 images. However,since images shot in and are always saved into thesame folder, a folder may contain more than 100 images.The number of images may also exceed 100 if a foldercontains images copied from a computer or images shotwith other cameras. Please note, however, that the imagesin folders containing 2001 or more images cannot bereplayed in this camera.
The file number is reset to the start (100-0001) each time a new CFcard is inserted. New images recorded on CF cards with existing filesare assigned the next available number.
The file number of the last image to be shot is memorized so thatimages recorded to a new CF card start from the next number.
On
Off
In the (Set up) menu,select .

80
Displaying Images Individually
• Turn the mode switch to the position.
• The last recorded image will appear inthe display (single image replay).
• Use the button to move to theprevious image and the button tomove to the next. Holding the buttondown advances the images morerapidly, but the images will not appearas clearly.
Replaying

Replaying 81
Magnifying Images
• Images can be magnified up toapproximately 10 times.
• Use the / / / buttons tomove around the image.
• Hold the button down and pressthe zoom lever toward to cyclethrough each setting, from approxi-mately 2.5 times, to approximately 5and 10 times.
• Hold the button down and pressthe zoom lever toward to cycle backthrough the levels of magnificationfrom approximately 5 times, to 2.5times and the standard view.
Approximate Locationof the Magnified Area
Movie frames and index replayed images cannot bemagnified.

82 Replaying
Viewing Images in Sets of Nine (Index Replay)
• Up to nine images can be viewed atonce in index replay.
• Use the / / / buttons tochange the image selection.
• Press the zoom lever toward todisplay the selected image in singleimage replay.
Switching between Sets of Nine Images• Successive sets of nine images can be
shown in the display.
• Use the button to move to theprevious set and the button to moveto the next.
• Hold the button down and pressthe or button to jump to the firstor last set.
• Press the zoom lever toward toreturn to standard index replay.
SelectedImage
Movie

Replaying 83
Viewing MoviesMovie clips can be replayed with the following procedures.
Movies cannot be played in the index replay mode.
• Use the or button to select amovie.
• Images with a icon are movies.
• The movie control panel will display.• Use the or button to select
(Play).
• The movie images and sound will play.• Use the or buttons to adjust the
sound volume.• When a movie is finished, it stops and
displays its last frame.

84 Replaying
Fast Forwarding / Rewinding• Use the or button to select one of
the following.
Return to Single Image View
Play
First Frame
Previous Frame[Rewinds if button is held down]
Next Frame[Fast Forwards if button is held down]
Last Frame
Switch to Movie Editing Mode (p. 85)
Use the television’s controls to adjust the volume whenplaying a movie on a TV set (p. 121).
• You may experience frame dropping and audio breakupwhen replaying a movie on a computer with insufficientsystem resources.
• Movies shot with other cameras may not replay on thiscamera. See the List of Messages (p. 137).
Pausing and Resuming Play• Press the button to pause the
movie. Press it again to resume.

Replaying 85
Editing Movies
Selecting (Edit) in the movie control panel enables you to cutunwant portions at the start or end of a movie clip.
Protected movies and movies less than 1 second in durationcannot be edited.
• Use the or button to select (Cut Beginning) or (Cut End) and the
or button to set the portion towhich the cut is applied.
• When (Cut Beginning) is selected, theleft hand cursor moves and when (Cut End) is selected, the right hand cursor moves.
• Use the or button to select (Play).
• A preview of the temporarily editedmovie clip plays. To stop it, press the
button again.
• Use the or button to select (Save) to keep the edits (p. 86). If you use
the or button to select (CloseMovie Editing/Return to Movie ControlPanel), the edits are not saved and theediting mode is canceled.
Switch to the movieediting mode (p. 84).

86 Replaying
• Use the or button to select [NewFile] or [Overwrite].- [New File] saves the edited movie
under a new file name. The pre-editdata is left unchanged.
- [Overwrite] saves the edited moviewith its original file name. The pre-edit data is lost.
• When the CF card lacks sufficient spaceto create a new file, only [Overwrite] canbe selected. A small ▲ symbol willappear in the time display on the moviein that case.
• The minimum duration of an edited movie is 1 second.• It may take approximately 3 minutes to save an edited
movie. If the battery pack runs out of charge partwaythrough, edited movie clips cannot be saved. When editingmovies, use a fully charged battery pack or the separatelysold AC Adapter Kit ACK500 (P. 141).

Replaying 87
In the (Play) menu,select .
Rotating Images in the DisplayImages can be rotated clockwise 90º or 270º in the display.
0º(Original) 90º 270º
• See Selecting Menus and Settings (p. 38).
• Use the or button to select theimage to be rotated.
• Cycle through the 90º/270º/0ºorientations with each press of the button.
• Press the button repeatedly untilthe replay screen reappears to finish theprocedure.
• Movies cannot be rotated.• When images are downloaded to a computer, the
orientation of images rotated by the camera will dependupon the software used to download the images.
Images taken vertically with the Auto Image Rotate (p. 78) setto [On] will automatically be rotated to the vertical positionwhen viewed on the camera’s LCD monitor.

88 Replaying
Attaching Sound Memos to ImagesIn replay mode (including single replay, index replay, and magnifyingreplay), you can attach sound memos (up to 60 seconds) to an image.the sound data is saved in WAVE format.
• See Selecting Menus and Settings (p. 38).
• Use the or button to select animage.
• The sound memo control panel willdisplay.
• Use the or buttons to select .
• The recording starts and the elapsedtime is displayed. Speak towards themicrophone of the camera.
• Press the button again to stoprecording. To resume recording, pressthe button again.
• Up to 60 seconds of recordings may beadded to any one image.
In the (Play) menu,select .

Replaying 89
• Playing/Erasing Sound Memos• Images with sound memos attached
have a symbol displayed on them inthe LCD monitor.
• The sound memo control panel willdisplay.
• Use the or buttons to select (Play) or (Erase).
(Play)• The sound memo will play. Playback will
stop when you press the button.Press the button again to resumeplayback.
• Use the or buttons to adjust thesound volume.
(Erase)A confirmation menu will display. Use the
or buttons to select [Erase] andpress the button.
• Exiting the Sound Memos• Press the button.
• You cannot attach sound memos to movies.• The “Memory card full” message will display when the CF
card is full and you will be unable to record sound memos tothat card.
• If an incompatible sound memo is attached to an image,you will be unable to record or play sound memos for thatimage, and the “Incompatible WAVE format” message willdisplay. You can erase incompatible sound data using thecamera.
• Sound memos for protected images cannot be erased.
The volume can be adjusted in the (Set up) menu (p. 131).
Display an imagewith a sound memo
attached (p. 80).

90 Replaying
• See Selecting Menus and Settings (p. 38).
• The Slide Show menu will display.
• Use the or button to select[Program] and the or button toselect [All Images], [Show 1], [Show 2]or [Show 3].
• Use the or button to select[Start].
• The slide show will start and automati-cally stop at the end of the show.
• Press the button repeatedly untilthe replay screen reappears to finish theprocedure.
• Movies play for their entire recorded length regardless ofthe time set in the slide show settings.
• The power-saving function does not activate during a slideshow (p. 27).
Automated Playback (Slide Shows)
Starting a Slide ShowA selection of images or all the images on a CF card can be displayedone-by-one in an automated slide show.Slide show image settings are based on DPOF standards (p. 111).
All Images Plays all images on the CF card in order.
Slide Show 1-3 Plays the images selected for each slide show in order (p. 91).
In the (Play) menu,select .

Replaying 91
Pausing/Resuming a Slide Show• Press the button to pause the slide
show. Press the button again torestart it.
Fast Forwarding/Rewinding a Slide Show
• Use the or button to display theprevious or next image. Hold down thebutton to advance through the imagesmore rapidly.
Stopping a Slide Show
• Press the button to stop the slideshow and redisplay the Slide Showmenu.
Selecting Images for Slide ShowsYou can mark images for inclusion in slide shows 1-3. Up to 998images may be marked per slide show. Images display in the order oftheir selection.
• Use the button to select [Program]and the or button to select [Show1], [Show 2] or [Show 3].
• Use the button and the or button to choose [Select].
Display the Slide Showmenu (p. 90).

92 Replaying
• A white checkmark will appear beside ashow already containing images.
• Use the or button to movebetween images and the or button to select or deselect them.Selected images display a numbercorresponding to their selection orderand a white checkmark .
• You can press the zoom lever toward to switch to the index mode (3
images) and use the same proceduresto select images.
• While in index replay, you can clear allof the images by pressing the button, using the or button toselect [Clear all] and pressing the button again.
• Press the button repeatedly untilthe replay screen reappears to finish theprocedure.

Replaying 93
Adjusting the Play Time and Repeat SettingsYou can change the play time for all the images in a show and have theshow repeat continuously.
Play Time Sets the duration that each image displays. Choose between3-10 seconds, 15 seconds, 30 seconds and Manual.
Repeat Sets whether the slide show stops when all the slides havebeen displayed or continues until stopped.
• Use the or button to select [Setup].
• Use the or button to select or and the or button to selectan option.
(Play Time)Select a play time.
(Repeat)Select [On] or [Off].
• Press the button repeatedly untilthe replay screen reappears to finish theprocedure.
• The display interval may vary slightly from the set time forsome images when played.
• Slide shows are easy to arrange on a computer with thesupplied software. See the Software Starter Guide.
Display the Slide Showmenu (p. 90).

94 Replaying
Protecting ImagesYou can protect important images from accidental erasure.
• See Selecting Menus and Settings (p. 38).
• Use the or button to select animage to protect.
• Press the button to protect theimage. Press the button again toremove the protection.
• You can make the selection of imageseasier by toggling between single imagereplay and index replay by pressing thezoom lever toward / .
• Press the button repeatedly untilthe replay screen reappears to finish theprocedure.
Please note that formatting (initializing) a CF card erases alldata, including protected images.
In the (Play) menu,select .
Protection Icon

95
Erasing
Erasing Single Images
• Please note that erased images cannot be recovered.Exercise adequate caution before erasing a file.
• Protected images cannot be erased with this function.
• Use the or button to select animage for deletion.
• Use the or button to select [Erase].• To exit instead of erasing, select
[Cancel].

96 Erasing
Erasing All Images
• Please note that erased images cannot be recovered.Exercise adequate caution before erasing a file.
• Protected images cannot be erased with this function.
• See Selecting Menus and Settings (p. 38).
• Use the or button to select [OK].• To exit instead of erasing, select
[Cancel].
In the (Play) menu,select .

Erasing 97
Formatting CF CardsNew CF cards must be formatted with the following proceduresbefore use.
Please note that formatting (initializing) a CF card erases alldata, including protected images and other file types.
• See Selecting Menus and Settings (p. 38).
• Use the or button to select [OK].• To exit instead of formatting, select
[Cancel].
• When the camera is malfunctioning, a corrupted CF cardmight be the cause. Reformatting the CF card may solvethe problem.
• When a non-Canon brand CF card is malfunctioning,reformatting it may solve the problem.
• CF cards formatted in other cameras, computers, orperipheral devices may not operate correctly in this camera.When that happens, reformat the CF card with this camera.If formatting in the camera doesn’t work properly, turn thecamera off and re-insert the CF card. Then turn the cameraback on and format again.
In the (Set up) menu,select .
In the (Set up) menu,select .

98
Printing
About PrintingThis camera supports direct printing. By connecting the camera to anoptional direct print compatible printer (CP series, sold separately)*1 orBubble Jet printer (sold separately) that supports the camera’s directprint function, you can send the images from the CF card directly to theprinter using the camera buttons. In addition, you can have printsmade to specification by a photo developing service by sending your CFcard with the DPOF*2 print settings set in advance on your camera.Please refer to the System Map supplied with your camera for directprint function compatible printer information.
Digital Camera
CF Card
Card Photo Printer(Compatible with thedirect print function)
Bubble Jet Printer(Compatible with thedirect print function)
Photo Lab
*1 The direct print icon appears on directprint compatible CP series printers.
*2 (Digital Print Order Format)

Printing 99
Setting Print Settings for Direct Printing
• Setting the Number of Print Copies (p. 107)▼
• Setting the Print Style (p. 107)- Standard/Multiple
(Direct Print Function Compatible Printer)- Paper: Card #1/Card #2/Card #3/LTR/A4
(Direct Print Function Compatible BJ Printer)- Bordered/Borderless- Date: On/Off
▼• Setting the Printing Area (Trimming) (p. 109)
DPOF Print Settings
• Select the images you wish to print (p. 111).▼
• Set the number of print copies (p. 112).▼
• Set the print style (p. 114).- Standard/ Index/Both.- Date: On/Off.- File Numbers: On/Off.
DPOF Transfer Order
• Select the images to send by email (p. 119)Software that supports DPOF transfer order settings is required
Please refer to the System Map supplied with your camera for directprint function compatible printer (CP series) information.

100 Printing
Print Menu SettingsUse the Print menu to set print related settings. The following diagramsillustrate how to use the Print menu.
DPOF Print Settings Set the Mode Switch to
Direct Print FunctionSet the Mode Switch to

Printing 101
Turn the menu On/Off.
Selects items and settings.
Sets items and settings.
Print Type (p. 114)
Date (p. 114)
File No. (p. 114)
Order Number of Copies (p. 111)
Set up
Reset (p. 116)
Style
Number of Copies (p. 107)
Trimming (p. 109)
Image (p. 107)
Paper (p. 107)
Borders (p. 107)
Date (p. 107)

102 Printing
Connecting a PrinterYou can make clear prints swiftly and easily when you connect thecamera to a direct print function compatible printer (CP series, soldseparately) or a direct print function compatible Bubble Jet printer (soldseparately). You can also print using DPOF print settings.
You are recommended to use the optional AC Adapter KitACK500 (sold separately) rather than the battery pack topower the camera when it is connected to a printer. If you douse a battery pack, ensure that it is fully charged and monitorthe battery charge while printing.
• Please see the System Map supplied with your camera forinformation on direct print function compatible printers(CP series).
• Please see your printer’s user guide for information aboutinstalling paper and ink cassettes / tanks.
Connecting to a Direct Print Function Compatible Printer (CP Series)Your printer should come equipped with two direct interface cables. Toconnect to this camera, please use the cable (DIF-100) that has the symbol on its connector.
• Attach the power cable to the printerand insert its plug into a power outlet.
• You can also power the printer with arechargeable battery if it is so equipped.Please see your printer’s user guide.
Shut the camera’spower off (p. 26).
To a Power Outlet

Printing 103
• Attach the direct interface cable to theprinter.
• Open the camera’s terminal cover andinsert the cable’s connector into thecamera’s DIGITAL terminal. Orient thecable so that the connector’s symbol faces the camera’s back panel.
• Press the printer’s ON/OFF button toturn on its power. (If you are using CardPhoto Printer CP-10, the printer’s powerwill turn on in Step 2 when printer andpower cable are connected.)
• Set the mode switch to the positionand turn on the camera’s power.
• will display when the printer iscorrectly connected.
Connecting to a Bubble Jet Printer
Please read the Quick Start Guide supplied with your BubbleJet printer to see if it is compatible with the camera’s directprint function, and for instructions regarding the connectioncables and the printer’s general operation.
Direct InterfaceCable (DIF-100)
This shows when adirect print functioncompatible printer isconnected.
Shut the camera’spower off (p. 26).

104 Printing
• Turn the Bubble Jet printer’s power onafter you have connected the powercord to the Bubble Jet printer andinserted the other end in a poweroutlet.
• Attach the interface cable to the BubbleJet printer.
• Open the camera’s terminal cover andinsert the cable’s connector into thecamera’s DIGITAL terminal. Orient thecable so that the word Canon on theconnector faces the camera’s frontpanel.
• Set the mode switch to the positionand turn on the camera’s power.
• will display when the printer iscorrectly connected.
This shows whena BJ printer isconnected.
Interface Cable
• On Bubble Jet printers with operation panels, images cannot beprinted through the operation panel while the camera is connected.
• The following cannot be conducted while the printer is connected. - Playing movies - Setting the language with the and the button
combination.• When the printer is disconnected, the or symbol will
disappear from the LCD monitor and the camera will revertto the standard replay mode.
• Use the following procedures to datach the cable from thecamera and printer. 1. Detach the cable from the printer. 2. Shut off the camera’s power. 3. Detach the cable from the camera.
• Ensure that you grip the connector’s sides when you detachthe cable from the camera’s DIGITAL terminal.
To the BJ Printer

Printing 105
PrintingThe following illustrations show examples from a direct print compatibleprinter (CP series). Options for the Style category will differ slightly forBubble Jet printers.
Print images displayed in single image replay or index replay mode.
• Use the or button to select theimages you wish to print.
• Specify the number of print copies,print style and print area as required. - Setting the Number of Print Copies
(p. 107) - Setting the Print Style (p. 107) - Setting the Printing Area (Trimming)
(p. 109)• Use the / / / buttons to select
[Print].• To quit the procedure instead, select
[Cancel].
• Press the button to start printing.• The replay screen will reappear when
printing is successfully concluded.
Movies cannot be printed.

106 Printing
• Canceling PrintingPress the button to stop printing. A confirmationmessage will display. Use the or button to select [OK]and press the button.
• Direct Print Function Compatible Printers (CP Series)A print in progress cannot be stopped. The printer willstop after the current print is complete and the camerawill display its replay screen at that point.
• Bubble Jet PrintersThe printer will stop printing the current image andeject the paper.
• Printing ErrorsAn error message will display if an error occurs whileprinting (pp. 139, 140). Use the or button to select[Stop] or [Resume] and press the button. (With aBubble Jet printer, the print will automatically restart if theerror is resolved.)
• Direct Print Function Compatible Printers (CP Series)The Resume option may not appear with some types oferror. In that case, select Stop.
• Direct Print Function Compatible Bubble Jet Printers- The [Continue] and [Stop] options may appear with
some error messages.- On Bubble Jet printers equipped with an operation
panel, an error number displays on the panel. Pleaserefer to the Bubble Jet Printer Quick Start Guide forthe remedies corresponding to the error numbers.

Printing 107
Standard Prints one image per page.Image
Multiple* Prints eight copies of the same imageon one page.
BordersBorderless Prints right to the edges of the paper.
Bordered Prints with a border.
Date Prints the image’s creation date.
Setting the Print Settings (Direct Print Function )
Setting the Number of Print Copies
• Use the or button to select[Copies] and the or button toselect the number. Up to 99 copies maybe specified.
Setting the Print StyleYou can select from among the following print styles.
Direct Print Function Compatible Printer (CP Series)
Bubble Jet Printer
Paper
Select a paper size from the following:Card #1, Card #2, Card #3, LTR andA4. See the Bubble Jet printer’s userguide for its media specifications.
BordersBorderless Prints right to the edges of the paper.
Bordered Prints with a border.
Date Prints the image’s creation date.
* This option is only available for printing on card-size paper.
If you are using a direct print function compatible printer (CPseries), the date and borders settings cannot be selectedwhen the Multiple option is selected. (Images are printedwithout a date or border.)

108 Printing
• Use the or button to select [Style].
• Use the or button to select ,, , or and the or button
to select an option.
(Image Settings)Direct Print Function CompatiblePrinter (CP Series)Select [Standard] or [Multiple].
(Paper)BJ PrinterSelect [Card #1], [Card #2], [Card #3],[LTR] or [A4].
(Borders)Select [Borderless] or [Bordered].
(Date)Select [On] or [Off].
Current print style selection

Printing 109
• Press the button to finish theprocedure.
• Practically all of the image area isprinted on bordered prints.
• With borderless or multiple prints, theimage is printed with its top, bottomand sides trimmed.
The date settings are overridden by the DPOF print settings ifyou are using them to print (p. 114).
Setting the Printing Area (Trimming)You can print a portion of an image.
The shape of the trimming frame is determined by the printstyle selection (image, paper, borders, date). Set the printstyle before setting the printing area (p. 107).
• Use the or button to select[Trimming].

110 Printing
Changing the Size of the Trimming Frame• Press the zoom lever toward or .• The trimming frame can be resized to
approximately half the image size atminimum and practically as large as theimage at maximum.
• You can cancel the trimming setting bysliding the zoom lever toward the again when the trimming frame isalready set to the maximum size.
• When printing an image that has beenmagnified using the trimming option,the image quality may become coarserand grainier depending on themagnifying rate. With direct printfunction compatible printers, thetrimming frame displays in red.
Moving the Trimming Frame• Use the , , or button to set
the trimming frame’s position.
Rotating the Trimming Frame• Press the button to rotate the
trimming frame.
• The trimming frame will appear on images that havealready had one assigned.
• Trimming settings can only be set for one image.• Trimming settings are canceled with the following
operations: - When the button is pressed. - When the trimming settings are set for another image. - When the print mode is closed (camera power shut off,
mode dial turned, or direct interface cable detached). - When the zoom lever is pressed further toward with
the trimming frame at its maximum.
Trimming Frame

Printing 111
Setting the DPOF Print SettingsYou can select images on a CF card for printing and specify the numberof print copies in advance using the camera. This is extremelyconvenient for sending the images to a photo developing service or forprinting on a direct print compatible printer (CP series) or a direct printcompatible Bubble Jet printer.
Selecting Images for PrintingThere are two ways to select images.
• Singly• All images on a CF card (the number of print copies is set to one
per image)
• See Print Menu Settings (p. 100).
• Use the or button to select [PrintOrder].
Display the Print OrderMenu.

112 Printing
Single Images• As shown below, selection methods differ according to the options
chosen for the (Print Type) settings (p. 107).
(Standard)/ (Both)• Use the or button to select an
image and the or button toselect the number of print copies (up tomaximum of 99).
(Index)• Use the or button to move to an
image and the or button toselect or deselect it. A checkmarkdisplays on selected images.
• You can use the same procedures toselect images in index replay (3 images).Press the zoom lever toward toswitch between single image replay andindex replay.
• Press the button repeatedly untilthe replay screen reappears to completethe procedure.
Number of Print Copies
Selected foran Index Print

Printing 113
All the Images on a CF Card
• Switch to index replay (3 images).
• Use the or button to select[Mark all].
• Selecting [Mark all] selects all of thecard’s images.
• Press the button to set the numberof print copies to 1 for each image.
• When the print type is set to Standardor Both, the number of print copies canbe set individually for each image.When Index is selected, the printsettings can be deleted (p. 112).
• Press the button repeatedly untilthe replay screen reappears to completethe procedure.
• The symbol will display on images that have had printsettings set by other DPOF-compliant cameras. Thesesettings will be overwritten by those set by your camera.
• The output of some printers or photo developing servicesmay not reflect the specified print settings.
• Print settings cannot be set for movie images.

114 Printing
Setting the Print StyleSet the print style after selecting the image to print.The following print settings can be selected.
• See Print Menu Settings (p. 100).
• Use the or button to select [Set up].
• Images are printed in order from oldest to newest by theshooting date.
• A maximum of 998 images can be selected per CF card.• When [Both] is selected, the number of print copies can be
set, but it applies to Standard prints only. The Index settingonly produces one print copy.
• Print settings can also be assigned to images with thebundled software on a computer.
Standard Prints one image per page.
Print Type Index Prints the selected images together at areduced size in an index format.
Both Prints the images in both the standard andindex formats.
Date Adds the date to the print.
File No. Adds the file number to the print.
Display the Print OrderMenu.

Printing 115
• Use the or button to select , or , and the or button to
select an option.
(Print Type)• Select [Standard], [Index] or [Both].
(Date)• Select [On] or [Off].
(File No.)• Select [On] or [Off].
• Press the button repeatedly untilthe replay screen reappears tocomplete the procedure.
The date prints as the date and time in the format specifiedin the Date/Time menu (p. 23).
When the print type is set to [Index], only one or the other ofthe [Date] and [File No.] options can be set to [On] at thesame time.

116 Printing
Resetting the Print SettingsThe print settings can all be removed at once. The print type resets toStandard and the Date and File No. options to Off.
• See Print Menu Settings (p. 100).
• Use the or button to select[Reset].
• Use the or button to select [OK].• To exit without resetting, select
[Cancel].
Display the Print OrderMenu.

Printing 117
Printing with DPOF Print SettingsThe DPOF print settings can be used to print on a direct print functioncompatible printer (CP series) or a direct print function compatible BubbleJet printer.
• See Print Menu Settings (p. 100).
• Use the / / / button to select[Print].
• Set the print style as required (p. 107).• The print style cannot be set for images
that have had the print type set toIndex in the DPOF print settings. (Youcan also select the type of paper whenprinting with a Bubble Jet printer.)
• Use the / / / buttons to select[OK].
• Press the button to start printing.• The replay screen will reappear when
printing is successfully concluded.
Display the Print OrderMenu.

118 Printing
• To include the date in the prints, set the Date setting in the Set up menuin Step 1 above to [On]. You cannot set the date to print with the Stylemenu in Step 2 above. Please note however, that the date will not printif the print type is set to Index even if it is turned On in Step 1.
• When the print type is set to [Both], it is possible to have both the [Date]and [File No.] options set to [On], but only the file number will print onthe Index print. (Bubble Jet printers cannot print the date orfile number on Index prints.)
• When the print type is set to [Standard], file numbers will not beprinted even if they are set to [On].
• The maximum number of images printed on one page in the Indexprint type depends upon the selected paper size. - Card Size: 20 images - L Size: 42 images - Postcard Size: 63 images(Please refer to your Bubble Jet Printer Quick Start Guide for anexplanation of the number of images printed with a Bubble Jet Printer.)
• Canceling PrintingSee page 106.
• Restarting PrintingIn the Print Order menu, use the or button to select [Resume] andpress the button. The remainder of the selected images will print.
Printing cannot be resumed under the following circumstances: - If the print settings were changed before printing is restarted, - If images with print settings were deleted before printing is restarted, - If there was insufficient spare capacity on the CF card when printing
was halted.Under these circumstances, you can select [OK] in the Print menu andreprint starting from the first image.If printing was stopped because of a low battery charge, you arerecommended to resume printing using the AC Adapter KitACK500 (sold separately). If you do use a battery pack, ensurethat it is fully charged. Remember to turn the camera power onagain before printing.
• Printing ErrorsSee page 106.

119
In the (Play) menu,select .
Image Transmission Settings(DPOF Transfer Order)
You can use the camera to specify settings for images that you wish tosend by email. Please use the software supplied with the camera toactually transfer the images to an email program. Please read theSoftware Starter Guide for image transfer instructions.The settings used on the camera comply with the Digital Print OrderFormat (DPOF) standards.
The mark will display on images that have had transfermarks set by another DPOF-compliant camera. These settingswill be overwritten by any marks set by your camera.
Selecting Images for Transferring
• See Selecting Menus and Settings (p. 38).
• The Transfer Order menu will display.
• Use the or button to select [Order].• Pressing [Reset] cancels the transfer
settings for all images on the CF card.

120 Image Transmission Settings (DPOF Transfer Order)
• Use the or button to move to animage and the or button toselect or deselect it. A checkmarkdisplays on selected images.
• You can use the same procedures toselect images in index replay (3 images).Press the zoom lever toward toswitch between single image replay andindex replay.
• While in index replay, you can select allof the images by pressing the button, using the or button toselect [Mark all] and pressing the button again.
• Press the button to complete thetransfer settings and redisplay theTransfer Order menu.
• Images are transferred in order from oldest to newest bythe shooting date.
• A maximum of 998 images can be selected per CF card.
Selected for Transfer

121
Shooting/Replaying with a TV
You can use a video-compatible television as a monitor to shoot orreplay images when it is connected to the camera with the supplied AVCable AVC-DC100. You must shut the TV and camera power offbefore you attach or detach the AV cable.
• After you have attached the AV cable at both ends, turn on the TVand set its TV/Video switch to Video.
• Set the mode switch to or and turn the camera power on.You can shoot or replay images using the normal procedures.
• If the images are not appearing on the TV when shooting, press the button.
• A TV set cannot be used in mode.• No image will appear on the LCD monitor when the
camera is connected to a TV.• If the TV is a stereo model, you can plug the audio plug
into either the left or right Audio In jack. Please refer tothe TV’s manual for details.
The video output signal can be switched (NTSC or PAL) toaccommodate different regional standards. The defaultsetting varies between regions.
NTSC: Japan, U.S.A., Canada, Taiwan, etc.PAL: Europe, Asia (excluding Taiwan), Oceania, etc.
If the video system is set incorrectly, the camera output maynot display properly.
Yellow
Black

122
Downloading Images to a Computer
Download images taken with the camera to a computer in one of thefollowing ways:
• Connect the camera to a computer with the USB cableYou can then download images directly from the camera to acomputer.
• Directly from the CF cardUsing a laptop computer or a card reader, you can downloadimages directly from the CF card.
Connecting the Camera to a Computer via the USB cableAfter the software is installed, you can use it to easily download imagesand print them or send them by email.
IMPORTANTYou must install the software and driver bundled on the suppliedCanon Digital Camera Solution Disk onto your computer if youare using any of the following operation systems:Windows 98 (including Second Edition) / Windows 2000 / Windows MeMac OS 9.0 - 9.2
The camera will not operate correctly if you connect it to yourcomputer before installing the driver and software. If thishappens, please refer to the Troubleshooting section of theSoftware Starter Guide.
Install the driver and the software applications bundled on theCanon Digital Camera Solution Disk.Please see the Software Starter Guide for information on systemrequirements and installation instructions.

Downloading Images to a Computer 123
USB Port
USB CableSlip a fingernail under the upper edge ofthe terminal cover to open it.Insert the connector until it clicks.
1
2
Connect the supplied USB interface cable to the computer’sUSB port and the camera’s DIGITAL terminal.
DIGITAL Terminal
USB Cable
• You do not need to turn off the computer or camera whenmaking a USB connection.
• Please refer to your computer’s manual for informationregarding the location of the USB port.
Set the camera’s mode swith to the position and turn thecamera’s power on.The LCD monitor will turn on in replay mode and then blank outwhen the connection to the computer is complete.
Please refer to the Software Starter Guide for the subsequentprocedures.

124 Downloading Images to a Computer
Downloading Images without Installing the Software(Windows XP and Mac OS X (v10.1/10.2) only)If you are using the Windows XP or Mac OS X (v10.1/10.2), you canuse the software distributed with these operating systems todownload images (JPEG format only) without installing the softwarebundled on the Canon Digital Camera Solution Disk. This is usefulfor downloading images to a computer in which the software is notinstalled.However, please note that there are certain limitations to downloadingwith this method.For more details, please refer to the supplied For Windows XP andMac OS X Users leaflet.
1. Connect the supplied USB interface cable to the computer’s USB portand the camera’s DIGITAL terminal. (Refer to step 2 on page 123).
2. Follow the onscreen instructions to download the images.
• Ensure that you grip the connector’s sides when you detachthe cable from sthe camera’sDIGITAL terminal.
• It is recommended to power thecamera from a household poweroutlet with the optional AC adapter Kit ACK500 whenconnected to a computer (p. 141).
• If the USB cable is detached while the camera power is on,the camera will power down.
• All procedures performed with a connection to a USB 2.0compliant board are not guaranteed.

Downloading Images to a Computer 125
Downloading Directly from a CF CardImages can be loaded directly from a CF card if you have a slot-equippednotebook computer, a PC card reader or a CF card reader.
Eject the CF card from the camera and insert it into a CF cardreader connected to the computer.
If you are using a PC card reader, first insert the CF card into a PCcard adapter (sold separately), and then insert the PC cardadapter into the computer’s PC card reader.
Double-click the icon of the drive containing the CF card.
Copy the CF card’s images to the desired folder on the hard disk.The images are contained in the [XXXCANON] folder, which is asubfolder of the [DCIM] folder on the CF card. The XXX representsa number from 100 to 998.

126
Lists of Menu Options and Messages
The following charts list the various menu contents. See Selecting Menusand Settings (p. 38) to learn how to select a setting.
FUNC. Menu
Item/Menu Screen Options ReferencePage
Sets the white balance option.• Auto*• Daylight• Cloudy• Tungsten
Sets the sensitivity at which images are recorded. • AUTO• 50*• 100
Sets the shutter speed.• 1* to 15 seconds
Sets the exposure compression.• -2 to 0* to +2
* Default setting
• Fluorescent• Fluorescent H• Custom
Sets the photo effect.• Effect Off*• Vivid• Neutral
• Low Sharpening• Sepia• BW
• 200• 400
Exposure Compression
Long Shutter
White Balance
Photo Effect
ISO Speed
p. 70
p. 71
p. 73
p. 77
p. 76

List of Menu Options and Messages 127
Item/Menu Screen Options ReferencePage
Sets the relative compression ratio used for images.• Superfine• Fine*• Normal
Sets the number of pixels used for movies.• 320 x 240 pixels*• 160 x 120 pixels
Sets the number of pixels used for images.• (Large)* 2272 x 1704 pixels• (Medium 1) 1600 x 1200 pixels• (Medium 2) 1024 x 768 pixels• (Small) 640 x 480 pixels
Resolution (Stills)
Resolution (Movies)
Compression
p. 51
p. 51
p. 51
Rec. Menu
Item/Menu Screen Options ReferencePage
* Default setting
Sets the continuous shooting mode.• Standard continuous shooting*• High-speed continuous shooting
Cont. Shooting
AiAF Sets whether or not the camera automatically select the AF frame or a fixed center AF frame.• On*• Off
p. 68
p. 57

128 List of Menu Options and Messages
Item/Menu Screen Options ReferencePage
* Default setting
Sets whether or not the optical zoom is supplemented by digital processing.• On• Off*
Digital Zoom
Self-timer Sets the duration before the self-timer delay. • 10 seconds*• 2 seconds
AF-assist Beam Sets the AF-assist Beam to on or off.• On*• Off
Review Sets the duration images display on the LCD monitor after the shutter button releases.• Off • 2*to 10 seconds (1-second increments)
Long Shutter Sets the shutter speed to slow settings.• On• Off*
p. 58
p. 36
p. 56
p. 50
p. 71

List of Menu Options and Messages 129
Play Menu
Item/Menu Screen Options ReferencePage
Protect
Rotate
Erase all
Slide Show
Protects images from accidental erasure.
Rotates images clockwise 90º or 270º in the display.
Deletes all images from a CF card (except for protected images).
Plays images in automated slide shows.
Sound Memo Adds sound memos to images.
p. 94
p. 87
p. 88
p. 96
p. 90

130 List of Menu Options and Messages
Item/Menu Screen Options ReferencePage
Print Order
Transfer Order
Selects images and the number of print copies for output to a DPOF - compatible printer or a photo developing service.
Selects the images that will be transferred to your email software.
p. 111
p. 119
Set up Menu
Item/Menu Screen Options ReferencePage
* Default setting
p. 35
–
Beep Sets whether or not a beep sounds when the shutter button is pressed.• On*• Off
A beep still sounds to warn of errors even when Off is selected.
Adjusts the brightness of the LCD monitor.• -7 to 0* to +7
Only the brightness adjustment bar displays if you press the button. If you press the or buttons, the display returns to the Set up menu. You can check the brightness in the LCD monitor while you are adjusting the setting.
LCD Brightness

List of Menu Options and Messages 131
Item/Menu Screen Options ReferencePage
Sets whether or not the camera automatically powers down after a set period of time elapses without something being pressed.• On*• Off
Auto Power Down
Sets the date and time and the date format.Date/Time
Format Formats (initializes) CF cards.
Shutter Volume Adjusts the volume of the sound played when the shutter releses. The shutter sound does not play when a movie is recording.• Off• 1• 2*
Playback Vol. Adjusts the volume of movie sounds and sound memos.• Off• 1• 2*
• 3• 4• 5
• 3• 4• 5
p. 27
p. 23
p. 97
p. 35
p. 83p. 88

132 List of Menu Options and Messages
Item/Menu Screen Options ReferencePage
Start-up Vol. Adjusts the volume of the start-up sound when the camera power is turned on.• Off• 1• 2*
Operation Vol. Adjusts the volume of the operation sound.• Off• 1• 2*
• 3• 4• 5
• 3• 4• 5
Selftimer Vol. Adjusts the volume of the self-timer sound played 2 sec. before shutter is released.• Off• 1• 2*
• 3• 4• 5
Sets how file numbers are assigned to images when new CF cards are inserted.• On• Off*
File No. Reset
Auto Rotate Sets whether or not images shot with the camera on end are automatically rotated in the display.• On*• Off
p. 26
p. 35
p. 58
p. 79
p. 78

List of Menu Options and Messages 133
My Camera MenuYou can select the start-up image and sound, shutter sound, operationsound and selftimer sound used on this camera. These are called theMy Camera settings. You can also customize the and optionsfor each item with images recorded on the CF card and newly recordedsounds or by using the supplied software. See the Software StarterGuide for details.
Item/Menu Screen Options ReferencePage
Sets the video output signal standard.• NTSC• PAL
Sets the language used in menus and messages on the LCD monitor.• English* • Italiano• Deutsch • Norsk• Français • Svenska• Nederlands • Español• Dansk • Chinese• Suomi • Japanese
You can also change the language in replay mode by holding the SET button and pressing the MENU button.
Language
Video System
p. 25
p. 121
Item/Menu Screen Options ReferencePage
* Default setting
Theme Selects a common theme for each My Camera settings item.*1
• Off• *••
p. 45
*1 For more information, see How the Beep in the (Set up) Menuand Sounds in the (My Camera) Menu Interact (p. 135).

134 List of Menu Options and Messages
Item/Menu Screen Options ReferencePage
Start-up Image Sets the image displayed when the camera power is turned on.• Off• *••
Start-up Sound Sets the sound emitted when the camera power is turned on.*1
• Off• *••
Operation Sound Sets the sound emitted when any button other than the shutter button is pressed.*1
• Off• *••
Selftimer Sound Sets the sound emitted 2 seconds before the shutter releases in self-timer mode.*1
• Off• *••
Shutter Sound Sets the sound emitted when the shutter button is pressed. There is no shutter sound for movies.*1
• Off• *••
p. 45
p. 45
p. 45
p. 45
p. 45
*1 For more information, see How the Beep in the (Set up) Menuand Sounds in the (My Camera) Menu Interact (p. 135).

List of Menu Options and Messages 135
Sounds in the (My Camera) Menu(Start-up, shutter, operation, self-timer)
● (Beep) - (Off)
● ( ) ● ( )
● ( ) ● ( )
● ( ) ● ( )
Beep Settings in the (Set up) Menu
On Off
How the Beep in the (Set up) Menu and Soundsin the (My Camera) Menu InteractTo turn off each sound, such as the start-up sound, shutter sound,operation sound and selftimer sound, the beep must first be set to [Off]in the (Set up) menu and then each sound item must be setindividually to [Off]. If the beep is set to [On], a beep will sound foreach item even if it is set to [Off] in the (My Camera) menu.
The table below shows the relationship.
● Sound emitted – Sound not emitted

136 List of Menu Options and Messages
Resetting Settings to Their Default ValuesYou can reset the menu and button settings to the default settings inone operation except for the Date /Time, Language and Video Systemsettings.
• Press the ON/OFF button until thegreen power lamp lights.
• Set the mode switch to any position.
• Press and hold the button formore than 5 seconds.
• Use the or button to select [OK].• To exit without resetting, select
[Cancel].
• White balance data recorded with the custom whitebalance function is not reset by this function (p. 74).
• Settings cannot be reset when the camera is connected to acomputer, to a direct print function compatible printer (CPseries, optional) or to a direct print function compatible BJprinter (optional).

List of Menu Options and Messages 137
List of MessagesThe following messages may appear on the LCD monitor whileshooting or replaying.
Busy... Image is being recorded to, or readfrom, CF card
No memory card You attempted to shoot or replayimages without a CF card installed.
Cannot record! You attempted to shoot an imagewithout a CF card installed.
Memory card error! CF card has experienced an anomaly.
Memory card full CF card is too full to accommodatemore images or print settings.
Naming error! The file could not be created becausethere is a file with the same name as thedirectory that the camera is attemptingto create, or the highest possible filenumber has already been reached. Inthe Rec. Menu, set the File Reset optionto On. Save all the images you wish toretain onto a computer, then reformatthe CF card. Please note that formattingwill erase all the existing images andother data.
Change the battery pack Battery charge is insufficient to operatethe camera. Replace it at once with acharged one or recharge the batterypack.
No image No images recorded on CF card.
Image too large You attempted to replay an imagelarger than 3200 x 2400 pixels or with alarge file size.
Incompatible JPEG format You attempted to replay an incompatibleJPEG file.

138 List of Menu Options and Messages
Corrupted Data You attempted to replay an image withcorrupted data.
RAW You attempted to replay an imagerecorded in the RAW format.
Unidentified Image You attempted to replay an image thatwas recorded in a special format(proprietary format used by the cameraof another manufacturer, etc.) or amovie clip recorded by another camera.
Cannot magnify! You attempted to magnify an imagewhich was photographed with anothercamera, recorded in a different format, oredited on a computer.
Cannot rotate You attempted to rotate an image whichwas photographed with another camera,recorded in a different format, or editedon a computer.
Incompatible WAVE format A sound memo cannot be added tothis image since the format of theexisting sound memo is incorrect.
Cannot register this image! You attempted to add a start-upimage that was created with anothercamera.
Protected! You attempted to erase a protected image.
Too many marks Too many images have been marked withprint settings, transfer settings or slideshow settings. Cannot process any more.
Unselectable image You attempted to set the print settingsfor a non-JPEG file.
Exx: (xx: number) Camera malfunction. Turnthe power off and then back on, thenshoot or replay. A problem exists if theerror code reappears. Note the numberand contact your Canon CustomerSupport Help Desk. If an error codedisplays directly after taking a picture,the shot may not have been recorded.Check image in replay mode.

List of Menu Options and Messages 139
List of Messages Displayed while a Direct Print FunctionCompatible Printer (CP series) is ConnectedThe following messages may appear on the camera’s LCD monitor whilea direct print function compatible printer (sold separately) is connected.
No Paper Paper cassette is empty or incorrectlyinstalled. Paper feed may not beoperating correctly.
No Ink The ink cassette is empty or missing.Incompatible paper size You attempted to print with a paper
size incompatible with this camera.
Incompatible ink size You attempted to print with an inkcartridge type incompatible with thiscamera.
Ink Cassette Error There is a problem with the ink cassette.
Paper and ink do not match The paper and ink are from differentsets.
Paper Jam Paper jammed during printing.Paper has been changed The paper size was changed between
the time the Print Style menu wasdisplayed and the time printing started.
Recharge the printer battery The printer’s battery is out of power.
Communication Error A communication error has occurred.
Readjust trimming You attempted to print the image witha different style than the one usedwhen the trimming settings were set.
Cannot print! You attempted to print an image shot bya different camera, one recorded in anincompatible format, or one downloadedto and edited with a computer.
Could not print XX images You attempted to print XX number ofimages with DPOF print settings that wereshot by a different camera, recorded in anincompatible format, or downloaded toand edited with a computer.

140 List of Menu Options and Messages
List of Messages Displayed while a Direct Print FunctionCompatible Bubble Jet Printer is Connected
The following messages may appear on the camera’s LCD monitor while a directprint function compatible Bubble Jet printer (sold separately) is connected.
On Bubble Jet Printers with operation panels, check the errornumber displayed on the panel and refer to the Bubble Jet PrinterQuick Start Guide.
Printer in use Printer is busy printing from a memorycard in computer or printer. Printer willautomatically start printing from camerawhen the current print queue empties.
Printer warming up Printer is warming up. When it is ready,the printer will start printing automatically.
No printhead No printhead installed in printer.
Printer cover open Secure the printer front cover.
Media type error You selected a paper type incompatiblewith the printer. Select a compatiblepaper type in the Print Style menu.
Paper lever error Adjust the paper thickness lever to theproper position.
Low ink level Ink tank needs replacement soon.Prepare a new ink tank. Select [Continue]in the error message to resume printing.(This message will not appear on somemodels.)
Waste tank full Restart printing by pressing RESUME/CANCEL button on printer, but requesta replacement waste ink tank from aservice center (see printer Quick StartGuide or the Contact List provided withthe printer) soon.
Printer error Turn printer off and on again. If errorpersists, consult service center listed inprinter Quick Start Guide or in theContact List provided with the printer.

141
Appendices
Using an AC Adapter Kit (Sold Separately)It is best to power the camera with AC Adapter Kit ACK500 (soldseparately) when you are using it for long periods of time or connect-ing it to a computer.
Turn the camera power off before connecting ordisconnecting the AC adapter.
• Connect the power cord to thecompact power adapter first and thenplug the other end into the poweroutlet.
• Open the battery cover and press thebattery lock in the direction shownwhile inserting DC Coupler DR-500.Insert the DC coupler all the way inuntil the battery lock clicks. Slide thebattery cover closed.
• Open the DC coupler terminal coverand attach the cord to the DC terminal.
• After you have finished using thecamera, unplug the AC adapter fromthe power outlet.
Use of an AC adapter kit other than ACK500 may cause amalfunction in the camera or kit.
DC CouplerDR-500
BatteryLock
Compact Power AdapterCA-PS500

142 Appendices
Using a Car Battery Charger (Optional)
Car Battery Charger CBC-NB1 (sold separately) can be used to chargebattery packs from an automobile’s cigarette lighter socket.
Always ensure that the automobile’s engine is running whenyou use the car battery charger. Use of it with the engine offmay flatten the battery in some automobiles. Always unplugthe car battery charger before turning off the engine.
• With the engine running, plug the carbattery cable into the cigarette lightersocket and the battery charger.
• Insert the battery pack all the way intothe battery charger as shown.
• The charge indicator will light red whilethe battery pack is charging. It willchange to green when the charge iscomplete.
• After charging, unplug the car batterycable from the cigarette lighter socketand remove the battery pack.
• The battery will stop charging whenever you turn theengine off, so be sure to unplug the car battery cable fromthe cigarette lighter socket.
• Wait until the engine is running again to plug the carbattery cable into the cigarette lighter socket.
• The car battery charger can only be used in a negativeground car. It cannot be used in a positive ground car.
To the cigarettelighter socket
Charge Indicator

Appendices 143
Camera Care and MaintenanceUse the following procedures to clean the camera body, lens,viewfinder and LCD monitor.
Never use thinners, benzene, synthetic cleansers or water toclean the camera. These substances may distort or damagethe equipment.
Camera BodyGently wipe dirt off the camera body with a soft cloth or eyeglass lenswiper.
LensFirst use a lens blower brush to remove dust and dirt, then remove anyremaining dirt by wiping the lens lightly with a soft cloth.
• Never use synthetic cleansers on the camera body or lens.• If dirt remains, contact the closest Canon Customer Support
Help Desk as listed on the separate Canon CustomerSupport leaflet.
Viewfinder and LCD MonitorUse a lens blower brush to remove dust and dirt. If necessary, gentlywipe with a soft cloth or an eyeglass lens wiper to remove stubborn dirt.
Never rub or press strongly on the LCD monitor. These actionsmay damage it or lead to other problems.

144 Appendices
• Press the ON/OFF button for a moment.
• Confirm that the battery cover and CF card slot cover are securely closed.
• Insert a fully charged battery into the camera.
• Use the AC Adapter Kit ACK500 (sold separately).
• Wipe the terminals with a clean dry cloth.
• Set the mode swith to .
• Wait until the flash charges. You can press the shutter button when the indicator lights orange.
• Insert a new CF card.• If required, download the
images to a computer and erase them from the CF card to make space.
• Format CF card (See Formatting CF Cards p. 97).
• If reformatting doesn’t work, the CF card logic circuits may be damaged. Consult the nearest Canon Customer Support Help Desk.
Power is not turned on
Battery cover or CF card slot cover is open
Insufficient battery voltage
Poor contact between camera and battery terminals
Mode switch is set to (Replay)
Flash is charging
CF card is full
CF card is not formatted correctly
Problem Cause Solution
Camera will not operate
Camera will not record
Troubleshooting

Appendices 145
• First close the battery cover or CF card slot cover and then turn the power off.
• First close the battery cover or CF card slot cover and then turn the power off.
• Replace the battery pack with a new one.
• Replace the battery pack with a new one.
• Insert battery pack securely into battery charger.
• Ensure that battery charger plug is securely plugged into the power outlet.
• Be careful not to move the camera while pressing the shutter button.
• Be careful not to block the AF-assist Beam with fingers or other items.
Problem Cause Solution
Lens will not retract
Battery pack consumed quickly
Battery pack will not charge
Image is blurred or out of focus
Battery cover or CF card slot cover was opened with power on
Battery cover or CF card slot cover was opened while recording to the CF card (warning signal sounds)
Battery life exceeded if battery pack loses its charge quickly at normal temperature (23º C/73º F)
Battery pack life exceeded
Poor contact between battery pack and battery charger
Camera moved
Autofocus function hampered by obstruction to AF-assist Beam

146 Appendices
Problem Cause Solution
• Set the AF-assist Beam to on (p. 128).
• Ensure there is at least 46 cm (1.5 ft.) between the camera lens and subject.
• Use the Macro mode to shoot close-ups between 30 and 46 cm (11.8 in. to 1.5 ft.) from the lens (5 cm (2 in.) when set to wide angle).
• Use the Infinity mode to shoot distant subjects.
• Use the focus lock to shoot. See Locking the Focus (AF Lock).
• Set the flash to on.
• Set the exposure compensation to a positive (+) setting or use the spot metering function.
• Shoot within 3.5 m (11.5 ft.) of the subject at the maximum wide angle or 2 m (6.6 ft.) of the subject at the telephoto end setting when using the flash.
• When using the flash, stay at least 30 cm (11.8 in.) from the subject.
• Set the exposure compensation to a negative (-) setting or use the spot metering function.
• Change the shooting angle.
• Set the flash to off.
Image is blurred or out of focus
Subject in recorded image is too dark
Subject in recorded image is too bright
AF-assist Beam is set to off
Subject is out of focal range
The subject is hard to focus on
Insufficient light for shooting
Subject is dark in contrast to the background
Subject is too far away for flash to reach
Subject is too close, making the flash too strong
Subject is bright in contrast to the background
Light is shining directly on the subject or reflected off the subject into the camera
Flash is set to on

Appendices 147
Problem Cause Solution
A red band appears on the LCD monitor
White dots appear on the image
Flash does not fire
Image not showing on TV monitor
Zoom does not work
Reading images from CF card is slow
Recording images to CF card takes a long time
• This is a normal occurrence in devices containing CCDs and does not constitute a malfunction. (This red bar of light will not be recorded when shooting still photos, but it will be recorded when shooting movies.)
• This is a phenomenon that occurs with digital cameras and does not constitute a malfunction.
• Set the flash to on.
• Set the video system to the appropriate setting, NTSC or PAL, for your TV (p. 133).
• The output will not appear on a TV in (Stitch Assist) mode. Shoot in a different mode.
• Adjust the zoom before shooting a movie.
• Use a CF card formatted in your camera. See Formatting CF Cards (p. 97).
Subject is too bright
Light from the flash has reflected off dust particles or insects in the air. This occurs more frequently when shooting at the wide-angle end.
Flash is set to off
Incorrect video system setting
Shooting mode set to (Stitch Assist)
Zoom lever pressed during movie recording
CF card was formatted in another device

148
Specifications
All data is based on Canon’s standard testing methods.Subject to change without notice.
PowerShot S400 DIGITAL ELPH / DIGITAL IXUS 400Camera Effective Pixels: Approx. 4 million
Image Sensor: 1 /1.8 in. CCD(Total number of pixels: approx. 4.1 million)
Lens: 7.4 (W) - 22.2 (T) mm(35 mm film equivalent: 36-108mm)
F2.8 (W) - 4.9 (T)
Digital Zoom: Maximum approx. 3.6 x (Maximum approx. 11 xwith optical zoom)
Optical Viewfinder: Real-image optical zoom viewfinder
LCD Monitor: 1.5 in. low-temperature polycrystalline silicon TFTcolor LCD, Approx. 118,000 pixels
Autofocus: TTL 9-point AiAF/TTL 1-point center AFFocus lock possible
Focusing Range: Normal: 46 cm (1.5 ft.) - ∞Macro AF: 5-46 cm (2.0 in. -1.5 ft.) (W)
30-46 cm (11.8 in. -1.5 ft.) (T)
Shutter: Mechanical + electronic
Shutter Speed: 15- 1 / 2000 sec.• 15 - 1 sec. possible in long shutter mode• Noise reduction processing on speeds between
15 - 1.3 sec.
Light Metering System: Evaluative metering/Center-weighted averaging/Spot metering
Exposure Control: Program AE
Exposure Compensation: +/- 2 stops in 1/3-stop increments
Sensitivity: Auto/ISO 50/100/200/400 equivalents
White Balance: TTL auto /preset (daylight, cloudy, tungsten,fluorescent, fluorescent H) or custom white balance
Flash: Red-eye reduction auto/auto/on/off/slow-synchro(W): wide angle (T): telephoto

Specifications 149
Flash Shooting Range: Normal mode: 46 cm - 3.5 m (1.5-11.5 ft.) (W)46 cm - 2.0 m (1.5- 6.6 ft.) (T)
Macro Mode: 30- 46 cm (11.8 in.-1.5 ft.) (W/T)
Shooting Modes: Auto /manual / stitch assist /movie
Continuous Shooting: Approx. 1.5 images /sec. (2.5 images /sec. in high-speed mode)(Large/Fine mode, LCD monitor off)
Self-timer: Shoots after approx. 10 sec. or approx. 2 sec.
PC Connected Shooting: Available (USB connection only. Exclusive softwareprogram “RemoteCapture” is included in thecamera kit.)
Recording Media: CompactFlash™ card (Type I)
File Format: Design rule for Camera File System, DPOF-compliant
Image Recording Format Still images: JPEG (Exif 2.2)*1
Movies: AVI - Image data: Motion JPEG- Audio data: WAVE (monaural)
Compression: Superfine / fine /normal
Number of Recording Pixels: Still images: large 2272 x 1704 pixelsmedium 1 1600 x 1200 pixelsmedium 2 1024 x 768 pixelssmall 640 x 480 pixels
Movies: 320 x 240 pixels (Approx. 3 min.)160 x 120 pixels (Approx. 3 min.)Approx. 15 frames / sec.• The data in parentheses refer to the
maximum movie length per clip.
Replay Modes: Single image view / index view (9 thumbnails)/zoomed view (LCD monitor zooms images up to10 x ) / slide show / printing with Card Photo PrinterCP-100, CP-10 or Bubble Jet Printer (Direct Print)
Display Languages: English, Deutsch, Français, Nederlands, Dansk,Suomi, Italiano, Norsk, Svenska, Español, Chineseand Japanese
My Camera Settings (Customizing) : Start-up image, start-up sound, shutter sound,operation sound and selftimer sound can becustomized with the following procedures.
1. Using the images and sounds recorded on the camera.
2. Using the downloaded data from your computer usingthe supplied software.
(W): wide angle (T): telephoto

150 Specifications
Interface: USB (mini-B, PTP [Picture Transfer Protocol]),Audio / Video output (NTSC or PAL selectable,Monaural audio)
Power Source: Rechargeable Lithium-ion battery(type: NB-1LH / NB-1L)
AC Adapter Kit ACK500Car Battery Charger CBC-NB1
Operating Temperatures: 0º- 40º C (32º - 104º F)
Operating Humidity: 10% -90%
Dimensions (w x h x d): 87.0 x 57.0 x 27.8 mm (3.4 x 2.2 x 1.1 in.)(excluding protrusions)
Weight: Approx. 185 g (6.5 oz.)(camera body only)
*1 This digital camera supports Exif 2.2 (also called “Exif Print”). Exif Print is a standardfor enhancing the communication between digital cameras and printers. Byconnecting to an Exif Print-compliant printer, the camera’s image data at the timeof shooting is used and optimized, yielding extremely high quality prints.
Battery Capacity
Battery Pack NB-1LH (fully charged)
• Excludes movie data.• At low operating temperatures, the battery performance may drop and the
low battery icon may appear sooner than at high temperature. To improveperformance at these temperatures, warm the battery in your pocket justbefore using it in the camera.
Test CriteriaShooting: Normal temperature (23º C/73º F), alternating between wide
angle and telephoto every 20 seconds, flash used once in fourshots, power turned off and on again after every eighth shot,LCD monitor set to default brightness.
Replaying: Normal temperature (23º C/73º F), continuous replay at 3seconds per image, LCD monitor set to default brightness.
Number of recordable imagesLCD monitor on Approx. 190 images
LCD monitor off Approx. 440 images
Replay Approx. 140 minutes

Specifications 151
FC-16M FC-32M FC-64M FC-128M FC-256MH
7 14 30 61 123 (2272 x 1704 pixels) 13 27 54 110 222
26 54 110 220 443
14 30 61 122 246
(1600 x 1200 pixels) 26 54 109 219 440
52 108 217 435 868
25 53 107 215 431
(1024 x 768 pixels) 46 94 189 379 762
84 174 349 700 1390
58 120 241 482 962
(640 x 480 pixels) 94 196 393 788 1563
165 337 676 1355 2720
MOVIE (320 x 240 pixels) 44 sec. 91 sec. 183 sec. 368 sec. 735 sec.
(160 x 120 pixels) 118 sec. 242 sec. 486 sec. 973 sec. 1954 sec.
CF Cards and Estimated Capacities (Recordable Images)
• The maximum movie clip length is approximately 3 min*. The times shown are themaximum continuous recording times.
• (Large), (Medium 1), (Medium 2), (Small), and indicate therecording resolution.
• (Superfine), (Fine) and (Normal) indicate the compression setting.• The FC-256 MH CF card is not sold in some regions.
CompressionResolution
(2272 x 1704 pixels) 2002 KB 1116 KB 556 KB
(1600 x 1200 pixels) 1002 KB 558 KB 278 KB
(1024 x 768 pixels) 570 KB 320 KB 170 KB
(640 x 480 pixels) 249 KB 150 KB 84 KB
Movies (320 x 240 pixels) 330 KB/ sec.
(160 x 120 pixels) 120 KB/ sec.
Image File Sizes (Estimated)

152 Specifications
CompactFlash™ CardCard Slot Type: Type I
Dimensions: 36.4 x 42.8 x 3.3 mm (1.4 x 1.7 x 0.1 in.)
Weight: Approx. 10 g (0.4 oz.)
Battery Pack NB-1LHType: Rechargeable Lithium Ion Cell
Nominal Voltage: 3.7 V
Typical Capacity: 840 mAh
Cycle Life: Approx. 300 times
Operating Temperatures: 0 - 40 ºC (32 - 104 ºF)
Dimensions: 32.3 x 49.8 x 10.6 mm (1.3 x 2.0 x 0.4 in.)
Weight: Approx. 29 g (1.0 oz.)
Battery Charger CB-2LS/CB-2LSERated Input: 100-240 V AC (50 / 60 Hz)
0.075 A (100 V) -0.045 A (240 V)
Rated Output: 4.2 V DC / 0.5 A
Charging Time: Approx. 130 minutes*
Operating Temperatures: 0 - 40 ºC (32 - 104 ºF)
Dimensions: 90.4 x 56.0 x 28.0 mm (3.6 x 2.2 x 1.1 in.)
Weight: Approx. 78 g (2.8 oz.)
* When charging Battery Pack NB-1LH
Compact Power Adapter CA-PS500(Included with the optional AC Adapter Kit ACK500)
Rated Input: 100 - 240 V AC (50 / 60 Hz)0.17 A
Rated Output 4.3 V DC / 1.5 A
Operating Temperatures: 0 - 40 ºC (32 -104 ºF)
Dimensions: 42.6 x 104.4 x 31.4 mm (1.7 x 4.1 x 1.2 in.)
Weight: Approx. 180 g (6.3 oz.)

Specifications 153
Car Battery Charger CBC-NB1 (Optional)
Rated Input: DC 12-24 V, 4.3 W
Rated Output: 4.2 V DC, 0.55 A
Charging Time: Approx. 130 minutes*
Operating Temperatures: 0-40 º C (32-104 º F)
Dimensions: 90.4 x 56.0 x 28.0 mm (3.6 x 2.2 x 1.1 in.)
Weight: Approx. 106 g (3.7 oz.)* When charging Battery Pack NB-1LH

154
Index
AAC Adapter Kit (ACK500) 141AE Lock 66AF Frame 32, 68AF-assist Beam 36AF Lock 64AiAF 34Autofocus 34, 68Autofocus Lock 64Auto Mode 49Auto Power Down 27Auto Rotate 78AV Cable AVC-DC100 121
BBattery
Battery Pack Charge 18Capacity 150Handling 19Installing 20Recharging 18Battery Pack 18
CCare and Maintenance 143CF Card
Capacities 151Formatting 97Handling 23Installing 22
Car Battery Charger 142Compression 51Continuous Shooting 57Custom White Balance 74
DDate/Time 23DIGITAL Terminal 103, 104, 123Digital Zoom 37Direct Interface Cable
DIF-100 103
Connecting to a Bubble JetPrinter 103
Direct Print function CompatiblePrinter 102
Direct Printing 99DPOF 99, 100, 111, 119DPOF Print Order 99
Printing 111Print Style 114Resetting 116Selecting Images 111DPOF Transfer Order 119
Downloading Images to a Computer122
EErasing
All Images 96Single Images 95
Exposure 66, 70
FFE Lock 67File Number 79File Sizes 151Flash 53Focus Lock 64Formatting 97Functions Available in Each Shooting
Mode 160
HHistogram 33
IImage File Sizes 151Index Replay 82Indicator 17ISO Speed 77

Index 155
LLanguage 25LCD Monitor
Information Displayed 31Using the LCD Monitor 29
MMacro Mode 55Magnifying 81Manual Mode 49Menu
Play 129Rec. 127Set up 130
MessagesList of Messages 137List of Messages Displayed while a
Direct Print Function CompatibleBubble Jet Printer is Connected140
List of Messages Displayed while aDirect Print Function CompatiblePrinter is Connected (CP series)139
Metering Modes 69Mode Switch 16, 28Movie
Movie Mode 62, 83Replaying 80Editing 85
My Camera MenuChanging 45File Format 48Registering 46
My Camera Settings 45
OOn/Off Button 26
PPhoto Effect 76Play Menu 129Power On/Off 26Power Lamp 16Power Save 27Print Settings (Direct Print Printers)
Number of Print Copies 107Print Area (Trimming) 109Print Style 107Selecting Images 105
Protect 94
RRec. Menu 127Red-Eye Reduction Function 54Replay Mode 30Resolution 51Review Duration 50Rotate 87
SSelf-Timer 58Set up Menu 130Shooting Mode 28, 49Shooting Mode Dial 49Shutter Button 35
Pressing Fully 36Pressing Halfway 35
Shutter Speed 71Single Image Replay 80Slide Show 90
Play Time 93Repeat Settings 93
Spot AE Point Frame 32, 69Stitch Assist Mode 59
TTelephoto 37
UUSB Cable 123
VVideo Output System 121Viewfinder 34Viewing
Single Image Replay 80Index Replay 82
WWhite Balance 73Wide Angle 37Wrist Strap 15

156
Disclaimer• While every effort has been made to ensure that the information contained in this
guide is accurate and complete, no liability can be accepted for any errors oromissions. Canon reserves the right to change the specifications of the hardwareand software described herein at any time without prior notice.
• No part of this guide may be reproduced, transmitted, transcribed, stored in aretrieval system, or translated into any language in any form, by any means,without the prior written permission of Canon.
• Canon makes no warranties for damages resulting from corrupted or lost datadue to a mistaken operation or malfunction of the camera, the software, theCompactFlash™ cards (CF cards), personal computers, peripheral devices, or useof non-Canon CF cards.
Trademark Acknowledgments• Canon, PowerShot and Bubble Jet are trademarks of Canon, Inc.• CompactFlash is a trademark of SanDisk Corporation.• iBook and iMac are trademarks of Apple Computer, Inc.• Macintosh, PowerBook, Power Macintosh and Quick Time are trademarks of Apple
Computer, Inc., registered in the United States and other countries.• Microsoft, Windows and Windows NT are either registered trademarks or trademarks of
Microsoft Corporation in the United States and/or other countries.• Other names and products not mentioned above may be registered trademarks or
trademarks of their respective companies.
Copyright © 2003 Canon Inc. All rights reserved.

157
FCC Notice(Digital Camera, Model PC1038)
This device complies with Part 15 of the FCC Rules. Operation is subject to thefollowing two conditions;(1) this device may not cause harmful interference, and(2) this device must accept any interference received, including interference that maycause undesired operation.
Note: This equipment has been tested and found to comply with the limits for Class Bdigital devices, pursuant to Part 15 of the FCC rules. These limits are designed toprovide reasonable protection against harmful interference in a residential installation.This equipment generates, uses and can radiate radio frequency energy and, if notinstalled and used in accordance with the instructions, may cause harmful interferenceto radio communications. However, there is no guarantee that interference will notoccur in a particular installation. If this equipment does cause harmful interference toradio or television reception, which can be determined by turning the equipment offand on, the user is encouraged to try to correct the interference by one or more of thefollowing measures:
• Reorient or relocate the receiving antenna.• Increase the separation between the equipment and receiver.• Connect the equipment into an outlet on a circuit different from that to which the
receiver is connected.• Consult the dealer or an experienced radio/TV technician for help.
The cable with the ferrite core provided with the digital camera must be used withthis equipment in order to comply with Class B limits in Subpart B of Part 15 of theFCC rules.
Do not make any changes or modifications to the equipment unless otherwisespecified in the manual. If such changes or modifications should be made, you couldbe required to stop operation of the equipment.
Canon U.S.A. Inc.One Canon Plaza, Lake Success, NY 11042, U.S.A.Tel No. (516) 328-5600
Canadian Radio Interference RegulationsTHIS CLASS B DIGITAL APPARATUS MEETS ALL REQUIREMENTS OF THE CANADIANINTERFERENCE CAUSING EQUIPMENT REGULATIONS.
Réglementation canadienne sur les interférences radioCET APPAREIL NUMERIQUE DE LA CLASSE B RESPECTE TOUTES LES EXIGENCES DUREGLEMENT SUR LE MATERIEL BROUILLEUR DU CANADA.

158
MEMO

159
MEMO

160
Functions Available in Each Shooting ModeThe chart below is a reference for the settings available for various shootingconditions. The settings selected in each shooting mode are saved after youfinish shooting.
p. 51
p. 51
p. 51
p. 51
p. 51
p. 51
p. 51
p. 51
p. 51
p. 53
p. 53
p. 53
p. 53
p. 53
p. 55
p. 55
p. 64
p. 66
p. 67
-
p. 57
p. 57
p. 58
p. 58
Reference Page
Resolution
Compression
Flash
Macro Mode
Infinity Mode
Focus Lock
AE Lock
FE Lock
ShootingMethod
Large
Medium 1
Medium 2
Small
Movie
Movie
Superfine
Fine
Normal
Auto
Red-Eye Reduction Auto
On
Off
Slow-Synchro
Single
Standard continuous shooting
High-speed continuous shooting
10-sec. self-timer
2-sec. self-timer
Function Auto Manual StitchAssist
Movie
●*
●
●
●
-
-
●
●*
●
●
●*
●
●
●
●
●
●
●
●
●*
●
●
●
●
●*
●
●
●
-
-
●
●*
●
●
●*
-
●
-
●
-
-
-
-
●*
-
-
●
●
-
-
-
-
●*
●
-
-
-
-
-
-
●
-
●
●
-
-
-
●*
-
-
●
●
▲*
▲
▲
▲
-
-
▲
▲*
▲
-
-
▲
▲*
▲
▲
▲
-
-
-
▲*
-
-
▲
▲

161
p. 68
p. 36
p. 56
p. 70
p. 69
p. 69
p. 69
p. 71
p. 73
p. 76
p. 77
p. 78
Reference Page
Autofocus Modes
AF-assist Beam
Digital Zoom
Exposure Compensation
Long Shutter
White Balance
Photo Effect
ISO Speed
Auto Rotate
Function Auto Manual StitchAssist
Movie
●
●
●
●
●
●
●
●
●
●
●
●
-
●
●
-
-
-
-
-
-
-
-(1)
●
-
●
-
●
-
-
-
-
●
●
-(1)
-
-
▲
-
▲
-
-
-
-
▲
▲
-(1)
▲
Light Metering Method
Evaluative
Center-Weighted Averaging
Spot Metering
* Default setting.● Setting available.▲ Setting can only be selected for the first image.
■ (Shaded Area): Setting is memorized even when the camera power isshut off.
(1) The ISO speed is automatically set.With the exception of the [Date / Time], [Language] and [Video System]settings, all the other menu settings and changes made with the camerabuttons can be reset to the default values in a single operation (p. 136).

CDI-E081-010 XX01XXX.X © 2003 CANON INC. PRINTED IN JAPAN