calorimetry: heat of neutralisation - edaq · calorimetry: heat of neutralisation ... the most...
TRANSCRIPT
Teaching Experiment EXP009
Heat of Neutralisation Page 1 of 15 TEXP009_0405
Calorimetry: Heat of Neutralisation
In this experiment, the heat of neutralisation of an acid – base reaction is measured using a
simple self calibrating “coffee cup” calorimeter and an e-corder unit. A suitable reaction for this
determination is solid NaOH being neutralised in excess HCl solution.
1. Aim
To experimentally determine the enthalpy change of an acid-base reaction, otherwise known as
the heat of neutralisation.
2. Background
When solid NaOH is added to an aqueous HCl solution, the following two processes occur, each
releasing energy in the form of heat.
NaOH(s)
Na(aq)
+ + OH(aq)
- + Hdissolution
OH(aq)
- + H(aq)
+ H2O + H
neutralisation
From the first law of thermodynamics the total enthalpy change ( Htotal) is the sum of the
enthalpy change of dissolution ( Hdissolution) and the enthalpy change of neutralisation
( Hneutralisation).
Hence
H
neutralisation= H
total- H
dissolution
The most common device for measuring the enthalpy change of a reaction, is the adiabatic bomb
calorimeter. These are constant-volume reaction vessels designed to prevent heat exchange with
their surroundings. As a calorimeter is adiabatic, the change in temperature ( T) of the
calorimeter is proportional to the heat (qv) that the reaction releases or absorbs. Therefore, by
measuring T we can determine qv and hence the change in internal energy ( U). In reactions
that only involve solids and liquids, the volume changes are miniscule and the values for U and
the enthalpy change H are almost identical.
In this experiment a simple “coffee cup” calorimeter which is shown in Figure 2.1 is used.
The calorimeter is made by placing two styrofoam coffee cups inside one another, and covering
with another inverted cup. A resistance heater passes through the lid of the inverted cup in a
manner that when in use, the heater pad is completely immersed in solution. The heater pad also
does not touch the sides of the vessel, so all heat is exchanged with the solution.
Even heating is achieved by mixing the solution with a magnetic stirrer and to monitor
temperature, a T-type thermocouple probe in inserted through the lid.
…… (2.1)
…… (2.2)
…… (2.3)

Teaching Experiment EXP009
Heat of Neutralisation Page 2 of 15 TEXP009_0405
As some heat is absorbed by the components of the calorimeter, the best way to convert T to
qv is by calibrating the calorimeter using a process of known energy output and determining the
calorimeter constant (C) with the relationship
q
v = C T
In this experiment, C is determined electrically by applying a potential (V) across the heater with
resistance (R) for a known period of time (t)
q
e =
V2t
R
Prior to the laboratory class, the instructor will measure the resistance of each of the heaters with
an accurate multimeter and mark the value on the outside of the calorimeter.
Figure 2.1 The coffee cup calorimeter
3. Hardware Required
Per Group:
• computer system with Chart and Thermocouple extension installed
• e-corder unit
• EP306 Thermocouple Pod
…… (2.4)
…… (2.5)
Resistance Heater
T-type
ThermocoupleProbe
2 170 mL
Styrofoam coffee
Magnetic stirrer
Solution mixedwith stirrer bar
BNC to alligatorclip cable
ToThermocouple
Pod
To e-corder
Inverted coffeecup with lid

Teaching Experiment EXP009
Heat of Neutralisation Page 3 of 15 TEXP009_0405
• coffee cup calorimeter*
• ET1400 T-type Thermocouple Probe
• resistance heater
• BNC T-piece
• BNC to BNC cable
• BNC cable terminating in two alligator clips
• magnetic stirrer with 10 mm stirrer bar
• retort stand with boss head and clamp
• tweezers
• watch glass
• 2 25 mL pipettes
• pipette bulb
• 2 250 mL beakers
• a box of lint free tissue
*See instructors notes for construction
Per Class:
• electronic balance (0.0001 g readability)
• dessicator jar
• multimeter
• printer
4. Reagents Required
• 200 mL distilled water
• 150 mL 0.1 M HCl
• NaOH pellets†
† Do not retrieve NaOH pellets from the dessicator until the group is ready to perform the
dissolution and neutralisation reactions. Retrieve and weigh each pellet immediately prior to use.
5. Safety Notes & Instrument Care
• NaOH pellets are caustic. Avoid contact with skin!
• Wear gloves and protective eyewear throughout the experiment
• Avoid spilling liquids on the hardware by mixing reagents away from the units
Teaching Experiment EXP009
Heat of Neutralisation Page 4 of 15 TEXP009_0405
• Rinse the tip of the thermocouple probe and the pad of the heater with distilled water
after use
6. Procedure
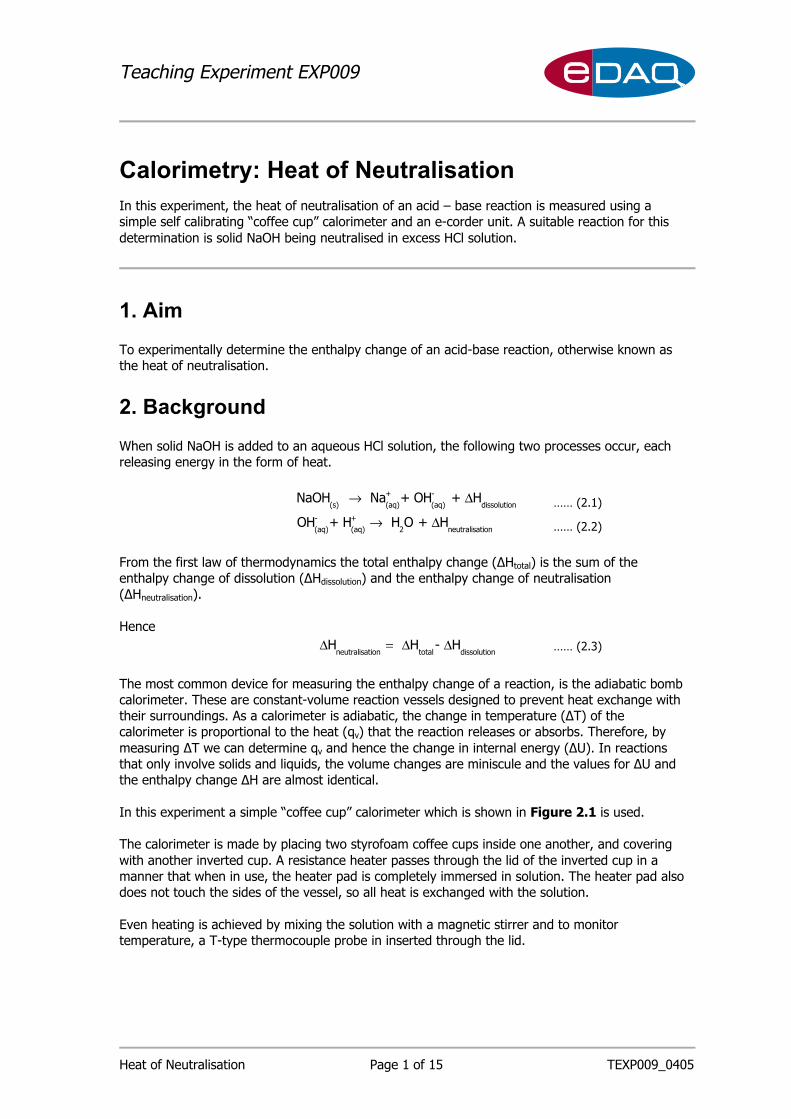
6.1 Calorimeter Setup
6.1.1 Place one coffee cup inside the other and place the cups onto the magnetic stirrer.
Secure the cups using the a retort stand and clamp and place the stirrer bar into the
cups.
6.1.2 Pipette 25 mL of distilled water into the calorimeter. Set the magnetic stirrer to a
moderate rate of stirring.
6.1.3 Invert the cup with the thermocouple probe and resistance heater emerging out of
the lid, and place on top of the other cups. Make sure that the tip of the probe is at
least 5 mm from the heater pad, and that both the pad and thermocouple tip will be
immersed when 25 mL of solution is placed into the calorimeter.
6.1.4 Connect the plug of the T-type thermocouple into the rear of the Thermocouple Pod.
The Thermocouple pod should be plugged into the DIN socket corresponding to
channel 1 of the e-corder.
6.1.5 Plug a BNC T-piece to the + output of the e-corder. Using a BNC to BNC cable,
connect one half of the T-piece to channel 2 of the e-corder. Attached the BNC
connector of the cable terminating in two alligator clips to the other half of the
T-piece. This splits the voltage output, enabling the voltage passed across the heater
to be recorded simultaneously by Chart.
e-corder 201
K-type Pod
Figure 6.1 e-corder setup
Coffee cupcalorimeter
e-corder
BNC T-piece
Thermocouple Pod

Teaching Experiment EXP009
Heat of Neutralisation Page 5 of 15 TEXP009_0405
6.2 General Chart Settings
6.2.1 Open Chart and load the settings file HofN.edset in the experiments gallery.
The settings for this file are as follows:
Number of Channels 2
Sampling 2 /s
Digital filter 1 Hz low pass
Initial temperature range 50 °C*
*T-type thermocouple set in the Thermocouple extension dialog box (automatic
calibration of the T-type thermocouple)
The file HofN.edset also includes a macro called Calorimeter Calibration, which
defines the potential profile to be applied to the heater.
6.2.2 Check that Thermocouple… is selected in the Channel Functions pop-up menu for
channel 1. In the Thermocouple extension dialog box, the T-type thermocouple radio
button should be selected, the offset check box should NOT be selected at this stage
and temperature should be recorded in °C to 3 decimal places.
6.2.3 Close the Thermocouple extension dialog box, click on Start, record the background
temperature for a couple of seconds and make a note of this temperature.
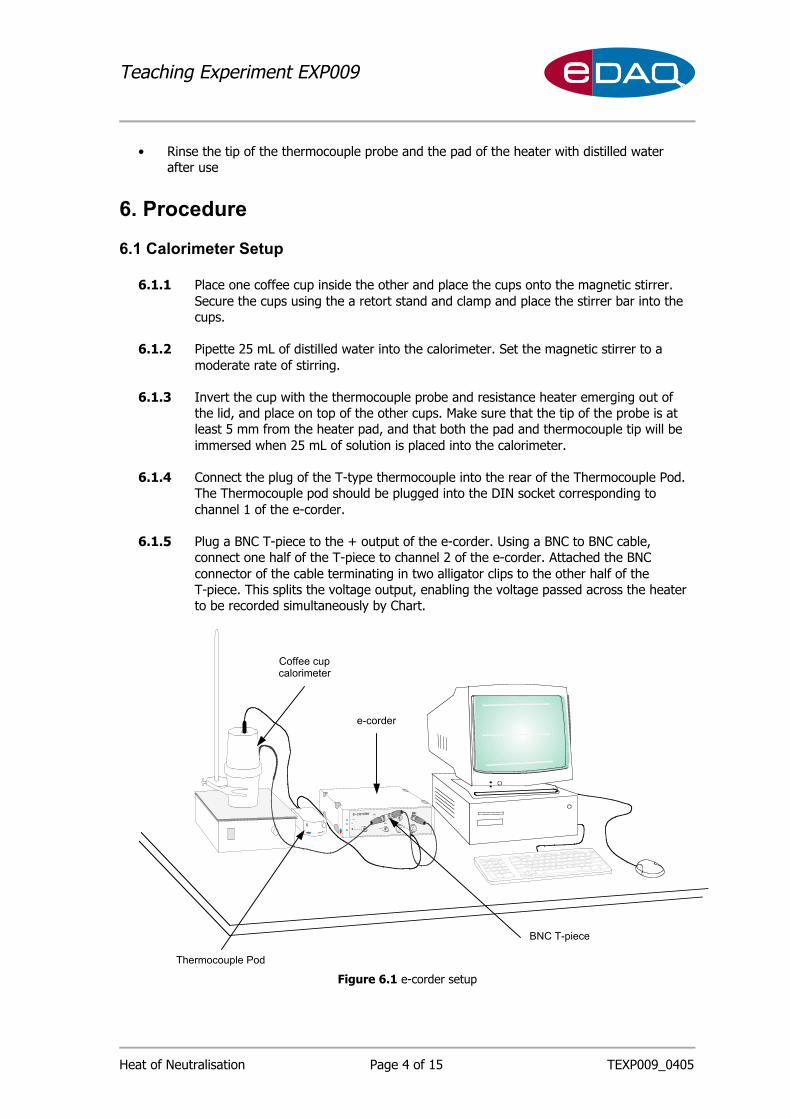
6.2.4 In this experiment, the offset temperature mode of the Thermocouple Pod is used to
measure temperature changes rather than absolute temperature. Using this mode,
small temperature fluctuations can be measured with higher sensitivity by taking
advantage of smaller temperature range settings. To switch to temperature offset
mode, firstly choose Thermocouple Pod… under the Channel Functions pop-up
menu. In the Thermocouple Pod dialog box, select the Offset radio box and an
offset temperature range of 25 °C. Use the knob on the front of the thermocouple
to adjust the signal to approximately 0. Figure 6.2 shows a screenshot of this
process.
Teaching Experiment EXP009
Heat of Neutralisation Page 6 of 15 TEXP009_0405
Figure 6.2 Adjusting the Thermocouple Pod output in Offset mode
6.2.5 In the Thermocouple Pod dialog box, select an offset temperature range of 5 °C.
Close the Thermocouple Pod dialog box and open the Thermocouple extension
dialog box again. Select the Offset and the New Blocks checkbox’s and enter the
temperature recorded in 6.2.3 as the initial temperature (Ti).
6.3 Calorimeter Calibration
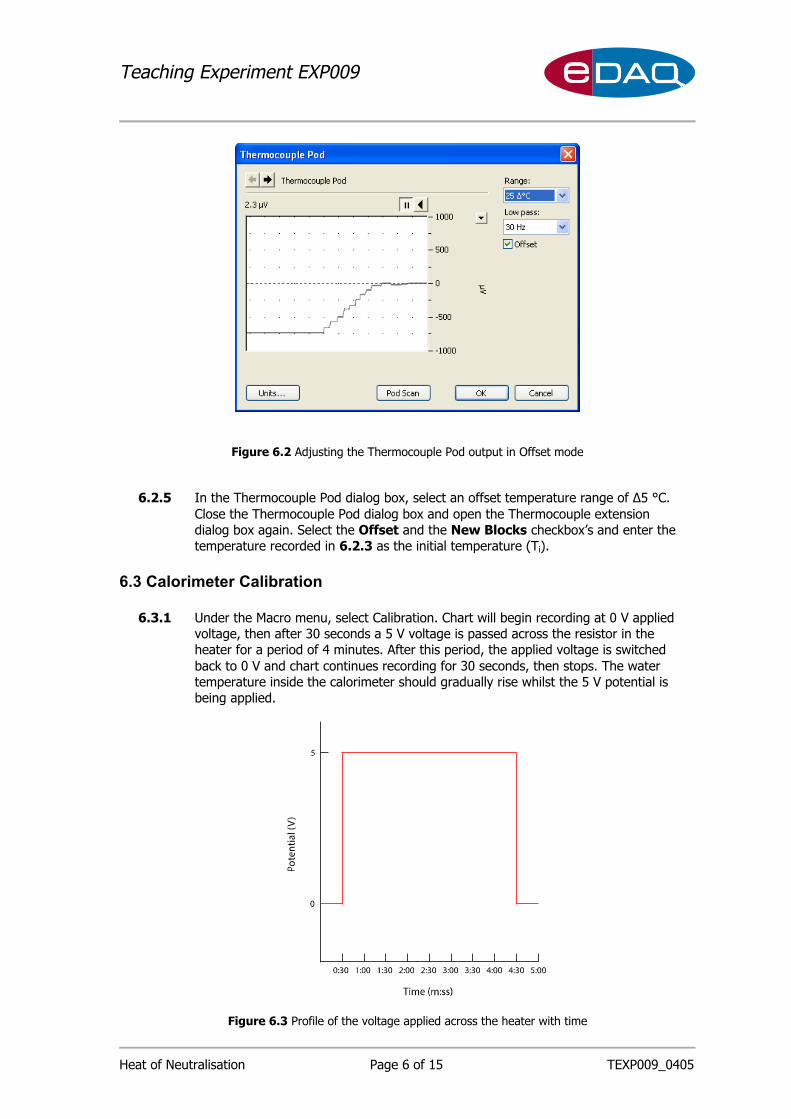
6.3.1 Under the Macro menu, select Calibration. Chart will begin recording at 0 V applied
voltage, then after 30 seconds a 5 V voltage is passed across the resistor in the
heater for a period of 4 minutes. After this period, the applied voltage is switched
back to 0 V and chart continues recording for 30 seconds, then stops. The water
temperature inside the calorimeter should gradually rise whilst the 5 V potential is
being applied.
Figure 6.3 Profile of the voltage applied across the heater with time
Teaching Experiment EXP009
Heat of Neutralisation Page 7 of 15 TEXP009_0405
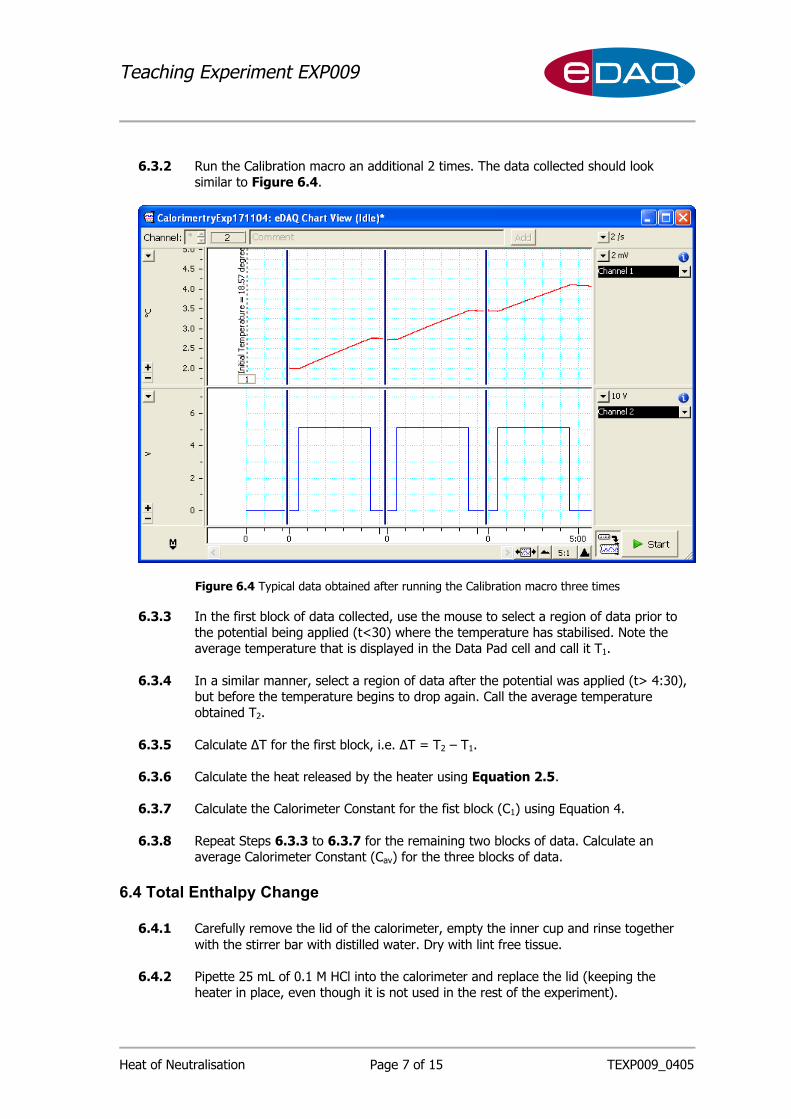
6.3.2 Run the Calibration macro an additional 2 times. The data collected should look
similar to Figure 6.4.
Figure 6.4 Typical data obtained after running the Calibration macro three times
6.3.3 In the first block of data collected, use the mouse to select a region of data prior to
the potential being applied (t<30) where the temperature has stabilised. Note the
average temperature that is displayed in the Data Pad cell and call it T1.
6.3.4 In a similar manner, select a region of data after the potential was applied (t> 4:30),
but before the temperature begins to drop again. Call the average temperature
obtained T2.
6.3.5 Calculate T for the first block, i.e. T = T2 – T1.
6.3.6 Calculate the heat released by the heater using Equation 2.5.
6.3.7 Calculate the Calorimeter Constant for the fist block (C1) using Equation 4.
6.3.8 Repeat Steps 6.3.3 to 6.3.7 for the remaining two blocks of data. Calculate an
average Calorimeter Constant (Cav) for the three blocks of data.
6.4 Total Enthalpy Change
6.4.1 Carefully remove the lid of the calorimeter, empty the inner cup and rinse together
with the stirrer bar with distilled water. Dry with lint free tissue.
6.4.2 Pipette 25 mL of 0.1 M HCl into the calorimeter and replace the lid (keeping the
heater in place, even though it is not used in the rest of the experiment).
Teaching Experiment EXP009
Heat of Neutralisation Page 8 of 15 TEXP009_0405
NB. Steps 6.4.3 to 6.4.5 should be performed without delay as solid NaOH pellets
rapidly absorb moisture from the atmosphere.
6.4.3 Accurately weigh and record the mass of a single NaOH pellet on a watch glass,
remembering to tare out the mass of watch glass.
6.4.4 Prior to dropping the NaOH pellet into the calorimeter, click on Start to begin
recording the background temperature.
6.4.5 After approximately 10 seconds, briefly remove the lid of the calorimeter and drop
the NaOH pellet into the HCl solution. Observe the change in temperature over the
next 5 minutes or so, until the temperature reaches a maximum.
6.4.6 Record the initial temperature (T1) and the final temperature (T2) at which the
system stabilises and before the temperature begins to drop again.
6.4.7 Calculate T, and with the Calorimeter Constant (Cav) calculated in 6.3.8, determine
the amount of heat released (q). Convert this number the molar enthalpy change in
units of kJ/mol.
6.4.8 Repeat steps 6.4.1 to 6.4.7 an additional two times. Calculate the average total
molar enthalpy change.
6.5 Enthalpy Change of Dissolution and Neutralisation
6.5.1 To calculate Hdissolution, repeat 6.4.1 to 6.4.6 in Section 6.4, substituting the 25 mL
of 0.1 M HCl with 25 mL of distilled water.
6.5.2 With the Calorimeter Constant (Cav) calculated in 6.3.8, determine the amount of
heat released (q). Convert this number to the amount of heat released per mole of
NaOH, which is equivalent to Hdissolution.
6.5.3 Repeat 6.5.1 and 6.5.2 a total of three times. Calculate the average molar enthalpy
change of dissolution.
6.5.4 Calculate the molar enthalpy change of neutralisation ( Hneutralisation) using
Equation 2.3.
Teaching Experiment EXP009
Heat of Neutralisation Page 9 of 15 TEXP009_0405
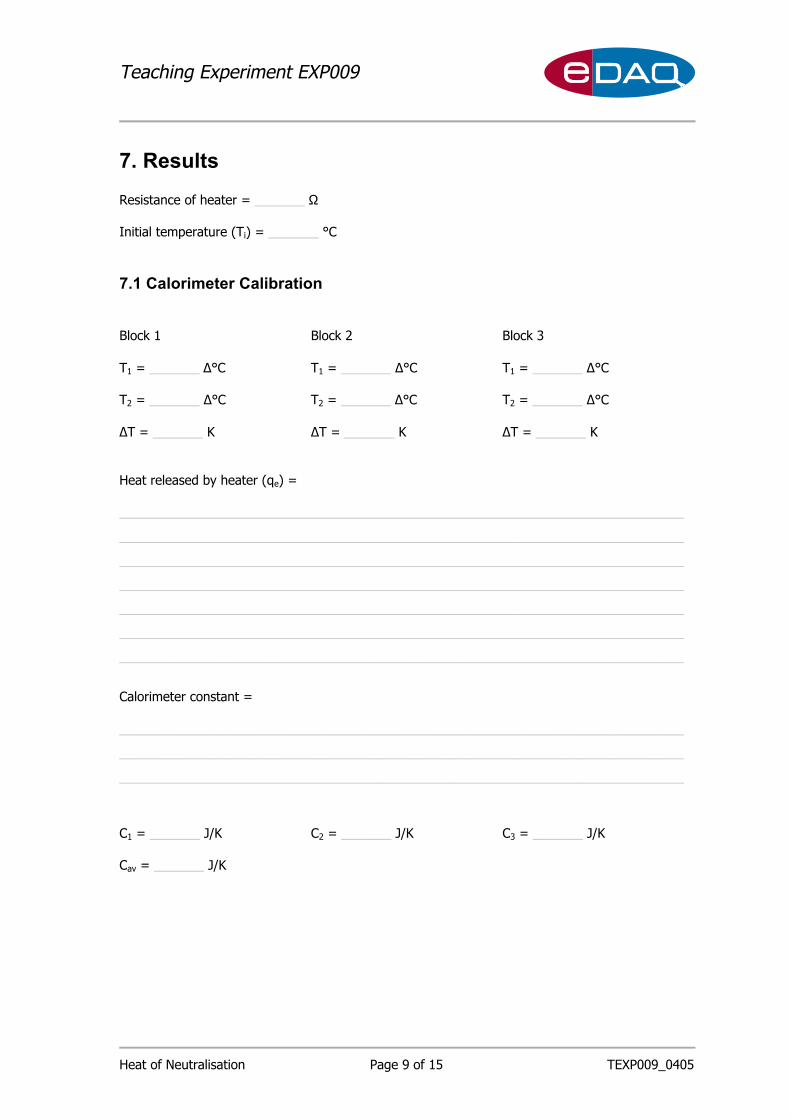
7. Results
Resistance of heater = _______
Initial temperature (Ti) = _______ °C
7.1 Calorimeter Calibration
Block 1 Block 2 Block 3
T1 = _______ °C T1 = _______ °C T1 = _______ °C
T2 = _______ °C T2 = _______ °C T2 = _______ °C
T = _______ K T = _______ K T = _______ K
Heat released by heater (qe) =
_______________________________________________________________________________
_______________________________________________________________________________
_______________________________________________________________________________
_______________________________________________________________________________
_______________________________________________________________________________
_______________________________________________________________________________
_______________________________________________________________________________
Calorimeter constant =
_______________________________________________________________________________
_______________________________________________________________________________
_______________________________________________________________________________
C1 = _______ J/K C2 = _______ J/K C3 = _______ J/K
Cav = _______ J/K
Teaching Experiment EXP009
Heat of Neutralisation Page 10 of 15 TEXP009_0405
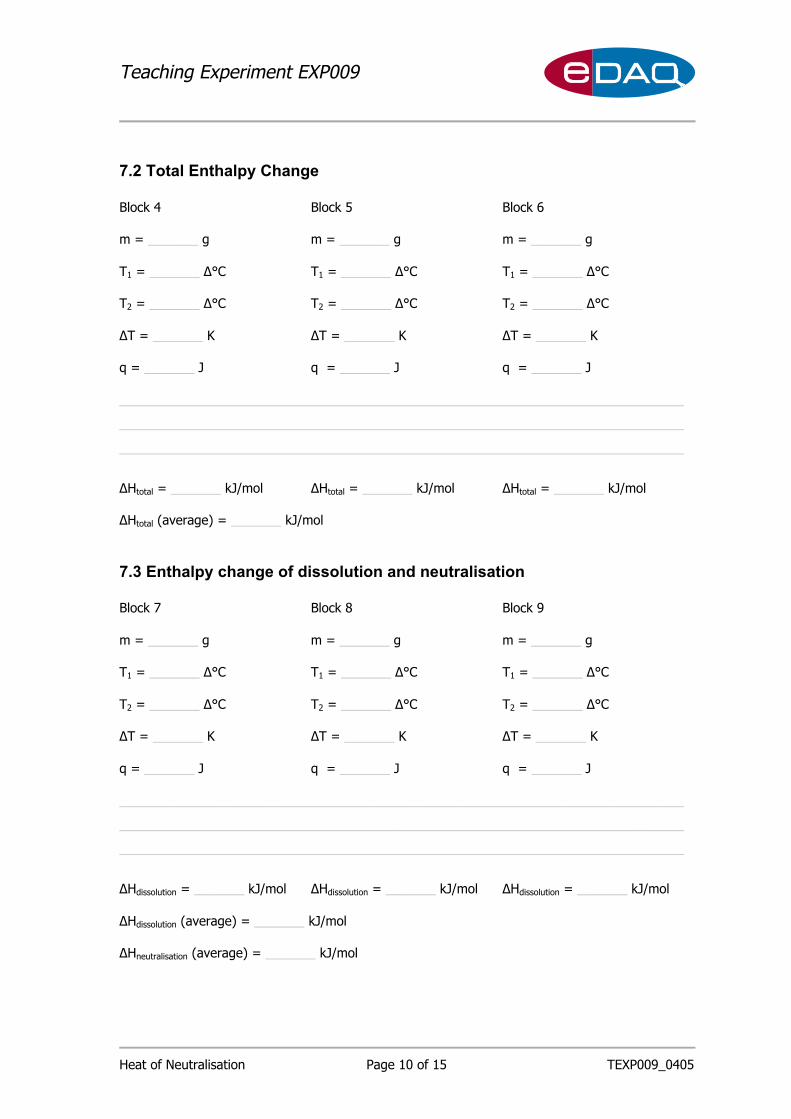
7.2 Total Enthalpy Change
Block 4 Block 5 Block 6
m = _______ g m = _______ g m = _______ g
T1 = _______ °C T1 = _______ °C T1 = _______ °C
T2 = _______ °C T2 = _______ °C T2 = _______ °C
T = _______ K T = _______ K T = _______ K
q = _______ J q = _______ J q = _______ J
_______________________________________________________________________________
_______________________________________________________________________________
_______________________________________________________________________________
Htotal = _______ kJ/mol Htotal = _______ kJ/mol Htotal = _______ kJ/mol
Htotal (average) = _______ kJ/mol
7.3 Enthalpy change of dissolution and neutralisation
Block 7 Block 8 Block 9
m = _______ g m = _______ g m = _______ g
T1 = _______ °C T1 = _______ °C T1 = _______ °C
T2 = _______ °C T2 = _______ °C T2 = _______ °C
T = _______ K T = _______ K T = _______ K
q = _______ J q = _______ J q = _______ J
_______________________________________________________________________________
_______________________________________________________________________________
_______________________________________________________________________________
Hdissolution = _______ kJ/mol Hdissolution = _______ kJ/mol Hdissolution = _______ kJ/mol
Hdissolution (average) = _______ kJ/mol
Hneutralisation (average) = _______ kJ/mol

Teaching Experiment EXP009
Heat of Neutralisation Page 11 of 15 TEXP009_0405
8. Conclusion
_______________________________________________________________________________
_______________________________________________________________________________
_______________________________________________________________________________
_______________________________________________________________________________
_______________________________________________________________________________
_______________________________________________________________________________
_______________________________________________________________________________
_______________________________________________________________________________
_______________________________________________________________________________
_______________________________________________________________________________
_______________________________________________________________________________
_______________________________________________________________________________
_______________________________________________________________________________
_______________________________________________________________________________
9. Questions
9.1 Given the following standard enthalpies of formation at 25 °C, calculate the standard
enthalpy of neutralisation of an acid-base reaction at 25 °C.
Hf H20(l) = –285 kJ/mol
Hf OH–(aq) = –230 kJ/mol
Hf H+
(aq) = 0 kJ/mol
Values obtained from SI Chemical Data (2nd Ed), John Wiley & Sons.
From the first law of thermodynamics, the work needed to change an adiabatic
system from one specified state to another specified state is the same however the
work is done.
Hence for any reaction,
H = Hf (products) - Hf (reactants)
For the neutralisation reaction
Hneutralisation = Hf H20(l) – ( Hf OH–(aq) + Hf H
+(aq)) = -55 kJ/mol
Teaching Experiment EXP009
Heat of Neutralisation Page 12 of 15 TEXP009_0405
9.2 How does the value for the calculated heat of reaction compare with the value
obtained experimentally? List possible sources of systematic error.
As a fairly basic calorimeter is used in the experiment, there is likely to be a net flux
of heat out of the calorimeter, resulting in enthalpy values with absolute values less
than expected.
The electrical heating doesn’t exactly model the heating due to energy released from
the chemical reaction and hence systematic errors in the calculation of the
calorimeter constant are likely. The rate of heating using the resistance heater is
fairly constant, whilst the rate of heating from the neutralisation reaction diminishes
with time as the NaOH is consumed.
Errors in measuring the resistance of the heater and the voltage applied would add
systematic errors to the result.
Contaminants in the calorimeter may cause systematic errors.
All measuring devises have a degree of uncertainty and may have systematic offsets.
In the case of the ET1400 T-type thermocouple probe, this uncertainty is less than
±0.1 °C when used with the Thermocouple Pod. For temperature differences, this
offset is likely to be cancelled out.
9.3 List possible random errors? What precaution was made to reduce the influence of
random error?
Random errors include errors measuring temperature and solution volume between
samples. To reduce random errors, repeat analyses were made.
9.4 Would the heat from molar equivalents of solid NaOH and KOH dropped in an excess
of HCl be the same?
No. Whilst the heat released due to neutralisation reaction would be the same, the
heat from the dissolution of KOH would be different.
Teaching Experiment EXP009
Heat of Neutralisation Page 13 of 15 TEXP009_0405
10. Instructors Notes
10.1 Software and Files Required
For each groups computer, eDAQ Chart with the Thermocouple extension must be installed. The
thermocouple extension automatically calibrates the output of the EP306 Thermocouple Pod to
standard NIST thermoelectric voltages for T- and K-type thermocouple probes, and is accurate to
the limits specified by the probes manufacturer. For the ET1400 T-type thermocouple probe, the
accuracy is ± 0.1°C.
The Thermocouple extension can be downloaded from the eDAQ website:
http://www.edaq.com/chart_extns_list.html
NB. eDAQ Chart requires Windows XP.
The settings file 'HofN.edset' found in the EXP009 resources folder, needs to be placed in Chart's
experiments gallery folder for each group. Refer to the Chart Software Manual on the eDAQ
Installer CD for instructions. This file has a macro called "Calibration" that sets up the required
voltage profile for calibration, plus the Chart settings for the experiment.
The Calibration macro was created by:
• First creating a macro called ‘0 V’ was recorded by choosing Stimulator… under the
Setup menu and setting the Stimulator mode to pulse, the Baseline voltage to 0 Vand the Amplitude to 0 V.
• Similarly creating a second macro called ‘5 V’ was recorded changing the Baselinevoltage to 5 V in the Stimulator dialog box.
• The final Calibration macro was recorded by
1. Calling the macro ‘0 V’ under the Macro menu.
2. Clicking on the Start button and selecting Do other macro steps during (slow)
sampling in the Macro Sampling dialog box and also selecting to Stop sampling aftera Fixed Duration of 5 minutes.
3. Selecting Macro Commands/Wait… under the Macro menu, and entering 30second in the dialog box.
4. Calling the macro ‘5 V’ under the Macro menu.
5. Selecting Macro Commands/Wait… under the Macro menu, and entering 4minutes in the dialog box.
6. Once again calling the macro ‘0 V’.
This instructs the e-corder to output the voltage profile shown in Figure 6.3.
Teaching Experiment EXP009
Heat of Neutralisation Page 14 of 15 TEXP009_0405
10.2 Constructing the Coffee Cup Calorimeter
10.2.1 Use 170 mL Styrofoam coffee cups with tapered lids.
10.2.2 The recommended resistance heater is the MINCO 5951 available from:
MINCO Products Inc. 7300 Commerce Lane/Minneapolis, Minnesota 55432-3177
U.S.A. (www.minco.com).
These heaters have a large surface area and a low thermal mass. Order the heaters
with sealed terminals.
Specifications:
Area: 1 in2
Resistance: 58
Voltage: 12 V
Watt Density: 2.5 W/in2
10.2.3 Peel off the backing tape of the MINCO 5951 resistance heater, and remove the
adhesive by wiping with a tissue soaked in acetone.
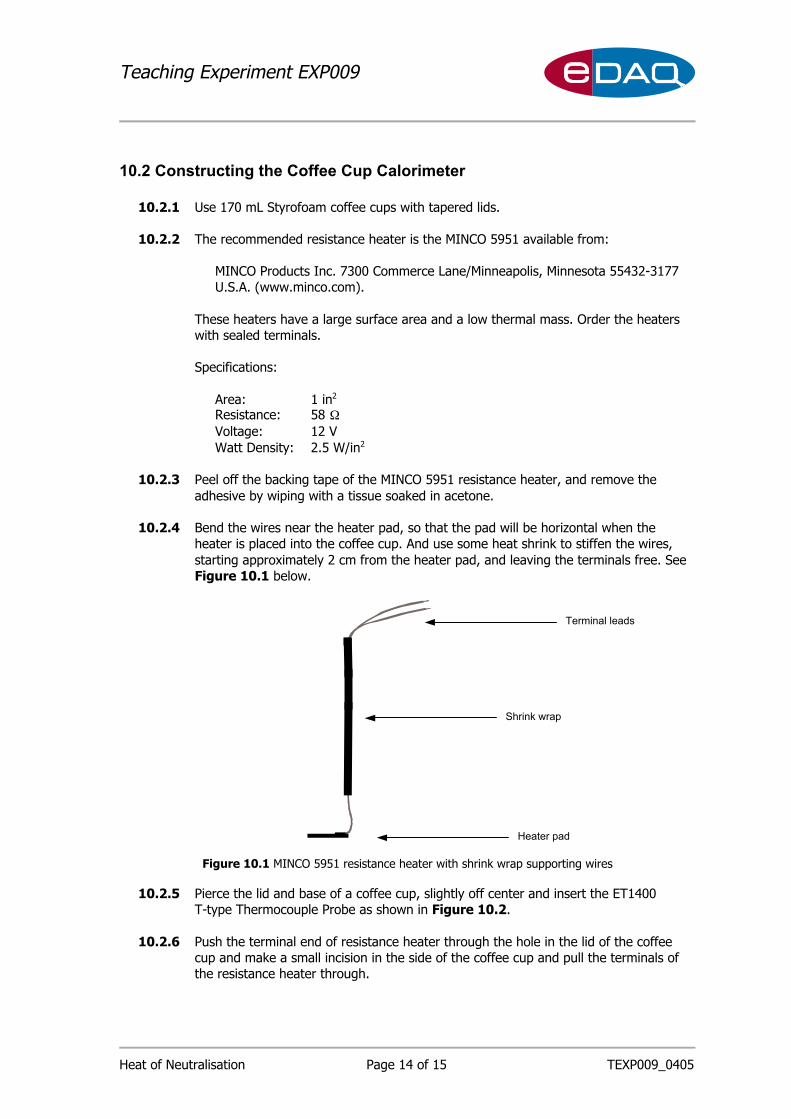
10.2.4 Bend the wires near the heater pad, so that the pad will be horizontal when the
heater is placed into the coffee cup. And use some heat shrink to stiffen the wires,
starting approximately 2 cm from the heater pad, and leaving the terminals free. See
Figure 10.1 below.
Figure 10.1 MINCO 5951 resistance heater with shrink wrap supporting wires
10.2.5 Pierce the lid and base of a coffee cup, slightly off center and insert the ET1400
T-type Thermocouple Probe as shown in Figure 10.2.
10.2.6 Push the terminal end of resistance heater through the hole in the lid of the coffee
cup and make a small incision in the side of the coffee cup and pull the terminals of
the resistance heater through.
Terminal leads
Shrink wrap
Heater pad
Teaching Experiment EXP009
Heat of Neutralisation Page 15 of 15 TEXP009_0405
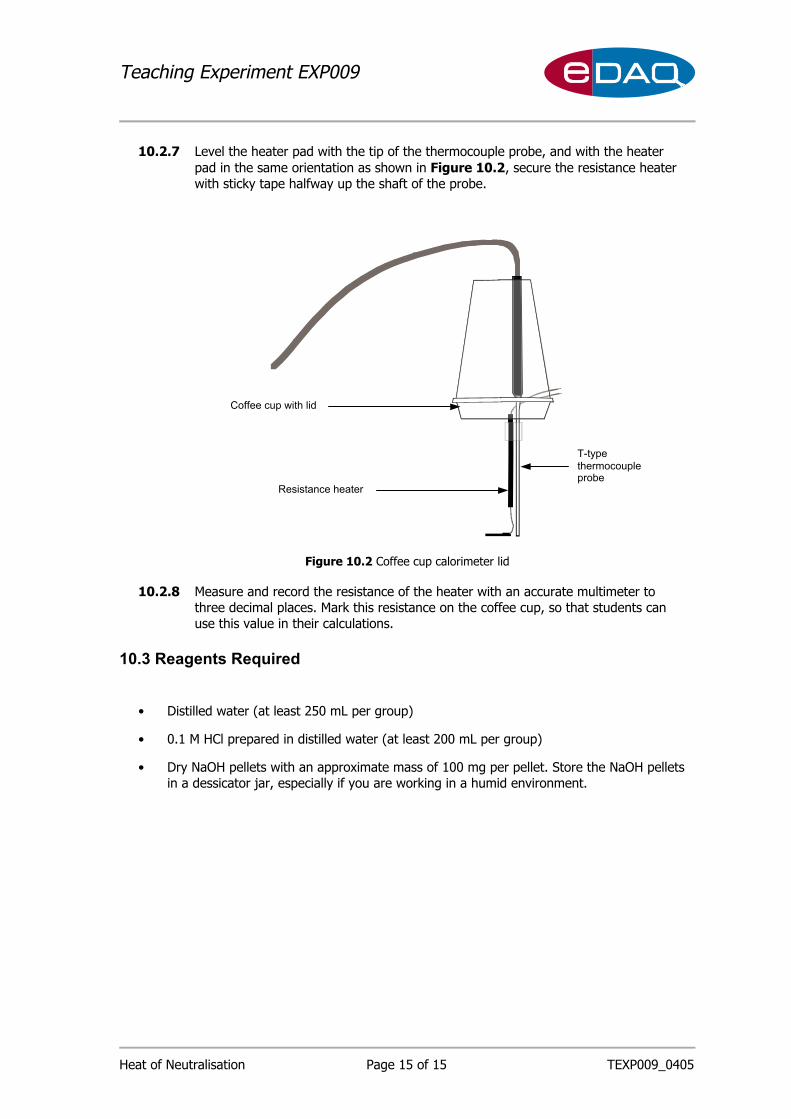
10.2.7 Level the heater pad with the tip of the thermocouple probe, and with the heater
pad in the same orientation as shown in Figure 10.2, secure the resistance heater
with sticky tape halfway up the shaft of the probe.
Figure 10.2 Coffee cup calorimeter lid
10.2.8 Measure and record the resistance of the heater with an accurate multimeter to
three decimal places. Mark this resistance on the coffee cup, so that students can
use this value in their calculations.
10.3 Reagents Required
• Distilled water (at least 250 mL per group)
• 0.1 M HCl prepared in distilled water (at least 200 mL per group)
• Dry NaOH pellets with an approximate mass of 100 mg per pellet. Store the NaOH pellets
in a dessicator jar, especially if you are working in a humid environment.
Resistance heater
Coffee cup with lid
T-type
thermocoupleprobe