cab local information system intranet installation guide
TRANSCRIPT

CAB Local Information
System Intranet
Installation Guide
Andy & Margaret Henderson
Constructive IT Advice

Version 7 – Dated 8 February 2015 1
Table of contents
1 Introduction ..................................................................................................................... 5
1.1 Features overview ........................................................................................................... 5
1.2 The intranet version ........................................................................................................ 5
1.3 Configuration options ..................................................................................................... 6
1.3.1 Local Information System hosted on the internet .......................................................... 7
1.3.2 Local Information System hosted on your network ....................................................... 7
1.3.3 Administration tools ....................................................................................................... 8
1.3.4 Connecting to other offices ............................................................................................ 8
1.3.5 Connecting a desktop version to the intranet version ................................................. 10
1.3.6 Using the document library .......................................................................................... 11
1.3.7 Using portable devices offline....................................................................................... 12
1.4 Server requirements ..................................................................................................... 12
1.4.1 Internet hosting ............................................................................................................ 12
1.4.2 Hosting in your network ............................................................................................... 12
1.4.3 IIS Support ..................................................................................................................... 13
1.5 Client requirements ...................................................................................................... 13
1.5.1 Equipment ..................................................................................................................... 13
1.5.2 Browser support............................................................................................................ 13
2 Installing the intranet version in the internet ................................................................... 14
2.1 Select an Internet Service Provider (ISP) ...................................................................... 14
2.2 Decide a domain name (URL) ........................................................................................ 15
2.3 Purchase your hosting package .................................................................................... 15
2.4 Setup IIS ........................................................................................................................ 16
2.5 Setup FTP ...................................................................................................................... 16
2.6 Populate the application folder .................................................................................... 16
2.7 Test your initial setup .................................................................................................... 17
3 Installing the intranet version on your network ............................................................... 18
3.1 Decide on the central PC ............................................................................................... 18
3.2 Install Internet Information Services (IIS) ..................................................................... 19
3.2.1 Windows Vista, Windows 7 and Windows 8................................................................. 19
3.2.2 Windows XP Professional .............................................................................................. 23
3.2.3 Windows Server 2008 ................................................................................................... 25
3.3 Allow access to IIS from other PCs in your network ..................................................... 26
3.4 Decide where to put the application folder .................................................................. 27

Version 7 – Dated 8 February 2015 2
3.5 Install the intranet application ...................................................................................... 27
4 Configuring the intranet application ................................................................................ 29
4.1 Point the intranet at desktop configuration files .......................................................... 30
4.2 Create a Local Information System configuration file .................................................. 30
4.2.1 Make a configuration file by copying entries from your desktop system .................... 30
4.2.2 Make a configuration file from scratch ......................................................................... 31
4.3 Configure your database ............................................................................................... 33
4.3.1 SQL Server database ..................................................................................................... 33
4.3.2 Access database stored locally ...................................................................................... 34
4.3.3 Access database via a connection string ....................................................................... 34
4.4 Make sure links to documents work correctly .............................................................. 35
4.4.1 Intranet hosted on the internet – using the document library .................................... 35
4.4.2 Intranet hosted on the internet – using the documents folder .................................... 36
4.4.3 Intranet hosted on your local network ......................................................................... 37
4.5 Configure password validation ..................................................................................... 38
4.6 Configure full text searching ......................................................................................... 38
4.7 Configure the logon rubric ............................................................................................ 39
4.8 Configure the document library .................................................................................... 39
4.9 Configure the text editor .............................................................................................. 39
4.9.1 The editor toolbar ......................................................................................................... 39
4.9.2 The ‘Format’ dropdown ................................................................................................ 40
4.9.3 Editor templates............................................................................................................ 40
4.10 Decide how to report unexpected errors ..................................................................... 40
4.11 Test the Local Information System ............................................................................... 42
4.11.1 Intranet hosted on the internet .................................................................................... 43
4.11.2 Intranet hosted on your network ................................................................................. 43
4.12 If you encounter a problem .......................................................................................... 43
5 Using the intranet tools ................................................................................................... 44
5.1 Database synchronisation ............................................................................................. 44
5.2 Database backup ........................................................................................................... 48
5.3 Database link checking .................................................................................................. 50
5.4 Installing the database tools ......................................................................................... 52
6 Security .......................................................................................................................... 53
6.1 User ids and passwords ................................................................................................. 53

Version 7 – Dated 8 February 2015 3
6.2 Logging out .................................................................................................................... 54
6.3 User groups ................................................................................................................... 54
6.3.1 Create user groups ........................................................................................................ 55
6.3.2 Assign web users to groups ........................................................................................... 55
6.3.3 Assign anonymous users to groups ............................................................................... 55
6.3.4 Hide items and sections of items from groups ............................................................. 56
6.3.5 Configure the system using groups ............................................................................... 56
6.4 Internet issues ............................................................................................................... 57
6.5 Documents stored in folders ......................................................................................... 57
6.6 Documents stored in the document library .................................................................. 57
6.7 Folder permissions ........................................................................................................ 58
6.8 Working with tablets ..................................................................................................... 58
7 Switching between synchronisable and updateable databases ......................................... 59
8 Get statistics from the intranet ........................................................................................ 61
9 Populating your database ............................................................................................... 62
10 Upgrading from a previous version .................................................................................. 63
10.1 Review your configuration ............................................................................................ 63
10.2 Backup your current system ......................................................................................... 63
10.3 Update your application folder ..................................................................................... 63
10.4 Run the database updater ............................................................................................ 64
10.5 Update your database tools .......................................................................................... 64
11 Taking the intranet version offline ................................................................................... 65
12 Appendices ..................................................................................................................... 66
12.1 Using Internet Information Services 7 or 8 (IIS 7 or 8) ................................................. 66
12.1.1 Find out the IIS application folder ................................................................................. 66
12.1.2 Create a virtual folder for your application .................................................................. 67
12.1.3 Create an application pool for your application ........................................................... 68
12.1.4 Tell IIS your CABLIS folder is an application .................................................................. 69
12.1.5 Tell IIS that LIS.aspx is the default page ........................................................................ 69
12.1.6 Create a virtual folder for a document folder ............................................................... 70
12.2 Using Internet Information Services 5.1 or 6 (IIS 5.1 or 6) ........................................... 71
12.2.1 Find out the IIS application folder ................................................................................. 71
12.2.2 Create a virtual folder for your application .................................................................. 72
12.2.3 Create an application pool for your application ........................................................... 74
12.2.4 Tell IIS your CABLIS folder is an application .................................................................. 74
12.2.5 Tell IIS that LIS.aspx is the default page ........................................................................ 78

Version 7 – Dated 8 February 2015 4
12.2.6 Create a virtual folder for a document folder ............................................................... 79
12.3 Install Microsoft Data Access Software ........................................................................ 82
12.4 Integration with other intranet applications ................................................................ 82
12.5 Differences between the desktop and intranet versions ............................................. 83
12.5.1 Enquiring on the database ............................................................................................ 83
12.5.2 Making changes ............................................................................................................ 84

Version 7 – Dated 8 February 2015 5
1 Introduction
This document helps you install the intranet version of the CAB Local Information System
developed by Constructive IT Advice. It covers installation from scratch and making changes to
your installation.
1.1 Features overview
The Local Information System supplements the CAB systems by providing information about local
contacts and resources likely to be useful to clients. It is designed to make it as easy as possible
for you to find the information you need online without having to find data from paper files. The
system will help ensure that data is as up-to-date as possible by linking directly to source material
on the web and in your bureau. The system provides:
1. An online index to the local information database. The online index provides a
sophisticated search and look up system, increasing the likelihood that you will find what
you are looking for. For example, you can search for index entries containing words you are
looking for. The electronic index also supports multiple index entries for the same item so,
for example, you can identify organisations by both acronyms as well as their full names.
2. Information about contacts and resources. The database contains textual information that
will help advisers in their dealings with clients. Text can be formatted to make it easier to
read. For example, it can include bullet points.
3. Links to local information. The database supports different types of link:
a. The database can link directly to supporting information held in web sites. Clicking
any link will take you straight to the relevant web page. The maintenance program
comes with a utility that regularly checks web links to make sure they are still valid.
b. Document links. These work in the same way as web links except that they refer to
documents held in your local network. For example, a database entry might link to a
local policy document written in Word. The database will automatically run the right
application to show you the linked document. Again, document links can be
checked regularly to make sure they are still valid.
c. Paper file links. Some documents are difficult or inappropriate to store
electronically. In these cases the database can provide a reference to a paper file.
The system is designed to be easy and straightforward to use, and does not require users to have
specific IT expertise - although a knowledge of web browsing will be helpful.
1.2 The intranet version
The intranet version of the Local Information System runs on a web server. You can host it on the
internet or on a PC in your network.
Advisers access the Local Information System using any device equipped with a reasonably
capable and modern web browser. See below for a list of devices and browsers we have tested.
There is no need to install any software on adviser’s devices.

Version 7 – Dated 8 February 2015 6
Similarly, local information administrators use web browsers to add, change and delete entries in
the database.
If you host the Local Information System on the internet, then any authorised person can access
the system as long as they have a connection to the web. That includes:
Multiple offices sharing the same database
Outreach sites
People working from home
If you decide to host the system on your network, the technology used by the intranet version
means you can share the system with other offices over relatively slow network connections.
Something that wasn’t practical for the desktop version.
Previously, you needed the desktop version to update the intranet database. That’s no longer the
case – the intranet version can run stand-alone. We have, however, provided utilities to allow the
desktop and intranet systems to work together. For example, you might want to keep your
desktop system running while you make sure your intranet system is bedded down.
Finally, all the software used by the Local Information Software is either provided by us for free or
is available free with Windows. The only cost to you is the hosting fee if you decide to place the
system on the internet. Even then, your cost should be significantly less than £10 per month.
1.3 Configuration options
There are therefore several different ways to deploy the Local Information System. The following
sections describe the main features:
Local Information System hosted on the internet
Local Information System hosted on your network
Administration tools
Connecting to other offices
Connecting a desktop version to the intranet version
Using portable devices offline

Version 7 – Dated 8 February 2015 7
1.3.1 Local Information System hosted on the internet
The intranet version is designed so it can run on a web server hosted by an Internet Service
Provider (ISP). The ISP will connect the web server to a URL – for example:
www.yourbureaulis.org.uk. Anyone connected to the internet can then navigate to your URL and
work with your Local Information System.
Local Information
System hosted by an ISP
The Internet
Web browser navigates to www.yourbureaulis.org.uk
We provide a mechanism to secure the system with user ids and passwords. We also explain how
to prevent search engines, like Google, showing your site in searches.
1.3.2 Local Information System hosted on your network
Most versions of Windows come with a web server – called Internet Information Server – included
for free. The Local Information System uses IIS to serve web pages to browsers.
Local information database
Internet Information
Services
Central PC
Web browser Web browser Web browser
Network

Version 7 – Dated 8 February 2015 8
Note that the central PC doesn’t have to be your office server – although it can be.
1.3.3 Administration tools
We provide the following tools to support the intranet version of the Local Information System:
1. A utility that checks links held by the database to see if they are valid
2. A backup utility designed to help you to automate backups of your database
3. A synchronisation utility that brings a database held by the intranet into line with a locally-
held database
Each of these utilities runs on a Windows PC. They use the same technology as a web browser to
connect to the intranet system. They work:
Regardless of where you host your Local Information System
Without needing special access to sites hosted on the internet
Without you having to stop the Local Information System
With both Microsoft Access and SQL Server: the two database technologies supported by
the intranet version
1.3.4 Connecting to other offices
In the past, users of the desktop version of the Local Information System shared access with other
offices by sending database copies over their networks. Direct access to a database over inter-
office links was rarely practical.
If you host your Local Information System on the internet, then everyone with internet access, a
valid id and a password can work with it. For example, they can get to it from:
Any of your offices
Outreach sites
Home

Version 7 – Dated 8 February 2015 9
Alternatively, if you host the system on your network, the intranet version places relatively low
demands on it. That means it’s more practical to share data across network-connected offices:
Internet Information
Services
Central PC
Web browser
Adviser’s PCs
Web browser
Office 1
Adviser’s PCs
Office 2

Version 7 – Dated 8 February 2015 10
1.3.5 Connecting a desktop version to the intranet version
You can run the intranet version of the Local Information System without the desktop version, and
vice versa.
You might find it useful, however, to use both versions simultaneously. We provide two main
ways to do that.
If you host your Local Information System on the internet, you can update your web site with
changes made by your desktop version…
Local information database
Central PC
Synchronisation utility
System hosted by an ISP
Network
The Internet
The utility reads data from the local database and updates the intranet version with any changes.
There is also an option to delete all the data held by the intranet version and rebuild it from the
local database.
Note that the data held by the intranet version is either updateable or synchronisable. It cannot
be both. If you decide to use the synchronisation utility you will be unable to change the database
via a web browser. We do, however, provide a mechanism to switch a synchronisable database to
an updateable one and vice versa.

Version 7 – Dated 8 February 2015 11
If you host your Local Information System on your network, the intranet and desktop versions can
share the same database…
Local information database
Internet Information
Services
Central PC
Web browser and/or desktop version
Web browser and/or desktop version
Web browser and/or desktop version
Network
Data access software
Changes made via the desktop version will be instantly available via web browsers. Similarly
changes made via web browsers will be instantly available to desktop users.
Note, however, there is a small difference in the way HTML is handled between the two versions.
We recommend using either the desktop or the intranet version to make most of your changes.
1.3.6 Using the document library
The intranet version of the system allows you to build a document library provided you use SQL
Server as your database (the common way to implement the system on the internet). The
document library provides two main benefits over using FTP to store documents on your web
server:
1. The system controls access to documents in the library so they can be hidden from people
that do not log on to the system
2. Documents are maintained in the library using a standard local information system page,
administrators don’t have to learn how to work with an FTP program
Documents are retrieved using a web address so they can be linked to items using web links
rather than document links. Those links will work from any desktop version you install provided it
has an internet connection. Further, you can link the document library to other systems and web
sites you run – people will see the standard log on page if they try to connect to a document that
is not available to anonymous users.

Version 7 – Dated 8 February 2015 12
1.3.7 Using portable devices offline
Finally, it is possible to install the system stand-alone on a laptop. That’s useful for advisers
working at outreach locations without an internet connection or a connection to the home office.
The backup tool provided by the intranet version is designed so it can update the database held
on a laptop simply by double-clicking an icon while the laptop can connect to the intranet version.
The adviser can then take the laptop to an outreach location and use it there.
1.4 Server requirements
1.4.1 Internet hosting
To host the intranet version on the internet, your Internet Service Provider must support a
Windows environment running:
Internet Information Server (IIS)
.NET version 2, 3 or 3.5 (ISP’s supporting version 4 or later will almost certainly install 3.5 as
well)
SQL Server 20081 or later
We can also support an Access database, but there are few – if any – ISP’s prepared to host Access
databases. The system is not designed for Linux or MySql – sorry.
1.4.2 Hosting in your network
To run the intranet version on a central PC in your network, that PC must run either:
Windows XP, or later
Windows Server 2003, or later
The system was developed to run under Microsoft’s .NET development environment. It requires
version 2. Recent versions of Windows have this already installed. Note that .NET versions 3 and
3.5 also include version 2.
The PC must also have software for accessing the Local Information database. One of:
Microsoft Access Database Engine 2010 (installed by Office 2010 or by downloading
“Microsoft Access Database Engine 2010 Redistributable”)
Microsoft Access Database Engine 2007 (installed by Office 2007 or by downloading “2007
Office System Driver: Data Connectivity Components)
Microsoft Data Access Components (MDAC) v2.7 (version 2.8 removes the interface we
need).
We recommend Microsoft Access Database Engine 2010.
1 The Local Information System will work with earlier versions, but you might need some help from us

Version 7 – Dated 8 February 2015 13
1.4.3 IIS Support
We’ve tested the intranet version works with IIS 5.1, IIS6, IIS7 and IIS8. That’s all the versions of
IIS installed with Windows since Windows XP and with Windows Server since Windows Server
2003.
1.5 Client requirements
1.5.1 Equipment
The Local Information System is designed to run on any equipment with a reasonably modern
browser. For example, we have tested it on:
Microsoft PCs and laptops
Apple PCs and laptops
Apple iPads
Android tablets and phones
1.5.2 Browser support
We expect the system will work with most browsers. For example, we have tested it with:
Internet Explorer versions 7, 8, 9, 10 and 11
Android ‘Internet’
Chrome (Windows and Android)
Firefox
Safari - (OS X, IOS and Windows)
We do not intend to support IE6 or earlier.
The intranet version makes heavy use of JavaScript, which must be enabled in browsers for it to
run.

Version 7 – Dated 8 February 2015 14
2 Installing the intranet version in the internet
Installing the Local Information System as an internet site has a number of advantages:
Advisers can access the Local Information System wherever they are working provided they
have an internet connection
The ISP will do a lot of the set up for you so you don’t have to get to grips with installing
server or database software
Performance will usually be better than using a shared server or a desktop PC as a central PC
There are some drawbacks, however:
If you don’t already have an arrangement to use a hosted Windows server with database
access, you might have to move any existing site and/or pay extra
We designed the system with installation at an ISP in mind, but it’s possible your selected ISP
might impose constraints that mean the system will not work in their environment (to date
that’s not been an issue for any internet installations, though)
You will need to install the intranet version and activate it within the ISP’s server –
unfortunately each ISP has a different way to do that, we can’t give you step-by-step
instructions
To help you with those issues we offer a free service to install your intranet software and/or
explore problems you might encounter. We will need temporary access to your web site’s
administration id and password. You can revoke access when we have finished. To take
advantage of this service, contact us via www.SeeITA.com/contact.shtml
The following sections provide guidelines for installing the intranet version under the following
headings:
3. Select an Internet Service Provider
4. Decide a domain name (URL)
5. Purchase your hosting package
6. Setup IIS
7. Setup FTP
8. Populate the application folder
9. Test your initial setup
Once you have installed the intranet version successfully, read the remaining sections of this
document starting from section 4 to learn how to complete your setup and test it.
2.1 Select an Internet Service Provider (ISP)
We describe the internet hosting requirements on page 12.
If you already have an ISP that hosts your bureau’s web site you might be able to use the same
one to host the Local Information System. If you currently use a Linux server you might be able to
switch to a Windows server without losing any functionality. If you use a Windows server but
Version 7 – Dated 8 February 2015 15
your package does not include SQL Server you can almost certainly upgrade it. If you are unsure
whether you can use your existing ISP, contact us; we’ll try to help.
If you need to switch to a different ISP, it’s possible you can transfer your existing web site to the
new ISP. Again, let us know if you need if you need help with this.
There are a large number of ISPs that are willing and able to host the Local Information System.
So far we have used these ones:
1&1 – more details at http://www.1and1.co.uk/hosting-windows
Fasthosts – more details at http://www.fasthosts.co.uk/web-hosting/
We have nothing to gain by suggesting either of them.
2.2 Decide a domain name (URL)
Most packages come with a free domain. Those that don’t will allow you to add one for an
additional fee. You don’t need to buy one to start with, however. You will always get an internal
domain name – it won’t be pretty or memorable, but it will get you going. You will be able to add
a domain later.
Typically CAB domain names are: www.<bureau name>cab.org.uk
.org.uk indicates a charity. We suggest you follow this convention if you intend to use the same
site for your bureau’s web site and your Local Information System. If you have to use a new ISP
and you already have a URL for your bureau, you can set the site up first and – when you’re happy
with it – you can switch your URL from the old site to the new one.
If you are creating a site just to host your local information system, we suggest you add ‘lis’ to the
end of your existing domain so www.<bureau name>cab.org.uk becomes www.<bureau
name>cablis.org.uk. That makes the URL easy to remember.
2.3 Purchase your hosting package
ISPs allow you to purchase hosting packages with a credit card. You’ll probably need to ask
someone to purchase the package for you with their credit card and claim the amount back as
expenses. If possible, you should use your bureau’s name to register the site. That way you won’t
have to jump through hoops to get the site reassigned later on.
You will then get:
An id and password for your control panel
A link for your control panel
A URL for your site (if you didn’t purchase one)
The control panel will allow you to setup your web site to run the Local Information System.

Version 7 – Dated 8 February 2015 16
2.4 Setup IIS
The control panel will provide a way to:
Create web site folders. If your site is solely for use by your Local Information System, your
application folder will be your site’s root folder2. Just create subfolders called ‘LogDirectory’
and ‘Documents’. Otherwise create a CABLIS subfolder to your root folder (CABLIS will be
your application folder), and LogDirectory and Documents subfolders to CABLIS.
Activate IIS for your application folder.
Grant access permissions to IIS – you will need to grant IIS full access to LogDirectory.
2.5 Setup FTP
FTP stands for File Transfer Protocol. It’s the mechanism you need to copy files and folders to and
from your web site.
The control panel will either provide an FTP facility built into the site or provide a way to allow you
to run an FTP program against your site. If you need to run an FTP program, the control panel will
allow you to:
Find the FTP address of your site
Find out your FTP id and password, or create a new one
The most widely-used FTP program is FileZilla available for free from http://filezilla-project.org/.
When you set it up with the FTP address, id and password you will be able to copy files and folders
to and from your web site.
2.6 Populate the application folder
Create a folder on your PC to hold your local copy of the web site. Create subfolders to mirror the
subfolders you created in your web site.
Copy all the contents of folder /Intranet/CABLIS including all its subfolders from the installation
media to your local copy of the application folder.
Add the following text to file web.config immediately before the last line that reads
“</configuration>”.
<system.webServer>
<defaultDocument>
<files>
<add value="LIS.aspx" />
</files>
</defaultDocument>
</system.webServer>
It instructs IIS to load the database search page by default.
2 The top level folder that will already have been created for you

Version 7 – Dated 8 February 2015 17
Add a file called Robots.txt to your application folder containing:
User-agent: *
Disallow: /
Well-behaved search engines will see the file and won’t try to index the Local Information System.
Use FTP to copy all the files and folders from your local copy to the web site.
2.7 Test your initial setup
You should now be able to run the intranet application by navigating to your web site’s URL. You
will need to append /CABLIS to the URL if you created a CABLIS application folder. The application
won’t run properly yet (see section 4 to continue to set up your web site). Instead you’ll see an
error message like this:

Version 7 – Dated 8 February 2015 18
3 Installing the intranet version on your network
You need to take the following steps to install the intranet version of the Local Information
System on your network:
1. Decide on the central PC
2. Install Internet Information Services (IIS)
3. Allow access to IIS from other PCs in your network
4. Decide where to put the application folder
5. Install the intranet application
Once you have installed the intranet version successfully, read the remaining sections of this
document to learn how to set it up and test it.
3.1 Decide on the central PC
Before installing the intranet version of the Local Information System, you need to decide which
PC to use to serve the other PC’s on the network.
You should consider using the same PC that holds the database. That will minimise the overhead
of transferring data to and from the database.
For many bureaux, the PC that holds the database will also be the office server. That’s also likely
to be the best location for the intranet server.
There are some other considerations:
1. If the PC holding the database is relatively low powered, or if it is already heavily used, you
might want to consider installing the intranet server on a different PC to keep response
times reasonable.
2. If you already have IIS running in your network, you should use the same PC to host the
intranet. That will save you a lot of time and effort setting it up. We provide some more
guidance in the appendices.
You might be tempted to use a central PC connected to the Local Information database across an
inter-office network. That’s unlikely to work well unless the inter-office connection runs at a
minimum of 10mbps – preferably more.
Note that – having installed the intranet version on a PC – you might decide later you want to
move it. That’s not a problem; simply restart the installation process on the new PC.
Version 7 – Dated 8 February 2015 19
3.2 Install Internet Information Services (IIS)
The following instructions are based around installing IIS on a PC running:
Windows 7
Windows 8
Windows XP Professional
Windows Server 2008
The procedure for other versions of Windows will be similar. If you need more help, there is
plenty of support available on the Internet. We can also help you if you contact us with specific
issues.
3.2.1 Windows Vista, Windows 7 and Windows 8
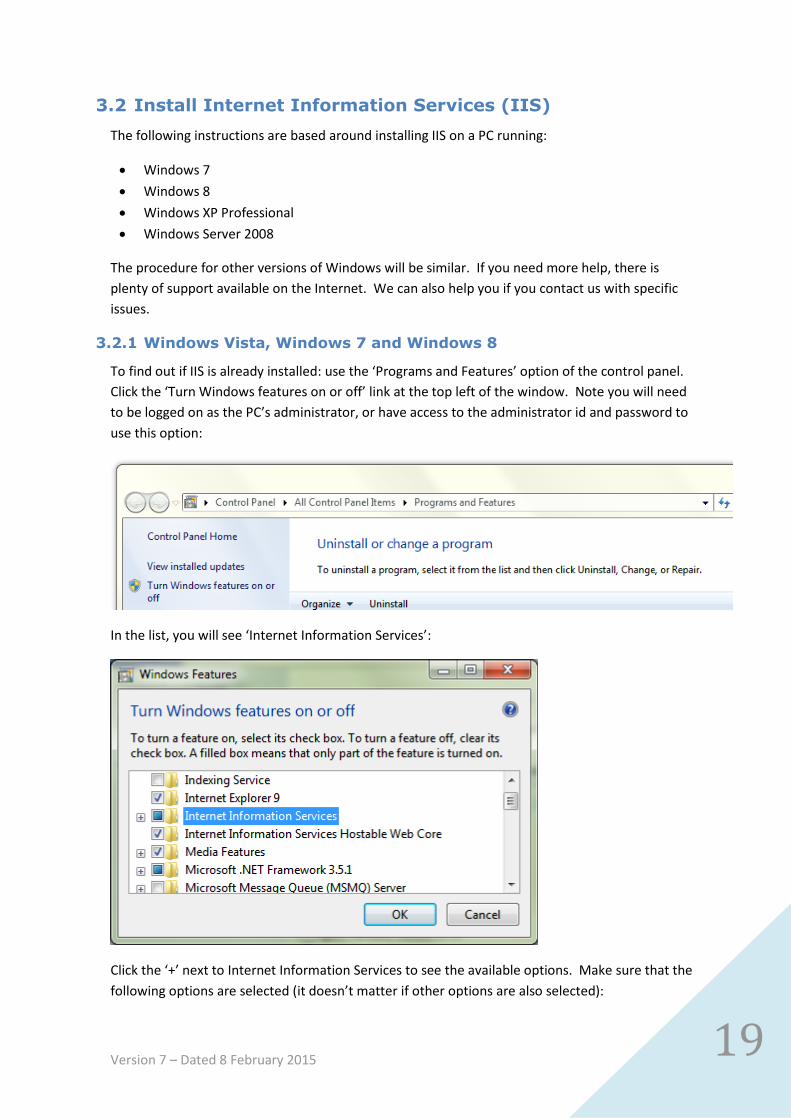
To find out if IIS is already installed: use the ‘Programs and Features’ option of the control panel.
Click the ‘Turn Windows features on or off’ link at the top left of the window. Note you will need
to be logged on as the PC’s administrator, or have access to the administrator id and password to
use this option:
In the list, you will see ‘Internet Information Services’:
Click the ‘+’ next to Internet Information Services to see the available options. Make sure that the
following options are selected (it doesn’t matter if other options are also selected):

Version 7 – Dated 8 February 2015 20
Under ‘Web management tools’, select option ‘IIS Management Console’
Under ‘World Wide Web Services’:
o Under ‘Application Development Features’, select:
.NET extensibility (or .NET extensibility 3.5)
ASP.NET (or ASP.NET 3.5)
ISAPI Extensions
ISAPI Filters
o Under ‘Common HTTP features’, select:
Default document
HTTP Errors
HTTP Redirection
Static Content
o Under ‘Performance Features’ select both Dynamic and Static Content Compression
o Under ‘Security’, select:
Basic Authentication
IP Security
Request Filtering
URL Authorization
Windows Authentication
If all the above are already ticked click ‘Cancel’ – you do not need to install IIS. Otherwise, tick all
the options above and click OK to install IIS.

Version 7 – Dated 8 February 2015 21
To test whether IIS is working correctly type “localhost” into the address bar of a browser running
on the same PC. For a fresh install, you should see a welcome message from IIS similar to one of
the following:

Version 7 – Dated 8 February 2015 22

Version 7 – Dated 8 February 2015 23
3.2.2 Windows XP Professional
IIS is provided as a component of Windows XP Professional. To find out if IIS is already installed:
use the ‘Add or Remove Programs’ option of the control panel. Click the ‘Add/Remove Windows
Components’ icon on the left:
You will see a progress screen:

Version 7 – Dated 8 February 2015 24
Find the ‘Internet Information Services (IIS)’ entry:
Tick the entry and click the ‘Details…’ button to review the selected options (and sub-options). As
a minimum, make sure the following are ticked:
Common Files
Internet Information Services Snap-In
World Wide Web Service:
o World Wide Web Service
There is no harm in ticking additional options.
Click ‘OK’ until you return to the ‘Windows Components Wizard’. Click ‘Next’ to start the
installation process. You might be asked for the installation disk at this point.

Version 7 – Dated 8 February 2015 25
To test whether IIS is working correctly type “localhost” into the address bar of a browser running
on the same PC. You will see an id and password challenge. Enter your PC’s administration id and
password. (Id: administrator and a blank password might work). You should then see something
like:
3.2.3 Windows Server 2008
IIS might already be active on your server. Try typing "http://localhost" in to a browser on the server and see if there's a response. If not, you need to add the 'Web server' role. To do that:
Click 'Start', point to 'Administrative Tools' and click 'Server Manager'
In 'Roles Summary', click 'Add Roles'
Use the 'Add Roles wizard' to add the web server role

Version 7 – Dated 8 February 2015 26
3.3 Allow access to IIS from other PCs in your network
If you have Windows Firewall installed and running, you will need to tell it to allow other PCs to
access IIS. To do that, use the ‘Windows Firewall’ option of the control panel.
Click the ‘Allow a program or feature through Windows Firewall’ link at the top left of the screen:
You will see ‘World Wide Web Services (http) towards the bottom of the list (the other selections
are not relevant):
If the option is ticked, there’s nothing more to do. Otherwise, click ‘Change settings’ (you will
need to be logged on as the PC’s administrator, or have access to the administrator id and
password). Tick the ‘World Wide Web Services’ option and click OK to enable access.
If you use different firewall software, you will need to ensure that other PCs can access IIS via port
80.

Version 7 – Dated 8 February 2015 27
To test IIS is available you’ll need the address of your central PC on the network. You can use one
of:
The central PC’s name. For example, if you access files on the PC using references starting
with “\\Server01\”, you should be able to use address “http://Server01/”.
The Central PC’s IP address. In Vista or Windows 7, go to the ‘Network and sharing center’
via the control panel or by right clicking the network icon in the right hand side of the task
bar. Click the link next to ‘Connections’ (it might appear as ‘status’). In the ‘Wireless
Network Connection Status’ panel, click ‘Details…’. The IP address will be shown next to
‘IPv4 Address’. The address will be something like: “http://192.168.0.66/”.
Enter the PC’s address in the address bar of a browser on another PC in the network and you
should see the same page you saw when you tested IIS in the previous section.
Make a note of this address. You’ll need it again later.
3.4 Decide where to put the application folder
By default, IIS installs a folder called ‘inetpub’ at the root of your primary drive (usually your ‘C’
drive). Under that folder you will see a folder called wwwroot. If you have not used IIS on the
Central PC before, wwwroot is the default folder for IIS applications. The simplest option is to
create a CABLIS subfolder to the wwwroot folder.
If you use an alternate folder for IIS applications, the simplest option is to create a CABLIS
subfolder to that folder. The appendices provide instructions for finding the current IIS
application folder.
Alternatively, you can use any location on the central PC that suits you. For example, there might
be a location that is a better fit with your backup strategy. Create a CABLIS folder there.
3.5 Install the intranet application
In the previous step, you decided the location for the CABLIS folder that will hold the intranet
application.
If you haven’t already done so, create the CABLIS folder at your chosen location. Copy the
contents of the Intranet/CABLIS folder from the installation media to it.
If you chose a location that is not a subfolder of the IIS application folder, you will need to create a
virtual folder in IIS. The appendices explain how to do that.
Next, create an application pool for your application. That will allow you to start and stop the
Local Information System without interfering with any other intranet applications you might have.
The appendices explain how to do that.
Tell IIS your CABLIS folder is an application. The appendices explain how to do that.
Tell IIS that LIS.aspx is the default page for the CABLIS application. The appendices explain how to
do that.

Version 7 – Dated 8 February 2015 28
You should now be able to run the intranet application by navigating to http://localhost/CABLIS in
a browser on the central PC. The application won’t run properly yet (you’ll be setting it up in the
next section). Instead you’ll see an error message like this:

Version 7 – Dated 8 February 2015 29
4 Configuring the intranet application
At this point you will have created your intranet application but it doesn’t run successfully
because you have not yet configured your system.
You configure your system by updating text files known as configuration files. You can use any
text editor to do that. Windows Notepad, for example.
If you decide to run the desktop system in the same network as the intranet system, you can point
the intranet to the desktop configuration files. That means you can use the desktop Network
Install Program to change many of the configuration values to update both the desktop programs
and the intranet simultaneously.
If you host your intranet on the internet you will be unable to share config files with the desktop
version. You can copy the config files from your desktop installation (if you have one) or you can
create a single configuration file from scratch.
Changes to the Local Information System configuration files do not take effect straightaway. For
performance reasons, the intranet version reads the configuration files every four hours, or so,
and makes an internal copy. You can see the configuration values in effect at any time by
navigating to page ‘ShowConfigurationValues.aspx’. At the foot of that page you will see a ‘Reload
the cached values’ button. Click this to force the system to re-read the parameters immediately
instead of waiting for the next scheduled read. The change will update the values for everyone
using the system. They will not lose their session.
You will also need to update a file called web.config in your application folder. Note that updating
web.config will force the web server to reset. People will lose their sessions and they will get
logged out. You should not, therefore, update web.config while the system is being used heavily.
If you host your intranet on the internet you will have to update the files in your local copy and
use an FTP program to copy your changes to the web site.
The following sections cover how to:
1. Point the intranet at desktop configuration files
2. Create a Local Information System configuration file
3. Configure your database
4. Make sure links to documents work correctly
5. Configure password validation
6. Configure full text searching
7. Configure the logon rubric
8. Configure the text editor
9. Decide how to report unexpected errors
10. Test the Local Information System
11. Deal with problems
Version 7 – Dated 8 February 2015 30
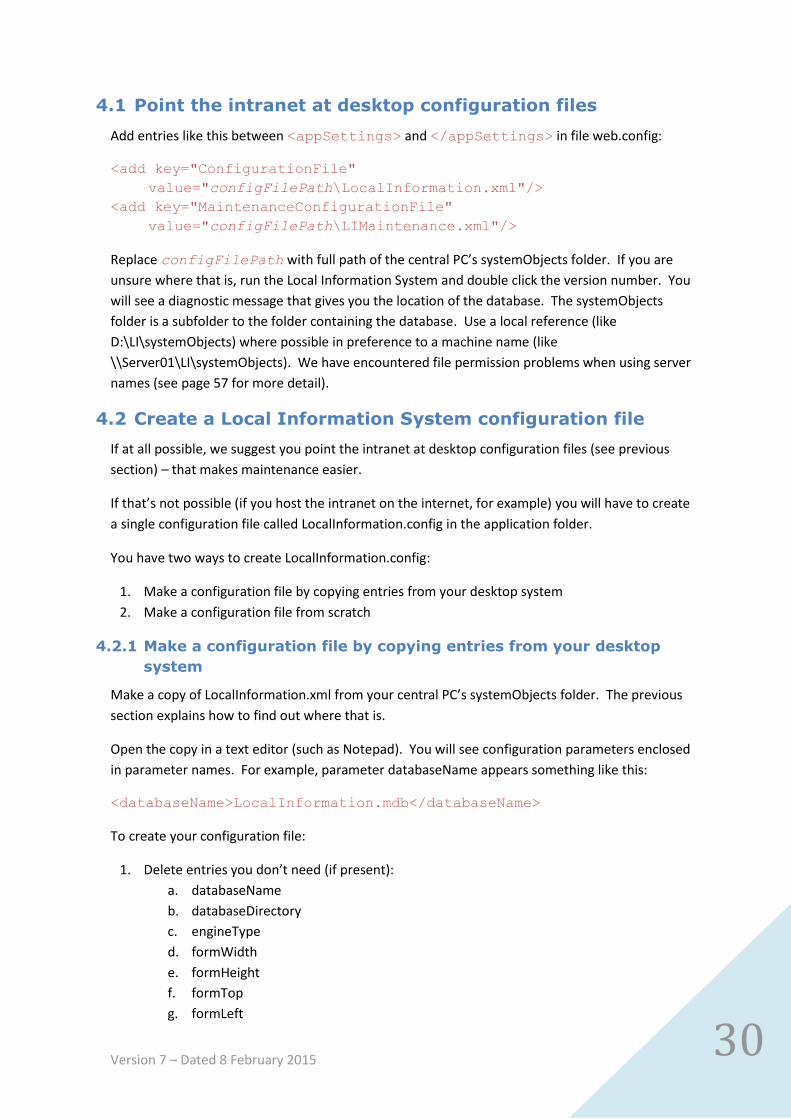
4.1 Point the intranet at desktop configuration files
Add entries like this between <appSettings> and </appSettings> in file web.config:
<add key="ConfigurationFile"
value="configFilePath\LocalInformation.xml"/>
<add key="MaintenanceConfigurationFile"
value="configFilePath\LIMaintenance.xml"/>
Replace configFilePath with full path of the central PC’s systemObjects folder. If you are
unsure where that is, run the Local Information System and double click the version number. You
will see a diagnostic message that gives you the location of the database. The systemObjects
folder is a subfolder to the folder containing the database. Use a local reference (like
D:\LI\systemObjects) where possible in preference to a machine name (like
\\Server01\LI\systemObjects). We have encountered file permission problems when using server
names (see page 57 for more detail).
4.2 Create a Local Information System configuration file
If at all possible, we suggest you point the intranet at desktop configuration files (see previous
section) – that makes maintenance easier.
If that’s not possible (if you host the intranet on the internet, for example) you will have to create
a single configuration file called LocalInformation.config in the application folder.
You have two ways to create LocalInformation.config:
1. Make a configuration file by copying entries from your desktop system
2. Make a configuration file from scratch
4.2.1 Make a configuration file by copying entries from your desktop
system
Make a copy of LocalInformation.xml from your central PC’s systemObjects folder. The previous
section explains how to find out where that is.
Open the copy in a text editor (such as Notepad). You will see configuration parameters enclosed
in parameter names. For example, parameter databaseName appears something like this:
<databaseName>LocalInformation.mdb</databaseName>
To create your configuration file:
1. Delete entries you don’t need (if present):
a. databaseName
b. databaseDirectory
c. engineType
d. formWidth
e. formHeight
f. formTop
g. formLeft
Version 7 – Dated 8 February 2015 31
h. formSplitterLeft
i. logDirectory
j. resultSortOrder
k. stopNewWindow
l. searchPrefix
m. searchSuffix
n. scale
o. zoomLevel
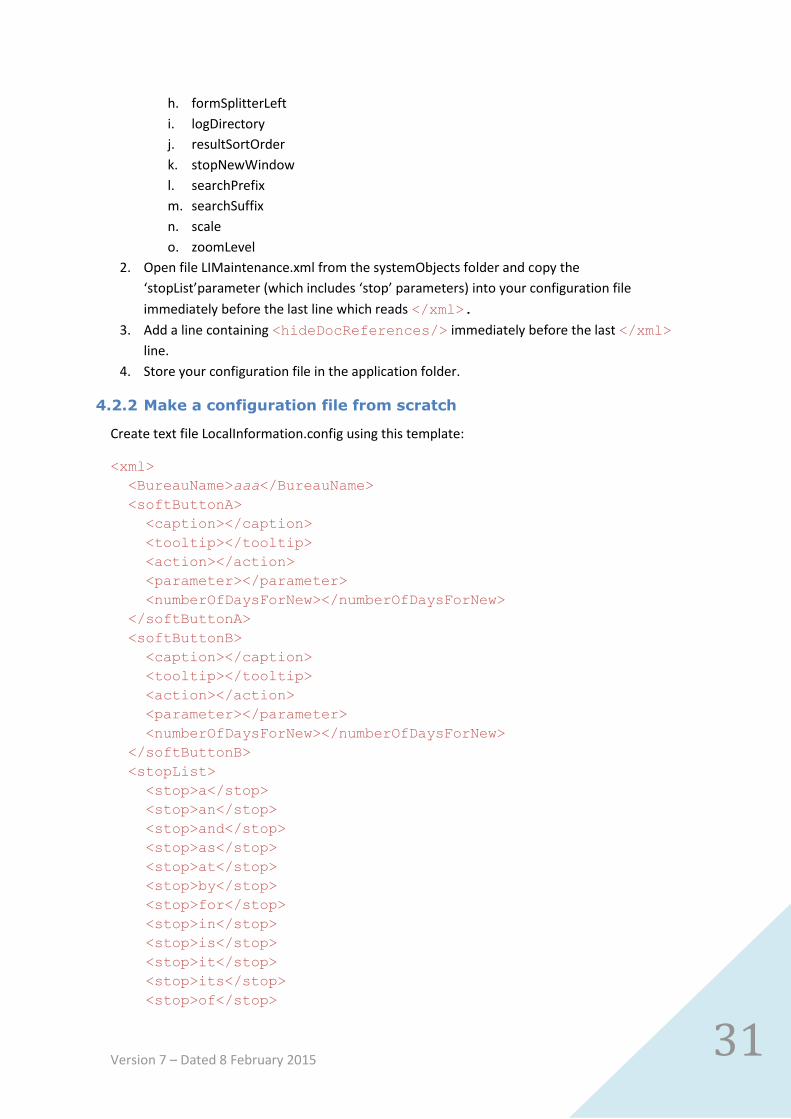
2. Open file LIMaintenance.xml from the systemObjects folder and copy the
‘stopList’parameter (which includes ‘stop’ parameters) into your configuration file
immediately before the last line which reads </xml>.
3. Add a line containing <hideDocReferences/> immediately before the last </xml>
line.
4. Store your configuration file in the application folder.
4.2.2 Make a configuration file from scratch
Create text file LocalInformation.config using this template:
<xml>
<BureauName>aaa</BureauName>
<softButtonA>
<caption></caption>
<tooltip></tooltip>
<action></action>
<parameter></parameter>
<numberOfDaysForNew></numberOfDaysForNew>
</softButtonA>
<softButtonB>
<caption></caption>
<tooltip></tooltip>
<action></action>
<parameter></parameter>
<numberOfDaysForNew></numberOfDaysForNew>
</softButtonB>
<stopList>
<stop>a</stop>
<stop>an</stop>
<stop>and</stop>
<stop>as</stop>
<stop>at</stop>
<stop>by</stop>
<stop>for</stop>
<stop>in</stop>
<stop>is</stop>
<stop>it</stop>
<stop>its</stop>
<stop>of</stop>

Version 7 – Dated 8 February 2015 32
<stop>on</stop>
<stop>or</stop>
<stop>to</stop>
<stop>the</stop>
</stopList>
<hideDocReferences/>
</xml>
Replace aaa with your bureau’s name (adding a trailing “-“ if you do not want the system to add
“Citizens Advice Bureau” after the name.
The stop list contains all the words that are ignored when indexing or searching the local
information database. You can remove words or add as many new ones as you want.
The <softButtonA> and <softButtonB> parameters control two optional buttons
displayed to the left hand side of the search page. Delete either or both parameters if you don’t
need it/them.
To use a soft button, complete the parameters for the button as follows:
caption - The caption that is shown on the button
tooltip - The tooltip that will be shown when someone hovers their mouse over the button
action - The action that will be taken if the button is clicked. One of:
o Index lookup. The button will run a search on the database as if the user had
entered one or more search terms and pressed the 'Search' button. Use parameter
to specify the search term(s) you want to use. You will also need to define how
many days back the program should look for new items when deciding whether to
highlight the button with a red border; specify zero if you do not want people to be
alerted to updates.
o Web lookup. The button will display a web page. That could be an often-used web
page, or it could be a link to a page that displays a list of useful links. Use parameter
to specify the address of the web page you want to show.
o Document lookup. The button will display a document from your network. Use
parameter to specify either the id of an item in your database or the address of a
document.
parameter - The parameter associated with the button action: either one or more search
terms, a web address, an item number or a document address
numberOfDaysForNew - the number of days the reader program should look back to decide
whether to highlight the soft button. “0” suppresses the alert. Used only if the action is
“Index lookup”.
Save your configuration file and store it in your application folder.

Version 7 – Dated 8 February 2015 33
4.3 Configure your database
If you intend to use the same database as your desktop system and you are sharing the same
configuration files, you have already configured your database. There’s nothing more to do.
Otherwise, the following sections describe how to configure different types of database:
1. SQL Server database
2. Access database stored locally
3. Access database via a connection string
If you create a new database, it will start empty and synchronisable. That means you can use the
synchronisation utility to copy the data from a desktop version of the Local Information System.
You will be unable to update the database via the web. We describe how to switch the database
to be updateable on page 59.
To start with your new database has just one maintenance id and password: TEST and TEST.
We describe strategies for capturing data into your new database on page 62.
4.3.1 SQL Server database
Your web site’s control panel will provide a way to:
Create a SQL Server database
Run a script against it to create the tables needed by the Local Information System
We provide the script you need in the installation media: /Intranet/Synchronisable
Databases/CreateLISDatabaseScript.sql
When you create your database you will be given a database name. You will need to update the
script with the name of your database – see the comments at the beginning of the script (you can
open it with Notepad) for more details.
We also provide a backup copy of an empty synchronisable database called SQLServer.bak which
might be a useful alternative to building the database from a script.
Your ISP will also give you a database administrator id, password and database address. Use these
to add a connection string like this…
<add name="LocalInformationSystem"
connectionString="Server=xxx;Database=yyy;User=zzz;Password=pp
p;Timeout=ttt;" />
… immediately below the line that reads <connectionStrings> in your web.config file,
where:
xxx is the database name
yyy is the address of the database
zzz is the database’s admin id
ppp is the password

Version 7 – Dated 8 February 2015 34
ttt is the time allowed to make a connection before it has been deemed to fail. The first
time you use a database in a day can take more than the default 15 seconds. We suggest an
initial value of 30.
Add the following parameter immediately after <appSettings> in your web.config file:
<add key="UseSql" value="yes" />
4.3.2 Access database stored locally
If your site supports Access databases, you can store the database as part of your application
without having to know its exact location on the server:
1. Create a folder called Database immediately below the application folder
2. Copy LocalInformation.mdb from the installation media: /Intranet/Synchronisable Databases
to your new Database folder
3. Add the following line to your LocalInformation.config file in the application folder:
<databaseName>LocalInformation.mdb</databaseName>
immediately after the line containing <xml>. Since you will not have provided a
<databaseDirectory> parameter, the system will automatically look for the database
in your Database folder.
4.3.3 Access database via a connection string
For complete flexibility, you can specify how to connect to an Access database using a connection
string. This method overrides any other database information in the configuration files.
If your ISP provided you with a connection string, add a line like this…
<add name="LocalInformationSystem" connectionString="xxx" />
… immediately below the line that reads <connectionStrings> in your web.config file,
where xxx is the connection string you’ve been given.
Otherwise add a line like this:
<add name="LocalInformationSystem"
connectionString="Provider=xxx;Data Source=yyy;Persist
Security Info=False;" />
… immediately below the line that reads <connectionStrings> in your web.config file,
where:
xxx is the name of the database connection software, Microsoft.ACE.OLEDB.12.0 to use the
Microsoft Database Engine or Microsoft.Jet.OLEDB.4.0 to use MDAC3.
yyy is the full path and name to your database. If you include “|ApplicationFolder|” in your
connection string the system replaces it with the path to your application folder.
3 If you are hosting your local information system on the web it is unlikely your ISP will support MDAC, try
MSDE. The TestFileReferences.aspx page (see on) lists all providers supported by your server.

Version 7 – Dated 8 February 2015 35
4.4 Make sure links to documents work correctly
We suggest you do not use document links if you are creating a system from scratch. Instead use
web links to retrieve documents from the document library or from the documents folder on your
web server. Web links are more flexible, easier to maintain and – if you use the document library
– can be access controlled. If your system has a small number of document links we suggest you
replace them with web links.
For documents in the document library use a link like this:
http://<site address>/getattachment.aspx?f=sampledocument.pdf
For documents in the document folder use a link like this:
http://<site address>/documents/sampledocument.pdf
If you don’t use – or plan to use – document links in your Local Information System, you can skip
the rest of this step.
The desktop system supports two types of link from an item in the database:
1. Web links are links to pages or documents held on a web server
2. Document links are links to documents (including static HTML pages) held by a file server
Security measures in web browsers mean that document links served through the intranet version
will be blocked even though they work fine in the desktop version. To be useful in the intranet,
document links have to be converted to web addresses. If you want to retain document links, you
need to tell the system to convert them to point to the document library or a subfolder of the
Local Information System. The way you do this depends on whether your database is hosted on
the internet, or not.
4.4.1 Intranet hosted on the internet – using the document library
First identify all the documents linked to by document links in your database and upload them to
the document library. Then add an entry like this this between <appSettings> and
</appSettings>:
<add key="DocumentLinkReplacements" value="replacementList"/>
where replacementList is a sequence of text items separated by |. The items are in pairs:
the first being part of a document link to replace; the second being the text to replace it.
Suppose your documents are all held in a folder referenced as \\Server\DocLib. You would need
to add a parameter like this:
<add key="DocumentLinkReplacements"
value="file:///\\Server\DocLib\|GetAttachment.aspx?f="/>

Version 7 – Dated 8 February 2015 36
This would convert a document reference like: \\Server\DocLib\Subfolder\Document.pdf to:
GetAttachment.aspx?f=Document.pdf which can be linked successfully from a web browser4.
Note that “file:///” is automatically prepended to document links that do not already start with
“file:”.
Suppose you also had a folder referenced as d:\AnotherLib you would need to add a parameter
like this:
<add key="DocumentLinkReplacements" value=" file:///\\Server\DocLib\|GetAttachment.aspx?f=| file:///\\Server\DocLib\Subfolder\|GetAttachment.aspx?f="/>
This would convert a document reference like: d:\AnotherLib\Document2.pdf to:
Documents\AnotherLib\Document2.pdf.
You can add as many pairs as you need to convert all your document references.
Note you will need to keep your local document libraries and the documents library on the web in
step with each other if people are not to see different documents via the intranet and the
desktop.
4.4.2 Intranet hosted on the internet – using the documents folder
You have no choice but to copy your documents to the web site since an internet hosted web site
cannot connect to your local network.
Identify all the folders linked to by document links in your database. If a folder contains
documents in several subfolders, that counts as just one folder; you do not need to map the
subfolders. Then:
1. Create a subfolder to the application folder for each document folder giving each one a
unique name.
2. Copy the documents from each local folder to the equivalent document folder on the web.
3. Add an entry like this between <appSettings> and </appSettings>:
<add key="DocumentLinkReplacements" value="replacementList"/>
where replacementList is a sequence of text items separated by |. The items are in pairs: the first being part of a document link to replace; the second being the text to replace it.
4 Case doesn’t matter when specifying replacements. “\\Server” will match “\\server”, for example.

Version 7 – Dated 8 February 2015 37
Suppose your documents are all held in a folder referenced as \\Server\DocLib. Suppose you created a web folder called “Documents” containing the same documents as DocLib. You would need to add a parameter like this:
<add key="DocumentLinkReplacements"
value="file:///\\Server\DocLib\|Documents\"/>
This would convert a document reference like: \\Server\DocLib\Subfolder\Document.pdf to: Documents\Subfolder\Document.pdf which can be linked successfully from a web browser5.
Note that “file:///” is automatically prepended to document links that do not already start with “file:”.
Suppose you also had a folder referenced as d:\AnotherLib and you created a subfolder to Documents called AnotherLib containing the same documents. You would need to add a parameter like this: <add key="DocumentLinkReplacements"
value="file:///\\Server\DocLib\|Documents|file:///d:\AnotherLi
b|Documents\AnotherLib\"/>
This would convert a document reference like: d:\AnotherLib\Document2.pdf to: Documents\AnotherLib\Document2.pdf.
You can add as many pairs as you need to convert all your document references.
Note you will need to keep your local document libraries and the documents folder on the web in step with each other if people are not to see different documents via the intranet and the desktop.
4.4.3 Intranet hosted on your local network
Identify all the folders linked to by document links in your database. If a folder contains
documents in several subfolders, that counts as just one folder; you do not need to map the
subfolders. Then:
1. Create a virtual folder for each document folder giving each one a unique name. The
appendices explain how to do this.
2. Add an entry like this between <appSettings> and </appSettings>:
<add key="DocumentLinkReplacements" value="replacementList"/>
where replacementList is a sequence of text items separated by |. The items are in pairs: the first being part of a document link to replace; the second being the text to replace it.
Suppose your documents are all held in a folder referenced as \\Server\DocLib. Suppose you created a virtual folder called “Library” pointing to the folder. You would need to add a parameter like this:
5 Case doesn’t matter when specifying replacements. “\\Server” will match “\\server”, for example.

Version 7 – Dated 8 February 2015 38
<add key="DocumentLinkReplacements"
value="file:///\\Server\DocLib\|Library\"/>
This would convert a document reference like: \\Server\DocLib\Subfolder\Document.pdf to: Library\Subfolder\Document.pdf which can be linked successfully from a web browser6.
Note that “file:///” is automatically prepended to document links that do not already start with “file:”.
Suppose you also had a folder referenced as d:\AnotherLib and you created a virtual folder called AnotherLib pointing to the folder. You would need to add a parameter like this:
<add key="DocumentLinkReplacements"
value="file:///\\Server\DocLib\|Library|file:///d:\AnotherLib|
AnotherLib"/>
This would convert a document reference like: d:\AnotherLib\Document2.pdf to: AnotherLib\Document2.pdf.
You can add as many pairs as you need to convert all your document references.
4.5 Configure password validation
When someone logs in to the intranet, we show a button allowing them to change their password
in the left hand panel of the main search page.
By default, the following validation rules are applied to new passwords:
The password must be at least 6 characters
It must contain at least one upper and lower case character
It must contain at least one character that is not alphabetic or numeric
You can change the default by adding the following below <appSettings> in web.config:
<add key="PasswordValidationString" value="abc"/>
where:
a = “n” to disable the mixed case check, anything else to enable it
b = “n” to disable the special character check, anything else to enable it
c = the minimum number of characters allowed in new passwords
4.6 Configure full text searching
If you are using a SQL server database then the system supports full text searching by default.
This allows people to search all the text of an item. The mechanism for doing that is not very
efficient, however. If you find it affects performance, or runs too slow, you can disable full text
searching by adding this line below <appSettings> in web.config:
<add key="SuppressFTSearch" value="yes" />
6 Case doesn’t matter when specifying replacements. “\\Server” will match “\\server”, for example.
Version 7 – Dated 8 February 2015 39
4.7 Configure the logon rubric
You can change the text shown to people logging on to the system. For example, you could tell
people who to go to if they do not have a user id. You specify the rubric you want to use by
adding a <LogonRubric> setting below <appSettings> in web.config. You can include
new lines in the setting which are translated into new lines in the rubric. The default value is:
<add key="LogonRubric" value="Please provide your Local
Information System user id and password to gain access to the
system" />
4.8 Configure the document library
Use a MaximumAttachmentSize setting to specify the largest size of document (in Mb) allowed in
the document library. For example:
<add key="MaximumAttachmentSize" value="2"/>
The web server has its own size restriction to limit the size of uploads. This check is implemented
before the checks implemented by the document library. It’s possible that your ISP prevents you
from overriding their limitation. If not, you can specify a web.config entry like this immediately
below <system.web> in your web.config file:
<httpRuntime maxRequestLength="xxx" />
where xxx is the new upload limit expressed in kilobytes. The standard default is 4096 (= 4Mb).
Use a AllowedAttachmentExtensionList setting to provide the list of file extensions allowed in your
document library. Use a | character to separate each entry in the list. For example:
<add key="AllowedAttachmentExtensions"
value="pdf|xls|xlsx|doc|docx|ppt|pptx|txt|bmp|jpg|jpeg|png|gif"/>
4.9 Configure the text editor
We use a third party tool called CKEditor to edit the text of an item. You can read more about it at
ckeditor.com
We provide support to configure:
The editor toolbar
The tags shown by the ‘Format’ drop down
One or more templates for database items
4.9.1 The editor toolbar
CKEditor allows you to modify the features available via the toolbar. You can change those
settings using an EditorToolBar setting below <appSettings> in web.config. The CKEditor
documentation lists the available options. The default value is:
<add key="EditorToolBar” value=”Bold|Italic|Underline|Strike|-
|Subscript|Superscript|-|RemoveFormat

Version 7 – Dated 8 February 2015 40
NumberedList|BulletedList|-|Outdent|Indent|-|Blockquote|-
|JustifyLeft|JustifyCenter|JustifyRight
Cut|Copy|Paste|PasteText|PasteFromWord|-|Undo|Redo
/
Table|HorizontalRule|SpecialChar
Link|Unlink
Format|TextColor|BGColor
Find|Replace|-|SelectAll|-|SpellChecker
ShowBlocks|About” />
The documentation also explains how to create templates that you can apply via the toolbar.
4.9.2 The ‘Format’ dropdown
You can decide which tags are shown in the ‘Format’ dropdown by adding an
<EditorFormatTags> setting below <appSettings> in web.config. The default value is:
<add key="EditorFormatTags” value=”p;h1;h2;h3” />
4.9.3 Editor templates
CKEditor allows you to apply one or more templates to items. You’ll need some understanding of
JavaScript to set up a template. There’s more information at:
http://docs.cksource.com/CKEditor_3.x/Developers_Guide/Templates
NB:
You have to add “Templates” to your toolbar definition to see the Template drop down
Use setting <EditorTeplatesFiles> in web.config to instruct CKEditor to use them.
You can specify either a single file, or multiple files separated by commas.
Use definition set name “lis” to register the set automatically. If you want to use a different
set name, define it with a <EditorTemplates> setting in web.config, the default is:
<add key="EditorTemplates” value=”lis” />
Each template definition must have an image, even if it’s just a single transparent pixel
4.10 Decide how to report unexpected errors
By default, if the system encounters an unexpected error, it will display a standard diagnostic page
to the person using the system. This is likely to be most useful while you are setting the system up
for the first time. In general use, however, it’s common for people to ignore this kind of error or,
worse, complain of a problem but not provide any diagnostic data from the page. You can
therefore opt to have details of unexpected errors sent to one or more email addresses.
For this option to work, your central PC will need to connect to an SMTP server. Most ISPs
provide one that you can use.

Version 7 – Dated 8 February 2015 41
To email error messages:
1. Add entries like these before the </configuration> line at the end of your web.config
file:
<system.net>
<mailSettings>
<smtp deliveryMethod="Network" from="returnAddress">
<network host="smtpServerAddress"
userName="smtpUserId"
password="smtpPassword"
port="smtpPortNumber" />
</smtp>
</mailSettings>
<system.net>
2. Add an entry like this between <appSettings> and </appSettings>:
<add key="ErrorEmailAddress" value="destinationEmailAddress"
/>
Where:
1. returnAddress is the return address shown on the emails. Normally, the address
doesn’t have to exist, but some ISPs might require you to use the domain you registered
with the ISP.
2. smtpServerAddress is the server’s SMTP address, for example: auth.smtp.server.co.uk
3. smtpUserId and smtpPassword are the credentials for logging on to the SMTP server
4. smtpPortNumber the port required by your ISP, if in doubt try 25
5. destinationEmailAddress is the address that should receive the emails; you can
specify multiple email addresses separated by commas (not semicolons)
You can test the above parameters by displaying the TestReferences.aspx page in a browser. Look
for the ‘Test error emailing’ link.
Note that, if you set up any parameters incorrectly, the system will fall back to displaying the
standard diagnostic page.

Version 7 – Dated 8 February 2015 42
4.11 Test the Local Information System
You should now be able to run the system. You should see a page something like this:
Try running a search – even if the system doesn’t find a match you will have tested database
access.
The following sections help you decide the URLs to use for:
1. Intranet hosted on the internet
2. Intranet hosted on your network
Version 7 – Dated 8 February 2015 43
4.11.1 Intranet hosted on the internet
You can test the system from any internet connected device. You should now be able to run the
intranet application by navigating to your web site’s URL. You will need to append /CABLIS to the
URL if you created a CABLIS application folder.
4.11.2 Intranet hosted on your network
Start by trying to navigate to the site on the central PC. That will ensure there are no network
issues to get in the way. Use:
http://localhost/CABLIS/
If that works OK, test the site is available from the rest of your network. You found the internet
address of the central PC in step 4 above. Go to any PC on the network, start a browser and
navigate to:
http://internetAddress/CABLIS/
where internetAddress is the internet address of the central PC. You should see the same page.
You can now start using the intranet version of the Local Information System.
4.12 If you encounter a problem
The error message you see might be sufficient for you to determine and fix the problem. If not we
provide two web pages to allow you to investigate further…
TestFileReferences.aspx
This page tests out all the file references made by the system and provides more diagnostics. If
the page doesn’t help, send us screen shots of the error you get running CABLIS and the
TestFileReferences.aspx page (as shown in a web browser), and we’ll try to help.
ShowConfigurationValues.aspx
This page shows you all the configuration values being used by the application. It might help you
work out why the system is not running the way you expect. Note that changes to configuration
values do not have immediate effect. The system stores configuration values internally for
performance reasons and updates them every four hours, or so. The ShowConfigurationValues
page displays a ‘Reload the cached values’ parameter at the bottom of the page so you can force
the system to read the latest configuration values.
Version 7 – Dated 8 February 2015 44
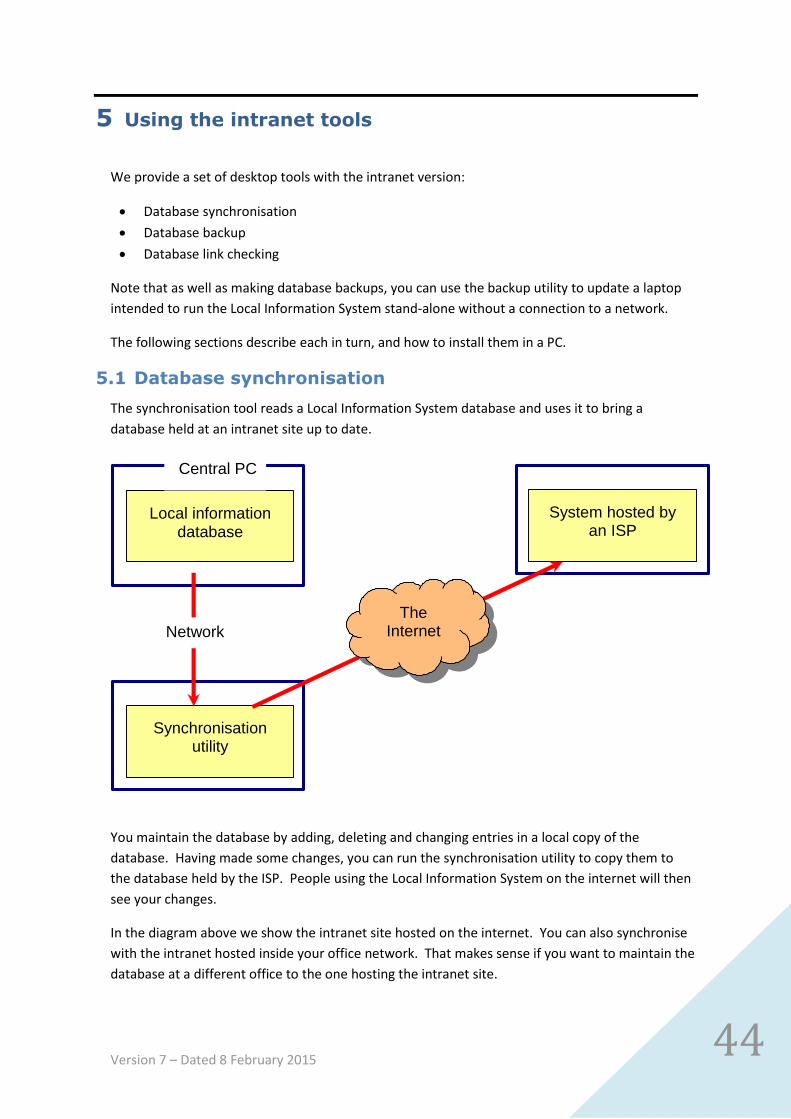
5 Using the intranet tools
We provide a set of desktop tools with the intranet version:
Database synchronisation
Database backup
Database link checking
Note that as well as making database backups, you can use the backup utility to update a laptop
intended to run the Local Information System stand-alone without a connection to a network.
The following sections describe each in turn, and how to install them in a PC.
5.1 Database synchronisation
The synchronisation tool reads a Local Information System database and uses it to bring a
database held at an intranet site up to date.
Local information database
Central PC
Synchronisation utility
System hosted by an ISP
Network
The Internet
You maintain the database by adding, deleting and changing entries in a local copy of the
database. Having made some changes, you can run the synchronisation utility to copy them to
the database held by the ISP. People using the Local Information System on the internet will then
see your changes.
In the diagram above we show the intranet site hosted on the internet. You can also synchronise
with the intranet hosted inside your office network. That makes sense if you want to maintain the
database at a different office to the one hosting the intranet site.

Version 7 – Dated 8 February 2015 45
A synchronisable intranet database is slightly different to the normal version. You can’t use an
updateable database if you intend to synchronise with it. Instead we provide ‘synchronisable’
versions of both Access and SQL Server databases in the distribution media.
The synchronisation utility is called SynchLIData.exe. When you run it, you see this form:
If you’ve used it before, you’ll see the URL and Database fields filled in for you. The URL is the URL
of the web service processor page: LISService.asmx. For example:
http://www.yourbureaulis.org.uk/LISService.asmx. The Database field should be the address of
the local copy of the Local Information System database – you can use the ‘?’ button to browse to
it.
The user id and password must be a valid maintenance id and password held in the remote
version of the database. If you’re starting with one of the empty databases we provide, use id
‘TEST’ and password ‘TEST’.
The ‘Force updates’ option is provided in case the dates in the database get misaligned for any
reason. It forces all entries in the remote database to be updated.

Version 7 – Dated 8 February 2015 46
If the utility detects there are no changes you see a message telling you. Otherwise you will see a
form like this:
Click ‘Yes’ to synchronise your changes. You will then see this message:
If there are user groups defined in either the local or remote system, you will see this message:
The synchronisation program assumes you are restoring a system backup because groups cannot
be maintained in the desktop system. If you don’t want to synchronise groups reply ‘No’. You will
see a follow-up warning if there are groups defined in the remote system but not the local one
(because synchronisation will delete group information from the remote system).

Version 7 – Dated 8 February 2015 47
If you decide not to synchronise group information, you will see this message:
Having synchronised group information or user information, you will see one of these messages:

Version 7 – Dated 8 February 2015 48
5.2 Database backup
The backup tool makes Access database copies of a database held by the intranet.
Backup utility
Intranet hosted at an ISP
The Internet
Database copy(s)
The diagram shows the tool working with a database hosted on the internet, but it works just as
well with databases hosted in your network. The database copies can be made on the same PC
that runs the tool or any other PC on your network.
The tool is a console application – it doesn’t require you to enter any data. That means you can
use Windows task scheduler to schedule a backup to run daily overnight, for example. The
technology we use means the database being backed up can be in use at the time the backup is
run.
NB, the technology we use in the backup tool and in the synchronisation tool used to restore data
is incompatible with the document library. The document library is not backed up by the backup
tool. Instead we suggest you keep a copy of every document you upload to the library. If you need
to restore the library, you can simply re-upload the documents.
The backup tool is called BackupLIData.exe. It runs in one of two modes:
1. Auto – automatically keeps a specified number of backups automatically; backups are
named with the date and time each backup was performed.
2. Overwrite – overwrites the same file every time the backup is run.
The overwrite mode is intended for situations when you what to copy a database to a laptop that
is to be used without a network connection – at an outreach location, for example. The backup
Version 7 – Dated 8 February 2015 49
database is not updateable. It can, however, be used by either the intranet or the desktop version
to enquire on the local information database.
To run the tool, create a batch file (a text file with the extension .bat) containing a single line like
this:
path\BackupLIData.exe mode ~ address ~ id ~ password ~ folder ~
backup count
Where:
path\ is the path to the tool on your PC
mode is either “auto” or “overwrite”
address is the address of the web service processor page: LISService.asmx; for example:
http://www.yourbureaulis.org.uk/LISService.asmx
id is a valid intranet user id
password is the password for the id
folder is the path to the backup folder containing the backup template and backup files
backup count is needed only for auto mode and determines how many backup copies
are kept in the backup folder
The backup folder contains the following:
A template database called ‘LocalInformation.mdb.template’ used to create empty
databases that are populated by the backup utility
Diagnostic information produced by the most recent backup in a file called ‘Progress.txt’
Either the latest backup called ‘LocalInformation.mdb’ if you use ‘Overwrite’ mode or a set
of backups called:
LocalInformationyyMMddhhmmss.mdb
where ddMMyy is the date the backup was made and hhmmss is the time. We chose that
file naming convention so that you can easily sequence the folder to show the latest backup
first.
We provide the template file in folder /Intranet/BackupFolder of the installation media. You don’t
need to create any of the other files, they are created automatically.
We don’t provide a restore tool because you can use the synchronisation tool to restore your
database. We suggest the following procedure which assumes the intranet database is
updateable7:
7 If you update the database using the desktop tools and synchronise it with the intranet, your backup strategy
should be based around the desktop database, not the intranet one.

Version 7 – Dated 8 February 2015 50
1. Make a backup of the intranet database before you start – even if you know it’s in a dodgy
state. The data it holds might still be useful if there’s a problem with the restore process.
For internet-hosted databases, your ISP will provide the means to make backups.
2. Use page DatabaseUpdater.aspx to delete all the data in the intranet database.
3. Make the intranet database synchronisable (see page 59).
4. Run the synchronisation tool, specifying the most recent database copy as the source
database and the intranet as the target. This will automatically restore the database and
rebuild the indexes.
5. Make the intranet database updateable (see page 59).
5.3 Database link checking
The link checking tool helps you check to see if the web links in your database are still working. It
works in a very similar way to the web link checking tool in the desktop version.
Link checker
Intranet hosted at an ISP
The Internet
The diagram shows the tool working with a database hosted on the internet. It works just as well
with databases hosted in your network, but you might find that the desktop link checker works
faster in this situation.
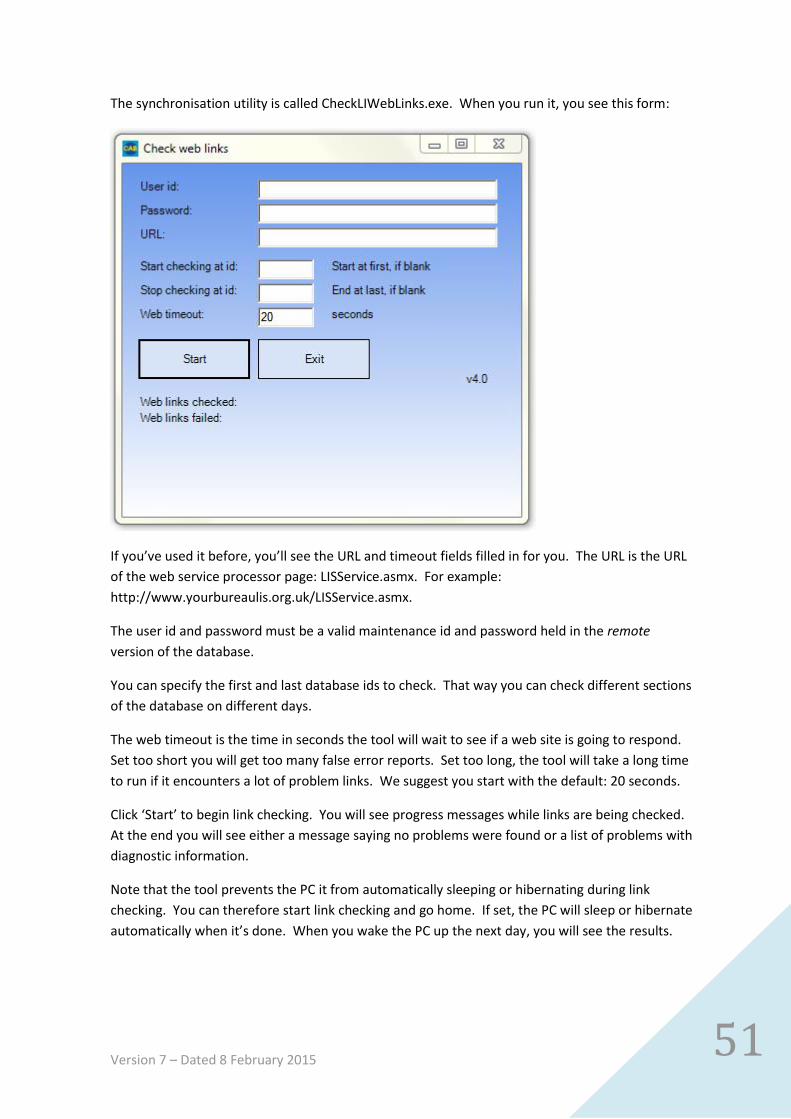
Version 7 – Dated 8 February 2015 51
The synchronisation utility is called CheckLIWebLinks.exe. When you run it, you see this form:
If you’ve used it before, you’ll see the URL and timeout fields filled in for you. The URL is the URL
of the web service processor page: LISService.asmx. For example:
http://www.yourbureaulis.org.uk/LISService.asmx.
The user id and password must be a valid maintenance id and password held in the remote
version of the database.
You can specify the first and last database ids to check. That way you can check different sections
of the database on different days.
The web timeout is the time in seconds the tool will wait to see if a web site is going to respond.
Set too short you will get too many false error reports. Set too long, the tool will take a long time
to run if it encounters a lot of problem links. We suggest you start with the default: 20 seconds.
Click ‘Start’ to begin link checking. You will see progress messages while links are being checked.
At the end you will see either a message saying no problems were found or a list of problems with
diagnostic information.
Note that the tool prevents the PC it from automatically sleeping or hibernating during link
checking. You can therefore start link checking and go home. If set, the PC will sleep or hibernate
automatically when it’s done. When you wake the PC up the next day, you will see the results.

Version 7 – Dated 8 February 2015 52
5.4 Installing the database tools
If you have installed the desktop system on your PC, there’s nothing to do. The tools are already
installed. You’ll find them in the Local Information System folder – c:\Program
Files\CITA\CABLocalInformation by default.
Otherwise, you will have to:
1. Install version 1.1 of the .NET framework – an appendix to the desktop installation guide
(contained in the systemDocumentation folder of the installation media) explains how to do
that.
2. Install the Microsoft Access Database Engine – again, see the appendices to the desktop
installation guide.
3. Copy the tool(s) you need from the systemObjects folder to your PC (Microsoft security rules
prevent you from running them from a server) together with file vbpowerpack.dll

Version 7 – Dated 8 February 2015 53
6 Security
This section describes various aspects of security:
1. User ids and passwords
2. Logging out
3. User groups
4. Internet issues
5. Documents stored in folders
6. Documents stored in the document library
7. Folder permissions
8. Working with tablets
6.1 User ids and passwords
The Local Information System allows you to specify two types of user id:
1. Web users are allowed to search the database and view results
2. Maintenance users have the same access as web users but they can also update the data in
the Local Information System. Maintenance users can also run the database tools
To start with, your database contains just one maintenance user (id: TEST, password: TEST). If you
synchronise with a local database, the TEST id is replaced with the ids and passwords in your local
system.
You can add, delete and change ids and passwords in one of two ways:
1. If you update your database via the web, maintenance users have access to page
MaintainUsers.aspx (see the online help pages for more detail)
2. If you make changes by synchronising with a local database, use the CABLIAccess.exe utility
to update your local database and synchronise those changes to the intranet – see the
Technical Overview provided in folder systemDocumentation of the installation media
If you do not create any web users, the Local Information System assumes you do not want to
control access to searches; people will be able to access the data without an id or password. If
you create one or more web users, the system will require everyone accessing the system to enter
a valid id and password. You can override this behaviour by adding one of two settings in the
<appSettings> section of web.config. This setting forces everyone to enter an id and password
even if you do not have any web users:
<add key="ForceSecure" value="yes" />
This setting allows access to the system without an id and password even if you have defined web
users:
<add key="AllowAnonymous" value="yes" />

Version 7 – Dated 8 February 2015 54
Having logged on, people can change their passwords any time using the ‘Change password’
button towards the bottom of the main search page. You can control how passwords are
validated via system configuration. See page 38 for more detail. To prevent any web user from
changing their password, add this setting to web.config:
<add key="SuppressChangePassword" value="yes"/>
Alternatively, you can specify whether individual groups of users can change their own passwords,
see the ‘User groups’ section on page 54.
To help people log on to the system and find out who to contact in the event of problems – like
forgetting their password – you can provide your own text at the top of the logon page. See page
39 for more detail.
6.2 Logging out
In developing the system we have created a compromise between usability and security. We have
implemented a regime that means people using the database stay logged on to the system while
they are using the main search page. The alternative would mean people having to log back on if
they left the system idle for more than 20 minutes or so – which would be onerous.
The compromise is that someone could – in some situations – use the browser ‘back’ button to
gain access to the system even if you click the ‘Log out’ button. The only sure way to prevent this
is to close your browser down having logged out. You will see a message explaining this when you
click the ‘Log out’ button.
6.3 User groups
Version 5 of the intranet version of the Local Internet System introduced user groups. User
groups allow you to control how the system behaves for different groups of users. For each
group, you can:
Hide database entries
Hide sections of database entries
Prevent/allow access to features of the system
Change how the system appears
The following sections explain how to:
Create user groups
Assign web users to groups
Assign anonymous users to groups
Hide items and sections of items from groups
Configure the system using groups
Note that user groups have no effect on maintenance users or users of the desktop version.

Version 7 – Dated 8 February 2015 55
6.3.1 Create user groups
We provide page MaintainGroups.aspx to add, change and delete user groups. For each group,
maintenance users specify whether people can:
see the additional search buttons
see any soft keys you have defined
see the ‘Log in’ button
see the ‘Change password’ button
See the system help for more information.
6.3.2 Assign web users to groups
The MaintainUsers.aspx page allows maintenance users to add, change and delete web users. The
same page can also assign web users to groups. See the system help for more information.
6.3.3 Assign anonymous users to groups
If a web user logs in with an id and password, their group is obtained from their id.
Maintenance users do not have a group; they always have access to everything.
Anonymous users are people that don’t log in. In order to control their access they need to be
assigned a group. The DefaultGroupList setting in web.config allows you to do that.
To set a default group for an anonymous user provide pairs of strings separated by | characters.
The first string is used to match with the request URL. If the text matches part of the request URL
(case is ignored), the second string is used as the default group id. The first match is used.
Specify a blank first string to force a default group regardless of URL.
Specify a blank second string to specify matching requests should not have a group.
For example, this setting will put all anonymous users in a group called Anonymous:
<add key="DefaultGroupList" value="|Anonymous"/>
Suppose you have system hosted in the internet that serves two different areas and you want
anonymous users in each area to not see items that are specific to the other area. You need to
assign users to a group based on their area. To do that, you could use your control panel to define
subdomains like this:
towna.areacablis.org.uk
townb.areacablis.org.uk
towna and townb are subdomains and you will normally be able to create them without charge.
You would point both subdomains to the CABLIS folder on your web site so they run the same
code against the same database. The following setting…
<add key="DefaultGroupList" value="towna.|TownA||TownB"/>

Version 7 – Dated 8 February 2015 56
… would assign all users using the ‘towna’ address to group TownA and all other anonymous users
to group TownB.
6.3.4 Hide items and sections of items from groups
When you add or change an entry in the database, you will see a ‘Hide from…’ section that allows
you to select the groups that shouldn’t see the item. All searches and attempts to access the item
directly made by the groups you select will behave as if the entry does not exist.
You can also embed [HideFrom] tags in the text of an item to hide parts of the text from specified
groups. For example:
[HideFrom TownA Anonymous]This text will not appear to groups
TownA and Anonymous[/HideFrom]
See the system help for more information.
6.3.5 Configure the system using groups
You can configure how the system appears to different groups using three web.config settings:
AlternateHelpPageList, AlternateSearchPageHelpList, AlternateSplashPageTextList. In each case,
data items are provided in pairs with each item being separated by a | character. The first item of
the pair is a group id, the second item of the pair provides the data relevant to that group. If you
specify an item for a blank group it is used for all groups (including anonymous users and users
without groups) that have not been specified previously. The system ignores any following pairs
once it has made a match.
The AlternateHelpPageList setting provides the address of a web page that you have created to
provide help tailored for the specified group(s). It is shown whenever someone from the specified
group(s) click the help button on the main search page. For example…
<add key="AlternateHelpPageList"
value="Anonymous|/simplehelp.html"/>
… could show a simplified version of the supplied help text for anonymous users.
The AlternateSearchPageHelpList setting provides text to be shown immediately below the
search buttons on the main search page. The text should be valid HTML starting with a <p> tag
and ending with a </p> tag. You cannot use < or > in settings, so use [ and ] instead. Use [[ to
specify a [ character and ]] for a ] character.
For example:
<add key="AlternateSearchPageHelpList" value="Anonymous|[p]Some
simplified help text for anonymous users[/p]" />
The AlternateSplashTextList setting provides text to be shown when people first load the main
search page. By default, the system shows the Constructive IT Advice logo followed by text
including your organisation's name and an attribution to CITA. Provide valid HTML here to replace
the logo and bureau-specific text. For example:

Version 7 – Dated 8 February 2015 57
<add key="AlternateSplashTextList" value = "Anonymous|[p]This is
the text to show to anonymous users[/p]" />
6.4 Internet issues
Placing your Local Information System on the internet raises concerns because it is then open to
attack from anyone with access to the internet.
You have some assurance because:
Microsoft builds security into its server software
As developers, we have been trained in and understand internet security exposures
No system is 100% secure, but you can be confident your system will resist all likely attackers. In
particular, we have specifically addressed the two most common vulnerabilities known as cross-
site scripting and SQL injection.
There are two steps you should take, however, to help protect your system on the internet once
you have installed it successfully:
1. Remove file TestFileReferences.aspx from your application folder (you can reinstate it later if
necessary). This removes a diagnostic page that can reveal information useful to people
trying to attack your system.
2. Prevent the system from displaying standard error messages by using email to report
unexpected errors – more detail on page 40. This forces the system to replace the standard
error messages (which contain information that could help an attack) with the message:
“Details of the error have been emailed to your Local Information System administrator(s).”
6.5 Documents stored in folders
The system allows you to store documents on the server and reference them via links attached to
entries in the database.
You should be aware that documents uploaded this way are not protected. Anyone who knows
the address of a document stored on the intranet server can access that document without having
a user id and password.
We anticipate this won’t be a problem for most documents. Note that you can use encryption to
protect sensitive documents. Microsoft Office supports encryption as standard. The encryption
provided by versions earlier than Office 2007 is not secure, however.
A better storage method is the document library…
6.6 Documents stored in the document library
Documents uploaded to the document library are stored in the Local Information System
database, not in a folder on the server. That means we can control access to the documents since
the only way to access the documents directly is via the Local Information System.

Version 7 – Dated 8 February 2015 58
For the time being we provide two-level access control. Documents are either available to anyone
including anonymous users, or they require a the requester to log in with a valid user id and
password.
6.7 Folder permissions
The most common problem people have encountered when installing the intranet version on
their network is that files and folders are inaccessible because of permissions problems.
Internet Information Server creates and uses local users rather than domain users. That means IIS
might not have access to files and folders that seem to be widely available to people on your
network. The simplest way to overcome permissions issues is to grant access to the “Everyone”
group which includes local users. The “All Domain Users” group doesn’t include local users. If you
want to fine-tune access, the id used by IIS is the one identified in the application’s application
pool - see the appendices for more detail.
Permissions problems can also arise when you use a server reference to start a path name when
referring to files used by the intranet. Again, because IIS uses local users, it might not have access
to server files when ‘normal’ users – registered to your domain – do. This can be particularly
puzzling if the server you are referring to is the one on which the intranet is running – because the
request is routed via your network it is treated as a request from outside the server. We
therefore recommend you avoid server references where possible, using local references or
mapped network drives instead.
6.8 Working with tablets
From the Local Information System point of view, the only difference between a tablet PC and an
ordinary one is that tablet PC’s have to be connected to a local network via WiFi. You will want to
ensure that the WiFi network cannot be used by unauthorised people. The best way to do that is
to implement access controls via your WiFi router. We suggest you:
1. Restrict access to the router to specific MAC addresses (these uniquely identify each piece of
equipment that connects to a network)
2. Change the default admin password for the router to a complex password (Googling for
GUID generator will find several sites that can generate a complex password)
3. If your tablet can connect without it, prevent your router from broadcasting a security
identifier (SID)
4. Implement the strongest network encryption your router supports - avoid ‘Wired
Equivalence Privacy’(WEP) which is easily cracked

Version 7 – Dated 8 February 2015 59
7 Switching between synchronisable and updateable
databases
There are two major versions of the Local Information System database:
Updateable databases can be updated directly using the desktop maintenance program or
the intranet Edit Item page. You cannot make an updateable database the target of a
synchronisation.
Synchronisable databases cannot be updated directly. Instead changes can be made only
through synchronisation.
The database installed by the desktop installer is updateable.
The database installed by the intranet installation procedure is synchronisable.
There are two main reasons why you might want to switch a database between synchronisable
and updateable:
1. You are setting up a new intranet system that you want to be updateable
2. You want to restore an updateable database from a backup
The following sections explain how to:
1. Switch SQL Server databases
2. Switch an Access database from synchronisable to updateable
3. Switch an Access database from updateable to synchronisable
Switch SQL Server databases
Maintenance users can open the database updater page: DatabaseUpdater.aspx.
The database updater allows you to switch between the two types of database online.
For example, to restore a SQL Server database from a backup:
1. Make a backup copy of the old database using the ISPs backup features (just in case)
2. Use the database updater to:
a. Make the database synchronisable
b. Remove all data from the database
3. Synchronise data from your backup copy to the intranet
4. Use the database updater to make the database updateable again
Switch an Access database from synchronisable to updateable
Simply take the Access database you have been synchronising from and use it to overwrite the
Access database on the intranet.
Version 7 – Dated 8 February 2015 60
Switch an Access database from updateable to synchronisable
The simplest way to do that is to:
1. Replace the intranet database with a blank, synchronisable database (we provide one in
folder \intranet\synchronisable databases of the installation media)
2. Synchronise your current database with the empty copy to bring it up to date
The document library
The document library cannot be stored reliably in an Access database. Instead it requires SQL
Server. That means the document library cannot be synchronised or backed-up using the Local
Information System tools. As a result, the document library is always updateable regarless of the
state of the rest of the database.

Version 7 – Dated 8 February 2015 61
8 Get statistics from the intranet
Whenever someone conducts a search on the local information database, the system logs the
search and the result.
Log data is held by the intranet in the logDirectory folder you created during installation. You can
retrieve records from a system hosted on the internet using an FTP program. You can get log data
from a locally-installed intranet by copying the files from the logDirectory folder. You should not
open the current log file directly – that will cause searches to fail.
The system creates one log file per month. Each file is called yyyy-mm.csv where yyyy is the year
and mm is the month. For example: the log information for July 2013 is contained in file 2013-
07.csv.
You can double-click a log file to open it in Excel. You will need to drag the width of the first
column to see the data if it appears to contain just # characters. You will see the following
columns:
Date and time of the log entry
Entry type; one of:
o S – startup – these entries log when people started a session on the internet
o I – logs use of the ‘Search’ button
o A – logs use of the ‘A-Z’ button
o F – logs use of the ‘Full text’ button
o C – logs use of the ‘Change’ button
o R – logs use of the ‘Review’ button
o T – logs use of the ‘Recent’ button
o LI – logs use of the ‘LI ref’ button
o SI – logs use of a soft button to run an index search
o SW – logs use of a soft button to display a web page
o SD – logs use of a soft button to display a document
One of:
o Nothing for entry type S
o For entry types SW and SD the web page or document that was displayed
o For other entry types the text used to search or lookup the database
For entry types other than S, SW and SD the number of results returned by the
search/lookup. A zero in this column indicates no matches were found in the database.
“Intranet” – use this column to differentiate intranet use from desktop use if you use a
shared log file.
The id of the user, or “Anonymous” if they had not logged on to the system.
The user’s group, or blank if they did not belong to a group.

Version 7 – Dated 8 February 2015 62
9 Populating your database
If you already use the desktop version of the Local Information System, you can either:
Share the desktop database with the intranet (see page 33); or
Use the synchronisation tool (see page 44) to copy your existing database to the intranet
If, however, you are building the database from scratch, we suggest you consult the
implementation notes provided in the systemDocumentation folder of the installation media.
They provide guidance for setting up your new database. They also describe:
Approaches to data capture
The Excel-based bulk data entry utility we provide
The notes assume you are using an Access database for data capture – as does our bulk data entry
utility. Unless you have SQL experience, we suggest sticking with Access to create your initial
database. Access has a strong affinity with Excel and is easier to use than SQL Server. We suggest
you install the desktop version of the system on a single PC during initial data capture (the
desktop installation guide has a worksheet for that). You can use the synchronisation tool to
update the intranet as you capture more data.
Once you have completed initial data capture, you can switch your database to updateable (see
page 59) and start adding new entries directly.

Version 7 – Dated 8 February 2015 63
10 Upgrading from a previous version
This section explains how to upgrade your intranet system to a new version. If you also run the
desktop version of the system, the desktop installation guide explains how to upgrade it.
You should use the following procedure to upgrade your intranet:
1. Review your configuration
2. Backup your current system
3. Update your application folder
4. Run the database updater
5. Update your database tools
10.1 Review your configuration
New releases might come with new configuration options. You should read through the
‘Configuring the intranet application’ and ‘Security’ sections of the updated version of this guide
to see what’s new. Make a note of the changes you want to make.
10.2 Backup your current system
Before you make any changes we strongly recommend you backup your current system so you
can fall back to it if necessary.
You will need to backup:
Your application folder and all subfolders. If your system is hosted on the internet, you
should use an FTP program to download all the folders to a local copy. You can use this local
copy to make your update (see on) but you should make an additional copy first so you don’t
overwrite your backup during the update procedure.
Your database. We suggest you use both:
o Our database backup tool (see page 48) – or equivalent
o If you use Access, a file copy of the Access database; or, if you use SQL Server, the
backup tool provided by your ISP
10.3 Update your application folder
The new version comes with an updated set of files and subfolders for your application folder.
These are in folder \intranet\CABLIS in the installation media.
The file web.config provided in the CABLIS folder is intended for new installations only –delete it
from the folder so you don’t accidentally overwrite your version of web.config.
If you run the intranet in your network:
Copy the new files and folders to your application folder (but not web.config) overwriting
any existing files and folders.
Make any changes you identified above to your web.config.

Version 7 – Dated 8 February 2015 64
If you host your intranet on the internet:
Overwrite your local copy of the application folder with the new files and folders (but not
web.config) overwriting any existing files and folders.
Make any changes you identified above to your web.config.
Use an FTP program to upload your changes to your web site. To save time, you don’t need
to upload all the files and folders. Instead, just upload the files from:
o The application folder itself
o The bin subfolder and any subfolders
o The images subfolder and all its subfolders
o The scripts subfolder and all its subfolders
o The styles subfolder and any subfolders
o The CKEditor subfolder and all its subfolders
Note that making changes to web.config and the bin folder will force Internet Information Server
to reset all sessions. This will disrupt people that might be using the system at the time. Also, if
there are database changes, people might see error pages until you update the database. You
should consider doing the update out of hours, if possible.
10.4 Run the database updater
Navigate to page DatabaseUpdater.aspx
If the new release requires a database change, you will see a message to that effect which gives
you the option to perform the update.
Following the update, you will see a page that includes an option to ‘Rebuild search data’. You
should use this after every database update to ensure you are making the best use of your new
version. You might see a message saying ‘0 entries updated’ – that’s OK; it just means there was
nothing to do.
10.5 Update your database tools
If you use any of the tools described on page 44, you need to ensure you update to the latest
versions.
If you have the desktop version of the system running on your PC and you run the tools from the
desktop programs folder, simply use the desktop upgrade procedure (there’s a worksheet for that
in the desktop installation guide).
Otherwise, copy the programs you need from folder \systemObjects of the installation media to
your local copy. See page 52 for more detail.
To update the backup tool you will also need to overwrite file LocalInformation.mdb.template in
your backup folder with the one provided in folder Intranet\BackupFolder of the installation
media.

Version 7 – Dated 8 February 2015 65
11 Taking the intranet version offline
You might need to take the intranet version offline to perform maintenance on the database. For
example, the maintenance program’s ‘Repair and Compact’ option requires exclusive access to
the database. You won’t be able to use it if people are accessing the database through the
intranet. Similarly, if someone tries to use the intranet version while ‘Repair and Compact’ is
running they will see a system error message.
To take the system offline, locate the ‘app_offlinex.htm’ file in the application folder (if you are
unsure where that is, you can find out by going to page ‘ShowConfigurationValues.aspx’). Rename
the file to ‘app_offline.htm’. This takes the system offline. Any attempt to use the intranet
version shows the offline page. By default, it looks like this:
You can edit the ‘app_offline.htm’ file to change the message. For example, you might want to let
people know who to contact to find out more.
To bring the system back online, simply rename ‘app_offline.htm’ back to ‘app_offlinex.htm’.

Version 7 – Dated 8 February 2015 66
12 Appendices
12.1 Using Internet Information Services 7 or 8 (IIS 7 or 8)
IIS 7 is the web server provided with Windows Vista and Windows 7. IIS 8 is provided with
Windows 8. The two versions are virtually identical. In this section we describe how to use IIS 7
to achieve various tasks. Those instructions also work for IIS 8. The next section describes how to
use IIS 5.1 and IIS 6.
To run the IIS manager: use the ‘Administrative Tools’ option of the control panel. Double click
‘Internet Services Manager’ option to see something like:
12.1.1 Find out the IIS application folder
Under ‘Connections’ on the left hand side of the IIS Manager, click the triangle next to the top
entry to see ‘Sites’. Click the triangle next to ‘Sites’ to see ‘Default Web Site’. Click ‘Default Web
Site’ to select it. In the right-hand pane, click ‘Advanced Settings…’. The main application folder is
shown next to ‘Physical Path’.

Version 7 – Dated 8 February 2015 67
12.1.2 Create a virtual folder for your application
Under ‘Connections’ on the left hand side of the IIS Manager, click the triangle next to the top
entry to see ‘Sites’. Click the triangle next to ‘Sites’ to see ‘Default Web Site’. Right click ‘Default
Web Site’ and click ‘Add Virtual Directory…’:
Enter “CABLIS” in ‘Alias’. Enter the path to your CABLIS folder in ‘Physical path’. The ‘…’ button
allows you to browse to it. Click ‘OK’ to create the virtual folder.
You will now see ‘CABLIS’ under the ‘Default Web Site’ in the left hand pane of the IIS Manager.

Version 7 – Dated 8 February 2015 68
12.1.3 Create an application pool for your application
Under ‘Connections’ on the left hand side of the IIS Manager, click the triangle next to the top
entry to see ‘Application Pools’. Right click ‘Application Pools’ and click ‘Add Application Pool…’:
Enter “CABLIS” in ‘Name’.
Select ‘.NET Framework v2.0.50727’ under ‘.NET Framework version’.
Select ‘Classic’ under ‘Managed pipeline mode’.
Click ‘OK’ to create the application pool.
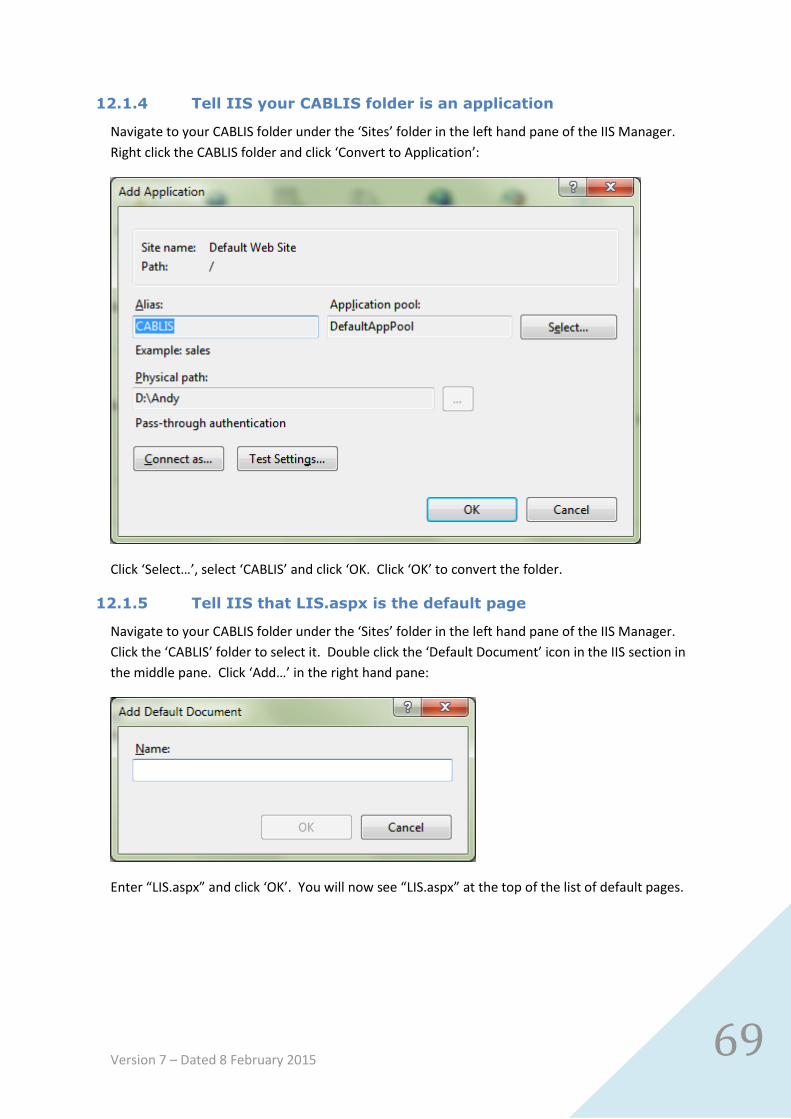
Version 7 – Dated 8 February 2015 69
12.1.4 Tell IIS your CABLIS folder is an application
Navigate to your CABLIS folder under the ‘Sites’ folder in the left hand pane of the IIS Manager.
Right click the CABLIS folder and click ‘Convert to Application’:
Click ‘Select…’, select ‘CABLIS’ and click ‘OK. Click ‘OK’ to convert the folder.
12.1.5 Tell IIS that LIS.aspx is the default page
Navigate to your CABLIS folder under the ‘Sites’ folder in the left hand pane of the IIS Manager.
Click the ‘CABLIS’ folder to select it. Double click the ‘Default Document’ icon in the IIS section in
the middle pane. Click ‘Add…’ in the right hand pane:
Enter “LIS.aspx” and click ‘OK’. You will now see “LIS.aspx” at the top of the list of default pages.

Version 7 – Dated 8 February 2015 70
12.1.6 Create a virtual folder for a document folder
Navigate to your CABLIS folder under the ‘Sites’ folder in the left hand pane of the IIS Manager.
Right click ‘CABLIS’ and click ‘Add Virtual Directory…’:
Enter your selected name for the folder in ‘Alias’. Enter the path to the corresponding document
folder in ‘Physical path’. The ‘…’ button allows you to browse to it. Click ‘OK’ to create the virtual
folder.
You will now see your selected name under the ‘CABLIS’ site in the left hand pane of the IIS
Manager.

Version 7 – Dated 8 February 2015 71
12.2 Using Internet Information Services 5.1 or 6 (IIS 5.1 or
6)
IIS 5.1 is the web server provided with the 32-bit version of Windows XP Professional. IIS 6 was
provided with the 64-bit version and also Windows Server 2003. In this section we describe how
to use IIS 5.1 to achieve various tasks. IIS 6 is virtually identical.
Each task starts with the IIS manager. To run the IIS manager: use the ‘Administrative Tools’
option of the control panel. Double click ‘Internet Information Services’ option to see something
like:
12.2.1 Find out the IIS application folder
In the left pane of the IIS Manager, click the plus to see ‘Web Sites’. Click the plus next to ‘Web
Sites’ to see ‘Default Web Site’. Right click ‘Default Web Site’ and click ‘Properties’ to see the
properties window. Click the ‘Home Directory’ tab. The main application folder is shown next to
‘Local Path’.

Version 7 – Dated 8 February 2015 72
12.2.2 Create a virtual folder for your application
In the left pane of the IIS Manager, click the plus to see ‘Web Sites’. Click the plus next to ‘Web
Sites’ to see ‘Default Web Site’. Right click ‘Default Web Site’ and click ‘New’ and ‘Virtual
Directory…’:
Click ‘Next’:
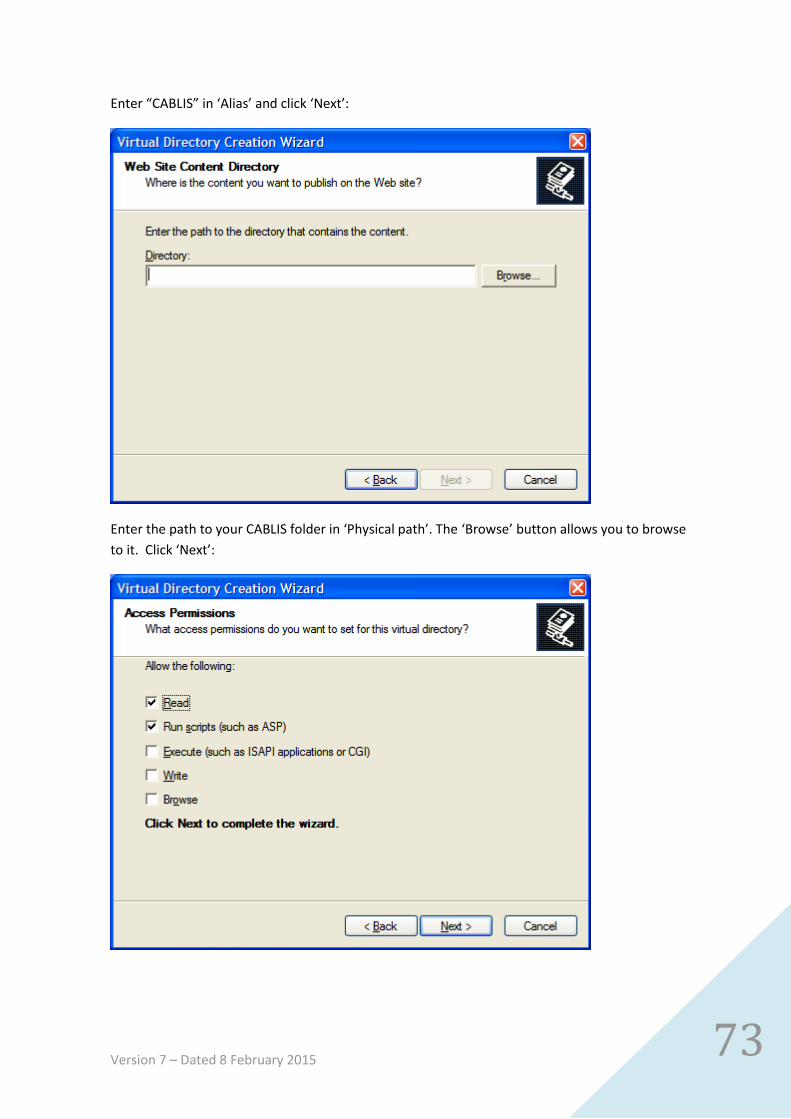
Version 7 – Dated 8 February 2015 73
Enter “CABLIS” in ‘Alias’ and click ‘Next’:
Enter the path to your CABLIS folder in ‘Physical path’. The ‘Browse’ button allows you to browse
to it. Click ‘Next’:

Version 7 – Dated 8 February 2015 74
Tick ‘Write’ and click ‘Next’:
You will now see ‘CABLIS’ under the ‘Default Web Site’ in the left hand pane of the IIS Manager.
12.2.3 Create an application pool for your application
This step is unnecessary for IIS 5 – it doesn’t support application pools.
12.2.4 Tell IIS your CABLIS folder is an application
Navigate to your CABLIS folder under the ‘Sites’ folder in the left hand pane of the IIS Manager.
Right click the CABLIS folder and click ‘Properties’. The screen you see will depend on whether
you added CABLIS as a folder to the main IIS folder, or whether you created a virtual folder. You
can tell the difference because the former will show a ‘Directory’ tab, while the latter will show a
‘Virtual Directory’ tab. Execute one of the next two steps then continue with the ‘For both
directory and virtual directory’ step below.

Version 7 – Dated 8 February 2015 75
For a directory
Click ‘the Directory’ tab. The properties window will look something like this:
Click ‘Create’. IIS will default your application name to CABLIS.
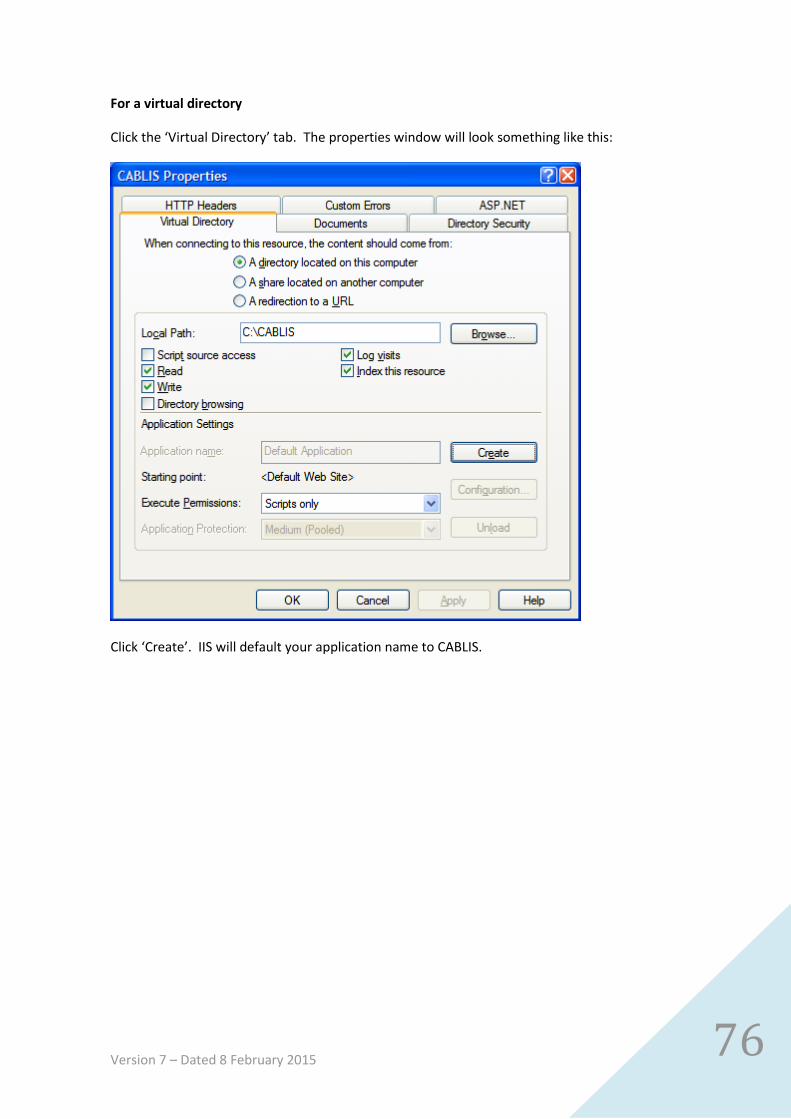
Version 7 – Dated 8 February 2015 76
For a virtual directory
Click the ‘Virtual Directory’ tab. The properties window will look something like this:
Click ‘Create’. IIS will default your application name to CABLIS.
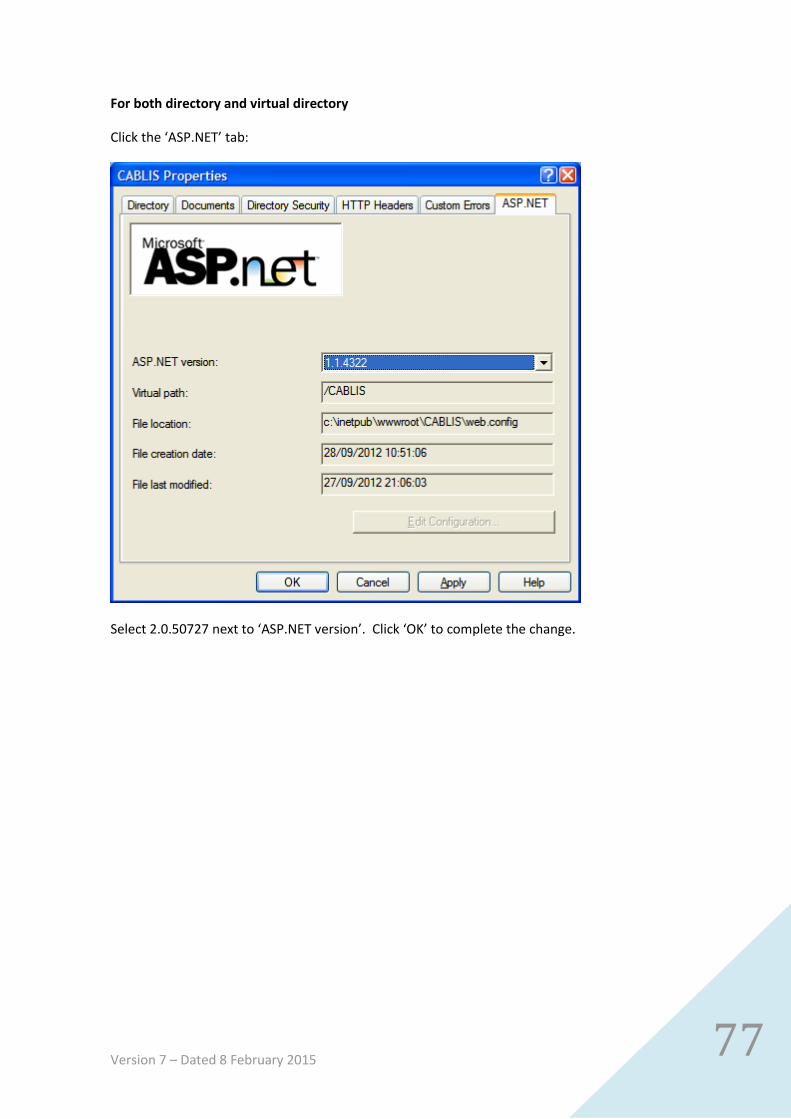
Version 7 – Dated 8 February 2015 77
For both directory and virtual directory
Click the ‘ASP.NET’ tab:
Select 2.0.50727 next to ‘ASP.NET version’. Click ‘OK’ to complete the change.

Version 7 – Dated 8 February 2015 78
12.2.5 Tell IIS that LIS.aspx is the default page
Navigate to your CABLIS folder under the ‘Sites’ folder in the left hand pane of the IIS Manager.
Right click the ‘CABLIS’ folder and click properties. Click the ‘Documents’ tab:
Click ‘Add…’
Enter LIS.aspx and click ‘OK’. LIS.aspx will now appear in the list of default documents. Click it to
select it and click the ‘up arrow’ button until it is at the top of the list. Click ‘OK’.

Version 7 – Dated 8 February 2015 79
12.2.6 Create a virtual folder for a document folder
Navigate to your CABLIS folder under the ‘Sites’ folder in the left hand pane of the IIS Manager.
Right click ‘CABLIS’ and click ‘New’ and ‘Virtual Directory…’:
Click ‘Next’:
Enter your selected name for the folder in ‘Alias’ and click ‘Next’:

Version 7 – Dated 8 February 2015 80
Enter the path to the corresponding document folder in ‘Physical path’. The ‘Browse’ button
allows you to browse to it. Click ‘Next’:

Version 7 – Dated 8 February 2015 81
Click ‘Next’:
You will now see you selected name under the ‘CABLIS’ site in the left hand pane of the IIS
Manager.
Version 7 – Dated 8 February 2015 82
12.3 Install Microsoft Data Access Software
To run successfully, the intranet application needs software to be able to read the Local
Information System database. It is possible you already have suitable software installed. If you
are unsure, you can use the ‘TestFileReferences.aspx’ page to find out. If it shows one (or both) of
the following in the ‘Available database providers’ section:
Microsoft.ACE.OLEDB.12.0
Microsoft.Jet.OLEDB.4.0…
… you do not need to install any data access software.
Otherwise we recommend you download a copy of “Microsoft Access Database Engine 2010
Redistributable” from the Microsoft Download Centre at http://www.microsoft.com We link
direct to a copy from http://www.SeeITA.com/CAB/Downloads.shtml .
You will see that two versions are provided: 32-bit and 64-bit. Choose the one appropriate for
your Operating System (you will be unable to install the wrong one).
12.4 Integration with other intranet applications
The main section of this document installs the system as a subfolder to the IIS default web site. If
you already have an intranet you might want to consider a couple of alternate configurations:
1. Install the system as a subfolder to your intranet. That’s best done using a virtual folder
pointing to a different location to your intranet application. That will prevent people from
deleting or disrupting the Local Information System by mistake when working with the
intranet.
2. Install the system as a separate web site. That would be the best approach if there’s a
serious risk of confusion when maintaining the intranet. The simplest way to do that is to
use a different port (web sites use port 80 by default). For example, if you set the system up
on port 8080, you would connect to the Local Information System using a link like:
http://serveraddress:8080/
Let us know if you would like some help with this.
You can, of course, cross link between your intranet and the Local Information System:
1. You can link to your intranet from the Local Information System using a web link or a link
embedded in an item
2. You can link to the Local Information System in several ways:
a. A simple link to the system
b. A link to a specific document: add ?id=nnn to the end of an LIS link where nnn is the
document’s internal id
c. A link to a search: add ?search=xxx to the end of an LIS link where xxx is one or more
search terms (separated by a space)

Version 7 – Dated 8 February 2015 83
12.5 Differences between the desktop and intranet versions
We describe the differences when:
1. Enquiring on the database
2. Making changes
Please let us know if there’s something we missed.
12.5.1 Enquiring on the database
The intranet version implements most of the features of the desktop version but there are some
differences:
1. The intranet version implements the full range of searches previously available only in the
desktop maintenance program.
2. If you are using SQL Server to store your data, you get a new ability to search the words used
in database entries. Note, however, this might be suppressed in your site if it causes
performance problems.
3. In the desktop version, all pages are displayed within the same window. You have to use
‘back’ to return to the list of matches. In this version, linked pages are displayed in a
separate window or tab (depending on your browser’s setup). That makes it easier to review
multiple items simultaneously. There is therefore no need to provide an option to stop
pages from forcing linked pages to display in a new window as there is in the desktop
version.
4. The desktop version requires you to click either the Search or AZ buttons to search the
database. The intranet version will use the ‘Search’ method if you press Enter while typing in
the search box.
5. You can drag the right edge of the main page's search pane to a position that suits you best
but, unlike the desktop version, the rest of the page does not resize automatically. It will
adjust to fit the next time you click one of the search buttons (or refresh the page).
6. This version does not provide a mechanism to auto-hide the search pane.
7. This version does not show an internet search button (because web searches are supported
directly by the browser).
8. This version ignores any soft button configured to generate a web search.
9. This version supports the special 'CABLINK' web address used by administrators with a
couple of differences:
a. The desktop version supports this form of address in any page it displays (including
sites it links to). This version detects CABLINK addresses only in database items.
b. This version ignores the CABLINK address variant that causes an internet search in
the desktop version.
10. This version does not provide options for zooming pages or resizing text. Instead, these
features are provided directly by the browser.
11. The desktop version uses Internet Explorer and runs under Windows PCs, this version works
with just about any equipment supporting a web browser.
12. The desktop version alerts you to updates in search results linked from a soft button by
flashing the button colour. This version does this with a red border to the button.
Version 7 – Dated 8 February 2015 84
13. This version allows you to use the full range of features supported by your chosen browser.
The desktop version implements a subset of the Internet Explorer features.
14. This version comes with an access control system so it can be deployed on the internet
without giving access to everyone. This system allows you to:
a. Restrict access to: specified items; specified sections of items; or the entire database
b. Create individual users that can each maintain their own passwords
c. Connect users together in groups to make managing access control easier
d. Set up shared ids and passwords (though that practice is not recommended)
e. Support anonymous users that do not have to log in; you can automatically assign
anonymous users to a suitable group to control their access
15. The desktop version ignores the access controls. It looks for and removes [HideFrom] tags in
entries, but they have no effect. All entries and all the text of each entry are visible to
desktop users that share the database with intranet users.
16. The desktop version cannot contain a document library. Instead the document library
requires the intranet version using a SQL Server database.
12.5.2 Making changes
The way you make changes is broadly similar between the desktop and intranet versions. There
are, however, a number of differences resulting from the underlying technologies which are quite
different. Most significantly:
Editors get the ability to create rich text for database entries using a simple editor that does
not require knowledge of HTML (the language of the internet). Instead, people use
highlighting and buttons like they do with, for example, Microsoft Word. The editor shows
how text will appear as it is being created.
For each item in the database, you can specify which groups of users cannot see it.
When maintaining an item, you can hide sections of the text from specified groups of users.
If you use SQL Server, this version allows up to 800 characters for index entries. The limit in
other versions is 255 characters.
We use a simpler method for specifying alternate index entries.
The desktop version tops and tails entries with <p> and </p> when displaying them in the
enquiry program. That means people can create entries without knowing any HTML. The
intranet version stores entries as complete web pages. The database keeps track of which
version last maintained each entry, but the desktop version will require you to make extra
editing changes if you update an entry that was last modified by the intranet version.