ca technologies 5/17/2013 · · 2014-10-08ca technologies, 2013 2 ca controlminder rapid...
TRANSCRIPT
CA Technologies 5/17/2013

CA ControlMinder Rapid Implementation Guide – Shared Account Management
CA Technologies, 2013 2 CA ControlMinder Rapid Implementation Guide - SAM – 3.0docx
Contents References ..................................................................................................................................................................... 4
CA ControlMinder References ................................................................................................................................... 4 Tibco References ....................................................................................................................................................... 4
Glossary ......................................................................................................................................................................... 6 Executive summary ........................................................................................................................................................ 7 Introduction ................................................................................................................................................................... 7 CA ControlMinder Components .................................................................................................................................... 9 SAM User and Component Interaction........................................................................................................................ 10
Initial Logon ............................................................................................................................................................. 10 Endpoint Creation ................................................................................................................................................... 11 Privileged Account Creation .................................................................................................................................... 11 Endpoint Logon ....................................................................................................................................................... 12 Endpoint Logoff ....................................................................................................................................................... 12
Architecture ................................................................................................................................................................. 14 Preparing the Environment ......................................................................................................................................... 15
Suggested Hardware and Software Components ................................................................................................... 15 Preparing the Database ........................................................................................................................................... 16
Create MSSQL User ............................................................................................................................................. 16 Create MSSQL Database ..................................................................................................................................... 16 Table Sizing ......................................................................................................................................................... 18
Creating Users in Microsoft Active Directory .......................................................................................................... 19 Collect Account DN ............................................................................................................................................. 19
ENTM Installation ........................................................................................................................................................ 22 Load the Media Containing Required Third-Party Products ................................................................................... 22 Install Pre-Requisite Software ................................................................................................................................. 23 Install ENTM ............................................................................................................................................................ 28 Installation Validation ............................................................................................................................................. 36
SAM Endpoint Creation ............................................................................................................................................... 37 Endpoint Creation ................................................................................................................................................... 37 Windows Endpoint .................................................................................................................................................. 39 Windows Endpoint – MS Active Directory Domain ................................................................................................. 47 UNIX SSH Endpoint .................................................................................................................................................. 49 MS SQL Endpoint ..................................................................................................................................................... 53 Verify Created Endpoints ........................................................................................................................................ 56
Privileged Accounts Discovery ..................................................................................................................................... 58 ENTM Administration Role Scoping ............................................................................................................................. 63
Administration Roles ............................................................................................................................................... 63 Privileged Access Roles ........................................................................................................................................... 64 Changing the Scope of Default Roles ...................................................................................................................... 65 Setting Up Endpoint Tagging and Approvers .......................................................................................................... 71
Tagging Setup ...................................................................................................................................................... 71 Approver Setup ................................................................................................................................................... 74
Privilege Access Role Definition .............................................................................................................................. 76 Role Creation ...................................................................................................................................................... 77 Role Scoping ........................................................................................................................................................ 81 Role Verification .................................................................................................................................................. 84
Advanced Topics .......................................................................................................................................................... 86
CA ControlMinder Rapid Implementation Guide – Shared Account Management
CA Technologies, 2013 3 CA ControlMinder Rapid Implementation Guide - SAM – 3.0docx
SAM Endpoint and Account Management Using the Feeder .................................................................................. 86 The SAM feeder process ..................................................................................................................................... 86 Import Endpoints using the SAM feeder............................................................................................................. 87 Import Privileged Accounts using the SAM feeder ............................................................................................. 94
Configure Email Notification for Workflow ............................................................................................................. 97 Verify the Workflow and Email Configuration ...................................................................................................... 103 Enable the CA IdentityMinder Management Console ........................................................................................... 107
CA ControlMinder Rapid Implementation Guide – Shared Account Management
CA Technologies, 2013 4 CA ControlMinder Rapid Implementation Guide - SAM – 3.0docx
References
The references related to CA ControlMinder may be found on the CA support web site in both PDF and HTML format.
https://support.ca.com
The references related to Tibco are included in the distribution and may be found in both PDF and HTLM format in the following folder:
…\AccessControlServer\MessageQueue\tibco\ems\5.1\doc
CA ControlMinder References
CA ControlMinder Premium Edition Release Notes 12.7 CA ControlMinder Premium Edition Implementation Guide 12.7 CA ControlMinder Premium Edition Enterprise Administration Guide 12.7 CA ControlMinder Reference Guide 12.7 CA ControlMinder Endpoint Administration Guide for UNIX 12.7 CA ControlMinder Endpoint Administration Guide for Windows 12.7 CA ControlMinder selang Reference Guide 12.7 CA ControlMinder Troubleshooting Guide 12.7
Tibco References
TIBCO Enterprise Message Service Installation 5.1 TIBCO Enterprise Message Service User’s Guide 5.1 TIBCO Enterprise Message Service Application Integration Guide 5.1 TIBCO Enterprise Message Service C and COBOL Reference 5.1
CA ControlMinder Rapid Implementation Guide – Shared Account Management
CA Technologies, 2013 5 CA ControlMinder Rapid Implementation Guide - SAM – 3.0docx
Copyright ©2013, CA, Inc. All rights reserved. Microsoft, Windows, Windows Server, Active Directory, SQL Server, and Internet Explorer are registered trademarks or trademarks of Microsoft Corporation in the United States and/or other countries. RACF is a registered trademark of International Business Machines Corporation in the United States, other countries, or both. Linux® is the registered trademark of Linus Torvalds in the U.S. and other countries. UNIX is a registered trademark of The Open Group. All trademarks, trade names, service marks and logos referenced herein belong to their respective companies.
This document is for your informational purposes only. CA assumes no responsibility for the accuracy or completeness of the information. To the extent permitted by applicable law, CA provides this document “as is” without warranty of any kind, including, without limitation, any implied warranties of merchantability, fitness for a particular purpose, or non-infringement. In no event will CA be liable for any loss or damage, direct or indirect, from the use of this document, including, without limitation, lost profits, business interruption, goodwill or lost data, even if CA is expressly advised in advance of the possibility of such damages.

CA ControlMinder Rapid Implementation Guide – Shared Account Management
CA Technologies, 2013 6 CA ControlMinder Rapid Implementation Guide - SAM – 3.0docx
Glossary
AC Access Control ACNT Account ACWS Access Control Web Service APM Advanced Policy Management APMS Advanced Policy Management Server CA formerly Computer Associates – now CA Technologies CM ControlMinder (formerly Access Control) CMPE ControlMinder Premium Edition CMVE ControlMinder for Virtual Environments CS Connector Server DH Distribution Host DMS Distribution Management Server DN Distinguished Name DR Disaster Recovery DS Distribution Server ELM Enterprise Log Manager ENTM Enterprise Manager EP Endpoint (server) GECOS GE Comprehensive Operating System (finger field in passwd file) GID Group ID HA High Availability IAM Identity and Access Manager JDK Java Development Kit MS Microsoft Corporation MSADS Microsoft Active Directory Server / Services MSSQL Microsoft SQL/Server MQ Message Queue NSS Network System Services OS Operating System PAM Pluggable Authentication Module PCI Payment Card Industry PR Production PUPM Privileged User Password Management RIA Rapid Implementation Architecture RIG Rapid Implementation Guide RS Report Server RSS Resident Security System SAM Security Account Manager (formerly PUPM) SeOS Security for Open Systems UARM User Access Reporting Module (formerly ELM) UAT User Acceptance Test UID User ID UNAB UNIX Authentication Broker W2K3 Windows 2003 W2K8 Windows 2008 WAS Web Application Server

CA ControlMinder Rapid Implementation Guide – Shared Account Management
CA Technologies, 2013 7 CA ControlMinder Rapid Implementation Guide - SAM – 3.0docx
Executive summary
The purpose of the CA ControlMinder SAM Rapid Implementation Guide is to demonstrate a way to recognize value from Shared Accounts Management (SAM) in a timely manner. A reasonable expectation is to be managing up to 500 privileged accounts across 100 endpoints in 3 weeks or less. Up to 20 users can be using Shared Accounts Management concurrently during this initial implementation. The implementation can readily be expanded as the value becomes apparent, and it is easy to see how this guide also lends itself to proof of concept deployments.
Introduction
This guide provides step-by-step instructions for a successful installation. Tried and true choices like user and object stores have been made. Repeated customer successes drove these choices. Key success factors owned by the customer include:
Having required hardware and software readily available (described in the Preparing the Environment section below).
Identifying the privileged accounts of interest, as well as, the respective endpoints and endpoint types.
Ensuring the Shared Accounts Management infrastructure can access the endpoints, for example, firewalls are not blocking required ports.
Team members contributing to your rapid implementation need familiarity with:
Basic SAM functionality and terminology
Basic Microsoft Windows Server Administration
Microsoft Active Directory
Microsoft SQL Server
Basis Linux Administration.
To demonstrate a quick success, CA Technologies suggests limiting managed endpoints to:
MS Windows Server 2008 (Local Accounts)
MS Active Directory 2008 (Domain Accounts)
MS SQL Server 2008
Red Hat Linux
These endpoint types are frequently managed by many customers, but this is by no means an all-inclusive list of supported endpoint types. Once the initial bang for the buck has been felt, other
CA ControlMinder Rapid Implementation Guide – Shared Account Management
CA Technologies, 2013 8 CA ControlMinder Rapid Implementation Guide - SAM – 3.0docx
endpoint types can be added. You can view the complete list of managed endpoint types at https://support.ca.com .
Some advanced topics of frequent interest to customers covered by this guide include:
Tagging endpoints and privileged accounts to simplify the process of identifying authorized users.
Bulk loading endpoints and privileged accounts. This reinforces the need to identify the privileged accounts of interest ahead of time. The accounts used to connect to the endpoints and their respective passwords must also be identified.
Providing ideas describing how to use roles to enforce separation of duties. After the initial implementation, some customers may choose to tailor the way roles are used.
Leveraging simple updates to the out-of-the-box workflow configuration that often satisfy customer requirements.
Using email to provide notifications.
As the success of your initial implementation sinks in, you are likely to want to invest in other advanced features like high availability. We highly recommend becoming familiar with the Enterprise Administration Guide and the Implementation Guide so you can make informed decisions on expanding your Shared Accounts Management implementation. The product Release Notes provide a handy resource for identifying any limitations.
CA ControlMinder Rapid Implementation Guide – Shared Account Management
CA Technologies, 2013 9 CA ControlMinder Rapid Implementation Guide - SAM – 3.0docx
CA ControlMinder Components
The current CA ControlMinder Premium Edition suite version is release 12.7 for the server components and 12.6 SP2 for endpoints. The suite consists of core ControlMinder, Advanced Policy Management, Shared Accounts Management and UNIX Authentication Broker. These components are anchored through a common interface that is known as Enterprise Management.
ControlMinder (CM) is the component that is typically referred to as a server-centric security offering. The intention of CM is to enhance the Resident Security System (RSS) found on all modern operating systems (OS). CM adds a layer of security over and above the RSS that enables the security administrator to effectively define security that is not available with the core OS security.
Advanced Policy Management (APM) is an enterprise security POLICY distribution layer that serves to deliver CM protection to the endpoint using a secure and tamper-proof model. Effectively, it is a management overlay for the enterprise that serves to reduce distribution overhead and enable the security set for the various endpoints to effectively be in place.
Shared Accounts Management (SAM) is a function that provides password management functions for privileged accounts. In the simplest form, SAM is a password vaulting facility that securely manages highly encoded endpoint passwords, and provides various methods of securely delivering those passwords to the user for direct input or through an automatic connection model whereby the user never has direct access to the password. SAM also provides a means to automatically change application passwords for password consumers like ODBC, JDBC, Scheduled Tasks and command line enabled applications. Finally, SAM supports an integration point with Observe IT to provide video-like recording and replay of endpoint activities through either Microsoft RDP, web interfaces for ORACLE or Microsoft SQL/Server or the PuTTY SSH application.
UNIX Authentication Broker (UNAB) provides UNIX endpoint authentication services through Microsoft Active Directory (MSAD).
Enterprise Management (ENTM) is the overarching component that ties the other components together through a unified management portal.

CA ControlMinder Rapid Implementation Guide – Shared Account Management
CA Technologies, 2013 10 CA ControlMinder Rapid Implementation Guide - SAM – 3.0docx
SAM User and Component Interaction
This section presents a high-level overview of the basic dataflow between users and SAM components. The direction of the arrows indicates the overall direction of data flow and the identifiers in each arrow indicate the types of data exchanged. The top-down nature of the arrows indicates that the top arrow is the first data exchange and the bottom arrow is the last data exchange.
Initial Logon
A user starts a browser session with the SAM portal hosted on the ENTM server. Using Active Directory credentials is a supported method of authenticating a user to ENTM. The following example relies on this method.
This interaction is through a web browser interface so the initial portal contact is to reference the ENTM URL. This URL is typically defined as https://<ENTMServer>:18443/iam/ac, where ENTM_server represents the actual hostname or IP address of the ENTM server.
ENTM
Username / Password
NT SID
ENTM URL
Username / Password
MS Domain
ENTM User

CA ControlMinder Rapid Implementation Guide – Shared Account Management
CA Technologies, 2013 11 CA ControlMinder Rapid Implementation Guide - SAM – 3.0docx
Endpoint Creation
SAM requires two fundamental configuration items to support endpoint access. The first is the definition of the endpoint and the second is the definition of the privileged account. Both of these activities are performed by an ENTM administrator.
The endpoint definition consists of completing a connection form and submitting it to ENTM task processing. If the connection data is correct then ENTM stores the connection data in the RDBMS.
ENTM
MSSQL
Endpoint Connection Validation
Endpoint Definition
Endpoint Connection Attempt
Endpoint
ENTM Administrator
Endpoint Definition
Privileged Account Creation
After an endpoint has been defined, the ENTM administrator uses the SAM Account Discovery Wizard to retrieve a list of accounts from the endpoint. The administrator selects a privileged account of interest, and ENTM stores the information in the RDBMS.
ENTM
MSSQL
Endpoint Account List
Endpoint Account Discovery
Endpoint Account Lookup
EndpointENTM Administrator
Endpoint Account Definition
Endpoint Account List
Endpoint Account Selection
Defining the endpoint and privileged account provides sufficient information to manage the account for SAM users.
CA ControlMinder Rapid Implementation Guide – Shared Account Management
CA Technologies, 2013 12 CA ControlMinder Rapid Implementation Guide - SAM – 3.0docx
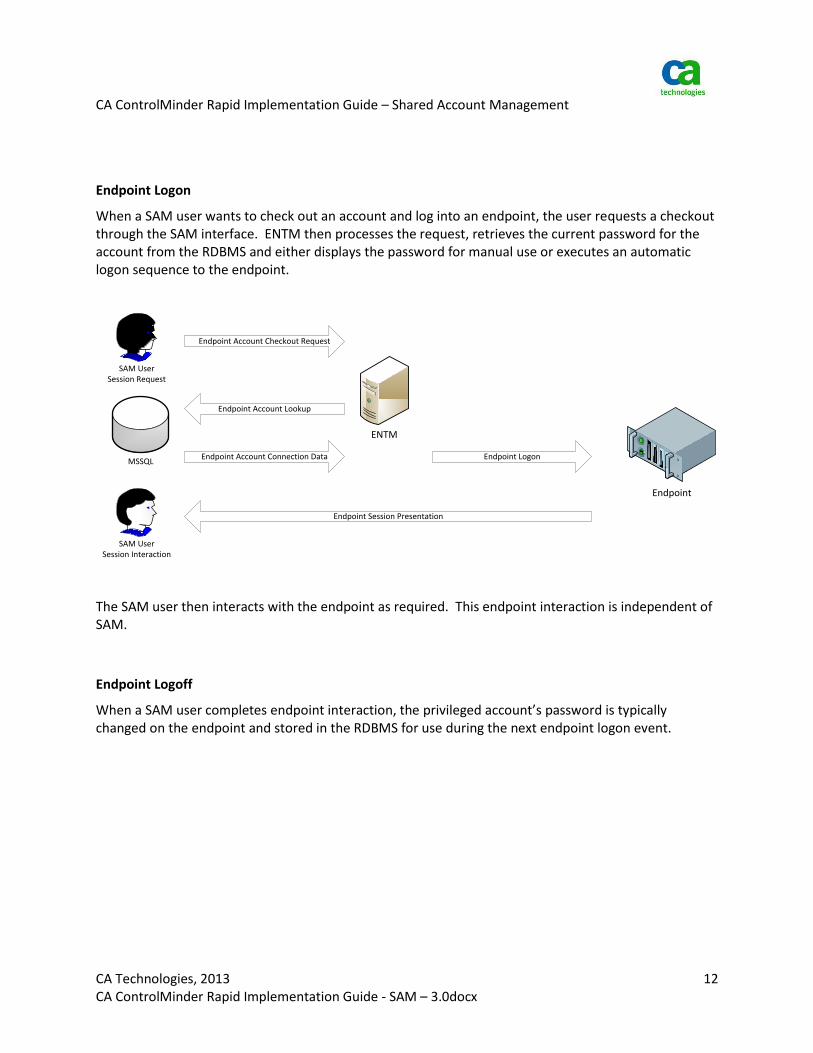
Endpoint Logon
When a SAM user wants to check out an account and log into an endpoint, the user requests a checkout through the SAM interface. ENTM then processes the request, retrieves the current password for the account from the RDBMS and either displays the password for manual use or executes an automatic logon sequence to the endpoint.
ENTM
MSSQL
Endpoint Session Presentation
Endpoint Account Checkout Request
Endpoint Logon
Endpoint
SAM UserSession Request
Endpoint Account Lookup
Endpoint Account Connection Data
SAM UserSession Interaction
The SAM user then interacts with the endpoint as required. This endpoint interaction is independent of SAM.
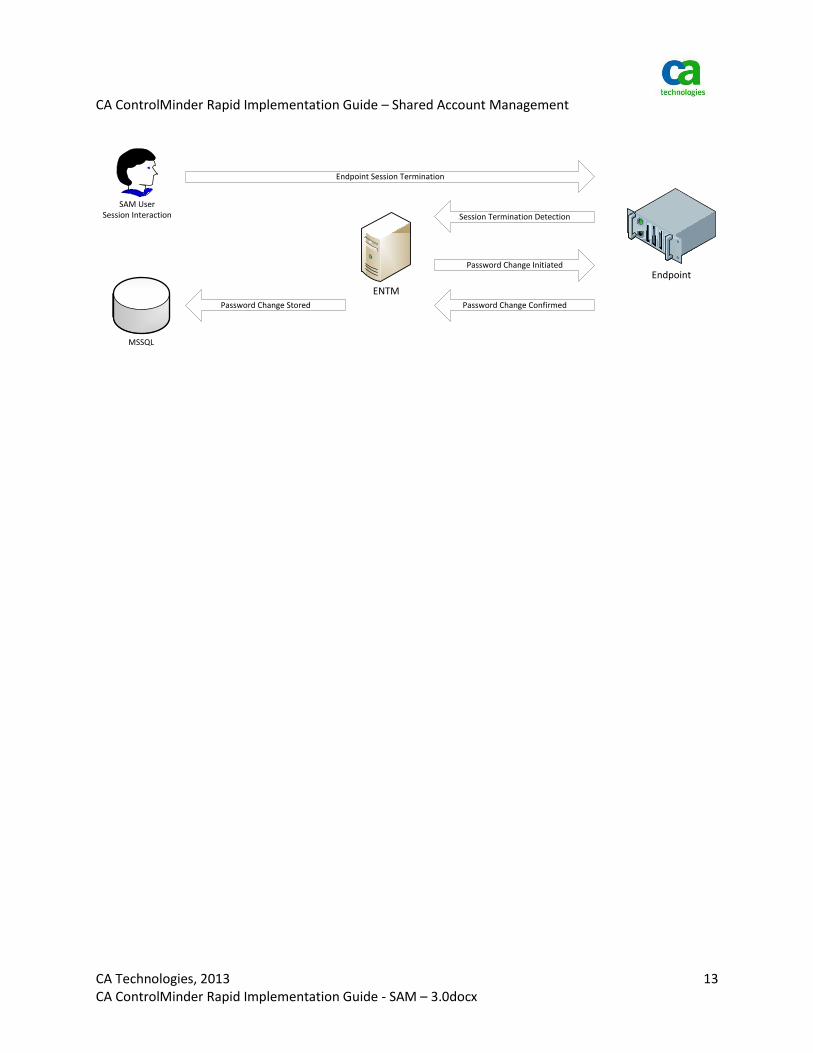
Endpoint Logoff
When a SAM user completes endpoint interaction, the privileged account’s password is typically changed on the endpoint and stored in the RDBMS for use during the next endpoint logon event.
CA ControlMinder Rapid Implementation Guide – Shared Account Management
CA Technologies, 2013 13 CA ControlMinder Rapid Implementation Guide - SAM – 3.0docx
ENTM
MSSQL
Endpoint Session Termination
Password Change InitiatedEndpoint
SAM UserSession Interaction
Password Change Stored
Session Termination Detection
Password Change Confirmed

CA ControlMinder Rapid Implementation Guide – Shared Account Management
CA Technologies, 2013 14 CA ControlMinder Rapid Implementation Guide - SAM – 3.0docx
Architecture
The base architecture supported in this RIA guide consists of a Microsoft Active Directory Server (MSADS), Microsoft SQL Server (MSSQL), and CA ControlMinder Enterprise Management (ENTM) as shown in Figure 1. Each of these components is hosted on separate servers; although, for demonstration purposes, all three can be hosted on the same server.
ENTM
Endpoint 1 Endpoint n
Login Sequence
AD AuthenticationEP/ACNT Definition
ACNT Credentials
Login Sequence
MS SQLMS ADS
Figure 1 – Rapid Implementation Guide Reference Architecture
MSADS is used for ENTM login authentication and as a user datastore repository to support SAM service accounts.
MSSQL is used to store user/group/task/role assignments, endpoint connection definitions, and endpoint account credentials.

CA ControlMinder Rapid Implementation Guide – Shared Account Management
CA Technologies, 2013 15 CA ControlMinder Rapid Implementation Guide - SAM – 3.0docx
Preparing the Environment
Suggested Hardware and Software Components
The following HW and SW configuration was used for the purpose of this document.
Component HW Specification SW Specification
CA ControlMinder ENTM 4x Intel Xeon 2,93 GHz CPU 4 GB RAM HDD1 – 36 GB HDD2 – 72 GB
MS Windows 2008 Enterprise Edition SP2 x64
Directory Server – Uses Store 4x Intel Xeon 2,93 GHz CPU 8 GB RAM HDD1 – 36 GB HDD2 – 72 GB
MS Windows 2008 Enterprise Edition SP2 x64 MS Active Directory Domain Controller
Database Server 4x Intel Xeon 2,93 GHz CPU 8 GB RAM HDD1 – 36 GB HDD2 – 72 GB HDD3 – 128 GB
MS Windows 2008 Enterprise Edition SP2 x64 MS SQL Server 2008
The above HW and SW configuration is sufficient to handle a small scale CA ControlMinder SAM implementation (up to 100 Endpoints and 500 privileged accounts).

CA ControlMinder Rapid Implementation Guide – Shared Account Management
CA Technologies, 2013 16 CA ControlMinder Rapid Implementation Guide - SAM – 3.0docx
Preparing the Database
STEP ONE in deploying SAM is to create an empty MSSQL database using Microsoft SQL Server Management Studio, which is typically available from the server where you installed Microsoft SQL Server.
Create MSSQL User
As shown below, an ENTM database user is created using SQL Server authentication. The user in this example is cmdbuser. Also note that it is recommended not to enforce password policy for this database user.
Create MSSQL Database
When creating the actual database, define it as a case-insensitive database with the item sort order set to SQL_Latin1_General_CP1_CI_AS. Failure to configure the correct settings may cause lookup problems later.
When creating the database, set the database owner to the user previously created. If that user is set as the owner (dbo) then no other access rights are required.

CA ControlMinder Rapid Implementation Guide – Shared Account Management
CA Technologies, 2013 17 CA ControlMinder Rapid Implementation Guide - SAM – 3.0docx
As shown, the database name is cmdb.

CA ControlMinder Rapid Implementation Guide – Shared Account Management
CA Technologies, 2013 18 CA ControlMinder Rapid Implementation Guide - SAM – 3.0docx
Set the newly created database as the default database of cmdbuser.
Table Sizing
It is important to pre allocate sufficient database space to hold configuration information and snapshot data.
In the example above we pre-allocated 20 GB of data space and 12 GB of log space. This size is sufficient to hold CM SAM data and reporting data for most environments.
If you do not intend to use the reporting functionality 5 GB of data space and 1 GB of log space will be sufficient.
Please refer to the “Sizing the Implementation” section of the CA ControlMinder Premium Edition Implementation Guide for more details.
CA ControlMinder Rapid Implementation Guide – Shared Account Management
CA Technologies, 2013 19 CA ControlMinder Rapid Implementation Guide - SAM – 3.0docx
Creating Users in Microsoft Active Directory
STEP TWO in deploying SAM is to create at least 2 Standard Microsoft user accounts in Active Directory before the installation of ENTM.
The first user will be used by CA ControlMinder Enterprise Management to connect to Active Directory.
User 1: CM ADlink
The best practice is to use a standard user with read-only access to MS Active Directory. Members of the Domain Users group have the necessary privileges by default.
Note: The following Enterprise Management tasks will not work if you use a read-only user (as they require write access to AD):
- modify user.
- create/modify/delete group.
- modify admin roles members.
However, this is not a limitation as you can assign users to roles by using the Modify Role task and specifying users and groups as members of a role in the members tab. This information is stored in the policy store (MSSQL).
The second account will be the super user of ENTM.
User 2: CM Admin
Collect Account DN
For both of the accounts created above you will need to know the Distinguished Name in the following format:
CN=<username>, CN=users, DC=<domain>, DC=<com>
However, if the account was created in another location in the AD tree then the DN may not be obvious. In that case you may use adsiedit.exe to obtain the DN as shown below.
Note that adsiedit.exe is available on all Microsoft domain controllers so there should be no need to find and download the utility.
After selecting the account, right-click the account and select properties to select the DN.

CA ControlMinder Rapid Implementation Guide – Shared Account Management
CA Technologies, 2013 20 CA ControlMinder Rapid Implementation Guide - SAM – 3.0docx
Select distinguishedName as shown.
If the DN is too large to see in the Properties display then select View and a separate pop-up will show the full name.

CA ControlMinder Rapid Implementation Guide – Shared Account Management
CA Technologies, 2013 21 CA ControlMinder Rapid Implementation Guide - SAM – 3.0docx
Save the DN to the clipboard for later use during ENTM installation.
CA ControlMinder Rapid Implementation Guide – Shared Account Management
CA Technologies, 2013 22 CA ControlMinder Rapid Implementation Guide - SAM – 3.0docx
ENTM Installation
ENTM installation consists of three steps followed by a SERVER REBOOT after the last step. The steps are simply to mount the distribution media, install the pre-requisite components and install the ENTM server software.
The entire installation process may take as little as 15 minutes or as long as 60 minutes, depending on the speed of the selected server.
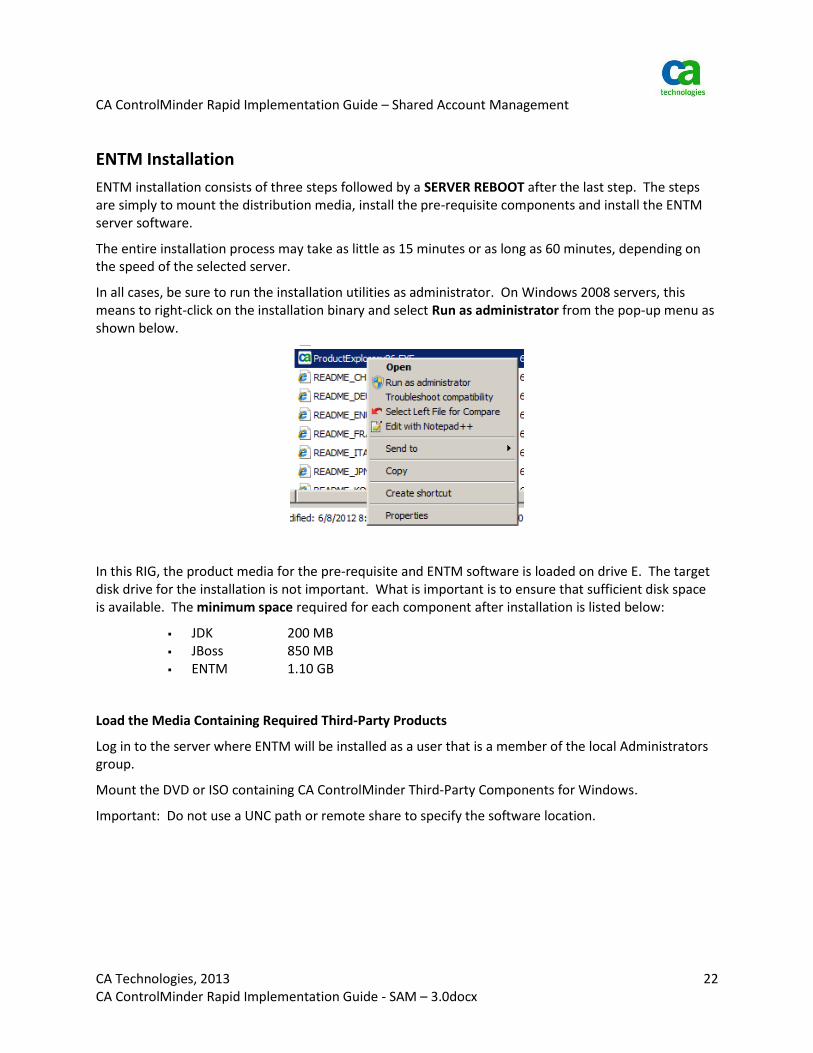
In all cases, be sure to run the installation utilities as administrator. On Windows 2008 servers, this means to right-click on the installation binary and select Run as administrator from the pop-up menu as shown below.
In this RIG, the product media for the pre-requisite and ENTM software is loaded on drive E. The target disk drive for the installation is not important. What is important is to ensure that sufficient disk space is available. The minimum space required for each component after installation is listed below:
JDK 200 MB JBoss 850 MB ENTM 1.10 GB
Load the Media Containing Required Third-Party Products
Log in to the server where ENTM will be installed as a user that is a member of the local Administrators group.
Mount the DVD or ISO containing CA ControlMinder Third-Party Components for Windows.
Important: Do not use a UNC path or remote share to specify the software location.

CA ControlMinder Rapid Implementation Guide – Shared Account Management
CA Technologies, 2013 23 CA ControlMinder Rapid Implementation Guide - SAM – 3.0docx
Install Pre-Requisite Software
Start the installation of the pre-requisite components by launching Install_PRK.exe from the PrereqInstaller directory on the ISO.
Right click and choose “Run as administrator”.
This will install the Java Development Kit and JBoss.
JDK Installation
Click OK
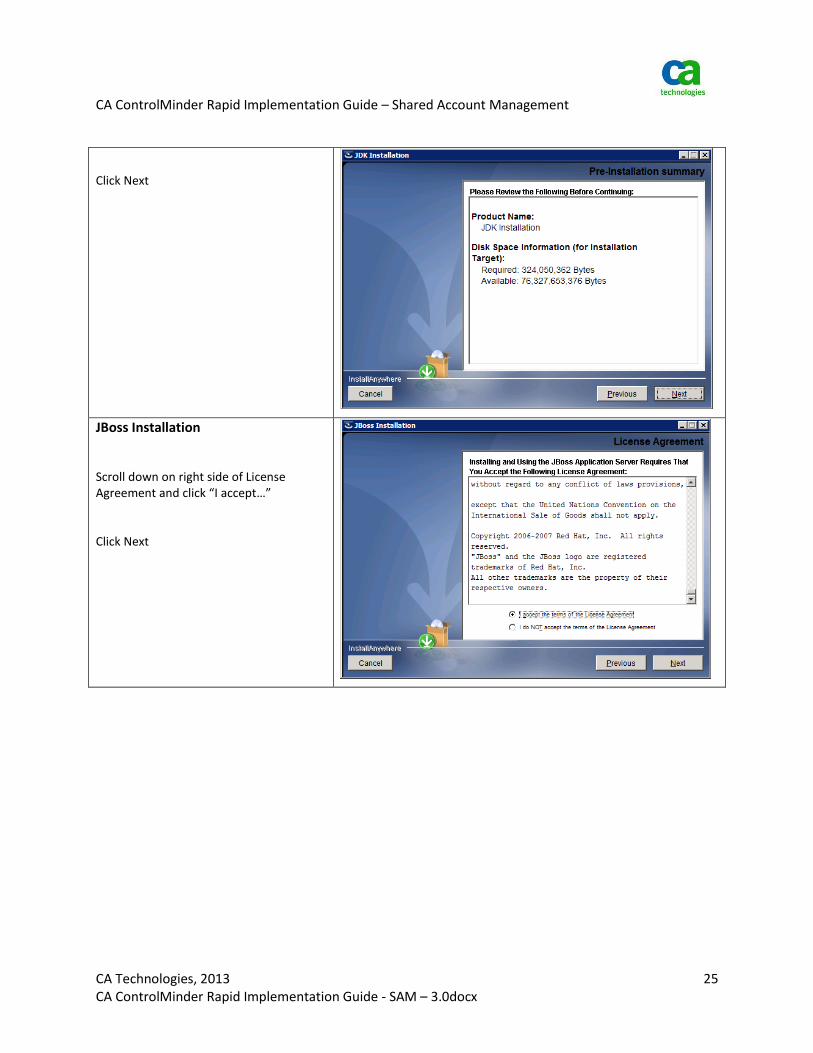
Click Next

CA ControlMinder Rapid Implementation Guide – Shared Account Management
CA Technologies, 2013 24 CA ControlMinder Rapid Implementation Guide - SAM – 3.0docx
Scroll down on right side of License Agreement and click “I accept…”
Click Next
Select destination folder
Click Next
CA ControlMinder Rapid Implementation Guide – Shared Account Management
CA Technologies, 2013 25 CA ControlMinder Rapid Implementation Guide - SAM – 3.0docx
Click Next
JBoss Installation
Scroll down on right side of License Agreement and click “I accept…”
Click Next
CA ControlMinder Rapid Implementation Guide – Shared Account Management
CA Technologies, 2013 26 CA ControlMinder Rapid Implementation Guide - SAM – 3.0docx
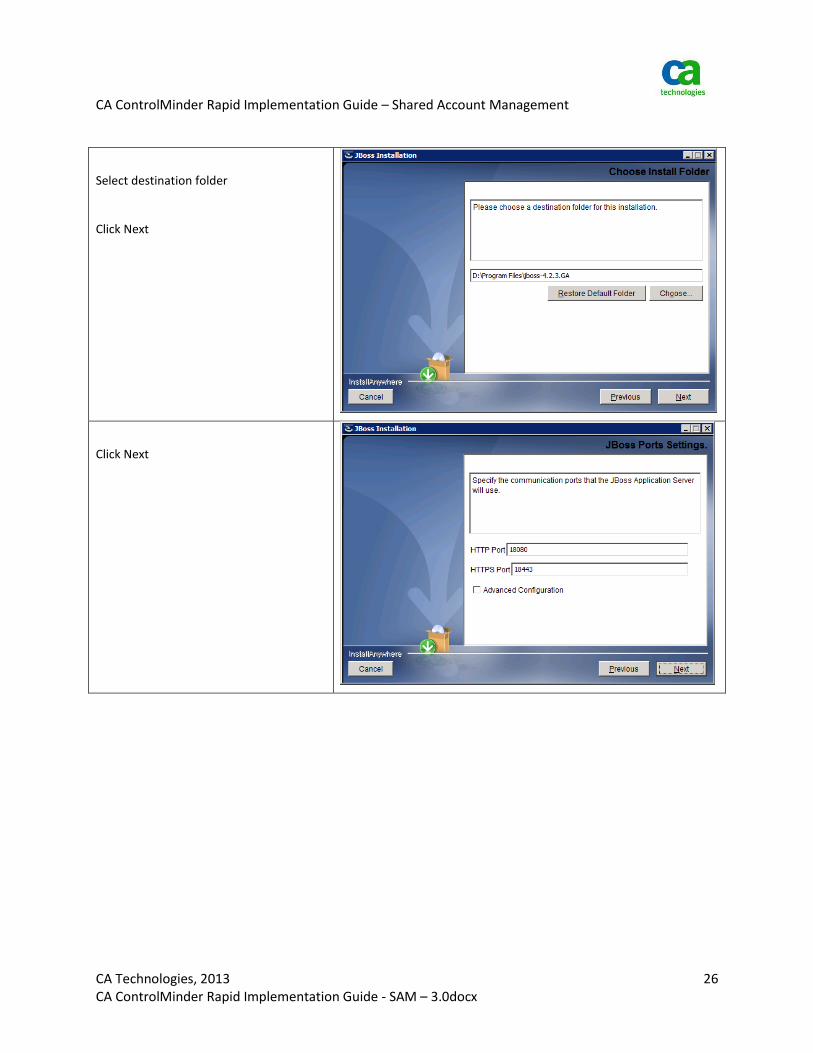
Select destination folder
Click Next
Click Next

CA ControlMinder Rapid Implementation Guide – Shared Account Management
CA Technologies, 2013 27 CA ControlMinder Rapid Implementation Guide - SAM – 3.0docx
Click Install
Wait for installation to complete
CA ControlMinder Rapid Implementation Guide – Shared Account Management
CA Technologies, 2013 28 CA ControlMinder Rapid Implementation Guide - SAM – 3.0docx
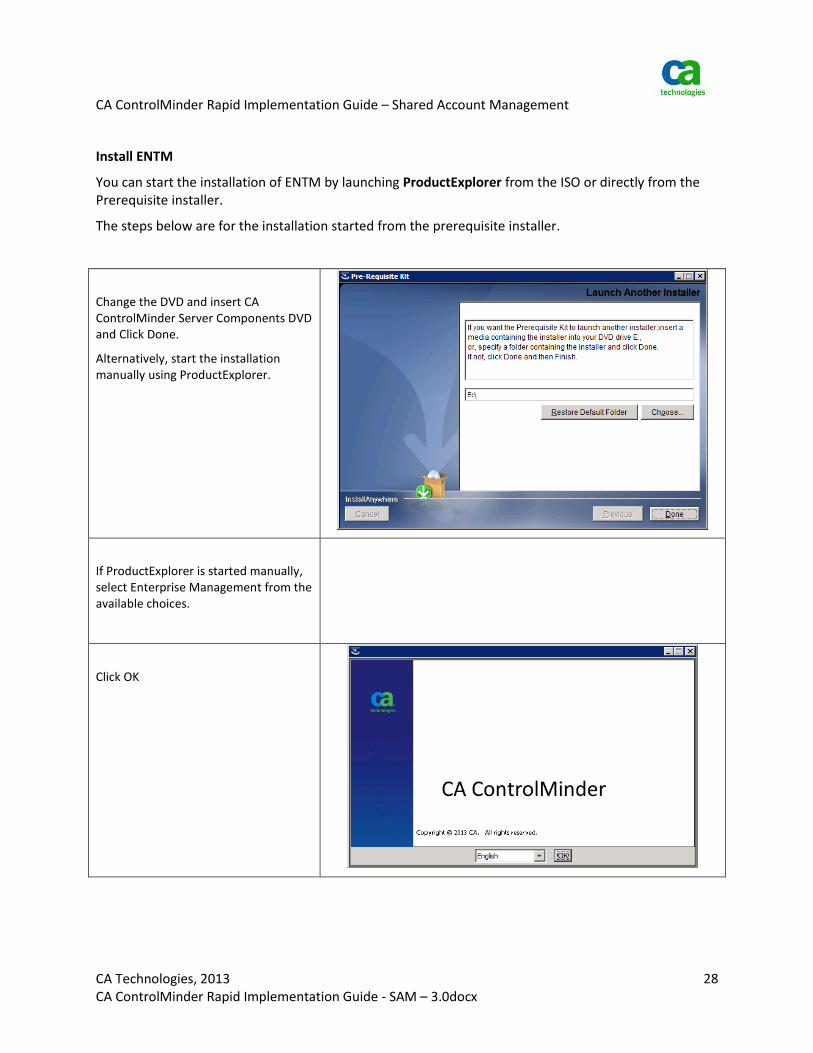
Install ENTM
You can start the installation of ENTM by launching ProductExplorer from the ISO or directly from the Prerequisite installer.
The steps below are for the installation started from the prerequisite installer.
Change the DVD and insert CA ControlMinder Server Components DVD and Click Done.
Alternatively, start the installation manually using ProductExplorer.
If ProductExplorer is started manually, select Enterprise Management from the available choices.
Click OK
CA ControlMinder Rapid Implementation Guide – Shared Account Management
CA Technologies, 2013 29 CA ControlMinder Rapid Implementation Guide - SAM – 3.0docx
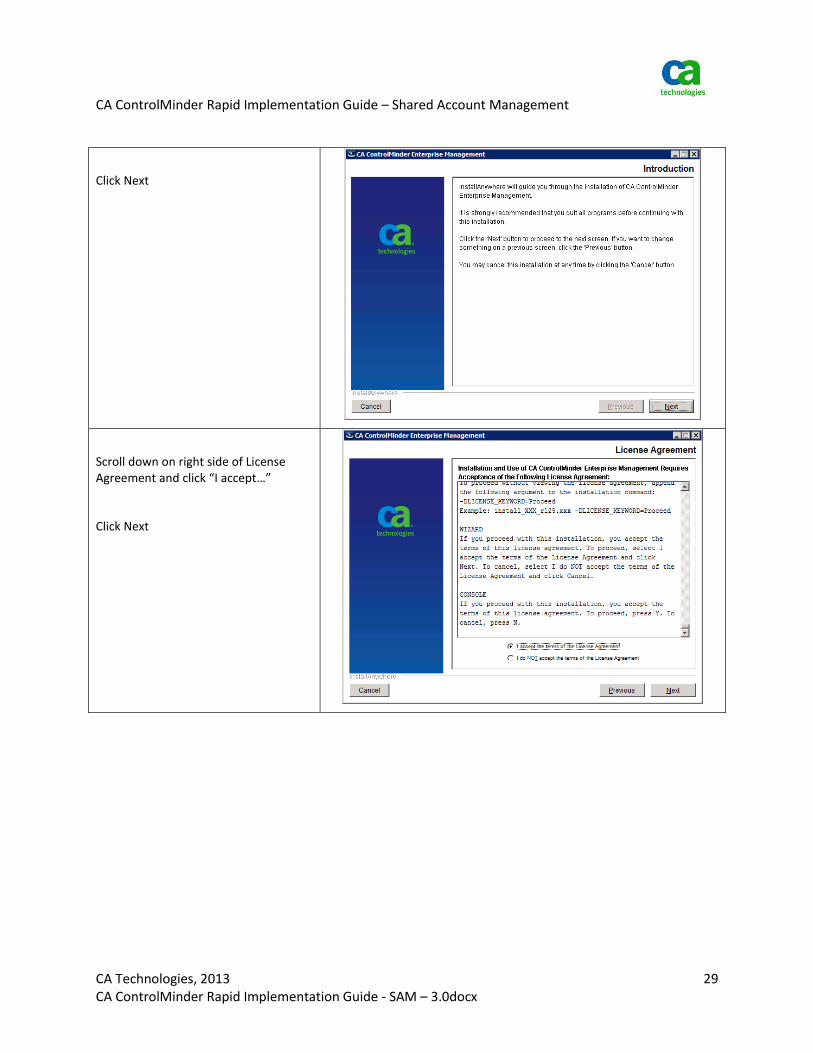
Click Next
Scroll down on right side of License Agreement and click “I accept…”
Click Next
CA ControlMinder Rapid Implementation Guide – Shared Account Management
CA Technologies, 2013 30 CA ControlMinder Rapid Implementation Guide - SAM – 3.0docx
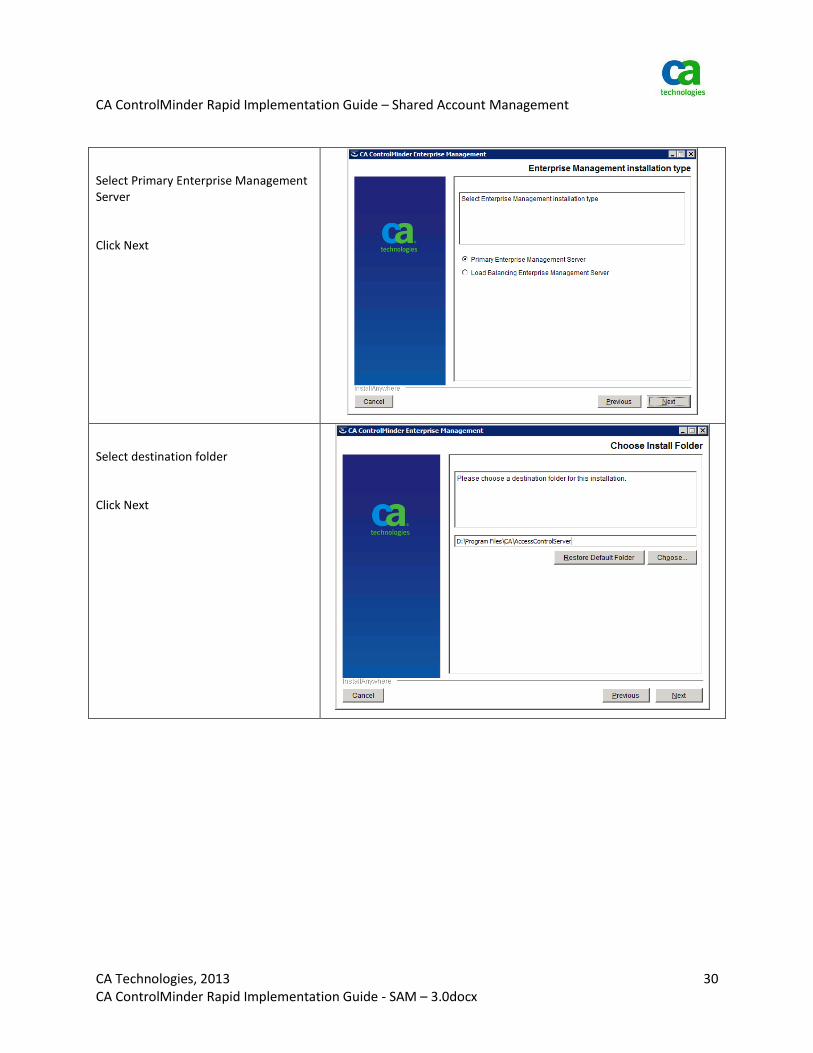
Select Primary Enterprise Management Server
Click Next
Select destination folder
Click Next
CA ControlMinder Rapid Implementation Guide – Shared Account Management
CA Technologies, 2013 31 CA ControlMinder Rapid Implementation Guide - SAM – 3.0docx
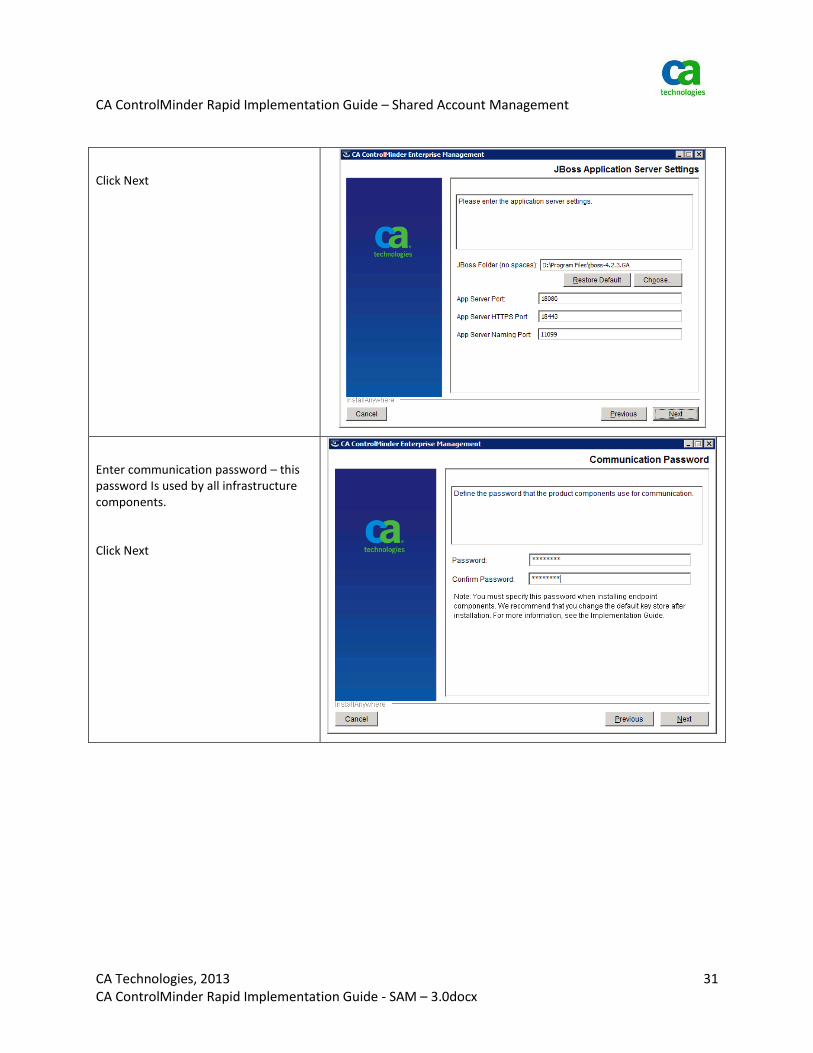
Click Next
Enter communication password – this password Is used by all infrastructure components.
Click Next

CA ControlMinder Rapid Implementation Guide – Shared Account Management
CA Technologies, 2013 32 CA ControlMinder Rapid Implementation Guide - SAM – 3.0docx
Select the database type that will be used to store the configuration information of CA ControlMinder Enterprise Management and data for the reports. You will be using MS SQL Server.
Enter the connection data for the MSSQL database connection
Click Next
CA ControlMinder Rapid Implementation Guide – Shared Account Management
CA Technologies, 2013 33 CA ControlMinder Rapid Implementation Guide - SAM – 3.0docx
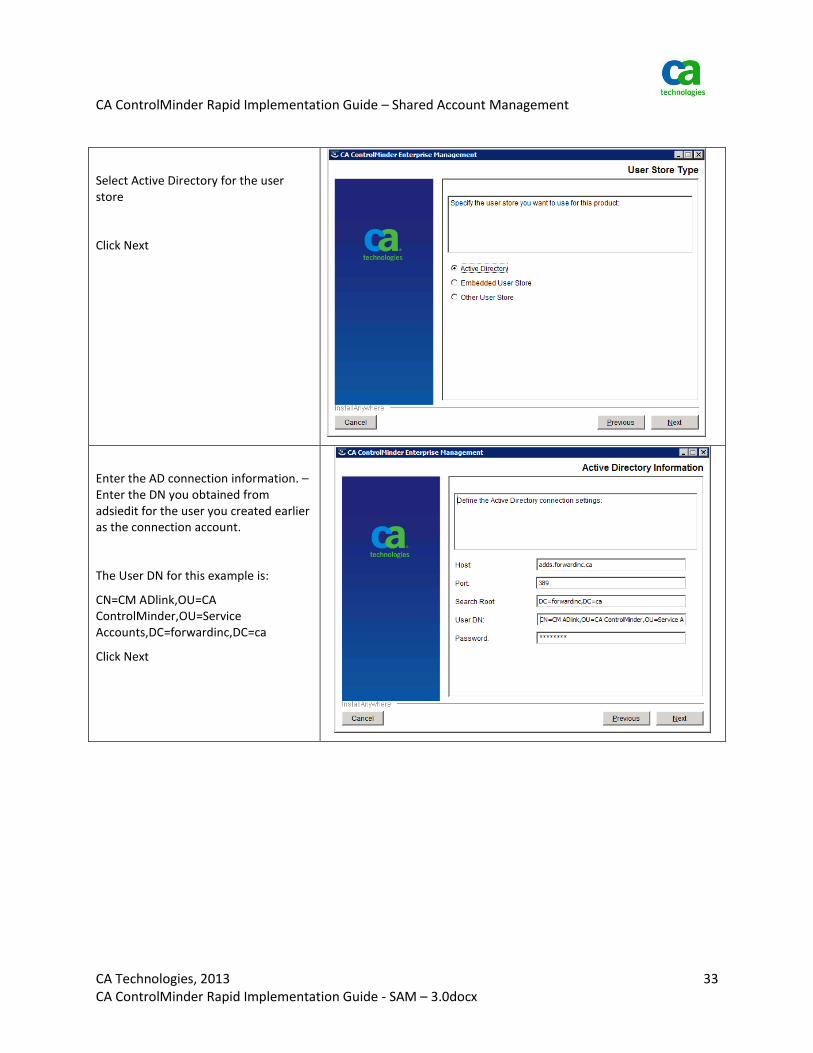
Select Active Directory for the user store
Click Next
Enter the AD connection information. – Enter the DN you obtained from adsiedit for the user you created earlier as the connection account.
The User DN for this example is:
CN=CM ADlink,OU=CA ControlMinder,OU=Service Accounts,DC=forwardinc,DC=ca
Click Next

CA ControlMinder Rapid Implementation Guide – Shared Account Management
CA Technologies, 2013 34 CA ControlMinder Rapid Implementation Guide - SAM – 3.0docx
Enter the System Manager DN as noted above. This is the DN of the user you created earlier to be the super user.
Click Next
Click Install

CA ControlMinder Rapid Implementation Guide – Shared Account Management
CA Technologies, 2013 35 CA ControlMinder Rapid Implementation Guide - SAM – 3.0docx
Wait for installation to complete
Important: If the installation does not appear to start then an installation confirmation window may be under the current window. Move the top window and check for an underlying window.
The installation may take from 15 to 60 minutes to complete
Click Done to reboot the server
CA ControlMinder Rapid Implementation Guide – Shared Account Management
CA Technologies, 2013 36 CA ControlMinder Rapid Implementation Guide - SAM – 3.0docx
Installation Validation
After the server has been rebooted, the ENTM components will be automatically started. During the first startup, a few configuration steps are performed to deploy the ENTM components in JBoss and build the required schema in the RDBMS. These activities may take about 5 minutes to fully complete so do not try to log onto the ENTM interface until the post-installation configuration steps have completed. If the server is dedicated to ControlMinder server components, use Task Manager to watch for CPU utilization to drop below 5%.
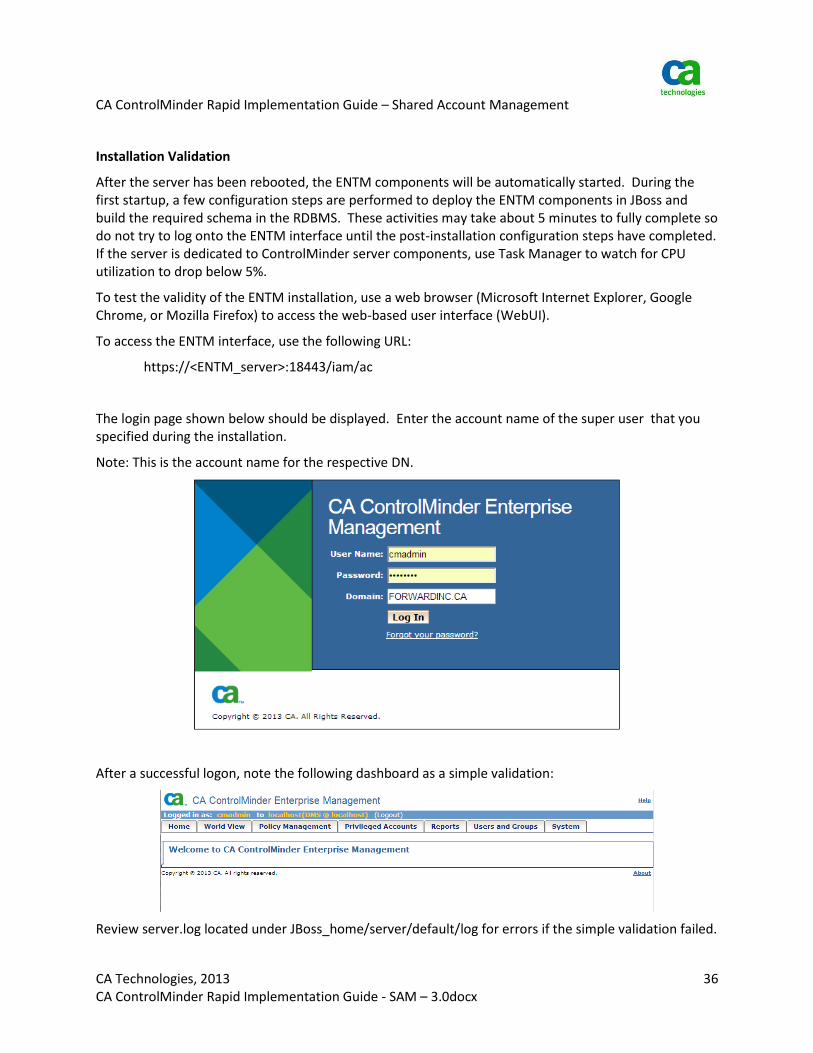
To test the validity of the ENTM installation, use a web browser (Microsoft Internet Explorer, Google Chrome, or Mozilla Firefox) to access the web-based user interface (WebUI).
To access the ENTM interface, use the following URL:
https://<ENTM_server>:18443/iam/ac
The login page shown below should be displayed. Enter the account name of the super user that you specified during the installation.
Note: This is the account name for the respective DN.
After a successful logon, note the following dashboard as a simple validation:
Review server.log located under JBoss_home/server/default/log for errors if the simple validation failed.
CA ControlMinder Rapid Implementation Guide – Shared Account Management
CA Technologies, 2013 37 CA ControlMinder Rapid Implementation Guide - SAM – 3.0docx
SAM Endpoint Creation
The installation and configuration flow of SAM is to create an endpoint definition first and then select privileged accounts of interest from that endpoint to be managed by SAM.
When you create an endpoint, you must define an account used by SAM to connect to the endpoint. This account must have sufficient privilege to list endpoint accounts and change endpoint account passwords. NOTE: The connection account itself can be managed by SAM as a privileged account.
Important: If the password of a connection account expires, SAM cannot manage accounts for this endpoint until the password for the connection account is updated. In support of this rapid implementation we recommend using connection accounts whose passwords do not expire.
Each of the endpoint and account creation methods presented below all use the same starting points.
In order to prevent repetition of those items, they are covered once in this section.
Endpoint Creation
Log into the ENTM WebUI as an administrator that has permission to create endpoint definitions and discover endpoint accounts. At this point, your System Manager user is the only user who can perform these tasks.
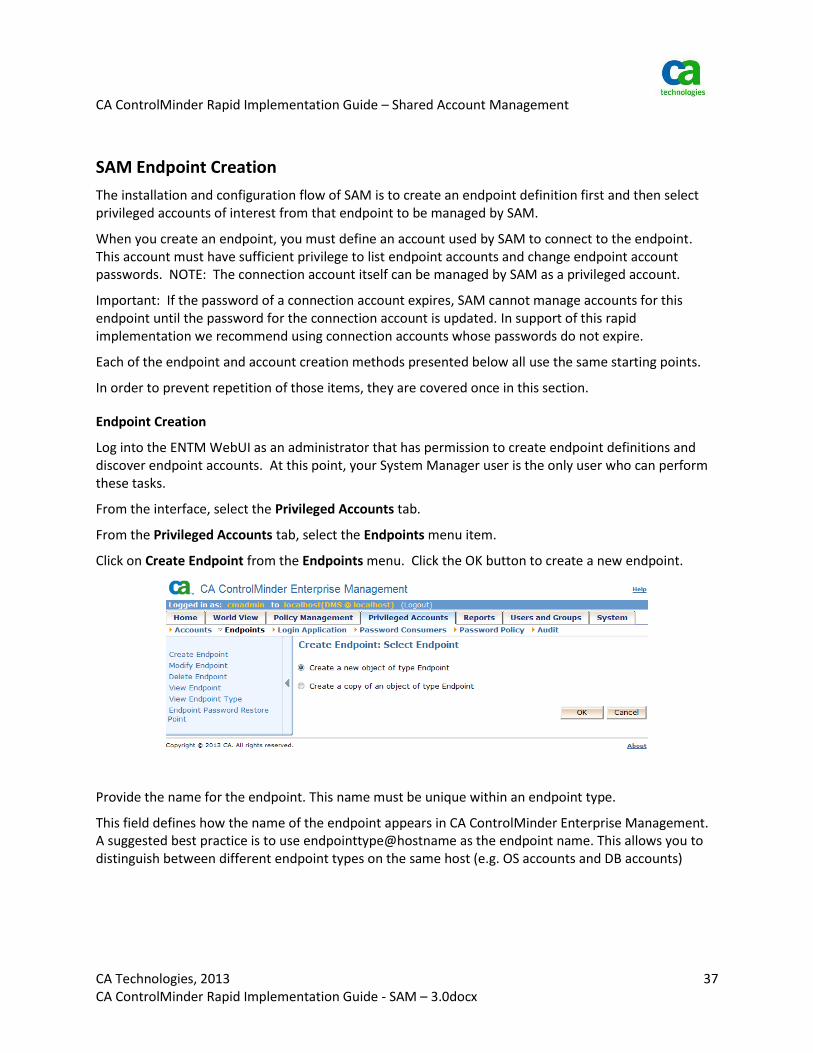
From the interface, select the Privileged Accounts tab.
From the Privileged Accounts tab, select the Endpoints menu item.
Click on Create Endpoint from the Endpoints menu. Click the OK button to create a new endpoint.
Provide the name for the endpoint. This name must be unique within an endpoint type.
This field defines how the name of the endpoint appears in CA ControlMinder Enterprise Management. A suggested best practice is to use endpointtype@hostname as the endpoint name. This allows you to distinguish between different endpoint types on the same host (e.g. OS accounts and DB accounts)
CA ControlMinder Rapid Implementation Guide – Shared Account Management
CA Technologies, 2013 38 CA ControlMinder Rapid Implementation Guide - SAM – 3.0docx
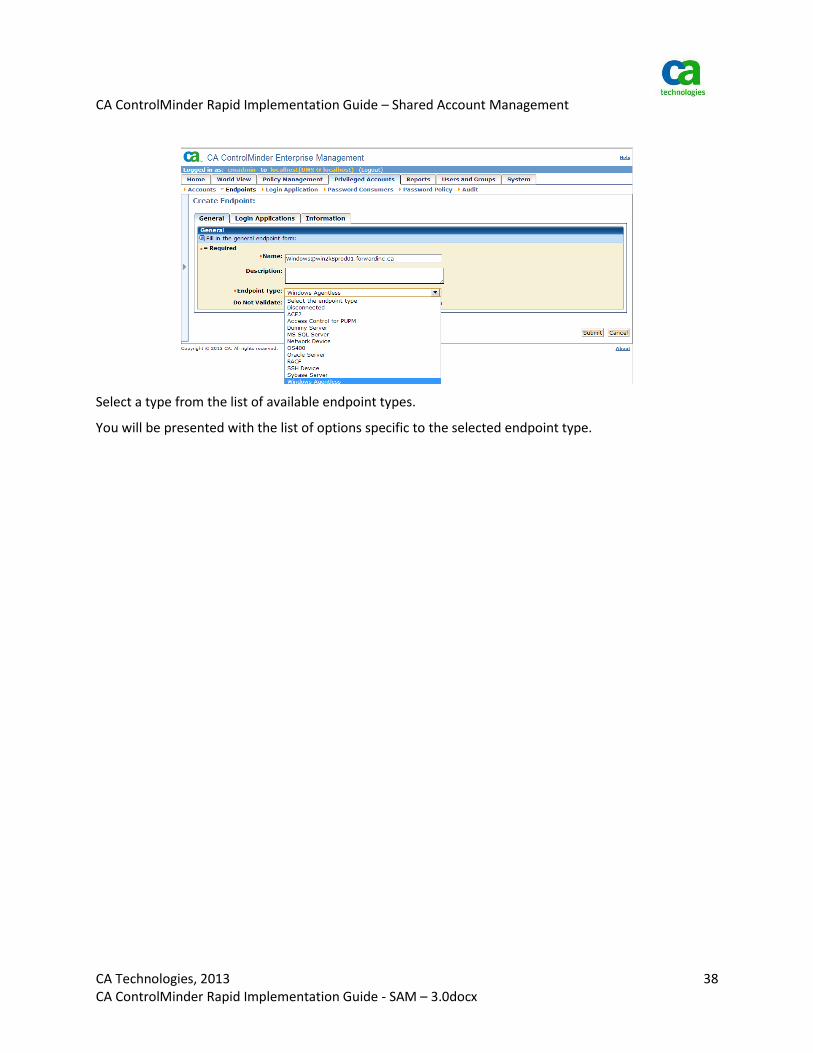
Select a type from the list of available endpoint types.
You will be presented with the list of options specific to the selected endpoint type.
CA ControlMinder Rapid Implementation Guide – Shared Account Management
CA Technologies, 2013 39 CA ControlMinder Rapid Implementation Guide - SAM – 3.0docx
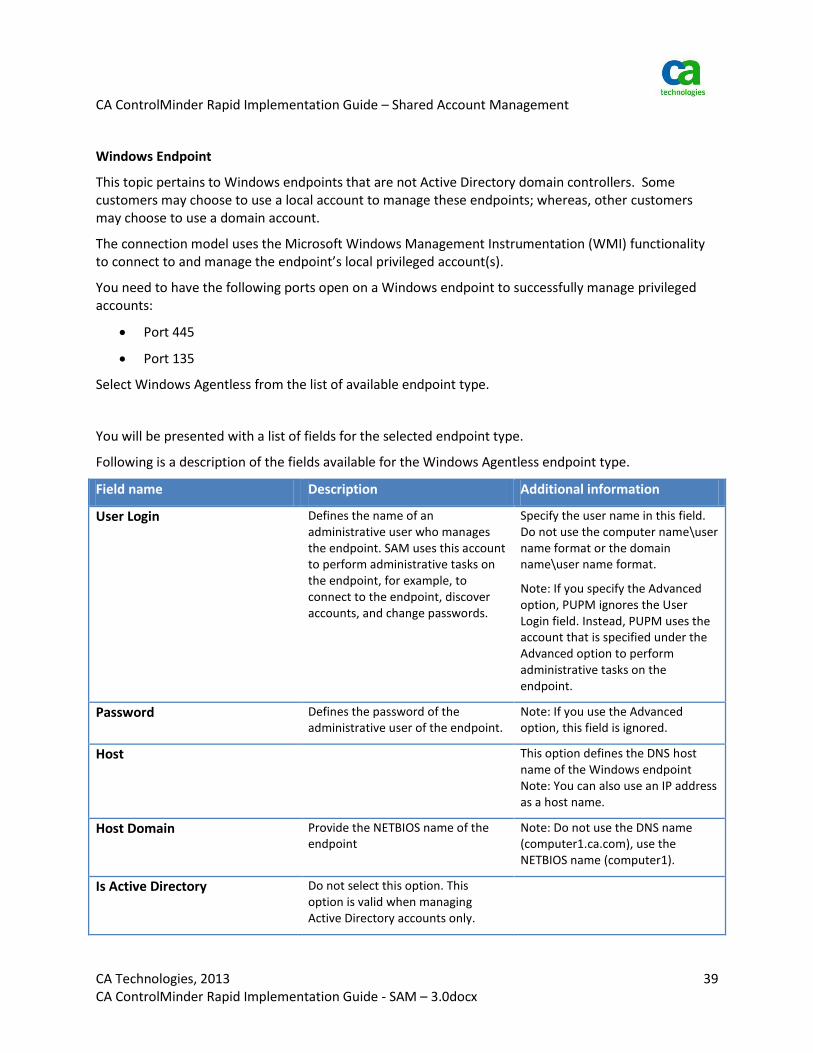
Windows Endpoint
This topic pertains to Windows endpoints that are not Active Directory domain controllers. Some customers may choose to use a local account to manage these endpoints; whereas, other customers may choose to use a domain account.
The connection model uses the Microsoft Windows Management Instrumentation (WMI) functionality to connect to and manage the endpoint’s local privileged account(s).
You need to have the following ports open on a Windows endpoint to successfully manage privileged accounts:
Port 445
Port 135
Select Windows Agentless from the list of available endpoint type.
You will be presented with a list of fields for the selected endpoint type.
Following is a description of the fields available for the Windows Agentless endpoint type.
Field name Description Additional information
User Login Defines the name of an administrative user who manages the endpoint. SAM uses this account to perform administrative tasks on the endpoint, for example, to connect to the endpoint, discover accounts, and change passwords.
Specify the user name in this field. Do not use the computer name\user name format or the domain name\user name format.
Note: If you specify the Advanced option, PUPM ignores the User Login field. Instead, PUPM uses the account that is specified under the Advanced option to perform administrative tasks on the endpoint.
Password Defines the password of the administrative user of the endpoint.
Note: If you use the Advanced option, this field is ignored.
Host This option defines the DNS host name of the Windows endpoint Note: You can also use an IP address as a host name.
Host Domain Provide the NETBIOS name of the endpoint
Note: Do not use the DNS name (computer1.ca.com), use the NETBIOS name (computer1).
Is Active Directory Do not select this option. This option is valid when managing Active Directory accounts only.
CA ControlMinder Rapid Implementation Guide – Shared Account Management
CA Technologies, 2013 40 CA ControlMinder Rapid Implementation Guide - SAM – 3.0docx
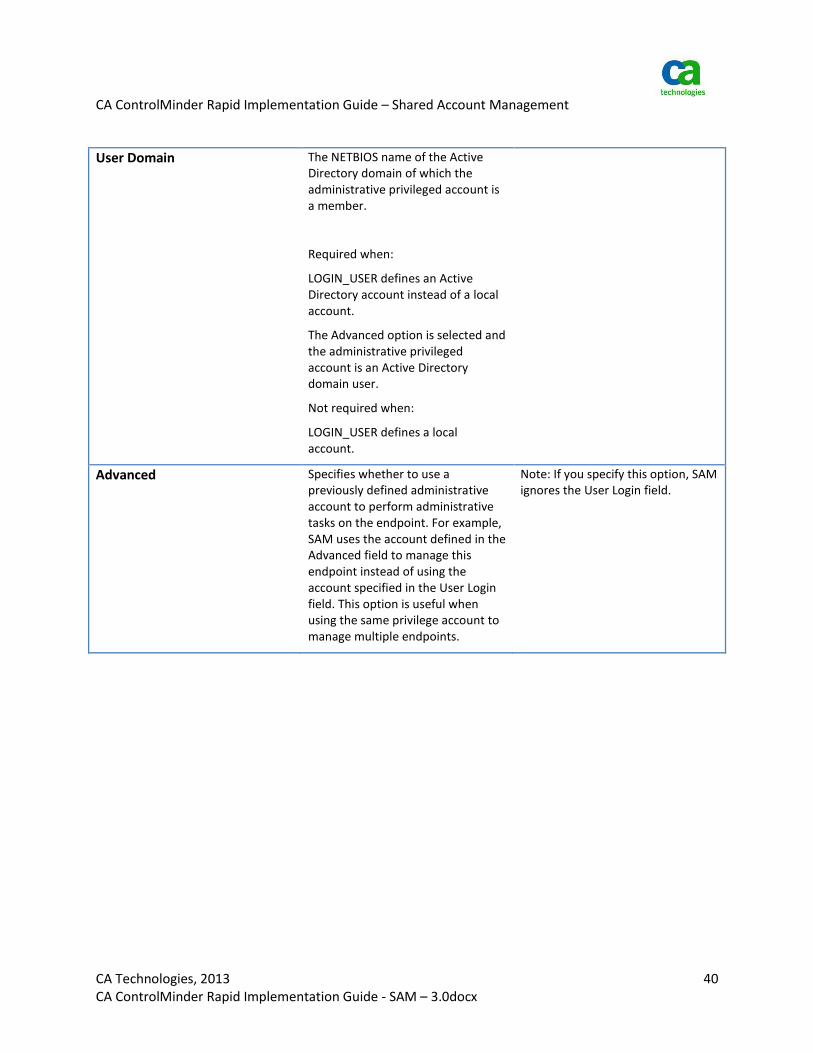
User Domain The NETBIOS name of the Active Directory domain of which the administrative privileged account is a member.
Required when:
LOGIN_USER defines an Active Directory account instead of a local account.
The Advanced option is selected and the administrative privileged account is an Active Directory domain user.
Not required when:
LOGIN_USER defines a local account.
Advanced Specifies whether to use a previously defined administrative account to perform administrative tasks on the endpoint. For example, SAM uses the account defined in the Advanced field to manage this endpoint instead of using the account specified in the User Login field. This option is useful when using the same privilege account to manage multiple endpoints.
Note: If you specify this option, SAM ignores the User Login field.

CA ControlMinder Rapid Implementation Guide – Shared Account Management
CA Technologies, 2013 41 CA ControlMinder Rapid Implementation Guide - SAM – 3.0docx
The following screenshot shows an example of Windows Agentless endpoint definition when a local account is used.
Use the local Administrator account or create a new account that is a member of the Administrators group.
If you create a new account as was done in the above example you need to modify the Admin Approval Mode.
This is valid on Windows Server 2008 and Windows 7.
SAM endpoint administration tasks run in the background and require access privileges of a native administrator account. If the SAM endpoint administrators do not have access to this native administrator account, you must allow all endpoint administrators to run in Admin Approval Mode.
Members of the Administrators group run in Admin Approval Mode, which (by default) prompts administrators to confirm actions that require more than Standard privileges.
This would block SAM agentless requests if the user is not the Administrator.
Important: If the policy setting is disabled, the Security Center notifies you that the overall security of the operating system has been reduced.

CA ControlMinder Rapid Implementation Guide – Shared Account Management
CA Technologies, 2013 42 CA ControlMinder Rapid Implementation Guide - SAM – 3.0docx
Follow these steps:
Select Control Panel, Administrative Tools, Local Security Policy
The Local Security window opens
Browse to Local Policies, Security Options
The Policy Pane opens
Right-click User Account Control: Run all administrators in Admin Approval Mode and select Properties
The Properties dialog appears
Change the operation mode to Disable and click OK
The Properties dialog closes
Reboot your computer to apply the change
CA ControlMinder Rapid Implementation Guide – Shared Account Management
CA Technologies, 2013 43 CA ControlMinder Rapid Implementation Guide - SAM – 3.0docx
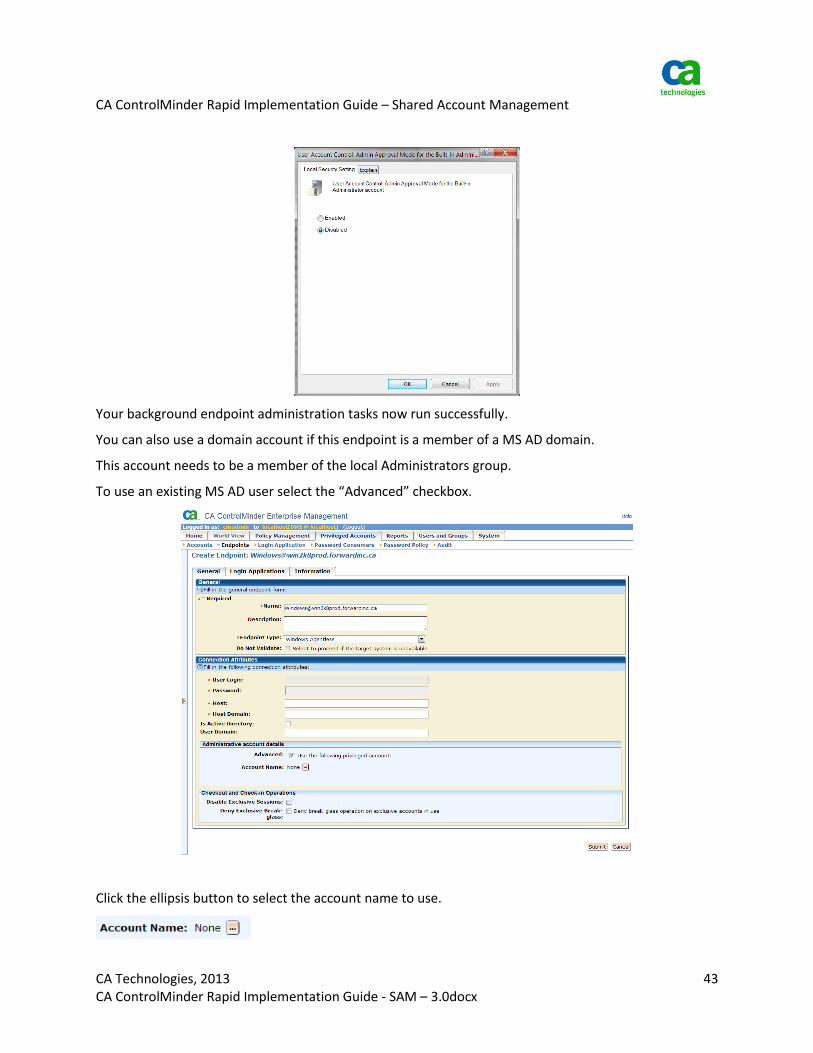
Your background endpoint administration tasks now run successfully.
You can also use a domain account if this endpoint is a member of a MS AD domain.
This account needs to be a member of the local Administrators group.
To use an existing MS AD user select the “Advanced” checkbox.
Click the ellipsis button to select the account name to use.

CA ControlMinder Rapid Implementation Guide – Shared Account Management
CA Technologies, 2013 44 CA ControlMinder Rapid Implementation Guide - SAM – 3.0docx
Search for the available accounts.
Select an existing account that was already defined to SAM.
A best practice is to use a MS Active Directory account to manage privileged accounts on endpoints that are members of the domain.
CA ControlMinder Rapid Implementation Guide – Shared Account Management
CA Technologies, 2013 45 CA ControlMinder Rapid Implementation Guide - SAM – 3.0docx
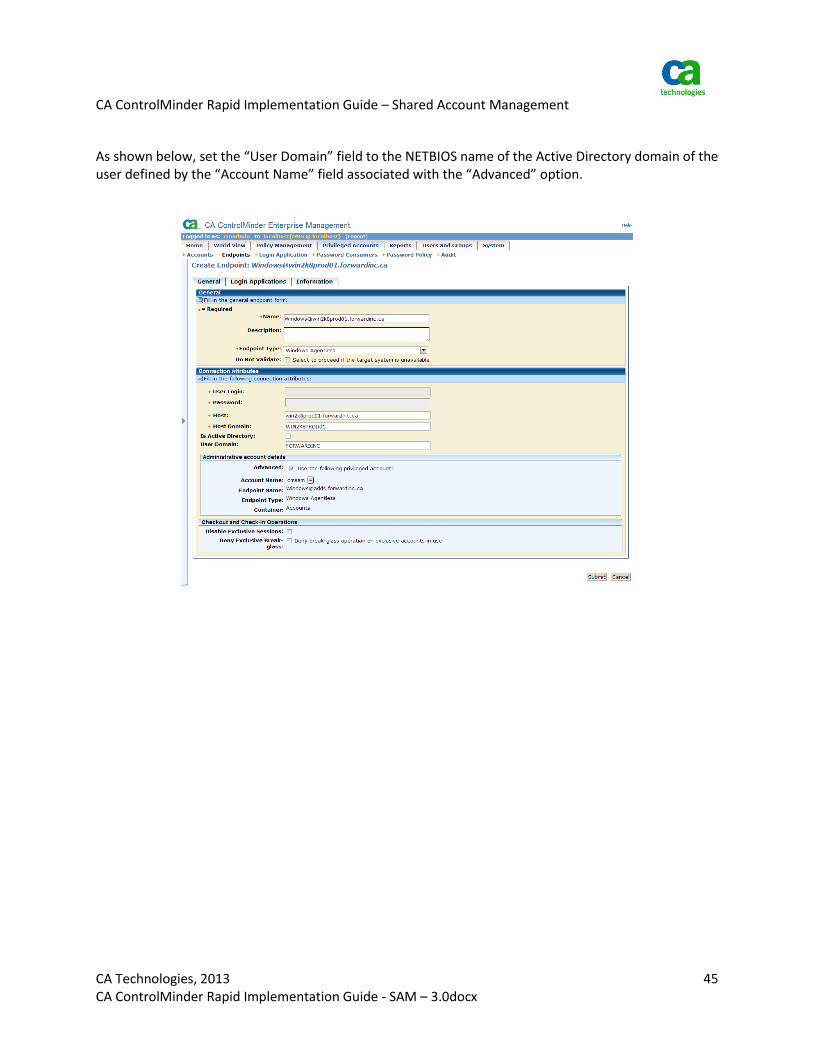
As shown below, set the “User Domain” field to the NETBIOS name of the Active Directory domain of the user defined by the “Account Name” field associated with the “Advanced” option.

CA ControlMinder Rapid Implementation Guide – Shared Account Management
CA Technologies, 2013 46 CA ControlMinder Rapid Implementation Guide - SAM – 3.0docx
Click Submit
You will see the following screen if the endpoint creation is successful.
CA ControlMinder Rapid Implementation Guide – Shared Account Management
CA Technologies, 2013 47 CA ControlMinder Rapid Implementation Guide - SAM – 3.0docx
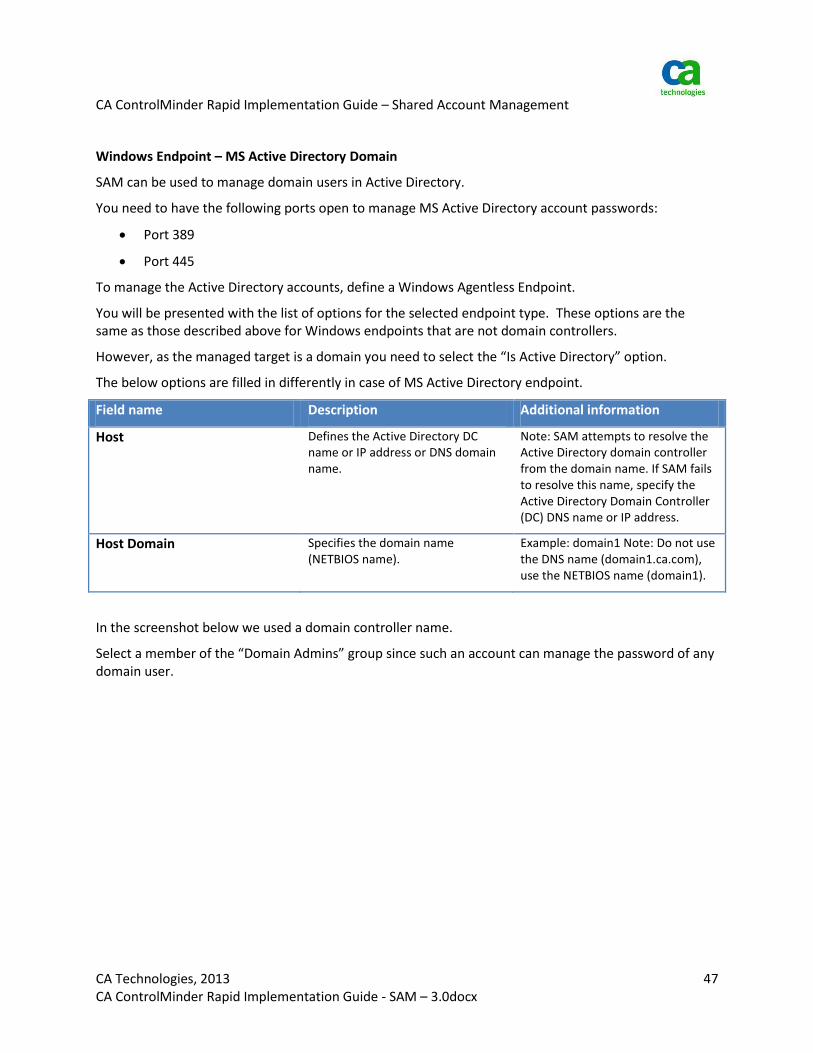
Windows Endpoint – MS Active Directory Domain
SAM can be used to manage domain users in Active Directory.
You need to have the following ports open to manage MS Active Directory account passwords:
Port 389
Port 445
To manage the Active Directory accounts, define a Windows Agentless Endpoint.
You will be presented with the list of options for the selected endpoint type. These options are the same as those described above for Windows endpoints that are not domain controllers.
However, as the managed target is a domain you need to select the “Is Active Directory” option.
The below options are filled in differently in case of MS Active Directory endpoint.
Field name Description Additional information
Host Defines the Active Directory DC name or IP address or DNS domain name.
Note: SAM attempts to resolve the Active Directory domain controller from the domain name. If SAM fails to resolve this name, specify the Active Directory Domain Controller (DC) DNS name or IP address.
Host Domain Specifies the domain name (NETBIOS name).
Example: domain1 Note: Do not use the DNS name (domain1.ca.com), use the NETBIOS name (domain1).
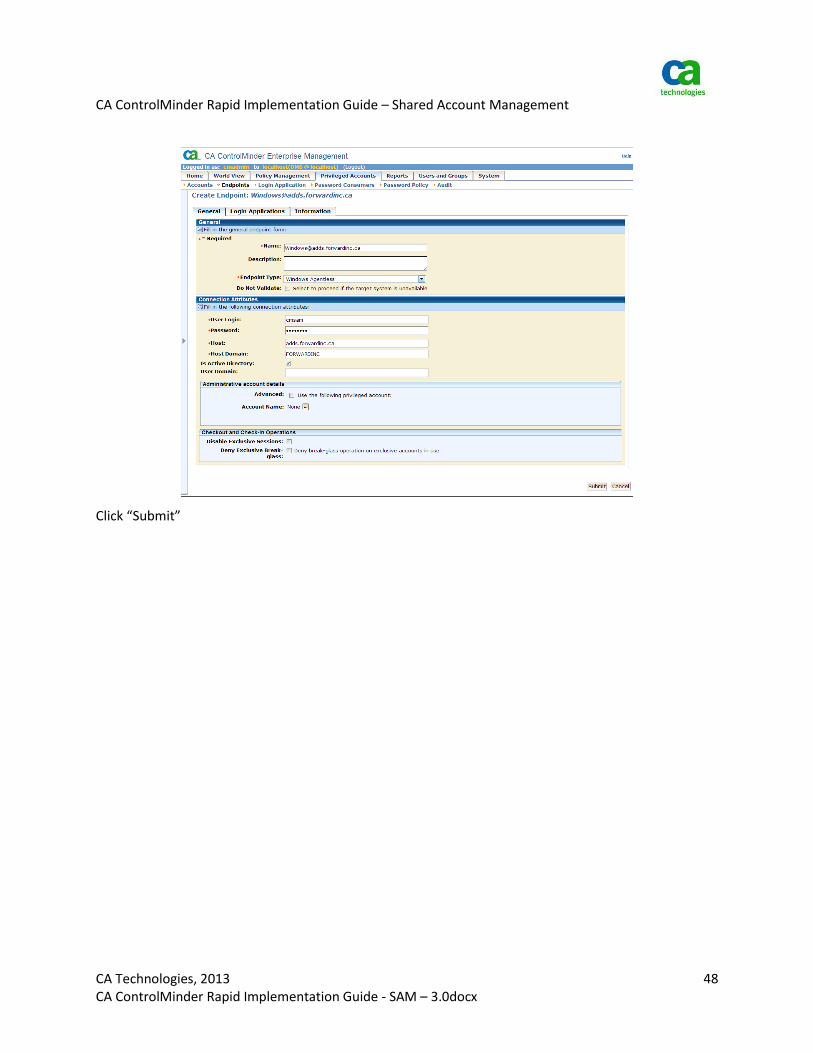
In the screenshot below we used a domain controller name.
Select a member of the “Domain Admins” group since such an account can manage the password of any domain user.
CA ControlMinder Rapid Implementation Guide – Shared Account Management
CA Technologies, 2013 48 CA ControlMinder Rapid Implementation Guide - SAM – 3.0docx
Click “Submit”

CA ControlMinder Rapid Implementation Guide – Shared Account Management
CA Technologies, 2013 49 CA ControlMinder Rapid Implementation Guide - SAM – 3.0docx
UNIX SSH Endpoint
You can manage privileged accounts on UNIX and Linux over ssh or telnet protocols.
You must have the ssh or telnet port to manage SSH Device endpoints.
Field name Description Additional information
User Login Defines the name of an administrative user of the endpoint. SAM uses this account to perform administrative tasks on the endpoint, for example, to connect to the endpoint, discover accounts, and change passwords.
Note the following points: If you specify the Advanced option, SAM does not use the User Login account to perform administrative tasks. Instead, SAM uses the specified privileged account to perform administrative tasks on the endpoint. If you specify an operation administrator account, SAM uses that account to perform administrative tasks on the endpoint, but the account specified by User Login is still used as the connection account unless the “Advanced” option was specified.
Password Defines the password of the user defined by the above User Login field.
Host Defines the host name of the endpoint.
Use Telnet Specifies to use Telnet rather than SSH to connect to the SSH device.
Note: The communication to the endpoint is not encrypted in this case.
Operation Administrator User Login
(Optional) Defines the name of an operation administrator user of the endpoint. SAM uses this account to perform administrative tasks on the endpoint, for example, discovering and changing the password of privileged accounts. If you do not specify an operation administrator user, SAM uses the User Login account to perform administrative tasks on the endpoint.
Operation Administrator Password
(Optional) Defines the password of the operation administrator user.

CA ControlMinder Rapid Implementation Guide – Shared Account Management
CA Technologies, 2013 50 CA ControlMinder Rapid Implementation Guide - SAM – 3.0docx
Field name Description Additional information
Configuration File Specifies the name of the SSH Device XML configuration file. You can customize the XML files according to your needs.
Note: If you do not specify a value for this field, CA ControlMinder Enterprise Management uses the ssh_connector_conf.xml file.
Advanced Specifies whether you want to use a privileged administrative account to perform administrative tasks on the endpoint, for example, to connect to the endpoint, discover accounts, and change passwords. For example, you can specify a privileged domain account that can perform administrative tasks on multiple endpoints.
If you specify this option, SAM does not use the User Login account to perform administrative tasks.
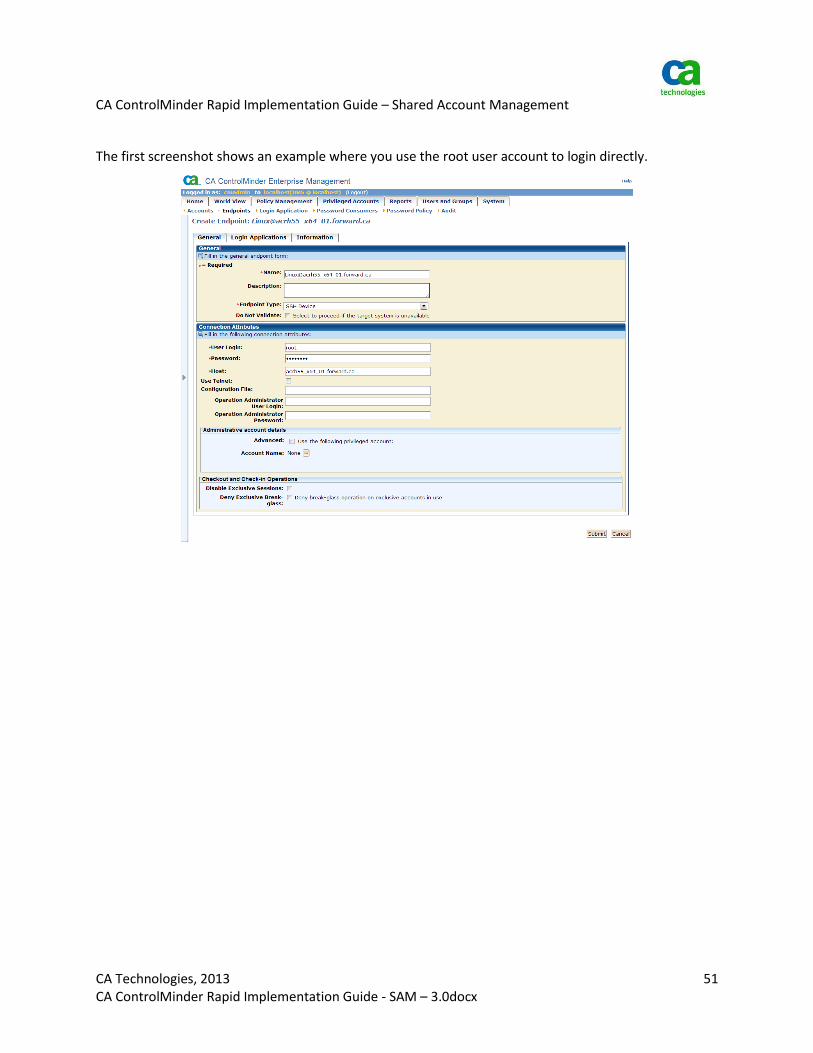
When you create an endpoint, you specify the administrator account that SAM uses to connect to the endpoint and perform administrative tasks, such as discovering and changing the password of privileged accounts. For UNIX accounts, the most suitable administrator account is often root. However, SAM uses SSH to connect to UNIX endpoints, and some organizations prohibit users and applications from making SSH connections as the root user.
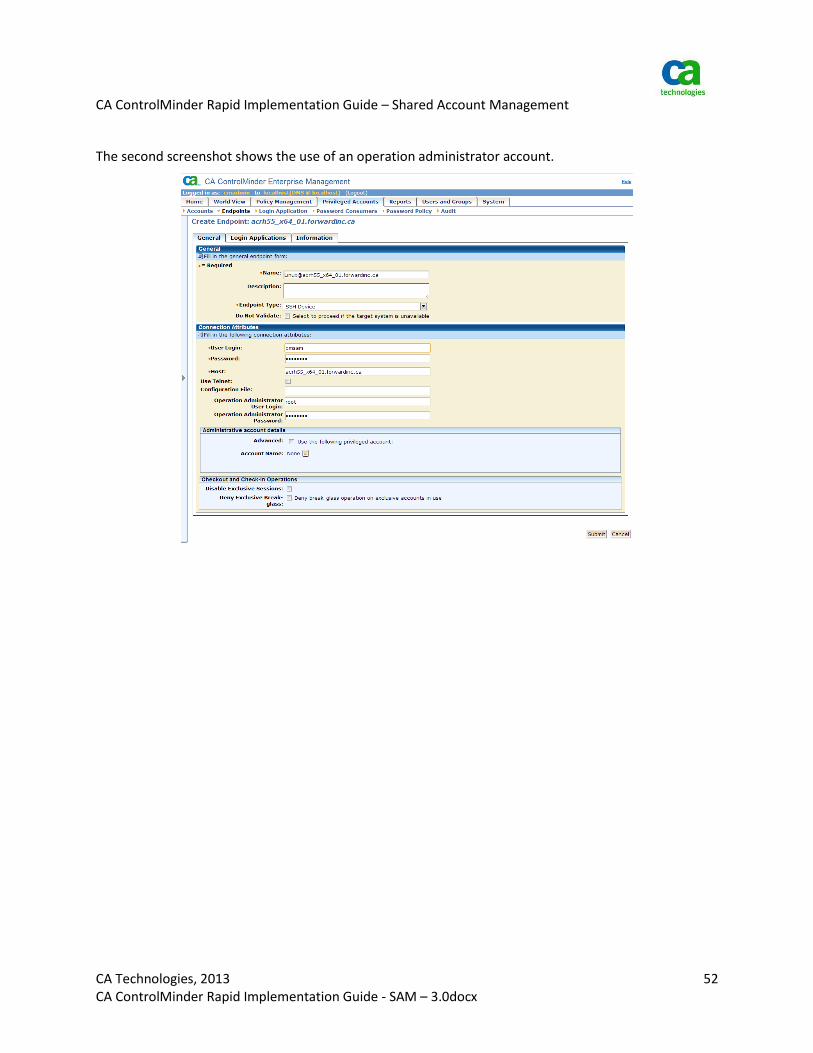
To overcome this problem, you can specify both a connection account and an operation administrator account when you create an SSH Device endpoint. (SAM uses SSH Device as the endpoint type for UNIX endpoints.) Using two accounts also lets you use a connection account that has fewer privileges than the operation administrator account.
The following process explains how SAM uses these accounts to connect to an SSH Device endpoint:
SAM uses the credentials of the connection account to connect to the endpoint. This is defined by “User Login” field or “Account Name” if “Advanced” option is used.
Using the credentials of the operation administrator account, the connection account connects to the endpoint and switches (su) to the operation administrator account.
Administrative tasks such as getting a list of accounts and changing passwords are performed by the operation administrator.
For example, if the operation administrator account is root, SAM performs administrative tasks as root.
When you view the privileged accounts on an SSH Device endpoint, both the connection and the operation administrator account are listed as endpoint administrator accounts.
CA ControlMinder Rapid Implementation Guide – Shared Account Management
CA Technologies, 2013 51 CA ControlMinder Rapid Implementation Guide - SAM – 3.0docx
The first screenshot shows an example where you use the root user account to login directly.
CA ControlMinder Rapid Implementation Guide – Shared Account Management
CA Technologies, 2013 52 CA ControlMinder Rapid Implementation Guide - SAM – 3.0docx
The second screenshot shows the use of an operation administrator account.
CA ControlMinder Rapid Implementation Guide – Shared Account Management
CA Technologies, 2013 53 CA ControlMinder Rapid Implementation Guide - SAM – 3.0docx
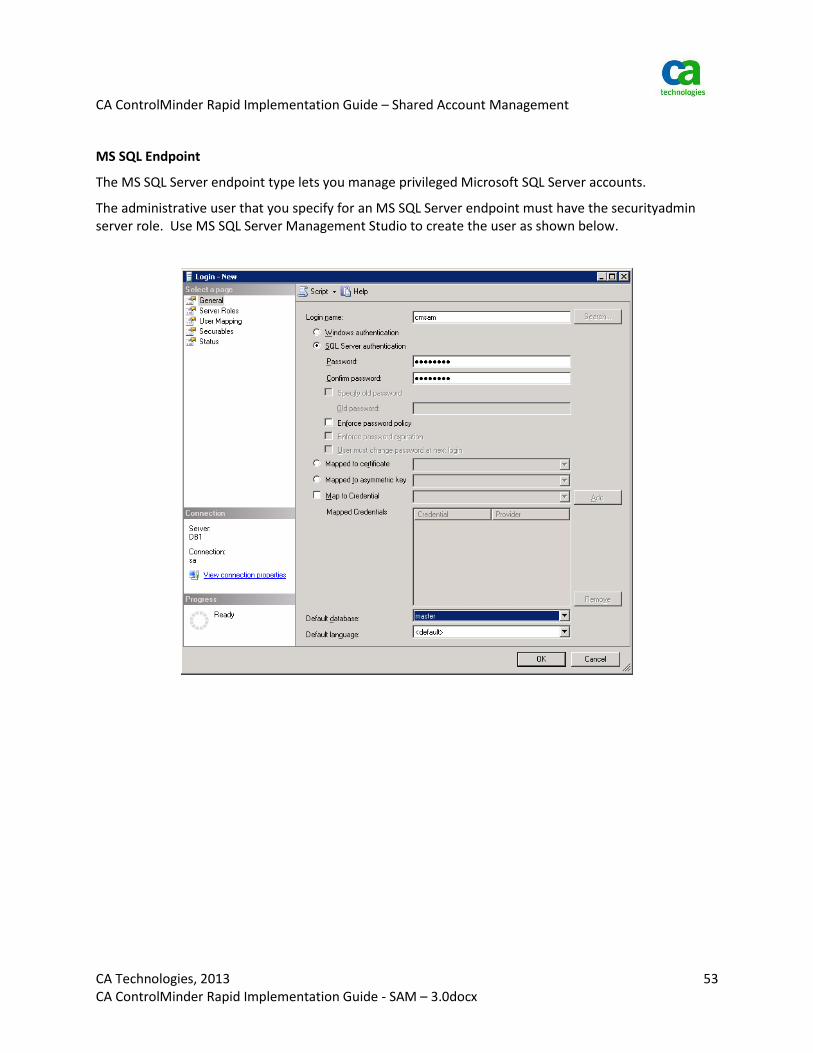
MS SQL Endpoint
The MS SQL Server endpoint type lets you manage privileged Microsoft SQL Server accounts.
The administrative user that you specify for an MS SQL Server endpoint must have the securityadmin server role. Use MS SQL Server Management Studio to create the user as shown below.

CA ControlMinder Rapid Implementation Guide – Shared Account Management
CA Technologies, 2013 54 CA ControlMinder Rapid Implementation Guide - SAM – 3.0docx
From the Server roles definition, select securityadmin.
Click “OK”.
Select MS SQL Server when creating an edpoint.
The below fields are specific to MS SQL Server endpoint.
Field name Description Additional information
URL Defines the URL that CA ControlMinder Enterprise Management can use to connect to the endpoint. The URL specifies a particular type of database server.
Format:
jdbc:sqlserver://servername:port
Example:
jdbc:sqlserver://db_hostname:1433
Port (Optional) Specifies the server listening port number. The port number that you specify must match the port number that you specify in the URL.
The port number is required when you use login applications.

CA ControlMinder Rapid Implementation Guide – Shared Account Management
CA Technologies, 2013 55 CA ControlMinder Rapid Implementation Guide - SAM – 3.0docx
Field name Description Additional information
Instance Name (Optional) Specifies the MS SQL Server instance name.
The screenshot below shows an example of MS SQL Server endpoint configuration.

CA ControlMinder Rapid Implementation Guide – Shared Account Management
CA Technologies, 2013 56 CA ControlMinder Rapid Implementation Guide - SAM – 3.0docx
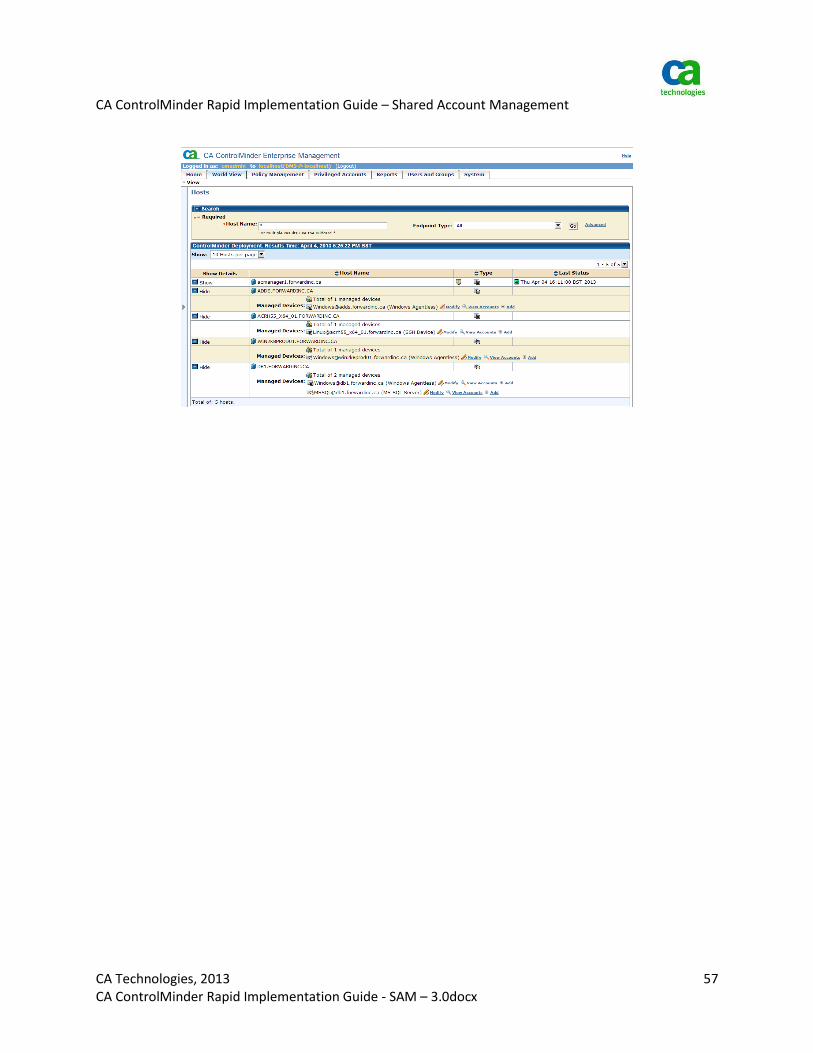
Verify Created Endpoints
Navigate to WorldView -> View -> Hosts
Click “Go” to search for all the available endpoints.
.
You should see all the endpoints you have already defined.
And you can verify these endpoints are managed devices in SAM.
Click “Show” to display the devices.
Note that the ENTM server was defined as a managed endpoint during product installation.
You can see in the screenshot below that for db1.forardinc.ca there are 2 managed devices (Windows Agentless and MS SQL Server).
CA ControlMinder Rapid Implementation Guide – Shared Account Management
CA Technologies, 2013 57 CA ControlMinder Rapid Implementation Guide - SAM – 3.0docx
CA ControlMinder Rapid Implementation Guide – Shared Account Management
CA Technologies, 2013 58 CA ControlMinder Rapid Implementation Guide - SAM – 3.0docx
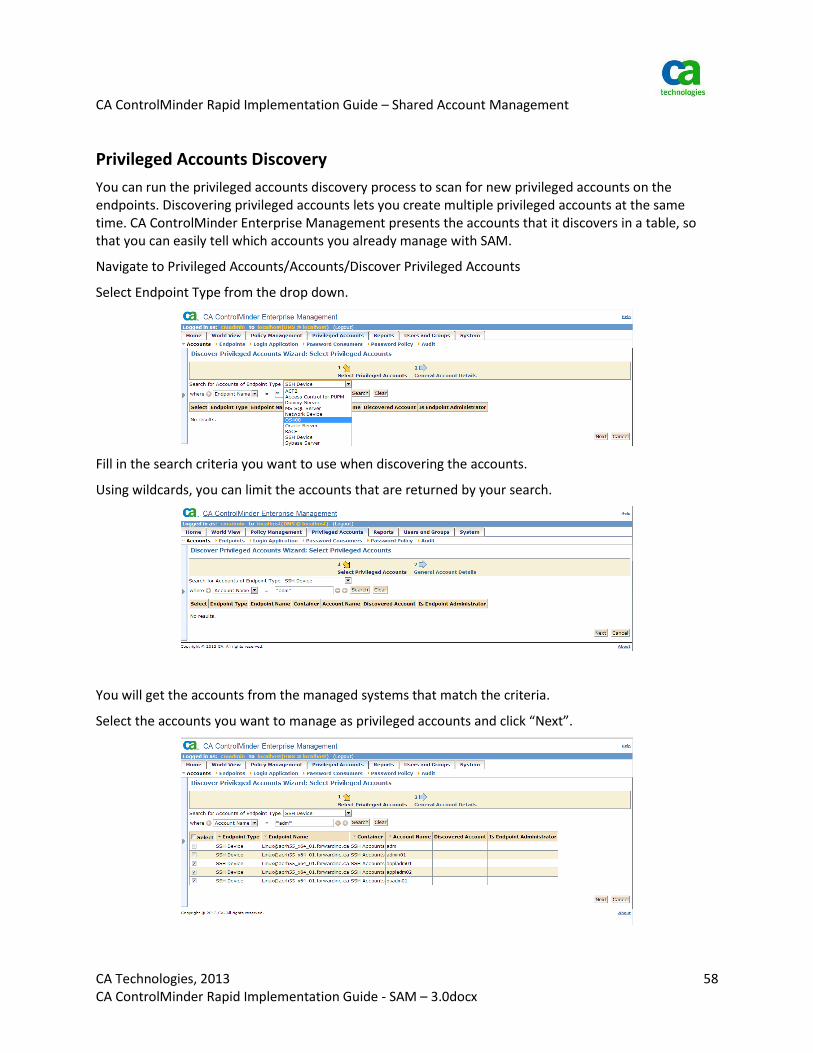
Privileged Accounts Discovery
You can run the privileged accounts discovery process to scan for new privileged accounts on the endpoints. Discovering privileged accounts lets you create multiple privileged accounts at the same time. CA ControlMinder Enterprise Management presents the accounts that it discovers in a table, so that you can easily tell which accounts you already manage with SAM.
Navigate to Privileged Accounts/Accounts/Discover Privileged Accounts
Select Endpoint Type from the drop down.
Fill in the search criteria you want to use when discovering the accounts.
Using wildcards, you can limit the accounts that are returned by your search.
You will get the accounts from the managed systems that match the criteria.
Select the accounts you want to manage as privileged accounts and click “Next”.
CA ControlMinder Rapid Implementation Guide – Shared Account Management
CA Technologies, 2013 59 CA ControlMinder Rapid Implementation Guide - SAM – 3.0docx
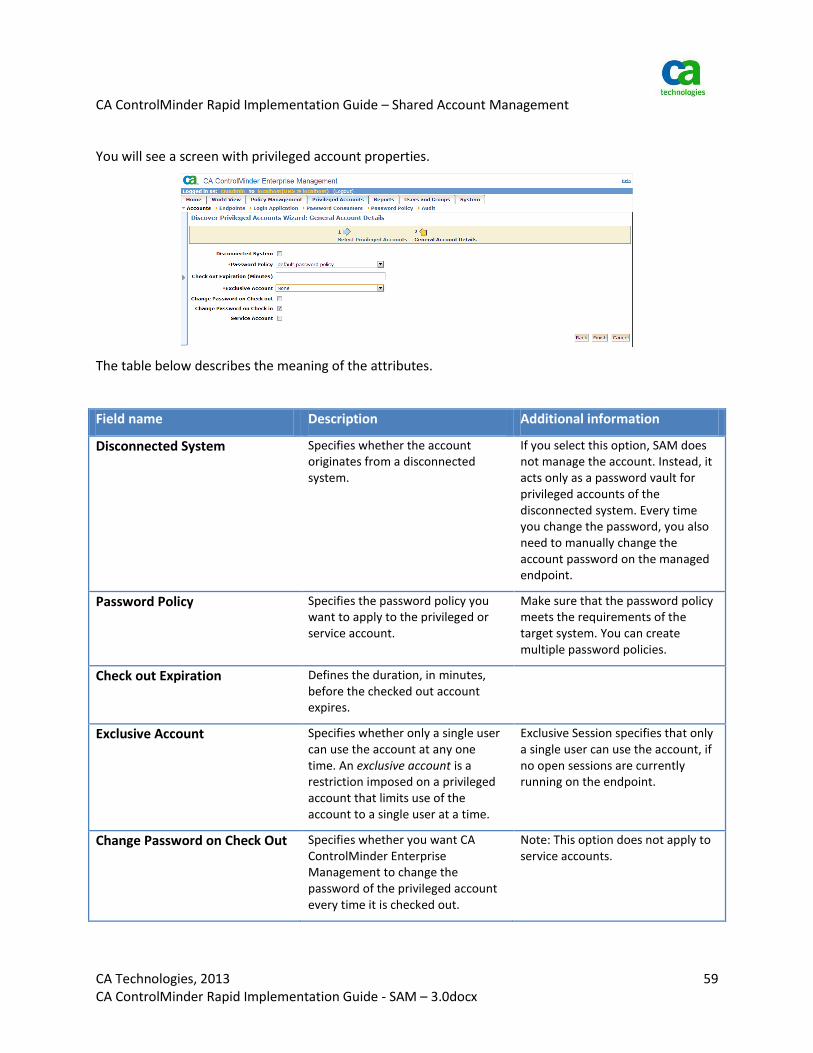
You will see a screen with privileged account properties.
The table below describes the meaning of the attributes.
Field name Description Additional information
Disconnected System Specifies whether the account originates from a disconnected system.
If you select this option, SAM does not manage the account. Instead, it acts only as a password vault for privileged accounts of the disconnected system. Every time you change the password, you also need to manually change the account password on the managed endpoint.
Password Policy Specifies the password policy you want to apply to the privileged or service account.
Make sure that the password policy meets the requirements of the target system. You can create multiple password policies.
Check out Expiration Defines the duration, in minutes, before the checked out account expires.
Exclusive Account Specifies whether only a single user can use the account at any one time. An exclusive account is a restriction imposed on a privileged account that limits use of the account to a single user at a time.
Exclusive Session specifies that only a single user can use the account, if no open sessions are currently running on the endpoint.
Change Password on Check Out Specifies whether you want CA ControlMinder Enterprise Management to change the password of the privileged account every time it is checked out.
Note: This option does not apply to service accounts.

CA ControlMinder Rapid Implementation Guide – Shared Account Management
CA Technologies, 2013 60 CA ControlMinder Rapid Implementation Guide - SAM – 3.0docx
Field name Description Additional information
Change Password on Check In Specifies whether you want CA ControlMinder Enterprise Management to change the password of the privileged account every time it is checked in by a user or a program, or when the checkout period expires.
Note: If the account is not exclusive, CA ControlMinder Enterprise Management generates a new privileged account password only when all users have checked in the account. This option does not apply to service accounts.
Service Account Specifies whether the discovered account is a service account.
Note: You can also use the Discover Service Accounts Wizard to discover service accounts.
To verify that the accounts were added successfully go to Privileged Account/Accounts/View Privileged Accounts.
You will see the accounts you discovered listed.
The accounts marked “Disconnected System” and “Is Endpoint Administrator” are the accounts you used to acquire the endpoints. These are so called connection accounts and by default CM SAM is not managing the passwords of these accounts.
Repeat this process for all endpoints that contain privileged accounts of interest.
CM SAM can also manage passwords of the connection accounts.
We suggest that you keep the connection accounts as disconnected (passwords are not managed) while user acceptance testing is in progress.
CA ControlMinder Rapid Implementation Guide – Shared Account Management
CA Technologies, 2013 61 CA ControlMinder Rapid Implementation Guide - SAM – 3.0docx
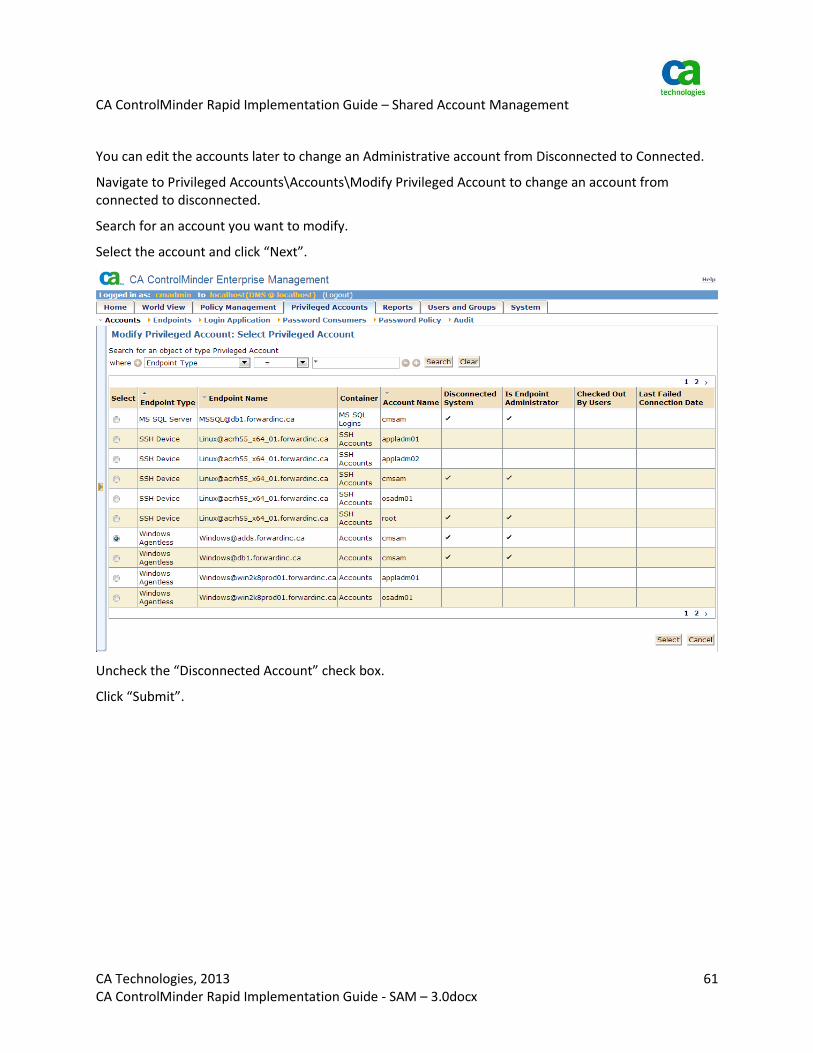
You can edit the accounts later to change an Administrative account from Disconnected to Connected.
Navigate to Privileged Accounts\Accounts\Modify Privileged Account to change an account from connected to disconnected.
Search for an account you want to modify.
Select the account and click “Next”.
Uncheck the “Disconnected Account” check box.
Click “Submit”.

CA ControlMinder Rapid Implementation Guide – Shared Account Management
CA Technologies, 2013 62 CA ControlMinder Rapid Implementation Guide - SAM – 3.0docx
Note that CA SAM will change the password of this account periodically based on the assigned password policy.
If you do not want the account password to be changed keep this account as disconnected.
CA ControlMinder Rapid Implementation Guide – Shared Account Management
CA Technologies, 2013 63 CA ControlMinder Rapid Implementation Guide - SAM – 3.0docx
ENTM Administration Role Scoping
Administration Roles
Predefined admin roles in CA ControlMinder Enterprise Management provide a basic set of admin roles that you can assign to administrators in your enterprise according to your requirements. Admin roles of interest to Shared Account Management customers include:
System Manager—Responsible for managing CA ControlMinder Enterprise Management. A user with this admin role can perform, create, and manage all tasks in CA ControlMinder Enterprise Management. Use this role for the implementation phase to define the actual admin roles in your organization and for emergency situations. We recommend that you assign this role to a minimal number of users, ideally only one user, and closely monitor this user's actions.
Customized System Manager—Consider creating a Customized System Manager role because the out-of-the-box System Manager role has all privileged accounts available for checkout.
Reporting—Responsible for managing English reports. A user with this role can schedule and view reports.
CA Enterprise Log Manager User—Responsible for viewing CA Enterprise Log Manager Reports. A user with this role can view CA Enterprise Log Manager Reports.
CA Enterprise Log Manager Admin—Responsible for managing CA Enterprise Log Manager Reports. A user with this role can administer the CA Enterprise Log Manager reports in CA ControlMinder Enterprise Management and manage the connection to the CA Enterprise Log Manager server.
Self Manager—Responsible for managing their own user account. A user with this role can perform administrative actions on their account: change the account password, modify their user profile, view their assigned roles, submitted tasks, and the items that are waiting for their approval. Note: By default, every user in the system is assigned the Self Manager role.

CA ControlMinder Rapid Implementation Guide – Shared Account Management
CA Technologies, 2013 64 CA ControlMinder Rapid Implementation Guide - SAM – 3.0docx
Privileged Access Roles
The following roles are relevant to SAM.
SAM User—A user with this role can check out and check in privileged account passwords to which the user is permitted. This role is assigned by default to all the users in CA ControlMinder Enterprise Management. The three ways a user can check out a privileged account are:
o By always being granted access to a privileged account(s). No approval is required. o Through approval of a user’s Privileged Account Request. When approved, access is
granted as a Privileged Account Exception. o By always being granted access to a privileged account via Break Glass. By default,
the Privileged Account owner is notified when a privileged account password is checked out via Break Glass. Under normal circumstances the user would submit a Privileged Account Request for approval. Under emergency situations, the user can check out a privileged account password without having to wait for approval.
Privileged Account Request— A user with this role can submit or delete requests for privileged account passwords. This role is assigned by default to all the users in CA ControlMinder Enterprise Management.
SAM Approver— A user with this role can respond to privileged access requests that CA ControlMinder Enterprise Management users have submitted. Approving the request grants the requestor a Privileged Account Exception. This role is assigned by default to all the users in CA ControlMinder Enterprise Management, but, by default, only the owner of a privileged account can approve or deny access to that privileged account. Beginning with CA ControlMinder r12.7, the owner can be a specific user or a group of users. NOTE: A user with the System Manager role can approve or deny any Privileged Account Request.
Break Glass— This role allows a user to check out a privileged account password via Break Glass for those privileged accounts to which the user has been granted Break Glass access. By default, all users are assigned this role but have no Break Glass access to any privileged account.
Endpoint Privileged Access Role— A user with this role can perform privileged account tasks on the specified endpoint type. The first time that you define a new type of endpoint, CA ControlMinder creates a corresponding endpoint privileged access role. For example, the first time you create a Windows endpoint in CA ControlMinder Enterprise Management, CA ControlMinder creates the Windows Agentless Connection endpoint privileged access role.
SAM Audit Manager— A user with this role can audit privileged account activity and manage the CA Enterprise Log Manager audit collection parameters.

CA ControlMinder Rapid Implementation Guide – Shared Account Management
CA Technologies, 2013 65 CA ControlMinder Rapid Implementation Guide - SAM – 3.0docx
SAM Policy Manager— A user with this role can manage role members and member polices, assign role owners, and create and delete roles.
SAM Target System Manager—A user with this role can administer password policies and privileged accounts, and can execute the privileged accounts discovery wizard to discover privileged accounts on endpoints. This role also provides the means to delete a Privileged Account Exception. Deleting a Privileged Account Exception results in voiding a previously approved Privileged Account Request.
SAM User Manager—A user with this role can administer CA ControlMinder Enterprise Management users and groups and password policies, and manage the work items of users.
Changing the Scope of Default Roles
By default, some of the predefined roles have membership rules set to “all”. This means that all the users are members of these roles.
The roles where the default of “all” is relevant are listed below:
Break Glass
Privileged Account Request
SAM Approver
SAM User
Self-Manager
This means that all the users that are defined in the ENTM user store are allowed to:
Login into ENTM.
Request any account password through a predefined workflow process.
Approve privileged account requests if processed via workflow. This is just for requests that are routed to the user for approval.
Use the Break Glass task within the defined scope. (The default scope is that no accounts are allowed to use the break glass functionality.)
It is a best practice to modify the membership rules of the above roles to allow only a predefined set of users to access roles listed above by limiting the membership with respect to users, groups and other criteria.
As an example, we shall limit the membership by AD group by creating a new group in AD and assigning all SAM users to this group. You can also use an existing AD group if a suitable group already exists.
We created a group named “CA CM Users” that all the users of CA CM SAM will be members of.

CA ControlMinder Rapid Implementation Guide – Shared Account Management
CA Technologies, 2013 66 CA ControlMinder Rapid Implementation Guide - SAM – 3.0docx
Login to ENTM using an account with System Manager permissions.
Click on Users and Groups tab
Select Roles
Select Privileged Access Role
Select Modify Role
Select one of the above mentioned roles.
The “Break Glass” role was used as an example.
Login to ENTM using an account with System Manager permissions.
Click on Users and Groups tab
Select Roles
Select Privileged Access Role
Select Modify Role
Click on Members tab
CA ControlMinder Rapid Implementation Guide – Shared Account Management
CA Technologies, 2013 67 CA ControlMinder Rapid Implementation Guide - SAM – 3.0docx
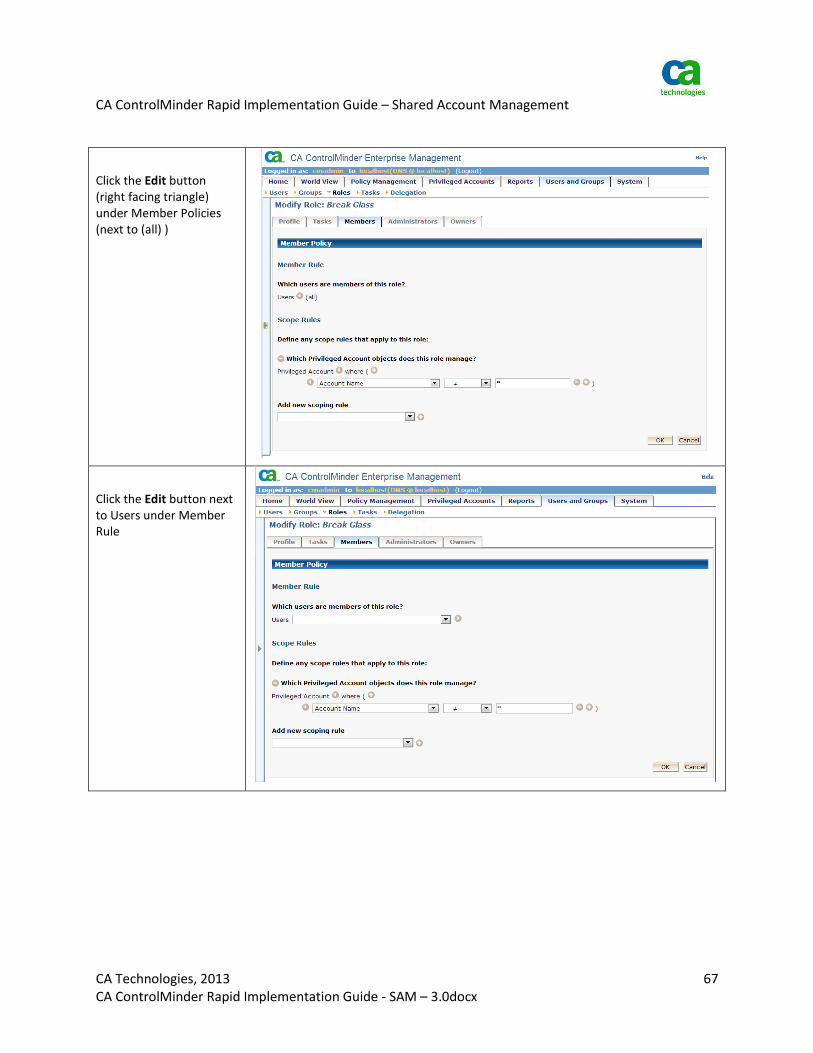
Click the Edit button (right facing triangle) under Member Policies (next to (all) )
Click the Edit button next to Users under Member Rule

CA ControlMinder Rapid Implementation Guide – Shared Account Management
CA Technologies, 2013 68 CA ControlMinder Rapid Implementation Guide - SAM – 3.0docx
Select “who are members of <group member-rule>” from the drop down list.
Search for a group that you want to use in the member rule.
CA ControlMinder Rapid Implementation Guide – Shared Account Management
CA Technologies, 2013 69 CA ControlMinder Rapid Implementation Guide - SAM – 3.0docx
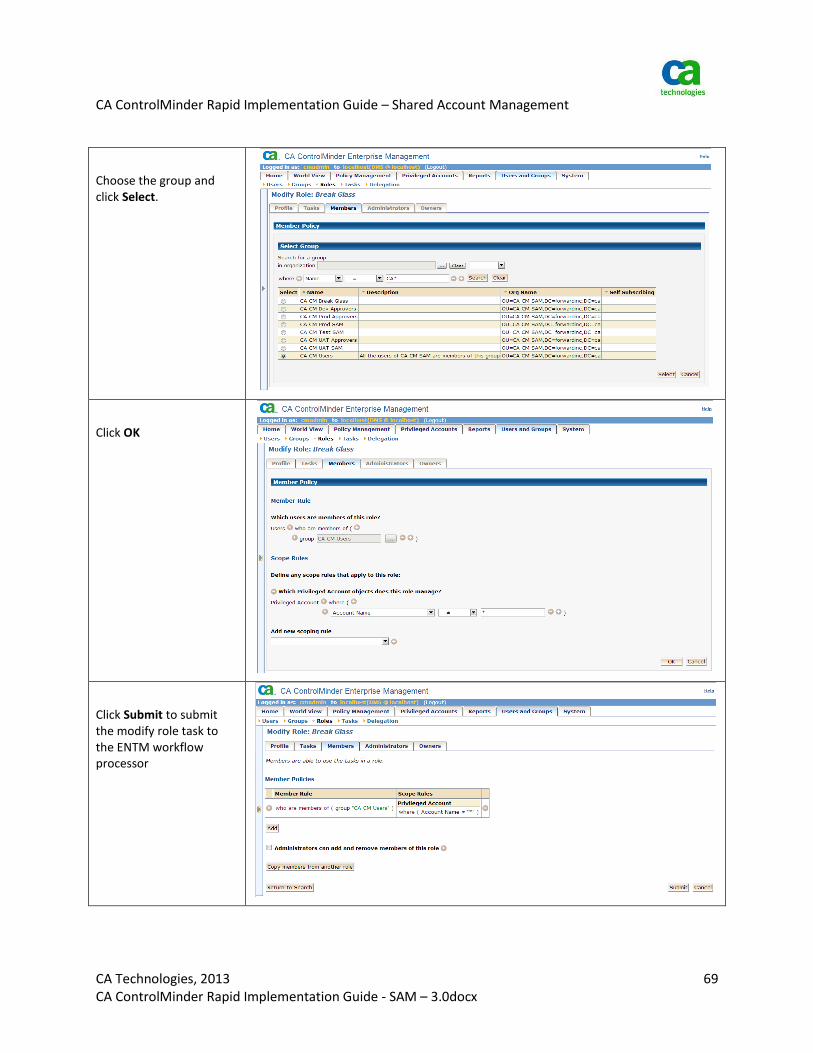
Choose the group and click Select.
Click OK
Click Submit to submit the modify role task to the ENTM workflow processor
CA ControlMinder Rapid Implementation Guide – Shared Account Management
CA Technologies, 2013 70 CA ControlMinder Rapid Implementation Guide - SAM – 3.0docx
If desired you may repeat the steps shown above for the Break Glass role modification to modify the role membership of the SAM default role definitions – Privileged Account Request, SAM Approver, SAM User and Self-Manager.
Note: Because of a current limitation in the product all the users that need access to accounts through “My Privileged Accounts” must be members of “Break Glass Role”. They will not be able to see the privileged account they are allowed to use otherwise.
You can specify which accounts would be available for break glass by changing the scoping rules of this role.
Please note that no accounts are available for break glass by default.
CA ControlMinder Rapid Implementation Guide – Shared Account Management
CA Technologies, 2013 71 CA ControlMinder Rapid Implementation Guide - SAM – 3.0docx
Setting Up Endpoint Tagging and Approvers
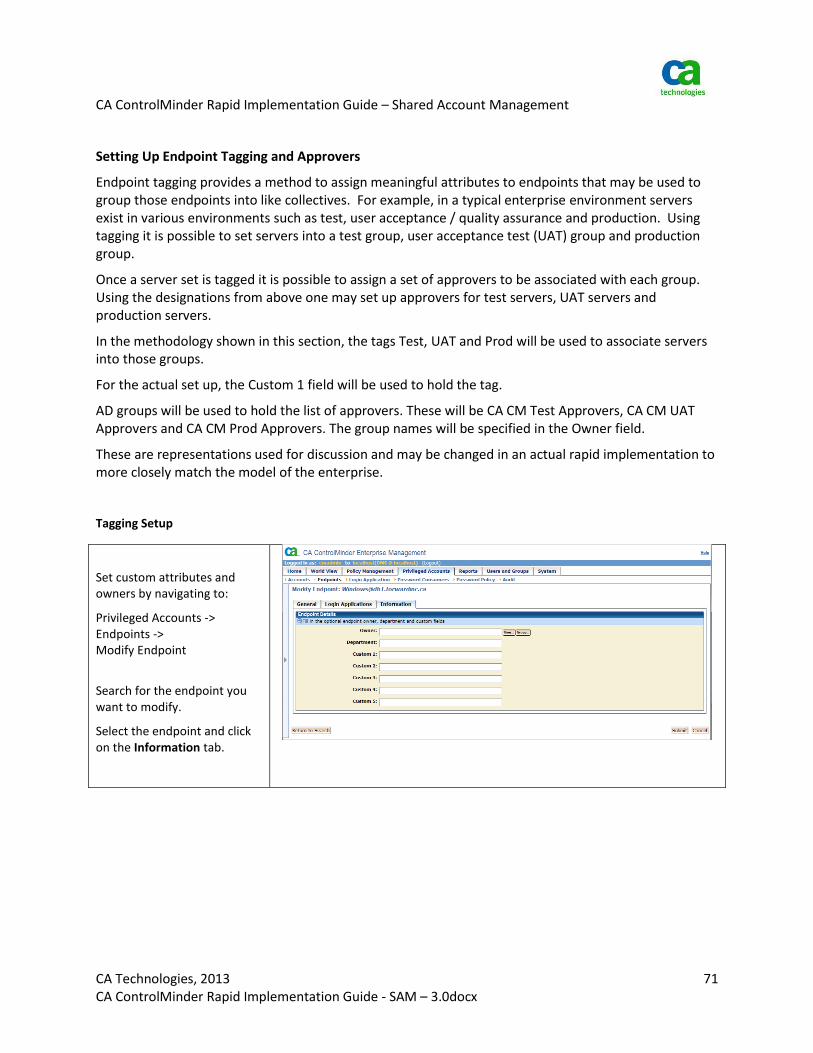
Endpoint tagging provides a method to assign meaningful attributes to endpoints that may be used to group those endpoints into like collectives. For example, in a typical enterprise environment servers exist in various environments such as test, user acceptance / quality assurance and production. Using tagging it is possible to set servers into a test group, user acceptance test (UAT) group and production group.
Once a server set is tagged it is possible to assign a set of approvers to be associated with each group. Using the designations from above one may set up approvers for test servers, UAT servers and production servers.
In the methodology shown in this section, the tags Test, UAT and Prod will be used to associate servers into those groups.
For the actual set up, the Custom 1 field will be used to hold the tag.
AD groups will be used to hold the list of approvers. These will be CA CM Test Approvers, CA CM UAT Approvers and CA CM Prod Approvers. The group names will be specified in the Owner field.
These are representations used for discussion and may be changed in an actual rapid implementation to more closely match the model of the enterprise.
Tagging Setup
Set custom attributes and owners by navigating to:
Privileged Accounts -> Endpoints -> Modify Endpoint
Search for the endpoint you want to modify.
Select the endpoint and click on the Information tab.
CA ControlMinder Rapid Implementation Guide – Shared Account Management
CA Technologies, 2013 72 CA ControlMinder Rapid Implementation Guide - SAM – 3.0docx
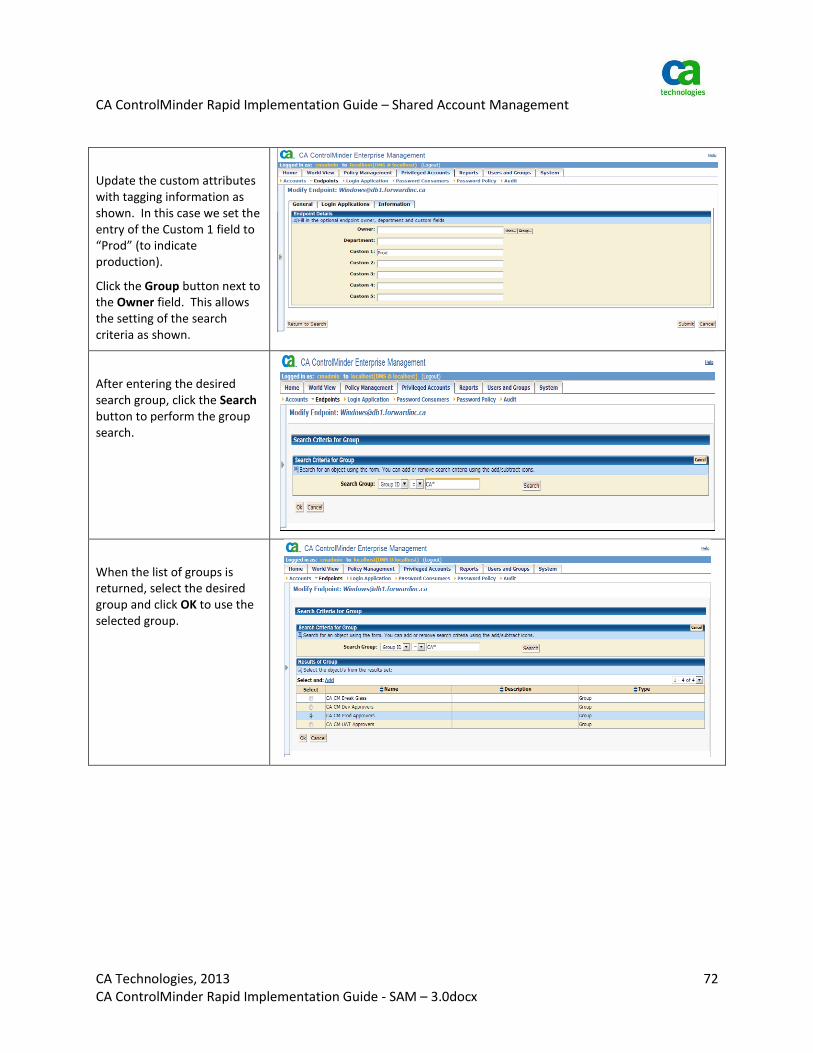
Update the custom attributes with tagging information as shown. In this case we set the entry of the Custom 1 field to “Prod” (to indicate production).
Click the Group button next to the Owner field. This allows the setting of the search criteria as shown.
After entering the desired search group, click the Search button to perform the group search.
When the list of groups is returned, select the desired group and click OK to use the selected group.

CA ControlMinder Rapid Implementation Guide – Shared Account Management
CA Technologies, 2013 73 CA ControlMinder Rapid Implementation Guide - SAM – 3.0docx
Click Submit to enter the changes.
Repeat the preceding steps for all of the tags that you want to define in your environment.
CA ControlMinder Rapid Implementation Guide – Shared Account Management
CA Technologies, 2013 74 CA ControlMinder Rapid Implementation Guide - SAM – 3.0docx
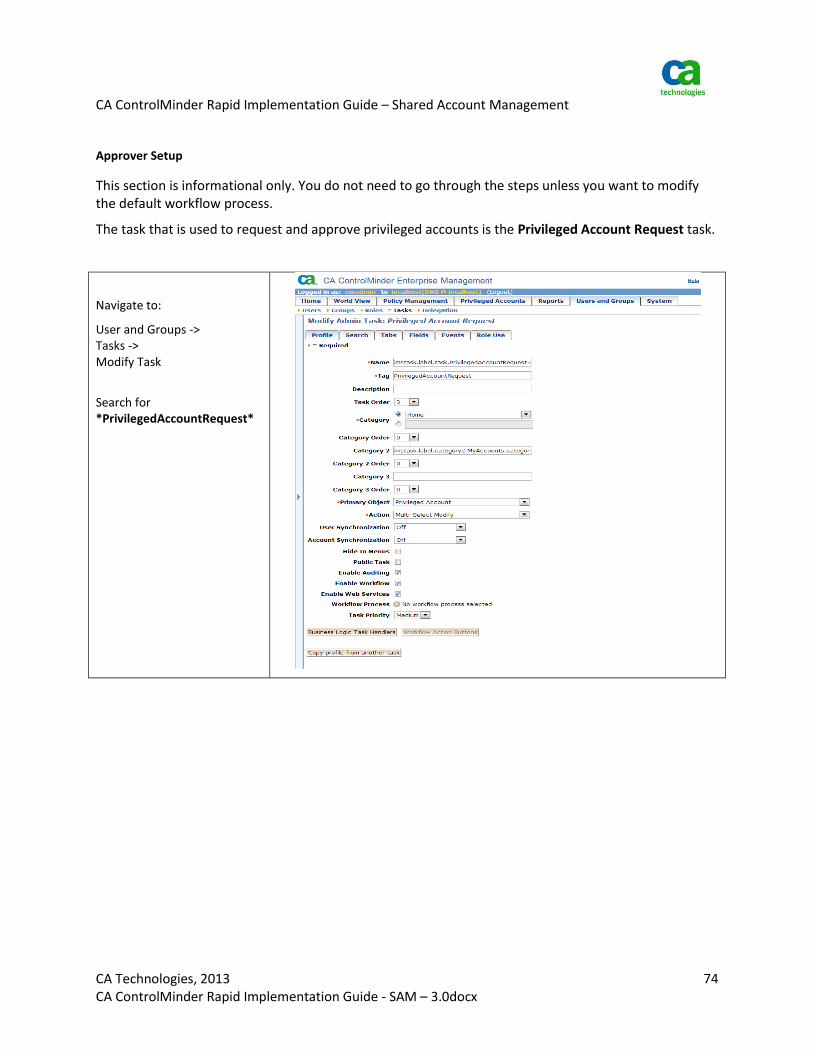
Approver Setup
This section is informational only. You do not need to go through the steps unless you want to modify the default workflow process.
The task that is used to request and approve privileged accounts is the Privileged Account Request task.
Navigate to:
User and Groups -> Tasks -> Modify Task
Search for *PrivilegedAccountRequest*

CA ControlMinder Rapid Implementation Guide – Shared Account Management
CA Technologies, 2013 75 CA ControlMinder Rapid Implementation Guide - SAM – 3.0docx
Click on the Events panel.
You can see that workflow process is set to SingleStepApproval and the participant resolver is set to PriviledgeAccountOwnerResolver
This means that the list of approvers will be retrieved based on the data in the Owner attribute of the Privileged Account or Endpoint.
We specified an AD group as an owner in our case. The list of owners will serve as list of approvers.
If the owner field is blank or no approver is specified then the “default” approver will be used. The default approver is the super admin user that was specified during the SAM installation.
If desired, you may modify the default approver to add multiple users to the default approver list.

CA ControlMinder Rapid Implementation Guide – Shared Account Management
CA Technologies, 2013 76 CA ControlMinder Rapid Implementation Guide - SAM – 3.0docx
Privilege Access Role Definition
In ENTM, you assign privileges to users and administrators by assigning admin and privileged access roles. A role contains tasks that correspond to application functions in CA ControlMinder Enterprise Management.
Roles simplify privilege management. Instead of associating a user with each task that they perform, you can assign a role to the user. The user can perform all the tasks in their assigned role. You can then edit the role by adding tasks. Every user who has the role can now perform the new task. If you remove a task from a role, the user can no longer perform that task.
When a user logs in to ENTM, they see tabs based on their role(s). The user can see only the tabs and tasks that are assigned to their role(s).
You can assign separate roles to different users to prevent one user being able to complete every task. This may help your organization comply with separation of duties requirements. However, you can assign more than one role to a user.
It is suggested to use the properties of the endpoints and accounts for tagging as described previously. In this case every endpoint will have the application and environment assigned listed in one of the custom fields. This will allow the rule sets to be simplified. When a new endpoint is acquired and tagged it will automatically be available to a user defined with the associated role.
The first time that you discover privileged accounts on an endpoint type, CA ControlMinder Enterprise Management automatically creates an endpoint privileged access role for using privileged accounts on that endpoint type. For example, the first time you discover privileged accounts on a Windows Agentless endpoint, CA ControlMinder Enterprise Management automatically creates the Windows Agentless Privileged Access Role.
You can see the created role if you go to Users and Groups/Roles/Privileged Access Roles/Manage Roles.
The SSH Device Privileged Access Role and Windows Agentless Privileged Access Role in the screenshot below were created by the discovery process.
This role can be used to give access to all the accounts of a given type. It can also be used as a template when you create new roles.
CA ControlMinder Rapid Implementation Guide – Shared Account Management
CA Technologies, 2013 77 CA ControlMinder Rapid Implementation Guide - SAM – 3.0docx
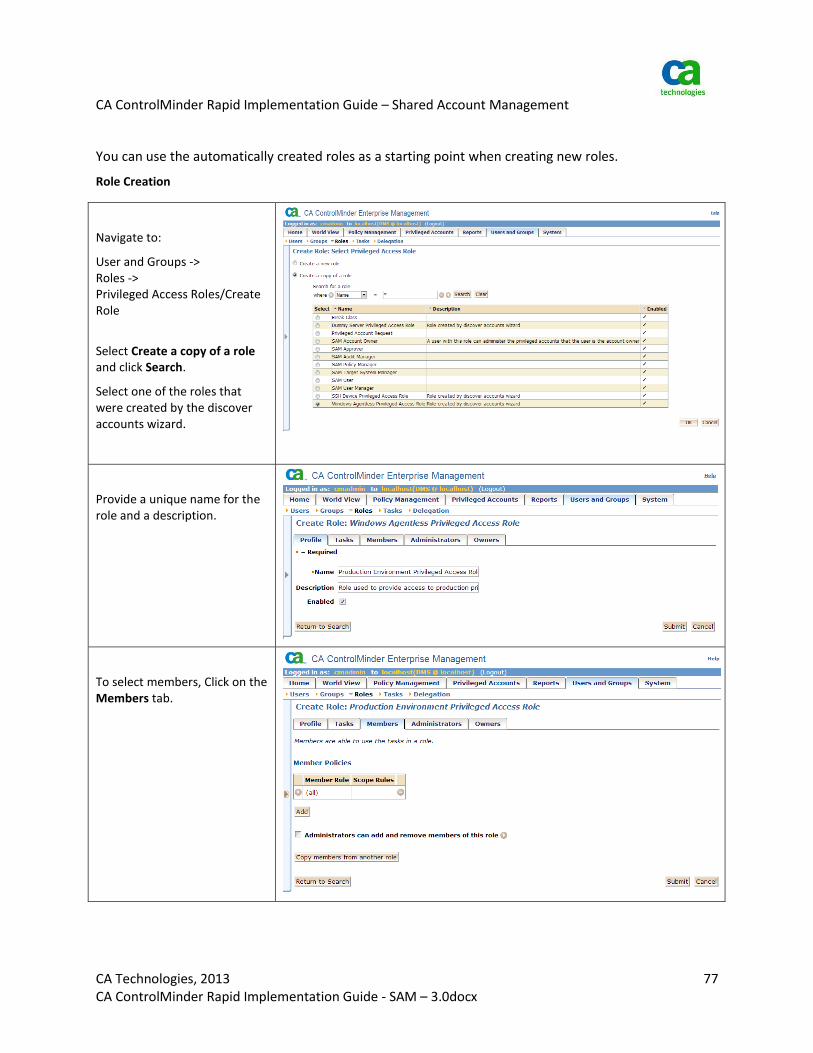
You can use the automatically created roles as a starting point when creating new roles.
Role Creation
Navigate to:
User and Groups -> Roles -> Privileged Access Roles/Create Role
Select Create a copy of a role and click Search.
Select one of the roles that were created by the discover accounts wizard.
Provide a unique name for the role and a description.
To select members, Click on the Members tab.
CA ControlMinder Rapid Implementation Guide – Shared Account Management
CA Technologies, 2013 78 CA ControlMinder Rapid Implementation Guide - SAM – 3.0docx
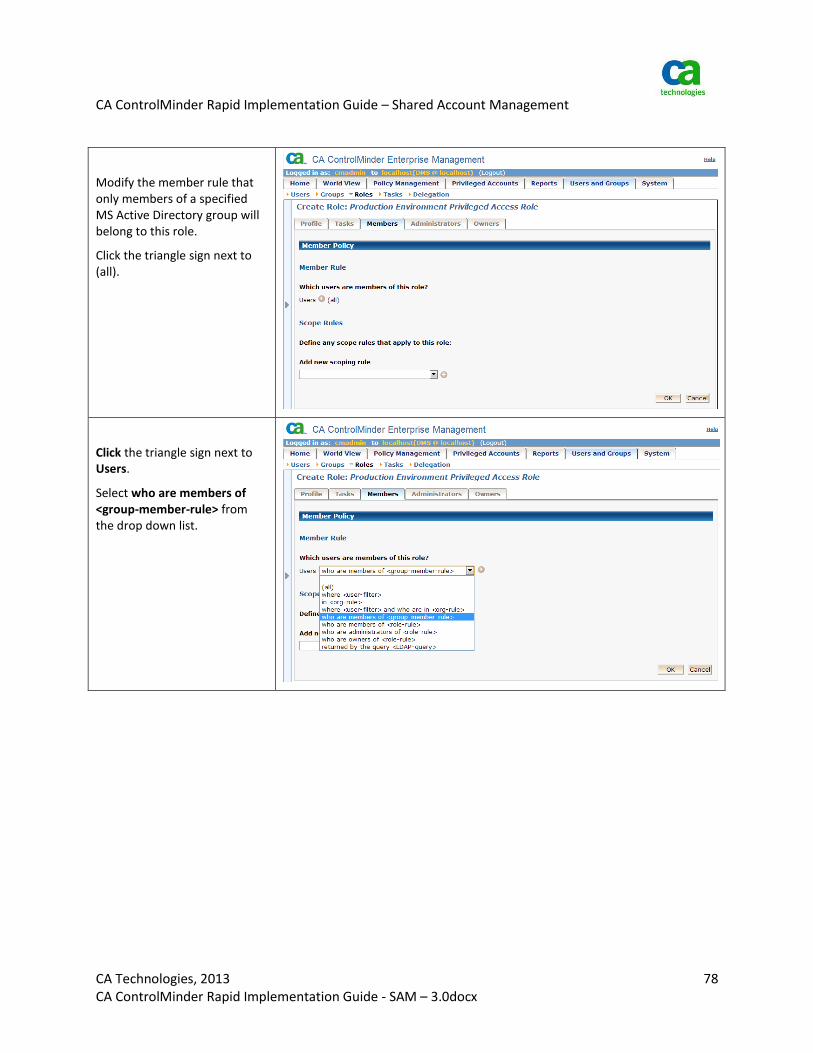
Modify the member rule that only members of a specified MS Active Directory group will belong to this role.
Click the triangle sign next to (all).
Click the triangle sign next to Users.
Select who are members of <group-member-rule> from the drop down list.

CA ControlMinder Rapid Implementation Guide – Shared Account Management
CA Technologies, 2013 79 CA ControlMinder Rapid Implementation Guide - SAM – 3.0docx
Select group <group> from the drop down list.
Click to search for a group.
Specify search criteria and click Search.
CA ControlMinder Rapid Implementation Guide – Shared Account Management
CA Technologies, 2013 80 CA ControlMinder Rapid Implementation Guide - SAM – 3.0docx
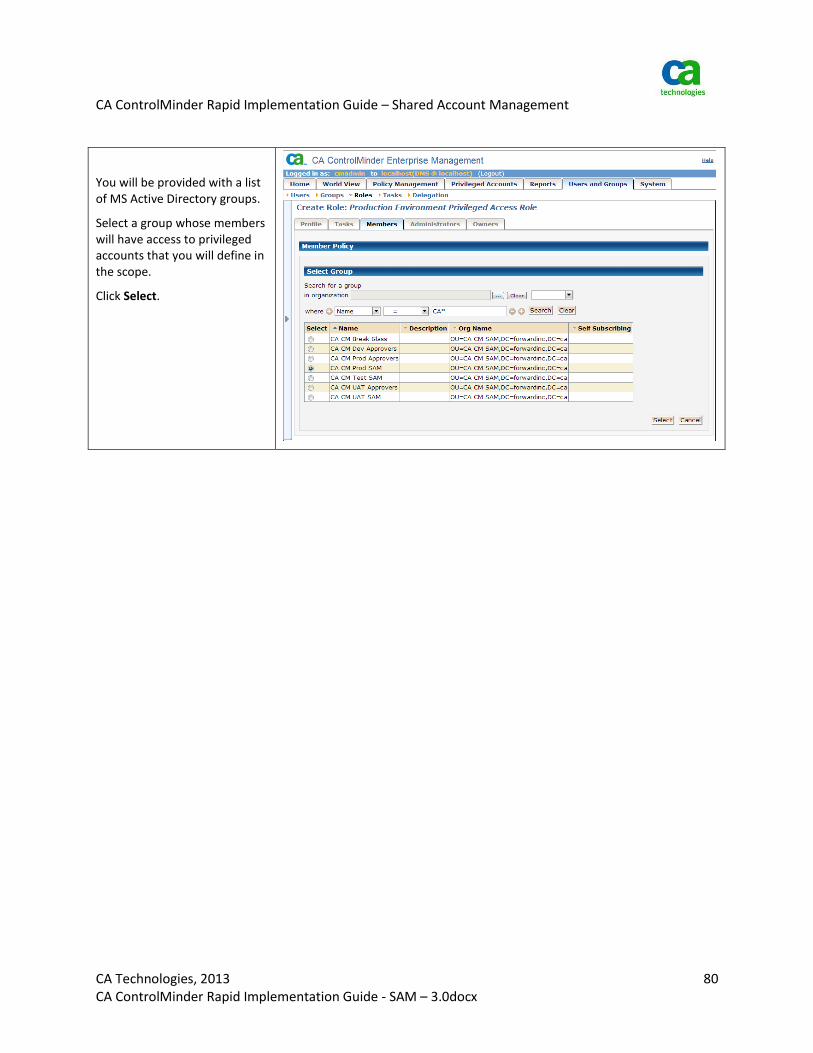
You will be provided with a list of MS Active Directory groups.
Select a group whose members will have access to privileged accounts that you will define in the scope.
Click Select.

CA ControlMinder Rapid Implementation Guide – Shared Account Management
CA Technologies, 2013 81 CA ControlMinder Rapid Implementation Guide - SAM – 3.0docx
Role Scoping
You use privileged access roles to specify the SAM tasks that each user can perform in ENTM and the privileged accounts that each user can check in and check out. ENTM comes with predefined privileged access roles. You can modify the predefined roles to suit your enterprise, or create new roles entirely.
When a user logs in to ENTM, they see only the tasks and privileged accounts that correspond to their role. Out-of-the-box, ENTM assigns the Break Glass, SAM Approver, Privileged Account Request, and SAM User roles to all users. You can modify this by defining the specific endpoints and privileged accounts that the role can access. Scope rules let you implement fine-grained access to privileged accounts across the enterprise and are defined by the member policy of a role.
In our example we have three groups for SAM users:
CA CM Prod SAM
CA CM UAT SAM
CA CM Test SAM
These groups were created to be able to give access to three sample environments:
Production
User Acceptance Testing
Test
Navigate to:
Create Role -> Members
Select Privileged Account from the drop down list
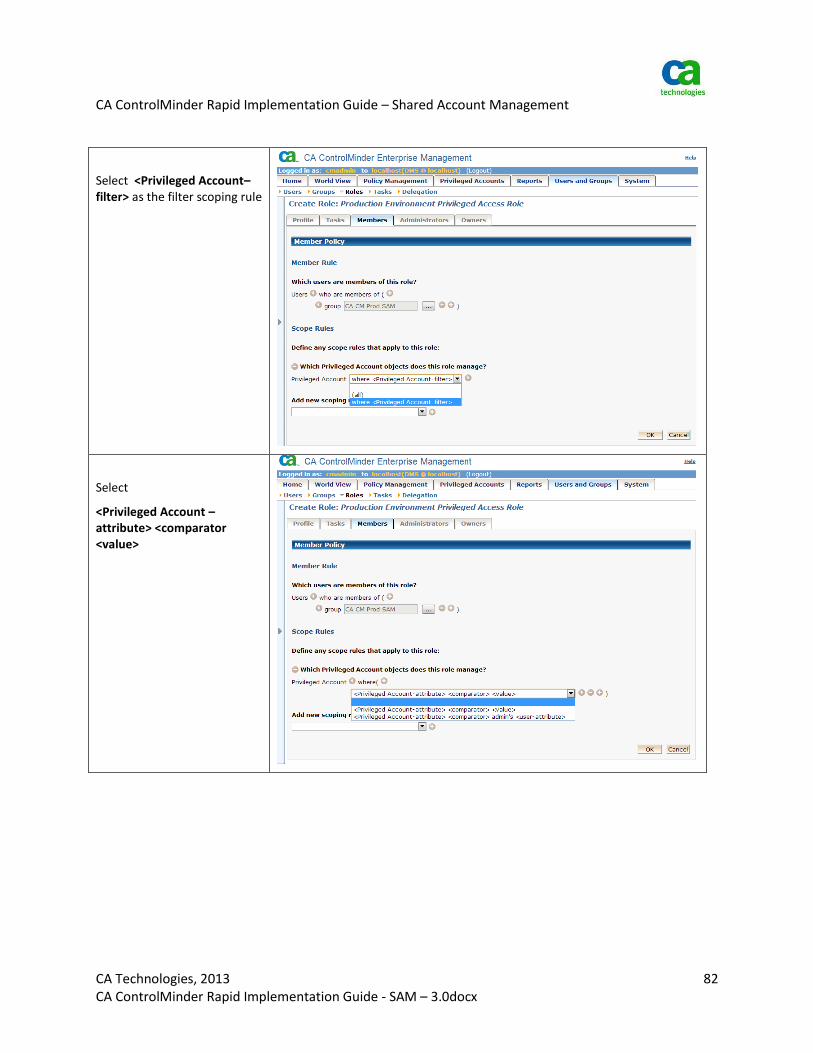
CA ControlMinder Rapid Implementation Guide – Shared Account Management
CA Technologies, 2013 82 CA ControlMinder Rapid Implementation Guide - SAM – 3.0docx
Select <Privileged Account–filter> as the filter scoping rule
Select
<Privileged Account – attribute> <comparator <value>

CA ControlMinder Rapid Implementation Guide – Shared Account Management
CA Technologies, 2013 83 CA ControlMinder Rapid Implementation Guide - SAM – 3.0docx
Select Custom 1 from the list of available attributes and specify a tag name you used previously for the environment you are creating a role for.
In our document we use the following tags:
Prod
UAT
Test
The custom attribute values are inherited from an endpoint to its accounts.
This value can be overwritten on the account level if required.
Click OK to confirm.
Verify the member rule and scoping rules on the next screen and click Submit
The members of this rule will be able to access the privileged accounts that have “Prod” tag set on the endpoint or account levels.
Repeat the above steps for each environment (group of servers).

CA ControlMinder Rapid Implementation Guide – Shared Account Management
CA Technologies, 2013 84 CA ControlMinder Rapid Implementation Guide - SAM – 3.0docx
Role Verification
Login to ENTM as a user that is member of a MS Active Directory group defined on the member rules of the defined roles.
In the example below the user was a member of “CM Prod SAM” group that is member of “Production Environment Privileged Access Role”. This roles gives access to all the accounts that are tagged as production - have “Prod” in their “Custom 1” field.
Navigate to Home -> My Privileged Accounts
You can see the list of accounts this user is allowed to “Check Out” without a need for an approval.
Navigate to Home -> Privileged Account Request and click Search.
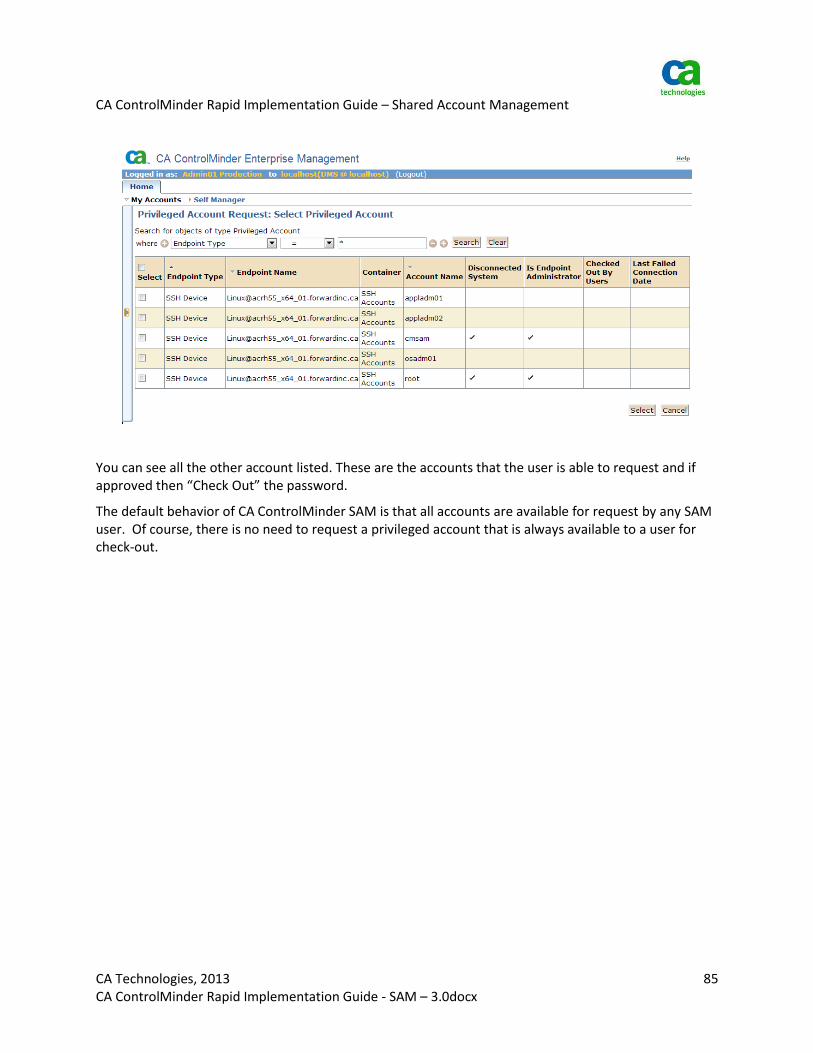
CA ControlMinder Rapid Implementation Guide – Shared Account Management
CA Technologies, 2013 85 CA ControlMinder Rapid Implementation Guide - SAM – 3.0docx
You can see all the other account listed. These are the accounts that the user is able to request and if approved then “Check Out” the password.
The default behavior of CA ControlMinder SAM is that all accounts are available for request by any SAM user. Of course, there is no need to request a privileged account that is always available to a user for check-out.
CA ControlMinder Rapid Implementation Guide – Shared Account Management
CA Technologies, 2013 86 CA ControlMinder Rapid Implementation Guide - SAM – 3.0docx
Advanced Topics
SAM Endpoint and Account Management Using the Feeder
In addition to the manual creation of endpoints and accounts using the ENTM WebUI, SAM provides a method to automatically create and update endpoints and associated accounts using technology known as a “feeder”.
The SAM feeder lets you import many SAM endpoints and shared accounts into CA ControlMinder Enterprise Management in a single step. You can also use the SAM feeder to create, modify, or delete SAM endpoints and privileged accounts.
While interviewing your application owners and system administrators to identify privileged accounts, you can add the endpoints and privileged accounts of interest to a feeder file. The feeder file is a simple CSV file. Copy your feeder files to a folder that is periodically polled by the feeder process of CA SAM. This enables an automated and unattended process. The feeder output can be monitored for conflict/errors.
The SAM feeder process
You, or an automated process, create and save one or more CSV files in the polling folder.
Each line in the CSV file represents a task to create or modify a SAM endpoint or privileged account.
You need to create separate CSV files for endpoints and for privileged accounts.
When the polling task starts, the SAM feeder uploads the CSV files in the polling folder to CA ControlMinder Enterprise Management. You can configure the polling task to run at a specified time, or you can start the polling task manually.
CA ControlMinder Enterprise Management renames the CSV file original_timestamp.csv, and moves the file to the processed files folder.
Note: original is the name of the original CSV file, and timestamp is a timestamp that indicates when the file was processed. For example, if you name the original CSV file endpoints.csv, CA ControlMinder Enterprise Management names the file in the processed file folder endpoints_091209130256.csv.
CA ControlMinder Enterprise Management processes each line in the CSV file in turn. For each line in the CSV file, the following happens:
As CA ControlMinder Enterprise Management successfully processes a line from the CSV file:
The action is committed, for example, an endpoint is created.
An audit event is written noting the action taken.
If CA ControlMinder Enterprise Management fails to process a line from the CSV file:
The line from the CSV file is copied to a CSV file in the error files folder.
A column named FAILURE_REASON is added to the CSV file in the error files folder.
CA ControlMinder Rapid Implementation Guide – Shared Account Management
CA Technologies, 2013 87 CA ControlMinder Rapid Implementation Guide - SAM – 3.0docx
The reason why the task failed is added to the FAILURE_REASON column for the affected line.
An audit event is written noting the failure.
The CSV file in the error files folder provides an easy way for you to review failures. The name of this file is also original_timestamp.csv.
Note: The CSV file in the processed files folder lists all processed lines, but it does not note success or failure.
Import Endpoints using the SAM feeder
Each row or line in the endpoint CSV file, after the header row or line, represents a task to create, modify, or delete an endpoint in CA ControlMinder Enterprise Management.
Create a CSV file and give it an appropriate name.
There are sample files located in the following directory, where <ACServer> is the directory in which you installed the Enterprise Management Server:
<ACServer>\IAM Suite\Access Control\tools\samples\feeder
Create a header row or line that specifies the names of the endpoint attributes.
The names of the endpoint attributes are as follows. Some endpoint attributes are valid only for certain endpoint types. If you specify an attribute in the header of the CSV file and there is no value used for a specific line in the file you need to leave a placeholder there (,,)
Note: The list below is not all inclusive. You can find additional information in the product documentation.
Attribute name Description Additional information
OBJECT_TYPE Specifies the type of the object to import. Value: ENDPOINT
ACTION_TYPE Specifies the type of action to perform Value: CREATE, MODIFY, DELETE
%FRIENDLY_NAME% Defines the name that you use to refer to this endpoint within CA ControlMinder Enterprise Management.
DESCRIPTION Defines any descriptive information that you want to record for this endpoint.
DO_NOT_VALIDATE (Optional) Identifies whether or not to connect to the endpoint when creating the endpoint. If the endpoint is offline, you may not want the connection to be validated because this results in an error.
Values: TRUE, FALSE Default: TRUE
ENDPOINT_TYPE Specifies the type of the endpoint. You can view the available endpoint types in CA ControlMinder Enterprise

CA ControlMinder Rapid Implementation Guide – Shared Account Management
CA Technologies, 2013 88 CA ControlMinder Rapid Implementation Guide - SAM – 3.0docx
Management.
HOST Defines the host name of the endpoint. It is a best practice to use the DNS fully qualified domain name
LOGIN_USER Defines the name of an administrative user of the endpoint. This field is ignored when the IS_ADVANCE attribute has a value of TRUE.
Setting the IS_ADVANCE attribute to TRUE is recommended when possible because the password does not have to be provided in the PASSWORD attribute.
Valid for all endpoint types
LOGIN_USER identifies the administrative account that connects to the endpoint and performs administrative tasks unless the IS_ADVANCE attribute has a value of TRUE. For the latter case, an already existing privileged administrative account is used.
For the SSH Device endpoint type, the administrative accounts described above only connect to the endpoint when the OPERATION_ADMIN_USER_NAME is defined. The OPERATION_ADMIN_USER_NAME attribute defines the account that performs administrative tasks.
When the OPERATION_ADMIN_USER_NAME is not defined, the SSH Device endpoint type behaves like all other endpoint types.
PASSWORD Defines the password of LOGIN_USER. When “IS_ADVANCE” identifies the administrative user, “PASSWORD” is ignored, but a placeholder is still required in the feeder file. There are advantages to not identifying the password.
URL Defines the URL that CA ControlMinder Enterprise Management uses to connect to the endpoint. This attribute is valid for the MS SQL Server and Oracle Server endpoint types.
Format: (MS SQL Server) jdbc:sqlserver://servername:port;
Format: (Oracle Server) jdbc:oracle:drivertype:@hostna

CA ControlMinder Rapid Implementation Guide – Shared Account Management
CA Technologies, 2013 89 CA ControlMinder Rapid Implementation Guide - SAM – 3.0docx
me:port:service
DOMAIN Provides the NETBIOS name of the endpoint when an account local to the endpoint will be managed as a privileged account.
Provide the NETBIOS name of the Active Directory domain when a domain account will be managed.
Valid for the endpoint types:
Access Control for SAM
Windows Agentess
IS_ACTIVE_DIRECTORY Specifies whether the endpoint is an Active Directory domain or an Active Directory domain controller.
Valid only for the Windows Agentless endpoint type.
Limits: TRUE, FALSE
USER_DOMAIN The NETBIOS name of the Active Directory domain of which the administrative privileged account is a member.
Required when:
LOGIN_USER defines an Active Directory account instead of a local account.
The Advanced option is selected and the administrative privileged account is an Active Directory domain user.
Not required when:
LOGIN_USER defines a local account.
Valid for the Windows Agentless endpoint type.
CONFIGURATION_FILE Specifies the name of the SSH Device XML configuration file that you are defining.
Valid only for the SSH Device and the Network Device endpoint types.
Note: If you do not specify a value for this attribute, CA ControlMinder Enterprise Management uses the default configuration file (ssh_connector_conf.xml).
Some endpoints require a different XML file. Refer to the product documentation for additional information.
OPERATION_ADMIN_USER_NAME (Optional) Defines the name of the operation administrator user of the
Valid only for the SSH Device
CA ControlMinder Rapid Implementation Guide – Shared Account Management
CA Technologies, 2013 90 CA ControlMinder Rapid Implementation Guide - SAM – 3.0docx
endpoint. SAM uses this account to perform administrative tasks on the endpoint, for example, discovering and changing the password of privileged accounts.
The purpose is to allow an account with less privilege to connect to the endpoint but perform administrative tasks with another account having enough privileges.
endpoint type.
‘LOGIN_USER’ defines the connection account unless you use the “IS_ADVANCE” and related attributes to identify the connection account.
OPERATION_ADMIN_USER_PASSWORD
(Optional) Defines the password for the operation administrator user of the endpoint.
Valid only for the SSH Device endpoint type.
IS_ADVANCE (Optional) Specifies whether you want to use an existing privileged administrative account already known to SAM to connect to the endpoint and to perform administrative tasks on the endpoint, for example, to discover accounts and change passwords.
Valid for all endpoint types.
Limits: TRUE, FALSE
Note: When the IS_ADVANCE attribute has a value of TRUE, the LOGIN_USER attribute is ignored, but you must provide values for: PROPERTY_ADMIN_ACCOUNT_ENDPOINT_TYPE, PROPERTY_ADMIN_ACCOUNT_ENDPOINT_NAME, PROPERTY_ADMIN_ACCOUNT_CONTAINER, and PROPERTY_ADMIN_ACCOUNT_NAME.
PROPERTY_ADMIN_ACCOUNT_ENDPOINT_TYPE
(Optional) Defines the endpoint type on which the privileged administrative account is defined.
IS_ADVANCE must be TRUE.
PROPERTY_ADMIN_ACCOUNT_ENDPOINT_NAME
(Optional) Defines the name of the endpoint on which the privileged administrative account is defined. The endpoint must already exist in CA ControlMinder Enterprise Management.
IS_ADVANCE must be TRUE.
PROPERTY_ADMIN_ACCOUNT_CONTAINER
(Optional) Defines the container in which the privileged administrative account is defined. A container is a class whose instances are collections of other objects.
IS_ADVANCE must be TRUE.
Values by endpoint type:
(Windows Agentless and Oracle Server): Accounts
(SSH Device): SSH Accounts
(MS SQL Server): MS SQL Logins
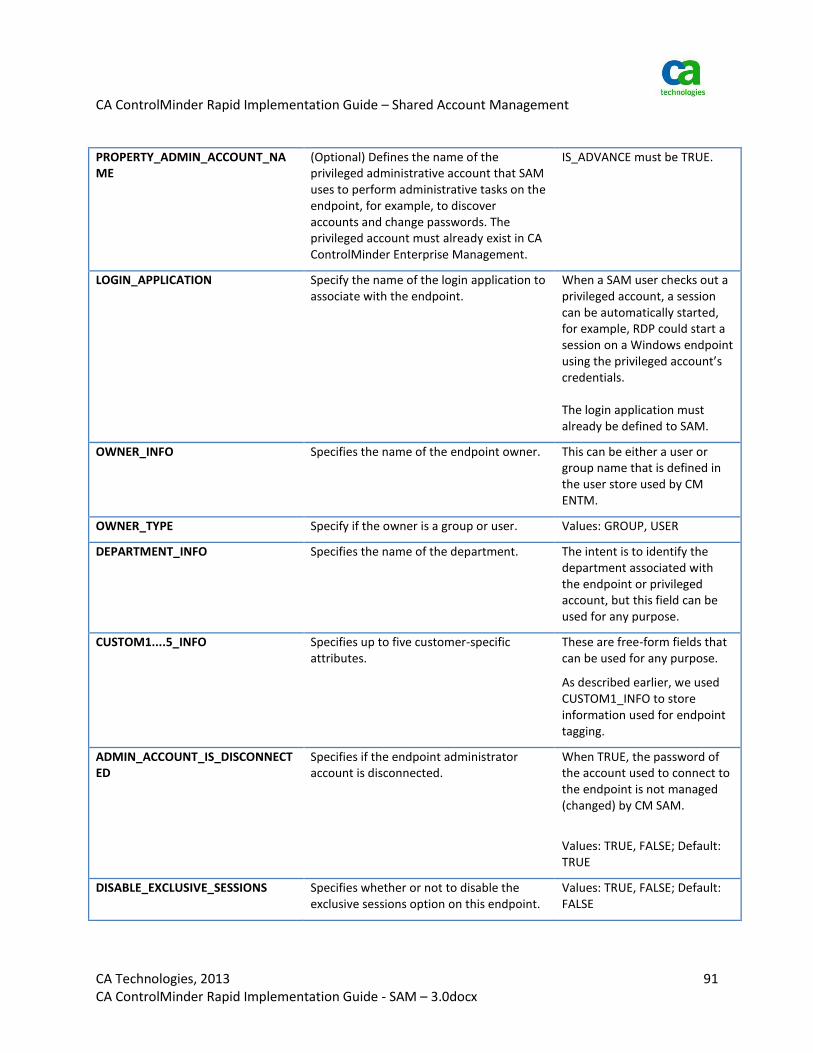
CA ControlMinder Rapid Implementation Guide – Shared Account Management
CA Technologies, 2013 91 CA ControlMinder Rapid Implementation Guide - SAM – 3.0docx
PROPERTY_ADMIN_ACCOUNT_NAME
(Optional) Defines the name of the privileged administrative account that SAM uses to perform administrative tasks on the endpoint, for example, to discover accounts and change passwords. The privileged account must already exist in CA ControlMinder Enterprise Management.
IS_ADVANCE must be TRUE.
LOGIN_APPLICATION Specify the name of the login application to associate with the endpoint.
When a SAM user checks out a privileged account, a session can be automatically started, for example, RDP could start a session on a Windows endpoint using the privileged account’s credentials. The login application must already be defined to SAM.
OWNER_INFO Specifies the name of the endpoint owner. This can be either a user or group name that is defined in the user store used by CM ENTM.
OWNER_TYPE Specify if the owner is a group or user. Values: GROUP, USER
DEPARTMENT_INFO Specifies the name of the department. The intent is to identify the department associated with the endpoint or privileged account, but this field can be used for any purpose.
CUSTOM1....5_INFO Specifies up to five customer-specific attributes.
These are free-form fields that can be used for any purpose.
As described earlier, we used CUSTOM1_INFO to store information used for endpoint tagging.
ADMIN_ACCOUNT_IS_DISCONNECTED
Specifies if the endpoint administrator account is disconnected.
When TRUE, the password of the account used to connect to the endpoint is not managed (changed) by CM SAM.
Values: TRUE, FALSE; Default: TRUE
DISABLE_EXCLUSIVE_SESSIONS Specifies whether or not to disable the exclusive sessions option on this endpoint.
Values: TRUE, FALSE; Default: FALSE

CA ControlMinder Rapid Implementation Guide – Shared Account Management
CA Technologies, 2013 92 CA ControlMinder Rapid Implementation Guide - SAM – 3.0docx
DENY_BREAKGLASS_EXCLUSIVE Specifies whether or not to prevent checkout of an exclusive account that is already checked out via break glass.
Values: TRUE, FALSE; Default: FALSE
You can use a spreadsheet or text editor of your choice to create the SAM feeder CSV file.
We suggest using a spreadsheet editor and exporting the file to CSV format (comma delimited).
Here as an example of an endpoint import CSV file.
OBJECT_TYPE,ACTION_TYPE,%FRIENDLY_NAME%,DESCRIPTION,ENDPOINT_TYPE,HOST,LOGIN_
USER,DOMAIN,IS_ACTIVE_DIRECTORY,USER_DOMAIN,IS_ADVANCE,PROPERTY_ADMIN_ACCOUNT
_ENDPOINT_TYPE,PROPERTY_ADMIN_ACCOUNT_ENDPOINT_NAME,PROPERTY_ADMIN_ACCOUNT_CO
NTAINER,PROPERTY_ADMIN_ACCOUNT_NAME,OWNER_INFO,OWNER_TYPE,CUSTOM1_INFO
ENDPOINT,CREATE,[email protected],Created by the SAM
feeder,Windows
Agentless,win2k8uat02.forwardinc.ca,,WIN2K8UAT01,FALSE,FORWARDINC,TRUE,Window
s Agentless,[email protected],Accounts,cmsam,"CA CM UAT
Approvers","GROUP","UAT"
ENDPOINT,CREATE,[email protected],Created by the SAM
feeder,Windows
Agentless,win2k8test02.forwardinc.ca,,WIN2K8TESTD01,FALSE,FORWARDINC,TRUE,Win
dows Agentless,[email protected],Accounts,cmsam,"CA CM Test
Approvers","GROUP","Test"
ENDPOINT,CREATE,[email protected],Created by the SAM
feeder,Windows
Agentless,win2k8prod02.forwardinc.ca,,WIN2K8PROD02,FALSE,FORWARDINC,TRUE,Wind
ows Agentless,[email protected],Accounts,cmsam,"CA CM Prod
Approvers","GROUP","Prod"
This file includes the header record and 3 endpoint records.
This will create 3 Windows Agentless Endpoints – OBJECT_TYPE = ENDPOINT, ACTION_TYPE = CREATE.
The IS_ADVANCE property is set to TRUE, which means that a privileged account already defined to SAM is used to connect to and manage the endpoint. The previously discovered administrative account is the “cmsam” Active Directory account from the [email protected] endpoint. The examples assume that the three new endpoints are members of the Active Directory domain, and “cmsam” has administrative rights on these endpoints.
For all three endpoints, the OWNER_INFO attribute is set to an Active Directory group, CA CM Prod Approvers, and the CUSTOM1_INFO attribute is set to Prod per our need to have a way to tag the endpoints’ environment.
When you are ready to add these endpoints to SAM, copy the CSV file to the following location:
JBoss_home/server/default/deploy/IdentityMinder.ear/custom/ppm/feeder/waitingToBeProcessed
where JBoss_home provides the drive and path to the JBoss installation on the Enterprise Management server. By default, the feeder checks the folder every hour.

CA ControlMinder Rapid Implementation Guide – Shared Account Management
CA Technologies, 2013 93 CA ControlMinder Rapid Implementation Guide - SAM – 3.0docx
Go to System\Connection Management\Modify Scheduling Config to view or modify the feeder’s schedule.
From the above example, the Feeder Folder Polling Cron Expression is set to:
0 10/60 * * * ?
The previous expression implies that the feeder polling job runs automatically every 60 minutes, starting on the 10th minute. This is a standard expression as used for cron scheduling. You can modify this expression to suit your needs.
Go to Privileged Accounts\Accounts\Feeder Folder Polling to start the polling manually.
The Feeder Folder Polling screen appears.
Click Submit.
The SAM feeder processes the CSV files in the polling folder.
You will see the screen below when the task is submitted.
You can check files in the following folders for processed records and failures.

CA ControlMinder Rapid Implementation Guide – Shared Account Management
CA Technologies, 2013 94 CA ControlMinder Rapid Implementation Guide - SAM – 3.0docx
Files in the following directory include all the processed records (failures AND successes).
JBoss_home/server/default/deploy/IdentityMinder.ear/custom/ppm/feeder/processed
Files in the following directory include the records that resulted only in failure. The reason for the failure is noted at the end of each record:
JBoss_home/server/default/deploy/IdentityMinder.ear/custom/ppm/feeder/failedToSubmit
You can also view the results in the UI at System/Audit/ View Submitted Tasks.
You can also use the feeder to delete or modify the endpoints. Set ACTION_TYPE in the CSVfile to DELETE or MODIFY, as appropriate.
The following example modifies OWNER_INFO (used to store approvers) to "CA CM Prod Approvers" and CUSTOM1_INFO to "PROD" (used for tagging). Other attributes stay the same as populated by the feeder in the above mentioned CREATE action.
OBJECT_TYPE,ACTION_TYPE,%FRIENDLY_NAME%,DESCRIPTION,ENDPOINT_TYPE,HOST,LOGIN_
USER,DOMAIN,IS_ACTIVE_DIRECTORY,USER_DOMAIN,IS_ADVANCE,PROPERTY_ADMIN_ACCOUNT
_ENDPOINT_TYPE,PROPERTY_ADMIN_ACCOUNT_ENDPOINT_NAME,PROPERTY_ADMIN_ACCOUNT_CO
NTAINER,PROPERTY_ADMIN_ACCOUNT_NAME,OWNER_INFO,OWNER_TYPE,CUSTOM1_INFO
ENDPOINT,MODIFY,[email protected],Modified by the SAM
feeder,Windows
Agentless,win2k8uat02.forwardinc.ca,,WIN2K8UAT01,FALSE,FORWARDINC,TRUE,Window
s Agentless,[email protected],Accounts,cmsam,"CA CM Prod
Approvers","GROUP","PROD"
Import Privileged Accounts using the SAM feeder
You can also use the feeder to create, modify and delete privileged accounts.
The process is the same as for the endpoints, but the attributes are different.
You need to create a CSV file and give it an appropriate name.
Each row or line in the privileged account CSV file, after the header row or line, represents a task to create, modify, or delete a privileged account in CA ControlMinder Enterprise Management.
Attribute name Description Additional information
OBJECT_TYPE Specifies the type of the object to import.
Value: ACCOUNT_PASSWORD
ACTION_TYPE Specifies the type of action to perform
Value: CREATE, MODIFY, DELETE
ACCOUNT_NAME Defines the name by which the endpoint refers to the account.
Note: Use upper case for mainframe privileged accounts, for example, RACF, ACF2, and Top Secret accounts and for Oracle accounts. Use the proper case for

CA ControlMinder Rapid Implementation Guide – Shared Account Management
CA Technologies, 2013 95 CA ControlMinder Rapid Implementation Guide - SAM – 3.0docx
the SSH Device endpoint type because it is case-sensitive.
ENDPOINT_NAME Specifies the name of the endpoint on which the privileged account resides.
NOTE: The endpoint must already exist before creating any privileged accounts for the endpoint.
NAMESPACE Specifies the endpoint type of the endpoint.
Note: You can view the available endpoint types in CA ControlMinder Enterprise Management.
CONTAINER Specifies the name of the container for the shared account. A container is a class whose instances are collections of other objects. Containers are used to store objects in an organized way following specific access rules.
Values:
Windows Agentless and Oracle Server endpoints: Accounts SSH Device endpoints: SSH Accounts MS SQL Server endpoints: MS SQL Logins.
DISCONNECTED_SYSTEM Specifies if the shared account originates from a disconnected system.
If you specify TRUE, SAM does not manage the account password. Instead, SAM acts only as a password vault for the privileged account.
Anytime the account’s password is changed on the endpoint, someone must manually update the password in SAM. Values: TRUE, FALSE
EXCLUSIVE_ACCOUNT Specifies if the account can only be checked out by one user at a time.
EXCLUSIVE – SAM lets a single user check-out the account at any time.
EXCLUSIVE_SESSIONS – SAM verifies that the privileged account is not already in use on the endpoint before allowing the account to be checked out.
NONE – SAM allows multiple users to check-out the account concurrently.
Values: EXCLUSIVE_SESSIONS, EXCLUSIVE, NONE
NEW_PASSWORD Defines the password for the shared account. If you do not
Note: The password must comply with the password policy.

CA ControlMinder Rapid Implementation Guide – Shared Account Management
CA Technologies, 2013 96 CA ControlMinder Rapid Implementation Guide - SAM – 3.0docx
specify a value for this attribute, CA ControlMinder Enterprise Management generates a password that complies with the specified password policy.
PASSWORD_POLICY Specifies the password policy for the shared account.
Note: If you specify a password policy that does not exist, the task fails and CA ControlMinder Enterprise Management does not create the account.
OWNER_INFO Specifies the name of the account owner.
This attribute is inherited from the endpoint if not specified.
OWNER_TYPE Specify if the owner is a group or user
Values: GROUP or USER
DEPARTMENT_INFO Specifies the name of the department.
This attribute is inherited from the endpoint if not specified.
CUSTOM1....5_INFO Specifies up to five customer-specific attributes.
These attributes are inherited from the endpoint if not specified.
CHANGE_PASSWORD_ON_CHECKOUT Specifies if you want CA ControlMinder Enterprise Management to change the password of the account every time it is checked out.
Values: TRUE, FALSE Default: FALSE
Use this option if there is a possibility that the account password might be changed outside of SAM. This is to ensure that the checked out password matches the one on the target system.
CHANGE_PASSWORD_ON_CHECKIN Specifies whether you want CA ControlMinder Enterprise Management to change the password of the account every time it is checked in by a user, program, or when the checkout period expires.
Values: TRUE, FALSE Default: TRUE It is a best practice to change the account password on check in.
The following CSV file snippet imports 3 privileged accounts to CM SAM.
The account passwords will be managed by SAM. Multiple users can checkout these privileged accounts since EXCLUSIVE_ACCOUNT is set to NONE.
Note that NEW_PASSWORD attribute is empty so the account password will be generated by CA SAM using the specified password policy.

CA ControlMinder Rapid Implementation Guide – Shared Account Management
CA Technologies, 2013 97 CA ControlMinder Rapid Implementation Guide - SAM – 3.0docx
OBJECT_TYPE,ACTION_TYPE,ACCOUNT_NAME,ENDPOINT_NAME,NAMESPACE,CONTAINER,DISCON
NECTED_SYSTEM,EXCLUSIVE_ACCOUNT,NEW_PASSWORD,PASSWORD_POLICY
ACCOUNT_PASSWORD,CREATE,osprodadm02,[email protected],Window
s Agentless,Accounts,FALSE,NONE,,Windows password policy
ACCOUNT_PASSWORD,CREATE,osuatadm02,[email protected],Windows
Agentless,Accounts,FALSE,NONE,,Windows password policy
ACCOUNT_PASSWORD,CREATE,ostestadm03,[email protected],Window
s Agentless,Accounts,FALSE,NONE,,Windows password policy
Set ACTION_TYPE to DELETE or MODIFY to delete or update an account.
The following CSV file snippet modifies PASSWORD_POLICY to “Windows password policy – Strong”
OBJECT_TYPE,ACTION_TYPE,ACCOUNT_NAME,ENDPOINT_NAME,NAMESPACE,CONTAINER,DISCON
NECTED_SYSTEM,EXCLUSIVE_ACCOUNT,NEW_PASSWORD,PASSWORD_POLICY
ACCOUNT_PASSWORD,MODIFY,osprodadm02,[email protected],Window
s Agentless,Accounts,FALSE,NONE,,Windows password policy - Strong
The manual feeder polling instructions are the same for endpoints and accounts.
Configure Email Notification for Workflow
CA ControlMinder Enterprise Management can send email notifications when a specific event occurs.
Email notifications inform CA ControlMinder Enterprise Management users of events in the system, and are generated from email templates. If you enable email notifications, CA ControlMinder Enterprise Management can generate email notifications when one of the following occurs:
An event that requires approval or rejection is pending.
An approver approves an event.
An approver rejects an event.
An event starts, fails, or completes.
A CA ControlMinder Enterprise Management user is created or modified.
It is a best practice to enable email notifications for events related to approval workflows.
The two events of interest include:
BreakGlassCheckOutAccountEvent
CreatePrivilegedAccountExceptionEvent
It is also possible to have a notification for “CheckOutAccountPasswordEvent” if you require a notification to be received every time a password is checked out.
To configure email notification settings follow these steps:
Stop the JBoss service from the Services panel.

CA ControlMinder Rapid Implementation Guide – Shared Account Management
CA Technologies, 2013 98 CA ControlMinder Rapid Implementation Guide - SAM – 3.0docx
Open the mail-service.xml file. By default, the file is located in the following directory:
JBoss_HOME/server/default/deploy
Locate the following entry in the file:
<property name="mail.smtp.host" value="smtp.nosuchhost.nosuchdomain.com"/>
Change the smtp.nosuchhost.nosuchdomain.com value to the full DNS domain name of the outgoing email server host. For example:
<property name="mail.smtp.host" value="mysmtpserver.mydomain.com"/>
Note: The Enterprise Management Server must resolve the IP address of the SMTP server to the full DNS domain name that you specify for this property.
Update the smtp port if required.
<property name="mail.smtp.port" value="25"/>
Open the corresponding email templates for the privileged account password request CreatePrivilegedAccountExceptionEvent.tmpl file in the following directories:
JBoss_HOME/server/default/deploy/IdentityMinder.ear/custom/emailTemplates/default/approved
JBoss_HOME/server/default/deploy/IdentityMinder.ear/custom/emailTemplates/default/completed
JBoss_HOME/server/default/deploy/IdentityMinder.ear/custom/emailTemplates/default/pending
JBoss_HOME/server/default/deploy/IdentityMinder.ear/custom/emailTemplates/default/rejected
Modify the template host name and port from “localhost:8080” to the Enterprise Management Server host name and port, for example: myentmserver.mydomain.com:18443
Do the same for the following template BreakGlassCheckOutAccountEvent.tmpl for the break glass event located under:
JBoss_HOME/server/default/deploy/IdentityMinder.ear/custom/emailTemplates/default/pending
Save and close the files.
Open the email.properties file. The file is located in the following directory:
JBoss_HOME/server/default/deploy/IdentityMinder.ear/config/com/netegrity/config/
Edit the following entry:
admin.email.address=IMS
Specify the sender email address then save and close the file. For example:

CA ControlMinder Rapid Implementation Guide – Shared Account Management
CA Technologies, 2013 99 CA ControlMinder Rapid Implementation Guide - SAM – 3.0docx
Start JBoss.
In the CA IdentityMinderTM Management Console, click Environments.
Note: See the “Enable the CA IdentityMinder Management Console” section of this document for the steps to enable and start the console.
Select “ac-env”.
Select “Advanced Settings”.
Select “E-mail”.

CA ControlMinder Rapid Implementation Guide – Shared Account Management
CA Technologies, 2013 100 CA ControlMinder Rapid Implementation Guide - SAM – 3.0docx
The E-mail Properties window appears.
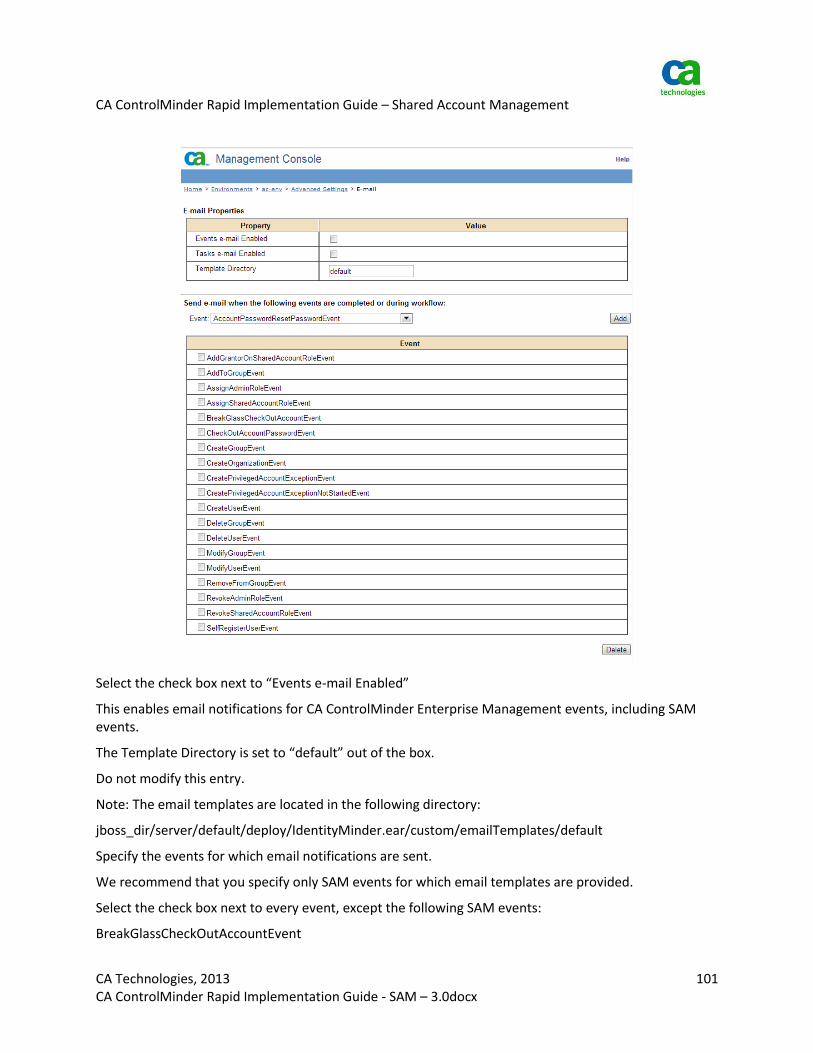
CA ControlMinder Rapid Implementation Guide – Shared Account Management
CA Technologies, 2013 101 CA ControlMinder Rapid Implementation Guide - SAM – 3.0docx
Select the check box next to “Events e-mail Enabled”
This enables email notifications for CA ControlMinder Enterprise Management events, including SAM events.
The Template Directory is set to “default” out of the box.
Do not modify this entry.
Note: The email templates are located in the following directory:
jboss_dir/server/default/deploy/IdentityMinder.ear/custom/emailTemplates/default
Specify the events for which email notifications are sent.
We recommend that you specify only SAM events for which email templates are provided.
Select the check box next to every event, except the following SAM events:
BreakGlassCheckOutAccountEvent

CA ControlMinder Rapid Implementation Guide – Shared Account Management
CA Technologies, 2013 102 CA ControlMinder Rapid Implementation Guide - SAM – 3.0docx
CreatePrivilegedAccountExceptionEvent
Click Delete.
Note: You can also keep “CheckOutAccountPasswordEvent” in if you want to receive a notification every time a password is checked out.
All notifications, other than these two SAM events, are deleted.
You have configured CA ControlMinder Enterprise Management to send email notifications for these two SAM events.
Click Save.
The email notification properties are saved.
You are warned that there are changes that require a restart.
Click “Restart.”
The CA IdentityMinder Management Console restarts the environment and applies your changes.
Note: For more information about email notifications, see the Enterprise Administration Guide.
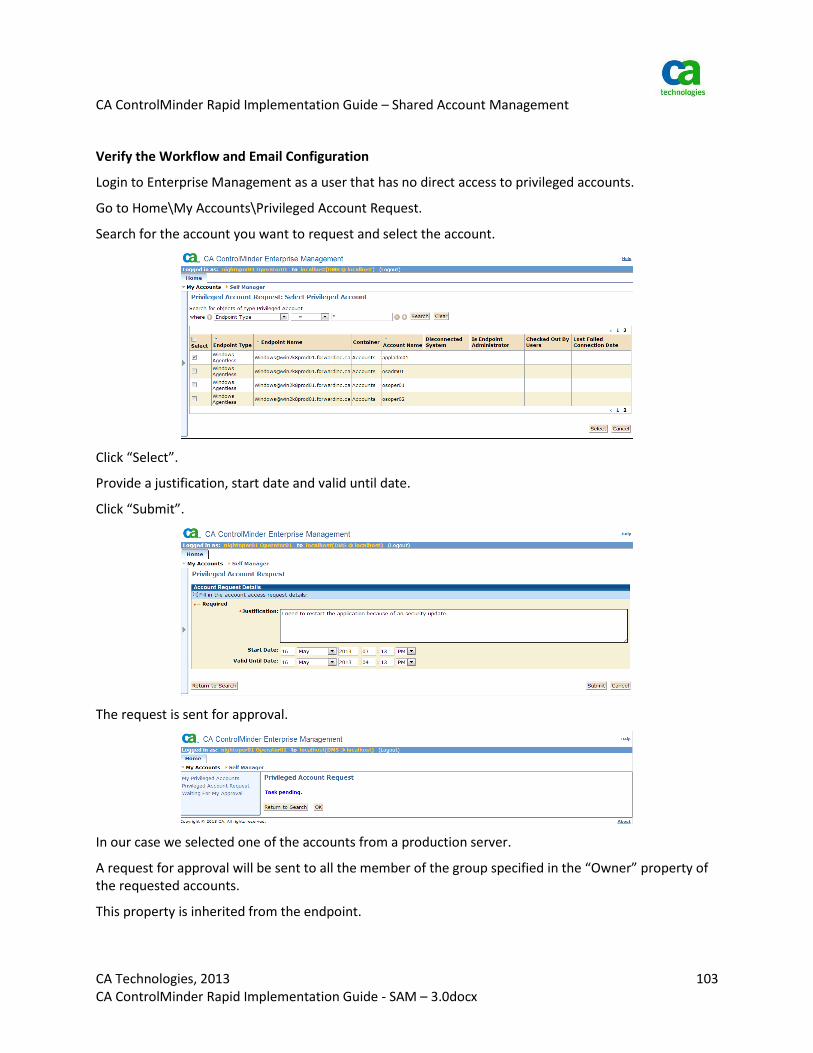
CA ControlMinder Rapid Implementation Guide – Shared Account Management
CA Technologies, 2013 103 CA ControlMinder Rapid Implementation Guide - SAM – 3.0docx
Verify the Workflow and Email Configuration
Login to Enterprise Management as a user that has no direct access to privileged accounts.
Go to Home\My Accounts\Privileged Account Request.
Search for the account you want to request and select the account.
Click “Select”.
Provide a justification, start date and valid until date.
Click “Submit”.
The request is sent for approval.
In our case we selected one of the accounts from a production server.
A request for approval will be sent to all the member of the group specified in the “Owner” property of the requested accounts.
This property is inherited from the endpoint.
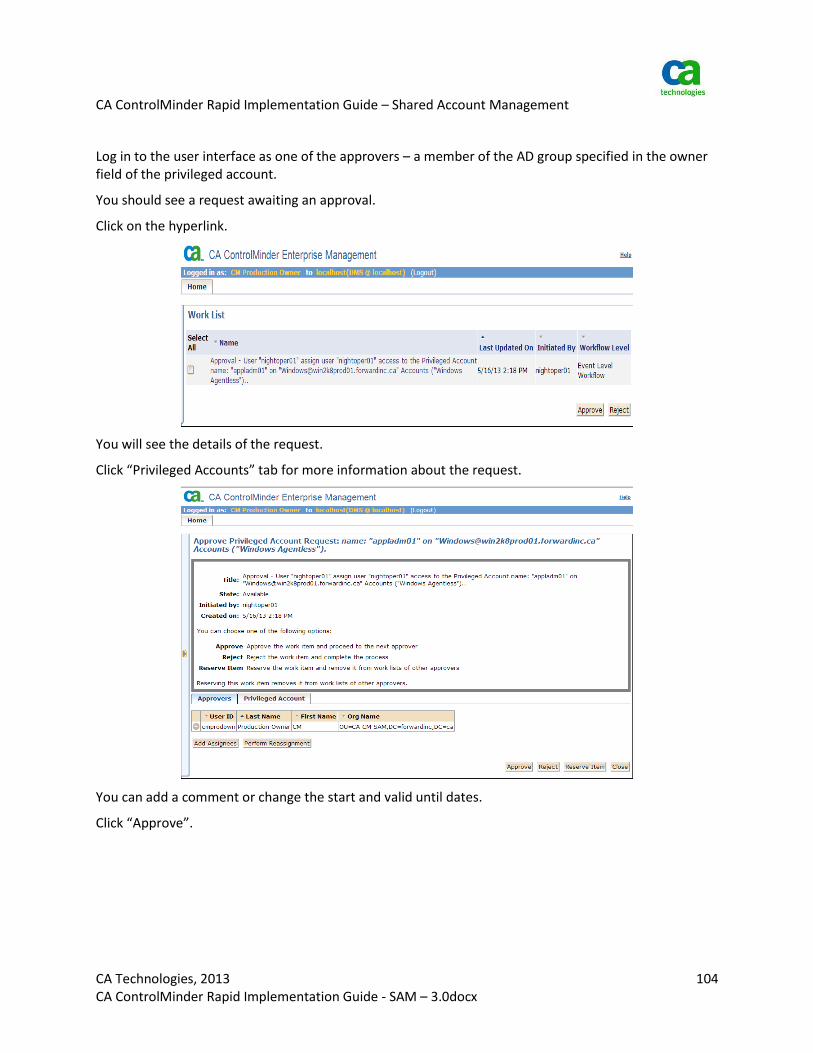
CA ControlMinder Rapid Implementation Guide – Shared Account Management
CA Technologies, 2013 104 CA ControlMinder Rapid Implementation Guide - SAM – 3.0docx
Log in to the user interface as one of the approvers – a member of the AD group specified in the owner field of the privileged account.
You should see a request awaiting an approval.
Click on the hyperlink.
You will see the details of the request.
Click “Privileged Accounts” tab for more information about the request.
You can add a comment or change the start and valid until dates.
Click “Approve”.
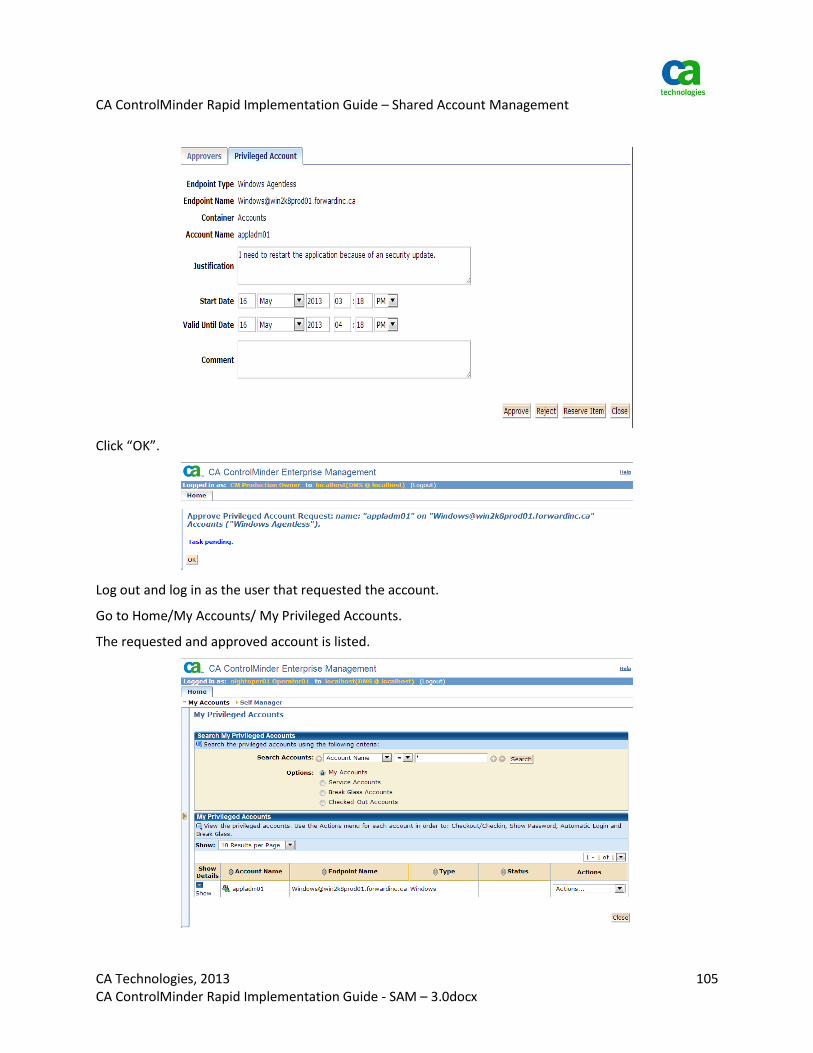
CA ControlMinder Rapid Implementation Guide – Shared Account Management
CA Technologies, 2013 105 CA ControlMinder Rapid Implementation Guide - SAM – 3.0docx
Click “OK”.
Log out and log in as the user that requested the account.
Go to Home/My Accounts/ My Privileged Accounts.
The requested and approved account is listed.
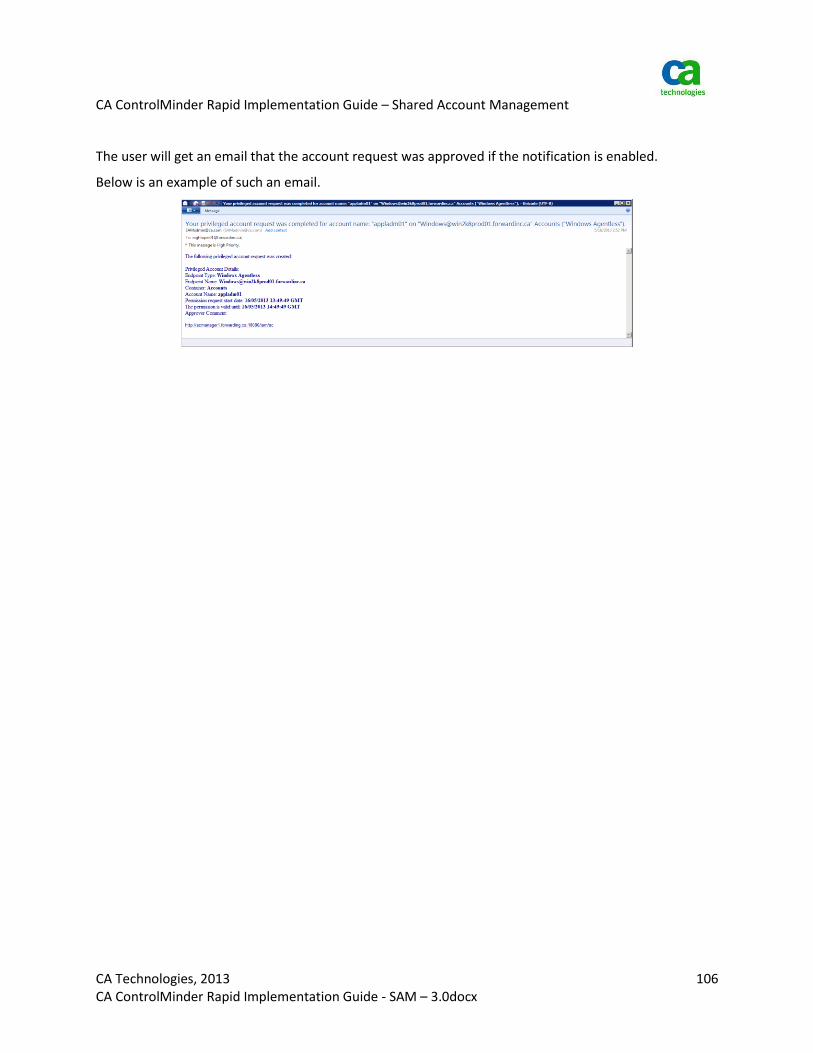
CA ControlMinder Rapid Implementation Guide – Shared Account Management
CA Technologies, 2013 106 CA ControlMinder Rapid Implementation Guide - SAM – 3.0docx
The user will get an email that the account request was approved if the notification is enabled.
Below is an example of such an email.

CA ControlMinder Rapid Implementation Guide – Shared Account Management
CA Technologies, 2013 107 CA ControlMinder Rapid Implementation Guide - SAM – 3.0docx
Enable the CA IdentityMinder Management Console
You use the CA IdentityMinder Management Console to perform advanced configuration tasks, such as CA ControlMinder Enterprise Management to send email notifications when a specific event occurs.
When you install the Enterprise Management Server, the CA IdentityMinder Management Console option is disabled.
To enable the CA IdentityMinder Management Console follow these steps:
Stop the JBoss Application Server service from the Services Panel.
Navigate to the following directory, where JBoss_HOME is the directory where you installed JBoss: JBoss_HOME \server\default\deploy\IdentityMinder.ear\management_console.war\WEB-INF
Open the web.xml file in an editable form.
Search for the following section: AccessFilter
<filter>
<filter-name>AccessFilter</filter-name>
<filter-
class>com.netegrity.ims.manage.filter.AccessFilter<
/filter-class>
<init-param>
<param-name>Enable</param-name>
<param-value>False</param-value> </init-param>

CA ControlMinder Rapid Implementation Guide – Shared Account Management
CA Technologies, 2013 108 CA ControlMinder Rapid Implementation Guide - SAM – 3.0docx
</filter>
In the <param-value> field, change the value to True.
Save and close the file.
<filter>
<filter-name>AccessFilter</filter-name>
<filter-
class>com.netegrity.ims.manage.filter.AccessFilter<
/filter-class>
<init-param>
<param-name>Enable</param-name>
<param-value>True</param-value> </init-param>
</filter>
Restart the JBoss Application Server service from the Services Panel.
The CA IdentityMinder Management Console is enabled.
To access the console go to:
https://<ENTMserver>:18443/idmmanage