ca endevor® software change manager
TRANSCRIPT

Parallel Development Option Guide Version 16.0.00
CA Endevor® Software Change Manager

This Documentation, which includes embedded help systems and electronically distributed materials, (hereinafter referred to as the “Documentation”) is for your informational purposes only and is subject to change or withdrawal by CA at any time.
This Documentation may not be copied, transferred, reproduced, disclosed, modified or duplicated, in whole or in part, without the prior written consent of CA. This Documentation is confidential and proprietary information of CA and may not be disclosed by you or used for any purpose other than as may be permitted in (i) a separate agreement between you and CA governing your use of the CA software to which the Documentation relates; or (ii) a separate confidentiality agreement between you and CA.
Notwithstanding the foregoing, if you are a licensed user of the software product(s) addressed in the Documentation, you may print or otherwise make available a reasonable number of copies of the Documentation for internal use by you and your employees in connection with that software, provided that all CA copyright notices and legends are affixed to each reproduced copy.
The right to print or otherwise make available copies of the Documentation is limited to the period during which the applicable license for such software remains in full force and effect. Should the license terminate for any reason, it is your responsibility to certify in writing to CA that all copies and partial copies of the Documentation have been returned to CA or destroyed.
TO THE EXTENT PERMITTED BY APPLICABLE LAW, CA PROVIDES THIS DOCUMENTATION “AS IS” WITHOUT WARRANTY OF ANY KIND, INCLUDING WITHOUT LIMITATION, ANY IMPLIED WARRANTIES OF MERCHANTABILITY, FITNESS FOR A PARTICULAR PURPOSE, OR NONINFRINGEMENT. IN NO EVENT WILL CA BE LIABLE TO YOU OR ANY THIRD PARTY FOR ANY LOSS OR DAMAGE, DIRECT OR INDIRECT, FROM THE USE OF THIS DOCUMENTATION, INCLUDING WITHOUT LIMITATION, LOST PROFITS, LOST INVESTMENT, BUSINESS INTERRUPTION, GOODWILL, OR LOST DATA, EVEN IF CA IS EXPRESSLY ADVISED IN ADVANCE OF THE POSSIBILITY OF SUCH LOSS OR DAMAGE.
The use of any software product referenced in the Documentation is governed by the applicable license agreement and such license agreement is not modified in any way by the terms of this notice.
The manufacturer of this Documentation is CA.
Provided with “Restricted Rights.” Use, duplication or disclosure by the United States Government is subject to the restrictions set forth in FAR Sections 12.212, 52.227-14, and 52.227-19(c)(1) - (2) and DFARS Section 252.227-7014(b)(3), as applicable, or their successors.
Copyright © 2013 CA. All rights reserved. All trademarks, trade names, service marks, and logos referenced herein belong to their respective companies.

CA Technologies Product References
This document references the following CA Technologies products:
■ CA Endevor® Software Change Manager (CA Endevor SCM)
■ CA Endevor® Software Change Manager Parallel Development (CA Endevor Parallel Development)
■ CA Librarian® Base for z/OS (CA Librarian)
■ CA Panvalet® for z/OS (CA Panvalet)
Contact CA Technologies
Contact CA Support
For your convenience, CA Technologies provides one site where you can access the information that you need for your Home Office, Small Business, and Enterprise CA Technologies products. At http://ca.com/support, you can access the following resources:
■ Online and telephone contact information for technical assistance and customer services
■ Information about user communities and forums
■ Product and documentation downloads
■ CA Support policies and guidelines
■ Other helpful resources appropriate for your product
Providing Feedback About Product Documentation
If you have comments or questions about CA Technologies product documentation, you can send a message to [email protected].
To provide feedback about CA Technologies product documentation, complete our short customer survey which is available on the CA Support website at http://ca.com/docs.

Documentation Changes
The following documentation updates have been made since the last release of this documentation:
Note: In PDF format, page references identify the first page of the topic in which a change was made. If the topic is long, the actual change may appear on a later page.
Release 15.1
■ The Merge Output File (see page 57)—Updated to remove an obsolete note and cross reference.
■ Merge a WIP File to a CA Endevor SCM Location—Deleted this obsolete topic.
■ Chapter 5: Merging WIP Files Directly to CA Endevor SCM Locations—Deleted this obsolete chapter including the following topics:
– Direct Merge of WIP files to CA Endevor SCM Locations
– How the Merge Process Works
– Merge Process Considerations
– How to Merge Multiple WIP Files
■ Merge Output WIP Statement Batch SCL Syntax (see page 98)—Updated to remove information about merging to a CA Endevor SCM location.
■ Merge Output WIP Statement Batch SCL Syntax Parameters (see page 99)—Updated to remove information about merging to a CA Endevor SCM location.
Version 15.0
■ Specifying a Root Member or Element (see page 30)—Updated to indicate that if an element of log delta format is selected, only the current level is a valid selection.
■ Specifying Derivation 1 (see page 31)—Updated to indicate that if an element of log delta format is selected, only the current level is a valid selection.
■ Specifying Derivation 2 (see page 33)—Updated to indicate that if an element of log delta format is selected, only the current level is a valid selection.

Contents 5
Contents
Chapter 1: Introduction 11
Parallel Development ................................................................................................................................................. 11
Simple Parallel Development .............................................................................................................................. 12
Complex Parallel Development ........................................................................................................................... 12
Vendor Application Updates ............................................................................................................................... 13
How to Integrate Concurrently Developed Software ......................................................................................... 13
The Parallel Development Option .............................................................................................................................. 14
PDM Tools for Project Analysis ........................................................................................................................... 14
PDM Tools for Consolidation and Conflict Resolution ........................................................................................ 14
PDM Tools for Integrating Changes .................................................................................................................... 14
How PDM Works ........................................................................................................................................................ 15
PDM Terminology ....................................................................................................................................................... 17
Access PDM ................................................................................................................................................................ 19
Specify User Defaults ................................................................................................................................................. 19
PRTMAT Output Defaults .................................................................................................................................... 20
Disable the Build WIP and Merge Performance Enhancement Option .............................................................. 21
Quick Edit Access to the Parallel Development Option ............................................................................................. 21
Chapter 2: Building Work-in-Process Files 23
How PDM Builds WIP Files ......................................................................................................................................... 23
Specify a WIP Library and Build WIP Options ............................................................................................................. 24
WIP Library Specification Panel Fields ................................................................................................................ 24
WIP Build Options ............................................................................................................................................... 25
Allocating a WIP Library ...................................................................................................................................... 26
Specifying a WIP Member ................................................................................................................................... 27
Specifying a Root Library or CA Endevor SCM Location ...................................................................................... 28
Root Specification Panel Fields ........................................................................................................................... 28
Specifying a Root Member or Element ............................................................................................................... 30
Specifying Derivation 1 ............................................................................................................................................... 31
Specifying Derivation 2 ............................................................................................................................................... 33
Creating a Merge Output File During the Build WIP Process ..................................................................................... 34
Merge Output Specification Panel Fields ................................................................................................................... 35
Using the WIP Member Selection Matrix ................................................................................................................... 36
Sample Matrix ..................................................................................................................................................... 36
Excluding a WIP Member .................................................................................................................................... 37
Including Matrix Rows ......................................................................................................................................... 38
6 Parallel Development Option Guide
Renaming a WIP Member ................................................................................................................................... 38
Moving a Derivation 1 or Derivation 2 Member ................................................................................................. 38
Like-Named WIP Members ................................................................................................................................. 39
Printing the Matrix .............................................................................................................................................. 39
Positioning the Matrix ......................................................................................................................................... 40
Sorting the Matrix ............................................................................................................................................... 41
Creating WIP Files or SCL .................................................................................................................................... 41
Using the Summary of Levels Panel ........................................................................................................................... 42
Using the Summary of Levels Panel with the WIP Member Selection Matrix .................................................... 43
How to Proceed After Building the WIP File ....................................................................................................... 43
Chapter 3: Editing WIP Files 45
The Format of the WIP File ........................................................................................................................................ 45
The WIP File Header ............................................................................................................................................ 45
The WIP File ........................................................................................................................................................ 46
Editing the WIP File .................................................................................................................................................... 47
WIP Edit Commands ................................................................................................................................................... 47
WIP Edit Command Syntax .................................................................................................................................. 48
WIPCOUNT .......................................................................................................................................................... 50
WIPLDEL .............................................................................................................................................................. 50
WIPUNDEL ........................................................................................................................................................... 50
WIPSHOW ........................................................................................................................................................... 51
WIPCHANG .......................................................................................................................................................... 52
WIPPARA ............................................................................................................................................................. 53
WIPCON............................................................................................................................................................... 53
WIPMERGE .......................................................................................................................................................... 54
What You Do After Editing the WIP File ..................................................................................................................... 55
Chapter 4: Merging WIP Files 57
The Merge Output File ............................................................................................................................................... 57
WIP File ............................................................................................................................................................... 58
Merge Output File Based on Edits to WIP File .................................................................................................... 58
Creating a Merge Output File ..................................................................................................................................... 59
Merge a WIP File to a Data Set ........................................................................................................................... 59
The Merge Output Specification Panel ...................................................................................................................... 60
The Merge Output Member Selection List .......................................................................................................... 61
What You Do After Merging the WIP Files ................................................................................................................. 62
Chapter 5: Using PDM in Batch 65
Generating Build WIP and Merge Requests ............................................................................................................... 65

Contents 7
Specifying a Request Data Set .................................................................................................................................... 65
Request Dataset Allocation Panel ....................................................................................................................... 66
Generating Build WIP Requests Option 1 .................................................................................................................. 67
Generating Merge Requests Option 3 ....................................................................................................................... 68
Submitting Batch Requests for Execution Option 4 ................................................................................................... 68
The PDM Batch Options Menu ............................................................................................................................ 69
Chapter 6: PDM Reports 71
General WIP and Merge Information ......................................................................................................................... 71
PDM Syntax Request Report for Build WIP ................................................................................................................ 72
PDM Build WIP Detail Report ..................................................................................................................................... 72
PDM Build WIP Detail Report Fields Description ................................................................................................ 73
PDM Build WIP Summary Report ............................................................................................................................... 77
PDM Build WIP Summary Report Field Descriptions .......................................................................................... 77
Highest BUILD Return Code ................................................................................................................................ 81
PDM Merge Output Detail Report ............................................................................................................................. 81
PDM Merge Output Detail Report Field Descriptions ......................................................................................... 81
PDM Merge Output Summary Report ........................................................................................................................ 82
PDM Merge Output Summary Report Field Descriptions ................................................................................... 83
Highest MERGE Return Code .............................................................................................................................. 84
Appendix A: Batch Execution JCL 85
Sample Batch Execution JCL ....................................................................................................................................... 85
Before Executing Batch JCL ................................................................................................................................. 85
Appendix B: PDM Batch Syntax 87
What PDM Syntax is ................................................................................................................................................... 87
PDM Syntax Statements ............................................................................................................................................. 87
The Structure of a PDM Request Statement ....................................................................................................... 88
PDM Process Flow ............................................................................................................................................... 88
Build WIP Statement Batch SCL Syntax ...................................................................................................................... 89
Build WIP Statement SCL Syntax Parameters ..................................................................................................... 90
The BUIld MASK Statement ........................................................................................................................................ 96
BUIld MASK Parameters ...................................................................................................................................... 97
Merge Output WIP Statement Batch SCL Syntax ....................................................................................................... 98
Merge Output Statement SCL Syntax Parameters .............................................................................................. 99
The MERGE MASK Statement .................................................................................................................................. 101
MERGE MASK Parameters................................................................................................................................. 101
The STATS OFF Statement ........................................................................................................................................ 102
STATS OFF Parameters ...................................................................................................................................... 102

8 Parallel Development Option Guide
Build WIP and Merge Syntax Examples .................................................................................................................... 103
Build WIP and Merge EXAMPLE 1 ..................................................................................................................... 103
Appendix C: Extending the WIP Edit Macro Facility 107
Before You Begin Using the WIP Edit Macro Facility ................................................................................................ 107
Existing Edit Macros ................................................................................................................................................. 107
Extending the Edit Macros ....................................................................................................................................... 108
BC1GM100 and BC1GMU01 .............................................................................................................................. 108
Appendix D: Statistical Data Control Blocks 109
$PBWSTAT: WIP Detail Statistics .............................................................................................................................. 110
Data Displayed by $PBWSTAT ........................................................................................................................... 114
General Source Location Information ($PBWSTAT) .......................................................................................... 114
General Statistics Total ..................................................................................................................................... 118
Data Common to Both Derivations ................................................................................................................... 119
Derivation 1 Statistics ....................................................................................................................................... 120
Derivation 2 Statistics ....................................................................................................................................... 121
Auto-Merge information ................................................................................................................................... 122
$PBWSSUM: WIP Summary Statistics ...................................................................................................................... 122
$PBMSTAT: Merge Detail Statistics .......................................................................................................................... 125
Data Display by $PBMSTAT ............................................................................................................................... 126
General Source Location Information ($PBMSTAT) .......................................................................................... 126
General Statistics .............................................................................................................................................. 127
$PBMSSUM: Merge Summary Statistics .................................................................................................................. 128
Appendix E: PDM Implementation 131
Implementation Process Overview .......................................................................................................................... 131
Assumptions ...................................................................................................................................................... 131
Step 1: Customize the PDM Batch JCL ...................................................................................................................... 132
Step 2: Modify the PDM Dialog Panels..................................................................................................................... 132
PDM ISPF Examples ........................................................................................................................................... 133
Step 3: Integrate PDM with ISPF .............................................................................................................................. 133
Define the PDM Data Sets to ISPF ..................................................................................................................... 133
Add PDM to an ISPF Option Panel ..................................................................................................................... 134
Step 4: Test PDM ...................................................................................................................................................... 134
Define the WIP and Merge Data Sets ................................................................................................................ 135
Perform the Build WIP Function ....................................................................................................................... 135
View and Edit the WIP File ................................................................................................................................ 136
Perform the Merge Function ............................................................................................................................ 137
Test Batch PDM ................................................................................................................................................. 137

Contents 9
Step 5: Link-edit the CA Panvalet Access Modules .................................................................................................. 138
Edit BC1JPAN ............................................................................................................................................................ 138
Run BC1JPAN ..................................................................................................................................................... 138
Redefine Defaults Table .................................................................................................................................... 138
Index 139


Chapter 1: Introduction 11
Chapter 1: Introduction
This section contains the following topics:
Parallel Development (see page 11) The Parallel Development Option (see page 14) How PDM Works (see page 15) PDM Terminology (see page 17) Access PDM (see page 19) Specify User Defaults (see page 19) Quick Edit Access to the Parallel Development Option (see page 21)
Parallel Development
Parallel development is a term used to describe the concurrent development activities necessitated by the complexity of today's applications and the pace at which these applications are developed. Aspects of parallel development include:
■ Several programmers working on the same application and often the same programs.
■ Identifying and resolving conflicts in programs that have been independently updated by more than one programmer.
■ The time-consuming, resource-intensive, and error-prone process of manually integrating independent changes to a program.
■ Reconciling differences between customized vendor software packages and vendor release updates.
■ Assessing project complexity, duration, and the resource requirements.
There are three general kinds of parallel development:
Simple parallel development
Concurrent work by a small number of programmers on modifications to a single program.
Parallel Development
12 Parallel Development Option Guide
Complex parallel development
Concurrent work on multiple or overlapping releases by several teams of programmers.
Vendor application updates
Integrating customization to a base release of vendor or internally developed software with a subsequent release of the software.
Each of these is discussed in the following sections. The discussion includes a problem typical of that kind of parallel development.
Simple Parallel Development
Simple parallel development is the concurrent and independent development of applications by different programmers within the same company. In most simple parallel development situations, modifications are minimal and conflicts are few or nonexistent. Managerial intervention is rarely required. Most of the time the developers themselves can determine the time needed to make the necessary changes.
The problem when using simple parallel development may arise, for example, when two programmers have been independently enhancing a single report generation program. Potential conflicts and overlaps need to be identified and resolved and the program modifications must be integrated before the program is placed into production.
Complex Parallel Development
Complex parallel development, like simple parallel development, involves more than one programmer working individually on the development of the same base program, with an eventual need to integrate the two sets of changes. But the actual complexity of the project--whether it be the degree of difficulty involved in the modifications required, the sheer number of changes involved, or the need for accurate and accessible information between all parties--sets it apart from a simple development situation. Complex parallel development can even involve two or more different sites. In this situation, the programs are not only being coded by different programmers, they are being coded by people who often have little or no communication with each other.

Parallel Development
Chapter 1: Introduction 13
Complex parallel development occurs in situations such as these:
■ A company must maintain an existing software release while developing a new release. For example, one team of developers must continue to write maintenance against an existing release, while another team of developers works on a new release of the product. Eventually, the maintenance changes must be incorporated in the next release.
■ A company has multiple sites that are doing development at the same time. For example, a state university with campuses in several cities may be upgrading its admissions tracking program. Two of the campuses are making modifications that eventually need to be integrated into the existing admissions tracking program.
The problem when using complex parallel development may arise, for example, when modified copies of a program must be integrated to produce a single, updated package. In complex parallel development situations, the potential for conflict tends to be higher, and the changes more difficult. Management intervention is usually required to determine the best approach and the most appropriate resources to produce the final product.
Vendor Application Updates
Vendor products, such as proprietary or in-house developed products, need to be maintained and updated on a regular basis. Whether you have purchased a vendor package that was customized by the vendor before delivery, or customized the package yourself, you need to integrate periodic vendor updates into the modified vendor code.
The problem when using vendor application updates may arise, for example, when the user customizes the base product and those changes must be identified and carried forward into the new release.
How to Integrate Concurrently Developed Software
Integrating concurrently developed software requires varying levels of involvement by programmers and managers, depending on the complexity of the parallel development effort.
There are three steps to the integration process:
■ Analysis, to determine the scope of the integration project. This can be handled by programmers in simple parallel development situations. More managerial involvement is often required for vendor updates or more complicated development projects.

The Parallel Development Option
14 Parallel Development Option Guide
■ Consolidation and conflict resolution. Procedures need to be established for gathering the proper programs and identifying conflicts for resolution. Again, managerial involvement increases as project complexity increases.
■ Integrating the changes. This is often a manual process, one that can be very time consuming and error prone in large or complicated projects.
The Parallel Development Option
The Parallel Development Option (PDM) is a powerful tool to help both developers and managers address the problems inherent in the three steps of parallel development projects. PDM can help:
■ Analyze the complexity of parallel development projects.
■ Consolidate changes and identify conflicts more quickly.
■ Automate the integration process.
PDM Tools for Project Analysis
PDM produces a set of reports that managers can use for project planning. The reports are based on one or more Work-in-Process (WIP) files. PDM builds WIP files from a base file and one or two files derived from the base. The Build WIP process analyzes the input files, identifies differences and conflicts, and creates statistics and reports.
The PDM reports include information such as numbers of inserted and deleted lines in specific input files, and an assessment of the complexity of the WIP file. By interpreting the Build WIP reports, programmers or managers can more accurately plan the resources and time needed to complete the assignment.
PDM Tools for Consolidation and Conflict Resolution
The Build WIP process is the PDM mechanism for consolidating changes and identifying conflicts. By automating the consolidation of changes and identification of conflicts, PDM both speeds up and increases the accuracy of this step in parallel development.
PDM also provides editing tools to speed up the process of resolving any conflicts that exist.
PDM Tools for Integrating Changes
Once a WIP file has been edited to resolve conflicts, PDM can create an integrated output file by inserting and deleting lines based on the annotations in the WIP file, then write the integrated output file to a user specified location.

How PDM Works
Chapter 1: Introduction 15
How PDM Works
The Parallel Development Option operates with standard PDS, PDSE and sequential data sets, as well as CA Panvalet files, CA Librarian files, and CA Endevor SCM elements.
You can use PDM interactively (in foreground) or in batch. In either mode, PDM processing involves three basic steps:
1. Build the Work-in-Process (WIP) File. PDM builds a Work-In-Process (WIP) file by comparing a base program and one or two files derived from the base. PDM annotates the WIP File to clearly mark all insertions, deletions, and conflict areas.
The Build WIP process also produces reports and statistical data which allow a manager to estimate the time and resources required to resolve the conflicts.
2. Edit the WIP File. Programmers edit the WIP File to resolve annotated conflicts. Editing tools provided by PDM allow a project team to try different edit scenarios before actually integrating the changes in the WIP file.
3. Merge the WIP File. The final step in the PDM process is to merge the WIP File into a Merge Output File. A Merge Output File is a source file that can be stored in the appropriate source repository, input to a compiler, or added into CA Endevor SCM. PDM uses the WIP File as input, performs the insertions and deletions noted, and produces the integrated source file.

How PDM Works
16 Parallel Development Option Guide
The following illustration outlines the basic PDM operation.
As previously illustrated:
1. The Work-in-Process (WIP) File is created and reports are produced.
2. The WIP File is edited and conflicts are resolved.
3. The WIP File is integrated into a Merge Output File.

PDM Terminology
Chapter 1: Introduction 17
PDM Terminology
Several PDM terms, including file names and reports, have already been mentioned in this chapter. To help familiarize you with these terms before you read the rest of the manual, they are defined here.
PDM File Names
Here's a list of PDM file names you should know.
Root
The base program with which programmers are working. Derivation 1 and Derivation 2 files are derived from this program. For example, the Root might be Release 1.0 of a vendor product; Derivation 1, your modifications to the product; and Derivation 2, the vendor's new release (1.1) of the product.
Derivation 1
A modified copy of the Root.
Derivation 2
Another modified copy of the Root.
Work-In- Process (WIP) File
The file built when PDM compares the Root and one or two Derivations. The WIP File is an annotated intermediate file that identifies the insertions and deletions made individually by the Derivations, as well as the insertions and deletions common to both. Potential insert conflicts are also identified.
Merge Output File
An output file created by PDM using the WIP File as input. When the Merge Output File is created, the annotations from the WIP File are removed, and all insertions and deletions are performed.
Statistics File
An optional file that can be created by the Build WIP or Merge function. This file contains statistics that describe the members involved in the Build WIP or Merge operation. These statistics include items such as the number of insertions made by Derivation 1, the number of insertions made by Derivation 2, and the like. This file can be used as input to an existing report package or a user written reporting system.
PDM Terms
Here's a list of PDM terms you should know:
Common Insertion
Common Deletion
The result of both programmers inserting or deleting the same line at the same place in their respective copies of the Root program.

PDM Terminology
18 Parallel Development Option Guide
Conflict
The result of both programmers inserting different lines at exactly the same place in their respective copies of the Root program. Conflicts are identified in the WIP File.
Conflict Area
A place in the WIP File where a conflict occurs. A conflict area involves at least two records--one from Derivation 1 and one from Derivation 2.
Contention Area
A place in the WIP File where conflicting changes exist, but are "offset;" that is, both Derivations have changed a section of code, but the changes do not begin at exactly the same place in each derivation. Because these sections of code overlap, however, they are considered conflicting in nature.
Complexity Factor
A value assigned to the WIP file, to help identify the resources required to resolve conflicts. The complexity factor is a function of the number of:
■ Records in the WIP file.
■ Derivation 1 records in conflict.
■ Derivation 2 records in conflict.
■ Conflict areas and contention areas.
The complexity factor ranges from 0-5:
■ 0--indicates that no changes occurred in the member.
■ 1--indicates that changes occurred but there are no conflict or contention areas.
■ 2-5--indicate that the member contains conflicts, where 2 indicates simple conflicts and 5 indicates complex conflicts.
Note: The complexity factor reflects the number of conflicts found in the WIP File, not the number of changes. The comparison procedure may identify many changes, but few or no conflicts, resulting in a low complexity factor. Conversely, you may find that although you have a small number of conflicts, each is relatively complex, resulting in a high complexity factor.
WIP Member Selection Matrix
A special PDM screen that shows side-by-side alignment, within the WIP data set, of the Root, Derivation 1, and Derivation 2 members. The matrix is used when dealing with multiple sets of Root, Derivation 1, and Derivation 2 members.

Access PDM
Chapter 1: Introduction 19
Access PDM
To use PDM, select the program from the ISPF/PDF Primary Option Panel by entering the appropriate code.
The CA Endevor Parallel Development Option menu is used to select each step of the PDM process.
Use this panel to indicate the primary option processing you want:
0
Establish defaults for work-area space allocations. These defaults are user ID-specific.
1
Build a WIP File or write Build WIP requests to a batch request data set.
2
Edit a WIP file.
3
Merge a WIP file into an output source library. You can use either foreground or batch mode to merge the WIP File.
4
Build a job that executes Build WIP or Merge requests in batch.
T
Invoke an online tutorial that describes PDM procedures and panel fields.
C
View a summary of the new features that have been added to PDM for this release.
Specify User Defaults
The PDM User Defaults panel allows you to override defaults for space allocation of work areas and temporary data sets that are used in foreground. The defaults remain in effect until you change them, either in this particular session or in a subsequent work session.
Allocation information is initially taken from the settings in the C1DEFLTS Table. The PDM User Defaults panel allows you to override those default values for your user ID only.
1. To select this option, type 0 in the option field of the Parallel Development Option menu.

Specify User Defaults
20 Parallel Development Option Guide
2. When you press Enter, the PDM User Defaults screen appears.
These fields define the default allocation for your work.
Primary Quantity
Number of units of space in the primary allocation.
Secondary Quantity
Number of units of space in each secondary allocation.
Space Units
Units in which space is allocated. Acceptable values are TRK (tracks), CYL (cylinders) or BLK (blocks).
Unit Name
Descriptive name of the disk device. You can specify any value appropriate in the UNIT=parameter of DD (JCL) statements at your site.
Volume Serial
Volume serial number of the specific device you want to use for your work areas. Leave blank to use the site default.
3. When you press Enter, the Parallel Development Option menu appears, with the following message in the upper right-hand corner of the screen:
Defaults Updated
This message indicates that the defaults have been updated.
PRTMAT Output Defaults
These fields allow you to set PDM defaults for the PRTMAT output destination for WIP Member Selection matrix output processing. The value of these fields depends on the standards established for your site.
SYSOUT Class
Required alphanumeric character defining the SYSOUT output class designation. This field is initialized to A.
Destination
Optional up to 17 character output destination identifier. The format is node.user. If only one parameter is used, PDM assumes that it designates the user. If blank, PDM uses the destination value LOCAL. This field is equivalent to the DEST= JCL statement.
For example, to set the default PRTMAT destination to the locally defined printer PRINTER1, specify PRINTER1 in the destination field.

Quick Edit Access to the Parallel Development Option
Chapter 1: Introduction 21
Disable the Build WIP and Merge Performance Enhancement Option
If PDM is executing on an z/OS system, it uses virtual storage as a work area during certain build and merge operations. If the Root file, Derivation files, or the WIP file is extremely large, PDM may exhaust all available virtual storage and the Build or Merge action will fail.
The disable the build WIP and merge enhancement field controls whether PDM uses external (disk) storage instead of virtual storage during builds and merge processing. Specify Y (yes) if PDM is to use external storage for its work area. Specify N (no) if PDM is to use virtual storage. The default is N.
Specify a value of Y in this field if PDM issues error message PDM2001E and the corrective action for this message does not correct the error.
Quick Edit Access to the Parallel Development Option
Clients who are licensed for the Quick-Edit option and the Parallel Development option can access PDM from the Quick-Edit Option panel. Provided PDM is enabled in the C1DEFLTS table, users can access PDM by selecting the PD Parallel Dev option, which appears in the Dialog Commands section of the Quick-Edit panel. If PDM is not enabled, then the option is displayed on the panel in lower intensity than the rest of the panel and if you select this option a message is displayed indicating that the option is not available. If PDM is enabled, but you are not licensed for PDM, when you select the PD Parallel Dev option from the Quick-Edit panel, the LMP licensing rules are invoked.


Chapter 2: Building Work-in-Process Files 23
Chapter 2: Building Work-in-Process Files
This section contains the following topics:
How PDM Builds WIP Files (see page 23) Specify a WIP Library and Build WIP Options (see page 24) Specifying Derivation 1 (see page 31) Specifying Derivation 2 (see page 33) Creating a Merge Output File During the Build WIP Process (see page 34) Merge Output Specification Panel Fields (see page 35) Using the WIP Member Selection Matrix (see page 36) Using the Summary of Levels Panel (see page 42)
How PDM Builds WIP Files
The first step in using the Parallel Development Option is to build the Work-in-Process (WIP) file and analyze the results. The WIP file is produced by comparing the Root (or base) file against one or two Derivation (modified) files. The WIP file combines the Root file and every insertion and deletion that has been made to the Derivation file(s), noting conflicting changes. When building the WIP file, PDM uses the Derivation 1 and Derivation 2 files to determine which lines to include in the WIP file.
The following table describes how the PDM writes the line.
If there is a PDM writes the line from
Common insertion (% I-1,2) Derivation 2
Insertion from Derivation 2 (% I-2) Derivation 2
Insertion from Derivation 1 (% I-1) Derivation 1
No change from the Root Derivation 2 (or Derivation 1 if there is a two-way compare.)
The Build WIP process produces one or more of the following reports:
■ PDM Syntax Report
■ PDM Build WIP Detail Report
■ PDM Build WIP Summary Report
Note: PDM can produce a Build WIP Summary Report during the Build WIP process without actually creating the WIP file.

Specify a WIP Library and Build WIP Options
24 Parallel Development Option Guide
To begin the Build WIP process, select option 1 from the CA Endevor Parallel Development Option menu.
When you select option 1, you must also indicate in the FOREGROUND OR BATCH field whether you want to create the WIP File in foreground or batch mode. Enter F to indicate foreground; enter B to indicate batch. If you specify B, you must also provide request data set information.
There are up to five steps in the Build WIP process:
1. Specify a WIP library and build WIP options.
2. Specify a Root library.
3. Specify a Derivation 1 library.
4. Optionally, specify a Derivation 2 library.
5. Optionally, specify a Merge Output data set.
These steps are discussed in the following sections.
Specify a WIP Library and Build WIP Options
To begin the Build WIP process, select option 1 from the Parallel Development Option menu.
Note: When you select option 1, you must also indicate in the FOREGROUND OR BATCH field whether you want to create the WIP File in foreground or batch mode. Enter F to indicate foreground; enter B to indicate batch. If you specify B, you must also provide request data set information.
When you type 1 in the OPTION field and press Enter, the WIP Specification panel displays. The WIP Specification Panel identifies the library or data set containing the WIP files you build.
WIP Library Specification Panel Fields
WIP Library
Required. Using standard ISPF naming conventions, specifies the library containing the new WIP files. Optionally, you can enter MEMBER information.
The WIP data set must be a partitioned or sequential data set. Its LRECL is equal to the LRECL of the Root library plus eight bytes.
Example The Root library's LRECL is 80 bytes, the WIP data set's LRECL is 88 (80 + 8).

Specify a WIP Library and Build WIP Options
Chapter 2: Building Work-in-Process Files 25
WIP Other Partitioned or Sequential Data Set
This field is an alternative to entering WIP LIBRARY information, using standard ISPF conventions.
If Partitioned, Replace Like-Named Members
Indicates whether you want to replace like-named members in the WIP data set. Acceptable values are:
■ Y—Default. Replace like-named members.
■ N—Do not replace like-named members.
Note: This option does not apply to a sequential WIP file.
WIP Build Options
The WIP Build options fields allow you to select several options for WIP Build processing.
Number of Derivation Files
Required. Indicates the number of modified files the Root file is compared against. Valid values are:
■ 1—One file.
■ 2—Default. Two files.
Create WIP
Required. Indicates if PDM should write a WIP file. Value values are:
■ Y—Default. PDM creates and writes to the WIP file.
■ N—PDM bypasses writing to the WIP file, and still produces all the requested PDM reports and statistics.
Automatically Merge
Required. Indicates if PDM should automatically merge the WIP data set. Valid values are:
■ N—Default. Do not merge the WIP data set.
■ Y—Automatically merge the WIP data set if no conflicts are detected.
Generate WIP Reports
Required. Valid values are:
■ A (All)—Default. Generates both the WIP Summary and Detail Reports.
■ S (Summary)—Generates only the WIP Summary Report.
■ N (No)— Prevents the generation of any reports.

Specify a WIP Library and Build WIP Options
26 Parallel Development Option Guide
Write Stats to Data Set
Optional. Specifies the name of the data set used to capture PDM statistics. It must conform to the normal ISPF/PDF naming conventions.
Note: For more information about statistics data set characteristics, see the appendix “Statistical Data Control Blocks”.
Allocating a WIP Library
If the WIP library you specify on the WIP Specification panel is not cataloged, PDM displays the WIP Dataset Allocation panel. This panel allows you to create a new WIP data set with the characteristics that you specify on the panel. This panel contains the following fields:
Management Class
Optional. If you specify a management class that is not defined, the allocation fails and PDM issues an error message.
Storage Class
Optional. If you specify a storage class that is not defined, the allocation fails and PDM issues an error message.
Volume Serial
Optional. If you specify a volume serial that is not defined, the allocation fails with a recoverable application error.
Data Class
Optional. If you specify a data class that is not defined, the allocation fails and PDM issues an error message.
Space Units
Acceptable values are:
■ BLKS—Blocks
■ TRKS—Tracks
■ CYLS—Cylinders
Primary Quantity
Numeric field. Space is allocated in the units specified in the SPACE UNITS field.
Secondary Quantity
Numeric field. Space is allocated in the units specified in the SPACE UNITS field.

Specify a WIP Library and Build WIP Options
Chapter 2: Building Work-in-Process Files 27
Directory Blocks
Numeric field.
■ Non-zero values are required when specifying a WIP member
■ Zero—Required for a sequential data sets.
Record Format
Acceptable values are:
■ F
■ FB
■ V
■ VB
Record Length
Must be numeric, greater than zero, and less than 32000 (fixed) or 32004 (variable)
Block Size
Required if the space unit is BLKS (blocks), otherwise optional. If left blank, the block size is set to zero. If provided, the value must be numeric, and greater than zero.
If the block size is specified and is not zero, and the record format is:
■ F—The block size must be equal to the record length.
■ FB—The block size must be an integral multiple of the record length.
■ V or VB—The block size must be at least four bytes larger than the record length.
Specifying a WIP Member
You have three alternatives when entering member names in conjunction with the WIP library. You can:
■ Leave the field blank. PDM builds a WIP library member list that is identical to the Root library member list.
■ Type a specific member. If you type a specific member name, the WIP File is built for that member only.

Specify a WIP Library and Build WIP Options
28 Parallel Development Option Guide
■ Type an overlay mask. An overlay mask differs from a standard name mask in that the characters specified before the asterisk (*) overlay the corresponding characters in the Root member name.
For example, if you provide an overlay mask of W*, every WIP member name begins with the letter W. This means that Root member BC1PAL00 appears in the WIP library as member WC1PAL00.
Press Enter when you have completed all the WIP specification data. The Root Specification Panel appears next.
Specifying a Root Library or CA Endevor SCM Location
When you press Enter after specifying a WIP library and WIP build options, the Root Specification panel displays.
Use the Root Specification Panel to define the Root library (and members) or the Root CA Endevor SCM location (and elements) you want to use when building the WIP file.
Note: You can specify a Root library and members or a Root CA Endevor SCM location and elements, but not both.
Root Specification Panel Fields
Enter the following information:
Build Root from
Indicates if the Root source is built from a data set or CA Endevor SCM. Valid values are:
■ D—Default. The root source is built from a data set.
■ E—CA Endevor SCM.
Root Library
Identifies the library containing the Root files. Define the library using standard ISPF naming conventions.
Root Other Partitioned or Sequential Data Set
This field can be used as an alternative to entering ROOT LIBRARY information.

Specify a WIP Library and Build WIP Options
Chapter 2: Building Work-in-Process Files 29
Compare Columns
Required. Indicates the columns to be compared (from and through) during the Build WIP operation.
Important! Specify the correct compare column values for the data you are processing. For example, columns 1-6 of a COBOL program usually contain sequence numbers. You should therefore specify a compare range of columns 7-72 for COBOL. PDM then builds the WIP file based on the contents of columns 7 through 72. Likewise, if the Root is an assembler program, the compare range should be columns 1-72. If the Root is a CA Endevor SCM location, PDM uses the compare column information on the type definition for that element. In addition, if the compare through value specified on the element type definition is greater than the Root or Derivation data set length or the element source length, PDM writes an error message and terminates the Build WIP process.
Use caution when specifying a compare range for variable length records. If record lengths are different, PDM may annotate a record (line) as changed, even if record data is identical. For example, trailing blanks may be truncated in a variable length record.
CA Endevor SCM fields
These fields must be explicit:
■ ENVIRONMENT
■ SYSTEM
■ SUBSYSTEM
■ TYPE
Selection lists are provided if necessary. If you provide an invalid Stage ID, acceptable stage ID values are displayed to the right of this field after you press Enter.
Note: For more information about providing these element names, see Specifying a Root Member or Element (see page 30).
Version and Level
These fields allow you to build a WIP member using a specific version and level of an element. You can:
■ Type a version and level on the Root Specification Panel.
■ Use a Summary of Levels panel to select a version/level of the element.

Specify a WIP Library and Build WIP Options
30 Parallel Development Option Guide
Where CCID and CCID Type fields
These fields allow you to specify a CCID as a selection criterion when building a list of elements. The CCID TYPE field allows you to further qualify the CCID. The valid values are:
■ A—Default. Any matching CCID field.
■ B—The Base CCID field.
■ L—The Last Action CCID field.
■ G—The Generate CCID field.
■ R—The Retrieve CCID field.
CCID selection is done only when a CCID is specified in the WHERE CCID field.
Specifying a Root Member or Element
Specify a Root member or element according to how the WIP Library Member was specified and how you can specify Root Members or Elements.
If the WIP Library Member was specified:
■ By leaving the field blank
■ By using an overlay mask.
You can specify root members or elements:
■ By leaving the field blank
■ Using a name mask
■ As an explicit value
If the WIP Library Member was specified as an explicit value, then you can specify root members or elements only as an explicit value.
If the WIP library is a sequential data set, you must specify an explicit member or element name.
Sourceless elements are not valid for the Root, Derivation 1, or Derivation 2. If a sourceless element is specified on an input specification panel, an error message results. When elements with log delta format are used as input for the Root, Derivation 1, or Derivation 2, then the current (last) level must be specified. If the current level is not specified, an error message results.

Specifying Derivation 1
Chapter 2: Building Work-in-Process Files 31
Selecting a Member
If you provide an explicit member name for the WIP library, but do not specify an explicit member at the Root location, PDM displays a Build WIP - Member Selection List. PDM allows you to select only one member from this list. After you select a member, you can do one of the following:
■ Press PF3 to deselect the member and return to the Root Specification Panel.
■ Press Enter to display the Derivation 1 Specification Panel.
Selecting an Element
If you provide an explicit member name for the WIP library, but do not specify an explicit element at the Root CA Endevor SCM location, PDM displays an Element Selection List. The list contains the current level of the selected elements at the specified location.
PDM allows you to select only one element from this list. To access a Summary of Levels panel for an element, first type S in the COMMAND field, then type S next to the desired element, and press Enter.
The sourceless element indicator column is titled NS. If a Y is shown in this column, you cannot use this element, because sourceless elements cannot be used for the Root, Derivation 1, or Derivation 2. If a sourceless element is selected, an error message will indicate that an invalid selection was made.
Note: If the Root Specification Panel reappears with the message "Type "S" for Levels," and S is preloaded in the COMMAND field, press Enter to access a Summary of Levels panel.
After you have selected an element you can do one of the following:
■ Press PF3 to deselect the element and return to the Root Specification Panel.
■ Press Enter to display the Derivation 1 Specification Panel.
Specifying Derivation 1
The Derivation 1 Specification Panel appears when you press Enter after completing the Root Specification Panel. Use the Derivation 1 Specification Panel to define the Derivation 1 source location (and members) you want to use when building the WIP File.
Sourceless elements are not valid for the Root, Derivation 1, or Derivation 2. If a sourceless element is specified on an input specification panel, an error message results. When elements with log delta format are used as input for the Root, Derivation 1, or Derivation 2, then the current (last) level must be specified. If the current level is not specified, an error message results.

Specifying Derivation 1
32 Parallel Development Option Guide
Specify a Derivation 1 library member according to the following table.
If the Root Library Member or Element is Specified
You Can Specify the Derivation 1 Member or Element
By one of these methods:
■ Leaving the field blank
■ Using an overlay mask
Using one of these methods:
■ Leaving the field blank
■ Using a name mask
■ An explicit value
As an explicit value Only as an explicit value
If you provide an explicit member or element name for the Root location, but do not do so at the Derivation 1 location, PDM displays a member or element selection list.
When you have specified all Derivation 1 source information and press ENTER, one of the following occurs:
■ The Derivation 2 Specification Panel appears if you specified NUMBER OF DERIVATION FILES=2 on the WIP Specification panel.
■ The Merge Output Specification panel appears if you specified NUMBER OF DERIVATION FILES=1 and AUTOMATICALLY MERGE=Y on the WIP Specification panel.
To proceed, specify a library to which PDM can write the merged output from the WIP file.
■ The Parallel Development Option menu appears if you provided explicit Root library and Derivation 1 library member names, and specified NUMBER OF DERIVATION FILES=1 and AUTOMATICALLY MERGE=N on the WIP Specification panel.
The Parallel Development Option menu displays the message WIP BUILD COMPLETE, meaning that PDM has created a WIP file from the Root and Derivation 1 library members.
■ The message log appears if the Build WIP process fails, and you specified NUMBER OF DERIVATION FILES=1 and AUTOMATICALLY MERGE=Y on the WIP Specification panel.
■ The Parallel Development Option menu appears if the Build WIP process fails, and you specified NUMBER OF DERIVATION FILES=1 and AUTOMATICALLY MERGE=Y on the WIP Specification panel, and there are conflicts in the WIP file.

Specifying Derivation 2
Chapter 2: Building Work-in-Process Files 33
■ The WIP Member Selection Matrix appears if you specified:
– NUMBER OF DERIVATION FILES=1 and AUTOMATICALLY MERGE=N on the WIP Specification panel
– The WIP Library by leaving the MEMBER field blank or using an overlay mask
– The Root library member by leaving the MEMBER field blank or using an overlay mask
– The Derivation 1 library member by leaving the MEMBER field blank, using an overlay mask, or providing an explicit value
Specifying Derivation 2
The Derivation 2 Specification Panel appears when you press Enter after completing the Derivation 1 Specification panel and if you specified NUMBER OF DERIVATION FILES=2 on the WIP Specification panel.
Use the Derivation 2 Specification Panel to define the Derivation 2 library (and members) or the Derivation 2 CA Endevor SCM location (and elements) you want to use when building the WIP File.
Sourceless elements are not valid for the Root, Derivation 1, or Derivation 2. If a sourceless element is specified on an input specification panel, an error message results. When elements with log delta format are used as input for the Root, Derivation 1, or Derivation 2, then the current (last) level must be specified. If the current level is not specified, an error message results.
Specify a Derivation 2 library member according to the following table.
If the Root Member or Element Was Specified
You Can Specify the Derivation 1 Member or Element
And You Can Specify the Derivation 2 Member or Element
By one of these methods:
■ Leaving the field blank
■ Using a name mask
Using one of these methods:
■ Leaving the field blank
■ Using a name mask
■ An explicit value
Using one of these methods:
■ Leaving the field blank
■ Using a name mask
■ An explicit value
As an explicit value Only as an explicit value Only as an explicit value

Creating a Merge Output File During the Build WIP Process
34 Parallel Development Option Guide
If you provide an explicit member or element name for the Root location, but do not do so at the Derivation 1 location, PDM displays a member or element selection list.
When you have specified all Derivation 2 source information and press ENTER, one of the following happens:
■ The Merge Output Specification panel appears if you specified NUMBER OF DERIVATION FILES=2 and AUTOMATICALLY MERGE=Y on the WIP Specification panel.
To proceed, specify a library to which PDM can write the merged output from the WIP file.
■ The Parallel Development Option menu appears if you provided explicit Root library, Derivation 1 and Derivation 2 library member names, and specified NUMBER OF DERIVATION FILES=2 and AUTOMATICALLY MERGE=N on the WIP Specification panel.
■ The Parallel Development Option menu displays the message WIP BUILD COMPLETE, meaning that PDM has created a WIP file from the Root, Derivation 1 and Derivation 2 library members.
■ The message log appears if the Build WIP process fails, and you specified NUMBER OF DERIVATION FILES=2, AUTOMATICALLY MERGE=N on the WIP Specification panel, and the WIP, Root, and Derivation 1 files were explicitly specified.
■ The WIP Member Selection Matrix appears if you specified:
– NUMBER OF DERIVATION FILES=2 on the WIP Specification panel
– The Root library member by leaving the MEMBER field blank or using an overlay mask
– The Derivation 1 and Derivation 2 library members by leaving the MEMBER field blank, using an overlay mask, or providing an explicit value.
Creating a Merge Output File During the Build WIP Process
If you specify AUTOMATICALLY MERGE=Y on the WIP Specification panel, PDM will try to create automatically a merge file from the WIP file as the last step in the Build WIP process. PDM will create the Merge file only if it finds no conflicts in the WIP file.
When you specify AUTOMATICALLY=Y on the WIP Specification Panel, the Merge Output Specification Panel appears when you press Enter after providing necessary information on either the Derivation 1 or Derivation 2 Specification panel.

Merge Output Specification Panel Fields
Chapter 2: Building Work-in-Process Files 35
Use the Merge Output Specification Panel to:
■ Identify the library to which you want PDM to write the merge output file.
■ Specify other options related to the merge process
Note: When PDM creates the merge output file automatically during the Build WIP process, the merge output file name is the same as the WIP member name. You cannot change the name of the Merge Output file.
When you press Enter after providing information on this panel:
■ The CA Endevor Parallel Development Option menu appears with a message indicating the merge process has succeeded or failed. The merge process fails if there are conflicts in the WIP file.
■ The message log appears if the merge process fails for some other reason.
■ The WIP Selection Matrix appears if Root or either of the Derivation files were not explicitly specified.
Merge Output Specification Panel Fields Merge Library fields
Use to specify the merge library, using standard ISPF conventions.
Note: The record length of the Merge data set must be large enough to support the largest WIP record. Generally this means that the Merge data set must be no shorter than eight bytes less than the WIP record length. For example, if the WIP data set record length is 88, then the Merge data set record length must be at least 80.
Data Set Name
Use as an alternative to the MERGE LIBRARY fields.
If Partitioned, Replace Like-named Members
Indicates whether PDM is to replace like-named members in the merge output library. The default is Y.
Delete WIP Member after Merge
Tells PDM whether to delete the WIP member after creating the merge output file. The default is N.

Using the WIP Member Selection Matrix
36 Parallel Development Option Guide
CA Panvalet or CA Librarian Language
Optional. This field associates a CA Panvalet or CA Librarian type identifier with the named output member. PDM ignores the field if the merge data set is not a CA Panvalet or a CA Librarian data set. Selections include:
■ CA Panvalet—ALC, ANSCOBOL, AUTOCODE, BAL, COBOL, COBOL-72, DATA, FORTRAN, JCL, OBJECT, PL/1, RPG, USER180, USER780, OTHER.
■ CA Librarian—ASM, COB, DAT, FOR, FRG, FRS, GIF, GOF, JCL, PLF, PLI, RPG, TXT, VSB.
If left blank, the default value is DATA for CA Panvalet, and DAT for CA Librarian.
Using the WIP Member Selection Matrix
The WIP Member Selection Matrix contains a header identifying the WIP, Root, Derivation 1 and Derivation 2 libraries or CA Endevor SCM locations. The matrix also displays the member or element names within the Root, Derivation 1, and Derivation 2 libraries or CA Endevor SCM locations next to their corresponding WIP member names. Any sourceless elements are excluded from the display.
The only difference caused by designating Root, Derivation 1, and/or Derivation 2 from CA Endevor SCM is in the format of the matrix header, as follows:
■ A CA Endevor SCM source name is defined using the environment, stage, system, subsystem, and type, separated by slashes.
Work-in-Process: ENDEVOR.PDM.WIPLIB
Root: SUPPORT /B /FINANCE /ACCTREC /COPYBOOK
Derivation 1: SUPPORT /A /FINANCE /ACCTREC /COPYBOOK
Derivation 2: DEMO /P /FINANCE /ACCTREC /COPYBOOK
■ A data set source name is defined using standard data set naming conventions.
Work-in-Process: ENDEVOR.PDM.WIPLIB
Root: ENDEVOR.PDM.ROOT
Derivation 1: ENDEVOR.PDM.DV1LIB
Derivation 2: ENDEVOR.PDM.DV2LIB
Sample Matrix
The matrix can be a useful tool because it allows you to view and manipulate matrix rows prior to invoking the Build WIP process.
Each row in the matrix consists of the name of a WIP file and of the Root and Derivation files from which it is built. Rows that contain the names of a WIP and Root are assigned a sequence number. Unmatched Derivation 1 or Derivation 2 members appear on the matrix after the last sequenced row, and are not assigned sequence numbers.

Using the WIP Member Selection Matrix
Chapter 2: Building Work-in-Process Files 37
Use the PF8 and PF7 keys to scroll through the matrix. To find a particular WIP member within the matrix, you can use the locate command. When you issue the CREATE command PDM processes all matrix rows containing:
■ WIP, Root and Derivation 1 file specifications.
■ WIP, Root, Derivation 1 and Derivation 2 file specifications.
Note: PDM does not process rows with only WIP, Root, and Derivation 2 file specifications.
For example, PDM processes rows 0001, 0009, and 0012. The remaining rows are not processed because they do not include a Derivation 1 file.
The WIP Member Selection Matrix panel provides row commands that allow you to restrict the rows processed by PDM, by:
■ Excluding rows from the Build WIP process.
■ Including previously excluded rows in the Build WIP process.
■ Renaming members that currently exist in the WIP data set.
■ Moving any Derivation 1 or Derivation 2 members to match them with specific Root members.
The WIP Member Selection Matrix panel also provides commands for manipulating the entire matrix. Specifically, you can:
■ Print the matrix, using the PRTMAT command.
■ Position the matrix on a line using the LOCATE command.
■ Sort the matrix, using the SORT command
■ Create WIP files or build SCL using the CREATE command.
These rows and matrix commands are discussed in the following sections.
Excluding a WIP Member
Use the EXCLUDE command to exclude a WIP matrix row from processing. You may decide that rather than rename a particular member, you will just not process it. Or, you may want to build WIP Files for only those matrix rows with members in the Root and at least one Derivation. The exclude command allows you to quickly eliminate unnecessary processing.
To exclude a WIP member(s) from processing, type X in the SELECTION field =next to the WIP member(s) to be excluded. Then, press Enter. The screen returns with the message *EXCLUDED in the RENAME field, next to the appropriate WIP member(s). Note that there is no longer a sequence number for the member.

Using the WIP Member Selection Matrix
38 Parallel Development Option Guide
Including Matrix Rows
The INCLUDE command can be used to include a matrix row that you have previously excluded, or to override the "no replace" parameter. To include a matrix row, type I next to the appropriate member(s), then press Enter.
The screen returns with the message *INCLUDED in the RENAME field, next =to the appropriate WIP member(s), to indicate that the member has been included. A sequence number also appears for the member.
Renaming a WIP Member
Use the RENAME command to assign a new name to a member with the same name as another member in the WIP data set. To rename a member, type an R in the SELECTION field next to the member(s) to be renamed, type the new name in the RENAME field, then press Enter.
The screen returns with the message *RENAMED in the RENAME field, next to the new member name.
Moving a Derivation 1 or Derivation 2 Member
Unmatched Derivation 1 and Derivation 2 member names are listed at the end of the WIP Member Selection Matrix. You may realize that some of these members actually do match listed Root members. Or, you may want to replace a Derivation 1 or Derivation 2 member in a matrix row with a different member. PDM allows you to move Derivation 1 and Derivation 2 members into the different matrix rows.
To move the member, tab to the member name you want to move. Type the number of the matrix row to which you want to move this member before the member name, then press Enter. If the member being moved is replacing an existing member, the old member is moved to the first available open slot in the matrix, after the last matrix row with a sequence number.

Using the WIP Member Selection Matrix
Chapter 2: Building Work-in-Process Files 39
Like-Named WIP Members
Occasionally, you may specify a WIP data set that contains a member with the same name as another member. If you answered Y for the IF PARTITIONED, REPLACE LIKE-NAMED MEMBERS option on the WIP Specification Panel, PDM replaces the existing member with the new member. If you indicated N for the option, the like-named member is not processed.
The message *NO-REPL in the RENAME column indicates that the data set ENDEVOR.PDM.WIPLIB already contains the member WC1PAL10, and that the IF PARTITIONED, REPLACE LIKE-NAMED MEMBERS option was not chosen (that is, N was entered in this field).
In this situation, you have three options:
■ You can leave the member name as is, which means that the member is not processed.
■ If you want to replace this particular member in the WIP data set and you are in foreground mode, you can simply include the member. The INCLUDE command is discussed earlier in this section.
■ If you want to keep both like-named members and/or you are processing in batch mode, you must include and rename the member. The RENAME command is also discussed earlier in this section.
Printing the Matrix
The PRTMAT command syntax is:
PRTMAT sysout-class destination
PRTMAT
Prints a formatted version of the matrix.
sysout-class
An optional parameter that identifies the output class. If the output class is not specified, PDM uses the values specified on the PDM User Defaults panel.
destination
An optional parameter that identifies the output destination. If the destination is not specified, PDM uses the values specified on the PDM User Defaults panel.
Note: If no defaults are provided, PDM routes the output to SYSOUT class A.

Using the WIP Member Selection Matrix
40 Parallel Development Option Guide
Example
Command Description
PRTMAT C Prints the matrix to class C.
PRTMAT C PRNT15 Prints the matrix to class C printer number 15.
Positioning the Matrix
The LOCATE command syntax is:
LOCATE row-value column-name
Locate
Positions the matrix to a specified row value. This command can be abbreviated to loc or l
row-value
Identifies the value being used in the search.
column-name
This optional parameter identifies the column being searched. The default LOCATE column is the WIP member name. If a SORT command is issued, the column name parameter provided becomes the default LOCATE column. Valid values include:
■ WIPSEQ—WIP sequence number
■ WIP—WIP member name
■ ROOT—Root member name
■ DER1—Derivation 1 member name
■ DER2—Derivation 2 member name
If the column name specified in the LOCATE command is not the current sort column, the LOCATE command may appear to position the matrix to the incorrect row. This can occur if:
■ The column name specified is not sorted.
■ The column contains renamed members.
■ The column contains unmatched members.
To correctly position the matrix in these instances, use the SORT command to sort the matrix.

Using the WIP Member Selection Matrix
Chapter 2: Building Work-in-Process Files 41
Example
Command Description
LOC PROGX Positions the matrix at the first row containing PROGX.
L PROGX DER1 Positions the matrix at the first row containing PROGX in the DER1 column.
Sorting the Matrix
The SORT command syntax is:
SORT column-name
SORT
Orders the matrix into ascending sequence based on the value of column-name.
column-name
Identifies which column to sort into ascending order. The default column is the WIP member name. Valid values include:
■ WIPSEQ—WIP sequence number.
■ WIP—WIP member name.
■ ROOT—Root member name
■ DER1—Derivation 1 member name
■ DER2—Derivation 2 member name.
Example
Command Description
SORT ROOT Sorts the matrix based on the Root column. The Root column now becomes the default LOCATE column.
Creating WIP Files or SCL
Once you have edited the matrix to meet all your requirements, you can create WIP files or SCL for each member or element. To do this, type CREATE in the COMMAND field, then press Enter.
Note: When you issue the CREATE command, PDM processes all the rows that are not excluded and that have at least a Root and Derivation 1 member.

Using the Summary of Levels Panel
42 Parallel Development Option Guide
If you are in foreground mode, PDM begins the Build WIP process for all the rows that are not excluded. If you are in batch mode, PDM creates batch requests for all the rows that are not excluded and writes the requests to the batch request data set. The batch files can be processed with the Submit option on the Primary Option Menu.
To cancel the Build WIP process, type QUIT in the OPTION field and press Enter to return to the Parallel Development Option menu.
When the Build WIP process is complete, the Parallel Development Option menu returns with one of these messages:
■ WIP Build Complete—If you are processing in foreground mode
■ Requests Written—If you are processing in batch mode
Using the Summary of Levels Panel
When using a CA Endevor SCM location as the Build WIP input location, you can tell PDM to use a level other than the current version and level during the build operation.
If you know the version and level you want to use, you can enter them directly on the Root, Derivation 1, or Derivation 2 Specification Panel. Otherwise, you can review a Summary of Levels panel to find the version/level you want to use. To access a Summary of Levels panel:
■ From a specification panel, type S in the COMMAND field, an explicit name or name mask in the ELEMENT field, then press Enter.
– If you provide an explicit element name the Summary of Levels panel displays.
– If you provide a mask, an Element Selection List displays. Select an element from this list, then press Enter to display the Summary of Levels panel.
■ From an Element Selection List, type S in the COMMAND field, S to the desired element, then press Enter.
Note: To find a particular version/level within the Summary of Levels display, you can use the ISPF locate command. The command must be specified in the COMMAND field, and pertains to version and level only. You can either enter the full command (locate 01.01) or abbreviate it (loc 01.01 or l 01.01).

Using the Summary of Levels Panel
Chapter 2: Building Work-in-Process Files 43
Using the Summary of Levels Panel with the WIP Member Selection Matrix
You can also access the Summary of Levels panel from the WIP Member Selection Matrix. Type an S next to the element name for which you want to use a particular version and level. Press Enter; the Summary of Levels screen is returned.
Select the version and level you want to use from the Summary of Levels screen, as described in the preceding section. Press Enter; the WIP Member Selection Matrix reappears.
When you view this panel, the "<" appended to the end of the element name indicates a version and level other than the current version/level is used for this element when building the WIP File.
Clearing an Assigned Version/Level
You can clear the version and level designated for an element by blanking out the entries on either the specification panel on which they appear or the Summary of Levels screen.
To clear the version and level on the specification panel, tab to the VERSION and LEVEL fields and space through the entries. The current version and level will now be used for the element. If you want to assign a different version and level, type the new entries on this panel or use the Summary of Levels panel.
To clear the version and level on the Summary of Levels panel, tab to the version/level displayed next to the element name (in the top portion of the screen) and space over the entry. Press Enter.
The Summary of Levels screen reappears, with no version/level for the element. The current version and level will be used automatically for the element, unless you select a different version/level from the panel. You must press PF3 to return to your previous screen.
Once you clear the version and level for the element, the "<" no longer appears at the end of the element name on the WIP Member Selection Matrix.
How to Proceed After Building the WIP File
Building the WIP File (or WIP File requests) and analyzing the results is the first step in the PDM process. You can review the WIP Summary Report during the Build WIP process without actually building the WIP file.

Using the Summary of Levels Panel
44 Parallel Development Option Guide
The PDM reports, listed below, can be generated during Build WIP processing:
■ PDM Syntax Report
■ PDM Build WIP Detail Report
■ PDM Build WIP Summary Report
The next step is to consolidate and resolve conflicts and duplicate code by editing the WIP File. Use the PDM edit WIP function to make the appropriate changes to the WIP file.

Chapter 3: Editing WIP Files 45
Chapter 3: Editing WIP Files
This section contains the following topics:
The Format of the WIP File (see page 45) Editing the WIP File (see page 47) WIP Edit Commands (see page 47) What You Do After Editing the WIP File (see page 55)
The Format of the WIP File
PDM builds the WIP File by adding, and annotating, all the changes made in the Derivation 1 and Derivation 2 files to the Root file. It then writes this new file to the WIP library. The WIP file is made up of:
■ Header information
■ WIP file annotations
■ The WIP file itself
This section describes these components.
The WIP File Header
Number of WIP Records
The number of lines in the WIP file.
Number of Deleted Records
The total number of lines flagged as deleted. The number of the deletions in DER1, in DER2, and common deletions are noted to the right of this figure.
Number of Inserted Records
The total number of lines flagged as inserted. The number of the insertions in DER1, in DER2, and common insertions are noted to the right of this figure.
Number of Conflicts
The number of areas where conflicting changes were found.
Complexity Factor
The PDM-calculated estimate of the severity of the conflicts in the WIP file.
Build Return Code
The highest return code from the Build WIP process.

The Format of the WIP File
46 Parallel Development Option Guide
The WIP File
As you review the WIP File, you notice various lines are annotated on the left side--in the first eight columns of the file. These annotations indicate the changes made to the Root program by each Derivation.
%
Indicates that a change has occurred between the Root and one of the Derivations.
?
Indicates that a conflict exists at this point; this means that both Derivations made different changes to this line of the Root file.
I
Indicates that a line was added (inserted) by one of the Derivation files.
D
Indicates that a line was deleted by one of the Derivation files.
1 or 2
Indicates which Derivation the change came from, either 1 or 2. If the change came from both derivation files, the annotation would be 1,2.
*
Indicates a comment line. One or more asterisks may appear at the beginning of the line, but an asterisk in the first position of the line signifies that it is a comment line. PDM merge processing ignores comment lines.
Examples
% I-1
A line has been inserted by Derivation 1.
% D-2
A line has been deleted by Derivation 2.
% D-1,2
There has been a common deletion; both Derivation files deleted the same line.
%?I-1
%?I-2
A potential conflict exists at this point in the original program. Both versions inserted different lines at the same place in the original program.
Note: See Editing the WIP File for instructions on editing a WIP file.

Editing the WIP File
Chapter 3: Editing WIP Files 47
Editing the WIP File
Once the WIP File has been built, you can edit it using the PDM Edit WIP function. The (edited) WIP File will be used as input to the Merge process, the result of which is an output file that can be added back into CA Endevor SCM, stored in a source repository, or serve as input to a compiler.
To edit a WIP file, do the following:
1. Type 2 (EDIT WIP) in the OPTION field on the CA Endevor Parallel Development Option menu:
2. Press Enter to display the Edit - Entry Panel. Specify the WIP library and the member you want to edit on this panel, using standard ISPF conventions.
3. When you have specified the member you want to edit, press Enter to display an ISPF/PDF edit panel.
PDM invokes the standard ISPF/PDF editor. All ISPF/PDF edit commands are available. Resolve the conflicts in the WIP File, using these ISPF/PDF editing tools.
Note: Remember that the WIP File contains all insertions and deletions made by both Derivations, and flags any potential conflicts. If you decide not to edit the WIP File, PDM inserts all lines marked as insertions and deletes all lines marked as deletions during the Merge process. Because this could result in unresolved conflicts within the file, we recommend that you edit any WIP File member with a complexity factor higher than zero.
PDM provides commands, implemented as ISPF/PDF edit macros, to help you edit WIP files. These commands are described in the next section.
WIP Edit Commands
To help edit the WIP file, PDM includes several commands that you can invoke from the ISPF/PDF Edit command line.
Note: To use these commands you must have accessed the WIP file using option 2 on the CA Endevor Parallel Development Option menu. These commands are not available if you edit the WIP file through the ISPF/PDF edit option.

WIP Edit Commands
48 Parallel Development Option Guide
WIP Edit Command Syntax
The syntax for invoking these commands is:
COMMAND-NAME parameter1 parameter2 parameter2
COMMAND-NAME
The following commands are valid:
WIPCOUNT
Counts the number of line records in the WIP member from the Root, Derivation 1, and Derivation 2 files.
WIPLDEL
Logically deletes lines from a specified WIP member.
WIPUNDEL
Restores any lines logically deleted by WIPLDEL, next it automatically invokes WIPCOUNT to recount the WIP statistics.
WIPSHOW
Displays only the lines that have not been logically deleted from the WIP member.
WIPCHANG
Displays only the lines that have changed during the WIP edit session.
WIPPARA
Identifies each inserted or deleted paragraph within the WIP member.
WIPCON
Displays only those lines identified as conflicts within the WIP member.
WIPMERGE
Creates a temporary Merge file from the WIP file.
WIPHELP
Displays help and tutorial information about the available WIP edit commands.
parameter1 parameter2 parameter2

WIP Edit Commands
Chapter 3: Editing WIP Files 49
When a command can use parameters, the acceptable values of the parameters are:
R
To specify a Root file
1
To specify a Derivation 1 file
2
To specify a Derivation 2 file
WIP Edit Examples
These examples provide an overview of the WIP edit command's general functionality.
WIPSHOW Example
To use the WIPSHOW command to display records for the Root and Derivation 2 files, you would type:
WIPSHOW R 2
WIPLDEL Example with Multiple Files
When you specify more than one file in a command, the command executes against lines that include identifiers for any or all of the specified files. When you issue the WIPLDEL command below, the WIPLDEL command logically deletes lines that were inserted from the Derivation 1 file (%I-1), the Derivation 2 file (%I-2), or both files (% I-1,2):
WIPLDEL 1 2
WIPLDEL Example with a Single File
When you specify one file in a command, the command executes against lines that include the specified identifier. When you issue the command:
WIPLDEL 1
The WIPLDEL command logically deletes lines that were inserted from the Derivation 1 file (%I-1) or both files (% I-1,2).

WIP Edit Commands
50 Parallel Development Option Guide
WIPCOUNT
The WIPCOUNT command counts the number of lines in the WIP member from the included Root, Derivation 1, and Derivation 2 files. The command places the result in a message line at the top of the WIP member. The message looks like this:
WIPCOUNT RESULTS:
NUMBER OF ROOT/COMMON LINES:
LINES INSERTED BY DERIVATION 1:
LINES INSERTED BY DERIVATION 2:
LINES INSERTED BY BOTH DERIVATION 1/2:
TOTAL COMMON AND INSERTED LINES:
Execute and Use WIPCOUNT
To execute the WIPCOUNT command, type WIPCOUNT in the COMMAND field, then press Enter.
Use the WIPCOUNT command to assess the condition of the WIP file.
Note: The WIPCOUNT command does not update the WIP header.
WIPLDEL
The WIPLDEL command logically deletes all lines in the specified file or files, by placing a comment indicator (*) in the first column of the line. The command then automatically invokes WIPCOUNT to recount the WIP statistics.
Execute and Use WIPLDEL
To execute the WIPLDEL command, type WIPLDEL and the desired parameters (R, 1, 2) in the COMMAND field, then press Enter.
Use the WIPLDEL command to:
■ Compare any two of the three input files.
■ View a single input member.
WIPUNDEL
The WIPUNDEL command undeletes any lines logically deleted by WIPLDEL. The command then automatically invokes WIPCOUNT to recount the WIP statistics.

WIP Edit Commands
Chapter 3: Editing WIP Files 51
Execute and Use WIPUNDEL
To execute the WIPUNDEL command, type WIPUNDEL and the desired parameters (R, 1, 2) in the COMMAND field, then press Enter.
Use the WIPUNDEL in conjunction with the WIPLDEL and WIPSHOW commands to try out different editing scenarios before beginning the merge process.
WIPSHOW
The WIPSHOW command displays the lines in the Root, the Derivation 1, or the Derivation 2 file. It does not display lines that have been logically deleted.
Execute and Use WIPSHOW
The user first types the command WIPSHOW R 1 in the COMMAND line.
The following is an example of how the WIPSHOW command works.

WIP Edit Commands
52 Parallel Development Option Guide
Pressing Enter executes the WIPSHOW command, which produces the following output.
In this example, the WIPSHOW command displays only those lines that are from the Root and the Derivation 1 file and that have not been logically deleted. Line 11 is excluded from the display because it was logically deleted from the WIP member. Lines 15, 20 and 24 are included in the display because they are common between the Derivation 1 and the Derivation 2 file.
WIPCHANG
The WIPCHANG command displays only the lines in the WIP file that have changed.
Execute and Use WIPCHANG
To execute the WIPCHANG command, type WIPCHANG in the COMMAND field, then press Enter.
Use the WIPCHANG command to assess the condition of the WIP file.

WIP Edit Commands
Chapter 3: Editing WIP Files 53
WIPPARA
The WIPPARA command identifies each paragraph in a WIP file. A paragraph is defined as a block of lines that have the same operation (insert or delete) from the same derivation file(s).
The WIPPARA command identifies each paragraph in the WIP file and adds a =NOTE= line immediately before the first line in the paragraph. The =NOTE= line identifies the type of paragraph. If the WIP file contains at least one paragraph, PDM positions the WIP member at the first paragraph found. To locate subsequent paragraphs in the WIP file, you can use the ISPF/PDF LOCATE SPECIAL command. The ISPF/PDF RESET command will remove the =NOTE= lines.
Execute and Use WIPPARA
To execute the WIPPARA command, type WIPPARA in the COMMAND field then press Enter. The following is an example of the output from the WIPPARA command.
Use the WIPPARA command to assess the condition of the WIP file.
WIPCON
The WIPCON command displays only those lines identified as conflicts within the WIP member.

WIP Edit Commands
54 Parallel Development Option Guide
Execute and Use WIPCON
To execute the WIPCON command, type WIPCON in the COMMAND field, then press Enter.
Use the WIPCON command to view quickly those areas of the WIP file where you will need to resolve conflicts.
WIPMERGE
The WIPMERGE command allows you to test edits by creating a temporary merge file within an edit session. If you do not like the results of the temporary merge file, you can return to the WIP file and continue editing it.
The WIPMERGE command:
■ Executes pending edit commands.
■ Saves the current WIP member.
■ Displays the merge file in browse mode.
When you end the browse session, the WIP edit session resumes.
Execute and Use WIPMERGE
To execute the WIPMERGE command, type WIPMERGE and, optionally, a single character change identifier in the COMMAND field, then press Enter.
WIPMERGE uses the single optional character in the command line to identify inserted lines in the merge file. PDM places the identifier in column 1 of the merge file when a line has been inserted by either the Derivation 1 or Derivation 2 file.
The following command instructs PDM to put the letter C in the first column of any lines in the merge file that were inserted by the Derivation 1 or Derivation 2 files.
WIPMERGE C
When you specify a change ID in the WIPMERGE command, the message Change ID Specified appears in the upper right hand corner of the merge file.

What You Do After Editing the WIP File
Chapter 3: Editing WIP Files 55
What You Do After Editing the WIP File
When you have finished editing the WIP File, press PF3; the Edit - Entry Panel reappears. The message Member Saved appears in the upper right-hand corner of the screen.
Editing the WIP File is the second step in the PDM process. The next step is merging the edited WIP File into an output source file, which can then be added back into CA Endevor SCM, stored in the appropriate source repository, or compiled.


Chapter 4: Merging WIP Files 57
Chapter 4: Merging WIP Files
This section contains the following topics:
The Merge Output File (see page 57) Creating a Merge Output File (see page 59) The Merge Output Specification Panel (see page 60) What You Do After Merging the WIP Files (see page 62)
The Merge Output File
PDM creates a merge output file from a WIP file. Before creating a merge output file, all conflicts must be edited out of the WIP file. The WIP file can contain non-conflicting inserts and deletes.
When building a WIP file, PDM:
■ Removes the WIP header information.
■ Inserts and deletes lines as necessary.
■ Removes the WIP annotations.
A portion of a WIP file and the resulting merge output file is shown below.

The Merge Output File
58 Parallel Development Option Guide
WIP File
Merge Output File Based on Edits to WIP File

Creating a Merge Output File
Chapter 4: Merging WIP Files 59
In this example, two steps were involved in creating the merge output file:
1. The user deleted from the WIP file both inserts from Derivation 2, namely:
%?I-2 02 INPUT-FIELD2 PIC X(6).
%?I-2 02 FILLER PIC X(34).
2. During the merge process, PDM:
■ Inserted the two Derivation 1 inserts. The lines annotated with %?I-1.
■ Made the common delete. The line annotated with % D-1,2.
■ Removed the annotation entries to produce the merge output file.
Creating a Merge Output File
PDM creates a merge output file:
■ Automatically, during the build WIP process, when you specify AUTOMATICALLY MERGE=Y on the WIP Specification Panel and there are no conflicts in the WIP file.
■ Upon request, by invoking option 3 on the CA Endevor Parallel Development Option menu, the following describes this procedure.
Merge a WIP File to a Data Set
You can indicate that you wan t the merge output placed in a data set.
To merge a WIP File
1. Type 3 in the Command field o n the CA Endevor Parallel Development Option menu. and specify the appropriate processing mode in the PROCESSING MODE: FOREGROUND OR BATCH field:
■ F—Foreground
■ B—Background
2. Define the WIP file that you want to merge, using standard ISPF conventions.
■ Enter an explicit member name, to merge only that member.
■ Enter an asterisk (*) to merge all members in the library.
■ Leave the MEMBER field blank or enter a name mask to select a member(s) from the Merge Output Member Selection List.
When you press Enter after typing in the appropriate information, the Merge Output Specification Panel opens.

The Merge Output Specification Panel
60 Parallel Development Option Guide
3. Select the merge output target location type D and press Enter.
The next Merge Output Specification Panel opens where you can specify the data set.
4. Specify the library and member to which you want PDM to write the merge output file, using standard ISPF conventions. Press Enter when you have typed in all pertinent data.
■ Enter an explicit member name, to create a merged member in the output data set.
■ Leave the field blank to select member names from the Merge Output Selection List.
■ Provide an overlay mask to be applied to all member names.
One of the following occurs:
■ If you specified an explicit member name or entered an asterisk for all members, the Merge process is immediately invoked. When processing is complete, the Merge Work In Process File screen is returned with the message MERGE COMPLETE in the upper right corner.
■ If you left the MEMBER field blank or provided a name mask, you must select one or more members from the Merge Output Member Selection List, described in The Merge Output Member Selection List. You complete the merge process from this selection list.
The Merge Output Specification Panel Merge Library fields1
Used to specify the merge library, using standard ISPF conventions.
Merge Other Partitioned or Sequential Data Set
Used as an alternative for specifying the merge library and target member. Specify using standard ISPF conventions.
If Partitioned, Replace Like-Named Members2
Indicates if you want to replace like-named members in the data set. Valid values are:
■ Y—Yes
■ N—No

The Merge Output Specification Panel
Chapter 4: Merging WIP Files 61
Delete WIP Member After Merge
Required. Specifies if the WIP member should be deleted after the merge action. Valid values are:
■ Yes—PDM deletes the WIP member if there are no errors on the MERGE action and the WIP data set is a PDS.
■ No—Default. Do not delete the WIP member after a MERGE action.
Generate MERGE Reports
Required. Acceptable values are:
■ A—Default. Generates both the Merge Summary and Detail Reports.
■ S—Generates only the Merge Summary Report.
■ N—Prevents the generation of any reports.
Panvalet/Librarian Language3
Optional. This field associates a CA Panvalet or CA Librarian type identifier with the named output member. Selections include:
■ CA Panvalet: ALC, ANSCOBOL, AUTOCODE, BAL, COBOL, COBOL-72, DATA, FORTRAN, JCL, OBJECT, PL/1, RPG, USER180, USER780, OTHER. If left blank, the default value is DATA.
■ CA Librarian: ASM, COB, DAT, FOR, FRG, FRS, GIF, GOF, JCL, PLF, PLI, RPG, TXT, VSB. If left blank, the default value is DAT.
Write Stats to Data Set
Optional. Specifies the name of the data set used to capture PDM statistics. If specified, this field must conform to the normal ISPF/PDF naming conventions.
1: The record length of the Merge data set must be large enough to support the largest WIP record. Generally this means that the Merge data set must be no shorter than eight bytes less than the WIP record length. For example, if the WIP data set record length is 88, then the Merge data set record length must be at least 80.
2: This option does not apply to sequential files.
3: PDM ignores the field if the merge data set is not a CA Panvalet or CA Librarian data set.
The Merge Output Member Selection List
PDM produces the Merge Output Member Selection List when you leave the MEMBER field blank or provide a name mask on the Merge Output Specification panel. PDM builds this list using the members in the WIP library.
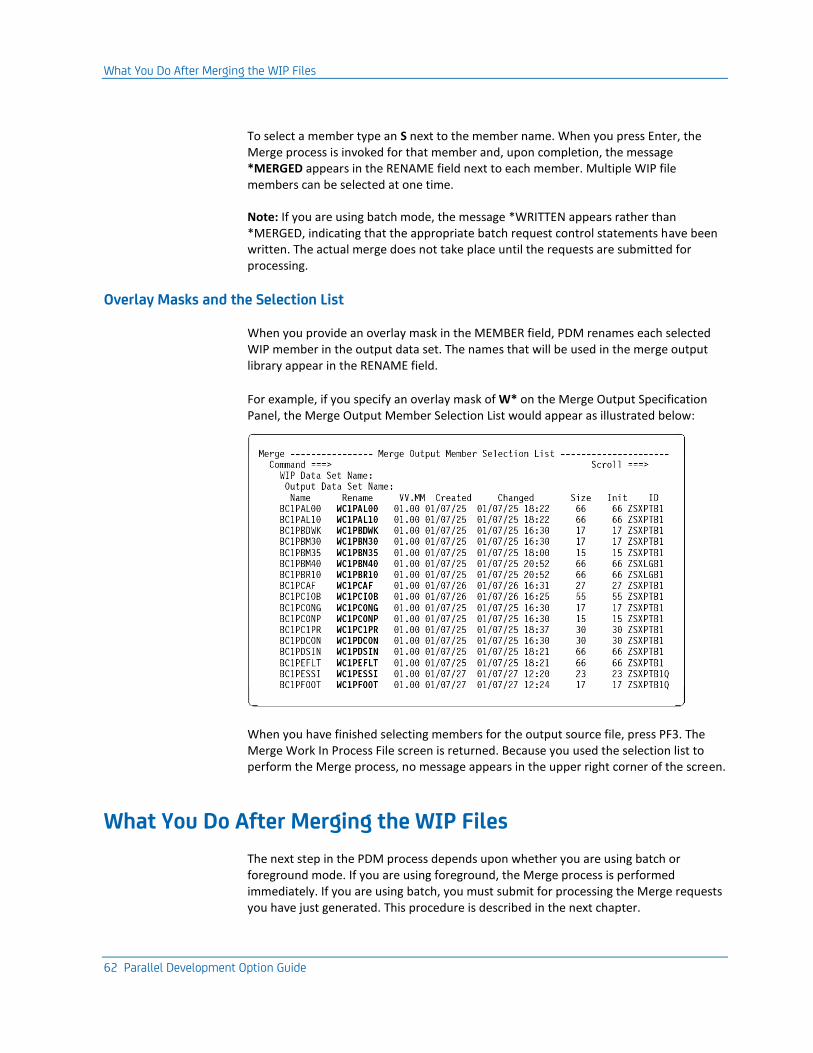
What You Do After Merging the WIP Files
62 Parallel Development Option Guide
To select a member type an S next to the member name. When you press Enter, the Merge process is invoked for that member and, upon completion, the message *MERGED appears in the RENAME field next to each member. Multiple WIP file members can be selected at one time.
Note: If you are using batch mode, the message *WRITTEN appears rather than *MERGED, indicating that the appropriate batch request control statements have been written. The actual merge does not take place until the requests are submitted for processing.
Overlay Masks and the Selection List
When you provide an overlay mask in the MEMBER field, PDM renames each selected WIP member in the output data set. The names that will be used in the merge output library appear in the RENAME field.
For example, if you specify an overlay mask of W* on the Merge Output Specification Panel, the Merge Output Member Selection List would appear as illustrated below:
When you have finished selecting members for the output source file, press PF3. The Merge Work In Process File screen is returned. Because you used the selection list to perform the Merge process, no message appears in the upper right corner of the screen.
What You Do After Merging the WIP Files
The next step in the PDM process depends upon whether you are using batch or foreground mode. If you are using foreground, the Merge process is performed immediately. If you are using batch, you must submit for processing the Merge requests you have just generated. This procedure is described in the next chapter.

What You Do After Merging the WIP Files
Chapter 4: Merging WIP Files 63
Three reports are produced when the Merge step is processed in batch mode.:
■ PDM Merge Output Detail Report
■ PDM Merge Output Summary Report
■ PDM Syntax Request Report
Review these reports as necessary.
Once you have created a merge output file, you can:
■ Add the file back into CA Endevor SCM, using the Add/Update capability.
■ Store the file in the appropriate source repository.
■ Input the file to a compiler.


Chapter 5: Using PDM in Batch 65
Chapter 5: Using PDM in Batch
This section contains the following topics:
Generating Build WIP and Merge Requests (see page 65) Specifying a Request Data Set (see page 65) Generating Build WIP Requests Option 1 (see page 67) Generating Merge Requests Option 3 (see page 68) Submitting Batch Requests for Execution Option 4 (see page 68)
Generating Build WIP and Merge Requests
You can generate Build WIP and Merge requests for batch submission by:
■ Using the appropriate options from the CA Endevor Parallel Development Option menu: option 1 for Build WIP requests, option 3 for Merge requests.
■ Coding your own job.
Note: Batch Syntax for PDM batch syntax.
You can then submit these requests for execution by:
■ Using option 4, SUBMIT, from the CA Endevor Parallel Development Option menu.
■ Submitting your own JCL.
Note: Refer to Batch Execution JCL for a sample of the required batch execution JCL.
Specifying a Request Data Set
The first step in generating a PDM batch request is to specify a data set in which to store the requests. You do this in the batch specification fields on the CA Endevor Parallel Development Option menu.
Batch Request Data Set fields
The batch request data set must be either a sequential data set or a partitioned data set with an explicitly identified member. The data set can contain either:
■ Fixed length records—LRECL must be 80
■ Variable length records—LRECL must be 84

Specifying a Request Data Set
66 Parallel Development Option Guide
Other Partitioned or Sequential Data Set
Used as an alternative for specifying a request data set, using standard ISPF conventions.
Append or Replace
Required. Valid values are:
■ R — Default. PDM replaces like-named members in the request data set
■ A — PDM appends the statements to an existing data set.
Request Dataset Allocation Panel
If the request data set you specify is not allocated, PDM displays a Request Dataset Allocation panel when you press Enter.
Management Class
Optional. If you specify a management class that is not defined, the allocation fails and PDM issues an error message.
Storage Class
Optional. If you specify a storage class that is not defined, the allocation fails and PDM issues an error message.
Volume Serial
Optional. If you specify a volume serial that is not defined, the allocation fails with a recoverable application error.
Data Class
Optional. If you specify a data class that is not defined, the allocation fails and PDM issues an error message.
Space Units
Acceptable values are:
■ BLKS — Blocks
■ TRKS — Tracks
■ CYLS — Cylinders
Primary Quantity
Must be numeric, and in the same units as the SPACE UNITS field.

Generating Build WIP Requests Option 1
Chapter 5: Using PDM in Batch 67
Secondary Quantity
Must be numeric, and in the same units as the SPACE UNITS field.
Directory Blocks
Must be numeric. If you specify a request member, you must provide a non-zero value in this field. If you want to allocate a sequential data set, this value must be zero.
Record Format
Acceptable values are:
■ F
■ FB
■ V
■ VB
Record Length
Must be numeric, 80 for fixed length records and 84 for variable length records.
Block Size
Required if the space unit is BLKS (blocks), otherwise optional. If left blank, block size is set to zero. If provided, the value must be numeric and greater than zero.
If the block size is specified, if it is not zero, and the record format is:
■ F or FB — The block size must be an integral multiple of the record length.
■ V or VB — The block size must be at least four bytes larger than the record length.
Generating Build WIP Requests Option 1
To generate Build WIP request statements for later job submission, select option 1 on the CA Endevor Parallel Development Option menu. Make sure that you:
■ Indicate B for batch processing in the PROCESSING MODE: FOREGROUND OR BATCH field.
■ Provide the required BATCH SPECIFICATION information. See the previous section if you need to review this information.
Press Enter.

Generating Merge Requests Option 3
68 Parallel Development Option Guide
You receive the same series of screens that appear when you process PDM to build a WIP File in foreground mode. When you have filled in the last panel or issued the create command on the WIP Member Selection Matrix, the CA Endevor Parallel Development Option menu reappears, with the message Requests Written in the upper right-hand corner of the screen This message indicates that the Build WIP requests have been written to the request data set specified on the CA Endevor Parallel Development Option menu.
Generating Merge Requests Option 3
To generate Merge requests for later job submission, select option 3 on the CA Endevor Parallel Development Option menu. Make sure that you:
■ Indicate B for batch processing in the PROCESSING MODE: FOREGROUND OR BATCH field.
■ Provide the required BATCH SPECIFICATION information. See the first section in this chapter if you need to review this information.
Press Enter. You will receive the same series of screens that appear when you process PDM to merge the WIP File in foreground mode. Follow the procedure to merge the file into an output source file.
If you provide a MEMBER name in the Merge Output Specification Panel, the Merge Work In Process File screen is returned when you press Enter. The message Requests Written appears in the upper right-hand corner, indicating that the batch request has been written.
If you leave the MEMBER field blank or specify a name mask on the Merge Output Specification panel, the Merge Output Member Selection List is returned when you press Enter. Select the member(s) to be merged then press Enter. The selection list reappears with the message *WRITTEN in the RENAME field next to the selected members.
Submitting Batch Requests for Execution Option 4
To submit batch jobs, select option 4 from the CA Endevor Parallel Development Option menu. Make sure you:
■ Indicate B for batch processing in the PROCESSING MODE: FOREGROUND OR BATCH field.
■ Provide the required BATCH SPECIFICATION information. See the first section in this chapter if you need to review this information.
Press Enter to display the PDM Batch Options Menu.
Submitting Batch Requests for Execution Option 4
Chapter 5: Using PDM in Batch 69
The PDM Batch Options Menu
The PDM Batch Options Menu allows you to browse, edit (as necessary), and subsequently submit the request data set you have defined. You can also build additional JCL to be included with the request. Listed below is a brief explanation of each processing option available:
1
Browse the request data set to ensure that the information it contains is correct. The BROWSE option uses a standard ISPF/PDF Browse facility, and lists the request card syntax as it was generated.
2
Edit the request data set, if necessary. The EDIT option uses the standard ISPF/PDF Edit facility.
3
Define additional JCL (generally DD statements) to be included with the JCL to be submitted.
4
Submit a job that executes the requests in the request data set.
Browsing the Request Data Set
Select option 1 from the PDM Batch Options Menu to review the request data set specified. When you press Enter, a standard TSO/ISPF Browse panel returns.
Editing the Request Data Set
Select option 2 from the PDM Batch Options Menu to edit the request data set specified. You can either change the existing Build WIP requests or add new requests using the PDM syntax (described Batch Syntax). When you press Enter, a standard ISPF/PDF Edit panel is returned.
Building JCL to be Included with the Batch Request
Select option 3 from the PDM Batch Options Menu to define JCL (usually DD statements) that should be included with the JCL submitted to execute the request data set. You might use this option if, for example, a request referenced a source or target file by DDNAME.

Submitting Batch Requests for Execution Option 4
70 Parallel Development Option Guide
Submitting the Request Data Set for Batch Processing
Select option 4 to submit the request data set for execution. In addition to specifying the WIP data set, you must also indicate whether you want to include any additional JCL that was defined (by option 3 above).
Enter the following information, then press Enter to submit the job.
Include JCL
Required. Indicates whether you want to include additional JCL when you submit the batch request. Valid values are:
■ Y — Yes, include the JCL. The JCL must be defined, using option 3, BUILD JCL, before entering Y in this field.)
■ N — No. Default.
Job Statement Information
This is the job card to be submitted with the job. A message similar to that listed on the screen below is returned to inform you that the job has been submitted:
*** IKJ56250I JOB JSMITH1F(JOB01743) SUBMITTED
Chapter 6: PDM Reports 71
Chapter 6: PDM Reports
This section contains the following topics:
General WIP and Merge Information (see page 71) PDM Syntax Request Report for Build WIP (see page 72) PDM Build WIP Detail Report (see page 72) PDM Build WIP Summary Report (see page 77) PDM Merge Output Detail Report (see page 81) PDM Merge Output Summary Report (see page 82)
General WIP and Merge Information
When you process your Build WIP and Merge requests in batch mode, PDM produces several reports. Use the Build WIP reports to determine the complexity of a project. Use the Merge Output reports to review the outcomes of the Merge process.
The PDM reports contain the following information:
■ The PDM Syntax Request Report (for Build WIP) lists the exact syntax you used to request the Build WIP operation.
■ The PDM Build WIP Detail Report lists every member set processed and provides detail information for each member set. You can optionally suppress the detail information from printing.
■ The PDM Build WIP Summary Report lists summary information about the entire Build action.
■ The PDM Syntax Request Report (for Merge) lists the exact syntax you used to request the Merge operation.
■ The PDM Merge Output Detail Report lists the WIP members used to create the merge output source file and detail information about each member. You can optionally suppress the detail information from printing.
■ The PDM Merge Output Summary Report lists summary information about the Merge process.

PDM Syntax Request Report for Build WIP
72 Parallel Development Option Guide
Important! If you code the STATS OFF clause using the DETAIL option, all reports are produced, but the Build WIP Detail and Merge Output Detail reports do not contain detail statistics for each member set. If you code the clause using the ALL option, however, only the Syntax reports are produced. The Detail and Summary reports are not produced at all.
In batch mode only, PDM writes the Syntax, Detail, and Summary Reports to the C1MSGS1 DD statement. It is possible to write the summary reports to a separate data set. If the C1MSGS2 DD statement is defined in the PDM execution JCL, PDM writes the Build Summary and Merge Summary Reports to the C1MSGS2 file. The C1MSGS2 DD statement can be added to the PDM batch execution JCL, the PDM batch execution skeleton, or you can specify it as additional, included JCL in the PDM Submit option.
Note: See “Batch Execution JCL” for information on modifying PDM JCL.
When running PDM in foreground, the action reports are written to a data set named userid.C1TEMPR1.MSGS. If you want to review the reports, split the ISPF screen and use the ISPF/PDF browse function to view the data set. To view the action reports, type PMSGS in the command field. This messages data set is automatically deleted when PDM terminates.
PDM Syntax Request Report for Build WIP
When you enter your Build WIP requests, the Parallel Development Option validates the syntax in the WIP request data set. The PDM Syntax Request Report mirrors exactly what you entered, in the order in which it was entered, and flags any syntax errors.
When all syntax requests have been checked, PDM looks for errors. If no errors can be found, processing continues. If errors do exist, processing terminates at this point. See the Messages and Codes Reference Guide for an explanation of any error messages received. Note the last line in the PDM Syntax Request Report above; this message indicates that all request cards have been processed successfully.
PDM Build WIP Detail Report
The Build WIP Detail report is created when your build requests have been validated successfully. This report provides you with information about each member set involved in the Build WIP process, identifying the WIP, Root, Derivation 1, and Derivation 2 sources and members. Additional detail information is included, unless you use the STATS OFF (DETAIL) option when first entering the request. If you enter the STATS OFF (ALL) option, this report is not produced at all.

PDM Build WIP Detail Report
Chapter 6: PDM Reports 73
There are three parts to each member set description:
■ Beginning of Build WIP information
■ Return code information
■ Detail statistics
PDM Build WIP Detail Report Fields Description
Beginning Build of WIP Information
The first section, BEGINNING BUILD OF WIP, indicates the beginning of the Build WIP process for this member only. This line appears as the first line whenever information for a new member is presented. This section provides the following data for each member set:
WIP
The location of the WIP data set.
Member
The WIP member name.
Root
The location of the Root source, either a data set or an CA Endevor SCM location.
Member
The Root member or element name.
Derivation 1
The location of the Derivation 1 source, either a data set or an CA Endevor SCM location.
Member
The Derivation 1 member or element name.
Derivation 2
The location of the Derivation 2 source, either a data set or an CA Endevor SCM location.
Member
The Derivation 2 member or element name.

PDM Build WIP Detail Report
74 Parallel Development Option Guide
PDM Return Code Information
The second section of the member set description begins with a time stamp and the informational message PDM0064I, which indicates the generation of a return code for the member set. The return code listed indicates whether the WIP file was built successfully; a return code of 0000 indicates that the WIP file was built with no problems.
A return code higher than zero indicates that an error has occurred. A second error message should appear also, providing you with additional information. In this situation, the WIP member built will most likely be invalid.
Detail Statistics
The third section contains detail statistics for the member set. This section appears for every member unless you have selected the STATS OFF (DETAIL) option.
Relative Change from Both Derivations
Provides information about the number of changes made by both Derivations, relative to the original (Root) module:
From Derivation 1
Indicates the percent of the original module changed by Derivation 1.
From Derivation 2
Indicates the percent of the original module changed by Derivation 2.
In Common
Indicates the percent of the original module changed by both Derivations at the same (common) place in the program.
Net Change
The total percent by which the original module has changed
Inserts and Deletes
The Inserts and Deletes sections provide information about the number of insert/delete lines from both Derivations.
Total Records
Indicates the total number of lines marked as inserts/deletes into the original module by both Derivation 1 and Derivation 2.

PDM Build WIP Detail Report
Chapter 6: PDM Reports 75
Blocks from Derivation 1
A block is a group of consecutive inserted/deleted lines from one Derivation. For example, if Derivation 1 inserts/deletes 10 lines in one place, that group of 10 lines constitutes a block, with a block size of 10. Similarly, if Derivation 2 inserts/deletes 5 lines in one place, that group of 5 lines constitutes a block, with a block size of 5.
BLOCKS FROM DERIVATION 1 indicates the number of blocks of inserted/deleted lines from the Derivation 1 file only.
RECORDS PER BLOCK provides additional detail, by noting:
■ MIN — Smallest block size
■ MAX— Largest block size
■ AVG— Mean average block size
from the Derivation 1 file only.
Blocks from Derivation 2
Indicates the number of blocks of inserted/deleted lines from the Derivation 2 file only.
RECORDS PER BLOCK provides additional detail, by noting:
■ MIN— Smallest block size
■ MAX— Largest block size
■ AVG— Mean average block size
from the Derivation 2 file only.
Blocks in Common (from both)
Indicates the number of blocks of inserted/deleted lines, made by both Derivations, in common (that is, inserts/deletes at the same location, with respect to the Root program).
RECORDS PER BLOCK provides additional detail, by noting:
■ MIN— Smallest block size
■ MAX— Largest block size
■ AVG— Mean average block size
with inserted/deleted lines in common.

PDM Build WIP Detail Report
76 Parallel Development Option Guide
Conflicts
The Conflicts section provides information about the number of conflict areas and contention areas found in this particular WIP member. Pay particular attention to this section of the report, as the number of conflicts and contentions can help you assess the complexity of a project.
A conflict area is a place within the WIP File where both Derivation 1 and Derivation 2 have inserted lines at exactly the same place in their respective copies of the Root program. The first three fields in this section refer to conflict areas only.
Total Conflict Areas
Indicates the total number of conflict areas in this WIP member.
Derivation 1 Records
Indicates the number of Derivation 1 records (not blocks) that have "participated" in conflicts in this WIP member.
Derivation 2 Records
Indicates the number of Derivation 2 records (not blocks) that have "participated" in conflicts in this WIP member. A contention area is a place within the WIP File at which both Derivations have inserted a block of changes, but the changes do not begin at exactly the same place in the copies of the Root program. Since these blocks overlap, they are considered conflicting in nature. You should always review contention areas for potential conflicts. The remaining fields in this section of the report refer to contention areas only.
Contention Area Detected at WIP Record Number
Indicates the beginning line, within the WIP file, of a contention area.
Total Contention Areas
Indicates the total number of contention areas in this WIP member.
Build WIP Summary
The Build WIP Summary Summarizes information for this particular WIP member.
Total Records in WIP
Indicates the total number of records contained in this WIP File from:
■ Root
■ Derivation 1
■ Derivation 2
PDM Build WIP Summary Report
Chapter 6: PDM Reports 77
Complexity Factor
A value assigned to the WIP file. The complexity factor is a function of the number of:
■ Records in (size of) the WIP file.
■ Derivation 1 records in conflict.
■ Derivation 2 records in conflict.
■ Conflict areas and contention areas.
The complexity factor ranges from 0-5:
■ 0— No changes occurred in the member.
■ 1— Changes occurred, but there are no conflict or contention areas.
■ 2-5— The member contains conflicts, where
– 2— Signifies simple conflicts
– 5— Signifies complex conflicts
Note: Two members may have the same complexity factor, but may be radically different in regard to the nature of the conflicts. Therefore, you should pay careful attention to the complexity factor for each WIP member, and should review those members with factors of 2 or above.
PDM Build WIP Summary Report
The PDM Build WIP Summary Report summarizes the detail information provided on the PDM Build WIP Detail Report, even if you suppressed detail information from printing. Data for the entire WIP data set is presented.
Important If you code the STATS OFF ALL statement, this report is not produced.
PDM Build WIP Summary Report Field Descriptions
WIP Data Set Library Information
This section of the report identifies the WIP data set and the components of the WIP data set, the Root and Derivation files.
WIP Data Set
Identifies the WIP data set constructed from the BUILD WIP process.

PDM Build WIP Summary Report
78 Parallel Development Option Guide
Root
Identifies the base Root file of this WIP data set.
Derivation 1
Identifies the first Derivation data set used during Build processing.
Derivation 2
Identifies the second Derivation data set used during Build processing.
WIP Data Set Member Information
This section of the report displays specific information regarding the WIP, Root, and Derivation files used during the BUILD WIP process.
WIP Member
Identifies the WIP data set member.
Root Member
Identifies the Root member of the WIP data set.
RC
Identifies the return code generated from the BUILD WIP process.
Complexity Factor
A value assigned to the WIP file. The complexity factor is a function of the number of:
■ Records in (size of) the WIP file.
■ Derivation 1 records in conflict.
■ Derivation 2 records in conflict.
■ Conflict areas and contention areas.
The complexity factor ranges from 0-5:
■ 0— No changes occurred in the member.
■ 1— Changes occurred but there are no conflict or contention areas.
■ 2-5— Indicates that the member contains conflicts, where:
– 2— Signifies simple conflicts
– 5— Signifies complex conflicts
Derivation 1 Member
Identifies the Derivation 1 member (or CA Endevor SCM element, including version and level numbering) of the WIP data set.
Der 1 Inserts
Displays the number of records Derivation 1 added to the Root member.

PDM Build WIP Summary Report
Chapter 6: PDM Reports 79
Der 1 Deletes
Displays the number of records Derivation 1 deleted from the Root member.
Derivation 2 Member
Identifies the Derivation 2 member (or CA Endevor SCM element, including version and level numbering) of the WIP data set.
Der 2 Inserts
Displays the number of records Derivation 2 added to the Root member.
Der 2 Deletes
Displays the number of records Derivation 2 deleted from the Root member.
Common Inserts
Displays the number of common inserts made by both Derivation 1 and Derivation 2 to the Root member.
Common Deletes
Displays the number of common deletes made by both Derivation 1 and Derivation 2 to the Root member.
Auto-Merge
States whether PDM invoked the Automerge feature during the BUILD WIP process.
BUILD WIP Summary Information
This section of the report provides an accounting of specific information for all members in the WIP data set.
Selected for Processing
Indicates the total number of members selected for processing.
Successfully Processed
Indicates the number of members processed successfully; that is, with return codes of zero.

PDM Build WIP Summary Report
80 Parallel Development Option Guide
With Replace Conflicts
Indicates the number of situations in which there were like-named members in the WIP data set and the replace/no replace option was set to "no replace." The following message that appears to the right of this field:
(PROCESSING BYPASSED)
IN ERROR
Indicates the number of members that could not be processed due to a problem, such as an I/O or system error. The following message that appears to the right of this field:
(PROCESSING INCOMPLETE)
When a WIP member is created but flagged as "in error," that member should be considered invalid.
With No Inserts or Deletions
Indicates the number of members that had neither insertions nor deletions from either Derivation. Such members have a complexity factor of zero.
With No Conflicts
Indicates the number of members containing changes, but did not have any conflicts resulting from the changes. Such members have a complexity factor of 1 assigned. If these changes involve a contention area, a complexity factor of 2 is assigned.
With Complexity Factor 5-0
Groups the members of the WIP data set by complexity factor, in descending order. The total number of members with a complexity factor of 5 is listed first, followed by the total number of members with a complexity factor of 4, the total with a complexity factor of 3, and so on.
As mentioned above, you should pay particular attention to those members with a complexity factor of 2 or above, as these factors indicate that there definitely are conflicts within specific members of the WIP data set. A factor of 5 indicates either an especially complex set of conflicts or a large amount of conflicts involved. The lower the factor, the less complex and fewer number of conflicts. Keep in mind, however, that the same complexity factor can signify different types of conflict situations.
A complexity factor of 1 indicates that the member had changes, but there were no conflicts. You should still review this member, however.
A complexity factor of 0 indicates that there no changes at all to the member.

PDM Merge Output Detail Report
Chapter 6: PDM Reports 81
Highest BUILD Return Code
The last line of the report indicates the highest BUILD return code. The return code listed here reflects the highest return code encountered during processing of the entire WIP data set.
If you receive a return code other than zero, check the PDM Build WIP Summary Report to find out which member had that return code and where the member is detailed in the PDM Build WIP Detail Report.
If the Create WIP Never clause was specified on the Build action, the following message appears after the highest BUILD return code:
Note: The WIP file(s) were not created at the user's request.
PDM Merge Output Detail Report
The Merge Output Detail report is created when the Merge request cards have been parsed successfully. This report, like the PDM Build WIP Detail report, provides you with location (source and member) information about each member set involved in the Merge process. Additional detail information is included, unless you code the STATS OFF (DETAIL) option when first entering the requests. Or, if you enter the STATS OFF (ALL) option, this report is not produced at all.
There are three parts to each member set description.
■ Beginning merge of WIP member information
■ Return code information
■ Detail statistics
PDM Merge Output Detail Report Field Descriptions
Beginning Merge of WIP Member Information
The first section, BEGINNING MERGE OF WIP MEMBER, indicates the beginning of the Merge process for this member only. This line appears as the first line whenever information for a new member is presented. This section provides the following data for each member set:
WIP
The location of the WIP data set.
Member
The WIP member name.

PDM Merge Output Summary Report
82 Parallel Development Option Guide
Output
The location of the output source file.
Member
The output source member name.
WIP Return Code Information
The second section of the member set description indicates the return code for the member set. The return code listed indicates whether the WIP member was merged successfully; a return code of 0000 indicates that the merge was indeed successful.
A return code higher than zero indicates that an error has occurred during processing. A second error message should also appear, providing you with additional information. In this situation, the merged WIP member will most likely be invalid.
WIP Detail Statistics
The third section contains detail statistics for the member set. This section appears for every member unless you have selected the STATS OFF (DETAIL) option for your Merge requests. This section provides the following data:
Total Records in WIP
Indicates the total number of records contained in this WIP File.
Total Records in Output
Indicates the total number of records in the Merge Output file.
Total Invalid WIP Records
Indicates the number of invalid WIP records detected in this particular WIP member. Invalid records occur when invalid editing changes are made during the WIP editing process. For example, a character other than an asterisk or percent sign mistakenly may have been coded in the first column of the WIP File annotation section.
PDM Merge Output Summary Report
The PDM Merge Output Summary report summarizes the detail information provided on the PDM Merge Output Detail report, even if you suppressed detail information from printing. Data for all WIP and output source files is presented.
Important! If you code the STATS OFF ALL statement, this report is not produced.

PDM Merge Output Summary Report
Chapter 6: PDM Reports 83
PDM Merge Output Summary Report Field Descriptions
WIP Data Set Library Information
The first line of this report identifies the WIP data set for which the Merge process was run.
Output Data Set Information
The second line of this report identifies the MERGE output data set in which the merged output is stored.
WIP Member Information
This section of the report provides information about each WIP member that was merged into the MERGE output data set.
WIP Member
Identifies the WIP member for which the Merge process was run.
Merge Member
Identifies the Merge output member created by the Merge process.
RC
Displays the return code for the Merge process for each WIP/Merge member.
Number of Records
Displays the number of records in the WIP data set member and the Merge output data set member.
Invalid Records
Displays the number of records from the WIP data set that could not be processed.
WIP Member Disposition
Indicates whether the WIP member has been KEPT or DELETED after completing the MERGE process.
Merge Summary Information
The next section of the report provides summary information about all the members in the WIP data set:
Selected for Processing
Indicates the total number of members selected for processing.
Successfully Processed
Indicates the number of members processed successfully; that is, with return codes of zero.

PDM Merge Output Summary Report
84 Parallel Development Option Guide
Deleted from the WIP data set
Indicates the difference between the WIP members that were selected for processing and those that were actually processed successfully. Members that could not be processed are deleted from the WIP data set.
With Replace Conflicts
Indicates the number of situations in which there were like-named members in the WIP data set and the replace/no replace option was set to "no replace." Such members are not processed. The following message appears to the right of this field:
(Not Processed)
IN ERROR
Indicates the number of members that could not be processed due to a problem, such as an I/O or system error. The following message appears to the right of this field:
(Processing Incomplete) Members flagged as "in error" should be considered invalid.
Highest MERGE Return Code
The last line of the report indicates the highest merge return code. The return code here reflects the highest return code that occurred during the merge of the entire WIP data set.

Appendix A: Batch Execution JCL 85
Appendix A: Batch Execution JCL
This section contains the following topics:
Sample Batch Execution JCL (see page 85)
Sample Batch Execution JCL
When you use batch processing for the Build WIP or Merge functions, you must submit the resulting batch requests for execution. You can submit these requests using either the PDM batch submit option or by creating your own JCL.
The BC1G1000 program does not have to be called by an authorized program. However, users executing the non-authorized program must have the requisite security access to the CA Endevor SCM data sets for the function requested. The caller's security profile must have sufficient CA Top Secret, CA ACF2, or RACF, access to the CA Endevor SCM control files (catalog, master, package, base, delta), because the CA Endevor SCM alternate ID facility is not available when running in an unauthorized mode.
If you want to call the PDM batch utility from a non-authorized program, specify:
EXEC PGM=BC1G1000
Before Executing Batch JCL
If you use your own JCL, be sure to do the following prior to execution:
■ Construct a valid JOBCARD.
■ Ensure that the CONLIB data set name is correct.
■ Specify the batch request cards to be used.
The JCL can be found in iprfx.iqual.CSIQJCL (member BC1GJCL2).


Appendix B: PDM Batch Syntax 87
Appendix B: PDM Batch Syntax
This section contains the following topics:
What PDM Syntax is (see page 87) PDM Syntax Statements (see page 87) Build WIP Statement Batch SCL Syntax (see page 89) The BUIld MASK Statement (see page 96) Merge Output WIP Statement Batch SCL Syntax (see page 98) The MERGE MASK Statement (see page 101) The STATS OFF Statement (see page 102) Build WIP and Merge Syntax Examples (see page 103)
What PDM Syntax is
PDM syntax is a free-form language consisting of English-like statements. The syntax allows you to drive a PDM Build WIP or Merge batch process quickly and easily.
You can generate PDM syntax request statements by using the PDM Build and Merge dialogs. You can also code the syntax requests yourself. The goal of PDM syntax is to provide you with a flexible yet easy-to-use method for creating your requests and, subsequently, submitting them for processing.
This appendix illustrates and describes how to use PDM syntax.
PDM Syntax Statements
PDM syntax involves only two actions — Build and Merge. PDM syntax is entered in, and referred to as, statements. A PDM syntax statement ends with a period (.).
A statement consists of one or more clauses. A clause is an individual line of information within each statement (for example, root DSN "root.lib" or compare 007 through 072). One statement may contain several clauses.
There are three types of statements you can use when coding each action:
■ The ACTION Statement — The action statement defines the action you want to perform against a set of elements or members, as well as the location of those elements or members. Action statements are the only statements actually executed by PDM, and only one action statement (of either type) is required.
The action statements are BUILD and MERGE.

PDM Syntax Statements
88 Parallel Development Option Guide
■ The MASK Statement — The mask statement defines the member(s) or element(s) against which the action will take place. You can enter either an explicit member or element name, or you can use a name mask. You can enter as many mask statements as necessary for each action statement.
■ The STATS OFF Statement — Statistical reports are generated for both the Build WIP and Merge processes. You have the option of suppressing these reports entirely, or limiting the amount of detail printed. The STATS OFF statement allows you to determine how detailed a report you want to print.
The Structure of a PDM Request Statement
When building a PDM request statement:
■ You must always include an ACTION statement. If you enter a BUILD statement, you must also enter WIP, Root, and Derivation 1 location information. Optionally, you can add Derivation 2, compare columns, and replace/no replace data.
■ You must always include BUILD MASK or MERGE MASK statements (unless you are using sequential files). MASK statements, defining the members and/or elements designated in the ACTION statement, must follow that ACTION statement (unless you are dealing with sequential files). A MASK statement entered with no preceding ACTION statement is flagged as an error.
■ STATS OFF statements are optional. If you enter a STATS OFF statement, it must follow the ACTION statement to which it pertains. If you enter a STATS OFF statement before the related ACTION statement, you receive an error.
Note: The positioning of the MASK statement and STATS OFF statement is interchangeable. It does not matter which statement immediately follows the ACTION statement, as long as the ACTION statement is coded first.
PDM Process Flow
When you submit your Build WIP or Merge requests, PDM follows a specific processing flow:
1. PDM first parses, or validates, the syntax.
2. A Build WIP or Merge Syntax Report is produced, echoing the Build WIP or Merge statements entered, and flagging any syntax errors.
3. When all requests have been validated, PDM checks for errors. If any errors exist within the syntax, processing terminates.
If no errors exist, PDM continues processing by calling in the appropriate Build WIP or Merge routine.

Build WIP Statement Batch SCL Syntax
Appendix B: PDM Batch Syntax 89
Build WIP Statement Batch SCL Syntax
The Build WIP statement compares the root and changes to the root contained in a derivation file. Optionally, you can also compare the changes contained in a second derivation file, compare specific columns, replace data, and merge the WIP data to a merge output library. In addition, you can specify whether to create a WIP file, write statistics gathered during the build process, delete the WIP file after completion of the merge process, and specify the language type for the members when the WIP file is merged and the merge data set is a CA Panvalet or CA Librarian data set.
If the merge output option is specified and the merge output location is a CA Endevor SCM location, then the following additional options can be specified: perform element synchronization at the target CA Endevor SCM location against the Root, before performing actions to create the derivation change levels; delete the derivation elements after a successful merge; bypass the execution of the element's generate processor after a successful merge; and specify a processor group name to override the element's processor group name.
The Build WIP statement syntax is shown next.
►►─ BUIld WIP ─┬─ DDName ─ ddname ─┬─ ROOt ─┬─ DDName ─ ddname ─┬────────► └─ DSName ─ dsname ─┘ ├─ DSName ─ dsname ─┤ └─ ┤ LOCATION1 ├ ───┘ ►─ DV1 ─┬─ DDName ─ ddname─ ┬─┬─────────────────────────────┬───────────► ├─ DSName ─ dsname ─┤ └─ DV2 ─┬─ DDName ─ ddname ─┬─┘ └─ ┤ LOCATION1 ├ ───┘ ├─ DSName ─ dsname ─┤ └─ ┤ LOCATION1 ├ ───┘ ►─ ¤ ─┬─────────────────────────────────────────────────────────┬─ ¤ ───► ├─ COMpare ─ nnn ─┬─ THRough ─┬─ nnn ─────────────────────┤ │ └─ THRu ────┘ │ ├─┬─ NO REPlace ◄ ─┬──────────────────────────────────────┤ │ └─ REPlace ──────┘ │ └─ MERge OUTput ─┬─ DDName ─ ddname ─┬─┬─ NO REPlace ◄ ─┬─┘ ├─ DSName ─ dsname ─┤ └─ REPlace ──────┘ └─ ┤ LOCATION2 ├ ───┘ ►─ OPTions ─ ¤ ─┬───────────────────────────────────────────────┬─ ¤ ─►◄ ├─ CREate WIP ─┬─ ALWays ◄ ─┬───────────────────┤ │ └─ NEVer ────┘ │ ├─ WRIte STATIstics TO ─┬─ DDName ─ ddname ─┬───┤ │ └─ DSName ─ dsname ─┘ │ ├─ SYNC NDVR OUTPUT ────────────────────────────┤ ├─ DELete WIP ─┬───────────────┬────────────────┤ │ └─ AFTer MERge ─┘ │ ├─ DELETE NDVR DV1 DV2 ─┬───────────────┬───────┤ │ └─ AFTer MERge ─┘ │ ├─ BYPASS GENERATE PROCESSOR ─┬───────────────┬─┤ │ └─ AFTer MERge ─┘ │ ├─ PROCESSOR GROUP NAME ─ proc-grpname ─────────┤ ├─ LANguage ─ language-type ────────────────────┤ └─ DISable PERformance ENHancement ─────────────┘
Expansion of LOCATION1
├── ENVironment ─ environment-name ─ SYStem ─ system-name───────────────► ►─ SUBsystem ─ subsys-name ─ TYPe ─ type-name ─────────────────────────► ►─┬─ STAge ─ stage-id ────────┬────────────────────────────────────────► └─ STAge NUMber ─ stage-no ─┘

Build WIP Statement Batch SCL Syntax
90 Parallel Development Option Guide
►─┬─────────────────────────────────────────┬──────────────────────────┤ └─ WHEre ─ CCId ─ ccid ─┬───────────────┬─┘ ├─ ANY ◄ ───────┤ ├─ BASe ────────┤ ├─ LASt ACTion ─┤ ├─ RETrieve ────┤ └─ GENerate ────┘
Expansion of LOCATION2
├── ENVironment ─ environment-name ─ SYStem ─ system-name ───────────────► ►─ SUBsystem ─ subsys-name ─ TYPe ─ type-name ──────────────────────────► ►─┬─ STAge ─ stage-id ────────┬─────────────────────────────────────────┤ └─ STAge NUMber ─ stage-no ─┘
Build WIP Statement SCL Syntax Parameters
This statement has the following parameters:
BUIld
Identifies the action statement. BUIld must be the first word in a Build action statement.
WIP DDName ddname | DSName dsname
Specifies the WIP file as one of the following:
DDName ddname
Specifies the ddname. This requires the appropriate JCL.
DSName dsname
Specifies the data set name.
ROOt DDName ddname | DSName dsname | LOCATION1
Specifies the Root location as one of the following:
DDName ddname
Specifies the ddname. This requires the appropriate JCL.
DSName dsname
Specifies the data set name.
LOCATION1
Specifies the CA Endevor SCM location. This is a syntax fragment composed of the following keywords and variables:
ENVironment environment-name SYStem system_name SUBsystem subsystem name TYPE type_name STAge stage_ID | STAge NUMber stage_number [WHERE CCID ccid [ANY|BASE|LAST ACTION|RETRIEVE|GENERATE]]
You must specify the environment, system, subsystem, type, and either the stage id or stage number. The optional WHERE CCID clause limits the search to elements that match the ccid you specify.

Build WIP Statement Batch SCL Syntax
Appendix B: PDM Batch Syntax 91
The following keywords and variables are required:
ENVironment environment-name
Specifies the element's environment location.
SYStem system_name
Specifies the element's system name association.
SUBsystem subsystem name
Specifies the element's subsystem association.
TYPE type_name
Specifies the element's type.
Also, you must specify one of the following:
STAge stage_ID
Specifies the element's stage ID location.
STAge NUMber stage_number
Specifies the element's stage number location.
The following clause is optional:
WHERE CCID ccid [ANY|BASE|LAST ACTION|RETRIEVE|GENERATE]
(Optional) Specifies the element's CCID. The following keywords are optional and let you limit the match to the element whose base, last action, retrieve, or generate CCID matches the CCID you specify. ANY is the default.
ANY - Indicates any element, with the specified CCID, at the specified location. The default.
BASE - Indicates the base level element, with the specified CCID, at the specified location.
LASt ACTion - Indicates the version of the element, with the specified CCID, upon which the last action was performed at the specified location.
RETrieve - Indicates the version of the element, with the specified CCID, that was retrieved to the specified location.
GENerate - Indicates the version of the element, with the specified CCID, that was generated at the specified location.
DV1 DDName ddname | DSName dsname | LOCATION1
Specifies Derivation 1 location as one of the following:
Note: The maximum LRECL allowed for a Derivation 1 member is 32000.
DDName ddname
Specifies the ddname. This requires the appropriate JCL.
Build WIP Statement Batch SCL Syntax
92 Parallel Development Option Guide
DSName dsname
Specifies the data set name.
LOCATION1
Specifies the CA Endevor SCM location. This is a syntax fragment.
Note: For more information, see the parameter ROOt DDName ddname | DSName dsname | LOCATION1.
DV2 DDName ddname | DSName dsname | LOCATION1
(Optional) Specifies Derivation 2 location as one of the following:
DDName ddname
Specifies the ddname. This requires the appropriate JCL.
DSName dsname
Specifies the data set name.
LOCATION1
Specifies the CA Endevor SCM location. This is a syntax fragment. For more information, see the parameter ROOt DDName ddname | DSName dsname | LOCATION1.
Note: The maximum LRECL allowed for a Derivation 2 member is 32000.
COMpare nn THRu nn
(Optional) Specifies the columns for comparison during the Build WIP process, to establish changes. If specified, you must provide a beginning column and an ending column with the keyword THRu or THRough. If only one column value is entered, you will receive an error message. The beginning column default is 7. The end column default is 72.
Note: Use caution when specifying a compare range for variable length records. If record lengths are different, PDM may annotate a record (line) as changed, even if record data is identical. For example, trailing blanks may be truncated in a variable length record.
REPlace | NO REPlace
(Optional) Indicates on a global level, whether you want to replace like-named WIP members in the WIP data set. Specify one of the following.
REPlace
Replaces existing members with like-named new members.
NO REPlace
Specifies that PDM will not replace like-named WIP members in the WIP data set and PDM will not write a new member to the WIP data set. The default.

Build WIP Statement Batch SCL Syntax
Appendix B: PDM Batch Syntax 93
MERge OUTput DDName ddname | DSName dsname | LOCATION2 [NO REPLACE | REPLACE]
(Optional) Specifies the location for the merge output library associated with this WIP data set. You have the option to replace existing members with like-named new members. If you code this clause, you must provide one of the following:
DDName ddname
Specifies the ddname. This requires the appropriate JCL.
DSName dsname
Specifies the data set name.
LOCATION2
Specifies the CA Endevor SCM location. This is a syntax fragment composed of the following keywords and variables:
ENVironment environment-name SYStem system_name SUBsystem subsystem name TYPE type_name STAge stage_ID | STAge NUMber stage_number
You must specify the environment, system, subsystem, type, and either the stage id or stage number. The following keywords and variables are required:
ENVironment environment-name
Specifies the element's environment location.
SYStem system_name
Specifies the element's system name association.
SUBsystem subsystem name
Specifies the element's subsystem association.
TYPE type_name
Specifies the element's type.
Also, you must specify one of the following:
STAge stage_ID
Specifies the element's stage ID location.
STAge NUMber stage_number
Specifies the element's stage number location.

Build WIP Statement Batch SCL Syntax
94 Parallel Development Option Guide
REPlace | NO REPlace
(Optional) Indicates on a global level, whether you want to replace like-named elements at the Merge CA Endevor SCM location or like–named members on a merge to a PDS file.
REPlace
Replaces existing members with like-named new members.
NO REPlace
Does not replace existing members with like-named new members. The default.
OPTions
Specifies optional parameters. You can specify any of the following parameters:
CREate WIP ALWAYS | NEVER
(Optional) Specifies whether PDM is to create a WIP file during the Build process. Specify one of the following.
ALWAYS
Specifies that PDM is to create a WIP file during the Build process. The default.
NEVER
Indicates that PDM is not to create a WIP file.
WRIte STATIstics TO DDName ddname | DSName dsname
Specifies the location of the statistics file gathered during the Build process. specify one of the following.
DDName ddname
Specifies the ddname. This requires the appropriate JCL.
DSName dsname
Specifies the data set name.
Note: See “Statistical Data Control Blocks” for information on statistics data set characteristics.
SYNC NDVR OUTPUT
Specifies that element synchronization will be performed at the target CA Endevor SCM location against the Root before performing actions to create the DV1 or DV2 change levels. This clause can only be used if the Merge Output location is in CA Endevor SCM.
DELete WIP AFTer MERge
Specifies that the WIP file is deleted after successful completion of the Merge process. The keywords AFTer MERge are optional.

Build WIP Statement Batch SCL Syntax
Appendix B: PDM Batch Syntax 95
DELETE NDVR DV1 DV2 AFTer MERge
Specifies that the DV1 and DV2 elements are deleted after a successful merge. This clause can only be used if the Merge Output location is in CA Endevor SCM. The keywords AFTer MERge are optional.
BYPASS GENERATE PROCESSOR AFTER MERGE
Specifies that the execution of the element's generate processor is bypassed after a successful merge. This clause can only be used if the Merge Output location is in CA Endevor SCM. The keywords AFTer MERge are optional.
PROCESSOR GROUP NAME proc-name
Specifies a processor group name that will be used to override the element's processor group name, This clause can only be used if the Merge Output location is in CA Endevor SCM.
LANguage
Specifies the associated language type for the members when PDM automatically merges the WIP file and the merge data set is a CA Panvalet or CA Librarian data set.
For CA Panvalet valid values are:
■ ALC
■ ANSCOBOL
■ AUTOCODE
■ BAL
■ COBOL
■ COBOL-72
■ DATA
■ FORTRAN
■ JCL
■ OBJECT
■ PL/1
■ RPG
■ USER180
■ USER780
■ OTHER

The BUIld MASK Statement
96 Parallel Development Option Guide
For CA Librarian, valid values are:
■ ASM
■ COB
■ DAT
■ FOR
■ FRG
■ FRS
■ GIF
■ GOF
■ JCL
■ PLF
■ PLI
■ RPG
■ TXT
■ VSB
DISable PERformance ENHancement
Directs PDM to use external (disk) storage instead of virtual storage for Build WIP processing. Generally, this option is not specified unless necessitated by message PDM2001E. Specifying this option degrades Build WIP processing performance.
Note: For a sequential file, no additional information is required for the BUILD statement, unless you want to use the STATS OFF statement. For partitioned data sets, CA Panvalet, CA Librarian files, or CA Endevor SCM locations, you must enter the appropriate MASK statements.
The BUIld MASK Statement
The BUILD MASK statement defines each set of members or elements for which a WIP File is to be built. You can enter as many BUILD MASK statements as are required. BUILD MASK statements must follow the BUILD statement.
►─ ROOt ─ = ─ root-mask ─┬─────────────────────────┬─┬─────────────────────┬─► └─ VERsion ─ version-num ─┘ └─ LEVel ─ level-num ─┘ ►─ DV1 ─ = ─ der1-mask ─┬─────────────────────────┬─┬─────────────────────┬─► └─ VERsion ─ version-num ─┘ └─ LEVel ─ level-num ─┘ ►─┬───────────────────────────────────────────────────────────────────────┬─► └─ DV2 ─ = ─ der2-mask ─┬───────────────────────┬─┬───────────────────┬─┘ └ VERsion ─ version-num ┘ └ LEVel ─ level-num ┘

The BUIld MASK Statement
Appendix B: PDM Batch Syntax 97
►─┬──────────────────────┬─┬────────────────┬─ . ────────────────────────────┤ └─ WIP ─ = ─ wip-mask ─┘ ├─ NO REPlace ◄ ─┤ └─ REPlace ──────┘
BUIld MASK Parameters
ROOt
Allows you to designate one or more members or elements by providing one of the following:
■ An explicit member or element name
■ A name mask
■ An CA Endevor SCM location and optionally, a specific version and level for that element
This parameter is required.
DV1
Allows you to designate one or more members or elements by providing one of the following:
■ An explicit member or element name
■ A name mask
This parameter is required.
DV2
Allows you to designate one or more members or elements by providing one of the following:
■ An explicit member or element name
■ A name mask
This parameter is optional.
WIP
Defines the WIP member to be built. This parameter is optional.

Merge Output WIP Statement Batch SCL Syntax
98 Parallel Development Option Guide
wip-mask
This can be:
■ An explicit name.
■ Blank. If you do not specify a wip-mask in this MASK statement, the WIP member name defaults to the Root member/element name.
■ An overlay mask. An overlay mask differs from the standard name mask in that the characters specified (before the asterisk) overlay the corresponding characters in the Root member name.
For example, you enter a Root name of BC1PAL10 and a WIP mask of W*. The WIP name for this member is WC1PAL10.
REPlace/NO REPlace
Allows you to override the global replace/no replace setting in the BUILD statement for the member set defined in this MASK statement only. This parameter is optional and if it is not specified, the global setting from the BUILD statement takes precedence.
Merge Output WIP Statement Batch SCL Syntax
The Merge Output WIP statement merges the WIP data to a merge output library. You can specify whether to write statistics gathered during the merge process, delete the WIP file after completion of the merge process, and specify the language type for the members when the WIP file is merged and the merge data set is a CA Panvalet or CA Librarian data set.
The Merge Output WIP statement syntax is shown next.
►►─ MERge ─ OUTput ─┬─ DDName ─ ddname ─┬─ WIP ─┬─ DDName ─ ddname ─┬─────────► └─ DSName ─ dsname ─┘ └─ DSName ─ dsname ─┘ ►─┬────────────────┬─────────────────────────────────────────────────────────► ├─ REPlace ──────┤ └─ NO REPlace ◄ ─┘ ►─ OPTions ─ ¤ ─┬───────────────────────────────────────────────┬─ ¤ ─ . ────►◄ ├─ DELete WIP ─┬───────────────┬────────────────┤ │ └─ AFTer MERge ─┘ │ ├─ LANguage ─ language-type ────────────────────┤ ├─ WRIte STATIstics TO ─┬─ DDName ─ ddname ─┬───┤ │ └─ DSName ─ dsname ─┘ │ └─ DISable PERformance ENHancement ─────────────┘

Merge Output WIP Statement Batch SCL Syntax
Appendix B: PDM Batch Syntax 99
Merge Output Statement SCL Syntax Parameters
This statement has the following parameters:
MERge OUTput DDName ddname | DSName dsname | WIP DDName ddname | DSName dsname [NO REPLACE | REPLACE]
Specifies the merge output file as either a ddname, dsname, or a CA Endevor SCM location. One of the following is required:
DDName ddname
Species a defined data set name. This requires the appropriate JCL.
DSName dsname
Specifies a data set name.
WIP
Specifies the WIP data set as one of the following:
DDName ddname
Species a defined data set name. This requires the appropriate JCL.
DSName dsname
Specifies a data set name
REPlace | NO REPlace
(Optional) Indicates on a global level, whether you want to replace like-named elements at the Merge CA Endevor SCM location or like–named members on a merge to a PDS file.
REPlace
Replaces existing members with like-named new members.
NO REPlace
Does not replace existing members with like-named new members. The default.
OPTions
Specifies optional parameters. You can specify any of the following parameters:
SYNC NDVR OUTPUT
Specifies that element synchronization will be performed at the target CA Endevor SCM location against the Root before performing actions to create the DV1 or DV2 change levels. This clause can only be used if the Merge Output location is in CA Endevor SCM.

Merge Output WIP Statement Batch SCL Syntax
100 Parallel Development Option Guide
LANguage
Specifies the associated language type for the members when PDM automatically merges the WIP file and the merge data set is a CA Panvalet or CA Librarian data set.
For CA Panvalet valid values are:
■ ALC
■ ANSCOBOL
■ AUTOCODE
■ BAL
■ COBOL
■ COBOL-72
■ DATA
■ FORTRAN
■ JCL
■ OBJECT
■ PL/1
■ RPG
■ USER180
■ USER780
■ OTHER
For CA Librarian, valid values are:
■ ASM
■ COB
■ DAT
■ FOR
■ FRG
■ FRS
■ GIF
■ GOF
■ JCL
■ PLF
■ PLI
■ RPG

The MERGE MASK Statement
Appendix B: PDM Batch Syntax 101
■ TXT
■ VSB
WRIte STATIstics TO
This parameter denotes the location of the statistics file gathered during the Build process. Valid values are:
■ DDName - requires the appropriate JCL
■ DSName (data set name)
■ Note: See “Statistical Data Control Blocks” for information on statistics data set characteristics.
DISable PERformance ENHancement
Directs PDM to use external (disk) storage instead of virtual storage for Build WIP processing. Generally, this option is not specified unless necessitated by message PDM2001E. Specifying this option degrades Build WIP processing performance.
Note: For sequential file, no additional information is required for the BUILD statement, unless you want to use the STATS OFF statement. For partitioned data sets, CA Panvalet, CA Librarian files, or CA Endevor SCM locations, you must enter the appropriate MASK statements.
The MERGE MASK Statement
Use the MERGE MASK statement to define the WIP and output source files involved in the Merge process. You can enter as many MERGE MASK statements as are required. MERGE MASK statements must follow the MERGE action statement.
►►─ WIP ─ = ─ WIP-mask ─┬─────────────────────────┬─┬────────────────┬─ . ────►◄ └─ OUT ─ = ─ output-mask ─┘ ├─ REPlace ──────┤ └─ NO REPlace ◄ ─┘
MERGE MASK Parameters
WIP
Defines the WIP member to be merged.
wip-mask
This can be:
■ An explicit member name.
■ A name mask.

The STATS OFF Statement
102 Parallel Development Option Guide
OUT
Identifies the output file to which the WIP File is merged.
out-mask
Can be one of the following entries:
■ An explicit member name.
■ Blank.
■ An overlay mask.
REPlace/NO REPlace
Overrides the global REPlace/NO REPlace switch in the merge statement for the member set defined in this MASK statement only. This parameter is optional. If it is not specified, the global setting from the MERGE statement takes precedence.
The STATS OFF Statement
The STATS OFF statement controls the generation of the PDM Build and Merge reports. It is an optional statement; but when specified, the STATS OFF statement must follow the related BUILD or MERGE statement. If you enter a STATS OFF statement without a preceding BUILD or MERGE statement, you receive an error message.
Note: The order of the MASK statement and the STATS OFF statement is interchangeable. It does not matter which statement follows the related action statement, as long as the action statement is coded first.
STATS OFF Parameters
STAts OFF
The keywords STAT and OFF must be the first words in a STATS OFF statement and they are required.
Build WIP and Merge Syntax Examples
Appendix B: PDM Batch Syntax 103
Detail Clause
Indicates the level of information you want to suppress:
DETail
Suppresses the detail information provided for each WIP member in the PDM Build WIP Detail Report and/or the PDM Merge Detail Report (depending on the action for which you code this statement). This is the default.
All
Suppresses detail and summary information; that is, no reports are produced. If you select this option, you only receive the final return code in the JCL.
Build WIP and Merge Syntax Examples
The following examples illustrate the use of PDM syntax to enter Build WIP and Merge requests.
Build WIP and Merge EXAMPLE 1
Enter Build WIP and Merge information using an explicit member name.
build wip Dsn 'endevor.pdm.wiplib'
root Dsn 'endevor.pdm.rootlib'
dv1 Dsn 'endevor.pdm.dv1lib'
dv2 Dsn 'endevor.pdm.dv2lib'
comPARE 007 thru 072
no replace .
root progx
dv1 progx
dv2 progx
wip progx .
merge wip dsn 'endevor.pdm.wiplib'
output dsn 'endevor.pdm.mergelib'
no replace .
wip progx
out progx .
The NO REPlace option is globally set for the BUILD and MERGE statements, and is not overridden by either of the MASK statements.

Build WIP and Merge Syntax Examples
104 Parallel Development Option Guide
Build WIP and Merge EXAMPLE 2
Enter Build WIP and Merge information using a combination of data set and CA Endevor SCM location information. In this example, the WIP and Derivation 1 locations are data sets; the Root and Derivation 2 locations are from CA Endevor SCM.
build wip dsn 'endevor.pdm.wiplib'
root env support
sys finance
sub acctrec
type copybook
stage b
dv1 dsn 'endevor.pdm.dv1lib'
dv2 env support
sys finance
sub acctrec
type copybook
stage p
compare 007 thru 072
no replace .
root copy1 ver 01 lev 02
dv1 progx
dv2 copy1
wip progx .
merge wip dsn 'endevor.pdm.wiplib'
output dsn 'endevor.pdm.mergelib'
no replace .
wip progx
out progx .
The element COPY 1 is assigned as the explicit element name for both the Root and Derivation 2. Note a version and level have been assigned to the Root element name. This indicates the current version/level of the element is used for Derivation 2, and a previous version/level of the element is used for the Root.
The NO REPlace option is assigned globally to the BUILD statement, with no overriding option in the BUILD MASK statement. The MERGE and MERGE MASK statements are the same as in example 1.

Build WIP and Merge Syntax Examples
Appendix B: PDM Batch Syntax 105
Build WIP and Merge EXAMPLE 3
This SCL builds and automatically merges three files. The actions create statistics records and delete the WIP member if the Merge is successful. Remember, the automatic merge is performed only if the WIP file contains no conflicts.
BUILD WIP DSNAME 'ENDEVOR.PDM.WIPLIB '
ROOT DSNAME 'ENDEVOR.PDM.ROOT '
DV1 DSNAME 'ENDEVOR.PDM.DV1 '
DV2 DSNAME 'ENDEVOR.PDM.DV2 '
COMPARE 001 THRU 072
REPLACE
MERGE OUTPUT
DSNAME 'ENDEVOR.PDM.MERGELIB '
REPLACE
OPTIONS DELETE WIP
WRITE STATISTICS TO DSNAME
'ENDEVOR.PDM.STATS '
.
WIP 'C1BMEI00 '
ROOT 'C1BMEI00 '
DV1 'C1BMEI00 '
DV2 'C1BMEI00 '
.
WIP 'C1BMEI10 '
ROOT 'C1BMEI10 '
DV1 'C1BMEI10 '
DV2 'C1BMEI10 '
.


Appendix C: Extending the WIP Edit Macro Facility 107
Appendix C: Extending the WIP Edit Macro Facility
This section contains the following topics:
Before You Begin Using the WIP Edit Macro Facility (see page 107) Existing Edit Macros (see page 107) Extending the Edit Macros (see page 108)
Before You Begin Using the WIP Edit Macro Facility
The PDM Edit WIP function, option 2 of CA Endevor Parallel Development Option menu, uses the ISPF/PDF Edit Macro facility to implement the WIPCOUNT, WIPLDEL, WIPUNDEL, WIPSHOW, WIPCHANG, WIPCON and WIPPARA commands.
The enhanced WIP edit commands are written in the TSO/E CLIST language and can be easily modified or extended.
The information in this chapter assumes familiarity with the TSO/E CLIST or REXX language, ISPF/PDF concepts and the ISPF/PDF Edit Macro facility. Refer to the appropriate IBM documentation for further information on these facilities.
Existing Edit Macros
During CA Endevor SCM installation, a set of CLISTs is copied into the CA Endevor SCM CLIST library. CLIST member BC1GM100 is the PDM Initial Macro and is used to establish the alias mapping between each CLIST name and the corresponding Edit Macro name.
The following list identifies the CLIST member name and the corresponding WIP Edit Macro name:
BC1GM101
WIPLDEL
BC1GM102
WIPSHOW
BC1GM103
WIPCON

Extending the Edit Macros
108 Parallel Development Option Guide
BC1GM104
WIPCOUNT
BC1GM105
WIPCHANG
BC1GM106
WIPPARA
BC1GM107
WIPUNDEL
BC1GM108
WIPHELP
Extending the Edit Macros
Because PDM Edit Macros can be written in the TSO/E CLIST or REXX language, it is easy to add additional customized Edit commands. The existing PDM Edit Macros can be used as guides for developing customized Edit Macros.
Important! If you want to extend the functionality of the supplied edit macros, copy the CA edit macro to a new macro, and make the desired changes to the new macro.
BC1GM100 and BC1GMU01
The PDM Edit WIP Initial Edit Macro, BC1GM100, executes a second CLIST, BC1GMU01, during the edit session startup. BC1GMU01 is available to the installation to perform additional, customized startup functions.
BC1GMU01 can be used, for example, to establish aliases for site customized edit macros or to issue ISPF/PDF Edit commands. The version of BC1GMU01 supplied is a skeleton that does not issue any commands and returns a return code of zero. BC1GMU01 can be enhanced using either the CLIST or REXX language.

Appendix D: Statistical Data Control Blocks 109
Appendix D: Statistical Data Control Blocks
Read this appendix for information about generating and interpreting PDM information.
PDM can optionally create data records containing detail and summary information about Build or Merge actions. The statistical records can subsequently be processed by a user program.
To have PDM create these statistics, you must code the WRITE STATISTICS TO clause with the Build or Merge action.
PDM can create statistical information about the Build WIP and Merge operations. These statistics can then be used to generate customized reports.
PDM writes the statistics to the location specified in the WRITE STATISTICS TO clause of the BUILD and MERGE statements. The statistics data set must have the following attributes:
DCB=(LRECL=540,RECFM=VB,BLKSIZE=block_size,DSORG=PS)
The block size can be any value greater than or equal to the LRECL value plus four.
Note: PDM allocates the data set specified in the WRITE STATISTICS TODSNAME clause with a disposition of OLD. Therefore, any existing data in the statistics data set is overwritten.

$PBWSTAT: WIP Detail Statistics
110 Parallel Development Option Guide
If you are performing multiple build or merge operations in a single job, PDM validates the data set to ensure that it has the correct attributes. PDM writes the statistical data in one of the following formats:
■ $PBWSTAT - WIP Detail Statistics
■ $PBWSSUM - WIP Summary Statistics
■ $PBMSTAT - Merge Detail Statistics
■ $PBMSSUM - Merge Summary Statistics
These control blocks correspond to the PDM Build WIP and Merge Output Detail and Summary Reports.
This appendix provides the record layouts for the four control blocks and explains all data contained within each block.
This section contains the following topics:
$PBWSTAT: WIP Detail Statistics (see page 110) $PBWSSUM: WIP Summary Statistics (see page 122) $PBMSTAT: Merge Detail Statistics (see page 125) $PBMSSUM: Merge Summary Statistics (see page 128)
$PBWSTAT: WIP Detail Statistics
The $PBWSTAT control block presents detail information about each member of the WIP data set, and reflects much of the statistical information provided on the PDM Build WIP Detail Report. One $PBWSTAT control block is written for each WIP member set.
*---------------------------------------------------------------------*
* MACRO: $PBWSTAT *
* *
* FUNCTION: The $PBWSTAT MACRO maps the PDM BUILD WIP Statistics *
* record. One record is created for each WIP file created by the *
* BUILD WIP action. *
*---------------------------------------------------------------------*
$PBWSTAT DSECT BUILD WIP Statistics record
$PBWLEN DC Y($PBWDSLN) Length of the Statistics record
$pbwece dc cl4'stat' eyecatcher
$PBWVERS DC Y(1) Version Number
PWTYPE DC Y(1) Record Type: WIP Statistics
PWREPL DS CL1 Global replace option (Y/N)
PWPRCMDE DS CL1 Processing Mode (F/B)
PWCMPBEG DS H Compare FROM column
PWCMPEND DS H COMPARE TO column
PWWIPDSN DS CL44 WIP Dataset Name

$PBWSTAT: WIP Detail Statistics
Appendix D: Statistical Data Control Blocks 111
*---------------------------------------------------------------------*
* Root information *
*---------------------------------------------------------------------*
PWROODSN DS CL44 Root Dataset Name
PWROOENV DS CL8 Root Environment
PWROOSYS DS CL8 Root System
PWROOSUB DS CL8 Root Subsystem
PWROOTYP DS CL8 Root Type
PWROOSTX DS CL1 Root Stage (ID or Number)
PWROOST# DS CL1 Root Stage Number (Y/N)
*---------------------------------------------------------------------*
* Derivation 1 information *
*---------------------------------------------------------------------*
PWDV1DSN DS CL44 DER 1 Dataset Name
PWDV1ENV DS CL8 DER 1 Environment
PWDV1SYS DS CL8 DER 1 System
PWDV1SUB DS CL8 DER 1 Subsystem
PWDV1TYP DS CL8 DER 1 Type
PWDV1STX DS CL1 DER 1 Stage (ID or Number)
PWDV1ST# DS CL1 DER 1 Stage Number (Y/N)
*---------------------------------------------------------------------*
* Derivation 2 information *
*---------------------------------------------------------------------*
PWDV2DSN DS CL44 DER 2 Dataset Name
PWDV2ENV DS CL8 DER 2 Environment
PWDV2SYS DS CL8 DER 2 System
PWDV2SUB DS CL8 DER 2 Subsystem
PWDV2TYP DS CL8 DER 2 Type
PWDV2STX DS CL1 DER 2 Stage (ID or Number)
PWDV2ST# DS CL1 DER 2 Stage Number (Y/N)
*---------------------------------------------------------------------*
* Other information *
*---------------------------------------------------------------------*
PWWIPMEM DS CL10 WIP Member name
PWROOMEM DS CL10 Root Member/Element name
PWROOLVL DS H Root Level (if ENDEVOR)
PWROOVER DS H Root Version (if ENDEVOR)
PWDV1MEM DS CL10 DER 1 Member/Element name
PWDV1LVL DS H DER 1 Level (if ENDEVOR)
PWDV1VER DS H DER 1 Version (if ENDEVOR)
PWDV2MEM DS CL10 DER 2 Member/Element name
PWDV2LVL DS H DER 2 Level (if ENDEVOR)
PWDV2VER DS H DER 2 Version (if ENDEVOR)
PWRUNTME DS F Time of BUILD WIP action
PWRUNDTE DS F Date of BUILD WIP action
PWPGENUM DS PL2 Report page number
PWRETCDE DS F BUILD WIP return code
SPACE ,
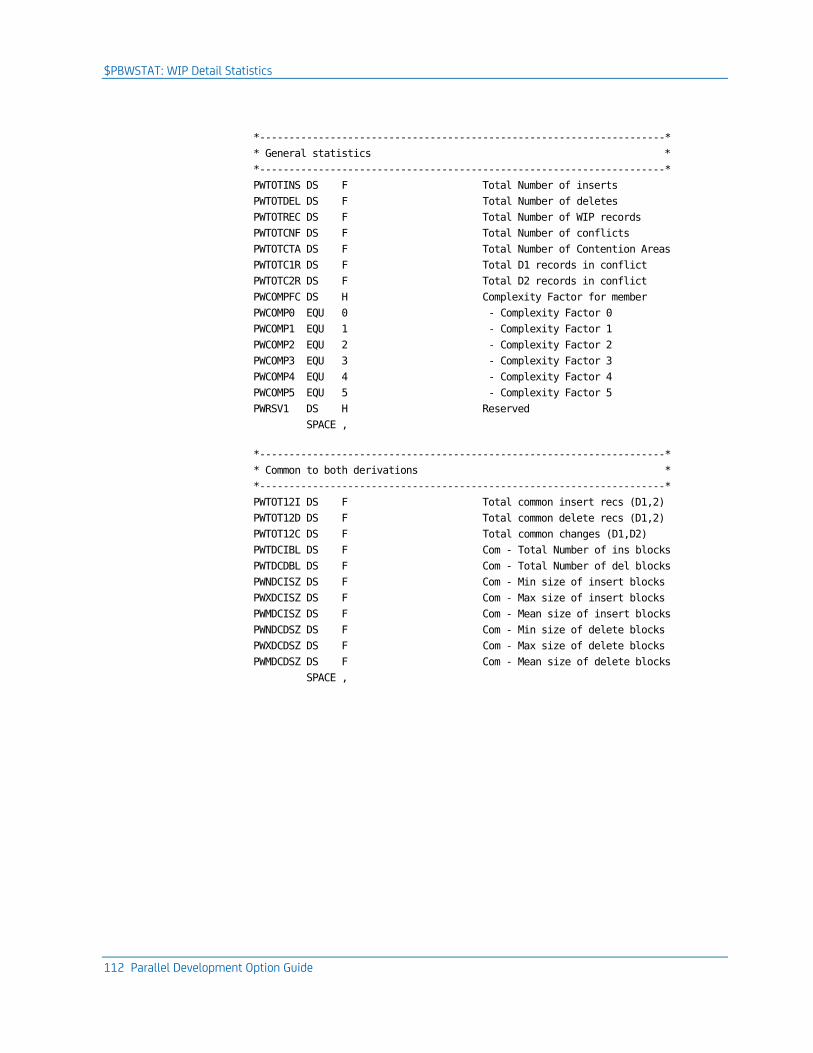
$PBWSTAT: WIP Detail Statistics
112 Parallel Development Option Guide
*---------------------------------------------------------------------*
* General statistics *
*---------------------------------------------------------------------*
PWTOTINS DS F Total Number of inserts
PWTOTDEL DS F Total Number of deletes
PWTOTREC DS F Total Number of WIP records
PWTOTCNF DS F Total Number of conflicts
PWTOTCTA DS F Total Number of Contention Areas
PWTOTC1R DS F Total D1 records in conflict
PWTOTC2R DS F Total D2 records in conflict
PWCOMPFC DS H Complexity Factor for member
PWCOMP0 EQU 0 - Complexity Factor 0
PWCOMP1 EQU 1 - Complexity Factor 1
PWCOMP2 EQU 2 - Complexity Factor 2
PWCOMP3 EQU 3 - Complexity Factor 3
PWCOMP4 EQU 4 - Complexity Factor 4
PWCOMP5 EQU 5 - Complexity Factor 5
PWRSV1 DS H Reserved
SPACE ,
*---------------------------------------------------------------------*
* Common to both derivations *
*---------------------------------------------------------------------*
PWTOT12I DS F Total common insert recs (D1,2)
PWTOT12D DS F Total common delete recs (D1,2)
PWTOT12C DS F Total common changes (D1,D2)
PWTDCIBL DS F Com - Total Number of ins blocks
PWTDCDBL DS F Com - Total Number of del blocks
PWNDCISZ DS F Com - Min size of insert blocks
PWXDCISZ DS F Com - Max size of insert blocks
PWMDCISZ DS F Com - Mean size of insert blocks
PWNDCDSZ DS F Com - Min size of delete blocks
PWXDCDSZ DS F Com - Max size of delete blocks
PWMDCDSZ DS F Com - Mean size of delete blocks
SPACE ,

$PBWSTAT: WIP Detail Statistics
Appendix D: Statistical Data Control Blocks 113
*---------------------------------------------------------------------*
* Derivation 1 statistics *
*---------------------------------------------------------------------*
PWTD1INS DS F D1 - Total Number of inserts
PWTD1DEL DS F D1 - Total Number of deletes
PWTD1IBL DS F D1 - Total Number of ins blocks
PWTD1DBL DS F D1 - Total Number of del blocks
PWTD1CHG DS F D1 - Total Number of changes
PWND1ISZ DS F D1 - Min size of insert blocks
PWXD1ISZ DS F D1 - Max size of insert blocks
PWMD1ISZ DS F D1 - Mean size of insert blocks
PWND1DSZ DS F D1 - Min size of delete blocks
PWXD1DSZ DS F D1 - Max size of delete blocks
PWMD1DSZ DS F D1 - Mean size of delete blocks
SPACE ,
*---------------------------------------------------------------------*
* Derivation 2 statistics *
*---------------------------------------------------------------------*
PWTD2INS DS F D2 - Total Number of inserts
PWTD2DEL DS F D2 - Total Number of deletes
PWTD2IBL DS F D2 - Total Number of ins blocks
PWTD2DBL DS F D2 - Total Number of del blocks
PWTD2CHG DS F D2 - Total Number of changes
PWND2ISZ DS F D2 - Min size of insert blocks
PWXD2ISZ DS F D2 - Max size of insert blocks
PWMD2ISZ DS F D2 - Mean size of insert blocks
PWND2DSZ DS F D2 - Min size of delete blocks
PWXD2DSZ DS F D2 - Max size of delete blocks
PWMD2DSZ DS F D2 - Mean size of delete blocks
*---------------------------------------------------------------------*
* Auto-Merge statistics *
*---------------------------------------------------------------------*
PWAMRGRC DS F Auto-Merge Return Code
PWAMRGFL DS CL1 Auto-Merge Indicator (Y/N)
$PBWDSLN EQU *-$PBWSTAT
MEND

$PBWSTAT: WIP Detail Statistics
114 Parallel Development Option Guide
Data Displayed by $PBWSTAT
$PBWSTAT presents data in five sections.
■ General source location information
■ General statistic totals
■ Data common to both derivations
■ Derivation 1 statistics
■ Derivation 2 statistics
Each section, and each field within that section, is explained in the following list.
General Source Location Information ($PBWSTAT)
The first section of this control block provides general information about the WIP, Root, Derivation 1, and Derivation 2 source.
$PBWLEN
Size of the control block.
$PBWEYE
Eye-catcher, to help visually identify this control block.
$PBWVERS
Version to identify the control block.
PWTYPE
Type indicator for the control block. A type of 1 indicates that this is the WIP Detail Statistics control block.
PWREPL
Indicates your selection for the replace/no replace option for this member set. Valid values are:
■ Y—Yes
■ N—No

$PBWSTAT: WIP Detail Statistics
Appendix D: Statistical Data Control Blocks 115
PWPRCMDE
Indicates the processing mode for this member set:
■ F—Foreground
■ B—Batch
PWCMPBEG
Indicates the column at which PDM should begin to compare Root, Derivation 1, and Derivation 2 information for the Build WIP process.
PWCMPEND
Indicates the last column of information that should be compared in the Build WIP process.
PWWIPDSN
The WIP data set name.
Note: The information presented in the next three groups of data (for the Root, Derivation 1, and Derivation 2) depends on whether you have a data set source location or an CA Endevor SCM source location. If you use a data set name, the CA Endevor SCM location fields are blank. If you use an CA Endevor SCM location, the data set name field is blank.
PWROODSN
The Root data set name.
PWROOENV
The Root environment name.
PWROOSYS
The Root system name.
PWROOSUB
The Root subsystem name.
PWROOTYP
The Root element type.
PWROOST#
Indicates whether the value in the field above is an ID or a number:
■ Y—PWROOSTX is a stage number.
■ N—PWROOSTX is a stage ID.

$PBWSTAT: WIP Detail Statistics
116 Parallel Development Option Guide
PWROOSTX
The Root stage ID or number, depending on the value entered for this member set.
PWDV1DSN
The Derivation 1 data set name.
PWDV1ENV
The Derivation 1 environment name.
PWDV1SYS
The Derivation 1 system name.
PWDV1SUB
The Derivation 1 subsystem name.
PWDV1TYP
The Derivation 1 element type
PWDV1STX
The Derivation 1 stage ID or number, depending on the value entered for this member set.
PWDV1ST#
Indicates whether the value in the field above is an ID or a number:
■ Y—PWDV1STX is a stage number.
■ N—PWDV1STX is a stage ID.
PWDV2DSN
The Derivation 2 data set name.
PWDV2ENV
The Derivation 2 environment name.
PWDV2SYS
The Derivation 2 system name.
PWDV2SUB
The Derivation 2 subsystem name.
PWDV2TYP
The Derivation 2 element type.
PWDV2STX
The Derivation 2 stage ID or number, depending on the value entered for this member set.

$PBWSTAT: WIP Detail Statistics
Appendix D: Statistical Data Control Blocks 117
PWDV2ST#
Indicates whether the value in the field above is an ID or a number:
■ Y—PWDV2STX is a stage number.
■ N—PWDV2STX is a stage ID.
PWWIPMEM
The WIP member name.
PWROOMEM
The Root member or element name.
PWROOLVL
The level of the Root source, if the Root uses an CA Endevor SCM location
PWROOVER
The version of the Root source, if the Root uses an CA Endevor SCM location.
PWDV1MEM
The Derivation 1 member or element name.
PWDV1LVL
The level of the Derivation 1 source, if Derivation 1 uses an CA Endevor SCM location.
PWDV1VER
The version of the Derivation 1 source, if Derivation 1 uses a CA Endevor SCM location.
PWDV2MEM
The Derivation 2 member or element name.
PWDV2LVL
The level of the Derivation 2 source, if Derivation 2 uses an CA Endevor SCM location.
PWDV2VER
The version of the Derivation 2 source, if Derivation 2 uses a CA Endevor SCM location.
PWRUNTME
The time at which the Build WIP process was executed.

$PBWSTAT: WIP Detail Statistics
118 Parallel Development Option Guide
PWRUNDTE
The date on which the Build WIP process was executed.
PWPGENUM
The page on which detail information for this member set appears in the PDM Build WIP Detail report.
PWRETCDE
The return code resulting from the Build WIP processing of this member set.
General Statistics Total
The second section of the control block provides a general summary for the entire WIP member set.
PWTOTINS
The total number of lines marked as insertions to the Root program, from both Derivation 1 and Derivation 2.
PWTOTDEL
The total number of lines marked as deletions to the Root program, from both Derivation 1 and Derivation 2.
PWTOTREC
The total number of records in this WIP member set.
PWTOTCNF
The total number of conflict areas in this WIP member.
Note: Refer to An Introduction to PDM for a definition of a conflict area.
PWTOTCTA
The total number of contention areas in this WIP member.
Note: Refer to An Introduction to PDM for a definition of a contention area.
PWTOTC1R
The total number of Derivation 1 records involved in conflicts in this member set.
PWTOTC2R
The total number of Derivation 2 records involved in conflicts in this member set.

$PBWSTAT: WIP Detail Statistics
Appendix D: Statistical Data Control Blocks 119
PWCOMPFC
The complexity factor of this WIP member, the format is value—label—complexity factor:
0—PWCOMP0—0
1—PWCOMP1—1
2—PWCOMP2—2
3—PWCOMP3—3
4—PWCOMP4—4
5—PWCOMP5—5
Data Common to Both Derivations
This section of the control block provides information for data that is common to both derivations.
PWTOT12I
Indicates the number of lines marked as insertions, from both derivations, at the same location with respect to the Root program (that is, insertions in common).
PWTOT12D
Indicates the number of lines marked as deletions, from both derivations, at the same location with respect to the Root program (that is, deletions in common).
PWTOT12C
Indicates the number of changes made to the same records of the Root program, by both derivations. This value refers to modifications made to an existing record (such as a change in field size or field name), rather than an insertion or a deletion of a record.
PWTDCIBL
Indicates the total number of blocks of insertion lines, made by both derivations, in common (that is, insertions at the same location, with respect to the Root program).
PWTDCDBL
Indicates the total number of blocks of deletion lines, made by both derivations, in common (that is, deletions at the same location, with respect to the Root program).
PWNDCISZ
The minimum size (smallest) of a common insertion block in this WIP member.

$PBWSTAT: WIP Detail Statistics
120 Parallel Development Option Guide
PWXDCISZ
The maximum size (largest) of a common insertion block in this WIP member.
PWMDCISZ
The mean average size of a common insertion block in this WIP member.
PWNDCDSZ
The minimum size (smallest) of a common deletion block in this WIP member.
PWXDCDSZ
The maximum size (largest) of a common deletion block in this WIP member.
PWMDCDSZ
The mean average size of a common deletion block in this WIP member.
Derivation 1 Statistics
This section of the control block presents information pertaining to Derivation 1 only.
PWTD1INS
Indicates the total number of lines marked as insertions to the Root program by Derivation 1.
PWTD1DEL
Indicates the total number of lines marked as deletions to the Root program by Derivation 1.
PWTD1IBL
Indicates the number of blocks of insertion lines from Derivation 1.
PWTD1DBL
Indicates the number of blocks of deletion lines from Derivation 1.
PWTD1CHG
Indicates the number of changes made to existing records in the Root program by Derivation 1.
PWND1ISZ
Indicates the minimum size (smallest) of an insertion block from Derivation 1.
PWXD1ISZ
Indicates the maximum size (largest) of an insertion block from Derivation 1.

$PBWSTAT: WIP Detail Statistics
Appendix D: Statistical Data Control Blocks 121
PWMD1ISZ
Indicates the mean average size of an insertion block from Derivation 1.
PWND1DSZ
Indicates the minimum size (smallest) of a deletion block from Derivation 1.
PWXD1DSZ
Indicates the maximum size (largest) of a deletion block from Derivation 1.
PWMD1DSZ
Indicates the mean average size of a deletion block from Derivation 1.
Derivation 2 Statistics
This section of the control block presents information pertaining to Derivation 2 only.
PWTD2INS
Indicates the total number of lines marked as insertions to the Root program by Derivation 2.
PWTD2DEL
Indicates the total number of lines marked as deletions to the Root program by Derivation 2.
PWTD2IBL
Indicates the number of blocks of insertion lines from Derivation 2.
PWTD2DBL
Indicates the number of blocks of deletion lines from Derivation 2.
PWTD2CHG
Indicates the number of changes made to existing records in the Root program by Derivation 2.
PWND2ISZ
Indicates the minimum size (smallest) of an insertion block from Derivation 2.
PWXD2ISZ
Indicates the maximum size (largest) of an insertion block from Derivation 2.
PWMD2ISZ
Indicates the mean average size of an insertion block from Derivation 2.

$PBWSSUM: WIP Summary Statistics
122 Parallel Development Option Guide
PWND2DSZ
Indicates the minimum size (smallest) of a deletion block from Derivation 2.
PWXD2DSZ
Indicates the maximum size (largest) of a deletion block from Derivation 2.
PWMD2DSZ
Indicates the mean average size of a deletion block from Derivation 2.
Auto-Merge information
This section of the control block presents information pertaining WIP members that were automatically merged.
PWAMRGRC
The merge return code.
PWAMRGFL
The auto-merge indicator. It is set to Y if the WIP member was automatically merged.
$PBWSSUM: WIP Summary Statistics
The $PBWSSUM control block presents summary information for the entire WIP data set, and reflects much of the statistical information provided on the PDM Build WIP Summary report. Only one $PBWSSUM control block is written for each Build action.
*---------------------------------------------------------------------*
* *
* Macro: $PBWSSUM *
* *
* Function: The $PBWSSUM macro maps the PDM BUILD WIP Summary stat-*
* istics record. *
* *
*---------------------------------------------------------------------*

$PBWSSUM: WIP Summary Statistics
Appendix D: Statistical Data Control Blocks 123
$PBWSSUM DSECT
$PWSLEN DC Y($PWSDSLN) Length of the structure
$PWSEYE DC CL4'SSUM' Eye catcher
$PWSVERS DC Y(1) Version number
WSTYPE DC Y(2) Record Type: WIP Summary
WSWIPDSN DS CL44 WIP dataset name
WSMBRSEL DS F'0' Members selected for processing
WSMBRSUC DS F'0' Members successfully processed
WSMBRREP DS F'0' Members with REPLACE conflicts
WSMBRERR DS F'0' Members in error
WSMNOICD DS F'0' Members with no Inserts/deletes
WSMNOCON DS F'0' Members with no conflicts
WSMCOMP5 DS F'0' Members, complexity factor 5
WSMCOMP4 DS F'0' Members, complexity factor 4
WSMCOMP3 DS F'0' Members, complexity factor 3
WSMCOMP2 DS F'0' Members, complexity factor 2
WSMCOMP1 DS F'0' Members, complexity factor 1
WSMCOMP0 DS F'0' Members, complexity factor 0
WSMWPMRG DS F'0' Members Auto-Merged
WSHWIPRC DS F'0' Highest BUILD return code
$PWSDSLN EQU *-$PBWSSUM
MEND
Each field in the control block is described in the following list.
$PWSLEN
Size of the control block.
$PWSEYE
Eye-catcher, to help visually identify this control block.
$PWSVERS
Version to identify the control block.
WSTYPE
Type indicator for the control block. A type of 2 indicates that this is the WIP Summary control block.
WSWIPDSN
The WIP data set name.

$PBWSSUM: WIP Summary Statistics
124 Parallel Development Option Guide
WSMBRSEL
Indicates the total number of members selected for processing.
WSMBRSUC
Indicates the total number of members processed successfully (with a return code of 0000).
WSMBRREP
Indicates the number of members flagged as "replace conflicts;" that is, like-named members exist in the WIP data set, but the replace/no replace option has been set to "no replace." These members are not processed.
WSMBRERR
Indicates the number of members flagged as "in error." These members, if processed, should be considered invalid.
WSMNOICD
Indicates the number of members with no insertions or deletions from either derivation (that is, no changes at all were made to the member).
WSMNOCON
Indicates the number of members to which changes were made, but with no conflicts resulting from those modifications.
WSMCOMP5
Indicates the number of WIP members with a complexity factor of 5.
WSMCOMP4
Indicates the number of WIP members with a complexity factor of 4.
WSMCOMP3
Indicates the number of WIP members with a complexity factor of 3.
WSMCOMP2
Indicates the number of WIP members with a complexity factor of 2.
WSMCOMP1
Indicates the number of WIP members with a complexity factor of 1.
WSMCOMP0
Indicates the number of WIP members with a complexity factor of 0.
WSMWPMRG
Indicates the number of WIP members that were automatically merged.
WSHWIPRC
The highest build return code.

$PBMSTAT: Merge Detail Statistics
Appendix D: Statistical Data Control Blocks 125
$PBMSTAT: Merge Detail Statistics
The $PBMSTAT control block presents detail information about each member set involved in the Merge process, and reflects much of the statistical information provided in the PDM Merge Output Detail Report. One $PBMSTAT control block is written for each member set.
*---------------------------------------------------------------------*
* *
* Macro: $PBMSTAT *
* *
* Function: The $PBMSTAT macro is used to map the PDM Merge Output *
* statistics record. An Output statistics record is created for *
* each WIP member processed by the PDM MERGE OUTPUT action. *
* *
*---------------------------------------------------------------------*
$PBMSTAT DSECT
$PBMLEN DC Y($PBMDSLN) Length of the structure
$PBMEYE DC CL4'STAT' Structure Identifier
$PBMVERS DC Y(1) Structure Version number
PMTYPE DC Y(3) Structure Type identifier
PMREPL DS CL1 Global Replace option (Y/N)
PMPRCMDE DS CL1 Processing Mode (F/B)
PMWIPDSN DS CL44 WIP Dataset Name
PMOUTDSN DS CL44 Merge Output Dataset name
PMWIPMEM DS CL10 WIP Member name
PMOUTMEM DS CL10 Merge Output Member name
PMRUNTME DS F Time of Merge operation
PMRUNDTE DS F Date of Merge operation
SPACE ,
*---------------------------------------------------------------------*
* Merge Output General Statistics *
*---------------------------------------------------------------------*
PMPGENUM DS PL2 Report Page Number
PMWIPMRG DS CL1 If 'Y', Merge was run as part X
of Build WIP processing
PMWIPDEL DS CL1 If 'Y', the WIP member was del-X
eted by the Merge operation
PMRETCDE DS F Overall return code for member
PMTWPREC DS F Total number of WIP records
PMTMGREC DS F Total number of Merged records
PMTERREC DS F Total number of invalid records
$PBMDSLN EQU *-$PBMSTAT
MEND

$PBMSTAT: Merge Detail Statistics
126 Parallel Development Option Guide
Data Display by $PBMSTAT
$PBMSTAT presents data in two sections:
■ General source location information
■ General statistics
Each section, and each field within that section, is explained in the following list.
General Source Location Information ($PBMSTAT)
The first section of this control block provides general information about each WIP and output source member.
$PBMLEN
Size of the control block.
$PBMEYE
Eye-catcher for this control block.
$PBMVERS
Version to identify the control block.
PMTYPE
Type indicator for the control block. A type of 3 indicates that this is the Merge Detail Statistics control block.
PMREPL
Indicates your selection for the replace/no replace option for this member set:
■ Y—Yes
■ N—No
PMPRCMDE
Indicates the processing mode for this member set:
■ F—Foreground
■ B—Batch
PMWIPDSN
The WIP data set name.
PMOUTDSN
The output file data set name.
PMWIPMEM
The WIP member name.

$PBMSTAT: Merge Detail Statistics
Appendix D: Statistical Data Control Blocks 127
PMOUTMEM
The output file member name.
PMRUNTME
The time at which the Merge process was executed.
PMRUNDTE
The date on which the Merge process was executed.
General Statistics
The second section of this control block provides statistical data for each member involved in the Merge process.
PMPGENUM
The page on which detail information for this member appears in the PDM Merge Output Detail Report.
PMWIPMRG
Set to Y if the merge operation was done as part of Build WIP processing.
PMWIPDEL
Set to Y if the WIP member was deleted by the merge operation.
PMRETCDE
The return code resulting from the Merge processing of this member.
PMTWPREC
The total number of records contained in this WIP member.
PMTMGREC
The total number of records contained in the output source file (merged file).
PMTERREC
The total number of invalid WIP records detected in this particular WIP member.

$PBMSSUM: Merge Summary Statistics
128 Parallel Development Option Guide
$PBMSSUM: Merge Summary Statistics
The $PBMSSUM control block presents summary information for the WIP and output data sets involved in the Merge process. Only one $PBMSSUM control block is written for each Merge action.
*----------------------------------------------------------------------*
* *
* Macro: $PBMSSUM *
* *
* Function: The $PBMSSUM macro maps the PDM Merge Summary statistics *
* record. The Summary statistics record contains summary inform- *
* ation about the MERGE OUTPUT operation. *
* *
*----------------------------------------------------------------------*
$PBMSSUM DSECT
$PMSLEN DC Y($PMSDSLN) Length of the structure
$PMSEYE DC CL4'SSUM' Structure identifier
$PMSVERS DC Y(1) Structure version number
MSTYPE DC Y(4) Structure type identifier
MSOUTDSN DS CL44 Merge Output dataset name
MSMBRSEL DS F'0' Members selected for processing
MSMBRSUC DS F'0' Members successfully processed
MSMBRREP DS F'0' Members with replace conflicts
MSMBRERR DS F'0' Members in error
MSWIPDEL DS F'0' Number of WIP members deleted
$PMSDSLN EQU *-$PBMSSUM
MEND
Each field in the control block is described in the following list:
$PMSLEN
Size of the control block.
$PMSEYE
Eye-catcher for this control block.
$PMSVERS
Version to identify the control block.

$PBMSSUM: Merge Summary Statistics
Appendix D: Statistical Data Control Blocks 129
MSTYPE
Type indicator for the control block. A type of 4 indicates that this is the Merge Summary control block.
MSOUTDSN
The Merge Output data set name.
MSMBRSEL
Indicates the total number of members selected for processing.
MSMBRSUC
Indicates the total number of members processed successfully (with a return code of 0000).
MSMBRRE
Indicates the number of members flagged as "replace conflicts;" that is, like-named members exist in the WIP data set, but the replace/no replace option has been set to "no replace." These members are not processed.
MSMBRERR
Indicates the number of members flagged as "in error." These members, if processed, should be considered invalid.
MSWIPDEL
Indicates the number of WIP members deleted by merge processing.


Appendix E: PDM Implementation 131
Appendix E: PDM Implementation
This section contains the following topics:
Implementation Process Overview (see page 131) Step 1: Customize the PDM Batch JCL (see page 132) Step 2: Modify the PDM Dialog Panels (see page 132) Step 3: Integrate PDM with ISPF (see page 133) Step 4: Test PDM (see page 134) Step 5: Link-edit the CA Panvalet Access Modules (see page 138) Edit BC1JPAN (see page 138)
Implementation Process Overview
This appendix explains how to implement PDM at your site. It includes the following steps:
1. Customizing the PDM Batch JCL
2. (Optional) Modifying the PDM Dialog Panels
3. Integrating PDM with ISPF
4. (Optional) Testing PDM
5. Link-editing the CA Panvalet Access Modules
Note: If you wish to invoke PDM from CA Endevor SCM, refer to the Administration Guide.
Assumptions
This installation procedure assumes that, before installing PDM, you:
■ Understand OS JCL.
■ Know how to use the TSO ISPF/PDF Editor to customize files.
■ Have proper authority to define data sets, and to modify TSO ISPF panels, messages, and CLISTs.
■ Are using 3390-type disk devices at your site. Adjust all SPACE parameters accordingly if you are using another type of device.
Step 1: Customize the PDM Batch JCL
132 Parallel Development Option Guide
Step 1: Customize the PDM Batch JCL
The CA Endevor SCM installation unloads two members containing JCL to execute PDM in batch mode. Member BC1GJCL1, in data set iprfx.iqual.CSIQSENU, is used by the PDM batch submit option to build execution JCL. Member BC1GJCL2, in data set iprfx.iqual.CSIQJCL, contains JCL a PDM user can submit to execute PDM in batch. Both JCL and skeletons must be customized. Note that the PDM batch utility BC1G0000 does not have to be called by an authorized program.
■ Update the STEPLIB and CONLIB DD statements to refer to the load library created earlier.
■ To receive a re-cap and summary report, uncomment the C1MSGS2 DD statement.
Step 2: Modify the PDM Dialog Panels
This step is optional.
By default, PDM dialogs do not save information that you type in the other partitioned or sequential data set fields. This field is found on panels BC1G2000, BC1G2100, BC1G2200, BC1G2300, BC1G2400, BC1G4000, and BC1G4400.
You can modify the standard ISPF dialog panel definitions to save the information typed in these fields.
Important! Do not make any changes other than those in the "Examples" section that follows. Any other changes may adversely affect the operation of the PDM dialog.

Step 3: Integrate PDM with ISPF
Appendix E: PDM Implementation 133
PDM ISPF Examples
The PDM ISPF panel data set (iprfx.iqual.CSIQPENU) contains one member for each PDM panel. The member name is the same as the panel name. Use the ISPF/PDF editor to edit the panel. At the bottom of the panel definition there are two sections that contain commented code.
To allow PDM to save the information in the other partitioned or sequential data set fields, uncomment the line containing the VGET and the VPUT statements. Do this be removing the leading /* and trailing */ characters. An example of a modified panel follows.
)INIT
.ZVARS='(PTBREPOP PTBWPDVC PTBWPCRT PTBWPMRG PTBWSTAT)'
.HELP= BC1T2000
VGET (PTBWPOTH) PROFILE
)PROC
VPUT (PTBWPOTH) PROFILE
)END
After the panel is modified, save the member and repeat the process for each panel member.
Step 3: Integrate PDM with ISPF
This installation step defines PDM to your ISPF environment. The steps involved are summarized below, then described in more detail in the sections that follow:
1. Define the PDM data sets to ISPF. You can do this through a CLIST, or by editing an existing logon procedure (which in turn allocates the data sets under ISPF).
2. Add PDM as a valid option on an ISPF primary or secondary options panel.
Define the PDM Data Sets to ISPF
Define the PDM data sets to ISPF as follows.
1. To define the data sets through a CLIST, use the supplied CLIST (member BC1GCLS1 in the iprfx.iqual.CSIQCLS0 library), first checking to ensure that the names of the libraries match those used at your site. Make any changes necessary, by editing the CLIST.
2. To define the data sets through an existing logon procedure, copy the appropriate statements from the CLIST provided with the installation (above) to the logon procedure.

Step 4: Test PDM
134 Parallel Development Option Guide
The CLIST library delivered (iprfx.iqual.CSIQCLS0) is fixed blocked (FB). If your existing CLIST libraries are variable blocked (VB), use the TSO utilities to create and populate a VB file.
PDM files are installed with a blocksize of 3120. Make sure to place the file with the largest blocksize first in the concatenation.
Add PDM to an ISPF Option Panel
Add PDM as a valid option on an ISPF primary or secondary options panel. You might define it as an option on the ISPF/PDF Primary Options Menu, for example, which is generally stored in the TSO Panel Library (ISPPLIB) as ISR@PRIM. Edit the panel you have selected, modifying the text portion of the panel to include an option for accessing PDM.
For example, to use option P to select PDM, insert the following line in the list of menu options:
P - Parallel Development Option
Modify the processing portion of the same panel to execute the PDM main program when the defined option is selected:
P,'PGM(BC1G1000) NOCHECK NEWAPPL(CTLI)'
Step 4: Test PDM
This step is optional.
This installation step walks you through the basic functionality of PDM, using examples provided within the iprfx.iqual.CSIQJCL library. The major steps in this exercise are laid out briefly below, followed by a detailed description of each step.
1. Define two data sets, one to hold the work-in-process (WIP) file and one to hold the results of the merge function.
2. Within PDM, perform the Build WIP function
3. View and edit the WIP file
4. Perform the Merge function
5. Test Batch PDM by performing the Build WIP and Merge functions in batch.

Step 4: Test PDM
Appendix E: PDM Implementation 135
Define the WIP and Merge Data Sets
Define two libraries as follows:
1. The work-in-process (WIP) data set must have a record length of at least 88. For the example, one track should be enough space for this library. Use the following specifications as a guideline when defining the WIP file:
RECFM=FB,LRECL=88,BLKSIZE=8800, DSORG=PO
2. The Merge data set should be in an appropriate physical format to hold the resultant source code. For the example, one track should be enough space for this library. Use the following specifications as a guideline when defining the Merge file:
RECFM=FB,LRECL=80,BLKSIZE=3120,DSORG=PO
Perform the Build WIP Function
Using the CLIST or the logon proc defined in the previous step, sign onto PDM. Perform the following:
1. Select option 1 - BUILD WIP from the PDM primary options menu. In the processing mode field, ensure that F (Foreground) is specified. Press Enter.
2. Specify the WIP library defined above on the WIP Specification Panel. Specify PROGX as the member name. Specify Y in the data set options field to replace like-named members in this library. Press Enter.
3. Specify the PDM JCL library (iprfx.iqual.CSIQJCL), and the member PDMROOT on the Root Specification Panel. Also specify the comparison columns desired (7-72 will work in this case). Press Enter.
4. Specify the PDM JCL library (iprfx.iqual.CSIQJCL), and the member PDMDER1 on the Der 1 Specification Panel. Press Enter.
5. Specify the PDM JCL library (iprfx.iqual.CSIQJCL), and the member PDMDER2 on the Der 2 Specification Panel. Press Enter.
When the WIP file has been successfully built, you will be returned to the primary options menu. There should be a message in the upper right-hand corner that says "WIP BUILD COMPLETE".
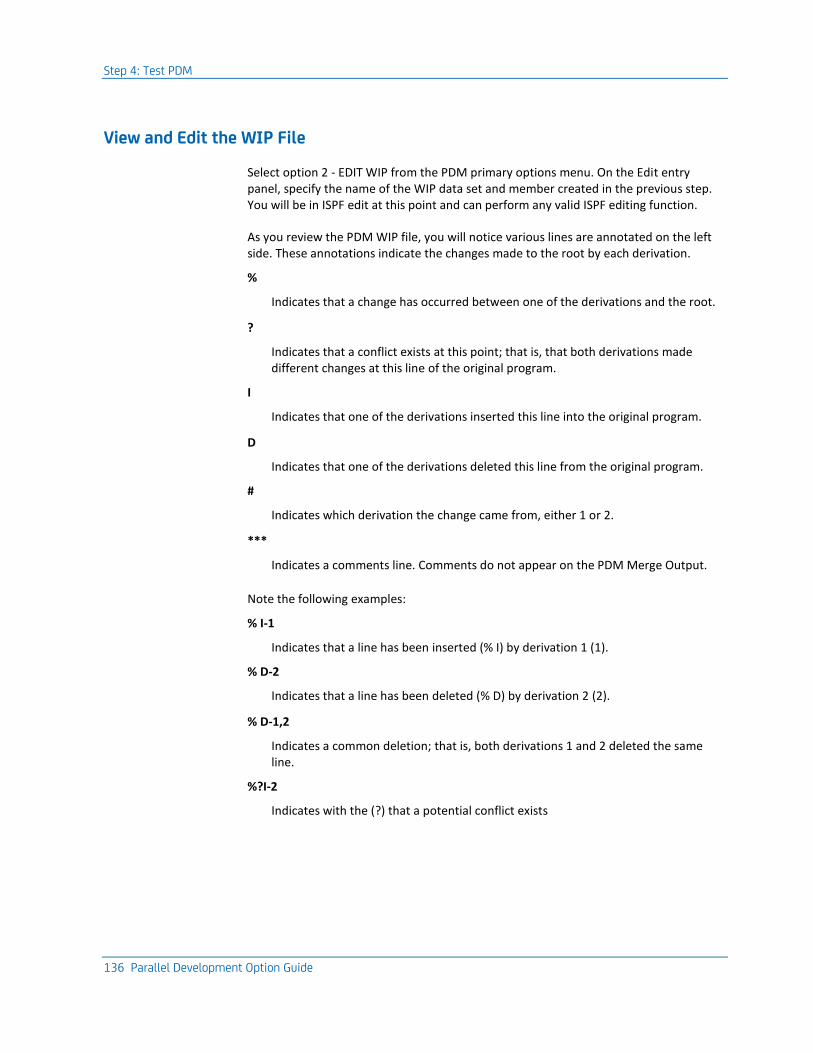
Step 4: Test PDM
136 Parallel Development Option Guide
View and Edit the WIP File
Select option 2 - EDIT WIP from the PDM primary options menu. On the Edit entry panel, specify the name of the WIP data set and member created in the previous step. You will be in ISPF edit at this point and can perform any valid ISPF editing function.
As you review the PDM WIP file, you will notice various lines are annotated on the left side. These annotations indicate the changes made to the root by each derivation.
%
Indicates that a change has occurred between one of the derivations and the root.
?
Indicates that a conflict exists at this point; that is, that both derivations made different changes at this line of the original program.
I
Indicates that one of the derivations inserted this line into the original program.
D
Indicates that one of the derivations deleted this line from the original program.
#
Indicates which derivation the change came from, either 1 or 2.
***
Indicates a comments line. Comments do not appear on the PDM Merge Output.
Note the following examples:
% I-1
Indicates that a line has been inserted (% I) by derivation 1 (1).
% D-2
Indicates that a line has been deleted (% D) by derivation 2 (2).
% D-1,2
Indicates a common deletion; that is, both derivations 1 and 2 deleted the same line.
%?I-2
Indicates with the (?) that a potential conflict exists

Step 4: Test PDM
Appendix E: PDM Implementation 137
%?I-1
at this point in the original program. Both derivations inserted different lines at the same location in the program.
You may perform any valid ISPF editing function within this file. You may also change the annotations in columns 1-8 of the WIP file. Any line marked with a D in the annotation area will not be included when the file is merged. Any line not marked or marked with an I in the annotation area will be included when the file is merged. Use PF3 to return to the main PDM menu when you are finished.
Perform the Merge Function
Select option 3 - MERGE from the PDM primary options menu. On the subsequent Merge Work In Process File panel specify the name of the WIP data set and member created above.
When you press Enter, the Merge Output Specification Panel appears. Specify on this panel the name of the Merge data set defined in the first step (PROGX). When complete, press Enter.
When the file has been successfully merged into an output data set, the Merge Work in Process File panel reappears with the message "MERGE COMPLETE" in the upper right corner of the screen. Press PF3 to return to the Primary Options Menu.
Test Batch PDM
On the PDM primary options panel, specify B (Batch) as the processing mode and enter the name of a Batch Request Data Set. Perform all the steps described above to Perform the Build WIP Function. Rather than performing the build WIP function immediately, PDM places requests into the specified batch request data set used to drive subsequent batch execution.
Once you have specified all the necessary parameters for building the WIP, and received the message "REQUESTS WRITTEN", select option 4-SUBMIT to execute the Build WIP function in batch. A batch submission panel is displayed. Type a valid jobcard on this panel, then choose option 3 - SUBMIT to submit the batch PDM job.
When the WIP has been successfully built, you can use the Merge panels to cause PDM to code the appropriate commands to perform the Merge function, then submit PDM in batch to perform the Merge function.

Step 5: Link-edit the CA Panvalet Access Modules
138 Parallel Development Option Guide
Step 5: Link-edit the CA Panvalet Access Modules
If you are using CA Panvalet as a source library manager at your site, you must link-edit the CA Panvalet access method (PAM) module with several of the PDM CA Panvalet interface modules. To do this:
1. Edit member BC1JPAN (in the JCL library) to supply the name of your CA Panvalet load library.
2. Link-edit the PAM module, using the BC1JPAN JCL to do this. Place the output load module created by this job in CONLIB.
3. If necessary, redefine the Defaults Table, specifying LIBENV as PV.
Each of these steps is described in the following sections.
Edit BC1JPAN
Tailor the BC1JPAN JCL to supply the correct name of your CA Panvalet load library on the PAMLIB DD statement.
Run BC1JPAN
If you have not done so already, copy the JOBCARD member (in the JCL library) to the beginning of BC1JPAN. Then submit the job for execution. BC1JPAN link-edits the PAM module and places the output load module in CONLIB.
Redefine Defaults Table
If necessary, redefine the Defaults Table to specify LIBENV as PV. The LIBENV parameter is in the TYPE=MAIN macro.
Note: See Step 2: Create the PDM Defaults Table for related instructions.

Index 139
Index
$
$PBMSSUM control block (Merge Summary Statistics) • 128
$PBMSTAT control block (Merge Detail Statistics) • 125
$PBWSSUM control block (WIP Summary Statistics) • 122
$PBWSTAT control block (WIP Detail Statistics) • 110
A
Accessing PDM • 19 Auto-Merge Information • 122
B
Batch PDM generating build WIP and merge requests • 65 generating build WIP requests option 1 • 67 generating merge requests option 3 • 68 specifying a request data set • 65 submitting batch requests for execution option 4
• 68 Batch requests for execution option 4, submitting •
68 BC1GJCL2 JCL sample • 85 Beginning build of WIP information • 73 Beginning merge of WIP member information • 81 Browsing request data set • 69 BUILD MASK syntax statement • 96 Build WIP
allocating a WIP library • 26 creating WIP files or SCL • 41 excluding a WIP member • 36 options • 25 positioning the matrix • 40 printing the matrix • 39 selecting an element • 31 sorting the matrix • 41 specifying a derivation 1 library or CA Endevor
SCM location • 31 specifying a root member or element • 30 specifying a WIP library and build WIP options •
24 specifying a WIP member • 27 specifying derivation 1 • 31
specifying the root • 27 using the WIP member selection matrix • 36
Build WIP requests option 1, generating • 67 Build WIP requests, generating • 65 BUILD WIP summary information • 79
C
C1MSGS1 DD statement • 71 C1MSGS2 DD statement • 71 Commands
CREATE • 41 EXCLUDE • 36 LOCATE • 40 PRTMAT • 39 SORT • 41 WIP edit • 47
Common deletion • 17 Common insertion • 17 Complex parallel development • 12 Complexity factor • 17 Concurrently developed software, integrating • 13 Conflict • 17 Conflict area • 17 Conflicts information • 74 Contention area • 17 CREATE command • 41 Creating
merge output file • 59 WIP files or SCL • 41
D
Derivation 1 file name • 17 Derivation 1 library or CA Endevor SCM location,
specifying • 31 Derivation 1, specifying • 31 Derivation 2 file name • 17 Detail statistics • 74, 82 Disable the build WIP and merge performance
enhancement option • 21 Displaying
beginning build of WIP information • 73 beginning merge of WIP member information •
81 BUILD WIP summary information • 79 conflicts information • 74

140 Parallel Development Option Guide
detail statistics • 74, 82 highest BUILD return code • 81 highest MERGE return code • 84 inserts and deletes information • 74 merge summary information • 83 output data set information • 83 relative change information • 74 return code information • 74, 82 WIP data set library information • 77, 83 WIP data set member information • 78 WIP member information • 83
E
Edit - Entry Panel • 47, 55 Edit Macronames listed with member names • 107 Editing
request data set • 69 WIP file • 47
EXCLUDE command • 36
G
Generating Build WIP and merge requests • 65 build WIP requests option 1 • 67 merge requests option 3 • 68
H
Highest BUILD return code • 81 Highest MERGE return code • 84
I
Inserts and deletes information • 74 Installing PDM
step 1 - customize the PDM batch JCL • 132 step 2 - modify the PDM dialog panels • 132 step 3 - integrate PDM with ISPF • 133 step 4 - test PDM • 134 step 5 - link-edit the CA Panvalet access modules
• 138 Integrating concurrently developed software • 13
L
LOCATE command • 40
M
Macronames listed with member names • 107 Matrix
positioning • 40 printing • 39 sorting • 41
Merge Detail Statistics (control block $PBMSTAT) • 125
MERGE MASK PDM syntax statement • 101 Merge output file
creating • 59 example • 58
Merge Output Member Selection List panel • 61, 62 Merge Output Specification Panel • 59, 60 Merge requests option 3, generating • 68 Merge requests, generating • 65 Merge summary information • 83 Merge Summary Statistics (control block
$PBMSSUM) • 128 Merge Work In Process File panel • 59 Merging a WIP file • 59
O
Output data set information • 83
P
Panels Edit - Entry Panel • 47, 55 Merge Output Member Selection List • 61, 62 Merge Output Specification Panel • 59, 60 Merge Work In Process File • 59 Parallel Development Option menu • 19, 47, 59,
65, 67, 68 Parallel Development Option WIP Summary • 45 PDM Batch Options Menu • 69, 70 Request Dataset Allocation Panel • 66 Summary of Levels • 42 WIP Member Selection Matrix • 39, 41
Parallel development complex • 12 description • 11 simple • 12
Parallel Development Option menu • 19, 47, 59, 65, 67, 68
Parallel Development Option WIP Summary • 45 PDM
accessing • 19 how it works • 15 specifying user defaults • 19 terms • 17 tools for project analysis • 14

Index 141
PDM Batch Options Menu • 69, 70 PDM Build WIP Detail report • 72 PDM Build WIP Summary report • 77 PDM Merge Output Detail report • 81 PDM Merge Output Summary report • 82 PDM Syntax Request Report for Build WIP • 72 PDM syntax statements
BUILD MASK • 96 description • 87 MERGE MASK • 101 STATS OFF • 102 structure of • 88
PRTMAT command • 39 PRTMAT output defaults • 20
R
Relative change information • 74 Reports
PDM Build WIP Detail • 72 PDM Build WIP Summary • 77 PDM Merge Output Detail • 81 PDM Merge Output Summary • 82 PDM Syntax Request Report for Build WIP • 72
Request data set browsing • 69 editing • 69 specifying • 65 submitting for batch processing • 70
Request Dataset Allocation Panel • 66 Return code information • 74, 82 Root file name • 17 Root member or element, specifying • 30 Root, specifying • 27
S
Saving WIP member after editing • 55 SCL, creating • 41 Simple parallel development • 12 SORT command • 41 Specifying
derivation 1 • 31 derivation 1 library or CA Endevor SCM location •
31 request data set • 65 root • 27 root member or element • 30 user defaults • 19 WIP library and build WIP options • 24
WIP member • 27 Statistics file, file name • 17 STATS OFF PDM syntax statement • 102 Submitting
batch requests for execution option 4 • 68 request data set for batch processing • 70
Summary of Levels panel • 42
U
Updates, vendor application • 13 User defaults for PDM, specifying • 19
V
Vendor application updates • 13
W
WIP data set library information • 77, 83 WIP data set member information • 78 WIP Detail Statistics (control block $PBWSTAT) • 110 WIP edit commands
WIPCHANG • 48, 52 WIPCON • 48, 53 WIPCOUNT • 50 WIPHELP • 48 WIPLDEL • 48, 50 WIPMERGE • 48, 54 WIPPARA • 48, 53 WIPSHOW • 48, 51 WIPUNDEL • 48, 50
WIP file annotations • 46 creating • 41 editing • 47 example • 46 format • 45 header • 45 merging • 59
WIP library allocating • 26 specifying • 24
WIP member excluding • 36 saving after editing • 55 specifying • 27
WIP member information • 17, 83 WIP Member Selection Matrix • 17, 39, 41 WIP Member Selection Matrix panel • 17

142 Parallel Development Option Guide
WIP Summary Statistics (control block $PBWSSUM) • 122
Work in process (WIP) file, file name • 17