c ot - sears parts direct...c ot digital still camera cyber-shot handbook...
TRANSCRIPT

_'CLICK!
C ot
Digital Still Camera
Cyber-shot Handbook
DSC- T70/T75/'I'200
Before operating the unit, please read thisHandbook thoroughly together with the"'Instruction Manual" and the "'Cyber-shotStep-up Guide", and retain them for futurereference.
© 2007 Sony Corporation 3-219-480-11 (1) ©

Notesonusingyourcamera
Notesonthetypesof "Memory Stick"thatcan heused(notsupplied)
_o_ "Memory Stick Duo":
you can use a "MeuleryStick Duo" wilh yourCauleFa.
"Memory Stick":
you cannot use a"Memory Stick"
with your camera.
Othermemorycardscannotbeused.
• For details on "Memory Stick Duo"_ seepage ]2 l,
Whenusinga "Memory Stick Duo"with"Memory Stick" compatible equipment
You c:m use the "Memory Stick Duo" by
inserting it into the Memory Stick Duo
Adaptor (not supplied).
Memory Stick Duo Adaptor
Notes on the battery pack
• Charge tile battery pack (supplied) belore usingtile cinllera lot lbe lirsl lime,
• The bauery pack can be charged even if it is notcomplelely discharged. Also, even if the bauel Tpack is nol flllly charged, you can use lhepaldally charged capacily of the baltery pack asis,
• If you do nol intend to use the balte W pack lot along lime, use up tile existing charge andrelnove it hom your camera, then store it in acool, dry place. This is to maintain the batterypack hmctions.
• For details on the usable bauery pack, seepage 123.
Carl Zeisslens
This camera is equipped with a C:uq Zeiss
lens which is capable of reproducing sharp
images with excellent contrast.
The lens for this camera has been produced
under a quality assurance system certified
by Carl Zeiss in accordance with the quality
standards of Carl Zeiss in Germany.
Notesonthe LCDscreenandlens
• Tile LCD screen is manul,tctured usingextremely high-precision teclmology so o_er99.99% of the pixels am operational 1or
ellcclive use. However, there may be some tinyblack points and/or brigbl points (white, rod,blue or green in color) that constantly appear onlhe LCD semen. Tbese poinls am normal in themanulacturing process and do not allect tberecording in any way.
: !ii
IIi _ Black, white, red, blue
_._.><.i_" or green points
• If waler droplets or other liquids splash on lheLCD screen and make it wet, inunediatcly wipeoil the screen with a soft cloth. Leaving lkluids
on the LCD semen surlace can harm the qualityand cause a nlalhlnction.
• Exposing lhe LCD screen or the lens to direclsunlight for long periods may causenlallhnctions. Be carehll when placing lhecamera near a window or oludoors.
• Do not prcss against the LCD screen. The screen
may be discolored and tbal may cause amalflmction.
• Images may trail across on the LCD screen in acold location. This is nol a malfunction.
• Be careful nol to bump the lens. and be carchllnot tO apply Iorce to il.

Thepictures usedinthis Handbook
Tile photographs used _lsexmnples oi pictures inthis Handbook am reproduced images, and are nolactual images shot using this camera.
On illustrations
lllustralions used in lifts H_uldbook arc oiDSC-T200 unless holed otherwise.

Table of contents
Notes on using your camera ..................................................................... 2
Basic techniques for better images ........................................................... 8Focus Focusing on a subject successfully ..................................................... 8Exposure Adjusting the light intensity ........................................................... 10Color On the effects of lighting ..................................................................... 11Quality On "image quality" and "image size". .............................................. 12Flash On using the flash ............................................................................... 14
Identifying parts ....................................................................................... 15Indicators on the screen .......................................................................... 17
Operate the touch panel ......................................................................... 22
Changing the screen display ................................................................... 23
Using the internal memory ...................................................................... 25
Shooting images easily (Auto Adjustment mode) ................................... 26Setting Image size/Self-timer/Flash mode/Macro recording ........................... 28Setting Focus/Metering Mode/ISO/EV ............................................................. 30
Viewing images ....................................................................................... 35
Deleting images ...................................................................................... 37
Learning the various functions - HOME/Menu ....................................... 39Menu items ............................................................................................. 42
Switching the shooting mode .................................................................. 43
Shooting images using Scene Selection ................................................. 44
Shooting menu ........................................................................................ 47
REC Mode: Selecting the continuous shooting method
EV: Adjusting the light intensity
Focus: Changing the focus method
Metering Mode: Selecting the metering mode
White Balance: Adjusting the color tones
Color Mode: Ch raging the vividness of the image or adding special effects
Flash Level: Adjusting the amount of flash light
Red Eye Reduction: Reducing the red-eye phenomenon
Face [)election: Detecting the li_ce of subject
SteadyShot: Selecting the anti-blur mode
Setup: Selecting the shooting settings

Playing back images from the HOME screen .............................54[] (Single Image): Playing back a single image
mmmm(Ira ige Index): Playing back a list of images
Slideshow : Playing back a series of ilnages
Viewing menu ......................................................................................57(Retouch): Retouching slill im iges
¢e_' (Paint): Painling on still images
(Mul 1 Reslzmg : (hanging the image size according to usage
(Wide Zoom Display): Displa} ing still images in 16:9
(Slideshow): Playing back a series of images
(Delete): Deleling images
d e (Protect): Preventing iccidental erasure
0POF: Adding a Prinl order mark
,h, (Print): Printing ilnages using a printer
(Rotate): Relating a still image
(Select Folder : Selecling Ihe folder for viewing images
(Vohlme Settings): Acljusting the vohlme
Painting or putting stamps on still images (Paint) ...................... 65
Customizing the Manage Memory feature and the Settings ........67Manage Memory ..........................................................................68
_,m Memory Tool -- Memory Stick Tool .................................................. 68
Formal Change REC.Folder
Create REC.Folder Copy
@,m Memory Tool -- Internal Memory Tool ............................................. 70
FOl'lllal
"_ Settings 71
_,1" Main Settings -- Main Settings 1 ...................................................... 71
Beep Calibralion
Function Guide Housing
hlitialize
_1' MainSettings -- Main Settings 2 ...................................................... 78USB Connect Video Oul
COMPONENT TV TYPE

6 Shooting Settings -- Shooting Settings 1......................................... 75
AF Illuminator AF Mode
Grid Line DiLzital Zoom
6 Shooting Settings -- Shooting Settings 2 ......................................... 78
Auto Orientation Smile Level
Auto Review
(_) Clock Settings ................................................................................... 79
[m Language Setting ............................................................................. 80
Viewing images on a TV ......................................................................... 81Viewing images by connecting your camera to a TV with the supplied cable formulti-use terminal ............................................................................................ 81Viewing an image by connecting your camera to a HD TV ............................. 83
Enjoying your Windows computer ........................................................... 85
Installing the software (supplied) ............................................................ 87
On the "Picture Motion Browser" (supplied) ............................................ 89
Copying images to your computer using the "Picture Motion Browser" .... 90
Copying images to a computer without "Picture Motion Browser". ......... 94
Viewing image files stored on a computer with the camera copying to the"Memory Stick Duo". ............................................................................... 96
Using the "Music Transfer" (supplied) ..................................................... 97
Using your Macintosh computer ............................................................. 98
Viewing "Cyber-shot Step-up Guide". ................................................... 100
How to print still images ........................................................................ 101
Printing images directly using a PictBridge compliant printer ............... 102
Printing at a shop .................................................................................. 105

Troubleshooting.....................................................................................107Warningindicatorsandmessages........................................................117
[i]l_
Using your camera abroad -- Power sources ....................................... 120
On the "Memory Stick Duo". .................................................................. 121
On the battery pack ............................................................................... 123
On the battery charger .......................................................................... 124
On Cyber-shot Station ........................................................................... 125
IITIII_B
Index ...................................................................................................... 127

Basictechniquesfor better images
This section describes the hasics so you canenjoy your camera. It tells you how to usevarious camera functions such as the HOME
screen {page 39), the menus (page 41 ), and soon.
Focusingon a subjectsuccessful/y
the shutter butlon halfway down, the camera atljusts the focus automatically
Remember to press the shutter butlou ouly halfway down.
Press tile shuuer Press tile slluuer Then press tile
button tully down bllUOll Ilalfway AE/AF lock indicator shuuer blulon
suddenly, dowll. I]asllillg _ lit/beeps lully dowll.
To shoot a slill image difficult Io focus on _ [Focus] (page 31)
If the image looks blurred even after focusing, it may be because of camera shake. _ See"Hints for preventing blur" (as follows;).

Hintsfor preventingblur
The camera moved accidentally when _ou took the picture. This is called "C:nnera shake."
On the other hand. if the subject moved when you took the picture, it is called "subjectblur."
Camerashake
Cause
Your hands or body shake while you hold tileCatllelu and press tile sbuuer button, alld tile enlh'c
screen is blurred.
Subjectblur
What you can do to reduce the blurring
• Use a tripod or place tile camera on a flat, stable
surlace to hoM tile cmnel"a steady.
• Shoot with a 2-second delay sell-tinier and
stabilize your cmllera by holding your shooting
ann firmly at your side after ,mvssing tile shuuerbutton.
Cause
E_en though tile CUlnera is steady, the subjecllno_/es durillg tile exposure so tile subject looksblulred when tile shutter button is pressed.
Notes
What you can do to reduce the blurring
• Select N_O (High Sensilivity) mode in Scene
Selection.
• Select a higher ISO sensilivity to nlake tile
shuuer speed luster, and press file shuuer buuon
belbre file subjecl moves.
The anti-blur hmction is enabled in tile hactory delault seUings so that tile camera shake is reducedautomatically. However, this is not ellcctive lor su_!iect blur.
Besides, camera shake and subject blur occur hequently under low-light or slow slmtter speed. e.ib .condl ions, such as hose encoun ered m ._ (Twdlgh) or m (Twfllgh Pot rm ) mode. In lla ca_,
sllool wilh lhe above tips in mind.

Basi_} te_H_iqll_eS f_[ b_tle_ i_/_s¢}s$
Adjusting the light intensity
_i.m ricre tte various images bv adiustiug tile exposure :rod tile ISO sensitivity. Exposure is
the _iffii tint ( f light that the camera will receive when you release the shutter.
Exposure:Shutter speed = Length of time the camera receives
light
Aperture = Size of the opening allowing light to pass
tim) ugh
ISO sensitivity (Recommended ExposureIndex)
= Recurding seusitivit_
Overexposure= too much lightWhitish image
Correct exposure
Underexposure= too little lightDarker image
The expusure is automatically set tu thepruper value in the auto adjustment mode.However, you can adjust it manually usingthe l)mctions below.
Adjusting EV:Alluws you tu adjust the exposuredetermined by the camera (pages 24, 34).
Metering Mode:Allows you to change the part of thesubject to be measured tu determine theexposure (page 33).
10

Adjusting ISO Sensitivity (Recommended Exposure Index)
IS() sensitivity is a speed rating for recording media that incorporates an image sensor thatreceives light. Even when the exposure is the same, images differ depending on the ISOsensitivity.To adjust the ISO sensitivity, see page 34.
High ISO sensitivityRecords a bright image even when shooting in a dark location, reducingblur with a high shutter speed.However. the image tends to become noisy.
Low ISO sensitivityRecords a smoother image.However. when the exposure is insufficient, the image may become darker.
Example: The color ol an image alfected by light sources
Daylight Cloudy Fluorescent Incandescent
White (standard) Bluish Green-tinged Reddish
The color tones are acUusted automatically in the auto adjustment mode.However, you can ac[iust color tones manually with [White Balance] (page 49).
11

On "image quality" and "image size"
iA di_ilal re]age ts made up ul a celleclten el small dots called ptxels.It ii l.'bh_ {ins a large number of pixels, tile picture becomes large, it lakes up mere memory.
and the image is displayed in fine detail. "hnage size" is shown by the number of pi×els.
Although you cannot see the differences on the screen of the can]era, the fine detail and data
processing time differ when the image is printed or displayed on a computer screen.
Description of the pixels and the image size
j_" ..........................3264 ................._ (_ hnagc size: 8M
L Pixels _l NI 64(1 pixels x 480 pixels = 307,200 pixels
Selecting the imagesize for use (page13)
Pixel Many pixels (Fine
image quality and
large file size)
Example: Printing in
up t_ A3 size
Few pixels (Rough
inlage quality but
small file size)
Example: An attachedin]age to be _nl bye-mail
12

The default settings are marked with _.
_8M(3264×2448)
_1.,2 3:2 113264×2176)
5M(2592× 1944)
_'_ 3M(2048x 1536)
{-_t, VGA(640x480)
For prints up to A3( I I x 17")
Shoot in 3:2 aspect ratio
For prints up to A4(8.5x I 1")
For prints up to 10x 15 cm
(4x6") or 13x 18 cm(5xT')
Shoot at small image size fore-mail attachments
Shoot in HDTV aspect ratio
Less Fine
[]
[]RoughMore
_...9 16:9'2(I 920x 1080)
*1 hnages are recorded in 3:2 aspect ratio, same as photograph printing paper or postcards, etc.
*2 Bolh edges ol tile image may be cul oll when prinling (page 114).
v[_ 640(Fine)(640x480)
Shoot high qualily movie |X)l display on TVApprox. 3(1
Approx. 17
Approx. 8
_'_D 640(Standard) Shoot standard quality movie for display on(640x480) TV
a_0 320 (320x240) Shoot at small image size for e-mailattachments
• The larger lhe image size. the higher file image quality.
• Tile more lrames per _cond you i?layed back. tile smoolher playback can be,
13

BaSilSteS_lr_i¢lSeSf_ b_tl@_ i_/_s¢}s$
The "Red-eye phenomenon"This is caused by the reflection of flash |ight off the Nood vesse|s of the retina of the subject's
eyes because the pupils of the subject's eyes are _ide open in a dark place.
Camera Eye
Retina
How can the "Red-eye phenomenon" be reduced?
• Set [Red Eye Reductkml lo [Onl (page 52)
• Select I_'O (High Sensitivity)* mode in Scene Selection (page 44) (The flash is turned oil automatically.)
• When file eyes of the subject turn oul red. correct the image with [Retouch] on lhe viewing menu(page 57) or with the supplied sol}ware "Piclurc Motion Browser"
The "White circularspots"
This is caused by partMes (dust, pollen, etc.) in the air. which when they are close to the lens.
can be accentuated by the camera's flash.
Camera
poUen, etc.) inthe air
How can the "White circular spots" be reduced?
• Light tile room mid shoot the subject without a flash
• Select I_'O (High Sensitivity)* mode in Scene Selection (The flash is turned oil aulonlulically )
* Even though you selected I_o (High Sensitivily) mode in Scene Selection. the shulter speed might beslower under low-light condilions, or in a dark place In lhal ca_, use a lripod or hold your shooting armfirnlly at your side alter pressing lhe shulter butlon
14

Identifyingparts
DSC-T200
See the pages in parentheses lor details of
operation.
[] Zoom (W/T) lever (28)
[] Shutter button (27)
[] Microphone
[] D_ (Playback) button (35)
[] POWER button/POWER lamp
[] Flash 129)
[] Lens
[] AF illuminator (75)/Self-timer lamp(28)/Smile shutter lamp 1461
[_1 Lens cover
[] LCD screen/Touch panel (22, 23)
[] Hook fllr wrist strap/Grip
[] Speaker
[] Battery insertion slot
[] Multi connector
Used in the following situations:
• Making a USB conneclion between lhecamera and the colnputer.
• Making a connection 1o audio/video inpuljacks on a TV.
• Making a connection 1o a PictBridgecomplianl prinler.
[] Access lamp
[] "Memory Stick Duo" slot
[] Battery q}ect lever
[] Battery/"Memory Stick Duo" cover
[] Tripod receptacle
• U_ a tripod with a screw length of less than5.5 mm (7132 inch). You will be unable tofirmly _cum the camera to tripods havingscrews longer than 5.5 mm 17132 inch), andmay damage the camera.
15

DSC-T70[r75
See the pages in pm'entheses for details ofoperation.
[] POWER button/POWER lamp
[] Zoom (W/T) lever 128)
[] Shutter button (27)
[] [_ (Playbackl button (35)
[] Flash 129)
[] Microphone
[] Lens
[] AF illuminator (751/SellLtimer lamp
/28)/Smile shutter lamp (46)
[_ Lens cover
[] Speaker
[] LCD screen/Touch panel (22, 23)
[] Hook for wrist strap/Grip
[] Battery insertion slot
[] Multi connectorUsed in the following situalions:
• Making a USB connection betweenthecamera and tile COlnputer.
• Making a connection to audio/video inputjacks on a TV.
• Making a connection to a PictBridge
complianl prinler.
[] Access lamp
[] "Memory Stick Duo" slot
[] Battery eject lever
[] Battery/"Memory Stick Duo" cover
[] Tripod receptacle
• Use a tripod with a screw lenglh of less than
5.5 mm (7/32 inch). You will be unable tofirnfly secure the camen_to tripods havingscrews longer than 5.5 mm (7132inch), andmay damage file canlera,
16

Indicators on the screen
Touch [DISP] on the screen to change tothe display selection screen (page 23).See the pages in parentheses for details ofoperation.
Whenshootingstill images
_[*_ 12_Fa._Iso4oo+_.0Ev,_a_]Q
When shooting movies
÷_m
Screen operation
You c:m change tile settings by touching the
following: [_, [_, [_.
• Touching an icon displays the guide aboutthe touched item. To hide this guide,touch [?1 (page 22).
[]
HOME
.f_ _o _o_OFF'_o _2
I_'o0 "° _Jm_
MENU
Displays Ihe HOME screen.
hnage size sellings (13)
Self-timer settings (28)
Shooting mode settings
(43)
Shooting mode (Scene
Selection) settings (44)
• Touch [] in the shootingmode settings to select lheScene Selection mode.
Displays the MENU screen.
[]
BACK
_OFF
._Auro_ f_sL('_
DISP
Ind
Backs to the previousscreen.
This cancels the focusingon the subject selected bythe touch operation.
Flash mode settings (29)
Macro/Close focus settings(3O)
Changes the scrc*-'ndisplay.
17

18
[]
mm_0.5m 1.Ore
3.0m 7.0m oo
[][][]
IsoAUTO
0EV
Screen indicators
Screen indicators [] to [] sho_x the
current setting status.
ndication ..................................................................
AF mode/focus preset
settings (31,32)
• [0,5m] is available in file
DSC-TT0/T75 only,
Metering mode settings(33)
ISO number settings (34)
Exposure Value settings
(34)
[]
[O]5
×1.3
sO,pO,
Flash charging
C:32:00 Self-diagnosis display
1117)
_ndicati n
Battery remaining
Smile shutter/number of
still images)
Zoom scaling (28, 76)
[]
_ON
SteadyShot (53)
• Displayed when the shuttcrbutton is pressed hall\ray
down ill tile delault _ttings,
Recording Media
('Memory Stick Duo,"internal memory)
Recording [okler (68)
• This does not appear whenusing internal nlemory.
AF ilhmdnator 175)
_i_iii__ji@!i!i!i!i!i!i!i!i!i!i!i!i!i!i!i!i!i!i!i!i!i!i!i!i!i!i!i!i!i!i!i!i
g6
00:00:00
;f+ {'--BRK _RK
[_ ±0.3 _0.7
BRK±t,0
[_] Face Deleclion/52)
_1 Touch AF indicalor 126)
=_ Housing 172
,_,_. .....,,_,,1,,,r-2 White bahmce (49)
Coh, 50)
_ndication
Vibration _ arning
• Indicates vibration mayprevent you fiom shootingclear images due toinsufficient lighting. Even iftile vibration warningappears, you can slill shootilllages. However, we
rccolnnlend lhal you [urll Oll
the anti-blur hlnction, usingthe flash lor better lightingor using a tripod or othernleans to stabili/c tile
camera (page 9).
Self-timer (28)
Number of recordable
images
Recordable time/h:m:s)
Red-c) e reduction (52)
Flash level (51 )
Recording mode (47)

I_isste_s e_ the ser88_
[]
r
AF rangefinder frame (31)
Low battery warning (117)
Histogram (24)
[]
RN
125
F3.5
IS0400
+2.0EV
{gSL @
Standby
REC
0:12
Indication
AE/AF lock (27)
NR slow shutter
• When the shutter speeddrops below a certain speedin low light conditions, theNR (Noise Reduction) slowshutlcr fllnction is activated
automatically to reduce thepicturc noise.
Shutter speed
Apmlure value
ISO number (34)
Exposure Vahle 134)
Macro/Close l_)cus (30)
• When [Display Setupl is set1o [Image Only], lhe currcnlsettings arc displayed,
Flash mode (29)
• When [Display Setupl is set1o [Image Onlyl, lhe currcnlsetlings am displayed.
Standby a movie/Recording
a movie
Recording time (re:s)
lg

Whenplayingbackstill images
When playing back movies
÷
101-8012 2G07 1 1 9:3OAM
Screen operation
You can change tile settings by touching the
following: [_, [_3.
[]ii iiiiiiiiiiiiiiiiiiiiiiiiiiiiiii_
HOME
MENU
b
Displays the HOME screen.
Changes to index mode.
Plays back the slide show.
Deletes the image.
Displays the MENU screen.
Selects the playback folder.
Returns to the single imagescreen from the indexscreen.
[]
BACK
t_VOL
,,>141_|
4141I_
DISP
Screen indicators
Screen indicators [] to [] sho_x the
current setting status.
Backs to the previousscreen.
Adjusts the volume (35).
Stop
Playback
Playback zoom (36)
Turns A/T/_I/I,- (711/o11.
Displays the prcxious/nextimage.
Fast forward/Rewind
Changes the screen disphLv.
[]
@22_
DPOF
Battery remaining
hnage size (13)
Check mark
Print order (DPOF) mark(105)
O._ Protect (61)
Q.X2,O Playback zoom (36)
C:32:00 Self-diagnosis display(117)
2O

I_isste_s e_ the ser88_
[]
q:3_
8/8 12/12
o_
PictBridge connecting
(103)
Playback Media ("MemoryStick Duo," internal
memory)
Playback folder (64)
• This does not appear whenusing internal memory,
hnage number/Number of
images recorded in selectedlblder
PictBridge connecting
(104)
• Do not disconnect the cableR)r multi-use terminal while
file icon is displayed.
Change lkdder (64)
• This does not appear whenusing internal memory,
Recording folder (68)
• This does not appear whenusing internal memory,
[]
125
F3.5
IS0400
+2.0EV
_D
AW8"g'-,_
{_wB
Ind
Lm_ batte U warning (117)
Shutter speed
Aperture value
ISO number (34)
Exposure Vahle (34)
Metering mode (33)
Flash
White balance (49)
Playback (35)
,_ , Playback bar
0:00:00 Counter
101-0012 Folder-file number (64)
2007 1 1 Recorded date/time of the
9:30 _,N playback image
Histogram (24)
• [] appears when histogramdisplay is disabled.
21

Operatethe touchpanel
This LCD screen also displays Ihe butlons for operating the camera/louch panel).
1 Press the POWER button or slide the lens cover downward.
2 Touch the buttons on the screen lightly with your finger.
0n the touch panel buttons
• When the item you vxant to set is oot oo the screen, touch A/V to change the page.• You can return to the previous screen by touching [BACK].
• Touching [?] displays the guide about the touched item. To hide this guide, touch [?] again.
?
• To operate the touch panel, press it lightly with your finger or the supplied paint pen.• Do not press the touch panel with any pointed object other than the supplied paint pen.• Do not press against the LCD screen more than necessary.• When the top right of the screen is touched, the icons will momentarily disappear. Taking
your finger off the screen will make the icons reappear.
22

Changingthe screendisplay
Touch [DISP] on the screen to change to
tile display selection screen.
• Settings <)tiler tllan [LCD Briglaness] call bemade separately klr shooling and playback.
• Ill index mode, yo/i call set tile n/inlber of
images displayed.
DISP
#
[Display Setup]
This sets whether or not 1o display tile iconson the screen.
Normal
Simple
Image Only
• [Image Only] is suitable tor sllooting orplayback in the 16:9 aspecl ralio.
• During playback, touch the right or left sideof the screen to display the next/prevk)usinlage, and touch llle cenler to display theguide,
23

[LCDBrightness]
This sets the backlight brightness.
• When viewing images in bright outside light if[LCD Brighmess] is set to [Normal], rcsel 1o[Brightl.However. the baltery power may decrease lhsterunder such conddion,
[Display Histogram]
This sets v_hether or not to display thehistogram on the screen.
[)ark Bright
A histogram is a graph showing the
brightness of an image. The graph display
indicates a bright image when skewed to
the right side, and a dark image whenskewed to the left side.
I_ N umber of pixels
Brighmess
• The histogram also appears when playing back asingle inlage, bill you cannot adjusl lhe
exposure,
• The histogram does nol appeal: in the lbllowingsitualkms:
While shooting
When lhe menu is displayed.
When recording movies
During playback
When the menu is displayed.In index mode
When you am using playback zoom.
When you arc rolating still ilnages,
During playbilck of movies
• A large diRcmnce in lhe histogram displayedwhen shooting and during playback may occurwhen:
The flash strobes.
The shutter speed is slow or lZlSl.
• The histogram may not appeal lot inmgesrecorded using other canleras.
24

Usingthe internalmemory
The camera has approximately 31 MB ef internal memory. This memery is not removable.Even when there is no "Memory Stick Duo" inserted in tile camera, you can record imagesusing this internal memory.
• Movies wilh the image size _etto [640(Fine)] cannol be recorded using file inlernal memoU.
Whena "Memory StickDuo"is inserted[Recording]: hnages are recorded on lhe ffVlemoJT SlickDIIO _,
[Playback]: Images on the "Memory Slick Duo" areplayed back.
[Menu, Settings, etc,]: Various hlnctions call beperlormed on inlages on the "Memory Stick Duo".
Whenthereis no "Memory Stick Duo"inserted[Recording]: hnages are recorded using the internal
lllelllOly,
[Playback]: Images stored in the internal memoly areplayed back.
[Menu, Settings, etc.]: Various ILinctions can beperJornled Oll images ill the inlelnaJ illelilory.
We recommend that yott copy (back up) data without error using one of the followingtnetheds.
To copy(backup)data ona "Memory StickDuo"
Prepare a "Memory Stick Duo" 'aith sufficient capacity, then perform tile procedure explained
in [Copy] (page 69).
To copy (hackup)data on a hard disk of your computer
Perform tile procedure on pages 90 to 95 without a "Memory Stick Duo" inserted in tilecamera.
• You cannot copy image data on a "Memoly Slick Duo" lo the inlernal menlory.
• By connecting the Calllera and a COli/puler with a cable for illulli-tlse lelli/illab you can copy dala stored in
the inlel_nal l/leli/Oly to a COli/ptuer. However you cannot copy dala on _t COl/lptuer to lh¢ inlernal ii/¢1i/ory.
25

Shootingimageseasily(AutoAdjustmentmode)
The procedure for shooting images using the basic funcliolls is given below.
Touch panel
blever
1 Open the lens cover.
2 Hold the camera steady, keeping your arm at your side.
Position the subject inthe center of the focus
frame or touch the point
for focusing.
f
"_" You can touch the screen to select the point to bring into focus.
Touching the subject on the touch panel displays a hame, andthen pressing tile shutter button halfway down brings tile flameinto focus. II there is a lace ill tile h'allle, ill addition to tile l_>cus.
the brightness and hue are also automatically optimized.
[_1 is displayed ifa lace is detected ill the touched positiono or
E_1is displayed il all object olher than a person's lace isdetecled.
• You cannot use this ftlllclion when using the digilal zoom and(_'lose locus lnode.
s " @o• You can al_o tl_ his lunc Ion m m'k (Soil Snap) mode.
• I1 you touch outside the selectable locus range, tile selectable range is displayed.
26

3 Shoot with the shutter button.
(_)Press and hekl Ibe sb/ltler bullen balfway down to focus.
The • (AE/AF lock) indicator (green) flashes, abeep sounds, the indicator stops flashing andrell'4tins lit.
(&)Press the sbuller button folly down.
AE/AF lock indicator
Shooting movies
Touch [HOME], then teucb I_ (Shoeting) --+ [_ZH Movie Model (page 39).
Or. toucb tbe shooting mode setting icon. then touch _ (Movie Mode).
Shooting mode setting icon
It yon shoot a still image of a subject that is difficult to focus on
• The shortest shooting distance is approx. 50 cm (19 3/4 inches) (W side). 80 cm (31 1/2 inches) (T side)(DSC-T200)/approx. 50 cm ( 19 3/4 inches) (DSC-T70/T75). Shoot in the dose-up (Macro) mode orClose locus mode when you shool a subject closer than the sholtesl shooting distance (page 30).
• When the camera cannot locus on the subject automalically, the AE/AF lock indicalor changes to flash
slowly and the beep does not sound. In addition, the AF range finder lrame disappears. Recompose lheshot and focus again.
Subjects difficult to focus on are:
Dislanl fi'om the camera and dark
The contrast belween the su_iect and its background is poor.
Seen lhrough glass
Moving last
Refleclive light or with a hIstFous finish
FlashingBacklit
_aa
27

W/T Usingthezoom
Slide tile zoom (W/T) lever to tile T side to zoom and slide to tile W side to return.
• When the zoom scale exceeds 5x (DSC-T200)/3x (DSC-T70/T75), the canlera uses lhe Digilal Zoom
Ihnction.
For details on the [Digital Zoom] settings and the image qualily, see page 76,
• The canleru zoon/s slowly while shooting a Inovie,
• When the Face Detect lunction is activated, you cannot use the Digilal Zoonl fimction.
• While using the Digital Zoom, you cannol R_cus by touching the screen,
(_) Changing the image size
@ Using the self-timer
@ Selecting a flash mode lbr still images
(_) Shooting close-up
Changingthe image size
Touch tile image size setting icon on tile screen. Totlch tile desired item, then [BACK].For details on tile image size, see page 12.
Image size setting icon
Usingtheself-timer
To/lch tile self-tinier setting icon on tile screen. Touch the desired item, then [BACK].
Self-timer setting icon
Self-Timer Olf (_OFF):Not usingthe self-timerSelf-Timer 10se¢ (_o): Settingthe 1O-seconddelayself-timerSelf-Timer 2sec (_2): Setting the 2-seconddelay self-timer
28

Press tile shutter button, tile selfqimer lamp flashes, and a beep sounds lmtil file shutter
operates.
To cancel, touch _V)0FF"
• U_ die 2-second delay self-tinier to prevent bhu" ol an image made by the shaking ol the camera whenpressing lhe shutler bulton.
Flash (Selecting a flash mode for still images)
) s L, ,Touch tile flash m( de ellin_, icon on tile screen. Touch tile desired item. then [BACK].
Flash mode setting icon
FlashAuto($Aum):Strobeswhen there is insufficient light or backlight (defaultsetting)FlashOn($)Slow Syuchro (Flashforced on) ($st): Theshutter speedis slow in a dark placeto clearlyshoot thebackgroundthat is out of flash light.FlashOff(C'_)• The flash strobes twice. Tile lirsl time is to adjust the lighl quantity.
• While charging the flash, _ is displayed.
2g

Macro/Close focus (Shooting close-up)
Touch tile Macro/Close focus mode setting icon on the screen. Touch tile desired item then[BACK].
Macro/Close focus mode setting icon
Macro Off (_OFF)Macro On(_): W side
DSC-T200:Approx.8 cm or farther(3 1/4 inchesor farther)DSC-T70fT75:Approx.8 cm or farther (3 1/4 inchesor farther)TsideDSO-T200:Approx.80 cm orfarther (31 1/2 inchesor farther)DSC-T70/T75:Approx.25 cm or farther (97/8 inchesor farther)
Closefocus enabled(_Q,): Lockedto the W side: Approx. 1 to 20 cm (13/32 to 7 7/8 inches
Macro
• Setting tile zoomall tile way to tile W skle is rccomnlended.
• Tile in-locus range becomes nanx)w,and the complete sut_ieclmay not entirely be in h)cus.• The Auto Focus speed drops.
Close focus
• Use this mode 1o shoot al even closer dislallces thall _ (Macro On) recording.
• Tile oplical zo(nn is locked to tile W sMe and cannot be used.
• You cannot shoot images ill tile Burst or Bruckel mode (page 47).
• You cnnnot u_ file Face Delection lizature when you shoot images in tile Clo_ focus mode.
• This mode is cancelled if you mrn oil lhe power or swilch die mode to another one.
The Focus. Metering Mode. ISO and EV icons appear only when the shooting mode is set torl'¢_.
(_) Changing the focus method
@ Selecting the metering mode
@ Selecting a luminous sensitivity
(_) Adjusting the light intensity
30

Focus: Changing the focus method
You can change the focus method. Use tile menu when it is difficult to get tile proper focus ina/lto Foe/is mode.
• When the shooting mode is set to _, [Focus] appeals in [MENU],
& M (Multi AF) Focuses on a subject in aU ranges of the finder fiameautomatically.
• This nlode is usefifl when the subject is not in the center of the
J]'_tnle.
12_ AF range finder frame
(Only for still image)
m (CenterAF)(Only for still image)
Dl, (Spot AF)(FlexibleSpot AF)(Only for still image)
AF range finder frameindicator
Focuses on a subject in the center of the finder frameautomatically.
• Using together with the AF lock/unction lets you shoot in tiledesired image conlposition.
AF range finder frame
AF range finder frameindicator
By moving the AF range finder frame to wherever you like onthe screen+ you can focus on an extremely sma]l subject or ai]_lrrow arL+ IL
• To set file Flexible Spot AF, see page 32.
• This is usefill when you shoot using a tripod and tile sut_iect is
out of tile center area.
• When shooting a moving subject, take care to hold the camera
stcady so that tile subject does not deviate lrom tile range finderI]anle.
AF range finder frame
AF range finder frameindicator
31

0.5 m (DSC-T70/T750nly)
1.Ore
3.0 m
7.Ore
oo (unlimited distance)
Focuses on the subject using a previously set distance to the
subject. (Focus preset)
• When shooling a subject lfirough a net or through window glass,
it is dillicult to get the proper Rtcus in auto R_cus mode. In lhese
cases, use of tile locus presel is convenient.
• AF slands lor Auto Focus.
• Distance setting inlk)rlnatkm in "Focus Preset" is approximate. If you zoom 1o the T side or poim file lenslip or down, the error increases.
• When you use DigitzU Zoom or AF lllundnator, the normal AF rtmge finder lrame is disabled and a newAF range finder fiame is displayed by a dotted line. In this case, the priority of AF movenlenl is given tosllbjecls arollnd the cenler of lhe hanle,
Howto usethe [SpotAF]
@ Set the shooting mode setting icon to _ (Program Auto), then touch [BACK].
@ Touch the focus mode setting icon _ E_ (Spol AF).
@ Touch [BACK] to turn off the menu.
(_) Touch where you want to focus the shot.
• If you touch outside file seleclable locus range, the selectable range is displayed.
32

MeteringMode:Selecting themetering mode
Selects the metering mode that sets which part of the subject to measure to determine the
exposure.
• When lhe shooting mode is sel to _, [Melering Mode] appears in [MENU].
{c_q(Multi) Divides into multiple regions and measures each region. The
camera determines a well-balanced exposure (Multi-pattern
metering).
[] (Center) Measures the center of the image, and determines theexposure based on the brightness of the subject there (Center-
weighted metering).
[] (Spot) Measures only a part of the suhject (Spot metering).
(0nly for still image) • This flmclion is useNl when the subject is backlit or when thereis strong contrasl belween lhe subject and the background.
• For details on tile Exposure, see page 10.
• When using spot melering or center-weighted metering, seuing [Focus] 1oEll (Center AF) isreconnnended to locus on file nletering posilion (page 31).
33

ISO:Selectinga luminoussensitivity
Low ISO sensilBity High [SO sensitivily
Sets the ISO sensitivity.
)uS°o(Auto)
ISo8o
ISOlOO
19o2oo
ISO4oo
I$O800
ISO1600
I$03200
• For details on the ISO sensitivity, see page 11.
• You can select only lrom [ISO AUTOI, [[SO 801 to [[SO 4001 when set to Burst or Exposure Bracket.
• When s]llllltillg ullder brighler c'.)llditiOllS, lhe calllera aUlOll/atically increases ils lolle reproduclioll alld
helps prevent images to become whitish (exchlding when [[SOI is set to [801).
When taking a picture in a dim location or of a movingsubject, raising the ISO sensitivity (higher number) canreduce blurring. However, higher ISO sensitivities results inincreased noise. Set the ISO sensitivity according to theshooting conditions.
EV:Adjustingthe light intensity
Manually a_ljuslsthe exposure.• When the shooling mode is set to _'_], [] or _, [EV] appears in [MENU].
Toward Toward +
-2.0EV Toward : Darkens an image.
0EV The exposure ix determined automatically by the camera.
+2.0EV Toward +: Brightens an image.
• For details on the Exposurc, see page 10.
• The compensation value can be _t in I/3EV increments.
• If a subject is being shot in extrenlely brigbl or dark condilions, or the flash is used, the exposurea(liustment may not be eflizctive.
34

Viewingimages
[_ (Playback)button
1 Press [] (Playback) button.
• It you press [] (Playback) when the camera is powered oil, the camera is turned on autonmtically
and sel to playback nlode. To switch to tim shooting mode_ press [] (Playback) again.
/ Touch I_ (previous)/_l (next) to select an image.
Moqe:
Touch _" to play back a movie.
Fast forward/Rewind: al._/It,,.l_ (Touch P" or • to return to normal playback.)
Volume control: Touch ,_vo_,then adjust the volume with _+/_-.
Touch ,*3rotagain. The volume control bar disappears.
Stop: Touch •.
• Movies of image size [3201arc displayed in a smaller size.
_aa
35

_QViewing an enlarged image (playback zoom)
Touch a still image while it is displa_ed to enlarge tile corresponding area.Touch (_ to ZOOll]o/lt.A/Y/4/P": Adjusts the position.BACK: Cancels playback zoom.
_E_:Turns A/VI',tI_ on/off.• To store enlarged images: [Trimmingl (page 58)
You can also enlarge the image v,'ilh the zoom/W/T) lever.
m ¸¸¸¸¸¸¸¸¸¸1Showsthedisp,a,edareao,thewho,eimaoe
Viewing an index screen
Touch _ (Index) to display the index screen.Touch X/X to display the previous/next page. To relurn to the single image screen, touch theIhumbnail image.
(Index)
When using the "Memory Stick Duo," if there are a number of lk_lders, touch _ (SelectFolder), then select the desired lk_lder from select folder screen.
• You can also access the index screen by selecting [_ hnage Index] in I[_ (View hnages) onthe HOME screen.
• If you touch [DISP] in index mode, you can set the number of images displayed in the indexscreen.
36

Deletingimages
[_ (Playback) button
1 Press [] (Playback) button.
2 Display the image you want to delete, then touch _.
3 Touch [OK].
When you delete images from the MENU screen
(_) Touch [MENU] while displ:13ing in single-image mode or in index mode.
@ Touch _.
(_) Touch to select the desir_:d deletion method among _ (This Image), _ (Multiple ]mages), or
_i (All In This Folder).
When yon select [This Image]
Deletes the selected inmge.Touch [OK].
37

_e/etkt_ ie_a_es
Whenyouselect[Multiple Images]
Selects and deletes multiple images at once.
(_) Touch the center of the image to put a check mark on the image you _ant to delete.
Ng" mark is checked in the check box of the im ige.
To cancel the deletion, touch the image again to deselect the mark.
Single Image Index Display
• Touching _ displays the index screen, AI this screen, louch lhe thumbnail images to add a check mark
to tile images you want to delele.
• Touching _ at the index screen returns to single-image mode.
(_ Touch 1---+],and then touch [OK].
Whenyouselect[All InThisFolder]
Deletes :ill the images in the selected lelder.Touch [OK].
38

Learningthe variousfunctions- HOME/Menu
The HOME screen is the galeway screen for all the functions of your camera.
You can access this screen regardless of wlaether tile camera is in shooling mode or playbackmede.
1 Touch [HOME] to display the HOME screen.
HOME
2 Touch the category you want to set.
3 Touch the item in the category you want to set.
Item
Category
• You cannot display the HOME screen when a PictBridge connection or a USB connection is made.
• The camera is sel to the shooling mode by pressing the shutter button halfway down.
• Touch [×] or [¸BACK¸] 1o return 1o ll_e previous screen.
39

Touching [HOME]displays the following items. Details on the itemsare displayed on thescreen by the guide.
Shooting
m_ Vie_ Images
Prinling, Other
g Manage Memory
Settings
Auto A(ljustment (page 43)
Scene Selection (page 43)Program Auto (page 43)
Movie Mode (page 43)
Single hnage (page 54)
hnage Index (page 541
Slideshow (page 54)
Print (page 102)
Music Tool (page 97)Dox_nload Music Format Music
Memo U ToolMemory Stick Tool (page 68)
Format Create REC. Folder
Change REC. Folder Copy
Internal Memory Tool (page 70)Format
Main SettingsMain Settings 1(page 71 )
Beep Function GuideInitialize Calibration
Housing
Main Settings 2 (page 73)
USB Connect COMPONENT
Video Out TV TYPE
Shooting SettingsShooting Settings 1 (page 75)
AF Illuminator Grid Line
AF Mode Digital Zoom
Shooting Settings 2 (page 78)Auto Orientation Auto Review
Smile Level
Clock Seltings (page 79)
Language Setting (page 80)
40

Leaill_ilr_I tle 7Iiri_s/s//l_ti_sl'_s - IQII£1I_I®II
1 Touch [MENU] to display the menu.
[?] to hidethis guide (page 22).
MENU
• Dillerent ilelns will become visible depending on lhe selected l/iOde,
2 Touch the desired menu item.
• It the desired item is hkklcn, keep touching ll/V until the item appears on the screen.
3 Touch the desired setting item.
¢o
4 Touch [BACK] to turn off the menu.
41

Menuitems
The available menu items vary depending en tile mode setting (sheeting/viewing) andshooting mode.Only tile available items are displayed on the screen.
(`/ : available)
Adjustment Selection Auto
Menn for shooting (page 43)
REC Mode `/ `/.2 ,/
EV.1 `/ `/ `/
Focus .1 `/
Metering Mode .1 `/
White Balance `/.2 `/ `/
Color Mode `/ `/
Flash Level V
Red Eye Reduction `/ `/.2 `/
Face Detection `/ ,/.2
SteadyShot `/ `/ `/
Setup `/ `/ `/ `/
.1 You can also change this selling in [Program Auto] (page 30).
*2 The operalion is limiled according to the selected Scene Selection mode (page 44).
Menufor viewing(page57)
_71_(Retouch) gg_ (Paint)
(MLdti Resizing) _ (Wide Zoom Display)
(Slideshow) _ (Delete)
O_ (Protect) OPOF
,t, (Print) _ (Rotate)
(Select Folder) _ (Volume Settings)
42

Switchingthe shootingmode
You can switch tile shooling mode on Ihe HOME screen.
Shootingmodes:
There :we three sht)oting modes :P,':dhlble for still imnges: Auto A_liusttnent.
Scene Selection. Progr_un Auto: mtd there is one recording mode for movies.
The defnult setting is Auto Atliustment.
To switch the shooting mode to other than Auto A@lstment. follow the proceduredescribed below.
(_) Touch [HOME] to display HOME screen.
@ Touch _ (Shooting).
(_ Touch the desired mode.
• You can also change tile shooting mode by louching tileshooting nlode _lling icon (page 17).
_rim:AutoAdjustment
AIIo_ s you to shoot still im_Jges _ith the setting adjusted _mtom_ltically.
_1: SceneSelectionm_o0 _3 -*') J [] _ _ _ _i:i:)Allo_ s you to shoot with preset settings according to the scene (page 44).
[ZI: Program AutoAllo_s you to shoot _ith the exposure icliusted autonxaically (hoth the shutter speed _md
the aperture vahle). Also you can select various settings using Ihe menu. (IEor details on the
fllnctions available_ sue page 42.)
H: Movie Mode
Allox_ s you to record movies x_ith audio.
g
43

ShootingimagesusingSceneSelection
SceneSelectionmodes
The following modes are predetermined to match tile scene conditions.
|to High Sensitivity _ Landscape
Allows you to shoot images Focuses only on a distanl subject
withom a Hash under low lighl to shoot landscapes, etc.conddions, reducing blun
Smile Shutter
When tile camera detects a smile,the shutter is relea_d
automatically. For details, seepage 46.
@om'3 Soft Snap
Allows yoIl to shoot images with asofter atmosphere for portraits ofpeople, flowers, etc.
&-_ Twilight Portrait'
Suilable lor shooling portraits illdark places. Allows you to shootsharp images of people in darkplaces without losing tile darkalnlospbere of the SIIITOUlIdilIgS,
J Twilight:
Allows you to shoot night scenes
at lhr distance without losing diedark atmosphere of lheSIlrroulldillgS,
_ Hi-Speed Shutter
Alh)ws you to captlllV l_tsl [llo_, ing
su[!iects outdoors or ill ot]ler
bright places.
• The slmtter speed becomeslaslcr, so images shot ill darkplaces become darker.
_ Beach
When shooting seasMe or h,keside scenes, tile blue of the water
is clearly recorded.
SnowWhell sbooling snowy scenes or
other places wherc the wholescreen appeals while, use thismode to prevent sunken colors
and rccord clear images.
_il Fireworks'
AIIo'_vs you to record fireworks inall their splendor.
* When you shoot images using _J (Twilight Pomai0, .,_ (Twilight) or {i:_:)(Fireworks) mode, the shutter
speed is slower and the images tend to blur, To prcvenl blurring, llle u_ of a lripod is recolnn/ended,
44

Functionsyou can use in Scene Selection
For shooting an image appropriately accoMing to tlle scene conditi(m, a combination offunctions is determined by the camera. Some functions are not available, depending on theScene Selection mode.
(_/: you can select the desired setting/
* [Flash] of white balance cannot be selected.
g
45

S_etb{_ i_a_es _sb_t_Sser® Ssbstiq'_
Shooting in Smile Shuttermode
(_) Press the shutter button all the wak down.
The [ _ ] is displayed to indicate that the camera is at the capturing smile screen. When a
smile is detected, the shutter is released automatically to take the picture.The smile shutter lamp will light when shooting (pages 15, 16).
(_ Holding down the shutter button again exits the capturing smile screen.
• A maximum of 6 images can be taken. Shooling ends automalically when eitller the recording medium/internal memory becomes fifll or 6 images is reached.
• If a smile is not detected, set the [Smile Level] (page 78).
• A smile cannot be detecled unless a l_lCe is delected.
• In some sbooling environments, lace detection is not possible and the slmlter will not be relea_d.
• A smile can be detecled ft)r only one person displayed in the lace detection fiame aller pressing the shuller
butlon all the way down.
• If nmltiple laces arc detecled, the lace touched belorc pressing the shutter button halfway down is givenpriorily. If no lace is louched, lbe camera will _lect tile primary subject lor deciding wlficll lhce is givenpriority.
• The image may not be in focus if the distance between the camera and the subjecl is changed afterpressing the slmlter buaon all the way down. The suilable exposure may not be obtained if lllesurrounding brighmess changes.
• The slmlter may be relea_d at the wrong time.
"_" Hints for better capturing of smiles
Q) Do not cover the eyes with tile bangs.
(_) Try lo orient the lace in h'ont of llle camera and be as level as possible. Tim detection rale is higherwhen the eyes are narrowed,
(_) Give a dear smile with an open mouth. The smile is easier to detect when the teeth am showing.%.
46

Shootingmenu Fordetai/son theoperation_ page41
The available modes are indicated as shown below. For details on how to operate tile menu,see page 41.
You can select the mode displayed in white.
Available Unavailable
Shooting mode (Auto Adjustment/Scene Selection/Program Auto) Movie Mode
The default settings are marked with _.
AUTOSONPGM
Selecls whelher rite camera performs continuous shooling or not when you press the shutter button.
_!] (Normal) Doesnol shool conlinuously.
1_ (Burst) Records up to lO0 images in succession _hen you press andhokl down Ihe shutter btlllon.
>
• The flash is set to ('_,)(Flash Oil),
BRK+_O.3EV Records a series of Ihree images wilh the exposure vahles
BRK+_O,7EV aulom aically shifted (Exposure Bracket).The Iirger the brackel step value, the larger Ihe shift of Ihe
BRK+_1.0EV exposure value.
• Whell you C_ulnot decide tile correct exposiire, shoot ill the
Exposure Bracket mode, shifting tile exposure vahle. You can
select the image wilh tile besl expostlre alterward,
• goll canllOl shoot ill the gxposllre Brackel mode, when lhe
shooting mode is sel to _ (Auto A_[iuslmenl).
• The flash is set to @ (Flash Oil).
g
47

S_ti_5_ _5_ Fordetailson theoperation _ page 41
On the Burst
• When recording with tile self timer, a series of a maxinmm of live images is recorded.
• The recording interva5 is approx. 0.46 _conds (DSC-T200)/approx. 0.51 seconds (DSC-T70/T75). Therecording intelwal becomes hmger, depending on lhe selling lbr the image size.
• When tile ballery level is low. or when the inlernal memory or "Memory Slick Dtlo" is full, lbe Btll'stslops.
• You may nol be able to shoot images in lhe Burst mode depending on lhe Scene Selection mode (page 45).
On the Exposure Bracket
• Tbe 5ocus and wlfite bahmce arc adjusled for the 5irsl image, and lhese _lfings are also u_d fi)r the olher
images.
• When the exposure is manually adjusled (page 34), lhe exposurc is shifted based on the adjustedbriglaness.
• The recording intelwal is approx. 0.46 _conds (DSC-T200)/approx. 55.51seconds (DSC-T70/T75).
• If the subject is 1oo brighl or 1oo dark, you may be unable to shoot properly wilb the selected bracket slepvalue.
• You may nol be able 1o sbool images in the Exposure Bracket mode depending on file Scene Seleclionmode (page 45).
Manually atliusls the exposure. Tiffs menu is the salne as the menu 5ha5appears when youtoucP_the EV setting icon in _ mode. See page 34.
You can change 5he focus lnethod. Use the menu when it is difficttlt B)get the proper focus illaLISOfOCUSmode. This menu is the same as the menu thai appears when you IOtleh 5he Focus
selling icon in _ mode. See page 3 I.
Selecss the meSering triode that sets which part of the sut_iect to tneasure to delerltfine the
exposure. This mentt is the same as the menu that appears when you touch the Metering Mode
setting icon in {_ mode. See page 33.
48

Slla_t#_ +_8_+_s Fordetailson theoperation _ page 41
. ,i " :l i i" n ll" - SCNPGMD
At[justs tile color tones according to the lighting condition in a situation, for example, whenthe colors of an image look strange.
AuToWB(Auto) Adjusts. Ihe White Balance automaticall,,_..
";_- (Daylight) A([justs for outdoorsconditions on a fine (lay, evening views,night scenes, neon signs, fireworks, etc.
INdl+ (Cloudy) At[justs for a cloudy sky or a shady location.
..... (Fluorescent Light 1)/(Fluorescent Light 2)/(Fluorescent Light 3)
;_+(Incandescent)
Fluorescent Light 1: Adjusts for white fluorescent lighting.Fluorescent Light 2: Adjusts for natural white fluorescentlighting.Fluorescent Light 3: Adjusts for day white fluorescentlighting.
A(ljclStS for places under incandescent lamp, or under bright
lighting, such as in a pholo sttldio.
4g

S_ti_ _ Fordetai/son theoperation _ page 41
_w. (Flash)(Onlyfor still image)
Acljusts for Ihe flash conditions.
• VILLIcannot select this itenl when s]looting IlK)vies.
• For details on tile white balance, see page 11.
• Under fluorescent lights that flicker, the while balance flmction may not work conectly even lhough you_lecl [Fluorescent Light lh [Fluorescent Light 21, [Fluorescent Light 31,
• Except in [Flashl modes, [White Balancel is set to [Amol when the flash strobes.
• Some options are not available depending on the Scene Selection mode (page 45),
,, t_ , ',' _7 fPGM H
You can change the brightness of the image, accompanied by effects.
,_ [-,+(Normal) Setstheimagetonormalcolorhue.
mV_ (Vivid) Sets the image to bright and deep color.
I/N_ (Natural) Sets the image to quiet color.
5O

Slla_ti_<__8_s Fordetailson theoperation _ page 41
(Sepia) Sels the image to sepia color.
_/_+ (B & W)
• You can seled only [Nonnal], [Sepia] or [B & W] when shooting movies.
At[justs tile amotmt of flash light.
_,±0(Normal)
_,+ (+)
• To change flash mode, see page 29.
Toward : Makes Ihe flash lexel lower.
Toward +: Makes the flash level higher.
g
51

S_i_ i_ Fordetailson theoperation _ page 41
The flash strobes two or more times before
shooting to reduce the red-eye phenomenon when
i_ using the flash.
_& (Auto) When the Face Detect flmction is activated, the flash strobesautomatically to reduce the red-c) e phenomenon.
_')N(On) The flash always strobes to reduce the red-eye phenomenon.
_o_ (Off) Does not use Red Eye Reduction.
• Because it takes about a second until tim shutter clicks, hold tim camera firmly to prevenl the eflkcts ofvibralion. Also. do not let the subject move.
• Red-eye reduction may not produce tile desired ellecls depending on individual dillcrences, the dislanccto the subjecL if the subject does not see the pro-strobe, or other condilions. In such a case. you can correctthe red-eye phenomenon using [Retouch] in the viewing menu after shooting (page 58).
• If you do not use tile Face Detccl lunction, Red Eye Reduction does not work. c'_vn when you _lect [Auto].
• This setting is not available depending on the Scene Selection mode (page 45).
Selects whether to use the Face Detect function continuously or when the touch panel istouched.
[g.o_.(Continuous)
c_ (When touched)
Detecting the faces of your subject will also acliust focus,strobe, exposure, white balance, and pre-strobe for red-eyereduction.
Face Detection mark
,_N Face Priority frame
I Face Detection frame
Touching the face changes the Face Detection frame to theFace Priority frame.lfthe subject area you touch is not a face, the sectkm near Ihetouched area is brought into focus.
Touch the screen, and if a face is detected, operation is thesame as [Continuoush
52

Slla_t#_ _8_/_s Fordetailson theoperation _ page 41
• When the Face Detect fllnclion ISactivated
You cannot use the AF illuminator.
You cannot use the Digital Zoom function.
• In _ (Soft Snap) mode, the det)mlt _tfing is [Continuous].
In the _ (Smile Shutter) mode, the Face Detect lunction activates continuously.e
@o• The canlera call detect up to g sublect laces. However, m Im'3 (Soil Sllap) nlode, i1call detecl only tip to
4 subject laces,
• When the cumera detects more than one subject, the canlera will judge which is the main su[_iect and _tlocus by priority.
• The lrame which the locus is sel will turn green by pressing the shuuer billion half way down. Even whenthe fiame does not turn green, if the distance of the su[_iect which the locus is _t on and other subjects arethe same. the R)cus is set on all subjects.
• Face Detection may l, ul, depending on the conditions under which it is used.
• When tile shooting nlode is a mode other than _ (Auto A_.0uslnlenl ), _ (Smile Sbulier), andoo (Soil Snap) nlode, lbe Face Detect hlnclion is always olf,m'3
Selecls Ilae anti-blur mode.
I(@,_(Shooting)
I(_,_,'(Continuous)
(({,;, (Off)
Activates the anti-bhlr flmction when pressing the shutter
button halfway dox_n.
Always activates the antid)lur function. You can stabilize
images even when zooming up a far subject.
• Battery consumption is I_Jster than in [Shooting] mode.
Does not use anti-blur mode.
• In Auto Al/iustment mode, [SteadyShot] will be set to [Shooting].
• For movies, the options am limited to [Continuous] and lOll"I.The delault setting is set to [Continuous].
• The anti-blur hlnction may not work properly in the lollowing cases.
When Calllera shake is too strong
When the slmtter speed is slow, lot example, shooting nigllt scenes
Selecls the settings for the slaooling function. These items al_l_earing in this merm are same
ones as fl'_ose in I_l Shooting Setlings in _ (Settings) on the HOME screen. See page 40.
53

Playingback imagesfromthe HOMEscreen
You can select tile ways to play back images.
(_) Touch [HOME].
(_) Touch D (View Images).
(_) Touch the desired viewing method.
!
Displays the image shot last.This is the same as pressing the [] (Playback) (page 35).
Displays a list of images contained in the selected lk_lder.This is the same as touching the [_ (Index) (page 36).
(!) Touch [_ Slideshow] on the HOME screen.
@ Touch [Slart] to start playback.
To adjust the volume of the music
Touch the p:mel to display the volume control screen, then ad.jusl the volume with <1+/_-.
Or atljllsl from the E_ (Volu/ile Settings) on the MENI3 screen, before the playback slarls.• Touch [×] to tuln oil the volume collllol screen.
To end the slide show
Touch the panel, and then touch [Exil].
54

Plslily bacR il_ayss lli_l_ the H@[_I£srs_'e_/
To changethesetup
You can change the slide show settings.
(_) Touch [MENU] _ _ (Slideshow) _ _ (Slidesho_).
(_ Touch the desired menu item.
(_ Touch the desired setting, then touch [Start].
• gol Call change tile settings by touching _ on tile vohune control screelL
The following items can be set.
The default settings are marked with _.
Folder Plays back all the images in the selected lk)lder.
All Plays back all the images in a "Memory Stick Duo" in order.
& Simple A simpleslideshox_suitablefor a widerange of scenes.
Nostalgic A moody slide show reproducing the atmosphere of a moviescene.
Stylish A stylish slide show proceeding at a middle tempo.
Active A high-tempo slide sh()_ suitable for active scenes.
Normal A blsic slide show switching images at a prcdetemfinedintec,'ah
• Only still images am displayed when [Simple], [Nostalgich [Slylishl or [Aclivel is selected.
• Music is not played (set to [Olll) during a [Normal] slide show. The sound of movies will be heard.
Music1 Thedelimitsettinglk)ra [Simple]slideshow.
Music2 The defimlt setting IDr a [Nostalgic] slide show.
Music3 The delimit setting lk)r a [Stylish] slide show.
Music4 The defimlt setting lk)r a [Active] slide shox_.
Off Selting for a [Normal] slide show. No Music available.
55

Pl_li_y bacR ilT_yss f_sl_ tte I@[_I£ s_re_/
3 sec
5 sec
10 sec
30 sec
1 min
Auto
Sets the display interval of images R)r a [Normal] slide shew.
The interval is set te suit file selected [EflL.cts] item.
The setting is fixed te [Aute] when [Normal] is net selectedas the [EfR.cts].
i{iI On Playsback inmgesin a centinueusleop.
Off After all the images have been played back, the slide showends.
"_" To add/change Music files
You can translPr a desired music file honl your CDs or MP3 files to tile camera to play back during Slideshow. You can transli:r music using [_ Music Tooll in _ (Printing, Other) on the HOME screen and the"Music Transli:r" software (supplied) installed on a computer. For delails. _e pages 97 and 99.
• You can record tip to lour pieces of inusic on tile canlera (Tile ILmrprcsel pieces (Musicl Music4) cilnbe replaced wilh the ones you transllrrmd).
• A maxinmn_ length of each music file lot music playback of the camera is aboul 3 minutes.
• If you cannot playback a Music file due 1o damage or olber malflmclions to the file. execule [FormatMusicl (page 97) and lranslcr file nlusic again.
56

Viewingmenu For detai/s on the operation _ page 41
This section explains the metal items available when you touch [MENU] in playback mode.
For details on how to use the menu. see page 41.
Allows you to modify or apply special effects to a still image.
The original image is retained.
To retouchthestill images
(_) Select the images )ou _ant to retouch from the single -image screen or the index screen.
@ Touch [MENU].
@ Touch _ (Relouch), then touch the desired mode.
(_) Retouch the images according to Ihe instructions.
• Touching [_ in the Retouch sclven enables checking of die ellccls thal are currenlly set (excepl R_r[Trimming] and [Red Eye Cormction]).
• tnmges cannol be retouched while die camera is connected to a TV.
(Soft Focus) Blurs the periphery around a chosen point to signalize a subject.
@ Touch the center point of the desired image to retouch, then
touch I--U.(_) A(!iust the desired range to retouch with 41/1_, then touch
I--)1.@ Select level of relouch x_ith _1/_-, then touch I--)l.(_) Touch ISave].
(PartialColor) Surrounds a chosen point in monochrome to signalize a sul!ject.
/(!) Touch the center point of the desired image to retouch, then
touch I--U.(_) A_!iust the desired range to retouch x_ith _1/_-, then touch
I--)1.@ Touch ISave].
57

_Je®i_t__e_ Fordetai/son theoperation _ page 41
58
_'}(Fisheye Lens)
(CrossFilter)
(Trimming)
(Red EyeCorrection)
Applies a fisheye effect around a chosen point.
(_) Touch the center point of the desired image to retouch, then
touch I--ft.@ Select level of retouch with 4lib, then touch I--ft.@ Touch ISavel.
Adds starburst effects to light sources.
lm-lm(_) Adjust the desired length to retouch with _l/Ib then touch
I---'1.@ Select level of retouch with _l/Ib then touch I---'l.@ Touch [Save].
Records the zoomed playback image.
(!) Touch the image or slide the W/T lever to zoom in on the
trimming range.
(_) Set the point with A/T/41/I_, then touch I-+l.@ Select image size x_ith _l/Ib then touch I--'l.@ Touch [Save].
• The qualily of trimmed inlages nlay deleriorate.
• The image size thal you call lriln may vary depending on file image.
Corrects the red-eye phenomenon caused by flash.
After red eye correction is completed, touch [Save].
• You may not be able 1o correct the red-eye phenomenon dependingon lhe in/age.

_Jiew#__e_ Fordetailson theoperation _ page 41
(Radial Blur)
_,, (Retro)
Decides the center point R_rexpressing movement in the stillimage.
• m(_)Touch the center point of the desired image to retouch, then
touch 1--+].
@ A([iust the desired range to retouch x_ith_11_-,then touchI---+l.
@ Touch [Save].
This softens the image by blmTing the lbcus and lowering thesurrounding light so that it appears as if it was taken by an oldcamera.
(_) Adjust the desired range to retouch with 4111_,then touchI---+1.
(_)Select the level of retouch with 41/_, then touch 1--+1.
(_)Touch ISave].
Paints characters or graphics on the still images, then saves them as new image.See page 65.
5g

V'_®;_ _e_ For detailson theoperation _ page 41
You can change the aspect ratio and size of the shooting images.You can converl images to the 16:9 aspect ratio for high definition viewing and Io the VGAsize for blog or e-mail altachmenls.
HDTV(_)
Blog/E-mail (_)
4:313:2 to 16:9
16:9/3:2 Io 4:3
(_) Display Ihe desired ilnage Io be changed.
@ Touch [MENU],and Ihen _ "ouch _ (Mul 1 Reslzmg).
@ Touch the desired s,ze ol the ,mage (_ (HDTV/or _h (Blog/E-mail)).(&) Specify the area you want to trim and touch [---+]. ([Trimming] ---+ page 58)
(_) Toucla ISavel.The resized linage is saved as a newest image in Ihe RE(7 fokler.
• For details about tile image size. see page 12.• You cannol resize lllovies.
1 1 VGA _e You c am res ze e i ges l o _'_o (HDTV).
• Elllarging the linage and trimming Call reduce the image qllalily.
During playback, slill images at a 4:3 and 3:2 aspect ratio are played al a 16:9 aspecl ratio.Touch [MENU] _ _ (Wide Zoom Display) _ Ngl (Wide Zoom Display).
6O
• Turning off lhe power or switching to shooting mode cuncels this setting.
• The only images that can be played in Wide Zoom are 4:3 and 3:2 inlages. Movies, 16:9 images, andi)orlrait inlages cannot be zoomed.
• Touching file center of file louch panel changes to lhe wide zoom exil screen.

_Ji_wi_ _ Fordetailson theoperation _ page 41
m
Touch [MENU] _ _ (Slideshow)_. _ (Slideshow).This ilem has same functiou as [_ Slideshow] on the HOME screen.See page 54.
To play hack a slide show from the index screen
Touch _ and fl'_entouch the image from whMa you want to starl the slide sl'u)w.
Selects and deletes images on the single-image screen or the index screen.
See page 37.
(This Image) [)deles the image that is now selected.
_ (MultipleImages) Selects and deletes multiple images.
_h (All In This Folder) [)deles all the images in the selected folder.
Protects images against accidental erasure.The o-,, (Protectl indicator appears on the protected image.
o"= (This Image)
o_ (Multiple Images)
o_N (SelectAll in ThisFolder)
erda,(ClearAll in This Folder)
To protect an image
(_) Display the image you want to protect.
(_) Touch [MENU[ to display Ihe menu.
@ Display _ (Protect) by touching ,It/Y, then touch it.
(_) Touch ct*_ (This hnage).
Protects/unh)cks the currently selected image.
Selects and protects/unlocks multiple images.
Protects all the images in the selected lblder.
Unlocks all the images in the selected folder.
o-n
61

_J_®i_t__e_l_ Fordetai/son the operation _ page 41
Toselectand protectimages
(_) Touch [MENU] in single-image mode or in index mode.
@ Display C¢_ (Protect) by touching &/T, then touch it.
@ Touch O_ (Multiple hnages).
In single-image mode:
@ Use I_II/I_Ito display the image to be protected, and then touch the center of that image._/is attached to the selected image.
(_) Touch t'_l/l_l to display other images you want to protecL then touch the center of that image.
(g) Touch I---*] ---* IOK].
In index mode:
(_) Touch the tlmmbnail image you want to protect.
V' is attached to the selected image.
(g) To protect other images, repeat step @.
@ Touch I---'l --+ IOKI.
• Touch _! on tile index screen lo return 1o lhe single-image screen,
Toselectall the images in thefolder
(!) Touch IMENUI in index mode.
@ Display d ° (Protect) by touching &/T, then touch it.
@ Touch c¢'_ (Select All in This Folder).
All the images in the selected lblder are protected.
• Proleclion cannot be set when there are more than IO0files ill a Iolder. Ill this case, sel lhe protection flomdon (Multiple Images).
To cancel the protection
Select the image for "_qfich you vxant to cancel protection, and unlock it by perfornfing thesame procedure to protect it.O+,,(Protect) indicator disappears.
• Touch _}F (Clear All in This Folder) to unlock all lhe images in the lolder.
• Note thai tile lortllatting erases all tile dala stored on the recording media, even if the images arc protected,
and these images cannot be restored.
• It may take some time to protect all image.
62

_Ji_wi_ _ Fordetailson theoperation _ page 41
Adds DPOF/Print order) mark to images you want to print.See page 105.
0% (This Image) Attaches/clears the DPOF-based print marks to (from) file imagethat is nox_ selected.
0m_ (MultipleImages) Selects images and attaches/clears the DPOF-based print marks to
lfrom) the images.
Dla0F(SelectAllinThis Altaches Ihe DPOF-based print marks to all Ihe images in Iheb0NFolder) selected folder.
.0% (Clear All in This Folder) Clears the DPOF-based print marks from all Ihe images in Iheselected folder.
Prinls the recorded images.See page 102.
Rotates a slill image.
O
(_ Display the image to be rotated.
(_) Touch [MENU] to display the menu.
@ Display _ (Rotate) by touching lk/Y, then touch it.
(&) Touch _ (Rotate).
(g) Touch [C "_,] to rotate the image.
(g) Touch [OK].
• You cannoI rotate protected images or nlo_ies,
• You may not be able to rotate ilnages shot with other cameras.
• When viewing images on a conlpuler, lhe image rotalion informalion may not be reflected del?ending onthe soltware.
63

V'_®;_t__e_l_ For detailson theoperation _ page 41
Selects the folder cenlaining nile image yeu v,'anl te playback when using the camera with
"Memory Slick Duo".
(_) Select the desired fekler wilh .&/V.
(g) Touch [OK].
To cancelselectingthefolderselection
Teuch [Exit] or [BACK] in step (_).
"_" On the folder
The canlera stores images in a specified iL_lderof a "Menlory Stick Duo". You can change the iL_lderorcrcale a new one.
• To cret_le a new Iolder _ [Creale REC.Folder] (page 68).
• To change the k_lder for recording images _- [Change REC.Folderl (page 69).
• When multiple lolders am created in lhe "Memory Stick Duo" and the first or lasl image in lhe h)lder isdisplayed, the k_llowing indicators appear.
_l_: Moves to the previous timider
_: Moves to the next folder
_]_: Moves to eidler ltle previous or next k)lders
Adju_,lsthe voltm/e.See page 35.
64

Paintingor puttingstampsonstill images(Paint)You can painl or put stamps on still images and save them separalely. Use the painl pen(supplied) for tiffs operation.
• You CallllOtpaint or put stamps on movies.• When viewing recorded images on a TV, you cannot paint the images.
To display the painting
@ Press [_ (Playback) button.
@ Touch [MENU] --+ _D (Paint) --+ _ (Paint).
[] {_ (save) button
[] p (pen) button
[] %_ (eraser) button
[] _o (stamp) button
[] Thickness select button
[] Color select button
[] X (exit) button
[] [_ (frame) button
[] k._ (revert) button
[] _ (clear all) button
To paint characters or graphics
@ Touch p.
@ Select the line thickness.Touch the thickness select button, the desired thickness, then [BACK].
(_) Paint characters or graphics.
To stamp
(_) Touch _.
(_) Select a stamp.Touch the stamp select button, the desired stamp, then [BACK].
@ Put stamps on the image.
65

P_ii_ti_ olr _tti_g st_m_s _ still i_®s (?_ii_t}
To adda frame
(_) Touch _[].
(_) Select i frame.
Select the desired frame with 4/_, then touch [OK].
Touch [BACK] to return to the painting screen.
To change the color o! the line
Touch the color select button, a desired color, then [BAUK].
To make corrections) s s (r •Touch _, then rub Ille part youwan ( erae ulna. he pare pen. Otherwise, touch _ to
revert to the previous state (if you touch t_ again, it returns to the latest state).• You can select the thickness of lhe eraser in the same way as you do lor lhe pen, using the lhickness selecl
billion. The selecled flfickness is applied to bolh lhe line and eraser.
Erasingall painting
(_) Touch _._.
"Clear All" appears.
@ Touch [OK].
All painting x_ill disappear from the image.
Touch [Cancel] to cancel the operation.
Tosave thepainting
O Touch [_.
(_ Touch the image size to be saved, then touch [OK].
The painted image is recorded in the recording folder as the ne_ est file.
Touch [Cancel] to cancel the operation.
• You can select the image size to be saved flom [VGA] or [3M].
To exit paint mode
O Touch _.
"Exit appears.
(_ Touch [OK].
Touch [Cancel] to cancel the operation.
66

Customizingthe ManageMemoryfeatureand the Settings
You can change Ihe defau]l sellings using _ (Manage Memory) or _ (Setlings) on IheHOME screen.
,4/ Touch [HOME] to display the HOME screen.
HOME
2 Touch m (Manage Memory) or _ (Settings).
F? • ×
3 Touch the desired setting item.
Touch ,iJV to display theother setting items.
4 Touch the setting item that you want to change, and then touch the desired
setting value to set it.
To cancel the setting change
Touch [Cancel] if it is one of the setting item.If not. touch [BACK] or [x].
• This setling is mainlained even when lhe power is turned oil.
67

I ManageMemory Fordetai/son theoperation_ page 67
68
Memory Tool -- Memory Stick Tool
This ilem appears only when a "Memory Slick Duo" is inserled in file camera.
Formats Ihe "Memory Stick Duo". A commercially available "Memory Stick Duo" is already
formatted, attd can be used immediately.
• Note thai l_wnl_uing in evocably erases all dala on a "Memo]y Stick Duo" including even prolectedimages
(_) Touch [Format].
The message "All data on Memory Stick will be erased" appears.
@ Touch [OK]
The format is completed.
To canceltheformatting
Touch [Cancel] or [BACK] in step @
Creates a folder in a "Memory Stick Duo" for recording images.
(_) Touch [Create REC.Folder].
The message "Creating REC.folder" ap?ears.
@ Touch [OK]A new folder is created with a number incremented one higher than the largest number and the
folder becomes the cum:nt recording folder
To cancelthefoldercreation
Touch ICancell or IBAC'K] in step @.
• When not creating a new li)lder tile "I01MSDCF" 1older is selected as the recording 1older
• You can cmale lolders designated up lo "999MSDCF"
• You cannol delete a lk)lder with the camera To delete a lolder use your computer etc
• hnages are recorded in the newly created lolder until a dilli:rcnt lolder is created or selected
• Up to 4,0/10 images can be stored in one lolder When the 1older capacity is exceeded a new Iblder isaut(nnalically created
• For details see "hnage file storage destinzJtions and file names" (page 92)

_,'_;_e _÷r__g Fordetailson theoperation (_ page 87
Changes tile fokler currently used for recording images.
@ Touch [Change REC.Fokler].The folder seleclion screen appears.
KZKZ_
(g) Touch IOKI.
To cancelchangingtherecordingfolder
Touch [Exit] or I BA(-'KI in step @.
• You ctmnot select the "100MSDCF" lk)lder as a recording h)lder.
• You CallllOtInox,'erecorded ilnages to a dil]Prcnl lolder.
Copies all images in the internal memory to a "Memory Stick Duo".
(!) Insert a Memor) Stick Duo" with sufficient capacity.
@ Touch [Copy].The message "All data ill internal memory will be copied" appears.
@ Touch [OK].Copying stm_s.
To cancel the copying
Touch [Cancel] or [BACK] in step @.
• U_ a hdly charged battery pack. If you attempt to copy image files using a battery pack with littleremaining charge, the battery pack may mn oul, causing copying 1o l_fil or possibly corrupling lhe dala.
• You cannot copy individual images.
• The original images ill the internal memo W am retained even alter copying. To delele the comems of the
inlernal memory, remove tile "Memol T Stick Duo" ariel copying, lhen execute lhe [Formal] command in[Internal Memory Tool] (page 70).
• When you copy data l)om the internal memo W to the "Memory Stick Duo," a new hdder will be createdill the "Memo U Stick Duo." You cannol choo_ a specific Iolder on the "Memory Stick Duo" as thedestinalion fin" lhe dala 1o be copied.
• Even if you copy data, a DPOF (Prim order) nlmk is nol copied.
m
6g

_+_ _÷_+_+_ Fordetai/son theoperation _ page 87
+. MemoryTool-- InternalMemoryTool
This item does not appear when a "Memory Slick Duo" is inserted in tile cmnera.
Formats the internal memory.
• Note that lkwmatting irrevocably erases all dam in the internal memory, including even protected images.
@ Touch [Format].
The message 'All data in internal memory will be erased" appears.
(_) Touch [OK].
The format is completed.
To canceltheformatting
Touch [Cancel] or [BACK] in step @.
7O

"_ _ettinnc Fordeta,so. theopera,o._ page87VV551 _V
?T Main Settings m Main Settings I
The default settings are marked with 8.
Selects the sound produced when you operate the camera.
Shutter Turns on the shutter sound when you press the shutter button.
0n Turns on the beep/shutter sound when you operate the touchpanel/press the shutter button.
Off Turns off the beep/shutter sound.
When you operate the camera, the description of functions is displayed.
*_ Orl Displays the function guide.0ff Does nol display the ltlllCliOnguide.
-- The display of this guide can be turned on and off with theabove setting.
• Tile guide that is displayed by touching [?] cannot be turned on or oil with the aboxe setting. To turn ol]this guide, touch [?1 again !page 22).
Initializes the setting to the default setting. Even if you execute this function, the imagesstored in the internal memory are retained.
(2) Touch [Initialize].The message "lnitialiTc all settings" appears.
@ Touch [OK].The settings are reset to the default setting.
To cancel the resetting
Tuuch [Cancel] or [BACK] in step @.
• Make sure thai the power is not disconnected during reselling.71

S_i?i_s Fordetai/son theoperation (_ page 87
Enables you to perform calibration when tile touch panel buttons do not react at theappropriate points where you touch.Using the paint pen, touch the x mark displayed on the screen.To stop tile calibration process mid-way, touch [Cancel]. Tile adjustments made up to thatpoint are not effccted.
×
The x mark moves on tile screen.
If you fail to press the right spot, tile calibration is not perlk_rmed. Press the x mark again.
i
Changes the function of some buttons to operate the camera installed in Ihe Marine Pack.
_ 0n(_) [ Changes the l,mclion of ,he bultons.01_1 Does not change any functions.
The buttons will work as follows when the setting is [On].
Objects cannot be brought into lk_cus by touching the screen.When [Spot AF] is selected, operation brings the center section into lk_cus.During playback, playback zoom operation cannot be performed.During playback, sliding the zoom/W/T) lever moves screen playback lk_rward orbackward.
The screen display is always [Normal].Some functions are limited./The icons are not displayed.)
• For details, see lhe operating instructions supplied with the Marine Pack.
72

Setti_'_s Fordetailson theoperation _ page 87
Main Settings m Main Settings 2
The default settings are marked with _.
Selects the USB mode to be used when connecting the camera to a computer or a PictBridgecompliant printer using the cable lk_rmulti-use terminal.
PietBridge Connects the camera to a PictBridge compliant printer(page 102). When you connect the camera to a computer, thecopy wizard starts automatically, and the images in therecording folder on the camera are copied to the computer.(with Windox_ s XP/Vista, Mac OS X)
Mass Storage Establishes a Mass Storage connection between the cameraand a computer or other USB device (page 90).
Auto The camera recognizes automatically and sets upcommunication with a computer or PictBridge compliantprinter (pages 90 and 102).
• If the camera and a PiclBridge complianl prinler cannot beconnecled when sel 1_ [AuI_)], change the setting to[PictBridgel.
• If the camera and a compuler or olher USB device cannol beconnected when sel 1o [Aulol, change lhe _lfing 1_ [Mass
Storage].
Selects the video signal output type from SD and HD(1080i), according to the TV connected
(page 81).
HD0080i) Selects this item to connect the camera to a 1080J-capableHigh Definition TV.
SD Selects this item to connect the camera to a TV that is not
compatible x_ithan HD(1080i) signal.
73

S_tti_s Fordetailson theoperation _ page 87
Sets tile video signal output according to tile TV color system of the connected videoequipment. Different countries aud regions use different TV color systems. If you want toview images on a TV screen, check page 84 for the TV color system of the country or regionwhere the camera is used.
NTSC Sets the vide() output signal to NTSC mode (e.g., lbr theUSA, Japan).
PAL Sets the vide() output signal to PAL mode (e.g. for Europe).
Set to the aspect ratio of television to be connected for playback.
Selects this item to play back Ihe images on a wide screentelevision.
16:9 image 4:3 image
_2 16:9
4:3 Selects this item Io play back Ihe images on a 4:3 raliotelevision.
16:9 image 4:3 image
74

S÷tti_'_s Fordetailson theoperation _ page 87
Shooting Settings -- Shooting Settings I
The default settings are marked with _.
The AF illuminator supplies fill light to lk_cus more easily on a subject in dark surroundings.
The AF illuminator emits red light allowing tile camera to lk_cus easily when tile shutter button
is pressed hall\ray, until the focus is locked. The D_ONindicator appears at this time.
Off Does nol use AF illuminalor.
• If lhe AF illuminator lighl does not reach lhe subject sulliciendy or the su_!iect has no conlrasl focus willnot be achieved
(The recommended dislanceDSC T2tt0: up lo approx 25 m 18 lhet 2 I/2 inches) (zoom: W)/up lo approx 20 in (6 lhet 63/4 inches)(zoom: T)DSC-T70FF75: up to approx. 2.7 m (g l_:et 10 3/8 inches) (zoom: W)/up to approx, 25 m (8 lcel2 1/2 inches) (zoom: T))
• Focus is achieved as long as lfie AF illuminalor lighl reaches lhe subject, regardless of whelher liglu hillsto roach the center of lhe subject
• You cannot use lhe AF illuminalor when:
When Focus preset is set (page 31)
When _ (Smile Shuuer) mode or j (Twilight) mode or [] (Landscape) mode or ":i};il(Fireworks)nlode is selected in file Scene Seleclion nlode,
When lhe Face Detecl limclion is aclivated,
When [Housing] is set to [On]
• When you use AF illuminator, lhe normal AF r,rage finder flame is disabled and a new AF range finderliame is displayed by a dotted line AF operates with priority on subjects h)caled near the center of lhel]_atne
• The AF illuminalor emils very bright lighl Although there are no problems with salcty do nol lookdirectly inlv) the AF ilhln/inalor emiuer at clo_ range
75

S_titi_{_s Fordetailson theoperation _ page 87
With reference to the grid lines, you can easily set a subject in a horizontal/vertical position.
On Displays the grid lines.
Off Does not display the grid lines.
• Tile grid lines are not recorded.
Selects the auto focus operation mode.
Single Automatically adjusts the l_lcus when the shutter button ispressed and held hall\_ ay down. This mode is uselill for
shooting stational 3 subjects.
Monitor Automatically a(ljusts the l_)cus before the shutter button ispressed and held hall\_ ay down. This mode shortens the timeneeded for focusing.
• Baltery consumption is lhster lhan in [Single] mode.
• When the Face Detect ftlnction is activaled, lhe AF mode is disabled.
Selecls Ihe digital zoom mode. The camera enlarges Ihe image using optical zoom (DSC-T2//O:up Io 5x/DSC-T71//T75: up Io 3x). When the zoom scale is exceeded. Ille camera uses eilhersmarl or precision digital zoom.
Smart Enlarges the image digitally within the range where the image(Smartzoom) will not be distorted, according to the image size. This is not(sO_) available x_hen the image size is set to ISMI or 13:21.
• Tile lllaxiInu[ll zool]l scale of gIllar[ ZOOlI] is s]lown in the
Ibllowing table.
Precision Enlarges all image sizes up to a maximum of(Precision digital zoom) lOx (DSC-T200)/6x (DSC-T711_75), but the image quality(P_) deteriorates.
Off Does not use the digital zoom.
76

S÷_;:i_'_s Fordetailson theoperation _ page 87
Image size and maximum zoom scale using Smart zoom
5M Approx. 6.3x Approx. 3.8x
3M Approx. 8x Approx. 4.8x
VGA Approx. 25x Approx. 15x
16:9 Approx. 8.5x Approx. 5. Ix
• When lhe Face Detect Ihnction is activaled, you cannol use tile Digilal Zoom.
77

S_iti_s Fordetailson theoperation _ page 07
6 Shooting Settings -- Shooting Settings 2
The default settings are marked with _.
When the camera is rotated to shuol a purtrait image, the camera recoMs its position change
and displays the image in the portrait position.
013 Records Ihe image with Ihe correct orientation.03_f Aulo Orienlalion deactivated.
• Depending on the shooting angle o1 the camera, the orientation ol ll_e image may not be recorded
correclly. W]len the orienlation of l]le ill]age is not correct_ you can rotale lhe image using the procedure
on page 63.
Displays the recorded image on the screen for approximalely two seconds immedialely after
shooting a slill image.
0n Use the Auto Review.Off Does not use Aulo Re'_iex_.
• 11you press file shuuer button hallway down during this period, tile recoMed image display disappearsand you can ilnmedialely shool file nexl linage,
This sets the smile detection level when [Smile Shutter] (page 44) is selected in the SceneSelection.
High Setting to [High] makes it easier to detect a smile.
,_' Medium
Low
• It is difficull to delect the snlile under lhe following condilions,
When the lace is too dark or too brighlWhen tile lace is lar fl:om the camera and too small
When llle subject is wearing sunglasses or glasses with thick flames
When file front hair, hat, or other objects am covering llle eyes
When lhe subjecl is not racing Iowards file IronI
78

S÷_;_i_'_s Fordetailson theoperation _ page 87
Q ClockSettings
Sets tile date nnd time.
(_) Select (_ (Clock Settings) l_rom _ (Settings on Ihe HOME screen.
(_) Touch [Clock Settings].
(_) Touch the desired date display format, then touch [----_].
The clock settings screen appears.
(_) Touch e_kch item, then set its numeric value by touching &/V.
(_) Touch IOKI.
To canceltheclocksettingTouch ICancell or IBA(-!K] in step (_).
79

S_i_i_s Fordetai/son theoperation _ page 67
IO Language Setting
Selects the language to be used to display tile menu items, warnings, and messages.
8O

Viewingimagesona TV
You can view images on a TV screen by connecting tile camera to a TV.The connection varies according to the type of TV the camera is connected to.See "TV TYPE" (page 74).
• Icons and olher indicators do nol appear on lhe TV screen.
Turn off botb your camera and the TV before connecling the camera and the TV.
1 Connect the camera to the TV.
4,VIDEO AUDIO
(&) To audio/video
input jacks
Yellow t Black
Cableformulti_use__ _tT(Playback)_ buttonterminal (supplied)
I
• ]fyollr TV has stereo inpilI jacks, connecl the audio plug (black) ol the cable lot illtlllJ-ii_ terminal to theleft audio jack (white),
," Turn on the TV and switch the input.
• For details, see lhe operaling instructions supplied with tile TV.
81

3 Press [] (Playback) button to turn on the camera.
Images shot with the camera appear on the TV screen.
Touch I_/_1 on the control button to select the desired image.
• When using your camera abroad, ii may be necessary lo switch the vide() signal outpui to maich thai ofyour TV sysleln (page 74).
82

Viswi_{_ i_w_es o_ s "_V
You can view an image recorded on the camera by connecting tile camera to an HD (Higb
Definition) TV' witb the HD Output Adaptor Cable (DSC-T75 only).
Turn off botb your camera and tile TV before connecting tile camera and the TV.
# lnlages taken at [VGA] rcsohllion cannot be played back with high image quality.
• In [Wide Zoom Displayl, still images with an aspect of 4:3 or 3:2 can be displayed with an aspect of 16:9(page 60).
• In [Multi Resizingl, the aspect can be converted to 16:9 h)r high definitkm viewing (page 60).
1 Connect the camera to an HD (High Definition) TV with a HD Output Adaptor
Cable (DSC-T75 only).
$COMPONENT AUDIO (]) To audio/video
VIDEO@@@IN _ input jacks
[] (Playback) button
/ Turn on the TV and switch the input.
• For details, see lhe operaling instructions supplied with the TV.
83

3 Press [] (Playback) button to turn on the camera.
Im:_ges shot with the c:mlera appear on the TV screen.
Touch 141/_1 to select the desired image.
• Set ICOMPONENT] to [HD(I080i)] in [Main Settings 21 by selecting _ (Settings) on tile HOMEscreen (page 73),
• When using your camera abroad, it may be necessary 1_ switch the video signal output to ]hatch thai ofyour TV system (page 74).
• You clmnot view movies outpul in HD signal Iorn/al.
On TV colorsystems
If you '_ :rot to vie'_ imnges on a TV screen, yon need :JTV with a video input.j:Jck and the
cable fur multi-use termiuah The colur system of the TV must match that of your digital still
camera. Check the following lists lk_r the TV color system of the country or region where thecaulera is/lsed+
NTSCsystemB:dt_m:_ lshmds. Bolivin. C:m:_dn. Central America. Chile. Culombim Ecuador. Jnnmicm
Japan. Korea. Mexico. Peru. Surinam. Taiwan. the Philippines. the U.S.A.. Venezuela. etc.
PALsystem
Anstr:dim Anstri:_. Belgium. Chin:_. Czech Republic. Denm:wk. Finland. (;erm:my. Holl:md.
Hung Kong, Hungary, Italy, Kuwait. Malaysia. New Zealand. Norway. Poland. Portugal,
Singapore. Slovak Republic, Spain. Sweden. Switzerland. Thailand. United Kingdom. etc.
PAL-MsystemBr:Jzil
PAL-Nsystem
Argentina, Paraguay, Urngua_
SECAMsystem
Bulgaria. France. Cuimm. Irml. lrm 1, Monaco. Russia. Ukraine. etc.
84

Enjoyingyour Windows computer
Displaying the shooting locations of still images on mapsonline
Creating a disc with the images shot (requires CD or DVDdisc writing drive)Printing or saving still images with the dateAdding/changing Music for slide show (using "MusicTransfer")
Additional information on this product and answers tofrequently asked questions can be found at the SonyCustomer Support Website.http://www.sony.net/
85

The following environment is
recommettded for a compttter connected tothe camera.
Recommendedenvironmentfor copyingimages
OS (pre-installed): Microsofl Window, s2000 Professional SP4, Windo_ s XP:'
SP2BNindo_ s Vista::'
• Operalion is not assured in an environmenlbased on an upgrade of tile operatingsystems described above or in a umlli-bootenvironn/ent.
USB jack: Provided as standard
Recommendedenvironmentfor using"Picture MotionBrowser"and"MusicTransfer"
OS (pre-installed): Microsofl Window, s2000 Professional SP4, Windo_ s XP::"SP2/Windo_ s Vista::'
CPU/Memory: Pentium Ill 500 MHz orfaster, 256 MB of RAM or more(Recommended: Pentium Ill 8(}(}MHz or
faster and 512 M B of RAM or more)
Hard Disk: Disk space required forinstallation approximately 200 MB
Display: Screen resolution: 1024 x 768 dots()r 11/()EL'
Colors: High Color (16-bit color) or more
* 64-bit edilions and Slarter (Edilion) arc nolsuppolted.
Notesonconnectingthecamerato acomputer• Operations are not guaranteed IL)rall tile
reconltllellded conlpuler en'_'irol]u/el]lS
nlenlioned above.
• If you connect two or nlom USB devices to asingle computer al tile sanle lhne, some devices,including the camera, may nol operate,depending on the types of USB devices you arcusing.
• Operations are not guarameed when using aUSB hub.
• Connecting tile camera using a USB interlacethat is compatible with Hi-Speed USB (USB 2.0compliant) allows advanced translcr/high speedlranstcr) as the camera is compatible wilh Hi-Speed USB (USB 2.0 compliant).
• Them am three modes lot a USB connection
when connecting a computer, [Autol/delaullsetting), [Mass Storage] and [PictBridgelmodes. This _ction describes file [Auto] and[Mass Smragel as examples. For details on[PictBridgel, see page 73.
• When your computer lCSUllles I]{)nl a suspend orsleep inode, con/lllUnical ion between tile canleraand your compuler may nol recover al file sanle
time.
86
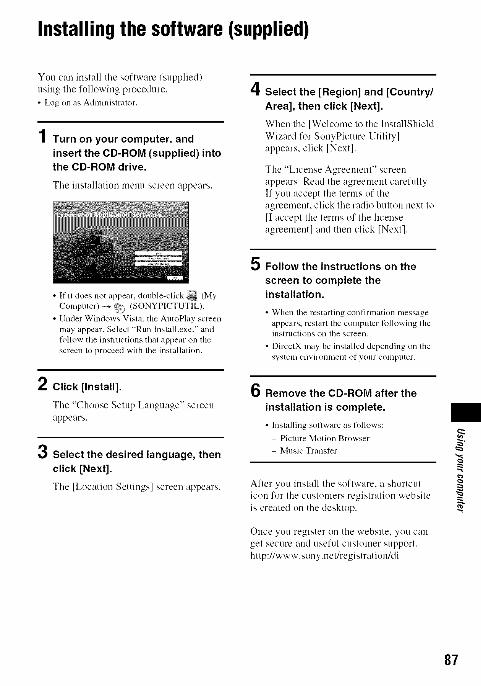
Installingthe software(supplied)
Yuu can install Ihe soflware (supplied)
using tile fullowiug procedure.
• Log ollas adluinistrator.
1 Turn on your computer, and
insert the CD-ROM (supplied) intothe CD-ROM drive.
Tile inslallaliuu menu screen appears.
• If it does no1 appear, double-click _ {My
Computer) _ il_ _ (SONYPICTUTIL).
• Under Windows Visla, file AumPlay screen
May appear. Select _Run lnslall.exe. _' arid
R)llow tile inslmclions that appear orJ the
screen 1o proceed wilh the illstallalion,
2 Click [Install].
The "Choose Setup Language" screen
appears.
3 Select the desired language, then
click [Next].
The [Lucatiuu Settings] screen appears.
4 Select the [Region] and [Country/
Area], then click [Next].
When tile [Welcome to the lnstallShield
Wizard for SonyPicture Utility]appears, click [Next].
The "License Agreemeul" screenappears. Read the agreement carefully.If you accept the terms of tileagreement, click tile radio button next to[I accept the terms of the licenseagruumentl mid then click ]Nextl.
5 Follow the instructions on the
screen to complete theinstallation.
• _']len e "es rtillg confirlnatioll lllessage
appears, reslar[ tile conlpllleF IoJ]owhlg the
insll-tlclions Oll tile screen.
• DirectX nlay be inslalled depending on filesysleli/ellvirounlellt OI yollr COlllpllter.
6 Remove the CD-ROM after the
installation is complete.
• Installing sol,ware as follows:Picture Motion Browser
[V[LISi C Tl'ansl er
After yuu itlstall tile software, a shurtculicon fur Ihe cuslumers registration _xebsileis crealed on the desklop.
Ollce yuu regisler on file vvebsite, you can
get secure and useful custumer support.
http://w',,vw.s my. e/reg stratiun/di
87

After you install tile software, the short cut icons for "Picture Motion Browser". "Picture
Motion Browser Guide". "Music Transfer" are created on the desktop.
• Double-click to start "Picture Motion Browser".
• Double-click to start "Picture Motion Browser Guide".
• Double-click to start "Music Transfer".
88

On the "Picture Motion Browser" (supplied)
You can use still images and tnovies fromthe camera more than ever by takingadvantage of the software.This section summarizes the "PictureMotion Browser".
With the "Picture Motion Browser" youC:II'C
• hnport images shot with the camera and display
them on tile colnl)/iter.
• Orgalli/t_ images on the computer on a calendar
by shooling dale to view lhenl.
• Retouch (Red Eye Correctkm, etc.), prim, and
send still images as e-nlail atlachmenls, change
tile shooting dale and nlore.
• Still images Call be printed or saved wilh lhedate.
• You can creale a data disc using a CD burnerdrive or DVD burner drive.
• For details, refer to "Picture Motion BrowserGuide".
To access "Picture Motion Browser Guide"
from the Start tnenu, click [Start] --+ [AllPrograms]/in Windows 2000, [Programs])--+ [Sony Picture Utility] --+ [Help] --+[Picture Motion Browser Guide].
Starting the "Picture Motion Browser"
Double<lick the ;>_ (Picture Motion
Browser) icon on the desktop.Or. from the Start menu: Click [Start] --+
[All Programs] (in Windows 2000.[Programs]) --* [Sony Picture Utility] -_[Picture Motion Browser].
• Tile confirnlalkm message of tile Inlormatkmtool appears on the screen when sturting the"Picture Motkm Browser" lot the first lime.Select [Star@This function inlk)rmsyou ofnews, such as sol}ware updates, You call c]lange
the setting later.
Exiting the "Picture Motion Browser"
('lick _ button in the top right corner ofthe screen.
89

Copyingimagesto yourcomputerusingthe"Picture MotionBrowser"
4/ Insert a "Memory Stick Duo" with
recorded images into the camera.
• When copying images in tile internal
ii]elnory, this slcp is illlllecessaly,
/ Insert the sufficiently charged
battery pack in the camera, orconnect the camera to a wall
outlet (wall socket) with the ACAdaptor (not supplied).
• When you copy images to your computer
using a b+ttterypack with little remainingcharge, copying may tail or image data maybecome corrupted if the battelT pack shulsdown too soon.
3 Press [] (Playback), then turn on
the computer.
[] (Playback) button
"Connecting to Mass Storage..." appears unthe screen of the camera.
Access indicators*
When a USB connection is establisbed fur
the first time, your computer automaticallyruns a program to recuguize the camera.Wait for a while.
* g_'d is displayed on tile screen during thecoliltllunicalion session.
Do not operate tile conlputer while the indicator
is displayed. When the indicator changes to
--USB _, you can slart using the COlrlpuler
again.
• If"Connecting to Mass Storage..." does notappear, set [USB Connect] to [Mass Smragel(page 731.
90

I I I I , ! " I , I il I " 2 Import the images.
To start importing images, click theConnects the camera to a [hnpurt] button.
computer as described
"Connecting the camera to your
computer".
After making a USB counecliocJ, the
J Import Media Files] screen of "Pk'}lJre
Motion Browser" ,'.tl)l)ears By default, images are imported into aautomatically.
• If),ou use lhe Memo D, SlJck _Jol. reJ_r J_
page 94.
• In Windows XP/Visla, if the AuloPlay
Wizard appears. ¢lo_e IL
folder crectted icJ "My Pictures" that is
named with the date of importing.
• For details on tile "Pic(ure Motion
[3rowser '_, rel_r to "Picttn-e ¸Motion Browser
(;iti_le".
When importing is complete, the "Picture
Motion Browser" st,'arls. Thumbnails of the
imported im_J)_es are displayed.
• Tile "My Pictures" folder is set as the de/aul(
foyer 1 "Viewed folder_",
gl

Organize images on tile computer oil a
calender by shooting date to view them.For details, see the "Picture Motion
Browser Guide".
Example: Month display screen
Perform tile procedures from slep (_) tn (_)below before:
• Discolllleclillg tile cable lor nnflli-use lerlnillal,
• Relno_,'ing a "Menloly Stick Duo".
• hlserting a "Memol)' Stick Duo" into tilecanlera alter copying images lroln the internal
l/lemory.
• Turning off tile canlera.
(_) Douhlc-click N on Ihc tasktr,).
Double-click here
(_) (:lick _/USB Mass Storage Device)[Stop].
@ Confirn/the device on the confirnmtion
window, then click IOKI.
@ Click IOKI.The device is disconnected.
• Step @ is unnecessaly R_rWindows XP/Vista.
Tile image files recorded wilh the cameraare grouped as !biders on Ihe "MemorySlick Duo" or Ihe internal memory.
Example:viewingfoldersonWindowsXP
_ Desl¢op
[_/_ My Documents
[-5_ My Computer
,_ _I 3% Floppy(A:)
r_:/_ LocalDisk (C:)
Local Disk(D:)
i:_i _ Compact Disc (E;)
CompacL Disc(F',)
_;13 Removable Disk (G:)/=} ;/_ DClM
100MSDCF----O....{__] 101F'lSDCF
SCj 999mDC_
('1 r,_zscFolder containing image data recorded
using a camera not equipped with theR)lder creating lhnction
1_ Folder containing image data recorded
using the cameraWhen no new folders are created, there are
folders as follows:
"Memory Slick Duo": "101 MSDCF" only
tnlernal memoly: "101 SONY" only
• You CallllOl record any hnages to tile
"IOOMSDCF" kflder. Tile images ill lhis kflderarc available only lbr viewing.
• You cannol record/playback ally images lo lhe"MISC" kflder,
g2

• hnage files are named as lollows:
Still image files: DSCI)DU]UT3.JpGMovie files: MOVODDND.MP(-3
Index image files thai are recorded when yourecord movies: MOVODU]ND.THM
DU]UT3 slands lor any number within therange fiom 0001 to 9999. The numericalportions of the name of a movie file recorded inmovie mode and its corresponding index imagefile are the same.
• For tllore infi)rtllalion about lolders, see
pages 64 and 68,
a
g3

Copyingimagesto a computerwithout"PictureMotionBrowser"You can copy images to your compttterwithout "Picture Motion Browser" as
follows.
For a computer with a Memory Stick slot
Remove the "Metnory Stick Duo" from thecamera and insert it in tile Memory StickDuo Adaptor. Insert the Memory Stick DuoAdaptor in the compttter and copy theimages.
• Even when you are using Windows 95/98/98
SecondEdition/NT/Me. you can copy images by
inserting tile "Memory Stick Duo" into the
Memo D' Stick slot on your computer,
• If tile "Memol T Stick PRO Duo" is not
recognized, see page 112.
For a computer without a Memory Stickslot
Make a USB connection and follow the
steps below to copy the images to thecomputer.
• Tile screen displays shown in lhis section are tile
examples lor copying images flom "Memory
Stick Duo.
• The camera is not compatible wilh Windows 95/
98/98 SecondEdition/NT/Me of the Windows
operating system,
When you use a conlputer wilhoul a menlory
Slick slot, use a commercially availableMemoW Slick Reader/Writerto copy imagestiom a "MelnoW Stick Du(f' 1oyour computer,
• To copy images in the inlernal menlolT to yourcompuler, copy lhe images to a "Memory StickDuo" first, then copy thenl to your compuler.
This section describes an example ofcopying images to "My Documents"/ForWindows Vista: "Documents").
Prepare the camera and acomputer.
Perform the same procedure asdescribed in "Preparing the camera :rodthe computer" on page 90.
2 Connect the camera to your
computer with the cable for multi-use terminal.
Perform the same procedure asdescribed in "Cotmecting the camera toyour computer' on page 90.• If "Picture Molion Browser" is already
installed, lfien [hnport Media Filesl isstarted on "Picture Molion Browser" but
_lecl [Cancel] 1o finish.
94

3 Click [Open folder to view files]
-* [OK] (Only for Windows XP) asthe wizard screen appears
automatically on the desktop.
®
• When the wizard screen does not appearautomatically, IMlow the procedure:"For Windows 2t)/,_l" on page 95.
4 Double-click [DCIM].
5 Double-click the folder where the
image files you want to copy arestored. Then, right-click an image
file to display the menu and click[Copy].
6 Double-click the [My Documents]
(For Windows Vista:"Documents") folder. Then, right-
click on the "My Documents"window to display the menu and
click [Paste].
The image files are copied to the "MyDocuments" (For Windows Vista:"Documents") folder.
• When an image with the same file nameexists in the copy destination lolder, theoverwrile confirnlalion message appears.
When you overwrite an existing image with
a new one, the original tile data is deleted.
To copy an image file to tile computer
without overwriting, change the file nanle
and then copy tile inlage file. However, notethal if you change the file name (page 96),
you may not play backlhat image with yourcamera.
For Windows 2000
Double<lick [My Computer] --+[Removable Disk] after connecting thecamera to your computer. Then, performfrom step 4.
a
• On tile storage destinatkm of file imagefiles, see page 92.
g5

Viewingimagefiles storedona computerwiththe cameracopyingto the "Memory StickDuo"This section describes the process using aWindows computer as an example.When an image file copied to a computerno longer remains on a "Memory StickDuo", you can view that image again on thecamera by copying the image file on thecomputer to a "Memory Stick Duo".
• Skip step 1 if the file name sel witb your camera
has not been changed.
• You may be unable to play back some images
depending on the image size.
• Sony does not guarantee playback of image files
on the camera if the files have been processed
using a conlpllter or recorded wilh another
canlera.
• When there are no Rdders in a 'Memory Stick
Duo", creale a Rdder (page 68) wilh the camera
Iirsl, lhen copy lhe image files.
2 Copy the image file to the
"Memory Stick Duo" folder in thefollowing order.
@Right-click the image file, then click
[Copy].
@Double-click [Removable Disk] or
]Sony MemoryStick] in [My
Computer].
@Right-click the [[Z}EEEEMSDCF] lk)lder
in the [DCIM] folder, then click ]Paste].
• [ZU]N stands R)r any number wilhin tile
range fl'om 100 to 999.
4l Right-click the image file, then
click [Rename]. Change the filename to "DSC0F-I[][]F-I".
Enter a number from 0001 to 9999 forr-lrn Eir-i.
Q-
• If the overwrile confirmation message
appears, enler a difi)rcnl number.
• An extension may be displayed depending
on file conlputer setlings. The exlension fin.
slill images is JPG, and tile extension R_r
movies is MPG. Do nol change the
extension.
96

Using the "Music Transfer" (supplied)
Yuu can change the Music files that arepreset at the factory to tile desired Musicfiles using "Music Transfer" in the CD-ROM (supplied). You can alsu delete or acidthese files whenever you want.
The music formats yuu can transfer with"Music Transfer" are listed below:
• MP3 files stored on lfiehard disk drive of yourCOlllputer
• Music on CDs• Presel-ii/usic saved on this camera
1 Touch [HOME] to display theHOME screen.
2 Touch ,L, (Printing, Other), then
touch [_ Music Tool].
3 Touch [Download Music].
Tile message "Connect to PC" appears.
4 Make a USB connection between
the camera and your computer.
5 Start "Music Transfer".
6 Follow the instructions on the
screen to add/change Music files.
• To restore the music preset at tile factoryto the camera:
(_) Perlbrm [Format Music] in step 3.
(_ Execute [Restore defaults[ on "MusicTransfer".
All Music files return to the preset-music, and[Music] in the [Slideshowl menu is set 1o[Ofil.
• You can reset the Music files to the preset onesusing [Initialize] (page 71), however, odlersettings will also be resel.
• Fordetails on using "Music Translcr", see theon-line help in "Music TranslPr".
97

Using your Macintosh computer
98
You can copy images to your Macintosh
comp/lter.
• "Picture Motion Brow_r is not cl)mpatiblewith Macintosb computers.
Tile following eovironnlent is
reconllllended for a colnplllel _connecled IOtile camera.
Recommendedenvironmentfor copyingimages
OS (pre-installed): Mac OS 9.1/9.21 Mac 1
OS Xfvl0.] to _ 10.4)
IJSB jack: Provided as standard
Recommendedenvironmentfor using"Music Transfer"
OS (pre-installed): Mac OS X lv ]0.3 to
v l0A) _,J
CPU: iMac, eMac, iBook, PowerBook_ PowerMac G3/G4/G5 series, Mac mini
Memory: 64 MB or morn ( 128 MB or more is
recommended)
Hard Disk: Disk space required lbr
installation--approximately 250 MB
Noteson connectingthecameratoa 3computer• Operations air not guaranteed for _dltile
recolllnlended conlputer environlnenls
nlentiolled above.
• If you connect two or morn USB devices to asingle computer al file same liIlle_sortie devices,including file camera, may not operatedepending on tile lypes of USB devices you arcusing.
• Operalions arc not guaranleed when using aUSB hub.
• Connecling lhe camera using a USB interlacelhat is compatible wilh Hi-Speed USB /USB 2.0compliant) allows advanced transler/high speedtransl_r) _s the camera is compatible wilh Hi-Speed USB/USB 2.0 complianl).
• Them am three modes k)r a USB connection
when connecting a computer, [Aulol/delaullsetting), [Mass Storage] and [PiclBridgelmodes. This _ction describes lhe [Auto] and
[Mass Storagel as examples. For details on[PictBridgel, see page 73.
• When your conlputer rcsulnes honl the Stlspend
or sleep IlK)de. comnlullicalion between lhecamera and your conlpuler nlay nol recover atthe Sallle time.
Prepare the camera and a
Macintosh computer.
Perform the same procedure asdescribed in "Preparing the camera andthe computer" on page 90.
Connect the camera to yourcomputer with the cable for multi-use terminal.
Perform the same procedure asdescribed in "Connecting the camera toyottr computer" on page 90.
Copy image files to the Macintoshcomputer.
QDouble-click the newly recognized icon[DCIM] _ the lblder where the
images you want to copy are stored.
QDrag and drop the image files to thehard disk icon.
The image files are copied to the harddisk.
• For details on the storage location of tbeim_ges and file names, see page 92.

_si_"!_2tsis__Sssi_tes_ _x_,t}p/)£elr
,/I_1, View images on the computer.
Double-click tile hard disk icon _ tiledesired image file in the foldercontaining the copied files to open thatimage file.
I I" " " I" "-= Ill" II
Drag and drop the drive icon or the icon oftile "Memory Stick Duo" to tile "Trash"icon beforehand when you perform theprocedures listed below, so that the camerais disconnected from the computer.
• Disconnecting the cable lot nmlti-use terminal.• Removing a "Menlo W Stick Duo".
• Inserting a "Memory Stick Duo" into lhecanlera ariel copying images flx)mlhe internalmelllory.
• Turning oll lbe camera.
You can change the Music files that arepreset at the factory to tile desired Musicfiles. You can also delete or add these files
whenever you want.The music formats you can transfer with"Music Transfer" are listed below:
• MP3 files stored on lbe hard disk drive of your
computer
• Music on CDs• Presel-illUSiC saved on lhe camera
To install "Music Transfer"
• Shul down all olher application software bel_reyou insl_dl"Music Transltrr".
• For inst_dlalion,you need to log on asAdnlinistr_ltor.
@ Turn(myour Macintosh computer, andinscrl the CD-ROM (supplied) into theCD-ROM drive.
@ Double-click _ (SONYPICTUTIL).
@ Double-click the [MusicTransli:r.pkg] fileill [Mac] AHder.The installation of the soflx_are starts.
To add/change Music files
See "Addin_Changing Music using"Music Transfer'"' on page 97.
• II ,Ill ,,
Additional information on this productand answers to frequently askedquestions can be found at the SonyCustomer Support Website.http://www.sony.net/
a
99

Viewing"Cyber-shot Step-upGuide"
When you install "Cyber-shot Handbook","Cyber-shot Step-up Guide" is alsoinstalled. "Cyber-shot Step up Guide"further introduces how to use tile camera
and optional accessories.
• I | I I
Start from tile shortcut icon Oll thedesktop.
", II Jl lA, I J_l
1 Copy the [stepupguide] folder in
the [stepupguide] folder to yourcomputer.
Select [stepupguide]
[language] _ [GB], and thencopy and overwrite all the files
from the [GB] folder to the [img]folder in the [stepupguide] folder
that was copied to the computerin step 1.
3 After copying is complete,double-click "stepupguide.hqx"
in the [stepupguide] folder touncompress it, then double-click
the generated file "stepupguide".
• If an uncompl_:ss tool lot HQX Lile is not
installed, install the Slullit Expander.
100

Howto print still images
When you print images shot in [16:9] mode, bothedges may be cut off, so be sure Io check before ..............................................................................................................
printing (page 14).
Printing directly using a PictBridge compliant printer (page 102)
You can print images with a "Memory Stick" compliant printer.For details, see the operating instructions supplied with theprinter.
You can copy images to a computer using the supplied "PictureMotion Browser" suftware and print Ihe images.You can insert Ihe dale on the image and print it.
You can take a "Memory Stick Duo" containing images shot with 2
101

Printingimagesdirectlyusinga PictBridgecompliantprinterEven if you do not have a computer, youcan print images shot using your camera byconnecting the cmnera directl_ to aPictBridge compliant printer.
_d(PictBridge• "PictBridge" is based on the CIPA standard.
(CIPA: Camera & Imaging Products
Association)
• You cannot print movies.• If tile _( indicator flashes on the screen of the
c_mmra (error notificalion), check lhe connecled
prinler.
" .t" P "1, I I" .Jl" .
Prepare the camera to connect it to the
printer with the cable for multi-use
terminal. When connecting the camera to a
printer that is recognized when [USB
Connect] is set to [Auto], Stage I is
unnecessary.
• It is recommended to use a flllly charged batterypack to prevent the power flom turning oilpartway through prinling.
4
/ Touch [HOME] to display theHOME screen.
2 Touch _. (Settings), and touch
[Yr Main settings].
3 Touch [Main Settings 2] and
touch [USB Connect].
4 Touch [PJctBridge].
The USB mode is set.
1 Connect the camera to the
printer.
connector
@ To the -- Cable for multi-useUSB jack
102

2 Press [] (Playback) button and
turn on your camera and theprinter.
After the connection is made,the f'_ indicator appears.
Tile camera is set to pla}back mode.
When you select [Multiple Images]You carl print multiple selected images.
(_) Touch the image )ou want to print._/' mark appears on the selected image.
(_) Touch 1--_1.
(_) Touch IOKI.
" .I q ' I It
1 Touch the desired setting item to
make the print settings.
1 Touch [MENU] to display the
menu.
2 Touch i/V to display ,t, (Print),
and touch _ (Print).
A Print menu appears on the screen.
3 Touch [This Image] or [Multiple
Images].
When you select [This Image]You can print the selected image. Move on
Io stage 4.
[Quantity]
When the [Layout] is set to [1-up/Bordedess] or [1-up/Border]:
Select tile nutnber of sheets of an imagethat you want to print. The image willbe printed as a single image.
When the [Layout] is not set to [1-up/Borderless] or [1-up/Border]:
Select tile nutnber of sets of images thatyou want to print as an index image. Ifyou selected [This hnage] in stage 3,
select the number of the same imageyou want to print side by side on a sheetas an index image.
• The designated number of images may notall fit onlo a single sheet depending on thequanlity of images.
[Layout]
Selects the number (!1"images _ou "_antto print side by side on a sheet.
[Size]
Select the size of the printing sheet.
103

[Date]
Select [Day & Time] or [Date] to insertthe date and tithe on images.
• When you choose [Dale], the dale will be
inserted in the order you select (page 79).
This flmctk)n may not be provided
depending on file prinler.
2 Touch [OK].
The image is printed.• Do not disconnect lhe cable fl)r nmlti-use
ternlinal while the _ (PictBrklgeConnecling) indicator appears on file screen.
o_# indicator
To printotherimages
Select [Multiple lmages], then perform theprocess again from stage 3.
" , I " I I " I " I I
Make sure the screen has returned t(! slage2, and disconnecl the cable for [nttlti-ttselerminal from Ihe camera.
104

Printingat a shop
You can take a "Memory Stick Duo"
containing images shot with your camera to
a photo printing service shop. As long as
the shop supports photo printing services
conforming to the DPOF, you can make a
DPOF(Print order) mark on images in
advance so that you do not need to reselect
them when you print them out at the shop.
• You cannot prinl images stored in the internalmemory at a print shop directly hom tilecamera. Copy the images to a "Memory StickDuo", then take tile "Menlory Stick Duo" to lheprinl shop.
What is DPOF?
DPOF (Digital Print Order Format) is a
function allowing you to make a DPOF
(Print order) mark on images of "MemoryStick Duo" that you want to print out later.
• You can also print the images with the DPOF(Print order) mark using a printer that c(mtorn/sto lhe DPOF (Digital Print Order Formal)standard or using a PiclBridge colnplianl
prinler.
• You cannot mark movies.
When takinga "Memory StickDuo"to ashop
• Consult your photo priming selvice shop as towhat types of 'Memory Stick Duo +they handle.
• Ila ' Memoly Stick Duo' is not handled by yourphoto printing service shop, copy tile imagesyou Walll to print ollt to ()tiler lnedhlll] such as il
CD-R _uldrake it to the shop.
• Be sulv to take tile Memory Sick Duo Adaptorwith it.
• Belbm you take image data to a shop, alwayscopy (back up) your data to a disk.
• You cgtnnot set tile number of plilllS.
• When you want to superimpose dates onimages, consull your pholo prinling serviceshop.
, I , " --I II,t"
[]_ (Playback) button
1 Press []_ (Playback) button.
2 Display the image you want to
print.
3 Touch [MENU] to display the
menu.
4 Touch [DPOF] and touch 0P%
(This Image).
DPOF(Print order) mark is altached lothe image.
DPOF
To removethe mark
Repeatstep 3and 4.
105

4/ Touch [MENU] while displaying
images in single=image mode orin index mode.
2 Touch [DPOF] and touch 0po_
(Multiple Images).
3 Touch an image to mark.
_/ mark is attached to the selected image.
Single Image
Index Display
To removethemark
Touch the im:*ges that you w:Jnt to remove
the marks.
To markall the images in the folder
@ Touch IMENU] while disphJying im:_gcs
in index mode.
(_) Touch [DPOF] _ _ (Select All in This
Folder).
_ re:irk is attached to :dl imtlges in the
selected l\)lder.
• The print order lnark cannot be altached when
lherc are more than 100 films in a tolder.
4 Touch [--+].
5 Touch [OK].
DPOFmark appe_,rs on the screen.
• ToLichhlg _ at tile illdex screen retllrlls 1o
single-image mode.
To cancel the selection
To c_u/cel,touch [Exit] in steg 5.
106

Troubleshooting
If you experience trouble with your camera, try tile following solutions.
0 Check the items on pages 108 to 116.
If a code such as "C/E:f-I[Zl:f-I[Zl" :if>pears on tile screen, see page II7.
0 Remove the battery pack, and insert the battery pack again after about oneminute, and turn on the power.
O Initialize the settings (page 71).
O Consult your Sony dealer or local authorized Sony service facility.
Please understaud that >ou give your consent that the contents of the internal uleulory, Musicfiles may be checked when you send your camera to be repaired.
Click one of the following items to jump to the page explailfiug the symptom and cause or theappropriale correclive action.
107

The battery pack cannot be inserted.
• Insert the battely' pack correctl? b} pressing and holding the b_Jttcryeject le_cr open.
Cannot turn on the camera.
• After insclling the b_Jttery pack into the c_unera_ it may t_Jkc _Jlittle while to get the c_unerapowered.
• Insert the battely' pack correctly.
• The battely pack is discharged. Insert a charged battery pack.
• The batte D, pack is dead (page 123). Replace it with a new one.
• Use a recommended battery pack.
The power turns off suddenly.
• If you do not operate the camera for about three minutes _11ile the pox_cr is on, the cmncraturns off automatically to prevent wearing down the battery pack. Turn on the camera again.
• The battely pack ix dead (page 123). Replace it with a new one.
The battery remaining indicator is incorrect.
• This phenomenon occurs _qlcn you use the career:, in _m extremely hot or cold loc:,tion.
• The displayed battery remaining differs from the current one. Fully discharge and then charge
the b _ttery pack to correct the_ display.
• The batte D, pack ix discharged. Insert a charged battery pack.
• The battery pack ix dead (page 123). Replace it wilh a new one.
The battery cannot be charged while inside the camera.
• Use the b_Jttcryclmrger to ch_uge the b_Jttcry.
Cannot record images.
• Check thl: free capacity of the intemM memory or 'Memor) Stick Duo". 11 it ix full do one ofthe following:
Delete unnecessary images (page 37).
Change the "Memory Stick Duo."
• You cannot record images while charging the flash.
• When shooting a still image_ set the shooting mode other than _.
• Set the shooting mode to _ when shooting movies.
• The image size is set to [640(Fine)] when recording movies. Do one of the follm_ ing:
Set the image size to other than [640(Fine)].
Insert a _Memory Stick PRO Duo."
108

This subject is not visible on the screen.
• Your camera is set to tlw ph_yback mode. Press [] to change to the recording mode
(page 35)
Anti-blur function does not work.
• The anti-blur l?mction does not x_ork x_bcn ((_0;__q)pc_n's on the disphJy
• The anti-blur function may not work properly when shooting night scenes.
• Shoot afler pressing the shutter button half_ay down: do not press it l_llly do_n suddenly.
Recording takes a long time.
• The NR slm_ shutter l?lnction is activated (page 19) This is not a malfimction
The image is out of focus.
• The su/_ject is too close Shoot in _ (Macro On) recording mode. M_Nc sure to position the
lens farther away from the subject than the shortest shooting distance, approximately 8 cm(3 1/4 inches) IW)/80 cm 131 1/2 inches) (T) (DSC-T2/)O), 8 cm (3 IN inches) (W)/25 cm
(9 7/8 inches) (T) (DSC-T70/T75), when shooting (page 30). Or set to _oO_ (Close focusenabled) mode and shoot about I to 20 cm l 13/32 to 7 7/8 inches) from the W side distance
(page 30)
• J (Twilight) mode or [] (Landscape) mode or _!{?_?lFircworks) mode is selected in the Scene
Selection when shooting still images.
• The Focus preset l?mction is selected. Select the auto focus mode (page 31 )
• Refer to How to use the [Spot AF]" on page 32.
Zoom does not work.
• Optical zoom cannot bc used in _O_ (Close focus enabled) mode• You cannot/ise the Smart zoom when:
the image size is sel to [8M], [3:21
• When the Face Detect function is activated, you cannot use the Digital Zoom
The flash does not work.
• The flash is set to _; (Flash Off) (page 29)• You cannot use the flash when:
[REC Model is set Io [Burst] or Exposure Bracket (page 47) _i_o(HighSensilivily)modeor.,_ Tw gl ) _ (e r'.'i_) Frew rks) _ (e sseece( inlhe
Scene Selection (page 45). g
Shooling in _C[ (Close focus enabled) mode.
Shooting movies.
• Set the flash to _ (Flash On) when [] (Landscape) mode, _ (Beach) mode, or t_ (Snow)mode is selected in the Scene Selection (page 29).
109

Fuzzy white circular spots appear in images shot using the flash.
• Particles (dusL polh:n, etc.) in the air reflected the flash light and appeared in the image. This
is not a malfiu_ction (page 14).
The close-up shoot function (Macro) does not work.
• J (Twilight) mode or [] (Landscape) mode or ".'!:_i?(Firc_orks) mode is selected in the SceneSelection (page 45).
• _kO. (Close lbcus enabled) mode shooting is disabled when _ (Smile Shutter) mode isselected in the Scene Selection.
• Close-up shooting (macro shooting) is disabled when _kO (Close focus enabled) mode isselected.
The date and time are not displayed on the LCD screen.
• While shooting, the date and time arc not displayed. The) arc displa) cd only during pla}hack.
Cannot insert dates on images.
• This camera does not have a feature for superimposing dates on images (page 114). By using"Picture Motion Browser", you can print or save images with the date.
The F value and shutter speed flash when you press and hold the shutterbutton halfway down.
• The exposure is incorrect. Correct the exposure (page 34).
The screen is too dark or too bright.
• Adjust thebrightness of the backlight (page 23).
The image is too dark.
• You are shooting a subject _ilh a light source behind the subject. Select the metering mode(page 33) or a([just the exposure (page 34).
The image is too bright.
• Adjust the exposure (page 34).
The image colors are not correct.
• Set [Color Model to [Normal] (page 50).
Vertical streaks appear when you are shooting a very bright subject.
• The smear phenomenon is occurring and x@itc, hlack, red, purple, or other streaks appear onthe image. This phenomenon is not a nmllimction.
110

Noise appears in the image when you view the screen in a dark place.
• The camera is _atcmpting to increase the visibilily of the screen by temporarily brightening
the image under conditions of k)w illumination. There is no effect on the recorded image.
The eyes of the subject come out red.
• Set [Red Eye Reduction] to [Auto] or IOn] (page 52)
• Shoot the subject it a distance closer than the flash range using the flash.
• Light the room and shoot the subject.
• Retouch the image using [Rcd Eye Correction] (page 58).
Dots appear and remain on the screen.
• This is not CJmalfilnction. These dots _II-L,not recorded (page 2).
Cannot shoot images in succession.
• The internal menlory or 'Memory Stick Duo" is fulh Delete unnccessluy' images (page 37).
• The batter} level is lm_. lnsert charged batte O pack.
Your camera cannot playback images.
• Press [] (Playback) button (page 35).
• The folder/file name has been changed on your computer (page 96).
• When an image file has been processed by a computer or when the image file x_as recorded
using a model other than that of your camerm playback on your camera is not guaranteed.
• The camera is ill USB mode. Delete the USB connection (page 92).
The date and time are not displayed.
• [Display Sctupl is set to [Simple] or [hnage Only]. Touch [DISP] to set [Display Sempl to
[Normal] (page 23).
The image appears rough right after playback starts.
• Tile im,ge re:l) appear rough right al'ler playback st_Jrts duc to im:lgc processing. This is not amall)ruction.
The icons no longer appear.
• When tile top right of the screen is touched, the icons _ill momentarily disappcCm TCJkingyour finger off the screen will make the icons reappear.
• [Display Setup] is set to [hnage Only]. Set to [Normal] or [Simple].
g
111

112
The slideshow music (background music) does not play.
• Use "Music Transfer to import music into tile camera (page 97).
The image does not appear on the TV.
• Check [Video Out] to see it"tile _ideo output signal of }our camera is set to the color s} stemof your TV (page 74).
• Check whether the connection is correct ]page 81).• If Ibe USB connector of the cable for multi-use terminal is connected to another device,
disconnect it (page 92).• You are tuing to play back movies in HD(1080i) output. Recorded movies cannot be viex_ed
at high-definition image quality. Set [COMPONENT] to [SD] (page 73).
Your camera cannot delete an image.
• Cancel the protection ]page 61).
Computer OS compatibility with camera is unknown.
• Check Recommended computer environment" on page 86 for Windows_ and page 98 l_)rMacintosh.
"Memory Stick PRO Duo" is not recognized by a computer with a "MemoryStick" slot.
• Check that tile computer and tile Memory Stick Reader/Writer support 'Memo U Stick PRODuo". Users of computers and Memory Stick Readers/Writers made by manufacturers otherIhan Sony should contact those manufacturers.
• If "MemoU Stick PRO Duo" is not supported, connect the camera to the computer ]pages 90and 98). The computer recognizes the "Memory Stick PRO Duo".
Your computer does not recognize your camera.• Turn on tile clllnel-a.
• When the battery level is low, insert the charged battery pack or use Ihe AC adaptor (notsupplied) ]page 90).
• Set [USB Connect] to [Mass Storage] ]page 73).
• Use the cable for multi-use terminal (supplied) (page 90).• Disconnect the cable for multi-use terminal from both the computer and the camera, and
connect it again firmly.
• Disconnect all equipment other than the camera, the keyboard and the mouse from the USBconnectors of your compllter.
• Connect the camera directly to your computer without passing through a USB hub or otherdevice (page 90).

Cannot copy images.
• Connect the CaIIIL'I'II_lndyo/ir computer correctly making a USB connection (page 90).
• Follow the designated copy procedure h_ryour OS (pages 91 and 98).• When you shoot images with a "Memory Stick Duo" fommtted by a computer, you may not
be able to copy the images to a computer. Shoot using a "Memory Stick Duo" fommtted bythe camera (page 68).
After making a USB connection, "Picture Motion Browser" does not startautomatically.
• Make the USB connection after the computer is turned on (page 90).
Cannot play back images on your computer.
• If you are using Picture Motion Bro_scr , refer to 'Picture Motion Browser Guide(page 89).
• Constl]t the computer or softx_arc mantlfaCttlrer.
You do not know how to use "Picture Motion Browser".
• Refer to ' Picture Motion Browser Guide'_(page 89).
The image and sound are interrupted by noise when you view a movie on acomputer,
• You {II'L'playing back the movie directly from the internal memory or the 'Memory StickDuo". Copy file movie to the hard disk of your computer, then play back the movie from thehard disk (page 90).
Cannot print an image.
• Refer to Ihe operation manual of the printer.
Images once copied to a computer cannot be viewed on the camera.
• Copy them to a folder recognized h) the camera, such as "IOI MSDCF" (page 92).
• Follox_ the correct procedures (page 96).
Cannot insert a "Memory Stick Duo".• Insert it in the correct direction.
You have formatted a "Memory Stick Duo" by mistake.
• All the data on the "Memory Stick Duo" is deleted b} formatting. You cannot restore it.
g
113

Cannot playback or record images using the internal memory.
• There is a Memo U Stick Duo insl:rled in the camera. Remove it.
Cannot copy the data stored in the internal memory to a "Memory Stick Duo".
• The "Memory Stick Duo" is fulh Copy to a ' Memory Stick Duo" _ith sulficicnt capacity.
Cannot copy the data on the "Memory Stick Duo" or the computer to theinternal memory.
• Data on a 'Memory Stick Duo or a computer cannot be copied to the internal memory.
Also see "PictBridge compliant printer" (as follows) in conjunction with the following items.
Images are printed with both edges cut off.
• Depending on your printer, the lel_, right, top, and hottom edges of the image may bc cut off.
Especially when you print an image shot with the image size set to [ 16:9], the lateral end ofIhe image may be cut off.
• When printing images using your own printer, cancel the trimming or borderless settings.Consult the printer manufacturer as to whether the printer provides these functions or not.
• When having images printed at a digit d print shop, ask the shop whether they can print theimages without cutting off both edges.
Cannot print images with the date.
• Using '_Picture Motion Bro_ ser'_,you can print images _qth date.• This camera does not have a li:aturc for superimposing dates on images. However, because
the images shot with the camera include information on Ihe recording date, you can printimages with the elate superimposed if the printer or the software can recognize Exifinformation. For compatibility with Exif information, consult the manufacturer of the printeror the soflwarc.
• When you print images at a shop, images can be printed with the elate if you ask them to do so.
114

A connection cannot be established.
• The camera cannot be connected directly to a printer th,t is not compliant _ith tlw PictBridgcstandard. Consult the printer manufacturer as to whether the printer is compliant wilh
PictBridge or not.
• Check that the printer is turned on and can be connected to the camera.
• Set [USB Connect] to [PictBridge] (page 73).
• Disconnect md connect the cable for multi-use terminal again. If an error message is
indicated on the printer_ relk.r to the operating instructions supplied with the printer.
Cannot print images.
• Check that the camera and the printer arc propcrl) connected using the cabh: for multi-useterminal
• Turn on the printer. For further information_ rcl_:r to the operating instructions supplied withthe printer.
• If you select [Exit] during printing_ images may not be printed. Disconnect and connect the
cable lbr multi-use terminal again, lfyou still cannot print your images, disconnect Ibe cablefor multi-use terminal turn the printer off and then on, then connect the cable for multi-use
terminal again.
• Movies cannot be printed.
• hnages shot using cameras other than this camera or images modified with a computer maynot be printed.
Printing is canceled.
• Confirm thai you have disconnected Ihc cable for mulli-usc terminal before the(PictBridge Connecting) mark disapi_ears.
Cannot insert the date or print images in the index mode.
• The printer does not pro_ kl,: these functions. Consult the printer manufacturer as to whetherthe printer provides these fimctions or not.
• The date may not be inserted in the index mode depending on the printer. Consult the printermanufacturer.
" is printed on the date-inserted part of the image.
• Imagesthat do not haxethe recording datacannot heprinted _ith Ihe date inserted.Set[Date]to [Off] and print the image again (page 103).
Cannot select the print size.
• Consult the printer manufacturer as to whether the printer can provide the desired size.
115

Cannot print the image at the size selected.
• Disconm:ct the cable for multi-use terminal and reconnect it _qwncver you change the paper
size after the printer has been connected to the camera.
• The print setting of lhe camera differs from that of the printer. Change the setting of either the
camera (page 103) or the printer.
Cannot operate the camera after canceling printing.
• Wait l_)r a _llile as the printer is carl3ing out the cancellation. It may take some trinedepending on the printer.
Cannot operate the touch panel buttons correctly or fully.
• Perform [Calibration] (page 72).
• [Housing] is set to [On] (page 72).
The paint pen operation reacts at inappropriate points.
• Perform [Calibration] (page 72).
The file number cannot be reset.
• E_en if you change the recording media, the fih: number cannot be reset in the camera. Toreset, perform [Fommt] (p iges 68, 70) with the camera, and then reinitialize the settings(page 71). Hm_ever, all data _ill be erased, and all settings including the date and time arccancelled.
The lens gets fogged.
• Moisture condensation has occurred. Turn off the camera and leave it lbr about an hour beforeusing it.
The camera becomes warm when you use it for a long time.
• This is not a malfimction.
The Clock Set screen appears when you turn on the camera.
• Set the date and time again (page 79).
You want to change the date or time.
• Set the date and time again (page 79).
116

Warningindicatorsandmessages
"" I .Ill I I ,
If a code starting with a letter of tile
alphabet appears, your camera has a self-
diagnosis display. Tile last two digits
/indicated by KIKl/will difl'cr depending onthe state of tile camera.
If you are unable to solve tile problem even
after trying tile lk_llowing corrective actions
a few times, your camera may need repair.
Contact your Sony dealer or local
authorized Sony service facility.
C:32:v1[]
• There is trouble with your career i's
hardware. Turn the power off and on
again.
C:13:vlr_
• The camera cannot read or write data OlX
the Memo U Stick Duo". Try turning
off and on the camera again, or takingout md inserting the "Memory StickDuo" several times.
• The internal menlory has experienced aforulat error, or an unformatted
"Memory Stick Duo" is inserted.
Format the internal memo13' or the"Memory Stick Duo" (pages 68_ 70).
• The inserted "Memory Stick Duo"cannot be used with your camerm or the
data is damaged. Insert a ne_ Memoly'Stick Duo".
E:61 :vwl
E:62:vw1
E:91 :r-lr-I
• A camera malfunction has occurred.
Initialize the camera (plge 71L thenturn the power on again.
• , I •
If the %llowing messages appear, followtile instructions.
• The battery level is low. Charge the
battery pack immediately. Dependingon the conditions of use or the type of
battery pack, the indicator may flasheven though there arc still 5 to lfl
minutes of remaining battery chargeleft.
For use with compatible battery only
• The battery inscm:d is not an NP-BD l/NP-FDI batte U pack.
System error
• Turn tile po_er off and then on again.
Internal memory error
• Turn tile po_er off and then on again.
Reinsert the Memory Stick
•Insert the 'Memory Stick Duo"correctly.
• The inserted MemoU Stick Duo" cannotbe used ill your camera !p_ge 121).
• The "Memory Stick Duo" is damaged.• The terminal section of the "Memory
Stick Duo" is dil_.y.
Memory Stick type error
• Tile inserted "Memory Stick Duo"cannot be used ill your camera(page 121).
Cannot access Memory StickAccess denied
• You arc using the "Memor) Stick Duowith the access controlled.
g
117

War@rNi_u_isa_s al_4_t_esss_s
Memory Stick formatting errorInternal memory formatting error
• Format the media again (pages 68, 70).
Memory Stick locked
• You are using the 'Memory Stick Duo"with the write-protect switch, and the
switch is set to the LOCK position. Setthe sx_itch to the recording position.
No memory space in internalmemoryNo memory space on Memory Stick
• Delete unnecessary images or files(page 37).
Read only memory
• YOLIr CUIIIL_I';I cunnot rL_cord or deletL _
images on this 'Mcmoly' Stick Duo.
No images
• No images that can bc phLvcdhave beenrecorded in the internal memo U.
• No images that can be played have beenrecorded in this R)lder.
• The selected folder does not contain afile that can be played ill a Slide Shm_wilh music.
Folder error
• A folder with the same first three digitnumber already exists on the "MemoryStick Duo" (for example: 123MSDCFand 123ABCDE). Select another lblder,or create a ne_ folder (pages 68, 69).
Cannot create more folders
• Tile folder with a name beginning _ith"999" exists on the "Memory StickDuo". You,cannot create any R)lders ifthis is the case.
File error
• An error occurred while the image wasplaying back.
• When an image file has been processedby a computer or when the image filewas recorded using a model other thanthat of your camera, playback on yourcamera is not guaranteed.
Read only folder• You ha_c selected a fi)lder that cannot
be set as a recording folder on yourcamera. Select another folder (page 69).
File protect
• Release the protection (page 61).
Image size over
• You are playing buck an image _ithsize that cannot be played back on yourcamera.
Invalid operation
• You are tly'ing to pl ,yback a file that isnot compatible with the camera.
• You have selected a function that is notavailable for movies.
• You have touched the panel when usingthe digital zoom or close focus mode.While using these modes, you cannotfocus by touching the screen.
• You are trying to resize the VGA size
linage to _ (HDTV) with Ihe MultiResizing flmction.
(Vibration warning indicator)
• Camera shake may occur due toinsufficient light. Use the flash, turn onthe anti-blur fimction, or mount the
camera on a tripod to secure the camera.
118

640(Fine) is not available
• 640(Fine) size movies can be recorded
only using a 'Memory Stick PRO Duo".Insert a 'Memory Stick PRO Duo" or
sol the image size to a size other than[640(Fine)].
Macro is invalid
• The macro is unav;0lablc under these
seltings (pages 3(), 45).
Flash settings cannot be changed
• The flash is unavailable under these
seltings (pages 29, 45).
Zoom disabled
• IDigital Zooml is set to IOffl when youare shooting in [Close lk)cus enabled[.Or, you arc trying to use [Smart] in[Digital Zoom] when the image size issel to [8M] or [3:21 (page 76).
Maximum images selected
• You can select up to lO0 images.Remove the check mark.
No enough battery
• when copying a image recorded in theinternal memor._ to the "Memo13 StickDuo", use a fully charged batteU.
Printer busyPaper errorNo paperInk errorLow inkNo ink
• Check the printer.
Printer error
• Check the printer.
• Check if the image you _ant to print iscormpted.
,c_g• The data transmission to the printer may
not be completed yet. Do not disconnectthe cable for muhi-use terminal.
Processing...
• The printer is canceling the current printjob. You cannot print until it is finished.This may take time, depending on theprinter.
Music error
• Delete the Music file, or replace it witha normal Music file.
• Execute [Form it Music], thendownload a new Music files.
Format music error
• Execute [Format Music].
Invalid operation
HD(1080i) output in progress...
• You are trying to play back movies.
• You ire trying to use the [Retouch]flmction.
TV output in progress...
• The camera is playing back images inthe Slide Sho_ mode.
No red-eye detected
• You may not bc able to correct the red-
eye phenomenon depending on theimage.
g
11g

Usingyourcameraabroad-- Powersources
You can use your camera, tile battery charger (supplied), and the AC-LS5K AC Adaptor (notsupplied) in any country or regi(m where the power supply is within 1(I(IV to 24(1 V AC.50/60 Hz.
• Do not use an electronic transformer (travel converter), as this may cause amalfunction.
120

On the "Memory Stick Duo"
A "Memory Stick Duo" is a compact,portable IC recording medium. Tile types of"Memory Stick Duo" that can be used withthis camera are listed in the table below.
However, proper operation cannot beguaranteed for all "Memory Stick Duo"functions.
:::,MemoU Stick Duo(without MagicGate)
Memory Stick Duo(with MagicGate)
MagicGate Memory StickDuo
Memory Stick PRO Duo
MemoU Stick PRO-HG Duo
0*2
0.1
0.1.2
0.1.4
0.1.3.4
.1 "Memory Stick Duo'L "MagicGale Memory
Slick Duo '_ and "Menlory Stick PRO Duo" ale
equipped with MagicGate _nctions.
MagicGale is copyright proleclion lechnology
that uses encJTplion technology. Dala
recording/playback that requires MagicGale
_n_ions cannot be perk_rmed with this
calnera.
*2 High-speed data transl_r using a parallel
inter_ce is not supported.
*3This camera does not support 8-bit parallel data
transit. I1 per%rms file same 4-bit parallel dala
transit as die ¸Memory Slick PRO Duo.
*4 [640(Fine)] size nlovies can be recorded.
• This product is conlpatible \vilh "Memory StickMicro" ("M2"). "M2" is an abbrevialkm lot"Menlory Slick Micro".
• A "Memory Stick Duo" lornlatled with a
colnpuler is not guaranteed to operale wilb Ibiscamera.
• Dala mad/write speeds differ depending on tilecombinalion of tile "Memory Stick Duo" andthe equipnlenl used.
• Do nol remove lhe "Memory Stick Duo" whilereading or writing data.
• Dala may be corrupted in tile lo]lowing cases:
When the "Menlory Slick Duo" is removed orlhe camera is turned oll during a read or writeoperatkm
When tile "Memo W Stick Duo" is used inlocalions subject lo stalic electricity oreleclrical noise
• We reconunend backing up impollam data.
• Do not press down hard when you write downon lhe nlelllO area.
• Do nol attach a label on the "Memory StickDuo" itself nor on a Memory Stick DuoAdaptor.
• When you carry or store the "Menlory SlickDuo", put it in tile case supplied wilh it.
• Do not touch lhe terndnal section of file
"Memory Stick Duo" wilh your hand or a nlelalotziect.
• Do not slrike, bend or drop llle "Memory StickDuo".
• Do not disassenlble or nlodil}' the "MenloryStick Duo'L
• Do not expose tile "Memory Stick Duo" towaler.
• Do not leave the "Memory Slick Duo" wilhinthe reach of small children. They mighlaccidentally swallow il.
• Do not insell anything other than a "MemoryStick Duo" into tile "Memory Stick Duo" slot.Doing so will cuuse a malflmction.
• Do not use or slore tile "Menlory Stick Duo"under lhe kdlowing conditions:
High temperature locatkms such as the holinlerior of a car parked in direcl sunlight
Localkms exposed to direct sunlightHunlid locations or ]ocations with corrosive
substances presenl
121

Noteson usingthe MemoryStickDuoAdaptor(notsupplied)• To use +t' Menloly Stick Duo' with a "Memory
Stick COlnplianl de_ice, be sure to insert the"Memo W Stick Duo" into a Menlory Stick DuoAdaptor. If you insert a "Menlory Stick Duo"inlo a "Memory Stick" compliant device
withoul a Menlory Stick Duo Adaptor, younlight nol be able lo relnove it lrom the device.
• When inserting a "Memory Stick Duo" inlo zlMenlo W Stick Duo Adaptor, make sure the"Memo W Stick Duo" is inserted lk_cing in tilecorrect direction, Illen insert it all the way illIncorrect insertion may result in a nlallunction.
• Wllen using a "Menlory Stick Duo" insertedinto a Menlory Stick Duo A&_ptor witll a"Memo W Stick" conlpliant device, nlake sumthat tile Memory Stick Duo Adaptor is insertedI_cing the correct direction. Note thal inlproperuse nlay damage the equipmenl.
• Do not insert a Memory Stick Duo Adaptor intoa "Melnory Stick" complianl device wilhout a"Memo W Stick Duo" attached. Doing so mayrcsull in nlalflmction of tile uniL
Noteson using"Memory Stick PRODuo"(notsupplied)
"Melnory Stick PRO Duo" with a capacity up to8 GB llave been conlirmed to opel'+tte properlywith this camera,
Noteson using"Memory Stick Micro"(notsupplied)
• To use a "[Vlenlol_, Stick Micro + with this
canlera, be sure to insert tile "Menlory StickMicro" into an "M2" Adaptor as large as of Duosize. If you insert a "MemolT Stick Micr(g' intothe camera without an "M2" Adaptor as large asof Duo size, you nligllt not be able to rcnlove ittrOlll tile camera.
• Do not leave the "Memoly Stick Micro' withinthe reach of small children. They mightaccidentally swallow it.
122

On the battery pack
On chargingthebatterypackWe recommend charging tile battery pack in an
ambient teml?eramre ol between IO°C to 3()°C
(50°F to 86°F). You may not be able to efficientlycharge tile battery pack outside of this teu/peralurc
range.
Effectiveuseof thebattery pack• Batlery perlormance decreases ill low
telnperalurc surroundings. So. tile time tllat tilebailer}' pack can be used is shorter in coMplaces. We recommend file Rdlowing to ensurelonger baltery pack u_:
Put lhe battery pack in a pocket close to yourbody to warm it up, and inert il in yourcamera immediately belore you startshooting.
• Tile battcly pack will run out quickly if you usetile flash or zoom flequenfly.
• We recommend having spare battery packsbandy lor two or three lhlles file expecledshooling time, and making trial shols belbretaking tile actual sllots.
• Do nol expose the baltery pack to waler. Thebaltery pack is not waler-resislanl.
• Do not leglve file balte W pack in extremely hotplaces, such as in a cal or under direcl sunlighl.
Howto storethebattery pack• It tile battery pack is not to be used lor a long
time, lully chm'ge il and then tully use it up once
a year on your camera belbre storing file batterypack in a dly. cool place. Repeat this chargingand using up once a year lo maimain file batlerypack's lunction.
• To use the balte W pack up, leave your camera inslide show (page 54) playback mode unlil lhepower goes oil.
• To i)rcvent staining file terminal, sllort-circuiting, elc.. be sure to use a supplied batlerycase when canting and sloring.
On batterylife• The bmtery lile is limited. Battery capacity
decreases little by little as you use it more and
inom. and as tinle passes. If the batteryoperating time seems shortened consklerably, aprobable cause is that the battery pack hasreached the end of its lilt. Buy a new battelT
pack.
• The battery lile varies according to how it isstored and the operating conddions andenviromnenl in which each ballery pack is used.
Compatiblebatterypack• Tile NP-BDI (supplied) can be u_d only ill D
type conlpalible Cyber-shol models. II cannot beused in Cyber-shot models compalible with fileT type and other battery types.
• If the NP-FDI battery pack (not supplied) is
used. file minute display (1_ 60 Min) is alsoshown ariel tile ballery remaining indicator.
123

Onthe battery charger
Onthe batterycharger• Only D-type, T-type, R-type and E-type battmy
I?acks (m_d no others) can be charged in tile
battmy' clmrgcr (supplied). Batteries other thantile specified kind may leak, overheat, orexpkMe if you attenlpt to charge them, poshlg _lrisk of iJ_iury tronl electrocution and burns.
• Tile batteries lfiat air conll_atible wilb Ibiscgmmra are D lype balteries. The suppliedbattcl T is NP-BD1 (D type).
• Remove the charged batlery pack flom thebatte W charger. 11 you leave lbe charged balterypack in the charger, ballery lilt may beshortened.
• If lhe CHARGE lamp flashes, remove thebattc W that is being charged and then reinsert ilcorrectly. If the CHARGE lanlp flashes again.lhe battery may be malfunctioning or a batteryotller than tile specified kind may ]lave beeninserted. Check lhat the battery is of lhespecified kind.If the inserted batlery is of the specified kind.remove the battery and insert a ditlbrent or newbattc W lo check whelher lhe baltery charger isworking properly. I1 the battery charger isworking properly, file baltel T is probablynlalfunctioning.
124

On Cyber-shotStation
On Cyber-shotStationTile lollowing Cyber-shot Station (not supplied) are compliant to your camera,
CSS-HDI (with tile remote conu_oller)
CSS-PC]
Using the Cyber-shot Station (not supplied) enables/aster charging than tile supplied battery charger and
easy' COlllleCl]on 10 a WV o1"Colllputel'.
For details, relEr to the operaling instructions supplied with lhe Cyber-shot Station.
Placingthecameraon theCyber-shotStation
Bel_re mounting tile camera to tile Cyber-shot Stalion, tile adaplor plale supplied wilh lhis camera must beii]Ollllled.
Placingthe adaptorplate@ Set tile MODEL SELECT switch to A.
@ Place the adaptor plale on lhe Cyber-shol SlalJon.
(_) Placing tile camera on tile Cyber-shol Station.
125

Operating theCyher-shotStationwiththeremoteWhen tim remote supplied with tim CSS-HDI is used with lids Cglnlel'a,tile following operations _lreavailable.
• For details on butlons nol described here, rcler to the instruction manual supplied with the Cyber-sholStation.
®
®
®
(_) HOME button: This button is invalid.
(_) MENU button: Displays tile setting screen of the Slkle show (page 54).
• The slideshow setting screen is dill_renl during remote control operation, but lhe selling ilems arc lbesame.
@ • button: Plays back lhe image in Wide Zoom Display (page 60).
@ • button: Changes the screen display.
@ _/_- button: Displays the prcviou_;/nexl image.
126

Index
Numerics16:9 ....................................... 74
4:3 ......................................... 74
AAdaptor plate ...................... 125
Adjusting EV ........................ 34
AE/AF lock indicator ............ 27
AF llhmfinator ...................... 75
AF Mode ............................... 76
AF range finder h'ame .......... 31
AF range finder hame indicator
....................................... 31
Aperture ................................ llt
AuI_) A_/iuslment mode ......... 26
AtllV) Foctls .............................. g
Aul£1 Orientation ................... 78
Aulv) Review ......................... 78
BB&W ................................... 51
Battery charger .................... 124
Battery pack ........................ 123
Beach mode .......................... 44
Beep ...................................... 71
Blur ......................................... 9
Bursl ...................................... 47
CCable lor multi-use terminal
......................... 81,90, 102
C_,libration ............................ 72
Center AF ............................. 31
Cenler-weighted metering ....33
Cllange REC.Folder .............. 69
Clock Settings ....................... 79
Close locus ........................... 30
Cloudy .................................. 49
Color ............................... 11,66
Color Mode ........................... 50
COMPONENT ..................... 73
Computer .............................. 85
Copying images ...... 90, 98
Macintosh ...................... 98
Recolllnlended
environmenl ............ 86, 98
Software ........................ 87
Viewing image files storedOll a COll/puler wilh yolff
camera ........................... 96
Windows ....................... 85
Connecting
Computer ...................... 9(I
Printer, ......................... 102
TV ........................... 81,83
Copy ..................................... 69
Copying images to yourconlputer ................. 90, 94
Creale REC.Folder ............... 6g
Cross Filter ........................... 58
D
[)ale .............................. 79, IO4
Daylighl ................................ 49
Delete ............................. 37, 61
Formal ..................... 6g, 70
Deleting images .................... 37
Digilal Zoom ........................ 76
DirectX ................................. 87
DISP ..................................... 23
Download Music .................. 97
DPOF ........................... 63, 105
EElectronic translormer ........ 120
EV ........................................ 34
Exposure ............................... 10
Exposure Bracket ................. 48
Extension .............................. 96
FFace Detection ...................... 52
Fast lorward/Rewind ............ 35
File name .............................. 92
File storage destination ......... 92
Fireworks mode .................... 44
Fisheye Lens ......................... 58
Flash ..................................... 29
Flash (Shooting) ................... 14
Flash/While Balance) .......... 49
Flash Level ........................... 51
Flash mode ............................ 29
Flash Off ............................... 29
Flash On ................................ 29
Flexible Spot AF ................... 31
Fluorescent Light 1, 2, 3.......49
Focus ........................... g, 27, 31
Focus preset .......................... 32
Folder .................................... 64
Changing ....................... 69
Creating ......................... 68
Selecting ........................ 64
Fomml ............................. 68, 70
Formal Music ........................ 97
Function Guide ..................... 71
GGrid Line .............................. 76
H
HE)(1 ogoi) ............................. 73
Higb Sensitivity mode .......... 44
Hi-Speed Shutter mode ......... 44
Histogram ............................. 24
HOME ................ 39, 43, 54, 67
HOME items ......................... 40
Housing ................................. 72
ca.
127

128
Ildentil_dng parts ................... 15
hnage file storage destinations
and file names ............... 92
Image Index .......................... 54
Image quality ........................ 12
Image size ....................... 12, 28
Incandescent ......................... 49
Index screen .......................... 36
Indicator. ............................... 17
lnitializc ................................ 71
Install .................................... 87
lnternal memo W ................... 25
lnternal Melnory Tool .......... 70
ISO ............................ 10. 11, 34
JJPG ....................................... 93
kLandscape lnode ................... 44
Language Setling .................. 80
LCD Screen .......................... 23
NMacintosh compmer ............. 98
Recommended
environn/enl ................... 9g
Macro .................................... 30
Main Settings 1..................... 71
Main Settings 2 ..................... 73
Manage Memol T ............ 40, 68
Mass Storage ........................ 73
"Menlory Stick Duo". ......... 121
Memoly Stick Tool .............. 68
Menu
Items .............................. 42
Shooting .................. 43, 47
Viewing ......................... 57
Metering Mode ..................... 33
Monitor ................................ 76
Movie Mode ......................... 43
MPG ..................................... 93
Multi AF .............................. 31
Mu]li connector
............ 15, 16, gl, 90, 102
Multi Resizing ...................... 60
Multi-pattern metering ......... 33
Music ................................... 55
Music Tool ........................... 97
Music TranslPr ............... 97_ 99
NNamral ................................. 50
Normal ................................. 50
NR slow shutter ................... 19
NTSC ................................... 74
0
Optical zoom .................. 28.76
OS .................................. 86. 98
Overexposure ....................... 10
PPaint ............................... 59. 65
Paint pen .............................. 65
PAL ...................................... 74
Partial Color ......................... 57
PC ......................................... 85
PictBridge .................... 73. 102
Piclurc Molion Browser
................................ 89, 94
Pixel ..................................... 12
Playback zoom ..................... 36
Precision digital zoom ......... 76
Pressing hallway down .......... 8
Print .............................. 63. 101
Print order mark ................. 105
Printing at a shop ............... 105
Printing directly ................. 102
Printing, Other ...................... 40
Program Auto mode ............. 43
Protect ................................... 61
RRadial Blur ........................... 59
REC Mode ............................ 47
Red Eye Correctkm .............. 58
Red Eye Rcductkm ............... 52
Reloucll ................................. 57
Relro ..................................... 59
Rotate ................................... 63
SScene Selection .................... 44
Screen
Changing the display,,.,. 23
Indicator. ....................... 17
LCD backlight ............... 23
SD ......................................... 73
Select Folder. ........................ 64
Sell2diagnosis display ........ 117
Sell2timer .............................. 28
Sepia ..................................... 51
Settings ........................... 40, 71
Setup ..................................... 53
Sllooling ......................... 4{I, 43
Movies ........................... 27
Still image ..................... 26
Shooting menu ...................... 47
Shooling Sellings 1............... 75
Sllooting Settings 2............... 78
Shultcr speed ........................ 10
Single .................................... 76
Single Image ......................... 54
Slideshow ....................... 54, 61
Slow Synchro ....................... 29
Smart zoom .......................... 76
Smile Level .......................... 78
Smile Shutler ........................ 46

Sllow illod¢ ........................... 44
Soft Focus ............................. 57
Soft Snap mode ..................... 44
Software .................... 87, 89. 97
Spol AF ................................. 31
Spot metering ........................ 33
Spot nletering cross llairs,.,.,.33
SteadyShol ............................ 53
l
Touch panel .......................... 22
Trimming .............................. 58
Troubleshooting .................. 107
TV ......................................... gl
TV TYPE .............................. 74
Twilighl mode ....................... 44
Twilighl Portrail inode .......... 44
uUnderexposure ...................... 10
USB Connect ........................ 73
Using your camera abroad..................................... 120
VVGA ...................................... 13
Vkleo Out ............................. 74
View hnages ......................... 40
Viewing images .................... 35
Viewing nlenu ....................... 57
Vivid ..................................... 50
Volume ................................. 35
Volume Settings ................... 64
W
Warning indicators and
messages ..................... 117
Wlfite Balance ...................... 49
Wkle Zoom Display ............. 60
Windows computer .............. 85
Reconmlended
ellvirollll/elll .................. g(1
Z
Zoom .............................. 28, 36
129

Notesonthe License
"C LibrmT", "Exp:_t" :rod "zlib" softwm'e
are provided in your camera. We provide
this software based oil license agreemems
with their owners of copyright. Based on
requests by tile owners of copyright of these
software applications, we have an
obligation to inform you of the lk)llowing.
Please read tile lk_llowing sections.
Read "license 1.pdf" in the "License" folder
on the CD-ROM. You will find licenses (in
English) of "C Library", "Expat" and "zlib"software.
On GNU GPL/LGPL applied software
The software that is eligible for the
following GNU General Public License
/hereiuafter referred to as "GPL") or GNU
Lesser General Public License (hereinafterreferred to as "LGPL") are iucluded in the
C_llllertl.
This informs you that you have a right to
have access to, modify, and redistribute
source code lk_r these software programs
under tile conditions of tile supplied GPL/LGPL.
Source code is provided on the web. Use
the following URL to downlond it.
http:/A_ ww.souy.nel/Products/Liuu x/
We would prefer you do not cout:lct usabout the cootents of source code.
Re:lcl "license2.pdf" in the "License" folder
on the CD-ROM. You will find licenses (in
English) of "GPL". mid "LGPL" softwnre.To view the PDF. Adobe Reader is needed.
If it is not installed on your computer, you
c:m downlo:ld it from the Adobe Systems
web pnge:
http://'_x ww .adobe .corn/
130

Additional information on this product and answers
to frequently asked questions can be found at our
('uston/er Supporl Website.
http://www.sony.net/