c a t p h a n ® 503 m a n u a l -...
TRANSCRIPT

1
T h e P h a n t o m L a b o r a t o r y
C a t p h a n ® 503 M a n u a l
Copyright © 2009
WARRANTYTHE PHANTOM LABORATORY INCORPORATED (“Seller”) warrants that this product shall remain in good working order and free of all material defects for a period of one (1) year following the date of purchase. If, prior to the expiration of the one (1) year warranty period, the product becomes defective, Buyer shall return the product to the Seller at: By Truck By Mail The Phantom Laboratory, Incorporated The Phantom Laboratory, Incorporated 2727 State Route 29 PO Box 511 Greenwich, NY12834 Salem, NY 12865-0511 Seller shall, at Seller’s sole option, repair or replace the defective product. The Warranty does not cover damage to the product resulting from accident or misuse.
IF THE PRODUCT IS NOT IN GOOD WORKING ORDER AS WARRANTED, THE SOLE AND EXCLUSIVE REMEDY SHALL BE REPAIR OR REPLACEMENT, AT SELLER’S OPTION. IN NO EVENT SHALL SELLER BE LIABLE FOR ANY DAMAGES IN EXCESS OF THE PURCHASE PRICE OF THE PRODUCT. THIS LIMITATION APPLIES TO DAMAGES OF ANY KIND, INCLUDING, BUT NOT LIMITED TO, DIRECT OR INDIRECT DAMAGES, LOST PROFITS, OR OTHER SPECIAL, INCIDENTAL, OR CONSEQUENTIAL DAMAGES, WHETHER FOR BREACH OF CONTRACT, TORT OR OTHERWISE, OR WHETHER ARISING OUT OF THE USE OF OR INABILITY TO USE THE PRODUCT. ALL OTHER EXPRESS OR IMPLIED WARRANTIES, INCLUDING, BUT NOT LIMITED TO, THE IMPLIED WARRANTY OF MERCHANT ABILITY AND FITNESS FOR PARTICULAR PURPOSE, ARE HEREBY DISCLAIMED.
WARNING This product has an FH3-4 mm/min flame rating and is considered to be flammable. It is advised not to expose this product to open flame or high temperature (over 125° Celsius or 250° Fahrenheit) heating elements.
10/29/09

2

3
T h e P h a n t o m L a b o r a t o r y
Catphan® Manual
Contents
Warranty 1
Introduction 5
Initial phantom positioning 6
Illustration of Catphan®504 model 7
Phantom position verification 8
CTP404 module 9
Patient alignment system check 10
Scan slice geometry (slice width) 11
Scan incrementation 12
Circular symmetry 13
Spatial linearity of pixel size verification 13
Spherical acrylic contrast targets 13
Sensitometry (CT number linearity) 14
CTP528 High resolution module with 21 line pair per cm gauge and point source 15
Bead point source for point spread function and MTF 15
Use of automated scanner MTF programs 16
Bead point source (slice sensitivity profile) 17
21 Line pair per centimeter high resolution gauge 18
CTP486 Image uniformity module 19
Installation and removal of test modules 21
Optional phantom annuli 22
Dose Phantoms 23
Sample quality assurance program 24
Automated computer analysis program 24
Bibliography 25

4

5
Introduction
The Catphan® 503 phantom configuration has been selected by Elekta. This manual is intended to supplement the Elekta Procedures and Manuals by offering additional details regarding the use of the Catphan® phantom. The Phantom Laboratory and physicist, David J. Goodenough, Ph.D., are continually developing and researching new tests and modifications for the Catphan® phantoms. The test objects that make up the current Catphan® models embody more than a quarter century of scientific evaluation and field experience. This manual outlines the applications of each module contained in the Catphan® 504 phantom.
We do not make specific recommendations on the content of your quality assurance program, because each medical imaging facility has its own unique set of requirements. A sample program is provided to give you ideas for possible program content. We suggest a review of local governing regulations, manufacturers’ specifications and the needs of your radiologists and physicists before developing your CT quality assurance program.
If you would like a pdf version of this manual they can be downloaded from the Catphan® page of our website. www.phantomlab.com
If you have any additional questions please contact The Phantom Laboratory at:Phone: 800-525-1190 or 518-692-1190 Fax: 518-692-3329 email: [email protected] product information is available at: www.phantomlab.com

6
Initial phantom positioning
The Catphan® phantom is positioned in the CT scanner by mounting it on the case.
Place the phantom case on the gantry end of the table with the box hinges away from the gantry. It is best to place the box directly on the table and not on the table pads.
Open the box, rotating the lid back 180°. If you are using an annulus, additional weight will need to be placed in the box to counterweigh the phantom. The patient straps can be used for additional stability.
Remove the phantom from the box and hang the Catphan® from the gantry end of the box. Make sure the box is stable with the weight of the phantom and is adequately counterweighed to prevent tipping.
Use the level and adjusting thumb screws to level the Catphan®. Once the phantom is level, slide the phantom along the end of the box to align the section center dots on the top of the phantom with the x axis alignment light.
Use the table height and indexing drives to center the first section’s, CTP404, Slice Geometry) alignment dots on the side and top of the phantom with the scanner alignment lights.
The z axis scan alignment position can be selected from the localizer scan, by centering the slice at the intersection of the crossed wire image created by the slice width ramps.
Scan section CTP404 to check the image for proper alignment as illustrated in the Phantom position verification section.

7
Illustration of Catphan® 504 model
Incremental phantom module positioning
The Catphan®504 phantom is designed so all test sections can be located by precisely indexing the table from the center of section CTP404 to the center of the other test modules. The indexing distances from the center of the CTP404 module are listed below. Phantom position and alignment verification is described on the next page.
Catphan® 504 test module locations: Module Distance from the center of CTP404 CTP528, 21 line pair high resolution 30mm CTP486, Solid image uniformity module 110mm

8
Phantom position verification
By evaluating a scan image of the CTP404 module the phantom’s position and alignment can be verified. The section contains 4 wire ramps which rise at 23° angles from the base to the top of the module. The schematic sketches below indicate how the ramp images change if the scan center is above or below the z axis center of the test module. The use of the scanner’s grid image function may assist in evaluation of phantom position.
If misalignment is indicated by the scan image, the phantom should be repositioned to obtain proper alignment and then rescanned. If the images of the repositioned phantom duplicate the original misalignment indications, the scanner’s alignment lights may require adjustment (contact your local service engineer).
Once correct alignment has been established, you can proceed with the tests.

9
CTP404 Module with slice width, sensitometry and pixel size
10
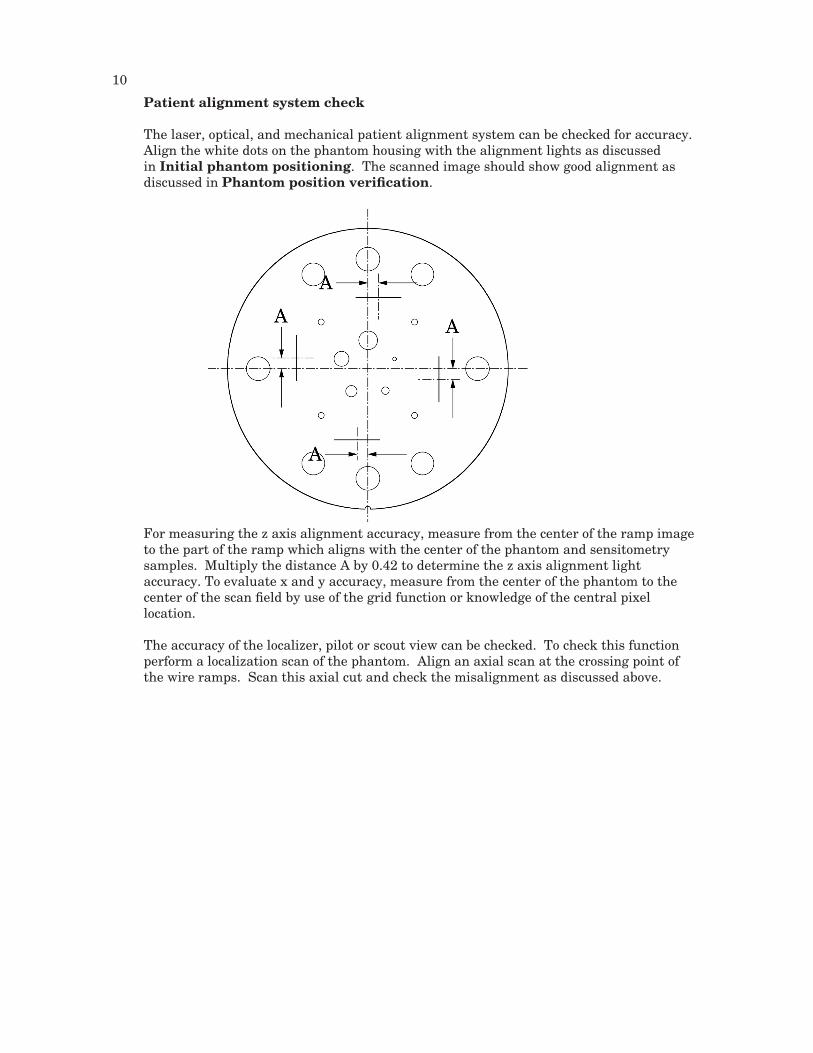
Patient alignment system check The laser, optical, and mechanical patient alignment system can be checked for accuracy. Align the white dots on the phantom housing with the alignment lights as discussed in Initial phantom positioning. The scanned image should show good alignment as discussed in Phantom position verification.
For measuring the z axis alignment accuracy, measure from the center of the ramp image to the part of the ramp which aligns with the center of the phantom and sensitometry samples. Multiply the distance A by 0.42 to determine the z axis alignment light accuracy. To evaluate x and y accuracy, measure from the center of the phantom to the center of the scan field by use of the grid function or knowledge of the central pixel location.
The accuracy of the localizer, pilot or scout view can be checked. To check this function perform a localization scan of the phantom. Align an axial scan at the crossing point of the wire ramps. Scan this axial cut and check the misalignment as discussed above.

11
Scan slice geometry (slice width)
Section 1 has two pair of 23° wire ramps: one pair is oriented parallel to the x axis; the other pair to the y axis. These wire ramps are used to estimate slice width measurements and misalignment errors as previously discussed.
The 23° wire ramp angle is chosen to improve measurement precision through the trigonometric enlargement of 2.38 in the x-y image plane.
To evaluate the slice width (Zmm), measure the Full Width at Half Maximum (FWHM) length of any of the four wire ramps and multiply the length by 0.42:
(Zmm) = FWHM * 0.42 To find the FWHM of the wire from the scan image, you need to determine the CT number values for the peak of the wire and for the background.
To calculate the CT number value for the maximum of the wire, close down the CT “window” opening to 1 or the minimum setting. Move the CT scanner “level” to the point where the ramp image just totally disappears. The CT number of the level at this position is your peak or maximum value.
To calculate the value for the background, use the region of interest function to identify the “mean” CT number value of the area adjacent to the ramp.
Using the above CT values, determine the half maximum:
First calculate the net peak... (CT # peak - background = net peak CT #)
Calculate the 50% net peak... (net peak CT # ÷ 2 = 50% net peak CT #)
Calculate the half maximum CT number... (50% net peak CT # + background CT # = half maximum CT #)

12
Now that you have determined the half maximum CT number, you can measure the full width at half maximum of the ramp. Set the CT scanner level at the half maximum CT value and set your window width at 1. Measure the length of the wire image to determine the FWHM. Multiply the FWHM by 0.42 to determine the slice width.
Schematic illustration of two sequential 5mm scans superimposed. L1 is the center point on the 23° ramp in the first scan image and L2 is the center point on the 23° ramp on the second image. Scan incrementation
Use the wire ramps to test for proper scanner incrementation between slices, and for table movement.
Scan section 1 using a given slice width, (e.g. 5mm). Increment the table one slice width (e.g. 5mm) and make a second scan. Establish the x and y coordinates for the center of each ramp image. Calculate the distance between these points and multiply by the 23° ramp angle correction factor of 0.42.
0.42(L1 - L2) = scan incrementation
This test can also be used to test table increment accuracy. Scan the section and increment the table 30mm in and out of the gantry and scan again. The ramp centers should be the same on both images.
0.42(L1 - L2) = 0

13
Circular symmetry of display system
The circular phantom sections are used to test for circular symmetry of the CT image, including calibration of the CT display system. If an elliptical image is produced, the x-y balance of the image display system should be adjusted.
Measuring spatial linearity in x and y axes.
Spatial linearity of pixel size verification
This section has four holes (one with a Teflon pin). These 3mm diameter holes are positioned 50mm on center apart. By measuring from center to center the spatial linearity of the CT scanner can be verified. Another use is to count the number of pixels between the hole centers, and by knowing the distance (50mm) and number of pixels, the pixel size can be verified.
The Teflon pin is used for identification and orientation only. The ability to change the Teflon pin position enables organizations with more than one Catphan® phantom to identify their phantoms by images of the first section.
Spherical acrylic contrast targets
The section has five acrylic spheres located in a 30mm diameter circular pattern. These spheres are used to evaluate the scanner’s ability to image volume averaged spheres. The sphere diameters are 2, 4, 6, 8, and 10mm.

14
Sensitometry (CT number linearity)
Four or seven high contrast sensitometric targets surround the wire slice thickness ramps. Three are made from the commercial plastics: Teflon, acrylic and low density polyethylene (LDPE). The fourth is air. These targets range from approximately +1000 H to -1000 H.
The monitoring of sensitometry target values over time can provide valuable information, indicating changes in scanner performance.
Linear attenuation coefficient µ [units cm-1]KEV Teflon Delrin Acrylic Polystyrene Water LDPE PMP Air 40 0.556 0.327 0.277 0.229 0.268 0.209 0.189 0 50 0.447 0.283 0.244 0.209 0.227 0.191 0.173 0 60 0.395 0.260 0.227 0.196 0.206 0.181 0.164 0 62 0.386 0.256 0.224 0.194 0.203 0.179 0.162 0 64 0.380 0.253 0.221 0.192 0.200 0.178 0.160 0 66 0.374 0.251 0.219 0.191 0.197 0.177 0.160 0 68 0.370 0.248 0.217 0.189 0.195 0.175 0.158 0 70 0.363 0.245 0.215 0.188 0.193 0.174 0.157 0 72 0.359 0.243 0.214 0.186 0.191 0.172 0.155 0 74 0.355 0.240 0.211 0.185 0.189 0.171 0.155 0 76 0.351 0.238 0.210 0.184 0.187 0.170 0.154 0 78 0.346 0.236 0.208 0.183 0.185 0.168 0.152 0 80 0.342 0.234 0.207 0.180 0.184 0.167 0.151 0 90 0.328 0.225 0.199 0.175 0.177 0.163 0.147 0 100 0.315 0.218 0.194 0.170 0.171 0.158 0.143 0 Nominal material formulation and specific gravity Material Formula Specific Gravity* Electron Density (1023e/g) CT # est.Air .78 N, .21 O, .01 Ar 0.00 3.007 -1000 PMP [C6H12(CH2)] 0.83 3.435 -200LDPE [C2H4] 0.92 3.429 -100 Water [H2O] 1.00 3.343 0Polystyrene [C8H8] 1.05 3.238 -35Acrylic [C5H8O2] 1.18 3.248 120 Delrin™ Proprietary 1.41 3.209 340Teflon [CF2] 2.16 2.889 990
Contrast Scale (CS) is formally defined as CS = µm (E) - µw (E) CTm (E) – CTw (E)
where m is reference medium, and w is water, and E is the effective energy of the CT beam.
Alternatively, CS = µ1 (E) - µ2 (E) CT1 (E) – CT2 (E)
where 1,2 are two materials with low z effective, similar to water (eg. acrylic & air).
*For sensitometry inserts The Phantom Laboratory purchases a multiple year supply of material from a single batch. Samples of the purchased material are then measured to determine the actual specific gravity.

15
CTP528 High resolution module with 21 line pair per cm gauge and point source
This section has a 1 through 21 line pair per centimeter high resolution test gauge and two impulse sources (beads) which are cast into a uniform material. The beads are positioned along the y axis 20mm above or below the phantom’s center and 2.5 and 10mm past the center of the gauge in the z direction. On older CTP528 modules the bead is aligned in the z axis with the gauge.
Bead Point Source for point spread function and MTFUse the impulse source to estimate the point source response function of the CT system. Print out a digitized image of the area surrounding the impulse source. Use the numerical data to determine the two-dimensional array of the CT values arising from the impulse source.
The FWHM of the point spread function is determined from the best-fit curve of the point spread function numerical data.
The average of several different arrays of impulse response functions is calculated to obtain the average point spread function of the system. These numerical values are used in conjunction with the Fourier Transform Program to provide an estimate of the two-dimensional spatial frequency response characteristics of the CT system (MTF). Illustration is on the next page.
The tungsten carbide bead has a diameter of 0.011” or 0.28mm. Because the bead is subpixel sized it is not usually necessary to compensate for it. However, some MTF programs are designed to compensate for its size.

16
0.5 -2 -3 -2 0.5
0.5 -2 -3 -2 0.5
-4 3 17 -43
-4 3 17 -43
-2 44 100 -244
-2 44 100 -244
LSF
-11 90 228 -1190
PSF
228
114
0
CT
nu
mbe
rs
Line spread function
Relative position, x axis
The above illustration shows how by summing the columns (y axis) of numbers in the point spread function (PSF) the line spread function (LSF) for the x axis is obtained.
0.0
0.5
1.0
0.8
0.6
0.4
0.3
0.2
0.1
0.9
0.7
3.0 6.0 9.0 12.00.0
Average MTF Cycles/cm 50% 3.84 10% 6.65 2% 9.29
MTF
Spatial Frequency (1/cm)The MTF curve results from the Fourier transform of the LSF data. Generally it is easiest to use automated software for this operation. Some CT scanners are supplied with software which can calculate the MTF from the Catphan® bead images. Independent software is listed in the Current automated programs available section of the manual.
Use of automated scanner MTF programsMany manufacturers include automated MTF software in the standard scanner software packages. Because the bead is cast into an epoxy background which has a different density than water, the software must accept an input for the background. The point size of .28mm must also be selected. While a sphere does produce a different density profile than a cross section of a wire or cylinder, the actual difference is not usually significant in current CT scanners.

17
Bead point source for slice sensitivity profileThe bead in this module can be used to calculate the slice sensitivity profile (SSP).
X
Y
Z
X
Y
ZZ
SS
P(z
)
Z
SS
P(z
)
3mm Spiral
10mm SpiralThe above image illustrates how the bead will produce an ovoid object in a 3 dimensional reconstruction. The length of the object at the Full Width at Half Maximum signal indicates the SSP. This measurement can be easily obtained on some systems, by making a sagittal or coronal reconstruction through the bead. The bead image in these reconstructions will appear as a small line. By setting the FWHM (use the same technique described in the Scan slice geometry section) measuring the z axis length of the bead image to obtain the SSP.
If the scanner does not have the ability to measure z axis lengths in the sagittal or coronal planes, a SSP can be made by incrementing or spiraling the slice through the bead and reconstructing images in positive and negative table directions from the bead (using the smallest available increments) and plotting the peak CT number of the bead image in each slice. The FWHM measurement can then be made from the plotted CT values of the bead as a function of z axis table position.
FWHM
0-2-4-6-8-10 2 4 6 8 10
250
200
150
100
50
0
300
z axis position in millimeters
CT#

18
21 Line pair per centimeter high resolution gaugeThe 21 line pair/cm gauge has resolution tests for visual evaluation of high resolution ranging from 1 through 21 line pair/cm. The gauge accuracy is ± 0.5 line pair at the 21 line pair test and even better at lower line pair tests.
The gauge is cut from 2mm thick aluminum sheets and cast into epoxy. Depending on the choice of slice thickness, the contrast levels will vary due to volume averaging.
Line Pair/cm Gap Size Line Pair/cm Gap Size
1 0.500 cm 11 0.045 cm
2 0.250 cm 12 0.042 cm
3 0.167 cm 13 0.038 cm
4 0.125 cm 14 0.036 cm
5 0.100 cm 15 0.033 cm
6 0.083 cm 16 0.031 cm
7 0.071 cm 17 0.029 cm
8 0.063 cm 18 0.028 cm
9 0.056 cm 19 0.026 cm
10 0.050 cm 20 0.025 cm
21 0.024 cm
Gap

19
CTP486 Image uniformity module
The image uniformity module is cast from a uniform material. The material’s CT number is designed to be within 2% (20H) of water’s density at standard scanning protocols. The typically recorded CT numbers range from 5H to 18H. This module is used for measurements of spatial uniformity, mean CT number and noise value.
The precision of a CT system is evaluated by the measurement of the mean value and the corresponding standard deviations in CT numbers within a region of interest (ROI). These measurements are taken from different locations within the scan field.
ROI
The mean CT number and standard deviation of a large number of points, (say 1000 for example) in a given ROI of the scan, is determined for central and peripheral locations within the scan image for each type of scanning protocol. Inspect the data for changes from previous scans and for correlation between neighboring slices.

20
0-7 7
0-7 7
Horizontal
Vertical
CT#
CT#
Measure spatial uniformity by scanning the uniformity section. Observe the trends above and below the central mean value of a CT number profile for one or several rows or columns of pixels as shown above.
Select a profile which runs from one side of the uniformity module to the opposite side. Due to scanner boundary effects, typical profiles start 2cm from the edge of the test module.
Integral uniformity may be measured by determining the minimum and maximum CT values along the profile and by using the following equation :
Integral Non-Uniformity = CTmax - CTmin
CTmax + CTmin
The phenomenon of “cupping” or “capping” of the CT number may indicate the need for recalibration.

21
Installation and removal of test modules
For most applications there is no need to remove modules from the Catphan®. However, modules can be removed by carefully following these steps.
Note the positon of the mounting plate in relationship to the housing before removing it.
Remove the four brass nuts that secure the mounting plate to the phantom housing.
Set the phantom with the studs facing down on 2 to 4 blocks to keep the studs off the surface.
Use a blunt object, such as a wooden rod, to press the modules out of the housing.
Block Block
Rod
Module
To insert modules hold the phantom housing on its side with the interior alignment key at the top. Align the module notches with the housing key as the modules are inserted one at a time into the housing. The illustrations on page 5 will indicate the correct locations of the modules.

22
Optional phantom annuli
WarningBefore mounting a Catphan® phantom with an annulus onto the Catphan® case, the case must be secured to the table by use of the patient restraint straps or additional weight. If the case is not secured to the table when the phantom is mounted, the case, phantom and annulus could fall off the edge of the table.
The following optional annuli are designed to be used with the standard 20cm Catphan® housing.
CTP299 21.5cm diameter, Teflon annulus simulates the high absorption of bone.CTP539 30cm diameter annulus, cast from the image uniformity material.CTP540 35cm diameter annulus, cast from the image uniformity material.CTP579 25-35cm OD oval annulus, cast from the image uniformity material.CTP599 45-55cm ODoval annulus, cast from the image uniformity material.CTP326 32cm diameter annulus, machined from acrylic.
The annuli are designed to slide over the 20cm Catphan® housing as illustrated below. Because the housing material and the uniformity annuli lack lubricity, the annuli may not slide easily. However, by adding some lubricant the resistance can be reduced.

23
Dose Phantoms
The CTP553 and CTP554 dose phantoms are designed to the Food and Drug Administration’s Center for Devices and Radiological Health specification, listed in 1020.33.
The dose phantoms may be mounted on the Catphan® case following the same procedures and precautions used in Initial phantom positioning. The holes will accept a 1/2” or 13mm diameter dose probe.
16cm 14cm
32cm 14cm
1cm
Ø 1.31cm
Ø 1.31cm1cm
CTP554
CTP553
WarningMake sure the Catphan® case is secure. Additional counterweight may be required before mounting 32cm dose module onto case.

24
Sample quality assurance program The following shows a sample QA program. Review the local governing requirements, and the needs of your physicians and physicists when developing a QA program for your institution. This program should only be utilized as a sample.
All tests should be conducted at initial acceptance and after major repair such as tube replacement. Perform the weekly tests after each preventative maintenance.
Suggested frequency of tests: Daily Weekly Monthly*
Positional verification • • •
Circular symmetry •
Scan slice geometry • •
Impulse response function •
Resolution • •
Low contrast • •
Contrast Sensitivity • •
Uniformity and noise characteristics • • •
*or following preventative maintenance
Automated computer analysis programThe Catphan® is specifically designed to be read by automated Quality Assurance programs.
The Institute for Radiological Image Sciences, Inc. (IRIS) has developed a commercially available automated QA program for CT performance parameter measurements and analysis. The program is designed to run on IBM compatible PC’s and measures the following functional capabilities:
Spatial resolution (modulation transfer function)Noise and image uniformitySlice width and pixel sizeSensitometry (CT# linearity, input - output relationship)Contrast detectability (C-D model)Patient localizer and scan incrementation accuracy
For further information contact:
Steve Dyer, MHSGeneral ManagerIrisQA, LCC
www.Irisqa.comP 301.631.0008

25
Bibliography
AAPM Report No. 39Specification and Acceptance Testing of Computed Tomography ScannersReport of Task Group 2 Diagnostic X-Ray Imaging Committee. Published for the American Association of Physicists in Medicine by the American Institute of Physics.May 1993
Brooks and DiChiro Principles of Computer Assisted Tomography (CAT) in Radiographic and Radioisotopic Imaging Phys Med Biol 1976:21:689-732
Goodenough, Weaver, and Davis Development of a Phantom for Evaluation and Assurance of Image Quality in CT Scanning The Proceedings of the Application of Optical Instrumentation in Medicine V meeting sponsored by The Society of Photo-Optical Instrumentation Engineers and The Society of Photographic Scientists and Engineers, September 16-19, 1976, Washington DC; and, Optical Engineering, January 1977
Goodenough, Weaver, and Davis Potential Artifacts Associated with the Scanning Pattern of the EMI Scanner Radiology 117:615-620, December 1975
GoodenoughAssessment of Image Quality of Diagnostic Imaging SystemsIn: Gray GA (ed). Medical images: formation, perception and measurements. Proceedings of the 7th L.H.Gray Conference, New York: John Wiley & Sons, 1976:263-77
Goodenough, Weaver, and DavisPhysical Measurement of the EMI Imaging System In: Ter-Pogossian, Phelps, Brownell, Cos Jr., Davis and Evens (eds). Reconstruction tomography in diagnostic radiology and nuclear medicine. Baltimore: University Park Press, 1977:225-243
GoodenoughPsychophysical Perception of Computed Tomography Images In: Newton and Potts (eds). Radiology of the skull and brain: technical aspects of computed tomography. Vol 5, St. Louis: CV Mosby, 1981:3993-4021
McCulloughPhoton Attenuation in Computed Tomography Medical Physics, 2:307-320, Nov/Dec 1975
McCullough, Baker, Hattery, Sheedy, Stephens and Payne Performance Evaluation and Quality Assurance of Computed Tomography (CT) Equipment with Illustrative Data for ACTA, Delta, and EMI Scanners Radiology 120: 173-188, July 1976
McCullough, Baker, Houser, and Reese An Evaluation of the Quantitative and Radiation Features of Scanning X-ray Transverse Axial Tomography: the EMI Scanner Radiology 111: 709-715, June 1974

26
Phelps, Hoffmar-PogossianAttenuation Coefficients of Various Body Tissues, Fluids and Lesions at Photon Energies of 18 to 136 keV Radiology 117:573-583, December 1975
RossmannPoint Spread Function, Line Spread Function and Modulation Transfer Function: Tools for the Study of Imaging Systems Radiology 1969:93:257-72
Weaver, Goodenough, and BriefelSensitometry in Computerized Tomography Proceedings of SPIE, Medicine VI. 1977:127:87-94
Yester and BarnesGeometrical Limitations of Computed Tomography (CT) Scanner Resolution Optical instrumentation in Medicine VI. SPIE, 1977:127:296-303
GoodenoughAutomated Quality Assurance for CT Scanners(Chapter): Radiology ICR 749, Editors Silver, Abecasis and Veiga-Pires. Excerpta Medica Press, Amsterdam 1987
Goodenough and AtkinsTheoretical and Practical Aspects of Automated Quality Assurance Approaches, Particularly for CTProceedings of the ICR 89, Excerpta Medica Press, Amsterdam 1990
Kriz and StraussAn Investigation of Computed Tomography (CT) LinearityMedical Imaging and Instrumentation SPIEVol 555, 195 1985
Goodenough and WeaverFactors Related to Low Contrast Resolution in CT ScannersComputerized Radiology Vol. 8 No, 5. 279-308 1984
Cohen and DiBancaThe Use of Contrast-Detail-Dose Evaluation of Image Quality in a Computed Tomographic ScannerComput. Assist. Tomogr. 3, 189-195 1979