business process modeling - ibm process modeling using ibm websphere business integration modeler...
TRANSCRIPT

Business process modelingUsing IBM WebSphere Business Integration Modeler
Skill Level: Intermediate
Doug Tidwell ([email protected])XML EvangelistIBM
18 Oct 2005
This tutorial shows you how to create a business process in WebSphere® BusinessIntegration Modeler, which is an extremely powerful tool that lets business expertsapply their expertise to process design. You start by defining the sequence of tasksthat make up the process. As you build the model, you'll define the resources andcosts associated with the process. Once everything is defined, you'll use the tool'ssimulation facility to run high-level test cases. Best of all, you can compare differentsimulations and different versions of the process to determine the best processdesign.
Section 1. Before you start
This tutorial takes you through three steps of defining a business process inside IBMWebSphere Business Integration Modeler. You'll start by defining the steps in yourprocess and the resources required to complete them. Next, you'll define the order inwhich the tasks should be performed. Finally, you'll run simulations of the process tofind the most efficient model.
Prerequisites
To get the most out of this tutorial, install WebSphere Business Integration Modeleron your machine. You can install the modeler by itself or as a plug-in for WebSphereStudio Application Developer, Integration Edition. The screen captures in this tutorialare from a plug-in installation. If you're using the modeler by itself, there will be smallchanges in the title bar, tool bar, and other parts of the surrounding screen. Themodeling tools themselves are the same.
Business process modeling© Copyright IBM Corporation 1994, 2008. All rights reserved. Page 1 of 43

Start the product on your desktop; like any other Eclipse-based tool, you'll be askedto choose a workspace. The workspace is simply a directory that stores all the filesfor your projects, including the business process you'll define here.
To view the demos included in this tutorial, JavaScript must be enabled in yourbrowser and Macromedia Flash Player 6 or higher must be installed. You candownload the latest Flash Player at http://www.macromedia.com/go/getflashplayer/.
Objectives
After completing this tutorial, you will know how to model a business process and allthe resources it requires. You will understand how to define branching and logicwithin the process, and how to simulate the process you defined. Finally, you willlearn how to compare different result sets from different simulations to determine thecost and efficiency of different paths through the process.
Animated demos
If this is your first encounter with a developerWorks tutorial that includes demos,here are a few things you might want to know:
• Demos are an optional way to see the same steps described in thetutorial. To see an animated demo, click the Show me link. The demo
opens in a new browser window.
• Each demo contains a navigation bar at the bottom of the screen. Use thenavigation bar to to pause, exit, rewind, or fast forward portions of thedemo.
• The demos are 800 x 600 pixels. If this is the maximum resolution of yourscreen or if your resolution is lower than this, you will have to scroll to seesome areas of the demo.
• JavaScript must be enabled in your browser and Macromedia FlashPlayer 6 or higher must be installed.
Section 2. Process overview
The plan
In this tutorial, you are going to use IBM WebSphere Business Integration Modelerto model a business process and some business objects, then define how the stepsof the business process work. After defining the costs and other attributes of the
developerWorks® ibm.com/developerWorks
Business process modelingPage 2 of 43 © Copyright IBM Corporation 1994, 2008. All rights reserved.

tasks in the process, run simulations of the process to estimate the benefits the newprocess will provide.
There are six objects to model:
• A PurchaseOrder
• A LogMessage
• Three warehouses: WarehouseA, WarehouseB and WarehouseC
• A LoggingFacility
Start the business process model by defining these objects, then define the dataflows, decision nodes, and other parts of the process.
1. The input to the process is a PurchaseOrder. A PurchaseOrder contains aunique ID and the quantity of items ordered.
2. The PurchaseOrder is first sent to WarehouseA. WarehouseA comparesits inventory to the items listed in the PurchaseOrder. If WarehouseA canship an item, it sets the quantity of that item to 0. WarehouseA returns anupdated PurchaseOrder that contains the unique ID and any items that itdidn't ship.
3. If the updated PurchaseOrder has any items left (it has at least one itemwith a quantity greater than zero), it is sent to WarehouseB.
4. WarehouseB processes the order just as WarehouseA did, then returnsthe updated order.
5. If the order has any items left, it is sent to WarehouseC.
6. If the updated order returned by WarehouseC has any items left, you callthe LoggingFacility to record the items that didn't ship.
7. The output from the process is an updated purchase order that contains alist of items that did not ship.
An important part of the process design is that the input to and output from theprocess are PurchaseOrders. That means you can use the process in a modularway. If some other process needs to handle a purchase order, it can invoke theprocess and receive an updated PurchaseOrder. That metaprocess can then dosomething else with the PurchaseOrder if any items didn't ship.
Starting Business Integration Modeler
Start Business Integration Modeler. Make sure you're in the Business ModelingPerspective:
ibm.com/developerWorks developerWorks®
Business process modeling© Copyright IBM Corporation 1994, 2008. All rights reserved. Page 3 of 43

Figure 1. The Business Modeling Perspective
Right-click in the Project Tree view and select New > Business Modeling Project:
Figure 2. Creating a new Business Modeling Project
The Quickstart wizard opens. Enter the values as shown here and click Finish.
Figure 3. The Quickstart wizard
The wizard creates a new project named SOA2005. Within that project, it creates aprocess catalog cleverly named Processes, and it creates a new business processnamed ProcessAndShipOrder within the process catalog.
developerWorks® ibm.com/developerWorks
Business process modelingPage 4 of 43 © Copyright IBM Corporation 1994, 2008. All rights reserved.

The process workspace
When Business Integration Modeler is finished creating your new project, you see aview similar to this:
Figure 4. The process workspace
(Yes, the microscopic text here is illegible; it's just shown to give you a sense of howthe overall workspace should look. Business Integration Modeler defines otherviews, but this is the one you'll use here.)
Configuring the Modeler
Before you begin, make sure the tool is configured properly.
Would you like to see these steps demonstrated for you?
Show me
Using the toolbar icons, set the user profile to Intermediate and the mode to BPELmode:
ibm.com/developerWorks developerWorks®
Business process modeling© Copyright IBM Corporation 1994, 2008. All rights reserved. Page 5 of 43

Figure 5. Setting Business Integration Modeler to Intermediate Mode
Figure 6. Setting Business Integration Modeler to BPEL Mode
Section 3. Defining business items
Creating a data catalog
Before defining business items, create a data catalog to store them.
1. Right-click the project name and choose New > Data Catalog:Figure 7. Creating a new data catalog
Would you like to see these steps demonstrated for you?
Show me
developerWorks® ibm.com/developerWorks
Business process modelingPage 6 of 43 © Copyright IBM Corporation 1994, 2008. All rights reserved.

2. Give the data catalog the intriguing name DataCatalog and clickFinish.Figure 8. Naming the new data catalog
Creating a new business item - The PurchaseOrder
Would you like to see these steps demonstrated for you?
Show me
Your first business item is the purchase order. Right-click the data catalog and selectNew > Business Item:
Figure 9. Creating a new business item
ibm.com/developerWorks developerWorks®
Business process modeling© Copyright IBM Corporation 1994, 2008. All rights reserved. Page 7 of 43

Create a new business item called PurchaseOrder:
Figure 10. Naming the new business item
(The comment at the bottom of the panel is optional.)
Defining the attributes of a business item
Would you like to see these steps demonstrated for you?
Show me
To define the attributes of a purchase order:
developerWorks® ibm.com/developerWorks
Business process modelingPage 8 of 43 © Copyright IBM Corporation 1994, 2008. All rights reserved.

1. In the Business Item Attributes panel, add 12 data fields (orderID,quantity605001 through quantity605010 and numItems):Figure 11. Defining the attributes of the purchase order
Note: In a real-world application, you would use an array to store all of theitems in the purchase order instead of creating a separate field for eachitem in the catalog. The method demonstrated here simplifies thebusiness items and the XML schemas. Or maybe it just serves as anexercise for the user.
2. By default, every attribute of a business item is a string. You want all ofthe quantities of a purchase order to be integers. To change the data typeof an item, double-click in the Type column, click the button that appears,then select the data type from the window:Figure 12. Selecting the data type of an attribute
ibm.com/developerWorks developerWorks®
Business process modeling© Copyright IBM Corporation 1994, 2008. All rights reserved. Page 9 of 43

3. Save and close the definition of the purchase order.
Defining the LogMessage business item
The other business item to create is a LogMessage. This is the data you'll send tothe logging facility to record an event. To create a new business item namedLogMessage:
Figure 13. Defining the LogMessage
There are four properties to define for the LogMessage: orderID comes from thepurchase order, service is the service that generated the event (WarehouseA, forexample), eventID is one of a set of predefined event codes (INSTOCK andENDORDER are two examples), and description is some text that describes theevent.
The business item should look like this:
Figure 14. Defining the attributes of the log message
developerWorks® ibm.com/developerWorks
Business process modelingPage 10 of 43 © Copyright IBM Corporation 1994, 2008. All rights reserved.

Save and close the definition of LogMessage.
Section 4. Defining resources
Defining a resource type
Now that the business items have been created, create the resources you need. Tomake your model more robust, define two types of resource (warehouses andlogging facilities), then define the instances of the actual objects you'll use.
1. Right-click the Resources folder and select New > Resource Definition:Figure 15. Defining the Warehouse resource type
2. Create a new resource definition named Warehouse:Figure 16. Naming the resource type
ibm.com/developerWorks developerWorks®
Business process modeling© Copyright IBM Corporation 1994, 2008. All rights reserved. Page 11 of 43

Would you like to see these steps demonstrated for you?
Show me
3. Make sure this is an individual resource. (A bulk resource is somethinglike power or water.) Save and close the resource definition.
4. Create a new resource definition for a LoggingFacility:Figure 17. Defining the LoggingFacility resource type
developerWorks® ibm.com/developerWorks
Business process modelingPage 12 of 43 © Copyright IBM Corporation 1994, 2008. All rights reserved.

5. Save and close this resource definition as well.
Defining a warehouse resource
Now that you've defined the Warehouse resource type, it's time to create an actualWarehouse.
Would you like to see these steps demonstrated for you?
Show me
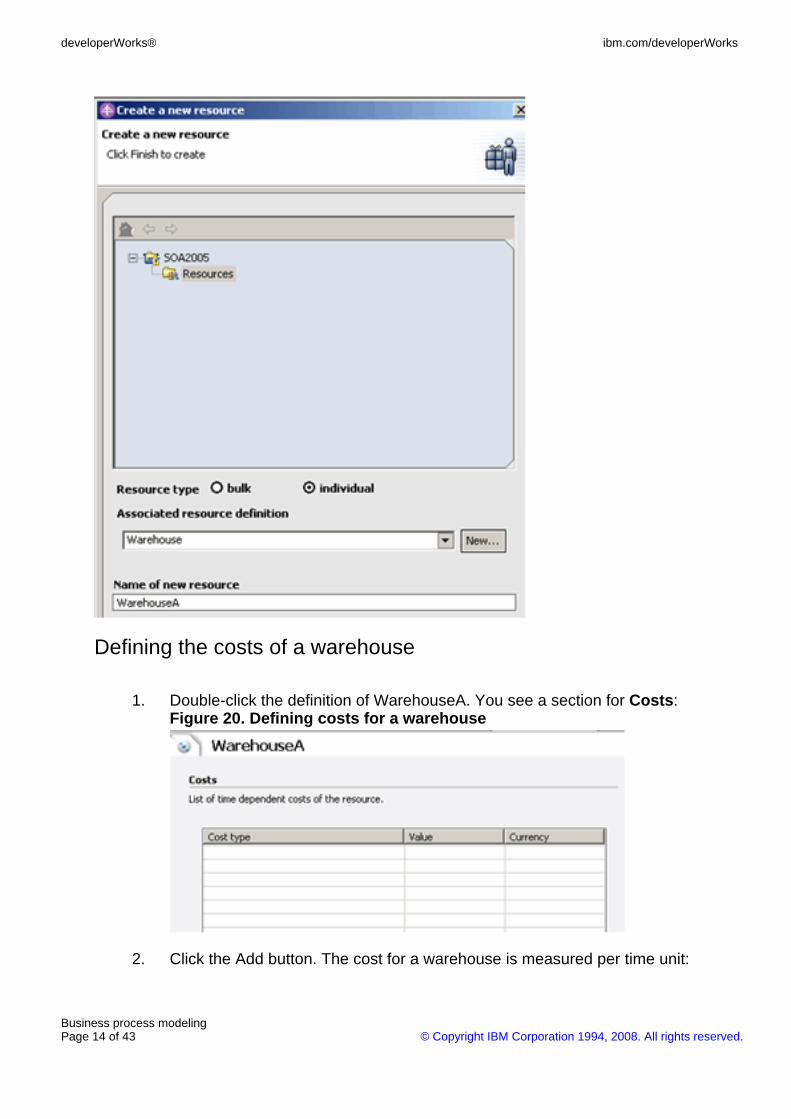
Right-click the Resources folder again and select New > Resource:
Figure 18. Defining a new resource
Each warehouse is an individual resource and is based on the Warehouse resourcedefinition you just created.
Figure 19. Naming the new resource
ibm.com/developerWorks developerWorks®
Business process modeling© Copyright IBM Corporation 1994, 2008. All rights reserved. Page 13 of 43
Defining the costs of a warehouse
1. Double-click the definition of WarehouseA. You see a section for Costs:Figure 20. Defining costs for a warehouse
2. Click the Add button. The cost for a warehouse is measured per time unit:
developerWorks® ibm.com/developerWorks
Business process modelingPage 14 of 43 © Copyright IBM Corporation 1994, 2008. All rights reserved.

Figure 21. Defining the cost type
3. Define the cost of WarehouseA to be $800.00 per hour:Figure 22. Defining the warehouse cost
4. Create the resources WarehouseB and WarehouseC the same way.Define the cost of WarehouseB to be $1,500.00 per hour and the cost ofWarehouseC to be $450.00 per hour.
Defining a logging facility resource
Finally, create a new LoggingFacility resource named Logger:
Figure 23. Defining a LoggingFacility
Define a cost for the Logger as $50.00 per hour.
ibm.com/developerWorks developerWorks®
Business process modeling© Copyright IBM Corporation 1994, 2008. All rights reserved. Page 15 of 43

At this point you've created all the objects you need to define our process. In thenext section you'll start defining the process by declaring the inputs and outputs fromthe process itself.
Section 5. Defining the process - Part one
At this point you've created all the resources you need to define the process. Startdefining the process by declaring the inputs and outputs from the process itself.Then draw the steps in the process, defining the inputs and outputs for each stepalong with the resources (warehouses, for example) needed for each step. Finally,draw connectors and branches between the steps to complete the process.
Configuring your workspace
To get started, move on to the main drawing area. Click the 2-pane layout button:
Figure 24. Switching to the 2-pane layout
This makes the drawing area occupy the top 2/3 of the screen:
Figure 25. The 2-pane layout
developerWorks® ibm.com/developerWorks
Business process modelingPage 16 of 43 © Copyright IBM Corporation 1994, 2008. All rights reserved.

Defining the process inputs
The first step in defining the process is to define its inputs and outputs. In thisexample, the input and output are both PurchaseOrders.
Would you like to see these steps demonstrated for you?
Show me
1. At the bottom of the drawing area, click the Attributes View tab:Figure 26. The Attributes View tab
2. The Attributes View lets you define the attributes of the process itself.Select the Inputs tab:Figure 27. Attributes View - Inputs tab
ibm.com/developerWorks developerWorks®
Business process modeling© Copyright IBM Corporation 1994, 2008. All rights reserved. Page 17 of 43

3. The input to your business process is a PurchaseOrder. To create thatinput, click the Add button in the Input settings section of the panel:Figure 28. Adding an input to the process
4. Double-click the default name (Input) and change it to InputPO.
5. Double-click the data type, then click the button that appears:Figure 29. Editing an input
6. In the Select type window, select Complex type, then expand yourproject to find the PurchaseOrder data type:Figure 30. Defining the data type of an input
7. Click OK and you'll see the input to the process:Figure 31. The input to the process, fully defined
There's an Input Logic tab, but you won't use it here. The Input Logic tab is used to
developerWorks® ibm.com/developerWorks
Business process modelingPage 18 of 43 © Copyright IBM Corporation 1994, 2008. All rights reserved.

define criteria for the input. For example, you can define logic that says aPurchaseOrder has to have at least five items for this business process to beinvoked.
Defining the process outputs
To define the outputs of the process:
1. select the Outputs tab:Figure 32. Attributes View - Outputs tab
2. Create an output named OutputPO of type PurchaseOrder:Figure 33. Adding an output to the process
As with the Inputs section, ignore the Output Logic panel.
Creating a process task
Now start drawing tasks and defining the process. The first step is to create aprocess task.
Would you like to see these steps demonstrated for you?
Show me
1. Switch to the Diagram tab at the bottom of the drawing area:Figure 34. The Diagram tab
2. In the tools palette, click Create a local task in the upper-left corner:Figure 35. Create a local task
ibm.com/developerWorks developerWorks®
Business process modeling© Copyright IBM Corporation 1994, 2008. All rights reserved. Page 19 of 43

3. Draw a box on the drawing surface and label the first task Send orderto Whse A:Figure 36. Labeling a task
Defining task attributes
1. With the task selected, go to the Attributes view in the bottom panel:Figure 37. The Attributes view
2. Click the Inputs tab, then click Add to define a new input namedAInputPO of type PurchaseOrder:Figure 38. Defining a new task input
developerWorks® ibm.com/developerWorks
Business process modelingPage 20 of 43 © Copyright IBM Corporation 1994, 2008. All rights reserved.
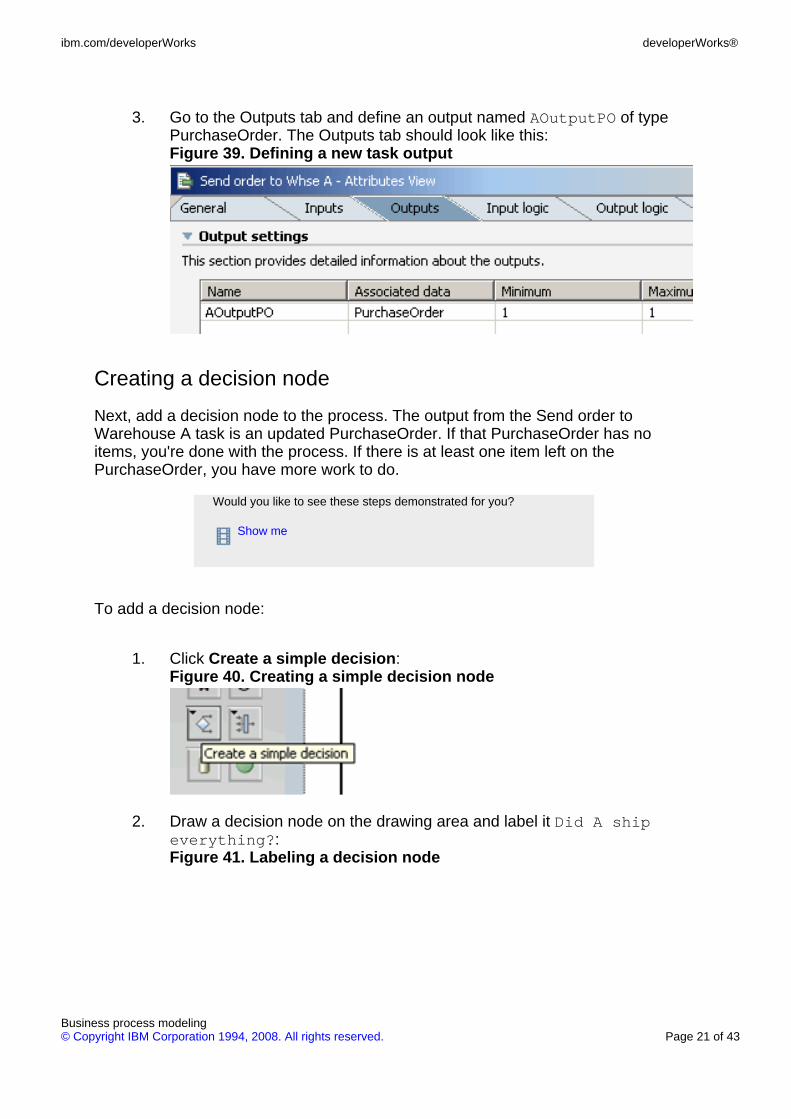
3. Go to the Outputs tab and define an output named AOutputPO of typePurchaseOrder. The Outputs tab should look like this:Figure 39. Defining a new task output
Creating a decision node
Next, add a decision node to the process. The output from the Send order toWarehouse A task is an updated PurchaseOrder. If that PurchaseOrder has noitems, you're done with the process. If there is at least one item left on thePurchaseOrder, you have more work to do.
Would you like to see these steps demonstrated for you?
Show me
To add a decision node:
1. Click Create a simple decision:Figure 40. Creating a simple decision node
2. Draw a decision node on the drawing area and label it Did A shipeverything?:Figure 41. Labeling a decision node
ibm.com/developerWorks developerWorks®
Business process modeling© Copyright IBM Corporation 1994, 2008. All rights reserved. Page 21 of 43

3. With the decision node selected, go to the Attributes view at the bottom ofthe window and define the decision node's input, a PurchaseOrder namedDecisionAInput:Figure 42. Defining the input to a decision
When you define the input for a simple decision, WebSphere Business IntegrationModeler automatically defines outputs of the same data type as the input. To clarifythe process diagram, rename them DecisionAYesOutput andDecisionANoOutput:
Figure 43. The outputs from a decision
Defining a data flow
Use the Connections tool to define how data flows between the process steps you'vedefined so far:
Would you like to see these steps demonstrated for you?
developerWorks® ibm.com/developerWorks
Business process modelingPage 22 of 43 © Copyright IBM Corporation 1994, 2008. All rights reserved.

Show me
1. Click the Connections button in the tool palette:Figure 44. The Connections button
2. Click in the input area for the process, then click the input (the left side)for the Send order to Warehouse A task. The drawing area should looklike this:Figure 45. Connecting the process input to a task
3. The process diagram indicates that the input to the process is aPurchaseOrder and that the PurchaseOrder flows from the entry point ofthe process to the Send order to Whse A task. Connect the output ofSend order to Whse A to the input of Did A ship everything?:Figure 46. Connecting a task's output to a decision node
ibm.com/developerWorks developerWorks®
Business process modeling© Copyright IBM Corporation 1994, 2008. All rights reserved. Page 23 of 43

Defining other process tasks
Before you move on, create two more tasks and two more decision nodes. Name thetwo tasks Send order to Whse B and Send order to Whse C, and name thetwo decision nodes Did B ship everything? and Did C ship everything?The diagram should look something like this:
Figure 47. The drawing canvas with three tasks and three decision nodes
Be sure to define all the inputs and outputs as you did for the first step and the firstdecision node.
Defining other data flows
To connect all the steps you've defined so far, use the Connections tool to draw thefollowing links:
• From the No branch of Did A ship everything? to the input of Send orderto Whse B
• From the output of Send order to Whse B to the input of Did B shipeverything?
• From the No branch of Did B ship everything? to the input branch of Sendorder to Whse C
• From the output of Send order to Whse C to the input of Did C shipeverything?
developerWorks® ibm.com/developerWorks
Business process modelingPage 24 of 43 © Copyright IBM Corporation 1994, 2008. All rights reserved.

After defining these links, the drawing canvas should look something like this:
Figure 48. The data flows between the warehouses
Rearranging the process diagram
Right-click the drawing area and select Auto-Layout Left to Right:
Figure 49. The Auto Layout menu
If you reduce the size of the display to 50%, you'll see something like this:
Figure 50. The rearranged diagram
ibm.com/developerWorks developerWorks®
Business process modeling© Copyright IBM Corporation 1994, 2008. All rights reserved. Page 25 of 43

Section 6. Defining the process - Part two
Defining branching logic
With the decision nodes defined, you need to define the logic used to determinewhich branch should be followed. To define the logic for the two output branchesfrom the decision:
1. Go to the Output branches tab and select Yes.Figure 51. Selecting a decision branch
Would you like to see these steps demonstrated for you?
Show me
2. Define the logic for the Yes branch. The decision you're defining iswhether or not Warehouse A shipped everything in the order. If that's true,the input purchase order (Decision A input) will have a numItems fieldequal to 0.
3. Scroll down to Decision Branch Condition at the bottom of the panel andclick Edit Expression:Figure 52. The Edit Expression button
developerWorks® ibm.com/developerWorks
Business process modelingPage 26 of 43 © Copyright IBM Corporation 1994, 2008. All rights reserved.

The Expression BuilderWhen you click the Edit Expression button, the Expression Builder appears:
Figure 53. The Expression Builder
1. In the First term drop down list, select Modeling artifact:Figure 54. Defining the first term of the expression
ibm.com/developerWorks developerWorks®
Business process modeling© Copyright IBM Corporation 1994, 2008. All rights reserved. Page 27 of 43

2. Expand Processes > ProcessAndShipOrder > Did Warehouse A shipeverything? > Input:Figure 55. Defining the details of the first term of the expression
3. Scroll to the bottom of the list and select numItems, then select Operator> is equal to:Figure 56. Defining the operator of the expression
4. For the second term, choose Number from the list menu, then make surethe number value is set to 0:
developerWorks® ibm.com/developerWorks
Business process modelingPage 28 of 43 © Copyright IBM Corporation 1994, 2008. All rights reserved.

Figure 57. Defining the second term of the expression
5. Click Apply. The Expression text field displays the text of the expression:Figure 58. The text of the expression
6. Click OK.
7. Scroll back to the top of the panel and select the No branch. If you scrollto the bottom, you'll notice that Business Integration Modeler has enteredthe negation of the Yes branch:Figure 59. The automatically generated negation of the first branchof the decision
This branch is true if numItems is not equal to 0. You can edit this expression if youwant, but the default expression does what you want. This decision has only twooutputs, so the second branch is automatically generated as the negation of the first.
Defining the logging task
Now that you've defined the major tasks, the connections between them and thelogic of the decision nodes, there are a couple of things left before our processdiagram is finished. If there are any items that weren't shipped by any of thewarehouses, you need a task to handle that. You also need a merge node to makesure the updated PurchaseOrder is returned correctly.
The first task is to log any items that weren't shipped by any of the warehouses. Tostart, scroll to an empty part of the drawing area and create a new task named Logitems not shipped:
Figure 60. The logging task
ibm.com/developerWorks developerWorks®
Business process modeling© Copyright IBM Corporation 1994, 2008. All rights reserved. Page 29 of 43

Define an input named LoggerInput and an output named LoggerOutput. Bothare PurchaseOrders, as you would expect. Create a connection from the output fromthe No branch of the Did Warehouse C ship everything? decision to the input of theLog items not shipped task.
Defining a merge node
The final step in building the diagram is to merge all the different threads of theprocess. No matter what has happened with the order, you need to return aPurchaseOrder from the process.
Would you like to see these steps demonstrated for you?
Show me
1. Hold down the mouse button as you click the Create a join node button:Figure 61. Selecting the merge node function
2. Click Merge to switch this button to Merge mode and draw a merge nodeon the diagram:Figure 62. Drawing a merge node
developerWorks® ibm.com/developerWorks
Business process modelingPage 30 of 43 © Copyright IBM Corporation 1994, 2008. All rights reserved.

3. You need four branches in all, so right-click the merge node and selectAdd branch twice:Figure 63. Adding a branch to a merge node
4. From top to bottom, name the four inputs A shipped everything, Bshipped everything, C shipped everything, and Incompleteorder. The data type of all four inputs is PurchaseOrder, as you'dexpect. Your input settings should look like this:Figure 64. Defining the inputs for a merge node
The merge node with four inputs should look like this after the inputs aredefined:
Figure 65. The fully-defined merge node
ibm.com/developerWorks developerWorks®
Business process modeling© Copyright IBM Corporation 1994, 2008. All rights reserved. Page 31 of 43

5. Define the following connections:
• From the Yes branch of Did A ship everything? to the first (topmost)input of the merge node
• From the Yes branch of Did B ship everything? to the second input ofthe merge node
• From the Yes branch of Did C ship everything? to the third input ofthe merge node
• From the output of Log unshipped items to the fourth (bottom) input ofthe merge node
• Finally, from the output branch of the merge node to the output of theprocess itself
When all the connections are defined, the merge node should look likethis:
Figure 66. The merge node with all connections defined
developerWorks® ibm.com/developerWorks
Business process modelingPage 32 of 43 © Copyright IBM Corporation 1994, 2008. All rights reserved.

Deleting the start and end nodes
Because you're using the process input and output as the start and end nodes, youdon't need the start and end nodes that are added to the diagram by default.
Would you like to see these steps demonstrated for you?
Show me
To delete them:
1. Scroll back to the process input node:Figure 67. The start and end nodes
2. Click the background of the canvas and draw a rectangle around the twonodes to select them, then click delete:Figure 68. Deleting the start and end nodes
ibm.com/developerWorks developerWorks®
Business process modeling© Copyright IBM Corporation 1994, 2008. All rights reserved. Page 33 of 43

The final diagram should look something like this:
Figure 69. The complete process diagram
Be sure to save the diagram before you go on to the simulation portion of thistutorial.
Section 7. Simulating the process
Creating a simulation profile
One of the strongest features of Business Integration Modeler is its ability tosimulate a business process. You can create simulation profiles that allow you tosave a snapshot of the process, then compare snapshots after running differentsimulations.
For this demo, you'll define some conditions for a scenario and run through it severaltimes. What happens if Warehouse A is much more expensive than Warehouse B?What happens if Warehouse C processes orders twice as fast as the other twowarehouses? These are the sorts of questions Business Integration Modeler helpsto answer.
To get started, right-click on the process definition and choose Simulate:
developerWorks® ibm.com/developerWorks
Business process modelingPage 34 of 43 © Copyright IBM Corporation 1994, 2008. All rights reserved.

Figure 70. Creating a simulation profile
Would you like to see these steps demonstrated for you?
Show me
This creates a simulation profile, which is a group of settings that define how theprocess will be evaluated. See a slightly modified version of the diagram in theupper-right portion of the window:
Figure 71. The modified process diagram
The notation (Simulate) is in the tab above the diagram and there are zeros and barsat various connections. You'll see what those are used for in a few minutes.
ibm.com/developerWorks developerWorks®
Business process modeling© Copyright IBM Corporation 1994, 2008. All rights reserved. Page 35 of 43
See the details of the simulation profile in the lower-right portion of the window:
Figure 72. The simulation details
Defining resource requirements
You could spend days examining all of the simulation settings, but keep it simplehere.
Would you like to see these steps demonstrated for you?
Show me
To define the resources needed for the process:
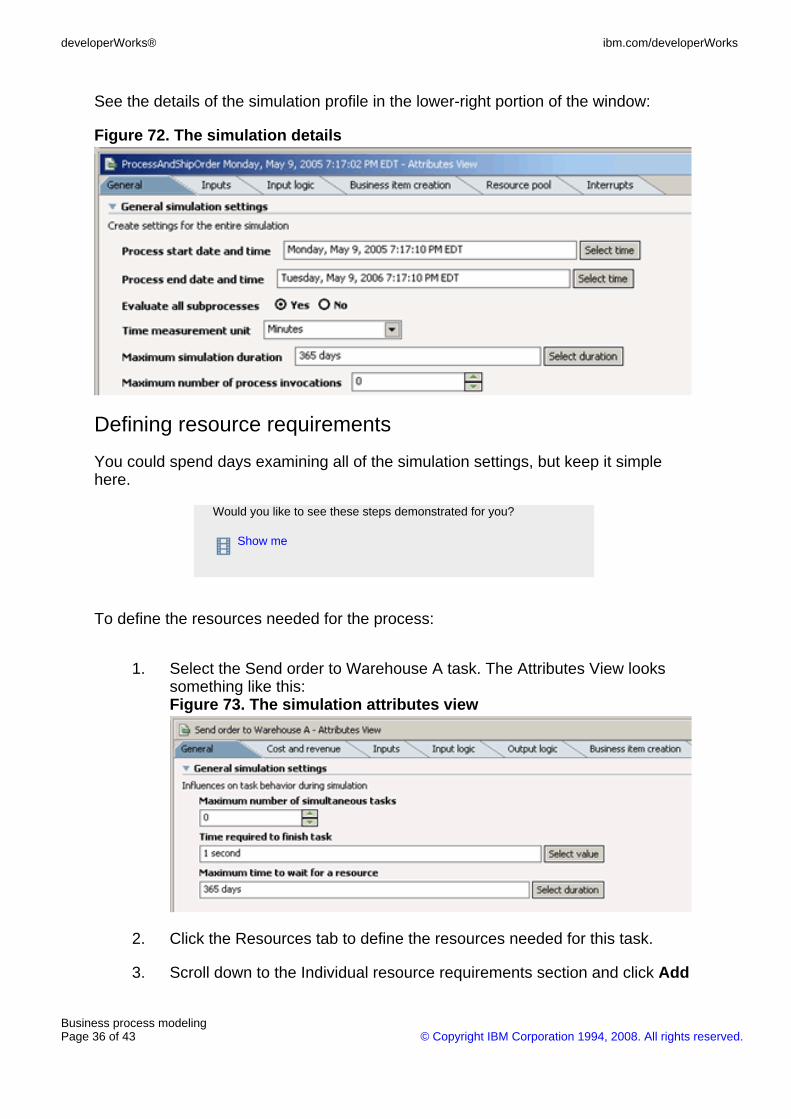
1. Select the Send order to Warehouse A task. The Attributes View lookssomething like this:Figure 73. The simulation attributes view
2. Click the Resources tab to define the resources needed for this task.
3. Scroll down to the Individual resource requirements section and click Add
developerWorks® ibm.com/developerWorks
Business process modelingPage 36 of 43 © Copyright IBM Corporation 1994, 2008. All rights reserved.

to create a new resource requirement.
4. Double-click the requirement name and change it to Warehouse.
5. Double-click in the Individual resource column, click the button thatappears, and select WarehouseA:Figure 74. Defining a resource requirement
6. Double-click in the Time required column and click the button thatappears. Specify 45 minutes for WarehouseA to complete this task. TheResources tab should look like this:Figure 75. A defined resource requirement
7. Define other resource requirements similarly. For the task Send order toWarehouse B, use WarehouseB for 90 minutes. For Send order toWarehouse C, you need WarehouseC for 15 minutes. For the task Logitems not shipped, you need Logger for 1 minute.
Running the simulation
Now that you've defined the properties of the simulation, it's time to run it.
ibm.com/developerWorks developerWorks®
Business process modeling© Copyright IBM Corporation 1994, 2008. All rights reserved. Page 37 of 43

Would you like to see these steps demonstrated for you?
Show me
Click the Control Panel tab at the bottom of the window:
Figure 76. The Control Panel tab
On the control panel, click the run button in the upper-right corner to run thesimulation:
Figure 77. The run button
An animation shows you how the process is going:
Figure 78. Simulation animation
In this screen capture, a PurchaseOrder is moving from the No branch of the Did Aship everything? decision to the Send order to Warehouse B task. You can userandom numbers or mathematical expressions to define how branching is donewithin your simulation; as you complete this tutorial, keep things simple.
Analyzing simulation results
Would you like to see these steps demonstrated for you?
developerWorks® ibm.com/developerWorks
Business process modelingPage 38 of 43 © Copyright IBM Corporation 1994, 2008. All rights reserved.

Show me
If you run the simulation several times, the process should go through differentpaths. Compare the time and costs of each iteration to see how efficiently theprocess worked. To fully analyze your business process, run many differentsimulations, changing the resource requirements and other factors each time.
As an example, here is one set of simulation results:
Figure 79. One set of simulation results
Here is another set:
Figure 80. Another set of simulation results
As you can see, the cost of processing the second order was significantly higherbecause WarehouseB was involved. In a much more detailed model, of course,there would be costs and revenues associated with each step. As you add moredetail to the model, the information you get from the simulation is much more useful.For example, a more detailed model might tell you that WarehouseC can ship theentire order 75% of the time. If orders were sent to WarehouseC, the first warehouseused, that might save a significant amount of money.
Section 8. Summary
ibm.com/developerWorks developerWorks®
Business process modeling© Copyright IBM Corporation 1994, 2008. All rights reserved. Page 39 of 43

Some thoughts about what you've done
In this tutorial, you've taken a look at WebSphere Business Integration Modeler, apowerful tool for modeling business processes. Although the sample you wentthrough was relatively complex, there are many functions of Business IntegrationModeler the tutorial didn't demonstrate. For example, you can define the statisticaldistribution of events. Experts in queuing theory can put their expertise to work:
• Business Integration Modeler is designed for business experts. These arepeople who know how goods, services, cash, and other resources flowthrough an organization. The assumption behind Business IntegrationModeler is that the business experts are not traditional programmers.
• One of the oldest and most common problems in the development worldis the frequent inability of programmers and non-programmers tocommunicate. Business Integration Modeler helps business expertsdefine a business process in technical detail without writing code.
• The business process design here is ideal for developing solutions in aService Oriented Architecture (SOA). In a perfect world, developers canstart with the business process you've defined here and then connecteach step in the process to a service already defined in an SOA.
• In the real world, it's unlikely that all of the services required by a businessprocess will be available. The development shop might need to modifylegacy applications or create new ones altogether.
• The level of detail provided by the process definition makes it much easierfor developers to estimate the cost and time necessary to implement thechanges.
• The level of detail provided by the simulation results makes it much easierfor business experts to estimate the benefits of implementing the newprocess.
Using Business Integration Modeler, executives can use the detailed costs andbenefits to make rational business decisions:
• A new business process might be significantly cheaper, but it might taketwice as much time as the current process. If the organization's mainpriority is for the process to run as quickly as possible, it won't beimplemented. On the other hand, if cost savings are more important thanprocess throughput, the new process is likely to move ahead.
• A new business process might be cheaper and faster, but it might requiresubstantial changes to a crucial and brittle legacy application. If thatcrucial application was originally written in COBOL 30 years ago bysomeone who died 10 years ago, the risks of modifying that legacy codemight outweigh any benefits that might come from the new process.
developerWorks® ibm.com/developerWorks
Business process modelingPage 40 of 43 © Copyright IBM Corporation 1994, 2008. All rights reserved.

• A new business process might not be faster or cheaper, but it might bethe first step in implementing a complete SOA. Management might decideto implement an SOA-based business process as a pilot project. This newprocess might be seen as more of a learning experience than a criticalbusiness improvement.
With this powerful tool, you've designed and simulated a new business process. In afuture tutorial you'll look at what's involved in implementing the new process in anSOA. For now, you should have a good understanding of how Business IntegrationModeler can help you move to a process-oriented architecture.
ibm.com/developerWorks developerWorks®
Business process modeling© Copyright IBM Corporation 1994, 2008. All rights reserved. Page 41 of 43

Downloads
Description Name Size Download method
The workspace used in this tutorial. SOA2005-ProcessModeler.zip150 KB FTP
Information about download methods
developerWorks® ibm.com/developerWorks
Business process modelingPage 42 of 43 © Copyright IBM Corporation 1994, 2008. All rights reserved.
Resources
• Participate in the discussion forum for this content.
• The IBM Redbook BPEL4WS Business Processes with WebSphere BusinessIntegration: Understanding, Modeling, Migrating takes an in-depth look atbusiness process modeling. You can download both the PDF file and thesource of the sample applications from the book's home page.
• Download WebSphere Business Integration Modeler V5.1 for Windows from thedeveloperWorks Downloads page.
About the author
Doug TidwellSenior Programmer Doug Tidwell is IBM's evangelist for Web Services. He was aspeaker at the first XML conference in 1997, and has been working with markuplanguages for more than a decade. He holds a Bachelors Degree in English from theUniversity of Georgia and a Masters Degree in Computer Science from VanderbiltUniversity. He can be reached at [email protected]. You can also see his Webpage at ibm.com/developerWorks/speakers/dtidwell/.
ibm.com/developerWorks developerWorks®
Business process modeling© Copyright IBM Corporation 1994, 2008. All rights reserved. Page 43 of 43