building a traditional workbench - frank klausz - woodworkers jounal
DESCRIPTION
Frank Klausz Workbench: step by stepTRANSCRIPT
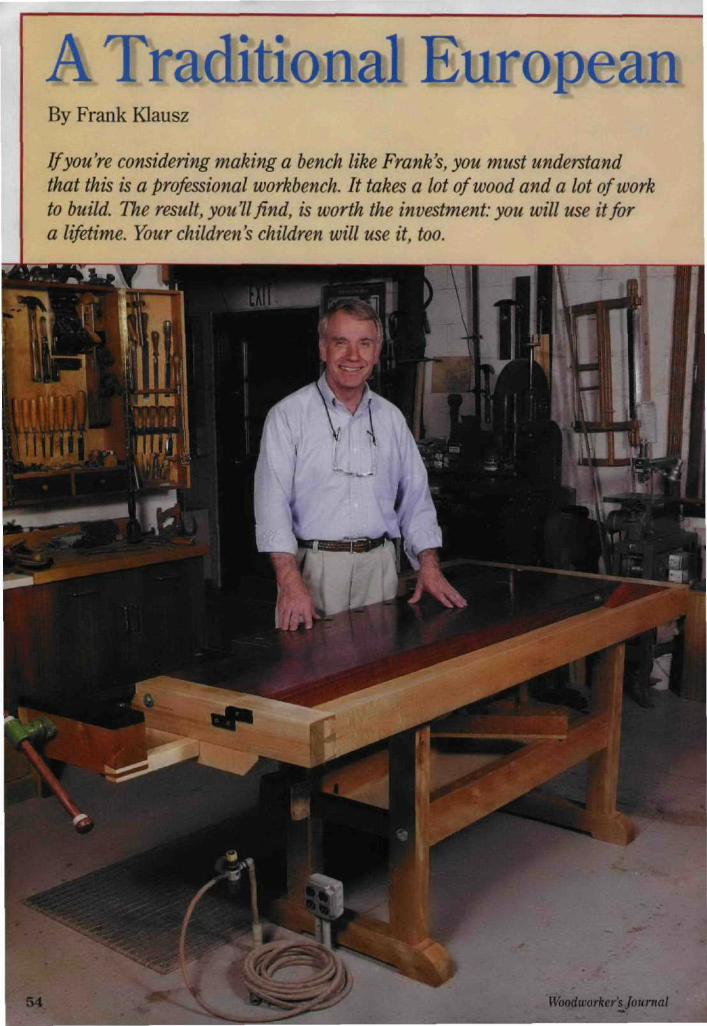
A Traditional EuropeanBy Frank Klausz
If you're considering making a bench like Frank's, you must understandthat this is a professional workbench. It takes a lot of wood and a lot of workto build. The result, you'll find, is worth the investment: you will use it fora lifetime. Your children's children will use it, too.
Woodworker's Journal
Workbench
a bench like this isan enjoyable process madeup of many simple steps.
A craftsman worthy of sucha bench will bo able to make it withordinary hand and power tools.'l"he benchtop is very heavy once Itis glued up. so youil want to havea helper on hand when you need tomaneuver it around your shop.
Building the BaseIlie base of my bench consists oftwo leg trestles connected by twoheavy rails that support a storageshelf. (For details, see the ExplodedView Drawings on page 56.)
The first thing you must do isdetermine how high you wanlyour bench to be and size Iht'legs accordingly. For planing,the ideal height is generallyconsidered to be the height ofyour palms from the floor whenyour arms are at your sides.This height allows you to makethe best use of your bodyweight to push the plane down.For chiseling and other benchwork, you can always putblocks under the feet to raisi'the height a couple of inchesTo determine the overall lengtiiof the legs, subtract 6'-" fromthe overall bench height.
The legs are connected to thetop rails with through-wedgedmortise and tenon joints, andto the foot rails with fox-wedged mortise and tenonjoints. (See the Drawings andphoto on pages 56 and 57). The
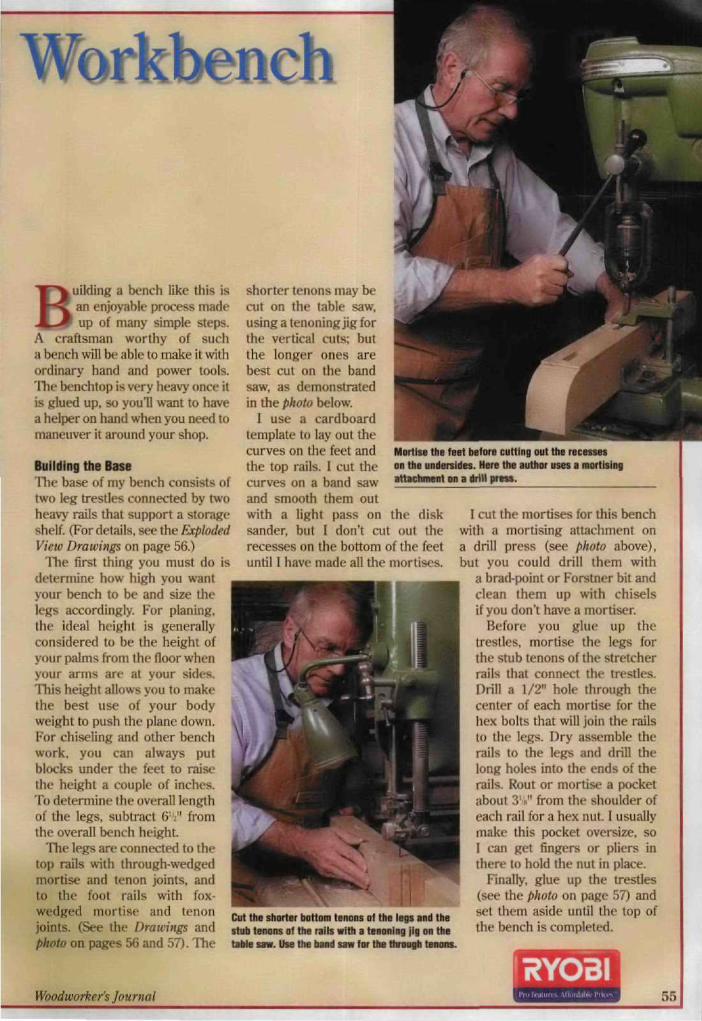
shorter tenons may becut on the table saw.using a tenoning jig forthe vertical cuts: buithe longer ones arebest cut on the bandsaw, as demonstratedin the photo below.
I use a cardboardtemplate lo lay out thecurves on the feet andthe top rails. I cut thecurves on a band sawand smooth them outwith a light pass on
Mortise the feet betore cutting out the recesseson the undersides. Here the author uses a mortisingattachment on a drill press.
the diskSander, but I don't cut out therecesses on the bottom of the feetuntil I have made all the mortises.
Cut the shorter bottom tenons ot the legs and thestub tenons of the rails with a tenoning jig on thetaMe saw. Use the band saw for the through tenons.
I cut the mortises for this benchwith a mortising attachment ona drill press (see photo above),but you could drill them with
a brad-point or Forstner bit andclean them up with chiselsif you don't have a mortiser.
Before you glue up thetrestles, mortise the legs forthe stub tenons of the stretcherrails that connect Ihe trestles.Drill a 1/2" hole through thecenter of each mortise for thehex bolts that will join the railsto the legs. Dry assemble therails to the legs and drill thelong holes into the ends of therails. Rout or mortise a pocketabout 3%" from the shoulder ofeach rail for a hex nut. I usuallymake this pocket oversize, soI can get fingers or pliers inthere to hold the nut in place.
Finally, glue up the trestles(see the photo on page 57) andset them aside until the top ofthe bench is completed.
Woodworker's Journal 55
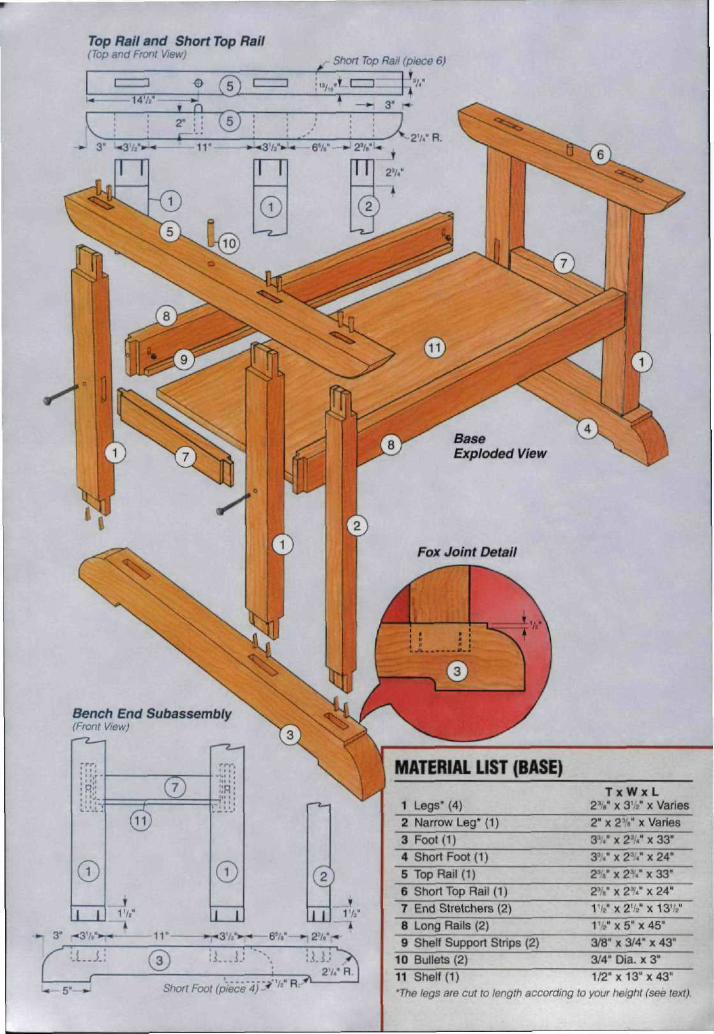
Top Rail and Short Top Rail(Top ana Front View)
Short Top Rail (piece 6}
Bench End Subassembiy(Front View)
•- 3" -<3Vi'» IV «3Vi -6V—.^^v--•
®- 5"- Short Foot R7^
27.' R.
\ MATERIAL LIST (BASE)1
12
3
4
5
6
7
8
9
10
Legs'(4)
Narrow Leg' (1}
Foot(i)
Short Foot (1)
Top Rail (1)
Short Top Rail (1)
End Stretchers (2)
Long Rails (2)
Shelf Support Strips (2)
Bullets (2)
T2\'
2"x
3^"
3^/
2 /̂«"
1 V
I'V
3/8"
3/4"
X W )X 3';̂ "
2'^," y
X 2^i"
X 2^*'
x2^"
X 2^'."
X 2'/."
X 5" X
x3/4"
Dia. X
[LX Varies
Varies
x33"
x24'
x33"
x24"
X 13V?"
45-
x43"
3"
11 Shelf (1) 1/2" X 13"x43"'The legs are cut to length according to your height (see text).

A t the heart of the bench are tfie screws:Benchscrew; shoulder vise {Garrett Wade,part #70G02.03). Benchscrew; tail vise(Garrett Wade, part #70G02.02).You'll need two bench dogs (Rockier, part#21868) and a small holdfast (Rockier, part#90407).Visit a local hardware store for these supplies:Hex head bolts (6) 1/2'x6'Lag Screws (6) 3/8'x 4'Lag Screw(1) m'x4VLjg Screw (2) „ „ 1/2' x 4'Threaded Hod (1)... 1/2'x 36'Flat Washers (8) / /? 'Flat Washers (6) WHex Nuts (8) 1/2'Flathead Screws (2) /12x VFlathead Screws (15). /fix vrFlathead Screws (12) ^x2'Screws tor 8enchscrew Nufs (8) To fit
Long Rail andShelf Support(Inside and Ena Views)
- • 3V," •V,"
Leg(Stretcher and Rail Locations)
5"
107
M
I I
7,"
27/
1"
117/
IfRYO3I
Moving Toward the BenchtopThe Workbench TopNext, make llie main part of thebenchtop. The top of the benchconsists of a long section, usuallymade of two hefty 7" wide boards,and a short front section thatbecomes the fixed jaw of the tailvise. (See the Drawings on pages58 and 59.) The front piece of thisshorter section is 4" high andcontains a series of bench dogholes that align with opposingholes in the tail vise.
Begin by letting your lumberacclimate in your shop for a weekor so before you start milling itThen rip, joint and surface all the
The legs are attached to ttiefeet with fox-wedged tenens.
pieces. It does not matterif there are some roughmill marks or defects onthe underside of the top.because these will notaffect the utility of thebench. I use the band sawto rip lumber that is morethan 2" thick, becausea band saw blade cutsthrough thick lumbermuch more efficiently tliana table saw blade.
Assemhie each trestlesection with white glue and
clamps. Here the authoruses a mallet to dnve thefox-wedged tenons home
(at the bottom of the legs).
Making the Bench Dog HolesTo makt' the bencli dog holes, youcut slots in the front lip of thebench before gluing it to the othershort section of the top. (See theDrawings.) You want the dogs totiit 2° toward the opposing benchdogs, so the slots must be at an88° angle to the bench surface.
To cut the slots, in both the frontstrip and the tail vise, I used a tablesaw slt'd that works like a box-jointjig, using a 3/4" dado blade anda tapered auxiliary fence thatskews the workpiece 2° fromperpendicular (see top photo, page60). Tilt' s!ed I use is 44" long, withthe slot for the dado blade right inthe middle. Reverse the taperedfence for cutting the tail vise slots,because they need to slope 2° inthe opposite direction.

Benchtop(Top View)
H-.-.-.
3V/
f
13"
-8'/V
9'
,,- tVhen flipped 'up. the stop •
-—V should align \29) with tray edge, j
r^ 1
IJ
ExplodedView
Backboard/long End CapDovetail Detail(Rear View)
58RYO3I
Woodworker's Journal

The two spacer blocks are notchedto accommodate the tray bottom,providing a level base for the top.
Drill a 3/4' hole for a "buiiet" dowel so the topcan be placed accurately on the base.
The center rail Is screwed into the inside guideblock and short end cap. It supports andguides the vise movement.
Tail Vise(Underside)
Shoulder Vise ScrewMounting Detail(Front View)
• / » •
Inner Jaw Detail(Front View) x8" 1%'
IV."
2'/."
5'/
:>--. y---r r*^
MATERIAL LIST (TOP)
12 Long Section (1)13 Short Piece (1)14 Front Lip (1)15 Backer Strip (1)
16 Long End Cap (1)17 Short End Cap (1)18 Shoulder Vise Arm (1)19 Shoulder Block (1)20 Shoulder Vise Jaw (1)21 Inside Guide Block (1)22 Backboard (1)23 Tool Tray (1)24 Tool Tray Ramps (2)25 Spacer Blocks (2)26 Plywood Spline Material
T
2 ' /2'/2"
1'.'/4 " x
4 " x
4 " x
2 ' /
1"x3"x1" X1/2"1/2"1 ' /1/2"
XX
X
X
X
333X
42
4X
X
X
X
W x L13" X 72V/3" X 58"4" X 58"1'/x58"•4" X 37 ' / /
u' X 24'/V'
U" X 23"
8%" X 7' . /
X 1 7 ' /
4° X 17' , /
X 76'/-"
8Vx7'//7'/ X 6'/3'M" X 22"
1' / X 60"
TAIL VISE27 Front Face (1)28 Jaws (Ends) (2)29 Back Rail (1)30 Center Rail (1)31 Outside Guide Block (1)32 Plywood Liner (1)33 Front Runner (1)34 Long Vise Cap (1)35 Short Vise Cap (1)
MISCELLANEOUS36 Carved Oil Cup (1)37 Wooden Stop(1)38 Crosscut Stops (2)
T
3',/1 ' /2 "
1 ' /
3'/."
1/4"3/4"7/8"7/8"
T1/2"1/4"1/4"
X
X
X
X
X
X
X
X
X
X
XX
X
X
Wx4'/."4''V'I V
2'//4''V'7/8"5 ' /4"x
Wx2"X
v./r X
LX 22V2"
X 13'//
x23"X 17%"
x20"X 16"
X 16"
x23"13'/L6"X7"
3"
59

Use a table saw sled witha 2* auxiliary fence to cutthe hench dog slots in thetail vise tace. Reverse thetence tor the opposing siotsin the tront lip of the hench.Guide strip tacked to the sledensures equal slot spacing.
Making the End CapsAfter you make the first cut, tack
a strip of wood the same thicknessas your dado blade to the base ofthe sled at the appropriate holespacing — in this case 5^". Aftercutting the first slot, you can cuteach successive slot by indexingthe previous slot on the woodstrip. Note: the last slot, at the endof the strip, has a different spacing.See the Drawings for details.
Assembling the TopAssembling the top involvesseveral steps. Before you can gluethe various parts together, youneed to drill the hole for thethreaded reinforcing rod that goesthrough the full width of the top atthe shoulder vise.
To do this, clamp the two planksof the long section together anddrill a 9/16" hole through the firstinto the second. Then clamp thissection to the next section andrepeat the process, drilling the holeprogressively through all tlie pans,including the block and the arm o!the shoulder vise. I use a spade bitwith an extender for this.
Once you have drilled throughall the pieces, rip grooves for thesplines with a dado blade on yourtable saw. Cilue up the 13" wick"section and the short front sectionseparately. I used 1/2" x 1'."plywood splines and white glue to
top.and
join all the parts of theincluding the end capsshoulder vise block.
Square off the short section andglue it to the long section, makingsure that all the holes line up andthat the splines don't interfere withthem. Finally, trim the ends squareand rout the grooves for the endcap splines (see photo, below).
Attaching the End CapsBefore you can attach the endcaps, you have several other jobsto do. First, you need to join thelong end cap to the arm of theshoulder vise. Tliis is a simplethrough-dovetail joint that you can
cut on the band saw and clean upw\\h chisels and rasps (see photos,facing page). I used an angledramp, clamped to the band sawtable, to tilt the shoulder vise armwhen cutting the dovetail socket.
Dry fit this dovetail, thendisassemble the parts and routor rip the spline grooves in bothparts, stopping the grooves sothey won't show when the partsare assembled. Cut the groove inthe short end cap also. All thespline grooves should be centeredon the thickness of the top.
Notch and drill the short endcap for the benchscrew nut at thistime. You will need to drill a hole inthe inside face with a Forstner bitfor the cast-iron nut, and thena smaller hole the rest of the waythrough for the screw itself. Thentrace the benchscrew fiangearound the larger hole and rout tlieend cap to the depth of the flange.(A typical installation is shown
Use a router with an edge guide to cut the spline grooves in the ends of the glued-upbenchtop. These grooves will match the spline grooves you'li form later in the end caps.
60 Woodworker's Journal

I>(wetails: Practical and Powerin the photo on page 63.) Repeatthis procedure for the shouldervise benchscrew nut. and installboth nuts with the appropriatesized screws before glue-up.
Next, drill the 1/2" holes throughthe end caps for the hex-headmachine bolts that will reinforcetheir connection to the top. (SeeDrawings.) Start the holes from theinside of the end caps, centered onthe spline groove. Then dryassemble the caps to the top anddrill the long holes into theendgrain of the top. Remove thecaps and continue the holes to theirftill depth. Drill or rout pockets inthe underside of the top for the hexnuts, as you did with the rail jointsin the base of the bench.
If necessary, trim the shoulderblock for a perfect fit between thetop and the end cap assembly. Routspline grooves on three sides ofthe block and dry assemble it.Then, mark the finish length ofboth end caps at 8' /' past the backedge of the top, and cut them tolength on a chop saw or radial saw.
The final step before gluing onthe end caps is to rout thedovetail sockets in theends for the backboard.I used a simple router jigsimilar to the one I madefor the tail-vise dovetails.(See photo, page 62.) Thejig uses a l/2"-diameterstraight bit and a 5/8"template bushing.
Clean and finish the joint witha paring chisel. Test tit the joint
before you try to glue it up andjoin it permanently, tt should tit
»iugly, but not too tight.
Glue-up isn't difficult, but it issomewhat complicated, so it's goodto have a helper if possible. Start byturning the top over, with a coupleof beams underneath it to raise itoff your assembly table. Do a dryrun first, to make sure you haveeverything you need, including allthe clamps, bolts and splines.
I used a flux brush to spreadglue in the grooves and a smalldisposable paint roller to roll itonto the various surfaces quickly.I always use white glue for this, asit allows more open time thanyellow glue.
Cut the large dovetail that joins the shouldervise arm to the end cap with a band saw.Nofe the angle ramp clamped to the bandsaw table.
Get all the parts assembledbefore clamping them, becausethey must be tightened in all direc-tions at once. At the shoulder viseend. clamp the big dovetail firstwith one long ciamp lengthwiseand another squeezing the jointitself. Then use another clamp topull the vise arm and the shoulderblock tight against the top and twomore to clamp it to the end cap.
yr
Now, clamp both end caps at thesame time with two 8-foot bar orpipe clamps and tighten the hexbolts to pull both caps into tightcontact with the ends of the top.
The final step of this main giue-upis to install and tighten the threadedrod with washers and hex nuts ateach end. (See photo, page 63.)When the glue dries, plane or belt-sand all the joints flush.
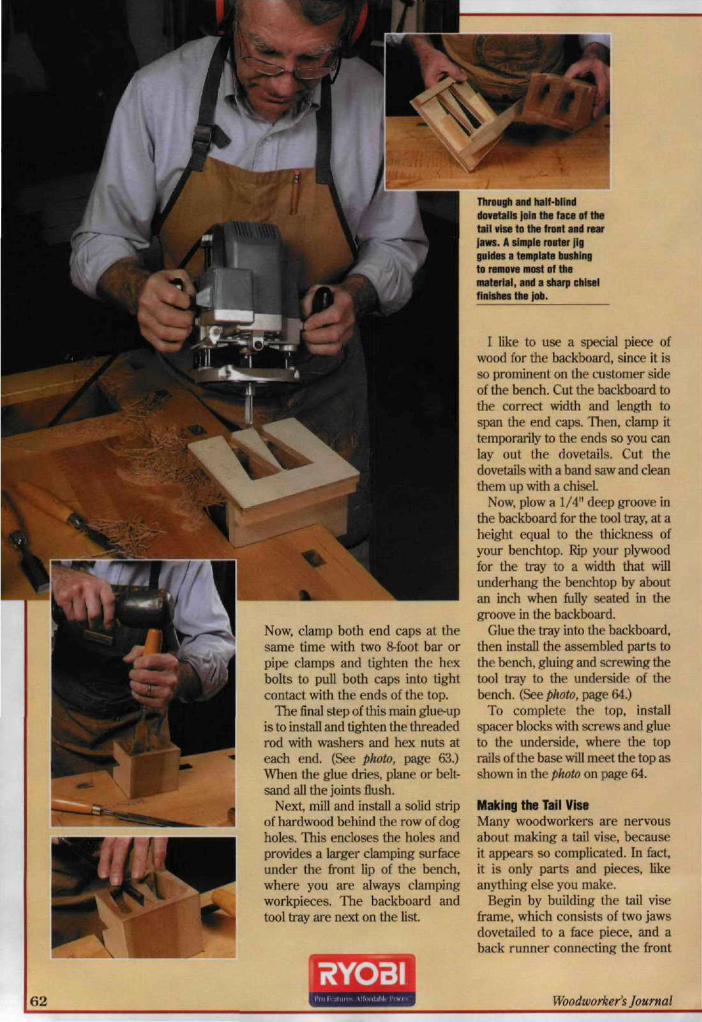
Next, mill and install a solid stripof hardwood behind the row of dogholes. This encloses the holes andprovides a larger clamping surfaceunder the front Up of the bench,where you are always clampingworkpieces. The backboard andtool tray are next on the list
62
Through and half-blinddovetails join the face of thetail vise to the front and rearjaws. A simple router jigguides 3 template bushingto remove most of thematerial, and a sharp chiselfinishes the job.
I like to use a special piece ofwood for the backboard, since it isso prominent on the customer sideof the bench. Cut the backboard tothe correct width and length tospan the end caps. Then, clamp ittemporarily to the ends so you canlay out the dovetails. Cut thedovetails with a band saw and cleanthem up with a chisel.
Now. plow a 1/4" deep groove inthe backboard for the tool tray, at aheight equal to the thickness ofyour benchtop. Rip your plywoodfor the tray to a v\adth that willunderhang the benchtop by aboutan inch when fully seated in thegroove in the backboard.
Glue the tray into the backboard,then install the assembled parts tothe bench, gluing and screwing thetool tray to the underside of thebench. (See photo, page 64.)
To complete the top, installspacer blocks with screws and glueto the underside, where the toprails of the base will meet the top asshown in the photo on page 64.
Making the Tail ViseMany woodworkers are nervousabout making a tail vise, becauseit appears so complicated. In fact,it is only parts and pieces, likeanything else you make.
Begin by building the tail viseframe, which consists of two jawsdovetailed to a face piece, and aback runner connecting the front
Woodworker's Journal
Carefiti Practiced Assemblyand rear jaws. (See the ExplodedView on page 59.) I use throughdovetails at the rear jaw but half-blind dovetails at the front jaw, toprovide an unbroken face-grainsurface where it meets the otherjaw. Here again, 1 use a simplerouter jig to hog out the dovetailsockets, then I clean them up witha chisel. The tails themselves areband sawn carefully and thenpared to final fit with chisels.While the front vise jaw is stillfree, joint about 1/8" off therearward part so you'U be able toresurface the clamping surface ofthe jaw a couple of times in thefuture, as necessary.
The dovetail joints that jointhe back rail to the jaws are alsoeasily cut with a band saw. The topof this runner should be evenwith the bottom of the end capwhen the vise is assembled tothe bench. To make sure thishappens, drill the clearance holefor the benchscrew in the rear jawso that it is the same height upfrom the runner as the benchscrew
nut is from the bottomof the end cap. Drill thishole slightly oversize soyou have some roomfor adjustment whenassembling the tail viseto the bench. (Refer tothe Drawings.)
To complete the tail visesubassembly, you stillneed to glue a thin pieceof plywood to the inside ofthe face piece to close offthe bench dog slots andinstall the hardwoodrunner to support thefront of the vise.
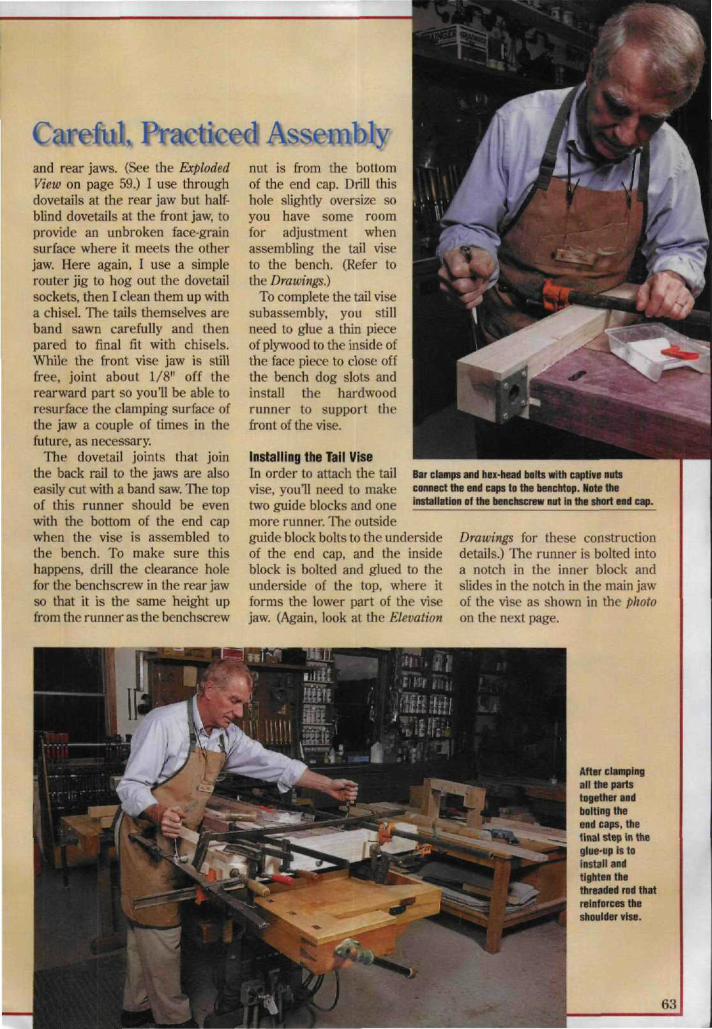
Installing the Tail ViseIn order to attach the tailvise, you'll need to maketwo guide blocks and onemore runner. The outsideguide block bolts to the undersideof the end cap, and the insideblock is bolted and glued to tlieunderside of the top, where itforms the lower part of the visejaw. (Again, look at the Elevation
Bar clamps and hex-head boits with captive nutsconnect the end caps to the benchtop. Note theinstallation of the iKnchscrew nut in the short end cap.
Drawings for these constructiondetails.) The runner is bolted intoa notch in the inner block andslides in the notch in the main jawof the vise as shown in the photoon the next page.
After clampingall ttie partstogethef andholting theend caps, thefinal step in thegiue-up is toinstall andtighten thethreaded rod thatreinforces theshoulder vise.
63

Final DetailsFor smooth operation of the tail
vise, it is critical to make all theparts accurately and to be sure therunners are parallel to each otherand to the benchtop. Before youinstall the benchscrew, move thetail vise through the full range ofits motion by hand to check forbinding and interference. Anymisalignment or eventual saggingcan be fixed by shimming therunners and rails as needed.
Once you have everythingrunning smoothly, with as littleslop as possible, you can install thebenchscrew. Run it all the way in,center it in the clearance hole, andscrew the flange to the rear jawof the tail vise.
Making the Vise CapsNext, make the vise caps. The twoparts of the cap should be thickerand wider than necessary; youwill trim them after installation.Miter the ends where they meet,then set the larger part of the caponto the completed tail vise, withthe inside of the miter aligned withthe inside corner of the frame.Mark the bench dog holelocations from the underside, thendrill and chop the correspondingholes in the top cap.
Finally, glue the two parts of thecap together at the miter, andassemble them to the frame withglue and clamps. When the gluedries you can plane them flushwith the benchtop and with theoutside surfaces of the tail vise.
Finishing TouchesAt this point, you are almostfinished with your bench. Just a fewimportant details are left.
First, mount the top on the base.I use rock maple "bullets" toregister the top to the base. Turnthe bullets to 3/4" diameter asshown in the Drawings. Glue oneinto each of the two bearing stripson the underside of the benchtop.Drill mating holes in the top rails ofthe base so the bullets will registerthe top in the exact location eachtime you assemble the bench. Afteryou install the bullets, drill throughthe top rails of the base for the 1/2"lag screws that secure the top.
To assemble the tail vise, bolt the center guide railto the fixed tail vise jaw and then bolt the outsideguide block to the end cap. Finish up by installingthe bench screw.
Next modify the benchscrew forthe shoulder vise. The shouldervise on this bench is designed toopen to about 5';". When the viseis closed, you want the handle tocome to rest about 1/2" from thearm of the shoulder vise. Thestock benchscrew that I used forthe shoulder vise was 2" too long,so I had to shorten it.
First, I punched out the roll pinthat holds the screw into thehandle casting. Then I used myreciprocating saw to cut off 2"
After gluing the backboard to the ends ofthe end caps, glue the plywood tool tray intothe groove in the backboard and screw andglue It to the underside of the benchtop.
from the end of the screw. Now,I had to grind the end of the screwto fit back in the handle casting.So, I made a simple V-block jig tohold the screw at the properheight for grinding. (See photo at
Attach spacer blocks to the underside of the benchtop where it meets the trestles.Then glue one maple "bullet" into each ^acer block and drill mating holes in the topsof the trestles to locate the top perfectly each time you assemble the bench.
Woodworker's Journal

right.) I screwed the jig to mygrinding bench with a singlescrew at the rear corner so I couldpivot the jig toward the grindingwheel. When I reached the rightdiameter, I reinstalled the screwin the handle. This procedureworked very well and took verylittle time.
Buiiding the Wooden Vise JawOnce you have bolted the top tothe base and cut the benchscrewto length, you're ready to make thewooden vise jaw for your shouldervise. I used a 1" thick piece ofrosewood for mine, but anyseasoned hardwood is OK Makeit a little wider than necessary soyou can plane it flush with yourbench after you install it
The wooden vise jaw has anextension on the left end that fitsbetween the shoulder block andthe top rail of the base. It isconnected to the benchscrew by acast-iron foot that allows the jaw topivot left or right to accommodatetapered or odd-shaped workpieces.
To locate the pivoting footaccurately, hold the wooden jaw inplace and tighten the benchscrewagainst it (with the swiveling footattached), making sure the openside of the foot faces to the right.Trace the outline of the foot ontoyour vise pad, then remove the padand rout a 3/8" deep recess in it toreceive the foot. This allows thejaw to open a bit wider, and it looksbetter, too.
Constructing a Wooden StopThe wooden stop is another usefulfeature of this bench. It is simplya strip of tough hardwood — I usedholly — that fits lightly intoa rectangular mortise through thetop (see the Drawings). A tap of
Woodworker's Journal
Shorten the shouider vise screw 2" witha reciprocating saw, and then grind theend ot the screw to fit in the handiecasting. A V-hiock hoids the screw torgrinding, and a drywaii screw in anadjacent piece ot plywood acts as a stop.
a hammer or mallet from belowraises it to working height forplaning thin pieces of wood.
To make the mortise, I drilleda series of 1/4" holes with a bradpoint bit, and then removed thewaste between them with a paringchisel. The mortise should slopeabout 2° from vertical, toward theright end of the bench. It's a goodidea to make the mortise first, thenmake the stop to fit the mortise.
I like to finish my benches withWaterlox* wiping varnish. A fewcoats at the beginning and a littlemore from time to time keep thebench looking beautiful. Makesure to seal up the entire benchwith the finish, including underthe benchtop.
If you build my bench, you willhave a friend forever. You will askyourself, "How did I work until nowwithout this bench?" Many yearsfrom now, your children will thankyou, too. j
Frank Klausz is a third generationHungarian master cabinetmakerwho runs a busy cabinet shop inNew Jersey. Thanks to frequentcontributor Ellis Walentine for hishelp with this article. Check Ellis'website at woodcentral.com.
DetailsMake theDifference
Small but important detailselevate Frank's bench to the
highest level of craftsmanship.The carved oil cup mounted tothe undersideof the tailvise,
for instance.Is a handyplace to keepa little
vegeuble oilto lubricateanything thatneeds it, suchas saws andplane soles.
Leather viseliners ar-eanotherdelightfulfinishingtouch
featured onFrank'sbench.Theleatherprotects thejaws and thework. Whenit wears outor getsdamaged, you Jcan soak it n. «
Ehony Crosscut Stopoff andreplace it.
And, of course, the fold-downcrosscut stop at the end ofFrank's bench is another detailthat truly enhances theperformance of his classic design.
65