building a lego rov using the mindstorms robotics kit · 1 building a lego rov using the mindstorms...
TRANSCRIPT

1
Building a LEGOLEGOLEGOLEGO ROV Using the MindStorms Robotics Kit Amos G. Winter, Tufts University Mentors: Paul McGill, Bill Kirkwood Summer 2001 Keywords: LEGO, ROV, MindStorms, RCX ABSTRACT
This paper discusses the design and creation of a Remotely Operated Vehicle
(ROV) that runs off the LEGO RCX and is primarily made out of standard LEGO
components. With the power of the RCX, the ROV has the ability to collect data and
control itself autonomously. It is simple enough to construct that it has the possibility of
being used as a classroom project. Furthermore, it is a prototype for a new LEGO kit
which could be produced as a model of MBARI’s (the Monterey Bay Aquarium Research
Institute) real ROV Tiburon.
INTRODUCTION
Three years ago LEGO introduced a new line of kits, called “MindStorms,” that
focused on robotics. At the heart of these kits is the RCX, a completely programmable
LEGO “brick” with three power outputs and three sensor inputs. LEGO produces a
variety of sensors to attach to the inputs and three different kinds of motors, as well as
lights for connection to the power outputs. The RCX runs off six AA batteries, enabling it

2
to deliver 9 Volts (each battery 1.5V, hooked in series) to the motors. It can also be run
off a 120V outlet with a 120VAC to 12VAC converter.
Figure 1: RCX
The RCX is programmed through IR (infrared). The IR is sent from a tower
hooked up to a computer and received by the RCX through its IR receivers. There are a
variety of programming languages that can be used with the RCX. These including
LEGO’s own program which they sell with MindStorms, Not Quite C, and ROBOLAB
which is sold with LEGO’s educational robotics kits. ROBOLAB is ideal for this project
because the programming is graphically based instead of text based. This enables
children who are not able to read to use it. ROBOLAB is also based on LabVIEW, a
powerful data acquisition program, and retains many of LabVIEW’s capabilities.
Although the MindStorms kit is a wonderful way to teach kids about robotics, it is
limited to a dry environment, such as a classroom floor. The current kit is not capable of
going underwater, and the components would be quickly destroyed if they got wet. This
limitation gave rise to the project of developing an underwater LEGO ROV. By making a
3
new LEGO kit that allows the RCX to be used underwater, many new possibilities open
up for MindStorms.
MBARI is interested in developing a LEGO ROV because the kit could be sold as
an educational toy through the Monterey Bay Aquarium. Furthermore, the LEGO ROV
could be modeled after Tiburon, MBARI’s in house designed, real ROV. Tiburon would
provide advertising for the kit, which would be good publicity for the Aquarium and
MBARI.
The main goal of the project was to first and foremost develop a LEGO ROV that
ran off the RCX. Furthermore, the ROV was to be a prototype for a new LEGO kit to be
used in conjunction with MindStorms. The kit had to keep as many LEGO components
unchanged as possible. It would include waterproof motors, waterproof sensors, and a
tether to connect these components to a control box that worked with the RCX. This way
the ROV could be controlled manually, autonomously by the RCX, or using a
combination of both. The ROV also had to retain simplicity in its construction as to leave
open the possibility of it being built as a classroom project. All its non LEGO parts had to
be made from easily attainable materials and built using common tools.
MATERIALS AND METHODS MOTORS
The RCX is capable of outputting a maximum of 700mA and 9V through each of
its power outputs. This translates into 6.3 Watts, which is a very small amount of power.
Because of this limited power supply, LEGO manufactured motors are the most efficient
to use for the ROV because they are already rated for such a low power level.
4
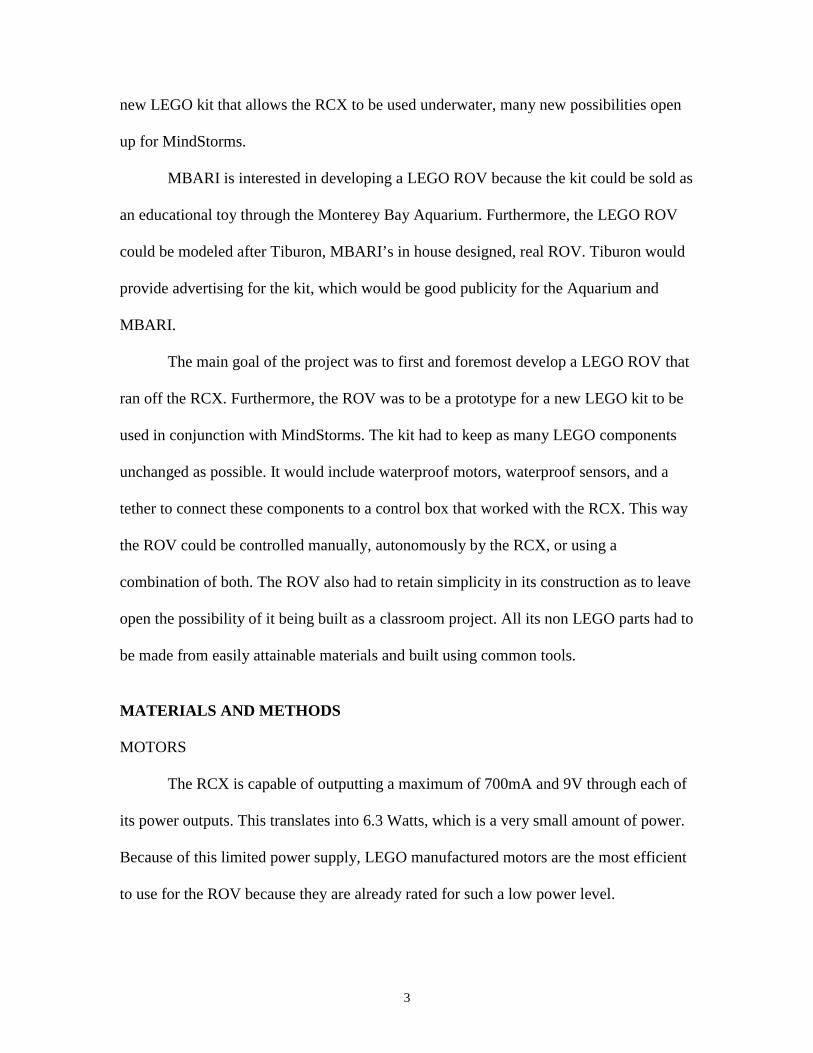
Additionally, if LEGO decides to produce the ROV as a kit in the future, they already
have the motors in production. The motors used for the project can be purchased from
LEGO’s educational distributor, www.pitsco.com.
Figure 2: LEGO motor used
The motors are waterproofed through a similar method as described in the book
Build Your Own Underwater Robot, by Harry Bohm and Vickie Jensen. First, the motor
is taken out of the LEGO casing. Next, an APS film canister is used as the motor housing.
A hole, slightly smaller than the shaft size, is drilled in it using a #49 drill. After sealing
up all the holes in the motor with either tape or hot glue, Vaseline is packed around the
shaft. When the motor is pressed into the housing, the Vaseline is spread out on the inside
face, making the seal through which the shaft passes. Because the Vaseline layer is so
thin and tightly packed between the face of the motor and the inside face of the housing,
and because the hole in the housing makes a snug fit around the shaft, a sufficient seal is
made. The rest of the motor housing cavity is filled with 3M Scotchcast which hardens
into a dense rubber. An APS film canister fits into LEGO dimensions perfectly, so a
LEGO motor brace is easily built around the motor to make it LEGO compatible.

5
Figure 3: Waterproof Motor Setup Figure 4: Finished Waterproof Motor in LEGO brace
PROPULSION
Remote control model boat props are used to propel the ROV. The props are
called “3/16” Drive Dog Props” and can be found at the hobby supplier http://hobby-
lobby.com. These props are used because they are very cheap ($1.05 to $1.30 each), work
much better than cropped airplane propellers (the props suggested in “Build Your Own
Underwater Robot”), and glue perfectly onto LEGO axels. With one motor connected to
one prop, the size “3” prop is the most efficient to use. With one motor connected to two
props, size “2” is the most efficient.
Figure 5: Prop Glued onto LEGO Axel
A serious problem encountered while developing the ROV was getting enough
vertical thrust to push it underwater. The solution is to put two outrigger thrusters on the

6
sides of the ROV where the water flow is much less restricted. One motor runs both
vertical propellers. To reduce power loss in the drive train caused by the churning of the
surrounding water, small 45o bevel gears are used. These gears work very well because
they don’t have teeth that extend outside the face of the gear, thus the teeth don’t paddle
the water as much as other LEGO gears. They are also made for 90o turns in the drive
train. For the horizontal thrusters, two motors, each with a prop directly connected, are
mounted on the back of the ROV. This way, to move the ROV forwards, the motors both
spin forwards. To move backwards, both motors spin backwards, and to turn, the motors
spin in opposite directions. With this configuration, the ROV is capable of moving in
three dimensions.
Figure 6: Thruster Configuration Figure 7: Close-up of Vertical Thruster and Bevel Gears

7
To try to further increase the efficiency of the vertical thrusters, ducted props
were designed and constructed. The thruster housings have the exact dimensions of an
8X8X4 (LXWXH) LEGO cube. They also have a ledge around the outside so that
LEGOs can be attached and built around them. The #2 “Drive Dog Prop” fits within the
housing, with the LEGO axel going through two bracing holes. The housing is made of
two pieces that press fit together. Its semi-circular shape helps capture the unique contour
of Tiburon’s foam pack, if it were to be used in a Tiburon kit.
Figure 8: Solid Works Drawing of Thruster Housing
UNDERWATER SENSORS
The RCX reads sensors by sending out 5V and then reading the voltage drop over
the sensor. The resulting voltage goes into a 10 bit A/D converter, so 0V = 0, 5V = 1023.
In order for the ROV to be able to collect data or react to its environment, it needs
sensors. Temperature and pressure sensors are important to include in order to collect
data. A light sensor fills the third sensor port on the RCX so the ROV can react to
changes in light, as in the case of getting too close to a wall.

8
The standard LEGO temperature sensor is easily adapted to the ROV because it is
already waterproofed. It has the ability to read –20oC to 50oC in increments of 0.01, or
the equivalent temperatures in Fahrenheit, as specified in the program.
The standard LEGO light sensor can be made waterproof by drilling small holes
in the bottom, and then injecting 3M Scotchcast through a syringe into them. The
Scotchcast covers the small circuit board inside and fills in the gap between the circuit
board and the sensor housing, making a seal. In ROBOLAB, light sensor reads a 0 to 100
scale; 0 being total dark, 100 being total light.
Figure 9: Bottom of Light Sensor, Showing Scotchcast Injection Holes
The pressure sensor is the most difficult sensor to make because LEGO does not
currently produce one. The circuit design used is adapted from an air pressure sensor
found at http://www.alynk.com/usr/gasperi/pressure.htm. In ROBOLAB, the pressure
sensor is programmed as a light sensor, so it reads 0 to 100 counts. The water pressure
sensor design differs from one on the internet in that a 75k instead of a 100k resistor is
used as the gain for the second op-amp. This does is makes the sensor read 5 counts at the
water surface instead of 0, so an immediate change is seen as the ROV submerges. The
water sensor also differs from the air sensor in that it uses a 15 psi gage sensor instead of
a 30 psi max differential sensor. This way the pressure sensor is ideal for use up to one

9
atmosphere (14.7 psi) which translates to 33.9 feet under water. The 15psi gage sensor
can be ordered directly from its manufacturer, Lucus Novasensor, by calling 800-962-
7346. The part number for the sensor is: NPC-410-015G-3L.
Figure 10: Circuit Diagram of Pressure Sensor
The sensor is waterproofed by casting it in 3M Scotchcast, leaving only the
pressure tube (which comes waterproof) exposed. LEGOs are used to make the mold for
the Scotchcast in order to keep the sensor in LEGO dimensions. To enable the sensor to
attach to other LEGOs, two LEGO plates are left bonded into the Scotchast
Figure 11: Pressure Sensor Circuit Board Figure 12: Sealed, Finished Pressure Sensor
10
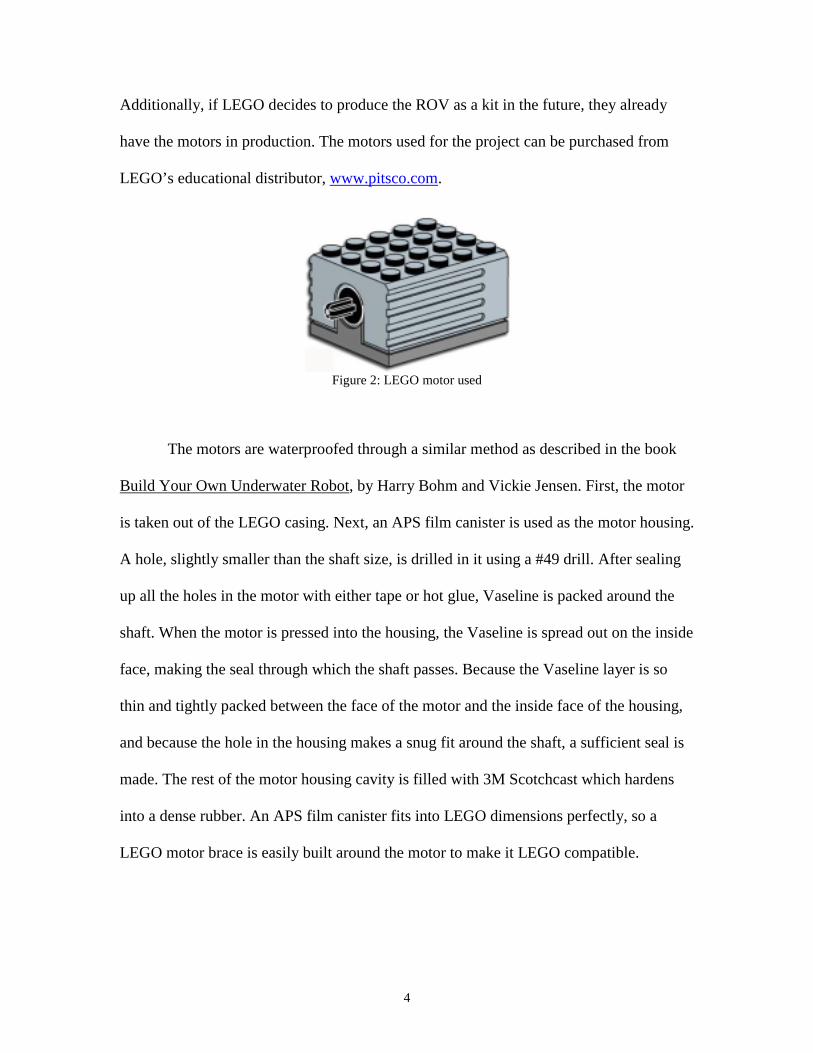
CONTROL In manual operation, the RCX delivers a constant 9V to each of its power outputs,
and the ROV’s motors are controlled by switching the current flow with Double Pole
Double Throw (DPDT) rocker switches. When the rocker switch is in its neutral position,
no current flows. When it is switched forward, the current flows and the motor turns
forwards. When the DPDT switch is switched backward, the poles are reversed, resulting
in the current flowing backwards, making the motors turn backwards. Additionally, in
each motor’s control circuit is a manual override Double Pole Single Throw (DPST)
switch to give the RCX direct control of the motor. With this switch, autonomous control
can be turned on and off for each motor individually, so the operator has the option of the
RCX controlling one function while another function is controlled manually. One
application of this ability would be the ROV hovering. The RCX would monitor the
pressure and adjust the vertical thrusters while the operator could still manually drive in
the horizontal plane.
Figure 13: Circuit Diagram of Motor Control Switches

11
The general control box design is a container for the RCX that is held with two
hands on either side. The top has the two horizontal motor control switch sets in reach of
the thumbs in addition to three subroutine switches. Each subroutine switch hooks
directly into one of the sensor inputs, and so when it is tripped it shorts out that input. In
the ROBOLAB program a shorted input will return the max value of the sensor
programmed to be hooked up to that input. When that max value is reached, the program
can be triggered to do a task. This makes it possible for a manual switch to run a
subroutine. The front of the box has the connection to the tether as well as the vertical
motor control switch set which is in reach of the index fingers. Additionally the box has
an AC adapter input on its left side. The box itself is made from a waterproof box
produced by “Otter Box.” It has a clear top so the LCD screen can be easily seen while
operating the ROV. The top is hinged and opens so the RCX can be popped in and out.
The boxes are available directly through the company at www.otterbox.com.
Figure 14: Top View and Front View of Control Box

12
The tether is made from two, six conductor Ethernet wires held together with zip
ties. Each motor and each sensor needs two conductors, which add up to a total of twelve.
The connections between the tether and a motor or sensor are sealed by being cast in 3M
Scotchcast.
UNDERWATER VIDEO CAMERA
A small video camera is on the larger, Tiburon ROV. This is made from a cheap
internet camera. This camera is ideal because all the circuitry is contained on one small
circuit board. To waterproof the camera, it is cast in 3M Scotchcast in a LEGO mold to
keep the LEGO compatibility. A flat lens is over the original camera lens to adjust for the
light refraction from water to air.
BUOYANCY
A problem with taking LEGOs underwater is that they tend to trap air. This
causes problems when the ROV goes deep and the air compresses. This means that if the
ROV is slightly positively buoyant at the surface, it becomes negatively buoyant a few
feet below. To help correct this problem, syntactic foam is used for the floatation inside
the ROV’s foam pack, which is a hollow chamber on the top of the vehicle. Syntactic
foam is most effective because it does not compress as the pressure increases underwater,
and thus provides a constant amount of lift. To balance out the lift from the foam, weights
are on the bottom of the ROV. The weights are made from shrink wrap filled with lead

13
shot. By putting a lot of weight on the bottom of the ROV, and a lot of floatation on the
top, the center of gravity is lowered towards the bottom and the center of buoyancy is
raised towards the top. This makes the ROV very stable and resistant to rolling over.
Figure 15: Syntactic foam (white) inside the ROV
The syntactic foam does not completely solve the problem of the ROV becoming
negatively buoyant underwater. Additionally, the Ethernet cable used for the tether is
negatively buoyant, so the farther it goes underwater, the more it makes the ROV sink.
To totally solve the problem of the ROV sinking, syntactic foam chunks are attached to
the tether to make it float. Through testing, it is determined that 0.63in3 of foam makes
one foot of tether neutrally buoyant. To totally fix the problem of the air compressing
inside the ROV and making it negatively buoyant, an increasing amount of foam is added
along the tether from the ROV to the control box. This way the tether becomes more
buoyant as the ROV goes deeper, balancing out the loss of lift from the compressed air
inside the LEGOs. This keeps the ROV almost perfectly neutral at any depth.
14
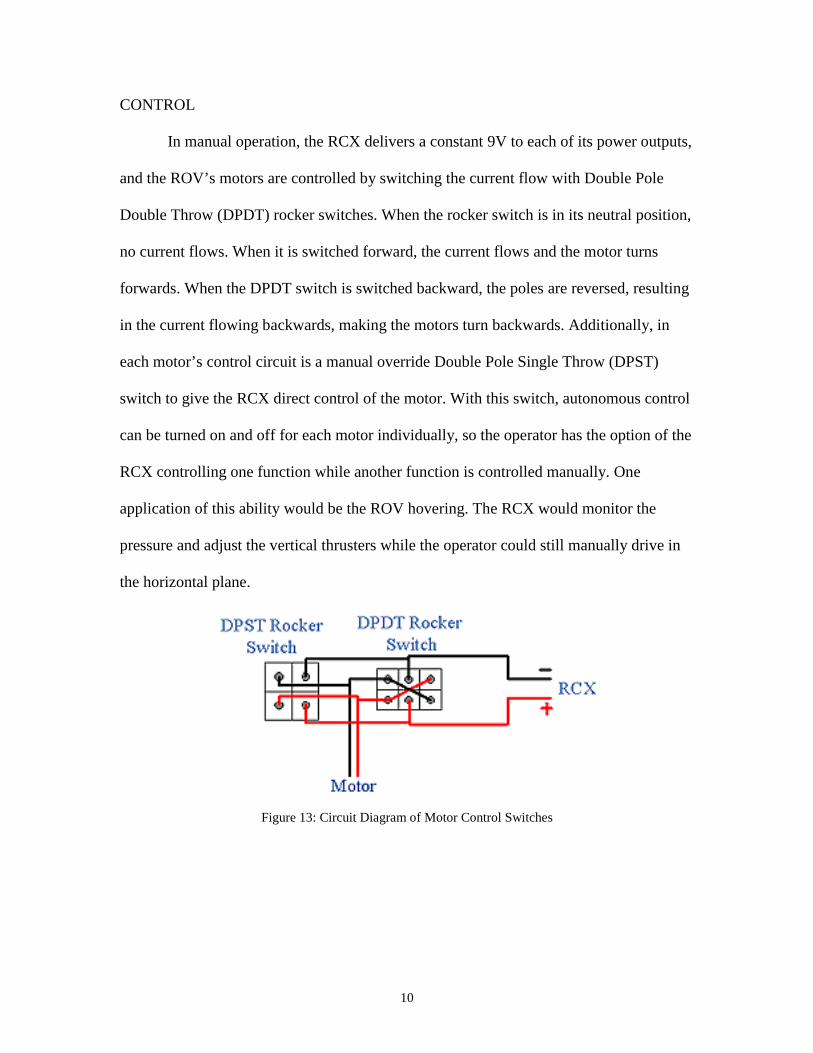
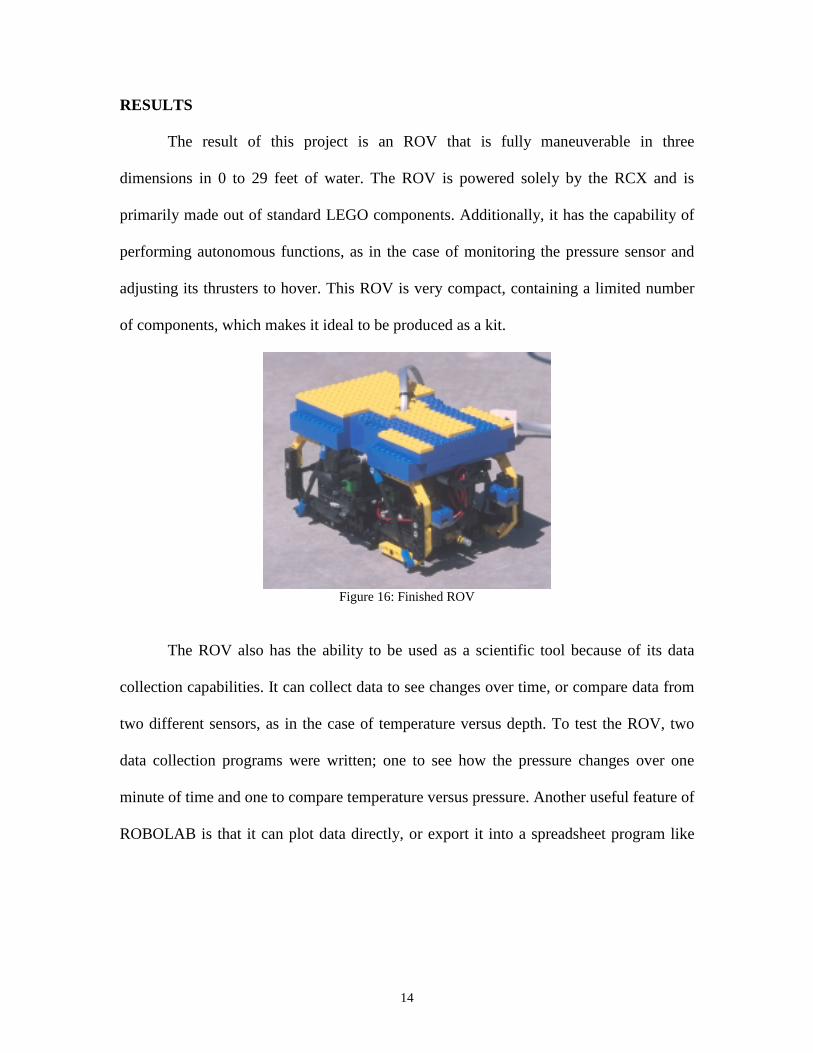
RESULTS The result of this project is an ROV that is fully maneuverable in three
dimensions in 0 to 29 feet of water. The ROV is powered solely by the RCX and is
primarily made out of standard LEGO components. Additionally, it has the capability of
performing autonomous functions, as in the case of monitoring the pressure sensor and
adjusting its thrusters to hover. This ROV is very compact, containing a limited number
of components, which makes it ideal to be produced as a kit.
Figure 16: Finished ROV
The ROV also has the ability to be used as a scientific tool because of its data
collection capabilities. It can collect data to see changes over time, or compare data from
two different sensors, as in the case of temperature versus depth. To test the ROV, two
data collection programs were written; one to see how the pressure changes over one
minute of time and one to compare temperature versus pressure. Another useful feature of
ROBOLAB is that it can plot data directly, or export it into a spreadsheet program like

15
Microsoft Excel. Both tests were conducted in the MBARI test tank. The results can be
seen in the figures below.
Figure 17: Pressure versus Time During One Minute of Hovering (Y axis labeled “Light” because of pressure sensor programmed as light sensor)
Figure 18: Temperature versus Pressure (graphed in Excell)
Temperature vs Pressure
66
67
68
69
70
71
72
0 20 40 60 80 100 120
Pressure (Counts)
Tem
pera
ture
(F)
Temperature(Fahrenheit)

16
The other ROV built is a model of Tiburon. This ROV differs from the other one
in that it has the on-board video camera, ducted thruster housings, and is much bigger.
Although this ROV looks a lot more appealing, it doesn’t perform as well in the water. It
is not powerful enough to easily move vertically. The ducted thruster housings are not
efficient because axel supports in them block too much water flow. This problem can be
easily solved by supporting the axel on only one side, and making the supports much
thinner. With some redesign, the thruster housings should be very effective. Their
compatibility with other LEGOs makes them desirable to put in a kit. The underwater
video camera works very well, even with no additional light source on board the ROV.
Figure 17: Finished Tiburon ROV CONCLUSIONS/RECOMMENDATIONS This project proved that a LEGO ROV can be built primarily with standard
LEGO components and be powered only by the RCX. The ROV is capable of being
controlled in three dimensions and operating to a depth of 29 feet. It also has the power to
perform autonomous functions, such as hovering and data collection. The small ROV
could easily be built in a classroom. All the custom parts were made from common

17
materials with no special tools. If the ROV were to be made in a classroom, I would
recommend a middle school or high school class to do it because of the dexterity and
dangerous tools needed to make some of the parts. Most importantly, the ROV is fun!
People of all ages helped test it, and everyone, from toddlers to sixty year olds, loved it.
If LEGO decided to produce the ROV as a kit, I would recommend they stick to a
design closer to the small ROV because it is a much simpler package with significantly
fewer parts than the Tiburon ROV. Ideally, the kit would be a combination of both
ROVs, with a low number of pieces like the smaller one, but with the shape and feel of
Tiburon with the thruster housing “bricks.” I would also recommend a neutral tether with
extra floatation that can be clipped on if necessary. Floatation and weighted “bricks”
should be part of the kit to make construction easier. Any combination of the ROVs
comprising a kit would undoubtedly be successful because taking MindStorms
underwater would open up numerous learning and playing possibilities.
ACKNOWLEDGEMENTS I would like to thank the following people for their help in making this project
possible: Paul McGill, Bill Kirkwood, Larry Bird, John Ferreira, Hans Thomas, Mark
Sibenac, Drew Gashler, Nicole Tervalon, Clark Brecht, Zorba Pickerill, Carolyn Todd,
Craig Okuda, Jim Scholfield, Farley Shane, Cindy Hanrahan, George Matsumoto, Chris
Rogers, and Todd Walsh.

18
References: Bohm, H.,V. Jensen (1999). Build Your Own Underwater Robot and Other Wet Projects. Westcoast Words Gasperi, M. (1998). MindStorms RCX Sensor Input Page. http://www.alynk.com/usr/gasperi/lego.htm