building a better robot
TRANSCRIPT

Building a Better RobotTips and Techniques for a great robot design
http://tinyurl.com/betterrobot

• Too much weight on non-drive wheel(s)– Hard to make turns
• Need more force to overcome more friction
• Turns can be less accurate
– Drive wheels may lose traction, skid, “burning rubber”
– Rotation sensors measure wheel rotation not robot travel!
Weight and Balance

Weight and Balance (cont.)
• Not Enough Weight on non-drive wheel(s)– Robot can pop a wheelie when starting or
stopping
– Steering becomes inaccurate, directional stability is lost
– Wheelie effect can be reduced
• Accelerate slowly
• Brake slowly

Weight and Balance (cont.)
• Too much weight on one side of robot
• Robot leans to one side, tends to steer in that direction
• Wheel on light side can slip
Weight and Balance (cont.)• Heavy Robot
– Tires can flatten, separate from rims
– Takes lots of force to start, stop, and turn
– Batteries run down faster
– Axles can become permanently bent• Especially if robot sits on its wheels for several
days

Weight and Balance (cont.)
• Long Robot (dragster)– Takes more force to turn, even if not front-
heavy
– Center of mass is natural pivot point
– Dragster: center of mass is further forward
• Weight and Balance will change when robot lifts, carries and drops objects

Strong vs. Heavy
• Sometimes the robot needs to be heavy
– “raise the house!”
• Usually, strong and light is better
– Especially on robot arms and attachments
– Consider axle beams vs. bricks
– Consider how bridges are built
• Just strong enough
– Don’t add unneeded weight or bulk
– Needs to be reliable

• If we drive a large gear with a small gear, we increase the torque but decrease the speed (that is called gearing down)
• If we drive a small gear with a large gear, we increase the speed but decrease the torque (that is called gearing up)
Gearing
Driver Gears (Green) Follower Gears
(Red)

• Gear Ratio is defined as:
# of follower’s teeth : # of driver’s teeth
• So for a gear down of 24 teeth to 8 teeth we have a gear ratio of 24:8, which can be reduced to 3:1. This means that it takes 3 revolutions of the driver gear to turn the follower gear one revolution.
Gearing (cont.)

Gearing (cont.)• Worm Gear very useful to gain lots of torque
– One revolution of worm gear moves follower gear one tooth

Gearing (cont.)• Worm Gear On Rack useful for
forklifts, changing rotation into linear motion).

Gearing (cont.)• Bevel and Crown gears useful for
changing angle of rotation 90 degrees

Gearing (cont.)• Great Gear Tutorial link in
References

Using LEGO rubber bands
• Use LEGO rubber bands to:– Keep wires out of the way
– Like springs - to hold touch sensor levers in place
– To trigger a trap– Make rubber band motors

Tires and Squishiness
• What are the best wheels and tires?
• Fat tires vs. skinny tires– Fat tires offer good traction
– Fat tires can squash under weight, change diameter
– Fat tires have a large footprint – inaccurate turning
• Big wheels vs. small wheels
– Big wheels mean higher speeds
– Big wheels may slip less than small wheels
• Dual wheels
– 2 large skinny wheels on each side (like a truck)
– Good traction, supports weight, fairly accurate turns

Wheel Size• “I want the robot to go 12 inches, how many
rotations is that?”
=(about 3.14)
Diameter X π = Distance PerOne Rotation
• If wheel diameter is 2.5 inches, one rotation is about 8 inches of travel.

Designing for Repeatability
• The best robot (and program) designs make for robust robot performance given variation that happens in a real world environment– Every Competition Table has different texture
(waves, bumps, dust, adhesion), alignment, lighting, pitch, color, models, etc.
– Robot behaves different as motors and parts age, battery level changes, etc.

Designing for Repeatability (cont.)• Reduce variation wherever possible
– Consider the battery power and motor loads
Motor Power Level
These curves show the speed of a motor vs. its load and battery voltage under several conditions. Note that as voltage changes and robot design changes, so will robot performance.See link in References for turn vs. battery power experiment one FLL team did.

Designing for Repeatability (cont.)• Consider Battery Discharge
Curve

Designing for Repeatability (cont.)• Reduce variation wherever possible
– Consider the wheel friction to the mat
– Consider different lighting conditions
– Consider variation of location of models and walls

Designing for Repeatability (cont.)• Consider using the walls for locating robot

Designing for Repeatability (cont.)• Make attachments that can handle as
much error as possible
Example of using a comb to get loops.
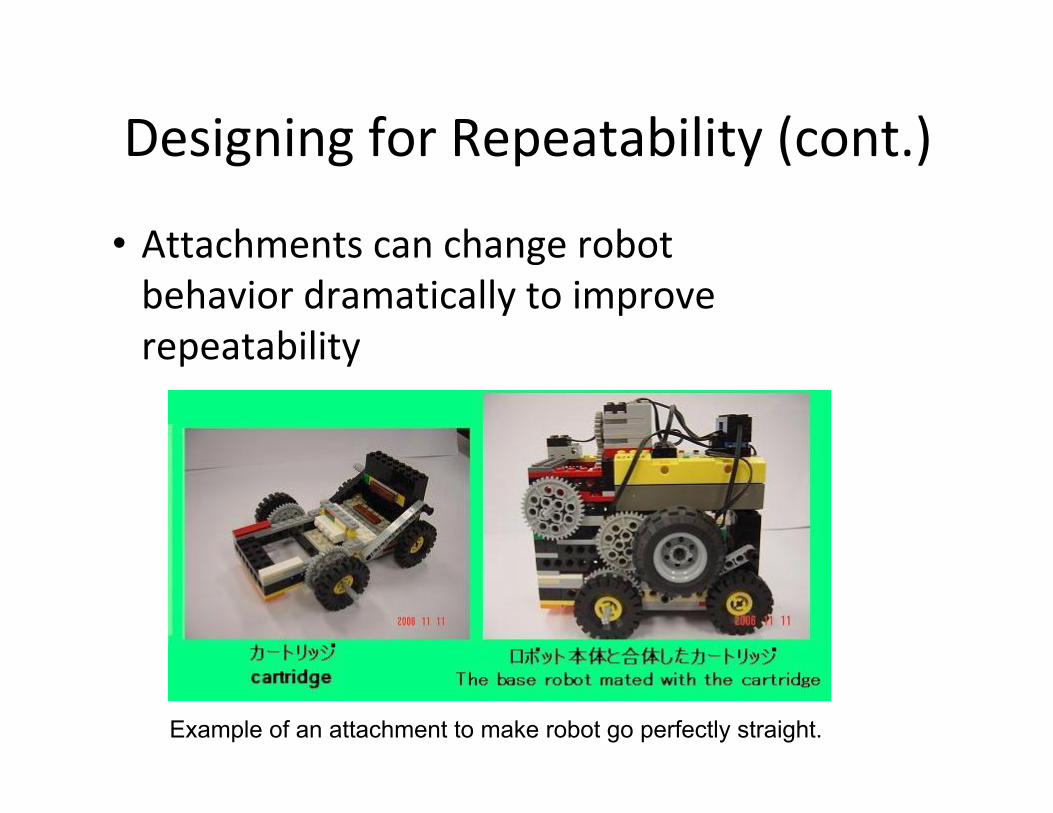
Designing for Repeatability (cont.)
• Attachments can change robot behavior dramatically to improve repeatability
Example of an attachment to make robot go perfectly straight.

Designing for Repeatability (cont.)
• Matching Motors– Better repeatability and easier to
program
– Website link in References

A Robot Design Example• Putting it all together:
Alignment Guides
• Alignment guides can be used in base, and used outside of base as well, if carried by the robot
• Useful to align onto models to perform a task
• Useful to line up robot in base to reduce variation in leaving base

Alignment Guides (cont.)

Variation Testing
• The best way to make sure that the robot is robust is to test with variations:– Slightly different starting positions
– Different mat conditions – “dusty”, just cleaned
– Different mat and model placements
– Different table tilts
– Different lighting conditions
– Different wall textures – paint vs. wax paper etc.

Robot Attachments• Consider handling variation!
• Consider doing tasks WITHOUT using the third motor
• Consider EASY TO ATTACH attachments– Use long black friction pins that won’t pull out
when attachment is removed

Robot Attachment Design Techniques
• Think of examples in construction:

Robot Attachments• Two basic categories of attachments:
– Passive (no motor)• Pushing type• Hooking type• Dumping type• Collecting type• Spring or rubber-band loaded type
– Active (motor)• Grabbing/Collecting type• Lifting type• Hooking type• Dumping type

Passive Pushing Robot Attachment• Great for pushing mission models
around

Passive Hooking Robot Attachment
• Great for gathering objects

Passive Dumping Robot Attachment
• A way to move mission objects from base to some location on the field. Doesn’t require a motor to activate; robot just “bumps” the trigger into something.

Passive Collecting Robot Attachment
• Great for bringing mission objects back to base
• Think of how to have trap door open only one direction

Spring (Rubber Band) Loaded Design
• A way to get an action without need for a motor

Active Grabber Attachment
• Great for collecting objects in multiple places on the field

Active Lifting Attachment• This Forklift attachment uses worm gears for strength in
lifting
• Gears are often used for powered attachments to provide torque and slower speed
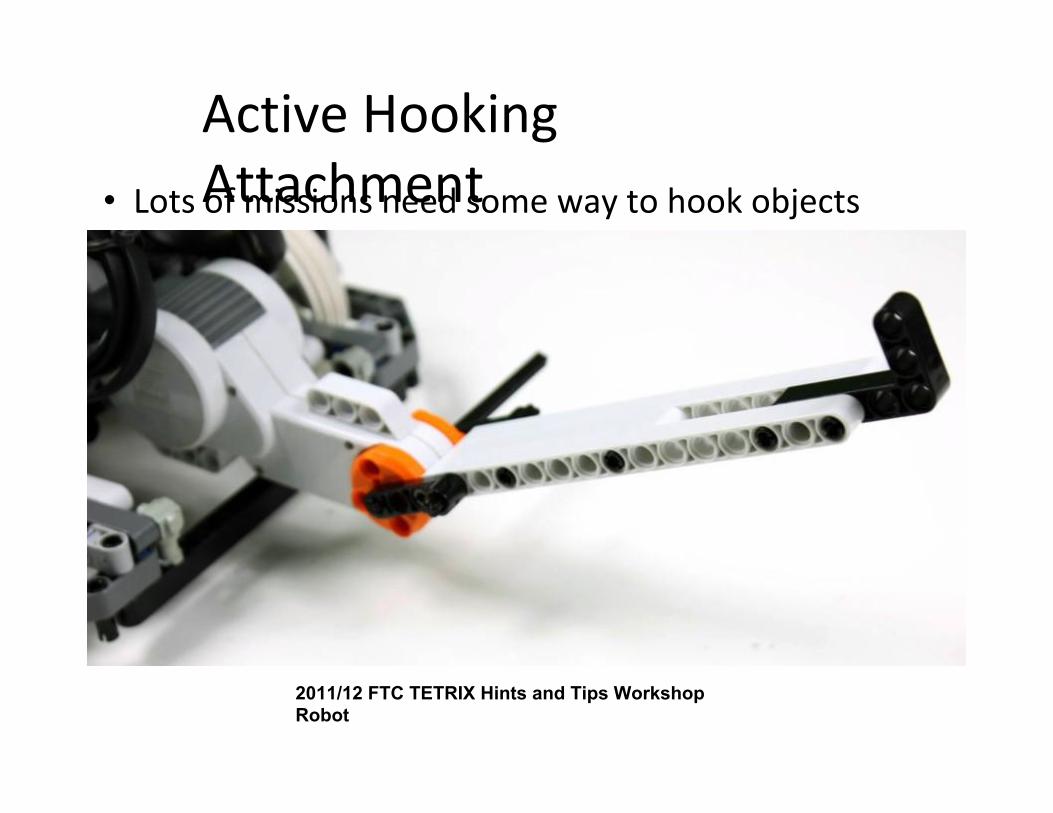
Active Hooking Attachment• Lots of missions need some way to hook objects
2011/12 FTC TETRIX Hints and Tips Workshop Robot

Other Examples

Complicated Attachment

Attachments (cont.)
Rubic Cube Solver – You can build anything from LEGOs!

References• Brick Link: Buying LEGO parts
– http://www.bricklink.com/
• Matching Motors: Better robot handling
– http://www.techbrick.com/Lego/TechBrick/TechTips/NXTC alibration/
• NXT Battery Voltage Experiment: Turn repeatability experiment
– http://www.ieeereliability.com/Newsletter/1_2010/Article 1.htm
• LEGO Gearing Tutorial
– http://sariel.pl/2009/09/gears-tutorial/
References (Continued)• Designing for FLL and LEGO Hints and Tips presentation
– http://www.syraweb.org/resources.htm
• Winning Design! LEGO Mindstorms NXT, David J. Trobough
• FLL Robot Design Workshop, Tool Design and Mechanism presentation ,Dr. C. H. Lin– www.neohstem.org/assets/pdf/FLL%20Robot%20Design%
20Workshop

Presentation Authors:
• Scott Gray– [email protected]
• Coleman Ellis– [email protected]
• Joseph Scheidemandel– [email protected]
• Adam Gray– [email protected]