build your own wifi internet radio – craig a. lindley
TRANSCRIPT

Build Your Own Wifi Internet Radio – Craig A. Lindley – Last Update: 08/21/11
I am writing this article while setting in my living room listening to music over my Wifi network streamed from a radio station in Europe. With my iPod Touch, I can select the station I am listening to, I can see the name of the artist and song being played, I can control the volume of the music and can even mute the music altogether if I get a phone call. And I can do all this without having to touch the Wifi Internet Radio (WIR) I've just finished building. Ah, life is good.
I had never listened to Internet radio so I didn't know what I was missing. Since completing my WIR it has played continuously whenever I am at home. With WIR you are not limited to radio stations you can pull in over the air from your location. Instead, you have access to hundreds if not thousands of stations world wide playing a wide variety of program material including music in every genre, news, talk radio, religious broadcasts, sports, comedy and probably other things I haven't yet discovered. While flipping through the stations on my WIR it occurred to me that this is just like the listening I used to do late at night with my Father on his short-wave radio. I had the world available at my fingertips then and with WIR I do again.
When I caught the urge to listen to Internet radio I first thought of buying a ready made unit but after some research on the Internet I decided I should build one instead. Besides saving money, building instead of buying a WIR would add substantially to my creds as a serious maker and as everyone knows, makers are the new rockstars.
In researching WIR I came across mightyohm.com (see Resources) and its WIR build. I would like to thank Jeff at mightyohm.com for providing the information and encouragement needed to build a WIR. The WIR Jeff presented was based on a repurposed ASUS WL-520gu router (with a USB interface) which can be purchased at Amazon, eBay or NewEgg for around $30 after rebate and sometimes even cheaper. A USB sound card/adapter is also required. In the finished configuration the USB sound adapter plugs into the USB interface of the router and converts the streamed digital audio into analog for subsequent amplification.
With the Internet music production component (the repurposed ASUS router) defined, I went about designing the rest of the system to fit my personal requirements. Since I wanted the WIR in our living room it had to look nice and fit in with the other living room furniture I built in the past. This meant the cabinet needed to be made of dark hardwood with black highlights. Next, I wanted a radio with a built in stereo amplifier and speakers but without a display or knobs and I also didn't want cords running from it for connection to my existing stereo system. In other words, I wanted a stand alone unit requiring nothing more than a power connection as this would allow me to move the radio anywhere (inside or outside the house) where Wifi and power are available.
I thought a lot about speakers and speaker enclosures during the design process. Fidelity was important to me but so was saving money. I had the option of buying individual speakers (a woofer and tweeter for each channel) and designing a cabinet to house them but good quality speakers are expensive and designing speaker cabinets is an art I have little experience with. It was then I remembered I had a pair of Radio Shack Realistic Minimus 7 speakers which I have had for years that have always sounded good for their size. Even after deciding to incorporate these speakers into my WIR I still had another decision to make. I could either include these speaker enclosures in my WIR cabinet or I could
Page 1

Build Your Own Wifi Internet Radio – Craig A. Lindley – Last Update: 08/21/11
cannibalize the components (the speakers, the crossovers, the acoustic batting) and reproduce the speaker cabinets out of wood in my cabinet. For simplicity I decided on the former and designed cavities in my cabinet for the speakers to slide into. In the end I epoxied the Minimus 7 speakers into the finished cabinet to prevent spurious vibrations from affecting the sound.
Amplification was the next design decision to make. The Minimus 7 speakers have a maximum rating of 40 watts so I knew I didn't want to exceed that. In terms of amplifier technology, I had been reading about Class D digital amplifiers and was eager to try them out. A quick Internet search lead me to Sure Electronics Class D stereo amplifier modules available from parts-express.com at a very reasonable price. After reading the positive reviews I was sold on the idea and purchased the 2 x 15 watt amplifier module and its power supply. I thought 15 watts RMS per channel was probably enough power for my WIR and it has turned out to be so. Interestingly, the amplifier module doesn't have heat sinks as they are unnecessary due to the efficiency of the Class D design.
Figure One shows the block diagram/schematic of the WIR I had in mind and Figure Two shows the parts list.
With all of the components of the WIR selected I went ahead and designed a cabinet to hold it all. Figures Five, Six and Seven show the cabinet I built which scored a two thumbs up rating from my wife. The only control on the radio is a power switch on the rear of the unit and the only indicator is a blue LED on the front to show that power is on.
MPD, MPC - The Big Picture
Having just described the hardware aspects of the WIR we now turn our attention to the software that makes Internet radio streaming possible. In our WIR application, the router's firmware is replaced with OpenWrt, a Linux distribution for embedded devices with limited memory. OpenWrt provides a basic Linux operating system with built in networking, a writable filesystem and package management. Once OpenWrt is operational on the router's hardware, USB sound drivers and the MPD and MPC packages (to be discussed shortly) are installed. Then, after tweaks are made to various configuration files, the router will be capable of streaming Internet radio. A step by step procedure for repurposing the router will be presented in the next section.
As you may have guessed the MPD (music player daemon) and MPC (music player client) packages are key to Internet radio operation on the repurposed router. MPD is a Linux server application for playing music that accepts connections and commands from MPC applications running locally or remotely. Using plugins and libraries, MPD can play a variety of sound formats while being controlled by its network protocol. For those interested, a link to MPD information can be found in Resources.
An MPC application directs the operation of the MPD server by connecting to it at a specific IP address and port number (typically at port 6600) and subsequently passing text based commands to it. MPD processes the commands then returns information to the client. In some cases only the success or failure of the command execution is returned. In other cases text based data is returned (e.g. the content of the current play list) to the MPC from the MPD.
Strictly speaking, the MPC package doesn't need to remain on our repurposed router as it is used only for testing purposes and not used at all when the WIR is being controlled by a remote MPC. That being
Page 2

Build Your Own Wifi Internet Radio – Craig A. Lindley – Last Update: 08/21/11
said the presence of MPC does no harm either. It should also be mentioned that we are using just a small fraction of MPD's capabilities in our WIR application.
Any MPC program can be used with this WIR. However most MPC programs are overkill as they are designed for MPD servers which, in addition to playing Internet radio stations, host complete digital music collections. This is not possible with our arrangement as there is little mass storage available on the router for the digital audio files of a music collection.
For this reason I decided to develop an iPhone/iPod Touch/iPad MPC app specifically for this WIR. The app called, “Internet Radio MPC” is available in the Apple App Store. Complete information about this app is available on line. Again, see Resources for a link.
Figure Three shows the main user interface of the Internet Radio MPC app. Other portions of the user interface, not shown, are used for adding and deleting radio stations.
Using a smartphone based MPC with this WIR is very convenient as you can control the radio from anywhere your Wifi signal is available and you don't have to point your mobile device at the radio like you do with IR type remote controls.
Repurposing the ASUS WL-520GU Router
I'm sure there are numerous ways to do this repurposing but I will describe the process and tools I used because it worked for me. Please note:
1. A computer running Windows is required. I used my MacBook Pro configured with BootCamp to run Windows 7.
2. The router's warranty is null and void once you replace its firmware.3. If you are not comfortable working in the Linux environment (e.g. logging in as root, running
the vi editor, etc.) you may want to find someone who is and have them do the repurposing for you or at least assist you.
4. You need to have the SSID of your Wifi network available and, if you are using encryption for security, you need to know which kind and the encryption key.
Carefully follow the steps outlined below to perform the repurposing. If things don't work as described, you can start over from step 3 as many times as necessary to get it right. There is very little possibility you will get the router into a state from which you cannot recover by starting over.
1. Download this article's zip file from Nuts & Volts and unzip it. It should contain (among other things) the router firmware restoration utility program (wl520.zip) which will allow us to load new firmware onto the router, the OpenWrt firmware image (openwrt-brcm-2.4-squashfs.trx) we will be loading and Putty (putty.exe) which will allow us to telnet and ssh into the router once its firmware is replaced.
2. Unzip and install the router firmware restoration utility on your Windows computer.
3. Go to network connections on your PC, right click on the local area network connection and
Page 3

Build Your Own Wifi Internet Radio – Craig A. Lindley – Last Update: 08/21/11
selected Properties. Then click on Internet protocol and click Properties again. Choose “Use the following IP address” and enter these values:
IP address: 192.168.69.10Subnet mask: 255.255.255.0
and click OK. If your computer has other network connections, disable them temporarily.
4. Plug an ethernet cable into your computer and into the Lan 1 port on the router.
5. Put the router into firmware restoration mode by unplugging it and depressing the restore button on the rear panel while reconnecting its power. The power light will blink if all is well.
6. Execute the router restoration utility previously installed on your PC and browse to the location of the OpenWrt firmware. Select it and click Upload. You should see the progress bar advance as the firmware is uploaded to the router. If you have a problem uploading the firmware you may have to disable your PC's firewall and try again.
7. Go back to your Network Properties and reset it so it obtains its IP address automatically.
8. Unplug the ethernet cable from the router, wait a minute and plug it back in so that it obtains a new IP address.
9. Start Putty, select Telnet and type in 192.168.1.1 and click Open. If all is well you should see the OpenWrt startup screen and the command prompt root@OpenWrt:/#.
10. Create a password for the root user by typing passwd. I used internetradio as my password.
11. Restart Putty and specify an ssh connection to IP address 192.168.1.1.
12. Click yes to the dialog box that pops up and login as root using the password you just created. You should again see the OpenWrt startup screen and command prompt.
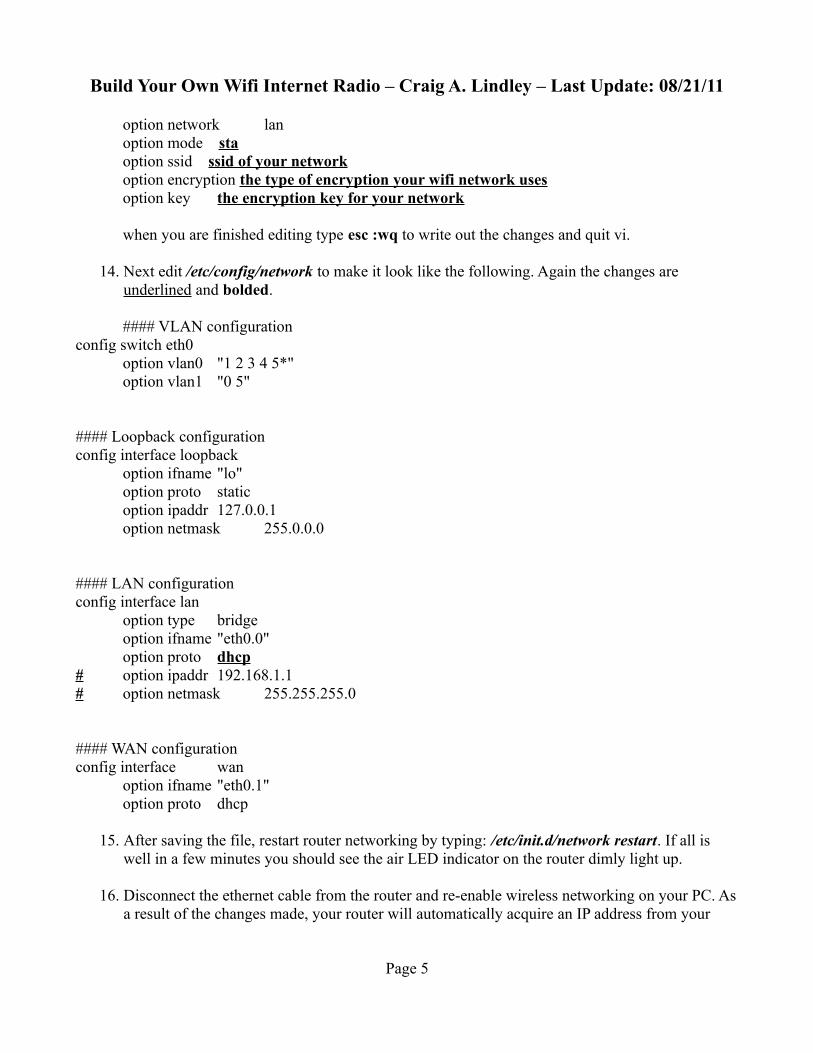
13. To enable wireless operation, use vi to edit the file /etc/config/wireless. Type vi /etc/config/wireless at the command prompt and modify your file to make it look like the following. The required changes are underlined and bolded.
config wifi-device wl0option type broadcomoption channel 5
# REMOVE THIS LINE TO ENABLE WIFI:# option disabled 1
config wifi-ifaceoption device wl0
Page 4
Build Your Own Wifi Internet Radio – Craig A. Lindley – Last Update: 08/21/11
option network lanoption mode sta option ssid ssid of your network option encryption the type of encryption your wifi network usesoption key the encryption key for your network
when you are finished editing type esc :wq to write out the changes and quit vi.
14. Next edit /etc/config/network to make it look like the following. Again the changes are underlined and bolded.
#### VLAN configuration config switch eth0
option vlan0 "1 2 3 4 5*"option vlan1 "0 5"
#### Loopback configurationconfig interface loopback
option ifname "lo"option proto staticoption ipaddr 127.0.0.1option netmask 255.0.0.0
#### LAN configurationconfig interface lan
option type bridgeoption ifname "eth0.0"option proto dhcp
# option ipaddr 192.168.1.1# option netmask 255.255.255.0
#### WAN configurationconfig interface wan
option ifname "eth0.1"option proto dhcp
15. After saving the file, restart router networking by typing: /etc/init.d/network restart. If all is well in a few minutes you should see the air LED indicator on the router dimly light up.
16. Disconnect the ethernet cable from the router and re-enable wireless networking on your PC. As a result of the changes made, your router will automatically acquire an IP address from your
Page 5
Build Your Own Wifi Internet Radio – Craig A. Lindley – Last Update: 08/21/11
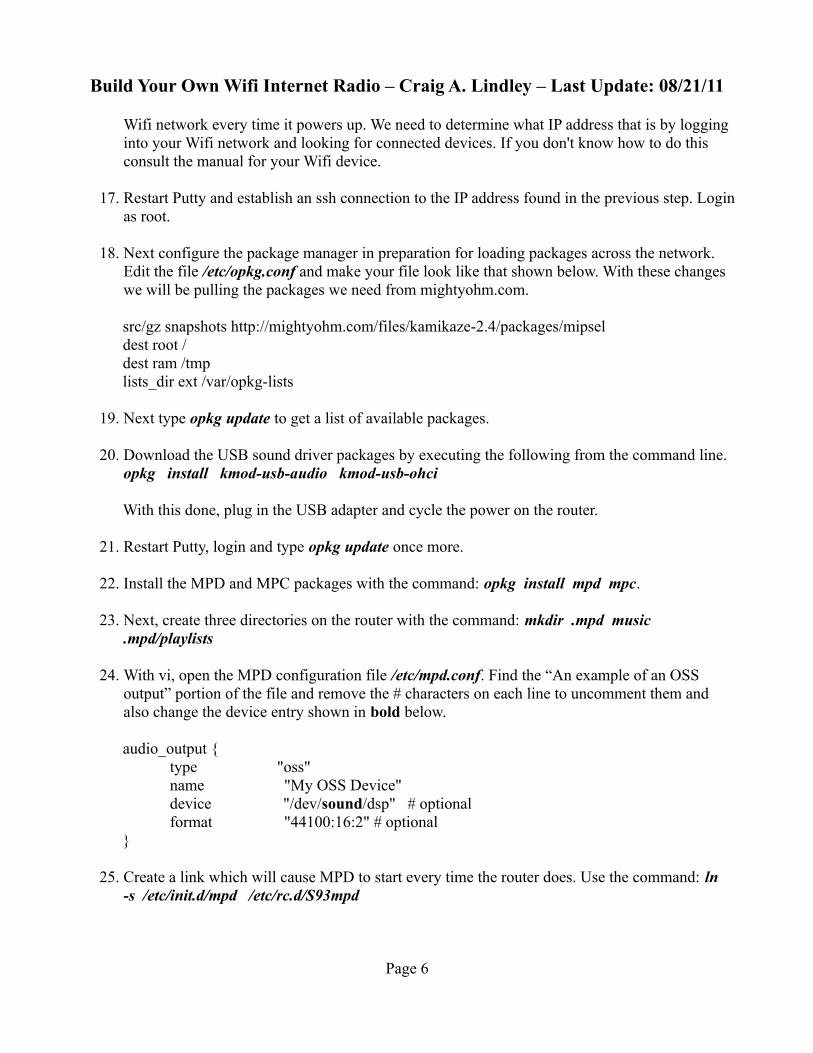
Wifi network every time it powers up. We need to determine what IP address that is by logging into your Wifi network and looking for connected devices. If you don't know how to do this consult the manual for your Wifi device.
17. Restart Putty and establish an ssh connection to the IP address found in the previous step. Login as root.
18. Next configure the package manager in preparation for loading packages across the network. Edit the file /etc/opkg.conf and make your file look like that shown below. With these changes we will be pulling the packages we need from mightyohm.com.
src/gz snapshots http://mightyohm.com/files/kamikaze-2.4/packages/mipseldest root /dest ram /tmplists_dir ext /var/opkg-lists
19. Next type opkg update to get a list of available packages.
20. Download the USB sound driver packages by executing the following from the command line. opkg install kmod-usb-audio kmod-usb-ohci
With this done, plug in the USB adapter and cycle the power on the router.
21. Restart Putty, login and type opkg update once more.
22. Install the MPD and MPC packages with the command: opkg install mpd mpc.
23. Next, create three directories on the router with the command: mkdir .mpd music .mpd/playlists
24. With vi, open the MPD configuration file /etc/mpd.conf. Find the “An example of an OSS output” portion of the file and remove the # characters on each line to uncomment them and also change the device entry shown in bold below.
audio_output { type "oss" name "My OSS Device" device "/dev/sound/dsp" # optional format "44100:16:2" # optional
}
25. Create a link which will cause MPD to start every time the router does. Use the command: ln -s /etc/init.d/mpd /etc/rc.d/S93mpd
Page 6

Build Your Own Wifi Internet Radio – Craig A. Lindley – Last Update: 08/21/11
26. Start the daemon by typing mpd. If you get a error message about not being able to open the database, you can ignore it.
27. Execute the music player client program by typing mpc. If you get the following response volume: 100% repeat: off random: offyou are good to go and the repurposing of the router is complete.
28. For the ultimate test, connect headphones or an amplifier and speakers to the output of the USB sound adapter and set a low volume level. Then execute the following series of commands.1. mpc volume 252. mpc add http:// 64.40.99.2:8088 3. mpc playif all is well you should hear the Beatles.
Locating Internet Radio Stations
MPC programs requires a Universal Resource Locator or URL to play a streaming radio station. Finding URLs of stations is easy in some cases and difficult in others. Some broadcast stations will publish a playlist file on their web site in either .pls or .m3u formats. .pls playlists have a format similar to a Windows .ini file. A typical example is shown below:
[playlist]numberofentries=2File1=http://88.191.111.120:8006Title1=(#1 - 39/2000) Cool93 FahrenheitLength1=-1File2=http://203.150.224.142:8000Title2=(#2 - 1950/5000) Cool93 FahrenheitLength1=-1Version=2
Two different URLs are supplied for the same station in this file. The URLs are contained in the File entries and are of the form http://IPAddress:Port. URLs in .m3u playlist files are specified in the same way.
Shoutcast.com is a great source of playlist files for hundreds if not thousands of internet radio stations. The nice things about shoutcast.com are the stations are arranged by genre and they also show the bit rates used for streaming. In general the higher the bit rate the better the quality of audio. This is of course at the expense of using more bandwidth on your Internet connection.
While on the shoutcast site, click on the name of the station you are interested in and you will get a playlist file downloaded to your computer. Open the playlist file in a text editor and extract the station name from the Titles line and the URL(s) from the Files line. Once your have the URL of an Internet radio station you supply it to an MPC program and it, in turn, conveys it to the MPD for streaming.
Packaging the WIR
Whereas I had rather strict requirements for my WIR in terms of packaging, you have a lot of options
Page 7

Build Your Own Wifi Internet Radio – Craig A. Lindley – Last Update: 08/21/11
for an WIR you might build including:
1. No packaging at all. Here, the USB sound adapter is plugged into router and the router's power adapter is plugged into the wall. Powered external speakers would be plugged into the USB adapter or the USB adapter would be connected to an existing stereo system via appropriate cables.
2. Packaging the router, USB adapter and power amplifier in a small enclosure with connectors for external speakers.
3. If you have an old time radio or a juke box you might consider building the WIR into that. 4. Building a cabinet for all components which also functions as a stereo speaker cabinet. This
would require one to know about speaker cabinet and electronic crossover design and would make the cabinet more complex to build.
5. Or you could do as I did and build a cabinet for all components with cavities on each side large enough to accommodate pre-made speakers (in enclosures) to be installed.
I used Google SketchUp (a free 3D CAD program) to design the cabinet I ended up building. A rendering of the cabinet is shown in Figure Four. The cabinet design file is available from Nuts and Volts for those people who would like to use my design as a starting point for theirs. The dimensions of each piece of the cabinet can be found using the dimensioning tool within SketchUp.
Speaker Cabinet Parts List
Description Part Number Source
Hardwood for top and bottom I used walnut but any nice wood could be used. The top and
bottom pieces of the cabinet are identical and are 3/4” thick.
Woodcraft
1/2” MDF for cabinet carcass N.A. Home Depot
Speaker Grill Cloth - Black #260-335 parts-express.com
I stained the top and bottom hardwood pieces and then used paste wax to bring up the shine. The carcass of the cabinet was made from 1/2” MDF which, after being glued together with biscuits, was painted black so as not to be visible through the grill cloth which wraps the cabinet. After cabinet construction was complete, I epoxied the speaker enclosures and router in place. All electronic items (except the router) were mounted on the removable back panel for easy maintenance as shown in Figure Seven. The power adapters were epoxied to the rear panel and the amplifier circuit board was mounted on short standoffs. Power and audio wire lengths were kept as short as practical to limit hum and noise pickup.
Conclusions
Building this WIR and the accompanying iPhone app was not only fun, but resulted in a device I will
Page 8

Build Your Own Wifi Internet Radio – Craig A. Lindley – Last Update: 08/21/11
use for years to come. One enhancement I may make in the future is a mute circuit that prevents a pop when power is first applied to the radio. Other than that, this WIR matches my requirements for functionality and aesthetics and I hope you get a chance to build one for yourself.
Page 9

Build Your Own Wifi Internet Radio – Craig A. Lindley – Last Update: 08/21/11
Figure OneSchematic/Block Diagram of the WIR
Figure TwoParts List
Designation Description Part Number Source
USB1 Syba USB Stereo Audio Adapter SD-CM-UAUD amazon.com or ebay.com
R1 ASUS Wireless Router WL-520GU amazon.com, newegg.com or
ebay.com
PA1 Router power adapter supplied with router
N.A. N.A.
A1 Sure 2x15W @ 4 Ohm TA2024 Class-D Audio Amplifier Board*
#320-308 parts-express.com
PA2 Sure 12 VDC 3A Power Adapter # 320-312 parts-express.com
LED LED power indicator Color of your choosing. superbrightleds.com
Page 10
Wireless Internet Radio Block Diagram
Router power adapter
Sure 2x15W Audio Amplifier
USBSoundAdapter
WL-520GU Router
Amplifier power adapter
Speakers of your choosing
AC power
Power on LED
PA1
PA2
R1
A1
SW1
USB1

Build Your Own Wifi Internet Radio – Craig A. Lindley – Last Update: 08/21/11
Designation Description Part Number Source
(used with a 1K resistor across the 12 VDC supply PA2 to limit
brightness)
I used blue.
SW1 110V Power Switch SPST, SPDT or DPDT
N.A. Radio Shack or allelectronics.com
Speakers Any stereo speakers you want to use. I used the Radio Shack
Realistic Minimus 7 speakers I had on hand. Note, the better the quality of the speakers, the better
your WIR will sound.
Realistic Minimus 7 Many pairs of Minimus 7 speakers are available
on eBay.
* The class D stereo amplifier module is available in 2 , 8, 15, 25 and 100 watt sizes. I used the stereo 15 watt module in this build.
Figure ThreeInternet Radio MPC iPhone/iPod Touch/iPad App
Page 11

Build Your Own Wifi Internet Radio – Craig A. Lindley – Last Update: 08/21/11
Figure Four Google SketchUp Model of the WIR cabinet
Figure FiveFront View of Finished WIR Cabinet
Page 12

Build Your Own Wifi Internet Radio – Craig A. Lindley – Last Update: 08/21/11
Figure 6 Rear View of Finished WIR Cabinet
Page 13

Build Your Own Wifi Internet Radio – Craig A. Lindley – Last Update: 08/21/11
Figure SevenElectronics mounted on the Removable Rear Panel
Resources
Resource Link
Mighty Ohm Internet Radio build mightyohm.com/blog/2008/10/building-a-wifi-radio-part-1-introduction/
Instructables Internet Radio build www.instructables.com/id/Build-your-own-Wifi-radio/
Google SketchUp Information sketchup.google.com/
Page 14

Build Your Own Wifi Internet Radio – Craig A. Lindley – Last Update: 08/21/11
Resource Link
Information about the InternetRadioMPCiPhone/iPod Touch/iPad app
clockwork.craigandheather.net/internetradio.html
Information about the OpenWrt Linux distribution for embedded systems
openwrt.org
The Music Player Daemon Protocol www.musicpd.org/doc/protocol/
BIOCraig is a retired hardware/software engineer who gets to design and build whatever projects he wants to. He lives in the mountains of Colorado and can be contacted at [email protected]. When not messing about with electronics and/or computer projects, he does a solo acoustic act around Colorado Springs.
Page 15