build your own sap fiori app in the cloud exercise week 5
TRANSCRIPT

BUILD YOUR OWN SAP FIORI APP IN THE CLOUD
Exercise Week 5 Create an App from a Smart Template and Annotation File
1 INTRODUCTION
1.1 Goal
Smart Templates in the SAP Web IDE of the SAP HANA Cloud Platform is an approach to create SAP Fiori applications based on OData services and Annotations requiring no JavaScript UI coding. An app, that is based on smart templates uses predefined template views and controllers that are provided centrally. As a result, no application-specific view instances are required. The SAPUI5 runtime understands the metadata and annotations of the underlying OData service and uses the corresponding views for the SAP Fiori app at start up.
1.2 Exercise Description
In this exercise, you will
create a Smart Template application from a template in the SAP Web IDE (using an SAP Gateway Service or a local schema file)
enhance the Smart Template application by changing the Annotation File with the Annotation Modeler
Note This exercise is based on SAPUI5 version 1.34. All screenshots are based on SAP Web IDE version 160324 (that means March 24, 2016). Future versions of SAP Web IDE might look different. SAP Web IDE supports numerous browsers, however, the Google Chrome browser is highly recommended for all exercises.

openSAP
Copyright/Trademark
1.3 Prerequisites
You have downloaded the ES4_GWSAMPLE_BASIC_0_annotations.xml file from the openSAP course page.
You have an SAP HANA Cloud Platform (HCP) trial account and work in your SAP Web IDE trial. There are two options to carry out this exercise:
You want to work with real backend data from the ES4 system (start with chapter 2.1). Therefore, you
need a user in the ES4 SAP Gateway system and set up this destination in your SAP HANA Cloud Platform (HCP) account as described in the System Onboarding Guide provided in week 4.
You want to work with mock data and a local schema file (start with chapter 2.2). In this case, you have to additionally download and use the schema file ES4_GWSAMPLE_BASIC.edmx.
1.4 Further Information
Generally, SAP recommends having the annotation as Core Data Service (CDS). As a second option, the implementation can be done within an OData service. The reason is that the lifecycle of the annotations is close to the data definition. To ensure that in this course all learners can do the entire exercise, the annotations are based on a local file as part of the example project. In a customer project, a local annotation file is used to selectively overwrite annotations that come from a backend system. For more information on Smart Template applications, see https://sapui5.hana.ondemand.com/#docs/guide/03265b0408e2432c9571d6b3feb6b1fd.html.

openSAP
Copyright/Trademark
2 CREATE A SMART TEMPLATE APP FROM TEMPLATE
2.1 Create App with an SAP Gateway Service
This chapter describes how to create a Smart Template application based on an SAP Gateway service from the ES4 SAP Gateway Demo Consumption system.
Note
In case, you cannot or do not want to work with an SAP Gateway service, you can skip this chapter and continue with the optional chapter 2.2.
Explanation Screenshot
1. Launch SAP Web IDE, with the
Google Chrome browser.
2. On the Welcome screen, create a new project by choosing the tile Project from Template.
Note
Alternatively, choose File → New → Project From Template from the top
menu.
3. In the Template Selection step of the wizard, search for the Smart Template Application tile.
4. Select the Smart Template
Application tile.
5. Click the button Next to continue.
6. In the step Basic Information,
provide the following details:
Project Name SmartTemplateExercise
Title Smart Template
Description openSAP exercise
7. Click the button Next to continue.

openSAP
Copyright/Trademark
Explanation Screenshot
8. In the step Data Connection, a data source is needed. Under Sources, select Service Catalog.
9. Choose the ES4 backend system
from the Service Information dropdown. If prompted, enter your credentials in the pop-up.
10. Search for and finally select the service GWSAMPLE_BASIC from
the list with available OData services that come from the ES4 SAP Gateway Demo Consumption system.
11. Click the button Next to continue.
12. In the step Annotation Selection,
an annotation must be defined. Click on the link + Add Annotation Files
13. From the dropdown, select File
System.
Note
For this exercise, the annotation information comes from a local file. In a customer project, the annotation comes from the backend system.
14. In the dialog box Add From File System, choose Browse… and
open the file you downloaded from the openSAP page: ES4_GWSAMPLE_BASIC_0_annotations.xml
15. Confirm with OK.
16. In the current wizard step, click the
button Next to continue.

openSAP
Copyright/Trademark
Explanation Screenshot
17. In the step Template Customization, go to the field OData Collection and select ProductSet from the dropdown.
18. Click the button Next to continue.
Note
After selecting ProductSet in the
OData Collection field, the OData Navigation field gets automatically updated with ToSalesOrderLineItems.
19. In the step Confirmation, click the button Finish to finalize the project
creation based on a Smart Template application template.
20. Now, in your SAP Web IDE Workspace, the new folder SmartTemplateExercise was
created. You can check out the files that were created. You may note that there are neither views nor controllers and only a few files contain code inside the project folder. Yet, you can still change the app - even without developing in JavaScript and others. See the following steps for some examples.

openSAP
Copyright/Trademark
2.2 Create App with a Local Schema File
This optional chapter describes the alternative way how to create a Smart Template application based on a local schema file.
Note
If you have already created your Smart Template application in chapter 2.1, you can skip this step.
Explanation Screenshot
1. Launch SAP Web IDE, with the
Google Chrome browser.
2. On the Welcome screen, create a new Project by choosing the tile Project from Template.
Note
Alternatively, choose File → New → Project From Template from the top
menu.
3. In the Template Selection step of the wizard, search for the Smart Template Application tile.
4. Select the Smart Template
Application tile.
5. Click the button Next to continue.
6. In the step Basic Information,
provide the following details:
Project Name SmartTemplateExercise
Title Smart Template
Description openSAP exercise
7. Click the button Next to continue.

openSAP
Copyright/Trademark
Explanation Screenshot
8. In the step Data Connection, you need to set the data source. Under Sources, select File System.
9. Choose the button Browse and
open the previously downloaded file you got from the openSAP page ES4_GWSAMPLE_BASIC.edmx.
10. Click the button Next to continue.
11. In the step Annotation Selection,
an annotation must be defined. Click on the link + Add Annotation Files
12. From the dropdown, select File
System.
Note
For this exercise, the annotation information comes from a local file. In a customer project, the annotation comes from the backend system.
13. In the dialog box Add From File System, choose Browse… and
open the file you downloaded from the openSAP page: ES4_GWSAMPLE_BASIC_0_annotations.xml.
14. Confirm with OK.
15. In the wizard step, click the button
Next to continue.
16. In the step Template Customization, go to the field OData Collection and select ProductSet from the dropdown.
17. Click the button Next to continue.
Note
After selecting ProductSet in the
OData Collection field, the OData Navigation field gets automatically updated with ToSalesOrderLineItems.

openSAP
Copyright/Trademark
Explanation Screenshot
18. In the step Confirmation, click the button Finish to finalize the project
creation based on a Smart Template application template.
19. Now, in your SAP Web IDE Workspace, the new folder SmartTemplateExercise was
created. You can check out the files that were created. You may note that there are neither views nor controllers and only a few files containing code inside the project folder. Yet, you can still change the app - even without developing in JavaScript or others. See the following steps for some examples.

openSAP
Copyright/Trademark
3 ENHANCE THE SMART TEMPLATE APPLICATION
3.1 Enhance Annotation File with the Annotation Modeler
Explanation Screenshot
1. In SAP Web IDE, expand the folder webapp/annotations.
2. To open the annotation file with the
correct editor, right-click the file localAnnotations_1.xml and
choose from the context menu Open With Annotation Modeler.
3. The file localAnnotations_1.xml
opens in the canvas. Check that the field OData Entity Set has the value ProductSet.
4. In the node of the Local
Annotations, go to the column Actions and click the icon + (plus)
to add a sub-node entry.
5. In the dialog box Annotations, select the checkbox UI.LineItem.
6. Confirm with the button OK.
7. The node UI.LineItem has been
created and shows a red light indicating that the node has not been adapted yet. In the column Actions of this node, click the icon + (plus).
8. In the dialog box Line Item, select the checkbox DataField.
9. Confirm with the button OK.

openSAP
Copyright/Trademark
Explanation Screenshot
10. Expand the node UI.LineItem and select the node UI.DataField.
11. In the UI.DataField Properties
panel on the right, go to the field Value and choose from the dropdown ProductID.
12. Confirm the changes with the
button Apply.
The red light indicator disappeared. The structure update was successful.
13. Go a second time to the sub-node of the Local Annotations UI.LineItem area, then to the column Actions and click the icon + (plus) in the UI.LineItem row to add a second UI.DataField entry for UI.LineItem.
14. In the dialog box Line Item, select the checkbox DataField.
15. Confirm with the button OK.
16. In the node UI.LineItem, select the secondly created UI.DataField.
17. In the UI.DataField Properties
panel on the right, go to the field Value and choose from the dropdown Name.
18. Confirm the changes with the
button Apply.
The red light indicator disappeared. The structure update was successful.
19. Save your changes in the file localAnnotations_1.xml by choosing Save.

openSAP
Copyright/Trademark
3.2 Run the Smart Template Application
Note If you have already opened the app preview in a separate tab and a refresh of the app does not work, we recommend that you close the preview tab, clear the browser cache and start the app anew and as follows.
Explanation Screenshot
1. In SAP Web IDE, select the folder SmartTemplateExercise folder and choose the button Run from
the top menu.
2. Depending on your Smart Template project setup, either connected to the ES4 SAP Gateway service or working with a local schema file and mock data, choose one of the following options:
With ES4 SAP Gateway service: In the dialog box Choose the File to Run,
select the flpSandbox.html file and confirm with the button OK. This option does not
work if you created the app with a local schema file only since your setup is not prepared to fetch data from a backend service.
With local schema and mock data: In the dialog box Choose the File to Run, select the option flpSandboxMockServer.html and confirm with the button OK.
3. The app preview is opened in a new browser window. If the pop-up Store Files on this Device is displayed, confirm with Allow.
You see a launchpad tile called SmartTemplateExercise.
4. Click on the tile to enter your app.
openSAP
Copyright/Trademark
Explanation Screenshot
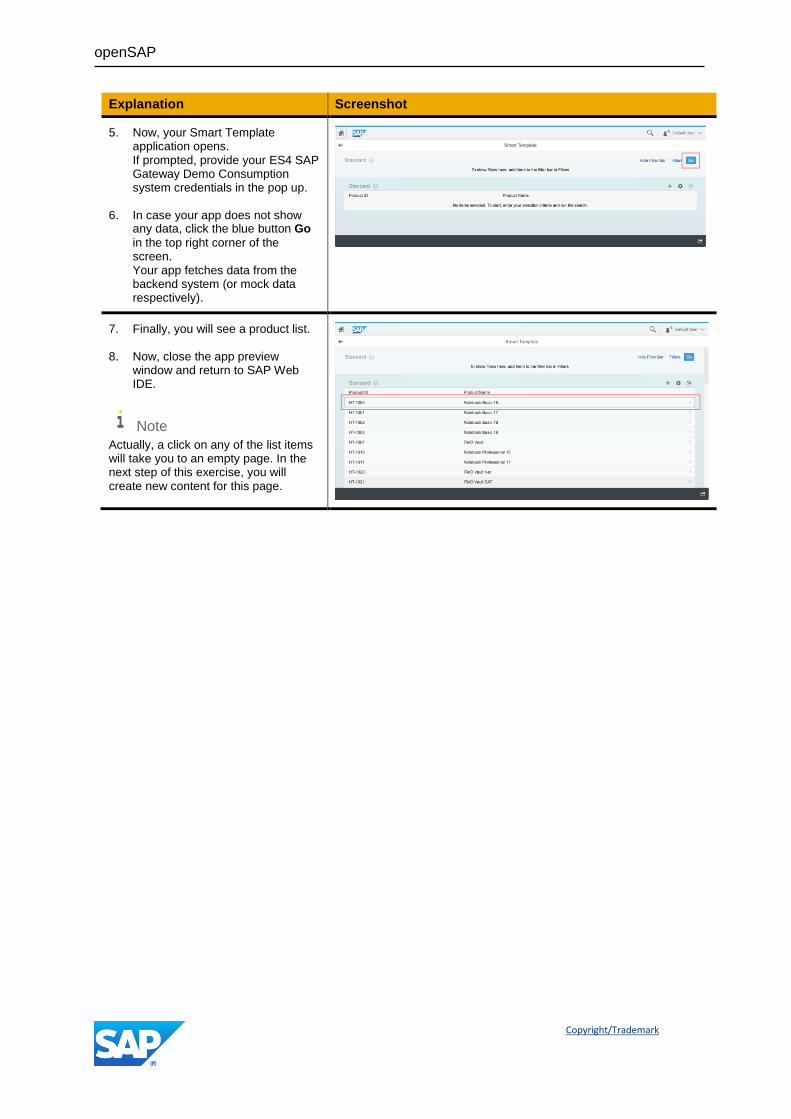
5. Now, your Smart Template application opens. If prompted, provide your ES4 SAP Gateway Demo Consumption system credentials in the pop up.
6. In case your app does not show any data, click the blue button Go
in the top right corner of the screen. Your app fetches data from the backend system (or mock data respectively).
7. Finally, you will see a product list. 8. Now, close the app preview
window and return to SAP Web IDE.
Note
Actually, a click on any of the list items will take you to an empty page. In the next step of this exercise, you will create new content for this page.

openSAP
Copyright/Trademark
3.3 Add Content to Second Page
Explanation Screenshot
1. In SAP Web IDE, go to your
project folder SmartTemplateExercise and expand webapp/annotations.
2. Again, open the file in the
Annotation Modeler. Therefore,
right-click the file localAnnotations_1.xml and
choose from the context menu Open With Annotation Modeler.
3. The file localAnnotations_1.xml
opens in the canvas. Check that the field OData Entity Set has the value ProductSet.
4. In the node Local Annotations, go
to the column Actions and click the icon + (plus) to add a sub-node
entry.
5. In the dialog box Annotations,
select the checkbox UI.Identification.
6. Confirm with the button OK.
7. The node UI.Identification has
been created and shows a red light indicating that the nodes has not been adapted yet. In the column Actions of this node, click the icon + (plus).
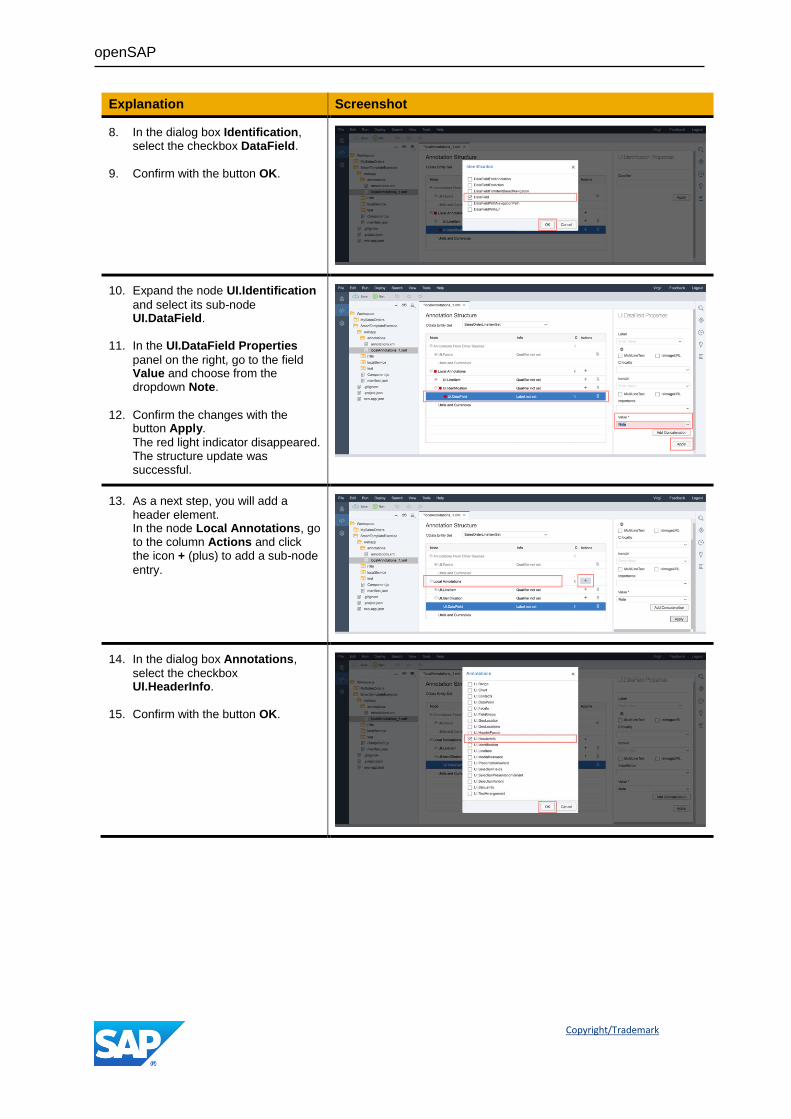
8. In the dialog box Identification, select the checkbox DataField.
9. Confirm with the button OK.

openSAP
Copyright/Trademark
Explanation Screenshot
10. Expand the node UI.Identification
and select its sub-node UI.DataField.
11. In the UI.DataField Properties
panel on the right, go to the field Value and choose from the dropdown Description.
12. Confirm the changes with the
button Apply.
The red light indicator disappeared. The structure update was successful.
13. Go a second time to the sub-node of the Local Annotations UI.Identification area, then to the column Actions and click the icon + (plus) in the UI.Identification row to add a second UI.DataField entry for UI.Identification.
14. In the dialog box Identification, select the checkbox DataField.
15. Confirm with the button OK.
16. In the node UI.Identification,
select the secondly created UI.DataField.
17. In the UI.DataField Properties
panel on the right, go to the field Value and choose from the dropdown SupplierName.
18. Confirm the changes with the
button Apply.
The red light indicator disappeared. The structure update was successful.

openSAP
Copyright/Trademark
Explanation Screenshot
19. Go a third time to the sub-node of the Local Annotations UI.Identification area, then to the column Actions and click the icon + (plus) in the UI.Identification row to add a third UI.DataField entry for UI.Identification.
20. In the dialog box Identification, select the checkbox DataField.
21. Confirm with the button OK.
22. In the node UI.Identification,
select the thirdly created UI.DataField.
23. In the UI.DataField Properties
panel on the right, go to the field Value and choose from the dropdown Price.
24. Attention! Do NOT confirm your
changes with the button Apply. 25. Choose the button Add
Concatenation and see more
fields that are displayed. Through this option, you add another value and display it in your app in the same field as your first value.
26. In the field Path, select from the
dropdown the value CurrencyCode.
27. Then go to the field Delimiter to
define how the price value and the currency code are separated. In the field Delimiter, insert a blank
space as value (with your computer keyboard).
28. Confirm the changes with the button Apply.
The red light indicator disappeared. The structure update was successful.

openSAP
Copyright/Trademark
Explanation Screenshot
29. As a next step, you will add a header element to your Smart Template app. In the node of the Local Annotations, go to the column Actions and click the icon + (plus)
to add a sub-node entry.
30. In the dialog box Annotations,
select the checkbox UI.HeaderInfo.
31. Confirm with the button OK.
32. Select the node UI. HeaderInfo.
33. In the UI.HeaderInfo Properties
panel on the right, go to the field TypeName and type in the value Product.
34. In the UI.HeaderInfo Properties
panel on the right, go to the field TypeNamePlural and type in the value Products.
35. Confirm the changes with the
button Apply.
The red light indicator still remains because the sub-node must be configured, too.
36. Expand the node UI.HeaderInfo and select its sub-node Title.
37. In the UI.DataFild Properties
panel on the right, go to the field Value and choose from the dropdown Name.
38. Confirm the changes with the
button Apply.
Now, the red lighted indicator disappeared. The structure update was successful. For the OData entity set ProductSet, all edit steps are
finished now.

openSAP
Copyright/Trademark
Explanation Screenshot
39. As a next step, you will adapt a further part of the Smart Template application. At the top of the canvas, go to the field OData Entity Set and choose
from the dropdown the value SalesOrderLineItemSet.
40. Start the next application edit steps for the OData entity set SalesOrderLineItemSet by clicking on the button Annotate.
41. In the node Local Annotations, go to the column Actions and click the icon + (plus) to add a sub-node
entry.
42. In the dialog box Annotations, select the checkbox UI.LineItem.
43. Confirm with the button OK.
44. The node UI.LineItem has been
created and shows a red light indicating that the nodes is not adapted yet. In the column Actions of this node, click the icon + (plus).

openSAP
Copyright/Trademark
Explanation Screenshot
45. In the dialog box Line Item, select the checkbox DataField.
46. Confirm with the button OK.
47. Expand the node UI.LineItem and select its sub-node UI.DataField.
48. In the UI.DataField Properties
panel on the right, go to the field Value and choose from the dropdown SalesOrderID.
49. Confirm the changes with the
button Apply.
The red light indicator disappeared. The structure update was successful.
50. Save your changes in the file localAnnotations_1.xml by choosing Save.
51. Run your app to see the changes on the second page (Product Details) of your Smart Template application. Select the folder SmartTemplateExercise and choose the button Run from the
top menu.
Note
Check chapter 3.2 Run the Smart Template Application in this document
on how to run your app depending on your project setup.

openSAP
Copyright/Trademark
Explanation Screenshot
52. Once your app is running, navigate from one product list item to its details. Check out the product list item navigation and the result of your changes to the annotation file on the second view.
53. On the Product details page
(second view), check the result of your changes done through the additions to the annotation file.
54. Finally, close the app preview
window and return to SAP Web IDE.

openSAP
Copyright/Trademark
3.4 Optional: Add Content to Third Page
This step shows how to add content to a third page that you can access from a Product Details page (second view). This page is labeled with Second Facet.
Explanation Screenshot
1. In SAP Web IDE, go to your
project folder SmartTemplateExercise and expand webapp/annotations.
2. Again, open the file in the
Annotation Modeler. Therefore,
right-click the file localAnnotations_1.xml and
choose from the context menu Open With Annotation Modeler.
3. The file localAnnotations_1.xml
opens in the canvas. In the field OData Entity Set,
select from the dropdown the value SalesOrderLineItemSet.
4. In the node Local Annotations, go
to the column Actions and click the icon + (plus) to add a sub-node
entry.
5. In the dialog box Annotations,
select the checkbox UI.Identification.
6. Confirm with the button OK.
7. The node UI.Identification has
been created and shows a red light indicating that the node has not been adapted yet. In the column Actions of this node, click the icon + (plus).
openSAP
Copyright/Trademark
Explanation Screenshot
8. In the dialog box Identification, select the checkbox DataField.
9. Confirm with the button OK.
10. Expand the node UI.Identification
and select its sub-node UI.DataField.
11. In the UI.DataField Properties
panel on the right, go to the field Value and choose from the dropdown Note.
12. Confirm the changes with the
button Apply.
The red light indicator disappeared. The structure update was successful.
13. As a next step, you will add a header element. In the node Local Annotations, go to the column Actions and click the icon + (plus) to add a sub-node
entry.
14. In the dialog box Annotations,
select the checkbox UI.HeaderInfo.
15. Confirm with the button OK.

openSAP
Copyright/Trademark
Explanation Screenshot
16. Select the node UI. HeaderInfo.
17. In the UI.HeaderInfo Properties
panel on the right, go to the field TypeName and choose from the dropdown the value Sales Order Item.
18. In the UI.HeaderInfo Properties
panel on the right, go to the field TypeNamePlural and choose from the dropdown the value Sales Order Items.
19. Confirm the changes with the
button Apply.
The red light indicator still remains because the sub-node must be configured, too.
20. Expand the node UI.HeaderInfo and select its sub-node Title.
21. In the UI.DataFild Properties
panel on the right, go to the field Value and choose from the dropdown SalesOrderID.
22. Confirm the changes with the
button Apply.
Now, the red light indicator disappeared. The structure update was successful.
23. Save your changes in the file localAnnotations_1.xml by choosing Save.
24. Now, check your changes within the code of your app to understand the page structure. Therefore, go to the folder webapp
and double-click on the file manifest.json
25. On the bottom of the canvas, click
the tab Code Editor.
openSAP
Copyright/Trademark
Explanation Screenshot
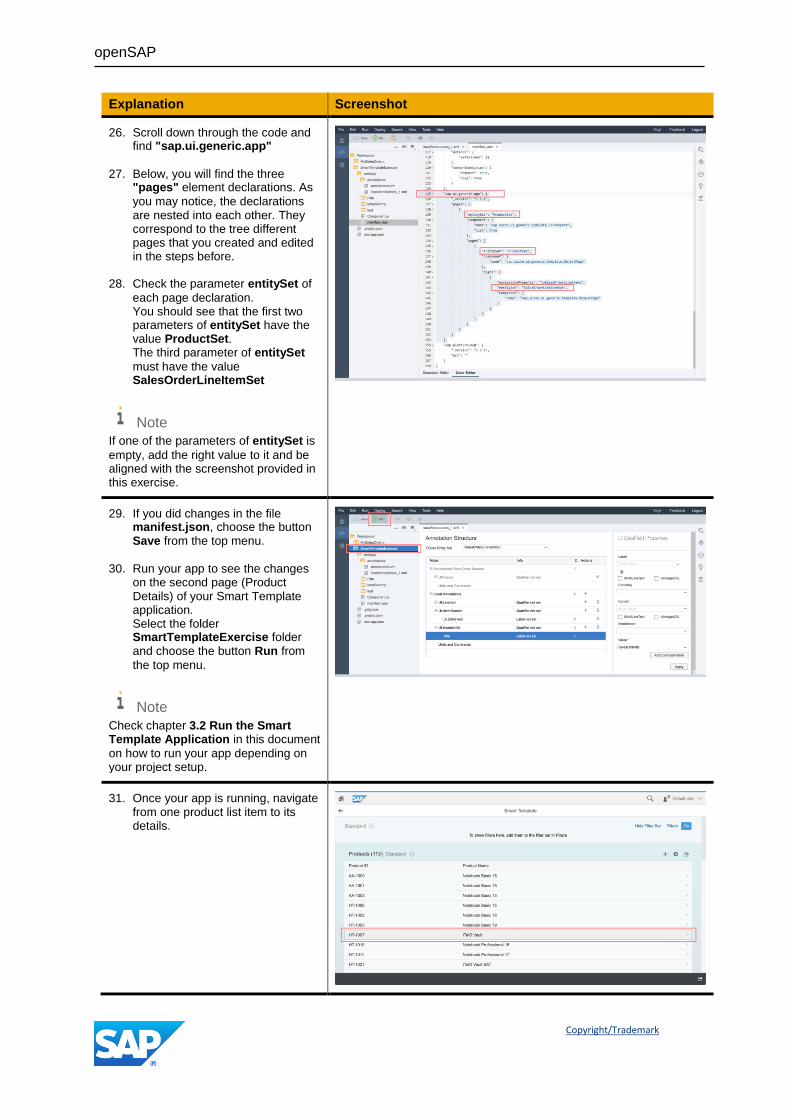
26. Scroll down through the code and find "sap.ui.generic.app"
27. Below, you will find the three
"pages" element declarations. As
you may notice, the declarations are nested into each other. They correspond to the tree different pages that you created and edited in the steps before.
28. Check the parameter entitySet of
each page declaration. You should see that the first two parameters of entitySet have the value ProductSet. The third parameter of entitySet
must have the value SalesOrderLineItemSet
Note
If one of the parameters of entitySet is
empty, add the right value to it and be aligned with the screenshot provided in this exercise.
29. If you did changes in the file manifest.json, choose the button Save from the top menu.
30. Run your app to see the changes
on the second page (Product Details) of your Smart Template application. Select the folder SmartTemplateExercise folder and choose the button Run from
the top menu.
Note
Check chapter 3.2 Run the Smart Template Application in this document
on how to run your app depending on your project setup.
31. Once your app is running, navigate from one product list item to its details.

openSAP
Copyright/Trademark
Explanation Screenshot
32. On the Product details page
(second view), navigate to the page SECOND FACET.
In case that there is not data displayed, click on the button Settings.
33. In the pop-up View Settings,
select Sales Order ID.
34. Confirm the button OK.
35. In the area SECOND FACET
check the result of your changes done through the additions to the annotation file.
36. First, check that there is a navigation to one of the Sales Order ID items for more details.
37. Then, check the result of your edits on the page Sales Order Item.
38. Finally, close the app preview
window and return to SAP Web IDE.

openSAP
Copyright/Trademark
3.5 Optional: Remove Navigation from Product List Items
This step shows how to remove the navigation from the product list items on the first to the Product detail page (second view). This may be important if you want to go for a single list report app.
Explanation Screenshot
1. In SAP Web IDE, go to your
project folder SmartTemplateExercise and expand the folder webapp.
2. Right-click on the file
manifest.json and choose from the context menu Open With Code Editor.
3. Inside the code, scroll down and search for the row that starts with sap.ui.generic.app. Inside, the entries “pages”: are
relevant.
Note
Try one of the following two options. If you delete code, you can save and run your app to check the results. When you let the file open in SAP Web IDE and return back to your code, undo your changes (e.g. code deletion) and try another option. Therefore go to the SAP Web IDE menu Edit Undo
4. Option 1:
You want to navigate from the product item list to the Product details page (second view). But on this second view, the navigation to a third view (e.g. to Sales Order Item) should be disabled.
5. For option 1, delete the code highlighted in orange.
The highlighted code to be deleted refers to this third page and is part of (or nested inside) the code of the second view.

openSAP
Copyright/Trademark
Explanation Screenshot
6. Option 2:
You want to disable the navigation from a product list item to the Product details page (second view). In this case no further navigation possibilities are available to any sub-page of your app.
7. For option 2, delete the code highlighted in orange and yellow.
The highlighted code to be deleted refers to the second and third page and is part of the code of the first view.
8. Save your changes in the file manifest.json by choosing Save.
9. Run your app to see the changes on the navigation behavior of your Smart Template application. Select the folder SmartTemplateExercise folder and choose the button Run from
the top menu.
Note
Check chapter 3.2 Run the Smart Template Application in this document
on how to run your app depending on your project setup.
10. In case of option 1:
Navigate from a product list item to its Product details page (second view). Check that a further navigation from Sales Order ID to the next detail page (third view) is not possible anymore.

openSAP
Copyright/Trademark
Explanation Screenshot
11. In case of option 2:
Check that the navigation from one of the product list items to its Product details page (second view) is not possible anymore.
Congratulations! You created and changed an SAP Fiori app based on a Smart Template Application
in SAP Web IDE.