build a regulation size cornhole set and start perfecting your … · 2017-04-25 · cornhole...
TRANSCRIPT
Cornhole BACKYARD GAMES SERIES
$ $ $
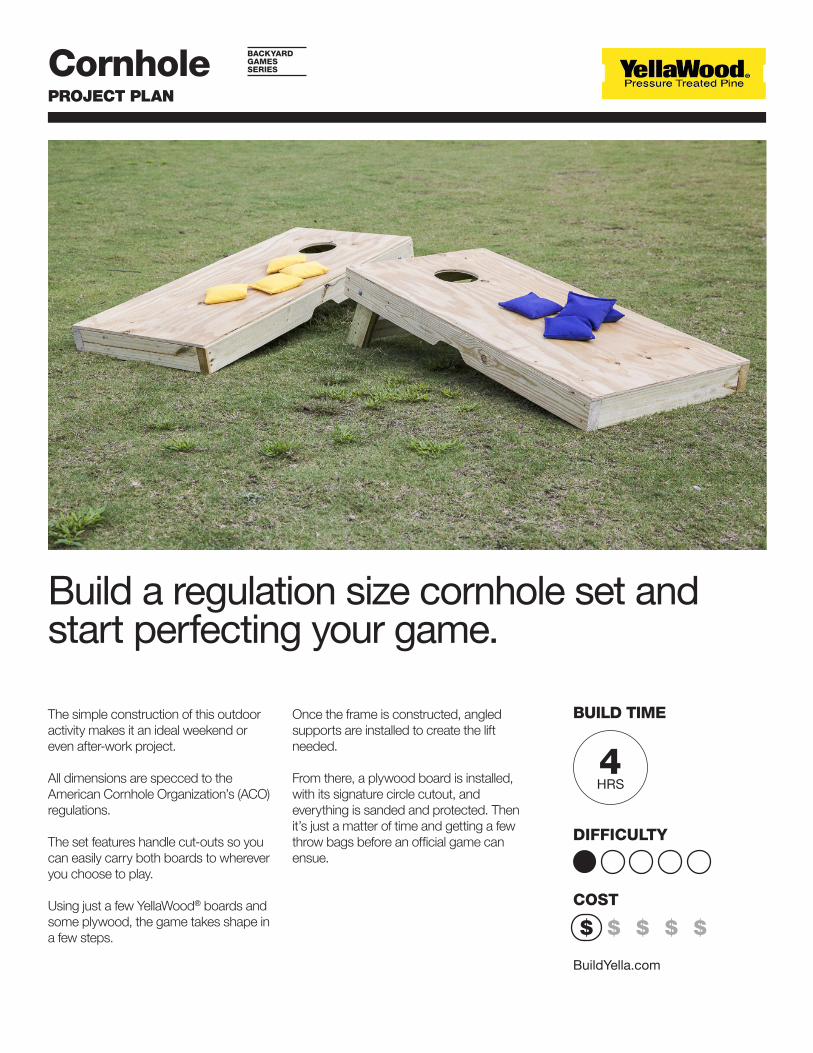
Build a regulation size cornhole set and start perfecting your game.
The simple construction of this outdoor activity makes it an ideal weekend or even after-work project.
All dimensions are specced to the American Cornhole Organization’s (ACO) regulations.
The set features handle cut-outs so you can easily carry both boards to wherever you choose to play.
Using just a few YellaWood® boards and some plywood, the game takes shape in a few steps.
Once the frame is constructed, angled supports are installed to create the lift needed.
From there, a plywood board is installed, with its signature circle cutout, and everything is sanded and protected. Then it’s just a matter of time and getting a few throw bags before an official game can ensue.
BUILD TIME
DIFFICULTY
COST
$$
BuildYella.com
PROJECT PLAN
4HRS
Cornhole BACKYARD GAMES SERIES
Get more project plans at BuildYella.com 2
BUILD TIME
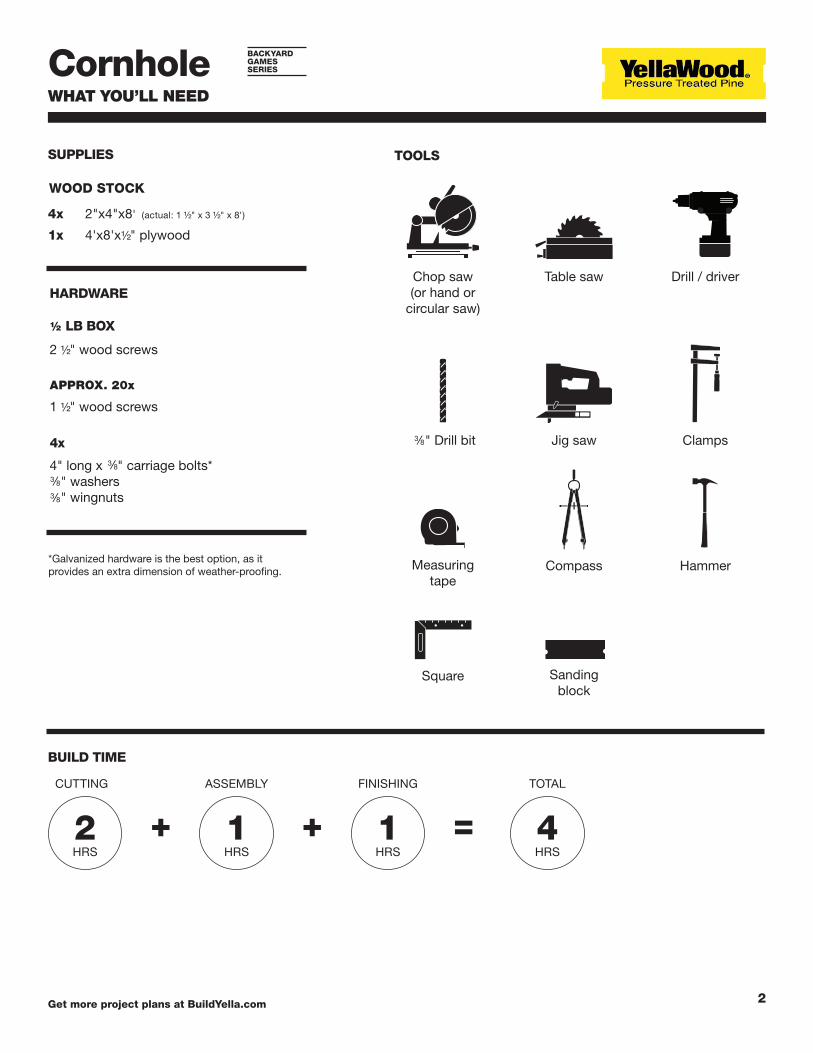
2 1 1 4+ + =
4x 2"x4"x8' (actual: 1 ½" x 3 ½" x 8')
1x 4'x8'x½" plywood
2 ½" wood screws
1 ½" wood screws
CUTTING ASSEMBLY FINISHING TOTAL
HRS HRS HRS HRS
WHAT YOU’LL NEED
SUPPLIES
½ LB BOX
APPROX. 20x
4x
HARDWARE
WOOD STOCK
Chop saw (or hand or
circular saw)
Table saw Drill / driver
Jig saw
HammerCompass
Sanding block
Clamps
Measuring tape
Square
TOOLS
4" long x " carriage bolts* " washers " wingnuts
3 8
3 8
3 8
" Drill bit3 8
*Galvanized hardware is the best option, as it provides an extra dimension of weather-proofing.
Cornhole BACKYARD GAMES SERIES
Get more project plans at BuildYella.com 3
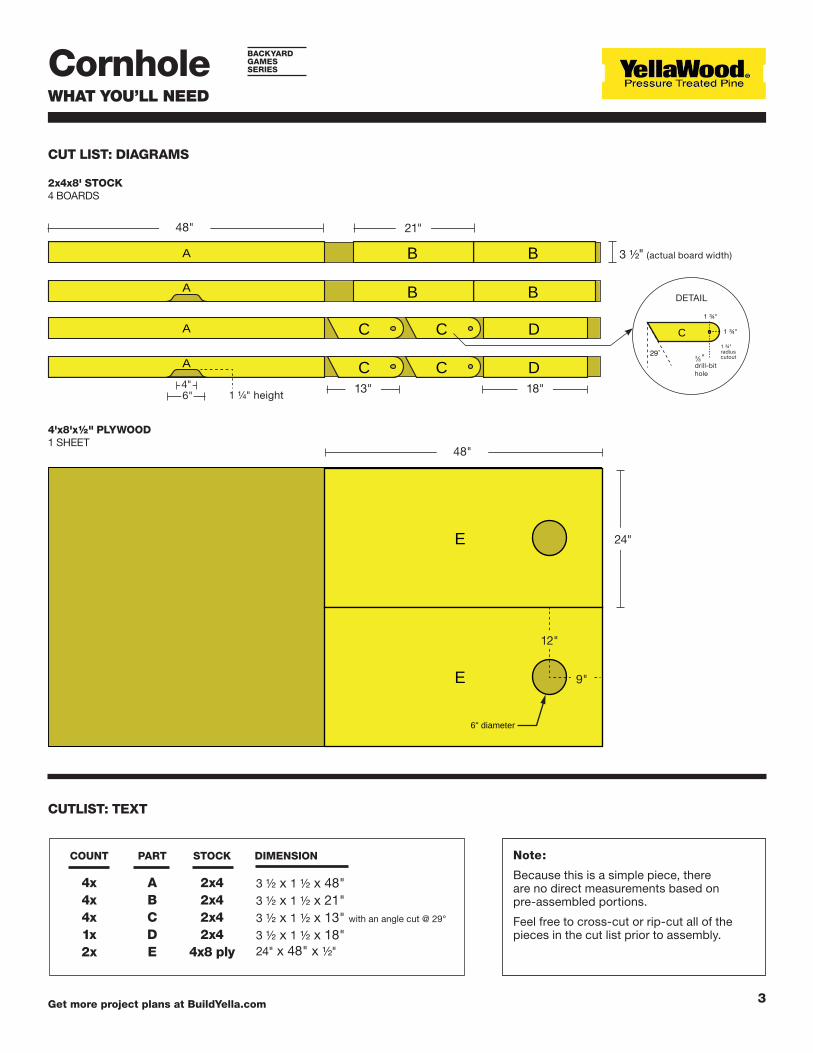
CUT LIST: DIAGRAMS
WHAT YOU’LL NEED
CUTLIST: TEXT
2x4x8' STOCK4 BOARDS
4'x8'x½" PLYWOOD1 SHEET
A
A
C C
B
B
D
B
B
C C D
48"
48"
24"
13"4"6"
18"
DETAIL
21"
3 ½" (actual board width)
1 ¾"
1 ¾"radius cutout
1 ¾"
E
E
6" diameter
9"
12"
C29˚
4x4x4x1x2x
ABCDE
2x42x42x42x4
4x8 ply
COUNT PART STOCK DIMENSION
3 ½ x 1 ½ x 48"3 ½ x 1 ½ x 21"3 ½ x 1 ½ x 13" with an angle cut @ 29°
3 ½ x 1 ½ x 18"24" x 48" x ½"
"drill-bit hole
38
Note:
Because this is a simple piece, there are no direct measurements based on pre-assembled portions.
Feel free to cross-cut or rip-cut all of the pieces in the cut list prior to assembly.
A
A
A
A
1 ¼" height

Cornhole BACKYARD GAMES SERIES
Get more project plans at BuildYella.com 4
TOP
48"
48"
50 ¾"
24"
4"
12"
Note:
Board dimensions can vary, so be sure to measure your stock.
DIMENSIONS & DIAGRAMS
LEFT
109°
Cornhole BACKYARD GAMES SERIES
Get more project plans at BuildYella.com 5
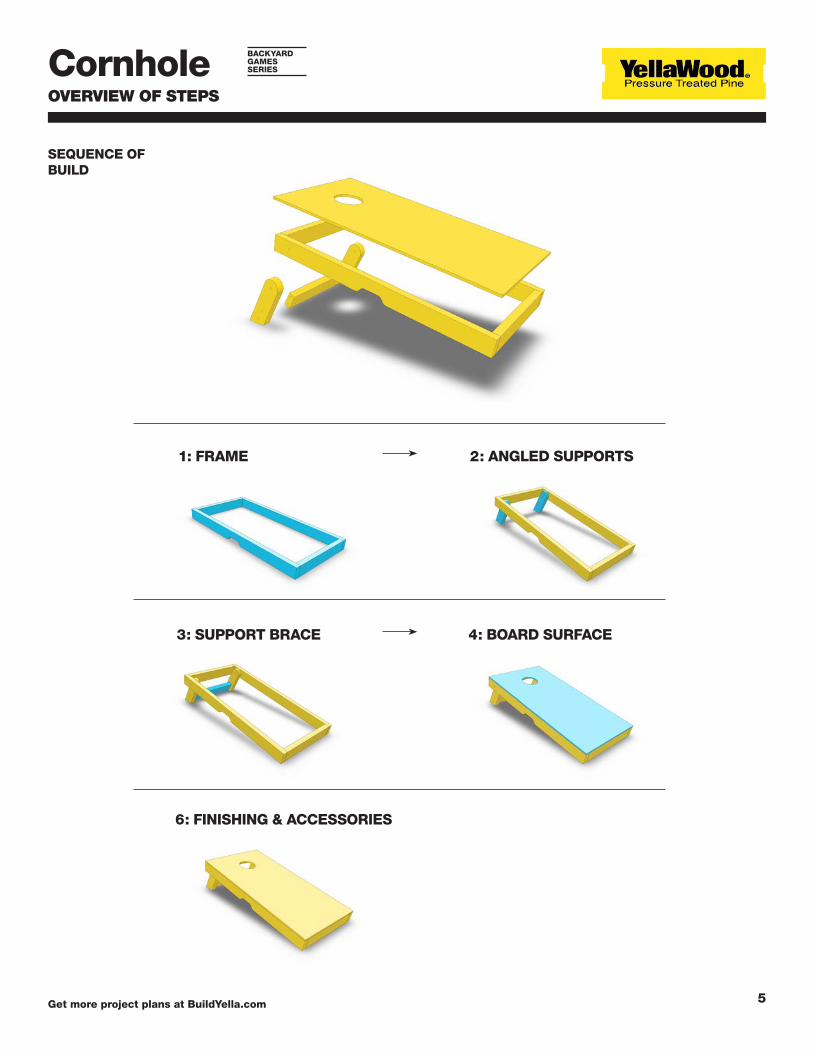
SEQUENCE OF BUILD
OVERVIEW OF STEPS
1: FRAME
3: SUPPORT BRACE
6: FINISHING & ACCESSORIES
2: ANGLED SUPPORTS
4: BOARD SURFACE
Get more project plans at BuildYella.com 6
Cornhole BACKYARD GAMES SERIES
DIMENSIONS & DIAGRAMS
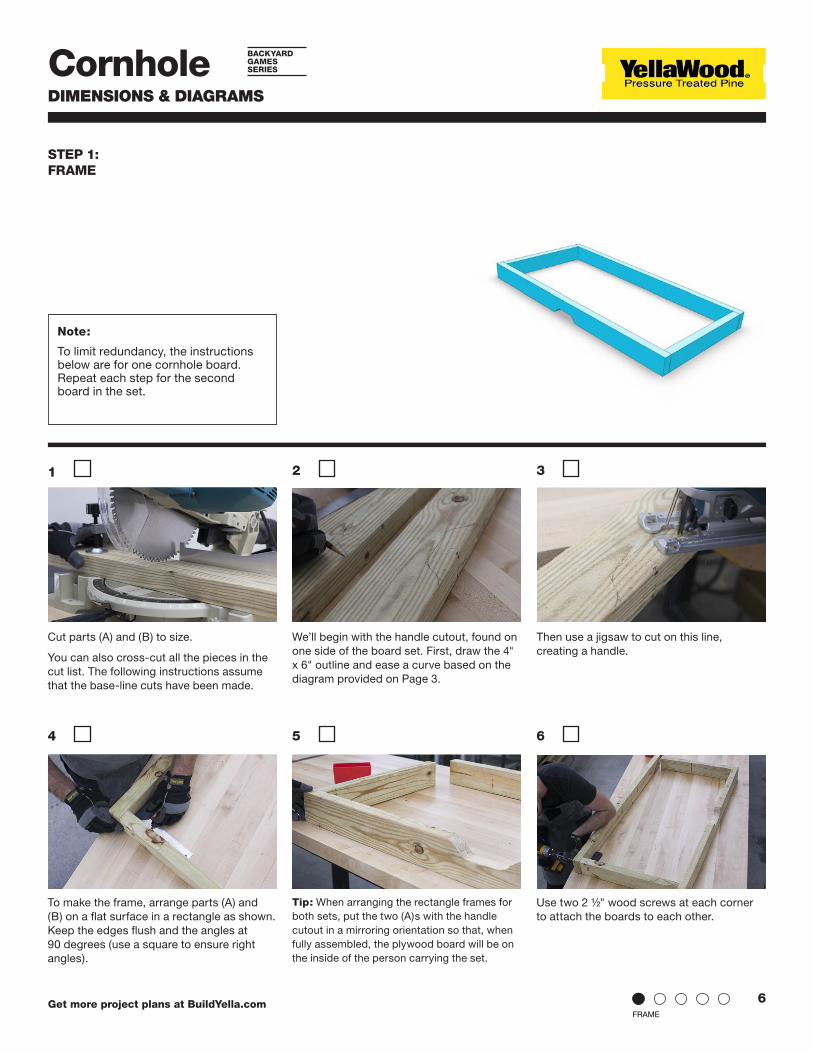
STEP 1:FRAME
Note:
To limit redundancy, the instructions below are for one cornhole board. Repeat each step for the second board in the set.
FRAME
5 6
Cut parts (A) and (B) to size.
You can also cross-cut all the pieces in the cut list. The following instructions assume that the base-line cuts have been made.
To make the frame, arrange parts (A) and (B) on a flat surface in a rectangle as shown. Keep the edges flush and the angles at 90 degrees (use a square to ensure right angles).
Tip: When arranging the rectangle frames for both sets, put the two (A)s with the handle cutout in a mirroring orientation so that, when fully assembled, the plywood board will be on the inside of the person carrying the set.
Use two 2 ½" wood screws at each corner to attach the boards to each other.
We’ll begin with the handle cutout, found on one side of the board set. First, draw the 4" x 6" outline and ease a curve based on the diagram provided on Page 3.
Then use a jigsaw to cut on this line, creating a handle.
1
4
32
Get more project plans at BuildYella.com 7
Cornhole BACKYARD GAMES SERIES
DIMENSIONS & DIAGRAMS
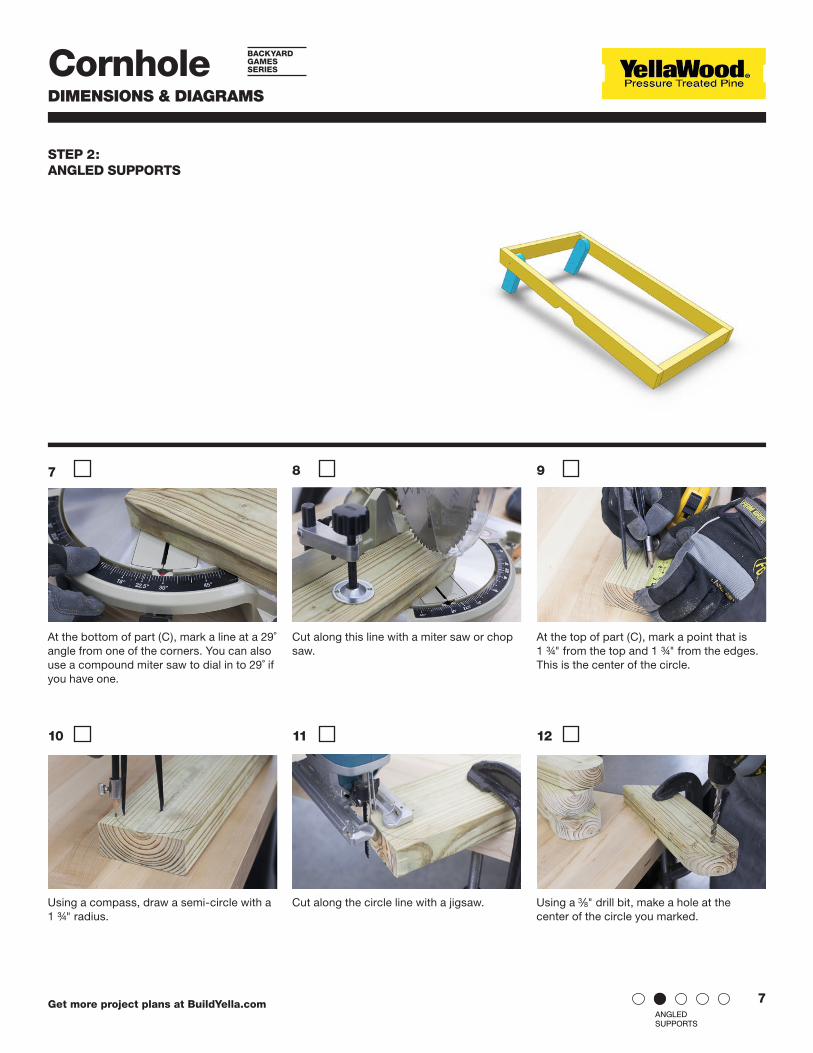
STEP 2:ANGLED SUPPORTS
ANGLED SUPPORTS
11 12
At the bottom of part (C), mark a line at a 29˚ angle from one of the corners. You can also use a compound miter saw to dial in to 29˚ if you have one.
Using a compass, draw a semi-circle with a 1 ¾" radius.
Cut along the circle line with a jigsaw. Using a " drill bit, make a hole at the center of the circle you marked.
Cut along this line with a miter saw or chop saw.
At the top of part (C), mark a point that is 1 ¾" from the top and 1 ¾" from the edges. This is the center of the circle.
7
10
98
3 8
Get more project plans at BuildYella.com 8
Cornhole BACKYARD GAMES SERIES
DIMENSIONS & DIAGRAMS
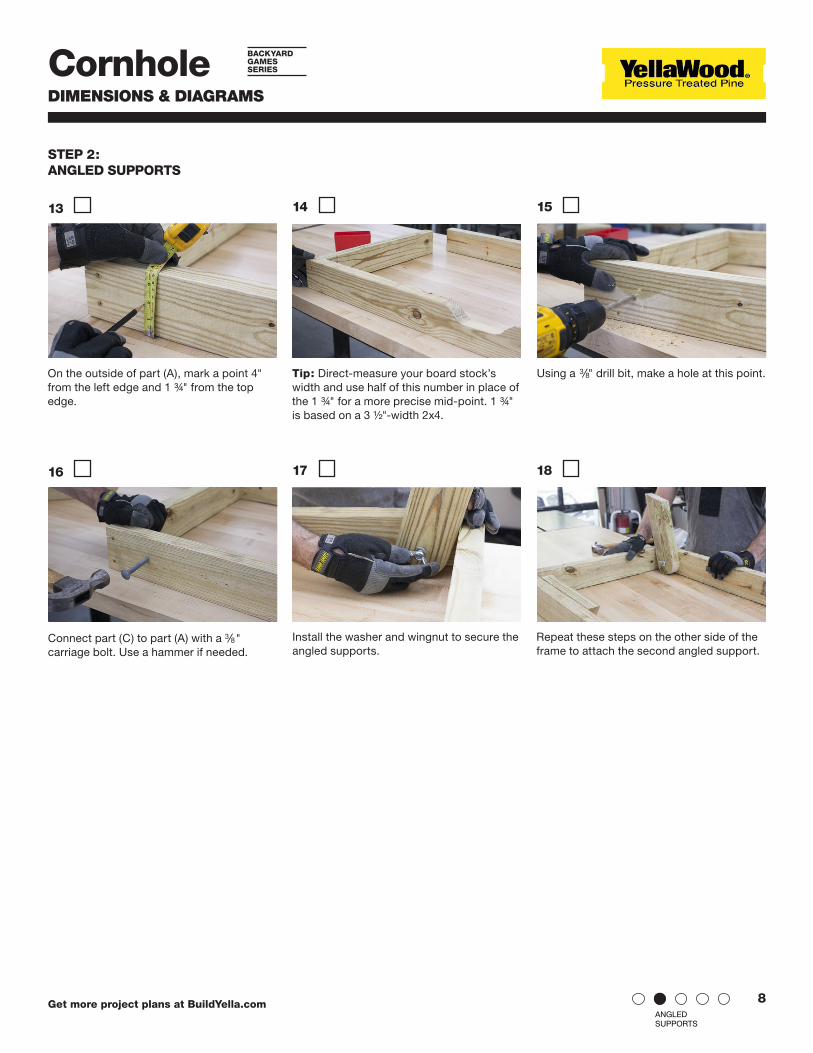
STEP 2:ANGLED SUPPORTS
ANGLED SUPPORTS
Using a ⅜ " drill bit, make a hole at this point.On the outside of part (A), mark a point 4" from the left edge and 1 ¾" from the top edge.
Connect part (C) to part (A) with a 3 8" carriage bolt. Use a hammer if needed.
Tip: Direct-measure your board stock’s width and use half of this number in place of the 1 ¾" for a more precise mid-point. 1 ¾" is based on a 3 ½"-width 2x4.
Install the washer and wingnut to secure the angled supports.
Repeat these steps on the other side of the frame to attach the second angled support.
16
13 15
17 18
14
3 8
Get more project plans at BuildYella.com 9
Cornhole BACKYARD GAMES SERIES
DIMENSIONS & DIAGRAMS
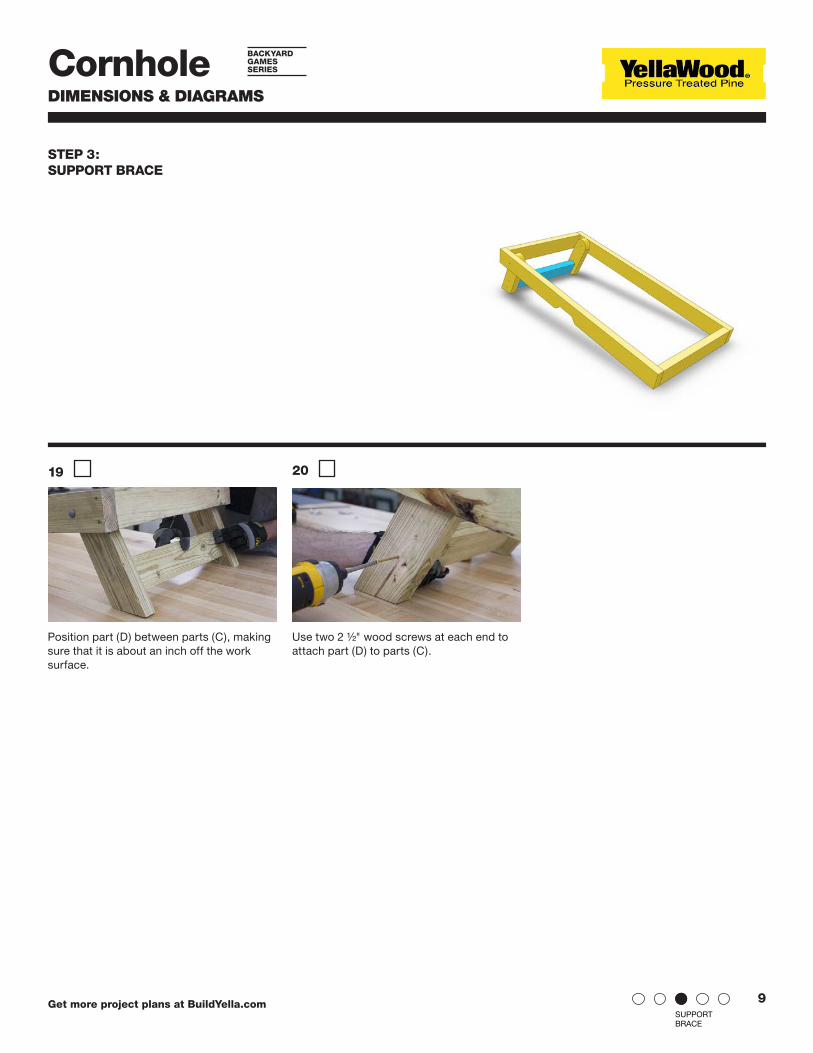
STEP 3:SUPPORT BRACE
SUPPORT BRACE
Position part (D) between parts (C), making sure that it is about an inch off the work surface.
Use two 2 ½" wood screws at each end to attach part (D) to parts (C).
19 20
Get more project plans at BuildYella.com 10
Cornhole BACKYARD GAMES SERIES
DIMENSIONS & DIAGRAMS
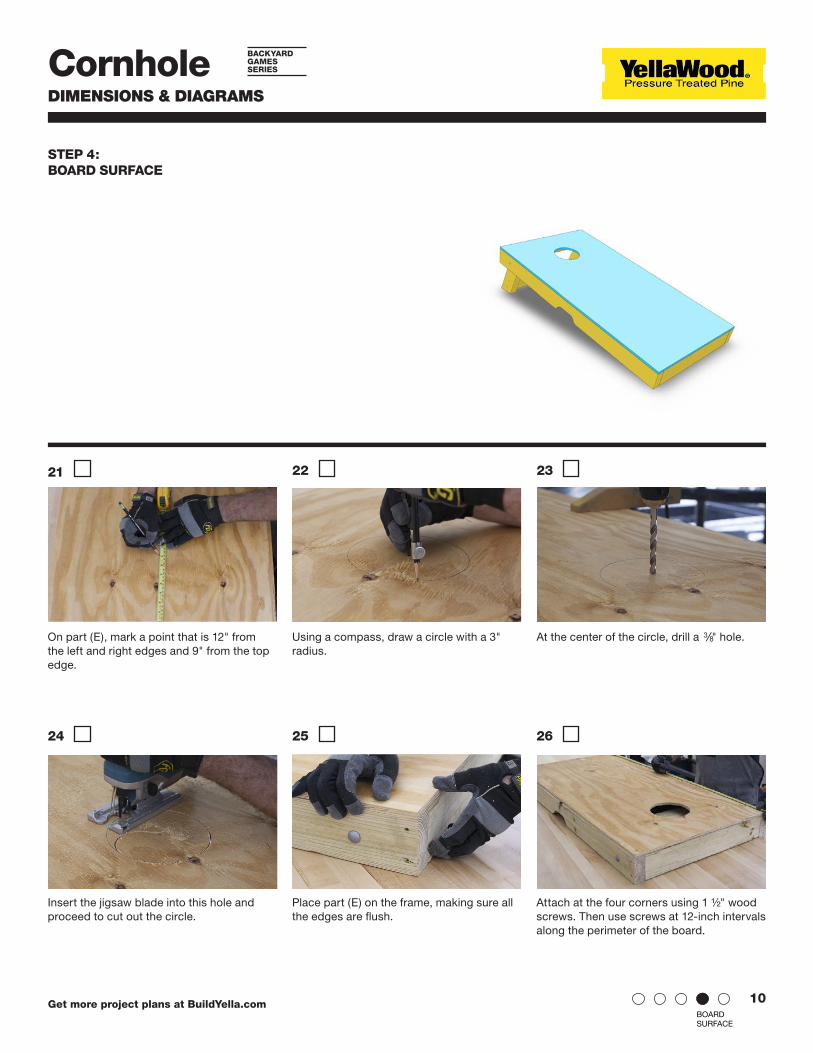
STEP 4:BOARD SURFACE
BOARD SURFACE
25 26
On part (E), mark a point that is 12" from the left and right edges and 9" from the top edge.
Insert the jigsaw blade into this hole and proceed to cut out the circle.
Place part (E) on the frame, making sure all the edges are flush.
Attach at the four corners using 1 ½" wood screws. Then use screws at 12-inch intervals along the perimeter of the board.
Using a compass, draw a circle with a 3" radius.
At the center of the circle, drill a ⅜ " hole.
21
24
2322
3 8
Get more project plans at BuildYella.com 11
Cornhole BACKYARD GAMES SERIES
DIMENSIONS & DIAGRAMS
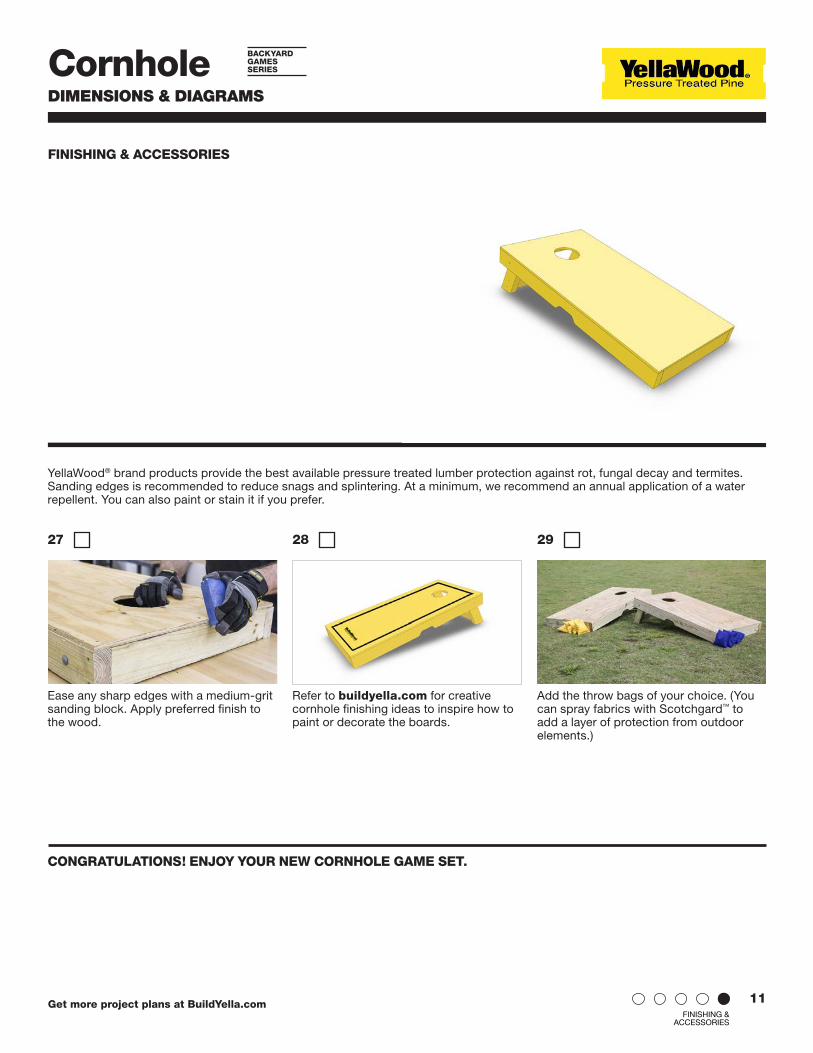
FINISHING & ACCESSORIES
Ease any sharp edges with a medium-grit sanding block. Apply preferred finish to the wood.
Refer to buildyella.com for creative cornhole finishing ideas to inspire how to paint or decorate the boards.
Add the throw bags of your choice. (You can spray fabrics with Scotchgard™ to add a layer of protection from outdoor elements.)
27 28 29
CONGRATULATIONS! ENJOY YOUR NEW CORNHOLE GAME SET.
FINISHING & ACCESSORIES
YellaWood® brand products provide the best available pressure treated lumber protection against rot, fungal decay and termites. Sanding edges is recommended to reduce snags and splintering. At a minimum, we recommend an annual application of a water repellent. You can also paint or stain it if you prefer.

Cornhole BACKYARD GAMES SERIES
Get more project plans at BuildYella.com 12
DIMENSIONS & DIAGRAMS
GALLERY OF IMAGES
Cornhole BACKYARD GAMES SERIES
Get more project plans at BuildYella.com 13
FASTENER & HARDWARE INFORMATION
FOR INTERIOR OR EXTERIOR APPLICATIONSUse fasteners and hardware that are in compliance with the manufacturer’s recommendations and the building codes for their intended use. As with any good design and construction practices, treated wood should not be used in applications where trapped moisture or water can occur. Where design and/or actual conditions allow for constant, repetitive or long periods of wet conditions, only stainless steel fasteners should be used.
FOR EXTERIOR APPLICATIONSThe following minimum galvanization levels may be used for connectors, joist hangers, fasteners and other hardware that are placed in direct contact with exterior applications of micronized copper treated wood:
• Fasteners – nails, screws, etc. ASTM – A 153 (1 oz/ft²)• Hardware – connectors, joist hangers, etc. ASTM – A 653 G90 (0.90 oz/ft²)
The effects of other building materials within a given assembly, along with environmental factors, should also be considered when selecting the appropriate hardware and fasteners to use for a given project containing treated wood.
Stainless steel fasteners and hardware are required for permanent wood foundations below grade and are recommended for use with treated wood in other severe exterior applications such as swimming pools, salt water exposure, etc. Type 304 and 316 are recommended grades to use.
ALUMINUMAluminum building products may be placed in direct contact with YellaWood® brand products used for interior uses and above ground exterior applications such as decks, fencing and landscaping projects. Examples of aluminum products include siding, roofing, gutters, door and window trim, flashing, nails, fasteners and other hardware connectors. However, direct contact of treated products and aluminum building products should be limited to code-compliant construction applications that provide proper water drainage and do not allow the wood to be exposed to standing water or water immersion.
We recommend that you contact the aluminum building products manufacturer for recommendations regarding use of its aluminum products in contact with treated wood in ground contact applications or when exposed to salt water, brackish water or chlorinated water, such as swimming pools or hot tubs.
Also check with the aluminum building products manufacturer regarding compatibility with other chemicals and cleaning agents and the use of their aluminum products in commercial, industrial and specialty applications such as boat construction.
YellaWood® brand pressure treated products are treated with preservatives (the “Preservatives”) and preservative methods, systems and technologies of unrelated third parties. For details regarding the Preservatives, methods, systems and technologies used by Great Southern Wood Preserving, Incorporated, visit www.yellawood.com/preservative or write us at P.O. Box 610, Abbeville, AL 36310. Ask dealer for warranty details. For warranty or for important handling and other information concerning our products, including the appropriate Material Safety Data Sheet (MSDS), please visit us at www.yellawood.com/warranties or write us at P.O. Box 610, Abbeville, AL 36310. YellaWood® and the yellow tag are federally registered trademarks of Great Southern Wood Preserving, Incorporated.
Great Southern Wood Preserving, Incorporated makes no warranties expressed or implied as to the fitness for a particular purpose of this plan.
Cornhole BACKYARD GAMES SERIES
Get more project plans at BuildYella.com 14
IMPORTANT INFORMATION
• Consult the end tag to determine which preservative or preservative system was used in the treatment of that particular product. YellaWood® brand products may be used in direct contact with aluminum building products when limited to code-compliant construction applications that provide proper water drainage and do not allow the wood to be exposed to standing water or water immersion.
• Use fasteners and other hardware that are in compliance with building codes for the intended use.
• Do not burn preserved wood.• Wear a dust mask and goggles when cutting or sanding wood.• Wear gloves when working with wood.• Some preservatives may migrate from the treated wood into soil/water or may
dislodge from the treated wood surface upon contact with skin.• Wash exposed skin areas thoroughly.• All sawdust and construction debris should be cleaned up and disposed of after
construction.• Wash work clothes separately from other household clothing before reuse.• Preserved wood should not be used where it may come into direct or indirect
contact with drinking water, except for uses involving incidental contact such as fresh water docks and bridges.
• Do not use preserved wood under circumstances when the preservative may become a component of food, animal feed or beehives.
• Do not use preserved wood as mulch.• Only preserved wood that is visibly clean and free of surface residue should be
used. If the wood is to be used in an interior application and becomes wet during construction, it should be allowed to dry before being covered or enclosed.
• Mold growth can and does occur on the surface of many products, including untreated and treated wood, during prolonged surface exposure to excessive moisture conditions. To remove mold from the treated wood surface, wood should be allowed to dry. Typically, mild soap and water can be used to remove remaining surface mold. For more information visit www.epa.gov.
• Projects should be designed and installed in accordance with federal, state and local building codes and ordinances governing construction in your area, and in accordance with the National Design Specifications (NDS) and the Wood Handbook.
DISPOSALRECOMMENDATIONSPreserved wood may be disposed ofin landfills or burned in commercial or industrial incinerators or boilers in accordance with federal, state and local regulations.