bsd-705/bss-705 bsd-905/bss-905 bsd-905m/bss-905m · 20.troubleshooting-----18 1 contents 24-----...
TRANSCRIPT

BSD-705/BSS-705 BSD-905/BSS-905BSD-905M/BSS-905M

Screencast Setup Quick Guide:(Only for BSD-905M & BSS-905M)
1.Warnings------------------------------------------2
2.Safety Precautions------------------------------3
BSD-705/BSD-905/BSD-905M
3.Features------------------------------------------�44.Front Panel Controls----------------------------5
5.Connection Diagram----------------------------6
6.Remote Control Operation---------------------7
7.System Operation------------------------------��88.Accessories--------------------------------------�89.Technical Specifications-----------------------�910.Handling Discs--------------------------------�10
BSS-705/BSS-905/BSS-905M
11.Features----------------------------------------�11
12.Front Panel Controls-------------------------�12
13.Connection Diagram--------------------------13
14.Remote Control Operation------------------�13
15.System Operation-----------------------------14
16.Accessories------------------------------------14
17.Technical Specifications---------------------15
18.Installation-------------------------------------�16
18.Leather Replacement------------------------�17
20.Troubleshooting-------------------------------18
1
CONTENTS
24
----------- 19
18.You are now connected and your display will be mirrored to your larger LCD display.
Note: Concept Miracast products are compatible with Android 4.2 and up as well as Apple iOS 7 and up. This serves as a general guide only. All of the steps above will vary depending on the exact phone model that you have. Please refer to the phone’s user manual as an additional resource.

Warning►Read this manul before using this product.►This product is composed of precesion componentsand shall not be disassembled unless approved orauthorized by us, other wise you will viod your warranty.►Protect the product from moisture and shock.
Product structure
Thank you for your purchase of our mobile video product. To ensure
long-term trouble free operation of the product, please read the following
operations manual before using the monitor. To further ensure the long-
term service of your product, please have one of our authorized dealers
to install this product into your vehicle for you.
2 23
15. Look for “HL-LINK ***” as shown on the screen and select it.
16. Slide your finger up from the bottom of the screen, as shown below.
17. Tap on “AirPlay” .

This device is designed to be operated with a DC12V grounded system.
Do not allow any foreign substance to get into the disc slot.
The device may not work in high or low temperatures. Stop using the
device until the temperature returns to a normal level. (Operating
temperature range: 14°F~122°F)
CleaningWhen cleaning the device, do not make contact with water. The device
may get damaged.
Since chemical solvents may damage the surface of the unit, do not use
them for cleaning.
Use a clean and dry cloth to clean.
CondensationWhen turning the heater on in the car during a rainy or humid day,
moisture may condense on the optical lens. lf this occurs, the device
may not read the disc and will not function properly. ln such a case,
it is advised to remove the disc from the device until the unit is dried.
Installation and RepairsPlease install and operate the device as specified by this manual. lf you
cannot install the device correctly by yourself, take it to an authorized
dealer.
Do not open the device by yourself for repairs. lf the device does not
work properly, take it to an authorized dealer. (lf you disassemble the
unit, you will void the warranty).
Video/Audio TroubleWhen driving on a rough road the unit is prone to severe shaking and
may experience video/audio problems. This is inevitable.
3
Safety Precautions
22
12. You can now listen and view all content displayed on your Android device on your new larger LCD display as well.13. For iPhone, tap on “Setting” on your iphone:
14. Tap on “Wi-Fi”.

•Touch sensitive controls
•High�resolution digital panel for superb picture
•High definition video input, soft touch controls & advanced ALC
audio technology
•Built-in multimedia disc player
•LED�backlit�panels for exceptional picture quality, high efficiency and
long life
•Cover colors easily interchangeable between black, gray and tan to
match vehicle interior (all 3 colors included)
•Pole distance adjustable from 100-190mm apart for universal fit
•Free tilt mechanism allows for adjustment to optimal viewing angle
•Data port and memory card slot for music, image and video playback
•Front 3.5mm jack for headphones
•2 A/V inputs
One 3.5 mm front input jack
One wired RCA input
•1 A/V RCA output
•Wireless remote control
•Built-in dual-channel speaker
•Built-in FM transmitter
•Built-in dual channel IR transmitter
Ch A: 2.3MHz(left)-2.8MHz(right)
Ch B: 3.2MHz(left)-3.8MHz(right)
•7 inch(16:9) TFT LCD display / 9 inch(16:9) TFT LCD display
•Resolution: 800(W) X 480(H)
•Brightness: 200 cd/m²•Power supply: DC + 12V(10.6V-15.8V)
•Power consumption: 12W
•Operating temperature: -10℃�to�+60℃•Dimensions: BSD-705:10"X5.9"X13.7"(BSD-905 & BSD-905M:11.4"X5.7"X14.1")•Weight:3.3 lbs(for BSD-705), 4.2 lbs(for BSD-905 & BSD-905M)
4
Features
BSD-705/BSD-905/BSD-905M
21
9. Look for the device with the matching address and tap on it.
10. The following screens will appear as the devices proceed to connect:
11. Once you see the screens below, you have successfully connected.

BSD-705/BSD-905/BSD-905M
Panel Release
Play/Stop
Menu
Source Select
Power on/off
Previous
Next
Adjustment-
Adjustment+
Data
HD Input
Card
AV 2 inEarphone
DisplayPanel Release
Cover
Laser
DISC Driver
5
Front Panel Controls
20
8.Scroll to the bottom and tap on “Screen Mirroring” .Note: The term used for “Screen Mirroring” as well as the steps to getto this setting may vary from phone to phone. Please refer to yoursmartphone’s user manual, if necessary.

The headrest multimedia player has an AV input port, a wired AV input and a
wired AV output.The AV input can connect with other sources such as GPS,
TV�Box, Game TV Box, etc. The AV output can connect to other displays.
Video Input
Audio Left Input
Audio Right Input
DC + 12VGND
Video Output
Audio Left Output
Audio Right Output
6
Connection Diagram
19
Screencast Setup Quick Guide: Only for BSD-905M & BSS-905M
1. Press the “POWER” button of the unit.2. Press the “ ” button until “Screencast” appear in the top right of the unit screen.3. When it starts, you can see “Screencast” on the screen.4.as shown below:
5. For iPhone, skip to step 13.6. For Android devices, go to your phone settings:
7. Select the “Connections” tab at the top.
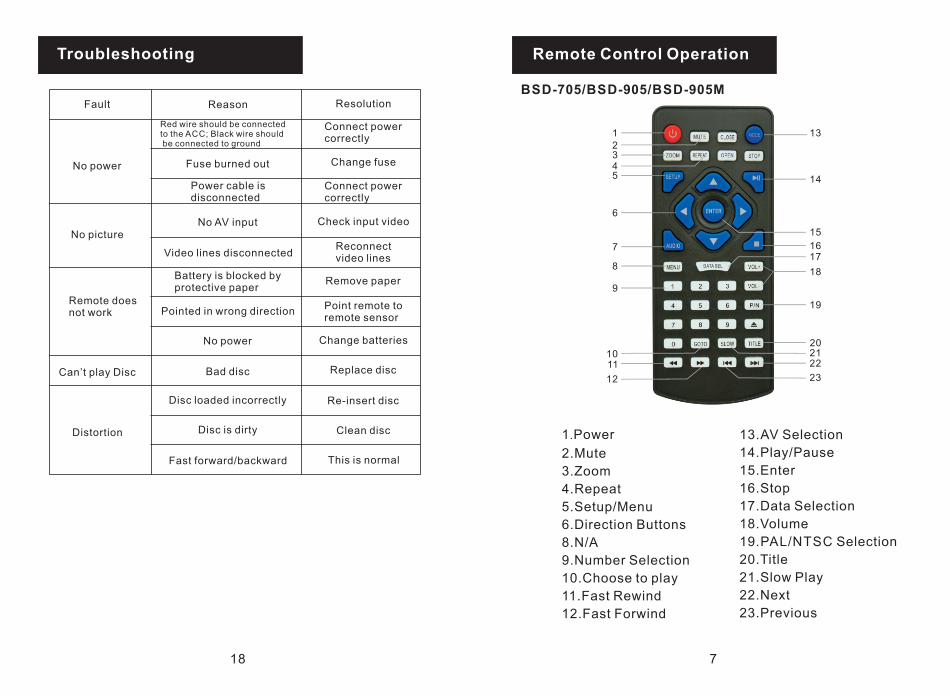
BSD-705/BSD-905/BSD-905M
1.Power
2.Mute
3.Zoom
4.Repeat
5.Setup/Menu
6.Direction Buttons
8.N/A
9.Number Selection
10.Choose to play
11.Fast Rewind
12.Fast Forwind
13.AV Selection
14.Play/Pause
15.Enter
16.Stop
17.Data Selection
18.Volume
19.PAL/NTSC Selection
20.Title
21.Slow Play
22.Next
23.Previous
Remote Control Operation
7
Fault
No power
No picture
Remote does not work
Can’t play Disc
Distortion
Reason Resolution
Red wire should be connected to the ACC; Black wire should be connected to ground
Fuse burned out
Power cable is disconnected
No AV input
Video lines disconnected
Battery is blocked by protective paper
Pointed in wrong direction
No power
Bad disc
Disc loaded incorrectly
Disc is dirty
Fast forward/backward
Connect power correctly
Change fuse
Check input video
Reconnectvideo lines
Remove paper
Point remote toremote sensor
Change batteries
Replace disc
Re-insert disc
Clean disc
This is normal
Connect power correctly
18
Troubleshooting
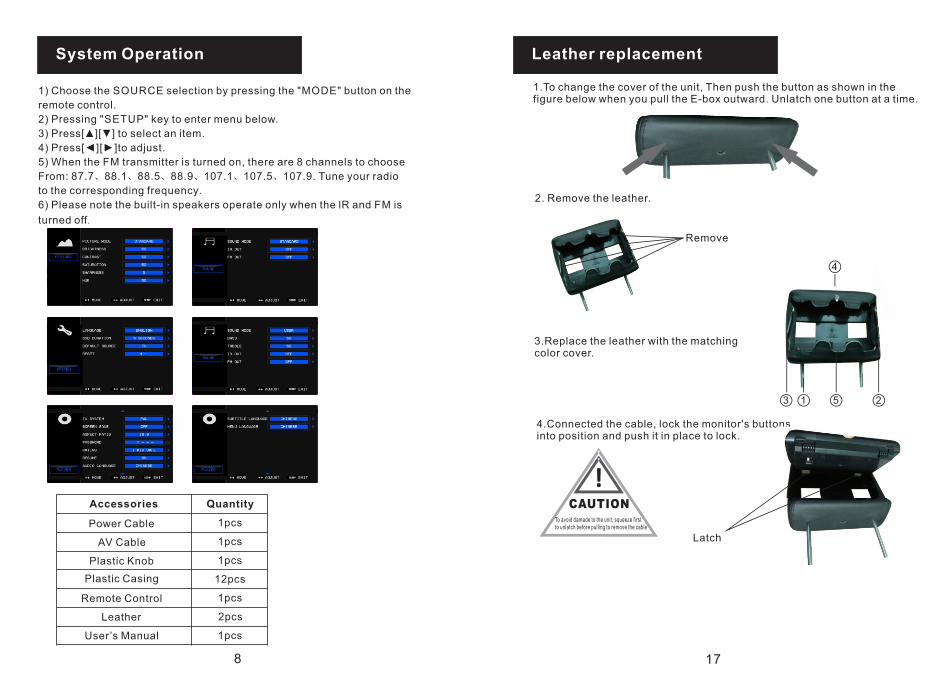
1) Choose the SOURCE selection by pressing the "MODE" button on the
remote control.
2) Pressing "SETUP" key to enter menu below.
3) Press[▲][▼] to select an item.
4) Press[◄][►]to adjust.
5) When the FM transmitter is turned on, there are 8 channels to choose
From: 87.7、88.1、88.5、88.9、107.1、107.5、107.9. Tune your radio
to the corresponding frequency.
6) Please note the built-in speakers operate only when the lR and FM is
turned off.
8
System Operation
Accessories
Power Cable
Plastic�Casing
Remote Control
User’s Manual
Leather
Quantity
1pcs
12pcs
1pcs
2pcs
1pcs
Plastic Knob 1pcs
AV Cable 1pcs
2. Remove the leather.
3.Replace the leather with the matchingcolor cover.
4.Connected the cable, lock the monitor's buttonsinto position and push it in place to lock.
Latch
1.To change the cover of the unit, Then push the button as shown in the figure below when you pull the E-box outward. Unlatch one button at a time.
Leather replacement
17
Remove
To avoid damade to the unit, squeeze firstto unlatch before pulling to remove the cable
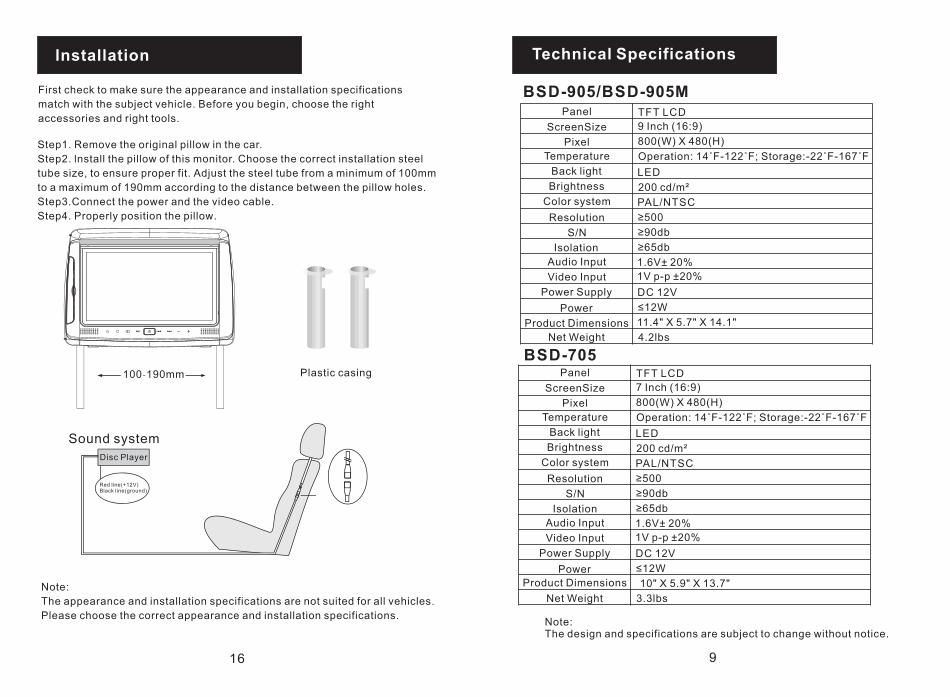
TFT LCD
9 Inch (16:9)
800(W) X 480(H)
Operation: 14˚F-122˚F; Storage:-22˚F-167˚F
LED
200�cd/m²
PAL/NTSC
≥500
≥90db
≥65db
1.6V± 20%
1V p-p ±20%
DC 12V
≤12W
11.4" X 5.7" X 14.1"
Panel
ScreenSize
Pixel
Temperature
Back light
Brightness
Color system
Resolution
S/N
Isolation
Audio Input
Video Input
Power Supply
Power
Net Weight 4.2lbs
TFT LCD
7 Inch (16:9)
800(W) X 480(H)
Operation: 14˚F-122˚F; Storage:-22˚F-167˚F
LED
200�cd/m²
PAL/NTSC
≥500
≥90db
≥65db
1.6V± 20%
1V p-p ±20%
DC 12V
≤12W
10" X 5.9" X 13.7"
Panel
ScreenSize
Pixel
Temperature
Back light
Brightness
Color system
Resolution
S/N
Isolation
Audio Input
Video Input
Power Supply
Power
Net Weight 3.3lbs
Note:The design and specifications are subject to change without notice.
Product Dimensions
BSD-905/BSD-905M
BSD-705
Product Dimensions
9
Technical Specifications
First check�to make sure the appearance and installation specifications
match with the subject vehicle. Before you begin, choose the right
accessories and right tools.
Note:
The appearance and installation specifications are not suited for all vehicles.
Please choose the correct appearance and installation specifications.
Plastic casing
Disc�Player
Red line(+12V)Black line(ground)
Step1. Remove the original pillow in the car.
Step2. lnstall the pillow of this monitor. Choose the correct installation steel
tube size, to ensure proper fit. Adjust the steel tube from a minimum of 100mm
to a maximum of 190mm according to the distance between the pillow holes.
Step3.Connect the power and the video cable.
Step4. Properly position the pillow.
Sound�system
100-190mm
lnstallation
16

Dust particles, scratches or twisting may cause sound disruption, poor sound
quality or poor screen image during play.
- Use a soft cloth to gently clean fingerprints and dust on the data surface
(polished side) of the disc.
- Never use anti-static spray or liquid, benzene, thinner or other chemical
solvents to clean discs. Such chemical solvents may damage the plastic surface
of the disc.
- After playing discs, you are advised to place them inside their original cases
to prevent any damage to them.
- Do not expose discs to direct sunlight, high humidity or high temperatures for
long periods of time. Discs may deform.
- Do not write on the disc's signal surface. A sharp pen or ink may cause damage
to the surface of the disc.
- The sound quality may vary among discs depending on their recording methods.
10
Handling Discs
15
TFT LCD
9 Inch (16:9)
800(W) X 480(H)
Operation: 14˚F-122˚F; Storage:-22˚F-167˚F
LED
200�cd/m²
PAL/NTSC
≥500
≥90db
≥65db
1.6V± 20%
1V p-p ±20%
DC 12V
≤12W
11.4" X 5.7" X 14.1"
Panel
ScreenSize
Pixel
Temperature
Back light
Brightness
Color system
Resolution
S/N
Isolation
Audio Input
Video Input
Power Supply
Power
Net Weight 4.1lbs
TFT LCD
7 Inch (16:9)
800(W) X 480(H)
Operation: 14˚F-122˚F; Storage:-22˚F-167˚F
LED
200�cd/m²
PAL/NTSC
≥500
≥90db
≥65db
1.6V± 20%
1V p-p ±20%
DC 12V
≤12W
10" X 5.9" X 13.7"
Panel
ScreenSize
Pixel
Temperature
Back light
Brightness
Color system
Resolution
S/N
Isolation
Audio Input
Video Input
Power Supply
Power
Net Weight 3.1lbs
Note:The design and specifications are subject to change without notice.
Product Dimensions
BSS-905/BSS-905M
BSS-705
Product Dimensions
Technical Specifications

•Touch sensitive controls
•High�resolution digital panel for superb picture
•High definition video input, soft touch controls & advanced ALC
audio technology
•LED�backlit�panels for exceptional picture quality, high efficiency and
long life
•Cover colors easily interchangeable between black, gray and tan to
match vehicle interior (all 3 colors included)
•Pole distance adjustable from 100-190mm apart for universal fit
•Free tilt mechanism allows for adjustment to optimal viewing angle
•Front 3.5mm jack for headphones
•2 A/V inputs
One 3.5 mm front input jack
One wired RCA input
•1 A/V RCA output
•Wireless remote control
•Built-in dual-channel speaker
•Built-in dual channel IR transmitter
Ch A: 2.3MHz(left)-2.8MHz(right)
Ch B: 3.2MHz(left)-3.8MHz(right)
•7 inch(16:9) TFT LCD display / 9 inch(16:9) TFT LCD display
•Resolution: 800(W) X 480(H)
•Brightness: 200 cd/m²•Power supply: DC + 12V(10.6V-15.8V)
•Power consumption: 12W
•Operating temperature: -10℃�to�+60℃•Dimensions: BSD-705:10"x5.9"x13.7"(BSD-905 & BSD-905M:11.4"x5.7"x14.1")
•Weight:3.1 lbs(for BSD-705), 4.1 lbs(for BSD-905 & BSD-905M)
11
BSS-705/BSS-905/BSS-905M
Features
1) Choose the SOURCE selection by pressing the "MODE" button on the
remote control.
2) Pressing "MENU" key to enter menu below.
3) Press[▲][▼] to select an item.
4) Press[◄][►]to adjust.
5) Please note the built-in speakers operate only when the lR is turned off.
14
BSS-705/BSS-905/BSS-905M
System Operation
Accessories
Power Cable
Plastic�Casing
Remote Control
User’s Manual
Leather
Quantity
1pcs
12pcs
1pcs
2pcs
1pcs
Plastic Knob 1pcs
AV Cable 1pcs
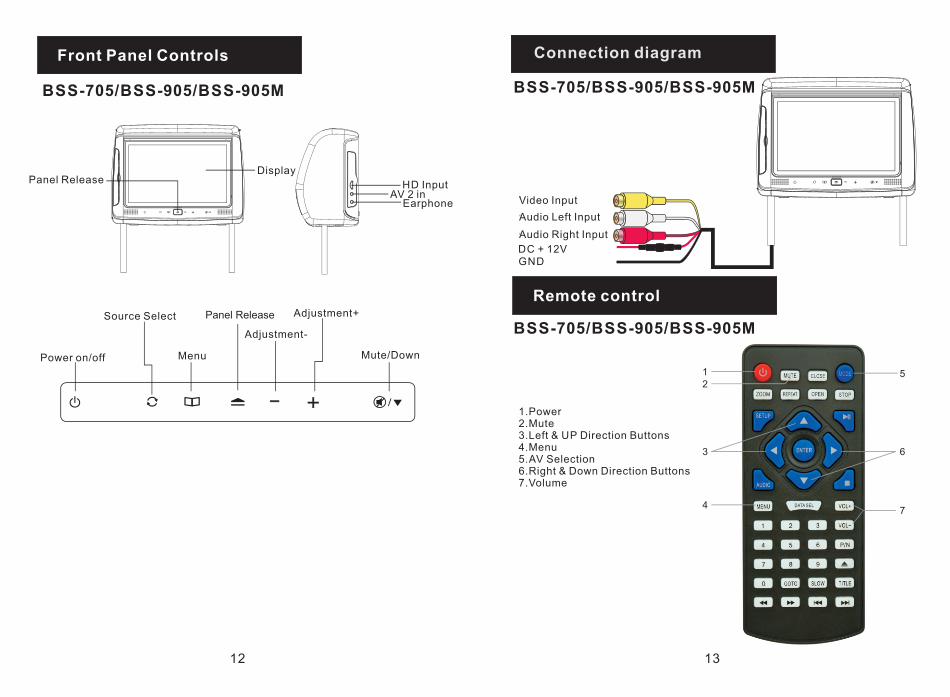
BSS-705/BSS-905/BSS-905M
Panel Release
Menu
Source Select
Power on/off
Adjustment-
Adjustment+
HD InputAV 2 in
Earphone
DisplayPanel Release
12
Mute/Down
Front Panel Controls
BSS-705/BSS-905/BSS-905M
BSS-705/BSS-905/BSS-905M
1.Power2.Mute3.Left & UP Direction Buttons4.Menu5.AV Selection6.Right & Down Direction Buttons7.Volume
13
Connection�diagram
Remote control
Video Input
Audio Left Input
Audio Right Input
DC + 12VGND