breeze sp-eng om 12 03 - purifierparts.com at.pdf · • breezeat 110 volt - 3 years parts and...
TRANSCRIPT

65-00085-003 REV 1203Breeze SP-ENG OM 12_03

2
Advanced Technology Electronic Air Quality System
CAUTION! - Disconnect power cord before servicing. 100, 110 volt models - use 1.0 Amp slow blow fuse. 220, 240 volt models - use 0.5 Amp slow blow fuse
PE Location for Protective Earth Line.
Did you forget to registeryour Breeze AT?
By registering, you’ll activate yourwarranty, and your privacy is guaranteed.
Just fill out your warranty card anddrop it in the mail.
310 T. Elmer Cox Drive
Greeneville, TN 37743
423.638.7246
www.EcoQuest.com
Copyright © 2003 EcoQuest International. All rights reserved
CONTENTS:Applications . . . . . . . . . . . . . . . . . . . . . . . . . . . . . . . . . . . . . . . . . . . . . . . . . . . . . . . . . . . . . . 3Notable Features . . . . . . . . . . . . . . . . . . . . . . . . . . . . . . . . . . . . . . . . . . . . . . . . . . . . . . . . . . 3Specifications . . . . . . . . . . . . . . . . . . . . . . . . . . . . . . . . . . . . . . . . . . . . . . . . . . . . . . . . . . . . 3Principles of Operation . . . . . . . . . . . . . . . . . . . . . . . . . . . . . . . . . . . . . . . . . . . . . . . . . . . . 4Pre-Installation / Inspection . . . . . . . . . . . . . . . . . . . . . . . . . . . . . . . . . . . . . . . . . . . . . . . 4Unit Features . . . . . . . . . . . . . . . . . . . . . . . . . . . . . . . . . . . . . . . . . . . . . . . . . . . . . . . . . . . . . 5Remote Features . . . . . . . . . . . . . . . . . . . . . . . . . . . . . . . . . . . . . . . . . . . . . . . . . . . . . . . . . . 5Manual Controls . . . . . . . . . . . . . . . . . . . . . . . . . . . . . . . . . . . . . . . . . . . . . . . . . . . . . . . . . . 6Rear Access/Filter . . . . . . . . . . . . . . . . . . . . . . . . . . . . . . . . . . . . . . . . . . . . . . . . . . . . . . . . . 6Ecotech Purifier Plate Installation . . . . . . . . . . . . . . . . . . . . . . . . . . . . . . . . . . . . . . . . . . . 7 Placing the Unit . . . . . . . . . . . . . . . . . . . . . . . . . . . . . . . . . . . . . . . . . . . . . . . . . . . . . . . . . . . 7Setting / Adjusting Controls (remote) . . . . . . . . . . . . . . . . . . . . . . . . . . . . . . . . . . . . . . . 8Setting / Adjusting Controls (manual) . . . . . . . . . . . . . . . . . . . . . . . . . . . . . . . . . . . . . . . 9Maintenance . . . . . . . . . . . . . . . . . . . . . . . . . . . . . . . . . . . . . . . . . . . . . . . . . . . . . . . . . . . . 10Troubleshooting . . . . . . . . . . . . . . . . . . . . . . . . . . . . . . . . . . . . . . . . . . . . . . . . . . . . . . . . . 11Warranty . . . . . . . . . . . . . . . . . . . . . . . . . . . . . . . . . . . . . . . . . . . . . . . . . . . . . . . . . . . . . . . . 12
Please record the serial number of your BreezeAT: Serial # ______________________________________________
Please record the name and phone of your EcoQuest Dealer: Name ________________________________________________Phone________________________________________________
To reduce the risk of electric shock, this equipment has a grounding typeplug that has a third (grounding) pin. This plug will only fit into agrounding type power outlet. If the plug does not fit into the outlet,contact qualified personnel to install the proper outlet. Do not alter theplug in any way.

3
APPLICATIONS
Eliminates
• Smoke • Odors • Tobacco Smoke
Plus it works as an appliance to Sanitize an area to reduce:
• Mold • Mildew • Bacteria
NOTABLE FEATURES:
• Remote Control
• Variable Speed Fan
• Sanitization Function
• Adjustable Purification Control
• Balanced Ion Production
SPECIFICATIONS:
Electrical:
• 100 volt 50/60 hz, 110 volt 60 hz, 220 volt 50 hz, or 240 volt 50hz ac line operation depending on model
• 30 watts power consumption
• 24 to 30 KV, 20-30 Khz ion generation pulsator
• Fixed 6 KV DC needle ion generator
Mechanical:
• 400 CFM fan
Size:
• Dimensions: 11.75” x 8” x 9.75”
• Weight: 16 pounds
Ozone Output:
• 0-340 mg per hour
Coverage:
• Covers a range of 20 square feet to 2,500 square feet.** Depends on variables such as severity and frequency of pollution,
humidity and temperature.
Warranty:
• BreezeAT 110 volt - 3 years parts and labor (excludes purifier plates).
• BreezeAT 100, 220 & 240 volt - 1 year parts and labor (excludes purifier plates).
• 6 months on Remote Control.

4
PRINCIPLES OF OPERATION
Nature cleanses the air with the lightning and rain. Lightning produces ozone, as
well as positive and negative ions which cleanse the air naturally. Rain helps
bring the ozone and ions closer to the earth's surface. They are then attracted to
atmospheric contaminants that are either removed from the air and attached to
grounded objects or are oxidized.
Breeze AT reproduces the natural conditions found in the outdoors. It is not
designed to create an artificial environment. The re-establishment of a natural
environment takes place out in the air, rather than inside the unit.
The Breeze AT cleanses the air using these natural processes.
The Breeze AT also includes a feature which will effectively sanitizes an
unoccupied area.
PRE-INSTALLATION AND INSPECTION
1. Open and remove shipping corners from top of carton
2. Remove parts box from carton
3. Remove unit from shipping carton
4. Remove all protective materials
5. Check for shipping damage and loose or broken parts
6. Read Owners Manual thoroughly prior to installation
7. Remove Ecotech Purifier Plate from the parts box and install
(See “Ecotech Purifier Plate Installation” Page 6)
8. Install batteries in remote
9. Plug power cord into back of unit
10. Determine placement location for the unit (See “Placement of Unit” Page 6), plug the unit into a 100, 110, 220 or 240 volt outlet depending on model
11. Be sure main power switch is in the ON position and adjust controls
according to the application (see “Setting Unit Controls” Page 7)
5
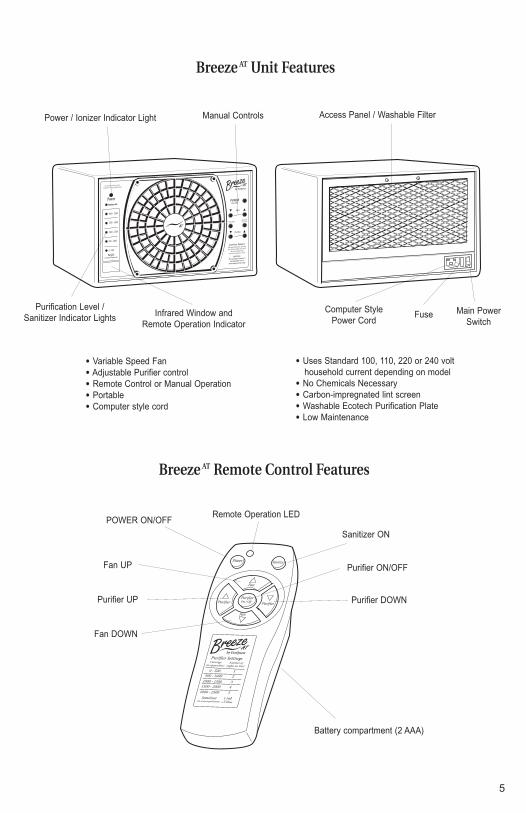
Power / Ionizer Indicator Light
Infrared Window andRemote Operation Indicator
Purification Level /Sanitizer Indicator Lights
Access Panel / Washable FilterManual Controls
Breeze AT Unit Features
Breeze AT Remote Control Features
• Variable Speed Fan• Adjustable Purifier control • Remote Control or Manual Operation• Portable• Computer style cord
• Uses Standard 100, 110, 220 or 240 volt household current depending on model
• No Chemicals Necessary• Carbon-impregnated lint screen • Washable Ecotech Purification Plate• Low Maintenance
Purifier
Fan
Purifier
Fan
PurifierOn / Off
Power Sanitize
POWER ON/OFF
Sanitizer ON
Battery compartment (2 AAA)
Purifier ON/OFF
Purifier DOWNPurifier UP
Fan UP
Fan DOWN
Remote Operation LED
Main PowerSwitch
FuseComputer StylePower Cord

6
Breeze AT Manual Controls
Removing the Rear Lint Screen
WARNING: DO NOT OPERATE theBreeze AT without the Rear Access /
Filter Door installed correctly.
POWER ON/OFF
Fan UP
Sanitizer
Purifier UP
Purifier DOWN
Fan DOWN
Purifier ON/OFF
CAUTION: UNPLUG UNIT BEFORE SERVICING.
NOTE: 110V MODEL DOES NOT USE LINT SCREEN CLIP
- SKIP TO STEP 3 FOR MODELS WITHOUT CLIP.
1. Loosen 2 screws securing clip at top center of lint screen.
2. Slide clip up.
3. Gently pull top of lint screen out of unit.
4. Once the top is out of the unit, pick straight up on the lint
screen to remove.
5. Reassemble in reverse order.
12
3
4

7
ECOTECH PURIFIER PLATE INSTALLATION
The Breeze AT utilizes one Ecotech
purifier plate. Installation is as follows:
1. Unplug the Breeze AT.
2. Remove the rear filter door (see
previous page).
3. Fully insert the purifier plate between
the guides until it stops.
4. Replace the filter door.
WARNING: DO NOT OPERATE the Breeze AT without theRear Access / Filter Door installed correctly.
PLACING THE UNITPlace the unit as high as possible toinsure complete purification. (On topof a bookshelf, high cabinet, etc.)
Suggested locations, listed in the orderof preference:
1. Nearest the source of the worstpollution.
2. Near a cold-air return tothoroughly circulate clean airthroughout the area.
3. In the area most heavily used to achieve maximum benefit.
Note: • The rear of the unit should always
have at least one inch of openarea to allow unrestricted airflow.
• Be sure power cord is notaccessible to small children toprevent injury.

8
SETTING AND ADJUSTING CONTROLS WITH THE REMOTE
TURNING YOUR BREEZE ON & OFF
The Breeze AT will come on by pressing the POWER button on the remote.
To turn on the Purifier feature, press the Purifier On/Off button once. To turn thePurifier feature off, press the Purifier On/Off again.
1. REMOTE FAN CONTROL
The remote will set the fan by pressing the FAN UP or FAN DOWN button. To turnthe fan off, press the POWER button (turns unit off as well).
Increased air circulation improves the cleansing properties of the Breeze AT, so the fan control should be set as high possible without creating an undesirablenoise level.
Note: A ceiling fan can also aid in distribution of cleansing properties.
2. PURIFIER CONTROL
The Purifier feature is turned on and off by pressing the PURIFIER ON/OFF button.The Purification level is adjusted by pressing and holding either the PURIFIER UPor PURIFIER DOWN button and watching the indicator LEDs (small blue lights) onthe front of the unit until achieving the desired level
Purifier Control: Set the purifier to approximately 40% (2 LEDs lit).
Adjust the purifier control up or down after one hour based on the following criteria:
1. The chart shows the correct purifier level for the square footage of the environment. Under normal conditions it is not necessary to adjust the purifier control above the square footage of the environment.
2. Keeping in mind the previous statement (#1), adjust the purifier so that the purifier odor fades into the background 15-30 seconds after entering the environment.
3. When the remote’s purifier control is turned off, the purifier will be turned completely off, the fan and ionization will continue to operate normally.
3. REMOTE SANITIZING MODE
• Press the SANITIZER button once. You should leave the area until the sanitizationis complete.
• The Breeze AT will operate for two hours at the maximum purification output andthen return to the output that matches the purifier setting.
• To interrupt sanitize mode before the end of the two hour period, press theSANITIZER button, OZONE ON/OFF button, or the POWER button.

9
square feet (square meters) approx. % output indicator lights lit
0 - 500 ( 0 - 46) 0- 20% 1
500 - 1000 (46 - 93) 20% - 40% 2
1000 - 1500 (93 - 139) 40% - 60% 3
1500 - 2000 (139 - 186) 60% - 80% 4
2000 - 2500 (186 - 232) 80% - 100% 5
Proper Purifier Level Settings for Indicated Square Footage
NOTES ABOUT ADJUSTING THE PURIFICATION LEVELS
The lights on the front of the Breeze AT indicate the approximate level of purifieroutput. You should adjust the level according to personal preference, but notexceeding the level recommended above for the square footage of the area.
SETTING AND ADJUSTING CONTROLS MANUALLYThe Breeze AT can also be adjusted using the buttons located on the front of theunit. The buttons correspond to the buttons on the remote (POWER, FAN UP, FANDOWN, PURIFIER ON/OFF, etc.), so operation and set-up are the same for both.
Power / Ionizer Indicator Light
Sanitizer Light (RED whensanitizer function is active)
Current Purification Level (blue lights show up when on)
IR Window and RemoteOperation Indicator

MAINTENANCEPeriodic maintenance is required to insure that the Breeze AT operates properly. Aseverely polluted environment can foul a purifier plate in as little as two weeks,normal plate cleaning should take place monthly. Shown here are basic proceduresthat should be carried out to keep your unit running at top performance.
CAUTION: Unplug the Breeze AT before performing any maintenance procedures.
Cleaning the Case:Wipe the Breeze AT with a soft cloth dampened with water. Do not use chemicals orsolvents. Vacuum the front grill periodically to remove any lint buildup.
Rear lint-screen / filter cleaning:
You have two options to clean the lint screen:
• When visibly dirty, simply remove the rear filter from the Breeze AT and, with ahand-held vacuum, remove the heavy particulate from the filter. This method willextend the life of the filter.
OR
• When visibly dirty, remove the rear filter from the Breeze AT and wash in hot water,brushing gently with a toothbrush to remove particulate. Allow to dry prior to re-installing the lint screen. Note: do not use soap - it will damage the carbonmaterial in the lint screen / filter.
Rear lint-screen / filter replacement:
Contact your EcoQuest Dealer for replacement filters.
Purifier Plate:
Remove the rear filter (see page 5). Carefully remove the Ecotech purifier platefrom the card cage by grasping the middle of the edge nearest to you, (See page 6for purifier plate location) and slowly pull it straight out.
Clean the purifier plate with hot water and ammonia. Dry completely using a hairdryer if necessary. Reinstall purifier plate (See page 6) . Be sure to check that theelectrical tabs are in contact with the plate.
Purifier Plate Card Cage:
Also be sure to clean the white stand-offs at the corners of the purifier plate cardcage. (A cotton swab with alcohol works well.)
Changing the fuse:
The fuse may be accessed by unplugging the cord fromthe back of the unit and gently pulling the fuse holderstraight out. Replace with a 1amp buss type fuse only.
Fuse Location
10

TROUBLESHOOTINGIndicators of Operation
The Ionizer/Fan lamp should be illuminated whenever the unit is on.
Depending on the current Purifier setting, between 1 and 5 of the small bluepurifier lights should be illuminated.
The SANITIZER light should be RED when the sanitizing feature is on.
A small lamp or bulb is located at the base of the frequency type ionizer antenna.Turn the unit on and check that the lamp is illuminated. This verifies that thefrequency type ionizer and needlepoint ionizer are functioning properly. The lampshould stay illuminated as long as the unit is turned on.
Troubleshooting - What to look for first.
1. I have plugged in the unit, turned “on” the main power switch, pressed the ONbutton on the remote (or the unit) and nothing happens…what's wrong?
• Make sure the electrical outlet is capable of providing power to the unit.
• Check the lint screen located at the back of the machine to ensure that thesafety switch activator clip depresses the safety switch.
• Check to see if the proper fuse is installed and that it is operational.
2. The fan is operating although the unit won't produce any ozone…what's wrong?
• Check the Ecotech purifier plate(s) for serviceability. If they are cracked orbroken, the purifier plate(s) will require replacement. Ensure maintenanceprocedures required for the purifier plate(s) have been performed accordingto the "Maintenance" section of this Owner's Manual. Order new plates fromyour EcoQuest Dealer.
• Electrical stainless steel contacts are not contacting the screen portion of thePurifier plate(s). Unplug and inspect the unit for any loose connections.
• Do not attempt to disassemble the unit, due to the Limited Warranty of theproduct.
3. How am I able to know if the Frequency Type Ionizer is working?
• Current models with the Frequency Type Ionizer system have a neon lightbulb mounted on the base of the Frequency Type antenna. When the powerswitch to the unit is turned ON, the neon light bulb will illuminate, indicatingthat the Frequency Type Ionizer is functioning normally.
4. The Ecotech Purifier Plate(s) are making a noise, have a burning smell, and/orappear to arc or spark. What is the problem?
• Purifier plate is most likely cracked. Refer to the answers for question # 2, as itwould apply to this question also.
5. What are the most typical application problems?
• Symptom: A belief that the proper equipment is placed in the environmentand the equipment appears unsuccessful.
Problem: Lack of air movement, improper placement of the unit.
• Symptom: Strong odors still remain within the environment after placement.
Problem: Lack of ozone, improper placement of the unit.
11

12
• Symptom: A strong odor of ozone is present within the environment.
Problem: Too much ozone accumulation within the environment, as a resultof improper purifier control setting, and / or lack of air movement.
• Symptom: Visual haze of smoke and / or particulate remain within theenvironment.
Problem: Lack of ionization and / or air movement.
6. Unit does not operate -
• Is the unit plugged in?
• Are you sure the outlet is active?
• Is the main power switch turned on?
• Is the rear lint screen installed properly to depress the safety switchdownward?
• Does the fuse need to be replaced?
7. Air flow is restricted or reduced -
• Is the unit properly placed away from objects that may obstruct air flow?
• Are the filter and front grill housing clean?
If your unit fails to operate properly after performing trouble-shooting, contactyour EcoQuest Dealer for further assistance, contact EcoQuest at the addresslocated on the front of the manual, or visit www.EcoQuest.com for additionaltechnical support.
WARRANTY INFORMATIONThis product is of solid state construction and is warrantied by
EcoQuest International, 310 T. Elmer Cox Drive, Greeneville, TN 37743,
to the original purchaser, depending on model, to be free from defect in materialsand workmanship for:
• Three (3) years from date of purchase (110 volt models).
• One (1) year from date of purchase (100, 220 & 240 volt models).
(Excluding Ecotech Purifier Plates, which are covered for 90 days from the samedate and Remote Control which is covered for 180 days)
See warranty card for specific details.
If you have any questions concerning your Breeze AT, please see your local EcoQuestDealer.
If your unit is defective, please contact
EcoQuest International, 310 T. Elmer Cox Drive, Greeneville, TN 37743
or visit www.EcoQuest.com for technical help.