brbt binoculars bonanza lesson plan - lesson plans - · pdf filebinoculars bonanza! overview...
TRANSCRIPT

Binoculars Bonanza! Binoculars Bonanza! Binoculars Bonanza!
Overview Students will explore
the bird world through binoculars and learn
basic bird identification strategies.
California Content
Standards Grade 6: 7.b.-I&E Grade 7: 7.a.d.-I&E
National Standards Content Standard A:
Scientific Inquiry
Materials Included Student Journal 15 Binoculars Checklist Common Birds of Modoc
County laminated guide
Activity Time Preparation: 15 min.
Activity Time: 35 min.
Best Season All Seasons
Vocabulary
Objective Lenses Eye Lenses Prism Binoculars
Grade Level: All ages (C.S.S: 6th-7th)
Learner Objectives Students will:
• Identify and label the features on binoculars • Demonstrate the appropriate use by properly handling binoculars • Use binoculars to observe and watch birds
Background Information Binoculars bring students close to birds without disturbing them in their natural habitat, allowing for observation, identification, and marveling at birds. By properly handling and using binoculars, students can easily ob-serve bird field marks, plumage (color of feathers), bill shape, and feet as well as flight patterns, feeding, and mating. This does not mean you cannot have fun without binoculars! Sometimes birding by ear is just as fun and students can learn a lot from bird sounds (see Birding By Ear). Neverthe-less, binoculars are a great way for students to get up close and personal with birds. The invention of binoculars can be credited to two extraordinary scientists: Galileo and Ernest Abbe. In 1609, Galileo developed the first simple tele-scope consisting of a positive objective lens and negative eyepiece lens, which is still used today. In 1893, Abbe developed the first prism binocular that caused the path of light to zigzag or fold upon itself. Unlike the simple Galileon telescope, prism binoculars allowed a higher range of magnifica-tion and a larger field of vision. The modern binoculars used today are es-sentially two telescopes mounted side by side. Both the external and inter-nal components work together to magnify visual images that can be clearly seen through binoculars. This activity presents information that will guide your teaching about bin-oculars. It includes a pre-lesson introducing the structure and components of binoculars to enhance students’ understanding before working in the field. Remember binoculars are fragile, expensive instruments, and proper care is a must! Rattling, shaking, or bumping binoculars could permanently damage the binoculars. For this reason, review the “safe use of binoculars” section in the lesson before distributing binoculars to students.
©Klamath Bird Observatory 2007 The River Center
Basin & Range Birding Trail Education Kit www.KlamathBird.org/Education/BRBT
LP-20

Getting Ready! 1. Read the background information and teacher tips. 2. Review “Safe Uses of Binoculars.” 3. Make copies of Student Journal: How to Use Binoculars sheets. Discuss! 1. Let students know that in this investigation, they will go outside
and use binoculars. Before doing so, students will “warm up” their binoculars skills.
2. Ask students why one would use binoculars (observing birds, watching a play or sports game, etc).
3. Introduce binoculars and the 7 different components: eye piece lens (lens closest to the eyes), objectives lens (lens closest to the object), central focus (primary focusing component), adjustable eyepiece (secondary focusing component), lens barrel, and prisms (see following page).
Investigate! 1. Give each student a Student Journal. 2. Give students ample time to fill out student sheets. 3. Have students share their answers and then reveal actual answers. Demonstrate! 1. Discuss “Safe Uses of Binoculars” and perform demonstration.
Don’t forget to explain that binoculars are expensive! Dropping them could permanently damage them!
2. Pass out binoculars and have students demonstrate the “Safe Use of Binoculars.”
3. Ask students to correctly identify the 7 different components on the binoculars.
3. Explain how to correctly focus binoculars. 4. Give students Common Birds of Modoc County laminated guides. 5. Take students on a walk outside to practice using binoculars and
observing birds. 6. Ask students to try to identify birds using laminated guides. Follow-up! 1. Ask students 2-3 questions to re-cap lesson (see right panel)
Take A Hike! Take students on a hike along the Basin and Range Birding Trail to practice us-ing binoculars. Observe, identify, and marvel at birds!
Connections! Use with Lesson Plans:
∗ Bird ID Experts
∗ BRBT Habitats
∗ Counting Birds
Lesson Plan
Suggested Questions What are prisms? What are two focusing compo-
nents on binoculars? What is the first step when
using binoculars?
©Klamath Bird Observatory 2007 The River Center
Basin & Range Birding Trail Education Kit www.KlamathBird.org/Education/BRBT
LP-21

What are Binoculars? Structure Binoculars are essentially two identical telescopes mounted side by side and aligned to point in the same direction. At the front of each telescope is an objective lens where light enters, is magnified, and formed into a visual image. The image produced is upside down and backwards. With the help of prisms (blocks of glass functioning as mirrors without reflecting back), the visual im-ages are turn right side up and viewed properly left to right. Magnification Binoculars are described by a pair of numbers such as 7x35 or 8x40. The first number represents the magnification, or “power,” of the binoculars. This means the 7 in a pair of 7x35 binoculars makes an object appear seven times closer than when viewed by the naked eye. The second number represents the aperture, or the diameter of each objective lens. Aperture is especially important because it de-termines the amount of light entering the binoculars. The larger ap-erture, the brighter the image.
Teacher Tips
Cleaning & Protecting Binoculars
1. Clean lenses with soft cloth. Make sure to blow off any dirt particles first so the lenses don’t scratch.
2. Thoroughly wipe off metal parts.
3. Never try to open up bin-oculars (leave internal cleaning to professionals).
4. If there is a dirty film on the lenses, put a drop of lens cleaner on a tissue and wipe in a circular fashion.
5. Keep binoculars clean, dry, and off the ground.
Safe Use of Binoculars
Keep the strap around the neck at all times.
Stand still when using bin-oculars.
Never look at the sun with binoculars.
Do not rattle, shake, or bump binoculars.
Never touch binoculars with fingers or dirty cloth.
Adjustable Eyepiece
Lens Barrel
Eyepiece Lens
Objectives Lens
Central Focus
Strap
©Klamath Bird Observatory 2007 The River Center
Basin & Range Birding Trail Education Kit www.KlamathBird.org/Education/BRBT
LP-22

How to Focus Binoculars Have students stand about 30 feet away from an object or enlarged bird photo before beginning the lesson. Explain the following 10 steps of how to focus bin-
oculars to students. Step 1: Put binoculars strap around the neck. Step 2: If you wear eye glasses, fold eyecups (extra rubber protecting eye from contacting eyepiece lens of binoculars) back. Step 3: Locate the adjustable eyepiece (most are located on the right eyepiece lens and read “ - 0 + ” (see right panel). Set adjustable eye-piece to “0”, or in the middle of the scale. Step 4: Locate stationary object (or enlarged bird photo) first with the naked eye. Step 5: Hold binoculars with two hands and bring binoculars up to your eyes, which are still looking at the stationary object. Step 6: Move the two halves of the binoculars (connected by a hinge) until one field of view is seen. If you see a dark patch or cres-cents in the center or on the sides, the binoculars are too close tighter. If you see through two circles or see two images, the binocu-lars are too far apart. Adjust binoculars to your eye width. Step 7: Open both eyes and use a finger or two to locate the center focus wheel. Turn the wheel back and forth until the object becomes clearest. Close right eye (left eye open) and turn wheel again until image is clearest in the left eye. Step 8: Continue looking at the object and close the left eye (keep right eye open). Use a finger on your right hand to locate the adjust-able eyepiece. Adjust the eyepiece back and forth until the image be-comes the clearest in the right eye. For some, the eyepiece will be closer to the “-”, for some it will be closer to the “+” or the “0”. Step 9: Use the central focus for further adjustments during birding, but try not to touch the adjustable eyepiece once focused. Step 10: Now you are ready for birding. Have fun!
Step 3: Adjustable Eyepiece
Teacher Tips
Students using binoculars while watching birds.
Student learning how to correctly focus binoculars.
©Klamath Bird Observatory 2007 The River Center
Basin & Range Birding Trail Education Kit www.KlamathBird.org/Education/BRBT
LP-23

Bird ID Experts!Bird ID Experts!Bird ID Experts!
Overview Students will identify
and sketch birds using field marks such as coloration, size, and
shape.
California Content Standards
Grade 1: 4.a.-I &E Grade 2: 4.c.-I&E Grade 3: 3.b.-L.S.
National Standards Content Standard A:
Scientific Inquiry Content Standard C:
Life Sciences
Materials Include Bird focus cards Common Birds
PowerPoint Student Journal Clipboards
Activity Time
Preparation: 15 min. Activity Time: 45 min.
Best Season
All Season
Vocabulary Field Marks Ornithologist Nape Rump Flank
Grade Level: 1st-12th (C.S.S: 1st-3rd) Learner Objectives Students will:
• Determine why field marks are important in identifying birds • Describe bird field marks using correct names of body parts • Identify five field marks on a focus bird
Background Information Identifying birds in the field can be a tricky and at times a challenging task. Birds are mobile, well-camouflaged, sometimes very small, and often seen from a far away distance. However, birds are well-adapted to their environ-ments and have special characteristics and lifestyles that can aid in their identi-fication. Three characteristics ornithologists (scientists who study birds) look for when identifying and studying birds are field marks, habitat, and behavior. Field Marks: Field marks are a great way to identify birds in the field. They in-clude physical characteristics such as coloration, size, and shape. Keep in mind coloration can be misleading because it can change with the light and the time of the year. On the other hand, size and shape work well when com-paring and identifying birds. Habitat: Many birds are specially adapted to specific habitats. For instance, waterfowl live in water areas and woodpeckers in wooded areas. In addition, there are birds that are specific to a location within a habitat as a result of their feeding behaviors. For instance, Spotted Towhees are almost always found in the underbrush looking for worms, woodpeckers on the trunk of a tree drill-ing for insect colonies, and hawks perched on high branches searching for small mammals. See BRBT Habitats for more information. Behavior: Birds engage in incredible and, at times, bizarre behaviors. Knowing the bird’s flight patterns, feeding mechanisms, nest building techniques, mat-ing displays, and/or sounds will help distinguish them from others. See Bird-ing By Ear for more information about bird songs and calls.
©Klamath Bird Observatory 2007 The River Center
Basin & Range Birding Trail Education Kit www.KlamathBird.org/Education/BRBT
LP-24
Getty Ready! 1. Read the background information & teacher tips. 2. Make copies of Student Journal: Bird ID Experts. Discuss! 1. Ask students if they know what an ornithologist is. (Hints: mam-
malogists study mammals, herpetologist studies reptiles and am-phibians). An ornithologists is a scientist who study birds.
2. Explain to students that an ornithologist identifies “field marks” to identify and study birds.
3. Ask students if they know what a field mark is? Field marks are physical characteristics that make bird species unique and different from an-other bird species. For example, most people have hair, but the length and color might be an important clue for identifying each person. Point to some-one in the class who has long, brown hair. Clues like color and length are also used to identify birds. For example, the length of the tail and shape of the bill are critical field marks.
4. Explain to students that field marks describe a bird body part by using adjectives such as color (red, yellow), size (small, large, short) and shape (round, blunt, sharp). You may have to write adjectives on the board to help explain.
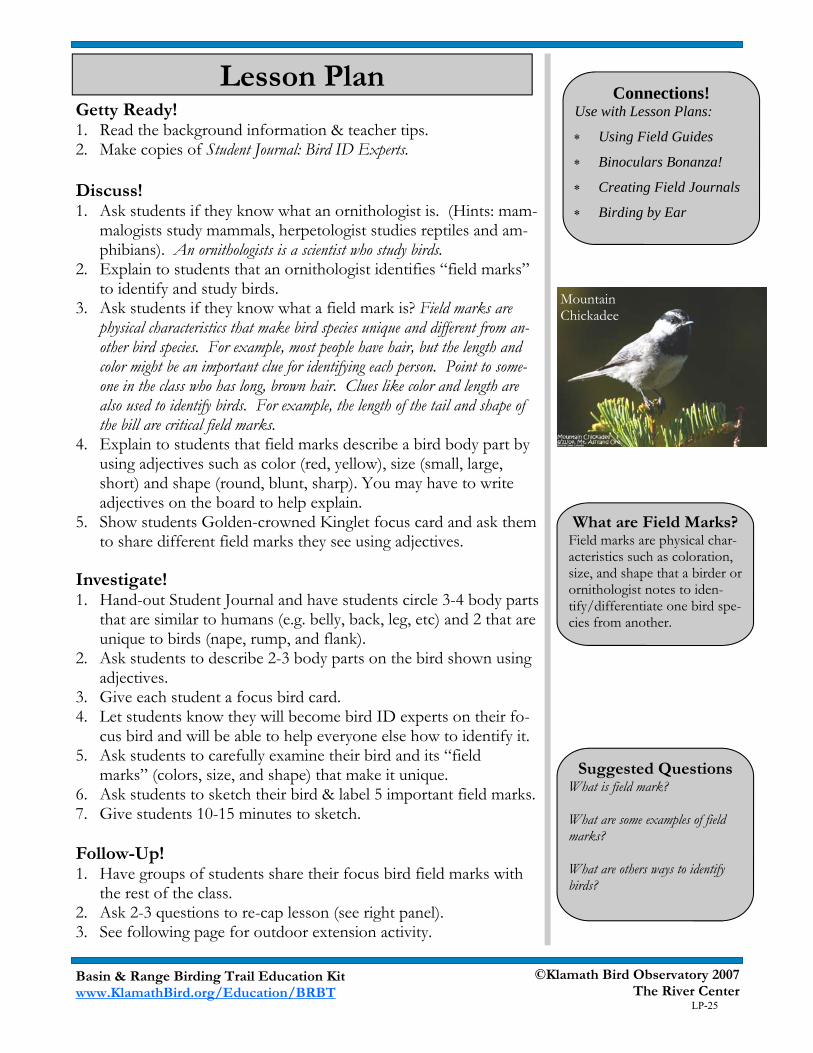
5. Show students Golden-crowned Kinglet focus card and ask them to share different field marks they see using adjectives.
Investigate! 1. Hand-out Student Journal and have students circle 3-4 body parts
that are similar to humans (e.g. belly, back, leg, etc) and 2 that are unique to birds (nape, rump, and flank).
2. Ask students to describe 2-3 body parts on the bird shown using adjectives.
3. Give each student a focus bird card. 4. Let students know they will become bird ID experts on their fo-
cus bird and will be able to help everyone else how to identify it. 5. Ask students to carefully examine their bird and its “field
marks” (colors, size, and shape) that make it unique. 6. Ask students to sketch their bird & label 5 important field marks. 7. Give students 10-15 minutes to sketch. Follow-Up! 1. Have groups of students share their focus bird field marks with
the rest of the class. 2. Ask 2-3 questions to re-cap lesson (see right panel). 3. See following page for outdoor extension activity.
Lesson Plan
What are Field Marks? Field marks are physical char-acteristics such as coloration, size, and shape that a birder or ornithologist notes to iden-tify/differentiate one bird spe-cies from another.
Connections! Use with Lesson Plans:
∗ Using Field Guides
∗ Binoculars Bonanza!
∗ Creating Field Journals
∗ Birding by Ear
Mountain Chickadee
Suggested Questions What is field mark? What are some examples of field marks? What are others ways to identify birds?
©Klamath Bird Observatory 2007 The River Center
Basin & Range Birding Trail Education Kit www.KlamathBird.org/Education/BRBT
LP-25
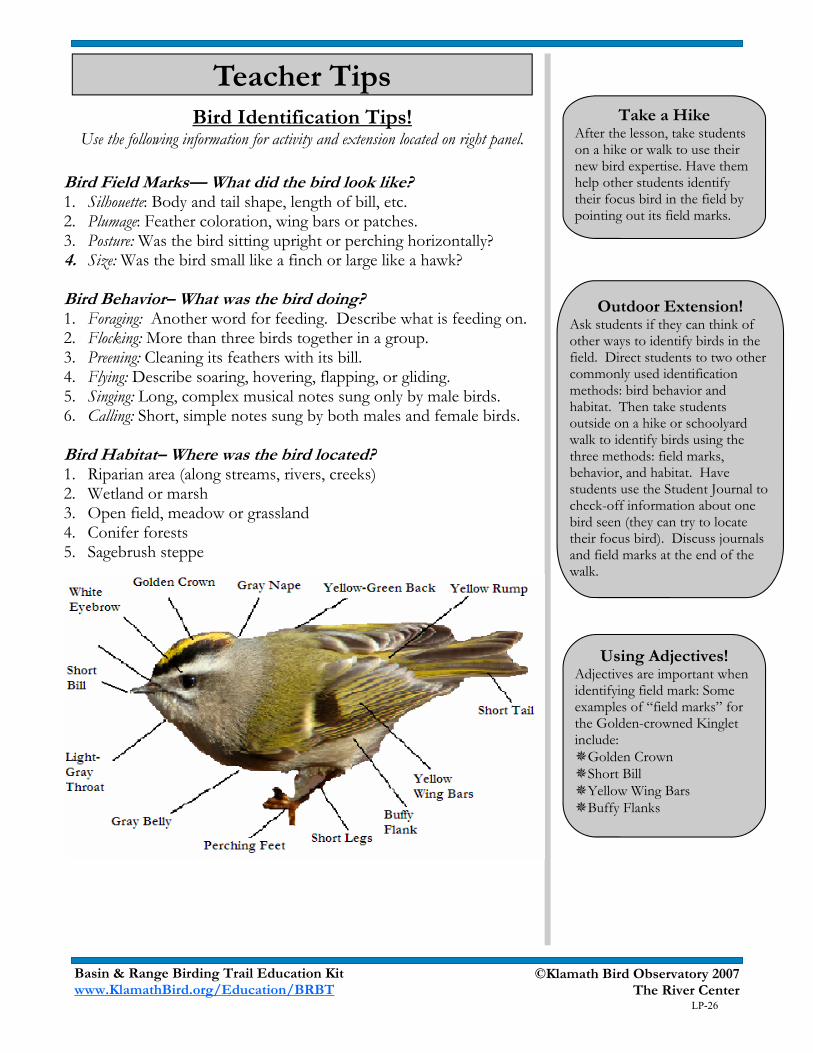
Bird Identification Tips! Use the following information for activity and extension located on right panel.
Bird Field Marks— What did the bird look like? 1. Silhouette: Body and tail shape, length of bill, etc. 2. Plumage: Feather coloration, wing bars or patches. 3. Posture: Was the bird sitting upright or perching horizontally? 4. Size: Was the bird small like a finch or large like a hawk? Bird Behavior– What was the bird doing? 1. Foraging: Another word for feeding. Describe what is feeding on. 2. Flocking: More than three birds together in a group. 3. Preening: Cleaning its feathers with its bill. 4. Flying: Describe soaring, hovering, flapping, or gliding. 5. Singing: Long, complex musical notes sung only by male birds. 6. Calling: Short, simple notes sung by both males and female birds. Bird Habitat– Where was the bird located? 1. Riparian area (along streams, rivers, creeks) 2. Wetland or marsh 3. Open field, meadow or grassland 4. Conifer forests 5. Sagebrush steppe
Teacher Tips Take a Hike
After the lesson, take students on a hike or walk to use their new bird expertise. Have them help other students identify their focus bird in the field by pointing out its field marks.
Using Adjectives! Adjectives are important when identifying field mark: Some examples of “field marks” for the Golden-crowned Kinglet include:
Golden Crown Short Bill Yellow Wing Bars Buffy Flanks
Outdoor Extension! Ask students if they can think of other ways to identify birds in the field. Direct students to two other commonly used identification methods: bird behavior and habitat. Then take students outside on a hike or schoolyard walk to identify birds using the three methods: field marks, behavior, and habitat. Have students use the Student Journal to check-off information about one bird seen (they can try to locate their focus bird). Discuss journals and field marks at the end of the walk.
©Klamath Bird Observatory 2007 The River Center
Basin & Range Birding Trail Education Kit www.KlamathBird.org/Education/BRBT
LP-26

Using Field GuidesUsing Field GuidesUsing Field Guides
Overview Students will explore
field guides by identify-ing local bird species and their characteris-
tics.
California Content Standards
Grade 6: 7.b.-I&E Grade 7: 7.a.c.-I&E
National Standards Content Standard A:
Scientific Inquiry
Materials Included Student Journal Bird focus cards Birds of Northern Cali-
fornia field guides
Activity Time Preparation: 15 min.
Activity Time: 40 min.
Best Season Spring/Summer
Vocabulary
Field guide Range map
Grade Level: 4th-12th (C.S.S: 6th & 7th) Learner Objectives Students will:
• Examine and interpret field guides • Use field guides when searching for a focus bird • Describe why a field guide is a critical tool in birding
Background Information Field guides are indispensable when it comes to identifying and studying birds in the field (outdoors). Just like binoculars, ornithologists (people who study birds) or birders are never in the field without this critical tool. They are mostly compact and light enough to put in a backpack and pro-vide a wealth of information on birds. Field guides are typically created for a particular region and include infor-mation about the organisms found there. There are a variety of California bird field guides available, and many are adult or children appropriate. Birds of Northern California, a Lone Pine Series Field Guide, is good for beginner birders and beyond. For this reason, this resource is included in the Basin and Range Birding kit. This field guide contains species account for 328 Northern California birds with in-depth species descriptions, range maps, and illustrations. Information about California bioregions, bird activities, birding, birding tools, and bird behaviors is also included. This activity will help teach students how to use the Birds of Northern Califor-nia field guide. It can also be adapted to other styles of field guides.
©Klamath Bird Observatory 2007 The River Center
Basin & Range Birding Trail Education Kit www.KlamathBird.org/Education/BRBT
LP-27

Getting Ready! 1. Read background information and review Birds of Northern Califor-
nia Field Guide. 2. Make copies of Student Journal: Using Field Guides. Discuss! 1. Ask students if they know (or can figure out by its name) what a
bird field guide is and what it is used for. A field guide is a critical tool biologists use to identify organisms when outdoors (in the field).
2. Let students know they will become Bird ID experts by using an exciting and critical tool used in bird studies.
3. Assign one field guide per 1-3 students. 4. Have students spend about 2-3 minutes looking through guide. 5. Discuss the following questions as a class: How is the field guide
organized? The field guide groups bird by similar characteristics. For in-stance, waterfowl (duck, swans, geese) are grouped together.
How would you locate more information about a bird you didn't recognize using the field guide? The four useful ways include: looking at the first pages of the guide, the back cover of the book, index, & flipping through.
Explore! 1. Give each student a Student Journal. 2. Have students spend about 5-10 minutes looking through the
field guide and answering questions in their journal sheet. Investigate! 1. Give each student or groups of students a bird focus card (use
study skins if accessible). 2. Have students spend about 10-15 minutes looking up their spe-
cies in the bird field guide. Ask students to learn as much as they can on their focus bird so they can become the expert on their bird! Have them record information on the journal sheet.
3. After the time has elapsed have students show their bird card and share some interesting facts they learned about their species.
Range Maps! 1. Direct students to page 35 to look at the provided range map key. 2. Have students fill in information about their species’ range map. Follow-up! 1. Ask students to share information they found about their bird. 2. Ask students 2-3 questions to recap the lesson (see right panel).
Lesson Plan
Take a Hike! Take students on a nature hike along a Basin and Range Birding Trail Site (see map & brochure in kit) and have them use field guides to identify birds. Ask students to share in-formation about their fo-cus bird during the hike!
Connections! Use with Lesson Plans:
∗ BRBT Habitats
∗ Binoculars Bonanza
∗ Bird Count
∗ Bird ID Expert
Suggested Questions What information can you gather from using a bird field guide? What color on a range map indicates a summer resident? What is one way to look up a bird in a field guide? What other types of field guides might exist?
©Klamath Bird Observatory 2007 The River Center
Basin & Range Birding Trail Education Kit www.KlamathBird.org/Education/BRBT
LP-28

Grade Level: 2nd-12th (C.S.S: 3rd, 5th-7th)
Learner Objectives Student will:
• Identify reasons why birds sing • Describe functions of bird songs and calls • Create mnemonic devices for five bird songs
Background Information Birds vocally communicate to each other by producing a series of songs or calls. This form of communication, using sound, is especially important for birds. Unlike mammals, a bird’s olfaction system, or sense of smell, is poorly developed. (Turkey Vultures are one exception to the rule and have extraordinary olfactory systems that can smell an animal carcass from more than 100 miles away). In addition to sound, birds visually communicate through their brightly colored plumages and elaborate displays. However, there are several disadvantages that come with this type of communication (for example, it is difficult to see other birds in dense forests and low light areas). Bird sounds can be divided into songs and calls. The difference is that bird songs are long and complex, and almost exclusively produced by male birds during breeding season. As a male bird matures, he gains a larger repertoire while his songs become more complex. Most bird songs signify establish-ment of a territory, displaying for a mate, or protection of a nest. On the contrary, bird calls are relatively shorter, simpler, and produced by both sexes throughout the year. They are mostly used to warn and threaten oth-ers of the same species or to make contact with family members. In addition to understanding field marks and bird habitats, learning the dif-ferent bird songs can help students identify birds in the field. This activity presents an interesting and useful way to teach bird songs– using mne-monic devices as ways to remember local bird songs.
Birding By EarBirding By Ear
Overview Students will identify local, native birds by songs and learn their
function.
California Content Standards
Grade 3: 3.a.-L.S. Grade 5: 6.a.-I&E Grade 6: 7.b.-I&E Grade 7: 7.a.-I&E
National Standards Content Standard A:
Science as Inquiry Content Standard C:
Life Sciences
Materials Included Student Journal Bird Song CD Audubon stuffed
birds
Materials Needed Extra pencils CD player
Activity Time
Preparation: 15 min. Activity Time: 35 min.
Best Season
Spring/Summer/Fall
Vocabulary Song Call Mnemotic device
©Klamath Bird Observatory 2007 The River Center
Basin & Range Birding Trail Education Kit www.KlamathBird.org/Education/BRBT
LP-29

Getting Ready! 1. Read background information section. 2. Make copies of Student Journal: Birding By Ear. 3. Decide on a site to go & listen for birds (schoolyard or BRBT
Trail). Discuss! 1. Begin with asking students some questions:
Have you ever listened to birds sing– when, where? (If outside, ask students to listen to birds singing for a minute for so). What does bird song sounds like? Why do birds sing.
2. Ask student what are 3 reasons birds sing (mating, establish terri-tory, & defending a nest) & 2 reasons why they call (threat, warn, or contact).
3. Explain that birders and biologists use special ways to remember birds songs. One fun system used is called a mnemotic device where bird songs are translated into words or phrases which a birder can always remember.
4. Show picture of the Mountain Chickadee and play its song using the Bird Song CD. Share the mnemotic phrase used to learn this bird song (“cheeeeese...buurger, cheeeesse…buurger”).
Investigate! 1. Let students know they will be listening to bird songs and that
they should listen carefully. 2. Give students Student Journal: Birding By Ear sheets. 3. Ask students to write down mnemonic phrases that will help
them remember the songs. 4. Show photo of each bird before playing each song. Then play the
song and give ample time for students to think about and write down phrases. Repeat CD if necessary.
5. Ask students to share their mnemonic phrases as a group. 6. Have students look up the particular bird song in the Birds of
Northern California field guide to compare phrases. 7. Repeat steps 4-6 with next four songs. Go Outside! 1. Take students outside to a place where you know there are birds. 2. Pick a location where students can sit and listen for birds. 3. Ask them to record their bird song observations on the sheets. 4. Ask students to share their bird song observations.
Lesson Plan
Challenge Students! After students create mnemonic phrases, test students’ memory of bird songs. Replay the songs at random and have students write down or point to the photo of the bird. Also 2 mystery bird songs are lo-cated on the Bird Song CD. Use these songs to test ad-vanced students.
Yellow Warbler
Connections! Use with Lesson Plans:
∗ Bird ID Experts
∗ Counting Birds
∗ BRBT Habitats
∗ Binoculars Bonanza!
Classroom Tip Play bird songs in the morn-ing before class begins so students are immersed in bird vocalizations.
©Klamath Bird Observatory 2007 The River Center
Basin & Range Birding Trail Education Kit www.KlamathBird.org/Education/BRBT
LP-30

Follow-up! Ask students 2-3 questions to re-cap the lesson (see right panel).
Lesson Plan
Nestlings! Introduction: To introduce the bird songs pre-sent the Audubon stuffed birds to students. Listen to the songs of the American Robin and the Western Meadowlark. If outside, have students listen to birds.
Pick a bird: Have each student pick one of the 5 focus birds and have them be responsible for learning that song.
Before songs: Before playing each song, show or have the stu-dent show the photo of the bird.
Repeat bird name: Have students repeat the name of the bird together.
Repeat song/call: After playing the song, ask students to repeat the song or call together. Remember you don’t have to cover all the songs.
When do birds sing? Season: Most birds begin singing during the spring and summer. This is when they are looking for a mate or protecting territory. Singing or calling helps birds find and attract a mate as well as sustain and protect their nest. There are a few species that sing year-round. Time of day: Birds generally sing during the morning hours and imme-
Suggested Questions What are 2 or 3 reasons why birds sing? What are 2 reasons why birds call? What is one way you can you remember bird songs or calls? What time of day do birds usu-ally sing the most?
©Klamath Bird Observatory 2007 The River Center
Basin & Range Birding Trail Education Kit www.KlamathBird.org/Education/BRBT
LP-31

What are bird songs? Bird songs are long, complex, and almost exclu-sively produced by male birds during breeding season. Function of Song:
Attracting a Mate Strengthen Pair Bond Establish Territory Defend Nest
What are bird calls? Bird calls are relatively shorter, simpler, and produced by both sexes throughout the year. Function of Call:
Threaten others of the same species. Alarm or warn others there is a presence of danger. Contact family members.
Teacher Tips Why do birds sing?
Birds communicate to each other through the production of sound in the form of songs and calls.
During breeding season, the song of the American Robin is one of the first heard in the morning.
How do birds sing? Birds have a similar sound-producing device to the human larynx called the syrinx. Unlike the larynx which is located at the top of the trachea, syrinx is located directly below. As air from the lungs move over the syrinx, special mem-branes called tympaniform membranes vibrate generating sound waves. For this reason, birds are able to produce a variety of sounds.
What is a mnemotic device?
A device used to remember bird songs or calls. This sys-tem translates songs into word phases so they are easier to remember.
©Klamath Bird Observatory 2007 The River Center
Basin & Range Birding Trail Education Kit www.KlamathBird.org/Education/BRBT
LP-32
Overview Students will identify
local birds in their schoolyard and conduct
a bird study.
California Content Standards
Grade 5: 6.c.-I&E Grade 6: 7a.b.-I&E Grade 7: 7.a.c.-I&E Grade 8: 9.a.e.-I&E
National Standards Content Standard A:
Scientific Inquiry
Materials Included Student Journals Bird focus cards Clipboards Pencils Watch/Stopwatch Binoculars (optional) Common Birds Power-
Point and script
Activity Time Preparation: 15 min. Activity Time: Varies
Best Season
Spring/Summer/Fall
Vocabulary Species Non-native
Counting BirdsCounting BirdsCounting Birds Grade Level: 5th-12th (C.S.S: 5th-8th)
Learner Objectives Student will:
• Describe why scientists count birds • Demonstrate the ability to collect and organize scientific data
during a local bird count • Identify local and native birds
Background Information At the turn of the 20th century, conservation was at its beginning stages and scientists were becoming more concerned about the declining bird popula-tions. To help stabilize bird populations, a new protocol was initiated when studying birds. The species and numbers of birds in a given area over an ex-tended period of time were documented. Ornithologists (scientists who study birds) began keeping lists or informal counts of bird species at a par-ticular site. Eventually, formal counts were established including the Christ-mas Bird Count in 1899, the Breeding Bird Census in 1937, and Breeding Bird Survey in 1965. Bird counts, when repeated year after year, within a sea-son, or weekly, can provide invaluable insight into past and present status and health of bird populations as well as the general health of our environ-ment. Today, ornithologists follow a standardized method when conducting a bird census. For example, biologists from the Modoc Wildlife Refuge with sup-port of the International Crane Foundation hold a Sandhill Crane Count each year in the spring. Community members participate each year to learn about Crane diets, habitats, communication, and reproduction habits. Counting the cranes helps Wildlife Refuge biologists protect Crane habitat and popula-tions. Developing a local bird count, whether in the schoolyard or a birding trail, is a great way for your students to better understand local bird species and to participate in the protection of birds! It is also an ideal opportunity for a sci-ence inquiry lesson based on field study. See the Citizen Science activity for ad-ditional information about becoming involved in bird conservation.
©Klamath Bird Observatory 2007 The River Center
Basin & Range Birding Trail Education Kit www.KlamathBird.org/Education/BRBT
LP-33

Lesson Plan Connections!
Connect with Lesson Plans:
∗ Binoculars Bonanza!
∗ Bird ID Experts
∗ Citizen Science
Citizen Science! Cornell Lab of Ornithology recently started one of the most innovative ways to study birds. They began what is called eBird where anyone can share their bird count data over the internet. Ultimately, the bird data helps scientists study birds and discover ways to protect them. Students are not excluded, but rather en-couraged, to participate in bird study counts and share their data on eBird. This way they become “citizen scien-tists!” See Citizen Science les-
Getting Ready! 1. Read over background information section & Common Birds Power-
Point. 2. Make copies of the Student Journal: Counting Birds. 3. Determine the type of count according to: Bird Study Unit: What variable would you like to investigate? A. # of birds by species B. # of birds by families (ducks, hawks, finches, etc). Location: Where would you like your count to occur? A. Schoolyard Count B. BRBT Trail Count C. Bird Feeder Count D. Other nature site (wetland, riparian area, prairie/meadow) Frequency: How often and for how long do you want to count? A. Seasonally over a school year B. Monthly over a semester or school year C. Hourly over a morning, afternoon, or end of the school day Others Variables: A. Native vs. non-native species B. Bird behavior Discuss! 1. Explain to students that scientists study birds by counting them year
after year, during different seasons, and/or monthly. 2. Ask students why scientists would count birds. To obtain information
about the presence and absence of bird species, monitor bird habitat quality, de-velop ways to protect and/or conserve bird species, etc).
3. Hand out Student Journals and direct students to the top graph. Have students answer the questions about the graph and discuss.
4. Show Common Birds PowerPoint to prepare students for counting. Investigate! 1. Explain to students they will conduct a bird count. 2. Ask students to predict/formulate and agree on a hypothesis based
on location, frequency, and study variables (see scenarios). 3. Once a hypothesis is formulated, divide students into pairs, giving
each group a clipboard, field guide, binoculars, & Student Journals. 4. Explain to students that they should count all the birds that they
see/ hear in the count area & record data into their journals. 6. Allow students at least 15-20 minutes to count birds. 7. Back in the classroom, list the names of birds seen. 8. Have students create a graph with their results & info in Journal. 9. After the count, ask students if the hypothesis was supported. Follow-up! 1. Ask students 2-3 questions to re-cap the lesson (see right panel).
Suggested Questions What is a bird census? To do a bird count, what data did you collect? What hypothesis would you test next?
Lesser Goldfinch
©Klamath Bird Observatory 2007 The River Center
Basin & Range Birding Trail Education Kit www.KlamathBird.org/Education/BRBT
LP-34

Teacher Tips Three Bird Count Scenarios
Scenario # 1 Bird Study Unit: # of birds by species Location: 3 different habitats Duration: Monthly over the school year Details: Students will formulate hypotheses about the kinds of bird species will be found at a wetland, meadow, and riparian area. They can also create hypotheses about which will have most or least abundances or greatest diversity. Students will observe birds found in the three locations and record data in Student Journal sheets. Af-ter the count is complete, students will create graphs with their col-lected data and draw conclusions. Scenario # 2 Bird Study Unit: # of birds by species Location: Bird Feeder Duration: One week with three daily observations: morning, lunch, and end of school day Details: Students will formulate hypotheses about when they think birds are most active and why. Students will observe birds at feeders and record data. After the count is complete, students will create graphs with their collected data and draw conclusions. Scenario # 3 Bird Study Unit: # of birds by species Type of Count: Schoolyard Duration: Weekly Details: Discuss with students the difference between native and non-native species. Show students laminated bird field guide of common non-native birds typically found in Modoc County. Have students formulate hypotheses about whether they will find more or less non-native species as compared to native species in the school-yard and why (non-native or native plants, landscape, feeders, etc). During the count, birds will observe and identify non-native species. Students will create graphs with their collected data and draw con-clusions. Ask students if they think non-native bird species are a
Native vs. Non-Native “Native” means….. Species originating in the area. Non-native means…. Species introduced into the area after 1800. Examples: European Starling House Sparrow Ring-necked Pheasant
Why Count Birds? Measures distribution and
abundances of bird species over time.
Helps detect bird popula-tion declines and endan-gered species.
Supports protection of native birds.
Facilitates management plans for local bird species.
Western Scrub Jay
©Klamath Bird Observatory 2007 The River Center
Basin & Range Birding Trail Education Kit www.KlamathBird.org/Education/BRBT
LP-35

Overview Students will identify local raptors by flight patterns, body shape,
and field marks.
California Content Standards
Grade 3: 2.a.-L.S Grade 4: 3.b.-L.S
National Standards Content Standard A:
Scientific Inquiry
Materials Included Student Journal Common Birds Power-
Point Binoculars Clipboards
Materials Needed Spotting scope
(optional) Extra pencils
Activity Time
Preparation: 20 min. Activity Time: Varies
Best Season
Spring/Summer/Fall
Vocabulary Raptor
Raptors Along the RoadRaptors Along the RoadRaptors Along the Road Grade Level: 5th-12th ( C.S.S: 3rd-4th)
Learner Objectives Student will:
• Identify local raptors along the road by three criteria: flight pat-terns, body shape, and field marks
• Sketch five local raptors using one of the three criteria
• Observe local raptors on a field trip
Background Information Driving along the roads of northern California, you typically see raptors perched on telephone poles, fences, and trees. Sometimes you may see them soaring above, flapping, gliding, or hovering close to the ground. By identi-fying characteristics such as flight patterns, body shape, and field marks you can easily determine what type of raptor you are looking at. First, what is a raptor? A “raptor” is a term used by ornithologists for eagles, hawks, falcons, and owls. Also known as birds of a prey, raptors are among the fastest and strongest of all flying birds. They are characterized by their sharp-hooked bills and curved claws called talons. Flight patterns are below. Soaring: During soaring, raptors take advantage of columns of warm air that rise when the ground is heated by the sun. Raptors such as Bald Eagles seek out these columns often called thermals and soar for hours without expend-ing any energy. A soaring bird circles upward in a thermal column. Once a thermal dissipates into higher altitudes, it seeks out another rising thermal. Flapping: Unlike soaring, flapping uses a great deal of energy. This is because a flapping bird thrusts its wings forward and back all in one motion to pro-duce an upward and forward lift. It is similar to the rotating blades of a heli-copter. Each blade rotates in a horizontal plane and is tilted slightly forward just like a wing of a bird. This position of the blades drive air downward to generate lift as well as drive air backward to thrust it forward. Gliding: Without flapping, birds often “sink” and gradually lose altitude be-cause of drag. Just like a glider airplane, a raptor glides and often takes ad-vantage of air deflected upward when it hits ridges or buildings. Coursing: Many birds such as the Northern Harrier move quickly at a low height when scanning the ground for field mice or small mammals.
©Klamath Bird Observatory 2007 The River Center
Basin & Range Birding Trail Education Kit www.KlamathBird.org/Education/BRBT
LP-36

Getting Ready! 1. Read over background information and teacher tips. 2. Make copies of Student Journal: Raptors Along the Road. 3. If going on a field trip, determine driving routes. Discuss! 1. Ask students if they know what a raptor or bird of prey is. 2. Ask students if they know any raptors by name or by sight. 3. Let students know they will be practicing identification of rap-
tors by flight pattern, bird shape, and field marks. 4. Explain to the students what the four different flight patterns
raptors use: Soaring, Flapping, Gliding, and Coursing. 5. Explain to students what it means to identify animals by the body
shape. Asking the following questions can help: Is it small or large? Is the raptor bulky or skinny? Does the raptor have a long tail or stubby one? Are the raptor’s wings rounded or flat wings?
6. Explain to students what a field mark is. A field mark is a physical characteristic of an animal that helps biologists identify it in the field. For instance, a Red-Tailed Hawk has a dark brown band across its belly or a Northern Harrier has a white rump. See Bird ID Experts! for info.
Investigate! 1. Give each student a Student Journal. 2. Show the raptors in the Common Birds PowerPoint. 3. Ask students a few questions before sharing information about
each raptor. Have you seen this raptor before? What are some field marks? Describe its body shape.
4. Explain each raptor using the PowerPoint script. 5. Ask students to sketch raptors during the PowerPoint. 6. Have record flight pattern, body shape, and field mark of each of
the five raptors in their journal. Take a Drive! 1. Let students know they will being going on a driving field trip
during which they will be identifying local raptors by the three criteria: flight patterns, bird shape, and field marks.
2. Hand-out binoculars. Make sure students have their journals. 3. Ask students to observe closely telephone poles, fences, irrigation
fences, and meadows during the drive. 4. Ask students to record their observations in their journals. Follow-up! 1. Ask students 2-3 questions to re-cap lesson. See right panel.
Connections! Use with Lesson Plans:
∗ Bird Count
∗ Bird ID Experts
∗ Binoculars Bonanza!
∗ Creating Field Journals
∗ Using Field Guides
Using Field Guides! Have students look up 1-2 raptors in the field guide to learn more about their life history traits.
Suggested Questions What is a raptor? What is one way to identify a rap-tor in the field? Name two local raptors?
Lesson Plan
©Klamath Bird Observatory 2007 The River Center
Basin & Range Birding Trail Education Kit www.KlamathBird.org/Education/BRBT
LP-37

Identify Raptors by.. Flight Patterns, Body Shape, & Field Marks.
Flapping: American Kestrels display powerful wing beats & high speed dives. Body Shape: When in pursuit of prey their long tail and short pointed wings allow them to make streamline dives. Field Marks:Eye stripes (like a football player).
Flapping & Gliding: Sharp-shinned hawks powerfully beats their wings during flapping while in pursuit of prey. Body Shape: Their rounded wings allow them to continuously flap their wings while their long thin tail helps with maneuvering through dense trees and brushes. Field Marks: Brown speckles on belly.
Coursing: Northern Harriers are typically found coursing low over across fields & marshes in search of field mice or other small mammals. Body Shape: Exaggerated hourglass. Field Marks: White rump observed during flight.
Gliding: Buteos such as the Modoc County resident the Red-tailed Hawk can glide for hours without expending any en-ergy. Body Shape: Large broad wings and chunky tail. Field Marks: Dark brown belly band and red tail (in adults only).
Soaring: Bald Eagles usually soar with flat ex-tended wings. Body Shape: Large body with long extended wings. Field Marks: White feathers on the head (in adults only).
Teacher Tips
American Kestrel
Sharp-shinned Hawk
Northern Harrier
Red-tailed Hawk
Immature Bald Eagle
©Klamath Bird Observatory 2007 The River Center
Basin & Range Birding Trail Education Kit www.KlamathBird.org/Education/BRBT
LP-38

Create a Field Journal!Create a Field Journal!Create a Field Journal!
Overview Students will create
their own personal sci-entific field journals
where they can docu-ment observations.
California Content
Standards Grade 6: 7.b.-I&E Grade 7: 7.a.c.-I&E
National Standards Content Standard A:
Scientific Inquiry Materials Included
Student Journal Bird field guide ”Life of Birds” DVD
Materials Needed
Grades 3-5: 12 sheets of 8.5”x11”
solid white paper 1 sheet of cardstock
8.5”x11” Heavy duty stapler Colored pencils Glue sticks, scissors
Grades 6-12:
1 3-ring binder per student, 10” x 7.5”
1 package lined filler paper per student 9.5” x 6”
Activity Time
Preparation: 20 min. Activity Time: Varies
Best Season
All Season
Vocabulary Field Journal
Grade Level: 3rd-12th (C.S.S: 6th & 7th)
Learner Objectives Students will:
• Create a scientific field journal based upon observations • Describe why a field journal is a critical tool when conducting
scientific field studies • Use a field journal to collect data in the field
Background Information Field journals are essential when conducting field observations and/or field experiments. They are a scientific tool most field biologists can not live without. During field studies, biologists use journals to collect and/or document field data including animal observations, vegetation characteris-tics, weather, location, time, and other interesting facts about the day. Jour-nals can also include more than a record of scientific facts. They can in-clude field sketches, plant presses, as well as feelings and thoughts about nature/science experiences. Field journaling is a great tool for learning about the environment and can help students develop a connection with nature. By recording observations and feelings in a field journal, students become familiar with their sur-rounding environment and birds within it. Bird sightings, field marks, and behaviors can be recorded in the journals and help students re-create their day in the field. Among the many types of field journals, the most widely used by biologists is the Grinnell-type journal. This type was developed by Joseph Grinnell, a well-known naturalist and ecologist. Grinnell was known for his emphasis on careful record keeping through documentation, a habit that led to his style of journaling. There are two parts to his journal: 1) daily accounts of observations at a location and 2) records of individual species of plants and/or animals. Creating a Grinnell-type journal works well for older stu-dents. This activity is flexible and you can use with most of the other activities in-cluded in the kit! Use it during “Counting for Conservation” and “Binoculars Bonanza!”
©Klamath Bird Observatory 2007 The River Center
Basin & Range Birding Trail Education Kit www.KlamathBird.org/Education/BRBT
LP-39

Getting Ready! 1. Read background information. 2. Determine type of journal-style you want students to create. A. Personal Journal (3rd-5th grade students) B. Grinnell-Style Journal (6th-12th grade students). 3. Gather or have students gather journal materials before class. 4. Make copies of Student Journal: Creating a Field Journal. 5. If going outside, determine a site where students can write in
their journals. Discuss! 1. Ask students if they have ever had a journal and if so, why? 2. If so, ask students what they put in their journals. 3. Explain to students that biologists use journals when studying in
the field. 4. Ask students why a biologist would need a journal. List answers
on the board. If you have your own journal this is a good time to share it with the students.
Investigate! 1. Let students know they are going to create their own field journal
and practice using them outside (or while watching Life of Birds). 2. Give each student a Student Journal. 3. Ask student to follow the Student Journal format and to record
the time, date, weather, animal and plant observations, thoughts or feelings, and/or sketches while outside or during the movie. Students can also cut and paste the journal layout at the begin-ning of their journal.
4. Hand-out journal materials and create journals: Grades 3-5: Create the journal by folding 12 sheets of the paper in half . Fold
the cover sheet (cardstock) and staple it to the pages with 3 well placed staples in the middle. Have students personalize the cover with pencils & crayons/markers.
Grades 6-12: Have students write observations directly into the 3-ring binder in
the field including the journal layout information from the Grin-nellian journal.
5. Allow students 20 min. to observe & sketch in their field journal Follow-up! 1. Have students share their observations and sketches. 2. Ask students 2-3 questions to re-cap lesson (see right panel).
Lesson Plan
Take a Hike! Take students on a nature hike along a Basin and Range Birding Trail Site & have them record observa-tions in their field journals. Pick a location where stu-dents can write or sketch in their journal. Remind stu-dents to use their senses while observing.
Connections! Use with Lesson Plans:
∗ Using Field Guides
∗ Binoculars Bonanza!
∗ Counting Birds
Grinnell-Style Journal
Suggested Questions Why is a field journal impor-tant for field biologists? What kind of information would you put in it? What do you think biologists do with their journal information?
©Klamath Bird Observatory 2007 The River Center
Basin & Range Birding Trail Education Kit www.KlamathBird.org/Education/BRBT
LP-40