brava! enterprise 7 · brava!® enterprise is web server software designed to help you view, print,...
TRANSCRIPT

Brava!® Enterprise 7.0
ACTIVEX CLIENT USER GUIDE
LAST UPDATED, FRIDAY, APRIL 22, 2011

ii
Table Of Contents Help Contents ............................................................................................................................ 5
New Features in this Release .................................................................................................... 5
Feature Availability ................................................................................................................... 8
What is CSF?.............................................................................................................................. 8
Why CSF? ................................................................................................................................ 10
All Toolbars.............................................................................................................................. 11
Viewing Tools .......................................................................................................................... 13
Display Tools................................................................................................................................. 13
View Tools ................................................................................................................................ 13
Display Color ............................................................................................................................. 14
Visible Layers ............................................................................................................................ 14
Rotate ...................................................................................................................................... 15
Mirror ....................................................................................................................................... 15
Fit All ........................................................................................................................................ 16
Fit Width ................................................................................................................................... 16
Pan ........................................................................................................................................... 16
Zoom Window and Zoom In/Out ................................................................................................ 17
Magnifier................................................................................................................................... 17
Page Control ............................................................................................................................. 18
Display Options ......................................................................................................................... 19
Placekeepers ............................................................................................................................. 20
Right Mouse Controls ................................................................................................................. 21
File Comparison Tools .................................................................................................................... 21
Compare Document Overlays ..................................................................................................... 21
Set Alignment Points .................................................................................................................. 24
Text Compare ........................................................................................................................... 25
Text Compare Reporting ............................................................................................................ 28
Viewing IDW Files ......................................................................................................................... 29
Brava Task Pane ...................................................................................................................... 30
Brava! Task Pane .......................................................................................................................... 30
Page Thumbnails ........................................................................................................................... 30
Bookmarks .................................................................................................................................... 32
Functions Menu ....................................................................................................................... 34
Brava Functions Toolbar ................................................................................................................ 34
Undo/Redo ................................................................................................................................... 35
Markup ......................................................................................................................................... 36
Markup Files .............................................................................................................................. 36

Table Of Contents
iii
Creating Markups ...................................................................................................................... 37
Editing and Copying Markups and Redactups............................................................................... 37
Closing Markups ........................................................................................................................ 40
Consolidating Markups ............................................................................................................... 40
Stamp Templates ...................................................................................................................... 41
Save ............................................................................................................................................. 43
Saving Markups ......................................................................................................................... 43
Print ............................................................................................................................................. 44
Printing ..................................................................................................................................... 44
Print a File ................................................................................................................................ 45
Print Region .............................................................................................................................. 47
Watermark/Banners ................................................................................................................... 47
Adding, Editing Watermarks/Banners .......................................................................................... 48
Tokens ...................................................................................................................................... 50
Font Selection for Watermarks and Banners ................................................................................ 53
Print to Scale ............................................................................................................................. 53
Line Thickness ........................................................................................................................... 55
Print Tips and Troubleshooting ................................................................................................... 56
Select ........................................................................................................................................... 56
Select Tool ................................................................................................................................ 57
Copy Text ................................................................................................................................. 57
Copy Region .............................................................................................................................. 57
Hyperlinks ................................................................................................................................. 58
Search .......................................................................................................................................... 59
Find Text, Search Wildcards, and Search Macros ......................................................................... 59
Advanced Searching .................................................................................................................. 60
Annotate Mode .............................................................................................................................. 77
Markup Toolbar ......................................................................................................................... 77
Copying Markups ....................................................................................................................... 78
Changing Markup Ownership ...................................................................................................... 79
Markup Entity Tools ................................................................................................................... 79
Changemarks Tool ..................................................................................................................... 96
Markup Properties ................................................................................................................... 106
Review Mode .............................................................................................................................. 110
Overlay Markups for Review ..................................................................................................... 110
Review Changemarks ............................................................................................................... 111
Changemarks Filters ................................................................................................................ 114
Markup Pages ......................................................................................................................... 115
Review Measurement Takeoffs ................................................................................................. 115

Brava 7.0 SR1 User Guide
iv
Redact Mode ............................................................................................................................... 117
About Redaction ...................................................................................................................... 117
Glossary of Terms .................................................................................................................... 118
Redact Tools ........................................................................................................................... 119
Open Redactup Template ......................................................................................................... 131
Verify Redactups to be Finalized ............................................................................................... 132
Verify Entire Document ............................................................................................................ 133
Publishing Review Drafts .......................................................................................................... 135
Redact Mouse Tool .................................................................................................................. 136
Measure Mode............................................................................................................................. 136
Measurement Tools ................................................................................................................. 136
Measurement Settings ............................................................................................................. 137
Calibration .............................................................................................................................. 138
Measure Line ........................................................................................................................... 139
Measure Rectangle .................................................................................................................. 140
Measure Polygon ..................................................................................................................... 141
Measure Polyline ..................................................................................................................... 142
Measure Circle ......................................................................................................................... 143
Measure Count ........................................................................................................................ 144
Measure Magnification Tool ...................................................................................................... 144
Measurement Takeoff .................................................................................................................. 145
Measure Takeoff ...................................................................................................................... 146
Takeoff Categories................................................................................................................... 148
Accumulation Results ............................................................................................................... 151
Publish Mode .............................................................................................................................. 152
Publishing Markups/Redactups ................................................................................................ 152
Publishing Markups in PDF Files ................................................................................................ 154
Publishing to CSF ..................................................................................................................... 155
Publishing Files to PDF ............................................................................................................. 164
Publishing Files to TIFF ............................................................................................................ 166
Save View as JPG .................................................................................................................... 168
Hot Keys ................................................................................................................................ 169
Keyboard Accessibility .......................................................................................................... 171
Contact Information .............................................................................................................. 172
Copyright Notices and Acknowledgments ............................................................................ 173

5
HELP CONTENTS
Brava!® Enterprise is web server software designed to help you view, print, publish, annotate, analyze,
and redact native format documents, images, CAD files, and our own secure CSF format quickly and
easily within and across the enterprise.
While this online help contains information for all Brava! Enterprise features, Brava! is a highly
customizable software application and several factors will determine which features are available to you.
READ MORE...
Choose a topic below to get information on a specific Brava! Enterprise feature.
Toolbars
Markups
Redaction
Changemarks®
Hyperlinks
View Tools
Compare Tools
Set Visible Layers
Calibrate and Measure
Copy Text
Find
Print Banners
Hot Keys
Content Sealed Documents
Publishing Files
Contact Information
NEW FEATURES IN THIS RELEASE
The following features and enhancements were implemented in Brava! Enterprise:
7.0 SR1 Changes
1. Text Compare Reporting. Ability to generate a merged text compare report and output the
results to PDF.
2. Keyboard Accessibility. Navigation of user interface through keyboard controls.
3. "name" search mode

Brava 7.0 SR1 User Guide
6
7.0 Changes
1. Modernized and redesigned user interface. Reorganized by process instead of by feature
(annotate, redact, review, measure, and publish mode buttons are used to access the tools for
each process).
2. Ability for administrators to apply predefined or custom themes (skins) to the client viewers.
3. Compare feature enhancements include:
Document text compare implemented as a new text level compare tool (vs. image compare).
Compare views are presented as buttons instead of drop down items.
Side-by-side and overlay compare improved to allow navigation by document Changemarks.
4. Text Search enhancements include use of Regular Expressions as a search option, ability to
change Highlight color, ability to alternate search targets.
5. Search results are cached resulting in instantaneous secondary searches.
6. Measurement is enhanced to include a results accumulator (measure takeoff). Ability to create
multiple measurement categories and to cut and paste the results into other applications. Results
saved in markup file.
7. New Text Strikethrough and highlight markup entities.
8. <Esc> key cancels markup and measurement entity creation before set.
9. %IPAddress and %Hostname added as watermark and banner tag options.
10. Support for Windows 7 as a client operating system.
11. Event history kept per document instead of per page allows additional redaction and
measurement feature undo/redo capabilities.
12. Improvements and enhancements to settings persistence logic. New optional parameter allows
administrators to enable/disable persistence.
13. Publishing improvements include:
Publishing options dialogs updated for uniformity and consistency.
CSF publishing improvements including support of page range and page size selection.
Coloring options in Publish dialogs allow setting Document and Markup colors separately.
Both Print and Publish banners and watermarks can be set and can be forced on published
documents through the security.xml file.
“Unredacted view” security permission added to CSF Publish options that allows access to
unredacted version of a document via set password.
Markup Burn-in, Review, and Authoring permissions combined into one CSF security option
“Markup”.
Print/Copy/Save As permissions combined into one CSF security option.
15. Changemarks feature improvements include:
Changemarks (Annotations) discussion feature provides a tool for back-and-forth dialog
(replies) among a group of reviewers within a single Changemarks entity.

New Features in this Release
7
The Changemarks "find" feature is enhanced to include both search all, and cumulative
(search within results)
Single click placement of Changemarks entities (rather than click and drag rectangle).
Updated Changemarks panel user interface to accommodate annotation discussion.
With the new Changemarks with text highlight, the highlighted text is copied to the clipboard
to allow insertion into the comment.
Enhanced graphics
Support for hyperlinks and formatted text in Changemarks text dialog.
New Type and State property fields added.
Term hit highlight added to Changemarks note search options.
16. Four new combination Changemarks entity types added (along with new mouse
tools). Once placed, entities are independent of each other:
Changemarks with Cloud
Changemarks with text highlight
Changemarks with highlight
Changemarks with arrow
17. Redaction Feature upgrades include:
New search macro [:ocr_ssn:] - Similar to [:ssn:] except allows both numbers and characters
in the pattern string. Improvements to [:ssn:] macro
Reasons tab added to Options Settings dialog offers setting to specify using either predefined
reason code lists or user defined reason codes
Ability to publish and distribute a review draft (PDF or TIFF) before finalizing the proposed
redactions.
Find and Redact From/To redaction tool added to toolbar. Redacts everything between two
defined phrases.
Publish to CSF added to the Publish (Finalize) menu as a third option for redacted output
format (along with TIFF and PDF).
Finalize permission "Unredacted view" added to CSF Publishing Options to allow certain users
to view an unredacted version of a file (via password).
8
FEATURE AVAILABILITY
While this online help contains information for all Brava! Enterprise features, Brava! is a highly
customizable software application and several factors will determine which features are available to you,
as well as certain default behaviors.
Factors that determine feature availability include:
The type of license you have purchased for Brava Enterprise will determine feature and format
availability.
Running Brava! through an integration such as Webtop, OpenText, Oracle, etc. Your integration
administrator will determine the available Brava Client features via server parameters.
Server parameter settings as determined by your administrator (see note below)
Any Visual Rights settings that have been set on a CSF file
Note that only licences formats can be opened in Brava Enterprise. If a file that you are loading contains
embedded files of formats that your Brava license does not support, then you will be prompted to either
continue loading the file without the embedded format(s), or abort the operation.
Server Parameters:
All Brava! Client features, tools, and menu items can be enabled or disabled through an associated server
parameter. A disabled feature will either be grayed out, or completely missing from the Brava! Enterprise
Client. Other parameters control the behavior of the Brava Client. If you are an administrator, please
refer to the Brava Administration Guide, located in your Brava install directory, for a complete list of these
customizable parameters and their usage.
WHAT IS CSF?
Informative Graphic's Visual Rights® technology is designed for securely sharing content (document,
image, and CAD files). Content Sealed Format (CSF) allows you to maintain control of what users can do
with your intellectual property and data. And because CSF is not a public, open format like PDF, it cannot
be edited or converted by any third party programs. Simply put, CSF is a compressed, encrypted,
accurate rendition of your document, image or CAD drawing file.
You can use the Net-It® Now print-capture utility to create a CSF file from any Windows application, then
distribute it for protected viewing with the free Brava!® Reader or Brava!® Desktop/Enterprise.
Brava Desktop and Brava Enterprise can also publish native formats to CSF, PDF, and TIFF along with a
currently open markup, including redactups (block areas/text from view, search, copy and print). Authors
of CSF files can choose to set passwords on any published redactions (PDF and TIFF redactions can never
be revealed).

What is CSF?
9
When you create a CSF file, you can add a variety of persistent security controls that include:
Password protection (on entire document and/or on redacted areas)
Expiration dates
Permit Print, measure, markup, copy, and other features
Add watermark and print banners
View More Details about CSF Publishing
Documents can be published to CSF format using IGC's Brava! Desktop®, Brava! Enterprise®, Net-It
Enterprise®, Redact-It® Enterprise, Net-It® Now, or MYRIAD® software.
To view a document secured with Visual Rights, simply select a published CSF document to view through
Brava! Enterprise, Brava! Desktop, Brava! Reader, or Brava! Free DWG Viewer which read the document's
file rights before displaying a document page. Note that Brava! Flash viewer does not support loading of
CSF files that have any Visual Rights set on the file.
The Brava viewers contain a lock icon in the status bar when a CSF file is loaded. When you click this
icon, a dialog displays informing you of the rights the document has enabled or disabled. For example:
Permitted Visual Rights®
Printing : No
Copy To Clipboard : No
Measurement : No
View By Layer : No
Save As : Yes
Markup Review : No
Markup Authoring : No
Burn In Markups : No
File Expires : Never
File Password Protected : No
See Also:
Publishing to CSF

10
WHY CSF?
CSF: Compressed, Content Sealed Format from Informative Graphics®
Share Content - Keep Control
CSF format allows you to securely share content. Our Visual Rights® supported content publishers render
document, image, and CAD files into an accurate, encrypted, and compressed content sealed format that
embeds persistent content usage controls. CSF files can be viewed with rights protection using the easy-
to-use, fast, and freely distributed Brava! Reader.
Advantages of creating CSF include:
Permit or disable print, copy, measure, markup, and analyze
Expire document use by date
Burn-in watermarks and banners
Password protect
Redaction (block out)
Easily create CSF files with one of these software choices:
Download the free Net-It Now CSF Writer software (web site: www.net-it.com) Net-It Now installs
a print driver that can create CSF files from any Windows application. The software is free!
Try Brava! Desktop (web site: www.bravaviewer.com) Brava! Desktop loads a wide variety of
native file formats and can publish them to CSF format (as well as PDF, TIFF, and DWF). Brava!
Reader and Brava! Free DWG viewer will load a limited selection of formats and can publish them to
CSF format. With Brava! Desktop, you can also add markups or block out content (redaction) in the
resulting secure CSF file. Brava! Reader and Brava! Free DWG Viewer will view these CSF files with
burned in markups and redactions.
Redact-It Desktop (web site: www.infograph.com/redact-it.asp) is full featured redaction software.
Redact-It safely removes privacy information and sensitive content from documents, images and
even e-mail. With unique features like reusable scripts, extensive logging and enhanced verification,
Redact-It is the best tool for electronic redaction available and can publish to CSF, TIFF, and PDF.
Similar to Brava Desktop, MYRIAD http://www.myriadviewer.com loads a variety of 2D and 3D
native file formats and can publish them to secure 2D (CSF) or 3D (3DF) output files.

11
ALL TOOLBARS
Below are all of the toolbars that can become available in the Brava! Enterprise user interface. The
availability of the toolbars and their options is dependent on the options your administrator has enabled.
In addition, when viewing CSF files, buttons may be disabled depending on the Visual Rights set for that
file.
Brava Functions Toolbar
Viewing Tools and Page Control
Find
Compare Toolbar
Status Bar
Markup Properties Toolbar

Brava 7.0 SR1 User Guide
12
Annotate Toolbar
Redaction
Toolbar
Measure
Toolbar
13
VIEWING TOOLS
DISPLAY TOOLS
VIEW TOOLS
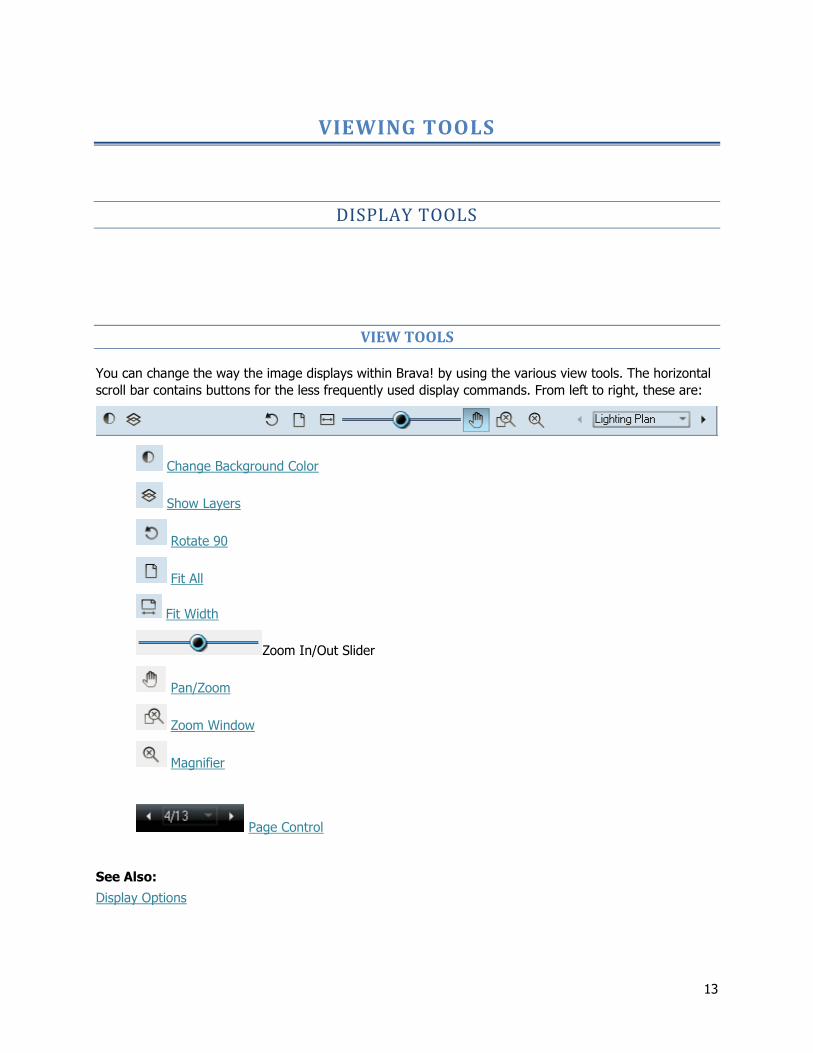
You can change the way the image displays within Brava! by using the various view tools. The horizontal
scroll bar contains buttons for the less frequently used display commands. From left to right, these are:
Change Background Color
Show Layers
Rotate 90
Fit All
Fit Width
Zoom In/Out Slider
Pan/Zoom
Zoom Window
Magnifier
Page Control
See Also:
Display Options

Brava 7.0 SR1 User Guide
14
DISPLAY COLOR
Change Background Color
You can change the background color of file types with "transparent" background colors, such as
monochrome raster and vector file types (color raster files are not affected) to black, white, or gray. If
you change the background color to the same color as the selected foreground color for monochrome
images, the foreground color will automatically be changed.
To change the background color, click on the scroll bar and select Black, White, or Gray from the
pop up menu. Background color can also be accessed through the view window right mouse button
menu. If you select the Default menu item, Brava! Enterprise will decide through driver directives which
background color to use (for example, CAD file backgrounds will use black, office formats will use white,
etc.).
You can toggle through the background colors using the hotkey <Alt> + <B>
Background color is persisted between opening like file types (document or drawing). For example, if you
set the background color on a currently viewed .PDF file to gray, and then set the background color on a
.DWG file to white, subsequent document files (pdf, tiff, doc, xls, etc.) display with a gray background
while subsequent drawing files (dwg, dwf, dgn, prt, etc.) display with a white background.
Monochrome Mode
Viewing in Monochrome Mode changes all lines of a color image to a single color (the default is black).
Markup entities remain in color for quick identification.
Click on the scroll bar and select Display Monochrome to change to monochrome mode. Click
Display Color to return to color mode.
When Monochrome Mode is active, the image displays and prints in black and white.
See Also:
Markup Text Background Color
Background Fill
VISIBLE LAYERS
You can turn image layers (e.g., layers of a DWG file) on or off through the Set Visible Layers dialog box.
If no layers exist, this button is disabled.
Viewing Tools
15
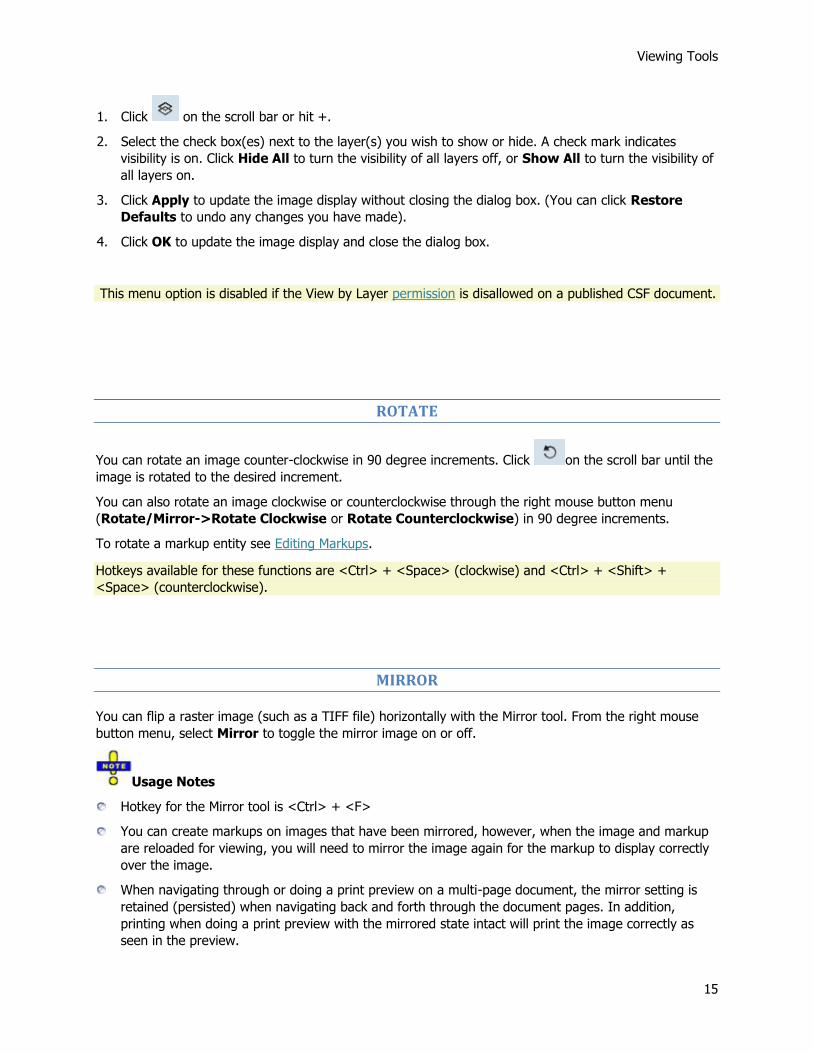
1. Click on the scroll bar or hit +.
2. Select the check box(es) next to the layer(s) you wish to show or hide. A check mark indicates
visibility is on. Click Hide All to turn the visibility of all layers off, or Show All to turn the visibility of
all layers on.
3. Click Apply to update the image display without closing the dialog box. (You can click Restore
Defaults to undo any changes you have made).
4. Click OK to update the image display and close the dialog box.
This menu option is disabled if the View by Layer permission is disallowed on a published CSF document.
ROTATE
You can rotate an image counter-clockwise in 90 degree increments. Click on the scroll bar until the
image is rotated to the desired increment.
You can also rotate an image clockwise or counterclockwise through the right mouse button menu
(Rotate/Mirror->Rotate Clockwise or Rotate Counterclockwise) in 90 degree increments.
To rotate a markup entity see Editing Markups.
Hotkeys available for these functions are <Ctrl> + <Space> (clockwise) and <Ctrl> + <Shift> +
<Space> (counterclockwise).
MIRROR
You can flip a raster image (such as a TIFF file) horizontally with the Mirror tool. From the right mouse
button menu, select Mirror to toggle the mirror image on or off.
Usage Notes
Hotkey for the Mirror tool is <Ctrl> + <F>
You can create markups on images that have been mirrored, however, when the image and markup
are reloaded for viewing, you will need to mirror the image again for the markup to display correctly
over the image.
When navigating through or doing a print preview on a multi-page document, the mirror setting is
retained (persisted) when navigating back and forth through the document pages. In addition,
printing when doing a print preview with the mirrored state intact will print the image correctly as
seen in the preview.

Brava 7.0 SR1 User Guide
16
If a raster file is loaded using INSO drivers, the image is treated as vector and therefore the mirror
function will have no effect.
FIT ALL
Fit All changes the view so that the full image is visible in the window. Files recognized as CAD
drawings are automatically zoomed to extents when opened in Brava! (Documents open at Zoom Width.)
Fit all can also be triggered with the <Ctrl> + <E> hotkey.
FIT WIDTH
The Fit Width command changes the zoom level so that the entire width of the image appears in the
window. This is most useful for 8.5 x 11 documents so you do not have to scroll left and right to read the
text.
To zoom an image to width, click on the toolbar. Documents are opened automatically at Fit Width
when loaded in Brava unless they are recognized as CAD drawing files. In that case, they are opened at
Fit All.
Fit width can also be triggered through the <Ctrl> + <W> hotkey.
PAN
To pan across an image, click on the toolbar. Note that the mouse pointer changes to a hand icon.
Click and hold the left mouse button while dragging the mouse pointer in the direction you wish to move
the image.
While in pan mode, you can press the right mouse button and move the pointer up and down to zoom in
and out of an image. Up increases magnification while down decreases it.
As with the Select tool, hyperlinks contained in the document are recognized when moused-over and can
be launched when the pan tool is active.
Panning can also be triggered by using the <Ctrl> + <Shift> + <A> hotkey combination

Viewing Tools
17
ZOOM WINDOW AND ZOOM IN/OUT
Zoom Window
Click to access the Zoom Window command:
Zoom Window. You can change the zoom area by dragging a box, or window, around the area you
want to zoom in on. The area within the box will fill the image window. Simply click and hold the left
mouse button, then drag the mouse around the area you wish to fill your viewing area.
While in Zoom Window mode, you can press the right mouse button and move the pointer up and
down to zoom in and out of an image. Up increases magnification while down decreases it.
Note: You can use the hotkeys <+> or <-> on the numeric keyboard to zoom in and out while any
tool is active. First click inside of the viewer frame window and then hit the + key to increase
magnification or the - key to decrease magnification. If you are using a laptop that has no numeric
keyboard, use the +/- keys while in Num Lock mode.
Zoom In/Out tool
You can use the viewer's zoom slider bar to zoom in and out of the document.
Press on the slider button while dragging it right to increase magnification and left to decrease
magnification. The button returns to center position on release and can be dragged repeatedly to
increase/decrease magnification.
MAGNIFIER
The Magnifier tool summons a rectangular "magnifying glass" in your viewing window. Use this tool
to zoom into smaller areas on a larger image.
Adjust the magnification by pressing on and dragging the zoom adjustment handle on
the right side of the rectangle window. Dragging upward increases magnification while dragging
downward decreases it. You can also adjust magnification by right clicking in the window and
dragging up or down, or by using the mouse wheel up and down to zoom in and out..
Move the magnifier by clicking and holding the left mouse button on the magnifier window, then
dragging.
Resize the magnifier by clicking and holding one of the four corner resize handles and dragging.
Close the magnifier by clicking the red "x" in the upper right corner.
Brava 7.0 SR1 User Guide
18
Toggle the magnification behavior (eyeglass, bird's eye, or dock) through the small icon in the upper
left corner of the magnifier window. Click the icon to toggle between the behaviors.
Eyeglass - When this icon is displayed in the magnifier, you can click on any area of the drawing or
document and the magnifier will snap to that area and display the selected section.
Bird's Eye - When this icon is displayed, a small rectangle displays with your cursor when it is
moved off of the magnifier window. You will notice that as you move your cursor around the document
or drawing, the area contained in the cursor's small rectangle displays in the magnifier window (bird's eye
view).
Dock - When this mode is selected, you can click on an area of the page that will stay "docked" in
the magnifier window. If you scroll the current page, the view that's in the magnifier stays the same.
See also:
Measurement Magnifier
PAGE CONTROL
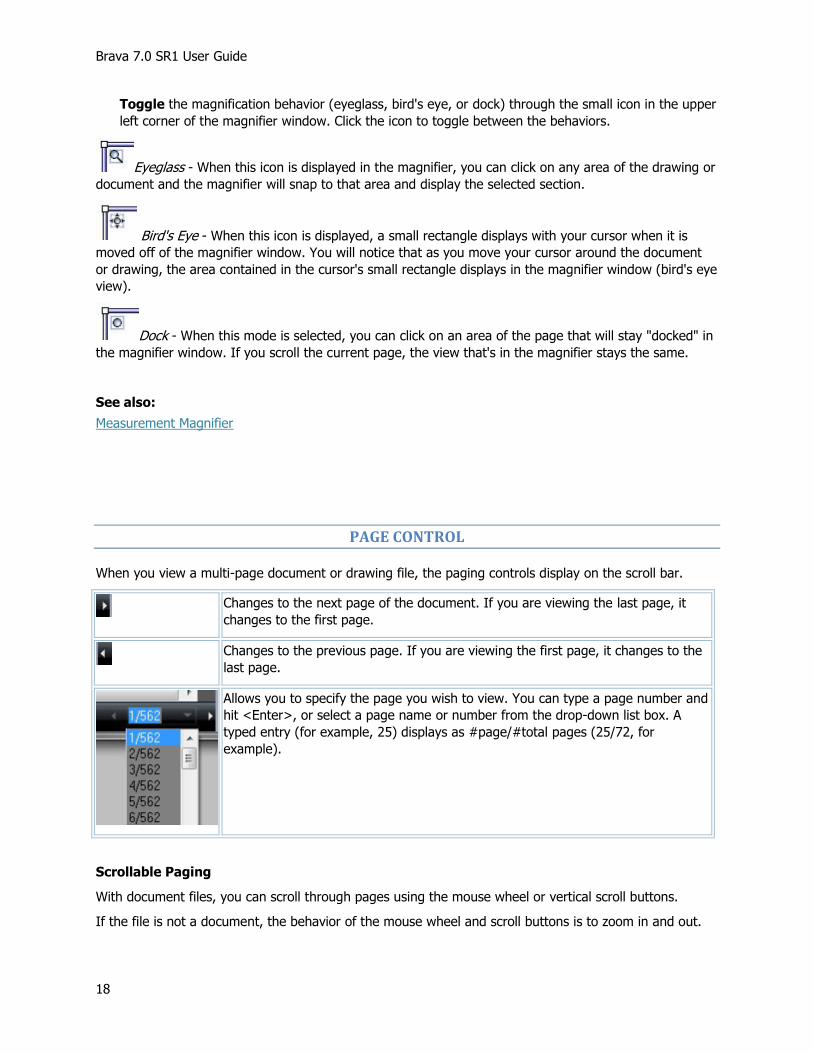
When you view a multi-page document or drawing file, the paging controls display on the scroll bar.
Changes to the next page of the document. If you are viewing the last page, it
changes to the first page.
Changes to the previous page. If you are viewing the first page, it changes to the
last page.
Allows you to specify the page you wish to view. You can type a page number and
hit <Enter>, or select a page name or number from the drop-down list box. A
typed entry (for example, 25) displays as #page/#total pages (25/72, for
example).
Scrollable Paging
With document files, you can scroll through pages using the mouse wheel or vertical scroll buttons.
If the file is not a document, the behavior of the mouse wheel and scroll buttons is to zoom in and out.

Viewing Tools
19
Thumbnail Paging
If enabled, thumbnail navigation is available for document pages via a scrollable thumbnail panel.
Selecting an image in the thumbnails panel changes the current view to the selected page. You can float
your mouse over each thumbnail to view page/sheet name, if available. See also Page Thumbnails.
Note: You can control the order that multi-page DWG files appear in the file list through the myrdrv.ini file located in your Brava! installation directory. In the [DWG2DL] section of the file, adjust the value of
the PageLoadOrder parameter according to the following preference:
0: Paperspace first
1: Modelspace first
2: Paperspace only
3: Modelspace only
4: Similar to 0 except the last active layout is first.
Example: PageLoadOrder=0
If there is only one page, it is loaded irrespective of the PageLoadOrder setting.
DISPLAY OPTIONS
Available from the right mouse button, Options menu are various check boxes that let you alter the way
the image displays in the view window such as Fit Width, Fit All, next and previous paging commands,
and the edit commands (copy, paste, and delete).
Select Animate View Changes if you would like to turn on this feature. When selected, the image
makes animated transitions from one viewpoint to the next when using any of the viewpoint
transition tools such as the zooming and rotate tools. When this feature is turned off, the image will
snap to each viewpoint change.
Select Show Line Weights to display an entity's true line width. If not enabled, the view displays
with all controllable vector lines drawn at one pixel thickness regardless of the entities true line
width. The one pixel with stays constant at zoomed magnification when this option is disabled.
Disabling the Show Line Weights command is useful when viewing files containing entities of unusual
thicknesses that can obscure other entities if displayed at their true width.
Note that this option overrides the state of the Show AutoCAD Line Weights option and if
unchecked, line weights will not display at all.
Select Show AutoCAD Line Weights to display any line weights that have been set in CAD files.
The line weights display on screen, and weights are maintained when publishing to the available
output formats (TIFF, PDF, and CSF). Note that Brava Reader cannot open AutoCAD files directly, but
may open a CSF file that was produced from a file with the relevant line weights. Note that the Show Line Weight option must also be enabled to use this feature.
GDI++ support is provided for viewing vector-based files with Anti-Aliasing (smooth lines). A right
mouse menu option "Smooth Edges (Slower)" allows you to turn off Anti-Aliasing to improve
display performance if desired. If GDI++ is not available, this menu option is grayed out.
Brava 7.0 SR1 User Guide
20
You can also control the Background color toggle from the right mouse button menu. Select
Background Color to switch from white, to gray, to black. Select Default to use the background color
determined by the driver directives.
You can flip a raster image horizontally with the Mirror tool. Select Rotate/Mirror to toggle the mirror
image on or off.
Select Show Pane and choose one of the four available panel views from the submenu. The Brava task
pane opens up (if not already open) on the right side of the viewer with focus on the selected panel.
PLACEKEEPERS
Placekeepers provide a simple way to temporarily save and traverse a list of view states. These
Placekeepers are session based place markers and do not carry forward from session to session.
The three Placekeepers commands can be accessed from the Marks-> command of the right mouse
button menu.
Add Placekeeper - This command saves the current view state to the end of the list of saved
Placekeepers . A new Placekeeper can be set whenever there is a change in zoom level, rotation,
page number, or compare view mode. (A new Placekeepers cannot be added for a pan location
change.) A maximum of 1000 Placekeepers can be added. You can use the hotkey <Ctrl> + <K> to
add a Placekeeper of the current view state.
GoTo Placekeepers - This command toggles through the list of saved Placekeepers . You can also
use the hotkey ,Ctrl> + <Alt> + <K> to navigate through the Placekeepers .
Remove Added Placekeepers - This command clears the list of saved Placekeepers . Placekeepers
only exist during the viewing of a single file. When the file is closed, all saved Placekeepers are
cleared. Currently, Placekeepers lists cannot be persisted in Brava! Enterprise .
Placekeeper Navigation Examples:
Load a multi-page (3 or more pages) document
Hit page down 3 times
Press Ctrl + Alt + Left Arrow (back) 3 times
1st back goes to top of page 3
2nd back goes to top of page 2
3rd back goes to top of page 1 (starting view)
Load a multi-page (3 or more pages) document
Scroll the view until the fourth page is visible
Press Ctrl + Alt + Left Arrow (back) 3 times
1st back goes to bottom of page 3
2nd back goes to top of page 3

Viewing Tools
21
3rd back goes to bottom of page 2
Placekeeper navigation key combinations:
Ctrl + Alt + Left Arrow - Back
Ctrl + Alt + Right Arrow - Forward
Previous View (Back) menu item can be found at the top of the right mouse button menu. (No Next
View (Forward) menu item exists)
RIGHT MOUSE CONTROLS
When using certain tools, clicking the right mouse button brings up a pop-up menu containing various
display and edit commands. However, when the Pan, Magnifier, and Zoom Window tools are active, the
right mouse button can be used as an added navigational control to quickly zoom in and out.
The right mouse button navigation is available for the following view tools:
Pan tool Zoom Window tool Magnifier tool
While using any of these three tools, you can press and hold the right mouse button while moving the
pointer up and down to zoom in and out of an image. Up increases magnification while down decreases
it.
Mouse Wheel
The mouse wheel behaves differently depending on the type of file being viewed. When using the mouse
wheel while viewing a document file, the document will scroll up and down. If used while viewing a
drawing file, the drawing will zoom in and out. Up increases magnification while down decreases it.
FILE COMPARISON TOOLS
COMPARE DOCUMENT OVERLAYS
Brava! Enterprise 's Overlay Compare feature allows you to perform a graphical or textual comparison of
two file versions. This feature is only available if it has been set up and configured by your
integration administrator. Currently, Compare is a view only feature and no output options are
available.

Brava 7.0 SR1 User Guide
22
COMPARISON TOOLS
The Comparison toolbar appears at bottom of viewing window. The toolbar contains various buttons for
different viewing options. Depending on the viewing option currently chosen, alignment buttons (nudge
alignment, set alignment points, and clear align), and a transparency slider may be present. Note that
while viewing in Compare mode, most of the functionality associated with Annotate, Review, Redact,
Measure, and Publishing (except Save View as JPG) will not be available for use.
Overlay
Use this button to overlay both versions on top of each other. Use the slider to change the
transparency of each file - left to dim the compare version, right to dim the open version.
Overlay Differences
With this button, the compare file version opens overlaid on the open file. The open file displays in
red (deleted geometry or text), and the compare file displays in green (added geometry or text).
Geometry/text that has not changed (common between both revisions) is gray.
Use slider to change transparency for clearer visibility of the file differences - right to dim red
(deleted) areas, left to dim green (added) areas.
Side-By-Side
Both versions are displayed in a split-screen view. Move the slider to view transparent differences
overlaid in each version.
Text Comparison
While a graphical comparison is useful for viewing differences in CAD drawings (as overlaid images),
this method has limitations when it comes to comparing the actual text contained in a document file.
Use the Text Comparison mode to view the (non WYSIWYG) text content comparison of the open
and compare documents.
Open File (Only)
Only the file that was first opened is displayed (normal colors). The set alignment points for
comparison tool is available in this mode. All Annotate, Review, Redact, Measure, and Publish
features are supported in this compare mode only.
Compare File (Only)
Only the file that was opened for compare is displayed (normal colors). The set alignment points for
comparison tool is available in this mode. Measure, and Publish features are supported in this
compare mode.
Additions
Only added areas (areas present in the compare version, but not in the open version) are displayed
in green.

Viewing Tools
23
Deletions
Only deleted areas (areas present in the open version, but not in the compare version) are displayed
in red.
Unchanged
Only areas that are present in both the compare version and open version are displayed in gray.
Transparency Slider
This tool is available for Overlay, Overlay Differences, and Side-by-side modes to adjust the
transparency amount of the two documents. In the two overlay modes, move the slider to the left to
reduce the transparency of the Compare document (additions), move the slider to the right to reduce
the transparency of the Open document (deletions). When the slider is centered, both documents
display at 50% transparency.
In Side-by-side mode, center the slider to view the changes side by side, overlaid at 25%
transparency. Move the slider all the way to the left to view 50% transparency, or all the way to the
right for 0% transparency (no overlay).
Nudge Alignment
This button is available when using the Overlay, Overlay Differences, Side by Side, Additions, Deletions, and Unchanged viewing modes. You can use the Nudge Alignment commands to nudge
and re-scale a compare image or drawing to an open drawing, allowing you to interactively make
small adjustments to align the files more precisely. This feature is especially useful for comparing two
TIFF images that contain the same text but have different line spacing. Click the Nudge Alignment
button and select a direction to nudge the compare file by one increment.
You can also use the hot keys below to quickly nudge the alignment. Use one of the following key
combinations (once or multiple times) to nudge the overlaid "older version" in the desired direction:
<Ctrl> + <Left arrow> = nudge position left
<Ctrl> + <Right arrow> = nudge position right
<Ctrl> + <Up arrow> = nudge position up
<Ctrl> + <Down arrow> = nudge position down
Text Compare Reporting
You can close the comparison file (and toolbar) at any time by selecting Close Compare from the File
menu.

Brava 7.0 SR1 User Guide
24
SET ALIGNMENT POINTS
Used with file version comparisons, the Set Alignment Point tool allows you to compare two versions of a
file that are of different scales, or world page sizes. This tool is especially convenient when a major
version of a file has multiple sections saved as separate files.
The alignment tool allows you to define a single identical location on each file that is used as a common
alignment section when the two files are overlaid.
To use the Align tool:
1. Open a document and use the Compare tool to open a second comparison file that is of any scale.
2. Select Open File (Only) from the Comparison tools to view the first document you opened.
3. Click on the Set Alignment Points button. The cursor changes to a measurement selection
tool and will allow you to precisely select two picking points on the image. Identify a small section of
the image that is contained in both the first and second document.
4. Left click on the start point and then left click on an end point of a common section to define the
alignment.
5. Select Compare File (Only) from the Comparison tools to view the second document you
opened for comparison.
6. Click on the Set Alignment Points button and select the exact same points of the section that
you chose to use in the first document. Now, if you select any of the compare features from the drop
down list (Overlay, for example), the points placed in the first file are pinned to the points placed in
the second file. When alignment is active, both documents display at exactly the same scale.
7. Once you have successfully chosen two identical alignment points in each document, the Clear
Alignment Points button becomes available. You can restore the original view at any time by
clicking this button to remove your set alignment points.
Note: The following hotkeys can be used while in Compare mode (excluding Text Compare) to nudge
the overlaid "older version" in the desired direction:
<Ctrl> + <Left arrow> = nudge position left
<Ctrl> + <Right arrow> = nudge position right
<Ctrl> + <Up arrow> = nudge position up
<Ctrl> + <Down arrow> = nudge position down

Viewing Tools
25
TEXT COMPARE
Available from the Compare toolbar, the Text Compare tool allows you to perform a non WYSIWYG
comparison of the searchable text contained in two file versions.
Comparing documents by graphic overlay (Overlay, Overlay Differences, Side by Side Compare, etc)
works well for engineering / CAD drawings and images, but it does not work well for office documents
that are mostly text. Text Compare feature resolves this by highlighting the actual text differences
between two compared documents.
1. Open two files (containing searchable text) for comparison in Brava! Enterprise.
2. Click the Text Comparison button from the Compare toolbar.
3. If no differences are found between the two documents, a message appears stating so. If differences
are found, the document is shown in split screen mode with the open and compare files displayed in
two windows as lines of text, and the WYSIWYG view of the Compare or Open file shown beneath.
Text differences between the two documents are highlighted in yellow, red, or green (see notes
section below).
You can generate a merged comparison report of the two documents and output as a PDF file. See Text
Compare Reporting.
ABOUT TEXT COMPARE VIEW
The Open File and Compare File labels in the top portion of the window correspond to which
document is the originally opened document and which document was opened for compare.

Brava 7.0 SR1 User Guide
26
The arrow indicators along the middle gray bar show which
document is currently being shown in the view window below. If the open document is shown, the
arrows are below the open document in the compare window. If the compare document is shown,
the arrows move to be below the compare document.
Clicking anywhere in either the Open File or Compare File text windows changes the document being
viewed in the window below. Any text that is highlighted in the text view window (hold down the left
mouse button and drag across any text) is also shown highlighted in the document view window
allowing you to easily identify changed areas. Note that highlighted text can be copied to the
clipboard by using the <Ctrl> + <C> hotkeys.
The count shows the number of lines with changes and indicates which changed line is
currently selected. The (previous and next difference) arrows to the left and right allow for moving
to the next and previous changed line. In the example above, 5 lines (of 119 total lines) have
changes and line 107 (currently being viewed) is the 4th of those 5 lines in the document with
changes.
The Text Compare views shows differences between the two documents using color:
- Red indicates something that was deleted out of the open document.
- Green indicates something that was added to the compare document.
- Yellow indicates something that has changed between the two documents.

Viewing Tools
27
Whenever there is a green or a red difference, there is a corresponding "placeholder" in the other
compare view. A placeholder is a thin indicator of "where the text used to be" in the case of red.
Or "where text was inserted" in the case of green. These placeholders are not actual characters
in the text but are simply indication markers.
If you left click on any red, green, or yellow component, it (and the corresponding difference bit in
the other view) is highlighted. This is useful in lines with many differences where it is difficult to
discern which bit pairs with which bit. When a paired set of differences are highlighted, the same
text will be selected in the lower view.
Corresponding bits may not be on the same line in each view. Sometimes they are on different
lines, depending on how the document wrapped text from line to line. When lines get too far out
of synch, blank lines are inserted to help keep the lines in the same relative vicinity.
NOTES ON USAGE AND BEHAVIOR.
You cannot open or create markups in Text Compare mode.
Publishing is not available in this mode, except for Save as JPG.
The Comparison Text button is disabled when either of the comparison documents is an image
(contains no searchable text).
The top half of the screen shows the split view of the open document and compare document side by
side. These views are raw text only and contain no images or other graphics, and no document
formatting (fonts, text sizes, etc.). The two views are synchronized, meaning they scroll vertically
and horizontally together.
The bottom half of the screen shows a single document view, complete with normal graphics and
formatting. This view shows the document, depending on which of the top views you click on.
If a noted change is to the left or right of either view's visible area, a small arrowhead appears on
the left or right edge of that line, indicating the need to scroll that direction to see the paired text
that is highlighted.
The currently selected line in the Text Compare window displays an * on that line, and in the
corresponding line in the compare view.
Lines of text with a gray background indicate that the lines contain differences. This is useful for
scrolling through a document looking for changes.
Lines of text with a white background indicates lines of text that have not changed significantly. This
would include changes in spaces, tabs or carriage returns. Case changes are considered significant
enough to flag as changed.
The Text Compare windows support the following mouse and keyboard functions:
mouse wheel scrolls up and down
keyboard arrow keys scroll up, down, left, and right
<Home> key scrolls the view to the top of the document
<End> key scrolls the view to the bottom of the document
<Page Up> and <Page Down> keys scrolls the view up or down one (visible) page worth of
text

Brava 7.0 SR1 User Guide
28
TEXT COMPARE REPORTING
In Text Compare mode, you can export the merged results of your two-document comparison to a PDF
file which can be printed or saved to a file system. The entire comparison is merged and the report
contains the following information:
File names: The display name of the original and compare documents are shown in the Compare
report PDF file. Descriptions of the older and newer versions of the document can be customized
within an integration.
Date and time that the report was published.
Merged content : The contents of the older document, merged with the additions and changes
appearing in the newer document.
A list of statistics for number of differences existing for each type of text change.
For any line that contains a difference, a black vertical line along the left edge of the document
displays as a visual indicator of a difference existing in that location.
Color legend: The color legend reflects the type of text changes in the merged content:
Red text with a strikethrough == text deleted from the older document
Green text with an underline == text added in the newer document
Yellow / Brown text with an underline == text changed, newer version
Yellow / Brown text with a strikethrough == text changed, older version
To generate a text compare report:
1. Open two documents for comparison.
2. From the Compare toolbar, click the compare report button
3. In the Export Text Compare Report dialog, browse to a directory where you would like to export the
pdf file and click Save.
By default, the document is assigned a merged filename of the two files being compared. For example, if
the two docs were named Open.doc and Compare.doc, the output file would be named
Open_doc_Compare_doc.pdf.
Report uses and benefits:
This text compare report can be used for several purposes. One use might be for verification that
requested edits have in fact been done correctly. Another might be to serve as a record of the edits that
can be kept for auditing purposes. In the first case, a user who doesn‟t edit the documents or have Brava
installed, is provided with a compare report (either electronically or on paper). He might even be
provided with a package that contains the “before” version, the “after” version, and the compare report.
Once the “after” document is approved, the compare report has little value to the user. This leads to the

Viewing Tools
29
second case of the compare report serving as a record of the change history of a document. Document
management systems are good at recording editing and version check-in activities, but the system has no
visibility as to the changes that occurred within the document. By keeping a copy of the compare report a
complete record of the changes made can be retained.
Usage Notes
The header text of all reports can be localized
Legend colors cannot be customized in this release
If either of the files being compared is a CSF file with print/copy/save as visual right restrictions set,
exporting to PDF is not permitted.
VIEWING IDW FILES
Installing Autodesk Inventor View for Inventor (IDW) Support
You must install Autodesk Inventor View on the Job Processor machine in order for Brava! Enterprise to
publish Inventor files. Brava! Enterprise supports Inventor natively using the IDW2DL.dll driver with
Autodesk Inventor View and you do not have to use the Inventor application print driver to publish the
.IDW file format.
1. On the Brava Enterprise Job Processor machine, browse to
http://www.infograph.com/support/bravaInventor.htm
2. Download Autodesk Inventor View 2009* for Brava Enterprise. Autodesk Inventor View version 2008
supports Inventor version 6 through version 2009 files.
3. Install Autodesk Inventor View 2009, accepting all of the default values.
*Autodesk Inventor View 2009 is not supported on Windows Server 2003 or Windows Server 2008
operating system. Customers running these "Server" operating systems should install Autodesk Inventor
View 2008.
30
BRAVA TASK PANE
BRAVA! TASK PANE
The Brava! Task Pane can be toggled opened or closed by clicking on the centered arrow of the bar on
the right side of the Brava Viewer . The Pane will also open when any of the tabs are summoned
through the right mouse button Show Pane-> menu item.
The tabbed panels available in Brava! Enterprise include:
Thumbnails <Ctrl> + <T>
Bookmarks <Ctrl> + <B>
Changemarks <Ctrl> + <Shift> + <M>
Takeoff <Ctrl> + <Alt> + <T>
Verify Redactions <Ctrl> + <Shift> + <V>
Each tab has a hotkey associated with it. If the Task Pane is not displayed, the pane will display when the
hotkey is pressed, with the associated tab displayed. If the tab is displayed, the hotkey press will hide the
Task Pane.
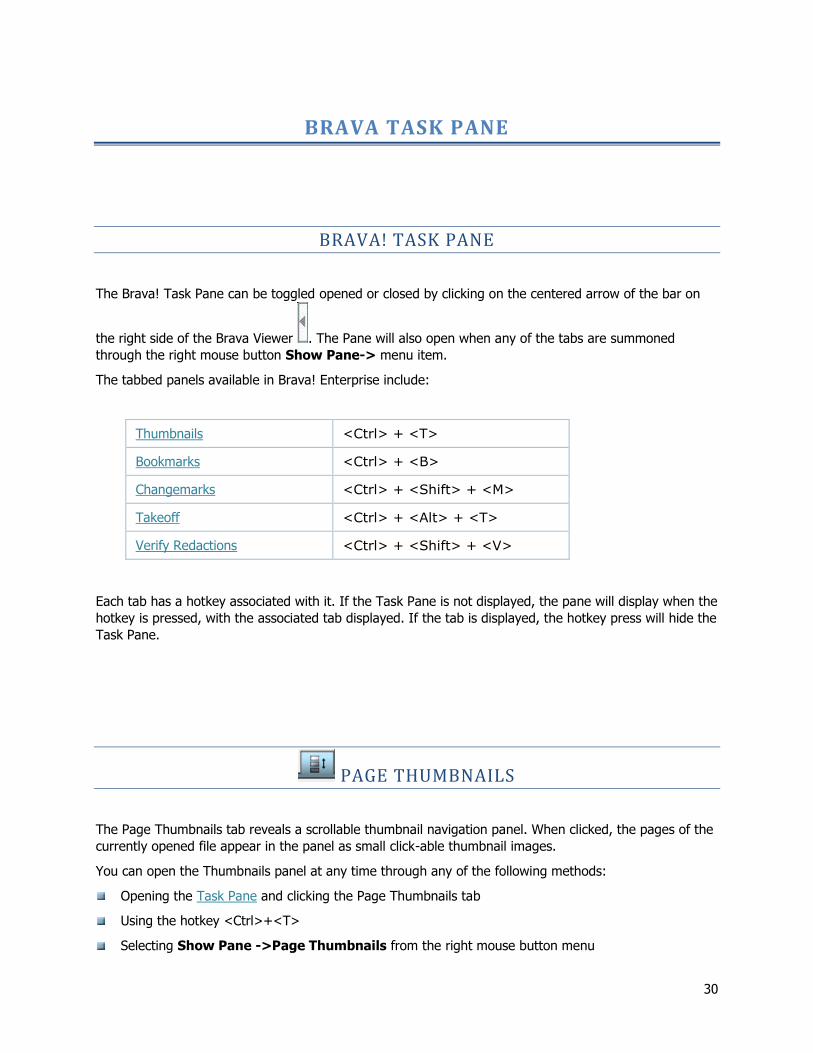
PAGE THUMBNAILS
The Page Thumbnails tab reveals a scrollable thumbnail navigation panel. When clicked, the pages of the
currently opened file appear in the panel as small click-able thumbnail images.
You can open the Thumbnails panel at any time through any of the following methods:
Opening the Task Pane and clicking the Page Thumbnails tab
Using the hotkey <Ctrl>+<T>
Selecting Show Pane ->Page Thumbnails from the right mouse button menu

Brava Task Pane
31
For large documents, using the scroll bar to navigate down the list of thumbnail images will pause the
sequential loading process. Loading will continue on the page you scroll to. This allows you to scroll to
any page thumbnail in a large document without having to wait for all page thumbnails to finish loading
sequentially.
Resizing Page Thumbnails
If Thumbnail resizing is enabled by your administrator, you can right click on the Thumbnails panel to
display a Page Thumbnails sizing menu and make the image sizes larger or smaller - up to ten
increments. Select Reduce Page Thumbnails to decrease the thumbnail image size, or select Enlarge Page Thumbnails to increase their size. If you have enlarged or reduced the thumbnail sizes, selecting Default Size resets them to their original size. The panel itself cannot be resized.
Usage Notes
Thumbnails won't display loaded markups unless the file is a CSF with published markups.
Thumbnails will have a red exclamation mark next to them if there are markups on the page
(whether the markup is published to, opened for edit, or opened for review).
Thumbnail images are always drawn with the default background color, all layers on, and non-
monochrome, regardless of the main view display settings.
The thumbnail panel contains 6 navigation buttons:
First page -- Takes you to the first page.
Previous page -- Takes you to the previous page
Next page -- Takes you to the next page.
Last page -- Takes you to the last page.
The following buttons are disabled if no markup entities are present.
Previous markup page -- Takes you to the previous page containing a markup.
Next markup page -- Takes you to the next page containing a markup.

Brava 7.0 SR1 User Guide
32
BOOKMARKS
Internal Bookmarks
Bookmarks are placeholders that make it convenient for users to recall a previously saved zoom view or
page in a document or drawing. Formats that support bookmarks in Brava! Enterprise are PDF (page
bookmarks) and AutoCAD (2D DWG Views).
Brava allows you to view these self-referencing bookmarks that have been previously authored in the
file's native source application. These type of bookmarks that have been pre-authored in the current file
being viewed are referred to as "Internal Bookmarks".
Review Bookmarks
You can open the Bookmarks panel at any time through any of the following methods:
Opening the Task Pane and click the Bookmarks tab
Using the hotkey <Ctrl> + <B>
Selecting Show Pane -> Bookmarks from the right mouse button menu
The bookmark panel lists only the bookmarks internal to the document being viewed.
Brava Task Pane
33
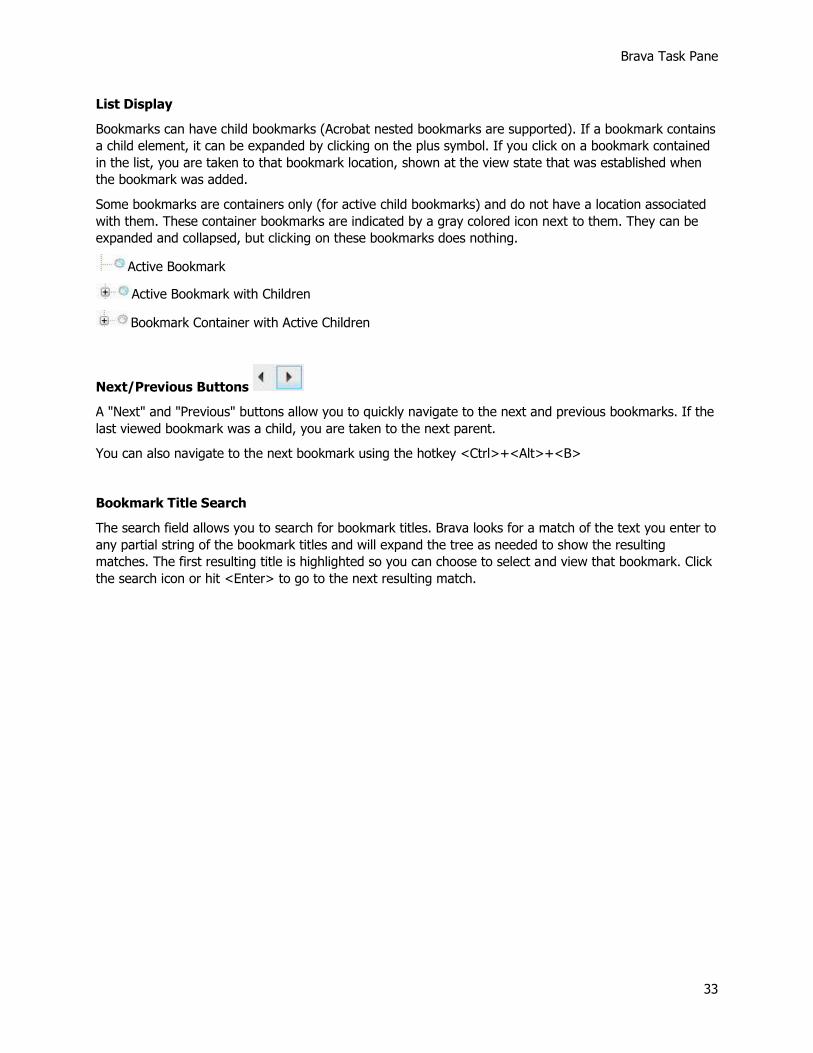
List Display
Bookmarks can have child bookmarks (Acrobat nested bookmarks are supported). If a bookmark contains
a child element, it can be expanded by clicking on the plus symbol. If you click on a bookmark contained
in the list, you are taken to that bookmark location, shown at the view state that was established when
the bookmark was added.
Some bookmarks are containers only (for active child bookmarks) and do not have a location associated
with them. These container bookmarks are indicated by a gray colored icon next to them. They can be
expanded and collapsed, but clicking on these bookmarks does nothing.
Active Bookmark
Active Bookmark with Children
Bookmark Container with Active Children
Next/Previous Buttons
A "Next" and "Previous" buttons allow you to quickly navigate to the next and previous bookmarks. If the
last viewed bookmark was a child, you are taken to the next parent.
You can also navigate to the next bookmark using the hotkey <Ctrl>+<Alt>+<B>
Bookmark Title Search
The search field allows you to search for bookmark titles. Brava looks for a match of the text you enter to
any partial string of the bookmark titles and will expand the tree as needed to show the resulting
matches. The first resulting title is highlighted so you can choose to select and view that bookmark. Click
the search icon or hit <Enter> to go to the next resulting match.

34
FUNCTIONS MENU
BRAVA FUNCTIONS TOOLBAR
The Functions toolbar contains buttons for the commonly used commands. From left to right, these are:
Markup File
Save Markup
Print, Print Region, Watermark/Banners
Select
Annotate
Review (markups)
Redact
Measure / Takeoff
Publish - Publish to CSF, Publish to PDF, Publish to TIFF, Save Current View As JPG
Search
This button is available from the Status bar, directly beneath the Brava Functions toolbar. Also
available from the Help submenu are options to launch the Brava! Online help file (Contents), suggest
new features, and launch the Brava! About screen.

Functions Menu
35
UNDO/REDO
A history stack of all document events allows you to undo-redo certain events by selecting Undo or
Redo from the right mouse button menu.
New with this release, the following actions can now be undone and redone while using Brava:
Redaction features include:
Find text and redact
Find text and un-redact
Redact all raster images
Redact zone
Un-redact zone
Load markup entities from embedded markup in redaction script command
Measurement features include:
Create measure category
Edit measure category
Delete measure category
Note that when a "Save As" or "Consolidate Markups" command is executed, the Undo/Redo history is
cleared. When the history is cleared, the Undo/Redo commands will not be available to redo or undo the
last series of session events.
Brava 7.0 SR1 User Guide
36
MARKUP
MARKUP FILES
Markups allow you to annotate documents without altering the document itself. All markup entities are
saved in a markup file, which is associated and overlaid on the image. There can be more than one
author per markup file. A new layer is automatically created for each new markup file author (determined
by the login user name), allowing them to see other author's markups, but not edit them.
You can create new markups, open an existing markup for editing, overlay one or more markups on its
source document for review, or permanently publish markups and redactups to CSF, PDF, or TIFF output
files.
The symbol indicates that markup files exist on the server for the current document.
What do you want to do?
Create Markups
Open Markups for Editing/Edit Markups
Overlay Markups for Review
Consolidate Markups
Close Markups
Save Markups
Publish Markups/Redactups
Change Markup Ownership
Create a Markup Stamp Template
Create Redactions
Start or reply to a Changemarks Discussion
See also:
Markup Toolbar

Functions Menu
37
CREATING MARKUPS
To enter Annotate mode and create a new markup file with Brava!:
1. Click *
2. Select the desired markup tool from the Markup Toolbar.
3. Once created, you can save your markup layer to be reviewed with the current file and/or publish the
file as a new rendition in PDF, TIFF, or CSF with the markup layer (including takeoffs and redactups)
permanently overlaid.
*You can also enter Annotate mode by:
clicking on the toolbar and then click New from the pop-up menu
using the <Ctrl> + <N> hotkey
EDITING AND COPYING MARKUPS AND REDACTUPS
You can edit (if you are the author) and copy markup and redactup entities in the active (editable)
markup files. You can create new markup/redactup entities or use the Select Markup Tool to select
existing entities to resize, reshape, move, copy, or delete. The Select Markup Tool must be active when
selecting and editing Markup Text.

Brava 7.0 SR1 User Guide
38
To open a markup file for editing:
1. With a document opened in Brava! Enterprise that has markup files associated that you have
previously authored, click on the toolbar and select Open....
2. From the Open Markup dialog, select a previously authored markup file you wish to open. There can
only be one markup file open for edit at a time. If a markup file is currently open, it is closed (with
prompt to save if changes have been made) and the selected file is opened
3. Click OK.
4. Click on the Markup toolbar.
5. Select the markup entity you wish to edit. You can select more than one markup entity by pressing
<Ctrl> while clicking on the desired markups, or by drawing a bounding box around a group of
entities that you wish to select. Holding down the <Ctrl> Key is not necessary when drawing a
bounding box for selection, but the entities you want included must be entirely contained within the
selection box boundaries. Any entities that are hanging over the box's edges will not be included.
6. Markup files can contain redactup entities, which can be copied and edited just like markup entities,
if they have not been finalized (unfinalized redactups will appear transparent). They can be edited in
both markup edit mode, and in Verify mode.
If you are not the author of the markup file, see Changing Markup Ownership.
7. Edit the markup/redactup entities as desired. You can move, resize, delete, copy, or
reshape entities.
Hold the left mouse button down on any of the 8 resize handles (to resize), or on the entity itself
(to move), and then drag.
To delete the selected entity, press <Delete> (on your keyboard or from the right mouse
button menu).
To cancel (reset) an entity being drawn (before the entity is set), click the <Esc> key. Escape
will reset the tool and delete any unfinished portions created while clicking or dragging.
To copy and paste the selected entity, use the <Ctrl> + <C> hotkey, or select Copy from the
right mouse button menu and Paste (<Ctrl> + <V>) into another area of the same page,
another page in the document, or another document open in another Brava window. See section
below for more information about copying entities.
To rotate the selected entity, click on the green ball extending from the center of your entity.
The cursor changes to . Drag the ball in the direction you wish to rotate and release the
mouse button to set the entity. For finer tolerance, click and drag the green handle farther away
from the center point of the entity and then rotate. The entity will rotate in much smaller
increments when the handle length is increased.
To change the shape of a selected entity, click on one of the independent edit handles (white
boxes) or anchor points (black dots) and drag in any direction.
To change the color of the selected entity, choose a new color from the markup or redactup
Properties color menu.
Functions Menu
39
You can change selection of additional markup properties from various drop down selection
boxes, such as line width, end arrow styles, line styles, fill type, etc.
To add a hyperlink, select the markup entity, click the add hyperlink button from the
markup properties, and type or select a URL from the hyperlink text box.
To edit a Changemarks note's text, editing must be done to the Changemarks entity itself. The
text cannot be edited directly in the Changemarks note List pane.
To edit a redaction reason, select one or more unfinalized redactups and either type a new
reason in the properties text field and hit <Enter> or simply select a different reason from the
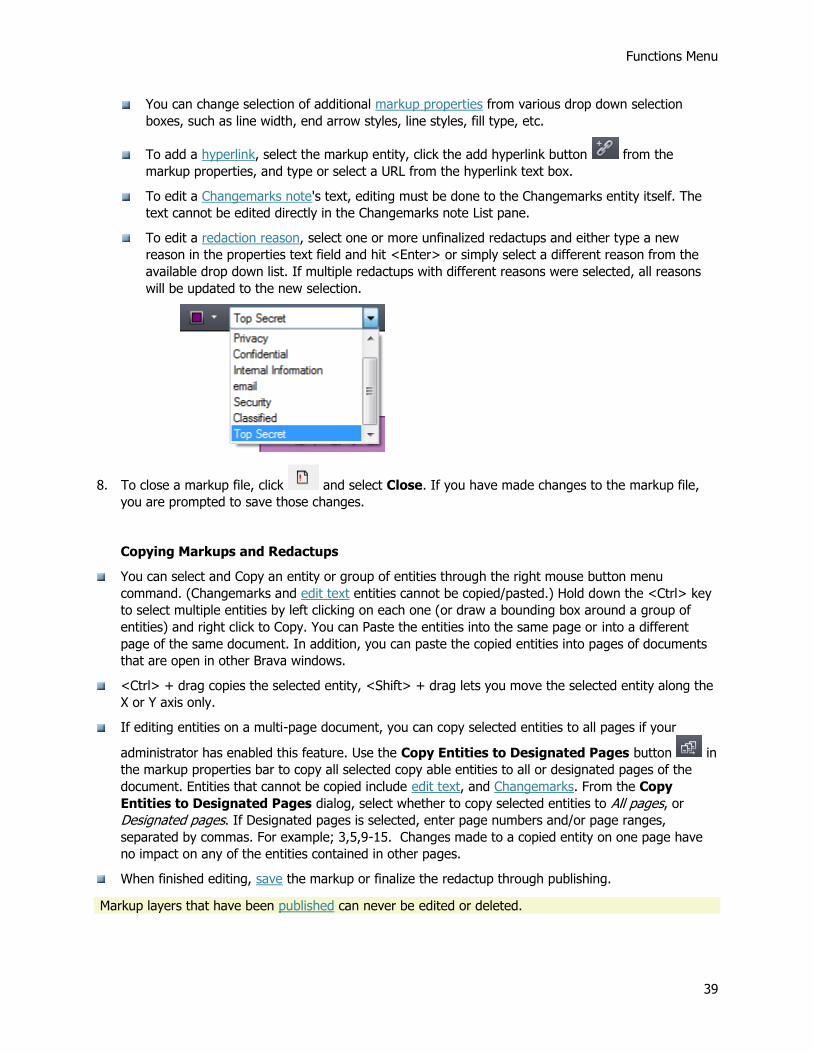
available drop down list. If multiple redactups with different reasons were selected, all reasons
will be updated to the new selection.
8. To close a markup file, click and select Close. If you have made changes to the markup file,
you are prompted to save those changes.
Copying Markups and Redactups
You can select and Copy an entity or group of entities through the right mouse button menu
command. (Changemarks and edit text entities cannot be copied/pasted.) Hold down the <Ctrl> key
to select multiple entities by left clicking on each one (or draw a bounding box around a group of
entities) and right click to Copy. You can Paste the entities into the same page or into a different
page of the same document. In addition, you can paste the copied entities into pages of documents
that are open in other Brava windows.
<Ctrl> + drag copies the selected entity, <Shift> + drag lets you move the selected entity along the
X or Y axis only.
If editing entities on a multi-page document, you can copy selected entities to all pages if your
administrator has enabled this feature. Use the Copy Entities to Designated Pages button in
the markup properties bar to copy all selected copy able entities to all or designated pages of the
document. Entities that cannot be copied include edit text, and Changemarks. From the Copy
Entities to Designated Pages dialog, select whether to copy selected entities to All pages, or
Designated pages. If Designated pages is selected, enter page numbers and/or page ranges,
separated by commas. For example; 3,5,9-15. Changes made to a copied entity on one page have
no impact on any of the entities contained in other pages.
When finished editing, save the markup or finalize the redactup through publishing.
Markup layers that have been published can never be edited or deleted.

Brava 7.0 SR1 User Guide
40
CLOSING MARKUPS
To close the currently active markup:
1. To close an editable markup, click on the toolbar and select Close from the drop-down menu.
You will be prompted to save the file before closing if the markup has not been saved yet or if
changes have been made.
2. To close markups that are opened for review, select Close Review from the review button drop
down and select the overlaid markups in the list that you want to close. If only one
markup is opened for review, it is automatically closed. No markup list will appear. You can also
access the Close Review command through the menu item File-->Markup-->Close Review.
Markups that have been published can never be closed.
The following keystrokes are available to quickly execute the close markup and close review
commands.
<Ctrl> + <Shift> + <C> = Close Markup
<Ctrl> + <Shift> + <R> = Close Review
CONSOLIDATING MARKUPS
If this feature is enabled by your administrator (via a server parameter), you can transfer all open
markup entities into one new consolidated markup file. To do this:
1. Click .
2. Select the markup files you wish to consolidate. You must open at least two markups to use this
feature.
3. Click and select Consolidate Markups
A new markup file is created for edit, and all of the markup entities in the markups selected
for consolidation are copied to this new markup file. All markup files that were opened for
review are closed after the command is executed. The entities in the consolidated file retain
their original author information and ownership does not change by default.

Functions Menu
41
If any markup entities exist that have been published to the file (burned in), they are not
included in the consolidated markup.
4. Save the current consolidated markup. The consolidate command cannot be undone, however, you
can close the markup opened for edit and choose not to save the consolidation.
Usage Notes
Executing a Consolidate Markups command clears the Undo/Redo event history.
If the markup files contain takeoff categories, those categories will be consolidated, and their totals
recalculated ONLY when category properties match exactly (name, color, type, sytem, unit, precision,
etc.). Any differences will be recognized as a separate category.
STAMP TEMPLATES
A Stamp Template is a group of markup entities, defined by an author as a "stamp". The template can
contain any of the available markup entities, including dynamic text (similar to banner strings) that
update when a user adds the stamp to a markup layer that is open for edit.
To create a New Stamp Template:
1. Open a document to use as a reference in regard to size and shape of the stamp template you wish
to create.
2. Verify that you are on page 1 of the document.
3. Click on the toolbar. Select Stamp Templates --> New. (Note: If the option is not available,
see notes below about permissions.)
4. The Markup toolbar opens. Use the available markup tools (see note) to create a group of one or
more entities and/or raster images that will be saved as a single stamp template. You can use
wildcards in your stamp's Markup Text that will dynamically update to the tag's value when in use.
Note that the following tools are not available for use with the stamp tool: Changemarks, redactups,
hyperlinks, and edit text group tools.
To allow reviewers to manually update values contained in a markup stamp, use the Token
button. When used in a markup text string of your stamp template, you can set user prompts via
the %prompt("Label_String") token. When the user inserts, or double clicks a markup stamp, a
text entry field displays, prompting them to enter requested information. This text entry field can
be edited at any time during the review process until the markup stamp is finalized through
publishing.
When inserting dynamic stamp tokens into markup text strings, an integration can use the
custom %dbupdatestring(field value) token in the stamp template to allow communication
with the integration database and to dynamically update the stamp's field label values when the
stamp is inserted into a markup, or when a reviewer double clicks on the inserted markup stamp.
For example, the following tokens:

Brava 7.0 SR1 User Guide
42
%dbupdatestring(Date)
%dbupdatestring(Time)
%dbupdatestring(Author)
%dbupdatestring(Priority)
%dbupdatestring(Status)
Produce the following table model:
Field label Value
Date May, 08, 2008
Time 13:00:31
Author Joe Smith
Priority HIGH
Status REVIEW
5. To save the group as a stamp template, click and select Stamp Templates --> Save or Save
As.
6. Enter a name for the new template and click OK. The template is saved to the server's list of
available stamp templates (by default C:\Program Files\IGC\Brava!\Brava! Server\stamptemplates)
that users may summon when inserting a stamp into an editable markup layer. A newly created or
updated stamp becomes immediately available to an end user when he accesses the server folder
through the markup stamp Browse button.
Note:Stamp templates created in one file format (such as PDF) should only be applied to files of the
same format type or the stamp may not be applied with the correct scaling for the file format. It is
recommended that you append the file type to the name of the stamp template, for example, a template
created on a PDF document might be named template1_pdf.xsp.
7. To exit Stamp Template mode, select either -->Stamp Templates-->Close or File--
>Markup-->Stamp Templates-->Close.
To Edit an existing Stamp Template:
1. Open the file on which the original Stamp Template that you wish to edit was created. Stamp
templates should be edited against the same document each time.
2. Click on the toolbar and select Stamp Templates --> Open
3. In the Open dialog, browse to and select a template file (XSP), then click Open. The template
opens at the same coordinates as when it was last saved.
4. You can edit the individual elements of the template as any other markup file by adding,
deleting, moving, and copying markup entities. (Note that you cannot copy markup entities to
other pages of the document. The template must be created only on page 1.)

Functions Menu
43
5. When finished editing, select --> Stamp Templates-->Save to save the template with
the same name. Select Save As if you would like to save the template with a different name.
When a new or existing stamp template is open for edit, the Save Markup menu items are disabled.
In addition, the following markup tools are not available and cannot be used when creating stamp
templates: Changemarks, redaction tools, Place Stamp, hyperlink, and edit text tools.
A group of entities can only be saved as a stamp template that were created on the first page of the
current file.
After saving a template that contains dynamic tags, you should verify that the template works as
expected by opening up another browser session, loading a file, and creating a new markup layer
that includes the stamp to be tested.
The stamp template feature may not be available if your administrator has disabled this feature
through its optional parameter EnableMarkupStampTemplate.
Stamp authoring can be disabled separately from stamp usage. If this feature (stamp authoring) is
disabled, you will still be allowed to use the stamps (available from the markup toolbar Insert Stamp
tool) that a user with more privileges creates.
Recently used stamp templates are persisted in ViewerConfig.xml as
<FileOptions><StampMrkDir><filepath>
SAVE
SAVING MARKUPS
Markup files are saved as XRL or DXF files.
1. Once you have created a markup layer, click on the toolbar to summon the Save Markup File
dialog.
2. You can also summon a markup Save dialog by clicking on the toolbar and select Save, Save
As, or Save As DXF.
3. Accept the suggested markup name (same as the source file name) or type a file name in the File
Name text box and select a directory to save the markup xrl file. For example, a markup created on
AdminGuide.pdf will have a suggested markup name of AdminGuide_pdf.xrl). Markups saved with
Brava 7.0 SR1 User Guide
44
Save or Save As are stored with the extension *.xrl. Markups saved with Save As DXF are stored
in *.dxf format and can also be opened in CAD applications.
4. Click Save.
Usage Notes
The following keystrokes are available to quickly execute the save markup commands.
<Ctrl> + <S> = Save Markup
<Ctrl> + <Shift> + <S> = Save Markup As
Markup layers that contain redactup entities must be published to complete the redaction.
Brava Enterprise ActiveX viewer can open and save older markup files (created with previous Brava
versions). The files are converted to the current markup format, which can be viewed in the Brava
Flash Viewer, if needed. (The Flash viewer does not support loading older version markup files.)
See Also:
Publishing Markups
Publishing Markups to PDF Files
PRINTING
If your Brava! Server administrator allows and enables it, you can use the Brava! Printing functions.
Images print as they appear on the screen. If you have a markup open or overlaid, it will print on the
image.
What do you want to do?
Print a file
Print a region
Print with banners
Add a Watermark
Functions Menu
45
See Also:
Print to Scale
Print Troubleshooting
PRINT A FILE
To print the open document with the default printer settings, click ( or you can use the hotkey +
< P>).
Note: If Printing is disabled by Visual Rights, the print button and menu item will not be available.
Additionally, Print Screen functionality will be disabled.
To change the default settings:
1. Click on the toolbar and select Print from the submenu.
2. To change printers click Printer Setup and select a printer from the printer Name drop down box.
Click Properties to make any adjustments to the printer properties. You can change the printer's
paper tray or change the paper orientation (landscape or portrait) Click OK to close the printer
Properties and Printer Setup dialog boxes.
3. From the General tab, specify a Print Range:
Print Range includes All pages, Current page, Pages from:To: (specify page numbers), and
Current View. Current View only prints the part of the image that occupies the viewing window.
Current View attempts to use the paper's entire printable area, so the printout can contain some
portion of the image that is not visible in the viewing window.
4. In the Options section, you can set your desired print options:
a. The Number of copies to print.
b. The minimum printed Line Thickness.
c. Print color options include "Original Colors" (file prints with original colors; markups print with
color), "As Grayscale" ( file prints in shades of black to white; markups print grayscale), and
"Lines As Black" ( file prints all lines black; markups print with color). The Original Colors option
is only available if the selected printer supports color printing.
d. Select the Automatically rotate for best fit check box if you want Brava! to determine if
rotating the image by 90 degrees will allow more of the image to fit on the printed page.
e. If Changemarks are associated with the document, the Print Changemarks notes check box is
enabled. When selected the content associated with each Changemarks note will print at the
end of the print job as an appended page. Only the Changemarks that fully appear in the printed
output page will appear if the output page is a zoomed view. Each note receives a unique
number that can be matched up to the text printout. Printed information includes the
Changemarks title, author, date and time authored, the note content, and any hyperlink
reference.
Brava 7.0 SR1 User Guide
46
f. If any redactup entities are contained in the document, the Print redaction reasons check box
is enabled. When selected, the text of each Redaction Reason (if present) will print at the end of
the print job as a separate summary sheet. Each redactup receives a unique number that can be
matched up to the text printout. Printed information includes the Redaction Reason string,
author, date and time authored.
g. Some older printers, and the PDF Distiller and Writer, may not properly invert printouts and
many file types print reversed (black background and white foreground). To correct the printout
(white background with black foreground), enable the Optimize for PDF/Postscript printing
option in the Print Options dialog. When selected, this causes a bitmap of the current image to
be sent to the printer resulting in accurate printouts for the problematic printer or print driver.
Note that enabling this option results in a slower print time and a larger print spool file. This
option is persisted per printer.
5. Adjust the scale of the document from the Scale tab - see Print to Scale for details.
6. Observe the Preview area of the Print dialog to verify the area you wish to print is contained in the
printable area of the page (indicated by the dashed blue line).
7. Note: If the print preview image does not display what you expect, study the textual output in the
print Preview panel. It displays the image's dimensions, the current scaling (e.g. "Fit to page,"
"1/50," etc.), the scaled output size (the image's dimensions multiplied by the scaling), the paper size
dimensions, and the printable area size. Pay particular attention to the scaled output size compared
to the printable area size; these are depicted, respectively, as the red and blue dashed lines in the
preview image. Adjust the paper size or scaling as necessary to obtain the desired output.
8. Click Print to print the file.
You can save your print settings (excluding Banner/Watermarks) as the default values to use for
subsequent printings. Click Defaults... and then click Save As Defaults. To clear your previously saved
default settings, click Clear Defaults. If Save as Defaults is not selected, the print dialog automatically
defaults to the values used for the last print job within the current session.
The following settings of the Print dialog box can not be set as default:
1. Print range: From_To - if selected, the default setting is Current page.
2. Scale entry always defaults to Fit to page.
3. Number of copies to print always defaults to 1.
See also:
Print Region
Printing Tips

Functions Menu
47
PRINT REGION
You can select just a region of an image to print using the Print Region command.
1. Click on the toolbar and select Print Region from the submenu.
2. Click the left mouse button on the viewing window and drag a window around the area of the
document you wish to print.
3. The selected area displays (according to the current settings) in the Preview area of the Print dialog
box. Current region is automatically selected in the Print range area. Click Print to print the
selected region.
In contrast to printing the Current View option, Print Region only prints the area selected in the dragged
rectangle. The printout is cropped and does not try to fill the paper's printable area.
Print Region can also be triggered using the <Ctrl> + <G> hotkey and then selecting the region.
If the Copy to Clipboard Visual Right is disallowed, this feature is disabled
See Also:
Print a File
WATERMARK/BANNERS
The banners are strings of specific information (date, time, page number, user name, etc.) assigned to a
location on the document header and footer. The watermark is a semi transparent character string that
stretches from the lower left corner to the upper right corner of the printed or on screen document.
Watermarks and banners can be used to support ISO 9000 and QS 9000 quality standards. They can
contain text strings, token values, or optionally (through integrations API), metadata fields from
document management and product life management systems can be extracted and inserted into the
banner or watermark. With 12 possible banner/watermark locations, you can add as much text as you
need to provide sufficient traceability and status.
Any of the banners or watermarks may be defined (added) by the administrator or by you. Any strings
that have been set by an administrator (specified on the server or in the security XML file) will not be
editable if this restriction has been set. Banners and watermarks set on a published CSF file will never be
editable by end-users.
Print banners and watermarks display on the printed output (paper) and CSF files while Publish banners
and watermarks display on the published output PDF or TIFF file (electronic).

Brava 7.0 SR1 User Guide
48
On-Screen Watermark and Banner
Watermark and banners are printed on the document print-out except for the on screen banner and
watermark which can be set independent of the print and publish watermark/banners and are visible only
in the Brava viewing window.
You can show the watermark and/or banner values in the Brava viewing window by adding an entry to
the Screen Watermark or Screen Banner lines of the Watermark/Banners dialog. The screen watermark
value displays diagonally across the viewing window, and the banner value displays on the bar just below
the viewing window. These settings are useful for displaying a document's classification to the viewer
(e.g., proprietary, draft, etc.).
See Also:
Edit the watermark/banners font
Use Tag values
Add/edit a banner or watermark
ADDING, EDITING WATERMARKS/BANNERS
You can add, edit, or clear print banners or the watermark if they have not already been defined on the
Brava! Server or in the html parameters. Note: Any banner or watermark strings that have been
published to a CSF file will not be editable.
Print banners and the watermark display on the printed output (paper) while Publish banners and
watermarks display on the (desired format) published output file (electronic).
To access print watermark and banners:
Click the print arrow on the toolbar (or click File) and select Watermark/Banners. The
button is also available from the Print dialog and CSF Publishing dialog.
To access publish watermark and banners:
Click on the toolbar and select Watermark/Banners from the selected format Publish Options dialog.
To edit the print/publish banners and watermark:
1. Click on the watermark or one of the banner folders (e.g., Top Left).
2. Type in the desired text string or % to access the tag drop down list. You can use multiple tokens in
one banner or watermark string (for example: %Date %Time).
3. Click the Font button to change the font by selecting a font name, style and size from the Font dialog box. Notes: Any change in font style and name selection are persisted for all documents in
the current session and across sessions and will be applied to all defined watermark and banner
settings (you cannot define multiple fonts or styles per document). Watermark font size is not
affected by your font size selection. The Screen Banner is not affected by any font setting.

Functions Menu
49
4. You can choose to show a watermark and/or banner value in the viewing window by adding an entry
to the Screen Watermark or Screen Banner lines. These settings are useful for displaying a
document's classification to the viewer (e.g., proprietary, draft, etc.) and the values can differ from
the values entered in the Watermark and banner location lines. Note that On screen banner fonts are
not affected by choices made in the Font dialog box.
5. Click List on the Print or Publish Watermark/Banners dialog to view all Watermark/Banner strings
that are set for the current document. Click Edit to return to the editable list.
6. Click OK to apply your changes and close the Watermark/Banners dialog box.
The symbols © and ® are supported for use in the screen or printed banner or watermark text
string.
See also:
Using Tag values
Editing Watermark and Banner fonts
About Banners and Watermarks
Watermarks on CSF files

Brava 7.0 SR1 User Guide
50
TOKENS
To access the Token (or Tag) drop-down list, enter a percent symbol (%) in the edit field of a
print/publish watermark or banner. Print banners and the watermark can contain text strings or one of
the available token values blow. These tokens are also supported when using the Stamp Template and
Find and Redact tools.
%Date - Inserts the date the print was spooled. If the tags are viewed on screen, the time at which
the screen was last refreshed displays.
% SysDatePlusDays(x) - Inserts a date the specified number of days past the system date.
Replace "x" with the desired number of days. Negative numbers of days may be entered. Be sure to
close the parenthesis when you add the number of days.
%Time - Inserts the time the print was spooled based on a 12 hour clock (AM/PM). If the tags are
viewed on screen, the date on which the screen was last refreshed displays.
% MilTime - Inserts the time the print was spooled based on a 24 hour clock.
Note that all of the date and time specific tokens above are based on the current UTC time.
%Title - Inserts the name of the document.
%Page - Inserts the page number.
% TotalPages - Inserts the total number of pages.
%BatesPgNo(x) - Bates Number. This tag is used to indicate the starting page number and the
number of digits to use. For example, %BatesPgNo(0002) would place 0002 on the first page, 0003
on the next page, etc.
%Login (or %User) - Inserts the user name of the person who issued the print.
%Hostname - Specifies the hostname of the machine that issued the print.
%IPAddress - Specifies the IP Address of the machine that issued the print.
%% - Inserts a single % character.
© - Inserts the copyright symbol.
® - Inserts the registered trademark symbol.

Functions Menu
51
In addition to the tokens above the following stamp Tokens can be used in creating Stamp
Templates when a markup text entity is selected:

Brava 7.0 SR1 User Guide
52
%prompt("Label_String") - Used in a token expression when creating a stamp template. When set,
a prompt dialog displays to the end-user prompting them to manually edit a markup stamp's text string
during review process. When this token is used, the prompt dialog displays when a user initially inserts
the markup stamp and at any time the stamp is double clicked. The dialog contains a text entry field
value which can be updated at any time before the markup is finalized through publishing. Unlike
%DBUpdateString, the %prompt tokens will NOT be sent to the integration database for resolution and
may not be customized for integrations. A separate dialog will display for each %prompt token set.
Note that a ":" character will be automatically added to the end of LABEL_STRING in
%prompt(LABEL_STRING) when displaying the caption to the user. You do not need to add any
quotation marks with your label string. For example, %prompt(Enter amount) means that the user will
see a prompt box with the caption "Enter amount:" and a text entry field to type in the requested
information.
%DBString(x) - This tag is used to resolve custom tags for products that integrate with Brava!. Replace
"x" with any printable character except a right parenthesis, ")". See notes below.
%DBUpdateString(field label) - Used when creating Stamp Templates to resolve custom integration
values during the review process. This tag inserts a corresponding field label value (Priority, Status, etc.)
from the integration's database tables when a user either inserts a markup stamp, or double clicks on a
markup stamp containing a %DBUpdateString token in the markup text string. The method for resolving
these tokens is determined by the integration's needs, and can include using a dialog or a non-interactive
method. If %DBUpdateStrings are not resolved, they are given a default answer which is displayed with
the resulting markup stamp.
Usage Notes
You may use multiple, differing tokens in any single banner or watermark string (for example %Date
%Time %Title might result in the string 7/14/2010 3:03 PM MyDocument.pdf). The tokens can be
used in conjunction with additional words and spaces. For example Today is %Date, at exactly
%Time results in Today is 7/14/2010, at exactly 3:03 PM
Tag values are case insensitive.
A Bates Number is considered to be both the prefix and the page number WITH leading zeros. To
create a bates ID, you can add text preceding the tag. For example, Smith vs.
Jones%BatesPgNo(00001) would result in Smith vs. Jones000001 being printed on the first
page, Smith vs. Jones000002 printed on the second page, etc.
Using the %DBString(x) macro allows you to incorporate database attributes into your watermarks
and banners. For example, the following show the resulting printed string of various typed input:
Input: This document was created on %DBString(r_creation_date) by
%DBString(owner_name).
Output: This document was created on 11/15/2007 by John Johnson.
Input: Document "%DBString(object_name)” was modified by %DBString(r_modifier) on %DBString(r_modify_date).
Output: Document "neo.doc” was modified by Pat McDonald on 1/12/2004.
Input: Reviewed and Approved, Version %DBString(r_version_label)
Output: Reviewed and Approved, Version 1.6

Functions Menu
53
FONT SELECTION FOR WATERMARKS AND BANNERS
The Font Properties dialog box is accessed through the Font button of the Watermark/Banners dialog
box. Here, you can choose the font properties to use for your print and publish watermark and banners
and screen watermark.
You can set the font style, size, and name from the Font Properties dialog box, however, note that the
screen watermark and banner are not affected by your choices.
Select a font name, style, and size from the available choices and click OK. You can review your selection
in the Review section of the dialog box. The list of available font names is the list that your default printer
supports.
If the default font properties have been set in the Brava server parameters (WatermarkBannerFontSize,
WatermarkBannerFontStyle, BannerFontName) changes made to these fields in the Font Chooser will not
be saved.
PRINT TO SCALE
You can print image files to scale through the Scale tab of the Print dialog box. You can scale the
original image to fit the page, fit document within banners, scale, or scale it to a preset ratio.
In the Unit section:
For the Measurement unit type, you choose from US Customary (inches) or Metric (millimeters) and
select pre-defined drawing scales to set up image-based Print To Scale operations.
Select the Use non-paperspace adjusted units check box to use the document's raw drawing units
for scaling instead of normalized units. When selected, one unit is assumed to equal either one millimeter
or one inch (depending on the measurement unit type selected). This option is not selected by default
and the document's normalized units are used for scaling. Normalized units are the drawing units
converted to a real world unit based on a conversion factor of the document type.
In the Scale section:
You can choose to use one of four scaling methods available - Fit to page, Fit document within banners, Scale, and Scale to (ratio) where you can enter custom values:
Fit to page
Fit to page automatically sizes a document to fit completely on the selected paper size.
Fit document within banners
Select if you would like to shrink the document to fit within the borders of any banners that might
exist.
Scale
Scale allows you to print a current file to a particular scale, based on the original scale of the image.
Select a scale amount from the drop down list. With Full , one inch of the original prints as one inch
on paper (1 inch = 1 inch) and with 1/x inch, one foot of the original document prints as a fraction of
an inch on paper(1/x inch = 1 foot). It is helpful to know the original scale of the file being printed in
order to adjust the printed image accordingly. If unsure, use the Scale To or Fit to Page method, or

Brava 7.0 SR1 User Guide
54
use trial and error. (If you have Acrobat PDF writer, you can select that option from your printer
drop-down name list to print to. You can then preview the file in Acrobat Reader as it will print.)
Scale to
Scale to "x to y" also allows you to print a current file to a particular scale, based on the original
scale of the image. Enter a scale ratio in the two text boxes. For example, entering 1 and 100, 1
unit (inch or millimeter) of the printed document is equal to 100 units of the original document.
(1/100 or 1%) Or, if entering 5 and 1 for example, 5 units of the printed document represents 1 unit
of the original (5/1 or 500%). The image is cropped if the scaled image is larger than the paper size.
It is helpful to know the original scale of the file being printed in order to adjust the printed image
accordingly.
Examples:
Small scale drawing file where 1 inch = 1 inch:
1) Scale to 1:2 (50%) 2) Scale to 6:1 (600%)
Examples:
Large scale drawing file example where ¼ inch = 1 foot:
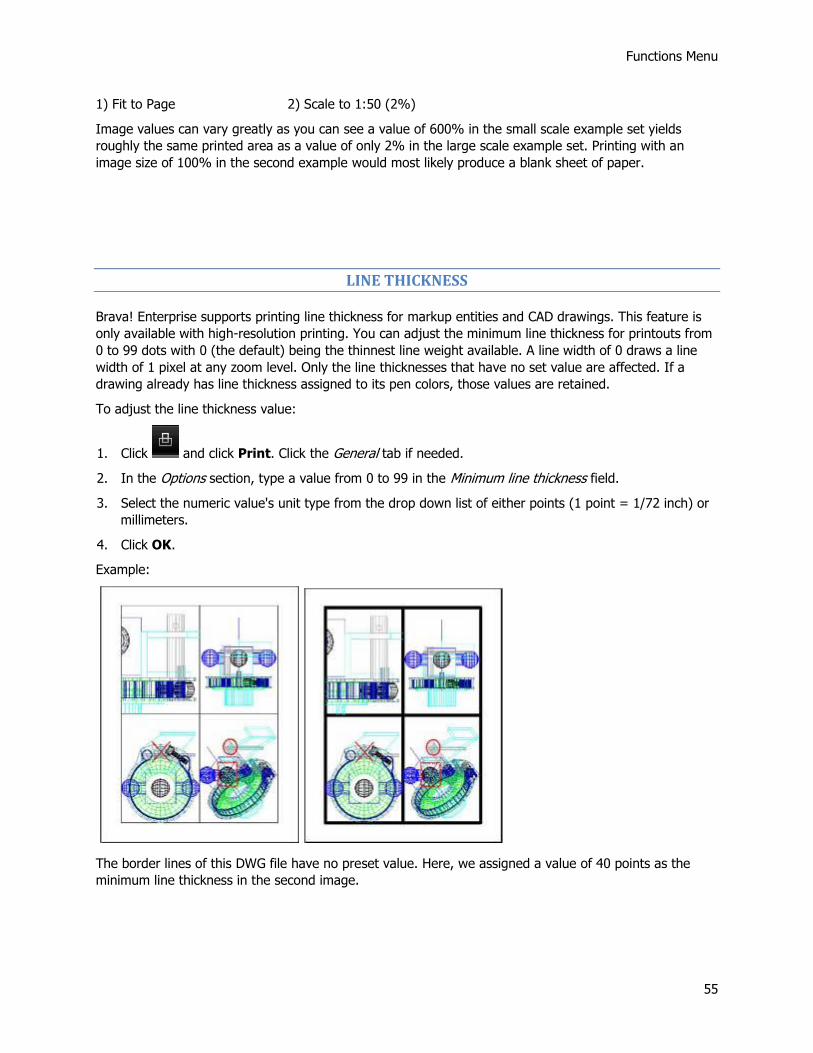
Functions Menu
55
1) Fit to Page 2) Scale to 1:50 (2%)
Image values can vary greatly as you can see a value of 600% in the small scale example set yields
roughly the same printed area as a value of only 2% in the large scale example set. Printing with an
image size of 100% in the second example would most likely produce a blank sheet of paper.
LINE THICKNESS
Brava! Enterprise supports printing line thickness for markup entities and CAD drawings. This feature is
only available with high-resolution printing. You can adjust the minimum line thickness for printouts from
0 to 99 dots with 0 (the default) being the thinnest line weight available. A line width of 0 draws a line
width of 1 pixel at any zoom level. Only the line thicknesses that have no set value are affected. If a
drawing already has line thickness assigned to its pen colors, those values are retained.
To adjust the line thickness value:
1. Click and click Print. Click the General tab if needed.
2. In the Options section, type a value from 0 to 99 in the Minimum line thickness field.
3. Select the numeric value's unit type from the drop down list of either points (1 point = 1/72 inch) or
millimeters.
4. Click OK.
Example:
The border lines of this DWG file have no preset value. Here, we assigned a value of 40 points as the
minimum line thickness in the second image.

Brava 7.0 SR1 User Guide
56
PRINT TIPS AND TROUBLESHOOTING
At this time, It is only possible to preview the page that is currently displayed in the viewer.
To get the best line resolution on vector images, print using the "Vector Lines as Black" option.
The rotation of the image displayed in the print preview area depends on the rotation of the image in
the viewer, the print range selection, and the "Automatically rotate for best fit" selection. When the
"Current View" print range option is selected, the preview image's base rotation (when the option
Automatically rotate for best fit is NOT selected) will be the same as the rotation in the viewer.
When any print range option other than Current View is selected, the preview image's base
rotation is 0 degrees (no rotation). Selecting the Automatically rotate for best fit option rotates
the image in the preview 90 degrees from its base rotation if it results in the image fitting better on
the target paper area.
If the print preview image does not display as you expect, study the textual output in the print
preview panel. It displays the image's dimensions, the current scaling (e.g. "Fit to page," "1/50,"
etc.), the scaled output size (the image's dimensions multiplied by the scaling), the paper size
dimensions, and the printable area size. Pay particular attention to the scaled output size compared
to the printable area size; these are depicted, respectively, as the red and blue dashed lines in the
preview image. Adjust the paper size or scaling as necessary to obtain the desired output.
Some older printers, and the PDF Distiller and Writer, may not properly invert printouts and many file
types print reversed (black background and white foreground). To correct the printout (white
background with black foreground), enable the Optimized PDF Postscript Printing option in the
Print Options dialog. When selected, this causes a bitmap of the current image to be sent to the
printer resulting in accurate printouts for the problematic printer or print driver. Note that enabling
this option results in a slower print time and a larger print spool file.
If attempting to publish an Office 95 compliant file with Office 2010, print/XPS publishing may fail if
the file block protection settings are enabled. This setting may be altered through your Office
application file options:
From your Office application, go to:
File->Options->Trust Center->Trust Center Settings->File Block Settings
Any file checked as 'open' will fail
SELECT
Functions Menu
57
SELECT TOOL
The select tool is used to pick interactive elements in a document or drawing.
With it, you can select and copy text, view any block attributes (mouse over reveals attribute
information) , select and copy any graphic image, and launch hyperlinks contained in the document. The
cursor changes to a hand when you move it over a hyperlink. Click to launch.
See Also:
Select Markup/Redactup
COPY TEXT
If allowed by Visual Rights, you can select text contained in a CSF, Microsoft Office document or a
drawing file and copy it to the Clipboard.
1. Use the Select tool to click and drag a selection box around the text you want to copy. The
selected text appears highlighted. The selection box can include as little as one letter, or as much as
all of the text contained in the page.
2. From the right mouse button menu, select Copy. You can then paste the contents of the Clipboard
into another application such as Notepad or Microsoft Word.
This feature is not permitted if the publisher of the CSF file has disabled the Visual Right "Copy to
Clipboard". If the document has the copy to clipboard right enabled, users can copy a specified portion,
or the entire page to the clipboard. If not permitted, Print Screen functionality is also disabled.
See Also:
Capture Changemarks Information
COPY REGION
You can select and copy a region of a document to the Clipboard as an image and paste that region into
other applications such as Word, Excel, CAD applications, Image editors, etc.
1. From the right mouse button menu, select Copy Region.
2. Click and drag a selection box around the region you want to copy.
3. The region is now copied and you can paste the contents of the Clipboard into another application.

Brava 7.0 SR1 User Guide
58
When viewing a CSF file, this feature is not permitted if the publisher of the CSF file has disabled the
Visual Right "Copy to Clipboard". If not permitted, Print Screen functionality is also disabled.
HYPERLINKS
A hyperlink contains a pointer to a text, image, sound or video file or a web address. When you launch a
hyperlink contained in a Changemarks or markup entity, the application associated with that file type is
automatically launched and the specified file is loaded. If the hyperlink references a web address, the
default browser is launched and goes to the specified URL.
ADD A HYPERLINK
You can attach a hyperlink to a Changemarks note or to any markup entity. Simply create the
Changemarks or markup entity and with the entity selected, click in the markup properties toolbar.
Type a hyperlink URL in the text box.
To edit a Changemarks or entity to add a hyperlink, click to select the entity and then click to
specify a URL. Only one hyperlink URL can be assigned to each markup object. in the case of
Changemarks, any URL entered into the Changemarks text field will automatically become an active
hyperlink in the Changemarks panel and can include multiple URLs. In addition, URLs added to the panel
in Changemarks Discussion mode will also be active.
LAUNCH A HYPERLINK
To launch a hyperlink from within a Brava! window (while in review mode), use the select tool to
move the cursor over an entity containing a hyperlink (pointer changes to a hand) and left-click.
To launch hyperlinks contained in Changemarks, open the Changemarks panel and click on any active
hyperlink (indicated with underlined blue text). The URL will launch in a separate browser window.
You can specify how hyperlinks launch in Brava! by adjusting the viewer parameter "HyperlinkLaunch".
default launches each document in its own separate window
one launches all documents in a separate window as Brava!
self launches documents in the frame (if frameset present) that the Brava! Viewer is in.
top launches documents in the same instance of the browser window replacing its current
contents.

Functions Menu
59
SEARCH
FIND TEXT, SEARCH WILDCARDS, AND SEARCH MACROS
The Search box allows you to search for text (normal phrases and text patterns) contained in a document
or drawing file.
1. Type the word or phrase you want to search for in the search edit field. You may also enter search
string commands or macros to find and highlight text.
2. You can specify your search parameters by selecting an option from the search menu (click the down
arrow) .
Down - progressively searches for the next instance in the document.
Up - progressively searches for the previous instance in the document.
Match Case - searches for the text exactly as typed with upper and lower case characters.
Find whole word only - finds the typed characters as an entire word as opposed to being part of a
longer word.
Regular Expressions - if selected, the search will run using regular expressions. (No need to type
regex: as part of the search string) If not selected, search uses classic search algorithms.
Term Hit - Toggles the highlighting mode on or off for viewing found text patterns. When selected,
all matching results in the current document display highlighted in yellow.
3. Click to launch your search. Use [F3] or press [Enter] to navigate to and highlight the next
search instance.
Multi-term searching:
When the Regular Expressions search option is ON, you can input multiple search terms separated with
an OR (pipe"|") symbol. For example, entering the string Oregon|California|Nevada will result in all
found instances of the three separate terms to be included in the consolidated search results.
When searching for words or phrases that contain a backslash character "\", you must use two slashes
for each instance. A single slash is a reserved search character. Examples: Type "and\\or" to find
"and\or". Type "\\C" to find "\C"
See Also (for advanced search information):
Text Search Modes
Using Search Macros
Conditional Macros
Search Rules and Examples

Brava 7.0 SR1 User Guide
60
ADVANCED SEARCHING
USING SEARCH MACROS
The stringing of multiple search patterns together to form an abstracted concept defines a search macro;
a concept ideally suited for use in redaction scripts since many related redaction strings can be grouped
together and executed as one convenient macro command. You can use any of the following predefined
macros in your search strings and scripts when using the Search text, Redact by Script, Find & Redact
From/To, and Find & Redact tools.
To see these macros in action, a sample directory of PDF files is included in your web server installation
(e.g., C:\Program Files\Apache\Apache Tomcat 6.0\webapps\ROOT\IGC\Samples\Redaction\). Open
any of these test files in Brava! Enterprise and follow the file's directions to run the specific macro against
the file's sample data. Explanations are provided for what is and isn't redacted in the results.
Brava! Enterprise uses a powerful searching language that allows most unique patterns to be found and
redacted via minor scripts or new macro customizations. To create custom macros that can be added to
your search strings and redaction scripts, please contact Informative Graphics for more information:
AVAILABLE SEARCH MACROS
The commonly used macros below have been predefined and are available for use with any Brava find
function. These usable macros are defined in the search_macros.xml file and can be customized as
needed.
MACRO FORMATTING
[:macro name:] (e.g. [:usphone:], [:ssn:], [:email:])
Note that the old macro formatting style \[macroname] has been deprecated, but still remains functional
for backwards compatibility. Search scripts that have previously been written in the old style will continue
to work in Brava Enterprise 7.0. Any new scripts should use the new macro syntax.
PREDEFINED MACROS IN BRAVA! ENTERPRISE :
[:usphone:] - Finds all USA style phone number representations.
[:ssn:] - Finds representations of US Social Security numbers patterns, such as 123-45-6789
[:ocr_ssn:] - Similar to [:ssn:] except allows both numbers and characters in the dash
pattern string. For example, SSN: l23-45-67B9. This macro is useful on TIFF documents
where numbers may have been recognized as letters during the OCR conversion process.

Functions Menu
61
[:email:] - Finds email addresses in standard form (for example, "[email protected]",
"[email protected]", "name, name [[email protected]]", etc.)
[:usmoney:] - Finds instances of US Currency ($10, $100, $1,000, $10,000, $1B, $1.1B,
$1.1T, $1.1M, $1.1K, etc.)
[:dob:] - Finds instances of Date of birth in forms.
[:creditcard:] - Finds instances of Visa, MasterCard, Diner's Club, Discover, American
Express, FIGI credit card numbers.
[:name:] - Finds various combinations of a person's name. Use this macro via the Privacy
Information tool*.
*Note that the Name, Email, USPhone, SSN, and dob macros can all be conveniently executed
through the Privacy Information tool of Brava! Enterprise.
The following form-based macros redact elements in a standard form.
[:zip:] - Redacts "Zip: xxxxx[-xxxx]”
[:usaddress:] - Redacts "Address: to end of \[Zip:]
[:age:] - Redacts Age: x[x[x]]
[:gender:] - Redacts Sex: [M]|[F]|[Male]|[Female] or Gender [M]|[F]|[Male]|[Female]
[:race:] - Redacts Race: [any single word]|[African American]|[American Indian]|[Alaska
Native]|[Pacific Islander]|[Native American]
[:acctno:] - Redacts "Account No: xxxxxx”
[:policyno:] - Redacts "Policy No: xxxxxx”
[:passportno:] - Redacts "Passport ID: xxxxxx”
[:drvlic:] - Redacts "Driver License: xxxxxx”
[:state:] - Redacts "State: XX OR XXXXXX XXXX”
[:date:] - Redacts "Date: xxxxx"
CUSTOM MACRO SYNTAX
If you would like to customize the search macro definitions by adding to or changing the existing
search criteria, the file (search_macros.xml) can be edited in Notepad. The XML file is downloaded
with the client CAB file and can be found in your HOMEPATH (C:\Documents and Settings\<user>\IGC\x7_0) directory. Be sure to make a backup copy of the XML file before
performing any edits.
The Macro would be executed in a search or redaction script using the following syntax:
[:macro_name:]
or
macro:(option codes): macroname (see command search strings)
Brava 7.0 SR1 User Guide
62
When creating custom macros, keep in mind that:
Wildcards and string commands may be used in creating macros.
Macro names cannot contain spaces or punctuation marks.
The search string must obey the restrictions of XML which disallows the use of the following
characters directly: & " < > (Instead you must use: & " < >)
The search string can reference other macros, but it may not reference itself or any other macros
that reference it. (Would create an infinite loop)
You can put comments anywhere in the file as:
<!-- [some text] -->
Comments are useful for making notes to yourself or to others and "some text" can say anything you
want since the comments are ignored by the code that reads the file.
See Also:
Wildcard Quick Tips
Find and Redact
Text Search Modes
Conditional Macros
Search Rules and examples
TEXT SEARCH MODES AND STRINGS
The following search string command behavior is active in the GUI search text box only when the
"Regular Expressions" search option is OFF (unchecked). When ON (checked), the text entered in the
find box is assumed to be a regular expression (regex) string and can be entered without needing to type
the "regex:" prefix. Search string commands can be used in the find text search box, in the find and
redact search boxes, and in any redaction script.
THE DIFFERENT MODES OF TEXT SEARCH AND THEIR OPTIONS
phrase:
Find exact text match. This mode works like the "find text" command in most word processors,
including Notepad. The string will be converted to a regular expression where spaces may be
allowed in-between characters. Spaces may be 0-to-many whitespace characters.

Functions Menu
63
anyof:
Find any of the specified words or quoted phrases. This mode is similar to Google's default
behavior regarding spaces and quotes. "Hello there "John Smith"" means to find "Hello" or "there"
or "John Smith". Each phrase string will be converted to a regular expression where spaces may
be allowed in-between characters and spaces may be 0-to-many whitespace characters.
macro:
Perform a find by looking up the named search string. For example, "email" would fetch the
search string associated with the name email in the search_macros.xml file. Note that the
brackets should not be included. If you want to use the "ssn" macro, then your search string
should be "ssn". Not "\[ssn]".
igc:
Perform a raw IGC wildcard search. Macro references, within the string, are specified in the
traditional escape format "\[macroname]".
regex:
Perform a Regular Expression search. Macro references, within the string, are specified in the
format "[:macroname:]", which works well along side the supported POSIX macro system. For
example, in POSIX, "[:alnum:]" represents "[A-Za-z0-9]" (all the alpha and numeric characters).
If you make your own macros, be sure to not use the name of one of the following that are
already reserved by POSIX: alnum, word, alpha, blank, cntrl, digit, graph,
lower, print, punct, space, upper, xdigit. Important: All custom macros used in
regular expressions need to be written in regular expression format. Do NOT reference an IGC
wildcard macro from within a regex string and vice-versa.
name:
Performs a clean name search. This uses the name macro, but includes additional functionality.
Following are the main differences:
uses simple format, such as "name:a:john david smith" vs. using the equivalent macro
command
not necessary to enter initials
not necessary to enter periods after prefixes (such as "Mr." or "Mr").
fewer parameters needed, and always case-independent
results from the search will not include cases where only 2 or 3 lower case initials were found.
For example, a result of "AS" will be considered a valid initials result and allowed. Results of
"as", or "As" are not included.
THE SEARCH STRING COMMAND
Search string commands allow you to specify additional options when performing searches.
The search command string that includes options will be formatted as follows:
[mode] : [options] : [search string]
for example, a term-hit highlight search might look like:
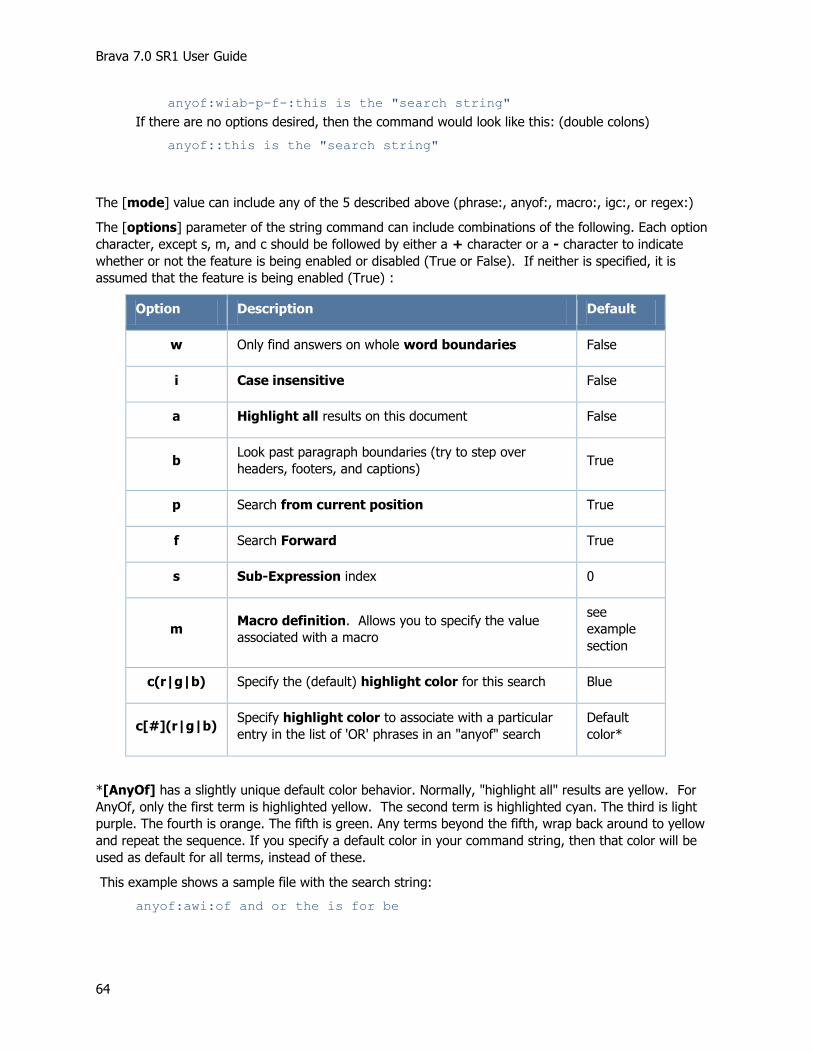
Brava 7.0 SR1 User Guide
64
anyof:wiab-p-f-:this is the "search string"
If there are no options desired, then the command would look like this: (double colons)
anyof::this is the "search string"
The [mode] value can include any of the 5 described above (phrase:, anyof:, macro:, igc:, or regex:)
The [options] parameter of the string command can include combinations of the following. Each option
character, except s, m, and c should be followed by either a + character or a - character to indicate
whether or not the feature is being enabled or disabled (True or False). If neither is specified, it is
assumed that the feature is being enabled (True) :
Option Description Default
w Only find answers on whole word boundaries False
i Case insensitive False
a Highlight all results on this document False
b Look past paragraph boundaries (try to step over
headers, footers, and captions) True
p Search from current position True
f Search Forward True
s Sub-Expression index 0
m Macro definition. Allows you to specify the value
associated with a macro
see
example
section
c(r|g|b) Specify the (default) highlight color for this search Blue
c[#](r|g|b) Specify highlight color to associate with a particular
entry in the list of 'OR' phrases in an "anyof" search
Default
color*
*[AnyOf] has a slightly unique default color behavior. Normally, "highlight all" results are yellow. For
AnyOf, only the first term is highlighted yellow. The second term is highlighted cyan. The third is light
purple. The fourth is orange. The fifth is green. Any terms beyond the fifth, wrap back around to yellow
and repeat the sequence. If you specify a default color in your command string, then that color will be
used as default for all terms, instead of these.
This example shows a sample file with the search string:
anyof:awi:of and or the is for be
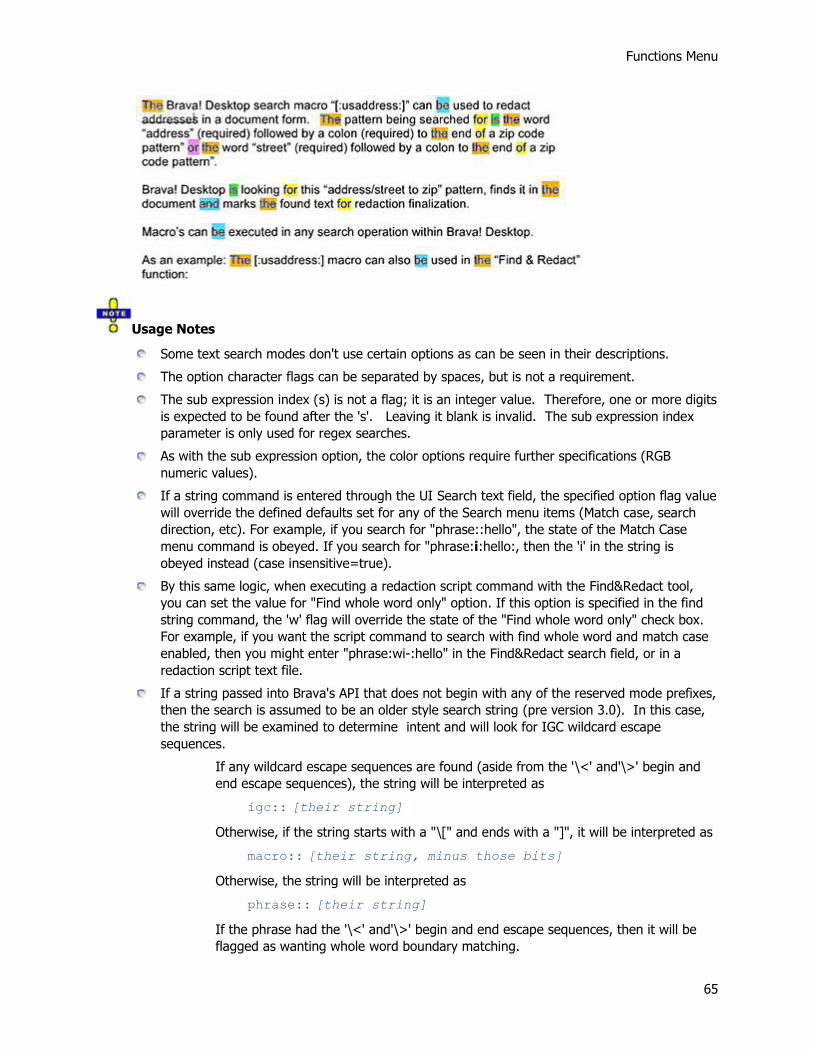
Functions Menu
65
Usage Notes
Some text search modes don't use certain options as can be seen in their descriptions.
The option character flags can be separated by spaces, but is not a requirement.
The sub expression index (s) is not a flag; it is an integer value. Therefore, one or more digits
is expected to be found after the 's'. Leaving it blank is invalid. The sub expression index
parameter is only used for regex searches.
As with the sub expression option, the color options require further specifications (RGB
numeric values).
If a string command is entered through the UI Search text field, the specified option flag value
will override the defined defaults set for any of the Search menu items (Match case, search
direction, etc). For example, if you search for "phrase::hello", the state of the Match Case
menu command is obeyed. If you search for "phrase:i:hello:, then the 'i' in the string is
obeyed instead (case insensitive=true).
By this same logic, when executing a redaction script command with the Find&Redact tool,
you can set the value for "Find whole word only" option. If this option is specified in the find
string command, the 'w' flag will override the state of the "Find whole word only" check box.
For example, if you want the script command to search with find whole word and match case
enabled, then you might enter "phrase:wi-:hello" in the Find&Redact search field, or in a
redaction script text file.
If a string passed into Brava's API that does not begin with any of the reserved mode prefixes,
then the search is assumed to be an older style search string (pre version 3.0). In this case,
the string will be examined to determine intent and will look for IGC wildcard escape
sequences.
If any wildcard escape sequences are found (aside from the '\<' and'\>' begin and
end escape sequences), the string will be interpreted as
igc:: [their string]
Otherwise, if the string starts with a "\[" and ends with a "]", it will be interpreted as
macro:: [their string, minus those bits]
Otherwise, the string will be interpreted as
phrase:: [their string]
If the phrase had the '\<' and'\>' begin and end escape sequences, then it will be
flagged as wanting whole word boundary matching.

Brava 7.0 SR1 User Guide
66
See Also:
Search Rules and examples
Text Search
Using Search Macros
Search Wildcards
Conditional Macros
TEXT SEARCH RULES AND EXAMPLES
The following search string command behavior is active in the GUI search text box only when the
"Regular Expressions" search option is OFF (unchecked). When ON (checked), the text entered in the
find box is assumed to be a regular expression (regex) string and can be entered without needing to type
the "regex:" prefix.
Multi-term searching:
When the Regular Expressions search option is ON, you can input multiple search terms separated with
an OR (pipe"|") symbol. For example, entering the string Oregon|California|Nevada will result in all
found instances of the three separate terms to be included in the consolidated search results.
When using the prefix-style search string commands (described below), you can highlight and search for
multiple terms using the following syntax with the BravaXParams HighlightTerms and
SearchTextAtStartup (see Brava Administrator's guide for parameter usage details):
To highlight multiple terms:
HighlightTerms=anyof:wi:"poor dog" cupboard
This example highlights both the phrase "poor dog" and the word cupboard. Each term (i.e. "poor
dog") is highlighted in its own color.
To search for multiple terms:
SearchTextAtStartup=anyof:wi:"poor dog" cupboard
This example will highlight the first of occurrence of either "poor dog" or cupboard, and will allow
the user to go to the next occurrence of either of these terms when they search for the next term.
REGULAR SEARCH EXAMPLES:
Input Result
Hello
there results in searching for the phrase "Hello there"
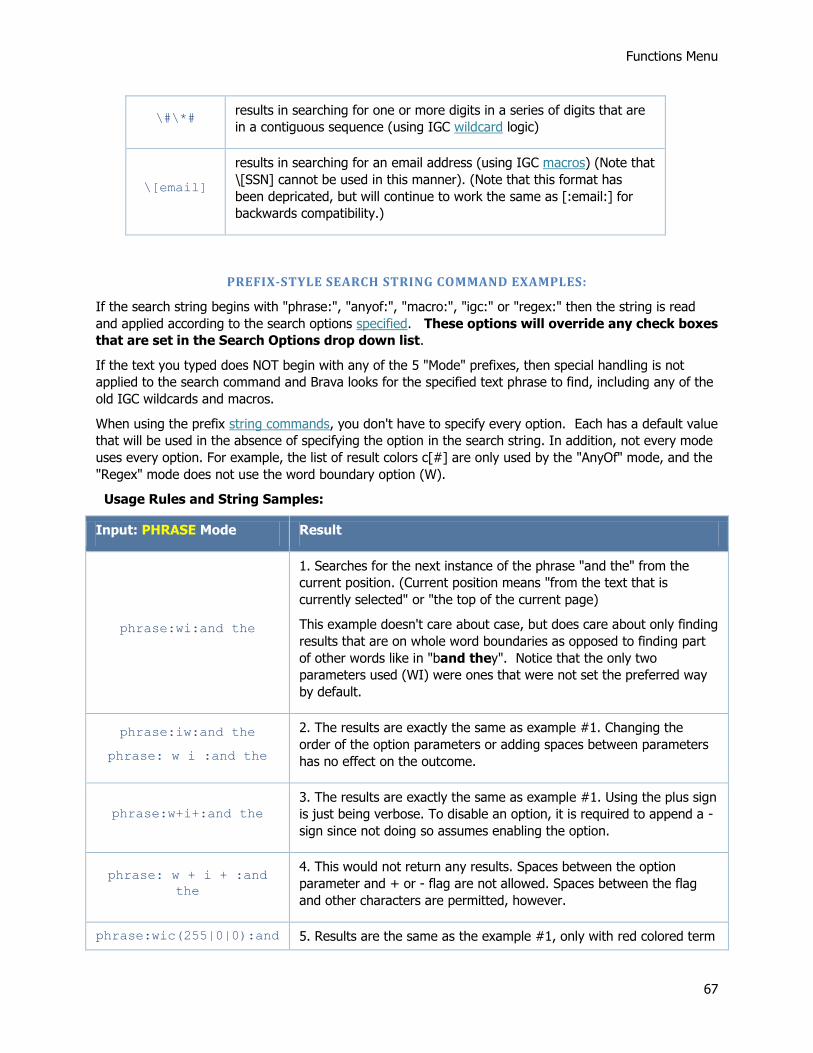
Functions Menu
67
\#\*# results in searching for one or more digits in a series of digits that are
in a contiguous sequence (using IGC wildcard logic)
\[email]
results in searching for an email address (using IGC macros) (Note that
\[SSN] cannot be used in this manner). (Note that this format has
been depricated, but will continue to work the same as [:email:] for
backwards compatibility.)
PREFIX-STYLE SEARCH STRING COMMAND EXAMPLES:
If the search string begins with "phrase:", "anyof:", "macro:", "igc:" or "regex:" then the string is read
and applied according to the search options specified. These options will override any check boxes
that are set in the Search Options drop down list.
If the text you typed does NOT begin with any of the 5 "Mode" prefixes, then special handling is not
applied to the search command and Brava looks for the specified text phrase to find, including any of the
old IGC wildcards and macros.
When using the prefix string commands, you don't have to specify every option. Each has a default value
that will be used in the absence of specifying the option in the search string. In addition, not every mode
uses every option. For example, the list of result colors c[#] are only used by the "AnyOf" mode, and the
"Regex" mode does not use the word boundary option (W).
Usage Rules and String Samples:
Input: PHRASE Mode Result
phrase:wi:and the
1. Searches for the next instance of the phrase "and the" from the
current position. (Current position means "from the text that is
currently selected" or "the top of the current page)
This example doesn't care about case, but does care about only finding
results that are on whole word boundaries as opposed to finding part
of other words like in "band they". Notice that the only two
parameters used (WI) were ones that were not set the preferred way
by default.
phrase:iw:and the
phrase: w i :and the
2. The results are exactly the same as example #1. Changing the
order of the option parameters or adding spaces between parameters
has no effect on the outcome.
phrase:w+i+:and the 3. The results are exactly the same as example #1. Using the plus sign
is just being verbose. To disable an option, it is required to append a -
sign since not doing so assumes enabling the option.
phrase: w + i + :and
the
4. This would not return any results. Spaces between the option
parameter and + or - flag are not allowed. Spaces between the flag
and other characters are permitted, however.
phrase:wic(255|0|0):and 5. Results are the same as the example #1, only with red colored term

Brava 7.0 SR1 User Guide
68
the results selection rather than the default dark blue.
Input: ANYOF Mode Result
anyof:awi:and the
6. Returns all instances of either "and" or "the". This example
doesn't care about case, but does care about finding results that
are on whole word boundaries. The results would all be colored
yellow since that is the default color for the results in "highlight
all" situations.
Note that "AnyOf" and "highlight all" are not connected. You can
input a phrase search and specify that you want to highlight all
the results. You can also input an "AnyOf" search and specify to
see only the next result, rather than all of them (in which case the
default color would be dark blue rather than yellow). The
"highlight all" flag determines the default color.
anyof:awic(255|0|0):and
the 7. Same result as example #6 but with red rather than yellow as
the selection color.
anyof:awic[1](255|0|0):and
the
8. Same result as example #7 but with all results for "the" being
red colored and results for "and" being the default yellow. The [1]
indicates to associate the color with any results found for the
second term. The index is zero-based, so 0 means the first result
while 1 means the second, etc.
anyof:awic[0](0|255|0)
c[1](255|0|0):and the
9. Same result as example #7 but with all results for "and" being
green colored and results for "the" being red. The default color is
never used for a result because colors for the first two result
groups (c[0] and c[1]) are specified and the search string only
contains two different terms (the default color doesn't have a
chance to be used in this scenario).
anyof:awic[1](255|0|0)
c[0](0|255|0):and the
10. Results are exactly the same as example #9. Order of defined
colors (c[1], c[0]) has no impact and only cares about what index
is associated with them.
anyof:awic(0|255|0)
c[1](255|0|0):and the
11. Same result as example #7 but with all results for "and" being
green colored. Results for "the" are still red. By not including an
index on the green color, this string specifies what the default
color should be. And, since it doesn't specify what color [0]
should use, it used the default color.
Had the search string included any additional terms like "and the
foo bar", then "foo" and "bar" results would have been green too
since green is the default color for this search.
If included in example #9, however, "foo" and "bar" would have

Functions Menu
69
been yellow. In that case, green was tied to the first result group
while "foo" would be group [2] and "bar" would be group [3].
The default was still just yellow, so those groups would be yellow.
You can input macros with or without the prefix. This command style macro allows you to specify
additional options in your search results. If you don't want to include additional options, you can just type
[:ssn:] or [:email:] etc., to run one of the pre-defined macros.
Input: MACRO Mode Result
macro:ai:ssn
12. Finds all instances of the SSN macro and ignores case. Word
boundaries are not applicable since that logic is built into the macros
themselves. This search string will work regardless of whether the macro is
written in wildcard or regex style.
macro:i:ssn
13. Finds the next instance of the SSN macro. Same conditions as
example #12 apply. If this command follows the previous example, it will
allow you to simulate walking through the results of a "highlight all"
collection.
macro:ai
m(prefix=Mr)
m(firstname=John)
m(middlename=)
m(lastname=Smith)
m(firstinitial=J)
m(middleinitial=)
m(lastinitial=S)
m(suffix=):name
14. This string finds all instances of a given name, using the "name" macro
and is case insensitive.
This example makes use of the macro definition parameter. Each 'm'
parameter is followed by a macro's name=value pair, inside parenthesis.
This parameter is only used by the macro and regex command.
Note that some of the macro pairs are missing the right side, as seen in
"m(suffix=)". This means that the value is set as an empty string. In this
example, the middle name and suffix are not known (the Third?, Junior?,
Esquire?). It is known that the person is a "he" so a "Mr" is entered as the
prefix. Notice that the Mr doesn't have a period at its end. That's
because the name macro will know to look for it anyway. If you include
one here, the search could fail to find cases where there isn't a period.
Also note that all parts of the name are defined. It's better to define
unknown parts as empty rather than to not mention them at all (since not
mentioning them will result in the macro using only what has been
specifically defined).
The value of using this search string is that the [:name:] macro used
alone is normally difficult to implement since it requires multiple steps.
Being able to specify the values in the search string simplifies things by
being self-contained. It also provides the ability to paste the string right
into the find text input box.
This feature is available to help with the [:specific_usphone:] macro
and the [:specific_email:] macro. Remember, this 'm' parameter
only works with regex macros.

Brava 7.0 SR1 User Guide
70
Input: IGC Mode Result
igc:ai:\<\#\#\#-
\#\#-\#\#\#\#\>
15. This string searches for all instances of a social security number using
the old IGC wildcard formatting.
Added is the specification to ignore case. Although specifying word
boundaries is not permitted, the wildcard sequence includes the
requirement for word boundaries within it.
Turning on the Regular expression option of the GUI's search text drop down menu enables this mode. If
enabled, do NOT type regex: in the search field. When the option is not enabled, you can type a
regex: command just as with any other prefix mode.
Input: REGEX Mode
regex:ai:(\`|(?<=[^[:digit:]]))[[:digit:]]{3}-
[[:digit:]]{2}[[:digit:]]{4}(\'|(?=[^[:digit:]]))
16.This string does the same, limited search as the IGC wildcard string in example #15, except that
regular expression (regex) formatting is used.
The formatting of the regular expression above breaks down as follows:
(\`|(?<=[^[:digit:]])) begins after the beginning of the document, or after a non-digit
[[:digit:]]{3} sequence of 3 digits
- dash
[[:digit:]]{2} sequence of 2 digits
- dash
[[:digit:]]{4} sequence of 4 digits
(\'|(?=[^[:digit:]])) is followed by the end of the document, or a non-digit
17. This string below provides an example of the "sub expression index" parameter which only applies to
regex search strings. In this example, the string finds "foobar", ignoring the case and highlighting every
instance of the "bar" portion.
regex:s2ai:(foo)(bar)
Here, regex considers "(foo)" to be sub-expression #1 and "(bar)" as sub-expression #2. If you want to
only find or select part of your search string, you can use the sub-expression index to do it. The

Functions Menu
71
integer '2' following the 's' parameter indicates which sub-expression to give as the search result.
The index numbers are 1-based. Meaning, they start at 1 and go up, rather than starting at 0. 0 is
reserved for "return all results" which is the default behavior if the parameter is not included at all.
The value of using this string would be in cases where you don't want to find every instance of "bar", but
rather every instance that follows an instance of "foo".
If you include an attribute named regex and set it to true, then your macro must be a regular
expression rather than an IGC wildcard string.
Example: <mymacro regex="true">(\`|(?<![[:alpha:]]))</mymacro>
If you include an attribute named simpleonly and set it to true, then your macro will, by default, not
use the complex stepping logic where search tries to find something even if it is interrupted by other text.
Simpleonly will cause the searched text to only be found when it appears contiguously. Many of the
smaller macros, such as the social security macro, use this feature since social security numbers are
rarely split by interrupting text. Some spreadsheets and forms will cause lots of false finds because
fragments of numbers taken in random order will appear to construct a social security number. The
social security macro definition turns off these false finds by including simpleonly.
Example: <mymacro regex="true" simpleonly=”true”>(\`|(?<![[:alpha:]]))</mymacro>
If you include an attribute named sub_expression and set it to an integer number, then you will be
able to capture (select/redact) only a specific part of a term found by a regular expression. This only
works with the regex=”true” attribute set. Sub_expression is an advanced regex concept and
requires in depth knowledge to be used effectively.
Example: <mymacro regex="true" sub_expression="2">(\`|(?<![[:alpha:]]))</mymacro>
Input: NAME Mode Result
name:a: mr. mister
dr. doctor, john
david smith, III.
jr. junior "the
third" m.d.
18. This is the name command. The text that follows the command
name and parameter list contains the person's name you wish to search
for. It works as follows:
The command can have up to 3 sections, separated by commas. If
there are 3 sections, they are considered to be: [prefix section], [name parts section], [suffix section]
If there are only 2 sections, they are considered to be [prefix section], [name parts section]
If there is only 1 section, it is [name parts section]
Therefore, if you don't know a person's possible suffixes, you can just
omit that last section. If you know the suffixes, but not the prefixes, set
the prefix section empty, for example: "name:a: , john david

Brava 7.0 SR1 User Guide
72
smith, junior".
If you don't know the suffixes or prefixes, then leave them both off and
only create one section, such as: "name:a:john david smith".
Optional spaces and periods can be included anywhere, except in literal
quotes. The command will filter those out.
19. Within a name parts section, there can be up to 3 parts, separated
by spaces. If there are 3 parts, they are considered to be
[firstname] [middlename] [lastname].
If there are only 2 parts, they are considered to be [firstname]
[lastname].
If there is only 1 part, it is considered to be [firstname].
If the full name is not known, the initial can be used in the firstname,
middlename or lastname part if known, for example; "george w.
bush".
In both the prefix and suffix sections, variations are separated by
spaces. Therefore, "Mr. Mister Dr." Means that any of those 3
terms might be a prefix for this person. If you have a prefix (or a
suffix) that needs to have a space in it, then put double quotes around
it to indicate that you want it whole. This example: "III. jr.
junior "the third" m.d." has 5 suffixes in it. Not 6. The space
between "the" and "third" is not considered a separator because of the
double quotes around it..
See Also:
Find & Redact
Text Search Modes
Conditional Macros
CONDITIONAL MACROS
Typically, macros are used as a "search and replace" type of search command where every instance of
[:foobar:] is replaced with the value that is associated with it. Conditional Macros are used a bit
differently and are currently used to facilitate the "name" macro which has a lot of variants based on
whether or not parts of the name are empty (unspecified) or not. The conditional macro allows the
"name" macro to identify the right combination.
The differences between conditional and normal macros are that:
Conditional macros can make a series of comparisons against the values associated with other
macros. Based on these comparisons, the resulting value of the conditional macro can be different,
rather than hard-coded.

Functions Menu
73
Conditional Macros do not have a name. Instead, the section of the string where their name would
be is filled with the conditional statements.
Only regex search strings can use conditional macros.
Conditional macros can resolve into either raw text or another macro's name. The only characters
allowed in a conditional statement are alphanumeric. (You can't put regex strings into the results).
Following is a normal macro, mixed in with some other text in a search string:
"text [:foo:] text"
If the foo macro was defined to be "qwerty", then the string would resolve to:
"text qwerty text"
Following is a conditional macro:
"text[:(foo="qwerty"{"hello"})(foo=""bar="wasd"{my_macro})({"default
"}):] text"
The parentheses in this string indicate that the macro is conditional, rather than a normal named
macro.
In this example, there are three conditionals, each defined within a set of parentheses.
( foo="qwerty" {"hello"} )
( foo="" bar="wasd" {my_macro} )
( {"default"} )
The formatting of a single conditional statement is defined as:
( [0 or more macro value comparisons] { [result if comparisons pass]
} )
A conditional statement can have 0 or more comparisons. If all comparisons pass, the macro is replaced
with the search result. If there are 0 comparisons, then the statement passes automatically. Because
the conditionals are tested left-to-right and will quit as soon as one of them passes, a default should be
placed as the last thing in the list of conditionals to serve as catch-all, unless you purposely want the
default answer to be empty. In that case, don't put a default statement on the end. If you do this and
none of the other conditional tests passed, then the macro will just go away.
COMPARISON AND RESULTS FORMATTING
The comparisons, inside a conditional statement, have a simple format. The name of a macro to test,
followed by the equals sign, followed by a quoted value. Use empty quotes when you expect the macro's
value to be empty.
The results can use two formatting options:
In the example of the preceding section, the first condition produced a result of "hello" and the
third produced "default". The quotes indicate that you want the result to be exactly what you put
in between the quotes (minus the quotes).
Results MUST only have characters that are spaces, alphabetic or numeric characters, and certain
punctuation marks (excluding parentheses, brackets, and curly braces) which would not confuse
the conditional statement. In the second conditional statement (in the example), the result was
my_macro. Note the lack of quotes. This indicates that you want to insert a macro name as the
result. This can be useful if you want your result to be a regular expression, which could/would
contain parentheses, brackets, and curly braces. This formatting method allows you to place a
complex expression in a macro and then place the macro name in the result field.
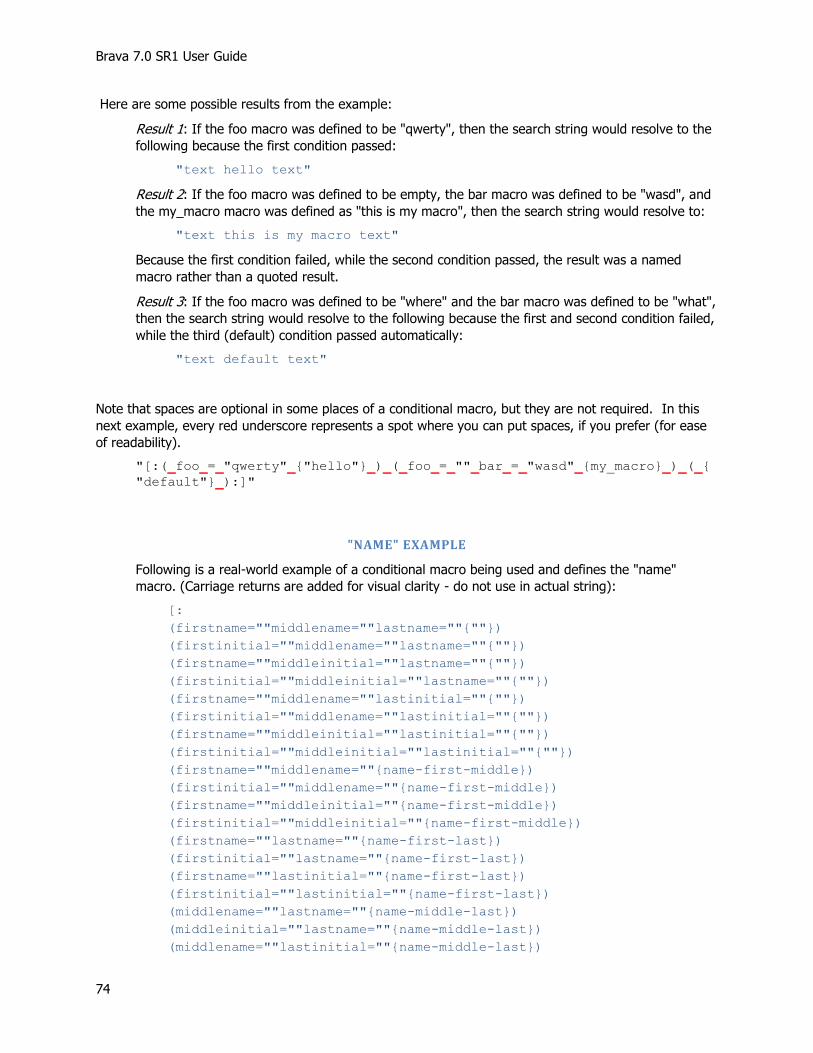
Brava 7.0 SR1 User Guide
74
Here are some possible results from the example:
Result 1: If the foo macro was defined to be "qwerty", then the search string would resolve to the
following because the first condition passed:
"text hello text"
Result 2: If the foo macro was defined to be empty, the bar macro was defined to be "wasd", and
the my_macro macro was defined as "this is my macro", then the search string would resolve to:
"text this is my macro text"
Because the first condition failed, while the second condition passed, the result was a named
macro rather than a quoted result.
Result 3: If the foo macro was defined to be "where" and the bar macro was defined to be "what",
then the search string would resolve to the following because the first and second condition failed,
while the third (default) condition passed automatically:
"text default text"
Note that spaces are optional in some places of a conditional macro, but they are not required. In this
next example, every red underscore represents a spot where you can put spaces, if you prefer (for ease
of readability).
"[:(_foo_=_"qwerty"_{"hello"}_)_(_foo_=_""_bar_=_"wasd"_{my_macro}_)_(_{
"default"}_):]"
"NAME" EXAMPLE
Following is a real-world example of a conditional macro being used and defines the "name"
macro. (Carriage returns are added for visual clarity - do not use in actual string):
[:
(firstname=""middlename=""lastname=""{""})
(firstinitial=""middlename=""lastname=""{""})
(firstname=""middleinitial=""lastname=""{""})
(firstinitial=""middleinitial=""lastname=""{""})
(firstname=""middlename=""lastinitial=""{""})
(firstinitial=""middlename=""lastinitial=""{""})
(firstname=""middleinitial=""lastinitial=""{""})
(firstinitial=""middleinitial=""lastinitial=""{""})
(firstname=""middlename=""{name-first-middle})
(firstinitial=""middlename=""{name-first-middle})
(firstname=""middleinitial=""{name-first-middle})
(firstinitial=""middleinitial=""{name-first-middle})
(firstname=""lastname=""{name-first-last})
(firstinitial=""lastname=""{name-first-last})
(firstname=""lastinitial=""{name-first-last})
(firstinitial=""lastinitial=""{name-first-last})
(middlename=""lastname=""{name-middle-last})
(middleinitial=""lastname=""{name-middle-last})
(middlename=""lastinitial=""{name-middle-last})

Functions Menu
75
(middleinitial=""lastinitial=""{name-middle-last})
(firstname=""{name-first})
(firstinitial=""{name-first})
(middlename=""{name-middle})
(middleinitial=""{name-middle})
(lastname=""{name-last})
(lastinitial=""{name-last})
({name-full})
:]
Notice that the most discerning conditions are done first. If they were placed in reverse order,
then the later conditions would never get tested since the simple checks like "is lastname empty?"
were done early, and passed.
As an example, the second condition listed in this macro would never pass:
(lastname=""{name-last}) (firstname=""lastname=""{name-first-last})
In order for the second condition to be true, the first condition would also need to be true since
both conditions check that lastname is empty.
See Also:
Find & Redact
Text Search Modes
Search Rules and examples
Using Search Macros
PATTERN SEARCHING QUICK REFERENCE
Below is a quick reference table of the IGC wildcard values that were previously used in redaction scripts:
Wildcard Description
\# 1 instance of a digit (0 through 9) character
\*# 0 to many instances of numerics
\% Numeric including punctuation '.' ',' '+' '-'
\*% 0 to many instances of numeric & punctuation
\a 1 instance of an alphabetic character (a through z and A through Z)
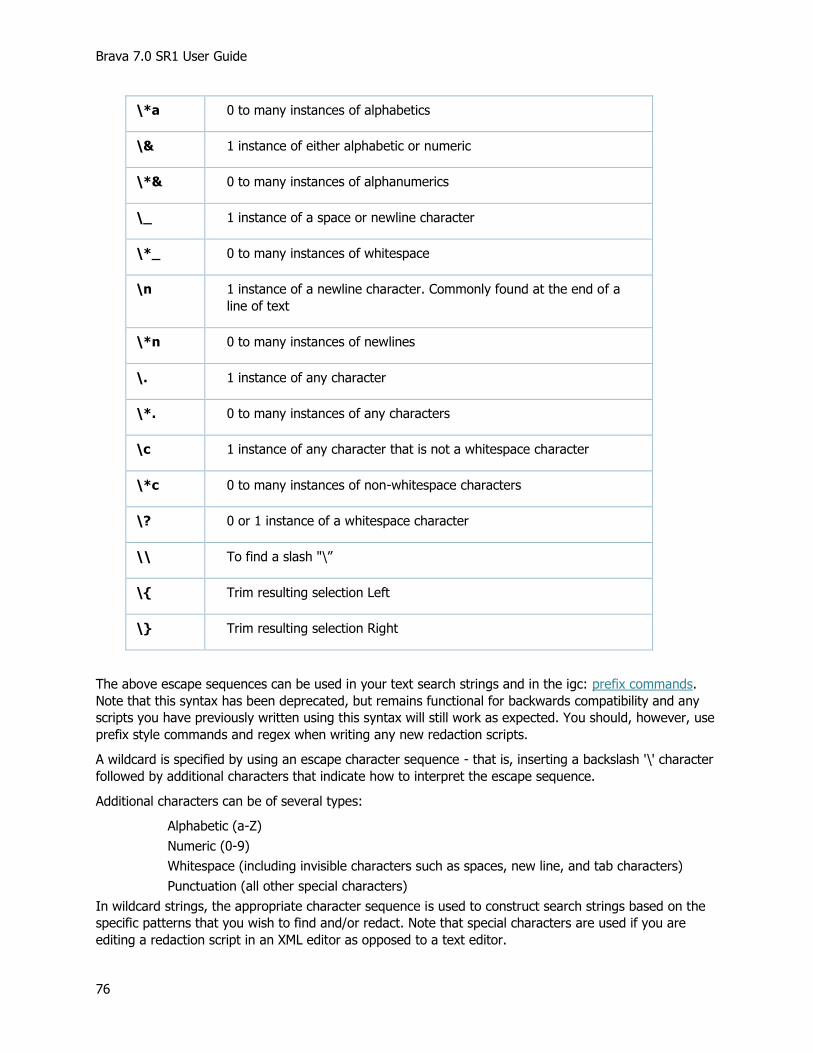
Brava 7.0 SR1 User Guide
76
\*a 0 to many instances of alphabetics
\& 1 instance of either alphabetic or numeric
\*& 0 to many instances of alphanumerics
\_ 1 instance of a space or newline character
\*_ 0 to many instances of whitespace
\n 1 instance of a newline character. Commonly found at the end of a
line of text
\*n 0 to many instances of newlines
\. 1 instance of any character
\*. 0 to many instances of any characters
\c 1 instance of any character that is not a whitespace character
\*c 0 to many instances of non-whitespace characters
\? 0 or 1 instance of a whitespace character
\\ To find a slash "\”
\{ Trim resulting selection Left
\} Trim resulting selection Right
The above escape sequences can be used in your text search strings and in the igc: prefix commands.
Note that this syntax has been deprecated, but remains functional for backwards compatibility and any
scripts you have previously written using this syntax will still work as expected. You should, however, use
prefix style commands and regex when writing any new redaction scripts.
A wildcard is specified by using an escape character sequence - that is, inserting a backslash '\' character
followed by additional characters that indicate how to interpret the escape sequence.
Additional characters can be of several types:
Alphabetic (a-Z)
Numeric (0-9)
Whitespace (including invisible characters such as spaces, new line, and tab characters)
Punctuation (all other special characters)
In wildcard strings, the appropriate character sequence is used to construct search strings based on the
specific patterns that you wish to find and/or redact. Note that special characters are used if you are
editing a redaction script in an XML editor as opposed to a text editor.

Functions Menu
77
ANNOTATE MODE
MARKUP TOOLBAR
The Markup toolbar contains related groups of markup tools. To invoke the Markup Toolbar, click
. (The markup tools are only available if your Brava! Server Administrator and license allows
and enables this feature.)
Note: Markup tools remain active until another tool is selected. While using any of the markup tools, you
can press the <Esc> key to abort the current entity creation before the last point is set. Escape will
delete any portion of the markup entity that is drawn so far.
Markup Select Arrow Pointer
Text
Insert Image
Changemarks
Text Highlight Changemarks
Highlight Changemarks
Cloud Changemarks
Arrow Changemarks
Cloud
Polycloud
Highlight
Sketch Sketch Polygon
Line
Polyline
Arc
Crossout

Brava 7.0 SR1 User Guide
78
Scratchout
Arrow Pointer
Solid and Hollow
Shapes
Ellipse
Polygon
Rectangle
Rounded Rectangle
Edit Text
Highlight
Underline
Strikeout
Strike through
COPYING MARKUPS
You can select and Copy a markup through the right mouse button menu command. Hold down the
<Shift> key to select multiple markup entities and click Copy. You can Paste the markups into the same
page or use the Copy Markups to All Pages feature to copy the selected markups to a specified range of
pages. You can also copy markups and paste them into pages of any other Brava session window that
you have open.
Quick copy - Hold down the <Ctrl> key and click on, then drag an entity. The original entity remains in
place, while a copy is created and placed wherever you release the mouse button on the page.
Copy Markups to All Pages
If editing markups on a multi-page document, you can copy selected markups and apply them to a
specified range of pages.
1. With the markup select tool active, select one or more markup entities you would like to copy and
click .
2. In the Copy Markup to Designated Pages dialog, select All pages, or type in a specific page range.

Functions Menu
79
3. Click OK. All copy-able entities are copied to All or Designated pages. Entities that cannot be copied
include edit text entities and Changemarks.
Note that a separate undo needs to be performed for each entity copied into each document page if you
change your mind. Once copied, all entities behave as individual entities. In other words, changes made
to a copied entity on one page have no impact on any of the entities contained in other pages.
CHANGING MARKUP OWNERSHIP
If this feature is enabled by your administrator (via a server parameter), you can take ownership of a
markup entity owned by another author.
To change markup ownership:
1. Open a markup for edit that contains markup entities created by other authors.
2. With the Select Markup tool active , hold down the <Shift> key and click on a markup entity.
3. The author information for that entity changes to your information.
4. Edit the entity as desired as you are the new owner.
This feature is only functional on markup entities in markups currently open for edit.
MARKUP ENTITY TOOLS

Brava 7.0 SR1 User Guide
80
SELECT MARKUP OR REDACTUP ENTITY
The Select Markup/Redactup tool allows you to grab entities to move, copy, resize, reshape, delete, or
change ownership. In Annotate mode, you can also select and edit markup text when this tool is active.
1. Click on the Annotate or Redact toolbar.
2. Once the tool is active, click on a markup/redactup entity to select it or press and hold <Ctrl> while
clicking to select multiple markups/redactups.
3. To select adjacent markups/redactups, click and hold the left mouse button and drag a box around
all the entities you wish to select.
4. Edit the entity as desired.
Note that when the Select Entity tool is active in Annotate mode, double clicking on a Markup Text entity
toggles the active tool to the Markup Text tool, allowing you to make changes to the markup (if you are
the markup author).
ARROW POINTER
The Arrow Pointer tool allows you to draw an arrow.
1. Press the left mouse button where you want the arrow point to begin, then drag and release the
mouse where you want the line to end. (As with any of the markup and measurement tools, you can
press <Esc> to abort the current entity creation before it is set. Escape will reset the tool and delete
any unfinished portions created while clicking or dragging.)
2. Edit the markup as desired. If the markup is not currently active, use the Select Markup Tool to pick
it.
3. Select a line color, line style, and size from the Properties bar.
ARROW WITH CHANGEMARKS NOTE
Purely for convenience, this tool allows you to create two entities at a time - a super Arrow and a
Changemarks note
1. In the markup Properties toolbar, select the color and line options to use for the arrow entity.
2. Press the left mouse button where you want the arrow point to begin, then drag and release the
mouse where you want the line to end.
3. A Changemarks entity is created at the tail end of the arrow.
4. Enter the Changemarks text as you would do for any independent Changemarks note.
5. Once placed, the two entities behave totally independent of each other, as two separate entities.

Functions Menu
81
The new Changemarks note and Arrow can be moved, resized, or deleted independently, and you can
use the select markup tool to select and edit either of the entity's properties.
MARKUP TEXT
Click on the Markup toolbar to place text directly on the image (as opposed to in an annotation).
1. Click the mouse pointer where you want the text to start and drag a rectangle to dictate the with of
the text column and the font height to be used. (The gray "<Text>" displayed is to preview how your
text will look)
2. Note: Single-clicking the text tool causes a new text entity to be created using the last established
font properties. The new text has no enforced column width until you hit the return key or manually
adjust the column width handles.
3. From the Markup Properties bar, select the desired font properties, then type the desired text. You
can adjust the font size by using the hotkeys <Ctrl> + <+ or ->. Use + to increase font size and - to
decrease font size.
4. Edit the markup as desired. You can change the Font, style, size, color, and background of the
markup text box. You may use tokens in your text strings that dynamically update, or that prompt
the user to update the string through an edit field dialog.
Note: An Administrator can customize the list of available text heights through the use of the
CustomTextHeights parameter and can specify increments to as little as one-hundredths. See the Brava
Administration Guide for information on configuring custom parameters.
5. If the markup is not currently active, use the Select Markup Tool to pick it. Note that markup text can
only be selected and adjusted when the Select Markup Tool is active. You can drag the text box to
another location, you can adjust the size of the text box by length or height, and you can select and
adjust the size of the markup text itself.
To rotate the text, select the entity then click and drag the green rotation handle in any
direction. For finer tolerance, click and drag the green handle farther away from the center point
of the entity and then rotate. The entity will rotate in much smaller increments when the handle
length is increased.
To adjust the text box length, click and drag one of the circular black handles on the upper right
or left corners. The size of the text does not change.
To adjust the text box height, click and drag the yellow ball on the lower left section of the text
box up or down. The text automatically re-sizes as you adjust the text box height. Note that
changing the text box height in this way resets the default font size to use for future markup text
entities.
To edit the text, with the Markup Text tool active, select (highlight) the characters you want to
edit and type. The highlighted characters will be replaced with the newly typed characters.

Brava 7.0 SR1 User Guide
82
Language Support Note: If enabled by an administrator, an edit box is presented where text can be
entered and edited directly. If the system is using a right-to-left language (such as Arabic or traditional
Japanese), the edit box will allow right-to-left input and editing. (Modern Japanese remains left-to-right)
See additional usage details outlined below:
MARKUP TEXT TOOL BEHAVIOR DETAILS:
Tool Behaviors:
Switching between markup Text/Select Tools: Double-clicking the mouse on a markup text entity,
when the current tool is the markup selection tool, causes it to change to the markup text tool.
Double-clicking the mouse on a markup text entity, when the current tool is the markup text tool,
causes it to change to the markup selection tool.
Editing Behaviors:
Individual characters of markup text can be edited. They are editable only with markup text tool
active.
Typed or Pasted Text inserted at cursor: When you type (or paste) new characters into a text entity's
body of text, they appear at the current cursor position. If there are any text characters currently
selected, they are erased. The cursor (and anchor) are then positioned to the right of the new
character(s).
DELETE Key: When you hit the DELETE key, the character to the right of the cursor is deleted, unless
some text is selected. In that case, the selected text is deleted and the character to the right of the
cursor is unaffected.
BACKSPACE Key: When you hit the BACKSPACE key, the character to the left of the cursor is deleted,
unless some text is selected. In that case, the selected text is deleted and the character to the left of
the cursor is unaffected.
Copy Text to the Clipboard: You can copy selected text to the clipboard, via <Ctrl> + <C> and paste
via <Ctrl> + <V>.
Right Mouse Menu: Cut, Copy, Paste and Insert Unicode character (CAD Symbols: plus/minus,
diameter, degree, copyright, and registered) operations are available:

Functions Menu
83
Keyboard Navigating Behaviors:
<Arrow> Keys: The left and right arrow keys move the cursor left and right 1 character. The up and
down arrow keys move the cursor up and down 1 line of text.
<Ctrl> Key: Holding down the Ctrl key while using the left or right arrow keys, causes it to move to
the beginning of the next/previous word instead of the next/previous character. Holding down the
Ctrl key while using the <+> or <-> keys causes the text to increase or decrease in size.
<HOME> Key: The Home key causes the caret to jump to the beginning (left edge) of the current
line of text.
<END> Key: The End key causes the cursor to jump to the end (right edge) of the current line of
text.
<Ctrl> + <HOME> Key Combination - Holding down the Ctrl key while using the Home key, causes
the cursor to jump to the beginning of all the text.
<Ctrl> + <END> Key Combination: Holding down the Ctrl key while using the End key, causes the
cursor to jump to the end of all the text.
<SHIFT> Key with above Keys: For all of the above commands, the anchor also moves to the new
position along with the cursor , unless the SHIFT key is held down. In which case the anchor is left
where it was. (anchored) Thus, selecting all characters between the cursor and the anchor.
Left Mouse Button Click: When you left-click the mouse inside a markup text entity, the cursor (and
anchor) is positioned at the location you clicked on.
Left Mouse Button Drag: When you left-click + drag the mouse inside a markup text entity, the
anchor is positioned at the location where the mouse button was pressed. While the cursor is
dynamically re-positioned to be under the mouse cursor's location as you drag, until you release the
left mouse button.
See Also:
Markup Text Background
Markup Stamp
STAMP TOKENS
You can use token variables in your markup text strings when creating stamp template. The variable text
button is only available when in stamp authoring mode when using the markup text tool, or
when a single text entity is selected.
To allow reviewers to manually update text contained in a markup stamp, use the %prompt (label string)
token. When used in a markup text string of your stamp template, you can set user prompts that allow
them to update the string. When the user inserts, or double clicks a markup stamp, a text entry field
displays, prompting them to enter the requested information. This text entry field can be edited at any
time during the review process until the markup stamp is finalized through publishing.

Brava 7.0 SR1 User Guide
84
To add a token to your markup text string:
1. Create a new stamp template, or select a text string of an existing stamp template.
2. Use the Markup text tool to draw out an area for your stamp text and set the font properties
(style, size, and color).
3. Type out descriptive text for the entity. This text is your stamp preview text. For example, if you
want the stamp to prompt the user for the file's current status and Employee ID number, type in:
If you want to reserve space for answers to fit multiple lines, you can add blank lines to the preview
text.
4. With the text entity selected, click the variable text button to add variable text that will
replace the preview text when the token is resolved by a user.
5. In the Replace with Variable Text dialog, enter % to summon the tags list.

Functions Menu
85
You can use any combination of text and tokens in your variable text strings. Select the
Prompt token for each prompt that you would like displayed to the user. In the above
example, the token expressions might be:
Status: %prompt(Enter Current Status)
Date: %Date
Emp #: %prompt(Enter your Employee number)

Brava 7.0 SR1 User Guide
86
6. Click OK on the Replace with Variable Text dialog to save the token value and then Save the stamp
template with a descriptive name such as "Status" in this example. ( - > Stamp Templates-
>Save)
This example would display the prompt dialogs shown below when a user resolves the token
by inserting or double clicking this markup stamp.
The text entered by the user replaces the preview text that you set in your stamp template.
The non-prompt tags update automatically (in this example, %Date). If the user cancels, the
prompt tags are not resolved and are left blank.
Usage Notes
If you are updating an existing stamp template's text string with tokens, be sure to update the
preview text so that it corresponds with the token expressions that are added.
You should always test your stamps before assuming that they will be placed and resolved correctly.

Functions Menu
87
You can type variable text expressions directly into the markup text field, rather than use the Token
button, and they will be resolved correctly. The main advantage of using preview text (that is
replaced with variable text) is that the preview text can be much shorter in length and more easily
understood than variable text.
MARKUP TEXT BACKGROUND
When the Markup Text tool is active , you can select the text box background type through the
Markup Text Background tool drop down menu. The following options are available:
Transparent Background - The background is transparent and all text and geometry is visible
beneath the text box.
Match Display Background - This option changes the markup text background color to the
currently selected background color. The background is opaque and no text box border is
displayed.
(Solid Color) - Displays the currently selected markup text background color (see below). When
chosen, the background color is opaque with a solid border that matches the current markup text
color.
Select Background Color - This option launches the markup text background color palette.
You can choose a custom color from the Color chooser dialog. The chosen color will be used
when (Solid Color) is selected from the tool's drop down menu.
INSERT IMAGE
Use this markup tool to insert external images (JPG, BMP, or PNG) into your current markup layer. Once
selected, images can be resized and positioned where you want them.
1. Click the button and browse to an existing image that you would like to insert.
2. Click Open in the Select Image dialog. The mouse cursor changes to a image. You can set the raster
image by one of the following methods:
a. Left-click and hold in the Brava! window to set the first corner point of the image, drag the
mouse to where you want to set the second point, and release.

Brava 7.0 SR1 User Guide
88
b. Left-click on a point in the document where you want to center the image. The image is inserted
into the document matching your orientation and is calculated to its natural size, relative to the
document or drawing size.
3. The new entity can be moved and resized just like any other markup entity.
4. You can set multiple instances of this same image entity or use the Browse button in the Markup
Properties bar to choose another raster image to insert. The properties bar also contains a list of 10
most recently used images which can be individually selected and inserted. The most recently used
list and last browse directory used are persisted.
Stamp Images
The insert image feature is useful for inserting raster stamp images into documents. A sample
directory of 16 commonly used stamp images (such as "Completed", "Sign here", "Confidential",
etc.) is provided in the Brava Client installation, by default as:
%USERPROFILE%\IGC\x7_0\StampImages
For example, C:\Documents and Settings\username\IGC\x7_0\StampImages
Note that an Administrator or Integrator can set the location of the image files for their specific
needs. The brava parameter that controls the initial directory that is opened when clicking the
Browse button is MarkupRasterDirectory
Image Special Considerations
Images (JPG, BMP, or PNG files) are created in an image editor for use with Brava's "Insert Image"
Markup tool. The images can be inserted when administrators or users are creating stamp templates to
be used with the Markup Stamp tool.
The following special considerations apply to the creation, use, and behavior of images in Brava:
The image should be created in the desired size and off set of the image. Brava will not scale the
image. If the image is created at 2 inches by 2 inches, it will be placed at that size on either a 36” X
48” sheet or an 8.5” X 11” sheet.
Once created, the stamps must be loaded to the server in a location available to the Job Processor.
Black and white images have special behavior when viewed in Brava:
o If an image is "black" and "white" only, the black pixels are drawn with the entity's current
color and white pixels are drawn transparent.
o What determines whether or not an image is considered color or black and white? Brava
examines every pixel to determine if they are 0,0,0 (black) or 255,255,255 (white). The

Functions Menu
89
test has a tolerance of 60, meaning that a pixel is considered black if all of its values are
within 0 to 60. A pixel is considered white if it's values are all within 195 to 255.
o If an image contains a third color, outside of the black/white tolerance, all colors are drawn
opaque.
MARKUP STAMP
If Stamp Templates have been authored and saved, the markup stamp button is available on the
Markup Toolbar. When clicked, a list of available stamp templates is shown that can be added to the
current markup layer. The stamp template is treated as a group and all elements of the template are
resized and moved as a single entity and cannot be edited otherwise. Color, content, and other elements
are defined by the author when a stamp template is created and saved.
The markup attribute author name and date is replaced with the name of the current user inserting the
stamp and date of insertion (visible on mouse float-over).
When a stamp is inserted, if a dynamic text field (such as %Page, %Date, %dbstring(value), etc.) exists,
the field is resolved and results are populated in the stamp. You can insert multiple stamp templates into
a markup layer.
To add a Markup Stamp:
1. While a markup layer is open for edit, click on the Markup Toolbar, if available.
2. From the properties bar, use the Browse button to look in the stamp folder located on the Brava!
Server or highlight an available stamp in the "Select Stamp File" list box and click OK. Note that
when an administrator creates a new template, or modifies an existing one on the server, the
changes are updated to the client only when accessing the stamp through the Browse button.
Stamps available in the properties list box may not be the most up to date.
3. To place the stamp at its default size, left click on the view window. The location you click is the
center point of the stamp.
4. To insert the stamp at a customized size, left-click an area of the current window and, while holding
down the mouse button, drag a box to position and size the stamp entity. Release the mouse button
to set the entity.
5. You can use the resize or rotate handles to change the shape and position of the stamp.
6. Once a stamp is added to a markup layer, the stamp name can be selected from the dropdown list in
the stamp tool's properties bar. You can add additional stamps to the drop down by clicking the
Browse button and selecting another stamp template name from the "Select Stamp File" list box.
The active stamp is drawn when you click and drag on the viewing window. Stamps can be created
on any page of a multi-page document and can be copied and pasted to any page.
7. If the stamp template creator used the prompt token, a dialog is presented immediately after
placement that allows you to edit any field label values that were specified in the stamp. Type in the
dialog's text box to update the value and click OK to close the dialog. If you click Cancel, the prompts

Brava 7.0 SR1 User Guide
90
are not resolved and are left blank. With any markup tool active, you can double click on the markup
stamp to summon the dialog and update the value at any time before the stamp is finalized through
publishing.
8. Add any additional markup entities (including stamps) you desire and click to save your
markup. The stamp entities are saved with the markup layer just as any other entity.
Stamps created in one file format should only be applied to files of the same format type or the scaling of
the stamp will be off in relation to the document. It is recommended that when stamps are created, that
their name be appended with their file type for identification. For example, a template created on a PDF
document might be named template1_pdf.xsp.
See Also:
Insert Image Tool
CLOUD AND POLYCLOUD
You can draw clouds using the Cloud and Polycloud tools .
1. Click and hold the left mouse button and drag the mouse pointer on the image to draw a cloud
shape.
2. Release the mouse button to set the entity.
3. For the Polycloud, move the mouse pointer to where you want the first vertex to be and click the left
mouse button to set the point. Continue to do this until all points are set.
4. Double-click to set the Polycloud.
5. Edit the markup as desired. If the markup is not currently active, use the Select Markup Tool to pick
it.
CLOUD WITH CHANGEMARKS NOTE
Purely for convenience, this tool allows you to create two entities at a time - a Cloud rectangle and
a Changemarks note.
1. In the markup Properties toolbar, select the color and line options to use for the cloud entity
2. Click and hold the left mouse button and drag the mouse pointer on the image to draw a cloud
shape.

Functions Menu
91
3. Release the mouse button to set the entity and a Changemarks entity is created in the upper left
corner of the cloud.
4. Enter the Changemarks text as you would do for any independent Changemarks note.
5. Once placed, the two entities behave totally independent of each other, as two separate entities.
When using the single click placement, the existing default size of the Changemarks note will be shrunk
to fit inside of the cloud entity if its size is larger than the cloud entity that you set.
The new Changemarks note and cloud can be moved, resized, or deleted independently, and you can use
the select markup tool to select and edit either of the entity's properties.
SKETCH AND SKETCH POLYGON
Use the Sketch tool to draw freehand shapes. Use the Sketch Polygon tool to create filled
freehand shapes.
1. Click and hold the left mouse button and drag the mouse pointer to draw the shape.
2. Release the mouse button to set the entity.
3. Edit the markup as desired. If the markup entity is not currently active, use the select markup tool to
pick it. Color, Line Style, and Line Width are available options for the Sketch tools. Fill Style is also
available for the Sketch Polygon tool.
The behavior of these two markup tools is unique in that after placing an entity, the entity is not selected
in Markup Select mode, thereby allowing continual use of the tool for freehand drawing.
STRAIGHT LINE AND LINE ARROW
The Line tool allows you to draw straight lines in any direction. The Line Arrow tool adds an
anchor and end arrowhead style to a straight line entity.
1. If the markup is not currently active, use the select markup tool to pick it.
2. Press and hold the left mouse button where you want the Line or Arrow Pointer to begin, drag and
release the mouse where you want the line to end.
3. Edit the markup as desired.
a. The Line tool provides options for color, line style, and line thickness
b. The Line Arrow tool has a variety of beginning and end styles to choose from in the markup
properties drop down selection boxes.

Brava 7.0 SR1 User Guide
92
POLYLINE
The Polyline tool allows you to draw a jointed line.
1. Click the left mouse button where you want the line to begin.
2. Move the mouse pointer to where you want the polyline's first vertex to be and click the left mouse
button to set the point. Continue to do this until all points are set. (As with any of the markup and
measurement tools, you can press <Esc> to abort the current entity creation before it is set. Escape
will reset the tool and delete any unfinished portions created while clicking or dragging.)
3. Double-click where you want the polyline to end to set the line.
4. Edit the markup as desired. If the markup is not currently active, use the select markup tool to pick
it.
ARC
You can place an arc using the Arc tool .
1. Click the mouse button where you want to begin. Click again at the approximate arc center point.
Click a third time at the desired end point to set the arc.
2. Edit the markup as desired. If the markup entity is not currently active, use the select markup tool to
pick it.
CROSS OUT
The Crossout tool is used to place an "X" over an area of the image.
1. Press and hold the left mouse button and drag the mouse pointer to draw the shape on the image.
2. Release the mouse button to set the entity.
3. Edit the markup as desired. If the markup entity is not currently active, use the select markup tool to
pick it.

Functions Menu
93
SCRATCHOUT
Similar to the Crossout tool, the Scratchout tool is used to place an easily identified zig-zagging line
pattern (rather than an X) through a rectangular region of an image or section of text, marking the area
as symbolically invalid.
1. Press and hold the left mouse button on a starting point and drag the mouse pointer to draw the
shape on the image.
2. Release the mouse button to set the entity.
3. Edit the markup as desired. If the markup entity is not currently active, use the select markup tool to
pick it.
SOLID AND HOLLOW SHAPES
The Solid Shapes group allows you to draw solid (filled) or hollow (unfilled) Rectangle , Rounded
Rectangle , Ellipse , or Poly shapes . Hollow markups render just the outline.
Select one of the above markup shapes from the Markup toolbar and select your desired options from the
markup properties toolbar. Options include color and fill type (hollow, solid, highlight, or background fill).
For the Filled or Unfilled Rectangle or Ellipse:
1. Press the left mouse button on a starting point and drag the mouse pointer to draw the shape.
2. Release the mouse button to set the entity.
For the Filled or Unfilled Poly,
1. Click the left mouse button where you want to set the first vertex of the polygon.
2. Move the mouse pointer to where you want the second vertex and click the left mouse button
again.
3. Set any remaining vertices, and then click the left mouse button on the first point to set the
entity. You can also double-click the left mouse button at the last vertex position and Brava!
automatically fills in the last line segment for you (connecting the last vertex point to the first).
As with any of the markup and measurement tools, you can press <Esc> to abort the current entity
creation before it is set. Escape will reset the tool and delete any unfinished portions created while
clicking or dragging.
Edit the markup as desired. If the markup is not currently active, use the select markup tool to pick it.
MARKUP HIGHLIGHT
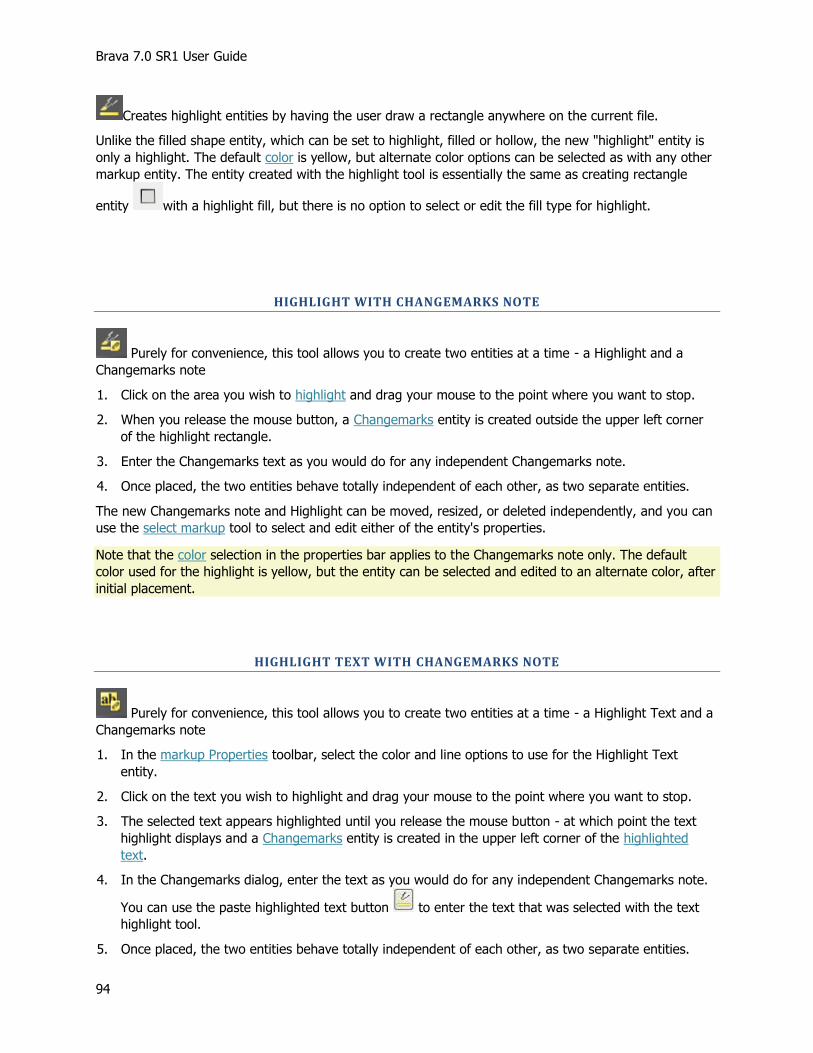
Brava 7.0 SR1 User Guide
94
Creates highlight entities by having the user draw a rectangle anywhere on the current file.
Unlike the filled shape entity, which can be set to highlight, filled or hollow, the new "highlight" entity is
only a highlight. The default color is yellow, but alternate color options can be selected as with any other
markup entity. The entity created with the highlight tool is essentially the same as creating rectangle
entity with a highlight fill, but there is no option to select or edit the fill type for highlight.
HIGHLIGHT WITH CHANGEMARKS NOTE
Purely for convenience, this tool allows you to create two entities at a time - a Highlight and a
Changemarks note
1. Click on the area you wish to highlight and drag your mouse to the point where you want to stop.
2. When you release the mouse button, a Changemarks entity is created outside the upper left corner
of the highlight rectangle.
3. Enter the Changemarks text as you would do for any independent Changemarks note.
4. Once placed, the two entities behave totally independent of each other, as two separate entities.
The new Changemarks note and Highlight can be moved, resized, or deleted independently, and you can
use the select markup tool to select and edit either of the entity's properties.
Note that the color selection in the properties bar applies to the Changemarks note only. The default
color used for the highlight is yellow, but the entity can be selected and edited to an alternate color, after
initial placement.
HIGHLIGHT TEXT WITH CHANGEMARKS NOTE
Purely for convenience, this tool allows you to create two entities at a time - a Highlight Text and a
Changemarks note
1. In the markup Properties toolbar, select the color and line options to use for the Highlight Text
entity.
2. Click on the text you wish to highlight and drag your mouse to the point where you want to stop.
3. The selected text appears highlighted until you release the mouse button - at which point the text
highlight displays and a Changemarks entity is created in the upper left corner of the highlighted
text.
4. In the Changemarks dialog, enter the text as you would do for any independent Changemarks note.
You can use the paste highlighted text button to enter the text that was selected with the text
highlight tool.
5. Once placed, the two entities behave totally independent of each other, as two separate entities.

Functions Menu
95
The new Changemarks note and Text Highlight can be moved, resized, or deleted independently, and you
can use the select markup tool to select and edit either of the entity's properties.
EDIT TEXT ENTITIES
You can underline, strikeout, strikethrough, and highlight text contained in a
document.
1. Select your desired edit text tool from the Markup Toolbar.
2. Select a desired color to use.
3. Click on the text you wish to mark up and drag your mouse to the point where you want to stop. The
selected text appears highlighted until you release the mouse button - at which point the underline,
highlight, strikeout, or crossout markups display.
Usage Notes
Markup text edit entities cannot be copied and pasted.
This tool is not available if the file does not contain selectable text.
HYPERLINKS
A hyperlink contains a pointer to a text, image, sound or video file or a web address. When you launch a
hyperlink contained in a Changemarks or markup entity, the application associated with that file type is
automatically launched and the specified file is loaded. If the hyperlink references a web address, the
default browser is launched and goes to the specified URL.
ADD A HYPERLINK
You can attach a hyperlink to a Changemarks note or to any markup entity. Simply create the
Changemarks or markup entity and with the entity selected, click in the markup properties toolbar.
Type a hyperlink URL in the text box.
To edit a Changemarks or entity to add a hyperlink, click to select the entity and then click to
specify a URL. Only one hyperlink URL can be assigned to each markup object. in the case of
Changemarks, any URL entered into the Changemarks text field will automatically become an active
hyperlink in the Changemarks panel and can include multiple URLs. In addition, URLs added to the panel
in Changemarks Discussion mode will also be active.

Brava 7.0 SR1 User Guide
96
LAUNCH A HYPERLINK
To launch a hyperlink from within a Brava! window (while in review mode), use the select tool to
move the cursor over an entity containing a hyperlink (pointer changes to a hand) and left-click.
To launch hyperlinks contained in Changemarks, open the Changemarks panel and click on any active
hyperlink (indicated with underlined blue text). The URL will launch in a separate browser window.
You can specify how hyperlinks launch in Brava! by adjusting the viewer parameter "HyperlinkLaunch".
default launches each document in its own separate window
one launches all documents in a separate window as Brava!
self launches documents in the frame (if frameset present) that the Brava! Viewer is in.
top launches documents in the same instance of the browser window replacing its current
contents.
CHANGEMARKS TOOL
CREATING CHANGEMARKS®
The Changemarks® feature allows authors of markups to assign a placeholder and descriptive text and/or
a hyperlink to a particular markup. All Changemarks contained in the opened markup files appear in the
Review Changemarks tab. This allows reviewers to step through each Changemarks annotation in all
related documents and images, so no comments are missed.
From the Changemarks tab, Changemarks can be filtered by content, and sorted by author, title, date,
type, state, or by position appearing in the document. The descriptive text contained in the
Changemarks note can be reviewed and copied to the Clipboard. Reviewers can enter into discussions by
adding their own comments to the Changemarks discussion panel.
1. To enter Annotation mode, click the Annotate button or click and select New to
create a new markup layer.
2. Click on the Markup toolbar to place a single Changemarks note. (Note that additional
combined Changemarks note tools are available from the Markup toolbar including Cloud
Changemarkl, Arrow Changemarks, Highlight Changemarks, and Highlight Text Changemarks.)
3. Draw the shape on the image by simply clicking on a location. A Changemarks note of default size
(50 pixels) is created at that location. Whenever you resize a Changemarks note, that size becomes
the new default to use for additional single-click Changemarks note placed on the document. This
single-click placement also applies to the combination Changemarks note tools listed in step #2. Note

Functions Menu
97
that the initial size of these Changemarks also depend on the size of the entity with which they are
created.
4. Enter the title of the Changemarks note in the title text box, and then press <Tab>.
5. Type any descriptive text necessary (this entry is optional and can be quite extensive) in the scrolling
window and click OK. (You can also copy text from the clipboard and select Paste from the right
mouse button menu). Any URLs that are recognized in the Changemarks note text will be active
hyperlinks in the Changemarks panel.
6. By default, the Changemarks Type is set to Comment, and State is left blank. You can set different
Types and States from the available drop down lists, depending on if and how you are using
Changemarks in a discussion workflow. Click OK to close the Changemarks text dialog.
7. You can edit the Changemarks size or position if desired. If the Changemarks note is not currently
active, use the select markup tool to pick it. Double-click the Changemarks entity with the Select
Markup tool to edit its contents. You can click the Paste Text button to quickly paste in any
text that you have copied to the Clipboard. Note that Changemarks entities themselves cannot be
copied and pasted.
COMBINATION CHANGEMARKS TOOLS

Brava 7.0 SR1 User Guide
98
When you have one of the combination " + Changemarks" tools as your active tool, the behavior is as
follows:
During the time before you create an entity, the markup properties toolbar will show the properties
for the soon-to-be markup entity and not the properties of the Changemarks note.
After you finish creating the markup entity, a Changemarks entity will also be created automatically
and selected. The properties in the markup properties toolbar will reflect the Changemark's
properties, not the original entity's.
You will be prompted to fill out the text of the Changemarks note, just as if you had created a single,
uncombined Changemarks note.
Once placed, the original entity and the Changemarks entity are NOT connected to each other in any
way. You can move, resize, recolor, and delete them independently without affecting the other.
Hyperlink and Text Format Support Details
In the Changemarks panel and Changemarks details dialog, the Author, Date, and Timestamp
display in bold, the Type and State are italicized, and the text is in normal font.
Hyperlinks appear as underlined hyperlinks and will launch the specified target. Strings beginning
with the following extensions will be recognized as hyperlinks:
http:
file:
mailto:
ftp:
https:
gopher:
nntp:
prospero:
telnet:
news:
wais:
See Also:
Reviewing Changemarks
Filtering Changemarks
Publishing Changemarks in PDF Files
Changemarks Discussion
Changemarks + Cloud Tool
Changemarks + Highlight Tool
Changemarks + Text Highlight Tool
Changemarks + Arrow Tool
Editing markups and redactups

Functions Menu
99
EXTRACT CHANGEMARKS
From the Changemarks Panel, you can access the Copy Changemarks dialog to copy the selected
Changemarks note, or all Changemarks information contained in a document to the Clipboard.
This function captures the Changemarks title, author, date, time, comment (text description), attached
hyperlink (as text), and image (WMF bits) to the Clipboard. The resulting RTF stream can be pasted into
Microsoft Word. The content can have both a textual and visual summary of the Changemarks note as a
backdrop to a report document.
1. From the Changemarks Panel, click .
2. In the Copy Changemarks dialog, select your desired options and click OK to close the Copy Changemarks dialog and to copy the specified information:
a. In the Copy To Clipboard area, select whether you want to capture information for only the
Selected Changemarks note, or for All Changemarks contained in the document.
b. In the Include section, select Changemarks Image(s) if you would like to include an image of
each Changemarks note as displayed in the viewing window, along with the text. Select
Hyperlinks if you would like to include any hyperlink information as a See Also link. If All Changemarks is selected in the Copy to Clipboard region, you can select Bookmark Page if
you would like to create a list of bookmarks linked to each Changemarks title captured in the
copy function.
c. In the RTF Output Format section, you can select your desired font style and image size. Click
Font to access the Font style selection dialog. Choose your options and click OK to close the
Font dialog. The selections are persisted across Brava! Enterprise sessions. In the Image Size

Brava 7.0 SR1 User Guide
100
drop down, select if you would like your images to display small, medium, or large. This option is
only available if Changemarks Image(s) is selected in the Include section.
The captured information is now ready to be pasted into Microsoft Word. Open a blank document and
select Paste from the right mouse button menu.
CHANGEMARKS DISCUSSION
The Changemarks Discussion feature adds the ability to respond to someone else's Changemarks
comment. When reviewing Changemarks in Edit or Review mode, users can reply to any comment
contained in the file and save the reply as a part of a Changemarks discussion.
If the markup file being replied to has been opened for edit, the replies are saved in that same markup
file and reviewers need to open only one associated markup to view the entire discussion.
If the markup file being replied to has been opened in review mode, Brava will automatically create a
new editable markup layer and only the Changemarks reply is saved to that new markup layer, separate
from the parent markup. Reviewers will need to open both the parent markup file and all associated reply
markup files that multiple reviewers have created to view the entire discussion.
Along with the text content of the note, replies added to the discussion will display the author name, time
and date stamp, and the Type and State assigned to that entry. When reviewing Changemarks
discussions, the type and state of the last entry is displayed as the current type and state at the bottom
of the Changemarks review panel.

Functions Menu
101
To use the Changemarks Discussion feature in Edit mode (recommended):
1. Open a file in Brava that you would like to start a discussion for, or that has an associated
Changemarks discussion already started.
2. If you would like to start a discussion, simply create a new markup file and add a Changemarks note.
If you would like to view and reply to an existing Changemarks note, click ->Open and select
the markup file containing a Changemarks note.
3. Select the Changemarks note from the Changemarks list panel that you would like to reply to and
click the Add Reply link near the bottom of the panel.
4. In the Changemarks Reply dialog, enter your reply in the Reply text field and select a Type and State
(optional) and click Reply to commit your comment to the Changemarks discussion. (The available
values set for Type and State are administered through the ChangemarkConfig.xml file. Please see
the Brava! Enterprise Administration guide for details.) The selected type is persisted during the
session, but not between sessions.
5. The discussion displays in the Changemarks discussion panel along with all associated replies. The
type and state of the last entry display as the current status. Note that the status can only be
changed by adding a new reply. A different discussion thread is kept for each Changemarks note
contained in the file, and all associated discussions are saved and can be accessed through the one
associated markup file.

Brava 7.0 SR1 User Guide
102
6. If you have started or replied to a discussion Annotations mode, Click on the toolbar to save
the discussion as part of a new or existing markup layer. Reviewers need to only open the one
markup file to view the complete discussion.
To use the Changemarks Discussion feature in Review mode:
When a markup file is open for review (or when a CSF file with burned in markups is loaded), that means
the markup is read-only and cannot be written to. Therefore, in these situations, any replies made to a
review Changemarks must be made in an editable markup layer, which is created automatically and must
be saved as a separate markup file. This fact changes the manner in working with Changemarks
discussions which is described below.
1. Open a file in Brava that has an associated Changemarks discussion already started, or a CSF file
that has markups burned in.
2. Click and select the markup file containing the discussion (skip this step if the
current file is CSF).
3. Select the Changemarks note from the Changemarks list that you would like to reply to and click
the Add Reply link near the bottom of the panel.

Functions Menu
103
4. In the Changemarks Reply dialog, enter your reply in the Reply text field and select a Type and
State (optional) and click Reply.
5. The discussion displays in the Changemarks discussion panel along with all associated replies of
the review markup file. The type and state of the last entry display as the current status.
6. Save your reply as a new markup file. This file will contain only the reply objects or other markup
entities that you have added and is kept as a separate markup file to the original parent markup
containing the Changemarks discussion.
Caution:
Note that if you close review of the current file, the editable reply markup is still open and needs to
be saved, even though the reply text will no longer be visible without the presence of the parent
markup.
You must assign this file a different name as the file that was opened for review. Assigning
the same name will overwrite all of the existing markup file data with just your reply data. For ease
of identification and manageability in your workflow, a suggested naming convention for these
associated replies might be <filename>_<username>_reply<001>.xrl
To view the entire discussion, users in your workflow will need to open the parent markup file
containing the original Changemarks discussion, as well as all associated reply markup files created
by other users in review mode (or replying to a Changemarks note in a published CSF file). If only
the associated markup files are opened, without the parent, no replies will be visible and the markup
file(s) will appear to be blank.
If managing multiple markups is not desirable or replies become too splintered, users can consolidate
all of the reply markup files back into the one parent markup file:
1. Open the parent markup file and all associated reply markup files in review mode.
2. Click and select Consolidate Markups.
3. Save the consolidated markup file.
CHANGEMARKS TYPES AND STATES
Used in the Changemarks Discussion Panel, Type and State are attributes that can be assigned to the
original Changemarks content and to each reply that is added to a discussion. These Types and States
are displayed for each Changemarks note contained in the Changemarks List, at the bottom of the panel.
In a Changemarks discussion, only the type and state for the last entry (reply) of the discussion displays
as the current Type/State. The Type/State that was assigned for each post is reflected in the text of the
discussion thread, right below the author and time/date stamp.

Brava 7.0 SR1 User Guide
104
When creating a Changemarks note or replying in a Changemarks discussion, drop-down lists are
available for selecting the Type and State. After the Type is selected, the State drop-down will show only
the States associated with the currently selected Type.
By default, Comment is the Type and State is left blank.
The Changemarks dialog will initially select the Type/State marked as the default type in
ChangemarkConfig.xml.

Functions Menu
105
The following Types and States are set in your default installation, but these values can be customized,
if permitted by your Administrator, by editing the ChangemarkConfig.xml file in your installed HOMEPATH
"<user profile>\IGC\x7_0" directory. In addition, you can set custom colors for each entry by
specifying the RGB color values for each corresponding State listed in the file. The Type, State, and color
information that is defined when you create the Changemarks note (or reply to a Changemarks note) is
saved in the markup file and can be reviewed by other users.
Type State RGB Value Color displayed
Action For
Discussion (default) 193,235,255 Light blue
An Idea 95,255,150 Light green
Investigate 255,190,110 Orange
Typo 255,205,160 Light orange
Revision Error 255,250,180 Light yellow
Confirm 180,140,200 Light purple
Urgent 255,90,80 Red
Change Request (default) 195,235,255 Light blue
Issued 255,255,255 White
Approved 95,255,150 Light Green
Rejected 255,90,80 Red
Superseded 0,0,139 Dark Blue
Released 0,0,0 Black
Verified 180,140,200 Light purple
Completed 0,0,0 Black
Closed 100,200,255 Blue
Notice 0,0,0 Black
Agreement Acceptable (Default) 95,255,150 Light Green
Can't do 0,0,0 Black
Carve out 255,250,180 Light yellow
Typo 255,90,80 Red
Discuss Further 195,235,255 Light blue
Make Reciprocal 195,235,255 Light blue
Reword 255,90,80 Red
Issue Undetermined
(Default) 195,235,255 Light blue
Critical 255,90,80 Red
High Priority 255,230,95 Yellow
Med Priority 255,240,215 Light peach
Low Priority 195,235,255 Light blue
Closed 0,0,0 Black
Status Investigate
(Default) 195,235,255 Light blue
Pending 195,235,255 Light blue
Working 195,235,255 Light blue
Review 195,235,255 Light blue

Brava 7.0 SR1 User Guide
106
Completed 0,0,0 Black
Closed 0,0,0 Black
Missing Approval (Default) 255,90,80 Red
Signature 255,90,80 Red
Account No 255,90,80 Red
Verification 255,90,80 Red
Amount 255,90,80 Red
Address 255,90,80 Red
Other 255,90,80 Red
Project Concern (Default) 195,235,255 Light blue
Deliverable 195,235,255 Light blue
Cost/Benefit 195,235,255 Light blue
Feasibility 195,235,255 Light blue
Resources 195,235,255 Light blue
Estimate 195,235,255 Light blue
Scheduling 195,235,255 Light blue
Usage Notes
If a user's configuration file defines state "X" to be colored green, but the markup entity they are
reviewing has "X" defined as blue, the edit box will appear blue. This occurs when different users
have different types and states defined.
The State font color is normally black. If the background color for the State has a luminance less
than 80, the state will display using a white font.
MARKUP PROPERTIES
MARKUP PROPERTIES TOOLS
The markup properties toolbar is available when creating or editing markup files. You can edit the
available markup properties individually or to a group of entities. Use the Select Markup tool to pick and
edit one or more markup entities.
Line Style and Line Width Properties
Arrow Pointer end styles
Color

Functions Menu
107
Text Properties
Hyperlinks
Copy markups to designated pages
Fill Type - The Fill Type properties are only available for the Rectangle, Rounded Rectangle, Ellipse,
Polygon, and Sketch Polygon tools
Solid
Hollow
Highlight
Background Fill (hide)
The Insert Image and Markup Stamp tools provide a drop down list in the Properties toolbar of available
image and stamp files. A Browse button is included to allow you to locate additional files to add to the
list.
MARKUP FONT
Change the font name, style, and size for markup text through the Markup Text Font dialog box. To
change the markup text font:
1. Use the select markup tool to select and alter existing text or click to add new text.
2. Select your desired options from the text properties toolbar. You can select the font style, size, and
color. Highlight the text and use the , , and buttons to apply Bold, Underline, and Italics to
the font. The markup text background button allows you to show the markup entity text box with
transparent or filled background, or choose a custom color to use.
3. Click OK.
HIGHLIGHT PROPERTIES
This property allows you to draw translucent shapes. Highlights can be selected from the drop down
menu as a property for the Rectangle, Rounded Rectangle, Ellipse, Polygon, and Sketch Polygon tools.

Brava 7.0 SR1 User Guide
108
Select one of the above markup shapes from the Markup toolbar and select your desired options from the
markup properties toolbar.
For the Rectangular or Elliptical Highlight tools:
1. Click and hold the left mouse button and drag the mouse pointer to draw the shape.
2. Release the mouse button to set the entity.
For the Poly Highlight:
1. Click the left mouse button where you want to set the first vertex of the polygon.
2. Move the mouse pointer to where you want the second vertex and click the left mouse button
again.
3. Set any remaining vertices, and then click the left mouse button on the first point to set the
entity. You can also double-click the left mouse button at the last vertex position and Brava!
automatically fills in the last line segment for you (connecting the last vertex point to the first).
Edit the markup as desired. If the markup is not currently active, use the select markup tool to pick it.
BACKGROUND FILLS
Background fills are the same color as the current image background color, however they are white when
printed. Background fills cover the designated area giving the impression that the area has been hidden;
note however that this information is not truly hidden since any text underneath the fill can be searched
or copied, or, if the background fill is not part of a published markup, the markup can be closed. To truly
block out information, a markup containing redactup entities needs to be published.
Background fills can be used to allow extra space for comments and other markups. They can be selected
from the drop down menu as a property for the Rectangle, Ellipse, Polygon, and Sketch Polygon tools.
Select one of these markup shapes from the Markup toolbar and select your desired options from the
markup properties toolbar.
To draw a Rectangular or Elliptical Background fill:
1. Click and hold the left mouse button and drag the mouse pointer to draw the shape.
2. Release the mouse button to set the entity.
For the Poly Background fill:
1. Click the left mouse button where you want to set the first vertex of the polygon.
2. Move the mouse pointer to where you want the second vertex and click the left mouse button
again.
3. Set any remaining vertices, and then click the left mouse button on the first point to set the
entity. You can also double-click the left mouse button at the last vertex position and Brava!
automatically fills in the last line segment for you (connecting the last vertex point to the first).
Edit the markup as desired. If the markup is not currently active, use the select markup tool to pick it.

Functions Menu
109
LINE STYLE AND WIDTH
Change the style and width of markup lines by using the Line Style and Line Width tools:
1. Select a new line style and line width from the drop down boxes when available from the Markup
properties toolbar.
2. You can change the line width of existing markup lines. If the markup is not currently active, use
the select markup tool to pick it.
See also:
Line Thickness
MARKUP COLOR
You can change the color of any markup entity, including redactups, using the16 predefined markup
colors. You can also select from a wider range of colors by selecting the "More" button from the markup
color list. This summons a color chooser dialog box containing a wide range of color options. Each
markup can be a different color and it can be changed at any time.
To change the markup color, click on the markup properties toolbar when available and select the
new color from the drop-down. Click More... to access the custom color dialog.
HYPERLINKS
A hyperlink contains a pointer to a text, image, sound or video file or a web address. When you launch a
hyperlink contained in a Changemarks or markup entity, the application associated with that file type is
automatically launched and the specified file is loaded. If the hyperlink references a web address, the
default browser is launched and goes to the specified URL.
ADD A HYPERLINK
You can attach a hyperlink to a Changemarks note or to any markup entity. Simply create the
Changemarks or markup entity and with the entity selected, click in the markup properties toolbar.
Type a hyperlink URL in the text box.

Brava 7.0 SR1 User Guide
110
To edit a Changemarks or entity to add a hyperlink, click to select the entity and then click to
specify a URL. Only one hyperlink URL can be assigned to each markup object. in the case of
Changemarks, any URL entered into the Changemarks text field will automatically become an active
hyperlink in the Changemarks panel and can include multiple URLs. In addition, URLs added to the panel
in Changemarks Discussion mode will also be active.
LAUNCH A HYPERLINK
To launch a hyperlink from within a Brava! window (while in review mode), use the select tool to
move the cursor over an entity containing a hyperlink (pointer changes to a hand) and left-click.
To launch hyperlinks contained in Changemarks, open the Changemarks panel and click on any active
hyperlink (indicated with underlined blue text). The URL will launch in a separate browser window.
You can specify how hyperlinks launch in Brava! by adjusting the viewer parameter "HyperlinkLaunch".
default launches each document in its own separate window
one launches all documents in a separate window as Brava!
self launches documents in the frame (if frameset present) that the Brava! Viewer is in.
top launches documents in the same instance of the browser window replacing its current
contents.
REVIEW MODE
OVERLAY MARKUPS FOR REVIEW
Though an image file can have only one editable markup associated with it, there can be multiple
overlaid, or read-only markups attached. Markups opened for review cannot be edited, but one or more
overlaid markup layers can be permanently published with the current file, along with any newly created
markup layers, as a new markup. If markup layers have been published to the current file, then those
burned in markups (including any Changemarks notes and discussions, redactups, or takeoff entities) are
now part of the current file and cannot be opened or closed independently.
1. Click and then select one or more available markup files from the Markup Open for Review dialog. Click OK. Changemarks discussion note: If users in your workflow have replied to
existing discussions while in Review mode, their replies will have been saved as associated markup

Functions Menu
111
files (because the review markup is read-only). The original markup file containing the Changemarks
discussion and all associated reply markup files will need to be opened for review to view the entire
conversation when selecting the original Changemarks note from the list. The replies will live in the
original markup file if the user has replied while in edit mode and one Changemarks note can contain
multiple replies from multiple authors.
2. To step through each page that contains markups, right click and select Page->Next Markup
page. To step through each page that contains Changemarks note, right click and select Marks-
>Next Changemarks. If Changemarks are found, the Changemarks panel becomes the active
panel of the Brava Task pane, which opens automatically if currently closed.
3. In markup review mode, you can review any takeoff information contained in the Measurement
Takeoff tab and review (and reply to) any Changemarks discussions that exist.
4. To close a markup file that is currently open for review, select Close Review from the Review
button drop down menu. If only one file is open for review, it is automatically closed. If more than
one file is opened, a Markup Close Review dialog displays where you can specify (highlight) which
files you wish to close. You can use the <Ctrl> key to select individual markup files, or <Shift> to
select a from/to span of files.
5. If you have added replies to a Changemarks discussion while in markup review mode, an editable
markup layer will have been created to contain the associated reply data (since the review markup is
read only). The reply layer remains open and unsaved even after you have closed the review
markup (though now you will not be able to see the data). You will need to save the reply markup
with a unique file name and this new reply file will need to be opened by reviewers along with the
markup file containing the associated Changemarks discussion to be visible.
Usage Notes
The following keystrokes are available to quickly execute the open markup for review command.
<Ctrl> + <R> = Open for Review
Brava supports loading markups created with older product versions, but not markups created with
newer product versions. Your Brava installation must be updated to the latest release if you need to
view newer markups.
See Also:
Consolidating Markups
Takeoff Results
REVIEW CHANGEMARKS
You or subsequent reviewers can view a list of all the Changemarks associated with a document through
the Review Changemarks panel. The panel shows the detailed information (content, author name,

Brava 7.0 SR1 User Guide
112
timestamp, date, type, and state) about the Changemarks that you have selected to review from the list
or from the viewing window. Any replies to that Changemarks note are also listed in chronological order.
If you are reviewing Changemarks notes that you authored in the active markup file, you can also edit
the Changemarks.
1. Open the image with the appropriate markup open or overlaid (Click and select an
available markup file from the Markup Open For Review dialog). Changemarks discussion note: If
users in your workflow have replied to existing discussions while in Review mode, their replies will
have been saved as associated markup files (because the review markup is read-only). The original
markup file containing the Changemarks discussion and all associated reply markup files will need to
be opened for review to view the entire conversation when selecting the original Changemarks note
from the list. The replies will live in the original markup file if the user has replied while in edit mode
and one Changemarks note can contain multiple replies from multiple authors.
2. From the drop-down menu, select Review Changemarks. The Changemarks panel
becomes the active panel of the Brava Task pane, which opens automatically if currently closed. Note
that selecting this option will clear any Changemarks filters, if set, and select the first Changemarks
note in the list.
3. Existing Changemarks can be sorted by title, author, date, type, state, or position by selecting the
appropriate sorting order from the drop down list. Position sorts the Changemarks note in the
order that they appear in the document pages.
4. You can search and filter Changemarks notes by content and/or title by entering a word or
phrase in the search text box. (Click Show All to return all Changemarks notes to the list.)
5. Click on a resulting Changemarks note that you wish to view. The original Changemarks text displays
in the panel's lower frame, including any discussion replies that have been added. The current type
and state of the Changemarks note are displayed at the bottom of the panel
. Note that if you click on a Changemarks note that only contains
reply data (because a user had replied in review mode), the Changemarks note will appear to be
blank. You must select the original Changemarks note that contains the discussion and all associated
replies that exist in the currently overlaid markup files will display in the Changemarks panel.
6. You can progress sequentially through the Changemarks notes by using the Next and Previous
arrow buttons . The <Ctrl>+<Alt>+<C> hotkey combination is available for navigating to
the next Changemarks note. You can also step through each page that contains Changemarks notes
by right clicking in the viewing window and selecting Marks ->Next Changemarks
7. The Changemarks entities appear in Brava! at the same magnification level the author created them.
To edit the original Changemarks note, you must be the author, have the markup opened in edit
(not review) mode. Click the individual Changemarks note you want to edit while in markup selection
mode.
8. In markup review or edit mode, you can enter into any active discussion from the Changemarks
panel by adding a reply (click Add Reply).
When a reply is submitted in review mode, a new editable markup layer is created (if one is
not currently open) where the reply information is stored.

Functions Menu
113
You may use the consolidate markups feature if you would like to merge all of the separate
reply markups into the original markup file. When reviewing markups in Brava Reader,
discussion threads can be reviewed but not replied to as new markups cannot be created
with Brava Reader.
9. You can extract information from one or all Changemarks notes contained in a document through the
Copy Changemarks dialog. Click to access this dialog.
10. You can launch any hyperlinks present in the Changemarks panel, and Brava! will launch the
specified URL in a separate browser window.
Usage Notes
You can review Changemarks notes information that exists in files that have been published with
markups.
If the published file is PDF format, Changemarks notes appear as PDF comments when viewed in
Acrobat.
See also:
Creating Changemarks
Extracting Changemarks Information
Markup Pages

Brava 7.0 SR1 User Guide
114
CHANGEMARKS FILTERS
On the Changemarks panel (<Ctrl> + <Shift> + <M>), you can filter Changemarks by content and
review the results sorted by title, author, date, type, or state.
Filter by Content
You can filter the Changemarks list by a word or phrase appearing in the Changemarks' title or
description. Only the Changemarks note containing the requested word or phrase will display in the
Changemarks list when the search is executed.
To filter Changemarks by text content that appears in either the Changemarks title or description, type
the word or phrase in the Search text box and click (you can turn on Whole Word or Match Case
filters by selecting one or both of these options through the search arrow drop down menu). If
Cumulative is turned on (checked), each subsequent search will just search/filter against the list of
entries returned from the previous search/filter. If Cumulative is off (unchecked), the search will query
all Changemarks in the document.
Changemarks Search Content Options:
Cumulative - if checked, searches only within results of previous search.
Match Case - searches for the text exactly as typed with upper and lower case characters.
Whole Word - find the typed characters as an entire word as opposed to being part of a longer
word.
Term Hit - if checked, search terms will appear highlighted yellow in the results.
Sort by Attribute
Included in the Changemarks panel is a drop down menu that will sort the current Changemarks
results by "Title", "Date", "Author", "Type", "State", or "Position". Selecting one of these commands sorts
the currently available Changemarks by that attribute and displays the resulting list in ascending order.
Position sorts the Changemarks in the order that they appear in the document pages. When changing the
sort selection, the Changemarks panel title list updates to display the attribute information that is
currently specified.
To return the list of all Changemarks associated with a file, click the Show All button .

Functions Menu
115
The Changemarks panel shows the details for the currently selected Changemarks note. If you select a
Changemarks note in the viewing window (using the Select tool), the details for that Changemarks note
are shown. If there is an active content filter applied which would prevent the Changemarks from being
displayed, the filter is cleared so that all Changemarks show in the list (essentially the same as clicking
the Show All button).
See also:
Reviewing Changemarks
MARKUP PAGES
Use the Markup Pages Tool to quickly navigate through markups on multi-page documents. When
navigating the current document using these commands, Brava! ignores pages that don't contain
markups.
To review markup pages, either:
From the right mouse button menu, select Page--> Previous Markup Page or Next Markup
Page to view the Previous or Next page that contains markups.
Click and select Review Markup Pages --> Previous Markup Page or Next Markup Page
From the Thumbnails panel, click on any page that contains a icon next to the thumbnail image.
This feature differs from the review Changemarks navigation in which the next and previous buttons step
from one Changemarks markup to the next. The Review Markup Pages feature navigates through all
pages that contain any markup entities, including Changemarks.
REVIEW MEASUREMENT TAKEOFFS
Measurement takeoffs can be captured in a markup layer and opened for review or burned in to a file
along with any other markup entities.
If a markup layer contains takeoff entities, they can be reviewed in the measurement takeoff panel. The
takeoff panel will contain a list of categories that have been defined for the drawing along with the
accumulated values for those measurements as area, length, or count.
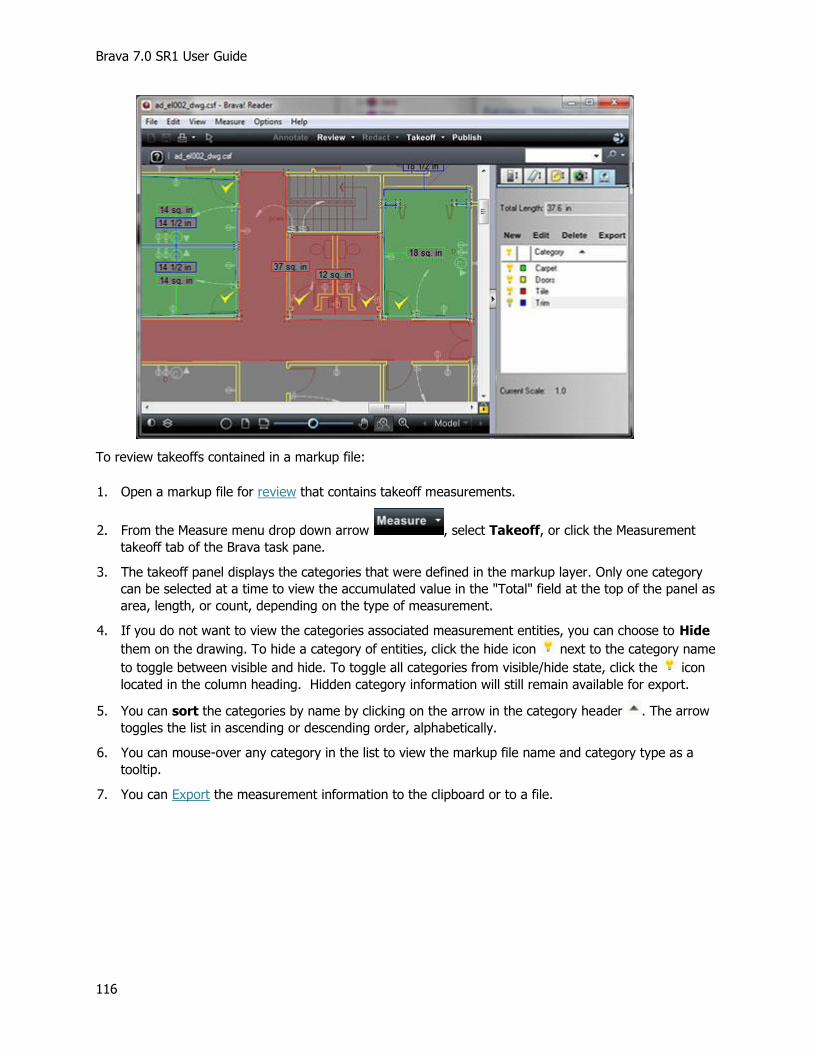
Brava 7.0 SR1 User Guide
116
To review takeoffs contained in a markup file:
1. Open a markup file for review that contains takeoff measurements.
2. From the Measure menu drop down arrow , select Takeoff, or click the Measurement
takeoff tab of the Brava task pane.
3. The takeoff panel displays the categories that were defined in the markup layer. Only one category
can be selected at a time to view the accumulated value in the "Total" field at the top of the panel as
area, length, or count, depending on the type of measurement.
4. If you do not want to view the categories associated measurement entities, you can choose to Hide
them on the drawing. To hide a category of entities, click the hide icon next to the category name
to toggle between visible and hide. To toggle all categories from visible/hide state, click the icon
located in the column heading. Hidden category information will still remain available for export.
5. You can sort the categories by name by clicking on the arrow in the category header . The arrow
toggles the list in ascending or descending order, alphabetically.
6. You can mouse-over any category in the list to view the markup file name and category type as a
tooltip.
7. You can Export the measurement information to the clipboard or to a file.

Functions Menu
117
REDACT MODE
ABOUT REDACTION
About Redaction: Brava! Enterprise software allow users to designate a markup file containing
redactup entities (rectangular solid covers to mark an area for redaction) to be published with the file as
a redacted document rendition (as a CSF, PDF, or TIFF output file). This means that the redactions
associated with the published document can never be edited or removed by the end-user and the text
and images beneath the redactup entities can not be viewed, copied, or searched. Redactions are used to
conceal sensitive information for legal, financial, privacy, and security reasons, for example.
Brava! Enterprise uses a powerful searching language that allows most unique pattens to be found and
redacted via minor scripts or new macro customizations that can be quickly executed in any search
operation. To create custom macros that can be added to your search strings and redaction scripts,
please contact Informative Graphics for more information: [email protected]
The following redaction tools are available through the Brava! Redaction toolbar which displays when you
click :
Redact Area
Allow Area
Redact Privacy Information
Find & Redact
Find & Redact From/To
Redact Using Script(s)/List(s)
Redact Pages
Image
To redact a document:
1. Open a file you would like to redact and use any of the redaction tools listed above to place your
redactup entities. You can also open a previously authored template file containing redactups.
2. Verify your redactups to be finalized.
3. Finalize the file as a redacted PDF, TIFF, or CSF version for distribution.
Exposing Redactions: When publishing to CSF only, the author has the capability to set an optional
password that will allow only users who know the correct password to view any text and images that
have been concealed. Redactup entities on a published CSF file remain solid unless the password has
been set and is correctly entered by the user. In that case, the entities become transparent. A mouse
over on a redactup entity reveals the author name and date and can include a reason for the redaction if
the author has chosen to include this information.

Brava 7.0 SR1 User Guide
118
Redactions can never be exposed on published PDF and TIFF files. However, when viewing a published
CSF file, if the author established a redaction password, you are prompted to enter that password. If the
correct password is entered, any redactup entities created with the redaction tools are transparent (all
other markup entities remain unchanged).
If no password, Cancel, or an incorrect password is given, the file will open, but any redactup entities
remain opaque and areas beneath them are hidden from view. If the publisher set no redaction
password, no prompt is presented and the redactup entities remain opaque, and cannot be edited. You
can not turn off the visibility state of a markup layer that has been published as a redaction.
See Also:
What is CSF?
Viewing CSF Files in Brava!
GLOSSARY OF TERMS
Throughout the redaction portion of this help file, you will see the following terms used. This page
provides a brief description of each:
Redactup
A marked area (transparent rectangle) on a document that will result in a Redaction when finalized.
Redaction
A Redactup that has been finalized into a “Redaction” that results in opaque cover up and content removed.
Redact
The action of creating a Redactup.
Verify
The act of manually reviewing (and editing, if needed) each redactup that has been placed on a document before finalizing the redactions through publishing.
Finalize
The act of publishing a file that has applied the marked areas (Redactups) as Redactions. Redacted content will be removed upon finalize.
Template
A set of Redactups to be placed at exact locations on like-formatted document files.
Script
A set of Redact operations (usually Find & Redact searches) to be repeated on a document. A script can optionally contain a set of Redactups to be placed at exact locations on the document.

Functions Menu
119
REDACT TOOLS
REDACTION TOOLBAR
The vertical Redaction toolbar is available when Brava is in Redact mode and contains related groups of
redaction tools. (The redaction tools are only available if your Brava! Server Administrator allows and
enables this feature.)
From top to bottom, the tools are:
Redactup Select
Redact Area
Redact Text
Allow Area
Redact Privacy Info
Find and Redact
Find & Redact From/To
Redact Using Script(s)/List(s)
Redact Page
Additional menu options available from the button include:
Finalize Redactions and Publish (PDF, TIFF, CSF)
Publish Review Draft As (PDF, TIFF)
Open Redactup Template
Run Script
Verify (Redactup, Image Areas, Entire Document)
REDACTION REASONS
When using the redaction tools, you can optionally assign a redaction reason code to each redactup
entity (up to 69 characters) placed on the document. Each entity can have a different reason code, if you
so choose. Common exemption codes can be used as reasons. Reasons are persisted in the User Profile
<user application data directory>\IGC\Brava! Client\Reasons.ini file. For example (Windows 7)
Brava 7.0 SR1 User Guide
120
C:\Users\myname\AppData\Roaming\IGC\Brava! Client\Reasons.ini or (Windows XP) C:\Documents and Settings\myname\Application Data\IGC\Brava! Client\Reasons.ini.
Reasons are entered in the current redaction tool's Reason text field (found in the tool's properties bar or
dialog). If a new reason is entered, the reason is assigned and added to the drop down list upon hitting
<enter>. If a reason is not explicitly assigned to a new redaction, the last reason assigned is used (may
be blank). If the user exits the program and returns, the last reason assigned during the preceding
session is used.
When verifying the redactups before publishing the file, you can filter redactups by reason code. When
the file is published as a redaction, the reason code assigned displays on top of each opaque rectangle of
the published file. The codes are permanently visible in both the viewing window and on any printed
output. Reason codes contained in a draft do not display on the review draft entities until the file is
finalized.
PRINTING REDACTION REASONS
If Redaction Reasons are associated with any redactup entities contained in a document you are printing,
the Print Redaction Reasons check box can be selected. When selected, the content associated with
each Redaction Reason will print at the end of the print job as a separate summary sheet. Each reason
receives a unique number that can be matched up to the text printout. Printed information includes the
Redaction Reason string, author, date and time authored. Text that is too long for the area is first sized
to fit, then truncated if it is still too long.
ADJUSTING REDACTION REASON FONT SIZE
On large drawing files, the text on redaction reason codes is scaled to fit the redactup rectangle and
therefore may appear too small to read on the final redacted pages. You can control the minimum font
size by editing two lines in the ViewerConfig.xml file, located in the <user application data
directory>\IGC\Brava! Client\ directory. You may need to increase these values when printing any file
that is over 20" in size, depending on your requirements. Suggested values might be to set minimum font
size, 6 points and maximum font size 100 points:
<PublishOptions>
<RedactionReasonsFontMin keytype="int">6</RedactionReasonsFontMin>
<RedactionReasonsFontDesired
keytype="int">100</RedactionReasonsFontDesired>
<RedactionReasonsFont keytype="string">Arial</RedactionReasonsFont>
</PublishOptions>
REDACT AREA TOOL
The Redact Area tool allows you to manually place one or more rectangular covers over areas of a
sensitive or confidential document to block only certain portions from being viewed, searched, or copied
after the file is published to CSF, PDF, or TIFF. If the file being marked up is a CSF file, it must have the
markup authoring and burn-in rights enabled and can not already contain a published redaction.

Functions Menu
121
To create a Redact Area entity:
1. Open a document containing text or images that you would like to redact.
2. Click from the toolbar to display the Redaction toolbar.
3. Click the Redact Area tool from the toolbar.
4. Click and hold the left mouse button and drag the mouse pointer to draw the rectangular shape
on the image.
5. Release the mouse button to set the entity.
6. Enter a reason for the redaction in the Reasons text field, if desired. A list of recently used
reasons is available in the Enter Reason drop down.
7. Edit the redactup as desired, including changing its color. If the markup is not currently active,
use the Select Markup tool to pick it.
8. You can cut away portions of the redactup entity (before publishing) with the Allow Area tool if
you would like to exclude from redaction specific areas within the covered area.
9. To complete the redaction, the markup must be published as a redacted version of the current
file, otherwise the redactups will just remain as transparent entities. Select Finalize Redactions
and Publish to (CSF, PDF, or TIFF) from the drop down menu and select your
publishing options. See the Publishing topic for help with publishing markups. You should also
choose to Verify the redactups before publishing a finalized redacted version.
Additional redaction tools are available from the expanding menu that allow you to redact specific
phrases contained in a document, redact text between specified phrases, redact Privacy Information
(such as phone numbers, social security numbers, etc), or run predefined redaction scripts to find and
redact various phrases and text patterns.
Additional Reasons.ini files are included in your installation: USA FOI reasons.ini and USA Privacy reasons.ini. The preset values in these files can be copied to your BravaEnterpriseClient_Reasons.ini file
located in the /<user profile/IGC/ installation directory as outlined below. Note that any custom reason
codes that you enter will also be stored in this new reason ini file:
1. Rename or make a backup copy of your existing BravaEnterpriseClient_Reasons.ini file.
2. Copy the sample reason code file that you want to use to the Brava Enterprise install directory.
3. Rename the copied file to BravaEnterpriseClient_Reasons.ini.
Note: The redactup entity only blocks information when its markup file has been published to a CSF,
TIFF, or PDF file. If the markup with the redactups is saved and reloaded, areas covered by the redactup
can be seen, searched, and copied. Also note that the redaction process physically removes text and
blanks out raster image information.
See Also:
Publishing Markups
Exposing Blockouts in CSF Files

Brava 7.0 SR1 User Guide
122
REDACT TEXT TOOL
The Redact Text tool allows you to manually place a blockout entity over a section of selectable text.
Unlike the Redact Area tool, image areas are not included in the selection. Use the Redact Text tool to
directly select text to redact or redact all like instances of a selected word or phrase.
To create a Redact Text entity:
1. Open a document containing text or images that you would like to redact.
2. Click the Redact Text tool from the Markup toolbar.
3. Click and hold the left mouse button and drag the mouse pointer directly across the text you
wish to redact.
Consecutive lines of text are selected if you drag the curser straight down a page.
Double clicking on a single word will select (for redaction) all like terms contained in the
document.
4. Release the mouse button to set the entity.
5. Enter a reason for the redaction in the Reasons text field, if desired . A list of recently used
reasons is available in the Enter Reason drop-down.
6. Edit the redactup entity as desired, including moving, resizing, deleting, or changing its color. If
the redactup is not currently active, use the Select Markup Tool to pick it. You can cut away
portions of the redactup entity (before publishing) with the Allow Area tool if you would like to
exclude from redaction specific areas within the covered area.
7. Repeat steps 3-6 for all areas in the document that you would like to redact in the published
version.
8. To complete the redaction, the redactups must be finalized and published as new PDF, TIFF, or
secure CSF file version; otherwise the redactups will just remain as transparent entities. See
finalizing redactups.
Usage Notes
When the tool is active, selected text is automatically searched for, and like instances are redacted,
throughout the document - whether that be one word, or an entire paragraph.
The tool will not redact your text selection if it is only 1 character long.
If your text selection is 2 or 3 characters long it will perform the search with "match case" enabled,
otherwise, it will perform the search with "match case" disabled.
If your selection contains whole words, and the first and last character are not punctuations, then it
will perform the search with the "whole word" option enabled, otherwise, it will perform the search
with the "whole word" option disabled.
When the tool is active, you can select redactions / markup entities and manipulate / delete them.

Functions Menu
123
ALLOW AREA TOOL
This tool allows you to cut away areas within an unpublished redactup entity that you would like to
reveal (exclude from the published redaction). The Allow Area rectangle, when drawn over an existing
redactup entity, cancels the redaction in that area only.
The tool has no affect on any area of the document other than on top of an existing, editable redactup,
before the file is published. It has no affect on redactions that have been previously published to TIFF,
PDF, or CSF files.
To create an Allow Area rectangle:
1. Open or create a markup file that contains redactup entities (using the Redact Area, Find& Redact,
Find & Redact From/To, Redact Privacy Information, or Redact Using Script(s)/List(s) tools).
2. Click and then click the Allow Area tool from the Redaction toolbar.
3. Click and hold the left mouse button and drag the mouse pointer to draw one or more rectangular
shapes on at least a portion of an existing redacted area. Release the mouse button to set each
Allow Area rectangle.
4. Once set, Allow Areas cannot be edited, moved, resized, copied, or deleted. However, they can be
removed with the Undo function - or you can place an additional redactup rectangle on top of an
Allow Area to re-conceal it.
5. To complete the redaction, publish the file. Select Finalize Redactions and Publish to (CSF,
PDF, or TIFF) from the drop down menu and select your publishing options.
REDACT PRIVACY INFORMATION
Use the Redact Privacy Information tool to quickly find and redact sensitive information commonly found
in documents and forms including Social Security numbers, Phone numbers, Email addresses, Date of
birth, and names.
This dialog acts as a convenient tool for using the available predefined search macros without needing to
format search strings. You can select one or more of the text pattern methods to apply to the current
document.

Brava 7.0 SR1 User Guide
124
To use the Redact Privacy Information tool:
1. Open a document containing sensitive information that you would like to redact and click
to display the Redaction toolbar.
2. Click the Redact Privacy Info tool from the toolbar.
3. Select one or more check boxes for the items you would like to redact in the current document.
4. Exception Lists: With Phone Numbers and Email addresses, you can choose to build an Exception
list.
a. Click the appropriate Exception list link and click Add to type in specific phone numbers or email
addresses that you do NOT want redacted.
b. Click OK to add the name to the list. You can add one email or phone number to each list at a
time, or you can use Open to bring in a previously saved exception list into the current list you
are creating.
c. If you want to edit an entry in the list, simply highlight the entry and click Edit, then OK after
you have made your changes.
d. Once you have created a list, click Save to save the list to be used for this and future
redactions.

Functions Menu
125
5. Use List of Names: With the redact Name option, you can choose to use a list of names. Click the
"use list of names" link to enter multiple names in the name list dialog that you DO want redacted.
This is not an exception list.
6. Enter a reason for the redaction in the text box, if desired, and select a Color for the redactups. A list
of recently used reasons is available in the Enter Reason drop down.
7. Click Redact. A dialog informs you of the number of strings that were found and marked for
redaction.
8. To complete the redaction, the markup must be published as a redacted version of the current file,
otherwise the redactups will just remain as transparent entities. Select Finalize Redactions and
Publish to (CSF, PDF, or TIFF) from the drop down menu and select your publishing
options. See the Publishing topic for help with publishing markups. You should also choose to Verify
the redactups before publishing a finalized redacted version.
Usage Notes
The Date of birth macro only finds and redacts strings in the format "Date of birth: <date>" or
"DOB: <date>". It does not redact dates either alone or in any other format.
Do not include periods in the Prefix and Suffix fields of the Name macro. Brava knows to look for the
term with or without a period and if you specify one in your search criteria, any instances in the
document that don't include periods will not be redacted.
Note that you can use OR strings in the Prefix and Suffix fields, meaning that, if you want to declare
multiple prefixes for a person, you can type them all in and seperate them with the OR (pipe)
character '|'. For example, "mister|missus|doctor|mrs|dr|mr" will look for the name
pattern using any of those prefixes/suffixes.
The prefixes in the OR string should be ordered by length; largest to smallest. That way, smaller
ones won‟t trip larger ones. For example, when searching “Mrs. Smith”, we don‟t want to look for
“mr” first, because it will pass and then the extra „s‟ character will invalidate the rest of the name. If

Brava 7.0 SR1 User Guide
126
they are ordered “MRS|MR” then it will return the expected result; first searching for MRS, and if not
found, will then search for MR.
In the above example, the following search string can be entered in the Find & Redact field to
accomplish the same result: macro:aim(prefix=mister|doctor|mr|dr)m(firstname=John)m(middlename=Luke)m(
lastname=Williams)m(firstinitial=J)m(middleinitial=L)m(lastinitial=W)m(suf
fix= the third|junior|III|m.d|Jr):name
This feature may be disabled by your server administrator through a server parameter. Because the
dialog options are English specific, administrators of localizations may choose not to show this dialog.
See Also:
Redact Using Script(s)/List(s) Tool
FIND & REDACT
This tool lets you run a command, for just the open file, that finds and marks for redaction multiple
instances of a common word or phrase simultaneously.
1. Click to display the Redaction toolbar.
2. Click the Find & Redact tool from the toolbar.
3. Enter a find phrase in the text field of the Find & Redact dialog. The field is not case-sensitive. The
use of search macros and search string commands is supported in the redaction find string. See
Wildcard Quick Tips, Using Search Macros, Text Search Modes, and Search Rules and examples for
syntax examples and advanced searching options.
4. Use the Find whole word only option to find the typed string as an entire word as opposed to
characters that are part of a longer word. Example, "state" finds only instances of "state" and ignores
"stated", "statement", "estate", etc. Select Match Case to specify searches for the text exactly as
typed with upper and lower case characters.
5. You can click the Redaction color box to summon a limited color selection panel. For additional
color choices, clicking More.. prompts a standard Windows color selection dialog.
6. Optionally, you can enter a reason for redaction in the Reasons text field (up to 69 characters). You
can use common exemption codes as reasons.
If this field is populated, the phrase is added as a text attribute to the redaction and displays on
top of the redactup rectangle entity when the file is published to CSF. When users mouse over
the redacted area of the document with the Select tool active, the who, when, and why
information displays.
If the file is published to PDF or TIFF, reason codes can be included as a summary page in the
published output.
Functions Menu
127
7. Click Redact to find and redact all phrases that match the redaction find string.
8. A dialog appears informing you how many instances were found and marked for redaction. Click OK
to return to the Find & Redact dialog.
9. Select Close to exit, or adjust the text string and perform another Find & Redact phrase.
10. To complete the redaction, the file must be published as a redacted version of the current file,
otherwise redactups will just remain as transparent entities. Select Finalize Redactions and
Publish to (CSF, PDF, or TIFF) from the drop down menu and select your publishing
options. See the Publishing topic for help with publishing markups. You should also Verify the
redactups that were set before publishing a redacted version.
Raster/graphic text is not handled by the find and redact functions. It is strongly recommended to
manually review any bulk redactions for accuracy as extra spacing and line wrapping may cause phrases
to not be recognized by the Find text commands.
Located in your webapp root installation directory (for example C:\Program Files\Apache
Software Foundation\Tomcat 6.0\webapps\ROOT\IGC\Samples\Redaction) is a folder named
"Redaction". The sample files included in this folder can be loaded in Brava and each provides
instructions for using the various pre-loaded macro scripts, along with the expected results.
When you run the specified scripts against the sample files, you'll be able to see what gets
marked for redaction and what doesn't.
See Also:
Find & Redact From/To
Redact using scripts
FIND & REDACT FROM/TO
This tool lets you run a command, for just the open file, that finds and redacts sections of a document
(using rectangular "redactup" entities) between two defined phrases.
1. Click and then click the Find & Redact From/To tool from the Redaction toolbar.

Brava 7.0 SR1 User Guide
128
2. Enter a starting find phrase in the "Find and redact from:" text field of the dialog. The field is not
case-sensitive. Limited use of search commands and macros is supported in the redaction find
string. Currently the prefix command strings are not supported with the use of this tool. See Wildcard
Quick Tips, Using Search Macros, Text Search Modes, and Search Rules and examples for syntax
examples and advanced searching options.
3. Enter an ending find phrase in the "to:" text field of the dialog.
4. Use the Include end text in redaction option if you want the phrase entered in the "to" field to be
redacted, otherwise, content is redacted to include the first character of the start phrase through to
the last character that precedes the first character of the end phrase.
5. You can click the Redaction color box to summon a limited color selection panel. For additional
color choices, clicking More.. prompts a standard Windows color selection dialog
6. Optionally, you can enter a reason for redaction in the Reasons text field (up to 69 characters).
7. Click Redact to find and redact all content that is located between matching From and To redaction
find strings.
8. A dialog appears informing you how many instances were found and redacted. Click OK to return to
the Find & Redact To/From dialog.
9. Select Close to exit, or adjust the text strings and perform another Find & Redact From/To
command.
10. To complete the redaction, the file must be published as a redacted version of the current file,
otherwise it will just remain a transparent entity. Select Finalize Redactions and Publish to (CSF,
PDF, or TIFF) from the drop down menu and select your publishing options. See the
Publishing topic for help with publishing markups. You should also Verify the redactions that were set
before publishing a redacted version.
Raster/graphic text is not handled by the find and redact functions. It is strongly recommended to
manually review any bulk redactions for accuracy as extra spacing and line wrapping may cause phrases
to not be recognized by the Find text commands.
See Also:

Functions Menu
129
Find & Redact
Redact using scripts
REDACT USING SCRIPT(S)/LIST(S)
The Redact Using Script(s)/List(s) tool allows you to run a command to find and redact specified phrases
and sections of a document in one action, through the use of redaction scripts.
Redaction scripts can be downloaded from a RedactionScripts.bin file on the web server. Customers can
create new scripts and have an administrator install it on the server, making available to all Brava clients.
The Redact Using Script(s)/List(s) dialog can be pre-populated with a default list of redaction scripts
(provided by IGC) that can be run on documents (Find and redact social security numbers, email
addresses, etc). You can use these sample files if set up by your administrator, or use custom scripts that
have been created and made available in the Brava Server Redaction Scripts directory. End users cannot
add to, edit, or delete the scripts that appear in the Find and Redact to Saved List dialog through the
Brava! Client.
1. Click to display the Redaction toolbar.
2. Click the Find & Redact Using Script(s)/List(s) button from the toolbar.
3. From the Redact Using Scripts dialog, select one or more appropriate list files to use on the
current document to find and redact a set of words, phrases, and/or patterns defined in the
selected list(s).
4. Click Redact. This command loops through each phrase of the source document and applies a
Find & Redact (and a reason) to each matching result.
5. When complete, the number of strings found and marked for redaction displays.
6. To complete the redaction, the redactup layer must be published as a redacted version of the
current file, otherwise the redactups will just remain as transparent entities. Select Finalize
Redactions and Publish to (CSF, PDF, or TIFF) from the drop down menu and
select your publishing options. See the Publishing topic for help with publishing markups. You
should also first Verify the redactups that were set before publishing a redacted version.
Usage Notes
Raster/graphic text is not handled by the find and redact function. It is strongly recommended to
manually review any bulk redactions for accuracy as extra spacing and line wrapping may cause
phrases to not be recognized by the Find command.
You can edit or remove any redactups before publishing the redaction. Use the Select Entity tool to
pick the specific entity and click <delete>.

Brava 7.0 SR1 User Guide
130
The ->Run Script tool allows you to run or test a single script (.xrs file that has been
previously created) against the current document.
Redaction script and macro formatting:
Server Administrators can modify an existing sample script, or create a new Redaction Script (.xrs
file) to display to end users in the Redact Using Scripts dialog. If downloaded from the web server,
the sample scripts display in the dialog list (un-checked). These sample scripts, downloaded to your
Brava user profile directory (i.e., C:\Documents and
Settings\<username>\IGC\x7_0\RedactionScripts) and can be edited and used as desired.
Brava! Enterprise has a powerful searching language that allows most unique patterns to be found
and redacted via minor script or new macro customization. Please contact IGC Sales for
customization services.
Located in your webapp root installation directory (for example C:\Program Files\Apache
Software Foundation\Tomcat 6.0\webapps\ROOT\IGC\Samples\Redaction) is a folder named
"Redaction". The sample files included in this folder can be loaded in Brava and each provides
instructions for using the various pre-loaded macro scripts, along with the expected results.
When you run the specified scripts against the sample files, you'll be able to see what gets
marked for redaction and what doesn't.
See also:
Using Search Macros
Find Text
Redact Privacy Information
Text Search Modes
Conditional Macros
Search Rules and examples
REDACT PAGE
This feature of Brava Enterprise allows you to quickly redact entire pages of documents with one
command. This tool is useful for redacting documents that contain only certain pages, words, or
paragraphs that you want to release in the published rendition. Essentially, it can be used as a reverse
redaction tool, in other words, "redact everything on this page except specified areas."
1. Click to display the Redaction toolbar.
2. Click the Redact Page button from the toolbar.
3. In the Redact Page(s) dialog, select the desired page range to redact. You can select to redact all
pages, only the currently displayed page, or a range of pages (type in the start and end page
numbers).

Functions Menu
131
4. Enter or select a reason for the redaction, if desired, and a color to use for the block entities.
5. Click Redact.
6. After using the Redact Page tool to place redactup entities on one or more entire pages, you can
optionally use the Allow Area tool to reveal only certain areas of your document.
7. Select Finalize Redactions and Publish to (CSF, PDF, or TIFF) from the drop
down menu and select your publishing options. Once you publish the document, all content of the
redacted pages, except the areas selected with the Allow Area tool, will be completely unavailable
(for view, print, copy, or search) in the redacted rendition.
OPEN REDACTUP TEMPLATE
A redactup template is simply a markup file that may or may not contain redactup entities and the
author has likely created it with the intent of using it as a template on multiple documents. This
previously authored set of redactups and/or markups can be placed at exact locations and overlaid
on like-formatted document files to speed up processing. Redactup templates are best used when
you have many like-documents (scanned images) or forms and you know that portions to be
redacted are ALWAYS in the same location and page number.
Brava Enterprise can open these templates files for review or edit (if not finalized). Though a file can
have only one editable markup/redactup layer associated with it, there can be multiple merged
markup files applied as a template.
1. From the redact button select Open Redactup Template. The hotkey combination
<Ctrl> + <M> is available as a shortcut.
2. Select the markup file or files you wish to overlay (can be a template or previously authored
markup or redactup file) and click OK. Markup/redactup files can be recognized as having the
extension .MRK or .XRL. If you open multiple markup/redactup files, they will be consolidated
into one markup/redactup layer with you as the author.
When applying a template to the current file, the following rules must be met:
1. The file and template must contain the same number of pages
2. The template must have been authored against the same file format (TIFF, for example)
3. The file and template must be of the same general layout for the redactup entities to be overlaid
in the proper locations.
When you apply a template to an open file, you can edit the redactup as desired and save the template
with the same or different name before it is finalized. To save the edited template, simply select Save or
Save As from the Markup button menu.

Brava 7.0 SR1 User Guide
132
Redaction templates can be created in either Annotate or Redact mode simply by creating a
markup/redactup layer and saving the file (as MRK or XRL) before any publishing is executed. Redactup
entities remain transparent in the overlaid template until the document is finalized.
VERIFY REDACTUPS TO BE FINALIZED
Once you have used the redaction tools on a document, you can optionally run the Verify tool to
manually check the accuracy of each redactup entity that has been set on the document before it is
published as a final redaction.
To Verify redactups:
1. Using any of the redaction tools on the current document, create a redactup file.
2. Click the Verify tab from the Brava! Task Pane to reveal the Verify panel. Alternatively, you
can access the Verify panel by either:
using the hotkey <Ctrl> + <Shift> + <V>
from the right mouse button menu, select Show Pane ->Verify
from the Redact drop-down menu select Verify -->Redactup, Images,
or Entire document
3. If you select Redactups from the Verify drop down list, the next and previous buttons scan
through each redactup entity with active edit handles that can be selected and dragged to re-
size the area. This feature allows you to check that all redactups have had reasons assigned and
also allows you to check that if a redaction template was used, that the template properly covers
everything it is supposed to and you can make adjustments to the entities if needed, including
changing reason codes.
4. If you select Image Areas from the drop-down, Brava cycles through each raster/vector image
of the document displaying the areas that cannot be redacted through find and redact scripts.
Text is hidden from view for the purpose of visual review of the non searchable areas that may
require redaction (such as image text). You can use your mouse to drag and size a zone on any

Functions Menu
133
area using the entity's edit handles. If the document is raster only, or vector with no raster
objects, then the Verify Image buttons are grayed out (disabled). This feature allows you to
check the document to make sure that there is no text in images that cannot be located and
redacted through any text search strings. If present, you can zone redact the portion of the
image that you want to conceal.
5. Redactup Filters: In the lower portion of the Verify panel, a set of options allows you to filter
the redactups in the document by color or reason if you don't want to verify All redactups
contained in the document. Note that every time the filter being applied changes, you are
returned to the first entity in the document that meets the new criteria set by the filter.
To filter by reason, select the With reason option and either type in or select an existing
reason from the drop down list.
To filter by color, select the Color option, then click the color menu arrow to choose a
color from the selection palette. For a specific color, choose More to display the full
custom color dialog.
6. Use the next and previous arrows to review each redactup contained in the file until you have
verified all of them. Redactups are cycled through by order of their time stamp and not by order
of location in the document. A redaction counter displays your current progress.
7. Edit any redactups as needed and then finalize the file for distribution (as a redacted PDF, TIFF,
or CSF rendition of the file).
VERIFY ENTIRE DOCUMENT
If you select Entire Document from the Verify menu, the document is presented in a strip panel in a
separate viewing window. This feature allows you to focus on and review every inch of the document in a

Brava 7.0 SR1 User Guide
134
strip wise fashion and at the same time a log is recorded of how much of the document has been
reviewed. Navigate through the document pages until the entire document has been reviewed.
Page review navigation control options:
Use the single side bar arrows, keyboard <up> and <down> arrows, or use your mouse wheel to
scroll up and down.
Use the space bar, <PageDown> key, or side bar arrow to advance the document one full review
area forward.
Use the <PageUp> key or side bar arrow to reverse the document one full review area backward.
You can click the side bar arrows for single line/section advancement, or hold down the arrows for
continuous advancement backward or forward. Release the mouse button to stop movement. Holding
down the single arrows advances slowly, holding the PageUp and PageDown arrows advances quickly.
While in View Entire Document mode, you can:
Review the document - The "Viewed" status bar is an indicator of what percentage of the
document has been reviewed. Note that if you back up to previously viewed paged, the bar
indicator DOESN‟T back up. This review state is remembered for the session, but not upon
exit. For example, if you close the panel half way through review and then enter Verify
Entire Document again – you will continue where you left off .
Add or edit Redactups - using any of the tools from the redactup toolbar. Redactups can be
drawn in the transparent areas and once drawn, they will appear under the transparent
area.
Restart - A Restart button is provided to allow you to start over. This will put the
document at the top and reset the bar indicator and document review position to start.
Functions Menu
135
Adjust the size of the viewing area with the Focus size slider. The intent of the viewing
area is to make it easier to concentrate vision on a portion of the page to permit faster
skimming of the content.
Access this Help file.
Close (exit the mode).
PUBLISHING REVIEW DRAFTS
Before finalizing a document for redaction, you can publish a PDF or TIFF draft version of the current
document for review purposes. The redactups on review drafts remain transparent and allow you to
review what will be redacted (with complete reasons) on the finalized document. The draft is merely a
distributable snapshot of what is currently selected for pending redaction. To create a PDF/TIFF with true
redactions, use the Finalize option.
To publish a review-only draft:
1. Create a redactup for the file you would like to publish as a review draft.
2. From the Redact drop-down menu , select Publish Review Draft As..
3. Select PDF (not redacted) or TIFF (not redacted).
4. Select your PDF or TIFF Draft publishing options and click Publish.
5. Type a name for the file, or accept the default format as <File Name>-draft.<ext> (for example,
myfile-draft.pdf) and click Save.
When a PDF review draft is opened in Acrobat, the redaction reasons display in Adobe comments
(Author/Reason) for quick review. (In the order they appear on the document, not by time stamp.)
Usage Notes
When a review draft is opened in Brava, the redactups contained in the draft cannot be selected,
edited or finalized. They are now part of the PDF file.
The original redactup file (.xrl) is the working draft which can be verified and finalized at any time.
Reason codes contained in a draft do not display on the review draft entities until the file is finalized.
If the currently loaded file has already been finalized for redaction, the Publish Review Draft As menu
item is disabled. Finalized redactions cannot be published as a review draft. However, you can close
and reload the document in order to publish a draft.
Save View as JPG can also be used to distribute "review draft" images. From the Publish menu, select
Save Current View as JPG and any unpublished redactup entities in the current view will appear
transparent in the resulting snapshot JPG file.

Brava 7.0 SR1 User Guide
136
REDACT MOUSE TOOL
An interactive mouse tool is active when using the Redact Area tool and Allow Area tool that
allows you to place redactup entities and Allow Area rectangles on the current image. When the Redact
Text tool is active, the mouse cursor is placed at the beginning of the text and dragged to select
desired text.
The five accompanying markup tools, Find & Redact , Redact Privacy Info , Redact Using
Script(s)/List(s) , Redact Page , and Find and Redact From/To are command tools and
do not have any mouse functions themselves.
After invoking either of these commands, the active tool is set to the default redaction tool (Redact Area).
MEASURE MODE
MEASUREMENT TOOLS
There are various Measure tools available for drawing and image files while in Measurement mode
. You should first set a standard measurement scale or calibrate a baseline distance to use as
scale. Brava! uses an interval of 0 to 360 degrees for all angular measurement.
Select one of the following measurement tools from the measure toolbar:
Distance (line)
Polygon
Polyline
Rectangle
Circle
Measure Count
Calibrate
Measurement Settings
Measure Magnification Tool
Measure Results Accumulators
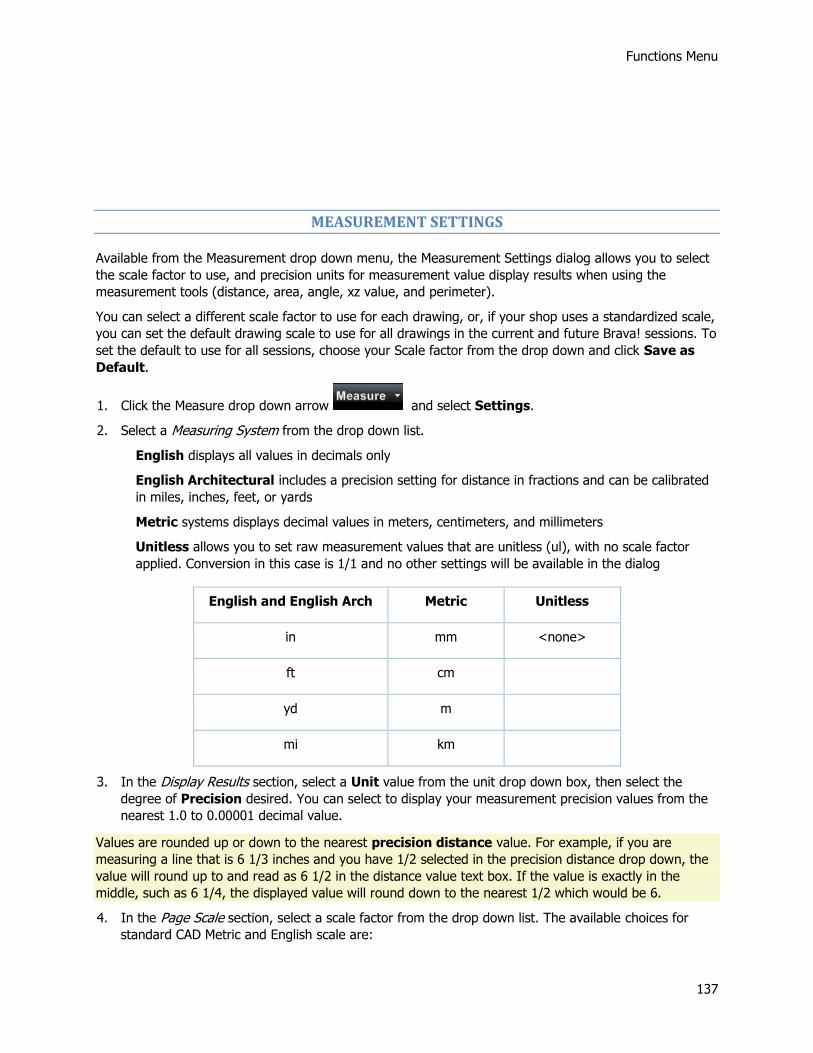
Functions Menu
137
MEASUREMENT SETTINGS
Available from the Measurement drop down menu, the Measurement Settings dialog allows you to select
the scale factor to use, and precision units for measurement value display results when using the
measurement tools (distance, area, angle, xz value, and perimeter).
You can select a different scale factor to use for each drawing, or, if your shop uses a standardized scale,
you can set the default drawing scale to use for all drawings in the current and future Brava! sessions. To
set the default to use for all sessions, choose your Scale factor from the drop down and click Save as
Default.
1. Click the Measure drop down arrow and select Settings.
2. Select a Measuring System from the drop down list.
English displays all values in decimals only
English Architectural includes a precision setting for distance in fractions and can be calibrated
in miles, inches, feet, or yards
Metric systems displays decimal values in meters, centimeters, and millimeters
Unitless allows you to set raw measurement values that are unitless (ul), with no scale factor
applied. Conversion in this case is 1/1 and no other settings will be available in the dialog
English and English Arch Metric Unitless
in mm <none>
ft cm
yd m
mi km
3. In the Display Results section, select a Unit value from the unit drop down box, then select the
degree of Precision desired. You can select to display your measurement precision values from the
nearest 1.0 to 0.00001 decimal value.
Values are rounded up or down to the nearest precision distance value. For example, if you are
measuring a line that is 6 1/3 inches and you have 1/2 selected in the precision distance drop down, the
value will round up to and read as 6 1/2 in the distance value text box. If the value is exactly in the
middle, such as 6 1/4, the displayed value will round down to the nearest 1/2 which would be 6.
4. In the Page Scale section, select a scale factor from the drop down list. The available choices for
standard CAD Metric and English scale are:

Brava 7.0 SR1 User Guide
138
Metric English and English Architectural
1:1 (Full Size) Full Size (1:1)
1:2 (Half Size) Half Size (1:2)
1:5 3"= 1'-0"
1:10 1 1/2"=1'-0"
1:20 3/4"=1'-0"
1:25 1/2"=1'-0"
1:50 1/4"=1'-0"
1:100 1/8"=1'-0"
1:200 1/16"=1'-0"
Calibrated Calibrated
English/English Architectural units are formatted as <Xunit>=<Xfeet>'-<Xinches>"
If you have used the Calibrate tool to define a custom scale to use, Calibrated displays in the drop
down field.
5. The out of the box default setting for the paperspace view scale factor is FULL (1:1). You can select
a different scale factor to use for each drawing, or, if your shop uses a standardized scale, you can
set the default drawing scale to use for all drawings in the current and future Brava! sessions. To set
the default to use for all sessions, choose your Scale factor from the drop down and click Save as
Default.
6. Click OK to activate your settings. Measurement settings are saved across Brava! Enterprise
sessions. Note that the selected scale only applies to the current page. If you explicitly change the
default (see step #4), that default scale will be reflected across all pages.
CALIBRATION
When measuring distances on 2D files, you should identify units with the distance using the calibration
tool. This will enable Brava to determine the correct scale at calibrate time. For example, if the image
contains a component with a marked dimension of 1.5 m, you can use the Calibrate tool to measure the
dimension line and enter 1.5 as the distance (scale) and m as the Unit of measure. The Measure tools will
now give measurements in meters.

Functions Menu
139
You can select a standard CAD scale to use for this session, or all future sessions, by selecting a scale
factor and Unit of measure in the Measurement Settings dialog. If you choose to Calibrate a scale,
Calibrated is displayed in the "Current is:" drop down of the Settings dialog.
1. From the Measure drop-down select Calibrate...
2. Click the left mouse button on the first then last point in the distance you will be using as the
baseline.
3. Set the Calibration Units value first (Select units:), and then enter the distance. The Units value
is controlled by the Measure System set in the Measurement Settings dialog.
4. Edit the calibration distance value to use as the scale (the unit that all future measured distances
will be based on) and click OK.
Usage Notes
English Architectural formatting is calibrated as <XDistance>=<Xmiles>-<Xyards>,
<XDistance>=<Xyards>-<Xfeet>, or <XDistance>=<Xfeet>'-<Xinches>"
Values can be entered as whole numbers, decimal values, or fractions (5, 5.125, or 5 1/8 for
example)
The default precision for the Calibrate tool is four (4) decimal places. You can change the unit types
and precision calculations through the Measurement Settings dialog.
Calibration only applies to the current page. If you want to change the scale across all pages, change
the default in the Measurement Settings dialog.
See also:
Measurement Tools
Measurement Settings
Measure Magnification Tool
Measurement Takeoff
MEASURE LINE
Measures the line (distance) between two selected points based on the calibrated baseline. The length of
the new line, in terms of the calibrated baseline, will appear in the properties bar above the Brava! viewer
window, along with the angle of the new line and the offset difference in y-axis position of the new line.
1. Click to enter measure mode.
2. Select the Line (distance) tool from the Measurement toolbar.

Brava 7.0 SR1 User Guide
140
3. Select the Snap check box if you would like your measurement points to snap to the nearest
picking point or to the midpoint of segments, arcs, and circles. Note: Only CAD-like formats
support snap. Raster images and text documents do not perform snap.
4. Click and release the left mouse button where you want to start measuring. An X will appear to
mark the first point.
5. Click the left mouse button where you want to finish measuring. An X will appear to mark the
first point.
6. Click the left mouse button where you want to finish measuring. Another X marks the end of the
line. Distance, angle, and X:Y coordinate information displays in the properties fields:
Usage Notes
For certain formats, you can use the Measurement Magnification Tool to assist in accurate placement
of the points.
Creating a new line removes the existing measurements from the properties bar and clears the old
line from the image window.
As with any of the measurement and markup tools, you can press <Esc> to abort the current entity
creation before it is set. Escape will reset the tool and delete any unfinished portions created while
clicking or dragging.
See also:
Measurement
MEASURE RECTANGLE
Allows you to measure a rectangular area. The width, height, and area of the rectangle display on the
properties bar, respectively.
1. Click to enter measure mode.
2. Select the Rectangle tool from the Measurement toolbar.
3. Select the Snap check box if you would like your measurement points to snap to the nearest
picking point or to the midpoint of segments, arcs, and circles. Note: Only CAD-like formats
support snap. Raster images and text documents do not perform snap.
4. Click and release the left mouse button where you want the rectangle to start.

Functions Menu
141
5. Click again where you want to place the opposite rectangle corner to set the shape. Width,
height, area, and X:Y coordinate information displays in the properties fields:
Usage Notes
For certain formats, you can use the Measurement Magnification Tool to assist in accurate
placement of the points.
Creating a new rectangle clears the old measurement and removes the old rectangle from the
image window.
As with any of the measurement and markup tools, you can press <Esc> to abort the current entity
creation before it is set. Escape will reset the tool and delete any unfinished portions created while
clicking or dragging.
MEASURE POLYGON
Allows you to measure a polygonal shape. The length of the line between the last point set and the
current mouse position, the total perimeter of the polygon (including the current mouse position) and the
area of the polygon (including the current mouse position) appear in the properties bar, respectively.
1. Click to enter measure mode.
2. Select the Polygon tool from the Measurement toolbar.
3. Select the Snap check box if you would like your measurement points to snap to the nearest
picking point or to the midpoint of segments, arcs, and circles. Note: Only CAD-like formats
support snap. Raster images and text documents do not perform snap.
4. Click the left mouse button where you want the first point of the polygon. As soon as you move
the mouse pointer away from the first point, the measurement information changes in the
properties bar.
5. Click the left mouse button where you want the second point, and continue to set the points of
the polygon. Notice that the measurement information continues to update. Note: For certain
formats, you can use the Measure Magnification Tool to assist in accurate placement of the
points.
6. Double-click the left mouse button to set the last point. You will not see accurate measurement
information if you have bisected the polygon, creating two or more shapes (the normally blue
polygon will turn red when this happens).

Brava 7.0 SR1 User Guide
142
7. Creating a new polygon clears the old measurement and removes the old polygon from the
image window.
The properties bar reveals:
- the length of the current segment (distance)
- the combined length of each segment (perimeter)
- the total area of the polygon (area)
- the current cursor location (X:Y coordinates)
As with any of the measurement and markup tools, you can press <Esc> to abort the current entity
creation before it is set. Escape will reset the tool and delete any unfinished portions created while
clicking or dragging.
See also:
Measurement
MEASURE POLYLINE
Allows you to measure a multi segment line. While using this tool, each successive left mouse click will
append a line segment to the polyline.
1. Click to enter measure mode.
2. Select the Polyline tool from the Measurement toolbar.
3. Select the Snap check box if you would like your measurement points to snap to the nearest
picking point or to the midpoint of segments, arcs, and circles. Note: Only CAD-like formats
support snap. Raster images and text documents do not perform snap.
4. Click the left mouse button where you want the first point of the polygon. As soon as you move
the mouse pointer away from the first point, the measurement information changes in the
properties bar.
5. Click the left mouse button where you want the second point, and continue to set the points of
the polyline. Notice that the measurement information continues to update. Note: For certain
formats, you can use the Measure Magnification Tool to assist in accurate placement of the
points.
6. Double-click the left mouse button to set the last point.

Functions Menu
143
7. Creating a new polyline clears the old measurement and removes the old polyline from the
image window.
The properties bar reveals:
- the length of the current line segment (distance)
- the combined length of each segment (perimeter)
- the current cursor location (X:Y coordinates)
As with any of the measurement and markup tools, you can press <Esc> to abort the current entity
creation before it is set. Escape will reset the tool and delete any unfinished portions created while
clicking or dragging.
See also:
Measurement
MEASURE CIRCLE
Allows you to measure the radius, circumference, and area of a circle as the values display on the
properties bar, respectively.
1. Click to enter measure mode.
2. Select the Circle tool from the Measurement toolbar.
3. Select the Snap check box if you would like your measurement points to snap to the nearest
picking point or to the midpoint of segments, arcs, and circles. Note: Only CAD-like formats
support snap. Raster images and text documents do not perform snap.
4. Click and release the left mouse button where you want to place the center point of the circle.
5. Click again where you want to place the outside edge to set the size of the circle. Radius,
circumference, area, and X:Y coordinate information displays in the properties fields:
Usage Notes
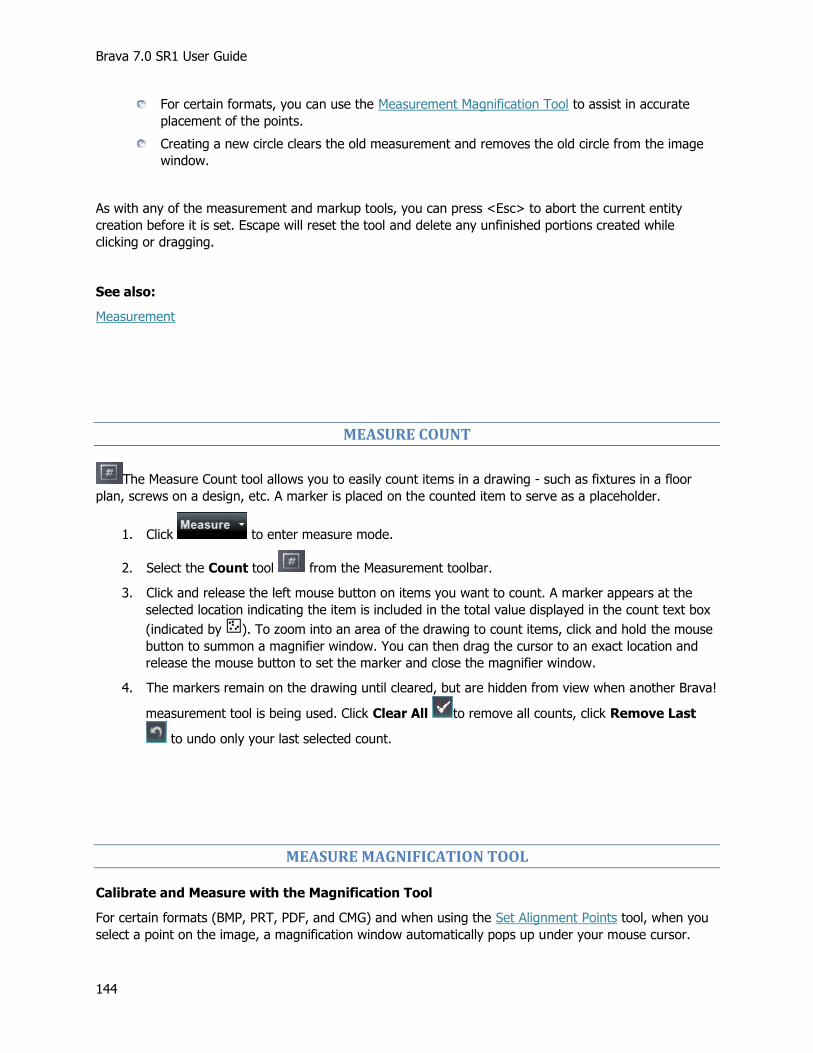
Brava 7.0 SR1 User Guide
144
For certain formats, you can use the Measurement Magnification Tool to assist in accurate
placement of the points.
Creating a new circle clears the old measurement and removes the old circle from the image
window.
As with any of the measurement and markup tools, you can press <Esc> to abort the current entity
creation before it is set. Escape will reset the tool and delete any unfinished portions created while
clicking or dragging.
See also:
Measurement
MEASURE COUNT
The Measure Count tool allows you to easily count items in a drawing - such as fixtures in a floor
plan, screws on a design, etc. A marker is placed on the counted item to serve as a placeholder.
1. Click to enter measure mode.
2. Select the Count tool from the Measurement toolbar.
3. Click and release the left mouse button on items you want to count. A marker appears at the
selected location indicating the item is included in the total value displayed in the count text box
(indicated by ). To zoom into an area of the drawing to count items, click and hold the mouse
button to summon a magnifier window. You can then drag the cursor to an exact location and
release the mouse button to set the marker and close the magnifier window.
4. The markers remain on the drawing until cleared, but are hidden from view when another Brava!
measurement tool is being used. Click Clear All to remove all counts, click Remove Last
to undo only your last selected count.
MEASURE MAGNIFICATION TOOL
Calibrate and Measure with the Magnification Tool
For certain formats (BMP, PRT, PDF, and CMG) and when using the Set Alignment Points tool, when you
select a point on the image, a magnification window automatically pops up under your mouse cursor.

Functions Menu
145
This zoom window allows you more accurate placement of the selection point for measuring, counting,
and aligning.
As long as the left mouse button is held down, you can adjust the position of the point under the
magnifier. When you release the left mouse button, the point is committed and the magnifier goes away
so that you can drag your measure tool to the next point location.
If you release the left mouse button while it is outside the magnifier rectangle, you are indicating that
you want to cancel the attempt to place the point.
The magnification level used depends on the file type. If it is entirely raster, then the magnification level
is 1 source pixel per screen pixel. Otherwise the magnification level is 1 drawing inch = 1 screen inch.
If the current view is already zoomed in beyond the above magnification levels (100% zoom or greater),
the magnifier does not display.
The magnification tool used in measure does not contain all of the features of the Brava magnifier tool
located on the main toolbar.
Using the Auto-Zoom Window:
When selecting picking points for calibration, measurement type,s and measurement count, an Auto-
Zoom window will appear when the drawing/document is zoomed out. This allows for exact placement of
your start and end points for precision accuracy.
An Auto-Zoom window appears when you pick a point by depressing the left mouse button.
The Auto-Zoom window remains open until you let up on the left mouse button.
You can place the measurement point more accurately while the Auto-Zoom window is active.
While in Auto-Zoom mode, you can move the mouse wheel up and down or hit the +/- keys on the
numeric keyboard to zoom in and out.
If the area inside the Auto-Zoom window does not include the spot you intended, you can abort the
placement of the point. Abort by moving your mouse outside the Auto-Zoom window and then
release the left mouse button.
The Auto-Zoom window shows you the drawing at a 1 to 1 ratio with the screen, meaning, 1 inch of
drawing is drawn at 1 inch of your monitor.
If you are zoomed in to the image far enough that the 1 to 1 ratio is the same (100% or closer)
between the current view and the Auto-Zoom window view, then the Auto-Zoom window does not
appear.
MEASUREMENT TAKEOFF

Brava 7.0 SR1 User Guide
146
MEASURE TAKEOFF
Measure takeoff is a feature that allows Brava Enterprise users to make multiple measurements on a
document and save them to a markup file (along with annotations and redact-ups). Takeoffs can be
grouped together into categories. This feature is useful if you are working with drawings and want to
estimate totals needed of specified categories. For example (shown below), the total area of carpet and
tile, the lineage of trim, and the number of doors that are needed for a specific plan.
The Brava Task Pane displays a Measurement Panel containing the accumulated value of measurements
from takeoffs that belong to the defined categories. For example, if the document shows the floor plan
for a collection of rooms and a category called Carpet is made, and takeoffs (polygons / rectangles /
circles) are drawn to represent all the area that will have carpet laid down, the Measurement Panel will
display the total area (e.g., square footage) of carpet that will be required for the rooms. Measurement
data (categories and total of measurements) can be exported to a file or saved to the clipboard.
To use the Measure Takeoff feature:
1. Open a drawing file for which you would like to accumulate measurements.
2. From the button, select Takeoff from the drop down arrow. The Brava Task Pane
displays the Measure Takeoff Panel and the measure takeoff toolbar displays on the left side of the
Brava window.
3. Create the Categories that you would like to use for this drawing.
4. To place your measurements, select the category from the list that you want to measure. Depending
on the measurement type, the appropriate measurement tools become available in the measurement
takeoff toolbar allowing you to place one or multiple entities. The measurement information for each
entity you create is added to the currently selected category results. The accumulated results display

Functions Menu
147
at the top of the panel. The entities on the drawing will be color coded according to which category
they belong to.
5. If Show Leader is selected, a text box (with category color border) will display each individual
measurement result on the entities you place. You can move the position of the text box by clicking
the Select button , clicking on the entity, then pressing on the text box and dragging it to a new
location. Release the mouse button to set the new text box location.
6. The Negative Area check box allows you to place a negative entity for that category. As long as the
check box is selected, any entity you place on the drawing will subtract from the accumulated
results. The measurement entities text box displays a negative number if Show Leader is selected.
Negative areas are typically drawn inside of a larger, positive area to exclude certain sections from
the total.
No intelligence is applied to decide if a negative area is logical (overlaps another „positive‟ area takeoff).
If you choose to designate an area as negative, its value is subtracted from the accumulation
7. To remove any of the measurement entities on the drawing, click the measure Select button ,
click on the entity you wish to delete, and hit <Delete> on your keyboard. The measurement value
for that entity is subtracted from the accumulated results. You can select several entities at once by
holding down the <Ctrl> key while clicking on the individual entities you wish to delete.
8. You may also select and edit any of the measurement entities to resize them. After selecting the
measurement , resize handles appear on the entity that can be grabbed and moved (dragged) to
a new location. You cannot move the entity, but can reshape it if needed.
9. Once you have defined your categories and placed all your measurements, you can Export the
results to the Clipboard (for cut and paste into other applications, such as Excel), or export to a CSV
file and save it on your computer.
10. As with any other markup layer, when you close the file you will be asked if you want to save the
current markup. If you select Yes, the category list, along with all of the current measurement
entities, will be saved as an XRL file and can be opened for edit or review along with its source file.
Usage Notes
If you would like the takeoff information to be able to be reviewed in Brava Free DWG Viewer 7.0,
then publish the file to CSF to burn in the markup layer, making it a permanent part of the published
(distributed) file.

Brava 7.0 SR1 User Guide
148
Brava Flash viewer 2.0 does not currently support viewing of takeoff information, regardless of
whether the markup is published with the file.
See Also:
Reviewing Measurement Takeoffs
TAKEOFF CATEGORIES
The purpose of a category is to allow you to group multiple measurements of the same type together.
You can create multiple categories of all things that are being measured. Creating categories is only
permitted when the user has markup editing permissions.
A takeoff is a geometry element (line, polyline, rectangle, polygon, circle, count check-mark) that has an
associated measurement or count value. A takeoff belongs to a category, which determines its
measurement type (length, area, or count). When you create a category, then all measurements
accumulate in the measurement panel by type.
All the takeoffs belonging to a category can be accumulated (sum of measurements) as they have the
same system, units and precision. Accumulations are done across document pages. In other words, all
takeoffs belonging to a category, no matter what page they are made on, contribute to the total value.
To create a category list:

Functions Menu
149
1. From the Measurement Takeoff panel, click New to create a new category. Note that if a markup file
is currently open, the new category will be added to the markup layer. If no markup is open, creating
a new category opens a new markup file.
If a markup file is currently open, the new category will be added to the markup layer.
If no markup is open, creating a new category opens a new markup file.
If the file being viewed is a CSF file with burned in categories, those categories will not be
editable and new categories cannot be created.
2. Select your measurement options from the following category attributes:
Name: Unique descriptive name. A category name can only be used once per markup file.
Type: One of Length, Area, or Count
Color: Measurement entities will be drawn in selected color
Units: Depends on system (similar to Measurement Settings). Ex: meters, inches, feet, etc.
Precision: Accuracy in terms of decimal places. Depends on system (similar to Measurement
Settings)
System: English Architectural, English, Metric, Unitless
Note that if previous categories have been defined for this file, the values will be pre-
populated with the attributes of the currently selected category. Attributes are persisted from
session to session. The default category attributes are stored in the ViewerConfig.xml file.
3. Click OK to save this category. (The OK button is not enabled until you assign a category Name.)
The category now displays in the Category list, in sorted order, and set to be the current category.
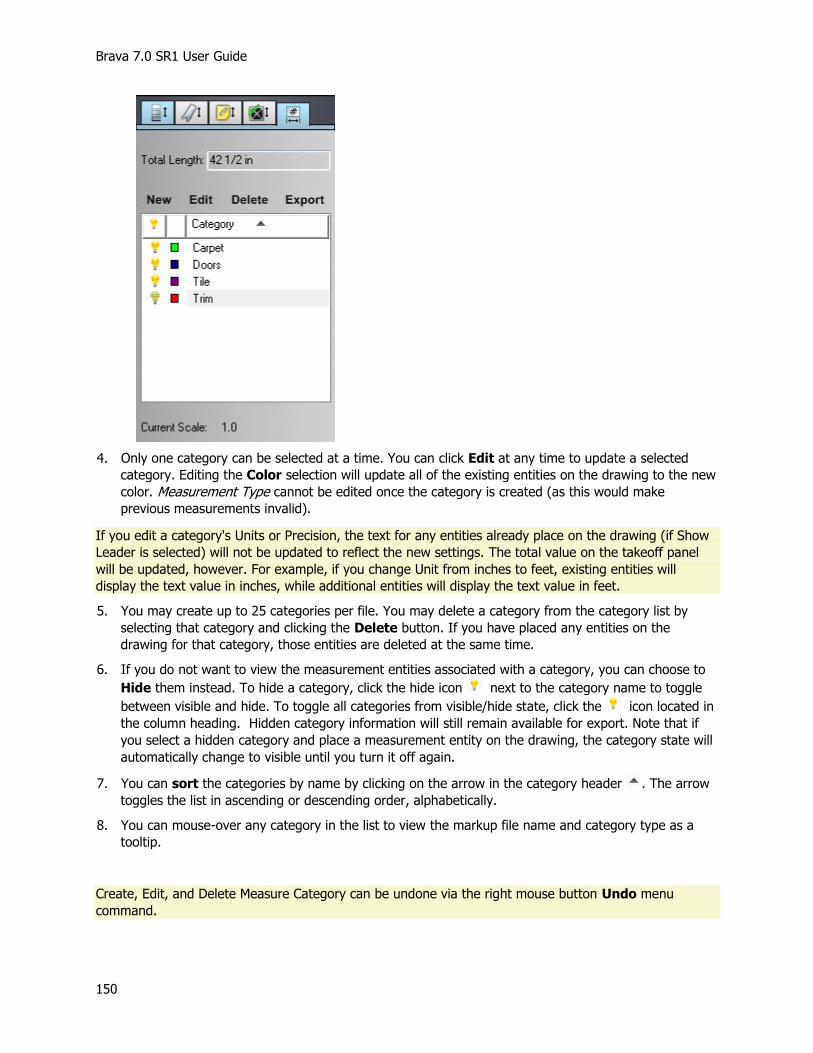
Brava 7.0 SR1 User Guide
150
4. Only one category can be selected at a time. You can click Edit at any time to update a selected
category. Editing the Color selection will update all of the existing entities on the drawing to the new
color. Measurement Type cannot be edited once the category is created (as this would make
previous measurements invalid).
If you edit a category's Units or Precision, the text for any entities already place on the drawing (if Show
Leader is selected) will not be updated to reflect the new settings. The total value on the takeoff panel
will be updated, however. For example, if you change Unit from inches to feet, existing entities will
display the text value in inches, while additional entities will display the text value in feet.
5. You may create up to 25 categories per file. You may delete a category from the category list by
selecting that category and clicking the Delete button. If you have placed any entities on the
drawing for that category, those entities are deleted at the same time.
6. If you do not want to view the measurement entities associated with a category, you can choose to
Hide them instead. To hide a category, click the hide icon next to the category name to toggle
between visible and hide. To toggle all categories from visible/hide state, click the icon located in
the column heading. Hidden category information will still remain available for export. Note that if
you select a hidden category and place a measurement entity on the drawing, the category state will
automatically change to visible until you turn it off again.
7. You can sort the categories by name by clicking on the arrow in the category header . The arrow
toggles the list in ascending or descending order, alphabetically.
8. You can mouse-over any category in the list to view the markup file name and category type as a
tooltip.
Create, Edit, and Delete Measure Category can be undone via the right mouse button Undo menu
command.

Functions Menu
151
Once you have created your categories, you can start accumulating takeoff measurements on the
currently loaded file. Depending on the type of category selected for the takeoff, different measurement
tools will be available from the toolbar as follows:
Length: Measure Line, Measure Polyline, Measure Circle
Area: Measure Polygon, Measure Rectangle, Measure Circle (note that these tools will fill with highlight
color)
Count: Measure Count
ACCUMULATION RESULTS
The Total value displayed at the top of the Measure Takeoff panel denotes the accumulated value for
the currently selected category. The text "Total" is appended by either "Length", "Area", or "Count"
depending upon the category type. The tabulation is accumulated for all pages of the file, not just the
current.
The measurement "Total" value at the top of the Measurement Takeoff panel can be individually selected
and copied to the clipboard for each category.
Use the Export button to create a table or CSV file that contains all of the category results. The
categories are listed in the Export table in order that they were created. You can hold the <Shift> key to
select a range or categories, or hold the <Ctrl> key to select individual categories to include in your
export:

Brava 7.0 SR1 User Guide
152
1. In the Takeoff Export dialog, select the categories that you would like to export data from. Only the
highlighted categories will be included in the export. If you are dealing with a lot of categories, you
can use the Select All and Deselect All buttons to hasten your selections. Multiple select can be
achieved by holding down the <Ctrl> key and clicking on individual categories.
2. The Save to Clipboard button creates a table in the following format, that can be pasted in other
applications, such as Notepad or Excel:
Category name, total value, units
For example:
3. Use Save to File to export the data to a comma separated value (CSV) file that can be saved to
your computer. A Save As dialog prompts you for a directory location to save the file. (.csv files can
be opened in Excel and the data viewed in columns by setting File type : Delimited and Delimiter:
Comma)
4. Use Close to exit the dialog with or without having exported the data.
PUBLISH MODE
PUBLISHING MARKUPS/REDACTUPS
You can publish markups (including redactups) with any native files (or CSF files that have the markup
burn-in right enabled) and output to CSF, TIFF, or PDF format. This means that when the publishing
action completes, the markups and resulting redactions, as well as the currently set banners and
watermarks are included within the newly created file and can never be closed or edited.
Functions Menu
153
If the file you are publishing markups into is a CSF file, the newly created CSF file with published
markups will retain all of the Visual Rights security settings of the original CSF file, including expiration
date if set.
Before producing a final redacted version of the file, you can optionally produce an unredacted PDF or
TIFF draft of the proposed redactions to be distributed for review purposes only.
To publish markups and finalize redactions:
1. Open a file and create a markup or redactup layer. You may also open markup layers for review.
2. If you have placed entities for redaction (through the use of redaction scripts, or redaction
tools), you should use the Verify tool to check your redactups before publishing the file as a
redaction.
3. Click Publish on the toolbar and select a publishing output format: CSF, PDF, or TIFF. When
publishing redactions, you can select Finalize Redactions and Publish to CSF, PDF, or
TIFF(redacted) from the drop down menu.
4. All currently opened markup layers are permanently published with the file's view. If the editable
markup contains redactup entities, the markup is automatically published as a redaction.
Redacted files are renditions of the original file that have had all sensitive or proprietary
information securely and permanently removed and can be used for outside distribution.
5. Select your publishing options for the desired output format and choose a destination location.
6. When a user opens a file that has been published with markups or redactions, both the markups
and document are automatically visible. The user can view and review any Changemarks note
contained in the published markup.
Publishing of Markup Entities
Markups that don't contain redactup entities can be published with the current file to a CSF, PDF, or TIFF
file and any markup that is opened for review or edit is stored. The output file is a snapshot of the
current view as a new file with markups permanently overlaid.
Publishing of Redactup Entities
Markups that contain redactup entities are published (finalized) to the output CSF, PDF, or TIFF file for
the purpose of redaction. A redaction processes these entities to disallow viewing, copying, or searching
on concealed text.
If the view contains redactup entities, note that selecting Save Current View as JPG from the Publish
menu does not finalize the redactions. The entities will appear transparent in the resulting snapshot JPG.
When initially publishing a markup that has redactup entities into a CSF file, you have the option of
setting an expose key (password). A correctly entered expose key (by the end user) will cause any
redactup entities to become transparent, revealing the hidden portions of text and graphics. If no expose
key is set, the redactup entities remain as solid entities (finalized redactions) and viewers cannot remove
or edit them, nor can they copy or search on the text they conceal.
Once a redactup contained in a markup layer has been published as a redaction, no mechanism exists for
you, as the author, to edit or remove that redaction (with the exception of CSF documents with an
expose key set).

Brava 7.0 SR1 User Guide
154
When a user opens a published file that has markups and/or redactions, both the markups and document
are automatically visible. Published markup layers cannot be closed, however, they can be printed and
Changemarks note can be navigated as they normally would.
When publishing redactions as TIFF and PDF files, you can choose whether or not to include the
redaction reason code summary as an appended page.
See Also:
Publishing markups to PDF files
Redaction
Publishing Review Drafts
PUBLISHING MARKUPS IN PDF FILES
When publishing a PDF file that contains markups, there are two ways those markups can be represented
in the resulting PDF file. Select your desired options from the PDF Options dialog:
Insert Markup as PDF Comment
The default behavior is for markups to be saved as PDF Comments, meaning that they can be altered
from Acrobat Professional. Note that the markup redactup entity does not have a corresponding Acrobat
comment, and therefore, the redacted text is actually removed from the published PDF file.
Burn-In Current Markup
Alternately, you can select to publish the markups on the PDF file meaning that they are a permanent
part of the document image and are not PDF comments. Changemarks are always transferred over as
PDF Comments to allow the Changemarks details to be reviewed with other PDF viewers..
A file that contains markups with redactup entities loaded and that is published to PDF will always have
those areas redacted in the output PDF file.
An Administrator can choose the method that you will use to apply markups to published PDF files, or he
can choose to let you select the method you prefer. If this is the case, a choice dialog displays when
using the Publish to PDF feature on a file containing markups.
Output Changemarks Information
If Changemarks exist in the markup and this option is selected, additional pages are appended to the PDF
file containing the Changemarks summary pages, which will include discussions if present. The
Changemarks entities will be numbered to correspond to the summary sheet.
If the option is not selected, the Changemarks summary pages are not included in the published PDF file.

Functions Menu
155
Output Redaction Reasons
If redactup entities exist in the current document, you can choose to Output redaction reasons (if any
have been set). When the published PDF file is viewed, a second image containing the redaction reasons
(as text with numbered references corresponding to each redactup entity) also displays. If the option is
not selected, or no reasons exist, the Reasons summary pages are not included in the published PDF file.
See Also:
Publishing Files to PDF
Publishing Markups
PUBLISHING TO CSF
PUBLISHING FILES TO CSF
Brava! Enterprise allows you to securely publish files to Informative Graphics Corporation's proprietary
portable format (CSF) from any native application. CSF is a neutral 2D format that is a replica of the
source file, including images, graphics, layout, and more. Markup layers can be optionally burned into
the published CSF file. Secure CSF files published with Brava! Enterprise can be opened with any of the
Informative Graphics products.
In order to publish Office and Outlook (MSG) formats with the IGC Writer Printer driver, you will need to
have WRITE access to the System TEMP folder (typically C:\Windows\Temp) for the creation of
temporary published files.
Publishing Options - Through a true/false server parameter (SecurityOptionsFromServer), your Brava!
Enterprise server administrator determines whether the CSF file's security options are automatically
pulled from the server, or whether you, as the publisher can set the rights visually. In the latter case, an
options dialog appears (for all but CSF files that are loaded for the purpose of burning in markups)
allowing you to specify certain publishing and security controls.
1. Open a file you would like to publish to CSF.
2. Click -> Publish To CSF. The current document must be saved before publishing.
3. If markups are opened (for edit or review) they are permanently published in the CSF output. If
redactup entities exist, you are prompted to set a redaction password (optional). Any Changemarks,
takeoff information, and redactions contained in the markup layer are burned in to the CSF rendition.
4. The file prepares for publishing and the Secure CSF Publish Options dialog appears (if enabled by
your administrator) allowing you to specify certain publishing and security controls. If this dialog is
disabled, skip to step #3 below.

Brava 7.0 SR1 User Guide
156
5. On the CSF Publish Options dialog, select your desired publishing options (described below).
a. In the Pages: Size section, select to use the document's default page size, or you can pick a size
from the Fit To: drop down box to force the PDF output to fit a particular paper size.
b. In the Pages: Output section, select whether to publish All pages, Current Page, or you can
enter Designated pages as page numbers or ranges separated by commas. For example
2,5,6,10-14,18 publishes only the 9 pages specified, in the order entered.
c. In the Include section, you can choose which existing elements of the current file to include in
your published CSF file. If Layering is selected, you must choose whether to include All layers,
or only the layers that are currently Visible in the viewing window.
d. In the Watermark/Banners section, you can also choose to include Print watermarks and banners
in your published CSF file by setting these through the Watermark/Banners button. If you
enter text into the Onscreen banner and watermark fields, those banners and watermarks will
permanently display on the end-user's view of the published CSF file and will take precedence
over any Onscreen print or publish string that may have been set on the file. Note that if you are
republishing a CSF file to CSF, you may only add banners and a watermark to fields that have
not already been set and locked in the current CSF file.

Functions Menu
157
e. The Permit section allows you to specify user rights for the sealed document. When the
published document is viewed in a CSF reader (Brava! Desktop, Brava! Reader, Brava!
Enterprise), users will be able to click on the "Visual Rights® " icon on the user interface to
display the rights that are available for that document.
f. The Expire section lets you set expiration dates on the published document.
g. In the Security section, select "Password Protected" to grant viewing rights to select individuals.
If selected, enter a password and confirmation in the text box. Users will be prompted for the
correct password before they will be allowed to view the published file in any CSF Viewer.
6. When you have chosen your desired options, click Publish.
7. In the Publish Option dialog, select how you would like to handle the published CSF file:
File Only if you only want to create and publish a file as CSF. If this option is selected,
a file browser dialog prompts you to select a file location to place the published file.
Email if you would like to send the published CSF file as an email attachment. If this
option is selected, you are presented with an outgoing email message with the CSF file
attached.
8. You will need to indicate a destination where the published CSF files should be contributed to (e.g.,
file system, mail, etc.). If you are contributing to a document management system, you may be
prompted to enter additional meta data to be associated with the file.
9. When Brava! Enterprise finishes publishing, it will collect security information for the published
document, convert it to CSF, and ask you where to save the generated CSF document. Browse to a
directory and click Save.
10. Click OK to close the successful publish message, or you can select to preview the CSF document.
Click Preview to launch the published document in your default CSF viewer (Brava Desktop, Brava
Reader, MYRIAD, MYRIAD Reader, etc.)
Usage Notes
Line weights in the document will be exported according to your preferences set in the Brava
Enterprise Line Weight options (Show Line Weight and Show AutoCAD Line Weights). See Display
Options.
Informative Graphics also provides integrations to various third party Content Management Systems
where the CSF file can be contributed/published.
Rights embedded in the new CSF file
Brava 7.0 SR1 User Guide
158
If the source file is a CSF file, the rights (including the watermarks and banners) in the original CSF file
are applied to the new CSF. For non-CSF files, the Brava! Enterprise application administrator establishes
whether default rights defined by the administrator are applied to newly published CSF files, or whether
you, as the end-user, can interactively set rights. If you can interactively select rights, the Watermark
and Banner settings currently displayed in the Brava! Enterprise viewer are embedded in the CSF file.
Note that if any Visual Rights have been set on a published CSF file, the protected file can only be viewed
in the Brava ActiveX viewers and are not permitted to load in the Brava Flash viewer.
Restrictions on Re-publishing CSF files
Protected CSF files cannot be republished to any other format except to CSF, and only then if the Markup
right was enabled in the CSF Publishing Options dialog when the original file was created. A protected
(with Visual Rights) CSF file is created if any permission listed in the "Permit" section is NOT checked, if a
CSF file contains redactions, or if a password, expiration date, or Banner/Watermark is set. In order to be
able to re-publish a CSF file to other formats, no Visual Rights can be set when the original (unprotected)
CSF file is created.
If the CSF file allows Markup permissions, you can add markup entities and publish to a new CSF file. The
file retains its original Visual Rights and a CSF Publish Options dialog is not presented.
See Also:
Watermark on CSF
USER PERMISSIONS
The CSF Publish Options, Permit section allows you to specify user rights for the sealed
document. When the published document is viewed in a CSF reader (Brava! Desktop, Brava!
Reader, Brava! Enterprise), users will be able to click on the "Visual Rights® " icon on the
user interface to display the rights that are available for that document.
Rights that you can control include:
User permissions:
Print/Copy/SaveAs - enables the following:
Print - enables printing of the secure document.
Copy to Clipboard - enables text content to be copied to the Clipboard and pasted
into another application.
Save As (JPEG) - enables turning on and off the "Save Current View as JPG"
command in the CSF reader.
Note that If a loaded CSF file has Print/Copy/SaveAs disabled, the Print Screen function
will be disabled. Attempting to use the Print Screen key places a Visual Rights tiled image
over the Brava viewing area, obscuring the screen.

Functions Menu
159
Measurement - enables the measurement tools in the CSF reader.
Markup/Redaction permissions:
Markup - enables markup review and authoring (create and edit) of markup files associated with
the published document. Also enables markup burn-in (publishing of markups to the output
document).
When the end-user loads a file, this permission allows the user to publish markups that are
currently open into a new CSF, PDF, or TIFF file. If the loaded file is a CSF file, the new CSF file
with published markups has the same permissions as the loaded CSF file, the only difference being
that the markups are now part of the CSF file.
Unredacted view - This setting is disabled if redactions are not applied or redactions have been
finalized in a previous step.
When enabled and checked, the following dialog displays after you click Publish.
If you always want to finalize your redactions, do not select "Unredacted View" to set additional
options (the dialog will not display).
The dialog provides you the option of allowing only certain users an unredacted view of the file by
entering a redaction password.
If "Finalize and remove blocked out content completely" is unselected, you will need to supply a
password ("Allow some users to view unredacted (via password)" option will automatically be
selected). The redactions are not finalized in the published CSF file, and only users who know the
redaction password can open the file with the text visible under the transparent redactups.
Note that only one option or the other can be selected in this dialog, not both.
EXPIRATION DATES
You can set expiration dates for your published CSF documents. The CSF reader checks the date settings
and will not allow usage if the user's system date is past the set expiration date.
No Date: Select "Never" as an expiration date if you do not want the published document to
expire.

Brava 7.0 SR1 User Guide
160
Select an absolute or relative date for access rights to expire on the published document.
Absolute Date: You can select a specific date for the document to expire by selecting "On" and
then selecting a date from the calendar control.
Relative Date: You can select an expiration date relative to the date the document is published.
Simply choose "In" and use the spin box to input a specified number of days that the document
will be usable. If the "In" option button is selected, the expiration absolute date field will update to
reflect the entered number of relative days. The expiration date must be at least one day later
than the publish date.
WATERMARKS ON CSF FILES
If you can interactively set rights (see Publishing files to CSF), you can choose to set on-screen or printed
banners and watermarks to your documents that will be saved with the published files. Any banners and
watermarks that are set in the secured published file take priority over any banner and watermark
settings that exist in the Brava! HTML parameters or in Brava! Reader, and cannot be edited by the end-
users. Secure HTML parameters for banners and watermarks will only be valid for the length that the CSF
document is open.
The watermark stretches from the lower left corner to the upper right corner of the viewing window.
These settings are useful for displaying a document's classification to the viewer (e.g., proprietary, draft,
etc.) and the values can differ from the values entered in the printed Watermark and banner location
lines.
You can choose to show the Watermark and/or banner values in the viewing window by adding an entry
to the Onscreen Watermark or Onscreen Banner lines of the CSF Publish Options dialog. Type in
banner or watermark text to display on screen or click the "Set Print Banners" button to summon the
print banner dialog. You can specify a watermark and define banners at any of the 12 document locations
available (top center, bottom right, etc.). If a screen banner or screen watermark is set in the CSF Publish
Options dialog, it applies only to the current rendering.
Print banners and watermarks can contain text strings or one of the available tag values.
You can set the font style and size of the Watermark through the Font button of the
Watermark/Banners dialog box. The font point size is restricted to a numeric value between 8
(minimum) and 300 (maximum). Note that On screen banner fonts are not affected by choices
made in the Font dialog box. A tiled watermark feature is also available for printed watermarks
and can be set by an administrator via the WatermarkTileSize optional parameter.
Banners and Watermarks are persisted across similar product Brava ActiveX sessions. For example,
Banners and Watermarks changed in Brava! Desktop will not be persisted in Brava! Reader and
vice-versa.
Note that CSF Publishing uses only Print based Watermarks/Banners. The other Publish formats (PDF and
TIFF) use Publish Watermark/Banners. This is because the banners embedded in a CSF do not render on
screen (except for the screen banner and screen watermark) and are only evident when the CSF is
published.

Functions Menu
161
CSF PUBLISHING & VISUAL RIGHTS®
Documents can be published as a CSF rendition of the file through various Informative Graphics Software
applications, including Brava! Enterprise, Net-It Enterprise, Redact-It Enterprise, Brava! Desktop, Myriad,
and Net-It Now. Net-It Now uses the document's native application on a client's machine to print and
then capture and convert the output. Brava! Enterprise publishes to CSF through its Job Processor
component.
Visual Rights® can be set per document and are assigned by the user doing the publishing. A CSF
Publishing Options dialog allows the publisher to control permissions on document content and on the
availability of specific features within the viewer when viewing the published CSF rendition. Permissions
are not limited by users except in the case of password protecting a document and providing the
password to selected users only. With CSF publishing, the publisher can control the following document
attributes:
set expiration dates for viewing
set printed banners and watermarks that override the ones set in Brava! Enterprise
whether the document is password protected
Visual Rights® permissions determine whether the viewer can:
view and manipulate layers
copy to the Clipboard
save as JPG
use the measurement tools
review markups
author markups
burn in markups
view unredacted versions
Visual Rights are static and once a document is published, the set of rights cannot be changed.

Brava 7.0 SR1 User Guide
162
Benefits of client side publishing:
In the case of publishing through printing, the author of the document or drawing already has the
native application on his system and therefore, that application does not need to be installed on the
server.
Necessary fonts and cross references will be present on the client machine.
Scalability is high since the processing is distributed among many client machines.
The original native file never leaves the client machine.
In relation to other IGC products, CSF files can be:
contributed to a Net-It Central site.
viewed with the freely distributed Brava! Reader.
placed on the local file system for uploading to an Application Service Provider (ASP) page.
See Also:
Viewing CSF Files
Publishing to CSF
About Redaction
Publishing Markups/Redactups
VIEWING CSF FILES IN BRAVA
Documents can be published to Informative Graphic's content sealed format (What is CSF?) using the
document's native application on a client's machine. CSF publishing is accomplished in one of several
ways, including using Brava! Enterprise, Net-It® Now, Brava! Desktop, Redact-It Enterprise or Net-It
Enterprise software which all use the document's native application printing feature to capture and
convert the output. The Net-It macros can be run inside of native applications such as Microsoft Word,
Excel, PowerPoint, Visio, and Project to produce the CSF output files.
To view a secure CSF document, simply select a published document to view through a CSF Viewer
(Brava! Desktop, Brava! Reader, Brava! Enterprise, Redact-It Desktop, Myriad, or Myriad Reader).
CSF Readers exhibit the following behaviors only when viewing a CSF file:
The document's file rights (Visual Rights®) are read before displaying a document page. If the file's
expiration date has been set, the current date is checked and an error message displays not within
the set time frame.
If the file is password protected, a password prompt displays. If these checks pass, and the CSF file
contains a redaction with a password set, the user is prompted for a redaction password, and the file
displays in your viewing window.
Menu options are disabled in the viewer if the file has a corresponding right disabled. Note: If the
Brava! HTML parameter has been set to disable a function, the function's menu option will not
display at all, regardless of the rights of the CSF file.

Functions Menu
163
The viewer interface contains a lock icon in the status bar . When you click this icon, a Visual
Rights® dialog box displays revealing the Visual Rights® the document has enabled or disabled. For
example:
Visual Rights Settings:
Printing : No
Copy to Clipboard : No
Measurement : No
View by Layer : No
Save as : No
Markup Review : No
Markup Authoring : No
Burn-in Markups : No
File Expires : Never
File Password Protected : Yes
If the CSF file has the Markup Burn-in right enabled, you can publish files with the markups you
currently have opened to the available publishing formats. When published, you are prompted to
save the file to a directory, or to send it as an email attachment. A new file is then created with the
open markups burned in and permanently display on the published file.
Markups that are being edited do not have to be saved for the burn-in markups feature to work.
When a CSF file is opened that contains published markups, the markups are opened in the viewer.
The user can view and review any Changemarks note contained in the markup, but he cannot close
or edit the markups. The markup file may be saved as DXF.
The current image displayed in Brava! Enterprise can be saved as a JPG file.
If a loaded CSF file has Print/Copy/SaveAs disabled, the Print Screen function will be disabled.
Attempting to use the Print Screen key places a Visual Rights tiled image over the Brava viewing
area, obscuring the screen.
Restrictions on Re-publishing CSF files
Protected CSF files cannot be republished to any other format except to CSF, and only then if the Markup
right was enabled in the CSF Publishing Options dialog when the original file was created. A protected
(with Visual Rights) CSF file is created if any permission listed in the "Permit" section is NOT checked, if a
CSF file contains redactions, or if a password, expiration date, or Banner/Watermark is set. In order to be
able to re-publish a CSF file to other formats, no Visual Rights can be set when the original (unprotected)
CSF file is created.
If the CSF file allows Markup permissions, you can add markup entities and publish to a new CSF file. The
file retains its original Visual Rights and a CSF Publish Options dialog is not presented.
Additional notes:

Brava 7.0 SR1 User Guide
164
If the document has the copy text right enabled, users can copy the entire page to the clipboard
(excluding any areas concealed by a redactup entity).
Banners and watermarks set in the CSF file take priority over any set in the HTML pages.
Exposing Blockouts in CSF files: If the author who published the CSF file established a redaction
password, then you are prompted to enter that password when opening the CSF file. If the correct
password is entered, any redactup entities are transparent while all other markup entities remain
unchanged.
If no or an incorrect password is entered, the redactups remain opaque and areas beneath them are
hidden from the viewer. If the publisher set no password for the redaction, no prompt is presented and
the redactup entities remain opaque, and cannot be edited. Users can never turn off the visibility state of
a redaction markup layer and any text hidden by the redactup entity cannot be copied or searched.
PUBLISHING FILES TO PDF
Brava! Enterprise allows you to publish the currently viewed file (with or without open markups) in PDF
format. (Note that CSF files that have had Visual Rights set cannot be republished to PDF.)
In order to publish Office and Outlook (MSG) formats with the IGC Writer Printer driver, you will need to
have WRITE access to the System TEMP folder (typically C:\Windows\Temp) for the creation of
temporary published files.
1. Open a file you would like to publish to PDF.
2. Click -> Publish To PDF.
3. On the PDF Publish Options dialog, select your desired publishing options (described below).
a. In the Pages: Size section, select to use the document's default page size, or you can pick a
size from the Fit To drop down box to force the PDF output to fit a particular paper size.
b. In the Pages: Output section, select whether to publish All pages, Current Page, or you can
enter Designated pages as page numbers or ranges separated by commas. For example
2,5,6,10-14,18 publishes only the 9 pages specified, in the order entered.
c. In the Pages: Rotation section, you can select to publish the document with the currently rotated
view as opposed to the default rotation of the original file.
d. In the Markup section, select how you would like to handle processing markups on the file:
Select Burn-In Current Markups to permanently burn in any open markups into the
published output
Select Insert Markup as PDF Comments to save any open markups as PDF comments.
If Changemarks exist in the current markup file, you can choose to append Changemarks
summary pages by selecting Append Changemarks notes. See Publishing Markups in PDF
Files.

Functions Menu
165
If redactup entities exist in the current document, you can choose to Append redaction
reasons (if any have been set). When the published PDF file is viewed, a second image
containing the redaction reasons (as text with numbered references corresponding to each
redactup entity) also displays.
e. In the Watermark/Banners section, you can also choose to include Publish watermarks and
banners in your published PDF file by setting these through the Watermark/Banners button.
Select the Fit document within banners option if you would like to squeeze the page to fit
within the borders of any banners that might exist.
f. In the Include section, you can choose which existing elements of the current file to include in
your published PDF file: Bookmarks, Block attributes, Layering, PDF/A-1b compatible,
and/or Hyperlink. If Layering is selected, you must choose whether to include All layers, or
only the layers that are currently Visible in the viewing window.
g. In the Remove section, select if you would like to remove all hidden text from your published
PDF file.
h. In the Coloring section, select how you would like to handle publishing colors in the file for both
the Document and Layer:
"Original Colors" -prints with original colors
"As Grayscale" - prints in shades of black to white
"Lines As Black" - prints all lines black
i. In the Security section, you can choose to Password protect a published PDF document. Enter
the same password in the Password and Confirm fields. Users will be prompted to enter the
password before they can view the file in any PDF viewer (Acrobat, MYRIAD, Brava Desktop,
etc.)
4. When you have chosen your desired options, click Publish.
5. In the Publish Option dialog, select how you would like to handle the published PDFfile:
File Only if you only want to create and publish a file as PDF. If this option is selected, a file
browser dialog prompts you to select a file location to place the published file.
Email if you would like to send the published PDF file as an email attachment. If this option
is selected, you are presented with an outgoing email message with the CSF file attached.
6. You will need to indicate a destination where the published PDF files should be contributed to (e.g.,
file system, mail, etc.). If you are contributing to a document management system, you may be
prompted to enter additional meta data to be associated with the file.
The entire document, including any open markup layers, is published to PDF - not just the current view.
Additionally, any banners or watermarks that are set will be burned into the output PDF file.

Brava 7.0 SR1 User Guide
166
Usage Notes
The entire document, including any open markup layers, is published to PDF- not just the current
view. Additionally, any banners or watermarks that are set will be burned into the output PDF file.
If the markup file contains redactups, the Publish to PDF dialog title will also display "Finalize"
indicating that any redactions set on the current document will be finalized as redacted output.
Any of the banners or watermarks may be defined (added) by an administrator or by you. Any
strings that have been set by an administrator (specified on the server in the Security.xml file) will
not be editable if this restriction has been set. Banners and watermarks set on a published CSF file
will never be editable by end-users.
Restrictions on Re-publishing CSF files
Protected CSF files cannot be republished to any other format except to CSF, and only then if the Markup
right was enabled in the CSF Publishing Options dialog when the original file was created. A protected
(with Visual Rights) CSF file is created if any permission listed in the "Permit" section is NOT checked, if a
CSF file contains redactions, or if a password, expiration date, or Banner/Watermark is set. In order to be
able to re-publish a CSF file to other formats, no Visual Rights can be set when the original (unprotected)
CSF file is created.
If the CSF file allows Markup permissions, you can add markup entities and publish to a new CSF file. The
file retains its original Visual Rights and a CSF Publish Options dialog is not presented.
See Also:
Publishing Markups in PDF Files
PUBLISHING FILES TO TIFF
Brava! Enterprise allows you to publish the currently viewed file (with or without markups) as a raster file
in TIFF (monochrome or color) format. Note that CSF files that have had Visual Rights set cannot be
republished to TIFF.
In order to publish Office and Outlook (MSG) formats with the IGC Writer Printer driver, you will need to
have WRITE access to the System TEMP folder (typically C:\Windows\Temp) for the creation of
temporary published files.
1. Open a file you would like to publish to TIFF.
2. Click -> Publish To TIFF.
3. On the TIFF Publish Options dialog, select your desired publishing options and then click Publish.
a. In the Pages: Size section, select to use the document's default page size, or you can pick a
size from the Fit To drop down box to force the TIFF output to fit a particular paper size.

Functions Menu
167
b. In the Pages: Output section, select whether to publish All pages, Current Page, or you can
enter Designated pages as page numbers or ranges separated by commas. For example
2,5,6,10-14,18 publishes only the 9 pages specified, in the order entered.
c. In the Pages: Rotation section, you can select to publish the document with the currently rotated
view as opposed to the default rotation of the original file.
d. In the Markup section, you can select to Append redaction reasons that have been assigned
to any redactup entities contained in the file. When the published TIFF file is viewed, a second
image containing the redaction reasons (as text with numbered references corresponding to
each redactup entity) also displays. If Changemarks exist in the current markup file, you can
choose to append Changemarks summary pages by selecting Append Changemarks notes.
e. In the Resolution section, enter an output resolution dots per inch (DPI). The default is 300.
You can also select a preferred Compression type from the drop down list.
f. In the Coloring section, select how you would like to handle publishing colors in the file for both
the Document and Markup layers:
"Original Colors" -prints with original colors
"As Grayscale" - prints in shades of black to white
"Lines As Black" - prints all lines black
g. You can choose to include Publish watermarks and banners in your published TIFF file by setting
these through the Watermark/Banners button. Select the Fit document within banners
option if you would like to squeeze the page to fit within the borders of any banners that might
exist.
4. When you have chosen your desired options, click Publish.
5. In the Publish Option dialog, select how you would like to handle the published TIFF file:
File Only if you only want to create and publish a file as TIFF. If this option is selected, a
file browser dialog prompts you to select a file location to place the published file.
Email if you would like to send the published TIFF file as an email attachment. If this option
is selected, you are presented with an outgoing email message with the CSF file attached.
6. You will need to indicate a destination where the published TIFF files should be contributed to (e.g.,
file system, mail, etc.). If you are contributing to a document management system, you may be
prompted to enter additional meta data to be associated with the file.
Usage Notes
The entire document, including any open markup layers, is published to TIFF - not just the current
view. Additionally, any banners or watermarks that are set will be burned into the output TIFF file.

Brava 7.0 SR1 User Guide
168
If the markup file contains redactups, the Publish to TIFF dialog title will also display "Finalize"
indicating that any redactions set on the current document will be finalized as redacted output.
Any of the banners or watermarks may be defined (added) by an administrator or by you. Any
strings that have been set by an administrator (specified on the server in the Security.xml file) will
not be editable if this restriction has been set. Banners and watermarks set on a published CSF file
will never be editable by end-users.
Restrictions on Re-publishing CSF files
Protected CSF files cannot be republished to any other format except to CSF, and only then if the Markup
right was enabled in the CSF Publishing Options dialog when the original file was created. A protected
(with Visual Rights) CSF file is created if any permission listed in the "Permit" section is NOT checked, if a
CSF file contains redactions, or if a password, expiration date, or Banner/Watermark is set. In order to be
able to re-publish a CSF file to other formats, no Visual Rights can be set when the original (unprotected)
CSF file is created.
If the CSF file allows Markup permissions, you can add markup entities and publish to a new CSF file. The
file retains its original Visual Rights and a CSF Publish Options dialog is not presented.
SAVE VIEW AS JPG
You can save the current view displayed in the Brava! Enterprise window as a JPG file. This feature
captures the image window as a screen capture and will include all visible elements (e.g., markup
entities, magnifier window, measurement indications, etc.).
1. Click on the toolbar and select Save Current View as JPG from the submenu. (Or press
<Ctrl> + <shift> + <J>)
2. Browse to and select a location on your file system to save the JPG file.
3. Click Save.
Usage Notes
If the Save as JPG Visual Right is disallowed on a CSF document, this menu option is disabled. Also,
Print Screen functionality is disabled.
Executing a "Save As" command clears the Undo/Redo event history.
If the view contains unfinalized redactup entities, Save View as JPG does not finalize the redactions.
The entities will appear transparent in the resulting snapshot JPG.
169
HOT KEYS
Various tools and commands can be accessed through these shortcut keys (accelerators):
<Ctrl> + <A> = Help About
<Ctrl> + <B> = Show Bookmarks Panel
<Ctrl> + <Alt> + <B> = Go to Next Bookmark
<Ctrl> + <Alt> + <C> = Go to Next Changemarks
<Ctrl> + <Alt> + <T> = Show Takeoff Panel
<Ctrl> + <C> = Copy to Clipboard
<Ctrl> + <E> = Fit All
<Ctrl> + <F> = Mirror (Flip)
<Ctrl> + <G> = Print Region
<Ctrl> + <H> = Help Contents
<Ctrl> + <K> = Add PlaceKeeper
<Ctrl> + <Alt> + <K> = Go to Next PlaceKeeper
<Ctrl> + <L> = Show Layers
<Ctrl> + <M> = Open Markup
<Ctrl> + <N> = New Markup
<Ctrl> + <P> = Print
<Ctrl> + <R> = Open for Review
<Ctrl> + <S> = Save Markup
<Ctrl> + <T> = Show Thumbnail Panel
<Ctrl> + <V> = Paste
<Ctrl> + <W> = Fit Width
<Ctrl> + <X> = Delete
<Ctrl> + <Y> = Redo
<Ctrl> + <Z> = Undo
<Ctrl> + <Shift> + <A> = Change mouse tool to pan
<Ctrl> + <Shift> + <B> = Burn-in Markup
<Ctrl> + <Shift> + <C> = Close Markup
<Ctrl> + <shift> + <D> = Publish to PDF
<Ctrl> + <shift> + <J> = Save View As JPG
<Ctrl> + <shift> + <K> = Publish to CSF

Brava 7.0 SR1 User Guide
170
<Ctrl> + <shift> + <M> = Show Changemarks Panel
<Ctrl> + <Shift> + <R> = Close Review
<Ctrl> + <Shift> + <S> = Save As Markup
<Ctrl> + <Shift> + <T> = Publish to TIFF
<Ctrl> + <shift> + <V> = Show Verify Panel
<Ctrl> + <Shift> + <X> = Change mouse tool to zoom window
<Ctrl> + <Shift> + <Z> = Change mouse tool to magnifier
<Ctrl> + <Space> = Rotate 90 Degrees
<Ctrl> + <Shift> + <Space> = Rotate 90 degrees counter-clockwise
<F3> = Find next search string instance
<+> = Zoom in, <-> = zoom out (when in Num Lock mode)
<Page Up> = moves to previous page
<Page Down> = moves to next page
<Ctrl> + <Home> = go to first page
<Ctrl> + <End> = go to last page
<Ctrl> + <Page Down> = Next Markup Page
<Ctrl> + <Page Up> = Previous Markup Page
<Ctrl> + <+> = increase the size of the markup text font when in edit mode
<Ctrl> + <-> = decrease the size of the markup text font when in edit mode
<End> = Last page
<Home> = First page
See also specific key combinations used when the Markup Text tool is active.
The following hotkeys can be used while in Compare mode to nudge the overlaid "older version" in the
desired direction:
<Ctrl> + <Left arrow> = nudge position left
<Ctrl> + <Right arrow> = nudge position right
<Ctrl> + <Up arrow> = nudge position up
<Ctrl> + <Down arrow> = nudge position down
<Ctrl> + <+> = nudge scale up
<Ctrl> + <-> = nudge scale down
The following hotkeys are available for navigating CAMCAD (*.cc) files with the Brava! Viewer (when
Select tool is active):
[mouse click] = "select entire geometry assembly and display it's attributes"
Contact Information
171
[mouse click] + [CTRL] = "select specific geometry and display it's attributes"
[mouse click] + [SHIFT] = "select a specific piece of a geometry and display it's attributes"
KEYBOARD ACCESSIBILITY
Brava provides the following keystroke focus combinations for users to navigate through the viewer
interface using the keyboard only.
Ctrl Key Sequences
Ctrl + 1 = Set focus to the main document drawing area. A light blue transparent rectangle will appear
around the area until the next draw.
Ctrl + 2 = Set focus to the Taskbar. Tab order for the Taskbar will be left to right, with the left-most
control receiving initial focus.
Ctrl + 3 = Set focus to the Navbar. The NextPage button will receive initial focus, followed by the Page
Combo, followed by the PreviousPage button. From there, focus will be tabbed through the remaining
controls in left to right order.
Ctrl + 4 = Set focus to right-side tabs. Individual tabs will be focused using left and right arrow keys.
Tabbing will cause focus to shift to the current active panel.
Ctrl + 5 = Set focus to the Infobar. Tab order for the Infobar will be left to right, with the left-most
control receiving initial focus.
Ctrl + 6 = Set focus to the markup/measurement tools left-side vertical tool bar. Tab order for the left-
side vertical toolbar will be top to bottom, with the top-most control receiving initial focus.
Ctrl + 7 = Set focus to the right-side tabs toggle bar. The Open/Close Panels button receives focus.
Ctrl + 8 = Set focus to the Comparebar. Tab order for the Comparebar will be left to right, with the left-
most control receiving initial focus.
Ctrl + 8 – Set focus to the Comparebar. Tab order for the Comparebar will be left to right, with the left-
most control receiving initial focus.
Ctrl + 9 = - Set focus to the Text Compare top review pane.
Ctrl + F = Set focus to the Find Combo box.
Alt + F = Close the help or other external dialog.
F2 = Used in Watermark/Banners dialog to enter data into text field.
F6 Traversal
F6 key toggles the focus between each panel/bar area of the viewer. The order of focus is:
1. Main document/drawing view area
2. Taskbar

Brava 7.0 SR1 User Guide
172
3. Infobar
4. Navbar
5. Right-side panels toggle bar
6. Right-side panels tab control
7. Markup/measurement tools left-side vertical tool bar
8. Comparebar
Modal Dialogs
All modal dialogs (e.g. Print, PDF Publish) will be fully accessible via keyboard. The tabbing order in the
modal dialogs should be logical and consistent.
CONTACT INFORMATION
If you need information on integrating and customizing Brava!® Enterprise or if you experience any
problems or have any general inquiries, please feel free to contact us.
Informative Graphics. Corp
4835 E. Cactus Road, Suite 445
Scottsdale, Arizona 85254
Phone: (602) 971-6061
M - F 5am to 5pm, Arizona time
E-mail: [email protected]
Web: www.infograph.com

173
COPYRIGHT NOTICES AND ACKNOWLEDGMENTS
This software includes third party component software distributed by IGC to you pursuant to specific third
party license agreements, whose terms and conditions are as set forth in your license agreement with
IGC and/or the Terms and Conditions of Embedded Products.
Below please find the applicable copyright notices required by such third party licenses:
Portions Copyright © 1988-1997 Sam Leffler. All Rights Reserved.
Portions Copyright © 1991-1997 Silicon Graphics, Inc. All Rights Reserved.
Portions Copyright © 1995-2005 Jean-loup Gailly and Mark Adler. All Rights Reserved.
Portions Copyright © 2004, 2006-2007 Glenn Randers-Pehrson. All Rights Reserved.
Portions Copyright © 2003 Boost Software. All Rights Reserved.
Portions Copyright © 2011 John Resig. All Rights Reserved.
Acknowledgements:
This software is based in part on the work of the Independent JPEG Group. (www.ijg.org)
This software includes LibTiff software developed by Sam Leffler while working for Silicon Graphics.(
www.sgi.com)
This software includes ZLib software developed by Jean-loup Gailly and Mark Adler
(www.zlib.net/zlib_license.html)
This software includes LibPng software developed by Glenn Randers-Pehrson and Cosmin Truta
(http://www.libpng.org/pub/png/src/libpng-LICENSE.txt)
This software includes Boost libraries developed by Boost Software.
(www.boost.org/LICENSE_1_0.txt)
This software includes DWF Toolkit developed by Autodesk, Inc.
(http://usa.autodesk.com/adsk/servlet/item?siteID=123112&id=5522878)