bppm 9.5 introduction & quick start guide - bmc software · pdf filebppm 9.5 introduction...
TRANSCRIPT

BPPM 9.5 Introduction & Quick Start Guide

Table of Contents
INSTALLING THE BPPM SERVER AND INTEGRATION SERVERS ............................................................... 3
OVERVIEW ...................................................................................................................................................................................... 3 DOWNLOAD AND EXTRACT THE FILES ....................................................................................................................................... 4 PREPARING YOUR BPPM ENVIRONMENT: ................................................................................................................................ 4 INSTALLING THE BPPM SERVER ON WINDOWS ..................................................................................................................... 5
Validate that the BPPM server is up and running .................................................................................................. 8 Apply the license files ......................................................................................................................................................... 9
INSTALL THE BPPM INTEGRATION SERVICES ....................................................................................................................... 11 CONNECTING THE IS NODES TO THE BPPM SERVER ........................................................................................................... 17 CONFIGURING THE CELLS .......................................................................................................................................................... 19
CREATING AND INSTALLING PATROL AGENT AND KM PACKAGES ...................................................... 22
ADDING THE EXTENDED REPOSITORY PACKAGE TO CMA. .................................................................................................. 22 Option 1: using the pw commands ............................................................................................................................. 22 Option 2: using CMA ........................................................................................................................................................ 23
CREATING AN INSTALL PACKAGE OF PATROL FOR WINDOWS: ........................................................................................ 26 INSTALL THE WINDOWS AGENT PACKAGE TO YOUR WINDOWS IS SERVER ..................................................................... 33
GENERAL OVERVIEW OF ADMINISTRATION ................................................................................................ 34
PRIVILEGE MANAGEMENT ......................................................................................................................................................... 35 CREATE A ROLE ........................................................................................................................................................................... 35 CREATE A USER GROUP AND ASSOCIATE THE CREATED ROLE ............................................................................................. 36 CREATE A USER AND ASSOCIATE TO THE USER GROUP ...................................................................................................... 37
VISUALIZING COMPONENT STATUS AND HEALTH. .................................................................................... 38
OVERVIEW: .................................................................................................................................................................................. 38 INTEGRATION SERVICE .............................................................................................................................................................. 39 PATROL AGENTS ......................................................................................................................................................................... 40 MARKED FOR DELETION (MFD) ............................................................................................................................................. 40 POLICY STATUS ........................................................................................................................................................................... 42 OPERATING SYSTEM VERSION .................................................................................................................................................. 42 UTILITIES ...................................................................................................................................................................................... 43 AGENT QUERY TOOL .................................................................................................................................................................. 43
CREATING A TIMEFRAME IN CMA. .................................................................................................................... 44
ADD A TIMEFRAME TO BPPM SERVER USING THE CMA ..................................................................................................... 45 ADD A ONCE OCCURRING TIMEFRAME .................................................................................................................................... 45 ADD A WEEKLY OCCURRING TIMEFRAME ............................................................................................................................... 46
CREATING/EDITING GLOBAL THRESHOLDS IN CMA. ................................................................................ 47
UNDERSTANDING EVENT THRESHOLDS .................................................................................................................................. 48 DECIDE ON THE TYPE OF THRESHOLD ..................................................................................................................................... 48
BPPM IS FAILOVER CLUSTERING ...................................................................................................................... 51
INSTALL BPPM IS ON DIFFERENT SYSTEMS .......................................................................................................................... 51 ADD THE NEW INTEGRATION SERVICE TO BPPM SERVER USING CMA ........................................................................... 55 CREATE THE IS CLUSTER USING CMA .................................................................................................................................... 56
BASIC POLICY MANAGEMENT: ........................................................................................................................... 59
LEVERAGING PRECEDENCE IN POLICY MANAGEMENT ......................................................................................................... 59 WALK THROUGH EXERCISE: ..................................................................................................................................................... 60

Login to the BPPM Central Monitoring Administration (CMA) Console ..................................................... 60 Create a Monitoring Policy for “All”. ......................................................................................................................... 60 Configuration Selection .................................................................................................................................................. 61 General Configuration. ................................................................................................................................................... 61 Agent Selection .................................................................................................................................................................. 62 Monitoring Configuration ............................................................................................................................................. 63 Filtering Configuration................................................................................................................................................... 68 Agent Threshold Configuration ................................................................................................................................... 70 BPPM Server Threshold Configuration .................................................................................................................... 74 Agent Configuration ........................................................................................................................................................ 76 Server Configuration ....................................................................................................................................................... 76 The ‘Configuration Variables’ Section. ..................................................................................................................... 77
PATROL AGENT EVENT AND DATA CONTINUITY ....................................................................................... 80
VERIFY THE PATROL AGENT IS SENDING DATA TO BPPM SERVER ................................................................................. 81 CONFIRM DATA IS PRESENT AND CONSISTENT....................................................................................................................... 81 CHANGE THE EXISTING POLICY TO MOVE THE PATROL AGENT ........................................................................................ 82 WATCH THE PATROL AGENT SWITCH BETWEEN IS’S ........................................................................................................ 82 VERIFY THE DATA FROM SAME PARAMETER CONTINUES TO COLLECT DATA: ................................................................... 83
USING THE QUERY AGENT FUNCTION. ............................................................................................................ 84
BLACKOUTS .............................................................................................................................................................. 86
CREATE THE BLACKOUT TIMEFRAME ...................................................................................................................................... 86 CREATE THE BLACKOUT POLICY FOR THE PARAMETER(S) / AGENTS(S). .......................................................................... 88 VIEW/VERIFY THE POLICY. ....................................................................................................................................................... 90
EVENT FLOW AND EVENT ASSOCIATIONS: .................................................................................................... 92
WHERE DO I CONTROL THE EVENT FLOW IN BPPM 9.5 ..................................................................................................... 92 PATROL Install package................................................................................................................................................. 92 Event integration properties for an IS ..................................................................................................................... 93 Monitoring Policies .......................................................................................................................................................... 94
HOW IS PATROL EVENT ASSOCIATION CHANGED IN BPPM 9.5 ............................................................ 95
EXAMPLE: ..................................................................................................................................................................................... 95
MERGED POLICY PRECEDENCE MANAGEMENT: .......................................................................................... 98
IMPLEMENTING LAYERED POLICIES TO PATROL AGENTS ................................................................................................. 99
USING A STAGING SERVER ................................................................................................................................ 105
ENABLE AN IS TO BE STAGING IS........................................................................................................................................... 106 Install an integration server...................................................................................................................................... 106 Make an image of a Patrol Agent ............................................................................................................................ 107 Cross Check the availability of the New Patrol Agent under the staging IS ........................................... 108 Create a Staging Policy that will change the IS address ................................................................................ 109
Installing the BPPM Server and Integration Servers
Overview:

This section covers the install of BPPM 9.5 including the BPPM server and two Integration Service Nodes. One Integration Server will be installed on Windows and the other on RedHat 6.2. After completion of this section these major infrastructure components will be installed and configured so that the Integration Service nodes are connected to the BPPM server and communicating with performance matrix being populated in the database for analytical purposes.
Download and extract the files http://webapps.bmc.com/epd Log in using your Customer Support credentials Navigate to: BMC ProactiveNet Performance Management Suite BMC ProactiveNet Performance Management Suite 9.5.00 BMC ProactiveNet Performance Management Suite (Monitoring, Analytics, Diagnostics, Event and Impact) 9.5.00 BMC ProactiveNet 9.5.00
Download the following files to your BPPM Server: BMC ProactiveNet Performance Management Version 9.5.00 – Core Components BMC ProactiveNet Performance Management Base Monitoring Installation Repository – January 2014 License Information for BMC ProactiveNet Version 9.5.00
Additional files if desired:
BMC ProactiveNet Performance Management Extended Monitoring Installation Repository – January 2014 BMC ProactiveNet Performance Management Version 9.5.00 – Extensions for Atrium CMDB BMC ProactiveNet SNMP Adapter Configuration Manager Version 9.5.00
Extract the files to a temporary location on the intended BPPM Server: BMC ProactiveNet Performance Management Version 9.5.00 – Core Components BMC ProactiveNet Performance Management Base Monitoring Installation Repository – January 2014 License Information for BMC ProactiveNet Version 9.5.00
Check for available product patches under the Product Patches tab and download if any exist: Instructions to apply the patch will be included in the documentation associated with that patch.
Preparing your BPPM environment: Prior to installing any BPPM 9.5.00 components, verify that the target systems meet the requirements listed at the following link:
https://docs.bmc.com/docs/display/public/proactivenet95/Preparing+host+computers+for+installation Perform all OS applicable pre-installation tasks listed in the following link: https://docs.bmc.com/docs/display/public/proactivenet95/Preinstallation+tasks
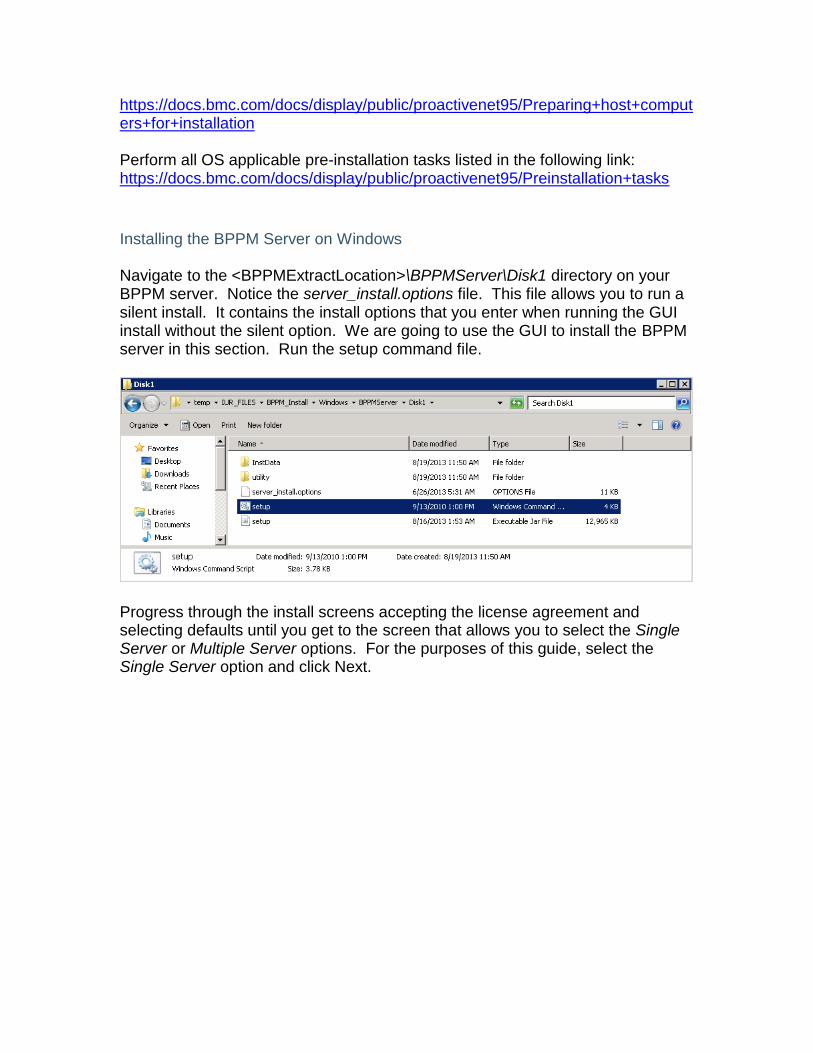
Installing the BPPM Server on Windows Navigate to the <BPPMExtractLocation>\BPPMServer\Disk1 directory on your BPPM server. Notice the server_install.options file. This file allows you to run a silent install. It contains the install options that you enter when running the GUI install without the silent option. We are going to use the GUI to install the BPPM server in this section. Run the setup command file.
Progress through the install screens accepting the license agreement and selecting defaults until you get to the screen that allows you to select the Single Server or Multiple Server options. For the purposes of this guide, select the Single Server option and click Next.

Select the ZIP file for the Base Repository from the ~/<RepositoryExtractLocation\9.5_base-<build#>.zip directory similar to the example below. The Extended Repository is loaded later in this document.

Enter email notification criteria specific to your installation environment
Note: Email is optional configuration Progress through the remaining install screens selecting the defaults and allow the install to complete. The install will take at least 45 minutes. If Email is configured correctly, you should receive an email from the BPPM server when the install is complete.

The installation completion screen will display an installation log including any errors. Verify that there are no installation errors from the installation completion screen. Click the Done button when you are finished verifying that there are no installation errors. If Email is configured, verify that you received an email from the BPPM server that you just installed.
Validate that the BPPM server is up and running. Windows: Right Mouse Button (RMB) on the BPPM icon in the system tray and select System Status. The following command window should be displayed automatically.
Unix: Log on to the system as root or su to root

Apply the license files.
Copy the license files from: ~/<LicenseExtractLocation>/proactivenet.lic, proactivenet.sign, license.dtd
To: Windows: C:\Program Files\BMC Software\ProactiveNet\pw\licenses Unix: /usr/pw/licenses
Open new telnet/cmd window and run the license update command as shown
below:

The default credentials for the BPPM server are: User ID: admin Password: admin Validate that you can log into the three components listed below, and navigate the BPPM server GUIs including the following:
1) BPPM Operations Console a. http://<hostname> or right click from the BPPM icon in the
system tray on the BPPM server
2) BPPM Administration Java Console a. Windows: Right click from the BPPM icon in the system tray
Unix: Using an X-Term with $DISPLAY defined, # pw admin b. Notice there is no option from a right click on Agent under
Advanced Options in the navigation tree.
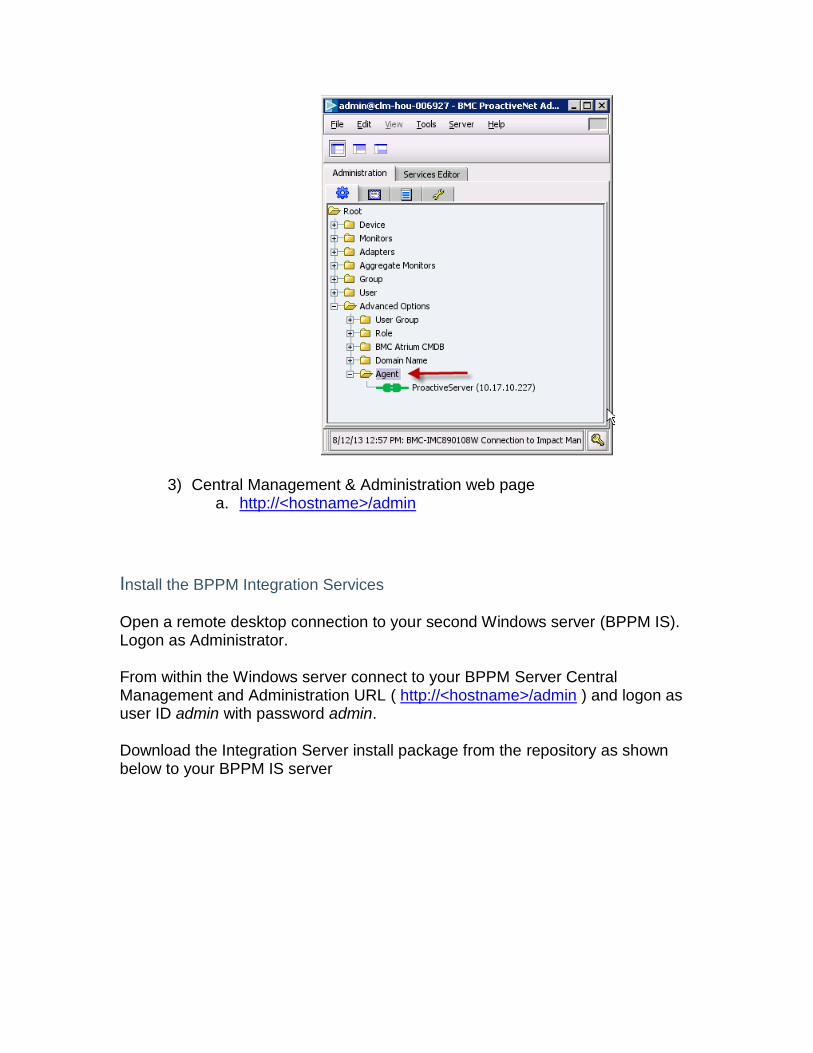
3) Central Management & Administration web page a. http://<hostname>/admin
Install the BPPM Integration Services Open a remote desktop connection to your second Windows server (BPPM IS). Logon as Administrator. From within the Windows server connect to your BPPM Server Central Management and Administration URL ( http://<hostname>/admin ) and logon as user ID admin with password admin. Download the Integration Server install package from the repository as shown below to your BPPM IS server

Run the install package you just downloaded by right-clicking on it and choosing Run as Administrator.
Select the defaults for all prompts and make sure you choose to install the Integration Service and the Remote Cell.

For Linux platforms, the BPPM component installs require specific 32 bit compatible library files that are not already installed on most RedHat servers. This applies to the BPPM server, Integration Services, and PATROL agents. The packages containing the necessary libraries are:
libXtst.i686 glibc.i686 libstdc++.i686 libstdc++.x86_64 compat-libstdc++-296.i686 compat-libstdc++-33.i686 compat-libstdc++-33.x86_64 pam.i686
You can install using either yum or rpm. The preferred method is yum as it will automatically apply any dependencies. NOTE:

You might get an error that references a missing library named “libstdc++-libc6.1-1.so.2” during the installation of the BPPM server or Integration Services on RHEL. This might not be resolved using yum in other environments. If this happens on RHEL 6.2 try the following: Download the following RPM packages from a RPM source (for example http://rpm.pbone.net/ )
libstdc++-4.4.7-3.el6.i686 libstdc++-devel-4.4.7-3.el6.i686 compat-libstdc++-33-3.2.3-69.el6.i686
Install the RPM packages in the order listed above using the following command: rpm -ivh <RPM file> Use the following command to uninstall an RPM package: rpm -e <RPM file> If you get a compatibility error when installing compat-libstdc++-33-3.2.3-69.el6.i686 uninstall the RPM that the compatibility error indicates is already installed, and then install compat-libstdc++-33-3.2.3-69.el6.i686. IMPORTANT: The yum utility automatically checks for and resolves dependencies. Usage of RPM bypasses yum and provides only limited dependency management. You should avoid using rpm and use yum in order to resolve dependencies if at all possible. At customer sites you should involve the customer’s Linux server administrator(s) to ensure you are following their standards, and that you are not introducing any libraries that they will not support, etc. You will install the Integration Server on the RedHat node in this step. Be certain that you have completed installing the required libraries before attempting to continue. Log into your BPPM server (In this case it is a Windows system) Launch a cmd window using Run as Administrator Change directories to <BPPMExtractLocation>\BPPMAgent\Linux.

FTP the following two files using the put command to transfer the two files from your BPPM server to your RedHat node.
bmc_pnet_is_install.options BPPMAgent9.5_b241177692.bin
The instructions above are shown executed in the screen shot below.
Launch a cmd/terminal window and logon to your RedHat node as root. Create a directory named BPPMAgent under your desired installation location. We will use “/opt/bmc” in the examples (/opt/bmc/BPPMAgent) Installing the Integration Services on Linux and UNIX nodes in most customer sites will require leveraging the silent install capability because there will be no GUI capability installed or configured on the customer’s servers. The steps below outline how to run the silent install. (Optionally, if you wanted to install the Integration Service node on Linux or UNIX using a GUI you could use a simple xTerminal server such as MobaXterm running on your Windows workstation and redirect the DISPLAY of the target Linux or UNIX node to your workstation before you start the install. If you use this method do not specify the “-i” “silent” and options file arguments at the command prompt when you launch the install binary. For this section we will leverage the silent install process because we expect most customer sites will require it.) Use vi to edit the bmc_pnet_is_install.options file on the RedHat node that you previously transferred. Change the highlighted content to the values as shown below. Do not edit any other entries.

-P installLocation=/opt/bmc/BPPMAgent -A IM -A IEA -A IELA ##### Component Selection settings #Set IS_INSTALL_INTEGRATION_SERVICE=true if you want to install all the components Integration Service -J IS_INSTALL_INTEGRATION_SERVICE=true #Set IS_INSTALL_REMOTE_CELL=true if you want to install Remote Cell. -J IS_INSTALL_REMOTE_CELL=true ##### Agent port **NOTE** Make sure to remove any ‘#’ sign from the second highlighted line if it exists (e.g. –J IN_INSTALL_REMOTE_CELL=true)
Save the file and quit vi. Change permissions on the install binary to 744 and initiate the install of the Integration Services using the commands as shown below.
After the install completes, check the install log for errors. You will find the install log in the following location.
/tmp/bppm_agent_install_log.txt
Use the following command to search for errors.
#cat /tmp/bppm_agent_install_log.txt | grep ERROR The install process starts the Integration Service processes after the install is complete. Verify that the Integration Service and cell are running.
#ps –ef | grep BPPM
The ps command should return a list of processes running under the BPPMAgent directory. These will include java processes, mcell, and other BPPM IS processes.
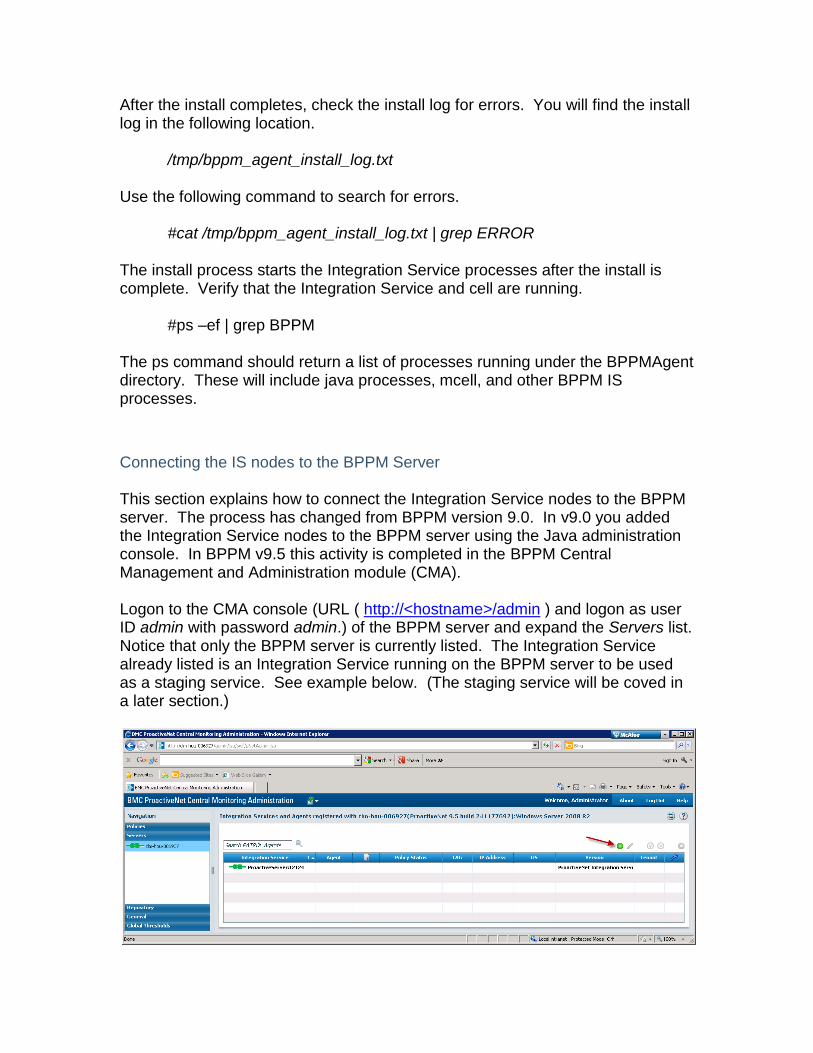
Connecting the IS nodes to the BPPM Server This section explains how to connect the Integration Service nodes to the BPPM server. The process has changed from BPPM version 9.0. In v9.0 you added the Integration Service nodes to the BPPM server using the Java administration console. In BPPM v9.5 this activity is completed in the BPPM Central Management and Administration module (CMA). Logon to the CMA console (URL ( http://<hostname>/admin ) and logon as user ID admin with password admin.) of the BPPM server and expand the Servers list. Notice that only the BPPM server is currently listed. The Integration Service already listed is an Integration Service running on the BPPM server to be used as a staging service. See example below. (The staging service will be coved in a later section.)

Click the Add button (green circle with a +) to add a remote Integration Server. Fill in the fields for your Integration Service running on Windows as shown in the example below. Enter the values for your Integration Service node.
You can specify a descriptive value for the Integration Service Name as noted by the red arrow. You must enter the appropriate DNS hostname or IP address for the Integration Service node. Notice you can designate where the cell on the Integration Service node will send events at this point in the install. You can also define or select a cluster for the Integration Service. Additionally, you can flag the integration services as a Staging node. After entering the appropriate values click the Add button.

The Integration Service should appear in the server list as shown below.
Add your Integration Service node running on RedHat in CMA following the steps outlined above.
Configuring the Cells The Integration Service processes that forward data to the BPPM server should now be configured and connected to the BPPM server. However, the remote event cells running on the Integration Service nodes are not visible in the BPPM server. You will now add these cells to the BPPM server. Note that you are only adding the cells so that they are accessible through the BPPM Admin and OPS UIs. Note: You will not be setting up event propagation at this point. Edit the mcell.dir file on each of your Integration Service nodes. NOTE: You might have to stop the cells, or use notepad, in order to save the files on Windows. You will find the mcell.dir files in the following directory locations:
Linux: $MCELL_HOME/etc Windows: %MCELL_HOME%/etc

Add an entry for the BPPM server embedded cell as shown by the format below and save the mcell.dir file. Note: Use UPPERCASE for the first word in the line (e.g. ‘CELL’)
Format: CELL <BPPM node cell> mc <BPPM Server>:1828 Example: CELL pncell_clm-hou-006927 mc clm-hou-006927:1828
Edit the mcell.dir file on the BPPM server. You will find the mcell.dir files under the following location:
Linux: $MCELL_HOME/etc Add entries for both of the cells on your IS nodes as shown by the format below and save the mcell.dir file.
Format: cell <IS node cell> mc <IS node>:1828 Example: cell clm-hou-006977 mc clm-hou-006977:1828
cell clm-hou-006937 mc clm-hou-006937:1828 Restart the cells on the IS nodes:
Windows: RMB on the BPPM icon in the System Tray and select pw commands. Enter the following command: mkill –n <cell_name> When the prompt returns enter: mcell –n <cell_name> Unix: Open a telnet/x-term window. Log on as or su to root # cd ~/BPPMAgent/pw/pronto/bin # . ./.tmprofile # mkill –n <cell_name> # mcell –n <cell_name>
Restart the admin cell on the BPPM server.
Windows: RMB on the BPPM icon in the System Tray and select pw commands. Enter the following command: pw p e acell When the prompt returns enter: pw p s acell Unix: Open a telnet/x-term window. Log on as or su to root # cd ~/BPPMAgent/pw/pronto/bin # . ./.tmprofile # pw p e acell # pw p s acell

Add the cells on your Integration Service nodes to the administration cell on the BPPM server. Use the command below to add the cells. The entire command is entered on a single line. You will need to run the command for each of the cells you are adding. Format:
iadmin –ac name=<Cell_Name>:key=mc:primaryHost=<IS_node>:primaryPort=1828:environment=Production:usergroups=*
Example:
iadmin –ac name=clm-hou-006937:key=mc:primaryHost=clm-hou-006937:primaryPort=1828:environment=Production:usergroups=*
Add the cells in the BPPM Ops Console. Click on the Navigation Pane Options button. Select the admin cell and your remote cells under the Other Cells list from the Navigation pane as shown below. Click the Ok button to save the settings.

Creating and installing PATROL Agent and KM Packages
Adding the Extended Repository package to CMA.
Overview: This section demonstrates the ways of adding the Extended Repository. There are two ways of adding the extended repository.
Follow either Option 1 or Option 2 below. DO NOT do both. Option 1: using the pw commands
1. Use the pw command to import the package
2. pw repository update [sourceDirectory] [destinationDirectory]
a. [sourceDirectory] is the directory from which the files of the Central
Monitoring Repository are copied
b. [destinationDirectory] is the directory that the files of the Central Monitoring Repository are copied to
Adding extended
repository
using the pw commands
using the CMA
functionality
Download the Extended repository from EPD to
BPPM Server
use either the pw command or CMA to
import the package DO NOT DO BOTH

Note: Both, the sourceDirectory and destinationDirectory values must be enclosed in double quotes and without an ending slash Example : pw repository update " C:\temp\IUR_FILES\Repository\ 9.5_extended-20130816-115947.zip "
"C:\Program Files\BMC Software\ProactiveNet\pw\pproxy\depot_directory"
Option 2: using CMA
1) Login to the http://<BPPM_Server>/admin 2) Navigate to the Repository navigation pane 3) Click on the Manage repository
4) Click on the import icon on the right hand side.
5) In the import screen, select the Full Repository and click on import

6) In the next screen navigate to the 9.5 Extended Repository zip file in the BPPM Server and click on Extract

7) The status will change as shown below.
8) Once done, you should get a Successful message as shown below.
9) Validate the import by clicking on the Manage Repository and checking for the availability of the new packages.

Creating an Install Package of PATROL for Windows:
Log on to the CMA console http://<BPPMServerHost>/admin Open the Repository Drawer Select Deployable Package Repository
Click the Add icon (green circle w/+) Use the pull downs to select the desired OS and Platform

By default the PATROL Agent is already selected for you. Select any additional KMs by putting a “check” in the box next to the line item and click the Right Arrow.


Click Next In the following screens, provide the required information and click Next

In the BMC ProactiveNet Integration Configuration Screen, enter the Integration Service Node you want this PATROL Agent to connect to. Provide an OS Tag and ensure that the “Yes” radio button is selected for Central Monitoring Administration of the PATROL Agent(s) Configuration.
Click Next. In the BMC ProactiveNet Performance Management Cell Configuration window, enter the hostname and port number for the cell you want this PATROL Agent to send events

Leave the “Yes” radio button selected for Route events via Integration Service and
Click Next
If you are using Patrol Central and want this PATROL Agent to connect to an RTServer,
enter the appropriate information or blank out the default entry and click Next.

For Windows Servers, you will be prompted whether or not you want the installation
program to automatically update Windows Firewall settings. We suggest you select
“Yes” and click Next.
In the final screen, give this Deployment Package a name, short description of its
contents. Select the file type of .zip and click the Save Installation Package button

Download the saved file either to your desktop and ftp/transfer the package to the desired target system(s) or connect to the CMA via a web browser from the system you intend to install the PATROL Agent to and Download the saved Installation Package directly on that system. Click the Close button to exit.
Install the Windows Agent package to your Windows IS Server

If you have not already done so, create a default patrol user account. Ensure the account is a member of the Local Administrators group
Navigate to the Windows server location where the PATROL Installation package is saved as the patrol default account user. Extract the installation package. Open a cmd window and execute the RunSilentInstall.exe from the command line.
General Overview of Administration

Privilege Management
Overview: This section demonstrates the configuration and usage of privilege management.
Create a Role
1. Login to the ADMIN UI of the BPPM Server.
2. Right click on Role and choose Add Role
3. Create a new role with the name Example_role_2. Unselect all permissions and select only the permissions below.
a. Allow logon to Central Monitoring Administration b. Allow Operations Console
Create a role
Create a User Group and
associcate the created role
Create a USER and associate
to the User Group.

4. Click the Finish button to save the role.
Create a User Group and associate the created role

Name the group Example_Ug_2. Select the role Example_role_2 you already created and enter configuration in the rest of the tabs as you desire (your choice), then click the OK/Finish button to save the group.
Create a USER and associate to the User Group
Right Click on User and choose Add User.
Select the user group Example_Ug_2 from the Available User Groups and move it to the Selected User Groups using the >> button. Click Add.

Login to the BPPM console as the Example_User_2 user and observe the privileges.
Visualizing Component Status and Health.
Overview: This section demonstrates the visualization component status in BPPM 9.5
1) Login to the http://<BPPM_Server>/admin 2) Navigate to the Server navigation pane

Note the status icons are described in the following tables.
Integration Service
Sl #
ICON Meaning Comment

1
The status of the Integration Server.
The Green plug indicates that the IS node is connected to the BPPM server On disconnection the plug will turn to Red Click on the triangle next to the IS. Click on the triangle before the IS to list all patrol agents connected to the selected IS node.
Patrol Agents
Sl # ICON Meaning Comment
1
The status of the Patrol Agent.
The Green plug indicates that the PATROL agent is connected to the IS node.
On disconnection the plug will turn to Red.
Marked For Deletion (MFD)
Sl #
ICON Meaning Comment

1
The icon represents MFD
In 9.5 we support MFD for Instances and Devices only.
MFD is not supported for IS nodes.
Note: The following is the general criteria to set the MFD flag:
1. The IS node is dis-connected (or is down)
2. PATROL agent is not connected to the IS node.
3. The device-associated instance is deleted at the PATROL agent.
4. The instance is deleted at the PATROL agent.
5. When the source PATROL agent is marked for deletion.

Policy Status
Sl #
ICON Meaning Comment
1
The status of the policies applied GREEN good RED one or more policies was not applied successfully
Moving your mouse over the icon will give you more information about the PATROL agent.
Operating System Version
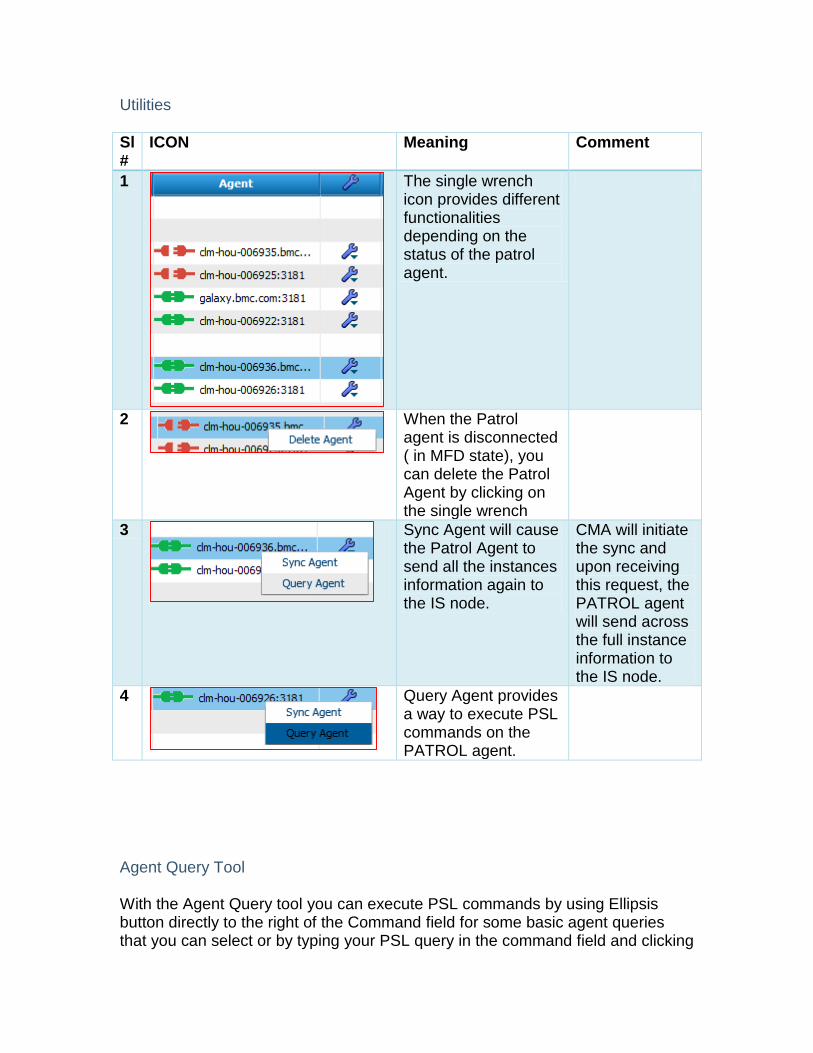
Utilities
Sl #
ICON Meaning Comment
1
The single wrench icon provides different functionalities depending on the status of the patrol agent.
2
When the Patrol agent is disconnected ( in MFD state), you can delete the Patrol Agent by clicking on the single wrench
3
Sync Agent will cause the Patrol Agent to send all the instances information again to the IS node.
CMA will initiate the sync and upon receiving this request, the PATROL agent will send across the full instance information to the IS node.
4
Query Agent provides a way to execute PSL commands on the PATROL agent.
Agent Query Tool With the Agent Query tool you can execute PSL commands by using Ellipsis button directly to the right of the Command field for some basic agent queries that you can select or by typing your PSL query in the command field and clicking

Execute. The buttons to the right of the Execute button are agent control buttons that allow you to reinitialize, stop, reload and purge the agent.
Creating a Timeframe in CMA.
Overview: This section demonstrates the procedure to create a time frame using CMA. In previous releases the same functionality was achieved using BPPM Admin UI and complicated rules.

Add a timeframe to BPPM Server using the CMA
a. Login to the http://<BPPM_Server>/admin b. Navigate to the General navigation pane c. Click on the time frames.
Add a Once occurring Timeframe
Click on the Add Icon a. Enter Example_TimeFrame_1 in the name field b. In the start field, enter the present time. c. The end time should be 4 hours from now.

Add a Weekly occurring Timeframe
Click on the Add Icon a. Enter Example_TimeFrame_2 in the name field b. In the start field, enter the 11:55 pm. c. Duration end time should be after 3.5 hours d. Select the alternate days starting from Monday.

Creating/Editing GLOBAL THRESHOLDS in CMA.
Overview: This section demonstrates the NEW procedure to create GLOBAL THRESHOLDS using CMA. You can still use the threshold facility in BPPM Operational Console. However, if you have multiple BPPM servers under the same CMA, then this method provides a single place to manage all thresholds.
Steps:

Understanding Event Thresholds Please refer to the following link for specifics on the different types of thresholds available: https://docs.bmc.com/docs/display/public/proactivenet95/Understanding%20event%20thresholds
Decide on the type of Threshold 1. Login to the CMA portal of BPPM Server.
a. Login to the http://<BPPM_Server>/admin b. Navigate to the “Global Thresholds” navigation pane.
Decide on the type of Threshold
configure the threshold
using CMA
Enable the configured threhsold.

Note: the attributes with a blue tick mark are enabled and the ones with a KEY are KPIs.
2. Navigate to the Percentage Bandwidth Utilization of Host Network section.
a. Click on All Unix and Linux HP UX and Linux 9.12.00 Network
b. Create a CRITICAL signature threshold for a duration of 5 mins above all baselines.
c. Once done, refresh the page and make sure the blue tick is enabled against the attribute, which you modified.
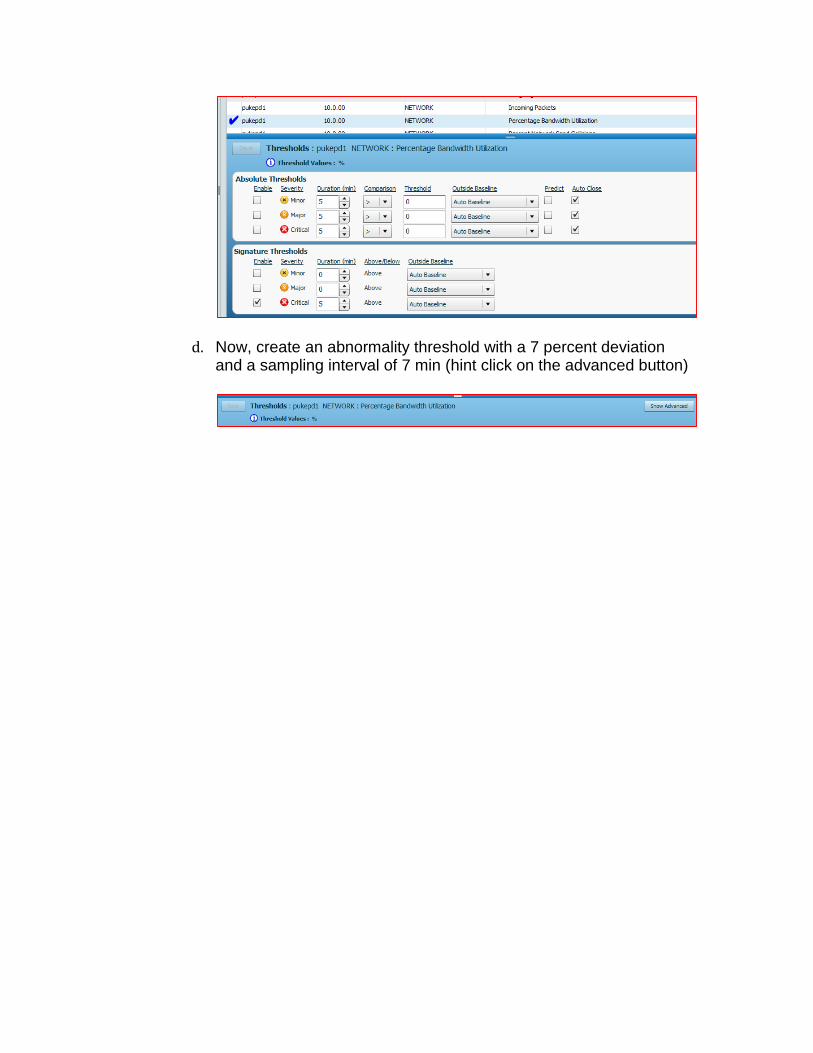
d. Now, create an abnormality threshold with a 7 percent deviation and a sampling interval of 7 min (hint click on the advanced button)

BPPM IS Failover Clustering
Overview: Failover of Integration Servers. This section demonstrates BPPM 9.5’s capability to support out of the box IS node clustering for the purpose of “Failover”. IS Clustering is not intended for Load Balancing. Note that the IS Cluster is independent of the following Operating System 3rd party applications 3rd party hardware.
In this section we will install 2 BPPM Integration servers on the same host (but running on 2 different ports).
Steps:
Install BPPM IS on different systems Note that you have already installed an Integration Service on one of your Windows nodes earlier in this guide.
Open Command Prompt on your Windows IS node and make sure the ports are in use and in listening mode as shown below.
1. Install another IS on the same server with different application ports. a. Accept the EULA
Install BPPM IS on different systems
Add the installed IS to BPPM using CMA
Congigure the IS Cluster by using the Cluster configuration
feature of CMA.

b. The installer will automatically detect all the other existing installations and would give you a choice to either install a new instance or update the existing one. Select the new installation.
c. Provide a new path for the destination directory.

d. In the feature selection screen, uncheck the BMC ProactiveNet Remote Cell and proceed further since we are installing the IS on the same system. The installer will detect the existence of a cell and will not allow you to proceed further if you try to install the cell. Best practice recommends using mcrtcell for installing multiple cells on the same host.
e. In the configuration screen, enter the following: i. Unique Application port number - 24248 ii. Display name for the IS Service - BPPM_IS_24248 iii. Unique adapter port number - 4183
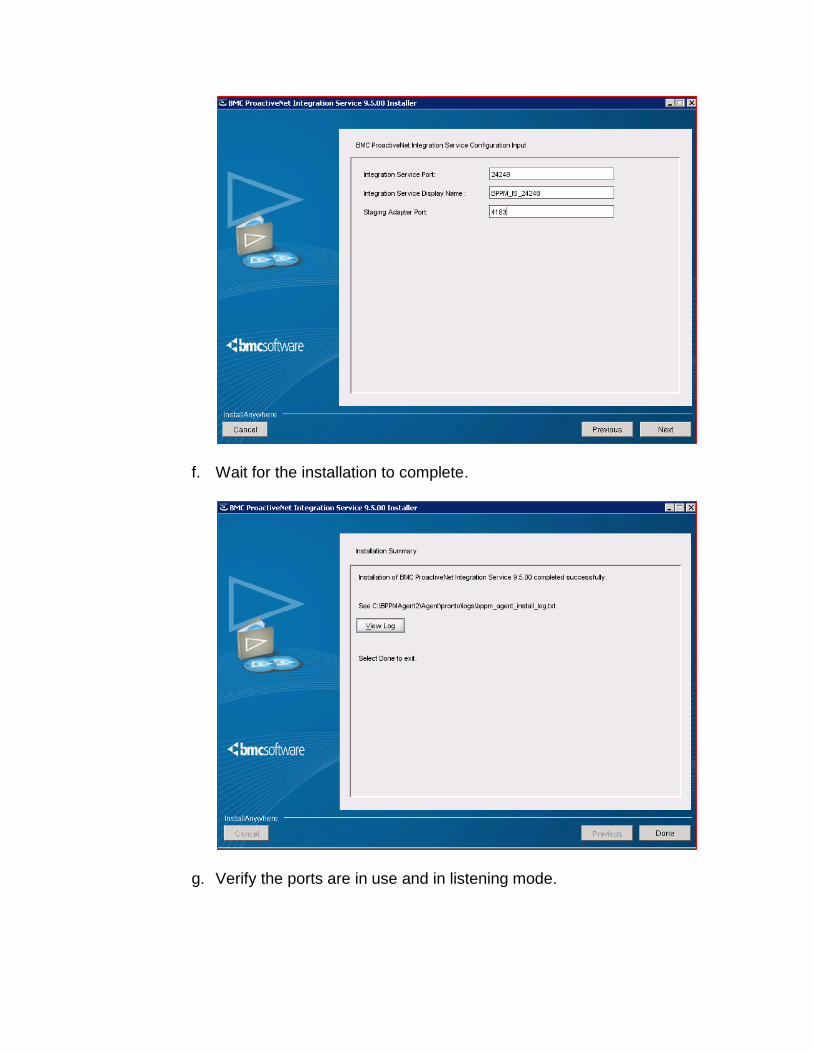
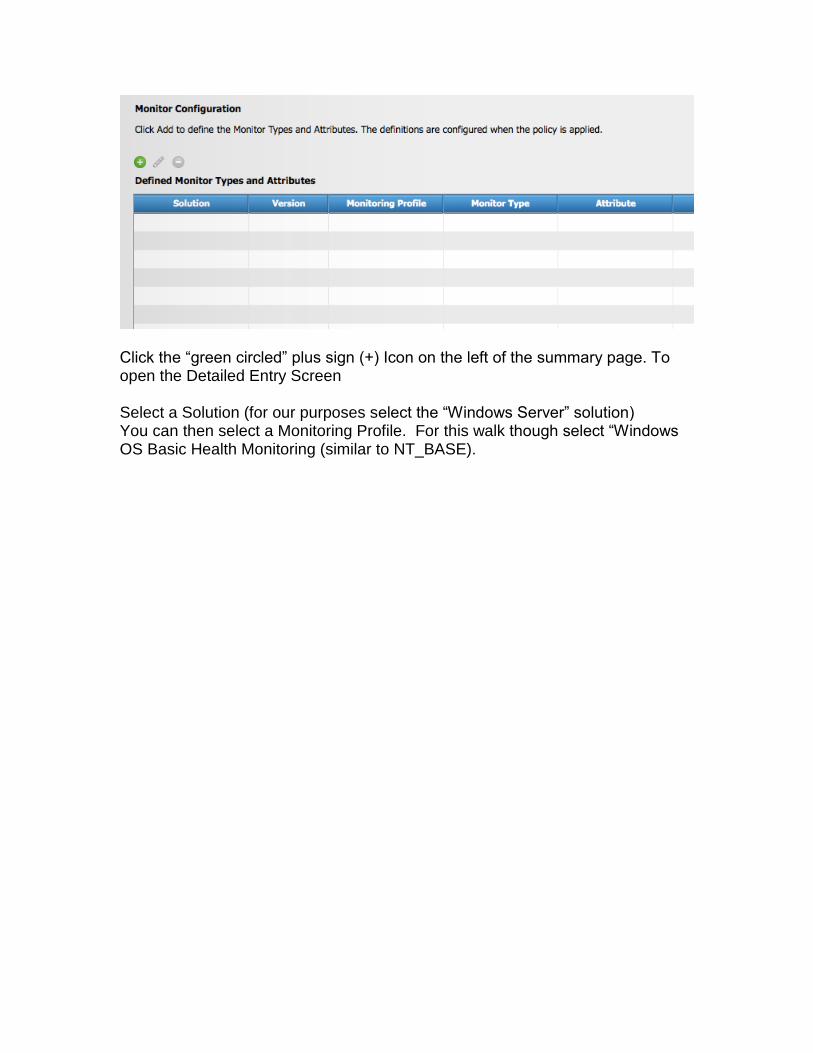
f. Wait for the installation to complete.
g. Verify the ports are in use and in listening mode.

h. Ensure that these Firewall ports are opened between BPPM Server, IS and Patrol Agents.
Add the new Integration Service to BPPM Server using CMA
a. Login to the http://<BPPM_Server>/admin b. Navigate to the Server navigation pane.
c. Click on the Add Icon and add the IS. d. Enter your information using the example as shown below.

e. Make sure that the IS nodes are listed in the registered list.
Create the IS Cluster using CMA
a. Login to the http://<BPPM_Server>/admin b. Navigate to the General drawer and select Cluster.

c. Click on the Add Icon and enter the details. From the available integration server list search for your IS nodes and move them to
the selected list.

d. Note that you have to make 1 of them the primary and the rest
secondary.

Basic Policy Management:
Overview: This section will focus on developing and understanding “Basic” Monitoring Policies. The first part will walk through all the available wizard screens, explaining your options and content expectations. Upon completion of the walk through, you will be presented with 2 Use Case requirements for you to create actual working policies to support. We will leverage these throughout the remainder of this document.
Leveraging Precedence in Policy Management In Policy Management, each Policy is assigned a precedence number. The default precedence number is 999. Precedence is set between 001 and 999. The Lower the number, the Higher the precedence CMA allows for multiple policies to have the same precedence. When two policies are applied to same agent and those policies share a common precedence, the last read value for a matching variable between the policies is retained. This can produce a challenge in determining which police’s version of a variable’s corresponding value is current in the agent. Precedence is established at a configuration level not policy level. If 2 policies meet the same Agent assignment criteria, both are loaded to the Agent. If any configuration contained in the policies conflict, the configuration item of the policy with the highest precedence wins. (Highest precedence being the lowest number) The first step to better manage this precedence behavior is to decide on a standard model for applying a precedence values, it is a good practice to have policies follow a Standard of Precedence: Below is an Example Standard: 000 – 099 : Policies that should ALWAYS be enforced in all PATROL Agents 100 – 199 : Polices that would be specific to a Customer/Application/Dept 200 – 299: Windows standard Policies 300 – 399: Linux standard Policies 400 – 899: Other Platforms or use case blocks of numbers

900 – 999: Basic Configurations which may be overridden by Specific Policies
Notice that you can sort on the Precedence Column letting you view all Policies by precedence number. When you have a question about a policy and which other policies may be effecting your desired result, sorting by precedence will help show you possible policies to investigate for conflicts.
Walk Through Exercise:
Login to the BPPM Central Monitoring Administration (CMA) Console
Create a Monitoring Policy for “All”.
Policy creation and editing is performed via a Wizard process. To Add a policy click on the “green circled” plus sign (+) Icon on the right of your screen

Configuration Selection
The first wizard screen allows you to identify all areas of configuration for this policy. A future configuration step will be presented for each area check marked on this screen. We will visit all of them as we proceed through this section. In practical use, you would only select those areas for which you have configuration information relative to the policy being created. ** Word of Caution ** Once an area is “Checked” configuration information MUST be entered to proceed further in the Wizard. Previous entries for username and password are not retained.
General Configuration.
Give your policy a Name and a brief description.

Agent Selection
This is the most important screen in the Policy Wizard. This information will determine which Agents (if any) will adopt the policy being created. Insure that your entry defines ONLY Those Agents you want, and EXCLUDES those that you do not want. An incorrect policy with a global reach will create global issues.
Use the below example to see how compound criteria can be used. NOTE: notice the (+) and (-) signs to the right of the entry fields. These are used to add and remove additional criteria.

If you provide criteria that the system deems a potential problem it will present a dialog box validating your decisions. You should not rely on the Wizard to catch all potential problems.
Monitoring Configuration
Monitoring Configuration is the first screen in the Wizard that presents a 2 page model of data entry. The pages are:
1.) A Summary of current configuration 2.) A Detailed Entry screen for adding to the presented summary
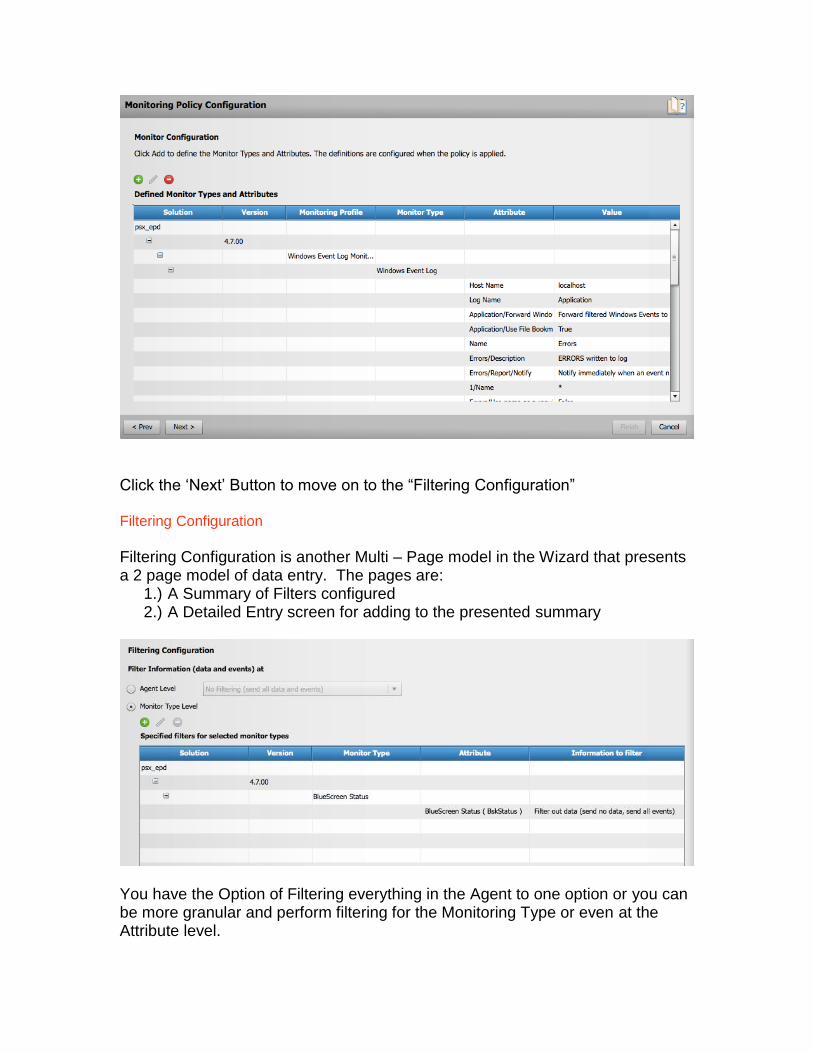
Click the “green circled” plus sign (+) Icon on the left of the summary page. To open the Detailed Entry Screen Select a Solution (for our purposes select the “Windows Server” solution) You can then select a Monitoring Profile. For this walk though select “Windows OS Basic Health Monitoring (similar to NT_BASE).

The Example used does not require further information from the User to activate. There are Monitoring Profiles which require additional information. Let’s look at one example Click the “green circled” plus sign (+) Icon on the left of the summary page. To open the Detailed Entry Screen Select a solution (for our purposes select the “Windows Server” solution) You can then select a Monitoring Profile. For this example we’ll select “Windows Event Log Monitoring” This Profile has 3 tiers of information required including the Hostname, the log, and any filters you may want to apply. ** Configuration requires a hostname entry. This is due to a common use of the Profile across local agent monitoring of logs and remote monitoring of logs. Enter the Hostname and select “Application” as the Log Name.

Scroll down using the “intra” scroll bar and you will notice that each tier of the Configuration has an ‘Add to List’ button toward the bottom of each section.

Click the ‘Add to List’ for the server entry, then complete the log and filter information. Now Click the ‘Add to List’ for the Filter Now Click the ‘Add to List’ for the Log Finally you can click the ‘Add’ button at the bottom (the example shows Update). Click the ‘Close’ button to get to the back to of Monitoring Summary Screen.
Click the ‘Next’ Button to move on to the “Filtering Configuration” Filtering Configuration
Filtering Configuration is another Multi – Page model in the Wizard that presents a 2 page model of data entry. The pages are:
1.) A Summary of Filters configured 2.) A Detailed Entry screen for adding to the presented summary
You have the Option of Filtering everything in the Agent to one option or you can be more granular and perform filtering for the Monitoring Type or even at the Attribute level.

Select the Radio Button “for Monitor Type Level” Click the “green circled” plus sign (+) Icon on the left of the summary page. To open the Detailed Entry Screen
You are presented with the Details page. It should look familiar to you now. You can select the Solution and Monitor Type of interest. Select the “Windows Servers” solution and the “BlueScreen Status” Monitoring type.
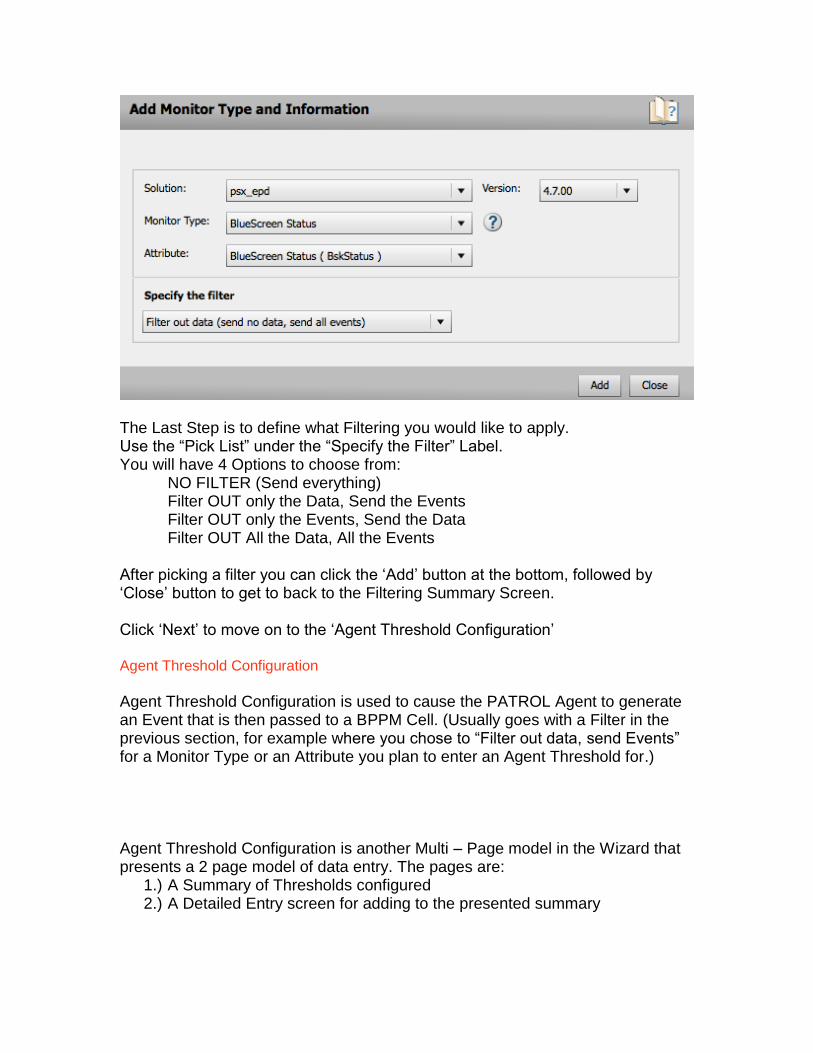
The Last Step is to define what Filtering you would like to apply. Use the “Pick List” under the “Specify the Filter” Label. You will have 4 Options to choose from:
NO FILTER (Send everything) Filter OUT only the Data, Send the Events Filter OUT only the Events, Send the Data Filter OUT All the Data, All the Events
After picking a filter you can click the ‘Add’ button at the bottom, followed by ‘Close’ button to get to back to the Filtering Summary Screen. Click ‘Next’ to move on to the ‘Agent Threshold Configuration’ Agent Threshold Configuration
Agent Threshold Configuration is used to cause the PATROL Agent to generate an Event that is then passed to a BPPM Cell. (Usually goes with a Filter in the previous section, for example where you chose to “Filter out data, send Events” for a Monitor Type or an Attribute you plan to enter an Agent Threshold for.) Agent Threshold Configuration is another Multi – Page model in the Wizard that presents a 2 page model of data entry. The pages are:
1.) A Summary of Thresholds configured 2.) A Detailed Entry screen for adding to the presented summary

Click the “green circled” plus sign (+) Icon on the left of the summary page. To open the Detailed Entry Screen

Select the “Windows Solution” and Pick the “Paging File” Monitor type Select the “Paging File Usage” Attribute In the Threshold Section enable the “Alarm 1”, set for “WARN” between 90 – 100

Instance Level Thresholds are supported as well. For Monitoring types configured for instances you will have a “Scope” pick list. If you select “Instance” you will be provided an entry field for the Instance Name.

After configuring the Threshold click the ‘Add’ button at the bottom, followed by ‘Close’ button to get to back to the Agent Threshold Summary Screen. Click ‘Next’ to move on to the ‘Server Threshold Configuration’ BPPM Server Threshold Configuration
Server Threshold Configuration is used to cause the Analytic Engine in the BPPM Server to generate an Event based on Metric values and additional variables (e.g. baseline, deviation, etc …) Server Threshold Configuration is another Multi – Page model in the Wizard that presents a 2 page model of data entry. The pages are:
1.) A Summary of Thresholds configured 2.) A Detailed Entry screen for adding to the presented summary
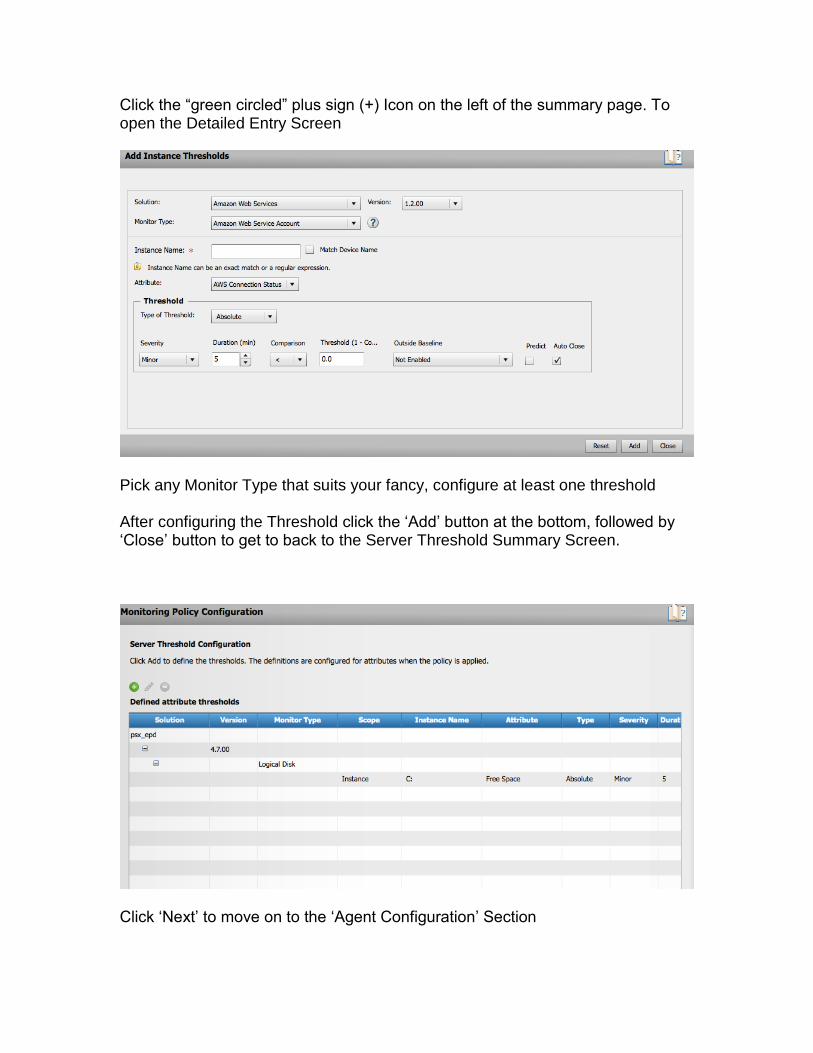
Click the “green circled” plus sign (+) Icon on the left of the summary page. To open the Detailed Entry Screen
Pick any Monitor Type that suits your fancy, configure at least one threshold After configuring the Threshold click the ‘Add’ button at the bottom, followed by ‘Close’ button to get to back to the Server Threshold Summary Screen.
Click ‘Next’ to move on to the ‘Agent Configuration’ Section
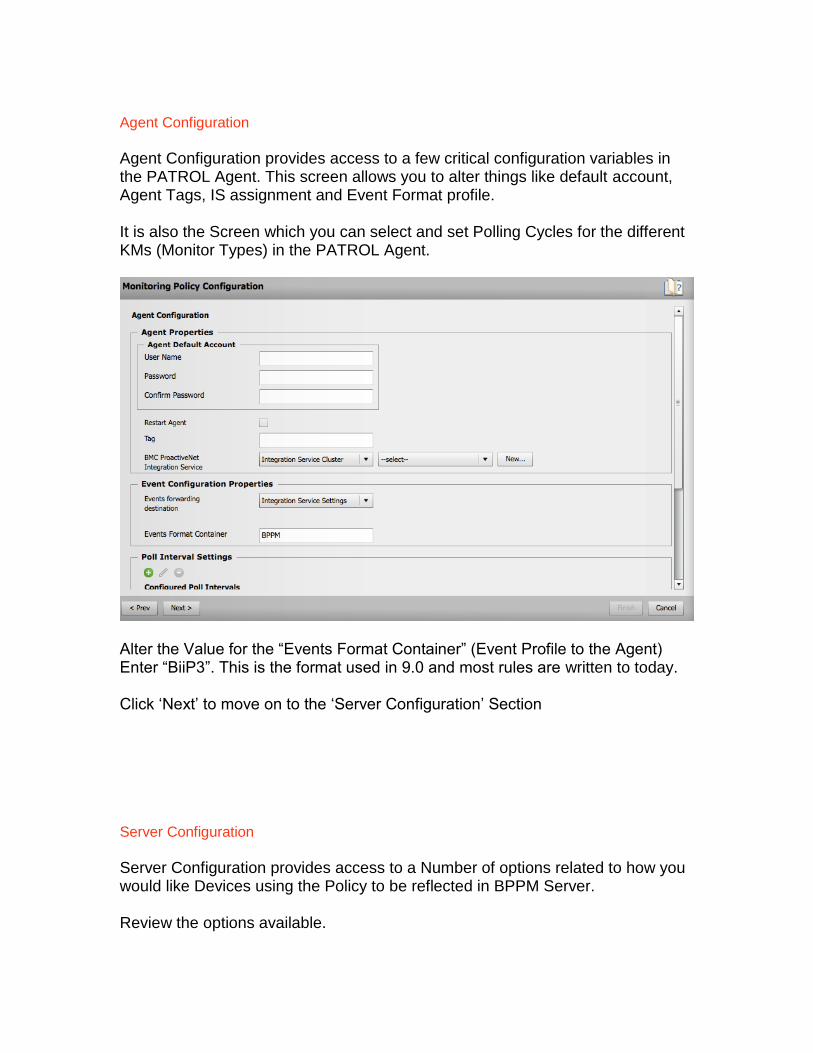
Agent Configuration
Agent Configuration provides access to a few critical configuration variables in the PATROL Agent. This screen allows you to alter things like default account, Agent Tags, IS assignment and Event Format profile. It is also the Screen which you can select and set Polling Cycles for the different KMs (Monitor Types) in the PATROL Agent.
Alter the Value for the “Events Format Container” (Event Profile to the Agent) Enter “BiiP3”. This is the format used in 9.0 and most rules are written to today. Click ‘Next’ to move on to the ‘Server Configuration’ Section Server Configuration
Server Configuration provides access to a Number of options related to how you would like Devices using the Policy to be reflected in BPPM Server. Review the options available.
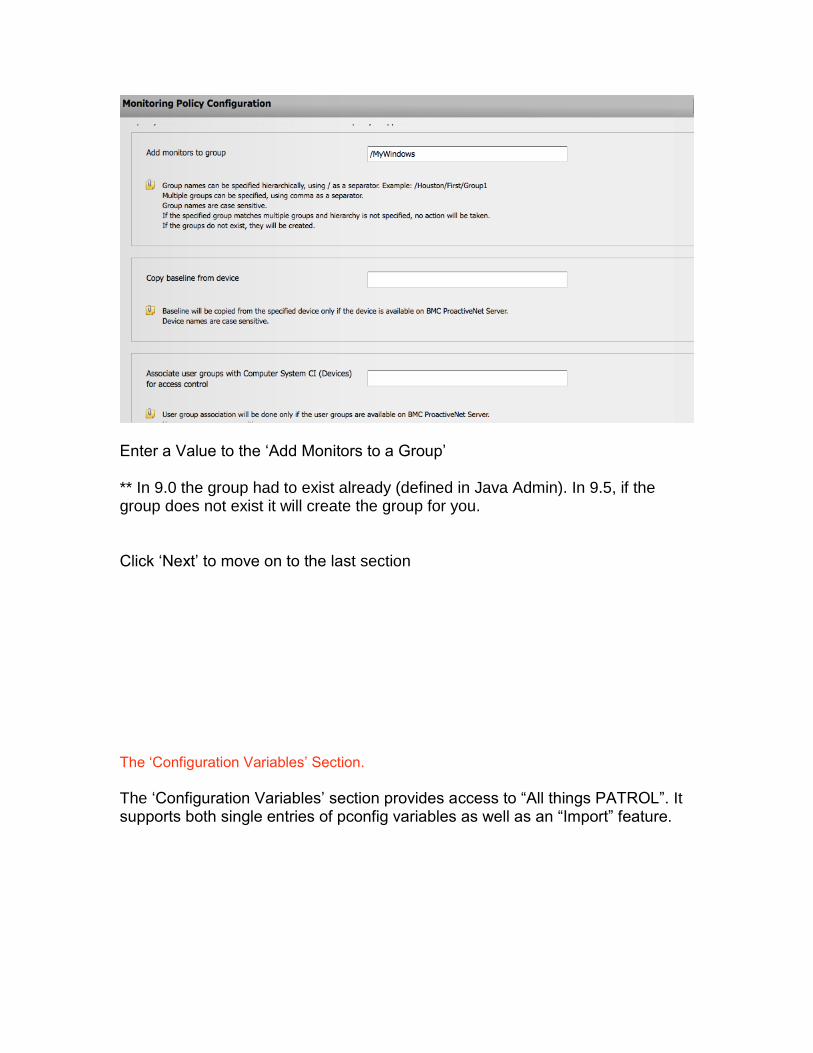
Enter a Value to the ‘Add Monitors to a Group’ ** In 9.0 the group had to exist already (defined in Java Admin). In 9.5, if the group does not exist it will create the group for you. Click ‘Next’ to move on to the last section The ‘Configuration Variables’ Section.
The ‘Configuration Variables’ section provides access to “All things PATROL”. It supports both single entries of pconfig variables as well as an “Import” feature.

Click the “green circled” plus sign (+) Icon on the left of the summary page to open the Detailed Entry Screen. Enter values similar to the example below. This will instruct an agent using this policy to ‘Disable’ the KM entered in the Value field. Click the ‘Add’ button to save your entry and return to the Summary Screen.

You have now visited all the different sections of Policy Creation. Not all Policies require information for each Section. You should be familiar with what you want to accomplish through a policy prior to creating it, then build the policy to that plan. Click the “Finish” Button ** Note – when you click the ‘Finish’ button the Policy is validated and a warning will appear when it finds another Policy in the Environment assigned the same precedence number. Not to worry here, this is our first Policy and it should not be used for any agent.

Now you should see your first Policy in the Summary Screen
PATROL Agent Event and Data Continuity
Overview:

This section will demonstrate PATROL Agent data continuity when switching IS’s and the catch up capability of data and events in BPPM after a data path interruption. Pre-Requisites: BPPM Server, PATROL Agent with monitoring policy, an IS installed on a Linux server, an IS installed on a Windows server
Verify the PATROL Agent is sending data to BPPM server
Verify the PATROL Agent is sending data to BPPM server via the IS installed on the Linux server. In the example below the PATROL Agent running on clm-hou-006936 server is sending data through the IS installed on clm-hou-006936.
Confirm Data is present and consistent. In the OPS UI, drill down to a parameter such as CPU or Memory and verify that data is present and consistent.

Change the existing policy to move the PATROL Agent
Change the existing policy to move the PATROL Agent on the Linux server to the IS installed on Windows server.
Watch the PATROL Agent switch between IS’s
If you are quick about it, you can watch the PATROL Agent switch between IS’s in the CMA UI…

Watch the Agent move to the new IS…
Verify the data from same parameter continues to collect data: After a few minutes, verify the data from same parameter. (No interruption in data and is associated to same agent instance in BPPM)

Using the Query Agent function.
This section will familiarize you with the functionality of the newly added Agent Query Tool. The Agent Query Tool is designed to supply some of the functionality previously found in PCM and a PATROL Developer console. Pre Reqs: BPPM Server, IS, and Windows or Linux PATROL Agent with a monitoring policy applied.

Select the “Query Agent” function as indicated in the screenshots below. OOTB only the “Admin” user can manipulate the agent.

When the agent query window appears enter a PSL command in the window and select the Execute button. Also, notice the other functions available to manipulate the agent.
print(get("/hostname"));
Blackouts Overview: This lab will demonstrate the new blackout capabilities in CMA. In this lab you will create a blackout for the Linux Agent so that no alerts are received during a specific time period. Pre-req: BPPM Server, Linux PATROL Agent with basic OS monitoring policy. Hands-on Exercise: Create a blackout for an entire Linux agent. (Emergency Blackout)
Create the Blackout timeframe The first step in creating a blackout is to create the blackout timeframe that can then be associated to a specific parameter(s) or agent(s).

Log into CMA as admin and select the General drawer in the navigation pane.
Select “Timeframes” and select the green plus in the upper right hand corner to create a new timeframe.
Set the blackout period to “Always Active” and “Start Immediately”. Notice the different recurrence patterns available. Give the blackout a name and save it.

NOTE: The Timeframe cannot cross the midnight hour. For example: If your timeframe for a blackout is between March 31st at 22:00 and April 1st at 01:00, you will have to create two timeframes. One for March 31st from 22:00 to 23:59 and one for April 1st from 00:00 to 01:00.
Create the blackout policy for the parameter(s) / agents(s).

In CMA, select the “Policies” drawer in the navigation pane. Now open the “Blackout” heading and select “All”. Create a new blackout policy by selecting
the green plus sign in the upper right.
Give the policy a name and select the timeframe created earlier. Notice you could also create a new timeframe here by selecting the “New” button. When finished select “Next”.
Enter the agent selection criteria.

Select the type of output to be blacked out such as data collection or events and then the scope of the blackout by selecting an entire agent or selecting specific application classes and instances. For our purposes, select “Data” for the blackout and select “Complete Agent” for the scope. Select “Finish” when done. NOTE: To blackout specific monitors or instances you change the scope to “Monitor types and Instances” and select the green plus sign to add the appropriate monitor(s) and instance(s) to be blacked out.
View/Verify the policy. You can verify the policy was applied to the correct agent by selecting the box in the “Applicable Agent” column in the CMA view below.

Verify the agent has been blacked out by looking at the events in the BPPM Operations Console as seen below and / or by drilling into the Agent that was selected for blackout. After drilling into the agent, verify that no more data is being collected for any of the parameters.
All parameters are blacked out. No data is being collected.

Event Flow and Event Associations:
Overview: This lab focuses on how to control Event propagation and recognizing Event Association changes in 9.5 in the BPPM Operations Console.
Where do I control the Event flow in BPPM 9.5 There are a number of places which can effect where a PATROL Agent will send Events generated in the course of KM operations. PATROL Install package
1.) A PATROL Install package can be configured to dictate where Events should be sent. This is the most basic control point and can insure that Events flow into a cell upon startup. However, this behavior may be undesirable if you have yet to configure Event rules and have knowledge of what events will flow. Prior to 9.5 we have recommended specifying a fake hostname in the installer (e.g. changeme/1828). This blocks event flow from the agent until one of two things change: a.) You provide a specific Cell location as part of a Monitoring Policy
that will update the Agent’s pconfig with a rule that looks like:

"/ConfigData/EventSetup/Configuration/EventCells" = { REPLACE = "<cellname>/1828" } b.) You Remove the Agent configuration variable:
"/EventSetup/Configuration/EventCells" = { REPLACE = "<cell>/1828" },
c.) You alter the value Directly in the Agent configuration with a variable
change like:
"/EventSetup/Configuration/EventCells" = { REPLACE = "<cell>/1828" },
NOTE: The Policy entries (e.g. /ConfigData/…..) will ALWAYS win over the Local Variables.
Event integration properties for an IS
2.) Event integration properties for an IS can be provided when adding the IS to the BPPM Server via the CMA. Setting the Value here dictates that any PATROL Agent sending events to the IS node (or configured to use “Integration Server Settings” in a Policy) will follow the settings specified. Options are: a.) Route to the BPPM Server b.) Use the integration Server Setting (e.g. use the cell associated to the IS node you are adding) c.) Dictate the Cell you want to use (You MUST identify the <host>/<port)

Monitoring Policies
3.) Policies also support identifying a location for Events to be routed. As a general rule you will want to control which Policies contain a setting that specifies which Integration Server is used. Think of using one that dictates Windows goes to ‘a’ and Linux goes to ‘b’. Otherwise you will need to get pretty crafty with either hostname matching or port control at the Agent. (e.g. All Servers in Buffalo use port 3185, in Chicago port 3188)
Infrastructure Events are always in the BPPM Server (e.g. Agent disconnected)
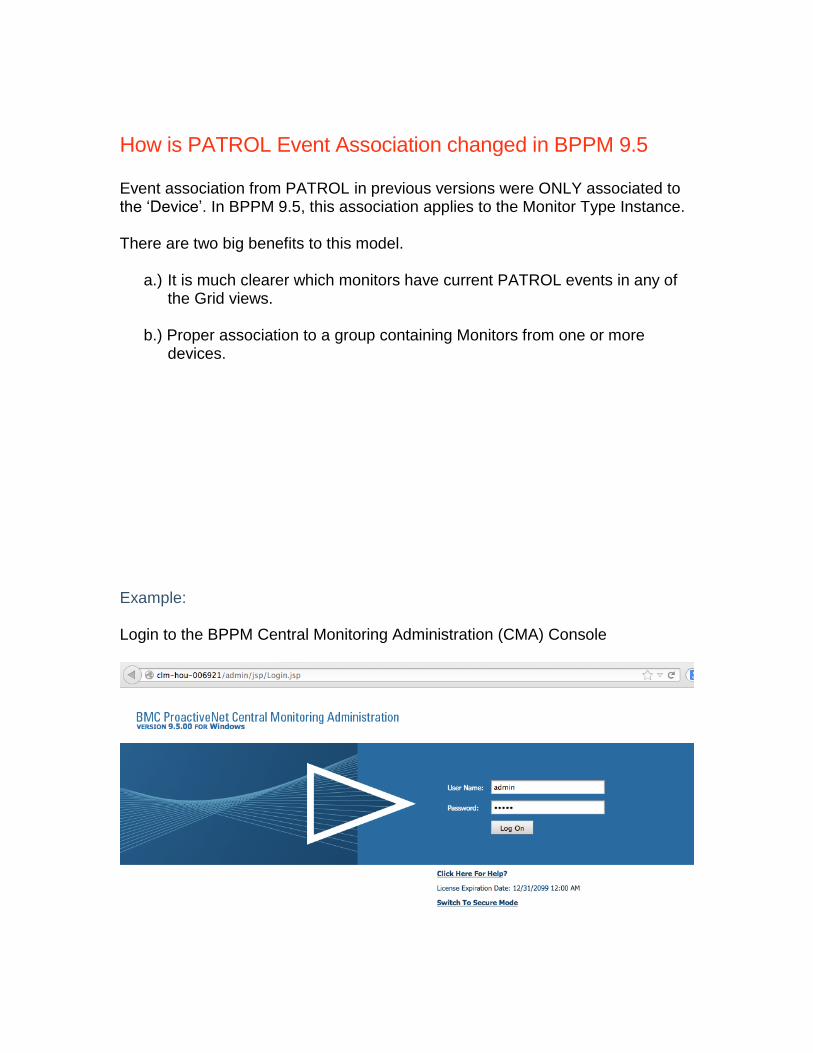
How is PATROL Event Association changed in BPPM 9.5 Event association from PATROL in previous versions were ONLY associated to the ‘Device’. In BPPM 9.5, this association applies to the Monitor Type Instance. There are two big benefits to this model.
a.) It is much clearer which monitors have current PATROL events in any of the Grid views.
b.) Proper association to a group containing Monitors from one or more devices.
Example: Login to the BPPM Central Monitoring Administration (CMA) Console

Edit your basic windows Monitoring Policy under “All” to implement specific management configuration that will ONLY apply to your Windows PATROL Agent. To Edit the policy Highlight your Windows policy and click the pencil icon. Select/Check the ‘Agent Threshold’ and ‘Agent Configuration’ options (if not already included) as the areas you would like to configure/edit. Click on the link for the ‘Agent Threshold’ screen Create a Threshold for: Solution = Windows Server Monitor Type = Memory Attribute = Memory Used (MB) Set the Alarm 1 as: Enabled, min=0, max=8000, Issue Event Alarm, Immediate Save the Values – Click ‘Add’ and ‘Close’

Click ‘Next’ to get to the ‘Agent Configuration screen Edit the Event Configuration Section

Direct Events to <your BPPM Server>/1828 Format = BiiP3 (case sensitive)
Click ‘Finish’ to Save the Profile
Merged Policy Precedence Management:
Overview: This section will focus on developing Layered Monitoring Policies and leveraging Policy Precedence.

Implementing Layered Policies to PATROL Agents Login to the BPPM Central Monitoring Administration (CMA) Console
Create a Monitoring Policy for “All” to implement Base Agent configuration that should/can be applied to all Servers as a “Standard”. To Add the policy click on the “green circled” plus sign (+) Icon on the right of your screen
The first wizard screen allows you to identify all areas of configuration for this policy. We will visit just the Configuration Variables Section.

Provide a policy Name and a brief description. Name it “BASE_CONFIG”. Assign a Precedence of ‘901’. (We will discuss Precedence Setting later in this section.

Agent Selection This is the most important screen in the Policy Wizard. This information will determine which Agents (if any) will adopt the policy being created. Insure that your entry defines ONLY Those Agents you want, and EXCLUDES those that you do not want. An incorrect policy with a global reach will create global issues.

Create a Condition that ‘Agent Port equals 3181’ (This will cause the policy to be applied to all of your Agents running on port 3181) Click ‘Next’ to move on to the last section – The ‘Configuration Variables’ Section The ‘Configuration Variables’ section provides access to all PATROL configuration variables. It supports both single entries of pconfig variables as well as an “Import” feature.
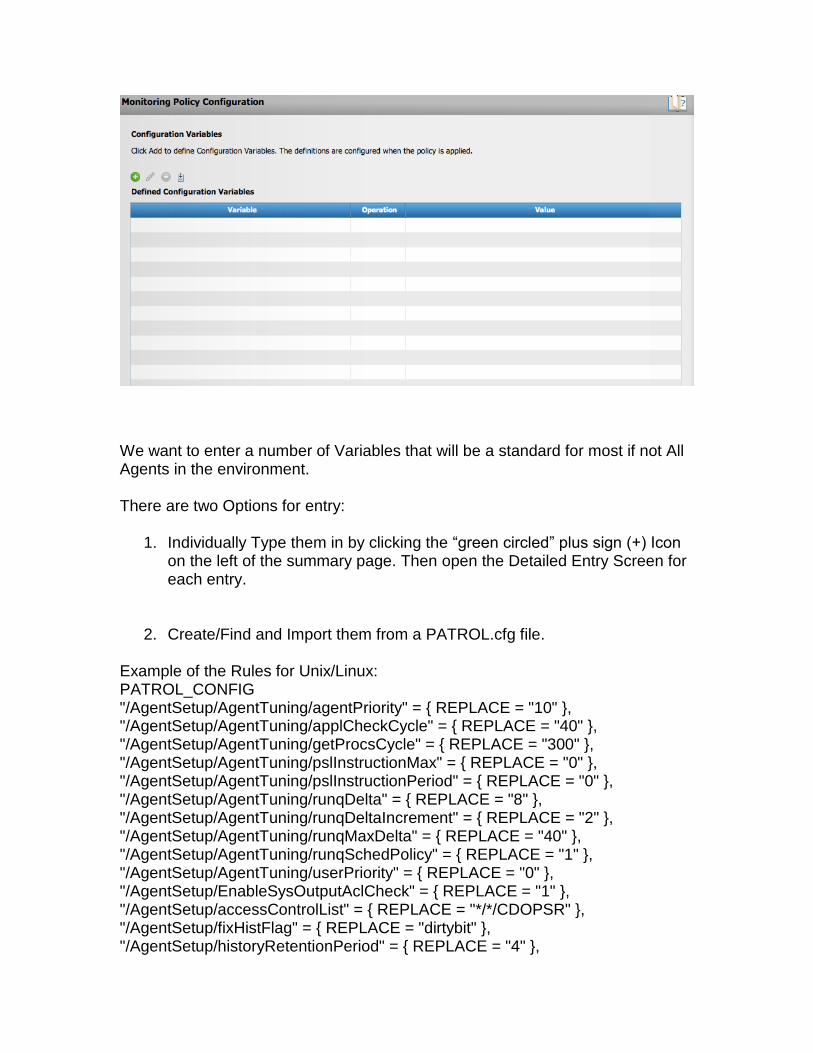
We want to enter a number of Variables that will be a standard for most if not All Agents in the environment. There are two Options for entry:
1. Individually Type them in by clicking the “green circled” plus sign (+) Icon on the left of the summary page. Then open the Detailed Entry Screen for each entry.
2. Create/Find and Import them from a PATROL.cfg file.
Example of the Rules for Unix/Linux: PATROL_CONFIG "/AgentSetup/AgentTuning/agentPriority" = { REPLACE = "10" }, "/AgentSetup/AgentTuning/applCheckCycle" = { REPLACE = "40" }, "/AgentSetup/AgentTuning/getProcsCycle" = { REPLACE = "300" }, "/AgentSetup/AgentTuning/pslInstructionMax" = { REPLACE = "0" }, "/AgentSetup/AgentTuning/pslInstructionPeriod" = { REPLACE = "0" }, "/AgentSetup/AgentTuning/runqDelta" = { REPLACE = "8" }, "/AgentSetup/AgentTuning/runqDeltaIncrement" = { REPLACE = "2" }, "/AgentSetup/AgentTuning/runqMaxDelta" = { REPLACE = "40" }, "/AgentSetup/AgentTuning/runqSchedPolicy" = { REPLACE = "1" }, "/AgentSetup/AgentTuning/userPriority" = { REPLACE = "0" }, "/AgentSetup/EnableSysOutputAclCheck" = { REPLACE = "1" }, "/AgentSetup/accessControlList" = { REPLACE = "*/*/CDOPSR" }, "/AgentSetup/fixHistFlag" = { REPLACE = "dirtybit" }, "/AgentSetup/historyRetentionPeriod" = { REPLACE = "4" },

"/AgentSetup/integration/useFQDNHostName" = { REPLACE = "yes" }, "/AgentSetup/loadOnlyPreloadedKMs" = { REPLACE = "yes" }, "/AgentSetup/prmHistCacheFlushTimer" = { REPLACE = "1200" }, "/snmp/agent_auto_start" = { REPLACE = "no" }
Click the “Finish” Button ** Note – when you click the ‘Finish’ button the Policy is validated and a warning will appear if it finds another Policy in the Environment using the same precedence. No other Policy should have your Precedence Setting.

Using a Staging Server
Overview:
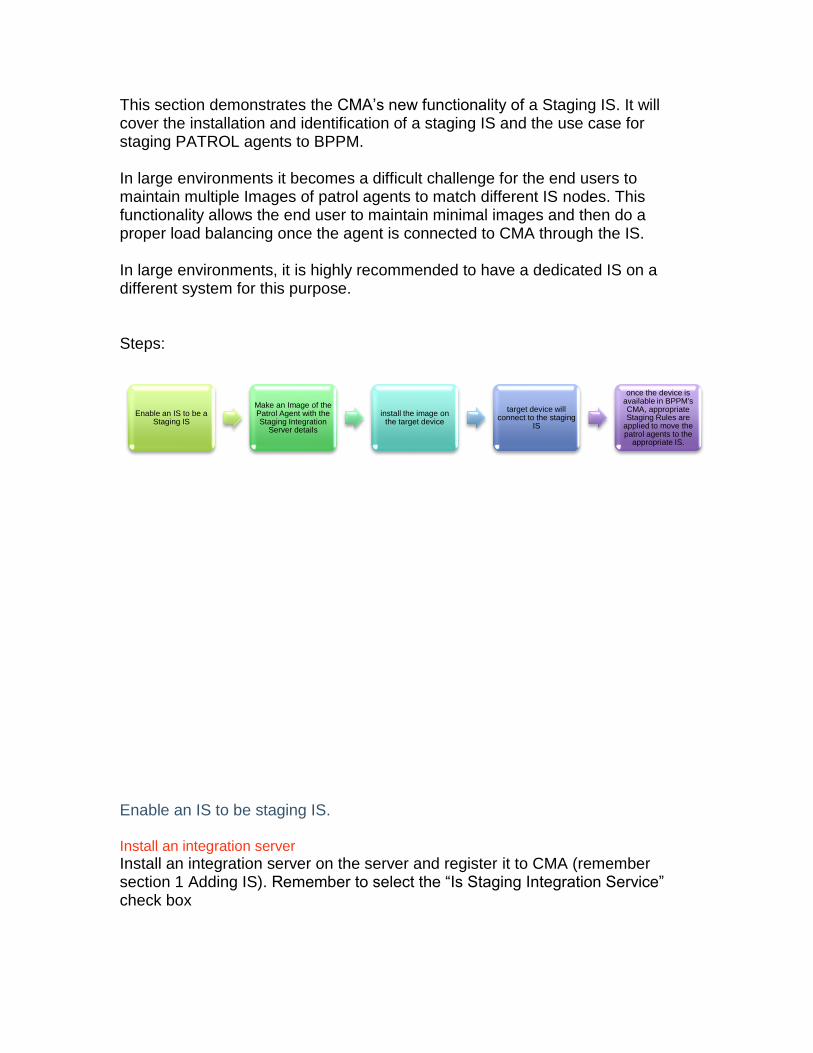
This section demonstrates the CMA’s new functionality of a Staging IS. It will cover the installation and identification of a staging IS and the use case for staging PATROL agents to BPPM. In large environments it becomes a difficult challenge for the end users to maintain multiple Images of patrol agents to match different IS nodes. This functionality allows the end user to maintain minimal images and then do a proper load balancing once the agent is connected to CMA through the IS. In large environments, it is highly recommended to have a dedicated IS on a different system for this purpose. Steps:
Enable an IS to be staging IS. Install an integration server
Install an integration server on the server and register it to CMA (remember section 1 Adding IS). Remember to select the “Is Staging Integration Service” check box
Enable an IS to be a Staging IS
Make an Image of the Patrol Agent with the Staging Integration
Server details
install the image on the target device
target device will connect to the staging
IS
once the device is available in BPPM's CMA, appropriate Staging Rules are
applied to move the patrol agents to the
appropriate IS.
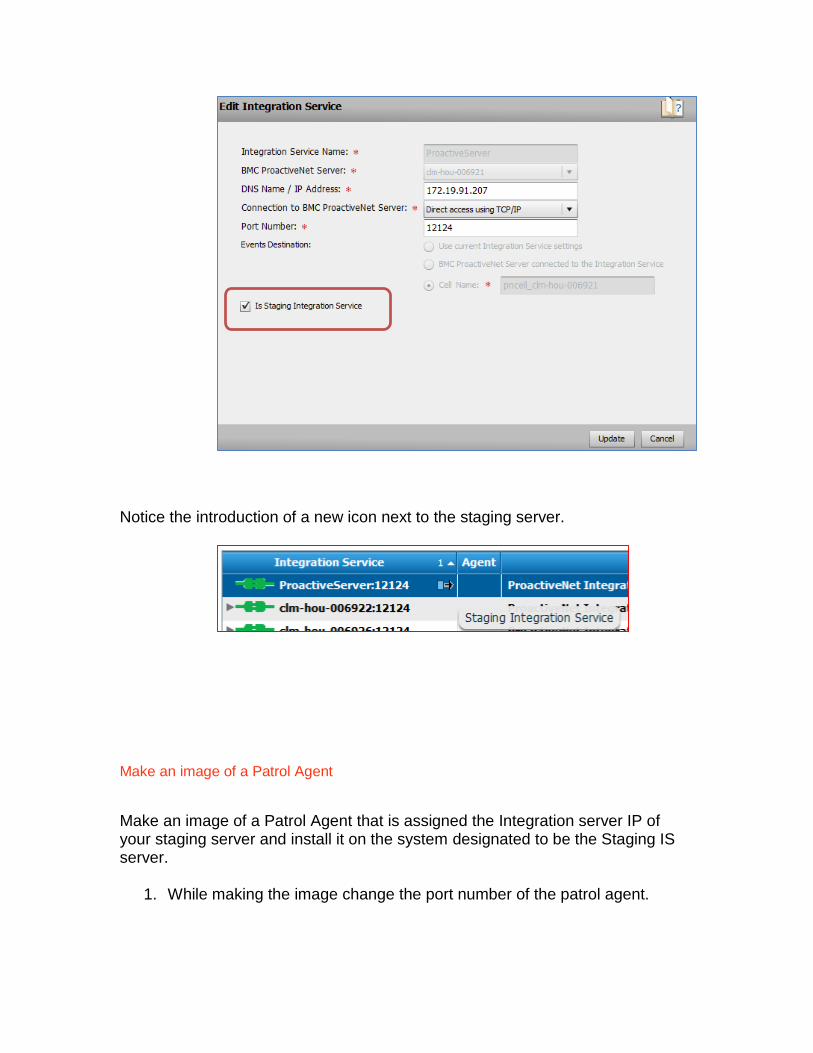
Notice the introduction of a new icon next to the staging server.
Make an image of a Patrol Agent
Make an image of a Patrol Agent that is assigned the Integration server IP of your staging server and install it on the system designated to be the Staging IS server.
1. While making the image change the port number of the patrol agent.

2. Specify the Staging Server IP when asked
3. Answer the rest of the prompts and save the image. 4. Download and install the image on the same system on which Patrol
Agent was installed in the previous labs. Cross Check the availability of the New Patrol Agent under the staging IS.
a. Login to the http://<BPPM_Server>/admin b. Navigate to the Servers pane and select the BPPM Server

c. Click on the Staging IS and the new Patrol Agent should be registered underneath.
Create a Staging Policy that will change the IS address
a. Using the example below, please enter the appropriate information and click Next.
b. In the next window, enter the TAG (if any) and change the IS to the single Integration Service and click Finish.

c. Once done, the Policy will appear as shown.
d. Wait a few minutes then verify that the New Patrol Agent switched from the staging IS to the dedicated IS.
This is the end of our Introduction/QuickStart Guide to BPPM 9.5. We hope you found this document useful in helping to understand the changes in behavior for BPPM 9.5 and understanding the basic installation/configuration processes to get you started with BPPM 9.5.