bpa121 user manual electronic weighing scale
TRANSCRIPT
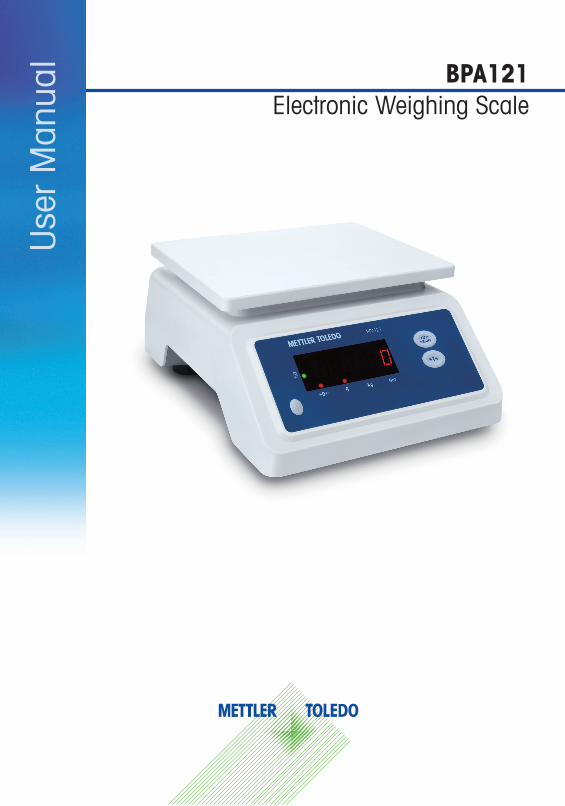
BPA121Electronic Weighing Scale
Use
r M
anua
l

2
User
Man
ual

3
Contents
1. General Information ------------------------------------------------------------ 4 1.1 Safety Instructions ----------------------------------------------------------- 4 1.2 Power supply connection -------------------------------------------------- 4 1.3 Introduction ------------------------------------------------------------------ 5 1.4 Commissioning -------------------------------------------------------------- 6
2. Basic operation ------------------------------------------------------------------ 7 2.1 Switching on and off -------------------------------------------------------- 7 2.2 Zeroing------------------------------------------------------------------------ 7 2.3 Simple weighing ------------------------------------------------------------- 7 2.4 Weighing with tare ---------------------------------------------------------- 8
3. Settings and Calibration ------------------------------------------------------- 9 3.1 LED brightness adjustment ------------------------------------------------- 9 3.2 Calibration ------------------------------------------------------------------- 9
4. Event and error messages ----------------------------------------------------11 4.1 Error code and corrective measures -------------------------------------11
5. Technical data and accessories ----------------------------------------------12 5.1 Technical data --------------------------------------------------------------12
6. Appendix -------------------------------------------------------------------------13 6.1 Geo Values ------------------------------------------------------------------13
4
User
Man
ual
1 General Information
1.1 Safety Instructions
1.2 Power supply connection
In order to make your counting scale work in best condition, please read this user instructions carefully before using it!• The scale must be powered off and unplugged during maintenance and
clean, or it will cause electric shock or damage to counting scale.• Flush the weighing platform with water is forbidden. Wet cloth wrung can
be used to wipe weighing platform or scale pan.• Chemicals such as solvent can't be touched, in case it corrodes the
surface of scale and damages internal devices.• Do not impact the scale with heavy weight. Make the scale work in best
condition.• Only authorized personnel may open the device.• Devices with built-in storage battery.• Ensure that the power socket outlet for the device is earthed and easily
accessible, so that it can be de-energized rapidly in emergencies.• Ensure that the supply voltage at the installation site lies within the range
85% to 110% of the local rated voltage.• Check the power cable regularly. If it is damaged, disconnect the device
immediately from the power supply.
CAUTIONRisk of electric shock!• Before connecting the power supply, check whether the voltage value
printed on the rating plate corresponds to your local system voltage.• Do not under any circumstances connect the device if the voltage value on
the rating plate deviates from the local system voltage.• Make sure the weighing platform has reached room temperature before
switching on the power supply.
• Plug the power plug into the power socket.After it has been connected, the device runs a self-test. The device is
ready to operate when zero appears on the display

5
Key Name Function in the operating mode
Function in the setting and calibration
Power/Zero• Power on/off• Set scale to zero,
clear tare
• Used to accept what you have selected, and advance one softswitch at a time
Tare• Remove the tare
weight of the wrappage or pallet
• Used to select softswitch settings.
1.3 Introduction
1.3.1 DisplayDefault layout
Weight (g)
Zero g kg Net
1.3.2 Function keys
1.3.3 Indication of the cursor Zero: the scale is in gross weight zerog: the unit currently selected is gramkg: the unit currently selected is kilogramlb: only available after calibration with lbNet weight: the weight displayed is the net weightBattery indication: the lead acid battery is configured by default and the charging cursor is lightened as required (on, by default)• Green indicates that the battery is full• Red indicates that the battery is low, and need charging immediately• Flashing red indicates that the battery is low and about to be off;• Yellow indicates a charging status• The display will present Display "Lo bAt" when the electric quantity
is too low to a certain degree, and the scale will stop working. At this time, the scale must be charged or the battery shall be replaced before continuing to work
6
User
Man
ual 1.4 Commissioning
1.4.1 Selecting the weighing platform location
The correct location is crucial for the accuracy of the weighing results.• Select a stable, vibration-free and a horizontal location
for the weighing platform• Observe the following environmental conditions:
- No direct sunlight- No strong drafts- No excessive temperature fluctuations
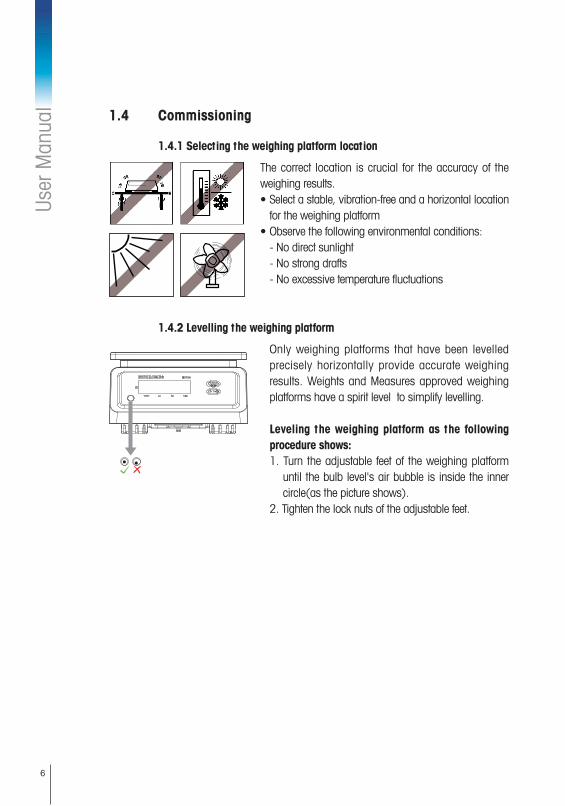
1.4.2 Levelling the weighing platform
Only weighing platforms that have been levelled precisely horizontally provide accurate weighing results. Weights and Measures approved weighing platforms have a spirit level to simplify levelling.
Leveling the weighing platform as the following procedure shows:1. Turn the adjustable feet of the weighing platform
until the bulb level's air bubble is inside the inner circle(as the picture shows).
2. Tighten the lock nuts of the adjustable feet.
7
2 Basic operation
2.1 Switching on and offPower on• Press [Zero/On/Off]• Pressing the key [Zero/On/Off] to turn on the scale when the platter is
empty. The scale will self-test, then display all segments of all digits, all cursors, SW No., SW version No. and------ one by one, finally enter into the weighing mode.
Power off • Press [Zero/On/Off]• Before the display shuts down, OFF appears briefly
2.2 ZeroingZeroWhen the scale is in gross weight mode, and displayed weight is between ± 2% of full capacity, pressing the key [Zero/On/Off] can return it into gross zero.
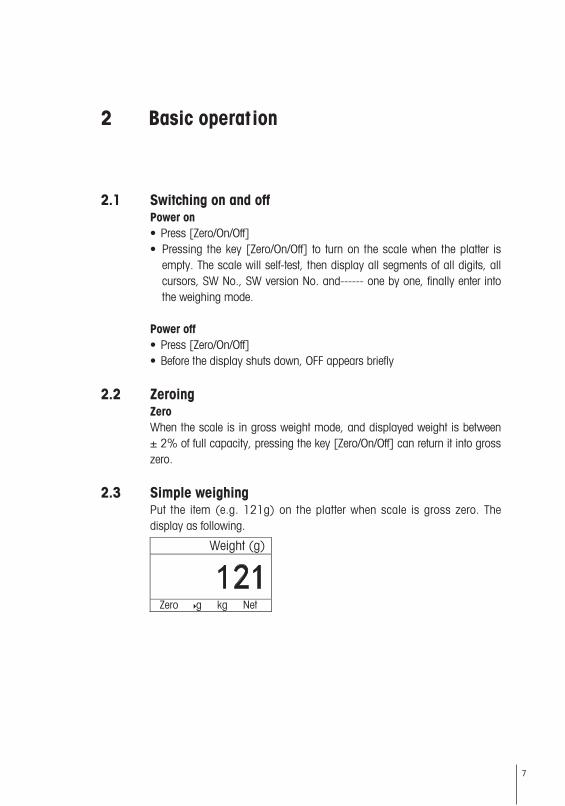
2.3 Simple weighingPut the item (e.g. 121g) on the platter when scale is gross zero. The display as following.
Weight (g)
Zero g kg Net
8
User
Man
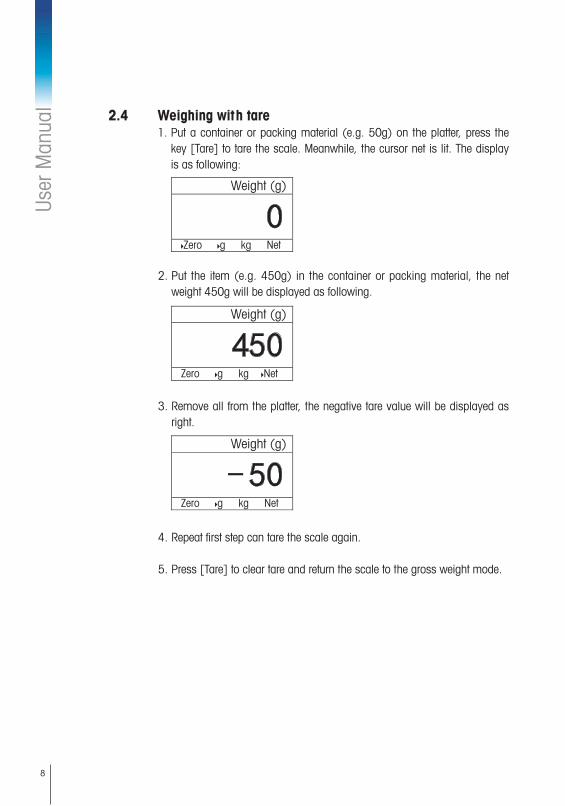
ual 2.4 Weighing with tare
1. Put a container or packing material (e.g. 50g) on the platter, press the key [Tare] to tare the scale. Meanwhile, the cursor net is lit. The display is as following:
Weight (g)
Zero g kg Net
Weight (g)
Zero g kg Net
Weight (g)
Zero g kg Net
2. Put the item (e.g. 450g) in the container or packing material, the net weight 450g will be displayed as following.
3. Remove all from the platter, the negative tare value will be displayed as right.
4. Repeat first step can tare the scale again.
5. Press [Tare] to clear tare and return the scale to the gross weight mode.
9
3 Settings and Calibration
Enter setting status through two ways: user menu and service menu.
User menu: Press on [Tare] in normal working status until F1 is displayed. At this time, the scale enters operating parameter settings.
Service menu: Start up in a non-authentication status and unscrew the lead seal screw in the measuring switch position where you will see a metal hole. Short circuit the measuring switch in the main board in the hole with a metal object, the interface will displays S1 and the scale will enter automatically on the system parameter setting. Entering the setting status in this way may calibrate the scale.
3.1 LED brightness adjustment1. Press on [Tare] until [F1 0] appears to enter the parameter setting status.2. Press [Zero/On/Off] once and [F2 3] will appears.3. Press [Tare] to select: 0 indicates highest that rhe scale is on his maximum
brightness; The other options available are 1, 2, 3, 4 and 5 where the higher the number, the lower is the brightness.
4. Press [Zero/On/Off] to select the required brightness and then gradually press [Tare] to enter the exit option [E 0]. Then press [Tare], select 1 and press [Zero/On/Off] to confirm. The scale will save the modifications made on the settings and return to the normal weighing status.
3.2 CalibrationCalibration and zero correction1. Remove the lead seal screw and short circuit the measuring switch in the
main board in the hole with a metal object (screwdriver). Enter the service menu.
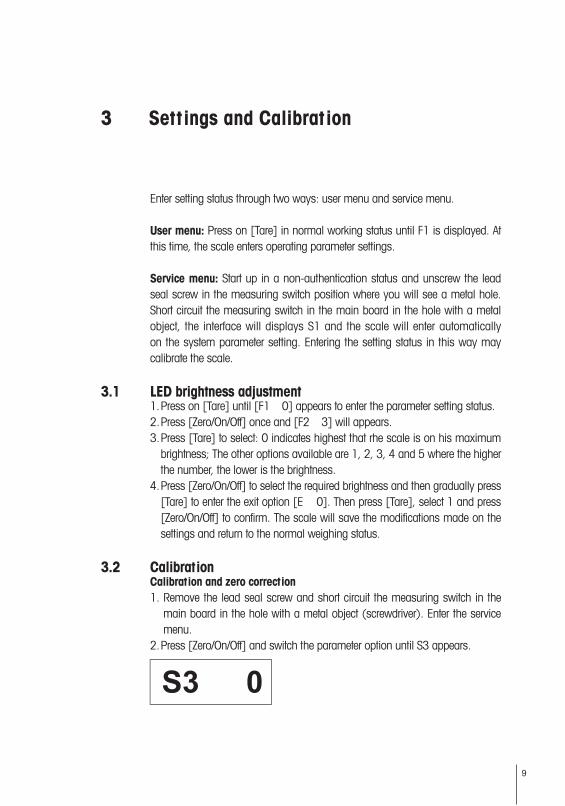
2. Press [Zero/On/Off] and switch the parameter option until S3 appears.
10
User
Man
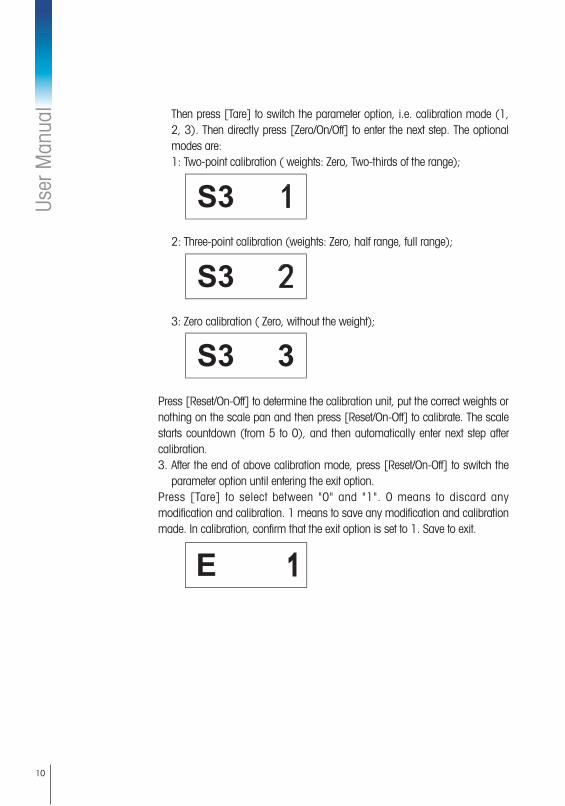
ual Then press [Tare] to switch the parameter option, i.e. calibration mode (1,
2, 3). Then directly press [Zero/On/Off] to enter the next step. The optional modes are:1: Two-point calibration ( weights: Zero, Two-thirds of the range);
2: Three-point calibration (weights: Zero, half range, full range);
3: Zero calibration ( Zero, without the weight);
Press [Reset/On-Off] to determine the calibration unit, put the correct weights ornothing on the scale pan and then press [Reset/On-Off] to calibrate. The scale starts countdown (from 5 to 0), and then automatically enter next step after calibration.3. After the end of above calibration mode, press [Reset/On-Off] to switch the
parameter option until entering the exit option.Press [Tare] to select between "0" and "1". 0 means to discard any modification and calibration. 1 means to save any modification and calibration made. In calibration, confirm that the exit option is set to 1. Save to exit.
11
4 Event and error messages
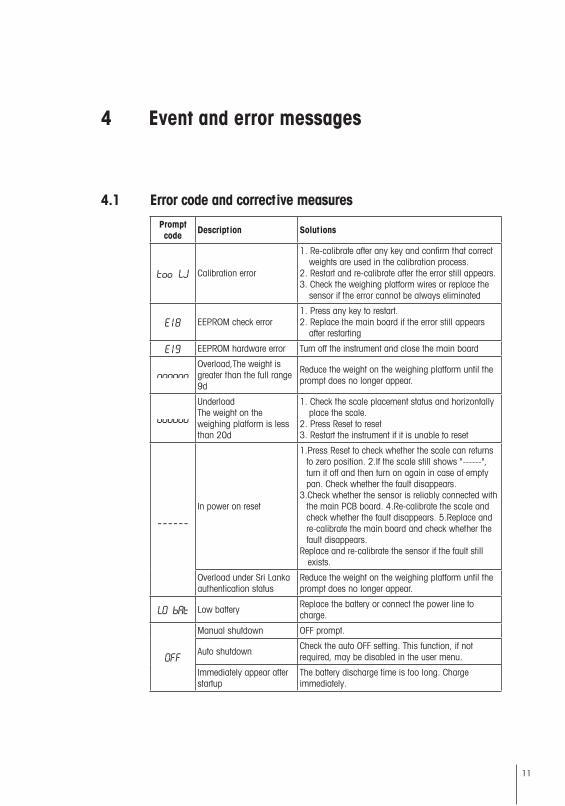
4.1 Error code and corrective measuresPrompt code Description Solutions
Calibration error
1. Re-calibrate after any key and confirm that correct weights are used in the calibration process.
2. Restart and re-calibrate after the error still appears.3. Check the weighing platform wires or replace the
sensor if the error cannot be always eliminated
EEPROM check error1. Press any key to restart.2. Replace the main board if the error still appears
after restarting
EEPROM hardware error Turn off the instrument and close the main board
Overload,The weight is greater than the full range 9d
Reduce the weight on the weighing platform until the prompt does no longer appear.
UnderloadThe weight on the weighing platform is less than 20d
1. Check the scale placement status and horizontally place the scale.
2. Press Reset to reset3. Restart the instrument if it is unable to reset
In power on reset
1.Press Reset to check whether the scale can returns to zero position. 2.If the scale still shows "------", turn it off and then turn on again in case of empty pan. Check whether the fault disappears.
3.Check whether the sensor is reliably connected with the main PCB board. 4.Re-calibrate the scale and check whether the fault disappears. 5.Replace and re-calibrate the main board and check whether the fault disappears.
Replace and re-calibrate the sensor if the fault still exists.
Overload under Sri Lanka authentication status
Reduce the weight on the weighing platform until the prompt does no longer appear.
Low batteryReplace the battery or connect the power line to charge.
Manual shutdown OFF prompt.
Auto shutdownCheck the auto OFF setting. This function, if not required, may be disabled in the user menu.
Immediately appear after startup
The battery discharge time is too long. Charge immediately.

12
User
Man
ual
5 Technical data and accessories
5.1 Technical dataModel Plaform Size Scale Capacity
BPA121182 x 226
[mm]1.5kg 3kg 7.5kg 15kg 30kg
Readability
2 x 1500eMulti-range
[kg/g]0.75kg / 0.5g
1.5kg / 1g1.5kg / 1g3kg / 2g
3kg / 2g7.5 kg / 5g
7.5kg / 5g16 kg / 10g
15kg / 10g30 kg / 20g
3,000d g 0.5g 1g 2g 5g 10g
7,500d g 0.2g 0.5g 1g 2g 5g
15,000d g 0.1g 0.2g 0.5g 1g 2g
30,000d g 0.05g 0.1g 0.2g 0.5g 1g
60,000d g 0.02g 0.05g 0.1g 0.2g 0.5g
Scale pan size 182x226mm
Power supply DC-AC 220V/50Hz or rechargeable maintenance-free rechargeable lead acid battery (6V/5Ah) are standard accessories and may be used while charging
Display 6-bit 7-section red LED display; Six-gear brightness adjustable; single-display and dual-display
Working temperature -10°C~+40°C
Environment humidity ≤95%
Tare range Full weighing: when tare exists, the weighing range of the net weight shall be reduced accordingly
Options
Stainless steel scale pan
Charger, charging six 6V/5Ah lead acid batteries simultaneously
6V/5Ah maintenance-free rechargeable lead acid battery
Keyboard Mechanical keyboard, 2 keys
13
6 Appendix
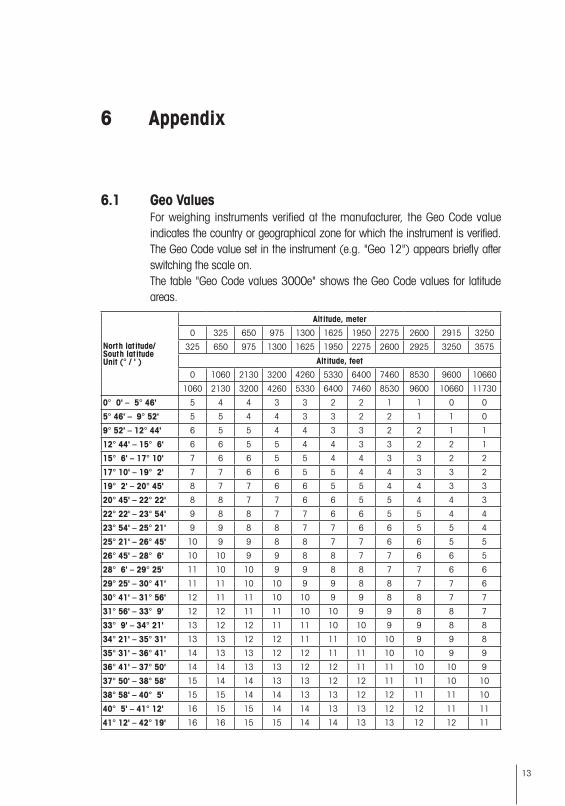
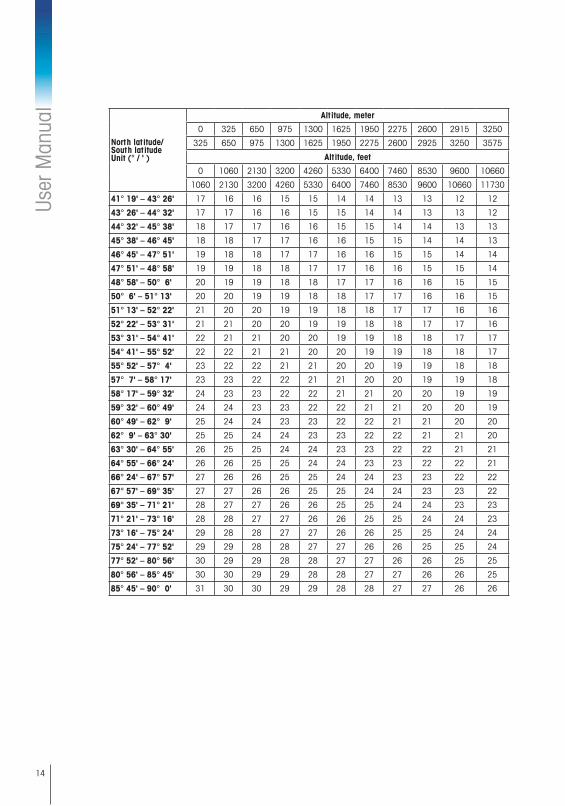
6.1 Geo ValuesFor weighing instruments verified at the manufacturer, the Geo Code value indicates the country or geographical zone for which the instrument is verified. The Geo Code value set in the instrument (e.g. "Geo 12") appears briefly after switching the scale on.The table "Geo Code values 3000e" shows the Geo Code values for latitude areas.
North latitude/ South latitudeUnit (° / ' )
Altitude, meter
0 325 650 975 1300 1625 1950 2275 2600 2915 3250
325 650 975 1300 1625 1950 2275 2600 2925 3250 3575
Altitude, feet
0 1060 2130 3200 4260 5330 6400 7460 8530 9600 10660
1060 2130 3200 4260 5330 6400 7460 8530 9600 10660 11730
0° 0' – 5° 46' 5 4 4 3 3 2 2 1 1 0 0
5° 46' – 9° 52' 5 5 4 4 3 3 2 2 1 1 0
9° 52' – 12° 44' 6 5 5 4 4 3 3 2 2 1 1
12° 44' – 15° 6' 6 6 5 5 4 4 3 3 2 2 1
15° 6' – 17° 10' 7 6 6 5 5 4 4 3 3 2 2
17° 10' – 19° 2' 7 7 6 6 5 5 4 4 3 3 2
19° 2' – 20° 45' 8 7 7 6 6 5 5 4 4 3 3
20° 45' – 22° 22' 8 8 7 7 6 6 5 5 4 4 3
22° 22' – 23° 54' 9 8 8 7 7 6 6 5 5 4 4
23° 54' – 25° 21' 9 9 8 8 7 7 6 6 5 5 4
25° 21' – 26° 45' 10 9 9 8 8 7 7 6 6 5 5
26° 45' – 28° 6' 10 10 9 9 8 8 7 7 6 6 5
28° 6' – 29° 25' 11 10 10 9 9 8 8 7 7 6 6
29° 25' – 30° 41' 11 11 10 10 9 9 8 8 7 7 6
30° 41' – 31° 56' 12 11 11 10 10 9 9 8 8 7 7
31° 56' – 33° 9' 12 12 11 11 10 10 9 9 8 8 7
33° 9' – 34° 21' 13 12 12 11 11 10 10 9 9 8 8
34° 21' – 35° 31' 13 13 12 12 11 11 10 10 9 9 8
35° 31' – 36° 41' 14 13 13 12 12 11 11 10 10 9 9
36° 41' – 37° 50' 14 14 13 13 12 12 11 11 10 10 9
37° 50' – 38° 58' 15 14 14 13 13 12 12 11 11 10 10
38° 58' – 40° 5' 15 15 14 14 13 13 12 12 11 11 10
40° 5' – 41° 12' 16 15 15 14 14 13 13 12 12 11 11
41° 12' – 42° 19' 16 16 15 15 14 14 13 13 12 12 11
14
User
Man
ual
North latitude/ South latitudeUnit (° / ' )
Altitude, meter
0 325 650 975 1300 1625 1950 2275 2600 2915 3250
325 650 975 1300 1625 1950 2275 2600 2925 3250 3575
Altitude, feet
0 1060 2130 3200 4260 5330 6400 7460 8530 9600 10660
1060 2130 3200 4260 5330 6400 7460 8530 9600 10660 11730
41° 19' – 43° 26' 17 16 16 15 15 14 14 13 13 12 12
43° 26' – 44° 32' 17 17 16 16 15 15 14 14 13 13 12
44° 32' – 45° 38' 18 17 17 16 16 15 15 14 14 13 13
45° 38' – 46° 45' 18 18 17 17 16 16 15 15 14 14 13
46° 45' – 47° 51' 19 18 18 17 17 16 16 15 15 14 14
47° 51' – 48° 58' 19 19 18 18 17 17 16 16 15 15 14
48° 58' – 50° 6' 20 19 19 18 18 17 17 16 16 15 15
50° 6' – 51° 13' 20 20 19 19 18 18 17 17 16 16 15
51° 13' – 52° 22' 21 20 20 19 19 18 18 17 17 16 16
52° 22' – 53° 31' 21 21 20 20 19 19 18 18 17 17 16
53° 31' – 54° 41' 22 21 21 20 20 19 19 18 18 17 17
54° 41' – 55° 52' 22 22 21 21 20 20 19 19 18 18 17
55° 52' – 57° 4' 23 22 22 21 21 20 20 19 19 18 18
57° 7' – 58° 17' 23 23 22 22 21 21 20 20 19 19 18
58° 17' – 59° 32' 24 23 23 22 22 21 21 20 20 19 19
59° 32' – 60° 49' 24 24 23 23 22 22 21 21 20 20 19
60° 49' – 62° 9' 25 24 24 23 23 22 22 21 21 20 20
62° 9' – 63° 30' 25 25 24 24 23 23 22 22 21 21 20
63° 30' – 64° 55' 26 25 25 24 24 23 23 22 22 21 21
64° 55' – 66° 24' 26 26 25 25 24 24 23 23 22 22 21
66° 24' – 67° 57' 27 26 26 25 25 24 24 23 23 22 22
67° 57' – 69° 35' 27 27 26 26 25 25 24 24 23 23 22
69° 35' – 71° 21' 28 27 27 26 26 25 25 24 24 23 23
71° 21' – 73° 16' 28 28 27 27 26 26 25 25 24 24 23
73° 16' – 75° 24' 29 28 28 27 27 26 26 25 25 24 24
75° 24' – 77° 52' 29 29 28 28 27 27 26 26 25 25 24
77° 52' – 80° 56' 30 29 29 28 28 27 27 26 26 25 25
80° 56' – 85° 45' 30 30 29 29 28 28 27 27 26 26 25
85° 45' – 90° 0' 31 30 30 29 29 28 28 27 27 26 26

www.mt.comFor more information
Mettler-Toledo (Changzhou) 111 West Taihu Road ChangzhouJiangsu 213125 ChinaTel. +86-519-8664-2040Fax +86-519-8664-1991
Subject to technical changes.© 2017 Mettler-Toledo (Changzhou)30401368APrinted in P. R. China 2017/06 30401368