bookbinding.pdf
DESCRIPTION
book bindingTRANSCRIPT

1
D.I.Y. Hand Bookbinding Handbook
By M. M. Rooney Created for a Directed Study Project in Hand Bookbinding for UBC SLAIS.
1
1 Diderot, Denis. “Diderot Encyclopedie, Bookbinding.” Excerpt from Diderot’s Encyclopedie (1751-1777). bookbinding.com. <
http://www.bookbinding.com/diderot/> (12 March 2006).

2
Introduction Bookbinding is in a tenuous position in our current times. Most bindings are mass produced; it is rare to find a reader bringing a book to a binder to be hand bound for the first time. More commonly, a hand bookbinder’s work will revolve around the restoration of old bindings. As books became more mass produced the materials used to bind them changed. These days, most books are bound in paper or cloth rather than animal skin, as the cost of leather has become too expensive to mass produce. It is not only hand binding that is being threatened with extinction, but commercial bookbinding is now being threatened as well. This is because the format of the book itself is being challenged. It is common to hear remarks from professionals in the tech industry, in academia, and even in librarianship say things akin to “Soon books will be digitized and all we’ll have to do to read one is download it from the internet onto our computers,” or “Thanks to digitization and the internet, books are becoming extinct.” Though I do not agree with these statements, I can’t ignore the fact that digitization of books is already happening regardless of whether anyone is actually reading them. It is clear that the future of printing and bookbinding is changing, though what the real future will bring is anyone’s guess. Where then does the future of bookbinding stand? I think the answer to bookbinding’s future exists currently, though it may be ignored or unknown by trade professionals and the mass of popular society. Since the 1960’s the counter culture/avant-garde/underground of North America and Europe (and by this point in time I’d imagine most everywhere else in the world) has been spreading ideas of art, politics, philosophy, culture and revolution through underground publications. I am of course referring to zines 2 and book arts 3. Zines and book arts expand the classic ideas of what a book is, what a book looks like, and what a book contains within its cover. The range of skill that goes into creating and binding these alternative books covers a wide spectrum. In the case of zines, no previous knowledge or experience of bookbinding is required, as long as the creator has some way to attach one page to another. In book arts, more skill is usually required as the book is often bound using a form (or variation) of classic bookbinding. Though neither zines nor book arts tend to be mass produced (in the case of books arts, there is usually only one copy), their impact on non-mainstream culture has been quite significant. Ever since Johannes Gutenberg invented the printing press around 1450, moving written thought out of monasteries and int o the mainstream, self- and small press publishing has allowed ordi nary people with extraordinary ideas to spread their words to an o ften, unsuspecting public. The results have been extraordinary. Subv erting the means of production to their own ends, defying commercial conventions, and
2 Zines are small, independently produced books/pamphlets/magazines, created using available technologies; often made using little
money and independently/personally distributed. 3 Book arts are often a combination of sculpture, visual art, text and bookbinding.

3
seizing control of the technology, artists, revol utionaries, writers, musicians, and visionaries of all kinds have take n publication into their own hands, producing and distributing their own work when nobody else would . 4 The punk and avant-garde aesthetic and philosophy that guides the creation of zines and book arts is firmly rooted in D.I.Y. (Do It Yourself) culture. It was in this spirit of D.I.Y. that this handbook was created. It is meant to be used as a basic stepping stone for bookbinding by those who wish to create their own book arts or advance their zine binding skills from the most commonly used stapling method. The following instructions have been gleaned from numerous bookbinding books and websites, the bibliography of which can be found at the end of the handbook. I’ve tried to make the instructions as simple as possible. The diagrams are scanned from Aldren Watson’s Hand Bookbinding. 5 It is my hope that this handbook will be useful as a reference, and will inspire the continuation of D.I.Y. hand bookbinding in all its future (r)evolutionary forms.
4 Carton, Sean and Gareth Branwyn. “D.I.Y. Revolution Curators’ Comments.” Philadelphia University Design Center.
<http://www.philau.edu/designcenter/Zines/comments.htm> (12 March 2006) 5 Watson, Aldren A. “Hand Bookbinding: A Manual of Instruction.” New York: Macmillan Publishing Company, 1986.

4
Hand Bookbinding in Six Steps Materials Paper (printed or unprinted) Cardboard or other kind of sturdy board Tape Woven cotton tape or cloth cut into strips Heavy, durable thread, such as cotton size No. 16 Wax paper or scrap paper Paste or glue Pencil Cloth or paper for cover Clip Sandpaper Tools Ruler or straight edge Weight Scissors, X-Acto knife or razor blade Paper folder or anything hard with a smooth edge that is gripable Needle Glue brush Piercing tool (for poking holes into paper) Chair Flat surface such as table or floor Wall Cutting board Vice grips Rag There are six stages to binding a book. This first is preparing the pages to be sewn. The pages are folded into groups, which are known as signatures. The second stage is the sewing together of the signatures. The third stage is attaching a backing to the sewn signatures, called a mull. In the fourth stage, the boards are attached to the mull. In the fifth stage the boards are covered, and in the sixth stage the endsheets are glued to the inside of the book. 6
6 Watson, 23-24.

5
Stage One: Preparing the Signatures First, decide on the size you want your book to be. For convenience’s sake, we’ll say that the book is going to be half the size of standard printer paper. You’re going to want to take small groups of this printer paper and fold them in half. That means that you would take a stack of, say, 5 to 10 sheets and fold them in half together as a group. To fold them tightly and squarely, butt one end of the paper up against a flat surface, such as a wall. Fold the opposite side over, touching the wall. To make the crease, use your paper folder to press down on the fold. Slide it along the length until the crease is tight and smooth. The paper folder you use can be anything from an empty bottle to the handle of a butter knife. Now you’ve made your first signature. Repeat this process five or so times, until you have the amount of pages that you want. It’s better to have more signatures with less paper, than fewer signatures with more paper.
7 8 In order to sew the signatures you will need to have a way to connect them. You will use the cloth tape for this, but you will need to attach the tape to something so that it will make a flat “wall” for the signatures to butt up against. The easiest way to do this is with a chair and a table. Pick up a chair and set it on top of your table (you can use
7 Watson, 32.
8 Watson, 31.

6
the floor if this doesn’t work). For the size of book we’re making, we’ll use three pieces of the cloth tape. If you can’t acquire cloth tape, you can cut pieces of cotton or linen into thin ½ or ¼ inch strips (just make sure they’re long enough to reach from the chair to the table). Tie or tape the strips of cloth vertically to the chair, and tape the loose ends to the table, so that they stand straight up and down, and are taught. Make sure that the strips are evenly spaced according to the size of the book.
9 Evenly stack the signatures on top of each other, and use a weight to keep them from moving around. Butt them up against the cloth strips to measure where you will poke the holes for sewing. With your pencil or pen, mark a line on both sides of the cloth strips. Also, mark a line ½ inch from both ends. Remove the weight and separate the signatures. Using your piercing tool, poke holes into the folds of the signatures where you marked. This is easier of you clip the pages together and press down into a cutting board or a piece of wood. When you have poked the holes, you are ready to sew the signatures together.
10
9 Watson, 38.

7
Stage Two: Sewing the Signatures Together When sewing the signatures together, start with one signature and add another on top of it as each one is sewn around the cloth tape. While sewing, you will be sewing the signatures around the cloth tape, as well as sewing the signatures to each other. Pick up your first signature and line it up flush with the cloth tape. Open it to the middle, and using your needle and knotted thread, pass the needle into the bottom hole from the outside of the crease, to the inside. Thread the needle back out the next hole. Proceed to thread the needle in and out of the crease, around the cloth tape. When you are finished, place another signature on top of the one you have just sewn. Pass the needle from the outside of the bottom signature to the outside of the top signature, and into the top signature to the middle of it. Work your way back along the new signature as you did with the first until you reach the end.
11
12 Then you will tie the two signatures together. To do this, pull on the knot on the outside of the first signature. Make a loop around and under the knot, then pass the needle through the loop and draw it tight. This is called a kettle stitch, and this is what you will sue to sew the signature to each other. Place the next signature on top, and continue sewing until all the signatures are sewn together. Be careful not to tie the signatures together too tightly, as they could tear, or the binding could cave in. When they are all sewn together, tie the last kettle stitch in a double knot.
10
Watson, 37. 11
Watson, 40. 12
Watson, 41.

8
13
14 Trim the thread leaving a bit of a tail, and cut the cloth tape from the chair. Pull the cloth tape taught, so that there are no wrinkles. If there are gaps between any of the signatures, they can be glued together. Now you are ready to attach the mull.
15
13
Watson, 42. 14
Watson, 42.

9
Stage Three: Attaching the Mull The mull is a piece of cloth that glues to the signatures and the cloth tape. The mull is what you will attach the cover to. You will need to put the sewn signatures into some kind of vice, so that the spine is facing up, and the sides are held together. If you don’t have any kind of vice, you could also use something heavy and stackable like bricks or encyclopaedias. Put them on either side of the signatures, and then with duct tape, tape them together on the sides so that they cannot separate. Once you have the vice set up, you will need to prepare the mull. The kind of fabric that is best to use is linen that has a weave tight enough to be strong, but loose enough to soak up the glue. Cut the mull long enough to fit from the top kettle stitch to the bottom kettle stitch, but no longer. The width should be around 3 inches wide and 1 ½ inches thinner than the cloth tape, so that the tape sticks out from under the mull. When the mull is cut, you will apply the paste. The best kind of paste to use is wheat paste, which you can make in your kitchen. To make wheat paste, put cold water in a pot and heat it up. As the water is heating up, slowly mix wheat flour into it until the desired paste consistency is reached. Apply the paste to the signatures and the cloth tape that is touching the spine. Use your fingers to work the paste into the cloth tape, making sure to keep the tape not touching the spine is free of paste. Apply the paste to the mull, making sure to work it in and saturate the fabric. Then attach the mull to the spine using your fingers to work the glue in. A dry rag can also be used to wipe up excess. If you need to apply more paste to the outside of the mull, do so. Leave in the vice overnight to dry.
16 17
15
Watson, 44. 16
Watson, 46.

10
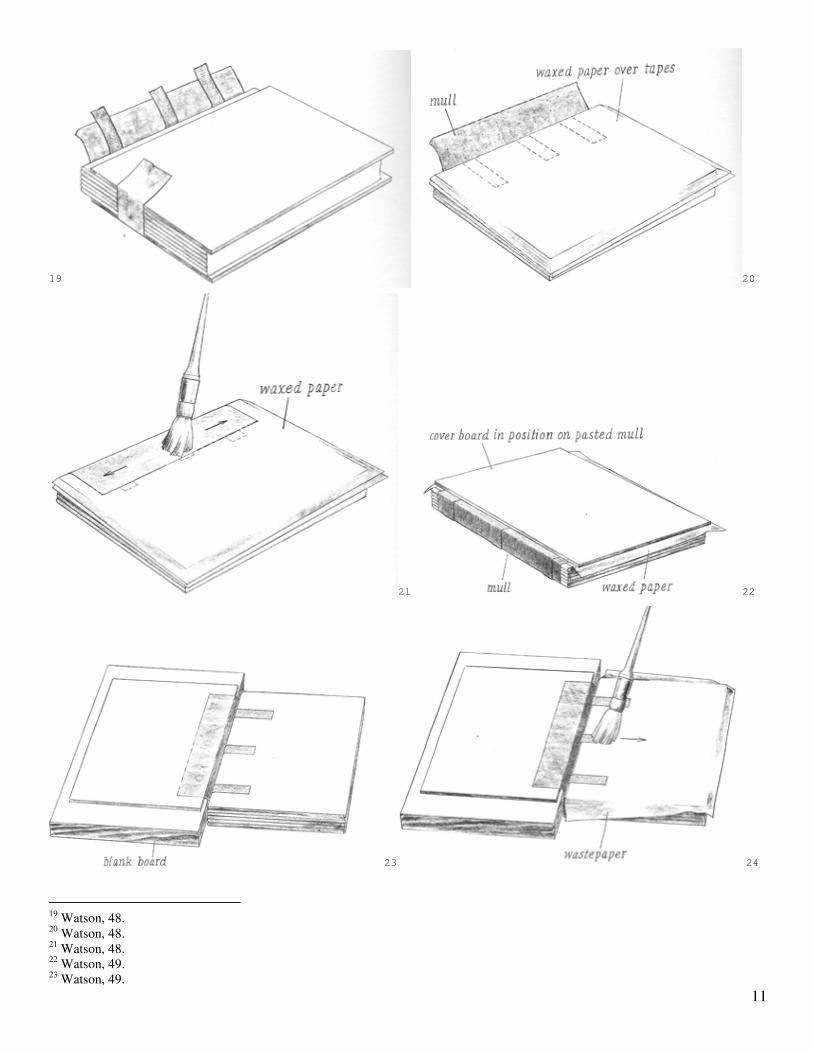
Stage Four: Attach Boards to Mull The board you will want to use should be around 1/8 inch thick. When cutting the board to the right size, make sure to always cut with the grain. You will cut three pieces, one for the spine, and two for the front and back covers. Measure the size of the signatures and spine as it is currently. When measuring the sides, subtract two board widths from the spine, and add 1/4 inch to the other three sides so the cover sticks out a bit to protect the pages, and so that at the spine, you will have room for the cover to bend. The size of the spine should be as tall as the cover boards, and the width of the paper spine plus the thickness of both the cover boards. Once the boards are cut, smooth the edges with sandpaper.
18 Lay the signature block face up. Put a piece of wax paper between the cloth tape and the signatures, and between the mull and the cloth tape. Brush the mull with paste, remove the piece of wax paper, and press the board (two widths away from the spine) onto the mull. Open the cover up and set against another book the same height as your book. Use your dry rag to work the paste into the mull. This will also help the paste to dry quickly. Apply the paste to the cloth tape, and glue it to the mull and the board. Take out the other piece of wax paper, and put a clean piece in its place. Then close the cover and put weights on it for 30 minutes.
17
Watson, 46. 18
Watson, 47.
11
19 20
21 22
23 24
19
Watson, 48. 20
Watson, 48. 21
Watson, 48. 22
Watson, 49. 23
Watson, 49.

12
Afterwards, open the book up, and cut the mull and tape down to 1 inch from the spine. Flip the book over, and repeat on the other side.
25
Stage Five: Cover the Boards Choose a piece of paper or cloth that you would like to use to cover the book. If you choose cloth, make sure that it is thin enough to fold, and strong enough to stand up against wear. Cut the mull 1/2 inch on either side of the spine on both the top and bottom of the book. This will make it easier to fold the cover over the spine later. Cut the cover so that it has extra room after covering both cover boards and the spine. Measure and mark the space where the spine and boards will be on the cover, leaving room for folding the cover over the boards. Make sure to take into consideration the space between the cover boards and the spine. Paste the spine onto the paper, then turn the paper over so that the spine is underneath it. Using the same tool that you used as a paper folder, mold the paper around the spine (a butter knife works well).
26 27 24
Watson, 49. 25
Watson, 50.

13
Attach the front cover board, by applying paste to the areas you marked out. Then, set the book down onto the paper. Turn it over and use your folding tool to smooth the paper and remove air bubbles. Do the same thing to the back cover. Put your folder into the spine and press on the hinge to seal the paper to the board. Lay the book flat and put weights onto it to keep it flat while it is drying.
28 29 When the book has dried, you will wrap the paper around the ends and glue them to the inside of the boards. Cut off the corners of the paper before folding the edges over. To fold the top and bottom spine edges, set the book on its side, and roll the paper around the edges of the board, then apply glue underneath the paper. Use your folder to smooth things out. Glue the sides and the corners over, and use your folder to smooth things out. Then, put wax paper in between the covers and the pages and put heavy weight back onto the book and press it overnight.
30 31
26
Watson, 50. 27
Watson, 51. 28
Watson, 52. 29
Watson, 53. 30
Watson, 56

14
32 33
34
35
31
Watson, 56. 32
Watson, 56. 33
Watson, 56

15
Stage Six: Gluing Endsheets
The endsheets will not only make the book look more attractive, but they will also reinforce the cover’s attachment. Open the front cover and lay it on a book the same height as your book. Use an unfolded piece of paper (the same size you used for the signatures), that is a bit thicker, like construction paper. Lay it flat across the open cover and the first page of your book. Using your folder, push the endsheet into the crease and holding it in place, close the cover, then open the cover up. This should have folded the endsheet into the place you’ll need to glue it. Put a piece of wax paper in between the endsheet and the first page. Paste the endsheet into the crease and 1/4 inch onto the first page. Smooth the glued area down with the folder. Apply paste to the other side of the endsheet, between the paper and the board, and glue the endsheet to the board, using the folder to smooth things out. Repeat on the other side. Replace the wax paper with clean wax paper on both sides. Put book under weight to dry over night.
36 After this, you may decorate your book as you see fit. Huzah! Now you have your own handmade book.
34
Watson, 57. 35
Watson, 29. 36
Watson, 63.

16
Bibliography
Bookbinding Ellenport, Sam. “The Future of Hand Bookbinding.” T he Books Arts Web. <http://www.philobiblon.com/FutureOfHandBookbindin g.ht m> (12 March 2006) Diderot, Denis. “Diderot Encyclopedie, Bookbinding. ” Excerpt from Diderot’s Encyclopedie (1751-1777). bookbinding.com. <http://www.bookbinding.com/diderot/> (12 March 2 006). Jones, Douglas W. “Jones on Preparation for Bookbin ding.” Excerpt from The Bookbinding Tutorial . The University of Iowa. <http://www.cs.uiowa.edu/~jones/book/prep.html> (1 2 March 2006) Pearson, David. “English Bookbinding Styles 1450-18 00, A Handbook.” New Castle, Delaware: Oak Knoll Press and The British Library, 2005. Roberts, Matt T. and Don Etherington. “Bookbinding and the Conservation of Books: A Dictionary of Descriptive Terminology.” C oOL. <http://palimpsest.stanford.edu/don/don.html> (12 March 2006) Tidcombe, Marianne. “Women Bookbinders 1880-1920.” New Castle, Delaware: Oak Knoll Press and The British Library, 1996. tobycraig. “Book Assembly Photo-Journal.” LiveJourn al. <http://tobycraig.livejournal.com/29223.html> (12 March 2006). Vaughan, Alex. J. “Modern Bookbinding: A Treatise C overing Both Letterpress and Stationary Branches of the Trade, With a Section o n Finishing and Design.” London: Charles Skilton Ltd, 1929. Watson, Aldren A. “Hand Bookbinding: A Manual of I nstruction.” New York: Macmillan Publishing Company, 1986. ________. “diy bookbinding.” This Woman’s Revolutio n. <http://thiswomansrevolution.trentwomenscentre.ca/ book binding.html> (12 March 2006) ________. “DIY Bookbinding: FrontPage.” DIY Bookbin ding Wiki. <http://diybookbinding.pbwiki.com/> (12 March 2006 ) ________. “Five-stitch Bookbinding.” Zum Gali Gali Rubber Stamps. <http://world.std.com/~deanb/zgg/book_5st_1.html> (12 March 2006) ________. “Historical Bookbinding Teaching Set.” Io wa Book Works. <http://iowabookworks.bookways.com/stories/storyRe ader $41> (12 March 2006) ________. “Practical Bookbinding.” Bookbinding.com. <http://www.bookbinding.com/rebinding/> (12 March 2006) ________. “The Zen of Bookbinding.” OPUS Framing an d Art Supplies. <http://www.opusframing.com/library/pdf/zen_of_boo kbin ding.pdf> (12 March 2006)

17
Zines, Book Arts D.I.Y. Bigge, Ryan. “Have You Thought About Publishing You r Own Zine?” Excerpt from 127 Days to Live . The Zine and E-Zine Resource Guide. <http://www.zinebook.com/resource/nzi.html> (12 Ma rch 2006) Carton, Sean and Gareth Branwyn. “D.I.Y. Revolution Curators’ Comments.” Philadelphia University Design Center. <http://www.philau.edu/designcenter/Zines/comments .htm > (12 March 2006) Dyer, Sarah. “Doing Your Own Zine.” Action Girl Onl ine. <http://www.houseoffun.com/action/zines/diy.html> (12 March 2006) Perkins, Stephen. “Alternative Art Publishing: Arti st Books (1960-1980).” The Zine and E-Zine Resource Guide. <http://www.zinebook.com/resource/perkins/perkins4 .htm l> (12 March 2006) Perkins, Stephen. “Alternative Art Publishing: Arti sts’ Magazines (1960-1980).” The Zine and E-Zine Resource Guide. <http://www.zinebook.com/resource/perkins/perkins5 .htm l> (12 March 2006) Perkins, Stephen. “Assembling Magazines (A.K.A. Com pilations).” The Zine and E- Zine Resource Guide. <http://www.zinebook.com/res ource/perkins/perkins6.htm l> (12 March 2006) Perkins, Stephen. “Punk Zines.” The Zine and E-Zine Resource Guide. <http://www.zinebook.com/resource/perkins/perkins7 .htm l> (12 March 2006) Perkins, Stephen. “The Counter Culture and Undergro und Press (1960-1975).” The Zine and E-Zine Resource Guide. <http://www.zinebook.com/resource/perkins/perkins3 .htm l> (12 March 2006) Runte, Robert. “Why Publish? A Sociological Analysi s of Motivation in Youth Avocational Subcultures.” Broken Pencil. <http://www.brokenpencil.com/features/feature.php? feat ureid=45> (12 March 2006) Printing ________. “Bindery Requirements and Folding Imposit ions. “ Acme Bookbinding. <http://www.acmebook.com/resources/bindFold> (12 M arch 2006) ________. “Imposition, From Wikipedia, the free enc yclopedia.” Wikipedia. <http://en.wikipedia.org/wiki/Imposition> (12 Marc h 2006) ________. “Wolf Printing Printips, March 2006.” Wol f Printing. <http://www.wolfprinting.com/pdf/Current.pdf> (12 March 2006)