bomb-defusal-manual_1 pt-br.pdf
TRANSCRIPT

BOMB
Revision 2
DEFUSAL
MANUAL
Version 1
Verification Code: 241
Tradução não oficial para PT-BR por GaBRieLBRHU3
Welcome to the dangerous and challenging world of bomb defusing.
Study this manual carefully; you are the expert. In these pages you will find
everything you need to know to defuse even the most insidious of bombs.
And remember — One small oversight and it could all be over!
Keep Talking and Nobody Explodes v. 1 Introduction
Page 2 of 23
Bem vindo ao desafiador e perigoso mundo de desarmação de bombas
Estude esse manual cuidadosamente; VOCÊ É O ESPECIALISTA. Nestaspáginas você vai encontrar tudo o que precisa saber para desarmar até a mais traiçoeira das bombas.E lembre-se: um pequeno descuido e tudo vai por àgua abaixo!!
Introdução

Strike
Indicator
Defusing Bombs
A bomb will explode when its countdown timer reaches 0:00 or when too many
strikes have been recorded. The only way to defuse a bomb is to disarm all of its
modules before its countdown timer expires.
Example Bomb
Front Side
Modules
Each bomb will include up to 11 modules that must be disarmed. Each module is
discrete and can be disarmed in any order.
Instructions for disarming modules can be found in Section 1. "Needy" modules
present a special case and are described in Section 2.
Strikes
When the Defuser makes a mistake the bomb will record a strike
which will be displayed on the indicator above the countdown
timer. Bombs with a strike indicator will explode upon the third
strike. The timer will begin to count down faster after a strike
has been recorded.
If no strike indicator is present above the countdown timer, the
bomb will explode upon the first strike, leaving no room for error.
Gathering Information
Some disarming instructions will require specific information about the bomb,
such as the serial number. This type of information can typically be found on
the top, bottom, or sides of the bomb casing. See Appendix A, B, and C for
identification instructions that will be useful in disarming certain modules.
Keep Talking and Nobody Explodes v. 1 Defusing Bombs
Page 3 of 23
Desarmando BombasA bomba vai explodir quando o cronômetro chegar a 00:00 ou quando chegar no numero limite de strikes. O unico jeito de desarmar a bomba é desarmando todos os módulos antes do contador expirar.
Exemplo
Frente Lateral
Módulos
Cada bomba pode ter até 11 módulos. Cada um dos módulos é diferente e pode ser disarmado em qualquer ordem.Instruções de como desarmar os módulos estão na Seção 1. Módulos "Needy" são casos especiais que são descritos na Seção 2.
Strikes
Indicadordo strike
Quando o desarmador errar, a bomba ira contar 1 strike, que pode ser visto acima do cronômetro. Bombas com o contador de strikes irão explodir depois de 3 strikes. O contador vai começar a ir mais rapido depois do 1º strike.
Se não houver nenhum indicador, a bomba vai explodir no 1º strike, deixando sem espaço para erros.
Pegando Informações
Algumas instruções de desarmamento precisam de informações especificas da bomba, como o serial. Esse tipo de info pode ser encontrada nos lados da bomba. Veja Appendix A, B e C para instruções de indentificação que vão ser úteis em certos módulos.
Desarmando a bomba
Section 1: Modules
Modules can be identified by an LED in the top right corner.
When this LED is lit green the module has been disarmed.
All modules must be disarmed to defuse the bomb.
Keep Talking and Nobody Explodes v. 1 Section 1: Modules
Page 4 of 23
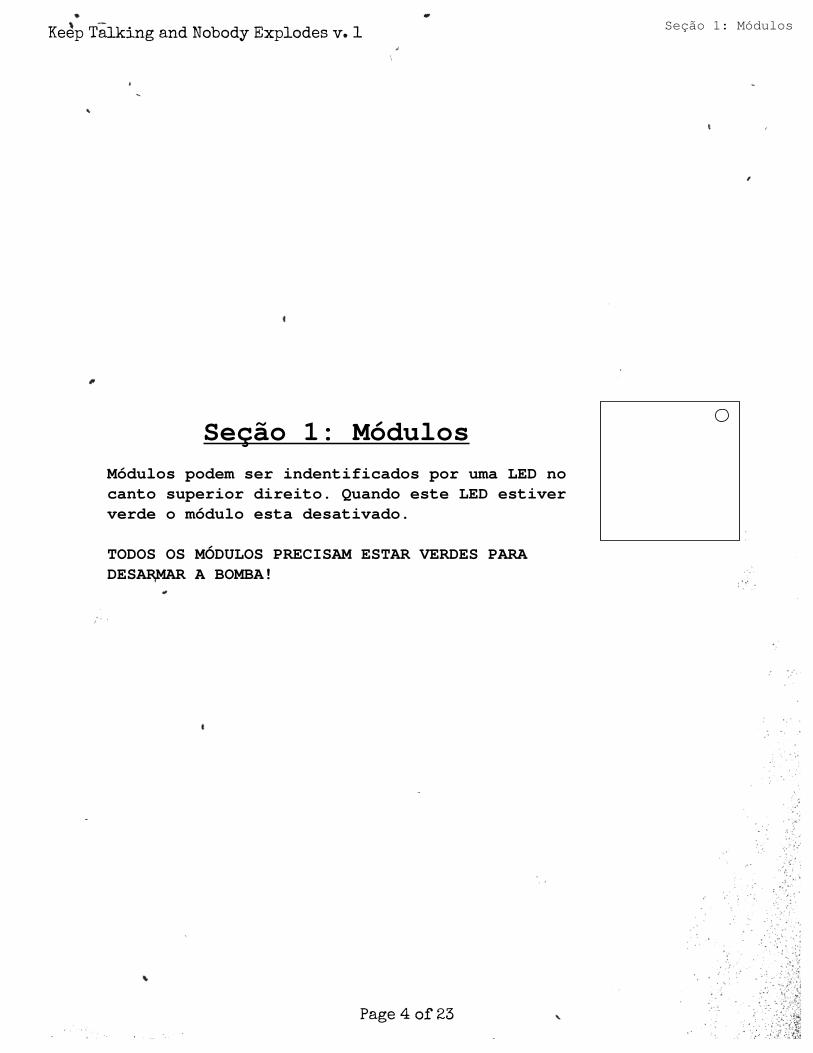
Seção 1: Módulos
Módulos podem ser indentificados por uma LED no canto superior direito. Quando este LED estiver verde o módulo esta desativado.
TODOS OS MÓDULOS PRECISAM ESTAR VERDES PARA DESARMAR A BOMBA!
Seção 1: Módulos

On the Subject of Wires
Wires are the lifeblood of electronics! Wait, no, electricity is the lifeblood.
Wires are more like the arteries. The veins? No matter…
A wire module can have 3-6 wires on it.
Only the one correct wire needs to be cut to disarm the
module.
Wire ordering begins with the first on the top.
3 wires:
If there are no red wires, cut the second wire.
Otherwise, if the last wire is white, cut the last wire.
Otherwise, if there is more than one blue wire, cut the last blue wire.
Otherwise, cut the last wire.
4 wires:
If there is more than one red wire and the last digit of the serial number is
odd, cut the last red wire.
Otherwise, if the last wire is yellow and there are no red wires, cut the first
wire.
Otherwise, if there is exactly one blue wire, cut the first wire.
Otherwise, if there is more than one yellow wire, cut the last wire.
Otherwise, cut the second wire.
5 wires:
If the last wire is black and the last digit of the serial number is odd, cut the
fourth wire.
Otherwise, if there is exactly one red wire and there is more than one yellow
wire, cut the first wire.
Otherwise, if there are no black wires, cut the second wire.
Otherwise, cut the first wire.
6 wires:
If there are no yellow wires and the last digit of the serial number is odd, cut
the third wire.
Otherwise, if there is exactly one yellow wire and there is more than one
white wire, cut the fourth wire.
Otherwise, if there are no red wires, cut the last wire.
Otherwise, cut the fourth wire.
Keep Talking and Nobody Explodes v. 1 Wires
Page 5 of 23
No assunto de: CabosOs cabos são como o sangue dos eletrônicos! Espera, não, eletricidade é o sangue. Cabos são tipo as artérias. Ou veias? Não importa...
*Um módulo de cabos podem ter de 3-6 cabos.*Apenas UM cabo precisa ser cortado para desarmar a bomba.*A ordem dos cabos começa de cima para baixo.
3 cabos:
Se não houver cabos vermelhos, corte o 2º caboNo entanto, se o ultimo for branco, corte o ultimoSe houver mais que 1 cabo azul, corte o ultimo azulOu então, corte o ultimo cabo
4 cabos
Se tiver mais que 1 cabo vermelho e o ultimo digito do serial for ímpar, corte o último cabo vermelhoSe o último cabo for amarelo e não tem cabos vermelhos, corte o 1º caboSe houver apenas 1 cabo azul, corte o 1º caboSe houver mais que 1 cabo amarelo, corte o último caboOu então, corte o 2º cabo
5 cabos:
Se o último cabo for preto e o último digito do serial for ímpar, corte o 4º cabo.Se houver apenas 1 cabo vermelho e mais que 1 amarelo, corte o 1º caboSe não houver nenhum cabo preto, corte o 2º caboOu então, corte o 1º cabo
6 cabos
Se não houver cabos amarelos e o último digito do serial for ímpar, corte o 3º caboSe tem apenas 1 cabo amarelo e mais que 1 branco, corte o 4º caboSe não houver cabos vermelhos, corte o último cabo Ou então corte o 4º cabo
Cabos

On the Subject of The Button
You might think that a button telling you to press it is pretty straightforward.
That’s the kind of thinking that gets people exploded.
See Appendix A for indicator identification reference.
See Appendix B for battery identification reference.
Follow these rules in the order they are listed. Perform the
first action that applies:
1. If the button is blue and the button says "Abort", hold the button and refer
to "Releasing a Held Button".
2. If there is more than 1 battery on the bomb and the button says "Detonate",
press and immediately release the button.
3. If the button is white and there is a lit indicator with label CAR, hold the
button and refer to "Releasing a Held Button".
4. If there are more than 2 batteries on the bomb and there is a lit indicator
with label FRK, press and immediately release the button.
5. If the button is yellow, hold the button and refer to "Releasing a Held
Button".
6. If the button is red and the button says "Hold", press and immediately
release the button.
7. If none of the above apply, hold the button and refer to "Releasing a Held
Button".
Releasing a Held Button
If you start holding the button down, a colored strip will light up on the right
side of the module. Based on its color you must release the button at a specific
point in time:
Blue strip: release when the countdown timer has a 4 in any position.
White strip: release when the countdown timer has a 1 in any position.
Yellow strip: release when the countdown timer has a 5 in any position.
Any other color strip: release when the countdown timer has a 1 in any
position.
Keep Talking and Nobody Explodes v. 1 The Button
Page 6 of 23
O Botão
No assunto Do Botão
Você pode pensar que um botão dizendo para você aperta-lo é bem óbvioÉ esse tipo de pensamento que faz as pessoas serem explodidas
Veja Appendix A para instruções do indicadorVeja Appendix B para instruções sobre baterias
Siga as regras na ordem que estão listadas. Utiliza a primeira regra que se encaixar:
1. Se o botão for azul e dizer "Abort", clique e segure o botão e vá para "Soltando o botão" 2. Se houver mais que UMA bateria na bomba e o botão diz "Detonate", aperte e imediatamente solte-o3. Se o botão for branco e o indicador aceso tem uma plaquinha escrita CAR, segure-o e vá para "Soltando o Botão"4. Se tiver mais que 2 baterias e o indicador aceso esta escrito FRK, aperte e imediatamente solte o botão5. Se o botão for amarelo, segure-o e vá para "Soltando o Botão"6.Se o botão for vermelho e esta dizendo "Hold", aperte e solte-o imediatamente7. Se nenhuma alternativa acima se encaixou, segure o botão e vá para "Soltando o Botão"
Soltando o Botão
Se você está apertando o botão, uma faixa colorida deverá acender do lado direito do módulo. Baseado na sua cor você precisa soltar o botão em um tempo específico:
*Faixa Azul: solte quando aparecer o número 4 no contador em qualquer lugar*Faixa Branca: solte quando aparecer o número 1 no contador*Faixa Amarela:solte quando aparecer o número 5 no contador*Faixa de qualquer outra cor: solte quando o número 1 aparecer no contador

On the Subject of Keypads
I'm not sure what these symbols are, but I suspect they have something to do with
occult.
Only one column below has all four of the symbols from
the keypad.
Press the four buttons in the order their symbols appear
from top to bottom within that column.
Keep Talking and Nobody Explodes v. 1 Keypads
Page 7 of 23
símbolos
No assunto de Símbolos*
* A tradução correta de "keypad" seria teclado, mas eu achei melhor deixar símbolos
Não sei o que esses símbolos são, mas acho que eles tem alguma coisa a ver com ocultismo.
*Apenas uma das colunas abaixo tem os quatro símbolos juntos*Aperte os quatro símbolos na ordem em que eles aparecem de cima para baixo

On the Subject of Simon Says
This is like one of those toys you played with as a kid where you have to match the
pattern that appears, except this one is a knockoff that was probably purchased at
a dollar store.
1. One of the four colored buttons will flash.
2. Using the correct table below, press the button with the
corresponding color.
3. The original button will flash, followed by another. Repeat this sequence
in order using the color mapping.
4. The sequence will lengthen by one each time you correctly enter a sequence
until the module is disarmed.
If the serial number contains a vowel:
Red
Flash
Blue
Flash
Green
Flash
Yellow
Flash
Button to press:
No Strikes Blue Red Yellow Green
1 Strike Yellow Green Blue Red
2 Strikes Green Red Yellow Blue
If the serial number does not contain a vowel:
Red
Flash
Blue
Flash
Green
Flash
Yellow
Flash
Button to press:
No Strikes Blue Yellow Green Red
1 Strike Red Blue Yellow Green
2 Strikes Yellow Green Blue Red
Keep Talking and Nobody Explodes v. 1 Simon Says
Page 8 of 23
Simon fala
No assunto de Simon falaEsse é tipo aqueles brinquedos que você tinha quando criança que precisava memorizar a ordem das cores que aparecem; Exceto que esse é uma cópia que foi comprada em alguma loja de R$ 1,99.
1. Algum dos botões vai piscar2. Usando a tabela abaixo, aperte o botão correspondente3. O botão original vai piscar, seguido de outro. Repita a sequência em ordem usando a tabela.4. A sequência vai se estendendo 1 cor cada vez que você acertar, até o módulo desarmar
Azul
Amarelo
Verde
Vermelho
Se o serial tiver uma vogal:
Se o serial NÃO tiver uma vogal:
Botão para apertar:
Sem strikes
1 strike
2 strikes
Luz vermelha
Luz azul Luz Verde Luz amarela
Azul
Amarelo
Verde
Vermelho
Verde
Vermelho
Amarelo
Azul
Amarelo
Verde
Vermelho
Azul
Botão para apertar:
Sem strikes
1 strike
2 strikes
Luz vermelha
Luz azul Luz verde Luz amarela
Azul
Vermelho
Amarelo
Amarelo
Azul
Verde
Verde
Amarelo
Azul
Vermelho
Verde
Vermelho
On the Subject of Who’s on First
This contraption is like something out of a sketch comedy routine, which might
be funny if it wasn't connected to a bomb. I’ll keep this brief, as words only
complicate matters.
1. Read the display and use step 1 to determine which
button label to read.
2. Using this button label, use step 2 determine which
button to push.
3. Repeat until the module has been disarmed.
Step 1:
Based on the display, read the label of a particular button and proceed to step 2:
YES FIRST DISPLAY OKAY SAYS NOTHING
BLANK NO LED LEAD READ
RED REED LEED HOLD ON YOU YOU ARE
YOUR YOU'RE UR THERE THEY'RE THEIR
THEY ARE SEE C CEE
Keep Talking and Nobody Explodes v. 1 Who's on First
Page 9 of 23
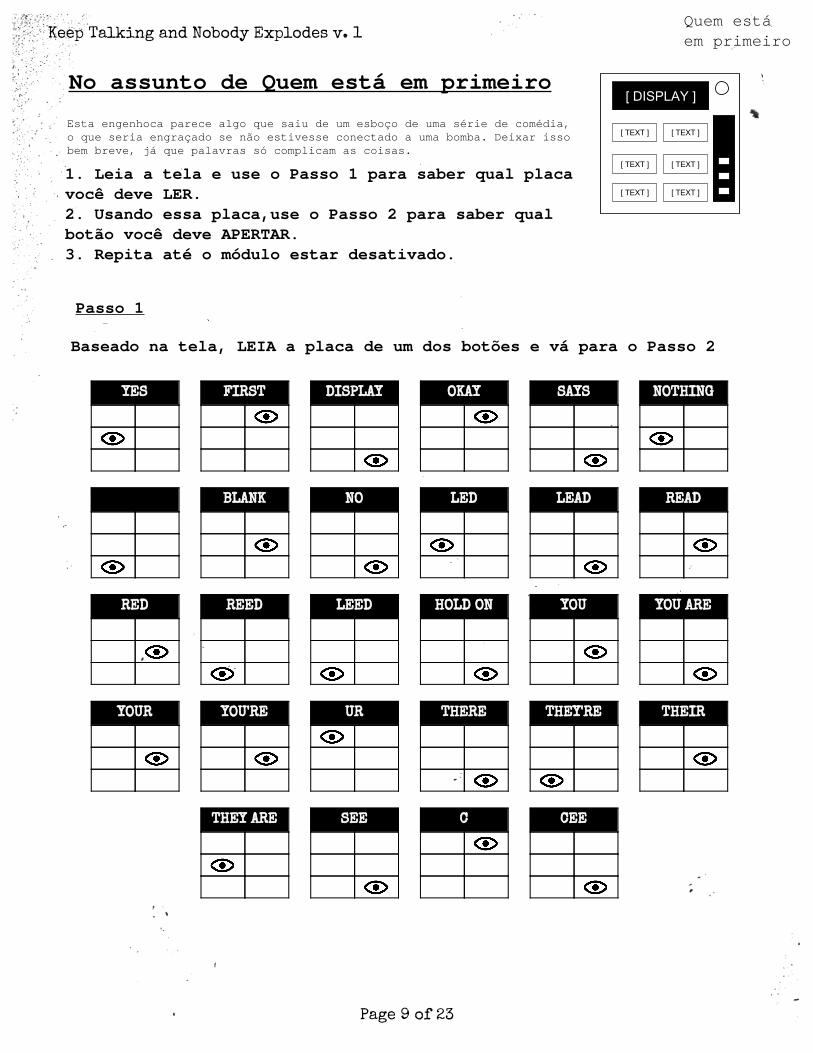
Quem está em primeiro
No assunto de Quem está em primeiro
Esta engenhoca parece algo que saiu de um esboço de uma série de comédia, o que seria engraçado se não estivesse conectado a uma bomba. Deixar isso bem breve, já que palavras só complicam as coisas.
1. Leia a tela e use o Passo 1 para saber qual placa você deve LER.2. Usando essa placa,use o Passo 2 para saber qual botão você deve APERTAR. 3. Repita até o módulo estar desativado.
Passo 1
Baseado na tela, LEIA a placa de um dos botões e vá para o Passo 2

Step 2:
Using the label from step 1, push the first button that appears in its
corresponding list:
"READY": YES, OKAY, WHAT, MIDDLE, LEFT, PRESS, RIGHT, BLANK, READY, NO, FIRST, UHHH, NOTHING, WAIT
"FIRST": LEFT, OKAY, YES, MIDDLE, NO, RIGHT, NOTHING, UHHH, WAIT, READY, BLANK, WHAT, PRESS, FIRST
"NO": BLANK, UHHH, WAIT, FIRST, WHAT, READY, RIGHT, YES, NOTHING, LEFT, PRESS, OKAY, NO, MIDDLE
"BLANK": WAIT, RIGHT, OKAY, MIDDLE, BLANK, PRESS, READY, NOTHING, NO, WHAT, LEFT, UHHH, YES, FIRST
"NOTHING": UHHH, RIGHT, OKAY, MIDDLE, YES, BLANK, NO, PRESS, LEFT, WHAT, WAIT, FIRST, NOTHING, READY
"YES": OKAY, RIGHT, UHHH, MIDDLE, FIRST, WHAT, PRESS, READY, NOTHING, YES, LEFT, BLANK, NO, WAIT
"WHAT": UHHH, WHAT, LEFT, NOTHING, READY, BLANK, MIDDLE, NO, OKAY, FIRST, WAIT, YES, PRESS, RIGHT
"UHHH": READY, NOTHING, LEFT, WHAT, OKAY, YES, RIGHT, NO, PRESS, BLANK, UHHH, MIDDLE, WAIT, FIRST
"LEFT": RIGHT, LEFT, FIRST, NO, MIDDLE, YES, BLANK, WHAT, UHHH, WAIT, PRESS, READY, OKAY, NOTHING
"RIGHT": YES, NOTHING, READY, PRESS, NO, WAIT, WHAT, RIGHT, MIDDLE, LEFT, UHHH, BLANK, OKAY, FIRST
"MIDDLE": BLANK, READY, OKAY, WHAT, NOTHING, PRESS, NO, WAIT, LEFT, MIDDLE, RIGHT, FIRST, UHHH, YES
"OKAY": MIDDLE, NO, FIRST, YES, UHHH, NOTHING, WAIT, OKAY, LEFT, READY, BLANK, PRESS, WHAT, RIGHT
"WAIT": UHHH, NO, BLANK, OKAY, YES, LEFT, FIRST, PRESS, WHAT, WAIT, NOTHING, READY, RIGHT, MIDDLE
"PRESS": RIGHT, MIDDLE, YES, READY, PRESS, OKAY, NOTHING, UHHH, BLANK, LEFT, FIRST, WHAT, NO, WAIT
"YOU": SURE, YOU ARE, YOUR, YOU'RE, NEXT, UH HUH, UR, HOLD, WHAT?, YOU, UH UH, LIKE, DONE, U
"YOU ARE": YOUR, NEXT, LIKE, UH HUH, WHAT?, DONE, UH UH, HOLD, YOU, U, YOU'RE, SURE, UR, YOU ARE
"YOUR": UH UH, YOU ARE, UH HUH, YOUR, NEXT, UR, SURE, U, YOU'RE, YOU, WHAT?, HOLD, LIKE, DONE
"YOU'RE": YOU, YOU'RE, UR, NEXT, UH UH, YOU ARE, U, YOUR, WHAT?, UH HUH, SURE, DONE, LIKE, HOLD
"UR": DONE, U, UR, UH HUH, WHAT?, SURE, YOUR, HOLD, YOU'RE, LIKE, NEXT, UH UH, YOU ARE, YOU
"U": UH HUH, SURE, NEXT, WHAT?, YOU'RE, UR, UH UH, DONE, U, YOU, LIKE, HOLD, YOU ARE, YOUR
"UH HUH": UH HUH, YOUR, YOU ARE, YOU, DONE, HOLD, UH UH, NEXT, SURE, LIKE, YOU'RE, UR, U, WHAT?
"UH UH": UR, U, YOU ARE, YOU'RE, NEXT, UH UH, DONE, YOU, UH HUH, LIKE, YOUR, SURE, HOLD, WHAT?
"WHAT?": YOU, HOLD, YOU'RE, YOUR, U, DONE, UH UH, LIKE, YOU ARE, UH HUH, UR, NEXT, WHAT?, SURE
"DONE": SURE, UH HUH, NEXT, WHAT?, YOUR, UR, YOU'RE, HOLD, LIKE, YOU, U, YOU ARE, UH UH, DONE
"NEXT": WHAT?, UH HUH, UH UH, YOUR, HOLD, SURE, NEXT, LIKE, DONE, YOU ARE, UR, YOU'RE, U, YOU
"HOLD": YOU ARE, U, DONE, UH UH, YOU, UR, SURE, WHAT?, YOU'RE, NEXT, HOLD, UH HUH, YOUR, LIKE
"SURE": YOU ARE, DONE, LIKE, YOU'RE, YOU, HOLD, UH HUH, UR, SURE, U, WHAT?, NEXT, YOUR, UH UH
"LIKE": YOU'RE, NEXT, U, UR, HOLD, DONE, UH UH, WHAT?, UH HUH, YOU, LIKE, SURE, YOU ARE, YOUR
Keep Talking and Nobody Explodes v. 1 Who's on First
Page 10 of 23
Quem está em primeiro
Passo 2:
Usando a placa do Passo 1, PRESSIONE O 1º BOTÃO que aparecer na lista correspondente:
Obs: Eu demorei pra caramba pra entender essa ai xD

On the Subject of Memory
Memory is a fragile thing but so is everything else when a bomb goes off, so pay
attention!
Press the correct button to progress the module to the
next stage. Complete all stages to disarm the module.
Pressing an incorrect button will reset the module back
to stage 1.
Button positions are ordered from left to right.
Stage 1:
If the display is 1, press the button in the second position.
If the display is 2, press the button in the second position.
If the display is 3, press the button in the third position.
If the display is 4, press the button in the fourth position.
Stage 2:
If the display is 1, press the button labeled "4".
If the display is 2, press the button in the same position as you pressed in stage 1.
If the display is 3, press the button in the first position.
If the display is 4, press the button in the same position as you pressed in stage 1.
Stage 3:
If the display is 1, press the button with the same label you pressed in stage 2.
If the display is 2, press the button with the same label you pressed in stage 1.
If the display is 3, press the button in the third position.
If the display is 4, press the button labeled "4".
Stage 4:
If the display is 1, press the button in the same position as you pressed in stage 1.
If the display is 2, press the button in the first position.
If the display is 3, press the button in the same position as you pressed in stage 2.
If the display is 4, press the button in the same position as you pressed in stage 2.
Stage 5:
If the display is 1, press the button with the same label you pressed in stage 1.
If the display is 2, press the button with the same label you pressed in stage 2.
If the display is 3, press the button with the same label you pressed in stage 4.
If the display is 4, press the button with the same label you pressed in stage 3.
Keep Talking and Nobody Explodes v. 1 Memory
Page 11 of 23
No assunto de Memória
Memória
Memória é uma coisa frágil, assim como tudo ao redor de uma bomba, então preste atenção!
*Pressione o botão correto para passar pro próximo estágio. Complete todos para desarmar o módulo.*Apertar um botão errado vai reiniciar o módulo de volta pro 1º estágio*Os botões estão ordenados da esquerda pra direita
Estágio 1:
Se a tela é 1, aperte o botão na 2ª posiçãoSe a tela é 2, aperte o botão na 2ª posiçãoSe a tela é 3, aperte o botão na 3ª posiçãoSe a tela é 4, aperte o botão na 4ª posição
Se a tela é 1, aperte o número "4".Se a tela é 2, aperte o mesmo BOTÃO que você apertou no Estágio 1.Se a tela é 3, aperte o botão na 1ª posiçãoSe a tela é 4, aperte o mesmo BOTÃO que você apertou no Estágio 1
Estágio 2:
Estágio 3:
Se a tela é 1, aperte o mesmo NÚMERO que você apertou no Estágio 2Se a tela é 2, aperte o mesmo NÚMERO que você apertou no Estágio 1Se a tela é 3, aperte o botão na 3ª posiçãoSe a tela é 4, aperte o número "4"
Estágio 4:
Se a tela é 1, aperte o mesmo BOTÃO que você apertou no Estágio 1Se a tela é 2, aperte o botão na primeira posiçãoSe a tela é 3, aperte o mesmo BOTÃO que você apertou no Estágio 2Se a tela é 4, aperte o mesmo BOTÃO que você apertou do Estágio 2
Estágio 5:
Se a tela é 1, aperte o mesmo NÚMERO que você apertou no Estágio 1Se a tela é 2, aperte o mesmo NÚMERO que você apertou no Estágio 2Se a tela é 3, aperte o mesmo NÚMERO que você apertou no Estágio 4Se a tela é 4, aperte o mesmo NÚMERO que você apertou no Estágio 3

International Morse Code1. The length of a dot is one unit.2. A dash is three units.3. The space between parts of the same letter is one unit.4. The space between letters is three units.5. The space between words is seven units.
UVWXYZ
ABCDEFGHIJKLMNO
QP
RST
1234567890
On the Subject of Morse Code
An antiquated form of naval communication? What next? At least it's genuine Morse
Code, so pay attention and you might just learn something.
Interpret the signal from the flashing light using the
Morse Code chart to spell one of the words in the table.
The signal will loop, with a long gap between
repetitions.
Once the word is identified, set the corresponding frequency and press the
transmit (TX) button.
If the
word is:
Respond at
frequency:
shell 3.505 MHz
halls 3.515 MHz
slick 3.522 MHz
trick 3.532 MHz
boxes 3.535 MHz
leaks 3.542 MHz
strobe 3.545 MHz
bistro 3.552 MHz
flick 3.555 MHz
bombs 3.565 MHz
break 3.572 MHz
brick 3.575 MHz
steak 3.582 MHz
sting 3.592 MHz
vector 3.595 MHz
beats 3.600 MHz
Keep Talking and Nobody Explodes v. 1 Morse Code
Page 12 of 23
No assunto de Código Morse
Código morse
Uma forma de comunicação naval antiquada? O que mais? Pelo menos é o verdadeiro Código Morse, então preste atenção e pode até aprender algo.
*Interprete o sinal da luz piscando usando a tabela para formar alguma das palavras.*O sinal vai se repetir, com um longo espaço entre as repetições*Assim que a palavra for identificada, arrume a transmissão certa e aperte pra transmitir (TX)
Código Morse internacional1. Um ponto é igual a uma unidade2. Um traço é 3 unidades3. O espaço entre as partes da mesma letra é uma unidade.4. Espaço entre as letras é 3 unidades5. Espaço entre palavras é 7 unidades
Se a palavra for:
A frequência é:

On the Subject of Complicated Wires
These wires aren't like the others. Some have stripes! That makes them completely
different. The good news is that we've found a concise set of instructions on what
to do about it! Maybe too concise...
Look at each wire: there is an LED above the wire and a
space for a "★" symbol below the wire.
For each wire/LED/symbol combination, use the Venn
diagram below to decide whether or not to cut the wire.
Each wire may be striped with multiple colors.
Keep Talking and Nobody Explodes v. 1 Complicated Wires
Page 13 of 23
S S
C D
CS
P
B
D B
P S
P B
D
C
Wire has red
coloring
Wire has blue
coloring
Has ★ symbol
LED is on
Letter Instruction
C Cut the wire
D Do not cut the wire
SCut the wire if the last digit of the
serial number is even
PCut the wire if the bomb has a parallel
port
BCut the wire if the bomb has two or
more batteries
See Appendix B for battery identification reference.
See Appendix C for port identification reference.
Cabos complicados
No assunto de Cabos ComplicadosEsses cabos não são como os outros. Alguns tem listras! Isso faz deles completamente diferentes. A boa noticia é que nós encontramos um manual resumindo todas as instruções! Talvez esteja muito resumido...
*Olhe cada cabo: tem um LED em cima de do cabo e um espaço para uma "�" abaixo.*Para CADA cabo/LED/combinação de símbolos, use o diagrama abaixo para decidir qual cortar ou não.*Cada cabo pode estar listrado em várias cores.
Cabo tem a cor vermelha
Cabo tem a cor azul
Tem esse símbolo "�"
LED está ligada
Letra Instruções
Corte o cabo
Não corte o caboCorte se o último número do serial for par
Corte se a bomba tiver uma porta/entrada paralela
Corte se a bomba tiver 2 ou mais baterias
Veja Appendix A para identificação de bateria.Veja Appendix B para identificação de porta/entradas.
On the Subject of Wire Sequences
It's hard to say how this mechanism works. The engineering is pretty impressive,
but there must have been an easier way to manage nine wires.
Within this module there are several panels with wires
on them, but only one panel is visible at a time. Switch
to the next panel by using the down button and the
previous panel by using the up button.
Do not switch to the next panel until you are sure that you have cut all
necessary wires on the current panel.
Cut the wires as directed by the following table. Wire occurrences are
cumulative over all panels within the module.
Red Wire Occurrences
Wire Occurrence
Cut if
connected
to:
First red
occurrenceC
Second red
occurrenceB
Third red
occurrenceA
Fourth red
occurrenceA or C
Fifth red
occurrenceB
Sixth red
occurrenceA or C
Seventh red
occurrenceA, B or C
Eighth red
occurrenceA or B
Ninth red
occurrenceB
Blue Wire Occurrences
Wire Occurrence
Cut if
connected
to:
First blue
occurrenceB
Second blue
occurrenceA or C
Third blue
occurrenceB
Fourth blue
occurrenceA
Fifth blue
occurrenceB
Sixth blue
occurrenceB or C
Seventh blue
occurrenceC
Eighth blue
occurrenceA or C
Ninth blue
occurrenceA
Black Wire Occurrences
Wire Occurrence
Cut if
connected
to:
First black
occurrenceA, B or C
Second black
occurrenceA or C
Third black
occurrenceB
Fourth black
occurrenceA or C
Fifth black
occurrenceB
Sixth black
occurrenceB or C
Seventh black
occurrenceA or B
Eighth black
occurrenceC
Ninth black
occurrenceC
Keep Talking and Nobody Explodes v. 1 Wire Sequences
Page 14 of 23
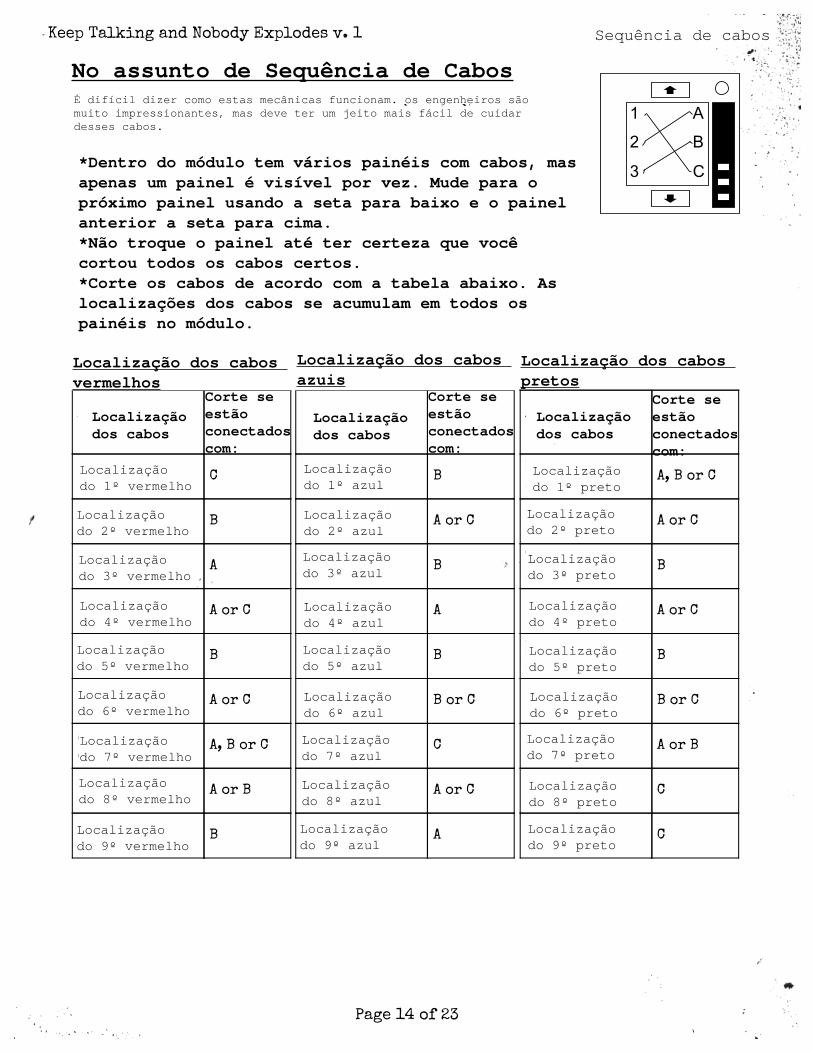
Sequência de cabos
No assunto de Sequência de CabosÉ difícil dizer como estas mecânicas funcionam. os engenheiros são muito impressionantes, mas deve ter um jeito mais fácil de cuidar desses cabos.
*Dentro do módulo tem vários painéis com cabos, mas apenas um painel é visível por vez. Mude para o próximo painel usando a seta para baixo e o painel anterior a seta para cima.*Não troque o painel até ter certeza que você cortou todos os cabos certos.*Corte os cabos de acordo com a tabela abaixo. As localizações dos cabos se acumulam em todos os painéis no módulo.
Localização dos cabos vermelhos
Localização dos cabos azuis
Localização dos cabos pretos
Localização dos cabos
Corte se estão conectados com:
Localização dos cabos
Localização dos cabos
Corte se estão conectados com:
Corte se estão conectados com:
Localização do 1º vermelho
Localização do 2º vermelho
Localização do 3º vermelho
Localização do 4º vermelho
Localização do 5º vermelho
Localização do 6º vermelho
Localização do 7º vermelho
Localização do 8º vermelho
Localização do 9º vermelho
Localização do 1º azul
Localização do 2º azul
Localização do 3º azul
Localização do 4º azul
Localização do 5º azul
Localização do 6º azul
Localização do 7º azul
Localização do 8º azul
Localização do 9º azul
Localização do 1º preto
Localização do 2º preto
Localização do 3º preto
Localização do 4º preto
Localização do 5º preto
Localização do 6º preto
Localização do 7º preto
Localização do 8º preto
Localização do 9º preto

On the Subject of Mazes
This seems to be some kind of maze, probably stolen off of a restaurant placemat.
Find the maze with matching circular markings.
The defuser must navigate the white light to the red
triangle using the arrow buttons.
Warning: Do not cross the lines shown in the maze. These
lines are invisible on the bomb.
Keep Talking and Nobody Explodes v. 1 Mazes
Page 15 of 23
Labirinto
No assunto de LabirintosEsse parece ser algum tipo de labirinto, provavelmente roubado de algum restaurante
*Encontre o labirinto com os círculos na mesma posição.*O desarmador deve mexer o ponto branco até o triangulo vermelho usando as setas do teclado*AVISO: Não cruze as linhas mostradas no labirinto. As linhas são invisíveis na bomba.

On the Subject of Passwords
Fortunately this password doesn't seem to meet standard government security
requirements: 22 characters, mixed case, numbers in random order without any
palindromes above length 3.
The buttons above and below each letter will cycle
through the possibilities for that position.
Only one combination of the available letters will
match a password below.
Press the submit button once the correct word has been set.
about after again below could
every first found great house
large learn never other place
plant point right small sound
spell still study their there
these thing think three water
where which world would write
Keep Talking and Nobody Explodes v. 1 Passwords
Page 16 of 23
No assunto de SenhasPor sorte essas senhas não atendem padrões de segurança do governo: 22 caracteres, tamanho diferenciado, números em ordem aleatória sem palíndromos acima de 3 pontos.
*Os botões acima e abaixo de cada letra vão trocar entre as possibilidades para aquela posição.*Apenas uma combinação das letras disponíveis vai ser igual a uma palavra abaixo.*Aperte em "Submit" assim que a palavra estiver feita.

Section 2: Needy Modules
Needy modules cannot be disarmed, but pose a recurrent
hazard.
Needy modules can be identified as a module with a small
2‑digit timer in the top center. Interacting with the bomb
may cause them to become activated. Once activated, these
needy modules must be tended to regularly before their timer
expires in order to prevent a strike.
Stay observant: needy modules may reactivate at any time.
Keep Talking and Nobody Explodes v. 1 Section 2: Needy Modules
Page 17 of 23
Seção 2: Módulos Needy
Os módulos Needy não podem ser desarmados, mas apresentam um perigo recorrente.
Módulos Needy podem ser identificados pelo pequeno contador de 2 dígitos no centro. Interagir com a bomba pode fazer com que eles se ativem. Assim que estão ativados, esses módulos devem ser cuidados antes que o tempo expire para prevenir um strike.
FIQUE ATENTO: Os módulos Needy podem se reativar a qualquer momento
Seção 2: Módulos Needy

On the Subject of Venting Gas
Computer hacking is hard work! Well, it usually is. This job could probably be
performed by a simple drinking bird pressing the same key over and over again.
Respond to the computer prompts by pressing "Y" for "Yes"
or "N" for "No".
Keep Talking and Nobody Explodes v. 1 Venting Gas
Page 18 of 23
Ventilação de Gas
No assunto de Ventilação de GasHackear computadores é difícil! Bom, geralmente é. Esse trabalho pode ser feito até por um passarinho apertando a mesma tecla pra sempre.
*Responda aos comandos do computador apertando "Y" para SIM, e "N" para NÃO.
On the Subject of Capacitor Discharge
I'm going to guess that this is just meant to occupy your attention, because
otherwise this is some shoddy electronics work.
Discharge the capacitor before it overloads by holding
down the lever.
Keep Talking and Nobody Explodes v. 1 Capacitor Discharge
Page 19 of 23
Descarregando o capacitor
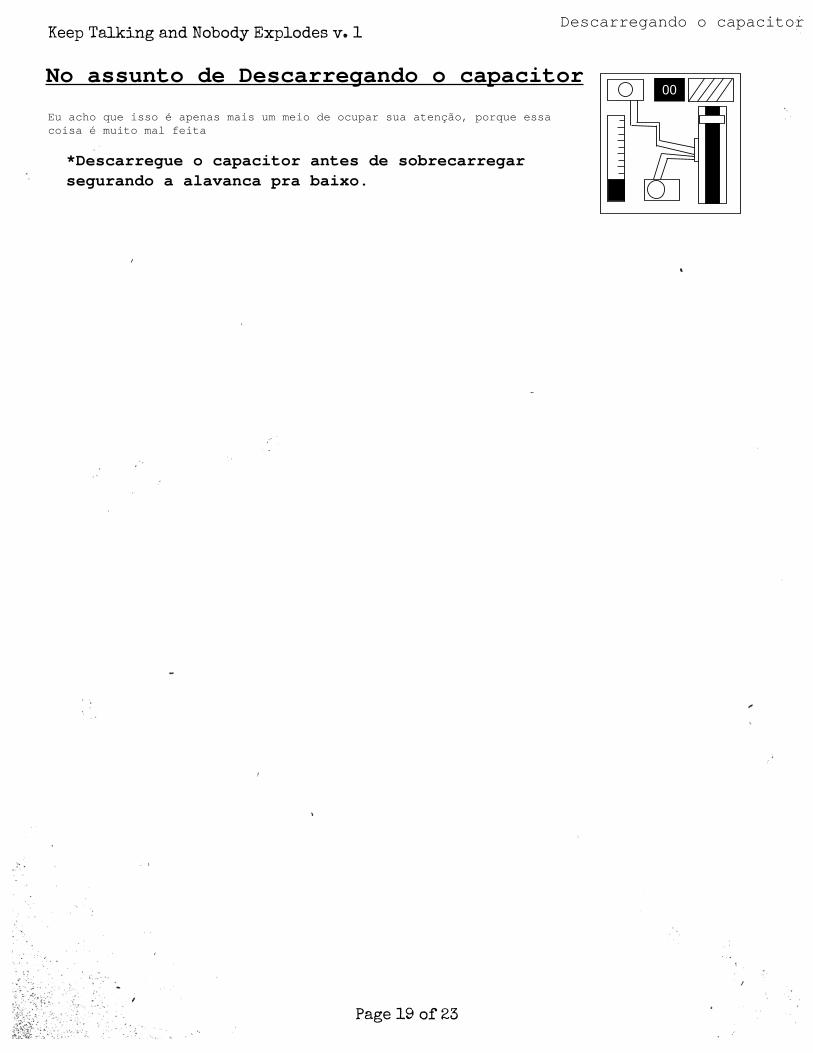
No assunto de Descarregando o capacitor
Eu acho que isso é apenas mais um meio de ocupar sua atenção, porque essa coisa é muito mal feita
*Descarregue o capacitor antes de sobrecarregar segurando a alavanca pra baixo.
On the Subject of Knobs
Needlessly complicated and endlessly needy. Imagine if such expertise were used
to make something other than diabolical puzzles.
The knob can be turned to one of four different
positions.
The knob must be in the correct position when this
module's timer hits zero.
The correct position can be determined by the on/off configuration of the
twelve LEDs.
Knob positions are relative to the "UP" label, which may be rotated.
LED Configurations
Up Position:
X X X
X X X X X
X X X
X X X X
Down Position:
X X X
X X X X X
X X X
X X
Left Position:
X
X X X X
X
X X
Right Position:
X X X X X
X X X X
X X X
X X X X
X = Lit LED
Keep Talking and Nobody Explodes v. 1 Knobs
Page 20 of 23
Maçaneta
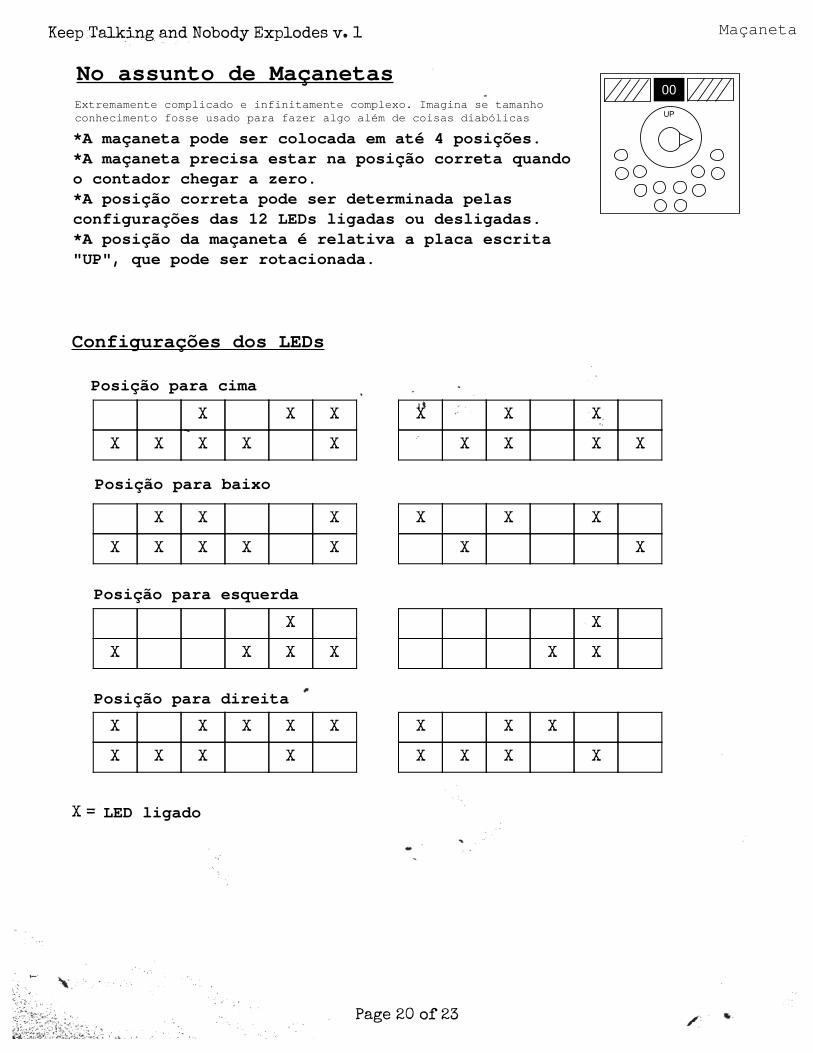
No assunto de MaçanetasExtremamente complicado e infinitamente complexo. Imagina se tamanho conhecimento fosse usado para fazer algo além de coisas diabólicas
*A maçaneta pode ser colocada em até 4 posições.*A maçaneta precisa estar na posição correta quando o contador chegar a zero.*A posição correta pode ser determinada pelas configurações das 12 LEDs ligadas ou desligadas.*A posição da maçaneta é relativa a placa escrita "UP", que pode ser rotacionada.
Configurações dos LEDs
Posição para cima
Posição para baixo
Posição para esquerda
Posição para direita
LED ligado

Appendix A: Indicator Identification Reference
Labelled indicator lights can be found on the sides of the bomb casing.
Common Indicators
SND
CLR
CAR
IND
FRQ
SIG
NSA
MSA
TRN
BOB
FRK
Keep Talking and Nobody Explodes v. 1 Appendix A
Page 21 of 23
Appendix A: Identificador dos indicadores
As plaquinhas com os indicadores podem ser encontrados nas laterais da bomba.
Indicadores comuns

Appendix B: Battery Identification Reference
Common battery types can be found within enclosures on the sides of the bomb
casing.
Battery Type
AA
D
Keep Talking and Nobody Explodes v. 1 Appendix B
Page 22 of 23
Appendix B: Identificador de Bateria
Tipos de bateria comuns podem ser encontrados nos lados da bomba.
Bateria Tipo

Appendix C: Port Identification Reference
Digital and analog ports can be found on sides of the bomb casing.
Port Name
DVI-D
Parallel
PS/2
RJ-45
Serial
Stereo RCA
Keep Talking and Nobody Explodes v. 1 Appendix C
Page 23 of 23
Appendix C: Identificador de Portas/entradas
Entradas analógicas ou digitais podem ser encontradas nos lados da bomba
Entrada Nome
Paralela