body signing booklet - communication in visually impaired ... · body signing guidelines for...
TRANSCRIPT

Body SigningGuidelines for Learners
who are Visually Impaired withAdditional Complex Needs
Working at P1, 2 and 3in Leicester, Leicestershire and Rutland

Introduction
Vision plays a key role in early interactions on which communication development is founded. It helps the learner through,
• promoting motivation• developing shared attention• developing mutual gaze• enabling communication to be initiated• giving access to non-verbal communication
Caregivers are drawn into the learner and typically respond to their behaviours as if communication is taking place. They will give meaning to what is happening and respond accordingly.
For learners who are visually impaired with additional complex needs, the use of cues helps to develop their understanding of communication and their immediate environment. These cues support the spoken word and may include,
• objects• photographs• signs • symbols
In the absence of these key visual elements, the learner with visual impairment can struggle to progress with their communication. How does the learner know when their caregiver is attending to them? How do they develop shared attention when they have a very limited range of experiences in common with those around them?
Body signing will involve limited touching of the learner’s shoulders, arms and hands.
Please contact the school/setting if you require further information.
This leaflet will focus on the use of body signing for learners with a visual impairment and complex needs (P level P1 - P3).
1

Why use body signs?
Learners who do not have sufficient vision to see a signing system may still benefit from receiving some formal signs as part of their communication environment. Body signing is a tactile communication system designed to develop language for students who have no, or extremely limited, expressive language. When body signs are used consistently across different environments they help to reduce the memory loads on the learner. Embedding the signs as part of the communication in clear daily routines should allow the learner gradually to make sense of what could otherwise be chaotic and fragmented experiences.
Making the patterns, routines and sequences of life explicit to the learner through the use of signs will increase their feeling of security. The learner will be able to understand and learn about their experiences and develop anticipation of events. They may eventually also learn how to manage when things do not go as expected.
Body signing,
• enhances attention and interaction,• provides security by giving the learner notice of what is coming,• supports their understanding of a concept,• motivates for movement and independence,• provides true choice,• should be used within a total communication approach which may include
Objects of Reference, speech, signing etc.
2

Before you start
Build a rapport with the learner,
For learners who are selective about what they touch, work through these issues using coactive movement and play; action rhymes etc.
Assess the learner's use of natural gestures and communication (Affective Communication Assessment – from Communication before Speech – see reference),
Discuss communication needs with the learner's Speech and Language Therapist, Teacher of the Visually Impaired and key communication partners.
SOME LEARNERS WILL HAVE PERSONALISED BODY SIGNS. THIS MAYBE BECAUSE OF,
• A LIMITED RANGE OF MOVEMENTS,• PAINFUL MOVEMENTS,• HISTORICAL REASONS,• LEARNER’S PREFERENCES.
Things to remember when using body signs
• use clear, simple speech,
• always use speech as you sign,
• sign only the key words in the phrase ("It's time for a drink now"),
• continue to accept and respond to the learner's personal gestures while reinforcing the body signs through their consistent use.
Body signs
The signs have been adapted from standardised signing systems. The adaptations have been made using the following criteria,
• They are made coactively with a start and or finish point on the body,
• There is minimal intrusion to learner's personal space,
• The movement is simple,
• They are related to the activity it represents or a natural gesture.
The following core vocabulary of signs has been chosen to provide the words needed to undertake daily care tasks and routines. They represent the key words and meanings that are important to the learner.
3

The learner is represented by the person wearing dark clothing
Seven steps to beginning hand under hand signing(this is done from in front)
1. Say the learner's name and say who you are2. Touch the left shoulder of the learner with your right hand to
alert them that something is about to happen3. Move your right hand gently down their left arm4. Place your right hand gently under their left hand with your
palm facing down5. Place your left hand under their right hand6. Both of the learner's hands are now resting on yours with your
thumbs linked7. Gently bring both hands to mid line in preparation for the body
sign
For the sign
• Allow the learner to withdraw their hands if they wish• If the learner has withdrawn their hands, continue
the sign • Make the sign slowly and say the key word• Repeat the sign and the key word• In general, the learner's right hand is making the
sign and the left hand is receiving the sign but reverse this if best for the learner.
4

The learner is represented by the person wearing dark clothing.
Adapted signs
More
This sign is two taps
• Steps 1-7 of the hand under hand intro• Move your left hand (and the learner's right hand) and tap it onto the thumb side
of the learner's left hand twice• Say more.
Point to consider
Respond to the learner’s behaviours which may indicate their preference. Therefore, if the learner shows they want more in their own way, the caregiver then uses the body sign to reinforce the communication.
5

The learner is represented by the person wearing dark clothing.
Finished
This sign is an outward sweep of the hands
• Steps 1-7 of the hand under hand intro• Place the learner's right hand on top of their left hand• Sweep the hands apart horizontally• Say finished
Point to consider
Respond to the learner’s behaviours which may indicate their preference. Therefore, if the learner shows they want to finish in their own way, the caregiver then uses the body sign to re-enforce the communication.
6

The learner is represented by the person wearing dark clothing.
Eat and Drink
This sign is two taps on the mouth
• Steps 1-7 of the hand under hand intro• With your left hand, bring the learner's right hand up to their mouth and gently
tap• Say eat or drink
Point to consider
Use routine cues
7

The learner is represented by the person wearing dark clothing.
Hello and Goodbye
This sign is a wave of the hand
• Steps 1-7 of the hand under hand intro• Place your hand under the learner's right hand, palms facing and lift to vertical• Wave hand from left to right• Say hello or goodbye
Point to consider
When greeting a learner, say their name first so they know you are talking to them.
8
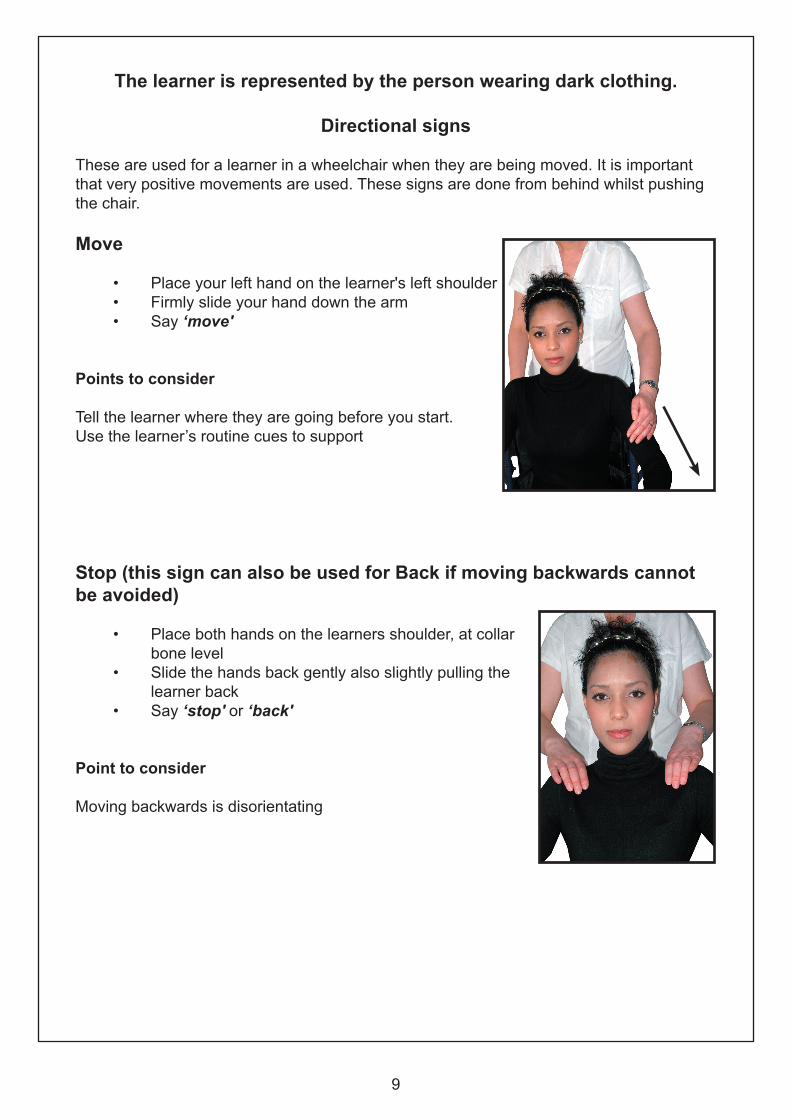
The learner is represented by the person wearing dark clothing.
Directional signs
These are used for a learner in a wheelchair when they are being moved. It is important that very positive movements are used. These signs are done from behind whilst pushing the chair.
Move
• Place your left hand on the learner's left shoulder• Firmly slide your hand down the arm• Say ‘move'
Points to consider
Tell the learner where they are going before you start. Use the learner’s routine cues to support
Stop (this sign can also be used for Back if moving backwards cannot be avoided)
• Place both hands on the learners shoulder, at collar bone level
• Slide the hands back gently also slightly pulling the learner back
• Say ‘stop' or ‘back'
Point to consider
Moving backwards is disorientating
9

The learner is represented by the person wearing dark clothing.
These signs are done from behind the learner whilst pushing the wheelchair
Left
• Stop the chair• Place left hand on the outside of the learner's left
arm on or below the shoulder• Make two firm taps• Say ‘left'• Turn at a right angle
Right
• Stop the chair• Place right hand on the outside of the learner's right
arm on or below the shoulder• Make two firm taps • Say ‘right'• Turn at a right angle
Points to consider
A clear turn is very helpful for orientation. Point out landmarks on corners.
10
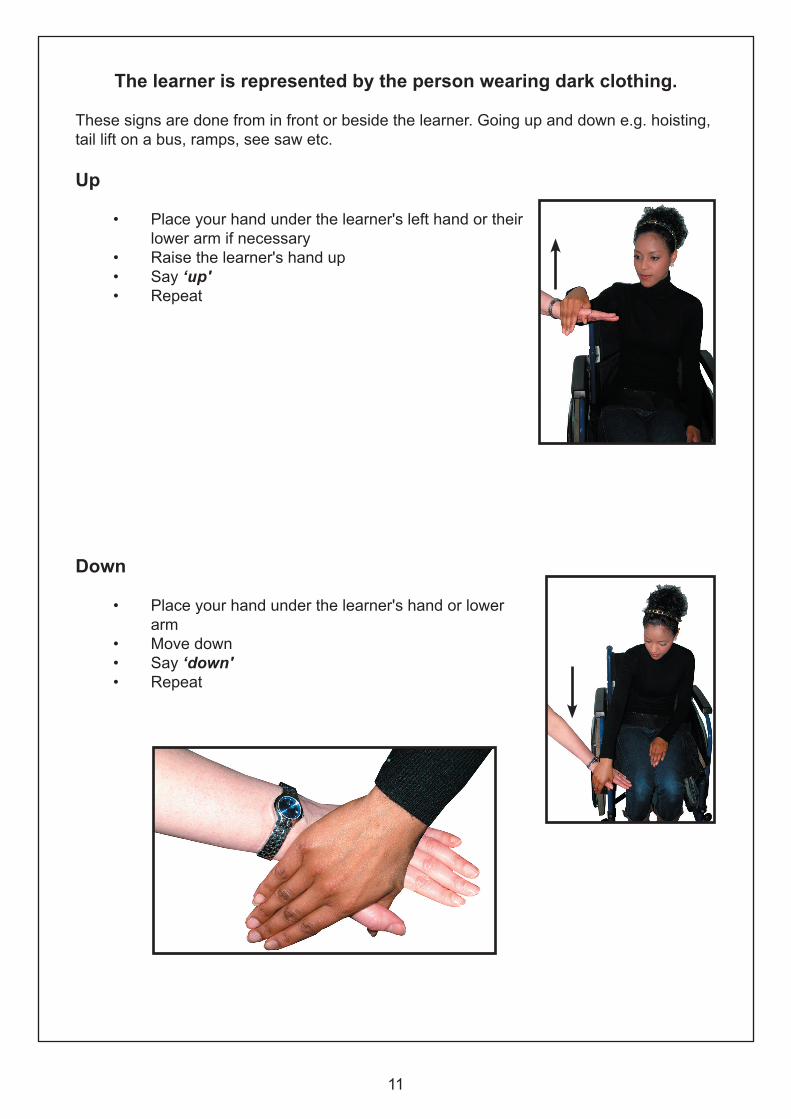
The learner is represented by the person wearing dark clothing.
These signs are done from in front or beside the learner. Going up and down e.g. hoisting, tail lift on a bus, ramps, see saw etc.
Up
• Place your hand under the learner's left hand or their lower arm if necessary
• Raise the learner's hand up • Say ‘up'• Repeat
Down
• Place your hand under the learner's hand or lower arm
• Move down• Say ‘down'• Repeat
11

Acknowledgements
Thanks to everyonewho was involved in the
consultation of this booklet
References and Related Reading
Lee, M. & MacWilliam, L. (1995)Movement, Gesture and Sign
Lee, M. & MacWilliam, L. (2002)Learning Together
Goold, L. & Hummel, J. (1993)Supporting the Receptive Communication of Individuals with Significant Multiple
Disabilities: selective use of touch to enhance comprehension
Coupe O'Kane, J. & Goldbart, J. (Eds.) (1998)Communication before Speech
Nind, M. and Hewett, D.(1994)Access to Communication
July 2010