boat preparation & damage control three emergency...
TRANSCRIPT
1 S a f et y at S e a
by Evans starzingEr
three emergency-Steering Solutionsa veteran offshore sailor offers a multilayered defense for avoiding rudder failure—and for coping with it when it does occur.
Based on statistics that my partner, Beth a. Leonard, and i’ve been gathering in the decade we’ve been out cruising, approximately five to 10 boats out of 1,000 suffer a rudder failure while crossing oceans each year. experienced offshore voyagers consider the success-ful steering of a boat without a rudder to be one of the most demanding feats of seamanship. Faced with the challenge, some crews simply give up and abandon their boats. however, with the proper preparation and attitude, almost any boat can be steered to within sight of a safe harbor. We’ve met several crews who’ve sailed hundreds of miles—and, in one case, more than 1,000 miles—without a rudder.
Rudders fail in four WaysThe rudderstock breaks: if the stock
fails, the rudder blade will be lost, leaving only the stub of the stock in the boat. a severe impact can break the stock, result-ing more often in damage to unpro-tected spade rudders than to skeg-hung rudders. corrosion of a stainless-steel stock, though, can result in failure of both spade and skeg-hung rudders. improper lamination can result in stock failure on fiberglass/carbon stocks. Previous strain can also cause a failure.
The blade detaches from the stock: This can happen in one of two ways. First, when the rudder consists of a stainless-
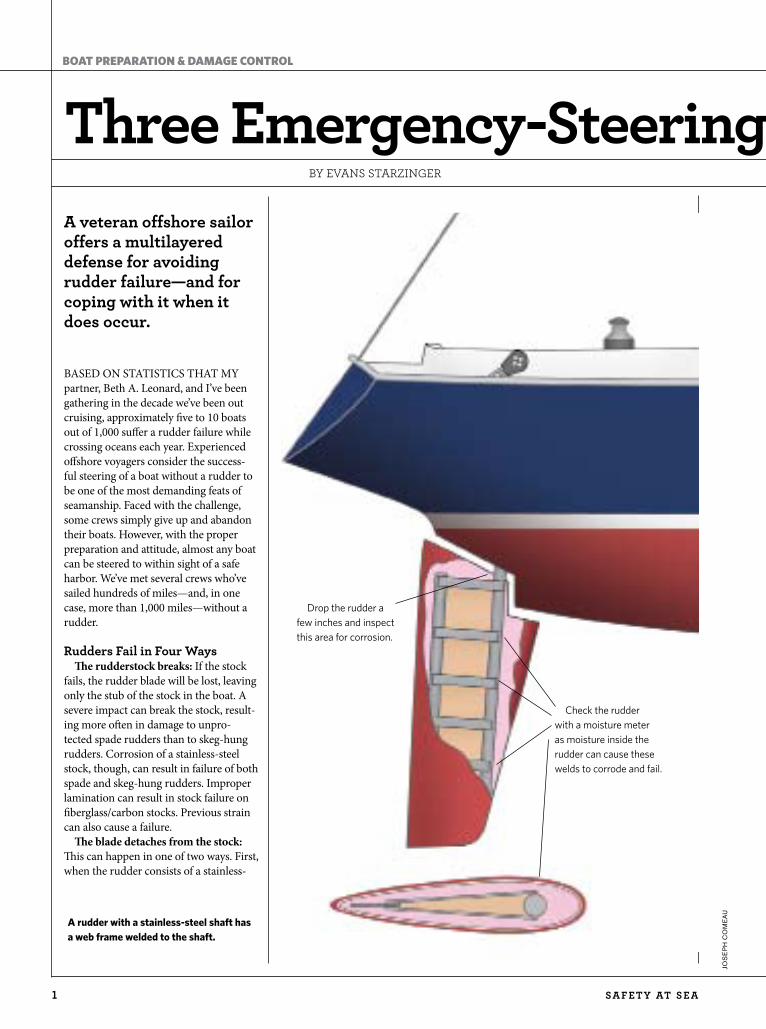
A rudder with a stainless-steel shaft has a web frame welded to the shaft.
Boat PreParation & Damage Control
jos
ep
h c
om
ea
u
Drop the rudder a few inches and inspect this area for corrosion.
Check the rudder with a moisture meter as moisture inside the rudder can cause these welds to corrode and fail.
S a f et y at S e a 2
steel stock with flat bar webs welded to it and foam and glass shaped over the webbing, the welds can fail at the webs if salt water enters the rudder. in this case, the positive flotation of the rudder blade usually holds it on the stock, but when the helm is turned, the blade doesn’t respond. second, an impact can destroy the blade entirely, leaving only the stock. This hap-pened when acquaintances of ours hit a whale off nova scotia.
The rudder bearing breaks: on skeg-hung rudders, an impact at the bottom of the skeg can break or detach the bottom rudder bearing. This causes the rudder to drop down until the quadrant/tiller arm inside the boat jams against something. With only one bearing, the rudder will tilt and bind side to side.
The rudder binds: This is by far the easiest rudder problem with which to deal. The culprit usually turns out to be fishing nets or line. sometimes, even after the visible line has been cut away, the rud-der will remain difficult to turn.
two basic messages cry out from this litany of potential problems: First, both skeg-hung and spade rudders are vulnerable to failure. second, many of the vulnerabilities can be identified—and subsequent failures avoided—with careful inspection before beginning the passage.
avoiding Rudder failuresas with so many emergencies aboard
offshore sailboats, the best way to deal with rudder failure is to avoid it entirely. sailors preparing to embrace long-distance sailing occasionally ask us what our most important piece of equipment has been. i think they expect to hear us say something like refrigeration or a watermaker, neither of which we carry. instead, i tell them we consider the steer-ing system our most vital gear. The sails and rig come second, and the anchor and windlass third. The GPs and good charts are fourth. most of those poised to head off spend a good deal of time and do a more than adequate job preparing the second, third, and fourth items. But many take the rudder/steering system for
granted, giving it almost no attention.The best way to avoid rudder failure
at sea is to spend some refit dollars on a new rudder and bearings, even if it means giving up some creature com-forts. it’s possible to build a virtually failure-proof rudder for less than the cost of many watermakers. We did this for Hawk, our aluminum Van de stadt samoa 47. We were delighted that we’d done so after we spent an hour bouncing the rudder off some rocks in a remote anchorage in iceland. in the next harbor, a diver checked the rudder for us. his report? he said he suspected that we might’ve broken some rocks, but the rudder looked fine. We later built a new rudder with a slightly more sophisticated
shape, and we took the opportunity to make it even stronger.
at a minimum, we’d suggest taking preventative steps before setting sail. First, on a rudder with a stainless-steel stock, use a moisture meter or drill a small hole in the bottom (plug the hole with epoxy afterward) to see if it’s wet inside. a surprisingly high percentage of rudders on used boats will have moisture inside. if the rudder is wet, the stainless-steel stock/webbing will corrode and break at some point. to decide how and when to address this problem, talk to your boatbuilder and a good surveyor.
second, drop the rudder down about 6 inches and inspect the stock where it goes through the hull. This can be easily done with most spade rudders, but it will be a bit more difficult with a skeg-hung rudder. any signs of corrosion, cracks, or poor lamination in this high-load area may signal a problem. The best solution may well be to have a new rudder built.
three emergency-Steering Solutions
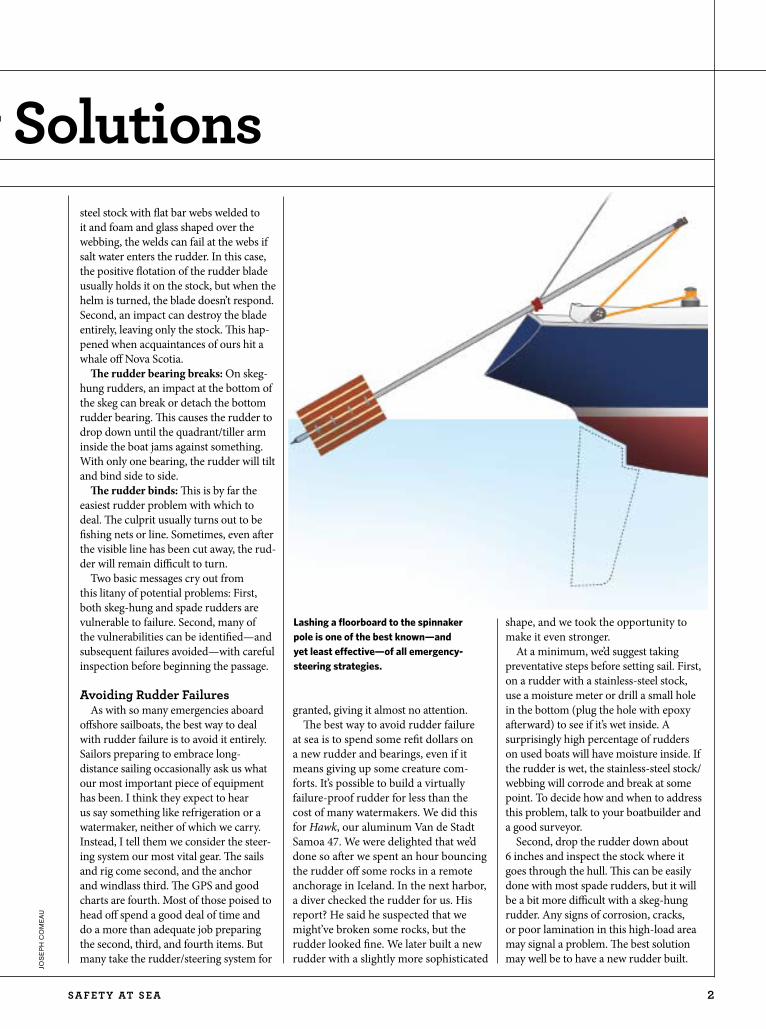
Lashing a floorboard to the spinnaker pole is one of the best known—and yet least effective—of all emergency-steering strategies.
jos
ep
h c
om
ea
u

3 S a f et y at S e a
finding Solutionsmaking sure that the rudder is strong
and in good condition greatly reduces the odds of a rudder failure, but such diligence can’t eliminate it. massive impacts with logs or containers can damage even extremely strong rudders, and many corrosion and lamination problems can’t be detected until they reach the breaking point.
if you lose steering, your attitude will be the key factor in determining whether you’re successful in sailing the boat to port without a rudder. First, even with the best emergency-rudder solution, expect to make somewhere between a third and a half of the boat’s normal speed, with the bow swinging through 60 degrees on either side of the desired course. sailors with windvane experience will adapt to this more quickly because they know that with proper adjustment, their average track can be quite straight. Those who’ve only sailed with autopilots will likely have difficulty accepting this oscillation around the desired course.
in addition, be persistent. Jury-rigged rudder solutions we’ve heard about usu-ally involve three or four attempts before sailors achieve a strong enough jury rig that provides adequate control to make decent progress. as the wind direction and strength shift, the boat’s balance will change, and both the sail plan and the rudder solution will need to be adapted. even in relatively consistent winds and seas, the sail plan and jury-rigged rudder will take constant attention to maintain the best course possible.
Bear in mind that the slower speed and extra distance sailed may increase the passage time by a factor of four or more. depending on the distance from land and the amount of stores aboard, the crew may have to consider rationing food and fresh water.
Loss-of-Steering tacticsThere are four basic approaches to
emergency-steering solutions. a workable arrangement will often combine elements from several.
Sail balance: Without a rudder, the boat’s normal balance will likely change dramatically, and you’ll have to adapt your sail plan and trim to the new bal-ance. on an upwind course, it’s possible, on board certain designs, to steer without a rudder by properly balancing the sails. most of the drive will likely come from
the jib, with a heavily reefed mainsail used as a trim tab: sheet in to steer higher; sheet out to steer lower.
on a downwind course, get the sails as far forward as possible and as bal-anced on both sides as best you can. The traditional double-headsail approach, with similar-size jibs poled out port and starboard, offers one workable solution.
This approach was widely used and refined back in the days before good self-steering solutions—windvanes and autopilots—were available. it’s self-correcting, because when the boat yaws too much one way, a jib will back and push the bow back down. an alternative downwind approach, for stronger condi-tions, is to sheet a jib or staysail flat on the centerline. This is also a self-correct-ing sail plan, since the jib will constantly be pushing the bow back downwind.
a reach will be by far the most dif-ficult course to steer. an eased jib will be the best sail plan on most boats. But the course will change dramatically with small increases or decreases in wind speed.
Drogues: The loss of a rudder means that the boat loses lateral resistance aft. This usually unbalances the boat. deploy-
ing a drogue adds surface area and re-stores balance. in addition, by deploying the drogue on a bridle, with one line tied to each stern quarter, you can steer the boat by adjusting the tension between the two bridle lines. (see “time to Put on the Brakes,” in this booklet.) most people we know who’ve successfully sailed with-out rudders have deployed a drogue as a part of their solution.
Jury-rigged rudders: The most com-mon jury-rigged rudder consists of a large board (to create rudderlike surface area) and chain (to sink the steering surface underwater) attached to the end of a spinnaker pole to create a sweep. The pole is lashed to the stern or the backstay so it pivots, and the boat is steered using two lines led from the end of the pole through snatch blocks at the
Boat PreParation & Damage Control
Essentially a sail on a pair of spars, the “soft rudder” was developed by U.S. West Coast naval architect Paul Kamen. Visit www.well.com/~pk/PCrudder-04.htm for more information on his emergen-cy-steering solutions.
jos
ep
h c
om
ea
u

S a f et y at S e a 4
quarters to cockpit winches.The loads on this sort of rudder are
quite high, and both the means of attach-ing the board to the pole and the pole to the backstay/stern must be extremely well executed. The most successful approach for attaching the board to the pole is to drill holes down the center of the board in two rows that are spaced slightly narrower than the diameter of the pole. Thread ei-ther large hose clamps or strong lashings through each pair of holes, then run the pole down through them. hose clamps work much better, so it’s worth keeping large ones on board. if you use lashings, each will need to be twisted tightly with a spanish windlass. you’ll need chain (or diving weights) tied to the pole end to sink it and keep the board from bouncing along the surface.
everyone we know who’s tried to use a jury-rigged rudder has found that it’s dif-ficult to build one strong enough and that the finished device provides much less steering control than expected.
Emergency rudders: By far the best solution is to build and store on board an emergency rudder that’s ready to deploy when the need arises. experience suggests that an emergency rudder must be, at the very least, half the depth of the original rudder to provide steering control. The stock needs to extend above the transom for the tiller attachment.
The cassette rudder is widely consid-ered the best design and is a common solution on round-the-world raceboats. This design has four components: two gudgeons permanently (and strongly) fixed to the transom; the cassette, with two bolts or pintles on its forward edge that slide into the gudgeons; the rud-der blade, which slides down into the cassette; and a tiller designed to attach securely to either the cassette or the rudder blade.
This design has several advantages over the alternatives. First, it’s relatively easy to install at sea, as the cassette can first be fixed on the gudgeons before the rudder is slid into place. one-piece rudders are much more difficult to install because the waves throw the rudder blade around, making it all but impossible to line up the fasteners. second, the assemblage breaks down into several components, making it easier to build and stow. Third, cassette rudders can be made strong enough to withstand rudder loads more easily than one-piece designs. Finally, if you make
it yourself, the cassette rudder can be a relatively economical solution.
however, we’ve found that very few cruising boats carry any sort of pre-made emergency rudder, due to the extra expense and the stowage challenge. many do carry windvanes—such as the hydro-vane or WindPilot Pacific Plus—so pick-ing a windvane design that steers its own
dedicated auxiliary rudder rather than the boat’s main rudder is an alternative. if they’re large enough, these rudders can act as full-fledged emergency rudders and require little or no effort to set up.
in 14 runnings of the Pacific cup from san Francisco to hawaii, there has been to date a 2-percent to 3-percent rudder-failure rate. in response, the race requires every boat to install and test an emergency-rudder system.
Putting It all togetheras is the case with most emergencies,
including rudder failure, a multilayered defense is most likely to get a crew and
boat back to port safely and relatively efficiently. to deal with the possibility of rudder failure, crews should install a very strong main rudder. They should carry a cassette rudder or mount a windvane with an auxiliary rudder for use in the event the main rudder fails, and in case the cassette or auxiliary-rudder solution can’t be fit, or in case the backup also fails, the
crew should be prepared to implement upwind and downwind sail plans to fa-cilitate steering. They should also carry a drogue and be prepared to piece together a pole sweep.
even with this level of preparation, steering without a main rudder will be a challenge. But these steps should keep you from having to abandon the vessel. With patience and persistence, you, like other crews before you, should be able to get the boat within sight of a port and within range of help.
Evans Starzinger and Beth A. Leonard
frequently cruise the high latitudes,
where self-reliance is paramount. Beth is
the author of The Voyager’s Handbook:
The Essential Guide to Bluewater Cruising
(McGraw Hill/International Marine).
Done properly, a cassette rudder is the most efficient emergency-steering solution, but it’s bulky to stow.
jos
ep
h c
om
ea
u

5 S a f et y at S e a
Boat PreParation & Damage Control
by andrEw burton
How to Prep your Boat for Passagemaking
When Cruising World’s resident delivery captain gets ready to offshore, he starts making lists.
WhateVer the reason that you’re heading offshore—a race, a cruise, a delivery—the first thing to do is make sure that the boat’s ready to go. it makes no difference whether the boat is your own, a friend’s, or—like so many i deliver—one you’ve never seen before. it’s necessary to inspect all the essential gear and ensure that it’s in shape to get you where you’re going. in fact, it’s probably better to treat your own boat as if you’ve never seen it before. otherwise, you’ll be tempted to live with jury-rigged systems. Fix them now and you won’t have a nasty failure at 3 in the morning in 10-foot seas.
in 30-some years as a delivery skipper, i’ve learned to prioritize. some sys-tems are essential to make the passage safely and successfully. others are merely aboard for the sake of comfort. in the first category, i place the rig and sails, the steering system, and the integrity of the hull and deck. all the rest is luxury: it’s a sailboat, so it can get anywhere you want to go without an engine. it just takes a little longer, sometimes.
When i start inspecting a boat, how much emphasis i place on getting every-thing aboard working perfectly depends on how long i expect to be at sea and in what sort of conditions. is this a trade-winds run of a few days or a long ocean crossing during which i must deal with a variety of weather? either way, the first things i look at are the halyards—if they’re too rotten to hold the sails up, there’s not much point in performing a thorough inspection of the rig.
attach messengers to the ends and inspect the whole length, looking for frays or just general age rot. if you have any doubts at all about them, go aloft attached
to two halyards. Go to the masthead first and check that the lights work and that any electronics connections are tight and don’t look corroded. on the way down, remove any tape and inspect all cotter pins and nuts and bolts; potential chafe points should be wrapped with tape or covered with a blob of silicone. search swages, shrouds, terminals, and chain-plates for cracks. The last thing i do is give each upper shroud a good shake to see if it and the spreaders will hold up to a sail flogging against the rig at sea.
at the partners, ensure that the mast is securely blocked, and inspect the mast boot for watertight integrity. make sure
any blocks are in good shape and firmly attached. Below, check for excessive cor-rosion at the butt of the mast, and exam-ine the wires that come out of the bottom for signs of chafe.
next come the sails. depending on the piece of ocean you’re crossing, make sure you have a storm jib or staysail aboard—and a trysail’s nice if it’s going to be a long passage. inspect them all to make sure they haven’t rotted from being stored in
When you’re going up the mast, never trust shackles on halyards. Always tie the halyard to the bosun’s chair.
an
dr
ew
bu
rto
n
S a f et y at S e a 6
the bilge. run the storm sails up so you can figure out sheet leads before it starts to blow. on one boat i delivered, the track was so misaligned that when i needed the trysail, i couldn’t hoist it.
The main and jib should be unfurled, dropped to the deck, and inspected for wear, especially at the corners, the batten pockets, and the spots where they may interact with the rig while sailing. replace any worn slides, and check the reef points for chafe. on a delivery, i always take along a sail-repair kit that includes a few square feet of dacron sticky-back to re-pair any holes or chafe spots that develop while under way.
While still on deck, inspect the stan-chions, lifelines, and lashings. i instruct my crew to move about the deck as if the lifelines weren’t there and to never rely on them in case they break; still, it’s comforting to know they’re in good shape if they’re needed.
sheet leads should all work well; sheaves should turn, and cars should move along tracks. are there extra blocks? snatchblocks are useful for moving a lead
outboard when you’re reaching so the sheet doesn’t chafe on the lifelines.
Look at the mainsheet and make sure that all the shackles on the blocks are tight and, if possible, seized with wire or a plastic wire tie; any sharp ends should be taped or filed smooth. Winches should all turn freely; if they don’t, remove the drum and give it a few quick shots of Wd-40 to get it turning until you have a calm day on which to take it apart for a proper clean-ing and lube.
many boats use hydraulics to control vang and backstay tension. after mak-ing sure the reservoir is topped up and the hose connections are dry, test these controls; pump them up and release the pressure a few times, then check the con-nections again for leaks.
How to Prep your Boat for Passagemaking
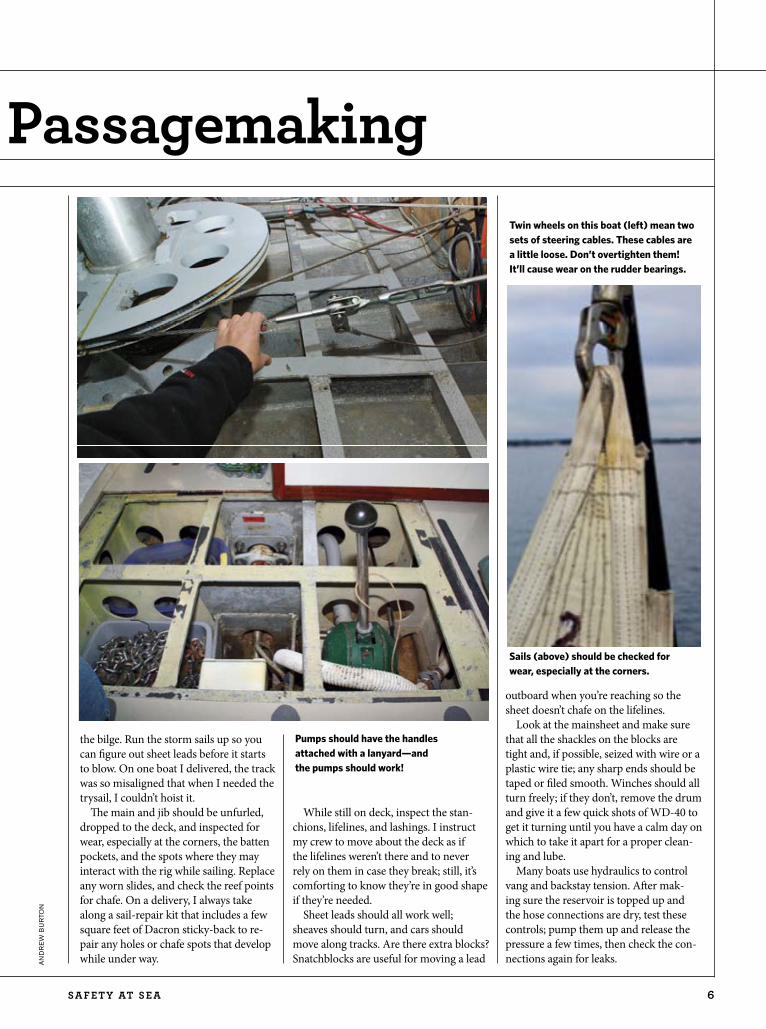
Pumps should have the handles attached with a lanyard—and the pumps should work!
Sails (above) should be checked for wear, especially at the corners.
Twin wheels on this boat (left) mean two sets of steering cables. These cables are a little loose. Don’t overtighten them! It’ll cause wear on the rudder bearings.
an
dr
ew
bu
rto
n
7 S a f et y at S e a
Boat PreParation & Damage Control
at the wheel, check for play; if it’s excessive, tighten the steering cables. see how many turns it takes to go lock to lock, then find and mark the center of the wheel. make sure that you actually get thrust from the propeller in forward and reverse gears. you’ll feel really silly if, when it’s time to leave, you cast off the dock lines, wave good-bye to friends and family, put the engine in gear, and noth-ing happens. check that cooling water is coming out of the exhaust, and take the boat out and briefly run the engine up to full throttle in gear; your top cruising speed should be about 75 percent to 80 percent of maximum rpm.
determine that the running lights work, and remember to have several spares aboard to replace the inevitable burned-out bulbs. much as we deplore stowing gear on deck, rarely is there room for dinghies and diesel jugs below, nor would we want the smells associated with the latter—allowing the crew inside is bad enough. so make sure any lashings are tight and strong enough.
Before going below, have a look around the deck and note the general condition of the boat. is everything in its place? are all the lines led so they won’t chafe? remember, “a tidy boat is a happy boat.” The same can be said of the interior. The old saw about a place for everything and everything in its place is never proved so true as when the boat heels in the breeze for the first time. Loud crashes from be-low are a signal that perhaps your stowage plan isn’t working out.
Before you check the mechanical equip-ment, get the tools out and inspect them. do you have a full set of wrenches, both standard and metric? do your adjustable tools adjust, or are they too rusty? are there screwdrivers of various sizes and types, a hacksaw with new blades, a ham-mer, spray lubricants?
diesel engines are simple. almost all
they need to be happy are four things: clean fuel, clean air, clean lubricating oil, and cooling water. That’s what i check when i look at a boat for the first time. start by thoroughly cleaning out the fuel pre-filter—it’s the one that’s not on the engine—and replacing the cartridge. make sure you have plenty of spares. Before one trip, a helpful owner added a biocide to the fuel just as we were topping up before heading offshore. This loosened the algae in the tanks, and as we bounced along offshore, the tank was shaken up; we ended up going through two seasons’ worth of fuel filters in a week. Being offshore is going to jostle the fuel tanks anyway, so plan on detritus getting sucked into the fuel lines.
take a look at the engine’s overall condition. if it’s really dirty, clean it with Fantastic or simple Green, which will make it easier to find any oil, water, and fuel leaks. to that end, also clean under the engine, and line the engine bed with fresh oil-absorbing pads. check and
tighten engine belts as necessary. start the engine and watch for anything unusual, such as excessive vibration or loose fas-tenings. With the engine in gear while the boat is under way, check the stuffing box for leaks or excess warmth. hold the side of a screwdriver on the shaft as it turns; if there’s vibration, you could have an align-ment problem or a bent shaft. your spares inventory will depend on your budget and the length of time you expect to be away. at the very least, you should carry a couple of spare impellers, a full set of belts, and some pieces of hose.
ocean-racing boats are required to have a softwood plug attached to each through-hull; this should be mandatory on cruis-ing boats as well. check that the shutoffs are accessible and turn easily. make sure all the bilge pumps work and that the manual ones have handles attached with a lanyard. try to get any gook out of the bilge that could plug up the pumps.
run through all electrical equipment. check that each switch on the electri-cal panel does what it’s supposed to do. open up the panel and look behind it for any signs of problems, such as burn marks caused by shorts or corrosion around connections.
Power up the nav gear to make sure it’s telling the truth. check the GPs position, and make sure the radar heading marker points in the same direction as the boat. Locate manuals for all the boat’s equip-ment and familiarize yourself with what’s in them.
high on your list should be making sure that all the safety gear is in place, including jacklines made of strong nylon webbing running the length of the boat on both sides and from the companion-way to the wheel or tiller. Finally, if you want to make the passage in a reasonable amount of time, make sure the bottom of the boat is clean; there’s a reason racers always do this.
if this is your first time heading offshore on your own boat, bear in mind that lists can be intimidating and endless. Prioritize your projects, take care of the must-dos, pick a good weather window, then go. if you wait until every item is checked off, you’ll spend the rest of your life at the dock.
Andrew Burton sailed nearly 300,000
miles as a delivery captain before becom-
ing a family man and an associate editor
at Cruising World.
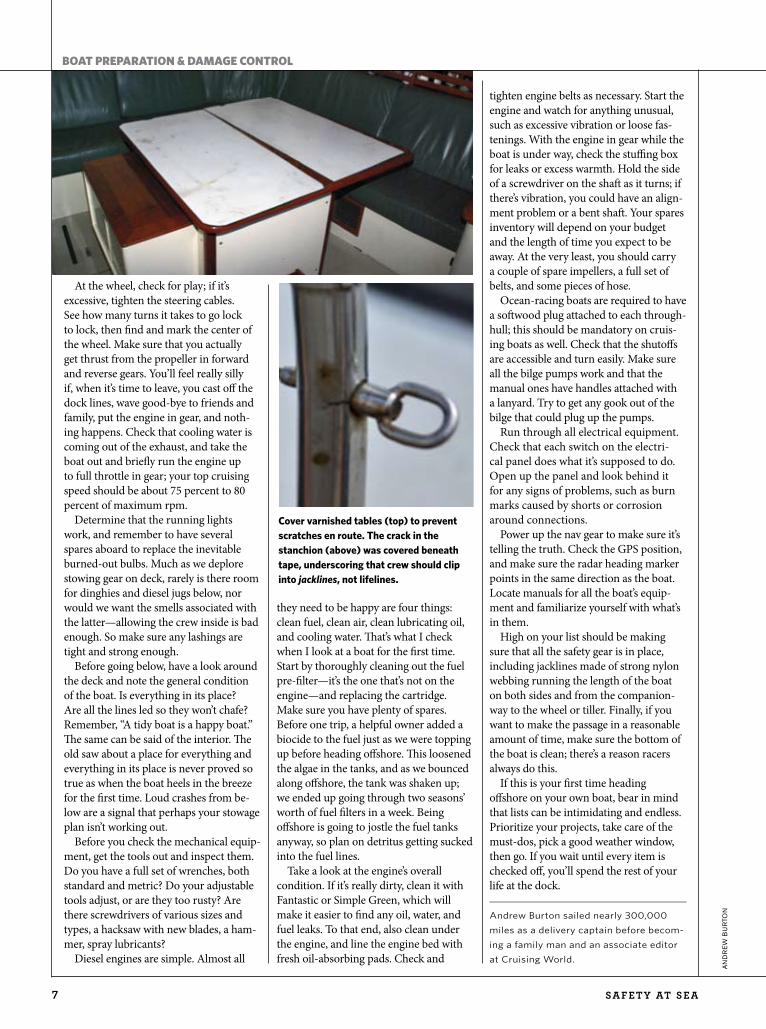
Cover varnished tables (top) to prevent scratches en route. The crack in the stanchion (above) was covered beneath tape, underscoring that crew should clip into jacklines, not lifelines.
an
dr
ew
bu
rto
n

S a f et y at S e a 8
3a thorough review of the boat and its systems should be “standard operating procedure” before leaving the dock.
start a thorouGh and orderLy in spection at the forepeak, looking at the chainplate and stemhead fit tings. are there any signs of leakage, corrosion or movement? is the grounding strap fas-tened securely? Wiring must be secured and not vulnera ble to tangling or damage. are the electrical connections solid? is the rode secured to the hull and free of corrosion or fraying? check the general condition of the hull and deck, especially the hull-deck joint, which should be tight, not leaking, with mechanical fastening in addition to a glued or bonded joint. check the condition of through-deck foredeck fittings: each should have a good-size backing plate.
aft of the forepeak, look at the hull/ deck joint wherever visible; at cabinetry for signs of loosening from the hull; and at electrical fittings for frayed or exposed wires. do the lights work? in the bilges, look for signs of movement between the hull, bulkheads and frames, where overlapping glass laminations break down when the hull is strained. if the wiring is not carried aft in a conduit, it should be banded and secured every 12-18 inches. check thru-hull fittings for soundness. Below the waterline, bronze seacocks are preferred. above the waterline, reinforced nylon (marelon) is ac ceptable. seacocks should operate through full range easily and without leaking; they should be la-beled with open and closed positions, and have a proper sized wood plug stowed nearby. metal should be free of corrosion, with hoses and clamps (double clamps for fittings below the waterline) in good con-dition. are the bilges clean? deck plates
must have latches or fit tightly enough to stay in place in the event of capsizing.
Throughout the boat check storage of flammables such as teak oil, solvents, and spray paints, which should be stowed in topside lockers. address wet swabs, loose rags, and haphazardly stowed gear.
Plumbing and Wiringon many boats, the head is the next
com partment aft. is the toilet clean and work ing? are operating instructions clear and posted where easily read? do any fittings leak? is the toilet firmly anchored and is the seat secure on the bowl? are the hoses kinked? check hose and clamp con dition. is the anti-siphon loop secure and in place? do freshwater valves leak? does the ventilation port seal? check wash basin faucets and drains, and valves or seacocks on overboard discharges. does the head door operate easily and can the latch close properly? if there is a shower, are the valves leak-free, and the sump drain and pump operable? is stow-age for personal toilet gear adequate and will toilet paper stay dry?
next is the saloon. Work from the head bilges to the saloon bilges checking through-hulls and inspecting the mast step. are the step and the foot of the mast corrosion-free? check for evidence of step fatigue or collapse (cracked lami nate, bent metal beam, cracked weld). is the mast firmly mounted with a bolt through the mast and step (or other mechanical means)? is the mast notched for spray and conden sation drainage? is the mast grounded, preferably to keel bolts? are wires secured and bundled, with connec-tions above bilge water and labeled for troubleshoot ing? tanks are often in the bilges; look for firm mounting to the hull (no signs of movement, cracks or leak-age); good, well connected (with double clamps on fuel lines); and large access plates for cleaning. Working farther aft, check all keel bolts hidden under tanks by looking for signs of corrosion and
tap ping with a hammer (a dull “clunk” im plies looseness or deterioration); also look for evidence of seepage around the bolt shaft and for signs of movement due to groundings. (check at both ends: a downward thrust at one end is usually matched by a push upward at the other.) check wiring runs and electrical ground-ing system for lightning protection. check the main bilge for cleanliness; small ob-jects clog bilge pumps. check remaining through-hull fittings and examine wiring, con nections, and the integrity of speed- and depth-sensor through-hulls.
Working aft toward the galley, check freshwater lines to the head and the galley for security and condition. check all clamps and end fittings, which are fre-quently ignored until one pops loose and pumps all the fresh water into the bilges.
in the saloon, check the shroud chain plates and their attachment to the hull. are there any signs of water seepage? movement? are they tight? is the chain plate electrically bonded to the keel and lightning protection system? are there signs of movement or separation of trans-verse bulkheads from the hull? Without removing interior cabinetry, look under and behind cushions, bins and draw-ers. check wiring runs, hoses or piping, hull penetrations and, where visible, the hull /deck joint. check for heavy gear that could go adrift in heavy weather or a cap size. check all cabin lights, includ-ing red lights for night use. do cushions have protective covers? do bunks have sturdy lee cloths or lee boards? check overhead for the condition and tight-ness of the headliner. is there any sign of leakage from topside hard ware? are opening ports watertight? are grab rails and handholds securely fas tened? is the saloon table solidly mount ed? can dorade vents be closed from be low? (if not, verify that closure plates are on board for every dorade.) do all doors and latches work?
at the navigation station, make sure all gear is firmly attached. check the oper-
by Captain John bonds, u.s.n. (rEt.), and Captain hal sutphEn, u.s.n. (rEt.)
Inspecting the Boat: a Prepassage Checklist

9 S a f et y at S e a
3ability of every unit. is the wiring behind the gear orderly, banded and anchored to the structure? The navigation inven-tory should include International Code of Signals (H.O. 102), Selected Worldwide Marine Broadcasts, and the Nautical Al-manac as well as celes tial tables, universal plotting sheets and maneuvering boards. don’t forget tide and current ta bles, Light Lists, Coastal Pilots, local Notices to Mari-ners, and such reference texts as Dutton’s or Reed’s. is the local Notices to Mariners on hand? is there a secondary compass with a deviation table at the navigation station? check binocu lars, hand-bearing compass, dividers, par allel rules and nau-tical slide rule. Verify sextant alignment and the accuracy of the time piece used for celestial navigation. check the logbook for accuracy and adequacy as a legal record of the vessel’s operations.
The electrical panel is frequently near the navigation station. check all meters, switches, fuses and circuit breakers, look-ing especially for jury rigs and jumpers that lack proper fire protection. all leads should be routed “downstream” of the main battery switch. examine the rear of
the panel for quality of installation: “Wire nuts” and “twist and tape” are never ac-ceptable. check for use of consistent color coding or tags for wire identifica tion. Be sure the back of the main battery selection switch is protected from contact with metal objects.
the Galley and Interiorturning to the galley, check the
refrigerator or icebox. is it free of cracks, broken racks, or supports? is it clean and odor-free? test for an open drain with a glass of water. if the box drains directly to the bilge, it’s a guaran teed source of foul bilges! check the tem peratures main-tained by a mechanical re frigeration unit. What kind of fuel does the stove use? cnG is safest because the gas is lighter than air, but tanks employ very high pressures. refills are sometimes hard to get and the regulator is difficult to re pair. LPG can be dangerous: heavier than air, it will collect in the bilge and lurk there, awaiting a spark. With stringent op erating practices, an operable bilge blower with intakes deep in the bilges and proper installation, LPG is an acceptable fuel and
preferable to alcohol. LPG tanks should be firmly mounted outside or in a dedi-cated compartment outfitted that drains over board (not into the cockpit). are tanks mounted securely and on hardwood blocks clear of the fiberglass and dry on the bottom? each must have a cut-off valve at the tank, then a pressure gauge, then the pressure-reducing valve, then a sole noid valve remotely operated from the gal ley stove, and finally approved marine piping (firmly mounted and well sup-ported) to the stove.
The stove should be gimballed and have a short length of flexible hose for at tachment to the gas supply. are proper instruc tion and warning plates, specified by aByc, visible at the tanks and each appliance? Verify that proper operating procedures are employed (to light: open tank valve, check pressure, open electrical solenoid valve, light match, then open stove valve. to secure: close electrical valve and wait for flame to go out, then close stove valve and tank valve). most alcohol stoves are undesirable as they tend to flare and spill. They have a very low heat output, so cooking is slow, adding to
Before you get under way, assign the following duties to your crew. These checks will prevent problems later and will familiar-ize your crew with the boat’s systems. These actions are based on practices proven aboard u.s. naval academy offshore sailboats.
aLL HandS l have a supply of seasickness remedy found to be personally most effective. l adjust safety harness and PFd for comfortable fit. l inventory personal safety gear.
SkIPPeRl ensure all emergency assignments are up-to-date with crew assigned to functions by name.
fIRSt Mate OR BOSun l inspect all standing rigging from masthead to deck, ensuring cotters intact, taped as necessary, no cracks in swages or signs of broken wire strands. l inspect all running rigging. end for end as necessary, whip loose ends, install chafing gear or change leads to prevent chafe. examine areas under strain in heavy weather (e.g., reefing lines where they pass through cringles). l Bend on all storm sails, install sheets, and determine sheeting locations (mark with permanent felt-tip pen). mark storm sail corners (i.e., tack, head, clew). l mark all reef tack and clew cringles on mainsail and mizzen with numbers corresponding to reef number. l inventory sail ties. carry triple the normal number. l Lay out safety lines on deck and in cockpit. if wire, check swag-es for cracks or unlaying. if braided webbing, check condition and
any stitching. run tether hooks fore and aft to ensure free travel. l inspect and inventory safety harnesses. check for sprung clips, torn webbing, and inoperative lights. l inspect and inventory PFds. check whistles, lights and reflect-ing tape, ensure boat’s name is on each PFd. l inspect life raft for security of stowage and attachment of painter/oper ating lanyard to boat with weak link. l inventory sail repair kit: Four- by six-foot heavy canvas for chafing gear. at least six assorted sail needles; two roping palms, right hand. Three small rolls sail twine. sail repair material including at least one yard of eight- to nine- ounce sailcloth, adhesive-backed dacron (sheet and tape), and rip-stop nylon tape for spinnakers. two yards reinforcing nylon or dacron tape. spare hanks and slides to fit each sail. complete set spare battens; yarn for telltales. one yard spare cloth to match heaviest sail; one yard spare cloth for each weight of sails.
enGIneeR l clean bilges, removing all debris and clearing limber holes. l clean bilge pump strainers. l test bilge pumps by pumping clean water with each pump. l ensure batteries and other heavy equipment are secured against rollover. l ensure all batteries are fully charged (use hydrometer for wet-cell type). replace defective batteries. l inspect steering for correct cable tension, proper clamps, free-
the Bluewater Checklist
Boat PreParation & Damage Control

S a f et y at S e a 10
3
the danger un der way. regardless of fuel used, stoves must have specific operating instructions, clearly written and posted at the stove. check each stove and oven burner in op eration for full function.
The stove tray must be clean and the heating elements as free as possible from corrosion. check all hose fittings for wear, abrasion and splitting, es pecially at the end fittings. The stove should be gimballed but have a lock for fixed posi-tioning. some means to hold pots in place is required, as is a strap to give the cook security and support.
check galley storage racks for secu-rity. Foot pumps for both salt and fresh water are desirable. Protection from galley flare-ups and fires is essential. is a nearby fire extinguisher accessible without reaching across the stove? does the galley have a cutting board and ad-equate storage for sharp tools? is it free of vermin or rodents?
Before leaving the saloon, do a quick once-over. do the hatches, scuttles or the mast collar leak? are the instruments protect ed? check for signs of stress or distortion under deck-stepped masts. is
the ladder firmly mounted so it will stay in place in a seaway? does the cabin sole provide safe footing? can crewmembers moving into the cockpit clip onto safety lines before leav ing the cabin’s protection?
The aft cabin and head deserve the same scrutiny as forward spaces: Bilges, bunks, stowage, ladder, ports, hatches, chain plates, and other fittings are similar to those forward. in the bilge, check the stern tube. a traditional stuffing box should drip slightly, but not more than three to six drips per minute. dripless seals must have good clamps and flexible bellows. Look for transmission oil in the bilges, a sign of leaking rear seals.
Systems and engineWhile aft, check the steering system.
The me chanical system cables should be in good condition, adjustment nuts tight, and sheave supports firmly mounted, with guards and proper stowage to prevent fouling cable and sheaves. cables should be tight enough to remove any slack that might allow them to jump out of the sheave in heavy weather, but not so tight that they stress hull supports and the
cable itself. examine the rudderpost for galls and burrs, and check the condition of the packing gland. check turnbuckle lubrication. are stops in place and strong enough? have a crewmember swing the helm from stop to stop while observing the post, quadrant, cable and sheaves for wobble, play, or binding. check swages and exam ine cable clamps (minimum of two) for proper installation. Fit the emer-gency tiller and observe its operation. are there com pass, rudder-angle indicators, or other methods to enable helmsmen to steer properly? For hydraulic systems, check hydraulic lines for leaks while at rest and in use. is there a pressure gauge on the reservoir and a pump to pressur-ize the system? are the dust-cover boots in place to protect the rams? can the hydraulic linkage be disconnect ed quickly to permit steering by hand? in the engine room, follow systems for continuity and work sequentially for thor oughness.
Raw-water cooling: does the through- hull cycle freely without leaks? are all the system’s hoses in good condition and double clamped? is the strainer accessible and mounted securely, and is the basket
dom from binding cable and sheave conditions. remove or secure loose gear in quadrant area. check and fill hydraulic steering reservoir and air charge. l test emergency tiller and stow in readily accessible place. l inventory engine spares. minimum: alternator drive belt, engine oil filter, two sets of engine fuel filters, two quarts of lubri-cating oil, spare cooling water impeller and gasket.
navIGatOR l test the receipt of VhF and ssB weather information by copying at least one broadcast. ensure that a complete list of weather frequen-cies is aboard. l test weatherfax if installed. carry sufficient paper for 1.5 times anticipated need. l Verify ability to receive time signals on at least two frequencies. l check barometer accuracy against standard barometer. l inventory emergency gear: Flares, ePirB, survival mirrors, radar reflec tor, space blanket, and abandon-ship bag. l ensure sufficient spare batteries for 1.5 times anticipated needs for flashlight and portable electronics (GPs). l Be prepared to navigate with GPs and other electronics—but also in full manual mode, including sextant and calculator or tables.
COOk l Prepare menus for entire sea period and for 30 hours of storm conditions. Procure, inventory, and store provisions to support those menus. l secure all stores for possible rollover. l rig all lee cloths and check for adequacy of attachment. l inventory and inspect immersion suits.
daMaGe-COntROL OffICeR l Fit all washboards and other hatch closure devices. ensure cov-
ers for large windows are on board, properly stored and ready for mounting. l cycle all through-hull valves and lubricate as necessary. check for dc plugs of correct size adjacent to each fitting. ensure that all hoses below the waterline connected to through-hulls are double clamped. l check topside tightness by applying high-pressure hose to hatches, deck edge, windows, and mast boot. l Locate all dorade-vent covers. l inventory damage control kit and toolbox.
MedICaL aSSIStantl using an approved checklist (cca, us sailing, etc.) inventory your medical supplies. obtain necessary prescription drugs.
daMaGe-COntROL kIt (u.S.n.a. StyLe)l assorted hose clamps; 3-m 5200 or equivalent sealant/glue (car-tridges and gun); extra wood plugs; rubber sheeting; 4x4 collision mat of heavy fabric with wide hem or bolt rope, corner grommets and 10’- 15’ lanyards; hacksaw with three spare blades (carbide for rod rigging) taped to frame; two drifts matching size of clevis pins in rig; hammer with lan yard or handle; duct tape and electrical tape; water-activated fiberglass repair fabric; bolt and wire cutters; two 12- to 16-inch plywood squares for hole patches; self-tapping screws (1.5 to 2 inches) and large screwdriver (nails for wood boat); shoring materials and wood wedges, marline or small braid ed nylon line for seizings and lashings. modern epoxies can harden even underwater and should be considered. similarly, a battery-powered circular cutting tool with diamond blades will cut stand-ing rigging quicker than anything, if battery power is sufficient.
J.B. and H.S.

11 S a f et y at S e a
3 3
rea sonably clean? Follow the hose to the raw-wa ter circulating pump. any signs of pump leakage? are the belts tight enough to pre vent turning the pump by hand? trace the hose to the heat exchanger. check engine water and transmission oil heat exchang ers for corrosion and leaks. Pull and in spect the pencil zincs required to prevent elec trolysis that will cause exchange failure. Follow the hose to the exhaust manifold.
Exhaust system: trace from manifold to muffler, checking for leaks and cracks. are hot, dry exhaust lines lagged ade-quately? check the muffler for corrosion, leaks and presence of drain at lowest point. Follow the line aft, checking for leaks. does the line include an anti -siphon loop three to four feet above the waterline, or a stop valve downstream of the muffler to avoid having water back-flow into the manifold?
Freshwater cooling: are the hoses in good condition, not collapsed or mushy (single clamps are oK)? check the water pump for leaks and wobble. inspect for leaks around the thermostat housing. check the level of the expansion tank and verify content as 50 percent anti-freeze solution.
Fuel system: trace lines from the tanks through any manifolds to the primary filter/separator, checking for leaks, firm attachment and support of lines. do valves operate freely? is the primary filter element clean? When was it last changed? examine a fuel sample for signs of water or sedi ment. all non-machine-made connections must be double clamped. Follow the line from the primary filter to lift pump, then to the main pump by way of secondary fil ters, then to the injectors. check for leaks at every joint. test the lift pump for easy manual operation. Look at the bleed points for signs of overtighten-ing or very frequent use (implying air leak). When was the secondary fuel filter last changed? check fuel return lines for leaks. are the injector pump controls fastened firmly? do the throttle and fuel shut-off linkages smoothly operate, and are they solidly fastened?
Other engine features: check air filter for recent cleaning. are the instrument sen sor wires firmly attached, free from corro sion and bundled and attached for protec tion? check the oil level and condition of oil. are there signs of oil leaks around the tim ing gear cover, valve cover, or fuel pump? any signs
of corrosion or overheating? check the engine mounts for tightness of nuts (use double or lock nuts to prevent loosening from vibration), for live rubber in vibra-tion damper, and for cracks in spider arms. check the transmission cover for corrosion. is there a cap on the vent? are flange attachments safety wired or double-nutted to prevent loosening? are there signs of leaks from the transmis-sion? When was the oil last changed? is there extra oil and transmission fluid on board? spare oil and fuel filters?
electrical Systemare cables secure at the battery and
protected from corro sion? are the cables color-coded (red +/black -) and in good condition? are batter ies in a box that will contain acid if a case breaks? Will they stay in place through a 180-degree knockdown? are terminals shielded from accidental shorting? are the ground connections at the engine tight and corrosion-free? trace cables to the starter. are the connections tight, clean, and greased? are cable runs banded and secured to prevent damage? is the alterna-tor aligned? sight along plane of belt; check the belt, and look for dust, which signifies belt wear. is the belt tight enough to keep the alternator from turning by hand? check the alternator wiring. trace the field, ground, and output leads for tight connec tions. one effective battery-charging sys tem uses three batteries: one hard-wired to the starter through an off-on switch; and two larger capacity units for general service wired via “off-l/both-2” switch. during en gine operations, charg-ing should be via diode isolator, with the sensing circuit from the service batteries switch in “both” positions.
While in the engine room, check bilge and overhead blower operations. diesels have exhaust blower intakes placed high to remove fumes, but the LPG system re quires the lowest possible intake. check all the other equipment in the engine room, including the backs of switch panels (which need cov ers), and exposed fuses. check the fire ex tinguisher. examine engine room bilges for oil; if present, remove in an environmental ly sound manner. check the operation of all pumps, both electrical and manual (two re quired). each pump should discharge over board, not into a common hose or cockpit drain. check cockpit drains for good hoses and tight connections.
inspect the transmission coupling and shaft ing inside the hull. is the coupling secured with a keyway in the shaft (good) or is the collar simply held to the shaft with set screws (unacceptable)? installing hose clamps or a circular zinc on the shaft for ward of the stuffing box will prevent the loss of a broken/uncoupled shaft. if there is a bearing between the transmis-sion and stern tube, does it have grease fittings, recently lubricated? any signs of misalignment?
Before leaving, check the entire engine room for hazards such as exposed light bulbs, frayed wires, unsecured items, flammables, and overhead leaks. check the hull-deck joint if visible.
deck Layoutstart in the cockpit. check wash boards
and hatches for heavy-weather readiness: can they be secured from ei ther side? start the engine and watch oil pres sure and ammeter (many systems don’t charge properly but their owners don’t realize it until they go to sea). if batteries appear fully charged, partially discharge the service bank by turning everything on and secure the engine after checking for smooth operation both ahead and astern without play in the linkages. check the charging rate when starting the en gine for underway trials.
On deck: check all stanchions, pul-pits, and stern rails for looseness. check lifelines for minimum slack, but watch for fittings that are too tight. examine lifeline end fittings for signs of rust; peel back the covering at swages and inspect for broken strands. check all standing rigging at the deck level. remove tape and make sure turnbuckle cotter pins are brass or stain-less. are the turnbuckles straight with toggles to prevent lateral stresses? are the threads undamaged, clean, and lubricat-ed? in each shroud and stay, at least one clevis pin should have its cotter pin spread only 20 degrees to facilitate emergency removal. check for clevis pins too far out of the hole, putting strain on cotter pins. check for cracks in turnbuckles and cable end fit tings, preferably with dye penetrant and a magnifying glass. check the swage where the wire joins the metal; any crack is seri ous. sealing the collar at the lower end of the wire with caulking may prevent mois ture from working down into the swage. any signs of wire unlaying indicate bro ken strands inside the swage. remove cos metic covers on the shrouds; although
Boat PreParation & Damage Control

S a f et y at S e a 12
3
they reduce chafe on lines and sails, they keep corrosion salt in contact with wire.
The mast: examine the collar and wedges and look for signs of stress or cracking on the mast or partners. check all winches. do they move freely and cause muted clicks, indicating lubrica-tion, or loud metal clicks? is there a winch handle holder? examine all halyards for condition of wire and fittings. meat hooks? twists or kinks? if the wire is in poor condition, consider re placing it with low-stretch synthetic-fiber line of appropriate strength. check spin naker gear to ensure the pole attachment slides smoothly, adjustments lock easily and securely, and the pole itself operates prop-erly. do gooseneck fittings have clevis pin and cotters? are the mast and boom tracks straight? is there a trysail track with a switching track? check boom reefing gear: are outhaul fairleads soundly at-tached and positioned aft of appropriate clew cringles? is the halyard marked at reef positions? is there a winch for haul-ing reefs tight? make the same checks on the mizzen, if applicable
Up the rig: on the way up, check all standing rigging and halyards for broken strands and unlaying; you can wipe with a paper towel or a tissue to create “flags” on broken strands. at the spreaders, check the lower shroud attachment. are clevis pins fully in serted, with heads outboard, and nonfer rous cotter pins? are the though-bolt holding tangs pinned? check the in-board end of spreaders for wear and elongation of pin/bolt holes; check wood spreaders, if applicable for rot (none is ac ceptable).
swing out to the spreader tips and try to move them up and down to check any seiz ing at the shrouds. ensure adequate soft cov ering of spreader tips to prevent sail chafe. Verify that the angle formed between the upper part of the shroud and the top of the spreader equals the angle between the lower part of the shroud and the bottom of the spreader. continuing upward, check the steaming light and any mast fittings such as a radar antenna and platform. re peat checks at upper spread-ers. at the masthead, check mechanical wind indica tor for free movement. exam-ine halyard sheaves for freedom and snug fit (any space between sheaves and cheeks can al low halyards to jump out and jam). check all clevis pins and cotters. Look for cracks in the welded masthead box. in-spect standing rigging swages for cracks,
rust stains, unlaying, unfair leads. check in strument and antenna connections and mountings. test tricolor and anchor lights. on split rigs, check the triatic stay for secure attachment and good tension. check the blocks and rigging for spin-naker gear. all shackles aloft should have safety wires to prevent accidental open-ing. coming back down, check the sail track or bolt rope groove for alignment and soundness. re peat the entire process for a mizzen mast.
On deck: check all crew overboard gear; a quick release system is desirable. test navigation, compass, and instru-ment lights. check decks and hatches for cracks, stress fractures, or delamination. sight closure plates for all ventilators. check the fastening and condition of deck- mounted blocks and fittings. ensure fair lead tracks are straight and soundly fas tened. is the companionway cover secure ly attached to its slides? does it slide freely? is the steering pedestal firmly mounted? is there a strong point for the helmsman to fasten a safety tether? check the condition of the dodger and its win dows and zippers. check the shore-power ca ble and receptacle. is the anchor secured against loss in high seas? are fair-leads and chocks smooth and free from sharp edges? is chafing gear available?
Inventories and Sailsin ventory safety gear in accordance
with orc classification. ensure that flares are ade quate in number and have not expired. check for an 8-inch bell (required by coLreGs for boats 39 to 66 feet long), day shapes for anchoring and motorsail ing, and make sure that there’s a heaving line in the cockpit. a foghorn must have manual/oral operating ability as a backup for canned air. check the radar reflector. Verify the servicing of the life raft within the past 12 months.
inventory the medical kit (and review its adequacy), the damage-control kit, and the sail-repair kits. (see “the Bluewater checklist” in this booklet). inventory all engine spares, including filters, gas kets, water-pump impeller, starter, alterna tor, plus manufacturer’s recommendations.
Sails: check the condition of eyes and cringles at the tack, clew, and reef points; inspect the head board, bolt rope, or sail slide condition, and how it attaches to sail. ensure that battens are securely fastened in the main and mizzen and pockets are
in good repair. examine all seam stitch-ing. Look for telltales at jib luff and on main/mizzen at battens.
set storm sails at the dock and verify proper sheeting angles. rig heavy-weather jack lines. are they firmly anchored fore and aft? do they run the full length of the boat to allow the crew to clip on while in the cockpit and maneuver freely all the way to the headstay or stern pulpit without unclipping?
For underway trials, start the engine and observe the charging rate and oil pressure. While under power, check the en gine room for previously undetected leaks, vibrations, and noises. check the shaft and stern tube for vibration, wobble, and leakage.
set all working sails (main, mizzen, 100- percent jib); observe trim technique and sheet angles. change sails, reef, and un reef; tack and jibe with each combina-tion. set the spinnaker, jibe, and douse. conduct unannounced crew-overboard drill and observe with “crew-overboard” procedure. (see “crew overboard: Four recovery methods” in this booklet).ro tate watches. make VhF and hF ssB ra diotelephone checks. check logs for com pleteness and adequacy.
has anything you’ve seen or heard cast doubts upon the boat’s readiness for her intended voyage? is the crew competent and ready for sustained sailing, pos-sibly in adverse conditions? if you have uncertain ties on either score, address the problem and find a solution. Going to sea in a sail boat presents plenty of chal-lenges; mini mize any risks before you leave the dock.
Captain John Bonds, U.S. Navy (Ret.), is the
former executive director of US Sailing. As
the director of Navy Sailing at Annapolis
in 1981, Bonds developed and wrote the 17
publications that comprise the substance
of the Navy’s sail-train ing program. As
commodore of the Naval Acad emy Sailing
Squadron from 1984 to 1987, he saw that
program adapted to a civilian public in
what has become the Cruising World/
US Sailing Safety-at-Sea Seminars. Bonds
teaches history at The Citadel, in Charles-
ton, South Carolina, and lives with his wife
aboard their J/40, Alliance, in Newport,
Rhode Island, during the summer months.
The late Captain Hal Sutphen, U.S. Navy
(Ret.), was a professional mariner, teacher,
writer, and a former direc tor of Navy Sailing.

13 S a f et y at S e a
Boat PreParation & Damage Control
by tim Carr
Is all Secure Below?your best defense in a knockdown or roll may well be properly stowed gear belowdecks.
thinGs Were haPPeninG Fast. Pauline, my wife, was down below, anxious and frightened, but i could see her through the sliding hatch of our classic 28-footer, Curlew; the hatch was cracked open just an inch. “are you all right?” i asked.
“yes, i think so,” she said to me. “What exactly happened?”
“Knockdown,” i said. “The mast went underwater, the dinghy has shifted, but otherwise she looks okay. can’t see any ice ahead so i’ll set the wind vane and come down to change my gear. i’m soaked through.”
The day before, Curlew had left Palmer sta tion, the u.s. base in antarctica, with what we’d hoped was a settling weather pat tern. Wrong. The barometer had plummet ed. screaming, smoking winds
blew from the north-northeast for 24 hours and now, after a brief lull, came howling in from the northwest, bring-ing with them a vicious cross sea. This was our worst time ever. With the cabin thermometer reading 26 degrees F, we were cold to our cores, and weary from hour-on, hour-off watches on which we hand-steered in minimal visibility.
Lying ahull in these seas was probably asking for trouble, but Curlew couldn’t heave to against such winds. turning downwind would mean running into all kinds of dangers: reefs, islands, and grounded icebergs on the banks. so we lay ahull, and our little cutter had been knocked down far beyond her beam ends. Later we found the fiberglass dinghy’s gunwales smashed in several places and the thwarts popped out, yet the only casu-alty below was the small transistor radio that had been overlooked in the sudden onslaught of bad weather.
our last big job while preparing to go down to the Falkland islands and points south was to add secure catches and methods for containing everything in
place in the event we would get knocked down or, may the gods forbid it, capsized.
all our locker doors were fit with brass friction turn buttons that tended to work loose. i replaced these with small, flat, barrel bolts. Their protruding knobs were not as ideal as countersunk flush-fitting latches sold in chandlers, but Curlew was in ar gentina by this time, so we had to make do. common cupboard fasten-ings with fin ger holes and hidden “elbow catches” can be inadvertently “triggered” by tumbling locker contents. after our burst of achieve ment, fixing all six doors with little effort, the next job proved a trifle more difficult.
Curlew’s four drawers are all the lift-to -pull-out variety. They work very well when the boat is the right way up, but that was no guaran tee in the southern ocean, so we searched for a better method to keep them closed. We finally chose to fit each drawer with its own piece of threaded rod with a wing nut handle, which we can turn into the side of the drawer through a threaded brass plate fixed to an adjacent bulkhead. We access
extra Security for Heavy Items Below by steve Callahan
in oFFshore PitchPoLes and roLLs, heaVy loose equipment aboard has destroyed vessels from the inside out. engines have broken mounts, fly ing inside ballast has smashed apart cabins, batteries have battered out ports, snakes of chain have whipped through furniture, and stoves have can-nonballed through interiors.
inspect both your engine bolts and mounts routinely to make sure none have fractured. Beware of some flexible mounts that might give way when the boat turns turtle and the weight of the engine yanks in what is normally an upward direction. engine bolts must be topped with heavy washers and nuts. even so, backup retainers are a good idea. Cruising World contributor ralph naranjo ran stainless cables across the top of the engine both fore and aft aboard his ericson 41,
fastening each to the lifting rings and engine beds. Properly baffled tanks will prevent liquid contents from surg-
ing. heavy straps or braces across the tops and/or along the edg-es should keep tanks in place. Wedges alone will not keep internal ballast in place; ballast should be structurally covered with framed panels or heavy glass and bolted and/or bonded in place.
Lash any anchors that you carry inside the boat to thru-bolted pad eyes or eye straps. chain is more difficult to secure, but a pile of it can be kept in place with a blanket of laced line or sewn-together web bing attached to eye straps. Provide chain lockers with latched covers.
stoves should not be simply dropped in place. Gimbals or the main body of the stove must be securely bolted. Barrel bolts will prevent a roll from swinging a stove beyond the gimbals’ capac-
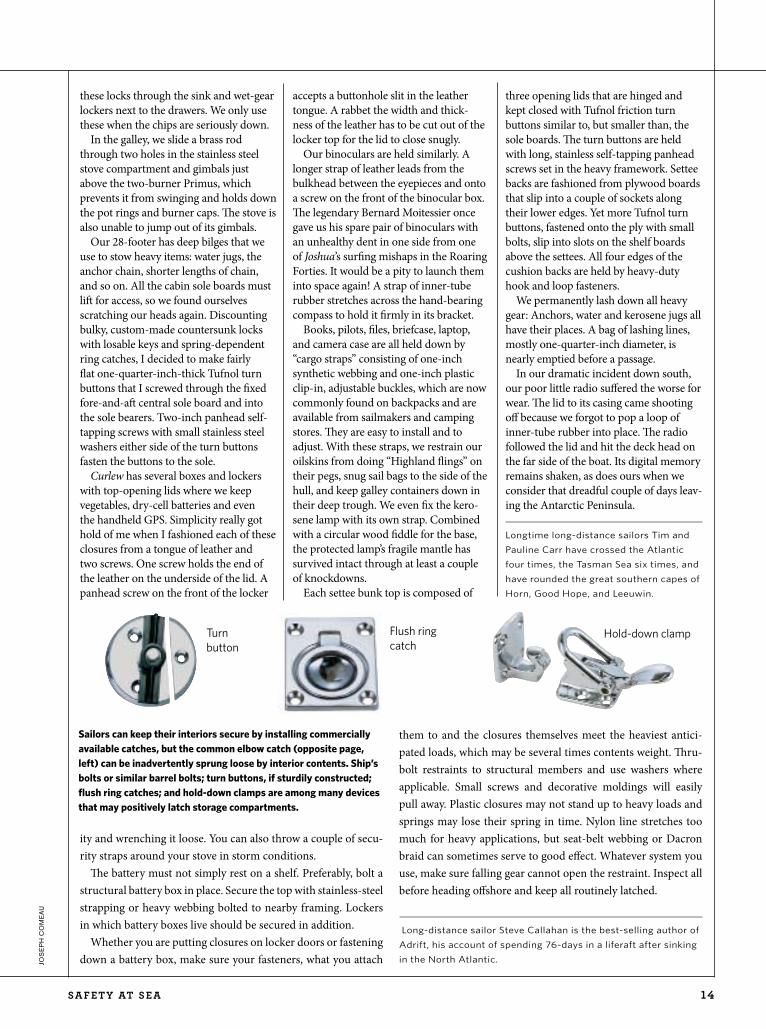
Elbow catch Ship’s or barrel bolt
jos
ep
h c
om
ea
u
S a f et y at S e a 14
these locks through the sink and wet-gear lockers next to the drawers. We only use these when the chips are seriously down.
in the galley, we slide a brass rod through two holes in the stainless steel stove compartment and gimbals just above the two-burner Primus, which pre vents it from swinging and holds down the pot rings and burner caps. The stove is also unable to jump out of its gimbals.
our 28-footer has deep bilges that we use to stow heavy items: water jugs, the anchor chain, shorter lengths of chain, and so on. all the cabin sole boards must lift for access, so we found ourselves scratch ing our heads again. discounting bulky, custom-made countersunk locks with los able keys and spring-dependent ring catches, i decided to make fairly flat one- quarter-inch-thick tufnol turn buttons that i screwed through the fixed fore-and-aft central sole board and into the sole bear ers. two-inch panhead self-tapping screws with small stainless steel washers either side of the turn buttons fasten the buttons to the sole.
Curlew has several boxes and lockers with top-opening lids where we keep vegetables, dry-cell batteries and even the handheld GPs. simplicity really got hold of me when i fashioned each of these closures from a tongue of leather and two screws. one screw holds the end of the leather on the underside of the lid. a panhead screw on the front of the lock er
accepts a buttonhole slit in the leather tongue. a rabbet the width and thick-ness of the leather has to be cut out of the locker top for the lid to close snugly.
our binoculars are held similarly. a longer strap of leather leads from the bulkhead between the eyepieces and onto a screw on the front of the binocular box. The legendary Bernard moitessier once gave us his spare pair of binoculars with an unhealthy dent in one side from one of Joshua’s surfing mishaps in the roaring Forties. it would be a pity to launch them into space again! a strap of inner-tube rubber stretches across the hand-bearing compass to hold it firmly in its bracket.
Books, pilots, files, briefcase, laptop, and camera case are all held down by “cargo straps” consisting of one-inch syn thetic webbing and one-inch plastic clip- in, adjustable buckles, which are now commonly found on backpacks and are available from sailmakers and camping stores. They are easy to install and to ad just. With these straps, we restrain our oil skins from doing “highland flings” on their pegs, snug sail bags to the side of the hull, and keep galley containers down in their deep trough. We even fix the kero-sene lamp with its own strap. combined with a circu lar wood fiddle for the base, the protected lamp’s fragile mantle has survived intact through at least a couple of knockdowns.
each settee bunk top is composed of
three opening lids that are hinged and kept closed with tufnol friction turn buttons similar to, but smaller than, the sole boards. The turn buttons are held with long, stain less self-tapping panhead screws set in the heavy framework. settee backs are fash ioned from plywood boards that slip into a couple of sockets along their lower edges. yet more tufnol turn buttons, fastened on to the ply with small bolts, slip into slots on the shelf boards above the settees. all four edges of the cushion backs are held by heavy-duty hook and loop fasteners.
We permanently lash down all heavy gear: anchors, water and kerosene jugs all have their places. a bag of lashing lines, mostly one-quarter-inch diameter, is near ly emptied before a passage.
in our dramatic incident down south, our poor little radio suffered the worse for wear. The lid to its casing came shooting off because we for got to pop a loop of inner-tube rubber in to place. The radio followed the lid and hit the deck head on the far side of the boat. its digital memory remains shaken, as does ours when we consider that dreadful couple of days leav-ing the antarctic Peninsula.
Longtime long-distance sailors Tim and
Pauline Carr have crossed the Atlantic
four times, the Tasman Sea six times, and
have rounded the great southern capes of
Horn, Good Hope, and Leeuwin.
ity and wrenching it loose. you can also throw a couple of secu-rity straps around your stove in storm conditions.
The battery must not simply rest on a shelf. Preferably, bolt a structur al battery box in place. secure the top with stainless-steel strapping or heavy webbing bolted to nearby framing. Lockers in which battery boxes live should be secured in addition.
Whether you are putting closures on locker doors or fastening down a battery box, make sure your fasteners, what you attach
them to and the closures themselves meet the heaviest antici-pated loads, which may be several times contents weight. Thru-bolt restraints to structural members and use washers where applicable. small screws and decorative mold ings will easily pull away. Plastic closures may not stand up to heavy loads and springs may lose their spring in time. nylon line stretches too much for heavy applications, but seat-belt webbing or dacron braid can sometimes serve to good effect. Whatever system you use, make sure falling gear cannot open the restraint. inspect all before heading offshore and keep all routinely latched.
Long-distance sailor Steve Callahan is the best-selling author of
Adrift, his account of spending 76-days in a liferaft after sinking
in the North Atlantic.
Hold-down clampFlush ring catch
Turn button
jos
ep
h c
om
ea
u
Sailors can keep their interiors secure by installing commercially available catches, but the common elbow catch (opposite page, left) can be inadvertently sprung loose by interi or contents. Ship’s bolts or similar barrel bolts; turn buttons, if sturdily constructed; flush ring catches; and hold-down clamps are among many devices that may positively latch storage compartments.

15 S a f et y at S e a
Boat PreParation & Damage Control
flame Off!Plan ahead and take proper precautions to ensure your boat is free from flames.
Fire is the uLti mate disaster on any boat. only if you are prepared for it do you have a chance to contain and ex tinguish it. most of us ignore the real dan ger of fire afloat. We comply with mini mums set by coast Guard regulations, but that is not enough. in the long run, it is better and easier to understand the fire hazards on a boat and eliminate the possibility of disaster through good habits.
What Makes a fire?Four components are required to start
and sustain a fire: fuel, or the material that burns; heat, or the element that raises the fuel temperature to its ignition point; oxygen, the gas consumed in the burning process; and a chemical chain reaction that converts fuel to ashes and smoke. Without these four compo nents, fire can’t exist.
Fires are classified in four categories. class a fires are those involving such solid fu el as wood, paper, textiles, or bed ding. class B fires have liquid fuel, such as gasoline, paint, or fat. class c fires are electrical in origin and occur in wiring, appliances, and switches. class d fires in volve pyrotechnics or metals, such as magnesium.
Class A fires: a class a fire starts when a heat source contacts a solid that will burn. Perhaps a smoldering cigarette falls onto a settee, matches tumble out of a locker onto the stove, or curtains ignite in a flare-up while preheating a kerosene or alcohol burner. These situations involve ordinary materials, and simply keeping a heat source away from any potential fuel will prevent a fire.
Class B fires: class B, liquid fires are more insidious. nearly every boat carries fuel for stoves and engines, and lockers often contain cleaners, paints,
or flammable solvents. Liquid molecules are tightly packed to gether, but at the surface they can escape and mix with air to form vapor.
Liquid odors are the result of molecules that evaporate, and then mix with air. The amount of vapor that escapes increases as liquid temperature rises. some vapors will burn if they contact a heat source. When a liquid burns, it is the vapor molecules that fuel the fire. some vapors are heavier than air; they will col lect in low areas to form a trail of vapors reaching far from the liquid itself. if this trail contacts a heat source (hot sur-face, open flame, static electricity, sparks) the resulting fire can flash back to the liquid source of the vapors. Fire occurs even though the liquid and the ignition source are far apart.
The lowest temperature at which a liq uid releases enough vapor to sustain burning is called its flash point, a charac-teristic that determines the relative fire hazards of liquids. Those classified as “flammable” have flash points below 100 degrees Fahrenheit. They release enough vapors to form burnable mixtures at nor-mal air temperatures. examples include gasoline, acetone, benzene, lacquer thin-ner, and turpentine. Liquids classified as “combustible” have flash points above 100 degrees Fahrenheit. They include diesel oil, kerosene, mineral oil and hydraulic fluid.
many fires on boats are caused by gasoline. if a car has a fuel leak, the gasoline vapors disperse quickly and rarely cause a problem. on a boat with a gas engine, where the tanks and fuel lines are also enclosed in the hull, leaking gasoline is trapped in the bilge where it vaporizes and mixes with air to form an explosive mixture.
inboard gasoline engines demand meticulous maintenance. Fuel lines and connections must be checked frequently to detect loose connections or leakage. if there is any gasoline odor, track down
the source immediately, repair the leak, and clean and ventilate the bilge. sniff the bilge before energizing an electric bilge blower, as sparks from the motor can ig-nite the vapors.
Vapors can find their way below dur ing refueling, so close all hatches and ports before filling the tanks. transfer gasoline or other flammable liquids from one container to another either on deck or off the boat. extra fuel should be stored on deck in approved plastic containers. This ap plies to an outboard motor as well as its fuel supply.
of course, these days most sailboats use diesel fuel, which is a much safer liquid. even so, it is best to store extra diesel top-side in heavy plastic containers approved for flammables.
cooking fuel, too, must be handled with care. alcohol stoves are found on many boats, and can leak into the burner priming pans. Because it is colorless, it is hard to see how much fuel is there. When the stove is lit, excess alcohol flames up to cause burns or a fire, or both. Keep a ket tle full of water handy to cover the burner and contain the flame until it burns itself out. a specially designed fire-ex tinguishing blanket near
by margarEt williams
co
ur
tes
y o
f b
oat
u.s
.
By being proactive and addressing your craft’s risk areas, you can avoid the last thing anyone wants to see on the water: a boat engulfed in flames.
S a f et y at S e a 16
the galley can help address a stove fire. Kerosene is a combustible liquid that
can be carried safely aboard a boat. Like alcohol, it should be transferred into heavy plastic containers for storage.
Barbecues are very popular on boats. some are fueled with charcoal, others with propane or butane. charcoal can ig nite by spontaneous combustion if it gets damp and has little ventilation. store it ashore and, when you put some aboard for a cruise, keep it completely dry. if it gets damp, get rid of it.
Liquefied petroleum gas (LPG), either propane or butane, is a highly efficient fuel used by many boat galleys and bar-becues. Like gasoline vapors, it is both explosive and heavier than air, so any leakage accumulates in the bilge. a safe system requires proper equipment and installation. The american Boat and yacht council (www.abycinc.org) has established guide lines for the installation of LPG systems on boats.
no one can afford to be casual when using LPG stoves. Good LPG stoves incor-porate a thermo sensor to secure the gas supply if a burn er flame is extinguished ac-cidentally, such as by a puff of wind. never leave a light ed galley stove unwatched.
other LPG appliances found aboard
boats include cabin heaters and refrigera-tors. as opposed to cooking stoves, these are considered “unattended” appliances. They have a pilot flame or glow plug to assure continuous operation. aboard boats, they must have a sealed combus-tion chamber to completely separate the combustion system from the atmosphere aboard. Buy LPG appliances from marine suppliers. rV equipment is not safe for use aboard a boat.
used solvents, cleaning liquids and rags soaked with flammable or com bustible liquids are often mistreated because they are no longer needed. Keep such materials topside in tightly closed containers until they can be disposed of properly.
The popularity of electrical equip ment and electronics increases the dan ger of class c, or electrical fires. make certain all electrical connections are tight, wires are large enough to carry the current and all equipment is protected by circuit break ers or fuses.
shield batteries from accidental short ing of the terminals and monitor alternator output to prevent overcharging. over charging causes boiling in the batter-ies and generates explosive hydrogen gas.
extinguishing fires
it is far simpler to prevent a fire than to fight one, but you must know how to fight any fire that occurs. Fire protec-tion systems should follow national Fire Protection association Guidelines. Fire extinguishers, required equipment on all boats, are classified a, B, and c to corre-spond to the types of fires for which they are effective. The appropriate letters are clearly marked on every extinguisher.
class a fires can be extinguished with water. its cooling effect eliminates the heat component and to some degree, it smothers the fire by reducing the oxygen available. if water is used, a lot is needed. at sea, that means hauling buckets of sea-water, a slow process that gives the fire a chance to spread.
multipurpose extinguishers are useful for most fires. you should have at least one on board. such an extinguisher can bring a small class a fire under control quickly; use water to finish the job, partic-ularly in a bunk or area that can smolder and reignite. multipur pose extinguishers avoid the need to stop and think about the type of fire be fore you deal with it.
on a class B fire, never use water; it will spread the flames or cause them to flare up. These types of extinguishers work on class B fires: carbon dioxide, dry
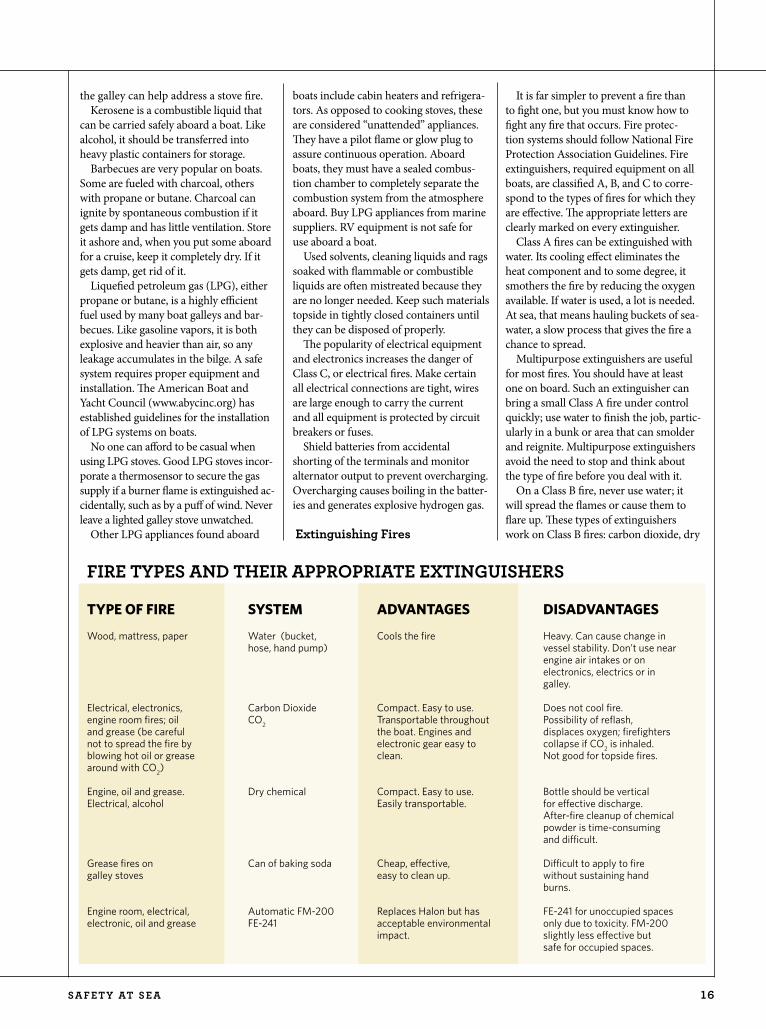
fIRe tyPeS and tHeIR aPPROPRIate eXtInGuISHeRS
TYPE OF FIRE SYSTEM ADVANTAGES DISADVANTAGES Wood, mattress, paper Water (bucket, Cools the fire Heavy. Can cause change in hose, hand pump) vessel stability. Don’t use near engine air intakes or on electronics, electrics or in galley.
Electrical, electronics, Carbon Dioxide Compact. Easy to use. Does not cool fire.engine room fires; oil CO
2 Transportable throughout Possibility of reflash,
and grease (be careful the boat. Engines and displaces oxygen; firefightersnot to spread the fire by electronic gear easy to collapse if CO
2 is inhaled.
blowing hot oil or grease clean. Not good for topside fires.around with CO
2)
Engine, oil and grease. Dry chemical Compact. Easy to use. Bottle should be verticalElectrical, alcohol Easily transportable. for effective discharge. After-fire cleanup of chemical
powder is time-consuming and difficult.
Grease fires on Can of baking soda Cheap, effective, Difficult to apply to firegalley stoves easy to clean up. without sustaining hand burns.
Engine room, electrical, Automatic FM-200 Replaces Halon but has FE-241 for unoccupied spaceselectronic, oil and grease FE-241 acceptable environmental only due to toxicity. FM-200 impact. slightly less effective but safe for occupied spaces.
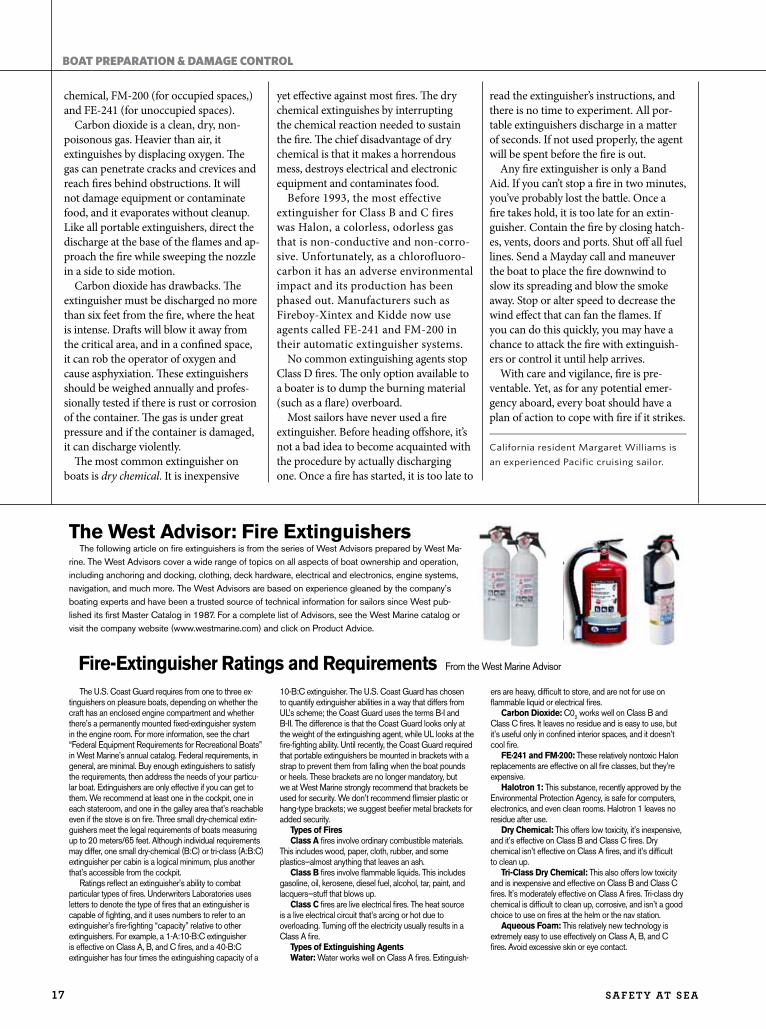
17 S a f et y at S e a
chemical, Fm-200 (for occupied spaces,) and Fe-241 (for unoccupied spaces).
carbon dioxide is a clean, dry, non-poisonous gas. heavier than air, it extin guishes by displacing oxygen. The gas can penetrate cracks and crevices and reach fires behind obstructions. it will not damage equipment or contaminate food, and it evaporates without cleanup. Like all portable extinguishers, direct the dis charge at the base of the flames and ap-proach the fire while sweeping the nozzle in a side to side motion.
carbon dioxide has drawbacks. The extinguisher must be discharged no more than six feet from the fire, where the heat is intense. drafts will blow it away from the critical area, and in a confined space, it can rob the operator of oxygen and cause asphyxiation. These extinguishers should be weighed annually and profes-sionally test ed if there is rust or corrosion of the con tainer. The gas is under great pressure and if the container is damaged, it can dis charge violently.
The most common extinguisher on boats is dry chemical. it is inexpensive
yet effective against most fires. The dry chem ical extinguishes by interrupting the chemical reaction needed to sustain the fire. The chief disadvantage of dry chemi cal is that it makes a horrendous mess, destroys electrical and electronic equip ment and contaminates food.
Before 1993, the most effective extinguish er for class B and c fires was halon, a colorless, odorless gas that is non-conductive and non-corro-sive. unfortunately, as a chlorofluoro-carbon it has an adverse envi ronmental impact and its production has been phased out. manufacturers such as Fireboy-Xintex and Kidde now use agents called Fe-241 and Fm-200 in their automatic extinguisher systems.
no common extinguishing agents stop class d fires. The only option available to a boater is to dump the burning material (such as a flare) overboard.
most sailors have never used a fire ex tinguisher. Before heading offshore, it’s not a bad idea to become acquainted with the pro cedure by actually discharging one. once a fire has started, it is too late to
read the extin guisher’s instructions, and there is no time to experiment. all por-table extin guishers discharge in a matter of seconds. if not used properly, the agent will be spent before the fire is out.
any fire extinguisher is only a Band aid. if you can’t stop a fire in two min utes, you’ve probably lost the battle. once a fire takes hold, it is too late for an extin-guisher. contain the fire by closing hatch-es, vents, doors and ports. shut off all fuel lines. send a mayday call and maneuver the boat to place the fire downwind to slow its spreading and blow the smoke away. stop or alter speed to decrease the wind effect that can fan the flames. if you can do this quickly, you may have a chance to attack the fire with extinguish-ers or control it until help arrives.
With care and vigilance, fire is pre-ventable. yet, as for any potential emer-gency aboard, every boat should have a plan of action to cope with fire if it strikes.
California resident Margaret Williams is
an experienced Pacific cruising sailor.
Boat PreParation & Damage Control
The West Advisor: Fire Extinguishersthe following article on fire extinguishers is from the series of west advisors prepared by west ma-
rine. the west advisors cover a wide range of topics on all aspects of boat ownership and operation, including anchoring and docking, clothing, deck hardware, electrical and electronics, engine systems, navigation, and much more. the west advisors are based on experience gleaned by the company’s boating experts and have been a trusted source of technical information for sailors since west pub-lished its first master catalog in 1987. for a complete list of advisors, see the west marine catalog or visit the company website (www.westmarine.com) and click on product advice.
the u.s. coast Guard requires from one to three ex-tinguishers on pleasure boats, depending on whether the craft has an enclosed engine compartment and whether there’s a permanently mounted fixed-extinguisher system in the engine room. for more information, see the chart “federal equipment requirements for recreational boats” in west marine’s annual catalog. federal requirements, in general, are minimal. buy enough extinguishers to satisfy the requirements, then address the needs of your particu-lar boat. extinguishers are only effective if you can get to them. we recommend at least one in the cockpit, one in each stateroom, and one in the galley area that’s reachable even if the stove is on fire. three small dry-chemical extin-guishers meet the legal requirements of boats measuring up to 20 meters/65 feet. although individual requirements may differ, one small dry-chemical (b:c) or tri-class (a:b:c) extinguisher per cabin is a logical minimum, plus another that’s accessible from the cockpit.
ratings reflect an extinguisher’s ability to combat particular types of fires. underwriters Laboratories uses letters to denote the type of fires that an extinguisher is capable of fighting, and it uses numbers to refer to an extinguisher’s fire-fighting “capacity” relative to other extinguishers. for example, a 1-a:10-b:c extinguisher is effective on class a, b, and c fires, and a 40-b:c extinguisher has four times the extinguishing capacity of a
10-b:c extinguisher. the u.s. coast Guard has chosen to quantify extinguisher abilities in a way that differs from uL’s scheme; the coast Guard uses the terms b-I and b-II. the difference is that the coast Guard looks only at the weight of the extinguishing agent, while uL looks at the fire-fighting ability. until recently, the coast Guard required that portable extinguishers be mounted in brackets with a strap to prevent them from falling when the boat pounds or heels. these brackets are no longer mandatory, but we at west marine strongly recommend that brackets be used for security. we don’t recommend flimsier plastic or hang-type brackets; we suggest beefier metal brackets for added security.
Types of FiresClass A fires involve ordinary combustible materials.
this includes wood, paper, cloth, rubber, and some plastics—almost anything that leaves an ash.
Class B fires involve flammable liquids. this includes gasoline, oil, kerosene, diesel fuel, alcohol, tar, paint, and lacquers—stuff that blows up.
Class C fires are live electrical fires. the heat source is a live electrical circuit that’s arcing or hot due to overloading. turning off the electricity usually results in a class a fire.
Types of Extinguishing Agents Water: water works well on class a fires. extinguish-
ers are heavy, difficult to store, and are not for use on flammable liquid or electrical fires.
Carbon Dioxide: c02 works well on class b and class c fires. It leaves no residue and is easy to use, but it’s useful only in confined interior spaces, and it doesn’t cool fire.
FE·241 and FM·200: these relatively nontoxic halon replacements are effective on all fire classes, but they’re expensive.
Halotron 1: this substance, recently approved by the environmental protection agency, is safe for computers, electronics, and even clean rooms. halotron 1 leaves no residue after use.
Dry Chemical: this offers low toxicity, it’s inexpensive, and it’s effective on class b and class c fires. dry chemical isn’t effective on class a fires, and it’s difficult to clean up.
Tri-Class Dry Chemical: this also offers low toxicity and is inexpensive and effective on class b and class c fires. It’s moderately effective on class a fires. tri-class dry chemical is difficult to clean up, corrosive, and isn’t a good choice to use on fires at the helm or the nav station.
Aqueous Foam: this relatively new technology is extremely easy to use effectively on class a, b, and c fires. avoid excessive skin or eye contact.
Fire-Extinguisher Ratings and Requirements from the west marine advisor

S a f et y at S e a 18