bladderscan bvi 6100 - verathon.com · bladderscan bvi 6100 operations & maintenance manual...
TRANSCRIPT
BLADDERSCAN
BVI 6100Operations & Maintenance Manual

0900‑4830‑00‑60

BLADDERSCAN
BVI 6100Operations & Maintenance Manual
Effective: July 31, 2017
Caution: Federal (United States) law restricts this device to sale by or on the order of a physician.

CONTACT INFORMATIONTo obtain additional information regarding your BladderScan system,
please contact Verathon® Customer Care or visit verathon.com/support.
Verathon Inc.
20001 North Creek Parkway Bothell, WA 98011 U.S.A.
Tel: 800.331.2313 (US and Canada only) Tel: 425.867.1348 Fax: 425.883.2896
verathon.com
Verathon Medical (Europe) B.V.
Willem Fenengastraat 13 1096 BL Amsterdam
The Netherlands Tel: +31 (0) 20 210 30 91 Fax: +31 (0) 20 210 30 92
0123
Copyright 2017 Verathon Inc. All rights reserved. No part of this manual may be copied or transmitted by any method without the express written consent of Verathon Inc.
Verathon, the Verathon torch symbol, BladderScan, the BladderScan symbol, Scan Point, and Vmode are trademarks or registered trademarks, and Total Reliability Plan is a service mark of Verathon Inc. All other brand and product names are trademarks or registered trademarks of their respective owners.
Information in this manual may change at any time without notice. For the most up‑to‑date information, see the documentation available at verathon.com/product‑documentation.
iOperations & Maintenance Manual: Table of Contents
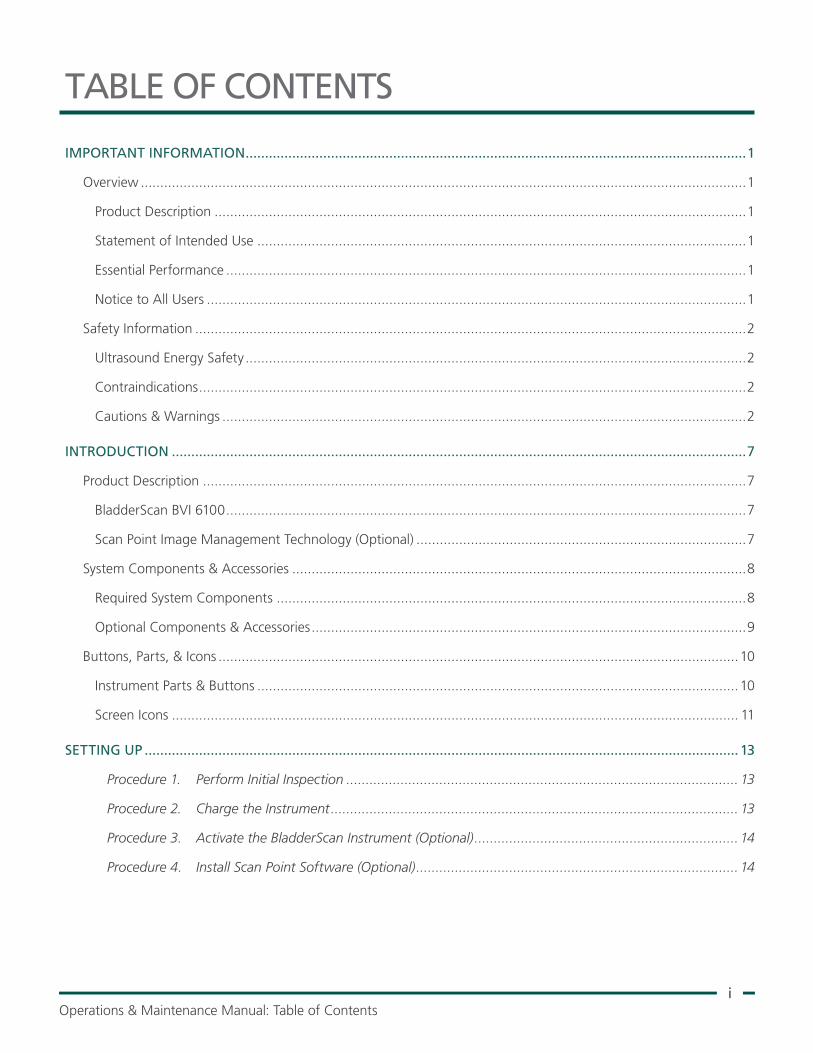
TABLE OF CONTENTS
IMPORTANT INFORMATION .................................................................................................................................1
Overview ............................................................................................................................................................1
Product Description .........................................................................................................................................1
Statement of Intended Use ..............................................................................................................................1
Essential Performance ......................................................................................................................................1
Notice to All Users ...........................................................................................................................................1
Safety Information ..............................................................................................................................................2
Ultrasound Energy Safety .................................................................................................................................2
Contraindications .............................................................................................................................................2
Cautions & Warnings .......................................................................................................................................2
INTRODUCTION ....................................................................................................................................................7
Product Description ............................................................................................................................................7
BladderScan BVI 6100 ......................................................................................................................................7
Scan Point Image Management Technology (Optional) .....................................................................................7
System Components & Accessories .....................................................................................................................8
Required System Components .........................................................................................................................8
Optional Components & Accessories ................................................................................................................9
Buttons, Parts, & Icons ......................................................................................................................................10
Instrument Parts & Buttons ............................................................................................................................10
Screen Icons .................................................................................................................................................. 11
SETTING UP .........................................................................................................................................................13
Procedure 1. Perform Initial Inspection ..................................................................................................... 13
Procedure 2. Charge the Instrument ......................................................................................................... 13
Procedure 3. Activate the BladderScan Instrument (Optional) .................................................................... 14
Procedure 4. Install Scan Point Software (Optional) ................................................................................... 14

ii
MEASURING BLADDER VOLUME .......................................................................................................................15
Performing Scans .............................................................................................................................................. 15
Procedure 1. Prepare for the Exam ...........................................................................................................16
Procedure 2. Measure Bladder Volume .....................................................................................................16
Scanning Tips....................................................................................................................................................19
CLEANING & DISINFECTING ...............................................................................................................................21
Procedure 1. Clean & Disinfect the Instrument ..........................................................................................22
MAINTENANCE & TROUBLESHOOTING .............................................................................................................24
Regular Inspections ..........................................................................................................................................24
Calibrating the BladderScan Instrument .............................................................................................................24
Procedure 1. Calibrate the Instrument ......................................................................................................24
Warranty ..........................................................................................................................................................28
Instrument Repair or Replacement .....................................................................................................................29
Troubleshooting ................................................................................................................................................30
Frequently Asked Questions ...........................................................................................................................30
Help Resources ..............................................................................................................................................31
Device Disposal .................................................................................................................................................31
PRODUCT SPECIFICATIONS .................................................................................................................................32
Component Specifications ................................................................................................................................32
Instrument Specifications ...............................................................................................................................32
Charging Cradle Specifications .......................................................................................................................34
Electromagnetic Compatibility ...........................................................................................................................35
Electromagnetic Emissions .............................................................................................................................35
Electromagnetic Immunity .............................................................................................................................35
Recommended Separation Distances ..............................................................................................................38
Accessory Conformance to Standards.............................................................................................................38
GLOSSARY ...........................................................................................................................................................39
1Operations & Maintenance Manual: Important Information
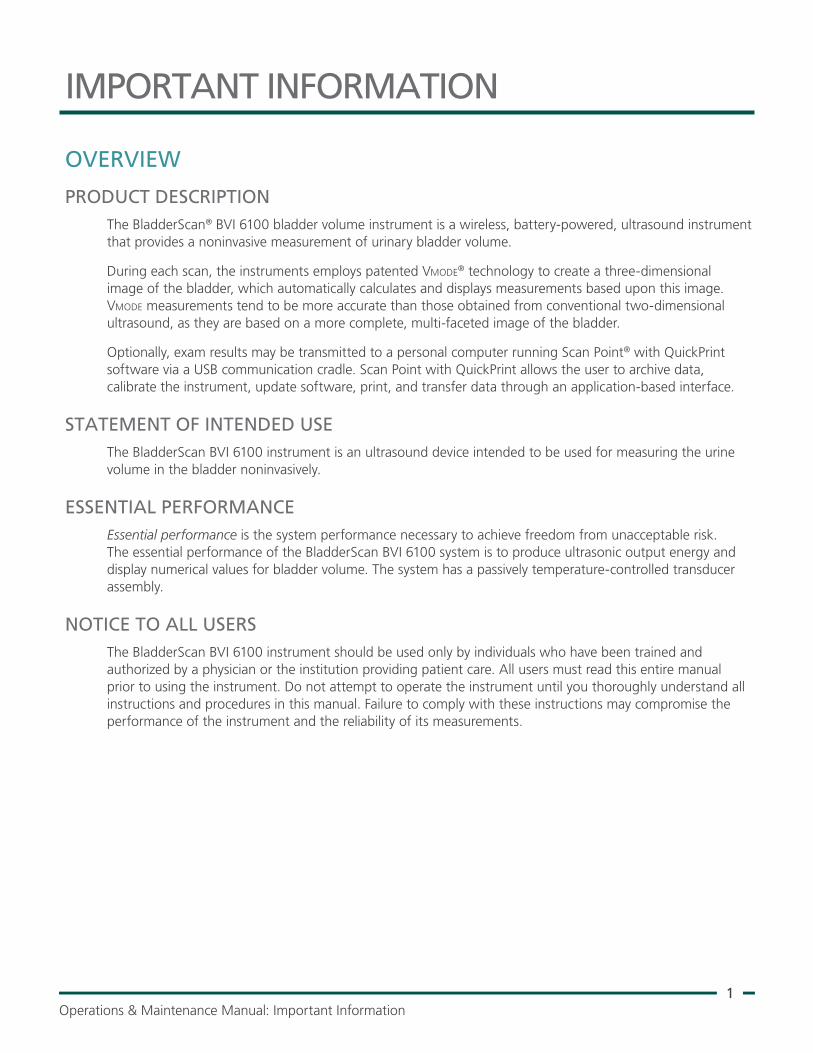
IMPORTANT INFORMATION
OVERVIEW
PRODUCT DESCRIPTIONThe BladderScan® BVI 6100 bladder volume instrument is a wireless, battery‑powered, ultrasound instrument that provides a noninvasive measurement of urinary bladder volume.
During each scan, the instruments employs patented Vmode® technology to create a three‑dimensional image of the bladder, which automatically calculates and displays measurements based upon this image. Vmode measurements tend to be more accurate than those obtained from conventional two‑dimensional ultrasound, as they are based on a more complete, multi‑faceted image of the bladder.
Optionally, exam results may be transmitted to a personal computer running Scan Point® with QuickPrint software via a USB communication cradle. Scan Point with QuickPrint allows the user to archive data, calibrate the instrument, update software, print, and transfer data through an application‑based interface.
STATEMENT OF INTENDED USEThe BladderScan BVI 6100 instrument is an ultrasound device intended to be used for measuring the urine volume in the bladder noninvasively.
ESSENTIAL PERFORMANCEEssential performance is the system performance necessary to achieve freedom from unacceptable risk. The essential performance of the BladderScan BVI 6100 system is to produce ultrasonic output energy and display numerical values for bladder volume. The system has a passively temperature‑controlled transducer assembly.
NOTICE TO ALL USERSThe BladderScan BVI 6100 instrument should be used only by individuals who have been trained and authorized by a physician or the institution providing patient care. All users must read this entire manual prior to using the instrument. Do not attempt to operate the instrument until you thoroughly understand all instructions and procedures in this manual. Failure to comply with these instructions may compromise the performance of the instrument and the reliability of its measurements.

2
SAFETY INFORMATIONULTRASOUND ENERGY SAFETY
To date, exposure to pulsed diagnostic ultrasound has not been shown to produce adverse effects. However, ultrasound should be used prudently, and total patient exposure should be kept as low as reasonably achievable (ALARA). Following the ALARA principle, ultrasound should only be used by medical professionals when clinically indicated, using the lowest possible exposure times necessary to obtain clinically useful information. For more information on ALARA, please refer to the American Institute of Ultrasound in Medicine publication, Medical Ultrasound Safety.
The ultrasound output power of the BladderScan BVI 6100 instrument is not user adjustable and is limited to the minimum level necessary for effective performance. For more information about acoustic output levels, see the Product Specifications chapter on page 32.
CONTRAINDICATIONSThe BladderScan BVI 6100 is not intended for fetal use or for use on pregnant patients, patients with open skin or wounds in the suprapubic region, or patients with ascites.
CAUTIONS & WARNINGSWarnings indicate that injury, death, or other serious adverse reactions may result from use or misuse of the device. Cautions indicate that use or misuse of the device may cause a problem, such as a malfunction, failure, or damage to the product. Throughout the manual, pay attention to sections labeled Important, as these contain reminders or summaries of the following cautions as they apply to a specific component or use situation. Please heed the following warnings and cautions.
PRECAUTIONS
When using the system with optional Scan Point® software, your computer must be minimally certified to EN/IEC/CSA/UL 60950‑1 or 60101‑1 standards. This configuration ensures that compliance to the EN/IEC 60601‑1 system standard is maintained. Anyone connecting additional equipment to the signal input port or signal output port configures a medical system, and is therefore responsible for ensuring that the system complies with EN/IEC 60601‑1. If you need assistance, contact your biomedical staff, local representative, or Verathon® Customer Care.
CAUTION
Use of the following cleaning methods or solutions may cause device damage not covered by the BladderScan BVI 6100 warranty:
• Do not immerse the instrument in disinfectant solution.
• Do not use Cidex Plus® to disinfect the instrument. Cidex Plus will damage the plastic enclosure.
• Do not subject the instrument to any method of sterilization.
CAUTION

3Operations & Maintenance Manual: Important Information
Statement of Prescription: Federal (United States) law restricts this device to sale by or on the order of a physician.
CAUTION
To maintain electromagnetic interference (EMI) within certified limits, the system must be used with the cords, components, and accessories specified or supplied by Verathon®. For additional information, see the System Components & Accessories and Component Specifications sections. The use of accessories or cords other than those specified or supplied may result in increased emissions or decreased immunity of the system.
Medical electrical equipment requires special precautions regarding electromagnetic compatibility (EMC) and must be installed and operated according to the instructions in this manual. For more information, see the Electromagnetic Compatibility section on page 35.
The system should not be used adjacent to or stacked with other equipment. If adjacent or stacked use is necessary, the system should be observed to verify normal operation in the configuration in which it will be used.
This device can radiate radio frequency energy and is very unlikely to cause harmful interference with other devices in the vicinity. There is no guarantee that interference will not occur in a particular installation. Evidence of interference may include degradation of performance in this device or other devices when operated simultaneously. To correct interference, use the following measures:
• Turn devices on and off in the vicinity to determine the source of interference
• Reorient or relocate this device or other devices
• Increase the separation between devices
• Connect the device to an outlet on a circuit different than the other device(s)
• Eliminate or reduce EMI with technical solutions (such as shielding)
• Purchase medical devices that comply with IEC 60601‑1‑2 EMC Standards
Be aware that portable and mobile radio frequency communications equipment (cellular phones, etc.) may affect medical electrical equipment; take appropriate precautions during operation.
CAUTION

4
WARNINGS
This product may only be cleaned and disinfected by using the approved processes provided in this manual. Cleaning and disinfection methods listed are recommended by Verathon® based on compatibility with component materials.
WARNING
Availability of cleaning, disinfection, and sterilization products varies by country, and Verathon is unable to test products in every market. For more information, please contact Verathon Customer Care or your local representative. For contact information, visit verathon.com/support.
WARNING
Cleaning is critical to ensuring the component is ready for disinfection. Failure to properly clean the device could result in a contaminated instrument after completing the disinfection procedure.
WARNING
Ensure that you follow the manufacturer’s instructions for handling and disposing of the cleaning and disinfection solutions provided in this manual.
WARNING
When preparing and using one of the approved cleaning, disinfection, or sterilization solutions, follow the instructions of the solution manufacturer. Pay close attention to the proper dilution and immersion times.
WARNING
In order to maintain electrical safety, use only the provided, medical‑grade power adapter, battery, and battery charger.
WARNING
To reduce the risk of electric shock, use only the accessories and peripherals recommended by Verathon.
WARNING
5Operations & Maintenance Manual: Important Information
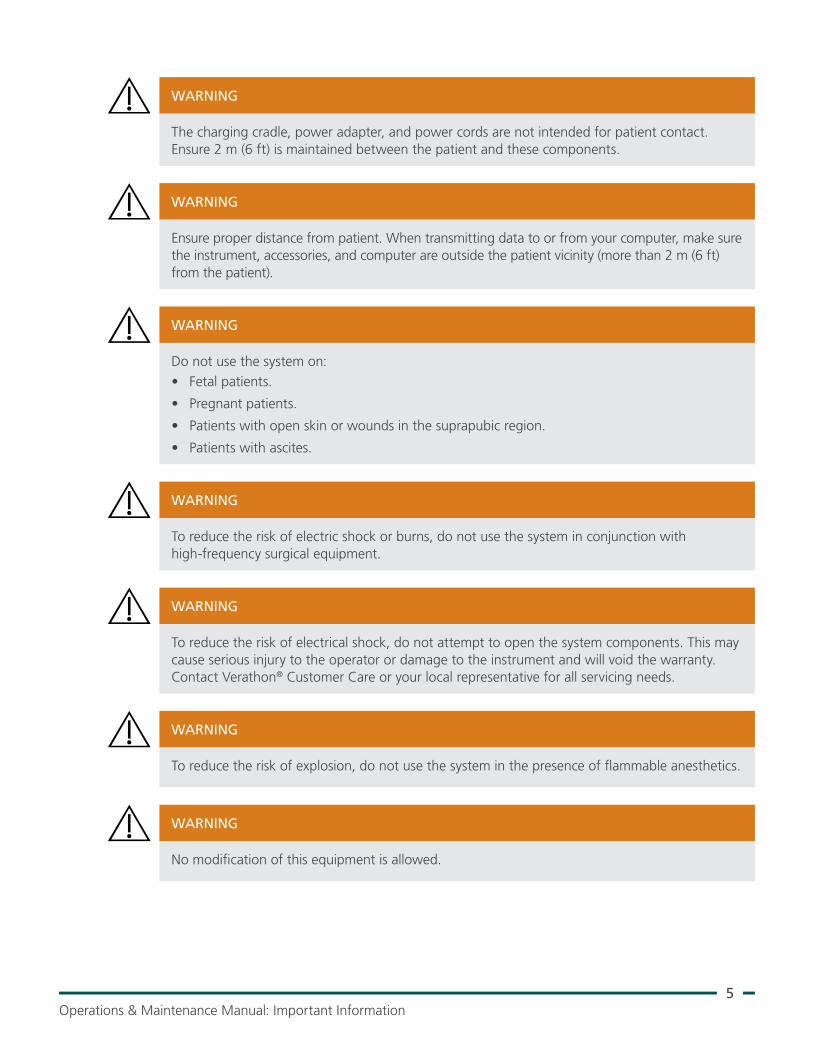
The charging cradle, power adapter, and power cords are not intended for patient contact. Ensure 2 m (6 ft) is maintained between the patient and these components.
WARNING
Ensure proper distance from patient. When transmitting data to or from your computer, make sure the instrument, accessories, and computer are outside the patient vicinity (more than 2 m (6 ft) from the patient).
WARNING
Do not use the system on:• Fetal patients.
• Pregnant patients.
• Patients with open skin or wounds in the suprapubic region.
• Patients with ascites.
WARNING
To reduce the risk of electric shock or burns, do not use the system in conjunction with high‑frequency surgical equipment.
WARNING
To reduce the risk of electrical shock, do not attempt to open the system components. This may cause serious injury to the operator or damage to the instrument and will void the warranty. Contact Verathon® Customer Care or your local representative for all servicing needs.
WARNING
To reduce the risk of explosion, do not use the system in the presence of flammable anesthetics.
WARNING
No modification of this equipment is allowed.
WARNING

6
Be aware of the following conditions that can affect ultrasound transmission:
• Catheterization—A catheter in the patient’s bladder may affect the accuracy of the bladder volume measurement in two ways: 1) by introducing air into the bladder that may block the ultrasound signal, and 2) by having the catheter‑retaining balloon interfere with the volume measurement. However, the volume measurement may still be clinically useful if it is large (detecting a blocked catheter, for example).
• Abdominal Surgery—Scar tissue, surgical incisions, sutures, and staples can affect ultrasound transmission. Use care when scanning patients who have had abdominal surgery.
WARNING
Accuracy is compromised if you do not obtain an optimal, repeatable image.
WARNING
To date, exposure to pulsed diagnostic ultrasound has not been shown to produce adverse effects. However, ultrasound should be used prudently, and total patient exposure should be kept as low as reasonably achievable (ALARA). Following the ALARA principle, ultrasound should only be used by medical professionals when clinically indicated, using the lowest possible exposure times necessary to obtain clinically useful information. For more information on ALARA, please refer to the American Institute of Ultrasound in Medicine publication, Medical Ultrasound Safety.
The ultrasound output power of the BladderScan BVI 6100 instrument is not user adjustable and is limited to the minimum level necessary for effective performance. For more information about acoustic output levels, see the Product Specifications chapter on page 32.
WARNING
To reduce the risk of leakage, explosion, fire, or serious injury, note the following when handling the lithium‑ion battery included in the system:
• Do not store the battery in the console for an extended period of time.
• Never short‑circuit the battery by bringing the battery terminals into contact with any other conductive object.
• Never expose the battery to abnormal shock, vibration, or pressure.
• Do not disassemble, heat above 60°C (140°F), or incinerate the battery.
• Keep battery out of reach of children and in original package until ready to use.
• Dispose of used batteries promptly according to local recycling or waste regulations.
• If the battery is leaking or its case is cracked, put on protective gloves to handle it, and discard it immediately.
• Put insulating tape, such as cellophane tape, on the electrodes during transportation.
WARNING

7Operations & Maintenance Manual: Introduction
INTRODUCTION
PRODUCT DESCRIPTIONThe BladderScan BVI 6100 device is a portable ultrasound instrument. Using patented Vmode® technology, it provides a noninvasive measurement of urinary bladder volume.
The instrument consists of an ergonomic, battery‑powered, hand‑held probe that scans the patient’s bladder. The LCD screen provides aiming assistance and displays an array of bladder measurement information.
BladderScan instruments are quick and easy to use. A sonographer is not required. The instrument measures ultrasonic reflections on multiple planes inside the body, producing a three‑dimensional image. Based on this image, the instrument calculates and displays the bladder volume.
Volume measurements made with Vmode ultrasound are more accurate than those from conventional ultrasound, as they are based on a more complex, three‑dimensional image of the bladder.
BLADDERSCAN BVI 6100The hand‑held, portable BladderScan BVI 6100:
• Measures bladder volume noninvasively.
• Takes scans quickly, providing test results in a matter of seconds.
• Is easy to operate: staff members can easily learn to scan patients quickly and accurately.
• Allows for exam results and images to be downloaded, viewed and printed using the optional Scan Point® Image Management Technology.
• Is battery‑operated, lightweight, and portable.
SCAN POINT IMAGE MANAGEMENT TECHNOLOGY (OPTIONAL)You may transmit bladder volume measurements and ultrasound images from your BladderScan instrument to Scan Point image management software. Scan Point installs on a Windows®‑based computer and allows viewing, printing, and archiving of patient exam results, including ultrasound images for patient records and reimbursement (when applicable). Exam data and ultrasound images may be printed in a variety of report formats from adhesive labels that may be affixed to patient charts, to full, letter‑size formats.
Scan Point can also be used to calibrate your instrument. The Scan Point image management technology (Scan Point software, license, and accessories) is available with the purchase of many BladderScan instruments. Comprehensive service and warranty are provided under the Scan Point Total ReliabilitySM Plan.
Note: Plan availability and conditions may differ depending on your location. For more information about terms and availability, contact Verathon® Customer Care or your local representative.
Scan Point Local Client (LC) is a stand‑alone, non‑networked version of the software. It is available for use with the BladderScan BVI 6100 instrument.

8
Scan Point with QuickPrint is a network‑based version of the application. Archived patient data is stored securely on HIPAA‑compliant, Verathon®‑maintained servers. Users can access records from any Internet‑enabled, Windows‑based PC. Scan Point with QuickPrint allows users to maintain the most recent software for their instruments, to calibrate their instruments themselves without having to send them in for service, and also enables remote diagnostics and troubleshooting by Verathon service technicians.
SYSTEM COMPONENTS & ACCESSORIES
REQUIRED SYSTEM COMPONENTS
Table 1. Required System Components and Accessories
PART DESCRIPTION
BladderScan BVI 6100
Hand‑held, wireless, battery‑operated, ultrasound bladder volume instrument.
Charging cradle
Use the charging cradle to charge the BladderScan instrument’s internal battery. The charging cradle plugs directly into an electrical wall outlet. Before using your BladderScan instrument, you must charge it for a minimum of 6 hours.
BladderScan BVI 6000 series in‑service CD
Includes the electronic version of this operations and maintenance manual.
Activation tool
If needed, use this tool in order to press the Activation button on the instrument.

9Operations & Maintenance Manual: Introduction
OPTIONAL COMPONENTS & ACCESSORIESThe following optional items are available to enhance the capabilities of your BladderScan instrument. Please contact Verathon® Customer Care or your local representative for more information on any of the following Verathon products.
Table 2. Optional Components and Accessories
PART DESCRIPTION
Local Client Local Client
Scan Point, Verathon and the Verathon Torch are trademarks of Verathon Inc. ©2017 Verathon Inc.
Verathon Inc.20001 North Creek ParkwayBothell, WA 98011, USATel: 800 331 2313 (USA & Canada only)Tel: 425 867 1348 Fax: 425 883 2896
Verathon Medical (Europe) B.V.Willem Fenengastraat 13 1096 BL Amsterdam, The NetherlandsTel: +31 (0) 20 210 30 91 Fax: +31 (0) 20 210 30 92
verathon.com0900-1009
0900-1025-04-40
Scan Point® LC Software install CD
Installs Scan Point Image Management System on a stand‑alone (non‑networked) Windows® PC. For more information, see Scan Point Image Management Technology (Optional).
Scan Point with QuickPrint Install CD
Installs Scan Point with QuickPrint software on a network‑enabled Windows PC. For more information, see Scan Point Image Management Technology (Optional).
Scan Point docking station
Used with Scan Point image management technology. Transmits data from the BladderScan instrument to the Scan Point host computer and simultaneously recharges the instrument battery.
Calibration kit (requires Scan Point with QuickPrint software)
The calibration tank base holds a spiral‑shaped calibration target and 4.2 liters of water. The indentation in the tank lid places the instrument in a known and repeatable location with respect to the spiral target. Self‑calibration takes about 15 minutes.
Scan Point label writer
Prints exam results on adhesive label media. Requires installation of Scan Point software on a Windows® PC. The following items are related to the Scan Point label writer:
• USB Cable—Connects the Scan Point label writer to the Scan Point host computer.
• Power Cord—Connects the Scan Point label writer power adapter to a wall outlet.
• Power Adapter—Connects the power cord to the label writer.
• Roll of Labels—Labels in roll format properly sized for the Scan Point label writer.
Battery replacement kit
Contains a replacement lithium‑ion battery and instructions for installing it.

10
BUTTONS, PARTS, & ICONS
INSTRUMENT PARTS & BUTTONS
Figure 1. BVI 6100 Parts
LCD screen
Scanhead
Activation button
Infrared window
Top button
Scan button
Table 3. BVI 6100 Parts and Buttons
PART PURPOSE
Scan button Press to take a scan.
ScanheadThe scanhead transmits and receives ultrasound waves, automatically moving its internal transducer 360º in order to scan twelve different planes, producing a three‑dimensional image of the bladder.
Top button Press to select gender.
Activation buttonPress to reactivate the BladderScan instrument if the battery becomes completely discharged.
LCD screenDisplays bladder volume measurements and other scan, patient, and instrument data.
Infrared (IR) windowEnables the BladderScan instrument to communicate with a Scan Point®‑equipped PC via the Scan Point docking station.
11Operations & Maintenance Manual: Introduction
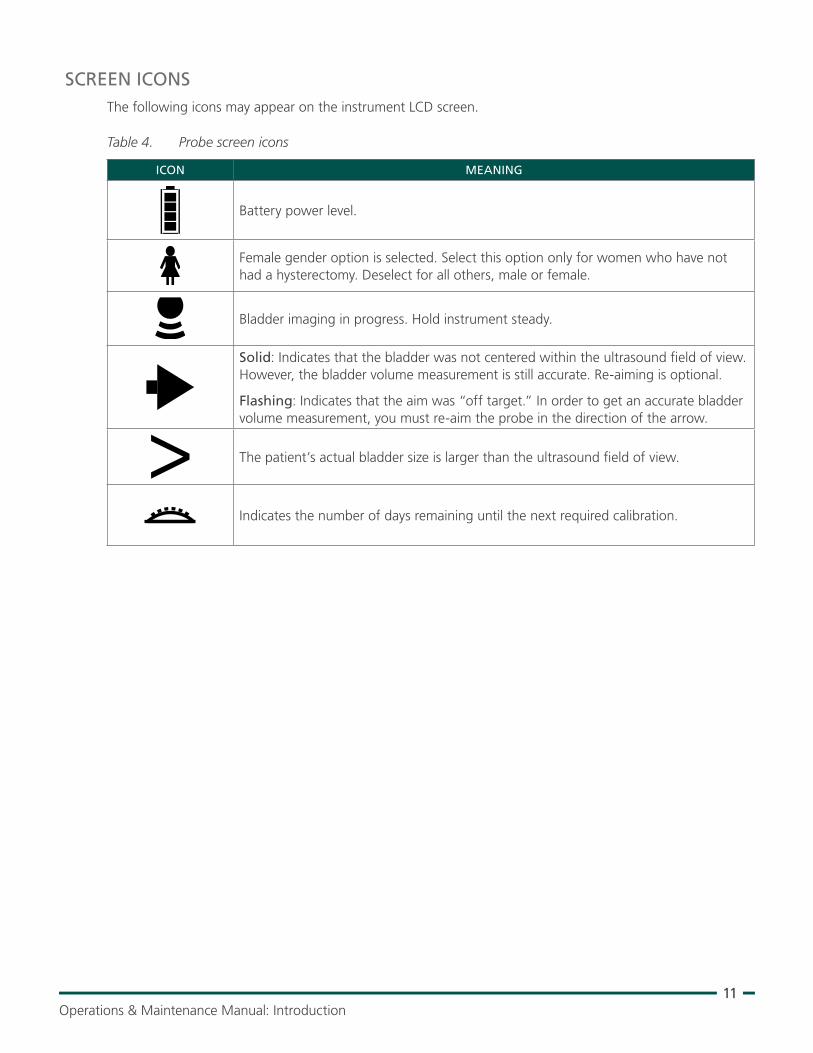
SCREEN ICONSThe following icons may appear on the instrument LCD screen.
Table 4. Probe screen icons
ICON MEANING
Battery power level.
Female gender option is selected. Select this option only for women who have not had a hysterectomy. Deselect for all others, male or female.
Bladder imaging in progress. Hold instrument steady.
Solid: Indicates that the bladder was not centered within the ultrasound field of view. However, the bladder volume measurement is still accurate. Re‑aiming is optional.
Flashing: Indicates that the aim was “off target.” In order to get an accurate bladder volume measurement, you must re‑aim the probe in the direction of the arrow.
The patient’s actual bladder size is larger than the ultrasound field of view.
Indicates the number of days remaining until the next required calibration.

12
BATTERY ICON
The battery icon is located in the lower‑right corner of the instrument’s LCD screen and indicates the power level of the battery. The instrument can be charged at any time, but must be recharged when the battery is completely discharged.
Table 5. Battery status icons
BATTERY ICON DESCRIPTION
Battery is fully charged and ready for use.
Battery is 50–75% charged.
Battery is 25–50% charged.
Battery is nearly discharged and may only have enough power for few scans. Recharge the battery as soon as possible.
The battery is completely discharged. The bladder volume instrument will not work until it is recharged.
Scrolling segments indicate that the battery is charging.

13Operations & Maintenance Manual: Setting up
SETTING UP
To help you get up and running as quickly as possible, the next few pages explain how to:
1. Perform Initial Inspection
2. Charge the Instrument
3. Activate the BladderScan Instrument (Optional)
4. Install Scan Point Software (Optional)
PROCEdURE 1. PERFORM INITIAL INSPECTION
When you receive the instrument, Verathon® recommends that an operator familiar with the instrument perform a full visual inspection of the system for any obvious physical damage that may have occurred during shipment.
1. Verify that you have received the appropriate components for your system by referring to System Components & Accessories.
2. Inspect the components for damage.
3. If any of the components are missing or damaged, notify the carrier and Verathon Customer Care or your local representative.
PROCEdURE 2. CHARGE THE INSTRUMENT
In order to maintain electrical safety, use only the provided, medical‑grade power adapter, battery, and battery charger.
WARNING
The charging cradle, power adapter, and power cords are not intended for patient contact. Ensure 2 m (6 ft) is maintained between the patient and these components.
WARNING
Before using your BladderScan instrument for the first time, or when the battery becomes completely discharged, you must charge your instrument battery for approximately 6 hours or until it is fully charged. In this procedure, you set up the charging cradle and use it to charge the battery.
Note: If you have already installed Scan Point® on your computer and installed the docking station, then you can use the docking station to charge the instrument.
When you are not using your instrument, Verathon recommends that you store it in the charging cradle in order to ensure that the instrument is always sufficiently charged. The charging cradle cannot overcharge the battery.

14
1. Plug the charging cradle into an electrical wall outlet.
2. Place the BladderScan instrument in the charging cradle. The scrolling‑segments battery icon displays, indicating that the instrument is charging.
If the battery icon does not appear, then the instrument was completely discharged. Allow the battery to charge for 2 hours. If the scrolling‑segments battery icon does not appear after 2 hours, reactivate the instrument according to the following procedure.
PROCEdURE 3. ACTIVATE THE BLAddERSCAN INSTRUMENT (OPTIONAL)
Complete this procedure if the battery is completely discharged, or if after 2 hours in the charging cradle the instrument does not show the scrolling‑segments battery icon.
1. Using the tip of the activation tool, press the Activation button located just above the Scan button.
2. Place the BladderScan instrument in the charging cradle or docking station until the “full battery” icon is displayed.
Note: When you are not using your instrument, Verathon® recommends that you store it in the charging cradle in order to ensure that your instrument is always sufficiently charged. The charging cradle cannot overcharge the battery.
PROCEdURE 4. INSTALL SCAN POINT SOFTWARE (OPTIONAL)
If you are using Scan Point® Image Management Technology, install it according to the instructions in the Scan Point user’s manual. Refer to the manual for further instructions on how to use Scan Point or how to set up and install the Scan Point label writer. For more information, see the section Scan Point Image Management Technology (Optional).

15Operations & Maintenance Manual: Measuring Bladder Volume
MEASURING BLADDER VOLUME
PERFORMING SCANS
Do not use the system on:• Fetal patients.
• Pregnant patients.
• Patients with open skin or wounds in the suprapubic region.
• Patients with ascites
WARNING
To reduce the risk of explosion, do not use the system in the presence of flammable anesthetics.
WARNING
Be aware of the following conditions that can affect ultrasound transmission:
• Catheterization—A catheter in the patient’s bladder may affect the accuracy of the bladder volume measurement in two ways: 1) by introducing air into the bladder that may block the ultrasound signal, and 2) by having the catheter‑retaining balloon interfere with the volume measurement. However, the volume measurement may still be clinically useful if it is large (detecting a blocked catheter, for example).
• Abdominal Surgery—Scar tissue, surgical incisions, sutures, and staples can affect ultrasound transmission. Use care when scanning patients who have had abdominal surgery.
WARNING
Accuracy is compromised if you do not obtain an optimal, repeatable image.
WARNING
To date, exposure to pulsed diagnostic ultrasound has not been shown to produce adverse effects. However, ultrasound should be used prudently, and total patient exposure should be kept as low as reasonably achievable (ALARA). Following the ALARA principle, ultrasound should only be used by medical professionals when clinically indicated, using the lowest possible exposure times necessary to obtain clinically useful information. For more information on ALARA, please refer to the American Institute of Ultrasound in Medicine publication, Medical Ultrasound Safety.
The ultrasound output power of the BladderScan BVI 6100 instrument is not user adjustable and is limited to the minimum level necessary for effective performance. For more information about acoustic output levels, see the Product Specifications chapter on page 32.
WARNING

16
PROCEdURE 1. PREPARE FOR THE EXAM
Before using a bladder volume instrument, ensure that you are familiar with the parts of the instrument. For more information, see the Introduction chapter.
If you are a new BladderScan instrument user, Verathon® recommends that you perform your first exam on a patient with a moderately full bladder rather than a nearly empty bladder. A nearly empty bladder can be more difficult to locate.
1. If the patient meets any of the following restrictions, do not use the BladderScan instrument for the exam:
• Patients with ascites
• Patients with open skin or wounds in the suprapubic region
• Small patients (under 27 kg [60 lbs] and 122 cm [48 in] tall)
• Pregnant patients
2. Ensure that you are aware if the patient has any of the following conditions, which may affect ultrasound transmission and the accuracy of the exam:
• A catheter in the bladder—The presence of a catheter may affect the accuracy of the bladder volume measurement, but the measurement may still be clinically useful (example: detecting a blocked catheter).
• Previous suprapubic or pelvic surgery—Scar tissue, surgical incisions, sutures, and staples can affect ultrasound transmission and reflection.
3. Check the instrument’s battery icon, and ensure that the battery has sufficient power.
4. Wipe the probe gently with a soft cloth soaked in isopropyl alcohol. This cleans and disinfects the instrument.
PROCEdURE 2. MEASURE BLAddER VOLUME
To ensure the highest degree of accuracy, Verathon recommends that you scan the patient’s bladder at least three times per exam, in order to ensure the repeatability of your measurements. Repeatability refers to your ability to center the bladder during each measurement, not your ability to obtain exactly the same bladder volume measurement each time. Volume measurements should be close, but need not be identical. If you cannot obtain an optimal, repeatable measurement, the accuracy of the result is compromised.
The BladderScan instrument will go into sleep mode 20 minutes after completing the exam. If the instrument goes to sleep or turns off due to a low battery before you do one of the following, the exam results will be lost:
• Manually record the exam results
• Transfer the exam results to Scan Point®
• Return the instrument to the charging cradle or docking station
Performing a new exam overwrites any previous exam data. For more information about performing scans, see Scanning Tips.
1. If the BladderScan instrument is in a charging cradle or docking station, remove it. The instrument turns on automatically.
If the instrument is not in the charging cradle or docking station and is in sleep mode, press any button. The instrument turns on.

17Operations & Maintenance Manual: Measuring Bladder Volume
2. If the patient is a female who has not had a hysterectomy, press the top button until the gender icon is displayed.
If the patient is a male, or a female who has had a hysterectomy, press the top button until the gender icon is cleared.
Top Button
Gender Icon
3. With the patient lying in a supine position and with the abdominal muscles relaxed, palpate the patient’s pubic bone.
4. Place an ample quantity of ultrasound gel, with as few air bubbles as possible, midline on the patient’s abdomen, approximately 3 cm (1 in) above the pubic bone.
5. Standing at the patient’s right side, gently press the probe onto the lower abdomen through the gel. The instrument’s handle should be oriented at 90 degrees to the sagittal plane of the patient.
Sagittal plane
90o
6. Aim it toward the expected location of the bladder. For most patients, this means angling the probe slightly toward the patient’s coccyx (tail bone) so the scan clears the pubic bone.

18
7. Press and release the scan button, located on the underside of the probe.
Scan button
A scanning symbol appears in the upper right corner of the LCD screen during the scan.
8. Hold the probe steady while scanning; avoid changing its position, angle, or pressure. When you hear the end‑scan tone, the scan is complete.
9. View the top half of the LCD screen. The bladder volume measurement is displayed in milliliters (mL).
If a flashing arrow is displayed, then the scan is off‑target, and the bladder was mostly outside the ultrasound field of view. Re‑aim the probe in the direction indicated by the flashing arrow and perform the scan again.
If a solid arrow is displayed, then the bladder was mostly inside the ultrasound field of view. The results are satisfactory, but in order to ensure accuracy, Verathon® recommends that you re‑aim in the direction of the arrow and perform the scan again.
If no arrow is displayed, then the bladder was completely contained within the ultrasound field of view. The measurement is accurate. Continue with the procedure.

19Operations & Maintenance Manual: Measuring Bladder Volume
10. If you would like to ensure the highest degree of accuracy, repeat Step 5–Step 9 in order to complete three scans, and then compare the results. It is not necessary that the three exam results be identical, but they should be similar.
11. Wipe the gel off the patient and the probe.
12. Ensure that you manually record the exam results or transfer the data to Scan Point® prior to performing another exam or allowing the instrument to go into sleep mode.
If you perform another exam or if the instrument goes into sleep mode before manually recording or transferring the exam results, the exam results will be lost.
IMPORTANT
SCANNING TIPS
Hold the BladderScan instrument steady while scanning. Movement will result in an inaccurate reading.
IMPORTANT
Applying too much pressure when scanning will lead to a “greater than” symbol (>) preceding the bladder volume measurement. Apply less pressure and re‑scan.
Volume reading will be affected by:
• The presence of scar tissue.
• The presence of a catheter.
• Obese patients—If you are scanning an obese patient, lift as much abdominal adipose tissue out of the way of the instrument as possible. Apply more pressure to the BladderScan instrument in order to reduce the amount of adipose tissue through which the ultrasound must pass.
To ensure accurate results, make sure that:
• There are no air gaps between the probe and the patient’s skin.
• There are no air bubbles in the ultrasound gel.
• You are holding the instrument steady while scanning (avoid changing its position, angle, or pressure).
• You are using enough pressure to maintain good skin contact until the scan is complete.
• There is not a catheter in the patient’s bladder. The presence of a catheter may affect the accuracy of the bladder volume measurement, but the measurement may still be clinically useful (detecting a blocked catheter, for example).

20
The following table illustrates typical scanning scenarios and corresponding bladder volume information that may appear on the LCD screen.
Table 6. Typical scanning scenarios and displays
SCANNING SCENARIO EXAMPLE DISPLAY DESCRIPTION
Optimal scan In an optimal scan, the bladder is entirely contained within the ultrasound field of view. The display shows:
• Bladder volume
• No > symbol
• No flashing arrow
• No solid arrow
Bladder volume is greater than 999 mL The bladder is entirely contained within the ultrasound
field of view but the bladder volume is greater than 999 mL. In this case, the display shows:
• A bladder volume of >999 mL
• No flashing arrow
• No solid arrow
Bladder is too large to be fully contained within the ultrasound
field of view
Either the bladder is too large to be contained by the ultrasound field of view, or the user is pressing too hard with the instrument. The display shows:
• Bladder volume with a > symbol
• No flashing arrow
• No solid arrow
Apply less pressure and rescan.
Bladder not centered (optional rescan)
The bladder is entirely contained within the ultrasound field of view but not centered. Rescanning is optional. The display shows:
• Bladder volume
• A solid arrow indicating re‑aiming direction for optional rescan
Move instrument in the direction of the arrow and rescan.
Bladder not centered (rescan required)
Bladder is only partially contained within the ultrasound field of view. A rescan is necessary to ensure accurate bladder volume measurement. The display shows:
• Bladder volume
• A flashing arrow indicating the re‑aiming direction
Move instrument in the direction of the arrow and rescan.

21Operations & Maintenance Manual: Cleaning & Disinfecting
CLEANING & DISINFECTING
Use of the following cleaning methods or solutions may cause device damage not covered by the BladderScan BVI 6100 warranty:
• Do not immerse the instrument in disinfectant solution.
• Do not use Cidex Plus® to disinfect the instrument. Cidex Plus will damage the plastic enclosure.
• Do not subject the instrument to any method of sterilization.
CAUTION
This product may only be cleaned and disinfected by using the approved processes provided in this manual. Cleaning and disinfection methods listed are recommended by Verathon® based on compatibility with component materials.
WARNING
Availability of cleaning, disinfection, and sterilization products varies by country, and Verathon is unable to test products in every market. For more information, please contact Verathon Customer Care or your local representative. For contact information, visit verathon.com/support.
WARNING
Cleaning is critical to ensuring the component is ready for disinfection. Failure to properly clean the device could result in a contaminated instrument after completing the disinfection procedure.
WARNING
Ensure that you follow the manufacturer’s instructions for handling and disposing of the cleaning and disinfection solutions provided in this manual.
WARNING
When preparing and using one of the approved cleaning, disinfection, or sterilization solutions, follow the instructions of the solution manufacturer. Pay close attention to the proper dilution and immersion times.
WARNING

22
Cleaning and disinfecting the BladderScan BVI 6100 instrument is an important part of using and maintaining the device. Prior to each use, ensure the instrument has been cleaned and disinfected according to the following procedures.
Remove the instrument from the docking station or charging cradle to clean and disinfect it.
BEST PRACTICES
Cleaning is the removal of all visible soil or contaminants from the exterior surfaces of the device, and disinfection is the process of destroying pathogenic organisms or rendering them inert. When cleaning, ensure all foreign matter is removed. This allows the active ingredients of the chosen disinfection method to reach all the surfaces of the device.
To significantly reduce the amount of effort needed to clean the system, do not let contaminants dry on any system component. Contaminants tend to become securely attached to solid surfaces when dried, making removal more difficult.
Change gloves as directed in the procedure or if gloves become soiled.
When using a wipe cleaning or disinfection method, please adhere to the following best practices:
• Always wipe in the direction from a clean surface towards a dirty surface.
• Minimize overlap on the wiping pattern.
• If a wipe becomes dry or soiled, replace it with a fresh one.
• Do not reuse dry or soiled wipes.
• Use a new wipe as instructed in the cleaning and disinfection procedures.
COMPATIBILITY & AVAILABILITY
The availability of the cleaning and disinfection products provided in this manual varies by region; ensure that you select products in accordance with your local laws and regulations.
The following solutions have demonstrated material compatibility with the system components, but they have not been tested for efficacy. For guidance on biological effectiveness of the disinfectant, refer to the instructions from the manufacturer:
• T‑Spray II®
• Cavicide®
• CaviWipes®
• Chloro‑Sol Spray®
• Sani‑Cloth® Bleach Wipes
• Sani‑Cloth® Germicidal Wipes,
• Clorox® Germicidal Wipes
• Sporicidin®
• Sporicidin® Disinfecting Towelettes

23Operations & Maintenance Manual: Cleaning & Disinfecting
PROCEdURE 1. CLEAN & dISINFECT THE INSTRUMENT
Use this procedure in order to clean the BladderScan BVI 6100 instrument. Review the information in the Best Practices and Compatibility & Availability sections before completing this procedure.
CLEAN THE INSTRUMENT
1. Put on new gloves.
2. After every exam, Using a dry paper towel or soft cloth, wipe any ultrasound gel completely off the scanhead.
3. Use a soft, moistened cloth to remove particulate matter or body fluids that remain on the instrument.
4. Allow the instrument to air dry or towel dry with a clean dry cloth before disinfecting.
5. Continue to the following section, Disinfect the Instrument. Low‑level disinfection of the scanhead is required between uses.
dISINFECT THE INSTRUMENT
Low‑level disinfection of the scanhead is required between uses. Only use disinfectants prior to their expiration date.
6. Remove the gloves used in the cleaning portion of the procedure, and then put on new gloves.
7. If using a liquid disinfectant, mix the disinfection solution according to the manufacturer’s label instructions for the appropriate disinfection level concentration.
8. Apply the solution to a soft cloth or wipe for application. Do not spray or apply liquid disinfectants directly to the surface of the instrument or soak the instrument in liquids.
9. Wipe the surfaces of the instrument allowing the surface to stay wet for the required contact duration. Follow the manufacturer’s instructions for the appropriate disinfection level contact duration.
10. If rinsing or removal of the disinfectant solution from the instrument is required by the disinfectant manufacturer’s instructions, wipe the instrument with a clean soft cloth dampened in sterile water. Verathon® recommends wiping the instrument three separate times to remove all residual disinfectant.
11. Allow the instrument to air dry or towel dry with a clean, dry cloth.

24
MAINTENANCE & TROUBLESHOOTING
REGULAR INSPECTIONS Inspect the instrument for damage prior to each use. Inspect for cracks, abrasions, gouging, and evidence of impact on the instrument. Cracks that allow the ingress of fluid may affect the safety and performance of the instrument.
If you see any physical damage or cracks in the instrument, discontinue use immediately and contact Verathon® Customer Care or your local representative.
IMPORTANT
CALIBRATING THE BLADDERSCAN INSTRUMENTYou must periodically calibrate your BladderScan instrument to make sure that it is providing accurate results. The required frequency of calibration depends on your Total ReliabilitySM Plan. Calibrating the instrument on a regular basis ensures accurate and proper alignment of the instrument’s internal coordinate system.
If you have the calibration kit and Scan Point® with QuickPrint, you can easily and quickly calibrate your own instrument. You may also send your instrument to an authorized Verathon service center.
If you are not using Scan Point with QuickPrint, you must send your instrument in to an authorized Verathon service center for calibration.
To contact Verathon Customer Care about calibration, please visit verathon.com/support.
PROCEdURE 1. CALIBRATE THE INSTRUMENT
Calibrating your BladderScan instrument ensures that it is providing accurate results, and maintains proper alignment of the instrument’s internal coordinate system. If the instrument is not calibrated by the prescribed date, the instrument is disabled and must be calibrated before it can be used again.
1. Place the calibration tank on a flat, non‑reflective surface, and then remove the lid.
2. Pour clean, room‑temperature water into the tank base, filling to the indicator mark. Ensure that there is a minimal amount of bubbles in the water.
Note: The tank may need to sit for 24 hours until the water has degassed.
25Operations & Maintenance Manual: Maintenance & Troubleshooting
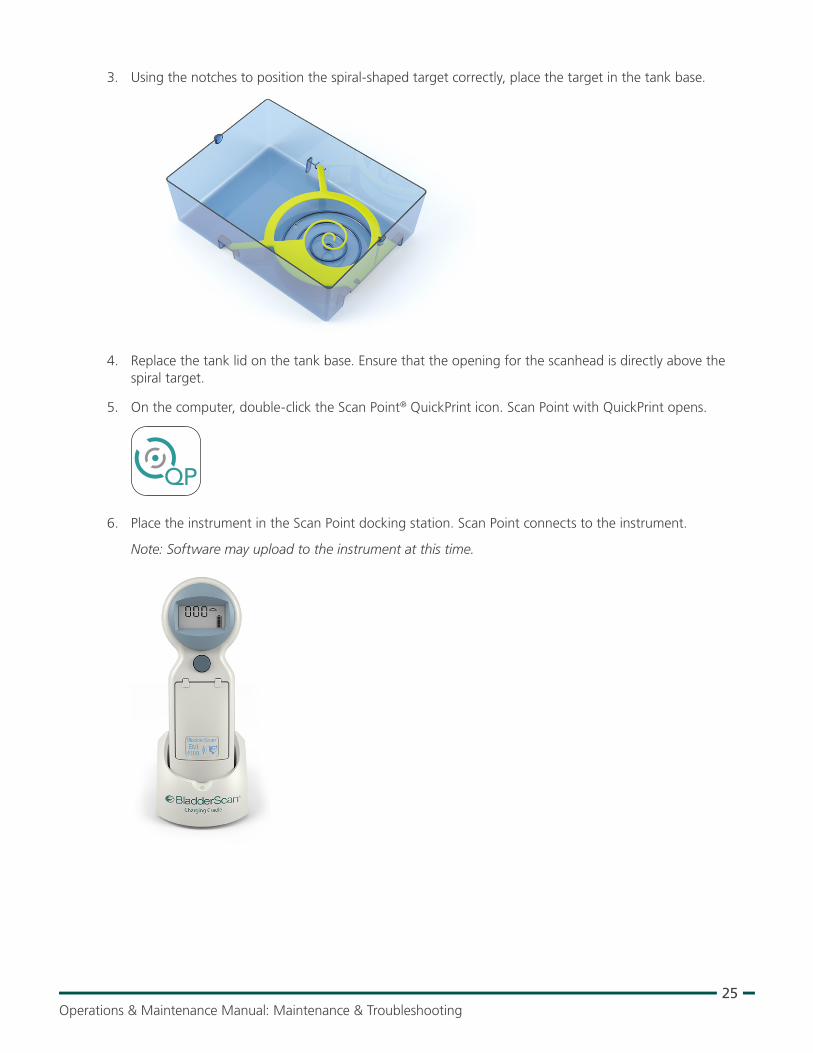
3. Using the notches to position the spiral‑shaped target correctly, place the target in the tank base.
4. Replace the tank lid on the tank base. Ensure that the opening for the scanhead is directly above the spiral target.
5. On the computer, double‑click the Scan Point® QuickPrint icon. Scan Point with QuickPrint opens.
6. Place the instrument in the Scan Point docking station. Scan Point connects to the instrument.
Note: Software may upload to the instrument at this time.

26
7. In Scan Point®, select the instrument, verify that the serial number matches the instrument you are calibrating, and then click the calibration tank icon.
8. In the Calibrate Instrument window, click the Calibrate button. Scan Point prepares the instrument for calibration.
9. When the text Make Phantom measurement, return to cradle is highlighted and the status says waiting, remove the instrument from the Scan Point docking station and place it into the recess in the calibration tank lid. Ensure that the tip of the scanhead is submerged in the water.

27Operations & Maintenance Manual: Maintenance & Troubleshooting
10. On the instrument, press the top button. The instrument begins to scan the calibration tank.
Note: Do not remove the instrument from the calibration tank while scanning is in progress.
Top Button
11. When the calibration scan is complete, four arrows appear on the instrument’s LCD screen, and the instrument plays a melody.
12. Dry the instrument with a clean, soft cloth, and then return it to the Scan Point® docking station. The instrument transmits the calibration results to Scan Point.
Note: Do not remove the instrument from the Scan Point docking station while data is being transferred.

28
13. If the calibration scan was successful, Scan Point® reinstalls the instrument software, and then the message “Calibration Successful” appears in Scan Point. You may remove the instrument from the Scan Point docking station.
If the calibration scan was not successful, then you are prompted to rescan the calibration tank. Ensure that the tank has sufficient water and the target is properly positioned, and then repeat Step 9 through Step 12. After three unsuccessful calibration attempts, you will need to contact Verathon® Customer Care in order to continue.
14. If you would like to print a certificate of calibration, in Scan Point, click the link Click Here for Printable Certificate of Calibration. The Calibration Report appears.
WARRANTYVerathon products and software are warranted against defects in material and workmanship according to the Terms and Conditions of Sale. This limited warranty applies as long as it is covered by the Scan Point Total ReliabilitySM Plan. Warranty coverage applies to the following system components:
• BVI 6100 instrument
• Scan Point® docking station
Additional reusable components purchased either singularly or as a part of a system are warranted separately. Consumable items are not covered under this warranty.
For more information about your warranty or to purchase a Scan Point Total ReliabilitySM Plan that extends the limited warranty on your system, please contact Verathon Customer Care or your local representative.
29Operations & Maintenance Manual: Maintenance & Troubleshooting
INSTRUMENT REPAIR OR REPLACEMENTThe BladderScan instrument is built with a replaceable battery, however, the charging cradle and docking station are completely sealed. Verathon® does not make available any type of circuit diagrams, component parts lists, descriptions, or other information that would be required for repairing the instrument and related accessories.
Scan Point® Total ReliabilitySM Plan customers have access to loaner units while their instruments are under repair and shipping options, which vary according to the plan.
Note: Plan availability and conditions may differ depending on your location. For more information about terms and availability, contact your local representative.
For additional information or to request service or repairs, contact Verathon Customer Care or your local representative. For contact information, please visit verathon.com/support.
BATTERY REPLACEMENT
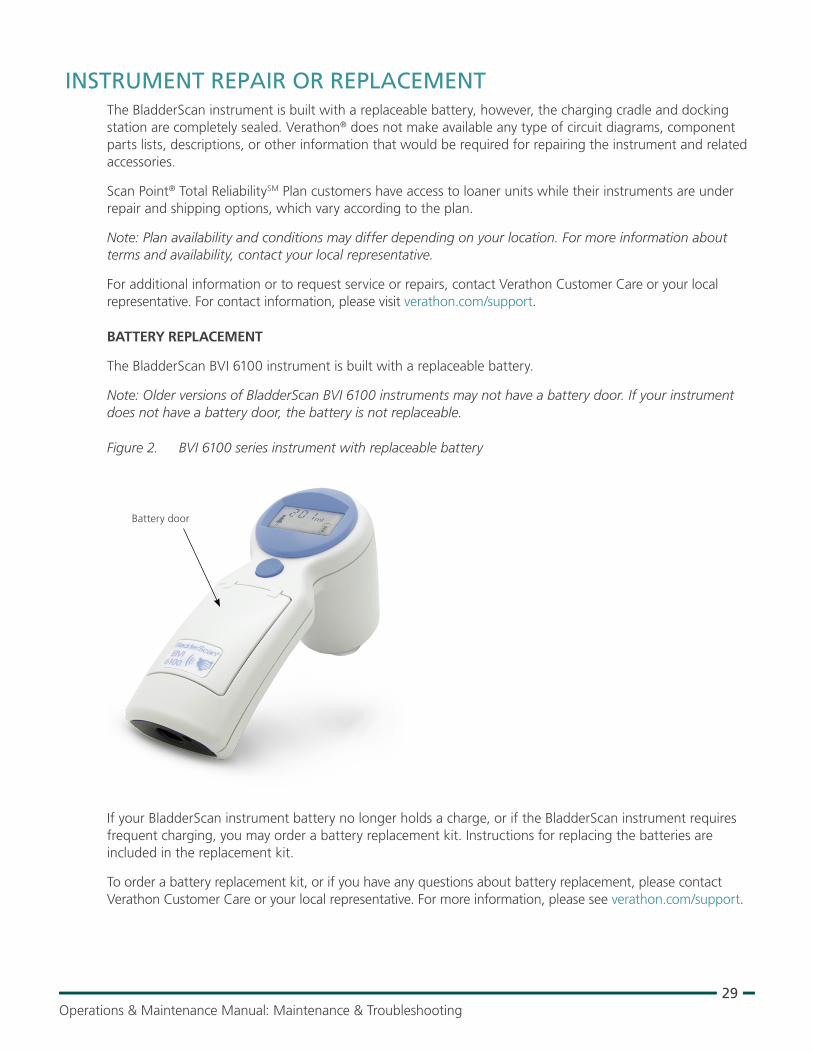
The BladderScan BVI 6100 instrument is built with a replaceable battery.
Note: Older versions of BladderScan BVI 6100 instruments may not have a battery door. If your instrument does not have a battery door, the battery is not replaceable.
Figure 2. BVI 6100 series instrument with replaceable battery
Battery door
If your BladderScan instrument battery no longer holds a charge, or if the BladderScan instrument requires frequent charging, you may order a battery replacement kit. Instructions for replacing the batteries are included in the replacement kit.
To order a battery replacement kit, or if you have any questions about battery replacement, please contact Verathon Customer Care or your local representative. For more information, please see verathon.com/support.
30
TROUBLESHOOTING
FREQUENTLY ASKED QUESTIONSIf you are encountering issues when operating your BladderScan instrument, review this list of common questions. If you do not find a solution here, contact Verathon® Customer Care or your local representative. For contact information, see verathon.com/support.
WHY WON’T MY INSTRUMENT TURN ON?
This problem is usually caused by an unresponsive or discharged battery. Charge the instrument for a minimum of 6 hours. If the scrolling battery icon does not appear after 2 hours, complete the procedure Activate the BladderScan Instrument (Optional). If the instrument still won’t turn on, the battery may need to be replaced.
WHY WON’T MY INSTRUMENT PERFORM A SCAN?
If the bladder volume instrument does not perform a scan when you press the scan button, but the battery icon on the instrument display indicates that the battery has some power remaining, one of the following conditions may apply:
• If the battery icon shows only one segment, then the battery power may be too low to perform bladder imaging. See the procedure Charge the Instrument.
• If the display shows 000 , you must calibrate the instrument before you can continue to perform bladder volume measurements. See Calibrating the BladderScan Instrument.
WHY dId MY INSTRUMENT BEEP?
Beeps indicate an alert or completion of a normal instrument function. The instrument may beep in the following situations:
• The instrument is turned on.
• The instrument goes into sleep mode in order to conserve battery power.
• The instrument completes a bladder volume or calibration measurement.
• The instrument has begun or finished transmitting data to Scan Point®.
• The calibration procedure was successfully completed.
• The female gender option is selected or deselected.
• The battery power is low, and the battery requires recharging. In this case, the battery icon will show no power segments. See the procedure Charge the Instrument.
• The instrument requires calibration. See Calibrating the BladderScan Instrument.
WHY IS THERE A FLASHING ARROW ON THE SCREEN?
If a flashing aiming arrow appears on the instrument LCD screen after a scan, the bladder was not fully within the ultrasound field of view. Adjust your aim in the direction indicated by the arrow, and then rescan the patient. Repeat this process until no flashing arrow appears. When the instrument is aimed properly, either a solid arrow or no arrow appears with the bladder volume measurement. For more information about the aiming arrows, see the procedure Measure Bladder Volume or the Scanning Tips section.

31Operations & Maintenance Manual: Maintenance & Troubleshooting
WHY IS THERE A SOLId ARROW ON THE dISPLAY?
A solid arrow indicates an aiming suggestion. The solid aiming arrow appears on the instrument’s LCD screen when the bladder is not completely centered in the ultrasound field of view. In this case, the measurement is accurate and re‑aiming is optional. For more information about the aiming arrows, see the procedure Measuring Bladder Volume or the Scanning Tips.
HELP RESOURCESVerathon® provides an extensive array of customer service resources, described in the table below.
You may obtain copies of this manual, quick reference cards, and clinical studies by visiting the Verathon Web site at verathon.com or by contacting your local representative. To obtain contact information, see verathon.com/support.
Table 7. Troubleshooting help resources
RESOURCE DESCRIPTION
In‑service CDThe CD included with your system provides instructions for using the instrument.
Clinical studies Scientific papers on BladderScan use.
Scan Point® Online
Scan Point Online provides customers:
• The ability to calibrate and certify instruments online anytime you wish.
• Automatic data backup and archiving (HIPAA compliant).
• Automatic software upgrades.
• Access to real‑time troubleshooting from Verathon.
Phone and Email supportPlease refer to verathon.com/support for a list of phone numbers and locations. To request information on our products, or to schedule an on‑site demo, please fill out the form found at verathon.com/contact‑us
DEVICE DISPOSALThe system and accessories may contain mineral oils, batteries, and other environmentally hazardous materials. When the instrument has reached the end of its useful service life, return the device and related accessories to a Verathon service center for proper disposal. Alternatively, follow your local protocols for hazardous waste disposal.

32
PRODUCT SPECIFICATIONS
COMPONENT SPECIFICATIONS
INSTRUMENT SPECIFICATIONS
Table 8. BladderScan Instrument Specifications
GENERAL SPECIFICATIONS
Bladder volume range: 0–999 mL
Accuracy:
The following accuracy specification assumes usage per instructions, scanning a Verathon® tissue equivalent phantom:
Bladder Volume: ± (15% + 15 mL)
Example for a scanned volume of 150 mL:
15% (22.5 mL) + 15 mL = 37.5 mL150 mL + 37.5 mL = 187.5 mL150 mL ‑ 37.5 mL = 112.5 mL
Scan time: Less than 5 seconds
Weight: Less than 11 oz (309 grams)
Power: 3.7 v lithium‑ion rechargeable battery
Display: Liquid crystal
Water resistance:Rated at IPX1 (indicates drip‑proof, a higher than ordinary level of protection from drips, leaks, and spills)
OPERATING & STORAGE SPECIFICATIONS
Operating Conditions
Temperature: 10°–40°C (50º–104ºF)
Relative humidity: 30–75% non‑condensing
Atmospheric pressure range: 70–106 kPa
Storage Conditions
Storage: Indoor
Ambient temperature range: ‑10°–50ºC (14°–122ºF)
Atmospheric pressure range: 50–106 kPa
Relative humidity: 20–95% non‑condensing
33Operations & Maintenance Manual: Product Specifications
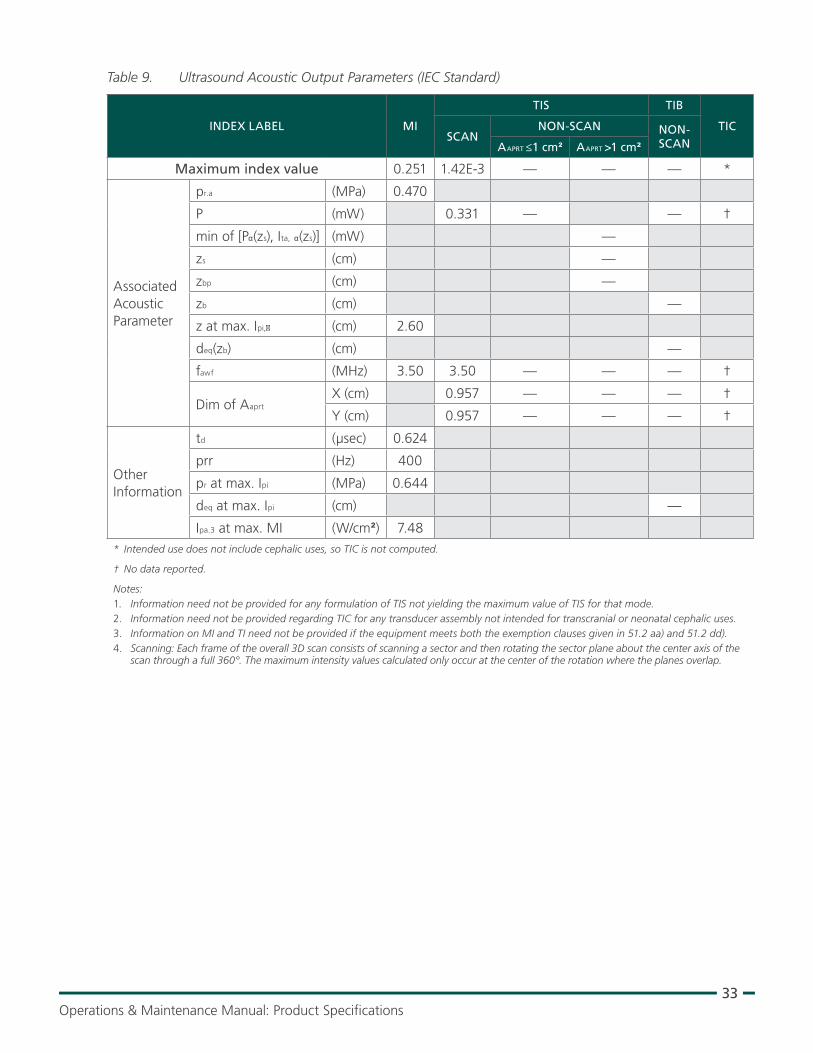
Table 9. Ultrasound Acoustic Output Parameters (IEC Standard)
INDEX LABEL MI
TIS TIB
TICSCAN
NON‑SCAN NON‑SCANAAPRT ≤1 cm² AAPRT >1 cm²
Maximum index value 0.251 1.42E‑3 — — — *
Associated Acoustic Parameter
pr.a (MPa) 0.470
P (mW) 0.331 — — †
min of [Pα(zs), Ita, α(zs)] (mW) —
zs (cm) —
zbp (cm) —
zb (cm) —
z at max. Ipi,α (cm) 2.60
deq(zb) (cm) —
fawf (MHz) 3.50 3.50 — — — †
Dim of AaprtX (cm) 0.957 — — — †
Y (cm) 0.957 — — — †
Other Information
td (μsec) 0.624
prr (Hz) 400
pr at max. Ipi (MPa) 0.644
deq at max. Ipi (cm) —
Ipa.3 at max. MI (W/cm²) 7.48* Intended use does not include cephalic uses, so TIC is not computed.
† No data reported.
Notes:1. Information need not be provided for any formulation of TIS not yielding the maximum value of TIS for that mode.2. Information need not be provided regarding TIC for any transducer assembly not intended for transcranial or neonatal cephalic uses.3. Information on MI and TI need not be provided if the equipment meets both the exemption clauses given in 51.2 aa) and 51.2 dd).4. Scanning: Each frame of the overall 3D scan consists of scanning a sector and then rotating the sector plane about the center axis of the
scan through a full 360°. The maximum intensity values calculated only occur at the center of the rotation where the planes overlap.

34
Table 10. Ultrasound Acoustic Output Parameters (FDA Standard)
Values in this table are the maximum readings obtained from three test results
ACOUSTIC OUTPUT MIISPTA.3
(mW/cm2)
ISPPA.3
(W/cm2)
Global Maximum Value 0.268* 0.0977 8.06
Associated Acoustic Parameter
pr.3 (MPa) 0.501
Wo (mW) 0.339 0.339
fc (MHz) 3.54 3.54 3.54
zsp (cm) 2.90 2.90
Beam dimensions
x‑6 (cm) 0.306
y‑6 (cm) 0.315
PD (µsec) 0.658 0.658
PRF (Hz) 400 400
EDSAz. (cm) 4.75
Ele. (cm) 4.75
TIS/TIB/TIC range 0.0‑1.0*
* Both MI and TI values are below 1.0.
CHARGING CRADLE SPECIFICATIONSThe charging cradle is tested to EN/IEC 60601‑1 requirements and is in compliance with UL and CSA equivalent standards. The charging cradle is not intended for direct patient contact. It is designed to operate within the specifications and environmental conditions identified in the following table.
Table 11. Charging Cradle Specifications
GENERAL SPECIFICATIONS
Input Voltage 90–264 VAC RMS
Input Frequency 47–63 Hz
Input Current 0.5 Amp max
Input Connection Direct plug‑in AC prongs for wall plug‑in units
Output 5V at 2.4 Amps
Insulation Class II with double insulation
STORAGE SPECIFICATIONS
Storage Indoor
Ambient Temperature Range ‑10°–50ºC (14°–122ºF)
Atmospheric Pressure Range 50–106 kPa
Relative Humidity 30–75% non‑condensing
Water Resistance IPX0 (ordinary equipment without protection against ingress of water)

35Operations & Maintenance Manual: Product Specifications
ELECTROMAGNETIC COMPATIBILITYThe BladderScan BVI 6100 system is designed to be in compliance with IEC 60601‑1‑2:2007, which contains electromagnetic compatibility (EMC) requirements for medical electrical equipment. The limits for emissions and immunity specified in this standard are designed to provide reasonable protection against harmful interference in a typical medical installation.
The system complies with the applicable essential performance requirements specified in IEC 60601‑1 and 60601‑2‑37. Results of immunity testing show that the essential performance of the system is not affected under the test conditions described in the following tables. For more information about the essential performance of the systems, see Essential Performance on page 1.
ELECTROMAGNETIC EMISSIONS
Table 12. Guidance and Manufacturer’s Declaration—Electromagnetic Emissions
The BladderScan BVI 6100 system is intended for use in the electromagnetic environment specified below. The customer or the user of the system should ensure that it is used in such an environment.
EMISSIONS TEST COMPLIANCE ELECTROMAGNETIC ENVIRONMENT – GUIDANCE
RF emissions
CISPR 11Group 1
The BladderScan BVI 6100 system uses RF energy only for internal function. Therefore, its RF emissions are very low and are not likely to cause any interference in nearby electronic equipment.
RF emissions
CISPR 11Class A
The BladderScan BVI 6100 system is suitable for use in all establishments other than domestic and those directly connected to the public low‑voltage power supply network that supplies buildings used for domestic purposes.
Harmonic emissions
IEC 61000‑3‑2Class A
Voltage fluctuations/flicker emissions
IEC 61000‑3‑3
Complies
ELECTROMAGNETIC IMMUNITY
Table 13. Guidance and Manufacturer’s Declaration —Electromagnetic Immunity
The BladderScan BVI 6100 system is intended for use in the electromagnetic environment specified below. The customer or the user of the system should ensure that it is used in such an environment.
IMMUNITY TESTS IEC 60601 TEST LEVEL COMPLIANCE LEVEL
ELECTROMAGNETIC ENVIRONMENT – GUIDANCE
Electrostatic discharge (ESD)
IEC 61000‑4‑2
± 6 kV contact
± 8 kV airIn compliance
Floors should be wood, concrete, or ceramic tile. If floors are covered with synthetic material, the relative humidity should be at least 30%.

36
Table 13. Guidance and Manufacturer’s Declaration —Electromagnetic Immunity
The BladderScan BVI 6100 system is intended for use in the electromagnetic environment specified below. The customer or the user of the system should ensure that it is used in such an environment.
IMMUNITY TESTS IEC 60601 TEST LEVEL COMPLIANCE LEVEL
ELECTROMAGNETIC ENVIRONMENT – GUIDANCE
Electrical fast transient/burst
IEC 61000‑4‑4
± 2 kV for power supply lines
± 1 kV for input/output lines
In complianceMains power quality should be that of a typical commercial or hospital environment.
Surge
IEC 61000‑4‑5
± 1 kV line(s) to line(s)
± 2 kV line(s) to earthIn compliance
Mains power quality should be that of a typical commercial or hospital environment.
Voltage dips, short interruptions and voltage variations on power supply input lines
IEC 61000‑4‑11
<5% Ut (>95% dip in Ut) for 0.5 cycle
40% Ut (60% dip in Ut) for 5 cycles
70% Ut (30% dip in Ut) for 25 cycles
<5% Ut (>95% dip in Ut) for 5 s
In compliance
Mains power quality should be that of a typical commercial or hospital environment. If the user of the system requires continued operation during power mains interruptions, it is recommended that the system be powered from an uninterruptible power supply or a battery.
Power frequency (50/60 Hz) magnetic field
IEC 61000‑4‑8
3 A/m In compliance
Power frequency magnetic fields should be at levels characteristic of a typical location in a typical commercial or hospital environment.
Conducted RF
IEC 61000‑4‑6
3 Vrms 150 kHz to 80 MHz
3 V
Portable and mobile RF communications equipment should be used no closer to any part of the system, including cables, than the recommended separation distance calculated from the equation applicable to the frequency of the transmitter.
Recommended separation distance d (m)
d=1.2 √P

37Operations & Maintenance Manual: Product Specifications
Table 13. Guidance and Manufacturer’s Declaration —Electromagnetic Immunity
The BladderScan BVI 6100 system is intended for use in the electromagnetic environment specified below. The customer or the user of the system should ensure that it is used in such an environment.
IMMUNITY TESTS IEC 60601 TEST LEVEL COMPLIANCE LEVEL
ELECTROMAGNETIC ENVIRONMENT – GUIDANCE
Radiated RF
IEC 61000‑4‑3
3 V/m 80 MHz to 2.5 GHz
3 V/m
d=1.2 √P 80 MHz to 800 MHz
d=2.3 √P 800 MHz to 2.5 GHz
where P is the maximum output power rating of the transmitter in watts (W) according to the transmitter manufacturer and d is the recommended separation distance in meters (m).
Field strengths from fixed RF transmitters, as determined by an electromagnetic site survey,a should be less than the compliance level in each frequency range.b
Interference may occur in the vicinity of equipment marked with the following symbol:
Note: Ut is the AC mains voltage prior to application of the test level.
At 80 MHz and 800 MHz, the higher frequency range applies.
These guidelines may not apply in all situations. Electromagnetic propagation is affected by absorption and reflection from structures, objects and people.
a. Field strengths from fixed transmitters, such as base stations for radio (cellular/cordless) telephones and land mobile radios, amateur radio, AM and FM radio broadcast and TV broadcast cannot be predicted theoretically with accuracy. To assess the electromagnetic environment due to fixed RF transmitters, an electromagnetic site survey should be considered. If the measured field strength in the location in which the BladderScan BVI 6100 system is used exceeds the applicable RF compliance level above, the system should be observed to verify normal operation. If abnormal performance is observed, additional measures may be necessary, such as re‑orienting or relocating the system.
b. Over the frequency range 150 kHz to 80 MHz, field strengths should be less than 3 V/m.

38
RECOMMENDED SEPARATION DISTANCES
Table 14. Recommended Separation Distances between Portable and Mobile RF Communications Equipment and the BladderScan BVI 6100 system.
The BladderScan BVI 6100 system is intended for use in an electromagnetic environment in which radiated RF disturbances are controlled. The customer or the user of the system can help prevent electromagnetic interference by maintaining a minimum distance between portable and mobile RF communications equipment (transmitters) and the BladderScan system as recommended below, according to the maximum output power of the communications equipment.
RATED MAXIMUM OUTPUT POWER OF TRANSMITTER (W)
SEPARATION DISTANCE ACCORDING TO FREQUENCY OF TRANSMITTER (m)
150 kHz to 80 MHz d=1.2 √P
80 MHz to 800 MHz d=1.2 √P
800 MHz to 2.5 GHz d=2.3 √P
0.01 0.12 0.12 0.23
0.1 0.38 0.38 0.73
1 1.2 1.2 2.3
10 3.8 3.8 7.3
100 12 12 23
For transmitters rated at a maximum output power not listed above, the recommended separation distance d in meters (m) can be estimated using the equation applicable to the frequency of the transmitter, where P is the maximum output power rating of the transmitter in watts (W) according to the transmitter manufacturer.
Note: At 80 MHz and 800 MHz, the separation distance for the higher frequency range applies.
These guidelines may not apply in all situations. Electromagnetic propagation is affected by absorption and reflection from structures, objects and people.
ACCESSORY CONFORMANCE TO STANDARDSTo maintain electromagnetic interference (EMI) within certified limits, the system must be used with the cords, components, and accessories specified or supplied by Verathon®. For additional information, see the System Components & Accessories and Component Specifications sections. The use of accessories or cords other than those specified or supplied may result in increased emissions or decreased immunity of the system.
Table 15. EMC Standards for Accessories
ACCESSORY MAX LENGTH
Scan Point® docking station 2.3 m (7.5 ft)
Charging cradle 3.8 m (12.5 ft)

39Operations & Maintenance Manual: Glossary
GLOSSARY
The following table provides definitions for specialized terms used in this manual or on the product itself. For a full list of caution, warning, and informational symbols used on this and other Verathon® products, please refer to the Verathon Symbol Directory at verathon.com/symbols.
TERM DEFINITION
C Celsius
cm Centimeter
CSA Canadian Standards Association
EMC Electromagnetic compatibility
EMI Electromagnetic interference
Essential performance The system performance necessary to achieve freedom from unacceptable risk
ESD Electrostatic discharge
GHz Gigahertz
HIPAA Health Insurance Portability and Accountability Act
Hz Hertz
IEC International Electrotechnical Commission
Ultrasound field of view Cone‑shaped area in which the probe transmits ultrasound waves
in Inch
IP Ingress Protection
ISPPA Spatial‑peak, pulse‑average intensity
ISPTA Spatial‑peak, temporal‑average intensity
LCD Liquid crystal display
m Meter
MHz Megahertz
MI Mechanical index
RF Radio frequency
RMS Root mean square
TIB Thermal index in bone
TIC Thermal index in the cranium
TIS Thermal index in soft tissue
UL Underwriters Laboratories
V Volt
VAC Volt alternating current
W Watt
WEEE Waste electrical and electronic equipment


