biomekanik
TRANSCRIPT

Mechanics of Selected Sport Skills
Sport Skills
General Skill
Specific Skill Rationale
Running Sprinting Athletes use sprinting as a form of locomotion. It is the most dynamic and vigorous of all running techniques. Walking and middle and long-distance running obey the same mechanical laws as sprinting but use less vigorous actions.
Swimming Freestyle Freestyle is the most popular and fastest of all major swimming strokes. The mechanical principles that govern the technique used in freestyle apply to other swimming strokes as well as to the sculling actions used in water polo and synchronized swimming.
Jumping High jump The mechanical principles that control how an athlete gets up in the air in the high jump also apply to other jumping skills (e.g., a volleyball spike, a basketball lay-up, and a receiver’s leaping catch in football). Once in flight, the same mechanical laws apply to the long jumper (or any athlete flight) as they do to the high jumper.
Throwing
Striking
Kicking
Javelin throw
Baseball Batting
Football Punting
All three skills require the athlete to generate high velocity. The javelin thrower wants the throwing hand moving as fast as possible, the hitter wants the bat moving quickly, and the punter wants his foot moving at high velocity when it contacts the ball. In all three skills, athletes try to simulate a whiplash action with their limbs.
Pulling, Pushing, Lifting and Carrying
Clean and Jerk The clean is a lifting-pulling action and the jerk is a push. Carrying and supporting actions occur when the athlete pauses with the bar at the chest and again when the bar is at arm’s length above the head. The mechanical principles involved in the clean and jerk apply to all lifting, carrying, and spotting techniques. Laws controlling stability also play an important role in the clean and jerk.
Swinging
Rotating
Back giant on the high bar
Front somersault
The back giant is a rotational skill controlled by many of the same mechanical principles that govern the front somersault. However, there are some differences. The back giant is a rotary swinging motion performed around a high bar, which acts as an axis external to the athlete’s body. In contrast, the axis for a front somersault passes through the athlete’s body from one hip to the other. There are
similarities and differences in the mechanics of these two skills.
Balance and Stability
Judo hip throw A judo hip throw represents the battle that occurs when athletes try to maintain their own stability and at the same time destroy the stability of their opponents. Judoka (i.e., Judo practitioners) use pulling, pushing, and rotary actions to get their opponents off balance. The mechanical principles governing the front giant, the front somersault, and the clean and jerk appear again in the judo hip throw.
Arresting Motion
Judo Breakfall A judo breakfall demonstrates an athlete arresting the motion of the body. The principles that judoka apply in dissipating the forces that occur when they slam into the mat also apply when athletes catch balls, take hits in contact sports, and land after jumping. The breakfall is a technique used to increase the area and lengthen the time frame that impact forces are applied to the athletes’ bodies when they drop on the mat.
Running Skills
Skill Highlights:
1. The time an athlete takes to run a set distance depends on the athlete’s stride length and stride frequency. The length of the athlete’s legs and the forward thrust that occurs with each stride determine stride length. Forward thrust is produced by the earth’s reaction force responding to the athlete’s backward thrust against the earth’s surface. Stride frequency is the cadence that the athlete uses (i.e., the number of strides that occurs each second).
2. A runner’s technique changes the faster the athlete runs. Sprinters spend more time in the air than distance runners. In addition, they flex and swing their arms more vigorously. Sprinters also have a higher knee lift, a greater leg thrust, and a higher flexed leg. Distance runners use less arm action but tend to swing their shoulders more than sprinters. The longer the distance, the greater the reliance on cardiovascular endurance and pacing. All elite runners hold their torsos close to perpendicular.
3. Tension is detrimental to all runners because tension saps energy and restricts muscle action and limb movement. Sprinters try to run explosively while still relaxing their faces, necks, shoulders and hands. Distance runners use the same relaxation techniques.

Technique Mechanics
Good sprinting technique demands an optimal blend of stride length and stride frequency. A predominance of fast-twitch muscle fibers is essential for top-level sprinting.
A combination of optimal leg power, stride length, and stride frequency produces the best sprinting times. Power, good reactions, and excellent flexibility are all essential. Stride length depends on hip flexibility, leg length, muscle power and range of movement. Training optimizes the forward thrust that occurs at each at each stride. Training also brings more muscle fibers into action and teaches the athlete to relax opposing muscle groups. Leg drive is improved by related power training. Overemphasis on stride frequency (i.e., stride rate or cadence) or on stride length produces inefficient sprinting.
Sprinting requires excellent leg, hip and shoulder flexibility. Flexibility in the hip and pelvic area is particularly important.
An ability to rotate the hips around the long axis of the body helps produce an optimal stride frequency and stride length. Flexibility in the shoulder girdle promotes good arm swing.
A sprinter’s arms are flexed at 90 degrees and swing powerfully forward and backward. The hands are relaxed and swing hip high to the rear and shoulder high in front.
Forward and backward arm swing counterbalances the twisting motion produced by each leg thrust on either of the sprinter’s long axis. Flexing the arms at the elbow reduces their rotary inertia and makes their pendular movement easier for the muscle involved. A vigorous forward swing of each arm transfers momentum to the athlete’s body as a whole. This adds to the athlete’s leg thrust and helps drive the athlete forward. Forward and backward arm swing parallel to the direction of sprint (rather than across the body) helps hold the torso and the shoulder girdle steady. This aids balance and relaxation and assures that the athlete runs a straight line toward the finish.
The driving leg extends to near full extension. When the driving foot leaves the ground, the leg flexes and the heel kicks up to buttock level.
A powerful leg extension via the hip, knee, and ankle joints provides the athlete with optimal thrust in the direction of the sprint. Thrust backward and downward at 50 to 55 degrees produces an equal and opposite reaction from the earth, which drives the athlete in a predominantly horizontal direction along the track. Flexion of the legs (like

the arms) reduces their rotary inertia and makes their recovery and forward movement easier for the muscles involved.
After thrusting backward and downward, the driving leg flexes at the knee and is brought directly forward and upward so that the thigh swings to just below horizontal.
The swing and upward thrust of the driving leg as it is brought forward is counterbalanced by the action of the opposing arm. Forward thrust of both arm and leg generates momentum transfer. This helps produce a greater thrust back at the earth with the driving leg, and in response, from the earth propelling the sprinter’s body along the track.
When the sprinter’s driving leg recovered and becomes the supporting leg, it flexes slightly on landing. The supporting foot lands below the sprinter’s center of gravity. The first contact of the foot with the ground is on the outside edge of the foot. The heel is lowered but does not contact the track.
A slight flexion of the supporting leg extends the time of impact that force is applied to the sprinter’s body and so cushions the landing. Flexion stretches the leg muscles, ready to extend the driving leg backward and downward against the earth. When the supporting foot lands vertically below the sprinter’s center of gravity, it eliminates deceleration that would occur if the foot was placed ahead of the sprinter’s center of gravity.
A sprinter’s forward body lean is extreme during a sprint start. At top speed torso is perpendicular and the shoulder girdle held square to the direction of run.
During a sprint start, forward body lean and shorter high-frequency strides overcome the inertia of the sprinter’s body mass and help the sprinter gain momentum. At full speed, a perpendicular torso coupled with vigorous forward and backward arm action counterbalances the movement of the legs.
A sprinter’s body rises and falls very little when running at full speed.
An elite sprinter’s center of gravity follows a low wavelike pattern as it travels forward. Slightly more time is spent in the air than in a support position. Too much time in the air is time wasted and indicates that too much thrust is directed in a vertical direction.
The sprinter’s head is held in a natural alignment with the torso. Vision is horizontal and directly ahead.
Proper position of the head and vision assists in maintaining the stability of the sprinter’s torso. Tilting the head back increases tension and restricts stride frequency and stride length.
Good sprinting combines power with relaxation. Face, neck, shoulders and hands are relaxed.
Tension in the body reduces the velocity of muscle contraction and reduces sprinting velocity. Good sprinting requires a rapid change from muscle contraction to relaxation. A technically superior sprinter is mechanically efficient. Unnecessary tension is avoided, and in this way the athlete uses energy efficiently.
An athlete’s sprinting speed is influenced by environmental conditions.
The greatest expenditure of energy in sprinting occurs when the athlete is thrusting back at the earth. Energy is also required for the knee lift and support phase of sprinting. The faster the athlete runs, the more energy the athlete must spend fighting air resistance. Headwinds add to this resistance. The condition of the track influences sprinting speed. Lightweight, high-quality spikes produce good traction, and driving back on a firm rubberized track helps thrust the athlete forward better than running on soft ground. Friction-reducing running tights and slick body suits help minimize drag from the air.
Swimming Skills
Skill Highlights:
1. The velocity at which a swimmer moves through the water depends on stroke length, stroke rate and the reduction of fluid frictional forces to minimal levels. Stroke length refers to the distance over which the swimmer pulls and pushes with each stroke. Stroke rate refers to the number of strokes per minute.
2. In the freestyle, back crawl and butterfly, the swimmer’s hands and forearms produce the greatest propulsive forces. In these strokes the legs also make a major contribution by aiding in propulsion and by holding the swimmer’s body horizontal, which minimizes form drag. In the breaststroke, both arms and legs provide powerful propulsive forces.
3. Swimmers fight against several frictional forces:
(a) Form drag, caused by the swimmer’s shape and body position in the water;

(b) Surface drag (skin friction), caused by the water rubbing against the swimmer’s body surfaces;
(c) Wave drag, caused by the resistance of the water piling up in front of the swimmer.
A horizontal body position in the water combined with smooth surfaces (i.e., resulting from shaving and the use of slick swimsuit fabrics) help to reduce form and surface drag. Swimmers reduce wave drag and attempt to be energy efficient by controlling up and down body motions and avoiding thrashing, splashing arm and leg actions.
4. Swimmers emphasize stretching and reaching forward to increase the length and range of the stroke as well maintaining a high stroke rate. Swimmers aim for rhythmic, relaxed swimming and try to develop a feel for the water.
Technique Mechanics
The freestyle is the fastest of the four swimming strokes. Arm action, leg kick, body position and breathing are synchronized and contribute to the velocity of the swimmer through the water.
In the freestyle, one arm pulls and pushes while the other recovers and reaches forward for the next propulsive action. Both freestyle and back crawl use this cyclic rotary action, whereas in the breaststroke and butterfly both arms pull, push and recover simultaneously. In the freestyle, the swimmer’s hands and forearms produce most of the propulsive force. Excellent joint mobility in the shoulders and ankles help to maximize propulsion from the arms and legs. A good leg kick coupled with the use of full or partial body swimsuits help maintain a low drag horizontal position in the water. Speed through the water is based on increasing the impulse that is applied to the water (i.e., increasing the applied force for the duration of the stroke); increasing the rate of force of application (i.e., stroke rate); and eliminating as much as possible all body positions and actions that increase form, surface, and wave drag.
The swimmer’s body lies horizontal in the water. The chest is pressed down and the face is immersed. Swimmers will often look at the bottom of the pool in order to raise the legs. The head and shoulders roll together as a unit for breathing. The leg kick occurs just below the surface. During the arm recovery, the arm is
Keeping the head down maintains good body alignment and reduces form drag in the water. It also enhances the ability to glide with each stroke. (Raising the head causes the legs to drop, which increases wave, form and surfaces drag). If the arm recovery is swung across the swimmer’s long axis, the swimmer’s body will

flexed at the elbow. Stretching forward with the leading arm and rolling along the long axis of the body is coupled with the breathing and the recovery of the propulsive arm.
“snake” through the water, increasing both form and surface drag. A flexed arm during recovery reduces its rotary resistance and makes it easier for the muscles involved to bring the arm forward. Slamming the arm and hand into the water at entry causes the body to react in the opposing direction and bounce up and down. This increases wave, surface and form drag. Rolling along the long axis presents a narrow profile to the water, which minimizes drag.
Entry of the hand is made in front of the head at a position ahead of the shoulder joint. At entry, the arm flexes slightly, with the elbow positioned above the hand. The fingers slice into the water before any other part of the hand and arm, and the swimmer attempts to “catch” or “fix” the pulling surfaces of the hand and forearm into the still, non-turbulent water ahead and draw the body past this “catch” or fixed point.
At the hand and forearm’s entry into the water, lift forces generated by the flow of water from the fingertips up the hand and arm aid partially in propulsion. The swimmer uses momentum to move past the “catch” position. Still, non-turbulent water provides an area of water in which the swimmer can pull and push more effectively. The swimmer uses the reaction of the water for propulsion as it responds equally and in the opposite direction to the pull and push exerted by the hand and forearm. This form of drag propulsion is greatest when the hand and forearm pull and push backward parallel to the direction of swim.
As the body moves forward past the “catch”, the pulling arm flexes at approximately 90 degrees with the elbow high and the hand positioned lower in the water. The degree of flexion at the elbow varies throughout the arm’s pull-push phase. The propulsive pull-push of the propulsive arm is timed to occur as the opposing arm is recovered and thrust forward in the water. The swimmer attempts to produce a predominantly straight-line horizontal pull-push with the immersed hand and forearm pressing back against the water. The propulsive arm exits the water at hip level.
Partial flexion of the propulsive arm at the elbow reduces its lever length relative to the shoulder joint, but does not reduce the active surface area of the swimmer’s arm as it pulls through the water. Flexion at the elbow also makes it easier for the swimmer’s muscles to pull the hand and forearm along their propulsive pathway. The pull-push with the hand and forearm is completed at hip level and optimizes the impulse (i.e., force X time) over which the propulsive force is applied. The swimmer’s forward movement results mainly from drag forces generated from the backward thrust of the hand and forearm. The resultant of lift and drag acts also as propulsive force predominantly at the beginning and end of the pull-push action.
Some lateral and vertical motion of the propulsive hand and arm occurs during the pull and push. The swimmer rolls
Anatomical limitations in the shoulder and elbow joint coupled with reactions to head movements and arm recovery

along the long axis of the body as the leading arm is stretched forward. Rolling assists with breathing and with recovery of the propulsive arm after it has completed its pull-push action.
cause some lateral and vertical movement of the propulsive hand and arm as they move backward through the water. The angle of attack of the hand varies continuously throughout the stroke to maximize lift and drag propulsion.
The flutter kick has an arc of movement of about 1 to 2 ft in size and occurs just below the surface of the water. It has a downbeat-upbeat action—plus some rolling lateral motion—which is caused by the rolling of the body itself. The kick starts at the hip and works down to the ankle in a whiplash motion. The flutter kick is synchronized with breathing and the arm action.
The flutter kick cannot compare with the hands and arms in terms of propulsion but it plays an important role in holding the swimmer’s body in the streamlined, horizontal, drag-reducing position. Much depends on the swimmer having great mobility and flexibility in the ankles. Kicking too deep increases drag without contributing much to propulsion. The depth of the kick depends on the swimmer’s build, strength, and stroke rate. A stiff-legged flutter kick consumes too much energy and is incorrect.
Breathing depends on the stroke pattern developed by the swimmer. Many swimmers breathe every stroke cycle, and breathing every two strokes is a common pattern in races that are longer than a single length (50m).
Breathing should not in any way hinder efficient propulsive technique. Lifting the head to breathe causes the legs to drop, increasing form drag.
The athlete tries to swim with a smooth, rhythmic, non-jerky, cyclic action. Up-down, side-to-side motions are eliminated with the torso held fairly rigid. The athlete’s arm action is long rangy and precise and gives an impression of relaxation even at high speed.
Jerky, up-down and side-to-side motions increase the resistance of the water, in particular wave drag (which increases according to the cube of the velocity). An increase in wave drag demands an immense increase in energy expenditure from the athlete and generates a phenomenal resistance the faster the athlete swims. The athlete should aim for fluid, relaxed motions. From a biomechanical and physiological standpoint, these actions are efficient and superior in terms of propulsion.
Crawl swimmers frequently shave the skin exposed to water flow and use bodysuits that are patterned with vortex generators. Dolphin kicks are used for several strokes immediately after entering the water from the start and also when coming off the wall after completing a turn. The laws of competitive swimming limit the distance that can be swum underwater using dolphin kicks.
Shaving reduces surface drag. Vortex generators are lines of small bumps or specifically located seams on bodysuits. The objective of vortex generators is to reduce both form and surface drag caused by the swimmer both on and below the surface of the water. Because of the additional buoyancy gained from using a bodysuit, the swimmer can dramatically reduce form drag by maintaining a horizontal position in the water. In the freestyle, dolphin kicks below the surface at the start and after

turns are a highly efficient form of propulsion that avoids the adverse effects of wave drag occurring at the surface.
Jumping Skills
Skill Highlights:
1. To get up in the air, jumpers exert a force against the earth’s surface well in excess of their own body weight. The earth’s reaction force then drives the athletes upward. The more forceful the athlete’s thrust against the earth, the greater the earth’s response.
2. Immediately before takeoff, a jumper’s center of gravity is lowered, the body tilted backward, and the athlete’s arms and free leg positioned to the rear of the body. Lowering the body pre-stretches the big muscles of the jumping leg, preparing them for the leg’s explosive thrust downward at the earth. Leaning back combines with lowering the body so the athlete can spend more time over the jumping foot applying force to the earth. Swinging the arms forward and upward adds to the downward thrust of the athlete’s jumping leg against the earth.
3. The path that a jumper’s center of gravity follows during flight is determined by the velocity at which the athlete is propelled upward at takeoff and the takeoff angle used.
4. When in flight, movement of one part of a jumper’s body causes other parts to move in the opposing direction. In high jump, this characteristic helps in bar clearance. In the long jump, rotary actions of the arms and legs are used in flight to counteract the unwanted forward rotation that inevitably occurs when the athlete takes off. In a volleyball spike, drawing the arm back and arching the body in a counterclockwise direction will cause the legs to move in a clockwise direction.
Technique Mechanics
The approaches used by elite athletes in the high jump range from 10 to 13 strides and commonly extend over a curved approach of 60 to 110 ft. Jumpers approach the bar at high velocity and accelerate to even greater velocity during the last 3 strides before takeoff.
A high jump approach should be long enough so that sufficient velocity is reached to carry the athlete through the actions performed at takeoff.

The greater the velocity of the approach, the greater its potential for helping the athlete jump high. Too little velocity in the approach can be detrimental to the takeoff. However, too much velocity can also be detrimental.
The speed of the approach must be fast enough to carry the jumper through all the body positions required in the takeoff. There also must be sufficient time to generate the optimal vertical, horizontal, and rotary thrust to get up and over the bar. If the approach speed is too great, there will not be enough time to optimize all of these actions. On the other hand, if the approach speed is slow, the athlete will move far too slowly through the takeoff and will have a difficult time getting from a back leaning position at the start of the takeoff to an upward rotating thrust that occurs just before leaving the ground.
Most high jumpers use a curved approach that has a large radius curve (or is almost straight) during the first 6 or 7 strides, followed by a small radius curve during the final 3 to 5 strides. Jumpers lean into the curve of the approach. They also lean backward as they plant the takeoff foot.
The athlete’s inward lean during the approach produces a centripetal force. A tighter curve and greater approach velocity requires more inward lean. Inward and backward lean as the jumping foot is planted lengthens the time that the athlete spends thrusting down at the earth with the jumping leg. Inward and backward lean before takeoff counterbalances the outward pull of inertia. A body position with lean away from the bar prevents the athlete from committing the error of leaning into (i.e., toward) the bar.
During the last 2 or 3 strides of the approach the athlete’s center of gravity is lowered and the arms and free leg positioned to the rear of the body. The penultimate (i.e., next to last) stride and the final stride are longer than previous ones. The athlete steps forward onto the jumping foot with the hips positioned well to the rear of the jumping foot.
Lowering the center of gravity and stepping well forward onto the jumping foot allow the athlete to apply force against the earth over a large arc (i.e., a long time frame) and in reaction have the earth spend more time driving the athlete upward. Lowering the center of gravity pre-stretches the jumping muscles in preparation for their powerful extension of the jumping leg.
The arms and free leg are positioned to the rear of the body as the athlete steps forward onto the jumping leg. The forward and upward swing of the arms and free leg is then coordinated with the extension of the jumping leg.
The upward swing of the arms and the free leg toward the bar is a form of momentum transfer. The momentum of their upward swing combines with the downward thrust of the takeoff leg. All unify to produce a greater reactive response from the earth, which drives the athlete upward.
The free leg and arms flex and accelerate during their upward swing. These actions occur while the takeoff leg is extending
Flexing the arms and legs brings their mass closer to their respective axes and reduces their rotary inertia. This action

vigorously in contact with the earth. makes it easier for the athlete’s muscles to move them upward at high speed. For greatest effect the free leg and arms move at maximum velocity at that instant when the athlete is last in contact with the earth. The muscles in the jumping leg must have enough power to extend the jumping leg explosively.
The takeoff for elite high jumpers is from a point 3 to 4 ft directly out from the near high jump standard. The takeoff foot is placed at an angle of 15 to 20 degrees to the crossbar. The free leg is first thrust upward and then rotated away from the bar and back toward the direction of approach. The shoulders rotate parallel to the bar. Vision is usually along the bar in the direction of the far standard.
Rotation of the jumper’s body in preparation for a back-lying position over the bar is initiated while the takeoff foot is still in contact with the ground. The athlete is then able to rotate around the body’s long axis by pushing against the earth’s surface. In the air, the same movement causes a twist like equal and opposite reaction to occur. Elite jumpers try not to compromise vertical thrust by overemphasizing rotation during the takeoff.
At takeoff, the high velocity of the approach coupled with the plant of the takeoff foot causes the athlete to move forward over the takeoff foot.
Moving up and over the takeoff foot initiates rotation, which continues in flight. Once in flight, the athlete can rotate more quickly (i.e., increase angular velocity) by pulling the body inward, or slow down rotation by stretching out and extending the body.
After takeoff the athlete’s upper body is flexed backward over the bar. The free (i.e., leg), which was swung up at the bar, is lowered from its elevated position.
Lowering the leading the leg, combined with the act of flexing the upper body backward, produces an equal and opposite reaction that elevates the athlete’s hips. This clears the hips over the bar. The athlete’s vision, directed along the length of the bar, helps time this critical maneuver.
When the athlete’s seat has crossed the bar, the head and shoulders are lifted upward. The athlete’s torso and the legs (which are now flexed at the knee) are pulled toward each other by contraction of the abdominal and quadriceps muscles.
The elevation of the head and shoulders causes two equal and opposite reactions to occur: (1) the flexed legs move upward toward the torso, and (2) the athlete’s seat (which has crossed the bar) drops downward. Flexion of the legs reduces their rotary inertia, making their movement easier so they are quickly drawn over the bar.
Once the athlete’s thighs have cleared the bar, the legs are extended at the knees so that the heels avoid clipping the bar.
Even though the legs extend, the fact that the athlete’s upper and lower body have moved toward each other causes the athlete’s body to increase its rate of spin (angular velocity) around the athlete’s transverse (hip to hip) axis. This

action, combined with some rotation around the long axis, continues as the jumper drops toward the pit.
The athlete relaxes and drops onto the shoulders on the high jump landing pad.
The continued rotation of the athlete’s body in flight causes the athlete to drop onto the shoulders on the landing pad. The focus of the eyes on the bar during the clearance of the feet pulls the chin into the chest and prevents a headfirst landing. The height of the high jump landing pad relative to the bar is designed to stop over-rotation and prevent the athlete landing on the back of the neck. The foam rubber of the landing pad extends the time frame and area of impact and gradually reduces the forces applied to the athlete during the landing.
Throwing, Striking and Kicking Skills
Skill Highlights:
1. High velocity throwing, striking, and kicking skills require the athlete to simulate the cracking of a whip. The high-speed movement of a racket in badminton smash, 100-mph tennis serves, a golf drive, a fastball in baseball or a javelin throw all require the athlete to generate phenomenal velocity. This flail-like action is called a kinetic link or kinetic chain action because the slower motions produced in the athlete’s longer, larger, and heavier limbs are made faster and quicker as they pass their motion on to lighter, less massive body parts.
2. In these high-velocity throwing and striking skills, there is a rapid acceleration of the athlete’s body segments, beginning with those in contact with the earth. A whiplash or flail-like, sequence progresses upward from the legs to the hips, from hips to chest, and culminates in the tremendous velocity of the striking or throwing arm. To achieve the greatest possible velocity, it is important that antagonist muscle groups are completely relaxed and that agonist muscles contract in sequence, helping to make each body segment move faster than the previous one.
3. Kicking skills differ from throwing and striking skills in that the last and fastest moving segments, or links, in the whip like sequence are the athlete’s lower leg and kicking foot. The progressive

acceleration of body segments in kicking skills is similar to that throwing and striking skill.
4. Each movement pattern in throwing, striking, and kicking skills contains some preparatory actions commonly called an approach, setup, windup, or backswing. These actions help position the body and implement (such as a ball in baseball pitching) in the optimal position for the application of force. A backswing in a golf drive provides additional distance over which the club is accelerated. The backswing pre-stretches the golfer’s muscles in preparation for their explosive recoil. Relaxation and flexibility help produce an optimal windup.
Technique Mechanics
An approach toward the direction of throw leads into a wide, powerful throwing stance. The approach is relaxed and increases in velocity. The athlete accelerates during the first two thirds of the approach. This leads into the final one third of the approach, which includes drawing back the javelin and stepping into the final throwing stance.
An approach builds momentum and generates enough velocity to carry the athlete through the throwing stance and into the follow-through. Too much velocity in the early part of the approach may cause the athlete to slow down during the throwing actions or may not give the athlete enough time in the throwing stance to apply an optimal amount of force to the javelin. Efficient use of an approach can increase the distance thrown by 90 to 100 ft compared with a standing throw.
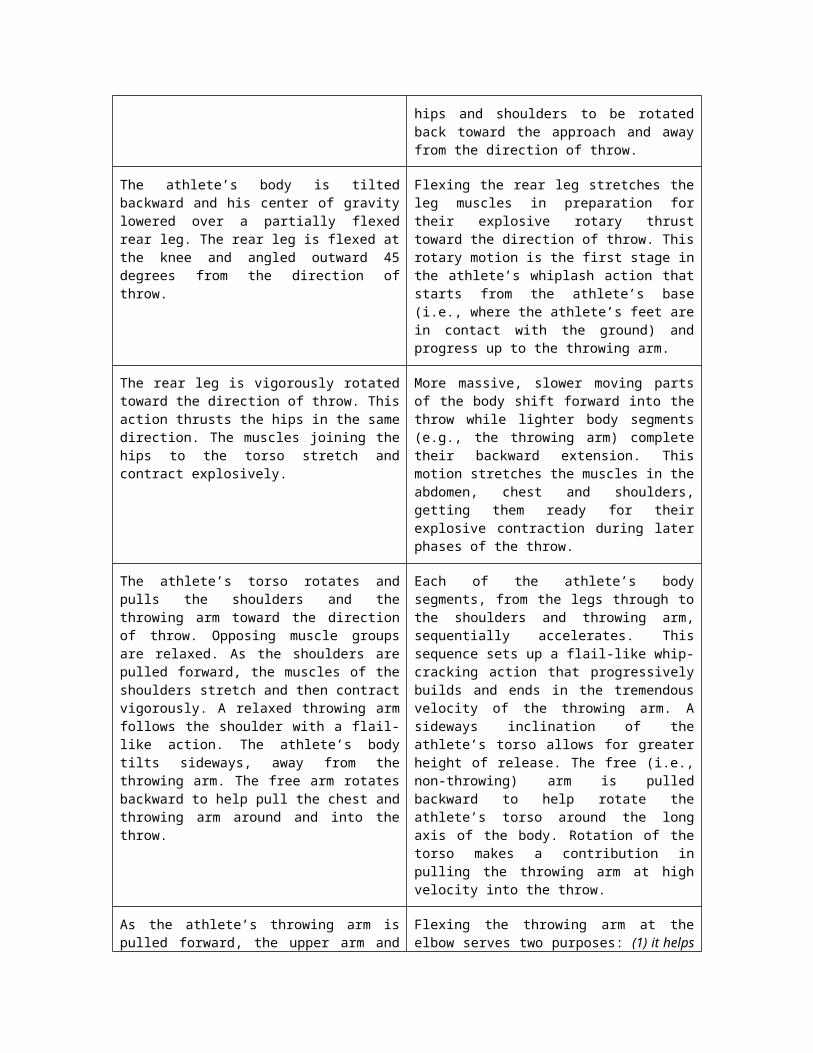
Before entering the throwing stance, the athlete’s shoulder girdle is rotated away from the direction of throw, and the throwing arm is taken back to arm’s length. By use of one or more crossover steps, the lower body moves forward under the torso so the athlete’s body is angled backward away from the direction of throw.
Rotating the shoulder girdle and extending the throwing arm prepare the athlete for the application of force to the javelin over the largest possible distance and time frame. The backward body lean makes this distance and time frame even greater.
The athlete steps into the throwing stance with the leg on the opposite side of the body to the throwing arm. This step is usually larger than those prior.
Stepping forward with the opposing foot (e.g., the left foot if the javelin is held in the right arm) sets up a large base of support for the application of force to the javelin. This allows the athlete’s hips and shoulders to be rotated back toward the approach and away from the direction of throw.
The athlete’s body is tilted backward and his center of gravity lowered over a partially flexed rear leg. The rear leg is flexed at the knee and angled outward
Flexing the rear leg stretches the leg muscles in preparation for their explosive rotary thrust toward the direction of throw. This rotary motion is the first
45 degrees from the direction of throw. stage in the athlete’s whiplash action that starts from the athlete’s base (i.e., where the athlete’s feet are in contact with the ground) and progress up to the throwing arm.
The rear leg is vigorously rotated toward the direction of throw. This action thrusts the hips in the same direction. The muscles joining the hips to the torso stretch and contract explosively.
More massive, slower moving parts of the body shift forward into the throw while lighter body segments (e.g., the throwing arm) complete their backward extension. This motion stretches the muscles in the abdomen, chest and shoulders, getting them ready for their explosive contraction during later phases of the throw.
The athlete’s torso rotates and pulls the shoulders and the throwing arm toward the direction of throw. Opposing muscle groups are relaxed. As the shoulders are pulled forward, the muscles of the shoulders stretch and then contract vigorously. A relaxed throwing arm follows the shoulder with a flail-like action. The athlete’s body tilts sideways, away from the throwing arm. The free arm rotates backward to help pull the chest and throwing arm around and into the throw.
Each of the athlete’s body segments, from the legs through to the shoulders and throwing arm, sequentially accelerates. This sequence sets up a flail-like whip-cracking action that progressively builds and ends in the tremendous velocity of the throwing arm. A sideways inclination of the athlete’s torso allows for greater height of release. The free (i.e., non-throwing) arm is pulled backward to help rotate the athlete’s torso around the long axis of the body. Rotation of the torso makes a contribution in pulling the throwing arm at high velocity into the throw.
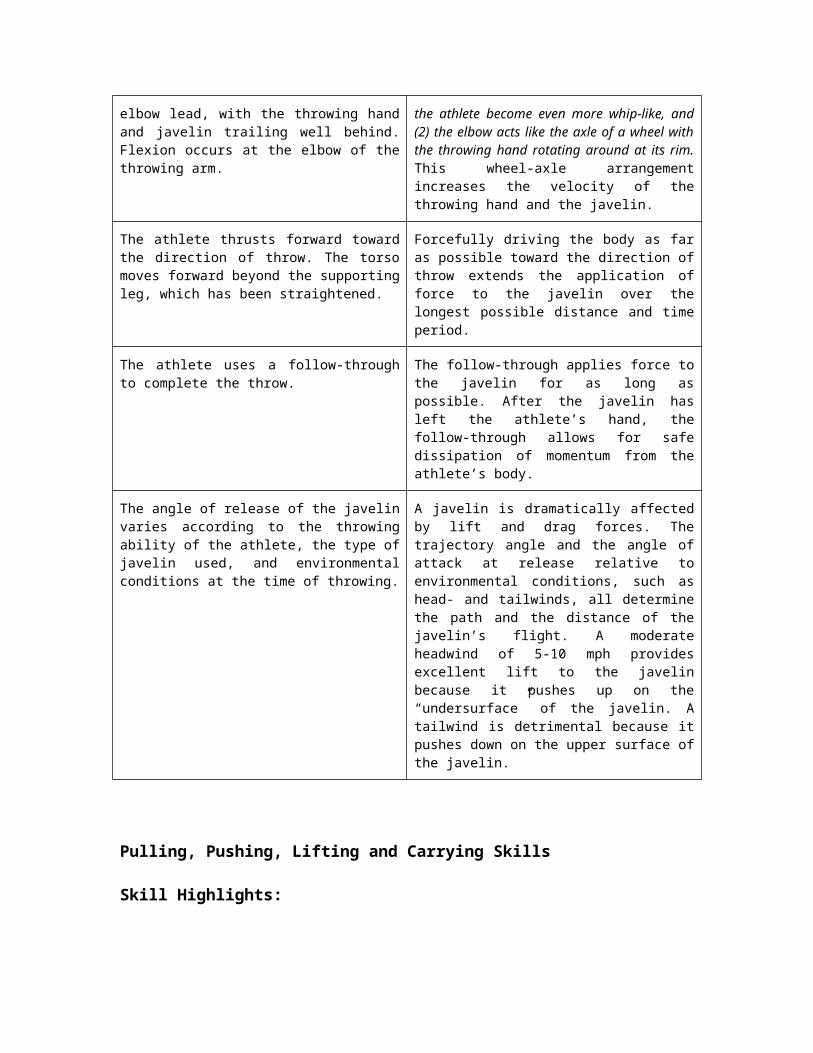
As the athlete’s throwing arm is pulled forward, the upper arm and elbow lead, with the throwing hand and javelin trailing well behind. Flexion occurs at the elbow of the throwing arm.
Flexing the throwing arm at the elbow serves two purposes: (1) it helps the athlete become even more whip-like, and (2) the elbow acts like the axle of a wheel with the throwing hand rotating around at its rim. This wheel-axle arrangement increases the velocity of the throwing hand and the javelin.
The athlete thrusts forward toward the direction of throw. The torso moves forward beyond the supporting leg, which has been straightened.
Forcefully driving the body as far as possible toward the direction of throw extends the application of force to the javelin over the longest possible distance and time period.
The athlete uses a follow-through to complete the throw.
The follow-through applies force to the javelin for as long as possible. After the javelin has left the athlete’s hand, the follow-through allows for safe dissipation of momentum from the athlete’s body.
The angle of release of the javelin varies according to the throwing ability of the
A javelin is dramatically affected by lift and drag forces. The trajectory angle and
athlete, the type of javelin used, and environmental conditions at the time of throwing.
the angle of attack at release relative to environmental conditions, such as head- and tailwinds, all determine the path and the distance of the javelin’s flight. A moderate headwind of 5-10 mph provides excellent lift to the javelin because it pushes up on the “undersurface” of the javelin. A tailwind is detrimental because it pushes down on the upper surface of the javelin.
Pulling, Pushing, Lifting and Carrying Skills
Skill Highlights:
1. Sports that use pull-push actions (e.g., rowing, kayaking, archery and weightlifting) require the athlete to apply force continuously throughout the desired range of movement. If an athlete wants to apply maximum force to a heavy resistance, the athlete simultaneously uses the largest number of body segments that can be applied to the task (e.g., the legs, back, chest, shoulders and arms). This simultaneous action differs from high-velocity throwing, kicking, and striking skills in which a sequential movement of body segments occurs.
2. Spotting in gymnastics is a lifting-carrying motion. It requires the spotters to be as close as possible to the athlete without hindering the performance of the skill. Oppositional, or resistive, torque produced by the performer increases in proportion to the performer’s body mass, speed of movement and distance from the spotter. Spotter must counter this torque by moving as close to the performer as possible.
Technique Mechanics
The two Olympic weightlifting events are the clean and jerk and the snatch. The clean and jerk is used to hoist the heaviest weight and is two-phase lift. The bar is first pulled to the chest, where a pause occurs. The athlete then jerks (pushes) the bar to arm’s length above the head. The snatch differs from the clean and jerk in that it is performed with a continuous pulling action with no pause at the chest.
The clean and jerk and the snatch are both power events in which strength and speed are combined. In these events, the athlete applies great force in a limited time frame to accelerate the barbell upward. At the height of the barbell’s upward movement, the athlete must move at high speed into positions where the barbell is stabilized at the chest (for the clean) and above the head (for the jerk and snatch).
The clean and jerk uses two types of leg action. With a heavy barbell, an athlete cleans the bar by first pulling on it and lifting it as high as possible. Without pause, the athlete either squats under the bar or splits the leg forward and backward. The athlete then rises up out of this position, with the bar held at the chest ready for the jerk. To complete the jerk, an upward jerking action is combined with a lunging motion in which the legs are split forward and backward.
The quicker the bar moves upward, and the higher it travels, the more time available for the athlete to perform the squat or leg split. The more powerful the athlete or the lighter the resistance, the faster and higher the bar will move upward. A bar pulled upward to a high position does not require a high-speed performance of a deep squat or a leg split as the athlete moves under the bar.
The starting position in the clean sees the athlete in a shoulder-width stance with the bar in front of the shins. The athlete grips the bar with the hands slightly wider than shoulder width and equidistant from the plates. The arms and back are straight and the legs flexed no more than necessary. The athlete’s back is angled at 45 degrees to the horizontal.
The starting position for the clean is such that the bar will be pulled predominantly in a vertical manner. The athlete’s partially flexed legs (i.e., approximately a half squat) are in a mechanically efficient position for a powerful extension. The arms are extended and immediately transmit force from the athlete’s legs and back to the bar.
The technique begins wit a powerful extension of the athlete’s legs and back to accelerate the bar upward.
The resting inertia of the bar is overcome by a powerful extension of the athlete’s legs and back. Both legs and back extend simultaneously, transferring the pull to the bar via the arms. The bar rises in a vertical direction.
When the legs have completed their extension, the athlete continues to pull upward by flexing the arms. The athlete rises up onto the toes and hyperextend the back. The pull of the arms complete the vertical movement of the bar, which travels upward close to the athlete’s body. The head is thrown back.
The large muscles of the legs and back apply the greatest force to the bar. Driving up onto the toes and pulling upward with the arms allow the athlete to continue applying force to the bar over a long time frame. The athlete pulls the bar upward as close to his line of gravity as possible. In this way the center of gravity of the bar stays above (and within) the athlete’s supporting base, and the athlete and bar are optimally stabilized.
When the barbell has risen to just below the pectoral muscles, the athlete squats down under the bar, simultaneously rotating the arms forward so the bar is pulled in toward the upper chest and held in place with the arms.
The greater the mass (weight) of the barbell, the more critical becomes the upward pull on the bar and the velocity with which the athlete rotates the arms forward and squats under the bar. A sufficiently high pull, fast arm rotation and equally fast squatting action are absolutely essential.
The athlete uses leg strength to lift up from a front squat position.
With the bar at the chest and in a squat position, the athlete must use great leg strength to battle the deadweight (i.e.,

inertia) of the barbell (plus the inertia of his own body mass) so he can rise to a standing position. With insufficient strength or too massive (i.e., too heavy) a barbell, the athlete will either fail to get up out of the squat or be physically drained from the effort of standing up and fail to complete the jerk.
In a standing position and with the bar held at the chest, the athlete dips and flexes the legs slightly. The weight discs at either end of the bar cause the bar to flex downward then upward.
A slight flexion pre-stretches the leg muscles before the extension of the legs. The upward recoil of the bar is timed to coincide with the leg extension to assist in thrusting the barbell upward.
The instant the athlete’s legs have completed their thrust and the bar is raising upward, the legs split forward and backward. One leg is extended directly backward at an angle of about 45 degrees. The opposite foot steps forward 10 to 11 in. This allows the athlete to lunge forward under the bar.
The athlete’s leg thrust and arm extension (with no leg split) is adequate to elevate a lightweight barbell. With a heavier resistance (which cannot be elevated to arm’s length above the head with leg thrust and arm extension alone), the athlete is forced to split the legs at high speed and drop very low under the bar.
With the bar held above the head at arm’s length, and with the legs split forward and backward, the athlete carefully brings both legs back toward their original position. The athlete finishes the lift standing with the feet shoulder-width apart and with the barbell held at arm’s length above the head. For approval from the judges, the athlete must demonstrate control over the barbell for 3 sec.
With the barbell above the head, the combined center of gravity of athlete and barbell is raised upward, and with increased height, both athlete and barbell become progressively unstable. The athlete must struggle to keep the line of gravity of the barbell centralized above his small, narrow base in order not to lose control and fail in the lift.
Swinging and Rotating Skills
Skill Highlights:
1. The same mechanical principles that control angular motion govern swinging. In swinging skills, an athlete stretches out on the downswing. This action moves the athlete’s center of gravity as far from the axis of rotation as possible. By carrying out this action, the athlete allows gravity to exert maximal accelerative torque to his body on the downswing.
2. To rise high on the upswing, an athlete counteracts the decelerating effects of gravity by flexing at the hips and shoulders.
This action pulls the athlete’s center of gravity closer to the axis of rotation, which reduces gravity’s decelerative torque.
3. When performing somersaults and other rotary skills in the air, an eccentric force (i.e., a force that does not pass through the athlete’s axis of rotation) is applied to the athlete’s body at the start of the skill. An eccentric force applies the turning effect of torque to the athlete’s body. A slight body lean in the direction of rotation at the instant of takeoff is a common method for applying this eccentric force.
4. Reducing the athlete’s rotary resistance during flight increases angular velocity (i.e., the rate of spin). Rotary inertia is reduced by using muscular force to pull the athlete’s body mass in toward the axis of rotation. Angular velocity is decreased by extending the athlete’s body mass outward from the axis of rotation. This action increases the athlete’s rotary inertia and reduces the athlete’s rate of spin.A Back Giant on the High Bar
Technique Mechanics
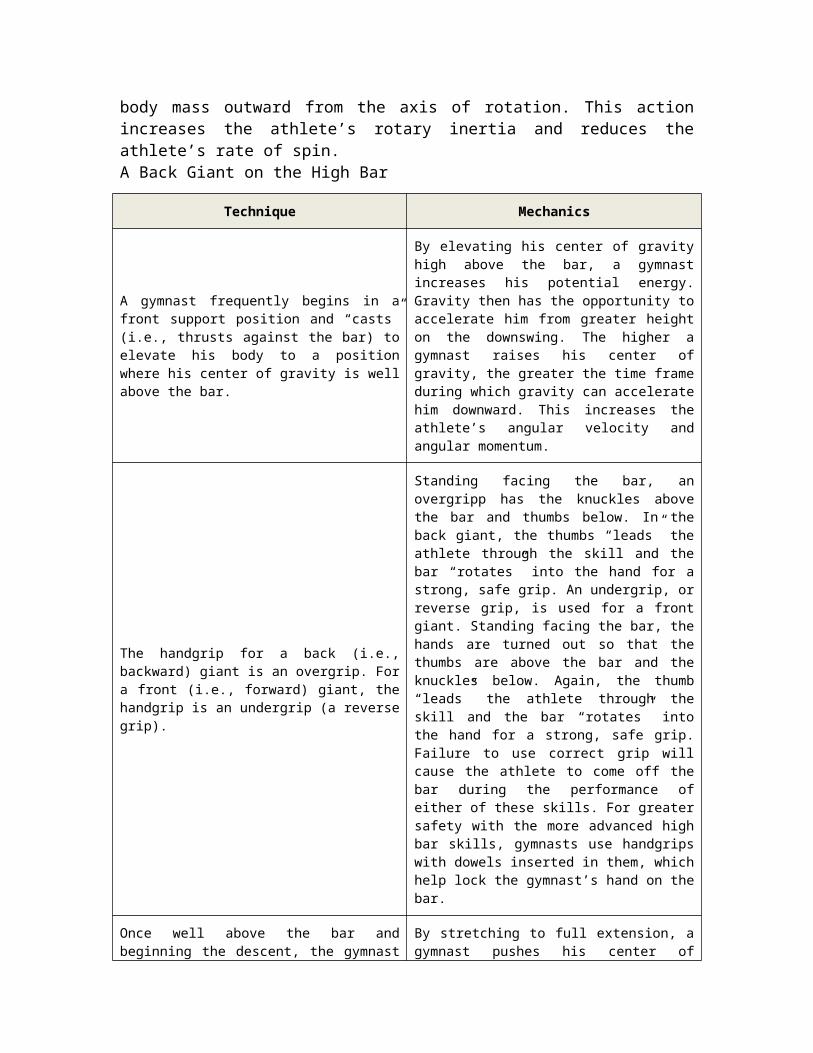
A gymnast frequently begins in a front support position and “casts” (i.e., thrusts against the bar) to elevate his body to a position where his center of gravity is well above the bar.
By elevating his center of gravity high above the bar, a gymnast increases his potential energy. Gravity then has the opportunity to accelerate him from greater height on the downswing. The higher a gymnast raises his center of gravity, the greater the time frame during which gravity can accelerate him downward. This increases the athlete’s angular velocity and angular momentum.
The handgrip for a back (i.e., backward) giant is an overgrip. For a front (i.e., forward) giant, the handgrip is an undergrip (a reverse grip).
Standing facing the bar, an overgripp has the knuckles above the bar and thumbs below. In the back giant, the thumbs “leads” the athlete through the skill and the bar “rotates” into the hand for a strong, safe grip. An undergrip, or reverse grip, is used for a front giant. Standing facing the bar, the hands are turned out so that the thumbs are above the bar and the knuckles below. Again, the thumb “leads” the athlete through the skill and the bar “rotates” into the hand for a strong, safe grip. Failure to use correct grip will cause the athlete to come off the bar during the performance of either of these skills. For greater safety with the more advanced high bar skills, gymnasts use handgrips with dowels inserted in them, which help lock the
gymnast’s hand on the bar.
Once well above the bar and beginning the descent, the gymnast stretches to full extension.
By stretching to full extension, a gymnast pushes his center of gravity as far as possible from the axis of rotation (i.e., the bar). This allows gravity to apply the greatest amount of accelerative torque to the gymnast’s body on the downswing. Just before reaching a position directly below the bar, the gymnast flexes the muscles of the spine. This action pre-stretches the abdominal muscles, which are ready to flex the hips when the athlete rises on the upswing.
Gravity accelerates the gymnast’s body downward.
Gravity applies an accelerative torque to the gymnast’s body. This torque increases until it is maximal when the gymnast is stretched horizontally from the bar. From that point, although the gymnast’s angular velocity and momentum continue to increase, the amount of torque applied to the gymnast’s body gets progressively less until it is zero when the gymnast passes directly below the bar.
After passing below the bar, the gymnast flexes at the hips and at the shoulders. Beginners may also flex at the knees.
Flexion at the hips and shoulders brings the gymnast’s center of gravity closer to the axis of rotation. Gravity’s decelerative torque is reduced. By flexing, the gymnast also pulls his mass closer to the bar. This reduces the gymnast’s rotary resistance (i.e., rotary inertia).
In a flexed body position, the gymnast rises upward. The flexion in the body is progressively eliminated as the athletes moves to a position vertically above the bar. Some pulling action is applied to the bar to get the gymnast body over the top of the bar.
With a reduction in the gymnast’s rotary inertia and a reduction in gravity’s decelerative torque, the gymnast is able to rise to a position vertically above his axis of rotation (i.e., the bar). Immediately before reaching the vertical position, the athlete can extend his body to slow down (i.e., control) the rate of spin around the bar.
Once above the bar and beginning the descent, the gymnast extends the body again to repeat the process described in steps 1 to 5.
Above the bar, the gymnast straightens out to shift his center of gravity as far form the bar as possible. This allows gravity to reapply maximum torque to the gymnast’s body on the downswing. In this way, continuous giants are performed.

Aerial Front Somersault
Technique Mechanics
The athlete can begin either with an approach or from standing. An approach allows the athlete to use the same technique as the high jumper for gaining height. The feet are placed ahead of the center of gravity, the quadriceps muscles are pre-stretched and the arms are swung upward to assist at takeoff.
An approach before takeoff allows the athlete to position the center of gravity to the rear of the takeoff foot. This allows the athlete to rock forward over the takeoff foot and apply more impulse (force x time) against the takeoff surface. A hurdle step coupled with a drop onto a sprung surface (e.g., a tumbling mat, beatboard or trampette) pre-stretches the quadriceps muscles and stores strain energy in the apparatus. This is added to the athlete’s leg thrust to propel the athlete upward.
During the takeoff the arms are swung upward at the same time that the legs thrust down at the supporting surface. Arm swing can be forward and upward or as in this sequence, backward and upward.
Arm swing during the takeoff provides momentum transfer to the athlete’s body as a whole. The action of the arms adds to the downward thrust of the legs and increases the reactional force of the takeoff surface (e.g., floor exercise mat, beatboard, or springboard) thrusting upward against the athlete.
The thrust of the legs can be made against a sprung surface (e.g., springboard, beatboard, trampette or gymnastic floor exercise mat).
Downward thrust by the athlete produces flexion in a sprung surface. A sprung surface stores strain energy. The recoil of the flexed surface helps drive the athlete up in the air.
An angle of takeoff close to the vertical, coupled with a powerful upward thrust, guarantees the most airtime for somersaulting (and twisting) skills. In diving, horizontal movement is necessary to clear the end of the board. This is not the case in floor exercises or during trampoline skills.
Vertical thrust is always partially compromised when horizontal movement and rotation are required. To perform the most somersaults in the air, the athlete must thrust downward as close to vertical as possible (to produce the greatest airtime) while still initiating rotation. In diving, the athlete must also apply some horizontal thrust to move a safe distance from the board.
To initiate rotation, the thrust that drives the athlete upward must not pass through the athlete’s center of gravity. Swinging the arms and shifting the head and trunk can assist in promoting rotation.
An eccentric force causing rotation occurs when the upward thrust from the athlete’s legs and the supporting surface is directed at a distance from—rather than through—the athlete’s center of gravity. This produces the turning effect of torque (force x distance from axis of rotation), which cause the athlete to

rotate. Rotation can be enhanced when the arms, head and trunk are also thrown in the direction of rotation. This form of momentum transfers must occur while the athlete is still in contact with the supporting surface.
The athlete’s flight path is set at takeoff and cannot be changed in flight.
Any amount of body movement in the air will not change the flight path of the athlete’s center of gravity once it is set at takeoff. Likewise, an athlete’s angular momentum is also set at takeoff. Angular momentum at takeoff depends on the mass of the athletes, the distribution of the athlete’s mass at the takeoff relative to the athlete’s axis of rotation and the angular velocity (i.e., rate of spin) initiated at takeoff.
To perform somersaults in the air the athlete must have the following:
(a) vertical thrust to provide optimal airtime
(b) a takeoff with the body in an extended position
(c) as much rotation at takeoff as possible without compromising airtime or an extended body position, and
(d) sufficient muscular strength and flexibility to pull the body into the tightest tuck possible while in the air.
A rotating body in an extended position produces considerable angular momentum. Since angular momentum is conserved in flight, pulling the athlete’s body mass in toward the axis of rotation produces an increase in angular velocity (i.e., rate of spin). A shift from a fully extended body position to the tightest tuck possible results in the greatest increase in the athlete’s rate of spin (i.e., angular velocity). In reverse, a shift from a tight tuck to an extended body position reduces the athlete’s rate of spin.
During flight, axes for somersaults and twists always pass through the athlete’s center of gravity.
Irrespective of changes in the athlete’s body position (e.g., shifting from an extended body position to a tuck or whatever combination of twist and somersault the athlete performs), axes of rotation always pass through the athlete’s center of gravity. Even when apparently out of control, the athlete’s body mass is balanced and in a state of equilibrium around her center of gravity.
All actions performed in the air cause equal and opposite reactions to occur. A counterclockwise movement of one part of the athlete’s body causes a clockwise movement of some other part. These occur simultaneously. Pulling the head and shoulders forward (clockwise) into a tuck causes the flexed legs to move in
The arc of movement of the athlete’s body segments producing the action and the arc of movement producing the reaction depend on their respective rotary resistance. More massive body segments that are extended farther from the axis of rotation shift a smaller distance (or arc) than those that are less

the opposing (counterclockwise) direction which is toward the head and shoulders.
massive and closer to the axis of rotation.
Variation of body position in flight allows an athlete to control the number of somersaults (and twists) that are performed. By extending the body, the rate of rotation can be reduced for a headfirst entry (in diving) or a feetfirst landing (in floor exercises and many skills on the trampoline).
Compressing the body mass in toward the axis of rotation reduces its rotary resistance. Because angular momentum is conserved in flight, a reduction in rotary resistance causes an increase in angular velocity. Extending the body increases rotary resistance and decreases the athlete’s angular velocity.
Balance and Stability
Skill Highlights:
1. Athletes in the sport of judo and other combative sports use combinations of rotation, pulling, pushing, and lifting to lessen an opponents’ stability and set them up for a throw. The counter attack is by leaning toward a push and away from pull. To increase stability, widen their base and lower and centralize their center of gravity. Weight divisions in combative are intended to negate advantages from body mass.
2. Maintaining stability and destroying the stability of an opponent I judo and other combative sports are predominantly a battle of one torque versus another. Pushing, pulling, and lifting are used to spin an opponent around axes formed by the athlete’s feet, hips, back and shoulders. Leg sweeps in judo are a common method of eliminating an opponent’s base of support.
Judo Hip Throw
Technique Mechanics
Judo involves pushing, pulling, lifting and rotating, all of which are designed to maintain the attacker’s stability while disrupting that of the opponent. Precise timing, coordination and superfast reactions are essential.
The intent of the attacker is to shift the opponent’s center of gravity outside of the opponent’s supporting base and so destroy his stability. Superfast combinations of pushing, pulling, lifting and rotating are used to achieve this end.
Judoka (judo practitioners) face each other in a standing position with their body slightly lowered and with their legs partially flexed. Their feet are at right
Lowering the center of gravity increases the stability of the athlete. Positioning the feet at right angles give good stability side to side and front to back.

angles to each other and shoulder-width apart. Fast, shuffling, flat footed steps are taken, with the athlete’s body weight frequently positioned closer to the front foot.
Fast, shuffling steps increase stability because they limit time spent on one foot. Having the line of the center of gravity closer to the front foot readies the rear leg for leg sweeps and other destabilizing actions used against the opponent.
Judoka begin their attacking and defensive maneuvers by grasping each other’s tunics on the collar at shoulder level with one hand and at the sleeve with the other. Grips are suddenly altered according to the throw being attempted.
Grips on the tunic are designed to facilitate pull-push and rotational movements. Any combination can be used. Applying force at the sleeve rotates the opponent around his long axis. Applying force at the collar and upper lapel produces forward and backward movement of rotation.
With grips on each other’s tunics, judoka circle each other, waiting for the opportunity to initiate the throw.
Preparation for a throw is a series of pull-push rotary actions in which the prime objective is to move the opponent’s center of gravity into a position of minimal stability.
In a hip throw, which incorporate the lifting action, the attacker grasp the rear part of the collar with the right hand. The left hand grips the opponent’s sleeve below the right arm. The attacker pulls the opponent forward with both hands.
Pulling the opponent’s body forward, the attacker lessens the opponent’s stability by moving the line of his center of gravity closer to or beyond the edge of his supporting base. A high grip on the rear collar maximizes the force arm from the collar to the axis of the attacker’s hips, over which the opponent will subsequently be rotated. The grip below the right arm will spin the opponent around his long axis.
The moment the opponent is successfully drawn forward and destabilized, the attacker quickly initiates a pivot on his left foot by stepping across with his right while flexing the legs.
By rotating his body to the left, the attacker prepares to use his hip as an axis of rotation over which the opponent will be pulled. Flexing his legs, the attacker not only increases his own stability but also prepares to totally destabilize the opponent by lifting him out of contact with the mat when he extends his legs.
The attacker’s lower back is pressed against the opponent’s thighs. The attacker’s upper back is pressed against the opponent’s abdomen. The opponent’s upper body is pulled downward over the attacker’s hip with both hands while the opponent’s feet are lifted off the mat when the attacker straightens his legs.
The attacker’s upper hip becomes an axis of rotation over which the opponent rotates. A force is applied by the attacker’s hands, which pull the opponent’s upper body downward. Another force is applied by the extension of the attacker’s legs, which drive the opponent’s lower body upward. The opponent spins around the axis of the
attacker’s hip.
The opponent’s lower body is forced upward, taking his feet out of contact with the mat. The opponent’s upper body is pulled downward. The opponent rolls over the attacker hip.
The attacker’s downward pull and leg extension eliminate the opponent’s contact with the mat. Frictional forces between the opponent and the mat no longer exist. The opponent now is defenseless and will be thrown onto his back.
A breakfall is performed by the opponent on contact with the mat.
Totally destabilized, the opponent prepares for the impact with the mat that will occur after the fall. The opponent correctly enlarges the time frame and area over which the impact is made with the mat.
Arresting Motion
Skill Highlights:
1. Catching, landing, slowing down and stopping are all forms of arresting motion. It involves the forces present in a collision when two or more objects come together. Athletes need to use correct technique when arresting motion, whether it’s their own body, an opponent or the motion of inanimate object such as baseball.
2. To safely arrest their own motion, athletes apply a stopping force to their bodies over as large as a distance and time frame as possible. In this way, the pressure applied at any one spot to the athlete’s body is reduced. Pulling the arm back when catching, flexing the legs and rolling when landing, and using padding and crash pads gradually dissipates the forces that occur during an impact. An athlete can then avoid an injury and maintain control and stability when the impact occurs.
Judo Breakfall
Technique Mechanics
Mastery of ukemi or the art of falling is necessary in judo, not only to facilitate movements that follow the fall but also to prevent the injury when the judoka is thrown.
Falls in judo occur from various heights (from as high as opponent’s shoulders). They also occur at various velocities. The opponent can add his own muscular force to that of gravity. The momentum generated during the fall equals the mass of the falling judoka multiplied by his

velocity.
When the judoka hits the mat, the athlete’s velocity is reduced to zero.
The judoka’s velocity (and momentum), which built up during the fall, is reduced to zero on contact to the mat. The force with which the judoka hits the mat is applied against the athlete’s body by the reaction of the earth.
Ukemi teaches the judoka to strike the mat simultaneously with the arms and legs as the trunk makes contact. In this way, the trunk is protected because it does not absorb the full force of the fall.
By striking the mat with thee arms and legs, the judoka uses the shoulders, thighs and lower legs as shock absorbers. By carrying out this action, the judoka extends the time frame during which force is applied against the earth, and in reaction from the earth against the athlete. An extended time frame over which force is applied causes more gradual change in the judoka’s momentum (and kinetic energy), and with this comes less chance of injury.
Judoka attempt to turn vertical movement in a fall into an oblique and subsequently horizontal movement by flexing and bending the body. They roll on the shoulders, back, and arms.
A situation where the judoka falls vertically onto the mat brings an athlete to a sudden stop. Considerable force is applied to the earth, and from the earth against the athlete, in a small time frame. Flexing the legs, squatting down, and rolling extend the time frame during which force is applied by the judoka against the mat and in reaction by the earth via mat to the judoka.
By rolling and contacting the mat with the extended arms and legs, the judoka enlarges the surface area of the body that contacts the mat.
Enlarging the contact area of the body as the judoka’s body contacts the mat decreases the pressure applied at any point on the athlete’s body. Enlarging the contact area and extending the time frame that force is applied to the earth (from earth to athlete) significantly reduce the possibility of injury as a result of being thrown.