bicycle safety lesson plans - colorado department of transportation
TRANSCRIPT

Colorado Department of Transportation
Bicycle Safety Lesson Plans:3rd through 6th grade

Photo credits:Sprinkle Consulting, Inc.Joshua Lawton/Consortium Productionshttp://www.worldchanging.com phott by Jay Willijaasper

Colorado Department of Transportation
1
Colorado Department of Transportation
1
Colorado Department of Transportation Safe Routes to SchoolBicycle Safety Lesson Plans
3rd through 6th GradeINTRODUCTIONAs recently as 1969 about half the school aged children in the United States walked or bicycled to school. Today fewer than 15% of school children walk or bike to school and as much as 20-30% of morning traffi c is generated by parents driving thier children to school. Children are less active today and the majority of children living within a 1/2 mile of schools are driven in private vehicles. Obesity rates are on the rise and the cost of obesity and other health related challenges have signiifi cant impacts on the rising cost of health care in the United States, not to mention the lifestyles of our children.1 In 2008, 50 percent of nonfatal bicycle injuries occured in children ages 5-20. That same year, children age 0 to age 20 made up 21 percent of bicycle fatalities and children under 15 accounted for 45 percent of bicycle injuries treated in emergency departments.2
In response to these challenges, in an effort to encourage healthy living and improve safety, the Colorado Department of Transportation has developed a bicycle safety curriculum in support of the Colorado Safe Routes to School program. Safe Routes to School initiatives have long been a focus of health and physical education in schools. These lesson plans, which help educators teach children about safe walking and bicycling, introduce a variety of skills that can help children stay safe while they walk or ride their bicycles and have been developed to improve the safety of students on their way to school and in their communities.
GOAL OF THE PROJECTThe primary goal of this project is to promote pedestrian and bicycle safety for elementary school children by teaching them skills that will help them safely cross the street.
HOW TO USE THESE LESSON PLANSThis curriculum is a combination of indoor and outdoor lessons that can be used together or separately, depending on time and space available. Each lesson builds on the concepts and skills of the previous one. The outdoor lessons are the practical application of the skills learned in the indoor lessons.
RELATIONSHIP TO COLORADO ACADEMIC STANDARDSThese lessons are age appropriate, and span third through eighth grade. The third grade lessons satisfy the following academic standard for the third grade level the Health and Physical Education content area:
2. Identify personal safety knowledge and skills to prevent, and treat unintentional injuryEvidence Outcomes: d. Demonstrate safe pedestrian and bicycle behaviors
1 What is Safe Routes to School: Background and Statistics; Safe Routes to School National Partnership 2 Promoting Bicycle Safety For Children: Strategies and Tools for Community Programs; Childrens Safety Network

Colorado Department of Transportation
2
Colorado Department of Transportation
2
The sixth grade lessons satisfy the following academic standard for the sixth grade level the Health and Physical Education content area:
2. Identify personal safety knowledge and skills to prevent, and treat unintentional injuryEvidence Outcomes: (6)a. Demonstrate the ability to identify and correct safety hazards at home, in school and in the community (6)b. Demonstrate ways to campaign to help to promote safety, and prevent unintentional injuries
The lessons satisy the third or sixth grade standards as described, however the lesson content may be appropriate to other age groups. Lessons may be adapted to satisfy other standards.
MATERIALS
Some of the lessons included in this section use the WALKSmart/BIKESmart DVD to introduce the concepts. This DVD is a compendium of pedestrian traffi c safety video clips. It is available by emailing [email protected] or by calling (541) 349-4845. Where the DVD is needed, it will be listed in the Materials section. Notes will also be included in each section about how to adapt the lesson if the video is not available. Worksheets and other supplementary materials will be included following each lesson.
ACKNOWLEDGEMENTSThere are a number of pedestrian and bicycle safety programs in use across the country. Research for this project included the review of a variety of these programs. The lessons included in this series are modelled after the Boudler Valley School District’s BLAST program and Florida’s Safe Routes to School Elementary Traffi c Safety Education Program. Additional program references include the following:
Safe Routes for Kids, the Bicycle Transportation AllianceWALKSMART/BIKESMART VERMONT!Iowa Kids on the MoveSafe Kids Worldwide
Thanks also to Jenna Berman of Bike Colorado and Landon Hilliard, Boulder Valley School District and numerous teachers and reviewers who graciously gave their time to this project.
FUNDED BYThis project was funded by the Colorado Department of Transportation and a Safe Routes to School Grant.

Colorado Department of Transportation
3
Colorado Department of Transportation
3
Lesson Title Page Indoor/Outdoor1 Bicycle Helmet Fitting 4 Indoor2 Basic Bike Fit 7 Indoor/Outdoor3 ABC Quick Check 9 Indoor/Outdoor4 Starting and Stopping 11 Outdoor5 Rules of the Road 16 Outdoor6 Hazards 18 Outdoor7 Riding skills - Scanning 19 Outdoor8 Riding skills - Rock dodge 21 Outdoor9 Riding with traffi c 22 Outdoor10 Navigating 25 Indoor11 Seeing, Being Seen 26 Indoor12 Dealing with Driveways 31 Outdoor13 Intersections 33 Outdoor14 Road Position - Turning and Signalling 35 Outdoor15 Bike Parking / Locking 37 Outdoor16 Riding on a Path 39 Indoor/Outdoor
LESSON LISTBICYCLE SAFETY
Colorado Department of Transportation
4
LESSON 1: BICYCLE HELMET FITTING
LESSON TIME: 30 minutes
(Lessons 1, 2, 3 may be taught in stations as instructor staffi ng allows)
MATERIALS:Activity 1: Helmets (one for each student and instructor if available)
Activity 2: Helmets (one for each student and instructor if available)
TAKE HOME: Helmet Fitting Guide
GRADES: 3rd, 4th 5th
OBJECTIVE: To help students understand the importance of wearing a bicycle helmet and how to properly fi t one.
BACKGROUND: Research shows that up to 90% of fatal bicycle crashes are the result of head trauma. A properly worn and certifi ed bicycle helmet cushions and protects the head from injurious impacts with hard surfaces such as asphalt and concrete. Scientists measure how hard something hits with “g-forces.” Things that hit hard have a high “g-force” and high potential for damage. Three hundred g’s is enough to cause permanent brain damage. Five hundred g’s can fracture the skull and cause death. The head of someone who falls from bicycle height to a concrete surface can receive a force of more than 1800 g’s. CPSC or SNELL approved helmets can reduce the 1800 g’s of bicycle falls to less than 200 g’s, which is not enough to fracture the skull or cause permanent brain damage. Many doctors agree if all bicyclists wore helmets, 75 percent or more of bicycle-related deaths would be eliminated.
KEY MESSAGES:• Wearing a properly fi tted bicycle helmet can dramatically reduce your risk of serious injury from a crash or fall.
• It is essential to wear your helmet EVERY time you ride your bike.
• Adjust your helmet so it fi ts correctly over the forehead, with chin strap buckled.
VOCABULARY: Brain injury, paralysis, motor skills, coordination, balance
SETUP:• Hand out helmets to each student. This lesson can also be done with a few helmets handed out to students working in groups.
General: Introduce lesson and importance. Ask your students the following questions:
What is the most important organ in your body?Answer: Your brain.
What are some things your brain controls?Answers: Higher functions like thinking memory and emotion but also basic physical functions like breathing, heartbeat, balance and sensation.
Colorado Department of Transportation
5
What happens if you hit your head during a bicycle crash?Answer: Your brain may be hurt.
Is your skull enough to protect your brainfrom the impacts that can occur in a bicycle crash?Answer: No
What is the purpose of a well-fi tting bicycle helmet?Answer: A bicycle helmet is specifi cally designed to protect your brain from impacts with a car, tree or pavement.
Why may a poorly adjusted helmet not protect your head as well?Answers: Because it might slip around your head, might leave some parts exposed, might fall off during a crash. ◦ A poorly adjusted helmet usually won’t protect the wearer as well as a well fi tted helmet.
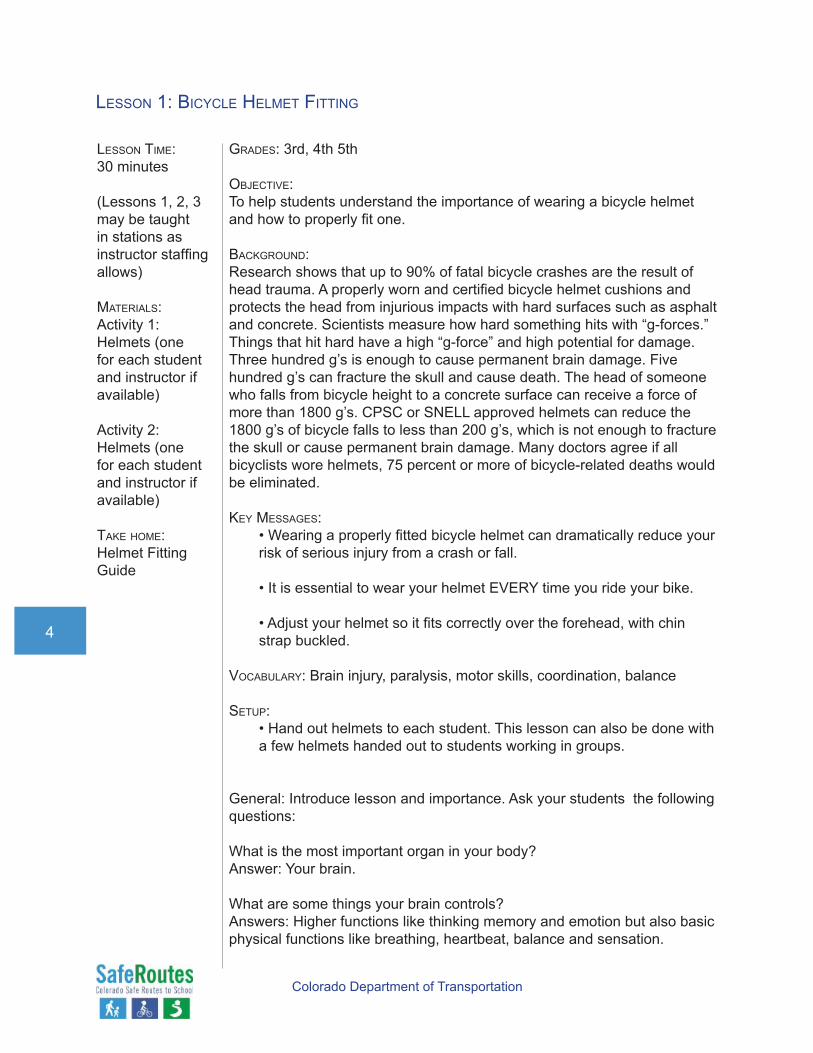
Demonstrate fi tting procedure on a student volunteer. - A helmet must be worn low over the forehead. - Helmet straps should not ride over the ears. - The chin strap should be tight enough so the helmet doesn’t wobble off, but loose enough for the wearer to open his mouth.
ACTIVITY 1: HELMET FITTING
1. Have students position helmet so it is level and covers the forehead.2. Tighten back of helmet (if there is an adjustment).3. Tighten chin strap and adjust side buckles.4. Have students pair off and check each other.5. Refer to the “Helmet Fit Guide” to ensure that ▪ The helmet sits low and level on the forehead- one or two fi nger- widths above your eyebrow. ▪ Helmet is level over the ears and straps make a V under each ear ▪ Chin strap is tightened until its snug, with no more than one or two fi ngers fi tting under the strap.
Review key messages.
LESSON 1: BICYCLE HELMET FITTING

Colorado Department of Transportation
6
LESSON 1: BICYCLE HELMET FITTING
ACTIVITY 2: TRIANGLE TAG (OPTIONAL)
Objective: Teach the children how a secure helmet should look and feel in motion. To ensure proper fi t, try moving the helmet from side to side and from front to back, after it has been fi tted. Triangle tag is a fun activity to check for loose fi tting helmets.
ACTIVITY:1. After all students have a properly fi t a helmet, divide them up into groups of four.
2. One person from each group is designated as the “tagger” and another person is designated as the person to be “tagged.”
3. The person to be “tagged” and the other two students hold hands and stand in a triangle formation.The person designated as the “tagger” stands outside of this group.
4. The group moves in a side-to-side movement as the “tagger” attempts to tag the student designated to be “tagged.”
5. The “tagger” cannot go under or over the group.
As the students move around, those helmets that are secure and those that are not will become evident.
LESSON TIME: 30 minutes
(Lessons 1, 2, 3 may be taught in stations as instructor staffi ng allows)
Activity 2: Helmets (one for each student and instructor if available)
TAKE HOME: Helmet fi tting guide

Step 4 Side Straps: Adjust the slider on both straps to form a “V” shape under, and slightly in front of, the ears. Lock the slider if possible.
Step 5 Chin Strap: Buckle your chin strap. Tighten the strap until it is snug, so that no more than one or two fingers fit under the strap.
Step 6 Final Fitting: A. Does your helmet fit right? Open your mouth wide…big yawn! The helmet should pull down on the head. If not, refer back to step 5 and tighten the chin strap.
B. Does your helmet rock back more than two fingers above the eyebrows? If so, unbuckle, shorten the front strap by moving the slider forward. Buckle, retighten the chin strap, and test again.
C. Does your helmet rock forward into your eyes? If so, unbuckle, tighten the back strap by moving the slider back toward the ear. Buckle, retighten the chin strap, and test again.
D. Roll the rubber band down to the buckle. All four straps must go through the rubber band and be close to the buckle to prevent the buckle from slipping.
Easy Steps to Properly Fit a Bicycle Helmet It’s not enough to simply buy a bicycle helmet – it should be properly fitted, adjusted, and worn each time you ride.
The Proper Helmet FitHelmets come in various sizes, just like hats. Size can vary between manufacturers. For the most comprehensive list of helmet sizes according to manufacturers, go to the Bicycle Helmet Safety Institute (BHSI) site: http://www.danscomp.com/products/charts/helmetchart.htm
To select and properly fit a bicycle helmet, follow the helmet fitting instructions in this flyer.It may take some time to ensure a proper fit. It is easier if you have someone help you adjust the straps.
Step 1 Size: Measure your head for approximate size. Try the helmet on to ensure it fits snuggly. While it is sitting flat on top of your head, make sure the helmet doesn’t rock side to side. Sizing pads come with new helmets; use the pads to securely fit to your head. Mix or match the sizing pads for the greatest comfort. In your child’s helmet, remove the padding when your child’s head grows. If the helmet has a universal fit ring instead of sizing pads, adjust the ring size to fit the head.
Step 2 Position: The helmet should sit level on your head and low on your forehead—one or two finger-widths above your eyebrow.
Step 3 Buckles: Center the left buckle under the chin. On most helmets, the straps can be pulled from the back of the helmet to lengthen or shorten the chin straps. This task is easier if you take the helmet off to make these adjustments.
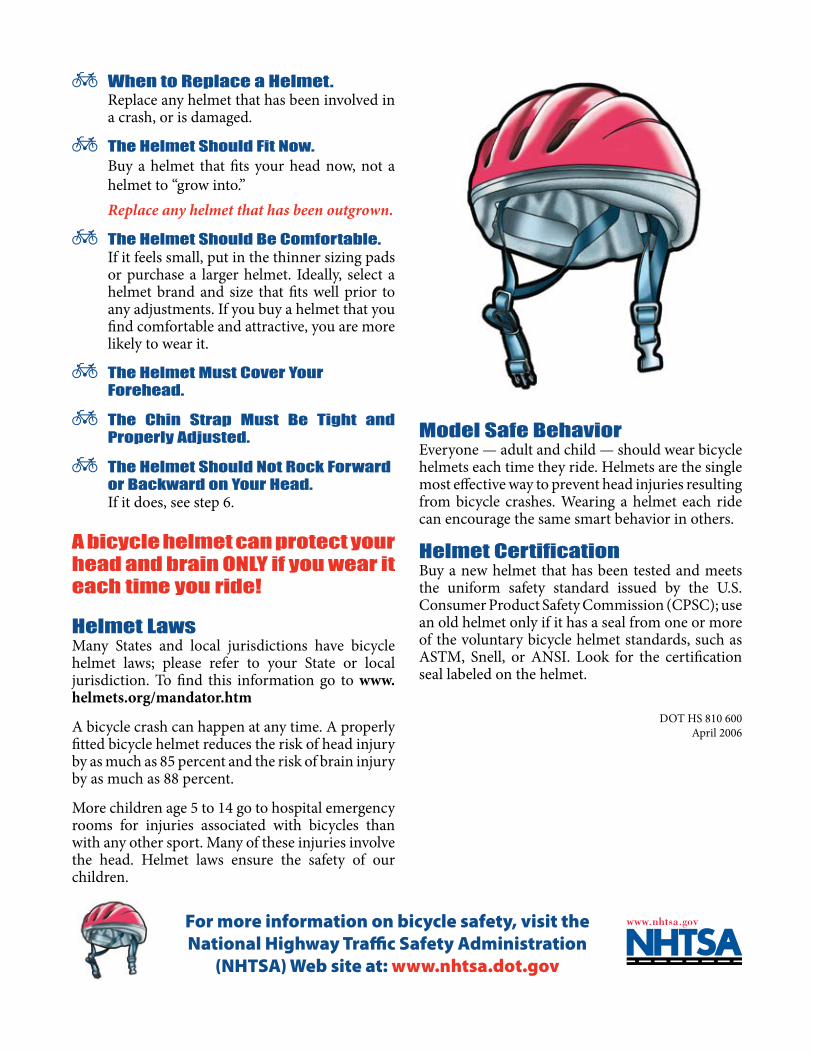
Model Safe BehaviorEveryone — adult and child — should wear bicycle helmets each time they ride. Helmets are the single most effective way to prevent head injuries resulting from bicycle crashes. Wearing a helmet each ride can encourage the same smart behavior in others.
Helmet CertificationBuy a new helmet that has been tested and meets the uniform safety standard issued by the U.S. Consumer Product Safety Commission (CPSC); use an old helmet only if it has a seal from one or more of the voluntary bicycle helmet standards, such as ASTM, Snell, or ANSI. Look for the certification seal labeled on the helmet.
DOT HS 810 600April 2006
^ When to Replace a Helmet. Replace any helmet that has been involved in
a crash, or is damaged.
^ The Helmet Should Fit Now. Buy a helmet that fits your head now, not a
helmet to “grow into.” Replace any helmet that has been outgrown.
^ The Helmet Should Be Comfortable. If it feels small, put in the thinner sizing pads
or purchase a larger helmet. Ideally, select a helmet brand and size that fits well prior to any adjustments. If you buy a helmet that you find comfortable and attractive, you are more likely to wear it.
^ The Helmet Must Cover Your Forehead.
^ The Chin Strap Must Be Tight and Properly Adjusted.
^ The Helmet Should Not Rock Forward or Backward on Your Head. If it does, see step 6.
A bicycle helmet can protect your head and brain ONLY if you wear it each time you ride!
Helmet LawsMany States and local jurisdictions have bicycle helmet laws; please refer to your State or local jurisdiction. To find this information go to www.helmets.org/mandator.htm
A bicycle crash can happen at any time. A properly fitted bicycle helmet reduces the risk of head injury by as much as 85 percent and the risk of brain injury by as much as 88 percent.
More children age 5 to 14 go to hospital emergency rooms for injuries associated with bicycles than with any other sport. Many of these injuries involve the head. Helmet laws ensure the safety of our children.
For more information on bicycle safety, visit the National Highway Traffic Safety Administration
(NHTSA) Web site at: www.nhtsa.dot.gov

PASO 4 – Ajustar las correas lateralesAjusta la corredera en ambas correas laterales para formar una “V” (debajo y enfrente de cada oreja). De ser posible fija la corredera para que no se corra fuera de posición.
PASO 5- Ajustar la correa de la barbillaAbrocha la correa de la barbilla. Ajusta la correa hasta que el casco te quede debidamente ajustado, de modo que no puedas colocar más de uno o dos dedos entre la correa y tu barbilla.
PASO 6- Ajuste finalA. ¿Te queda bien tu casco? Abre tu boca lo máximo que puedas… ¡Da un gran bostezo! Deberás sentir cómo el casco presiona sobre tu cabeza. Si no es así, regresa al Paso 5 y ajusta más la correa de la barbilla.
B. ¿Puedes mover tu casco hacia atrás a más de dos dedos sobre tus cejas? De ser así, desabróchatelo, y acorta la correa frontal deslizando la corredera hacia adelante. Abróchatelo, ajusta la correa de la barbilla, y pruébatelo de nuevo.
C. ¿Puedes mover tu casco hacia adelante de manera que cubra tus ojos? De ser así, desabróchatelo, ajusta la correa de atrás deslizando la corredera hacia atrás en dirección a tu oreja. Abróchatelo, y ajusta la correa de la barbilla, y vuelve a probártelo.
D. Desliza el anillo elástico hacia el broche. Las cuatro correas deben pasar a través del anillo elástico para evitar que éste se corra.
Consejos y pasos para el uso debido del casco para montar bicicletaPara montar bicicleta de forma segura, no basta tener un casco. Es muy importante:
^ Usar el casco del tamaño adecuado
^ Que el casco te quede debidamente ajustado
^ Que cuando montes en bicicleta, siempre uses el casco
PASO 1-Tamaño adecuadoLos cascos vienen en varios tamaños que varían según el fabricante. Mide la circunferencia de tu cabeza para obtener una talla aproximada. Pruébate el casco para asegurarte que te queda debidamente ajustado (o sea, que el casco no se deslice de lado a lado).
Los nuevos cascos traen unas almohadillas adicionales para ajustar la talla del casco. Combina las almohadillas para lograr que te quede cómodo, pero ajustado como es debido.
Si has crecido, saca las almohadillas. Si el casco cuenta con un anillo de ajuste tipo universal en vez de almohadillas, ajusta el anillo para que te quede cómodo, pero debidamente ajustado.
*Para una lista de tamaños según el fabricante, visita: Bicycle Helmet Safety Institute (BHSI por sus siglas en inglés). http://www.danscomp.com/products/charts/helmetchart.htm
PASO 2- Posición correctaEl casco debe de ir nivelado sobre tu cabeza y debe cubrir parte de tu frente. Para probar si tienes el casco puesto correctamente, coloca uno o dos dedos sobre tus cejas. Para quedar debidamente protegido, el casco debe tocar tus dedos.
PASO 3- Ajustar la hebilla debajo de la barbilla Centraliza la hebilla izquierda del broche para que quede debajo de tu barbilla. Puedes ajustar las correas desde la parte de atrás del casco para que la correa de la barbilla sea más larga o corta. Es más fácil ajustar las correas si no tienes puesto el casco.

Importancia de usar cascos:
1. Reduce el riesgo de lesiones Los choques en bicicleta pueden ocurrir en cualquier
momento. Comparado con otros deportes, más niños entre las edades de 5 y 14 años llegan al hospital debido a lesiones por choques en bicicleta. Un casco de bicicleta debidamente ajustado protege contra el riesgo de lesiones en la cabeza hasta en un 85 por ciento, y de lesiones en el cerebro hasta en un 88 por ciento.
2. Hay leyes que requieren el uso de cascos
Las leyes que requieren el uso de cascos de bicicletas son para proteger a todos, pero en especial a los niños. Por favor consulta las leyes de tu estado o jurisdicción local. Para más información visita: www.helmets.org/mandator.htm
3. Es un buen ejemplo de precaución Todos, tanto adultos como niños, deben utilizar
cascos cada vez que monten una bicicleta pues es la única manera efectiva de prevenir las lesiones en la cabeza o el cerebro por choques en bicicleta. Al usar tu casco siempre que montes bicicleta motivas a otros a tomar precauciones para protegerse.
Recuerda que:
^Debes usar un casco certificado Compra un casco que cumpla con las normas de seguridad de la Comisión de Seguridad de Productos para el Consumidor en los EE.UU. (U.S. Consumer Product Safety Commission o CPSC, por sus siglas en inglés); Usa un casco usado sólo si tiene un sello que certifique que cumple con las normas de seguridad de cualquiera de estas organizaciones: ASTM, Snell o ANSI. Busca el sello de certificación en la etiqueta del casco.
^Debes cambiar de casco Cambiar de casco es necesario si fue usado durante un
choque, si está dañado o maltratado, o si has crecido y ya te queda pequeño.
^El casco debe ser del tamaño adecuado
Compra un casco para el tamaño actual de tu cabeza, y no uno que te quede grande para que te quede bien “cuando crezcas”.
^El casco debe quedarte cómodo pero ajustado
Si te aprieta demasiado, usa almohadillas más delgadas o compra un casco más grande. Es mejor elegir un modelo y tamaño que te quede bien, y te guste, pues es más probable que lo uses siempre.
^El casco debe cubrir casi toda tu frente.
Si caben más de dos dedos entre tus cejas y el casco, regresa al paso 2.
^La correa de la barbilla debe quedarte ceñida.
Si se te queda holgada, regresa al paso 5
^El casco no debe deslizarse hacia delante o hacia atrás.
Si se te desliza, regresa al paso 6.
^¡ Un casco puede proteger tu cabeza y tu cerebro sólo si lo usas SIEMPRE que montes bicicleta!
AlmohadillasCorreas lateralesCorrederas
AnilloelasticoCorrea de la barbilla Hebilla
Para obtener más información sobre manejar una bicicleta de forma segura, visite el sitio Web de la Administración Nacional de Seguridad del Tráfico
en las Carreteras (NHTSA por sus siglas en inglés)
www.nhtsa.dot.gov
DOT HS 810 600 Agosto 2006

Colorado Department of Transportation
7
LESSON 2: BASIC BIKE FIT
LESSON TIME:15-30 minutes(depending on how the lesson is run)
MATERIALS: 1) Bicycle (one for each student and instructor), wrenches or if this a demonstration to a group, 1 bicycle for the instructor
2) 1 Allen Y-wrench, 12,13, 14 & 15 mm box wrenches)
TAKE HOME: None
GRADES: 3rd, 4th 5th
OBJECTIVE: To help the students understand the importance of bicycle fi t and how to properly fi t a bicycle.
BACKGROUND: The fi rst step to having a safe bike is to have one that fi ts. A bike that fi ts properly helps bicylists stop better, balance better, and conserve energy. After fi nding one that fi ts, it’s just as important to know that all of the parts work. It is very important to do a bicycle safety inspection every time you ride your bicycle. This lesson works best if there are bicycles for each student. Fitting can be demostrated on a student volunteer of there are limited bicycles available.
NOTE: There may be liability issues with this lesson. Check with supervisor prior to teaching.
KEY MESSAGE: The seat should be at the proper height for safe riding.
SETUP: • Have bikes out and organized by size. • Teach with ABC Quick Check.
GENERAL: Introduce lesson and importance.- Bikes are like shoes and need to fi t to be comfortable.- Small adjustments to a bicycle can dramatically alter riding comfort.
Ask the students: Why should your bicycle be properly fi tted to you?Answer: To ensure maximum enjoyment and avoid long-term injury and discomfort.
How does seat height affect your riding?Answer: Appropriate seat height maximizes comfort, power and speed.
What are 2 important aspects to fi tting your bicycle? Answer: (There are many subtleties to bike fi t) but The most important things are a frame you can stand over and seat height that allows almost full extension of the leg while pedaling.

Colorado Department of Transportation
8
LESSON 2: BASIC BIKE FIT
INTRODUCTION:Goal is to fi nd a bike that will fi t you. If the class is meeting multiple times, let students know they should continue to use the same one that has been adjusted to thier size during the class.
ACTIVITY:1. Get each student a bike they can stand over with 1" - 2" of clearance over the top tube.
2. Have students work in groups of 2 or 3.
3. Demonstrate how to use quick release seat binders.
4. Have students mount bike with one hand on a wall or table for stability.
5. Put ball of the foot squarely on pedal.
6. Pedal backwards until one foot is in lowest position, pedal down.
7. Have partners check to see if there is a slight bend in knee.
8. Make adjustments and check again.
9. Repeat for each student.
10. Briefl y discuss gears and demonstrate how to shift. The proper gear combination is important for effi cient pedaling:
▪ Chain is farther away from the bike the harder the gear (downhill). ▪ The closer the chain is to the bike the easier the gear (uphill). ▪ Flat riding is in the middle. ▪ Right hand controls the back gears.
Review key messages.

Colorado Department of Transportation
9
LESSON 3: ABC QUICK CHECK
LESSON TIME: 10 Minutes
MATERIALS: 1. Bicycles (one for each student and instructor); ABC Quickcheck worksheet
TAKE HOME: ABC Quickcheck worksheet
GRADES: 3rd, 4th 5th, 6th (age appropriate)
OBJECTIVE: To help students understand the steps to do a safety check on their bicycle each time they ride.
BACKGROUND: It’s very important to do a safety check each time you ride your bike so you don’t get stranded or injured while out riding. Any part that is broken may compromise your safety.
KEY MESSAGES:• A properly functioning bike is safer and more fun to ride.• Perform the ABC Quick Check before every ride.• Knowing how some of the essential bike parts work will make diagnosing problems easier.
VOCABULARY: chain, cranks, cassette
SETUP: • Make sure each student has a bike or work in pairs. • This lesson can be taught with Lesson 2: Bike Fit.
INTRODUCE LESSON AND IMPORTANCE:◦ Before you get on your bike to ride you should perform this quick check.
◦ You don't need to do exhaustive maintenance, but a 30-second check of a few essentials could save you from a serious crash or from having your bike break down at an inconvenient time or place.
◦ Explain each part of the ABC Quick Check and what each bike part does. ▪ A - Air ▪ B - Brakes ▪ C - Chain, Cranks, Cassette ▪ Quick - Quick Release ▪ Check - Check over whole bike
ACTIVITY: Using the ABC Quick check guide have students check the following:
1. Air ▪ Have students squeeze tires to make sure they are fi rm. ▪ Pump up tires if air pressure is low.
2. Brakes ▪ (if handbrake) Squeeze the brakes and make sure that the bike

Colorado Department of Transportation
10
won't roll and that the lever doesn't come all the way back to the bars.(if coaster brake) Push backwards on the pedal and make sure the bike won’t roll.
4. Chain ▪ Lift the back end of the bike and pedal forwards for a few pedal strokes. ▪ Check that the chain runs smoothly through both derailleurs. ▪ If chain is rusty, dry or off the chainrings, lube or re-position it.
5. Quick ▪ Manually inspect quick release levers to be sure that they are tight. ▪ Also make sure that the wheels are straight in the frame.
6. Check ▪ Give the whole bike a look over to check for anything that is falling off, rubbing or not where you think it should be. ▪ Once riding, make sure nothing is noisy or loose.
Review key messages.
LESSON 3: ABC QUICK CHECK

Developed by the Florida Traffic and Bicycle Safety Education Program
The ABC Quick Check A is for Air B is for Brakes C is for Cranks, Chain and Cassette Quick Check is for Quick Release Direction: Carefully observe each checkpoint of your bicycle for safety. Please check the items that pass your safety inspection. If a chekcpoint does not pass, describe the problems that could make the bicycle unsafe to ride.
A is for Air Air is leaving your tires all the time! So pinch the tires to make sure they have plenty of air. If they appear low, pump them up to the recommended pressure on the side of the tire (or until they are firm.) _______________________________________________________________
B is for Brakes You may be able to ride but can you stop? Push your bike to test your brakes. Does it stop quickly? (Your brakes may be foot brakes or handbrakes.) Remember when braking with handbrakes, to squeeze both equally and never only the front brakes (which can cause you to go over the handlebars). _______________________________________________________________
C is for Cranks, Chain and Cassettes They’re what make your wheels turn when your pedal. Lift the back of your bike and turn your pedals forward. The wheels should turn smoothly and there shouldn’t be any odd noises. The chain should not be loose or rusty. Get chain lube from a store if needed.* _______________________________________________________________
Quick Check Check the quick releases on the seat post and wheels to make sure they’re secure. Then do an overall “quick check” to make sure the bike is ready to ride. Once you’re done with the ABC’s look over the rest of your bike and make sure everything looks secure and tight. _______________________________________________________________
81

Colorado Department of Transportation
11
LESSON 4: STARTING AND STOPPING (OUTDOOR)
LESSON TIME: 1 class period
ACTIVITIES: 1. Stopping15 minutes
2. Traffi c Mix 30 minutes
MATERIALS: 1. Bicycles (one for each student)
2. Cones (5)
3.Whistle (1)
4.Chalk or rope
5.Mock cars (or posters of cars)
TAKE HOME: None
GRADES: 3rd, 4th 5th
OBJECTIVE: The intent of this lesson to teach children the skills of stopping by identifying stop signs and stop bars; to look left, right, left and proceed only when it is safe to do so. There are three activities in this lesson.
BACKGROUND INFORMATION:Stopping at the edge of a driveway, at stop signs, and intersections with traffi c signs are the fi rst skills of learning to be safe in traffi c. Therefore, they are extremely important. The single most frequent cause of injury to young bicyclists (and pedestrians) is failure to stop, “driveway ride out.” This skill of stopping with control of the bike and looking for “edges,” where it is important to stop, begins with the pedestrian skills but continues into the bicycle unit.
KEY MESSAGES: • Always start in Power Pedal Position. • Always use proper braking technique. • Always step down from the saddle at a stop.
VOCABULARY: pedal, edge, braking
ACTIVITY 1: Stopping• Introduce lesson and importance ◦ Proper starting/stopping technique can save your life. ◦ A rider must master starting/stopping before starting to ride on the road..Give instructions for lesson ◦ Explain Starting Technique (Power Pedal Position)
1. Make sure each rider is off of the seat and straddling the top tube.2. Have students fi gure out which foot they want to start on (one foot is on the ground and the other will begin on a pedal).3. Have students raise the pedal on the side of their starting foot up to the two o’clock position.4. Start by simultaneously stepping off the grounded foot and stepping your weight onto the starting foot while lifting up to sit onto the saddle.
◦ Explain Stopping Technique1. Stop by having pedals at 12 and 6 o’clock (pedals seen as hands on a clock).2. Remove foot that is on the 12 o’clock position while slowing to a stop.3. Step onto ground and straddle the top tube.4. Repeat.
Colorado Department of Transportation
12
LESSON 4: STARTING AND STOPPING (OUTDOOR)
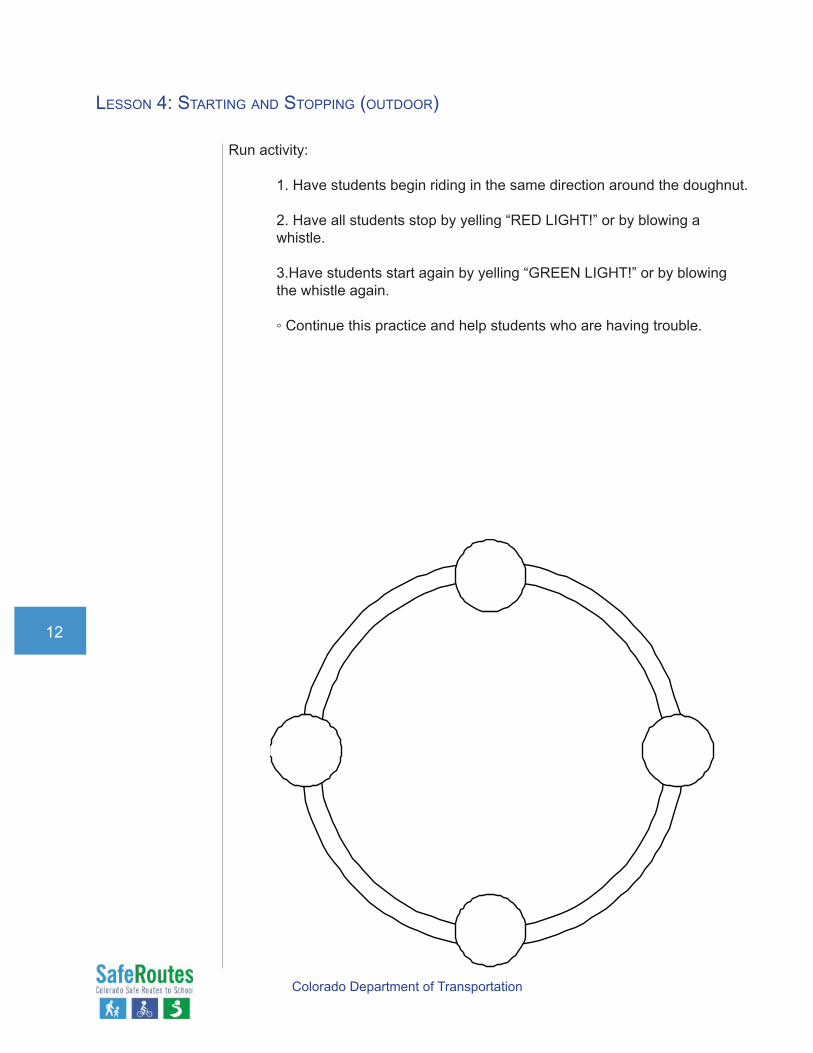
Run activity:
1. Have students begin riding in the same direction around the doughnut.
2. Have all students stop by yelling “RED LIGHT!” or by blowing a whistle.
3.Have students start again by yelling “GREEN LIGHT!” or by blowing the whistle again.
◦ Continue this practice and help students who are having trouble.

Colorado Department of Transportation
13
LESSON 4: STARTING AND STOPPING (OUTDOOR)
ACTIVITY 2: Traffi c Mix1. Use illustration provided to help with this activity’s set up.
2. The skills for this activity include: stopping at a stop sign or stop bar, look-ing left, right, left for traffi c, and practicing the “power pedal” position (which is a down stroke of the pedal for a quick start).
3. Divide the children into groups, and line them up single fi le behind fi ve or six cones that face along lanes that are marked off with cones, ropes or chalk. Call the fi rst children in each line and have them ride down their lane looking for the stop signs and stop bars (these could be marked with tape or chalk across the lane).
4. They should say aloud “stopping” and give a hand signal (if they are able), stop and straddle their bike, and look left, right, left for traffi c.
5. When clear, they may proceed to the next stop sign and repeat.
6. Have the next group of children begin as the fi rst group is approaching the 2nd stop sign.
7. They should circle around the outside of their lane, to the end of the line.
8. Repeat until skills are mastered or time runs out.
LESSON TIME: 30 min
MATERIALS: 1. Bicycles (one for each student)
2. Cones (5)
3. Whistle (1)
4. Chalk or rope
5. Mock cars (or posters of cars)
TAKE HOME: None

Colorado Department of Transportation
14
LESSON 4: STARTING AND STOPPING (OUTDOOR)
ACTIVITY 3: Traffi c Mix
OBJECTIVE:Children practice controlling their bicycle, stopping on command and discovering the need for traffi c rules.
BACKGROUND:This activity allows the instructor to quickly assess the skills of all the students in a controlled environment. It places the children in situations that allow for their discovery of why traffi c rules and laws are important. The activity is conducted in an open space defi ned by traffi c cones or pavement markings, measuring twenty-fi ve by twenty-fi ve feet or a forty foot diameter circle. The intent of this activity is that children move freely about without touching each other or leaving the established boundaries.
ACTIVITY:
1. Set up a 25ft x 25ft area or a 40ft diameter circle using cones or chalk to establish the boundaries. (The marked area can be larger depending on the number of children.)
2. Have the children go through the ABC Quick Check taught in Lesson 3.
LESSON TIME:30 min
MATERIALS: 1. Bicycles (one for each student)
2. Cones (5)
3. Whistle (1)
4. Chalk or rope
5. Mock cars (or posters of cars)
TAKE HOME: None

Colorado Department of Transportation
15
3. Call all the children to the center of the defi ned area, identify the boundaries, introduce your stop signal, (whistle, voice, megaphone) and tell the children that in a minute they will begin moving slowly in any direction within the boundaries, being careful NOT to touch or run into anyone or their bicycles. When conducting this activity for the fi rst time with 3rd graders, have them walk their bicycles fi rst.
4. Have children line up on the outside corners or edges of the boundaries and allow them to enter the area 2 to 4 at a time, moving in any direction, and gradually building up the “traffi c mix.” Remind them to be cautious and not touch each other. (Remove children that appear to demonstrate inability to follow your instructions and have them wait outside the boundaries and have them be traffi c cops. Not only is it a great management tool but it will also help them recognize why certain actions are hazardous to self and others.)
5. When the “traffi c” is getting diffi cult to fl ow, stop the class and ask them why. What would make it easier to keep moving? Should there be rules fortraffi c? What should the rules be?Now proceed to have children move within the boundaries, following “the rules” of traffi c by circulating in a counter clockwise pattern (staying on the right) and stopping on command.
Review key messages.
LESSON 4: STARTING AND STOPPING (OUTDOOR)

Colorado Department of Transportation
16
LESSON 5: RULES OF THE ROAD
GRADES: 3rd, 4th 5th, 6th
OBJECTIVE: To explain the laws that pertain to the safe operation of a bicycle in any context.
BACKGROUND: Many cyclists, pedestrians, and motorists are not aware of pedestrian and bicyclist traffi c laws. They do not know regulations concerning right-of-ways, correct roadway positions, turn signals or lighting requirements. Reviewing the laws teaches students how to act in traffi c and helps them anticipate the actions of pedestrians, cyclists and motorists.
By Colorado state law, a cyclist has a right to use the roadway but also has the responsibility to follow all the traffi c laws. Riding against traffi c is the most common cause of bike/car crashes for all cyclists. Traffi c laws keep everyone safer - without them roads would be completely chaoticHand signals are essential to inform other road users of your intentions so they can predict your actions.
KEY MESSAGES: • Cyclists fare best when they act and are treated as drivers of vehicles. • A bicycle is a vehicle just like a car • Always follow the basic rules no matter where you are riding
PROCEDURE
• Review the rules for safe bicycle riding. The rules for riding no matter where you are:
1. RIDE IN THE SAME DIRECTION AS TRAFFIC (BIKE RIGHT - “GO WITH THE FLOW”)
Ride on the right, in the same direction as the traffi c next to you. Riding with the fl ow of traffi c makes you more visible. Riding on the left, against traffi c, is illegal and dangerous. Motorists and other road users are not looking for bicyclists on the wrong side of the road. Riding the wrong way increases the chance of a head-on collision with vehicles moving with the normal traffi c fl ow. § 42.4.1412 (5)
2. OBEY ALL TRAFFIC SIGNS
Know and obey all traffi c laws. Give motorists a reason to respect bicyclists! It is illegal and dangerous to ride through stop signs, red lights, impede traffi c, ride several abreast, or ride the wrong way down a street. These illegal actions reinforce the myth that bicycle drivers are irresponsible and do not belong on the road. By driving your bicycle in a safe manner (watching out for yourself as well as others) you make it easier for motorists
LESSON TIME: 45 minutes
MATERIALS: Colorado bike laws pamphlet
TAKE HOME: None

Colorado Department of Transportation
17
to treat you as an equal on the road and be polite to you or the next bicyclist they see. § 42.4.1412 (1)Show them the stop sign and make sure they all know what it means
3. SIGNAL YOUR TURNSUse the proper hand signals for left or right turns and for slowing or stopping. § 42.4.609 (5)
▪ Left turn is just stick your left hand out▪ Right turn is signaled by left arm extended out with elbow bent so the hand is pointed up.
4. RIDE ON THE RIGHT § 42.4.1412 (5)-Ride in the right lane with the fl ow of traffi c. -Ride as close to the right side of the right lane as safe and practical when being overtaken by another vehicle. -Ride on the paved shoulder whenever a paved shoulder suitable for bicycle riding is present. -Ride in the right lane except when:
• Overtaking another bicycle or vehicle proceeding in the same direction • Preparing for a left turn • Avoiding hazardous conditions
5. RIDE IN A STRAIGHT LINERiding predictably will make you more visible to motorists. It’s easier for a motor vehicle driver to pass when you’re riding in a straight line. Don’t weave in and out of parked cars - you may disappear from motorists’ sight and get squeezed out or clipped when you need to merge back into traffi c. At intersections, stay on the road. Don’t ride in the crosswalk and suddenly reappear on the road again. A driver may not see you and turn the corner and hit you.
6. RIDING ON SIDEWALKS & IN CROSSWALKSYou are allowed to ride your bicycle on a sidewalk or in a crosswalk unless it is prohibited by offi cial traffi c control devices or local ordinances. When riding on a sidewalk or in a crosswalk, you must observe all the rules and regulations applicable to pedestrians, yield the right-of-way to pedestrians, and give an audible signal before passing them. An audible signal can be a bell, horn or your voice saying, “Hello, passing on your left.” Riding on sidewalks, however, is not recommended. Many crashes between bikes and cars occur on sidewalks at driveways and street crossings, especially when bicyclists ride against the fl ow of traffi c. You should always walk your bicycle in busy shopping areas or on downtown sidewalks. Sidewalks are for pedestrians, not bicyclists, and you should be courteous and ride slowly and cautiously. § 42.4.1412 (10)
LESSON 5: RULES OF THE ROAD

Colorado Department of Transportation
18
LESSON 6: HAZARDS
LESSON TIME: 35 minutes
MATERIALS:1. LAB video (optional)
2. Screen, projector or TV
3. DVD player
4. Photographs of hazards, (if available)
5.Find the Hazards Worksheet and answer key
TAKE HOME: Find the Hazards Worksheet and answer key
GRADES: 3rd, 4th 5th
OBJECTIVE: To help students recognize hazards in the roadway.
BACKGROUND: This lesson will encourage children to think about different hazards and why hazard avoidance is important. Children should also become familiar with the different types of hazards: surface, moving and stationary. This is a good opportunity to discuss how these types of hazards are different, yet equally dangerous.
KEY MESSAGES
• Always be looking out for the common hazards of the road • Danger can come from unpredictable road conditions
SETUP: Get LAB video cued up and TV/projector set up if showing video clip or use visual aids (photographs).
PROCEDURE
• Introduce lesson and importance◦ There are a few common hazards of the road that a cyclist can usually avoid by watching out for them and riding defensively.
◦ By identifying these hazards and where they usually occur, a cyclist can predict the unpredictable and stay safe.
ACTIVITY
Show optional video clip and pause for brief discussion of each hazard illustrated and/or ask students the following:
What are some hazards that you might encounter as a bicyclist?Answers: Sand, rocks, slippery and wet metal and painted surfaces, railroad tracks, uneven pavement
Ask students what should be done if they encounter the following:Railroad tracks ▪ Approach railroad tracks as close to 90 degrees as possible
Cracks in the pavement that parallel the direction of travel
• Longitudinal cracks in pavement parallel to direction of ravel are one of the most dangerous passive hazards to cyclists.
Have students fi nd the hazards on the worksheet, review with the class.
Review key messages

Colorado Department of Transportation
19
LESSON 7: RIDING SKILLS - SCANNING
GRADES: 3rd, 4th 5th
OBJECTIVE: To teach children control of their bicycle while riding in a straight line and looking back over their shoulder to identify over taking traffi c. There are two activities in this lesson.
BACKGROUND INFORMATION:The second most prevalent cause of fatalities among adolescent cyclists is making left turns or swerving into traffi c without looking back (failing to yield right of way). Many cyclists have a problem with looking back (scanning) rid-ing in a straight line. This skill will help cyclists become more confi dent and safer. Practice looking over your left shoulder fi rst. This is the primary side for traffi c identifi cation, since you ride on the right side of the road.
ACTIVITY 1: Stationary Scanning and Active Scanning
Stationary Scan1. Students are grouped with partners.
2. One partner holds the bicycle stationary in front while their partner sits on the bicycle as if they were riding.
3. The partner holding the bicycle tells the rider to scan.
4. The cyclist looks over their left shoulder and verbally identifi es an object behind them.
5. The objective for the cyclist is to keep their balance and bicycle straight.
6. The students repeat the exercise after switching partners.
7. Once the students are confi dent with the stationary scanning, they can try the active scanning.
Active Scan8. The cyclist rides his or her bicycle in a straight line while a partner fol-lows with a card. The partner calls “scan” while holding a card, a mock car poster, either facing the cyclist or with back side to the cyclist for the cyclist to identify by looking over his or her left shoulder.
9. The cyclist needs to verbally identify the card by saying “car” or “no car”, while keeping control of his or her bicycle.
10. A second variation (see illustration) of this is to have the teacher or volunteer in a stationary location holding a mock car sign. As the cyclists pass, the person holding the sign calls out “SCAN” and puts the mock car
LESSON TIME: 30 minutes
MATERIALS:ACTIVITY 11. Cones
2. Poly spots
3. Mock car boards

Colorado Department of Transportation
20
LESSON 7: RIDING SKILLS - SCANNING
sign either face up (for which the cyclists verbally call out “CAR” or “NOT SAFE”) or face down (the cyclists identify this by calling out “NO CAR” or “SAFE”). The correct verbal answer is given while keeping the bicycle going in a straight line.
Much practice is needed on this technique so it is recommended that several tries be given to the student.

Colorado Department of Transportation
21
LESSON 8: RIDING SKILLS - ROCK DODGE
OBJECTIVES:The main objective of this activity is quick hazard avoidance. Children learn to identify a hazard in the roadway and dodge it without weaving into traffi c and/or falling. If their front tire avoids the hazard, they will not lose control, even if the rear tire hits it.
BACKGROUND INFORMATION:This is an advanced skill taught as an emergency maneuver to avoid road debris when there is not time to scan behind and pull around. Students will be afraid at fi rst to quickly turn their handlebars, but gradually, and with practice, they can learn the technique “snap” (left) “snap” (right).
ACTIVITY:1. Students ride down the middle of the row. When they come to a hazard, they give a quick turn (snap, snap) of the handlebars to get around the ob-ject. This not a fi gure-eight maneuver.
2. This is an object or road hazard that they see at the last second, not something they have time avoid by scanning. If they hit it with their front tire, it can cause them to fall.
3. They must keep the bicycle going in a straight line. It is acceptable if the back bicycle tire runs over the object.
LESSON TIME:30 minutes
MATERIALS:1. Bean bags
2. Sponges, tennis can lids, or tennis balls cut in half
3. Cones
TAKE HOME:None

Colorado Department of Transportation
22
LESSON 9: RIDING WITH TRAFFIC (ON BIKE SKILLS)
LESSON TIME:35 minutes
MATERIALS: 1. Chalk board or laminated intersection poster
2. Dry erase markers
3.Stop signs (2)
TAKE HOME: None
GRADES: 4th, 5th, 6th
OBJECTIVE: Provide basics of traffi c laws and how to turn at a simple intersection.
KEY MESSAGES
• Cyclists fare best when they act and are treated as drivers of vehicles
• Behaving predictably and confi dently is necessary while riding on streets (signaling)
• Cyclists must follow the rules of the road (lesson 5)
• Riders must be aware of other traffi c at all times (scanning and looking right-left-right)
• Cyclists must ride to the right but not too close to the curb
SET UP
• See diagram below.
Note about set up: The practice course for this module takes a lot of time and space to build. Please allow enough time to scout out and build the course prior to class.
PROCEDURE
• Introduce lesson and importance.◦ Cyclists fare best when they act and are treated as drivers of vehicles.◦ Bikes must generally follow the same rules of the road as automobile drivers.◦ A bicycle is a vehicle; just slower and smaller than a car.◦ Intersections are where two roads meet; some have stop signs others do not.
◦ Remember and apply these rules: ▪ Ride to the right. ▪ Follow all traffi c laws. ▪ Use hand signals to show stops and turns.
◦ Apply all of the bike skills learned: ▪ Power Pedal Position. ▪ Ride in a straight line-no swerving. ▪ Stop properly.
◦ Scanning for traffi c before turning lets you identify potential confl icts.

Colorado Department of Transportation
23
LESSON 9: RIDING WITH TRAFFIC (ON BIKE SKILLS)
◦ Looking right-left-right for cars before entering intersections lets you identify potential confl icts.
◦ Ride on the right side of the road.
◦ Ride in a straight line about three feet from the side of the road or the curb.
GIVE INSTRUCTIONS FOR LESSON
◦ Class will follow the leader until the whistle is blown
◦ After the whistle is blown everyone can choose which way to go.
◦ Everyone must follow all rules.
◦ Everyone must use hand signals.
◦ Everyone must scan for traffi c.
◦ Explain right-of-way and yielding.
◦ No U-Turns.
ACTIVITY
1. Instructor will lead class through the course.
2.Instructor will blow whistle after the entire class has gone through the full course to signal that students will then make their own directions.
3.Instructor will blow whistle twice to stop the class in case of emergency, disorder or end of class.
4.As an optional addition, the instructor may designate the driveway as a hospital or a jail and place unsafe drivers there for a short period of time.
• Review key messages
OPTIONAL ADVANCED ACTIVITY
In addition to the activity described above, instructors can create a more advanced traffi c situation (if time permits) by replicating a neighborhood. The neighborhood should consist of some or all of the following aspects:
• Multiple Intersections,• Destinations such as parks, school, friends’ houses, etc.,• Parked and moving ‘cars, and• Traffi c signs and signals.

Colorado Department of Transportation
24
Or go on a neighborhood ride.
NOTES
• Use large orange cones to mark the inside and outside corners of the course.
• Use half tennis balls to mark the centerline.
• Use two stop signs as indicated.
• This is a large and complex course so be sure to allow enough set up time before the lesson.
LESSON 9: RIDING WITH TRAFFIC (ON BIKE SKILLS)

Colorado Department of Transportation
25
LESSON 10: NAVIGATING
LESSON TIME: 45 minutes
MATERIALS:1. Maps of local area (talk to your city of county for this information or have students use the internet to generate a map their area.
2.Parent volunteers or local cyclists
TAKE HOME: 1. Mapping exercise
2. My Safety Map worksheet
GRADES: 4th, 5th, 6th
OBJECTIVE: To help students understand that choosing the best route may depend on the mode of transportation.
BACKGROUND: This lesson is a great opportunity to get your local planning offi ce, bicycling club, and parents involved. As students are using bicycles to get to and from school, activities and friend’s houses they should learn how to pick appropriate routes and navigate.
ACTIVITY: 1. Students should make a list of places near students’ homes and schools that students frequently visit.
2. Ask the students what makes a good route.Volunteers will work with students to choose appropriate bicycling routes taking into consideration bicycle trails, bike lanes, traffi c speeds, cross-walks, signalized intersections and roadway shoulder. It is important to keep in mind that the best bicycling route is not usually the best driving route.
Note: Internet mapping sites have begun integrating bicycling as an option when one needs enters a location for directions. Local communites may also have mapping software. Check local agency websites. Students may be able to use the internet to generate a route. If this is the case, use the internet route.
Have students present their routes to the class and review the conditions they encounter. Compare different routes that students chose.

Colorado Department of Transportation
26
LESSON 11: SEEING, BEING SEEN
GRADES: 4th, 5th, 6th
OBJECTIVE: To help students understand what it means to be visable to traffi c.There are three activities in this lesson. Activity 2 is suitable for older students.
BACKGROUND: When bicycle and pedestrian-related crashes occur, it is often because the motor vehicle driver failed to see the bicyclist or pedestrian. Bright and light colors, such as white, yellow, orange, neon, and hot pink, are the most visible. Contrasting colors, such as stripes, are also great attention-getters. Children should wear these colors whenever they bike or walk. Additionally, backpacks and helmets should be brightly-colored. Children should avoid riding at night or dusk when visibility is low. However, those who must travel at such times need to wear retro-refl ective jacket with stripes or other refl ective equipment over their clothing and have lights on their bike. In addition it is critical to ride where motorists are looking for traffi c or obstacles. (See notes at end of lesson).
ACTIVITY 1: 1. Dim the lights and have the class close their eyes. Have four of the volunteers, some wearing light colored tee-shirts and some dark stand side-by-side in a row at the front of the room. Have the fi fth stand against the wall at the side of the class.
2. Have the class open their eyes. Ask the class whom they see: First? Second? Last? Did anyone mention the one on the side of the class? If not, why not?
3. Ask students which colors are most visible.
4. Explain to students which colors are most visible. (See notes at end of lesson.)
5. Ask students what, other than colors can make them more visible. Refl ectors, retro-refl ective materials and lights are answers. But equally important is being where motorists are looking for you.
6. Explain to students why it is their responsibility to make sure motorists can see them. If a crash occurs, regardless of fault, the cyclist or pedestrian is most likely to be hurt.
7. Show students retro-refl ective material. Turn the lights out, and shine a fl ashlight on the material to show the class how the material stands out.
DISCUSSION TOPICS:Seeing and Being Seen - Why is being visible important when riding a
LESSON TIME:45 minutes
ACTIVITY 1:MATERIALS: None
ACTIVITY 2: Where Drivers Look
MATERIALS: Where Drivers Look Worksheet
TAKE HOME: Where Drivers Look Worksheet

Colorado Department of Transportation
27
bicycle? How can you make sure a vehicle driver sees you when you are riding your bike?
How can you be predictable in traffi c?
NOTES:1. Most visible colors—yellow, white, orange, neon, hot pink, bright green; also, contrasting colors and patterns such as hot pink and blue, stripes and polka-dots.
2. Least visible colors—dark colors such as black, brown, navy, forest green, and camoufl age materials.
3. Students should avoid night riding. Those who must walk or ride at dusk or at night need to wear retro-refl ective material over clothing, on backpacks, and on helmets. According to Colorado Law, a bicycle needs a white light in the front and a red light on the back when ridden at night.
4. Retro-refl ectives are materials that refl ect light back to the light source when shined upon.
5. Students can help motorists see them by riding in a location that is consistent with where motorists are looking (See Lesson 14: Road Position-Turning and Signaling).
ACTIVITY 2: Where Drivers Look
Objective: To teach students where motorists look when they approach driveways and intersections.
BACKGROUND:When bicycle and pedestrian-related crashes occur, it is often because a turning motor vehicle driver failed to see the bicyclist or pedestrian. While this may be because the bicyclist or pedestrian was not clearly visible, it is often because the motorists never looked in the direction of the bicyclist or pedestrian. Consequently, if a bicyclist or pedestrian is approaching a confl ict point from an area where motorists are not looking for hazards, the bicyclists or pedestrian must be especially wary of turning motorist.
DISCUSSION TOPICS:• Where do drivers look when they are driving? • What about turning motorists? • What are they looking for? • How can you make sure a motor vehicle driver sees you when you are riding your bike?
LESSON 11: SEEING, BEING SEEN

Colorado Department of Transportation
28
• How can you be predictable in traffi c? • What can you do to prevent a crash when a motorist is not looking for you? •Discussion of bicycle crashes and how to avoid them (defensive driving)
ACTIVITY 2:1. Have the class sit facing the front of the room. Tell them they are going to pretend they are driving cars and that they want to turn left across (insert name of busy local multi-lane highway here) to get to a movie theater.
2. Ask if they think they will be able to just drive up and turn left without stopping. If not, why not? What do they have to wait for?
3. So they have to wait for cars coming from the opposite direction. Tell them cars are coming…still coming…still coming…still coming, the movie is about to start…still coming…still coming…Okay its clear no cars are coming what do you do?
4. Ask if they think motorists are likely to look behind them prior to turning? What would happen to a bicyclists or pedestrian who was crossing the drive coming from behind the motorist?
5. Have the class sit facing the front of the room. Tell them they are going to pretend they are driving cars and that they want to turn right onto (insert name of busy local multi-lane highway here) to get leave school.
6. Ask if they think they will be able to just drive up and turn right without stopping. If not, why not? What do they have to wait for? Which direction will cars be coming from?
7. So they have to wait for cars coming from their left. Tell them cars are coming…still coming…still coming…still coming, gosh it’s been a long day, I really want to get home…still coming…still coming…Okay it’s clear no cars are coming what do you do?
8. Ask if they think motorists are likely to look to their right prior to turning? What would happen to a bicyclist or pedestrian who was crossing the drive coming from the right?
9. Ask what the students can do when they are riding their bike to reduce the chance of a crash with a turning motorist.
10. Have the students complete the attached worksheet following this lesson.
LESSON 11: SEEING, BEING SEEN

Colorado Department of Transportation
29
NOTES:1. Most motorists are looking for other motorists, not for bicyclists and pedestrians.2. The farther a bicyclist or pedestrian is from the travel lanes, the less likely a motorist is to see the bicyclist or pedestrian.
3. Riding against traffi c is a contributing cause in almost one third of all bike crashes.
4. If bicyclists or pedestrians ride against traffi c on the sidewalk or on a path next to the roadway, they must be aware of the fact that most motorists are not looking for bicyclist coming from against traffi c and that they, as bicyclists riding against traffi c on the sidewalk or path, must be extra careful looking for motorists who are turning.
5. Do not assume that just because a motorist is stopped at an intersection that the motorist sees you. A motorist waiting behind the crosswalk, may move across the crosswalk unexpectedly to improve his or her sight lines to traffi c coming from the left.
6. If possible, bicyclists should make eye contact with motorists waiting to turn to ensure the motorists sees them. If they cannot make eye contact, bicyclists riding against traffi c should assume they are not seen.
ACTIVITY 3: Gearing Up [optional]
OBJECTIVE: To increase student awareness that visible and practical bike gear (clothing and accessories) can be fashionable.
BACKGROUND:Bright and light colored clothing and accessories make cyclists more visible to motorists. (Refer to “Seeing, Being Seen” activity for explana-tion.) Many state laws require that a bicycle operated between sunset and sunrise be equipped with a white front light visible for 500 feet, and on the back, a red light that is visible for 600 feet. Additionally both wheels should be equipped with refl ectors.
ACTIVITY:1. Ask the entire class to “dress-up” for visibility one day.
2. Ask volunteer students to “show and tell” their gear. You may offer awards for the best outfi ts.
3. Ask students to explain why they chose particular items.
4. Teachers should also dress up and explain their choices.
LESSON 11: SEEING, BEING SEEN
ACTIVITY 3:
MATERIALS:1. Bicycle equipped with proper refl ectors and lights
2. Bright backpack with retro-refl ective tape (optional)
3.Retro-refl ective gear (vest, arm/leg bands, adhesive tape)
4. Bright biking outfi t including helmet, shorts, and/or jacket
5. Flashlight
6. Room that can be made dark by turning out lights and drawing shades

Colorado Department of Transportation
30
LESSON 11: SEEING, BEING SEEN
5. Ask the class to gather around the bicycle while demonstrating correct lighting and refl ector placement for night riding.
6. Darken the room and let students take turns shining the fl ashlight at retro-refl ective gear. Turn on bike lights for students to see.
7. Allow students to try on the retro-refl ective gear.

Colorado Department of Transportation
31
LESSON 12: DEALING WITH DRIVEWAYS
LESSON TIME: 15 minutes
ACTIVITY 1MATERIALS:1.Visual barriers (parked car, cardboard shrubs, electrical boxes, and trash cans)
2.Cones
TAKE HOME:None
GRADES: 3rd, 4th, 5th, 6th
OBJECTIVE: Students will understand the mechanics of dealing with intersections.
• Cyclist will learn to fi nd the edge of the street.• Cyclist will learn to look left, right and left again and go when it is clear.• Cyclist will learn how to deal with visual barriers.• Cyclist will learn how to cross over the safest way to the right side of the road or the sidewalk.
BACKGROUND:The number one cause of child fatalities on bicycles is failing to stop before entering the street (i.e., midblock ride out or driveway ride out). In many cases, the cyclist’s and motorist’s vision are obstructed by visual barriers: parked cars, shrubs, electrical boxes, and the like. Students must learn to STOP, look left, right and left again before proceeding into traffi c. Students look left fi rst because that is the side cars approach closest to the rider, then right, and left again to make sure nothing entered the roadway while looking right.
ACTIVITY:1. Students start to ride out of the driveway.
2. Have students identify the edge of the roadway and stop at the edge.
3. Have students look left, right, and left again.
4. Ask students to identify visual barriers on the sides of the street.
5. Ask students to identify options to see around the visual barrier. • They can move to the other side of the visual barrier, so they are not blocked in. • They can pull out just enough to see around the visual barrier to make sure no cars are coming. • To make sure the bicycle is not sticking out in traffi c, the student needs to slide off the seat and lean over handle bars.
6. Once clear of the barrier, have students look left, right, and left again.
7. Students should go straight across the street to the right side of the roadway or sidewalk continuing to look as they cross.

Colorado Department of Transportation
32
LESSON 12: DEMON DRIVEWAYS
8. Students have the option of walking their bikes on the sidewalk to an intersection and then crossing.
Have students repeat this process until each of them can comfortably go though the process and understands the dangers visible barriers present.

Colorado Department of Transportation
33
LESSON 13: INTERSECTIONS
GRADES: 3rd, 4th, 5th
OBJECTIVES: To teach children how to turn right and left and how to negotiate traffi c when going straight through an intersection.
BACKGROUND: Being a predictable cyclist includes knowing when to stop, how to search for traffi c and in what direction to expect traffi c. Other important bicycle safety practices include stopping at stop signs, obeying all traffi c-control devices, and using proper hand signals to communicate with motorists, and proper road positioning. All of these skills are necessary to successfully negotiate intersections.
SET-UP: See diagram below
LESSON TIME: 30 minutes
MATERIALS:1. Video: Bike Smart Interactive CD 2“Watching for Cars” 3:00 minutes(optional)
1. Computer and projector
2. Visual barriers (parked car, cardboard shrubs, electrical boxes, and trash cans)
3. Cones
4. Ropes
5. Large numbered cards (1-8)
TAKE HOME:None

Colorado Department of Transportation
34
For setup:• Use ropes or line chalk to outline the borders of the intersection and stop bars.• It can be set up fi rst as a four-way stop then subtract two stop signs to create a two-way stop.Then explain how the east-west traffi c does not have to stop and that north-south traffi c must stop and yield the right-of-way.
ACTIVITY DESCRIPTION:1. Review the BikeSmart segment (optional).
2. Divide students among the eight stations.
3. Have each student travel through the intersection negotiating in this order: • Two right turns • Two straight through maneuvers • Two left turns
4. This is a continuous activity. Students will yield and stop for each other when appropriate.
5. Have each student verbalize their actions.
6. The teacher stands in the center of the intersection to serve as the traffi c cop.
7. Non-cycling students or parent volunteers can be added to the traffi c mix eventually as “mock cars” and as crossing pedestrians.
LESSON 13: INTERSECTIONS

Colorado Department of Transportation
35
LESSON 14: ROAD POSITION - TURING AND SIGNALING
GRADES: 4th, 5th, 6th
OBJECTIVES: Children will learn where to position themselves on the road when going straight through an intersection or when turning right and left. Children will also learn the proper hand signals for right and left turns.
DISCUSSION TOPICS & QUESTIONS:There are some valid reasons for riding with traffi c. Ask the students what some of those reasons might be.
Answer: It’s the legal way to ride; motorists do not expect to see traffi c coming in the opposite direction. If bicyclists expect to be seen, they must ride where motorists expect to see traffi c, on the right; traffi c control devices face the normal fl ow of traffi c.
• Wrong-way riding results in nearly one-fourth of all car/bike crashes.
• Wrong-way riders face the danger of a head-on crash with cyclists who are obeying the law
ACTIVITY:Demonstrate and, while sitting on their bicycles, have children practice the hand signal for a right turn (right arm and hand straight out to the right) and a left turn (right arm with hand pointed up).
Emphasize to children the importance of signaling their intentions by signalling the way they want to go and holding the signal long enough for a motorist behind them to know what they are doing. Practice the verbal (voice) commands “stopping, turning right” or “scanning, turning left.”
1. Have the children line up as in the stopping line drill, to begin practicing road position for right and left turns and straight through movement.
2. Discuss and demonstrate the proper procedure for making a right turn. Verbalize each step.
• Scan behind for on-coming traffi c.• Remain on the right hand side of the road. Give your right hand turn signal.• Stop at the stop sign, look left, right, and left again.• When clear, give right hand signal once again before proceeding to turn right.
3. Discuss and demonstrate a straight through road position to the second stop sign. Traveling straight through an intersection requires cyclists to move closer to the middle of the travel lane to let traffi c know their intent to go straight through the intersection and to prevent any right turning cars from pulling in front of them.
LESSON TIME:30 min
MATERIALS:1. Video: Bike Smart Interactive CD 1“Hand Signals” 3:00 minutes(optional)
2. Bicycles and helmets
3. Cones
4. Rope or chalk to mark lane and intersection crossing.
Colorado Department of Transportation
36
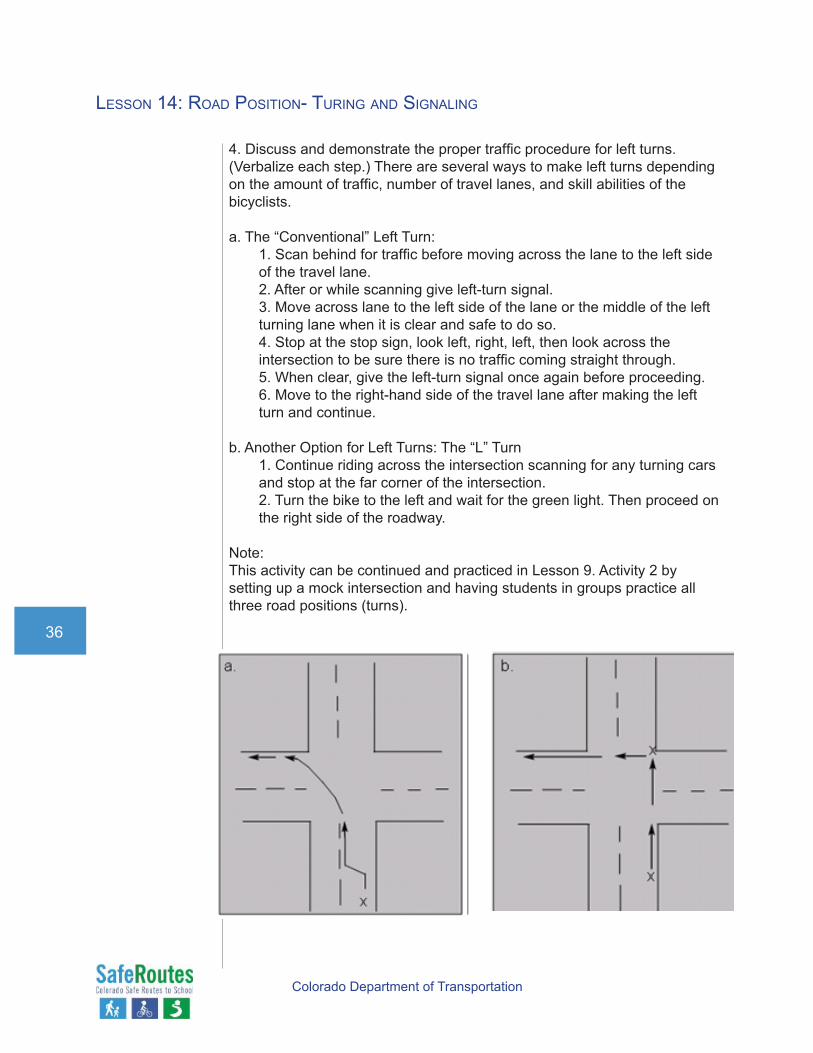
4. Discuss and demonstrate the proper traffi c procedure for left turns. (Verbalize each step.) There are several ways to make left turns depending on the amount of traffi c, number of travel lanes, and skill abilities of the bicyclists.
a. The “Conventional” Left Turn:1. Scan behind for traffi c before moving across the lane to the left side of the travel lane. 2. After or while scanning give left-turn signal.3. Move across lane to the left side of the lane or the middle of the left turning lane when it is clear and safe to do so.4. Stop at the stop sign, look left, right, left, then look across the intersection to be sure there is no traffi c coming straight through.5. When clear, give the left-turn signal once again before proceeding.6. Move to the right-hand side of the travel lane after making the left turn and continue.
b. Another Option for Left Turns: The “L” Turn1. Continue riding across the intersection scanning for any turning cars and stop at the far corner of the intersection.2. Turn the bike to the left and wait for the green light. Then proceed on the right side of the roadway.
Note:This activity can be continued and practiced in Lesson 9. Activity 2 by setting up a mock intersection and having students in groups practice all three road positions (turns).
LESSON 14: ROAD POSITION- TURING AND SIGNALING
Colorado Department of Transportation
37
LESSON 15: BIKE PARKING & LOCKING
LESSON TIME: 10 minutes
MATERIALS: 1. Bicycle (1),
2. U-lock (1);
3.Cable lock(1)
TAKE HOME: None
GRADES: 3rd, 4th, 5th, 6th
OBJECTIVE: Proper selection of parking location and locking technique
BACKGROUND: Bicycles should be parked and locked in designated bicycle parking areas (i.e., bike racks) which are well lit and secure. Bicycles parked in designated areas will pose fewer hazards to pedestrians. Additionally, properly parked bicycles will be more protected from damage and theft. Students should know where and how to secure their bicycles properly. The bike frame needs to be secured to post of something stationery. Helmets also need to be stored properly. Helmets in school can be hung on a coat hook by the straps or placed on a shelf.
KEY MESSAGES
Bike theft can happen, but with appropriate precautions you can keep your bike safe.
SETUP
• Have a bike standing where the class can gather around and see it.
• Introduce lesson and importance. Ask studentsWhat might happen if you leave you bicycle unlocked?Answer: It might get stolen.
◦ You should never leave your bike unlocked even if it seems safe or if you’re only leaving if for a short time.◦ You can never prevent bike theft, but a good lock job will strongly deter most thieves.
Show and tell about different types of locks and related benefi ts of each
• Cable lock (easier to cut) but it can run it through both wheels and frame and even saddle, and around posts/trees
• U Lock (hard to break) but harder to lock all parts of bike
• Highlight parts of bike that should be locked ▪ Frame is most important ▪ Lock one or both wheels if possible ▪ If possible to lock saddle too - do so or use a saddle cable in a high crime area or with a very expensive saddle
• Point out some common bike locking mistakes ▪ Just locking a wheel but not the frame ▪ Not getting lock completely closed ▪ Locking handle bars or seat post

Colorado Department of Transportation
38
▪ Locking to a short object like a parking meter with a cable lock ▪ Accidentally missing either the frame or the rack when weaving a cable or chain through
◦ Emphasize that students should lock only to designated bike parking infrastructure rather than trees, fences, signposts etc. because it may be illegal and it’s usually more secure
◦ Remind students to keep their combination or key in a safe place and have a spare available as a backup.
• Run activity ◦ Review information by having students lead you through locking up a bike.
OPTIONAL ACTIVITY: bring class out to a bike rack and have students identify strengths and weaknesses of actual lock jobs.
Optional activity: bring class out to a bike rack and have students role play scenarios where bikes are locked incorrectly to identify strengths and weaknesses of actual lock jobs.
• Alternatively - use photos from real racks to serve as examples of good and bad locking technique.
Review key messages.
LESSON 15: BIKE PARKING & LOCKING

Colorado Department of Transportation
39
LESSON 16: RIDING ON A PATH
LESSON TIME: 15 minutes
MATERIALS: None
TAKE HOME: None
GRADES: 3rd, 4th, 5th
BACKGROUND: Students will learn how to safely ride on a multi-use path.
KEY MESSAGES:• The rules still apply on a multi-use path.• Be aware and respectful of other users of the path.• A bike path that parallels a roadway (like a sidewalk) can be more dangerous than riding in the road (watch for turning cars).• A rider must be aware of various hazards like loose gravel and cracks.
PROCEDURE
Ask students the following:What is a multi-use path?Answer: A multi-use path is usually paved and is a shared byway for non- motorized traffi c including walkers, joggers, roller bladers, bikes, skateboards, scooters and others.
Why is it important toAnswer:Because of the diverse nature of the traffi c on a multi-use path, it is essential to be aware of everyone around you.
Why is it important to follow the rules when riding on a multi use path?Answer: Multi-use paths are a very popular place to ride which means that they get used heavily - therefore it is important that all users adhere to the same rules to keep it safe for everyone.
Why might riding on the sidewalk be more dangerous than riding on a roadway?Answer: Riding on the sidewalk is often more dangerous than riding in the road especially at intersections and when crossing driveways. Drivers may not be looking for bicylists as they turn into the roadway. Review the following rules for riding on a multi-use path:1. Always ride as far to the right as possible (go with the fl ow).
2. Always pass slower traffi c on their left side using the following steps:▪ Look over your left shoulder to check for faster traffi c coming up behind you.▪ If it's clear, announce your intention by ringing your bell or loudly saying "passing on your left."▪ Give other path users at least 3 feet of clearance when passing while being mindful of oncoming traffi c in the other direction.
3. Limit your speed to 15 mph or less.

Colorado Department of Transportation
40
4. Look out for hazards:▪ Loose material like gravel, sand or glass.▪ Unpredictable path users such as small children or dogs.▪ Blind curves and intersections.▪ Underpasses - ring your bell even if you can't see anyone coming.▪ Slippery surfaces - wet or icy bridges, metal plates.
5. Always signal your turns.
6.Always stop a intersections with the road or driveways.
7. Slow to walking speed or dismount in crosswalks.
8.Even if you have the right-of-way, make eye contact with drivers before proceeding at an intersection.
9. Watch out for:▪ Turning motorists (right turn in your lane or left turn in oncoming lane).▪ Motorists exiting driveway or side street (especially when cyclist is on sidewalk).
Review key messages.
LESSON 16: RIDING ON A PATH