best practices start with purpose and audience write the ... · video editing and screencast guide...
TRANSCRIPT

1
http://www.depts.ttu.edu/english/medialab | English/Philosophy 362 | [email protected]
Video Editing and Screencast Guide
Best Practices
Begin your project with a description of the video’s goals and audience. Understanding the diverse set of potential viewers will help narrow your decisions as the project continues. You can use a wide variety of research methods and techniques to develop a list of concepts, information, or instructions your audience will need to achieve the video’s goals.
Start with Purpose and Audience
The English Department Media Lab is dedicated to helping students and instructors learn and use technology to become critical users and producers in their chosen fields.
This document outlines basic video recording, editing, and screencasting suggestions in order to • introduce a few best practices, • provide links to tutorials to help you get started, and• help students and instructors decide which technologies to use.
Avoid picking up the camera until after you’ve written the script. Filming is exciting, but successful video projects often follow thoughtful planning. Video projects are composed of three general phases:
• Pre-production (Planning)• Production (Filming)• Post-production (Editing)
Writing your script first will help you envision the bigger picture before you commit needless time to filming, as well as help you narrow your content. Once you have determined what needs to be said, you can make decisions in the storyboarding phase on how to represent the content: video, audio, etc.
*Remember to write concisely. It takes about one minute to read 150 words at a comfortable pace.
Write the Script Before Filming
Storyboarding is an organizational technique that helps you visualize your video’s narrative and/or sequence of events. Storyboarding can also enable you to see the whole story at once, helping you decide how to present your content.
This practice will help determine who, what, and how to film your movie by determining filming order, preparing editing workflow, and compiling the final sequence of events. Seeing this “big picture” also helps identify weak points, missing content, confusing ideas, and unnecessary shots. In short, storyboarding helps you to
• evaluate your script,• rework your story, and• plan ahead to avoid potential pitfalls.
Create the Storyboard
2
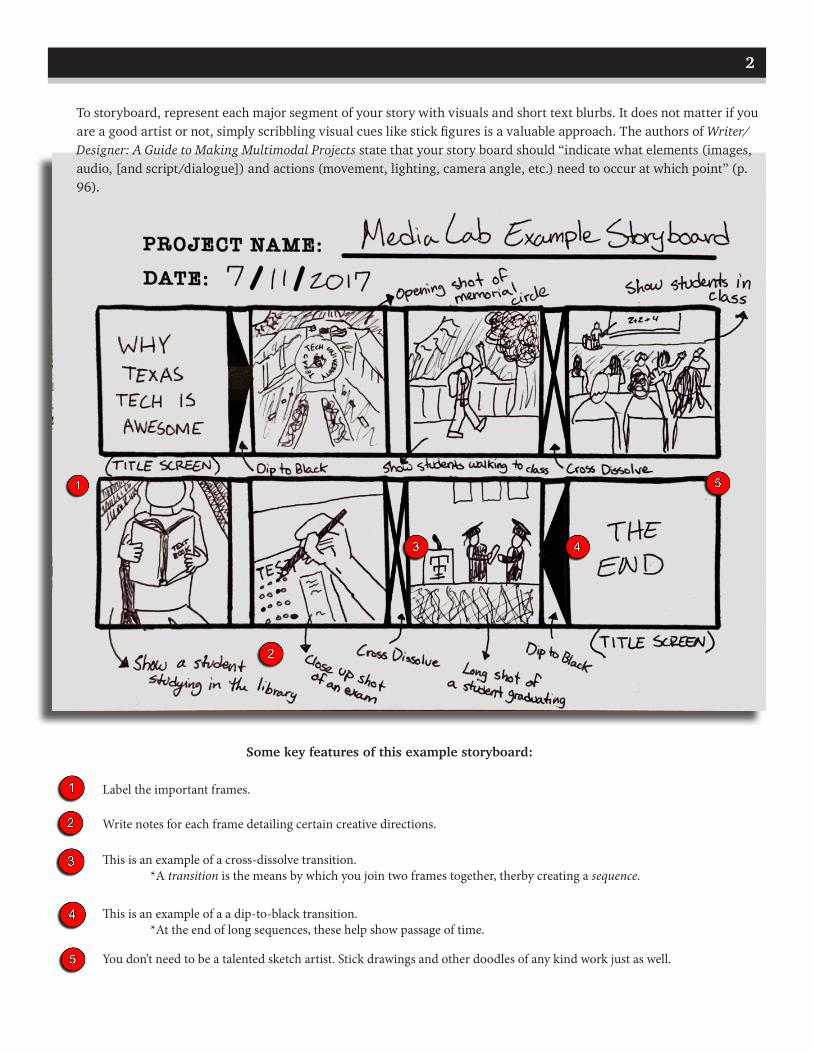
To storyboard, represent each major segment of your story with visuals and short text blurbs. It does not matter if you are a good artist or not, simply scribbling visual cues like stick figures is a valuable approach. The authors of Writer/Designer: A Guide to Making Multimodal Projects state that your story board should “indicate what elements (images, audio, [and script/dialogue]) and actions (movement, lighting, camera angle, etc.) need to occur at which point” (p. 96).
Some key features of this example storyboard:
Label the important frames.
Write notes for each frame detailing certain creative directions.
This is an example of a cross-dissolve transition. *A transition is the means by which you join two frames together, therby creating a sequence.
This is an example of a a dip-to-black transition. *At the end of long sequences, these help show passage of time.
You don’t need to be a talented sketch artist. Stick drawings and other doodles of any kind work just as well.
2

3
Consider using a tripod.
Camera shake can be really annoying. Small movements—breathing, turning your head, gesturing—by the person recording can seem big in a video, so find a way to steady or anchor your camera. Keep in mind that the more you zoom in, the more likely you will pick up small camera movements.
Good lighting usually goes unnoticed; bad lighting is distracting.
Consider the light source and direction. Indirect, natural lighting (like from a window) usually produces a softer, more subtle effect. Indoor lighting tends to influence colors more noticeably. Digital cameras adjust the color for different light sources (an effect called white balance), but they aren’t always successful. The more light sources you film under, the more dramatic difference you will see in the final cut.
If you are filming outside, consider the following rules of thumb:
• Overhead lighting (midday) is usually harsh and unattractive. • Sunrise and sunset light create a dramatic and often desirable effect.• Overcast (when it’s too cloudy) diffuses sunlight and produces soft shadows.• Direct light produces hard shadows, while indirect light produces softer shadows.
Overall, think about the ways you can use lighting to achieve the effect you want. It helps to aim for consistency. Shooting the same scene under different lighting conditions (direction and source) can be distracting when viewing the final cut.
Audio can be an important part of how you communicate your video.
Though it can be one of the more difficult aspects to control, these four details will help you plan accordingly.
1) If the video utilizes speech, ensure that whoever is speaking can enunciate and articulate audibly and clearly. Consider how the voice reverberates in the chosen setting: is it hard to hear the speacker? Will you pick up echoes? How far away are the speakers from your mic? Will you need someone who speaks louder?
2) Being aware of the setting will help you anticipate ambient noise. It’s easy to overlook the positive or negative role background sounds can play in your video, so remember that you communicate your message not only by what is spoken, but also through ambient sound. There will usually be unaccountable ambient sound (i.e., a closing door, the traffic outside the window, the air conditioner switching on/off or humming loudly, the wind hitting the mic); therefore, it is important to be aware of its useful or distracting nature.
3) Consider whether music will be important for the film’s message. Background music can add to or take away from the meaning. Also, remember to cite your music sources and ensure that you have permission to include the music in your video. Permission means you have the expressed approval of the artist to publish their music or the music is licensed as Creative Commons.
4) Lastly, think of audio as a means for communicating your message. Doing so will help you prioritize which medium (spoken word, music, ambient noise) might work best for each aspect you intend to communicate. Editing audio to remove background noise and refine an actor’s voice is possible in post production, but planning can save you lots of time. Use a mic, and take practice shots. Review the video on a computer to determine the sound quality; don’t rely only on your camera’s speakers to determine if the video sounds good.
Video Production, Lighting, and Audio
3

4
Make your video accessible to as many viewers as possible. Video enables you to express meaning in both visual and aural modes. For some viewers, however, audio may not be an option. Some viewers may have hearing impairments; others may watch the video in a setting where audio is prohibited. Whether your viewer has disability needs or the situation calls for it, captioning your video can help express meaning when audio is restricted.
There are many resources to help you learn how to caption, but free options include YouTube and Amara. YouTube will auto-caption your video, but don’t rely on the auto version alone. Revise the auto-captions to meet the needs of the viewer. For example, your video may contain non-verbal sounds that help create meaning. Applause, a car door shutting, and the style of background music help a viewer understand the joviality or seriousness of the scene. Captioning such details can give access to such perspective.
Think of captioning as a rhetorical act. In other words, let who your viewers will be, your purpose, and the possible contexts in which a viewer might watch your video guide your captioning decisions. Beginning the video making process with a script will make captioning your video in post-production must easier.
Captioning
4

5
Adding B-roll to your interviews - 10m40s• Overviews how to add visual material—images and video clips—to enhance your video. “B-roll” refers to the
additional elements you add to your video to transition and/or introduce shots. This tutorial will help you apply slow-motion, overlay shots and images, and cover jump-cuts (rough transitions between different videoclips).
Performing basic audio adjustments - 8m17s• Demonstrates how to add music to your video, including muting different audio tracks during editing, adjusting
audio levels, etc.
Adding basic effects and titles - 10m01s• Shows how to add effects to smooth-out your transitions as well as how to add titles. The tutorial demonstrates
how to zoom in and out and reposition a video. It overviews how to add, edit, and make effective use of textual elements in the video.
TutorialsThese tutorials review some of the basic editing features and effective techniques when using Adobe Premiere Pro. They introduce you to the technology, but they also demonstrate how to view your project in a big-picture view. In other words, they help you use the tool in reference to audience, purpose, and context. As you will see, they also include tips such as keyboard shortcuts.
To view these tutorials, • Navigate to the Texas Tech Library’s access page for Lynda.com: library.ttu.edu/lynda.• Click the “Sign In Using eRaider” button.• Sign in to your eRaider account (username and password).
After singing in, you can click the links below and watch these tutorials.
Storyboarding - 5m43s• Provides general advice for the prediction phase, including research, writing the script, storyboarding, etc.
Adobe Premiere Pro super basic workflow - 3m56s• Provides an overview of what it looks like to use Premiere Pro. This video shows you how to upload a video, and it
introduces the function of each main section of the editing interface.
Storyboard editing in Premiere Pro - 6m43s• Demonstrates how to use the storyboarding feature Adobe Premiere provides. Besides giving you a digital
interface to storyboard, this is a good option to use after storyboard on paper, as an intermediary step to editing, clipping, and joining video.
Launching Premiere Pro and touring the interface - 11m26s• Provides a more in-depth introduction to the main sections of Premiere Pro’s editing interface. It also provides
thoughtful logic to establish efficient workflow, such as naming your files, organizing video content, etc.
Basic editing - 10m15s• Provides a review of the most common tools used to edit your video: how to select shots, remove unwanted shots
(cutting and joining), add sound bites, and more. Most importantly, the tutorial shows you how to do so when considering the content and purpose of your video editing.
5

6
Choosing Your Software
Video Editing Options
Video projects require video editing software. But if you are working on a technical communication project, you may also need software that helps you record your desktop (e.g., to create a tutorial of a computer application). Below is a list available (either free to download or located on campus for free) software for both editing and recording.
6
7
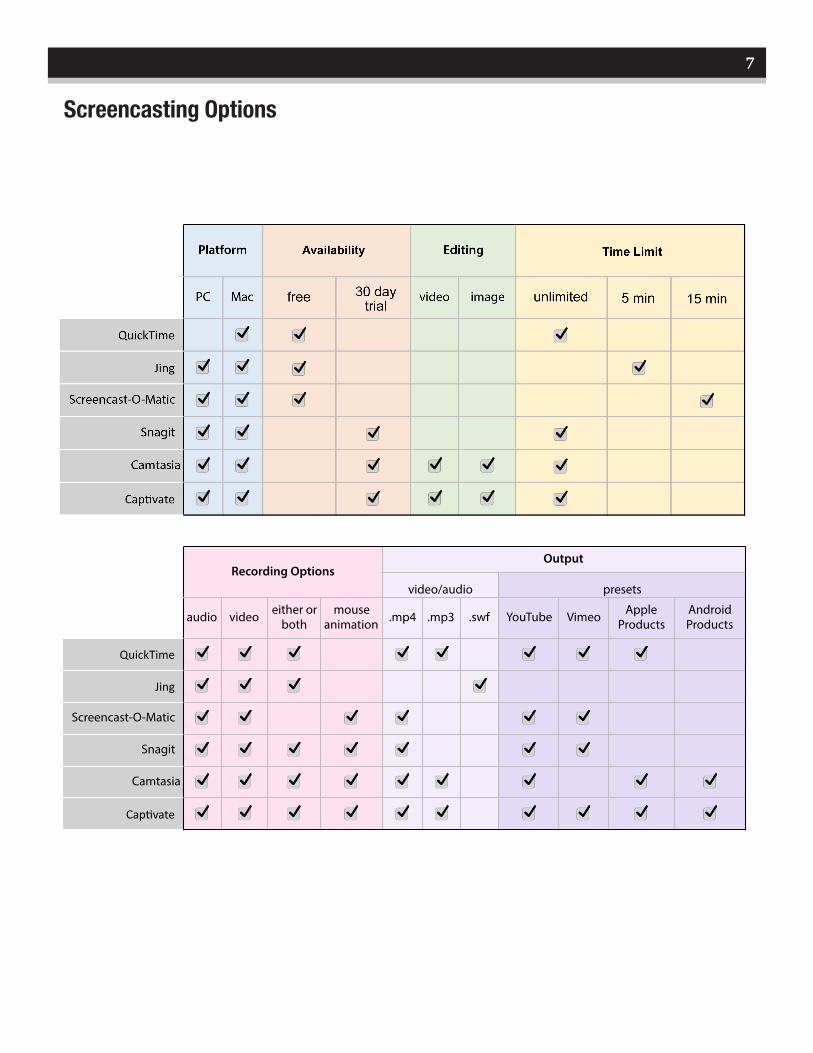
Screencasting Options
Platform Availability Output
video/audio presets
PC Mac Free 30 day trial Media Lab Library .mp4 .mp3 YouTube Vimeo Apple
ProductsAndroid Products
Movie Maker
iMovie
Premiere Pro
Final Cut Pro
Platform Availability Editing Time Limit
PC Mac free 30 day trial video image unlimited 5 min 15 min
QuickTime
Jing
Screencast-O-Matic
Snagit
Camtasia
Cap0vate
Editing Features
cut/join effects transitions background titles multilpe video tracks
images/slides
overlay music
adjust audio
adjust ligting
Movie Maker
iMovie
Premiere Pro
Final Cut Pro
Recording OptionsOutput
video/audio presets
audio video either or both
mouse animation .mp4 .mp3 .swf YouTube Vimeo Apple
ProductsAndroid Products
QuickTime
Jing
Screencast-O-Matic
Snagit
Camtasia
Cap0vate
7