best practices hand-out - debbie silver
TRANSCRIPT

1
Best Practices for Best Practices for Science TeachingScience Teaching
Presented by:Presented by: Dr. Debbie SilverDr. Debbie Silver
Melissa, TXMelissa, TX www.debbiesilver.comwww.debbiesilver.com

2
Petals Around the Daisy
Purpose: The purpose of this game is to foster critical thinking skills, practice formulating hypotheses, and develop means of problem solving. Objectives: Students will develop hypotheses that accurately explain the game, Petals Around the Daisy. Procedure:
1. This is an open-ended activity in that no directions are given except to state, “The name of the game is Petals Around the Daisy.”
2. Tell the students they are being asked to consider a scientific problem –
determining the rules of the game.
3. To begin the game tell the students to observe for 5 throws of the dice.
4. Roll the five dice. Count the number of petals around the daisies by counting the number of dots around the center dot of each odd die (if there are any). The answer to the throw is the total number of dots off around the center dot of each die. After the throw you say, “The answer is ___.” (In the above picture the answer is 8. The first and fifth die have 0. The second and fourth die have 2 each. The middle die has 4. 2 + 2 + 4 = 8.)
5. If at the end of 5 throws any student feels they have solved the problem, ask
him/her to test his/her hypotheses by rolling the dice 3 times and giving the correct response each time. If the student does indeed answer correctly, he/she becomes a mentor to a smaller group of students with his/her own set of dice. Now he/she can lead other students in determining the solution to the game. No hints can be given to other students. Each student must figure out the answer individually!
6. At the end of each of the 5 throws pause and allow the students to think of or
write a new hypotheses. Continue until there are several small groups working together.
7. If after a reasonable amount of time students do not figure out the solution,
reduce the number of dice to 4, then 3, 2, or even 1. The important part of Petals Around the Daisy is not the problem, but rather the strategies that students employ. Students might use any number of strategies to think about the puzzle, including:
▪ Keep an organized list. ▪ Guess and check. ▪ Consider a simpler problem. ▪ Generate a table of observations. ▪ Draw diagrams.

3
The Cartesian Diver by: William C. Deese Introduction
The Cartesian Diver, named for the French philosopher, scientist, and mathematician, Rene' Descartes (1596-1650), is a popular science toy. It is commonly found in science classrooms, or perhaps you have seen the Diving Tony toy distributed in boxes of Frosted Flakes™. The Cartesian diver offers an eloquent demonstration of the most unique property of a gas, its compressibility.
Materials One 2-liter plastic bottle with cap One glass eyedropper and one beaker or drinking cup Procedure
1) Fill the drinking cup or beaker about 3/4 full of water. 2) Draw water into the dropper until it is 1/3 full. 3) Place the dropper in the beaker of water. Adjust the amount of water in the dropper until
it will float but is almost completely submerged. 4) Fill the bottle with water. 5) Place the dropper into the 2-liter bottle and screw the cap tightly in place.
Activity Squeeze the bottle. What do you observe? Release the pressure and observe again. Questions Why does the dropper sink when you apply pressure to the bottle? As you squeeze the bottle the pressure inside increases. Liquids are not easily compressed but gases are. Therefore, the air in the dropper compresses and allows more water to flow into the dropper. This increases the weight of the dropper. As the weight increases, the density increases until it becomes greater than the density of water. Objects that have a density greater than water will sink. Why does the dropper float when you release the bottle? When the bottle is released, the pressure decreases. The air in the dropper expands pushing water out of the dropper. The density of the dropper decreases until it is less dense than water. Objects with a density less than that of water will float.
4
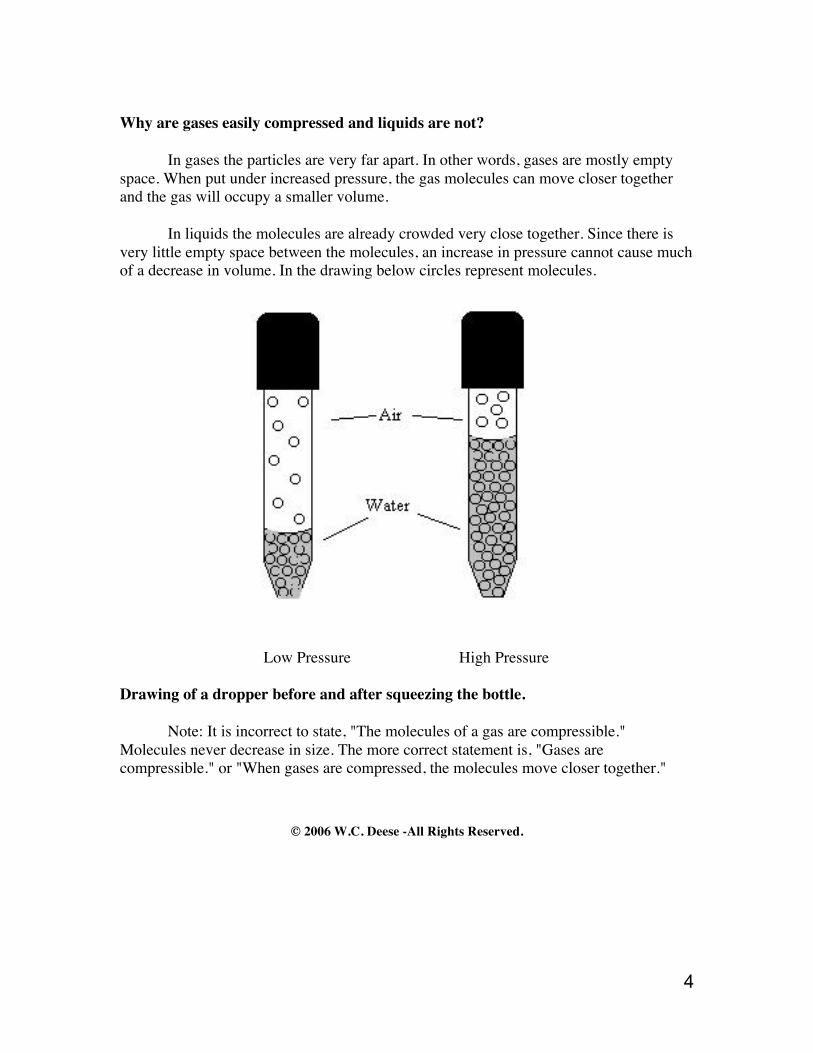
Why are gases easily compressed and liquids are not? In gases the particles are very far apart. In other words, gases are mostly empty space. When put under increased pressure, the gas molecules can move closer together and the gas will occupy a smaller volume. In liquids the molecules are already crowded very close together. Since there is very little empty space between the molecules, an increase in pressure cannot cause much of a decrease in volume. In the drawing below circles represent molecules. Low Pressure High Pressure Drawing of a dropper before and after squeezing the bottle. Note: It is incorrect to state, "The molecules of a gas are compressible." Molecules never decrease in size. The more correct statement is, "Gases are compressible." or "When gases are compressed, the molecules move closer together."
© 2006 W.C. Deese -All Rights Reserved.
5
Remote Control Cartesian Diver By Dr. Bill Deese, Louisiana Tech University
You can amaze your students by operating your Cartesian Diver by "remote control." Start with the standard Cartesian Diver set-up. Drill a hole in the bottle top just large enough to accommodate a piece of aquarium tubing. Use another bottle (any size, but smaller is usually more convenient). Drill a hole in its cap also large enough to accommodate the aquarium tubing. Fill the second bottle with water and insert a piece of aquarium tubing 3 or more feet long inside each bottle.
By squeezing the small bottle, you will increase the pressure in it. The increased pressure in the small bottle will result in an identical increase in pressure in the large bottle, thus sending the Cartesian Diver to the bottom of the large bottle by a "remote control" device.
Some sneaky teachers we know even hide the "remote control" so that they can seemingly command the Cartesian Diver to dive by voice control alone. We highly recommend this procedure! It really causes the students to think about what is happening. This activity demonstrates the principle that pressure is the same throughout a fluid.

6
Balloon In A Bottle Materials: 2 plastic bottles with caps Sharp cutting instrument Silicon glue (from hardware store or pet center) 9" balloon 1. Remove label from one 2 or 3 liter bottle. Rinse and dry. 2. From the second bottle (any size as long as the tops and necks of both bottles are the same), cut off the top and part of the neck. You can use very sharp scissors, a utility knife, or a razor blade. 3. Take off a cap and trace its shape onto the middle of the first bottle. 4. Carefully cut a hole the size of the cap. 5. Ease the top and neck from the second bottle into the hole on the first bottle. 6. Seal the top into the second bottle with a silicon glue (like used to repair aquariums). Allow the glue to dry at least 24 hours. 7. Place a 9" balloon over the lip of the inserted top and neck. Student Questions: 1. Where are the high pressure and low pressure areas when the balloon is NOT inflated? (Mention the inside of the balloon, inside the bottle but outside the balloon, and outside the bottle.) 2. Where are the high pressure and low pressure areas when the balloon IS inflated? (Mention the inside of the balloon, inside the bottle but outside the balloon, and outside the bottle.) 3. Why does the balloon deflate when the cap is unscrewed? 4. Can you design a device that uses the principles you found here? Describe and illustrate your creation.

7
Make Your Own Lava Lamp What You Need: Tall glass, glass jar or plastic cup Water Vegetable oil (light-colored) Food coloring A large Alka-Seltzer tablet Water Flashlight (optional) What You Do: 1. Fill glass 1/3 with water and add a couple of drops of food dye. 2. Carefully float oil on top of the water, filling the glass to about 1 cm from the rim. 3. Break the Alka-Seltzer tablet into 4 parts and gently drop them into the glass. Note: If you don’t have an Alka-Seltzer tablets you can add a tablespoon of white vinegar to the water and then sprinkle a few teaspoons of bicarbonate of soda onto the surface of the oil. 4. Screw on the cap of the soda bottle. Tip the bottle back and forth and watch the wave appear. Oil and water really don’t like each other; they don’t even mix (in containers and social situations). Oil is less dense than water and rests on its surface. The Alka-Seltzer tablets chemically react with the water producing bubbles of oxygen gas. This gas is less dense than both the water and the oil, and so it will rise up through both liquids. When the gas bubble passes from the water into the oil it pulls a small amount of water with it. Eventually, when the bubble reaches the surface of the oil and pops, the water falls back through the oil, back to its “friends,” away from the rival blobs. Once the tablet hits the water it begins to react pretty quickly, but why doesn’t the citric acid and the sodium bicarbonate (in the Alka-Seltzer) react when the tablet is dry? In order for two chemicals to react they need to run into each other. The problem is, in their solid form the sodium bicarbonate and citric acid are basically stuck in the one spot. When you drop an Alka-Seltzer tablet into a glass of water the sodium bicarbonate and citric acid begin to dissolve and can move around much more easily allowing them to come into contact and react. Place a flashlight with a bright beam under the bottle to illuminate the bubbles for maximum visual effect.

8
Flinn Safety Contract http://www.flinnsci.com/documents/miscpdfs/safety_contract.pdf Excellent School Chemistry Laboratory Safety Guide (pdf.): http://www.cdc.gov/niosh/docs/2007-107/pdfs/2007-107.pdf Fabulous Website Directory for Middle School Science Teachers!! http://www.sldirectory.com/teachf/scied.html
What happened to Bob the Bear?
Dear Investigator,
Bob the Bear had an accident. By observing the scene, which lab rules were broken by Bob?
Write three possible explanations of what happened to Bob.
1.
2.
3.

9
Checklist for Science Safety Equipment and Materials
Use the following checklist to aid in assessing the level of safety in
the science learning environment for you and your students.
___clearly marked exits ___fire blankets ___adequate emergency exits ___eyewash station ___fire drill instructions ___fire extinguisher(s) ___fume hood ___safety shower ___safety goggles ___protective gloves ___adequate ventilation ___lab aprons ___adequate floor space ___first aid kit ___accessible circuit breakers ___flammables cabinet ___corrosives cabinet ___safety signs posted ___safety rules posted ___glass container ___communications system ___materials cart

10
Annual Science Safety Checklist
It is important that science teachers check their learning environment each year to ensure that it is safe for both teachers and students. Note that a completed copy of the annual checklist should be filed with key administrative personnel, both school and district, in an effort to guarantee that adequate measures are taken to correct any problems that may be noted.
Teacher___________________________________________________ School____________________________________________________
District____________________________________________________
Date_______________________________________________________
**If a hazard is identified that could prove to jeopardize the safety of any individual, the appropriate administrators should be notified immediately in writing.
General: Communications Yes No N/A
Phone system
Intercom system
General: Fire Extinguishers Yes No N/A
Dry chemical extinguisher in classroom
Dry chemical extinguisher in laboratory
All extinguishers checked quarterly; safety seal in place
Fire extinguishers clearly visible, near exits, labeled
General: Fire Blankets Yes No N/A
Approved fire blankets in each laboratory
Blankets located at eye level, clearly visible, marked
General: Emergency Exits Yes No N/A
Two emergency exits for each laboratory
Two emergency exits in both stock room and classroom
All exits clear of obstructions
All exits unlocked for outgoing traffic

11
General: Other Protective Measures (fire related) Yes No N/A
Exit signs visible
Fire alarm system functional in building
Fire drill procedures in place and posted
Emergency lights in place if exterior windows unavailable
Chemical Storage Room Yes No N/A
Dry chemical extinguisher in chemical storage room
Extinguisher checked quarterly, safety seal in place
Extinguisher clearly visible, near exit, labeled
Approved fire blanket in place
Fire blanket located at eye level, clearly visible, marked
Two emergency exits in both storage and prep rooms
All exits clear of obstructions
All exits unlocked to outgoing traffic
Exits clearly marked
Fire alarm system functional in building/room
Fire drill procedures in place and posted
Carts available for moving materials
General Storage Room Yes No N/A
Work surface of nonporous chemical resistant materials
Sink with hot water
Emergency shower accessible
Adequate lighting in room with doors that lock
Work space without clutter
Appropriate space for storing chemicals

12
Chemical waste container and broken glass container
Refrigerator marked “No Food Allowed”
Storage space (at least 15 square feet recommended)
Smoke detectors
Laboratory
Work Stations Yes No N/A
Number of students does not exceed the work station area
Work surfaces are nonporous and chemical resistant
Unobstructed area for moving through stations
Utility Controls Yes No N/A
Valve for controlling natural gas present and labeled
Electrical shut-off present and labeled
Shut-off system for water present and labeled
Fume Hood Yes No N/A
Located in lab room where chemicals are used
Hood area not used for storage
Air flow adequate at hood site
Hood vent to outside above roof level away from vents
Fume hood location away from doors and windows
Spill Control Yes No N/A
Chemical spill kits available
Sand or cat litter (absorbent clay) available

13
Sinks Yes No N/A
Adequate sink available for every four students working
At least one sink with hot water
Appropriate Ventilation Yes No N/A
Ventilation forced from floor to ceiling
6 ventilation changes per hour
Emergency exhaust fan in place
General Requirements Yes No N/A
At least 45 square feet of space per student available
Complete safety rules and safety signs posted
Chemical storage space with broken glass container
Doors with locks
Handicap accessible for students and teachers
Guidelines for Personal Safety
Emergency Showers Yes No N/A
Shower present in all laboratory rooms
Access to shower unobstructed
Handle of shower and floor drain functional
Eyewash/Face Wash Station Yes No N/A
Eyewash station available in all laboratory rooms
Eyewash stations clearly marked
Stations allow tepid water to continuously affect both eyes
Stations are flushed for 5 minutes and tested weekly

14
Clothing Yes No N/A
Lab aprons or coats available for each student and teacher
Protective gloves resistant to acid and heat available
Safety Goggles Yes No N/A
Approved safety goggles available for each student
Safety goggles and face shield available for the instructor
System for sanitizing goggles available
First Aid Yes No N/A
First aid kits located in each laboratory room
First aid kits marked clearly and easily visible
All first aid kits checked regularly and replenished
First aid kit located near a sink
Electrical Outlets Yes No N/A
All electrical outlets equipped with grounding connections
Number of outlets sufficient to eliminate extension cords
No outlets located near water sources
Circuit box for electrical system easily accessible
All circuit breakers identified by area or control
This information represents an accurate assessment of the school’s science facilities.
Signature___________________________________________Date_______________
15
S a f e t y i n t h e L a b o r a t o r yS a f e t y i n t h e L a b o r a t o r y Students must be engaged in hands-on, minds-on learning activities for optimal understanding of complex science concepts. Managing laboratory experiments, however, requires preparation, organization, consistency, and diligence.
Hot glassware that appears cool to the eye, caustic chemicals, and open flames are common elements in middle and high school classrooms. When teachers and students are not prepared to deal with these conditions, disaster is imminent. As a science educator, you must evaluate and refine the laboratory teaching techniques you use to prepare students to safely conduct experiments. You are also responsible for inspecting and maintaining your laboratory workspace, storage spaces, and equipment. Follow these guidelines to make safety a priority in your laboratory. Create a Calm, Focused Atmosphere The atmosphere that you establish and reinforce in your classroom helps establish the attitude your students have regarding safety. ▪ Provide an organized, uncluttered environment. The risk of confusion and
accidents decreases when students know where to find equipment, and have sufficient room to work. Establish consistent locations for specific pieces of equipment and chemicals. Countertops, floors, and exits should be clear of book bags, loose paper, and other obstructions.
▪ Model proper techniques and a professional attitude. Students learn a great deal from observing how you conduct yourself in the laboratory. When you speak calmly and work deliberately, you set a crucial, positive tone for student behavior and work ethic. When a teacher takes unsafe procedural shortcuts or does not focus on the work at hand, students are likely to take his or her lead.
▪ Create and implement a safety contract. Develop an agreement that outlines your expectations for student conduct in the laboratory. Be consistent in enforcing these rules. Students and parents who sign the contract should understand that unsafe behavior in the lab will result in loss of laboratory privileges for a specified period of time.
Prepare your Students Preparation is a critical step to ensuring success-and safety-in the classroom. • Teach basic laboratory skills, and make sure students perform them correctly.
Never assume that students already know how to perform basic laboratory skills when they enter your classroom. Lighting a Bunsen burner, using a pair of tongs, or disposing of a match are essential skills that, when done improperly, can cause dangerous situations. Teach these skills, and monitor and provide feedback to students as they perform them.
• Provide instruction in the location and use of safety equipment. Simply having a fire blanket, fire extinguisher, and eyewash station in the lab is not sufficient

16
preparation for an emergency. Teach students how to access these tools, and review specifics of their usage periodically.
• Provide opportunities for practice. Students should be prepared to respond to emergency situations quickly and efficiently. Incorporate safety drills for fire emergencies and chemical spills into classroom activities. Include questions related to safety issues in graded assessments of other curricular topics.
• Spend adequate time teaching and practicing new skills. Bending glass tubing, inserting glass tubing into a stopper, and other infrequently used techniques require special preparation. Make sure students are comfortable with a new procedure before expecting them to try it on their own.
Establish and Enforce Specific Standards Standards of conduct and dress go a long way toward ensuring that your students remain safe in the laboratory. • Demand appropriate attire for laboratory work. Middle and high school
students can be preoccupied with physical appearances. But while safety goggles and chemical aprons may not be stylish, they are crucial to student safety. Enforce a strict dress code for the lab: goggles must be worn at all times, and students must not be allowed to wear sandals, garments with long, floppy sleeves, dangling earrings, or long hair that is not restrained.
• Deal with unsafe behaviors quickly and consistently. Students must know that
you are watching them closely and will not tolerate behavior that could cause a dangerous situation.
• Require students to prepare for an experiment prior to laboratory day.
Students should be familiar with the procedure before beginning an experiment. Have students read through the entire experiment one or more days prior to conducting it. Use questioning and discussion to make sure they are comfortable with each procedural step.
Evaluate the Lab Environment Your laboratory environment can provide students with equipment that is either safe and reliable or sub-standard. Take the steps necessary to ensure the best experience possible. • Examine glassware and other equipment for defects on a regular basis.
Removing faulty equipment before students attempt to use it reduces confusion and can eliminate a potentially dangerous situation.
• Inspect work spaces frequently. Floors and countertops must be free of debris, and insist on non-skid wax on laboratory floors. Vents and nozzles should be free of obstruction and allow air to move freely. Seldom-used equipment should be stored in a secure location.

17
Consider Time Management Issues Careful consideration of the time required for preparation, investigation, and clean-up will ensure the safest possible environment for your students. • Provide sufficient time for experiments. The potential for accidents increases
when students rush through an experimental procedure. Consider stretching lengthy experiments over multiple days. Provide students with time updates throughout the experiment, and let them know when they should stop work and begin to clean up.
• Incorporate sufficient time for students to clean up after a lab. Provide ample time for students to clean and dry glassware, dispose of chemicals, and return equipment to a central location before class ends.
This article was contributed by Jennipher Willoughby, a freelance writer and former science and technology specialist for Lynchburg City Schools in Lynchburg, Virginia. Retrieved from: Safety in the Lab Today, Glencoe online http://www.glencoe.com/sec/teachingtoday/subject/safety.phtml
DuPont™ Science Safety Zone™ Science Safety Awareness Program General Science Safety Checklist
Science safety is a team effort involving not only teachers and students but also school administrators and parents. But where can you go for guidance about proven safety practices?
Many—if not all—issues related to science safety are addressed by the Council of State Science Supervisors (CSSS). From chemical storage to safety equipment recommendations, CSSS's Web site provides readers with a wealth of practical information.
The following is a suggested checklist of safety concerns in K-12 science labs adapted with permission from the Council of State Science Supervisors. (This and other related materials are available online at: csss.enc.org/safety.htm.
Safety Equipment
▪ Keep appropriate safety equipment on hand, including an emergency shower, eye-wash station, fume hood, fire blankets, and fire extinguisher. All students and teacher(s) should have and wear safety goggles and protective aprons when working in the lab.
▪ Ensure proper eye protection devices are worn by everyone engaged in supervising, observing, or conducting science activities involving potential hazards to the eye.

18
▪ Provide protective rubber or latex gloves for students when they dissect laboratory specimens.
▪ Use heat-safety items such as safety tongs, mittens, and aprons when handling either cold or hot materials.
▪ Use safety shields or screens whenever there is potential danger that an explosion or implosion might occur.
▪ Keep a bucket of 90 percent sand and 10 percent vermicullite or kitty litter (dried bentonite particles) in all rooms in which chemicals are handled or stored. The bucket must be properly labeled and have a lid that prevents other debris from contaminating the contents.
Teaching Procedures
• Set a good example when demonstrating experiments by modeling safety techniques such as wearing aprons and goggles.
• Help students develop a positive attitude toward safety. Students should not fear doing experiments or using reagents or equipment, but they should respect them for potential hazards.
• Always demonstrate procedures before allowing students to begin the activity. Look for possible hazards and alert students to potential dangers.
• Explain and post safety instructions each time you do an experiment.
• Maintain constant supervision of student activities. Never allow students to perform unauthorized experiments or conduct experiments in the laboratory alone.
• Protect all laboratory animals and ensure that they are treated humanely.
• Remind students that many plants have poisonous parts and should be handled with care.
• For safety, consider the National Science Teachers Association's recommendation to limit science classes to 24 or fewer students.
Student Safety Tips
• Read lab materials in advance. Note all cautions (written and oral).
• Never assume an experiment is safe just because it is in print.
• Do not eat or drink in the laboratory.

19
• Keep personal items off the lab tables.
• Restrain long hair and loose clothing. Wear laboratory aprons when appropriate.
• Avoid all rough play and mischief in science classrooms or labs.
• Wear closed-toed shoes when conducting experiments with liquids or with heated or heavy items.
• Never use mouth suction when filling pipettes with chemical reagents.
• Never force glass tubing into rubber stoppers.
• Avoid transferring chemicals to your face, hands, or other areas of exposed skin.
• Thoroughly clean all work surfaces and equipment after each use.
• Make certain all hot plates and burners are turned off before leaving the laboratory.
Lab Environment
• Place smoke, carbon monoxide, and heat detectors in laboratories and storerooms.
• Ensure that all new laboratories have two unobstructed exits. Consider adding additional exits to rooms with only one door.
• Frequently inspect a laboratory's electrical, gas, and water systems.
• Install ground fault circuit interrupters at all electrical outlets in science laboratories.
• Install a single central shut-off for gas, electricity, and water for all the laboratories in the school, especially if your school is in an earthquake zone. Maintain Material Safety Data Sheets (MSDS) on all school chemicals and an inventory of all science equipment.
• Conduct frequent laboratory inspections and an annual, verified safety check of each laboratory.

20
P.O. Box 219, Batavia, IL 605101-800-452-1261 • Fax: (866) 452-1436
[email protected] • www.flinnsci.com
“Your Safer Sourcefor Science Supplies”
PURPOSEScience is a hands-on laboratory class. You
will be doing many laboratory activitieswhich require the use of hazardous chemicals. Safety in the science classroom isthe #1 priority for students, teachers, and parents. To ensure a safe science classroom,a list of rules has been developed and pro-vided to you in this student safety contract.These rules must be followed at all times.Two copies of the contract are provided. Onecopy must be signed by both you and a par-ent or guardian before you can participate inthe laboratory. The second copy is to be keptin your science notebook as a constantreminder of the safety rules.
GENERAL RULES1. Conduct yourself in a responsible man-
ner at all times in the laboratory.
2. Follow all written and verbal instruc-tions carefully. If you do not understanda direction or part of a procedure, ask theinstructor before proceeding.
3. Never work alone. No student may workin the laboratory without an instructorpresent.
4. When first entering a science room, donot touch any equipment, chemicals, orother materials in the laboratory areauntil you are instructed to do so.
5. Do not eat food, drink beverages, orchew gum in the laboratory. Do not uselaboratory glassware as containers forfood or beverages.
6. Perform only those experiments autho-rized by the instructor. Never do any-thing in the laboratory that is not calledfor in the laboratory procedures or byyour instructor. Carefully follow allinstructions, both written and oral.Unauthorized experiments are prohib-ited.
7. Be prepared for your work in the labora-tory. Read all procedures thoroughlybefore entering the laboratory.
8. Never fool around in the laboratory.Horseplay, practical jokes, and pranksare dangerous and prohibited.
9. Observe good housekeeping practices.Work areas should be kept clean and tidyat all times. Bring only your laboratoryinstructions, worksheets, and/or reportsto the work area. Other materials (books,purses, backpacks, etc.) should be storedin the classroom area.
10. Keep aisles clear. Push your chair underthe desk when not in use.
11. Know the locations and operating proce-dures of all safety equipment includingthe first aid kit, eyewash station, safetyshower, fire extinguisher, and fire blan-ket. Know where the fire alarm and theexits are located.
12. Always work in a well-ventilated area.Use the fume hood when working withvolatile substances or poisonous vapors.Never place your head into the fume hood.
13. Be alert and proceed with caution at alltimes in the laboratory. Notify theinstructor immediately of any unsafeconditions you observe.
14. Dispose of all chemical waste properly.Never mix chemicals in sink drains.Sinks are to be used only for water andthose solutions designated by theinstructor. Solid chemicals, metals,matches, filter paper, and all other insol-uble materials are to be disposed of inthe proper waste containers, not in thesink. Check the label of all waste con-tainers twice before adding your chemi-cal waste to the container.
15. Labels and equipment instructions mustbe read carefully before use. Set up anduse the prescribed apparatus as directedin the laboratory instructions or by yourinstructor.
16. Keep hands away from face, eyes,mouth and body while using chemicalsor preserved specimens. Wash yourhands with soap and water after per-forming all experiments. Clean all worksurfaces and apparatus at the end of theexperiment. Return all equipment cleanand in working order to the proper stor-age area.
17. Experiments must be personally moni-tored at all times. You will be assigned alaboratory station at which to work. Donot wander around the room, distractother students, or interfere with the labo-ratory experiments of others.
18. Students are never permitted in thescience storage rooms or preparationareas unless given specific permissionby their instructor.
19. Know what to do if there is a fire drillduring a laboratory period; containersmust be closed, gas valves turned off,fume hoods turned off, and any electri-cal equipment turned off.
20. Handle all living organisms used in alaboratory activity in a humane manner.Preserved biological materials are to betreated with respect and disposed ofproperly.
21. When using knives and other sharpinstruments, always carry with tips andpoints pointing down and away. Alwayscut away from your body. Never try tocatch falling sharp instruments. Graspsharp instruments only by the handles.
22. If you have a medical condition (e.g.,allergies, pregnancy, etc.), check withyour physician prior to working in lab.
CLOTHING23. Any time chemicals, heat, or glassware
are used, students will wear laboratorygoggles. There will be no exceptions tothis rule!
24. Contact lenses should not be worn in thelaboratory unless you have permissionfrom your instructor.
25. Dress properly during a laboratory activ-ity. Long hair, dangling jewelry, andloose or baggy clothing are a hazard inthe laboratory. Long hair must be tiedback and dangling jewelry and loose orbaggy clothing must be secured. Shoesmust completely cover the foot. No san-dals allowed.
26. Lab aprons have been provided for youruse and should be worn during labora-tory activities.
ACCIDENTS AND INJURIES27. Report any accident (spill, breakage,
etc.) or injury (cut, burn, etc.) to theinstructor immediately, no matter howtrivial it may appear.
28. If you or your lab partner are hurt,immediately yell out “Code one, Codeone” to get the instructor’s attention.
29. If a chemical splashes in your eye(s) oron your skin, immediately flush withrunning water from the eyewash stationor safety shower for at least 20 minutes.Notify the instructor immediately.
30. When mercury thermometers are bro-ken, mercury must not be touched.Notify the instructor immediately.
HANDLING CHEMICALS31. All chemicals in the laboratory are to be
considered dangerous. Do not touch,taste, or smell any chemicals unlessspecifically instructed to do so. Theproper technique for smelling chemicalfumes will be demonstrated to you.
32. Check the label on chemical bottlestwice before removing any of the con-tents. Take only as much chemical asyou need.
33. Never return unused chemicals to theiroriginal containers.
Flinn Scientific’s Student Safety Contract
© 2004, Flinn Scientific, Inc. All Rights Reserved. Reproduction permission is granted to science teachers who are customers of Flinn Scientific, Inc. Batavia, Illinois, U.S.A. No part of this material may be reproduced or trans-mitted in any form or by any means, electronic or mechanical, including, but not limited to photocopy, recording, or any information storage and retrieval system, without permission in writing from Flinn Scientific, Inc.

21
Lab Safety LyricsLab Safety Lyrics Chorus Wait, you’ve gotta make sure that your lab is safe Before you make a measurement, scope out the space Got your gloves pulled up, got your goggles on Don’t want to be another lab experiment gone wrong Go with goggles, go with the gloves! Go without food, and spit out your gum! Go safe! Go safe! And get into it Go safe scientists, no accidents! Verse I You know the science lab can be a pretty dangerous place You gotta wear safety goggles to protect your face And just in case you still end up with stuff in your eye You should know how to find the eyewash nearby And as a matter of fact, know where the exits are too ‘ Cause if a fire starts, you better know what to do And you don’t have to be a hero, try to break the mold Be sure to follow all directions and just do as you’re told It reminds me of this time I was sitting in lab Trying to work through the experiment and give it a stab When my partner started grabbing chemicals from the shelves Started mixing up some liquids with unusual smells Before he could stop, it began to bubble up In a couple of seconds he was in deep, deep trouble So maybe mixing crazy potions didn’t go as he’d planned He didn’t follow the directions and he burned his hand (ouch!) Chorus Verse II It’s lab time and you’re ballin’, on top of things Hypothesis made the call on what you want to see But hold up, because it looks like you forgot some things Before you pour, let me know what’s wrong with this scene Your eyes are wide open to take in results Or get blinded by all kinds of chemicals They could splash up and mess up your complexion So keep it hot, yo, and don those goggles The same goes for your fingers, your hair, and your toes No flip-flops, your kicks should have the tips closed Your fingers should slip through the wrists of some gloves No acid contamination on your palms And your nose, you’ve gotta steer clear of the chemicals
22
Or they’ll burn your nostrils (and you kind of want those!) Protect it, don’t smell it, just waft with me, waft with me Don’t need no medics, just waft with me, waft with me Hands over the flask, your nose hanging back Keep your nostrils intact, just waft with me, waft with me Chorus Verse III Hey, I think I really like this lab stuff I’m gonna do it again tomorrow ’cause I can’t get enough Of safely making crazy things happen, it’s fun It’s amazing, I’ve seen the reactions, I’m done You’re almost done man, can you tell me your plan For what to do with all that toxic waste in your hand? I just heard the bell ring, I’ve gotta think quick I think I’ll wash it down the sink Whoa, whoa, whoa Hold on, bro, how do you know where that goes? By tomorrow the sink will be starting to glow Put the waste in the designated receptacle And clean your station off before you take off, yo “Put the caps on the bottles?” Yeah, that’s right. “Wipe the tabletop off?” Yeah, that’s right. “Run the flask under water?” Yeah, that’s right. You cleaned up real nice, see, and nobody died. Music can be purchased from Rhythm Rhyme Results – Educational Rap http://www.educationalrap.com/
Safety in the Science Classroom Web Resources http://www.thecatalyst.org/hwrp/safetymanual/gen_guidelines.html http://nobel.scas.bcit.ca/debeck_pt/science/intro/intro_p1.htm# http://science.valleyheights.org/safety.htm http://www.aasd.k12.wi.us/staff/Leonardann/safety.htm http://www.fallriver.k12.wi.us/mscience/safety.htm http://www.scienceaware.com/w_genlabsf.htm http://csss.enc.org/safety.htm http://www.flinnsci.com/homepage/safe/contract.html http://www.flinnsci.com/homepage/safe/safscien.html http://www.nsela.org/roysafe.htm

23
Safety Is Everyone’s Responsibility (from Cathi Cox & Missy Wooley @ LA Tech University)
The responsibility for safety in the science classroom and laboratory is shared among all individuals involved in the learning experience. Students should not expect the teacher to be the only one responsible for maintaining and contributing to a safe learning environment. It is necessary for students to also be partners in this process protecting the safety of themselves, their classmates, and the environment that others will work in.
It is paramount that all science students be made aware of the safety rules and procedures before ever beginning any work in the science classroom or laboratory. An important aspect of this process is the implementation of a safety contract that each student must read, understand, and then sign. It is also recommended by experts that the parents of each student be involved in this process as well.
Many of the safety rules that are covered should become a reflex for students when preparing for their science investigations. Safety goggles should always be worn along with any other protective means such as safety aprons, coats, or gloves; it is also important to remember to keep such articles in place until all chemicals have been returned, glassware cleaned, and equipment properly stored. Long hair should be tied back and any articles of clothes or jewelry that could pose a problem should be tied back or removed as well. Students should remember to wear shoes with closed toes and never eat or drink anything while in the lab or engaged in scientific procedures.
Another way students can ensure their safety and the safety of others is to commit to memory the location of safety equipment in the learning environment. There should be no question should a need arise for the eyewash station, the safety shower, fire blankets, fire extinguisher, first aid kit, or even exit doors.
Though it is important for students to focus on the work that they are going while in the lab or science classroom, it is also important that they remain alert and sensitive to what is going on around them. This will enable them to react accordingly should a problem arise. Should an unsafe situation develop or other problem be noted, the instructor should be alerted immediately. It should also be noted that no student should work alone in the lab so that help will be available if needed.
Reacting to chemical spills can be alarming but students should know how to handle themselves properly should this situation develop. Always alert the instructor immediately and follow their instructions completely. Move quickly but calmly from the site. If skin or clothing has come into contact with the chemical, wash the area completely with large amounts of water for at least 15 minutes using the eyewash station or safety shower. Students should be aware of the fact that they may need to assist another student in this situation and be prepared to act accordingly.

24
Problems can be avoided by keeping the work area clean. While engaged in the learning experience, keep papers and other lose items out of the way. Clutter during a lab experience is a problem waiting to happen. At the end of the class, clean the work station thoroughly and dispose of materials in the appropriate manner.
In addition, students should always be mindful to wash their hands for at least 20 seconds with soap and warm water after completing their lab experience and leaving the lab itself. Also, the student should never enter the prep room or the chemical storeroom; furthermore, student should be mindful not to touch anything that has been prepared or in place for class until instructed to do so.
Finally, an important area that students can focus on is a commitment to always reading and studying whatever science activity, lab experience, or other type of learning experience before beginning. By asking questions prior to beginning the work and clarifying points of confusion prior to initiating work, the risk of unsafe practice is diminished. This also enables the student to identify any hazards that might exist and therefore take precautions as needed. In addition, a better understanding of the procedure will allow the student to better understand the overall process and procedure being undertaken which will lower the risk for unforeseen problems.
Just as the student has many areas of responsibility in the science classroom and laboratory, so does the teacher. Because classrooms and laboratories may be overcrowded, the chances for accidents certainly increase. Advanced preparation and effective planning can then be the best safety practice a teacher can use to reduce the risk of accidents and problems.
It is imperative that the teacher understands each and every science learning experience prior to implementation. This includes field and lab investigations as well as demonstrations and other classroom experiences. Becoming familiar with information related to chemicals or other hazards that will be used in the learning experience is an essential component of proper planning. This information is found on Materials Safety Data Sheets and each of these should be kept on file in the teacher’s work area for quick referencing. After reading the materials and becoming informed about the risks and hazards associated with the chemicals or materials, the teacher must then seriously consider whether the student should be working with these substances. If there is any question, thought should be given to substitute materials or procedures. It is never appropriate to take a chance.
Once the decision has been made about the lab or learning experience, the teacher has the responsibility of engaging in a trial run of the experience if he or she has not done it before. If substituting materials in a familiar learning experience, care should still be taken to practice the procedure before engaging the students in it.

25
In planning the learning experience, careful consideration should be given to what could go wrong. Anticipating the problem enables the teacher to possibly diffuse the situation before it actually takes place. It is imperative to take whatever measures are necessary to reduce the possibility of an unsafe situation or accident occurring.
A good rule of thumb to always follow is to make certain that there is a regular safety routine followed prior to every science lab investigation or learning experience. The teacher and students should go over all safety rules that apply as well as reinforce general policies and procedures that need to be highlighted. Make certain that student questions are answered and all concerns are covered before the students begin their work.
The proper handling and storage of all laboratory materials is a vital part in maintaining the adequate level of safety in the science classroom and laboratory. All chemical MUST be labeled correctly and clearly, stored in the proper containers, and arranged according to safety guidelines in the storage area or stockroom. In addition, any materials that are to be used by the students should be carefully arranged in a proper location that is safe for student use.
It is of utmost importance that order and discipline are both maintained during all science learning experiences. The teacher’s effective classroom and laboratory management skills are necessary tools that must be adequately developed before ever engaging students in a lab setting. The teacher is responsible for implementing the safety rules, policies, and procedures in the classroom with the active participation of the student throughout the process. These rules are to be obeyed by everyone in the learning environment and the teacher must strictly enforce this policy.
Careful monitoring of students is also critical to not only the success of the learning experience, but to maintaining its level of safety. Students should never be left alone in the lab or classroom when engaged in work with chemicals or other hazardous materials. Through the monitoring process, the teacher can then work with students to correct any problem or behavior that is unsafe or inappropriate.
Teachers should require all students to thoroughly clean their work space following the learning experience or investigation. Careful monitoring can help ensure that goggles remain on students as well as other protective articles until all tasks are completed. Make certain that all chemical and biological waste is properly disposed as well.
In the event that an accident does occur, be sure to follow the school or district policies and guidelines concerning first aid and the reporting of an accident. It is imperative that the teacher not wait to record the cause of the accident, injuries sustained, who was involved, what action was taken, and the results. A more detailed record of the incident can be made at a later date. The proper closure to an accident can aid in the prevention of another one taking place.
26
NSTA Position Statement: Responsible Use of Live Animals and Dissection
In the Science Classroom Introduction NSTA supports the decision of science teachers and their school or school district to integrate live animals and dissection in the K–12 classroom. Student interaction with organisms is one of the most effective methods of achieving many of the goals outlined in the National Science Education Standards (NSES). To this end, NSTA encourages educators and school officials to make informed decisions about the integration of animals in the science curriculum. NSTA opposes regulations or legislation that would eliminate an educator's decision-making role regarding dissection or would deny students the opportunity to learn through actual animal dissection. NSTA encourages districts to ensure that animals are properly cared for and treated humanely, responsibly, and ethically. Ultimately, decisions to incorporate organisms in the classroom should balance the ethical and responsible care of animals with their educational value. While this position statement is primarily focused on vertebrate animals, NSTA recognizes the importance of following similar ethical practices for all living organisms. Including Live Animals in the Classroom NSTA supports including live animals as part of instruction in the K-12 science classroom because observing and working with animals firsthand can spark students' interest in science as well as a general respect for life while reinforcing key concepts as outlined in the NSES. NSTA recommends that teachers: Educate themselves about the safe and responsible use of animals in the classroom. Should seek information from reputable sources and familiarize themselves with laws and regulations in their state. Become knowledgeable about the acquisition and care of animals appropriate to the species under study so that both students and the animals stay safe and healthy during all activities. Follow local, state, and national laws, policies, and regulations when live organisms, particularly native species, are included in the classroom. Integrate live animals into the science program based on sound curriculum and pedagogical decisions.

27
Develop activities that promote observation and comparison skills that instill in students an appreciation for the value of life and the importance of caring for animals responsibly. Instruct students on safety precautions for handling live organisms and establish a plan for addressing such issues as allergies and fear of animals. Develop and implement a plan for future care or disposition of animals at the conclusion of the study as well as during school breaks and summer vacations. Espouse the importance of not conducting experimental procedures on animals if such procedures are likely to cause pain, induce nutritional deficiencies, or expose animals to parasites, hazardous/toxic chemicals, or radiation. Shelter animals when the classroom is being cleaned with chemical cleaners, sprayed with pesticides, and during other times when potentially harmful chemicals are being used. Refrain from releasing animals into a non-indigenous environment. Dissection NSTA supports each teacher's decision to use animal dissection activities that help students: - develop skills of observation and comparison, - discover the shared and unique structures and processes of specific organisms, and - develop a greater appreciation for the complexity of life. It is essential that teachers establish specific and clear learning goals that enable them to appropriately plan and supervise the activities. NSTA recognizes science educators as professionals. As such, they are in the best position to determine when to use—or not use—dissection activities. NSTA encourages teachers to be sensitive to students’ views regarding dissection, and to be aware of students’ beliefs and their right to make an informed decision about their participation. Teachers, especially those at the primary level, should be especially cognizant of students’ ages and maturity levels when deciding whether to use animal dissection. Should a teacher feel that an alternative to dissection would be a better option for a student or group of students, it is important that the teacher select a meaningful alternative. NSTA is aware of the continuing development and improvement of these alternatives.

28
Finally, NSTA calls for more research to determine the effectiveness of animal dissection activities and alternatives and the extent to which these activities should be integrated into the science curriculum. Regarding the use of dissection activities in school classrooms, NSTA recommends that science teachers: Be prepared to present an alternative to dissection to students whose views or beliefs make this activity uncomfortable and difficult for them. Conduct laboratory and dissection activities with consideration and appreciation for the organism. Plan laboratory and dissection activities that are appropriate to the maturity level of the students. Use prepared specimens purchased from a reputable and reliable scientific supply company. An acceptable alternative source for fresh specimens (i.e., squid, chicken wings) would be an FDA-inspected facility such as a butcher shop, fish market, or supermarket. The use of salvaged specimens does not reflect safe practice. Conduct laboratory and dissection activities in a clean and organized workspace with care and laboratory precision. Conduct dissections in an appropriate physical environment with the proper ventilation, lighting, furniture, and equipment, including hot water and soap for cleanup. Use personal safety protective equipment, such as gloves, chemical splash goggles, and aprons, all of which should be available and used by students, teachers, and visitors to the classroom. Address such issues as allergies and squeamishness about dealing with animal specimens. Ensure that the specimens are handled and disposed of properly. Ensure that sharp instruments, such as scissors, scalpels, and other tools, are used safely and appropriately. Base laboratory and dissection activities on carefully planned curriculum objectives. —Adopted by the NSTA Board of Directors June 2005 Revised: March 2008

29
Common Chemical Substitutions
Generic Name & Formula Common or Trade Name
Acetic acid CH3COOH Vinegar
Acetone CH3COCH3 Nail polish remover
Aluminum Soft drink cans
Aluminum potassium sulfate AIK(SO4)2●12H2O Alum
Ammonium hydroxide (dilute) NH4OH Ammonia water
Ammonium nitrate NH4NO3 Cold-Pak
Amyl acetate CH3COOC3H11 Banana oil
Ascorbic acid C6HaO6 Vitamin C
Boracic acid (orthoboric) H3BO3 Boric acid
Benzaldehyde C7H6O Almond oil
Calcium chloride CaCl2 Malt-a-way
Calcium hydroxide Ca(OH)2 Lime
Copper Cu U.S. Penny (before 1982)
Dextrose C6H1206 Glucose
Ethanol C2H5OH Everclear or ditto fluid
Ethylene glycol C2H6O2 Antifreeze
Glucose C6H1206 Dextrose
Glycerol C3H5(OH)3 Glycerin or Glycerine
Graphite (allotrope of C) Pencil lead
Hydrochloric acid HCl Muriatic acid
4-Hydroxy-3-methoxybenzaldehyde C3H8O3 Vanilla
Isopropanol C3H5OH Isopropyl alcohol (rubbing alcohol)
30
Magnesium hydroxide MgOH Milk of magnesia
Magnesium sulfate MgSO4 Epsom salts
Manganese dioxide MnO2 Manganese dioxide from battery
Methyl salicylate C6H4(OH)CO2CH3 Oil of wintergreen
Mineral talc Talcum powder
Mineral turpentine or oil of turpentine Turpentine
Methanol CH3OH Methyl alcohol
Napthalene C1OH8 Moth flakes
Parachlorobenzene C6H4Cl2 Moth balls
Paraffin oil Mineral oil
Phenolphthalein C20H14O4 Ex-lax tablets
Potassium bitartrate C4H5KO6 Cream of tartar
Potassium hydroxide KOH Potash
Potassium nitrate KNO3 Saltpeter
Quinine sulfate 2(C20H24N2O2).H2SO4 Quinine sulfate in quinine water
Sodium bicarbonate NaHCO3 Baking soda or washing soda
Sodium carbonate Na2CO3 Baking powder
Sodium chloride NaCl Table salt (plain)
Sodium hydroxide NaOH Easy Off (oven cleaners) or Lye
Sodium hypochlorite NaOCl 13% Clorox
Sodium tetraborate B4Na2O7 Borax
Starch (C6H10O5)n Starch
Sucrose C12H32O11 Sugar (table)
Zinc oxide ZnO Calamine lotion

31
Big Needs, Small BudgetsBig Needs, Small Budgets Debbie Silver
• Keep a “Needs List” on the board or write it in your class newsletter.
When asked ahead of time for coffee cans, clean jars, magazines, pet containers, egg cartons, plastic milk jugs. 2-liter bottles, or other available materials both students and parents will contribute items if given enough notice. Remember to thank them.
• When you go into a store to make a purchase for you classroom, ask to
speak to either the manager or assistant manager. Tell her/him that you are a local educator on a limited budget. Ask her/him if s/he can give you a discount on items you are purchasing for your students. Sometimes store managers have a certain amount of discretionary funds they can use to make charitable donations, so you may end up getting your purchases for free.
• As soon as you move into your classroom start making a “dream list” of items you need and want (a piece of equipment, supplies, supplementary materials). Prioritize your list and periodically submit it to the local PTA/PTO, local service organizations, or other groups that help in the community. Often times theses groups have extra money in their budgets and will give it to an educator who makes a reasonable request. Sometimes you can get three or four groups to go together and help purchase the larger items you need. • Show up at community events and get to know leaders in the service
organizations. Being visible in the community helps you build support. Groups are more likely to support your requests if they know you and you support them.
• When a group, individual, or business donates items to your classroom take
a picture of the students actually using it and attach it to a thank you note from the children. Mention it in your newsletter, highlight it, and mail that along, too. Making a practice of following up with acts of appreciation is great for building support with the community as well as insuring that you will be positively received the next time you make a request.
• Don’t limit yourself to money donations or even new items. A local
MacDonald’s™ gave me a wonderful set of slightly used plastic trays for my cooperative learning activities. The community hospital donated extra urinal cups (yes, they were clean) for a measuring activity. A pharmacy gave me a whole box of eyedroppers to use in making Cartesian Divers. It’s best to ask first at places where you regularly shop. If you are a good customer the management is usually more receptive to your request. However, you can always approach an unknown manager with this line,

32
“Hello Ms/Mr. (read it off her/his name tag), my name is (read it off your school badge if you have forgotten), do you like children?” What’s s/he going to say? That gives you an opening. “Well, I’m glad to hear it because I’m here today on behalf of some really deserving children . . .” You know the drill. Just be very specific about what you want, and you are far more likely to get it. “I need 24 carpet samples” is much more effective than “We’ll take anything that you’ve got!”
If you cannot afford to join the national organization(s) for your grade level or subject area, at least join the local and state levels. Ask your principal or librarian to subscribe to the journals that pertain to your area. Some of the best grant opportunities, teaching resources, and professional development offerings are advertised in their newsletters and periodicals. Go to yard sales, garage sales, and second-hand stores for wonderful
buys on larger items like aquariums, ice chests, mats, playground toys, pet habitats, instructional toys, books, and furniture. Attend workshops on grant writing. Check out grant sites on the internet for tips and available sources. Find out if local or state organizations offer teachers a chance to compete for funds. Remember that your chances of winning a local grant are much better than getting a national one, and they are usually easier to write.
Grantwriting Websites:
http://www.grantproposal.com/starting_inner.html http://www.npguides.org/
http://www.techlearning.com/article/8354 http://www.techlearning.com/article/8490 http://www.techlearning.com/article/8608

33
Strategies for Writing Winning Grants Debbie Silver
• Make absolutely sure that you have followed ALL rules, regulations, and guidelines! This sounds obvious, but you would be amazed at how many proposals are pre-screened and disqualified because of a simple failure to follow directions. • Have others read and critique your proposal. Let them read it "cold" without any explanation from you. Ask them to make sure that your proposal: - clearly states a solvable problem
- has goals that match those of the sponsor's Request for Proposals (RFP).
- indicates how the project will benefit students academically. - gives a clear purpose for all items that are to be purchased. - presents understandable, detailed descriptions of the activities involved. - clearly describes how the method of evaluation will measure progress towards the stated purposes and student needs. - has a justifiable budget that directly correlates with the objectives of
the proposal. - provides solid evidence that you have the skill and experience to
implement successfully your plan (special training, workshops, certifications, courses, etc.).
• Be sure you have filled out all required forms and have obtained the
required authorization signatures. Check once again to see that your proposal meets each of the requirements on the RFP.
• Send the proposal in a way that can be certified -- Express Mail, Federal
Express, UPS, or registered mail. Make absolutely certain that your proposal arrives on or before the due date. Late entries are usually discarded unread.