best practices for configuring a highly available, integrated, … · 2012-02-06 · best practices...
TRANSCRIPT

Best Practices for Configuring a Highly Available, Integrated,
NAS/SAN Solution using SANsymphony™-V R8.0 Storage Virtualization Software
on Windows Server 2008 R2 Operating System
Applicable to:
Product versions:
SANsymphony-V Release 8 (R8)
Windows Server 2008 R2 (x64) Enterprise Edition
Cumulative Change Summary Date
Original release February 28, 2011

Page 2
This document is the property of DataCore Software. It is intended solely as an aid for installing and configuring Storage Virtualization solutions with DataCore™ software products. This document does not provide a warranty to any DataCore software, equipment, or service, nor does it imply product availability. DataCore Software is not responsible for the use of this document and does not guarantee the results of its use. DataCore Software does not warrant or guarantee that anyone will be able to recreate or achieve the results described in this document. This document does not supersede technical knowledge taught in DataCore training courses nor professional skills in working with SAN and storage environments. The installation and configuration described in this document made use of third party software and hardware. DataCore Software does not make any warranties or guarantees concerning such third party software and hardware.
COPYRIGHT Copyright © 2011 by DataCore Software Corporation. All rights reserved. DataCore, the DataCore logo, and SANsymphony are trademarks of DataCore Software Corporation. Other DataCore product or service names or logos referenced herein are trademarks of DataCore Software Corporation. All other products, services and company names mentioned herein may be trademarks of their respective owners. No part of this document may be copied, reproduced, translated or reduced to any electronic medium or machine-readable form without the prior written consent of DataCore Software Corporation.

Page 3
Table of Contents
CHAPTER 1 – GENERAL OUTLINE/SCOPE 4
CHAPTER 2 – FUNCTIONAL DIAGRAMS 5
CHAPTER 3 – PREREQUISITES AND SYSTEM REQUIREMENTS 7
CHAPTER 4 – PHYSICAL SERVER SETUP FOR HIGHLY AVAILABLE NAS 8
Install Windows Server 2008 R2 and Logon 8
Setup of NICs in Windows Server 2008 R2 Operating System 8
Features and Rules Setup in Windows Server 2008 R2 Operating System 9
Installing and Configuring SANsymphony-V R8 Software 10
Setup and Configure Local iSCSI Target Ports 11
Create, Configure and Serve Mirrored Virtual Disks 12
Discover and Configure HA Virtual Disks as Shared Volumes for Microsoft Cluster Configuration 15
Validate and Configure a Failover Cluster 16
Setup and Create an HA Cluster File Server 18
CHAPTER 5 – HYPER-V VIRTUAL MACHINE SETUP FOR HIGHLY AVAILABLE NAS 22
Install Windows Server 2008 R2 and Logon 22
Setup of NICs in Windows Server 2008 R2 Operating System 22
Deploy Virtual Machines 26
Configure Virtual Machines as Hosts 33
Create, Configure and Serve Mirrored Virtual Disks 33
Discover and Configure HA Virtual Disks as Shared Volumes for Microsoft Cluster Configuration 36
Validate and Configure a Failover Cluster 37
Setup and Create an HA Cluster File Server 40
CHAPTER 6: USING AN NFS-SHARE WITH VMWARE ESX 43
Overview 43
Configuration Diagram 43
Setup 43
Modifying Settings for the NFS Share 44
VMware Setup 47

Page 4
Chapter 1 – General Outline/Scope
This document outlines two different setup processes to provide highly available Network Attached Storage (NAS) resources to CIFS and NFS hosts using a combination of DataCore™ SANsymphony™-V R8 storage virtualization software and running failover clusters on Microsoft Windows Server 2008 R2 operating system. The same configuration will simultaneously provide highly available, advanced block-level disk services to SAN hosts using Fibre Channel and iSCSI protocols. The integrated NAS/SAN solution leverages NAS features from the File Services role in Windows Server 2008 R2 operating system, supplemented by redundancy features of Failover Clustering in the operating system and SANsymphony-V block-level synchronous mirroring. The processes discussed in the document effectively eliminate single points of failure in the NAS/SAN configuration using a pair of standard servers whose local storage resources are replicated between each other in real time. Automatic failover of the file services is handled by the failover cluster software, whereas automatic failover and failback of the underlying storage infrastructure is handled by the DataCore software. Overall storage performance of the solution is also enhanced by block-level caching intrinsic to the SANsymphony–V R8 software. The first process (see Chapter 4), describes a physical server-only implementation. In this configuration, the storage software and Microsoft‟s roles and features, i.e. file services, failover cluster, run on the same physical server. Two DataCore Servers running the same combination provides a SANsymphony-V R8 highly available storage solution with an HA file share configured from a failover cluster configuration. The second process (see Chapter 5), describes a physical server and Hyper-V virtual machine implementation. In this configuration, the storage software runs in conjunction with Hyper-V on a pair of physical servers. Virtual machines are created on each server, configured as a failover cluster, and the HA file share is configured on the cluster using shared volumes served from SANsymphony-V R8 software.
The instructions in this document assume that the user has knowledge and training in the use of Microsoft Windows Server 2008 R2 including extended Roles and Features. A similar level of knowledge and training on the use of DataCore SANsymphony-V software is also assumed.
Page 5
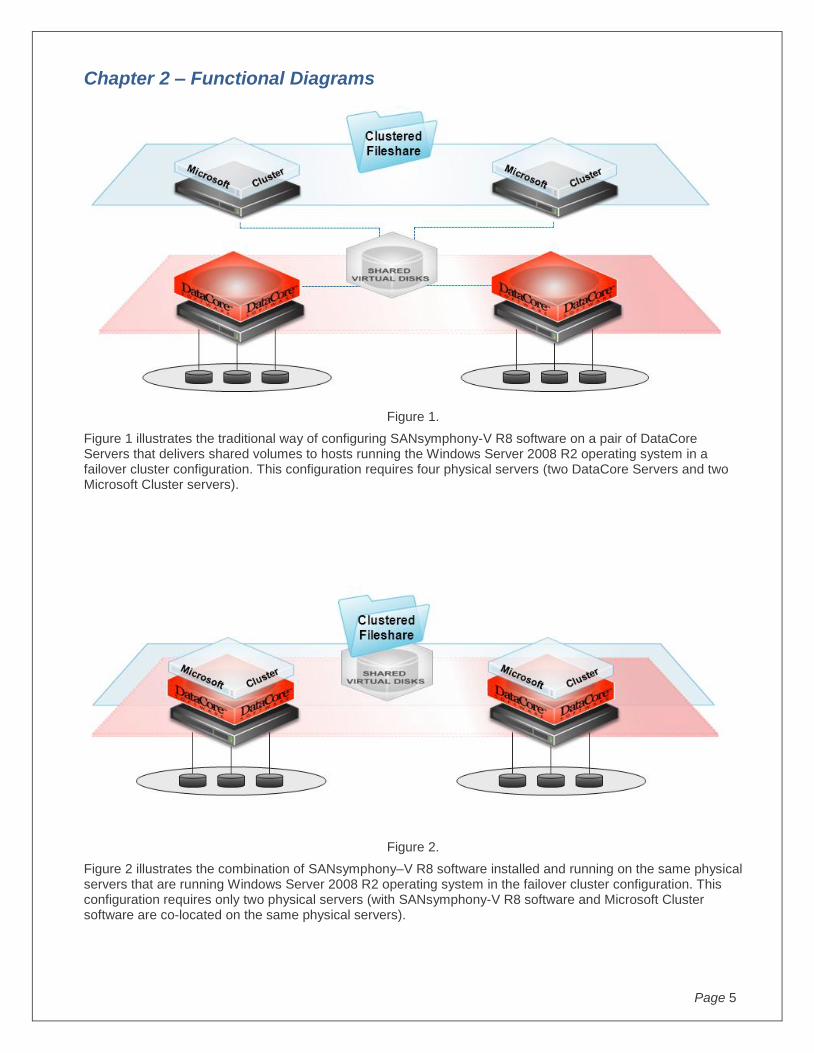
Chapter 2 – Functional Diagrams
Figure 1.
Figure 1 illustrates the traditional way of configuring SANsymphony-V R8 software on a pair of DataCore Servers that delivers shared volumes to hosts running the Windows Server 2008 R2 operating system in a failover cluster configuration. This configuration requires four physical servers (two DataCore Servers and two Microsoft Cluster servers).
Figure 2.
Figure 2 illustrates the combination of SANsymphony–V R8 software installed and running on the same physical servers that are running Windows Server 2008 R2 operating system in the failover cluster configuration. This configuration requires only two physical servers (with SANsymphony-V R8 software and Microsoft Cluster software are co-located on the same physical servers).

Page 6
Figure 3.
Figure 3 illustrates the combination of SANsymphony-V R8 software installed and running on the same physical servers that are running Windows Server 2008 R2 operating system with the Hyper-V Role enabled. This configuration requires two physical servers (each running SANsymphony-V R8 software and Microsoft Hyper-V) and two Hyper-V virtual machines with Microsoft Cluster software configured on the same physical servers.

Page 7
Chapter 3 – Prerequisites and System Requirements
o Two physical servers that meet Microsoft Windows Server 2008 R2 operating system (x64 Enterprise edition) failover cluster requirements
o These servers must also meet the basic requirements for running DataCore SANsymphony-V R8 software.
See this DataCore web page for system requirements: http://www.datacore.com/Software/Products/SANsymphony-V-Prerequisites.aspx
Page 8
Chapter 4 – Physical Server Setup for Highly Available NAS
Install Windows Server 2008 R2 and Logon
1. On each server install Windows Server 2008 R2 operating system (x64 Enterprise version).
a Use standard methods to install the operating system.
b Install latest updates.
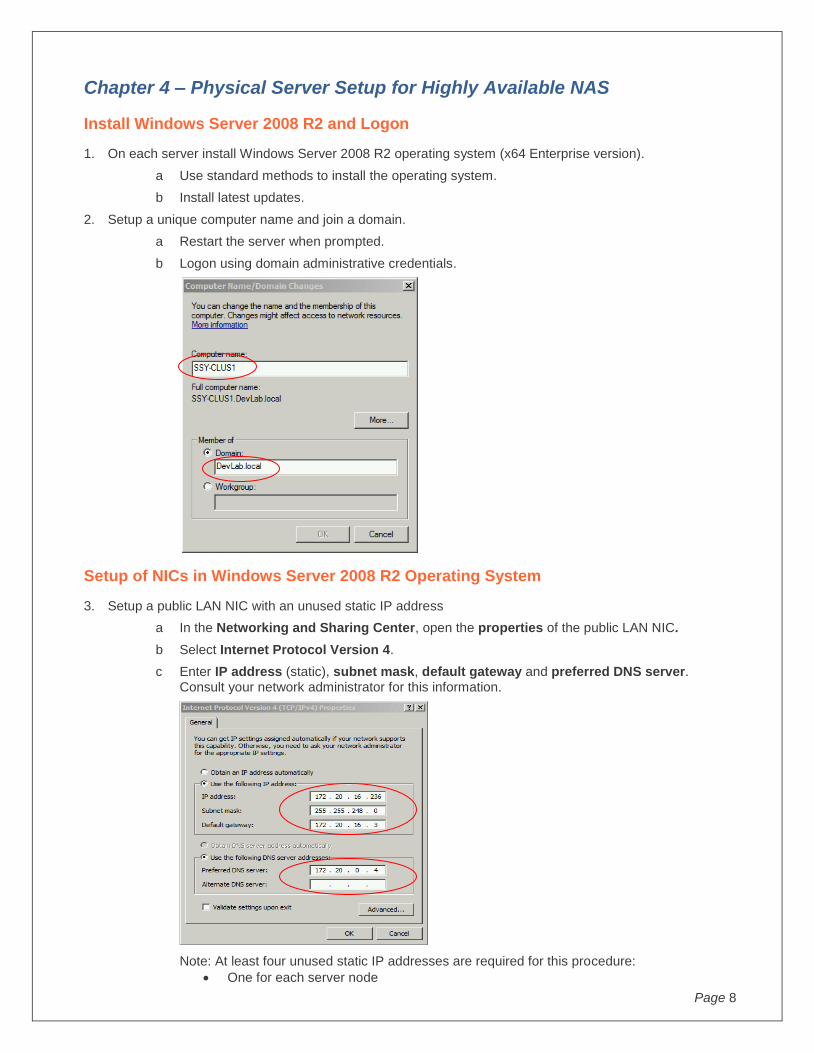
2. Setup a unique computer name and join a domain.
a Restart the server when prompted.
b Logon using domain administrative credentials.
Setup of NICs in Windows Server 2008 R2 Operating System
3. Setup a public LAN NIC with an unused static IP address
a In the Networking and Sharing Center, open the properties of the public LAN NIC.
b Select Internet Protocol Version 4.
c Enter IP address (static), subnet mask, default gateway and preferred DNS server. Consult your network administrator for this information.
Note: At least four unused static IP addresses are required for this procedure:
One for each server node

Page 9
One for the cluster configuration
One for each created file share.
4. Install and setup one or two additional NICs to use in the cluster configuration. NICs should be setup with private network addresses using static IP addresses.
a In the Networking and Sharing Center, open the properties of the additional NIC.
b Select Internet Protocol Version 4.
c Enter the IP address (static) and subnet mask. Enter Consult your network administrator for this information.
5. Click the Advanced button.
a Select the DNS tab and clear the Register this connections address in DNS check box.
b Select the WINS tab and select Disable Netbios over TCP/IP.
6. Repeat the above steps for any additional private NICs.
Features and Rules Setup in Windows Server 2008 R2 Operating System
7. In the Features wizard, select Failover Clustering.

Page 10
8. In the Roles wizard, under the File Server role, select Services for Network File System.
9. Restart the server and log back in when prompted.
Installing and Configuring SANsymphony-V R8 Software
10. On each server, install SANsymphony-V R8 software using standard install procedures outlined in the SANsymphony-V installation guide. To log into the SANsymphony-V Management Console, use the local administrator account with fully qualified credentials:
Setting up the configuration will now be performed using the SANsymphony-V Management Console.
11. In the console, add both DataCore Servers to the same Server Group. (See Establishing Server Groups in the Help)
12. Create disk pools on both DataCore Servers (See Creating Disk Pools and Adding Physical Disks in the Help for detailed instructions.)

Page 11
Setup and Configure Local iSCSI Target Ports
13. For each DataCore Server, use the Microsoft iSCSI Initiator component in the DataCore Servers Panel to add a target port. (See Discovering iSCSI Targets in the Help for detailed instructions.)
a Add an iSCSI target to the same DataCore Server that is being configured. In other words, a DataCore Server iSCSI target to itself. This is referred to as an iSCSI loopback connection.
b Loopback connections should be created on both DataCore Servers.

Page 12
Create, Configure and Serve Mirrored Virtual Disks
14. Create mirrored virtual disks for the failover cluster configuration:
a One cluster witness volume
b One or more share volumes
Note: We recommend using a meaningful naming convention when creating mirrored virtual disks. (See Creating Virtual Disks in the Help for detailed information.)
15. I/O paths between the two DataCore Servers will be created for the mirrored virtual disks. (Paths will be iSCSI or Fibre Channel, if available.)
Page 13
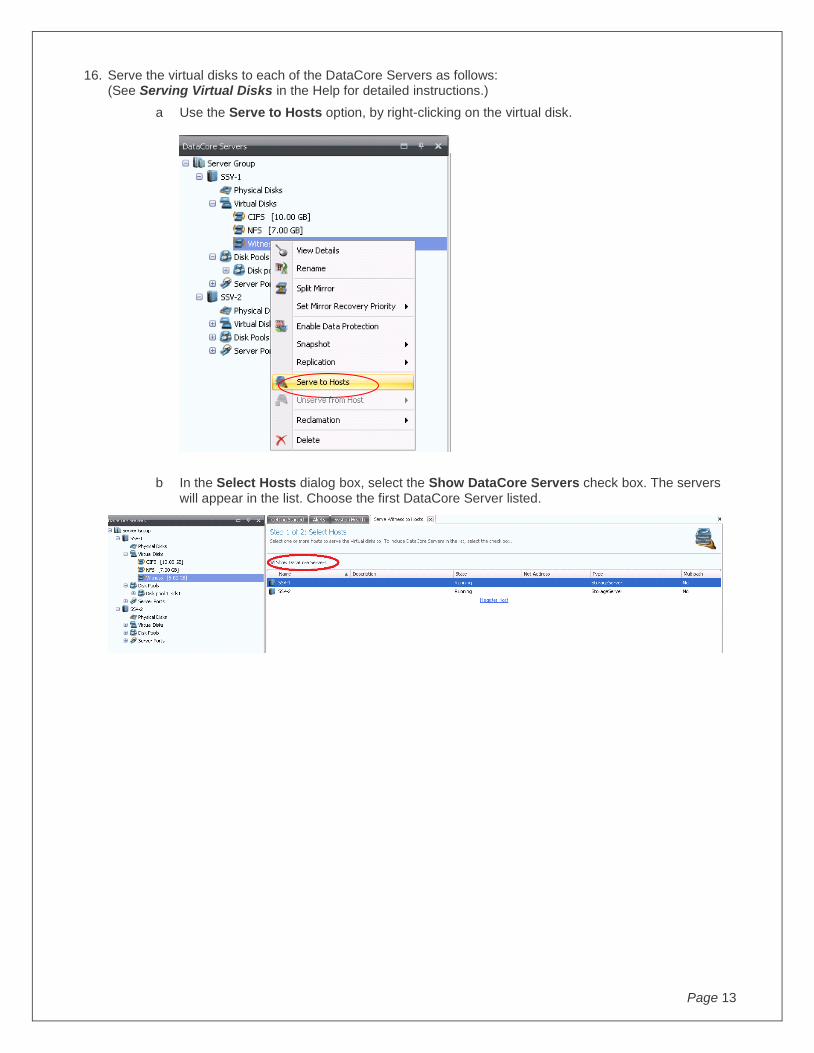
16. Serve the virtual disks to each of the DataCore Servers as follows: (See Serving Virtual Disks in the Help for detailed instructions.)
a Use the Serve to Hosts option, by right-clicking on the virtual disk.
b In the Select Hosts dialog box, select the Show DataCore Servers check box. The servers will appear in the list. Choose the first DataCore Server listed.

Page 14
c In the Select Paths dialog box, configure both paths to use the Microsoft iSCSI Initiator as the initiator port and the previously configured target port to each selected DataCore Server as shown in the paths SSV-1 to SSV-1 and SSV-1 to SSV-2 in the example below.
17. Repeat the last step to serve the virtual disk to the second DataCore Server. You will receive a warning message the virtual disk is already served to a host. This is expected, click Yes.

Page 15
Discover and Configure HA Virtual Disks as Shared Volumes for Microsoft Cluster Configuration
18. Open Server Manager on each cluster server.
19. In Device Manager and scan for new disk drives.
20. In Disk Management, perform the following:
a Locate the new volumes.
b Set the volumes online and initialize them.
c On one of the servers, create NTFS file systems on all new volumes.
i Cluster witness (Quorum) disk
ii File share disks (one or more) for SMB or NFS access
Note: We recommend using the same naming convention that was used when creating the virtual disks in the SANsymphony-V Management Console.
Page 16
Validate and Configure a Failover Cluster
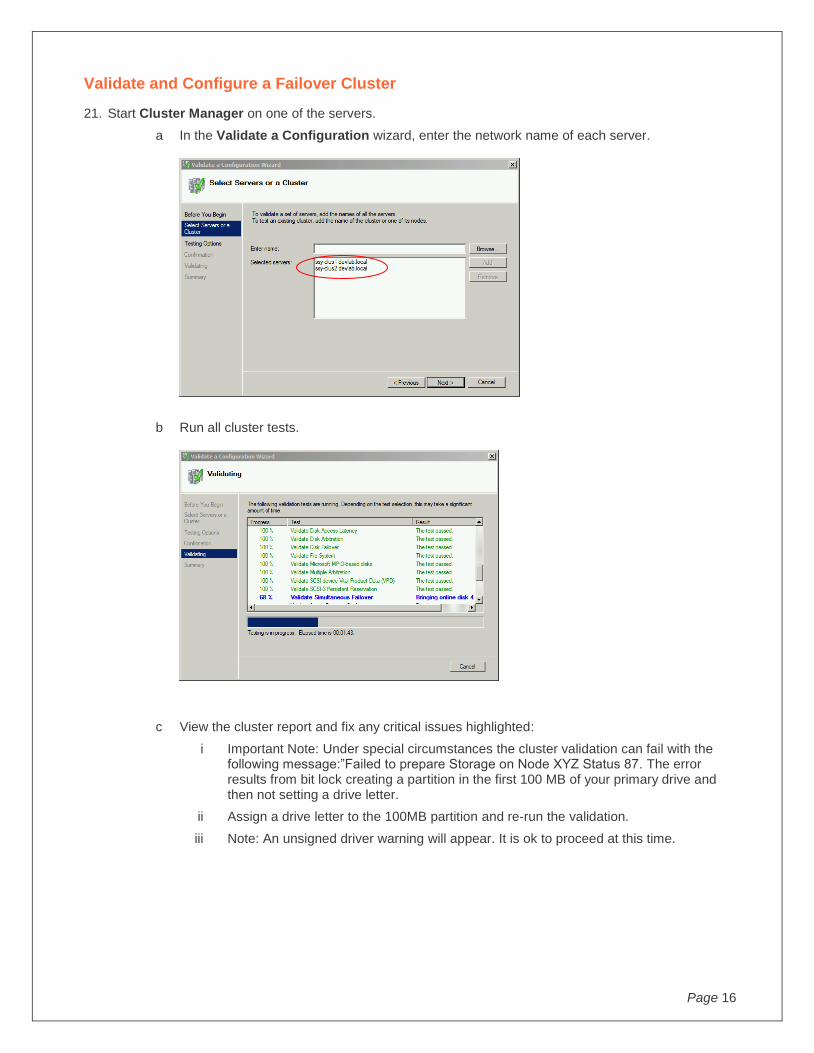
21. Start Cluster Manager on one of the servers.
a In the Validate a Configuration wizard, enter the network name of each server.
b Run all cluster tests.
c View the cluster report and fix any critical issues highlighted:
i Important Note: Under special circumstances the cluster validation can fail with the following message:”Failed to prepare Storage on Node XYZ Status 87. The error results from bit lock creating a partition in the first 100 MB of your primary drive and then not setting a drive letter.
ii Assign a drive letter to the 100MB partition and re-run the validation.
iii Note: An unsigned driver warning will appear. It is ok to proceed at this time.

Page 17
d Run the Create Cluster Wizard.
i Enter server names.
ii Enter a Cluster Name and a static IP address.
iii Once the cluster is created, the servers will appear in the Failover Cluster Manager, as shown in the example below.

Page 18
Setup and Create an HA Cluster File Server
22. Create a highly available Cluster File Server, as follows.
a Select Configure a Service or Application.
i Select File Server.
ii In the Client Access Point, enter the file share name and static IP address.
iii In Select Storage, select the storage volumes.

Page 19
iv Complete the wizard.
23. Note the new defined file share in the tree under Services and Applications.

Page 20
24. Run the Provision a Shared Folder wizard.
a Select an existing folder or define a new folder.
b Select NFS or SMB.
c Select folder permissions.
d Network mount the share to gain access to the failover file share. For example, \\SMB\jb2.
25. This ends the instructions for the process. Create more HA file shares as required.
Figure 4.
Figure 4 illustrates how combining SANsymphony–V R8 software on a server running Windows Server 2008 R2 operating system in the failover cluster configuration results in a highly available NAS:
SANsymphony-V R8 software uses physical disk pool resources to create mirrored virtual disks.
SANsymphony-V
MS Cluster
SANsymphony-V
MS Cluster
File
share
Mirrored
Virtual Disk
Disk Disk
Highly available NAS
SMB NFS

Page 21
The mirrored virtual disks are served to both DataCore Servers via the iSCSI loopback connection.
A failover cluster configuration is created.
A HA file share is created.
User host mounts the file share.
Disk, server, or cluster failures result in HA failover action.
Users continue to have access to the file share.

Page 22
Chapter 5 – Hyper-V Virtual Machine Setup for Highly Available NAS
Install Windows Server 2008 R2 and Logon
1. On each server install Windows Server 2008 R2 (x64 Enterprise version).
o Use standard methods to install the operating system.
o Install latest updates for the operating system.
o Activate the Hyper-V role.
2. Setup a unique computer name and join a local workgroup.
o Restart the server when prompted.
o Logon with local administrative credentials.
Setup of NICs in Windows Server 2008 R2 Operating System
3. In addition to a public LAN NIC, install and setup one or two additional NICs to use in the Hyper-V configuration. NICs should be setup with private network addresses using static IP addresses.
a In the Networking and Sharing Center, open the properties of the public LAN NIC.
b Select Internet Protocol Version 4.
c Enter IP address (static) and subnet mask. Consult your network administrator for this information.

Page 23
4. Click the Advanced button.
a Select the DNS tab and clear the Register this connections address in DNS check box.
b Select the WINS tab and select Disable Netbios over TCP/IP.
5. Repeat the above steps for any additional private NICs.

Page 24
Installing and Configuring SANsymphony-V R8 Software
6. On each server, install SANsymphony-V R8 software using standard install procedures outlined in the SANsymphony - V installation guide. To log into the SANsymphony-V Management Console, use the local administrator account with fully qualified credentials.
Setting up the configuration will now be performed using the SANsymphony-V Management Console.
7. In the console, add both DataCore Servers to the same Server Group. (See Establishing Server Groups in the Help)
9. Create disk pools on both DataCore Servers (See Creating Disk Pools and Adding Physical Disks in the Help for detailed instructions.)
10. Reduce the cache settings of the DataCore Servers to leave some memory for the virtual machines that will form the NAS cluster.

Page 25
11. Configure port roles via the Getting Started page. (See Assigning Server Port Roles in the Help for detailed instructions.)
In the example below, Frontend-2 is the NIC that is bound to the virtual switch of the Hyper-V server and will have virtual 10GB connectivity to any virtual machine that isl be created to build the NAS cluster.

Page 26
Deploy Virtual Machines
12. Deploy one virtual machine on each of the DataCore Servers and store the VHD locally on the file system.
a. Provide a meaningful name for the virtual machine.
b. Specify memory size.

Page 27
c. Connect the virtual machine to the Hyper-V virtual switch that was previously configured.
d. Define the local boot VHD.
Page 28
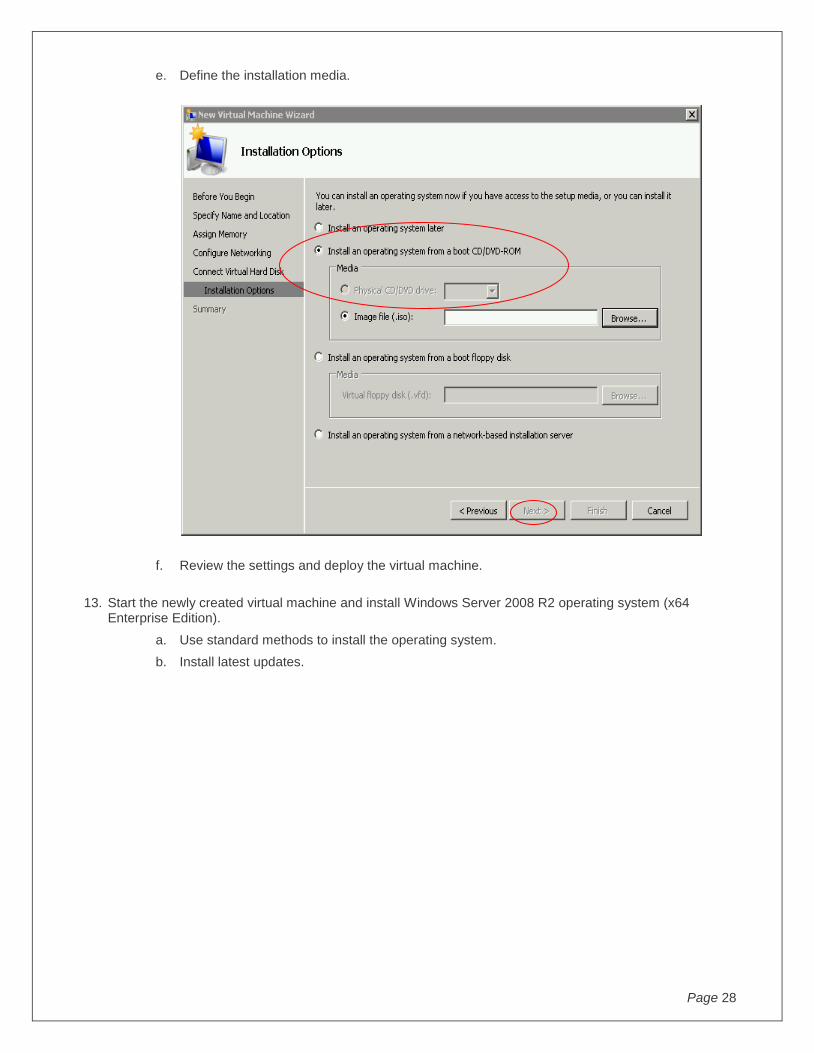
e. Define the installation media.
f. Review the settings and deploy the virtual machine.
13. Start the newly created virtual machine and install Windows Server 2008 R2 operating system (x64 Enterprise Edition).
a. Use standard methods to install the operating system.
b. Install latest updates.
Page 29
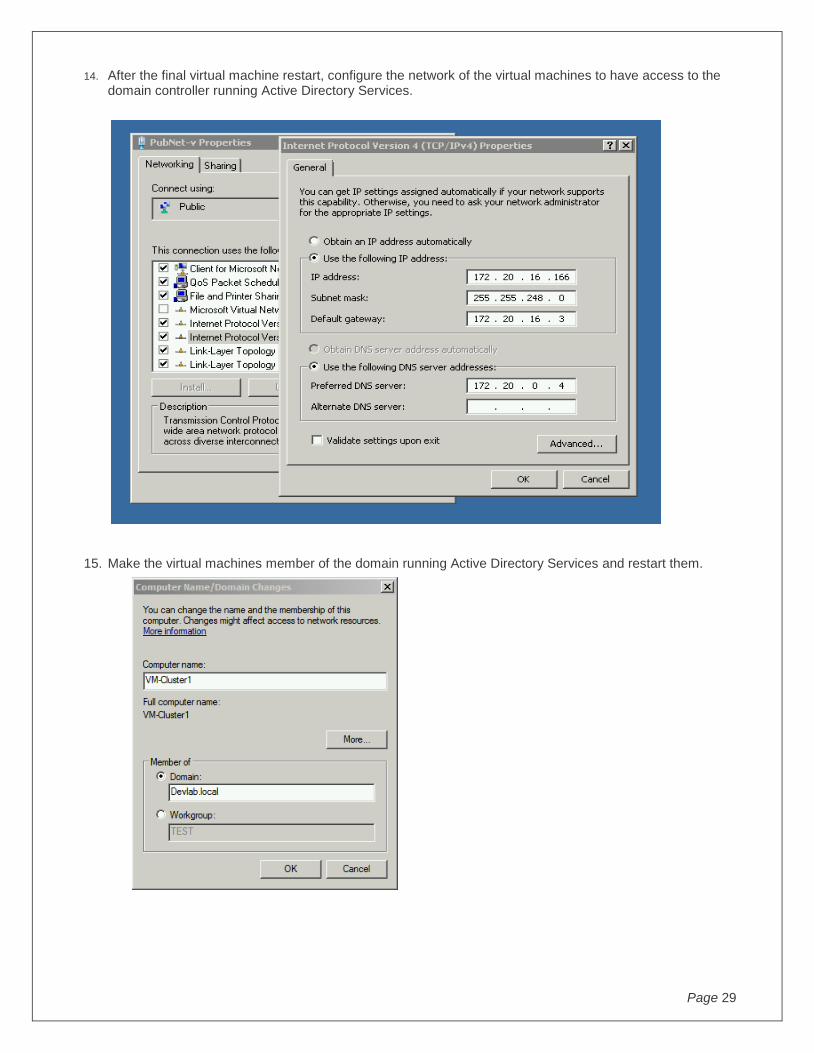
14. After the final virtual machine restart, configure the network of the virtual machines to have access to the domain controller running Active Directory Services.
15. Make the virtual machines member of the domain running Active Directory Services and restart them.

Page 30
When done correctly, both virtual machines should be displayed in the Active Directory.
16. After restart, logon to the virtual machines with the administrator account on the domain controller instead of the local administrator account.

Page 31
17. Enable the File Service role and the Failover Cluster feature on each of the two virtual machines.
18. In the Roles wizard, under the File Server role, select Services for Network File System.

Page 32
19. Start the iSCSI initiator in each virtual machine and connect to both DataCore Servers. In our case, the IP addresses of Frontend-Port2 has to be used to allow local loopback access.
20. Install the latest version of DataCore MPIO on each of the virtual machines and restart the virtual machines when requested.

Page 33
Configure Virtual Machines as Hosts
21. Register the virtual machines as hosts in SANsymphony-V R8 software. (See Registering Hosts and Assigning Ports in the Help for detailed instructions.)
a. Select the Multipath Enabled check box.
b. Select the parent Hyper-V/DataCore Server as the preferred server.
Create, Configure and Serve Mirrored Virtual Disks
22. Create mirrored virtual disks for the failover cluster configuration:
o One cluster witness volume.
o One or more share volumes.
Note: We recommend using a meaningful naming convention when creating mirrored virtual disks. (See Creating Virtual Disks in the Help for detailed instructions.)
Page 34
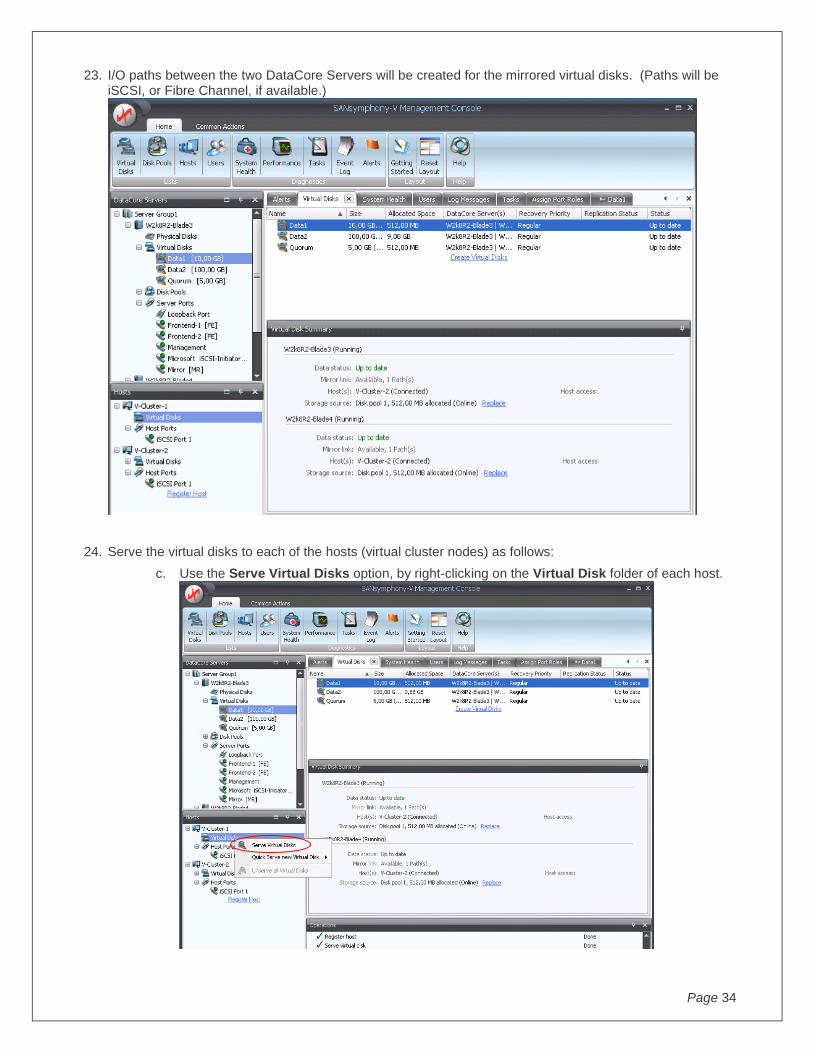
23. I/O paths between the two DataCore Servers will be created for the mirrored virtual disks. (Paths will be iSCSI, or Fibre Channel, if available.)
24. Serve the virtual disks to each of the hosts (virtual cluster nodes) as follows:
c. Use the Serve Virtual Disks option, by right-clicking on the Virtual Disk folder of each host.

Page 35
d. Select all virtual disks to be served to the first host (virtual cluster node). When serving virtual disks to the second host (virtual cluster node), select the Show served virtual disks check box so the same virtual disks will be shown in the list.
e. Select the path mode to be Single path.

Page 36
25. Repeat the steps to serve the virtual disk to the second host (virtual cluster node). You will receive a warning message that the virtual disks are already served to a host. This is expected, click Yes to continue.
Discover and Configure HA Virtual Disks as Shared Volumes for Microsoft Cluster Configuration
26. Open Server Manager on each virtual machine cluster server.
27. In Device Manager and scan for new disk drives.
28. In Disk Management, perform the following:
a. Locate the new volumes.
b. Set the volumes online and initialize them.
c. On one of the servers, create NTFS file systems on all new volumes.
i. Cluster witness (Quorum) disk

Page 37
ii. File share disks (one or more) for SMB or NFS access
Note: We recommend using the same naming convention that was used when creating the virtual disks in the SANsymphony-V Management Console.
Validate and Configure a Failover Cluster
29. Start Cluster Manager on one of the servers.
a. In the Validate a Configuration wizard, enter the network name of each server.

Page 38
b. Run all cluster tests.
c. View the cluster report and fix any critical issues highlighted:
i. Important Note: Under special circumstances the cluster validation can fail with the following message:”Failed to prepare Storage on Node XYZ Status 87. The error results from bit lock creating a partition in the first 100 MB of your primary drive and then not setting a drive letter.
ii. Assign a drive letter to the 100MB partition and re-run the validation.
d. Run the Create Cluster Wizard.
i. Enter server names.

Page 39
ii. Enter a Cluster Name and a static IP address.
iii. Once the cluster is created, the servers will appear in the Failover Cluster Manager, as shown in the example below.

Page 40
Setup and Create an HA Cluster File Server
30. Create a highly available Cluster File Server, as follows.
a. Select Configure a Service or Application.
i. Select File Server.
ii. In the Client Access Point, enter the file share name and static IP address.
iii. In Select Storage, select the storage volumes.

Page 41
iv. Complete the wizard.
31. Note the new defined file share in the tree under Services and Applications.
Page 42
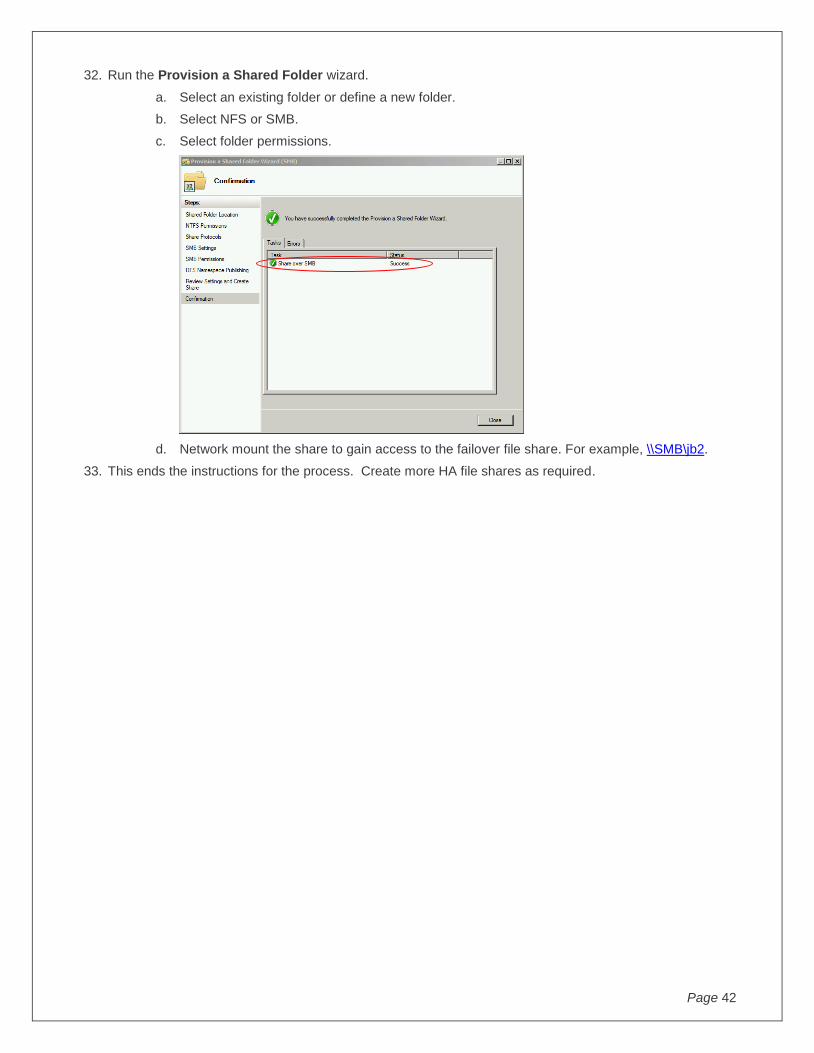
32. Run the Provision a Shared Folder wizard.
a. Select an existing folder or define a new folder.
b. Select NFS or SMB.
c. Select folder permissions.
d. Network mount the share to gain access to the failover file share. For example, \\SMB\jb2.
33. This ends the instructions for the process. Create more HA file shares as required.

Page 43
Chapter 6: Using an NFS-Share with VMware ESX
Overview
This chapter will provide instructions on how to provision a shared disk for NFS purposes for use with VMware ESX.
Configuration Diagram
Setup
See Chapter 4 (Physical Server Setup) or Chapter 5 (Hyper-V Virtual Machine Setup) to create a highly available NAS NFS Share.

Page 44
Modifying Settings for the NFS Share
1. After configuring an NFS share in the Failover Cluster Manager/Services and applications, right click on the share and set the resource offline, if it isn‟t already. Right-click again and open the properties tab. Consider modifying the share name for clarity.
2. Open the Parameters tab and check the „Enable unmapped user access‟ box and select the „Allow unmapped user access [by UID/GID]‟ method the (anonymous access is not allowed for clustered shares).
3. Next click on the Permissions button.

Page 45
4. Select Read-Write access and check the „Allow root access‟ box. Click OK to close both dialogs.

Page 46
5. Right-click on the share and set the new NFS resource online.

Page 47
VMware Setup
6. Next, open the VMware Virtual Infrastructure client, select a VMware server that has a TCP/IP connection to the previously configured Highly Available NFS cluster and select “Add storage”.
7. The Add storage wizard opens. Select Network File System (NFS) and click Next.

Page 48
8. Enter the IP Address or DNS name of the NFS Cluster in the Server field, the NFS share name with a preceding “/”
in the Folder field, name the Datastore and click Next.
9. Review your settings and click Finish to close the wizard.

Page 49
10. The NFS-Share is imported as a new Highly Available NFS Datastore and is ready for use.

Page 50
This document is published by:
DataCore Software Corporation
Worldwide Headquarters
6300 NW 5th Way
Ft. Lauderdale, FL 33309
United States of America
Telephone: +1 (954) 377-6000
Fax: +1 (954) 938-7953
Internet: http://www.datacore.com
Email: [email protected]