behind the digital screen assignment 4: feeds, part 1 ...csandvig/313w16/assignment_4_part_1... ·...
TRANSCRIPT
Part A
Behind the Digital Screen Assignment 4: Feeds, Part 1 Deadline: Monday, 3/28, 3:00pm (one hour before class begins) This assignment comes in two parts, each part is a different PDF file. This is Part 1 of 2. Objectives:
● Understand basic nonlinear editing (using audio as an example) ● Understand syndication and RSS feeds ● Syndicate something with a hand-coded RSS feed
Requirements to Complete This Assignment:
● Audacity software (see the class software page) ● An advanced text editor like Notepad++ (Windows) [or TextWrangler (Mac)] ● OPTIONAL: A way to record digital audio (this can be on your laptop using Audacity, on
your phone using a free app like Voice Recorder (FREE) [iPhone or Android], or a stand-alone audio recorder if you have one.
Files to Turn In: For this assignment, we are splitting the assignment into two parts. This is part 1 of 2. The files to turn in will be listed on the first page of part 2.
Time Estimates: By popular request, here are our time estimates for this assignment:
Part A: Non-Linear Editing With Audacity: 1:20 Part B: Teach Yourself One Advanced Audacity Technique: 0:40 Part C: Syndicating a Podcast With RSS: 0:30 Part D: Finding and Using Feeds Automatically: 0:30
Part A
<assignment part 1> PART A: PART A: Non-Linear Editing With Audacity This assignment is about syndicating and distributing content using "feeds." The feed technologies we will consider started as a way to share audio. To begin, in this section you’ll be guided through a number of tasks to be completed in the non-linear audio-editing program Audacity. 1. Use your Web browser, download the two .mp3 files located on the Lab Assignments
Page here http://313.niftyc.org/ below the Assignment 4 section, named alices_adventures_01_carroll_64kb.mp3 and aliceinwonderland_00_carroll_64kb.mp3. To download the file(s), right click on the file name and select “Save file as...” and save both.
SOURCE: These .mp3 audio files were obtained from the vast collections of public domain and creative commons audio found on the Internet Archive website, from the following pages:
● http://www.archive.org/details/alices_adventures_1003 ● http://www.archive.org/details/aliceinwonderland_1102_librivox
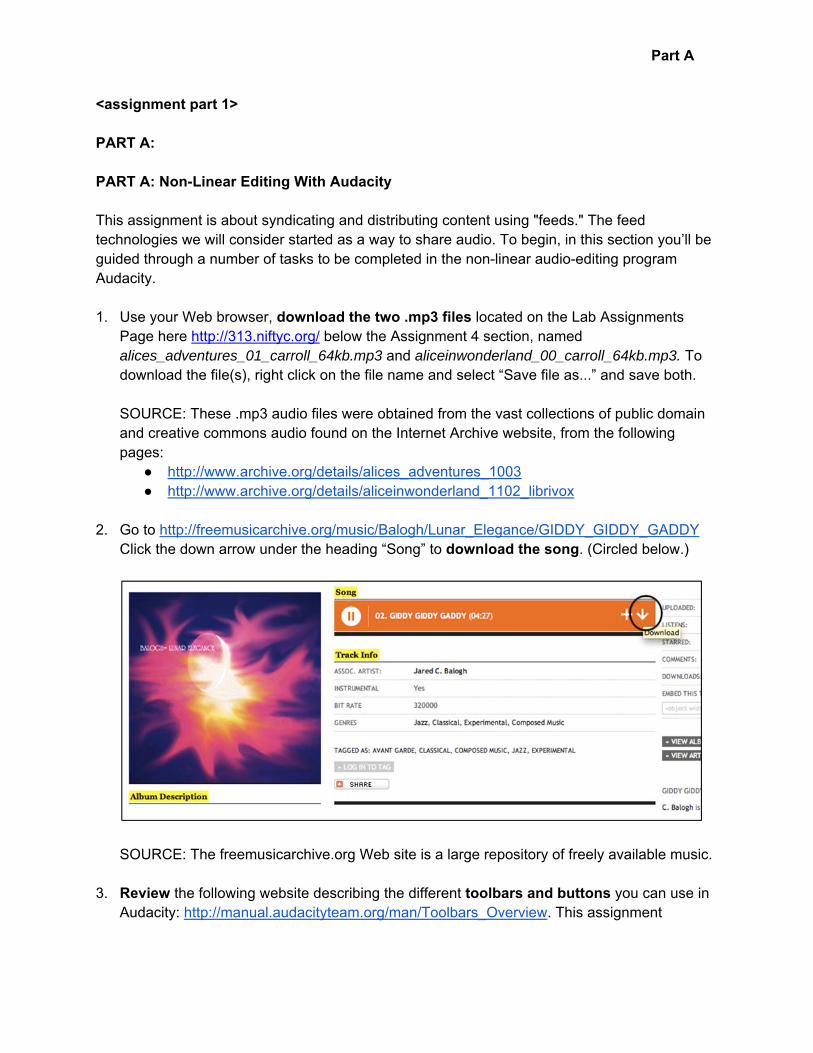
2. Go to http://freemusicarchive.org/music/Balogh/Lunar_Elegance/GIDDY_GIDDY_GADDY
Click the down arrow under the heading “Song” to download the song. (Circled below.)
SOURCE: The freemusicarchive.org Web site is a large repository of freely available music.
3. Review the following website describing the different toolbars and buttons you can use in
Audacity: http://manual.audacityteam.org/man/Toolbars_Overview. This assignment
Part A
references many different tools so use this site as a reference while you work on the assignment.
4. Open Audacity. If you want to download the program onto your personal computer use the link on your software downloads page.
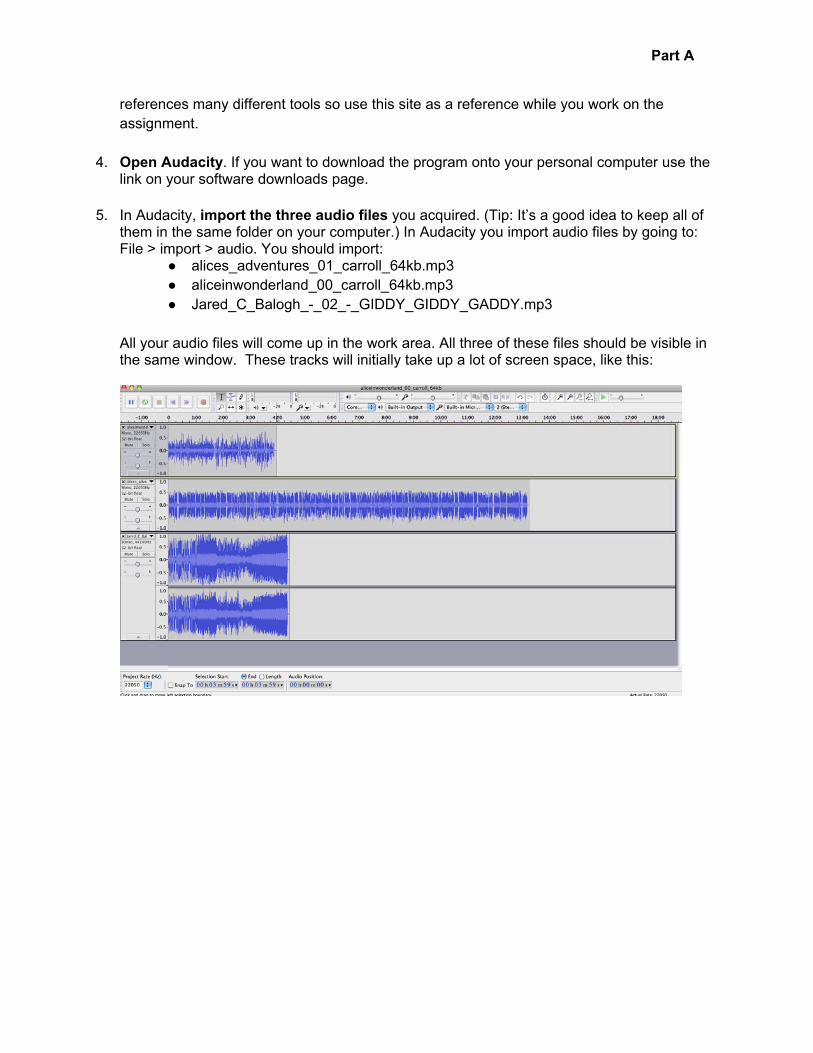
5. In Audacity, import the three audio files you acquired. (Tip: It’s a good idea to keep all of
them in the same folder on your computer.) In Audacity you import audio files by going to: File > import > audio. You should import:
● alices_adventures_01_carroll_64kb.mp3 ● aliceinwonderland_00_carroll_64kb.mp3 ● Jared_C_Balogh_-_02_-_GIDDY_GIDDY_GADDY.mp3
All your audio files will come up in the work area. All three of these files should be visible in the same window. These tracks will initially take up a lot of screen space, like this:
Part A
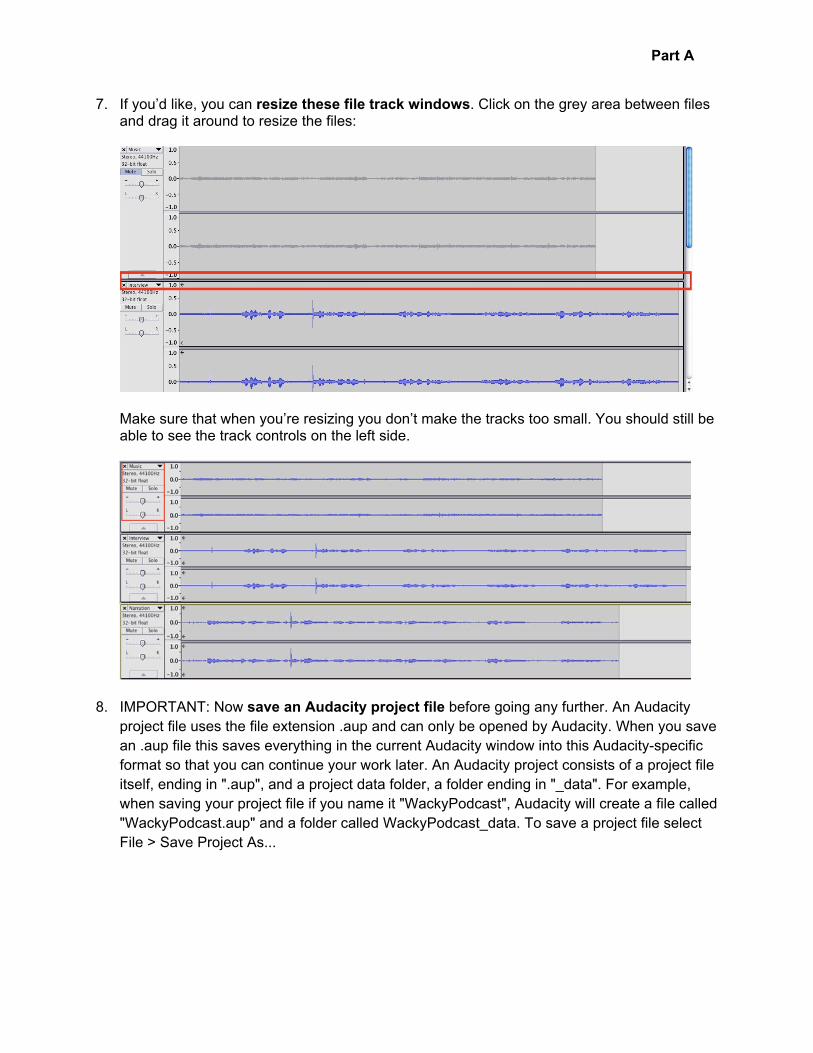
7. If you’d like, you can resize these file track windows. Click on the grey area between files and drag it around to resize the files:
Make sure that when you’re resizing you don’t make the tracks too small. You should still be able to see the track controls on the left side.
8. IMPORTANT: Now save an Audacity project file before going any further. An Audacity
project file uses the file extension .aup and can only be opened by Audacity. When you save an .aup file this saves everything in the current Audacity window into this Audacity-specific format so that you can continue your work later. An Audacity project consists of a project file itself, ending in ".aup", and a project data folder, a folder ending in "_data". For example, when saving your project file if you name it "WackyPodcast", Audacity will create a file called "WackyPodcast.aup" and a folder called WackyPodcast_data. To save a project file select File > Save Project As...

Part A
9. Press the play button. You’ll notice that all your audio is playing at once, making it a
big jumbled mess! Press the stop button to stop it. 10. On the left side of each track are the track controls. Try out the controls as described
below:
Note: DON'T press the “X” in the upper left corner, it removes the track from your workspace (if you do this you will have to re-import your track).
● Mute the current track by pressing the “Mute” button. ● Mute every track except the current track by pressing the “Solo” button. ● Control the volume of just this track with the bar that has the “-” and “+” on it. ● Control the panning of just this track with the bar that has the “L” and “R” on it.
Moving the marker to the “L” means all your audio will come out of the left speaker, while moving it toward the “R” will make your audio come out of the right speaker. This can be useful when trying to create an artificial sound environment, but it’s not necessary for your project then it’s generally a good idea to avoid this, because people listening on only one speaker will not be about to hear some of your audio. For the purposes of this project, leave the marker in the middle.
11. Using your newfound knowledge of these controls, determine what is on each of the
tracks by listening to them. Then press the down arrow in the upper right hand corner and click “name.” Rename each of the tracks “Male Narration”, “Female Narration”, and “Music” as appropriate.
12. Press solo on the “Female Narration” track and listen to some of it.
13. Use the zoom button to zoom in to where you can see every second on the timeline:
14. On the “Female Narration” track, find the 20 second mark. There will be a section that
looks like this (with a long almost horizontal line, longer than the other horizontal lines nearby):
Part A
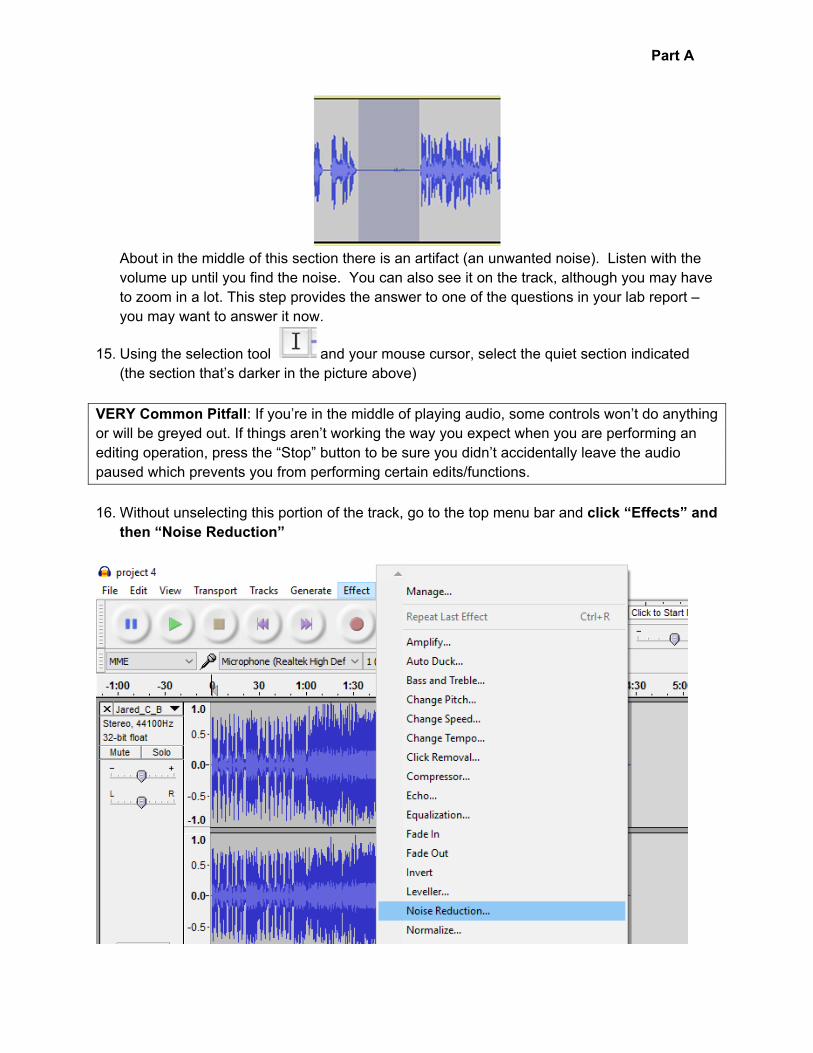
About in the middle of this section there is an artifact (an unwanted noise). Listen with the
volume up until you find the noise. You can also see it on the track, although you may have to zoom in a lot. This step provides the answer to one of the questions in your lab report – you may want to answer it now.
15. Using the selection tool and your mouse cursor, select the quiet section indicated (the section that’s darker in the picture above)
VERY Common Pitfall: If you’re in the middle of playing audio, some controls won’t do anything or will be greyed out. If things aren’t working the way you expect when you are performing an editing operation, press the “Stop” button to be sure you didn’t accidentally leave the audio paused which prevents you from performing certain edits/functions.
16. Without unselecting this portion of the track, go to the top menu bar and click “Effects” and
then “Noise Reduction”

Part A
17. The following window will pop up. Click “Get Noise Profile.” This will teach Audacity what you want to remove.
18. The window will automatically close once you’ve clicked “Get Noise Profile. Now go back to the track that you had selected the noise from and select the entire track. (Double-clicking with the selection tool will select an entire track.)
19. Go back to Effects > Noise Reduction. (Tip: Even though the “Get Noise Profile” button is
still there, you don't have to click it again.) Click “Preview”. You can mess around with the levels until you’re satisfied with the results—your noise reduction should not make the desired sound (the narrator) sound strange. The default levels will often work fine. Once you are satisfied, click “OK”. Now listen to the clip and make sure it sounds fine with the noise removed. If you have done this correctly the artifact identified in step 14 should be gone! Check to be sure it is gone.
20. Select all of the “Female Narration” track, then click “Effects” > “Normalize”. A window will
pop up that looks like this:

Part A
Play around with the number in the box (dB) and use “Preview” to see what it sounds like when you change this parameter. Again, the default setting is usually fine, but play around and find something you like before hitting “OK”.
21. Listen to the audio and notice how it’s changed. In some cases it may not be very noticeable, but it’s often better than your original audio, especially if your original audio is too quiet.
22. Repeat step the previous two steps for the “Male Narration” audio. (Tip: You do not need
to create a new noise profile.)
Now that your audio sounds a bit better, it’s time to start putting it in the order you want. 23. On the “Male Narration” track, select (roughly) the first five seconds of the clip. This
section should end right after the the narrator says “by Lewis Carroll”.
24. Click the “Trim” tool . This will cut everything but the portion of the audio you’ve selected on a track. Your track will go from looking like this:

Part A
To looking like this:
Common Pitfall: Note that on some platforms Audacity can be buggy. If you find the controls aren’t responding (for instance, the “trim” button doesn’t do anything), save your work, close Audacity, and restart it. This fixes most problems.
25. On the “Female Narration,” select roughly the first 22 seconds of the track.
26. Using the “Cut” tool, , cut this portion of the track. It will go from this:
To this:
27. Select the “Time Shift” tool: . You can used this to move portions of your audio around. Select the “Time Shift” tool and move the “Male Narration” fragment by dragging it so that the audio begins at the 10 second mark.

Part A
28. Then select the “Female Narration” track and move it so that the audio from this track begins just as the audio from the “Male Narration” track ends. It should look like this:
29. Using the select tool , click on the “Music” track at as close to the 10 seconds mark as you can get. Don’t select anything, just click. (You may have to click around a few times to get it.) Go to “Edit” on the top menu bar, and go to Edit > Clip Boundaries > Split, and click “Split”. A split command works the same way as using a pair of scissors to cut a piece of old school magnetic tape into two pieces.
Part A
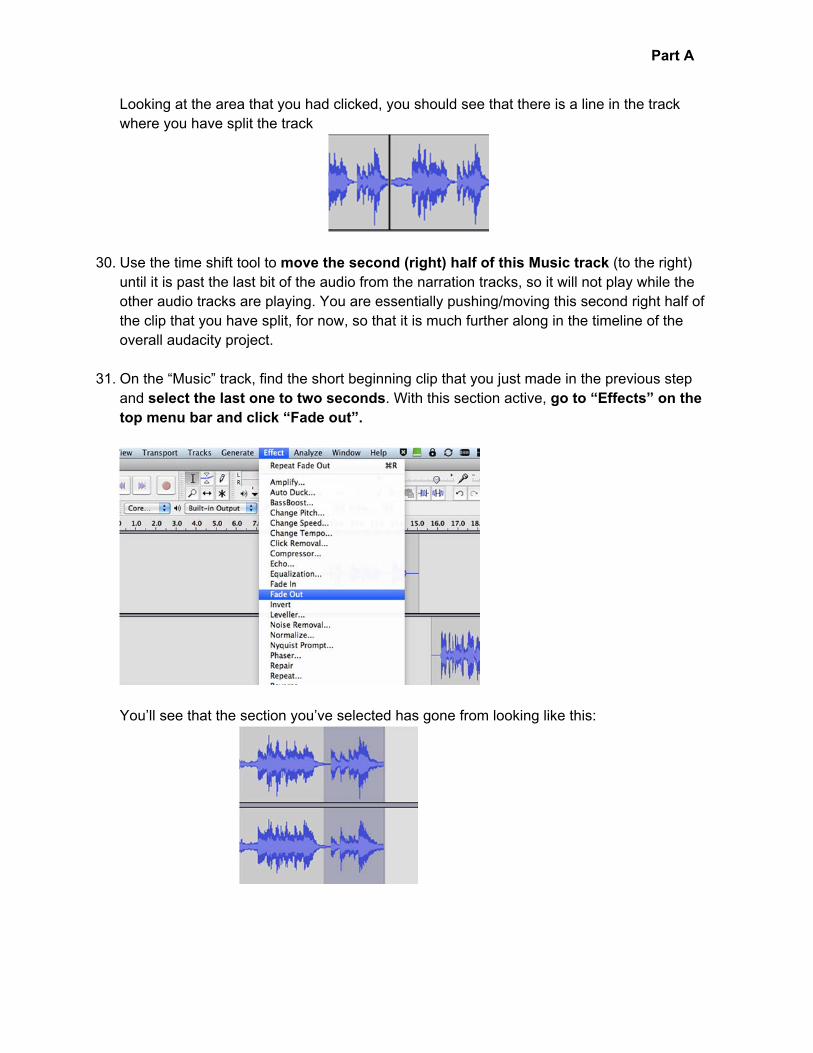
Looking at the area that you had clicked, you should see that there is a line in the track where you have split the track
30. Use the time shift tool to move the second (right) half of this Music track (to the right) until it is past the last bit of the audio from the narration tracks, so it will not play while the other audio tracks are playing. You are essentially pushing/moving this second right half of the clip that you have split, for now, so that it is much further along in the timeline of the overall audacity project.
31. On the “Music” track, find the short beginning clip that you just made in the previous step and select the last one to two seconds. With this section active, go to “Effects” on the top menu bar and click “Fade out”.
You’ll see that the section you’ve selected has gone from looking like this:

Part A
To looking like this:
Listen to the new section to hear the difference.
32. On the “Female Narration” find the the 1 minute 49 seconds mark. The narration at this section starts with “The rabbit hole went straight on, like a tunnel, for some way”. Select from this point until the 2 minute 1 second mark. The last bit of narration in the part you’ve selected should be “Before she found herself falling down a very deep well”. Important note: YOU WILL HAVE TO ZOOM IN A LOT TO SELECT THE CORRECT PART OF THE TRACK.
33. With this section selected, go to Edit menu on the top menu bar and click “Duplicate”
The Duplicate function creates a copy of the selected section of the clip and puts it on a new track below all your other tracks. Your screen should now look something like this:

Part A
34. Rename this newly created track “Second Female Narration”. You can also move the track up so that it is right below the original track by clicking on the down arrow next to the track name and selecting “Move Track Up”
35. You’ll notice that both the original section and the newly created section are still selected. Unselect both and then reselect the original selection in the original “Female Narration” track, so that it looks like this:
Part A
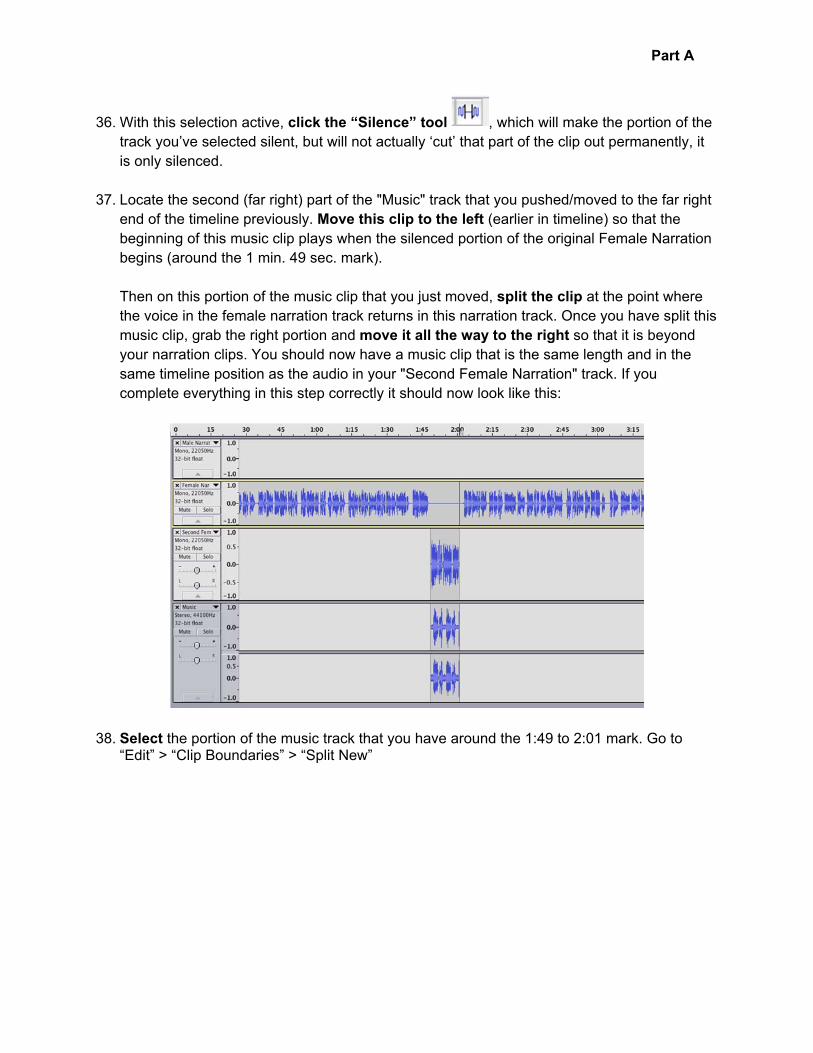
36. With this selection active, click the “Silence” tool , which will make the portion of the track you’ve selected silent, but will not actually ‘cut’ that part of the clip out permanently, it is only silenced.
37. Locate the second (far right) part of the "Music" track that you pushed/moved to the far right
end of the timeline previously. Move this clip to the left (earlier in timeline) so that the beginning of this music clip plays when the silenced portion of the original Female Narration begins (around the 1 min. 49 sec. mark).
Then on this portion of the music clip that you just moved, split the clip at the point where the voice in the female narration track returns in this narration track. Once you have split this music clip, grab the right portion and move it all the way to the right so that it is beyond your narration clips. You should now have a music clip that is the same length and in the same timeline position as the audio in your "Second Female Narration" track. If you complete everything in this step correctly it should now look like this:
38. Select the portion of the music track that you have around the 1:49 to 2:01 mark. Go to
“Edit” > “Clip Boundaries” > “Split New”
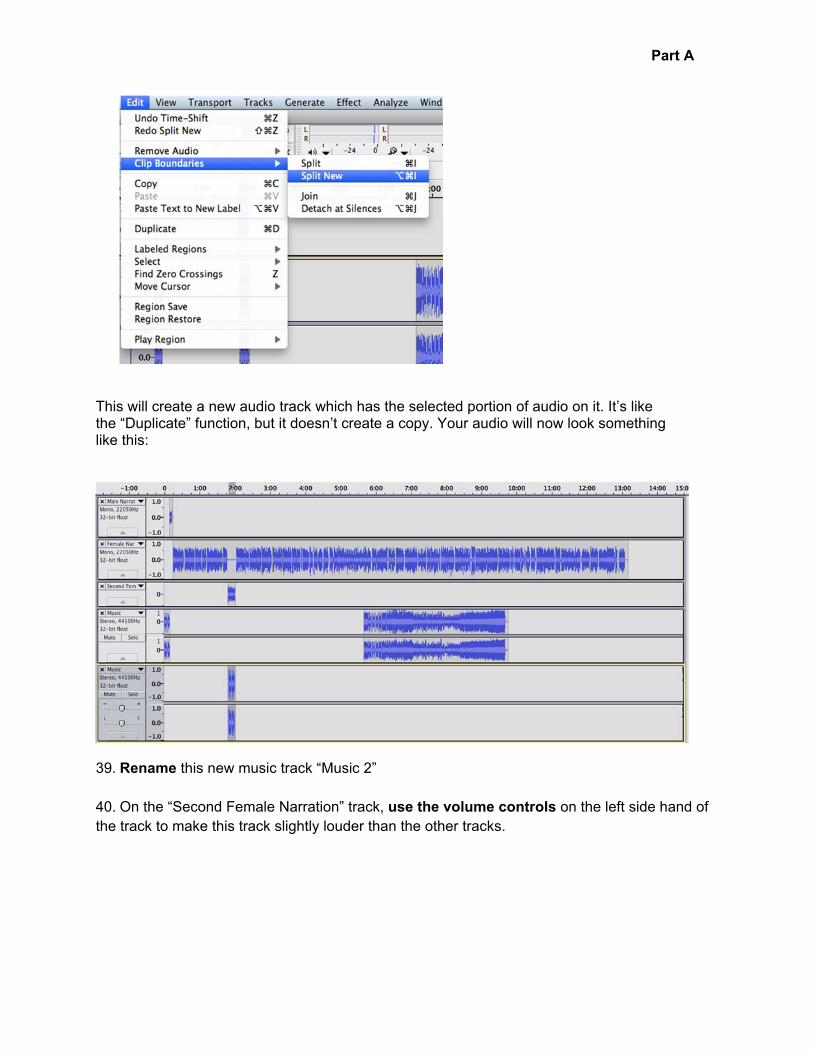
Part A
This will create a new audio track which has the selected portion of audio on it. It’s like the “Duplicate” function, but it doesn’t create a copy. Your audio will now look something like this:
39. Rename this new music track “Music 2”
40. On the “Second Female Narration” track, use the volume controls on the left side hand of the track to make this track slightly louder than the other tracks.
Part A
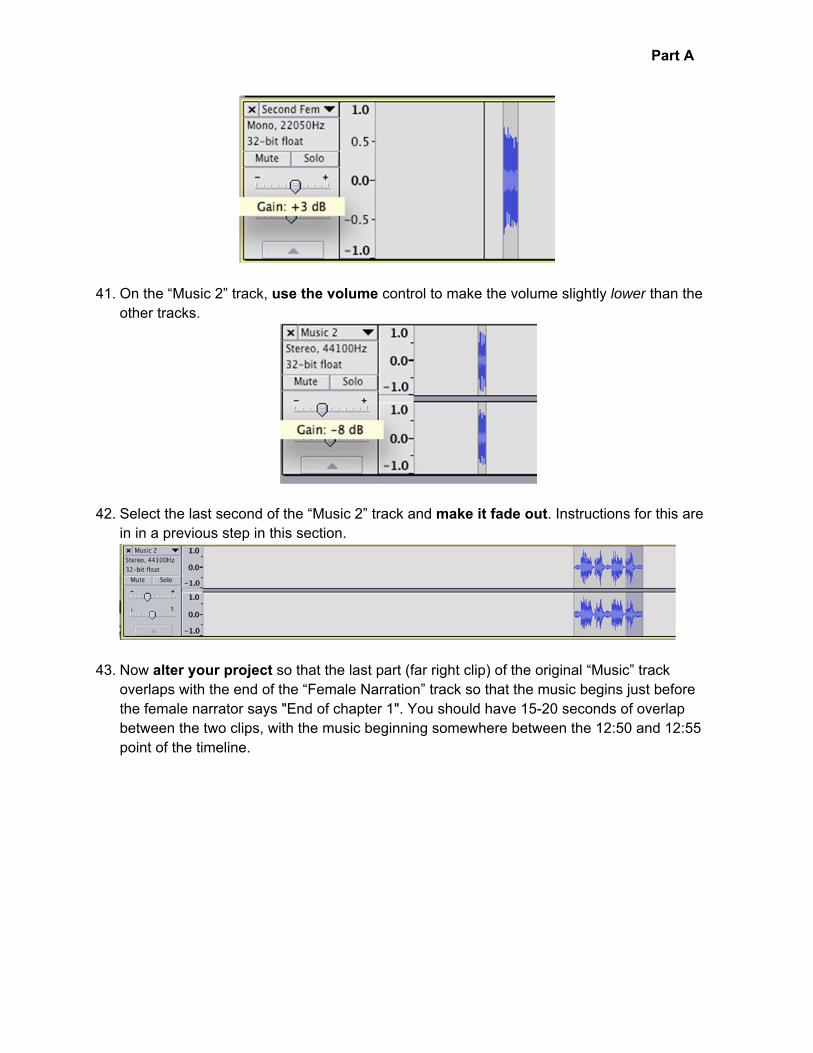
41. On the “Music 2” track, use the volume control to make the volume slightly lower than the other tracks.
42. Select the last second of the “Music 2” track and make it fade out. Instructions for this are in in a previous step in this section.
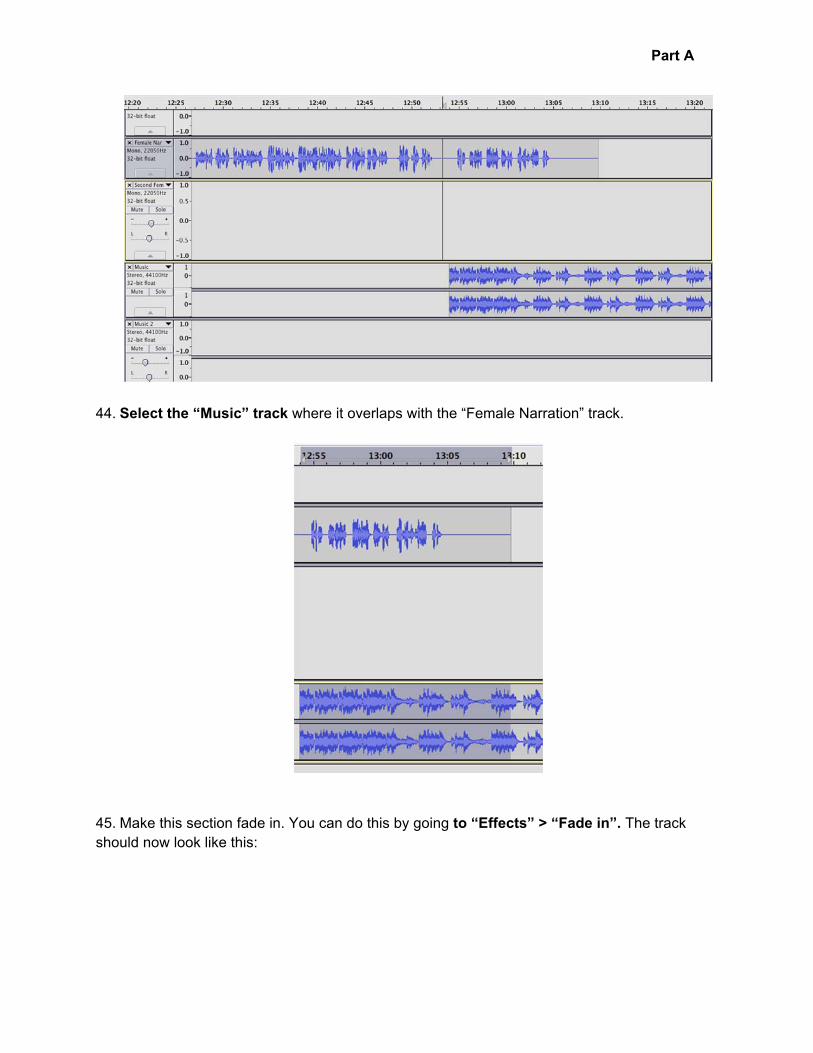
43. Now alter your project so that the last part (far right clip) of the original “Music” track
overlaps with the end of the “Female Narration” track so that the music begins just before the female narrator says "End of chapter 1". You should have 15-20 seconds of overlap between the two clips, with the music beginning somewhere between the 12:50 and 12:55 point of the timeline.
Part A
44. Select the “Music” track where it overlaps with the “Female Narration” track.
45. Make this section fade in. You can do this by going to “Effects” > “Fade in”. The track should now look like this:

Part A
46. Select the remainder of this “Music” track, from the point in the timeline where the Female
Narration audio ends to the end of the music.
47. Delete this section using the “Cut” tool . The audio will now look something like this:
Part A
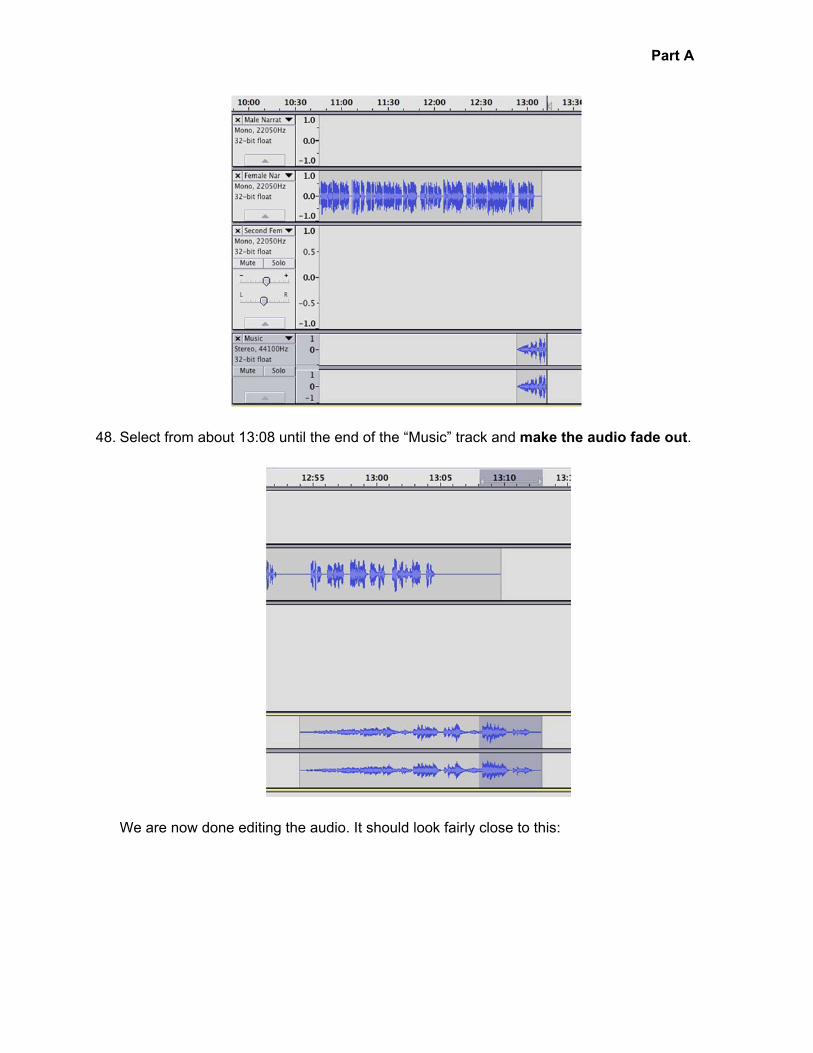
48. Select from about 13:08 until the end of the “Music” track and make the audio fade out.
We are now done editing the audio. It should look fairly close to this:

Part A
49. It’s now time to export the file so that it can be played in a music player other than Audacity. On the top menu bar go to “File” > “Export”.
50. Save the file as “yourUMuniqname_Assignment4A.wav”. Substitute your actual UM
uniqname for “yourUMuniqname” in the filename. Make sure the file you export is a “.wav” file.
51. A warning may pop up informing you that “Your tracks will be mixed down to two stereo
channels in the export file”. Click “OK”.
Part A
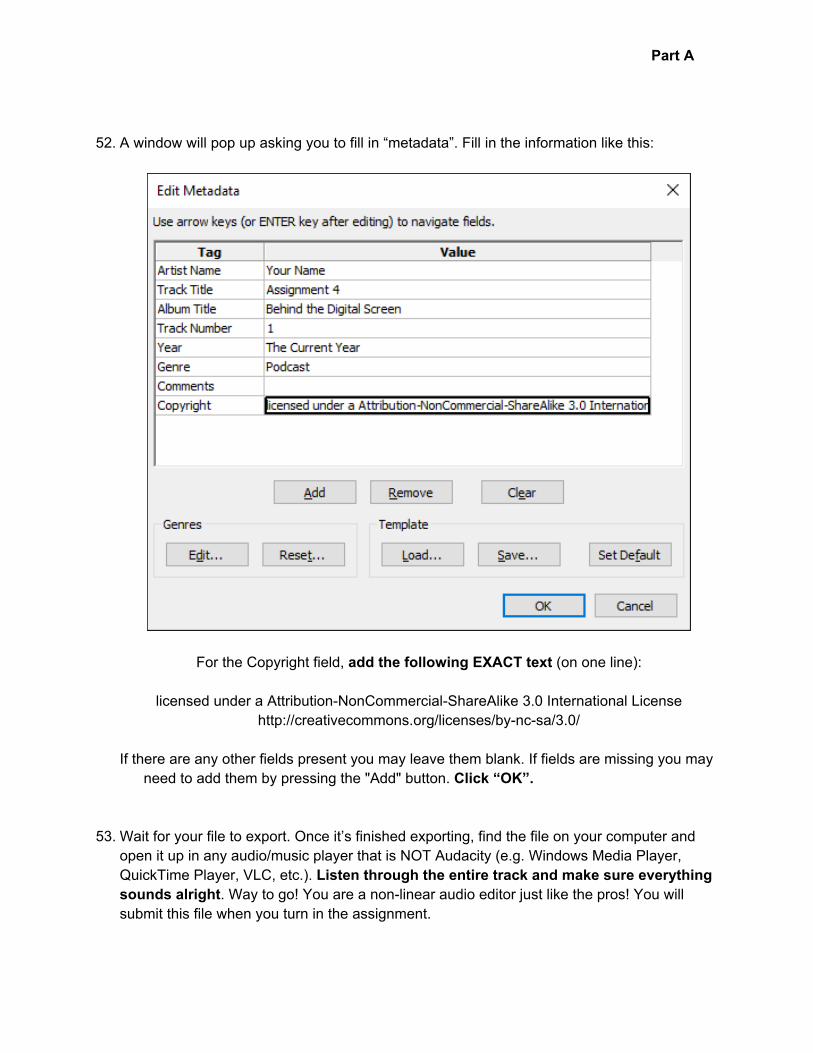
52. A window will pop up asking you to fill in “metadata”. Fill in the information like this:
For the Copyright field, add the following EXACT text (on one line):
licensed under a Attribution-NonCommercial-ShareAlike 3.0 International License http://creativecommons.org/licenses/by-nc-sa/3.0/
If there are any other fields present you may leave them blank. If fields are missing you may
need to add them by pressing the "Add" button. Click “OK”. 53. Wait for your file to export. Once it’s finished exporting, find the file on your computer and
open it up in any audio/music player that is NOT Audacity (e.g. Windows Media Player, QuickTime Player, VLC, etc.). Listen through the entire track and make sure everything sounds alright. Way to go! You are a non-linear audio editor just like the pros! You will submit this file when you turn in the assignment.

Part B
PART B: Teach Yourself One Advanced Audacity Technique Now that you've got your Audacity basics down, it's time learn an advanced Audacity technique on your own.
1. First, you'll need to find some audio to manipulate. Ideally this would be audio of interest to you. You can record your own audio or find audio on the Web. You must use audio that you have permission to manipulate and republish. If you are interested in manipulating music, try searching http://freemusicarchive.org/ with the following settings/filters checked in the left column (after you type your search term and press "Enter").
For spoken-word audio, podcasts, and radio, try searching https://archive.org/details/audio but ensure that the tracks you decide to use are downloadable and that they are licensed in a way that you can use them. It must have a copyright, license, or usage statement that says "public domain" or "creative commons", but it cannot say "No-Derivs" or "No Derivatives." For example, the following file would be OK:
Part B
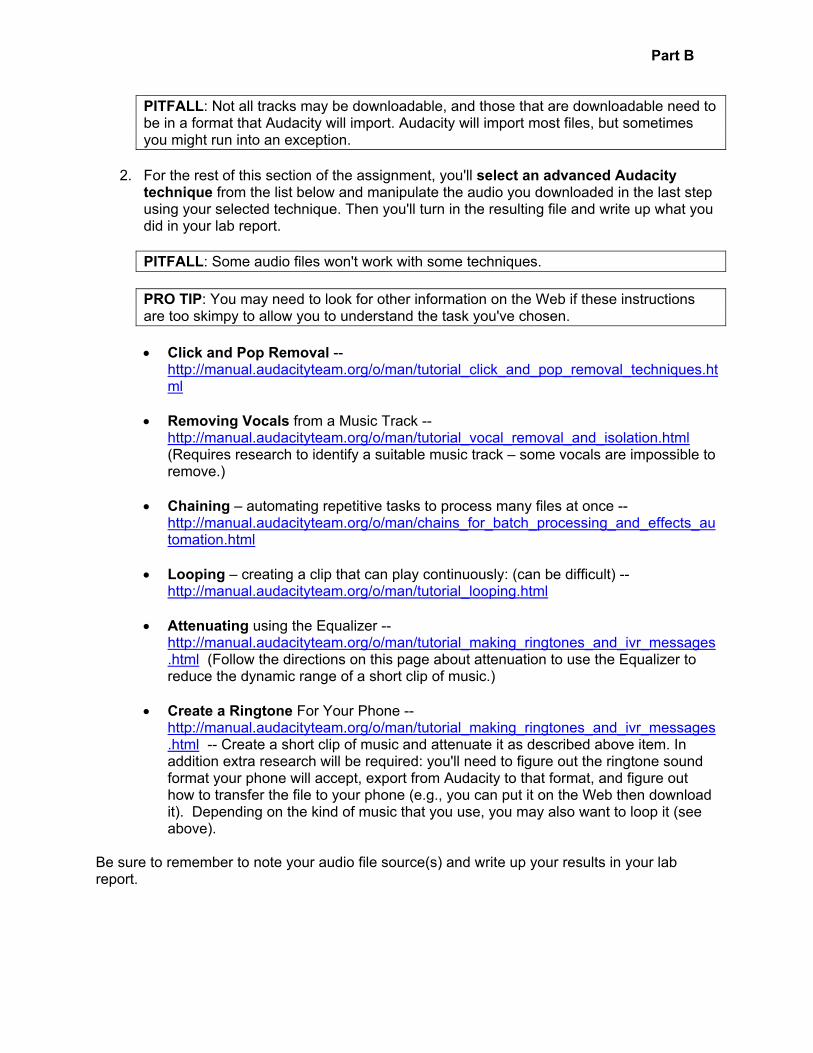
PITFALL: Not all tracks may be downloadable, and those that are downloadable need to be in a format that Audacity will import. Audacity will import most files, but sometimes you might run into an exception.
2. For the rest of this section of the assignment, you'll select an advanced Audacity
technique from the list below and manipulate the audio you downloaded in the last step using your selected technique. Then you'll turn in the resulting file and write up what you did in your lab report.
PITFALL: Some audio files won't work with some techniques.
PRO TIP: You may need to look for other information on the Web if these instructions are too skimpy to allow you to understand the task you've chosen.
Click and Pop Removal --
http://manual.audacityteam.org/o/man/tutorial_click_and_pop_removal_techniques.html
Removing Vocals from a Music Track --
http://manual.audacityteam.org/o/man/tutorial_vocal_removal_and_isolation.html (Requires research to identify a suitable music track – some vocals are impossible to remove.)
Chaining – automating repetitive tasks to process many files at once --
http://manual.audacityteam.org/o/man/chains_for_batch_processing_and_effects_automation.html
Looping – creating a clip that can play continuously: (can be difficult) --
http://manual.audacityteam.org/o/man/tutorial_looping.html
Attenuating using the Equalizer -- http://manual.audacityteam.org/o/man/tutorial_making_ringtones_and_ivr_messages.html (Follow the directions on this page about attenuation to use the Equalizer to reduce the dynamic range of a short clip of music.)
Create a Ringtone For Your Phone --
http://manual.audacityteam.org/o/man/tutorial_making_ringtones_and_ivr_messages.html -- Create a short clip of music and attenuate it as described above item. In addition extra research will be required: you'll need to figure out the ringtone sound format your phone will accept, export from Audacity to that format, and figure out how to transfer the file to your phone (e.g., you can put it on the Web then download it). Depending on the kind of music that you use, you may also want to loop it (see above).
Be sure to remember to note your audio file source(s) and write up your results in your lab report.
Part C
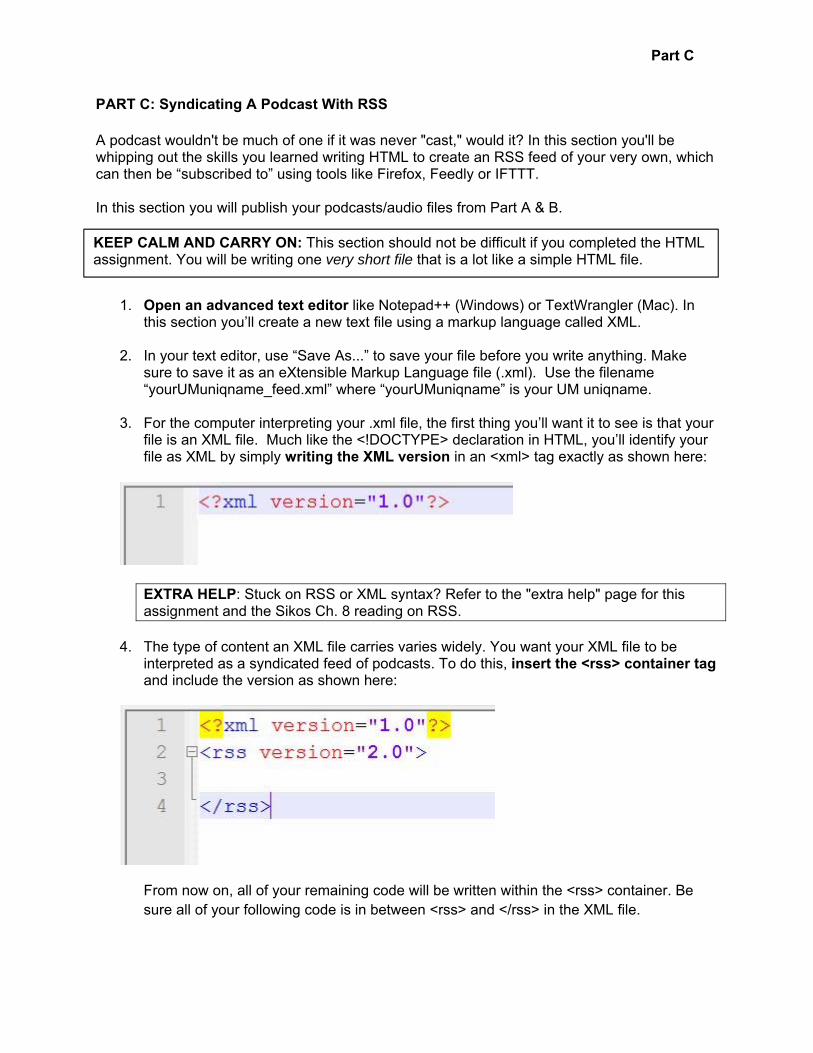
PART C: Syndicating A Podcast With RSS A podcast wouldn't be much of one if it was never "cast," would it? In this section you'll be whipping out the skills you learned writing HTML to create an RSS feed of your very own, which can then be “subscribed to” using tools like Firefox, Feedly or IFTTT. In this section you will publish your podcasts/audio files from Part A & B.
1. Open an advanced text editor like Notepad++ (Windows) or TextWrangler (Mac). In
this section you’ll create a new text file using a markup language called XML.
2. In your text editor, use “Save As...” to save your file before you write anything. Make sure to save it as an eXtensible Markup Language file (.xml). Use the filename “yourUMuniqname_feed.xml” where “yourUMuniqname” is your UM uniqname.
3. For the computer interpreting your .xml file, the first thing you’ll want it to see is that your
file is an XML file. Much like the <!DOCTYPE> declaration in HTML, you’ll identify your file as XML by simply writing the XML version in an <xml> tag exactly as shown here:
EXTRA HELP: Stuck on RSS or XML syntax? Refer to the "extra help" page for this assignment and the Sikos Ch. 8 reading on RSS.
4. The type of content an XML file carries varies widely. You want your XML file to be interpreted as a syndicated feed of podcasts. To do this, insert the <rss> container tag and include the version as shown here:
From now on, all of your remaining code will be written within the <rss> container. Be sure all of your following code is in between <rss> and </rss> in the XML file.
KEEP CALM AND CARRY ON: This section should not be difficult if you completed the HTML assignment. You will be writing one very short file that is a lot like a simple HTML file.

Part C
5. All RSS feeds contain <channel> containers. Channels themselves contain trait container tags like <title>, <description>, and <link>. Add a channel container with these three trait tags. <title> your channel “(Your First Name)'s Podcasts”. Write a <description> similar to the example below. Normally the <link> tag would link to the home page of your site. Since you don’t have one in this case, use the URL to Web page you made in Assignment 2: http://www-personal.umich.edu/~yourUMuniqname/COMM313
As you complete this step, your XML will look somewhat like this, but the above screen shot is intentionally incomplete.
Note: Since you are only creating one channel, all of the remaining RSS code will be within this <channel> container tag.
6. RSS feeds contain <item> container tags that describe each individual news item,
podcast, or whatever it is you happen to be syndicating. Like channels, items themselves contain <title>, <description>, and <link> tags. Create two <item> containers for each of your two audio files (the result from Part A & B). Fill out the <title> tag with its title and the <description> tag with an appropriate description.
7. In order to complete the <link> tags for your RSS items, you’ll need to create publicly accessible URLs that link to your audio files. To publish your audio you will need to upload it to a Web server where it will be publicly accessible. This process is exactly the same as Part Z way back in Assignment 2. Visit MFile https://mfile.umich.edu/ and upload your two audio files (from Part A & B) within the Public/html/COMM313 folder you created for Assignment #2. Your working URLs for the <link> tags in your RSS should now take the form:
http://www-personal.umich.edu/~yourUMuniqname/COMM313/filename.wav
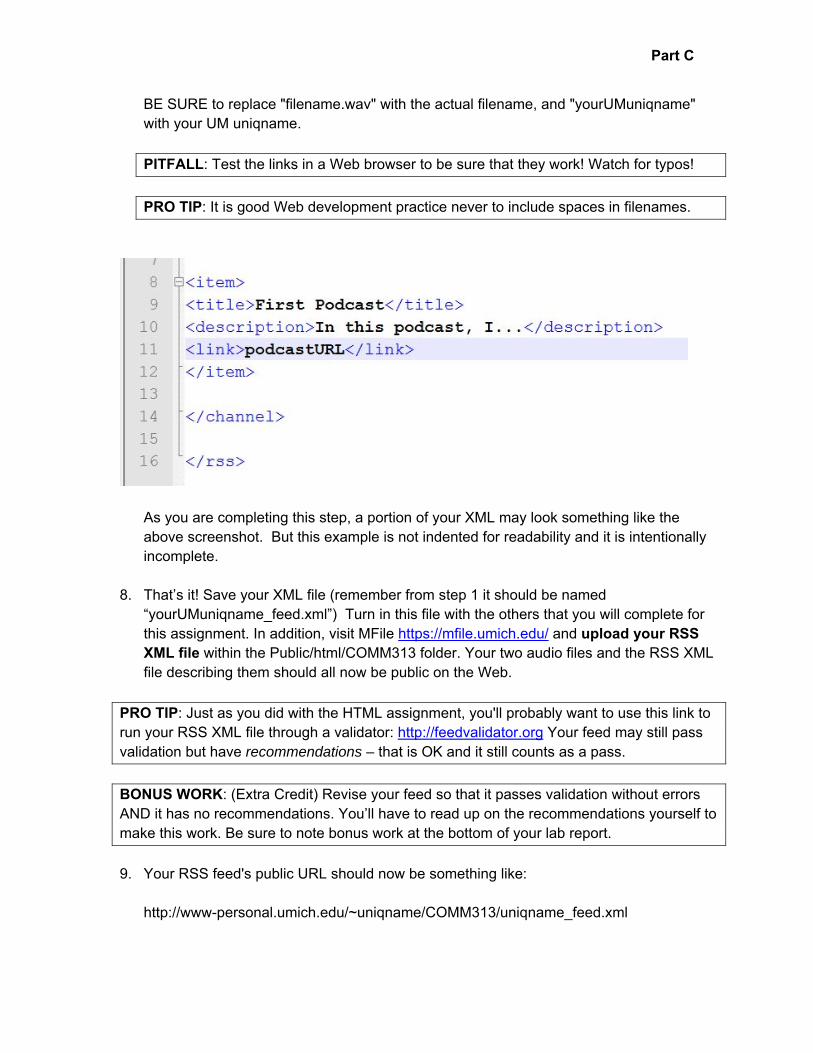
Part C
BE SURE to replace "filename.wav" with the actual filename, and "yourUMuniqname" with your UM uniqname.
PITFALL: Test the links in a Web browser to be sure that they work! Watch for typos!
PRO TIP: It is good Web development practice never to include spaces in filenames.
As you are completing this step, a portion of your XML may look something like the above screenshot. But this example is not indented for readability and it is intentionally incomplete.
8. That’s it! Save your XML file (remember from step 1 it should be named
“yourUMuniqname_feed.xml”) Turn in this file with the others that you will complete for this assignment. In addition, visit MFile https://mfile.umich.edu/ and upload your RSS XML file within the Public/html/COMM313 folder. Your two audio files and the RSS XML file describing them should all now be public on the Web.
PRO TIP: Just as you did with the HTML assignment, you'll probably want to use this link to run your RSS XML file through a validator: http://feedvalidator.org Your feed may still pass validation but have recommendations – that is OK and it still counts as a pass.
BONUS WORK: (Extra Credit) Revise your feed so that it passes validation without errors AND it has no recommendations. You’ll have to read up on the recommendations yourself to make this work. Be sure to note bonus work at the bottom of your lab report.
9. Your RSS feed's public URL should now be something like:
http://www-personal.umich.edu/~uniqname/COMM313/uniqname_feed.xml

Part C
Visit your URL in a Web browser that supports XML RSS feeds, such as Firefox or Internet Explorer. (Google Chrome will not work.) If your feed is formatted correctly, you should see additional options related to feeds. On Firefox this will be the ability to add a "Live Bookmark" while in Internet Explorer it will suggest some additional search options. You should be able to click on the links in your feed and they should work.

Part D
PART D: Finding and Using Feeds Automatically Reading Feeds Now that you have audio content and an RSS feed, let’s put it to use with a Feed Reader.
1. Just as a Web Browser reads and displays Web pages (HTML files), a Feed Reader reads and displays feeds (RSS XML files). Visit Feedly at http://feedly.com and press “Get Started” to create an account. You can either use an existing account with another online service, or create a new account just for Feedly by pressing “Feedly.”
2. After logging in you’ll see the Feedly main page. Find the “Discover and add content to your feedly” search box.
You can use this box to find content from around the Web, but you can also use it to directly subscribe to an RSS feed. Type the URL for the RSS XML feed you created in the last step of Part C and press [Enter].
3. If your RSS file is public, the URL is correct, and your RSS and XML are valid, Feedly
should recognize your feed and allow you to subscribe to it by pressing the green “+” button. Press the green “+” button shown here:
Then click “Add.” You should see the feed appear on the left sidebar, under “uncategorized.”
DON’T WORRY: Since we didn’t put much information into the RSS, the information listed for your feed will be pretty minimal.
Part D
Finding Feeds of Interest RSS feeds are also discoverable around the Web and can be used for a variety of purposes. Let’s try a few different tactics to discover RSS feeds.
4. Word Press is the largest public blogging platform and it supports RSS. Visit the
wordpress.com public blog search engine at https://en.search.wordpress.com/ and type in a query to find a blog topic you are interested in (e.g., "parrots"). Click on a result that looks interesting.
5. In HTML, Web developers use the <link> tag in the <head> container to indicate that a particular item has an RSS feed associated with it. Use the "View Source" command on your Web browser to view the HTML. Read the HTML until you find one or more <link> tags indicating RSS feed(s) are associated with this page. Note that <link> tags to RSS feeds have the type= attribute set to “application/rss+xml”
6. View each available feed directly by clicking on its associated URL in the <link> tag. The URL will be in the href= attribute. (URLs may end in "feed/" or some other suffix and not .xml or .rss.) You will need to use a Web browser that supports RSS XML such as Firefox or Internet Explorer – Google Chrome will not work.
7. In addition, some Web platforms provide documentation about their RSS feeds. Browse these or search for your own to find feeds of interest to you:
Reuters News: http://www.reuters.com/tools/rss New Movie trailers released on iTunes:
http://trailers.apple.com/trailers/home/rss/newtrailers.rss New album reviews by the Chicago music magazine Pitchfork that received a
"best" ranking: http://pitchfork.com/rss/reviews/best/albums/ US Government weather forecasts and observations for every city in the US:
http://w1.weather.gov/xml/current_obs/ Etsy shops and favorites: https://www.etsy.com/help/article/100
8. One more tactic: Some Web sites indicate the presence of RSS by providing an "RSS"
or "Feed" link (usually orange) somewhere on a page that the user can see. Try searching Ann Arbor Craigslist ( https://annarbor.craigslist.org/ ) for a listing of your choice using a browser that supports RSS (Google Chrome will not work.). Then click the "RSS" button at the bottom of the search results. This link will generate an RSS feed for this particular search query.
9. Find THREE specific public RSS feed URLs from the above sources (steps 4-8), then add all three to your Feedly account by repeating steps 2 and 3 for each feed.
Part D
Using Feeds
10. A variety of Web tools link different Web sites together using programming and standard data formats like RSS XML. One of these services is IFTTT, which stands for "If This Then That." Unlike Feedly, IFTTT can connect a variety of data formats and sources. Visit http://ifttt.com and follow the directions to create a free account.
11. After signing in to your new account, click "My Recipes" at the top of the page, then
"Create a Recipe"
12. IFTTT links a conditional (if this) to a result (then that). Click the word "this" to set the conditional for your first recipe.
13. When you see the prompt, "Choose Trigger Channel," type "feed" and press [Enter.]
Then click the "Feed" channel. (At this point you may be prompted to "connect" the feed channel. Follow the directions to do so.)
14. Choose "New feed item" and for "Feed URL" add one of the feeds URLs from the
previous section that you are interested in (steps 4-9). Do not use your own RSS XML URL in this step. Then press "Create Trigger."
BONUS WORK: (Extra Credit) Your own RSS XML file, even if it is valid RSS XML, will not work for this step because it does not meet IFTTT’s three requirements for Feeds. For extra credit, revise your feed so that it meets IFTTT’s three requirements: https://ifttt.com/help?#feed
15. Next, click the word "that" to set the result – in other words, set what will happen when
there is a new feed item at that URL that matches your conditional. Search for and select either the SMS, Gmail, email, or "IF notification channel" (your choice) to set up a notification that is triggered when a new post appears. For instance, if you choose Gmail, you can have the trigger (a new item appears in your feed).
16. Confirm that the notification worked. You may have to wait some time until the feed is updated (say, a day). Take a screenshot or cell phone picture of the notification and include it in your lab report.
17. Finally, Use IFTTT on your own to create a useful new recipe of your own design that links a conditional to a result. Use a different conditional (“this”) channel than the “Feed” channel. You may have to experiment to get this to work. For example, a new recipe might send you a text message if rain is forecast near your house.
PITFALL: Do not create a “do” recipe, use a “this” recipe. Do not use the “Feed” channel.
</assignment part 1>