bedienungsanleitung saphira mask 4 rev d · bedienungsanleitung für sie nicht ausführlich genug...
TRANSCRIPT

Bedienungsanleitung / Mode d’emploi / Instruction for use Saphira Seite A 10.05.05 / Rev D / PPB
SAPHIRA
§ Bedienungsanleitung 1 - 18 § Mode d’emploi 19 - 36 § Instructions for use 37 - 54
Bedienungsanleitung / Mode d’emploi / Instruction for use Saphira Seite B 10.05.05 / Rev D / PPB
Nur für UL-Geräte / Only for UL-Appliances / Seulement pour UL-Appareils Important Safeguards When using electrical appliances, basic safety precautions should always be followed, to reduce the risk of fire, electric shock, and/or injury to persons, including the following: - Read all instructions. - Do not touch hot surfaces. Use handles or knobs. - To protect against fire, electric shock and personal injury do not immerse cord, plugs, or appliance in
water or other liquid. - Close supervision is necessary when any appliance is used by or near children. - Unplug from outlet when not in use and before cleaning. Allow to cool before putting on or taking off
parts, and before cleaning the appliance. - Do not operate any appliance with a damaged cord or plug or after the appliance malfunctions, or
has been damaged in any manner. Return appliance to the nearest authorized service facility for examination, repair or adjustment.
- The use of accessory attachments not recommended by the appliance manufacturer may result in fire, electric shock or personal injury.
- Do not use outdoors. - Do not let cord hang over edge of table or counter, or touch hot surfaces. - Do no place on or near a hot gas or electric burner, or in a heated oven. - Always attach plug to appliance first, then plug cord into the wall outlet. To disconnect, turn any
control “off”, then remove plug from wall outlet. - Do not use appliance for other than intended use. - Use extreme caution when disposing hot steam. - For household and commercial use. Special Cord set Instructions Regarding your Cord Set: A. A short power-supply cord (or detachable power-supply cord) is to be provided to reduce risks
resulting from becoming entangled in or tripping over a longer cord. B. Longer detachable power-supply cords or extension cords are available and may be used if care is
exercised in their use. C. If a long detachable power-supply cord or extension cord is used, (1) the marked electrical rating of
the detachable power-supply cord or extension cord should be at least as great as the electrical rating of the appliance, (2) if the appliance is of the grounded type, the extension cord should be a grounding type 3-wire cord, and (3) the longer cord should be arranged so that it will not drape over the counter top or table top where it can be pulled on by children or tripped over.
Warning: To reduce the risk of fire or electric shock, do not remove any service covers. No user serviceable parts inside. Repair should be done by authorized personnel only. Caution This appliance is for household and commercial use. Any servicing other than cleaning and user maintenance should be performed by an authorized service representative. - Do not immerse base in water or try to disassemble. - To reduce the risk of fire or electric shock, do not remove the base. No user serviceable parts inside.
Repair should be done by authorized personnel only. - Check voltage to be sure that the voltage indicated on the name plate agrees with your voltage. - Never use warm or hot water to fill the water container! Use cold water only! - Keep your hands and the cord away from hot parts of the appliance during operation. Never clean with scouring powders or hard implements.
SAVE THESE INSTRUCTIONS

Bedienungsanleitung / Mode d’emploi / Instruction for use Saphira Seite C 10.05.05 / Rev D / PPB
Legende / Légende / Legend:
Display DISPLAYANZEIGE: Dient als Information Display DISPLAYANZEIGE: Führen sie die angezeigten Meldungen aus
Display MESSAGE VISUEL: utilisez-le comme information. Display GUIDE INTERFACTIF AVEC VISUEL: exécutez les indications données
Display DISPLAY: serves as information Display DISPLAY: please follow the instructions shown
Markierung / Marque / Mark
F Hinweis I Wichtig A Tipp
Remarque Important Conseil
Note Important Tip outta here.
Fig. 1 Fig. 2 Fig. 3
Fig. 4 Fig. 5 Fig. 6
Fig. 8 Fig. 9
A A B
Fig. 7

Bedienungsanleitung / Mode d’emploi / Instruction for use Saphira Seite D 10.05.05 / Rev D / PPB
Bedienungselemente / Eléments de commande / Instroctions for use Nr. Legende: Légende: Legend: 1. Tropfschale Bac Drip tray 2. Tropfgitter Tôle perforé Perforated plate 3. Satzbehälter Collection des marcs Drawer 4. Auslauf Kaffee / Milchschaum Sortie café / mousse au lait Coffee Outlet / Milkfroth 5. Milchzuführung Alimentation lait Milk supply 6. Produktetasten Touche pour produit Push buttons 7. Display Affichage Display 8. Tassenablage Pose tasses Cup surface 9. Mühle links Moulin gauche Grinder left 10. Einwurf Reinigungstablette Trappe pour pastilles de nettoyage Slot cleaningtabletts 11. Mühle rechts Moulin droit Grinder right 12. Mühlevorwahl Présélection moulin Preselection grinder 13. Wassertank Remplir l’eau Water tank 14. Abdeckung Programmiertastatur Couvercle clavier de programmation Cove programming-keyboard 15. Produktetaste Dampf Touche vapeur Product-button hot steam 16. Produktetaste Heisswasser Touche eau chaude Product-button hot water 17. Auslauf Heisswasser / Dampf Sortie eau chaude / vapeur Outlet hotwater / steam 18. Abdeckung Mühlen Couvercle pour moulins Cover grinders 19. Netzkabel Câble électrique Power supply cord 20. Netzschalter Commutateur principal Mains switch 21. Typenschild Plaque d’indentification Data plate 22. Anschluss Festwasserspeisung Connexion d’eau Connection water supply
1 2 3
4
5
6
7
8
11 9 12
14
15
16
10
17
22 21 20 19
13
18
Bedienungsanleitung / Mode d’emploi / Instruction for use Saphira Seite E 10.05.05 / Rev D / PPB
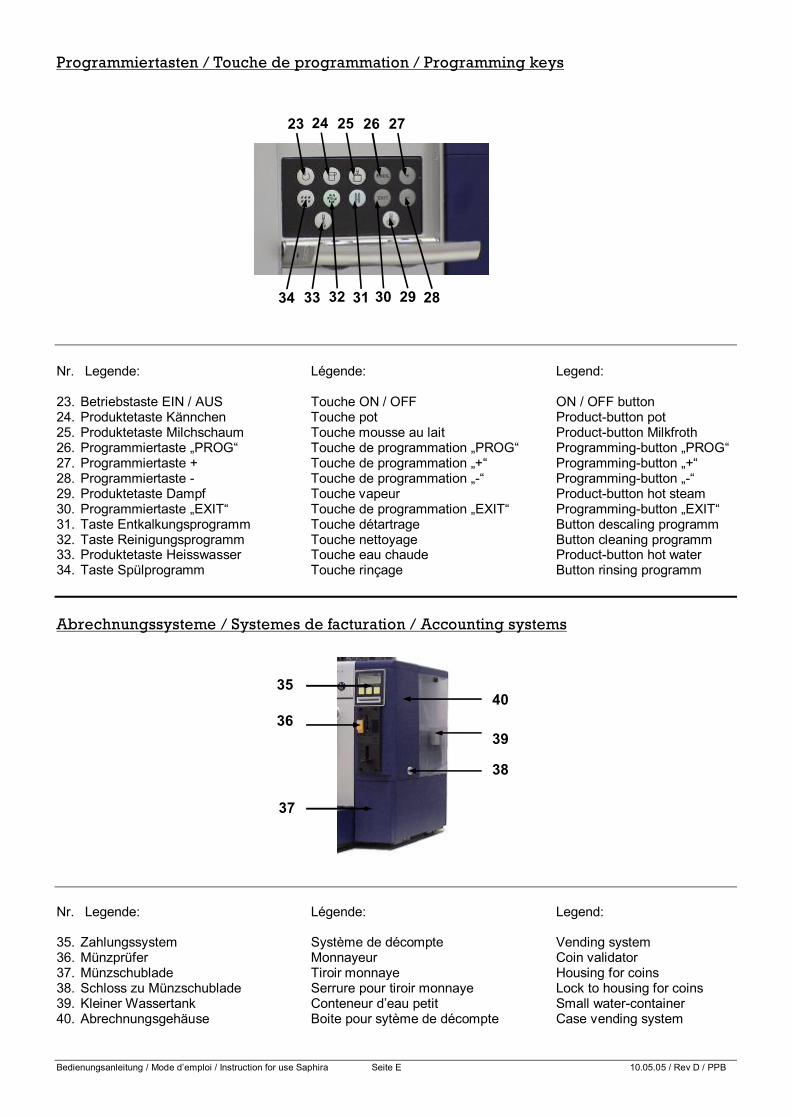
Programmiertasten / Touche de programmation / Programming keys Nr. Legende: Légende: Legend: 23. Betriebstaste EIN / AUS Touche ON / OFF ON / OFF button 24. Produktetaste Kännchen Touche pot Product-button pot 25. Produktetaste Milchschaum Touche mousse au lait Product-button Milkfroth 26. Programmiertaste „PROG“ Touche de programmation „PROG“ Programming-button „PROG“ 27. Programmiertaste + Touche de programmation „+“ Programming-button „+“ 28. Programmiertaste - Touche de programmation „-“ Programming-button „-“ 29. Produktetaste Dampf Touche vapeur Product-button hot steam 30. Programmiertaste „EXIT“ Touche de programmation „EXIT“ Programming-button „EXIT“ 31. Taste Entkalkungsprogramm Touche détartrage Button descaling programm 32. Taste Reinigungsprogramm Touche nettoyage Button cleaning programm 33. Produktetaste Heisswasser Touche eau chaude Product-button hot water 34. Taste Spülprogramm Touche rinçage Button rinsing programm Abrechnungssysteme / Systemes de facturation / Accounting systems Nr. Legende: Légende: Legend: 35. Zahlungssystem Système de décompte Vending system 36. Münzprüfer Monnayeur Coin validator 37. Münzschublade Tiroir monnaye Housing for coins 38. Schloss zu Münzschublade Serrure pour tiroir monnaye Lock to housing for coins 39. Kleiner Wassertank Conteneur d’eau petit Small water-container 40. Abrechnungsgehäuse Boite pour sytème de décompte Case vending system
33 32 31 30 29 28 34
23 24 25 26 27
40
37
36
35
38
39
Bedienungsanleitung Saphira Seite 1 10.05.05 / Rev D / Mask 4 / PPB
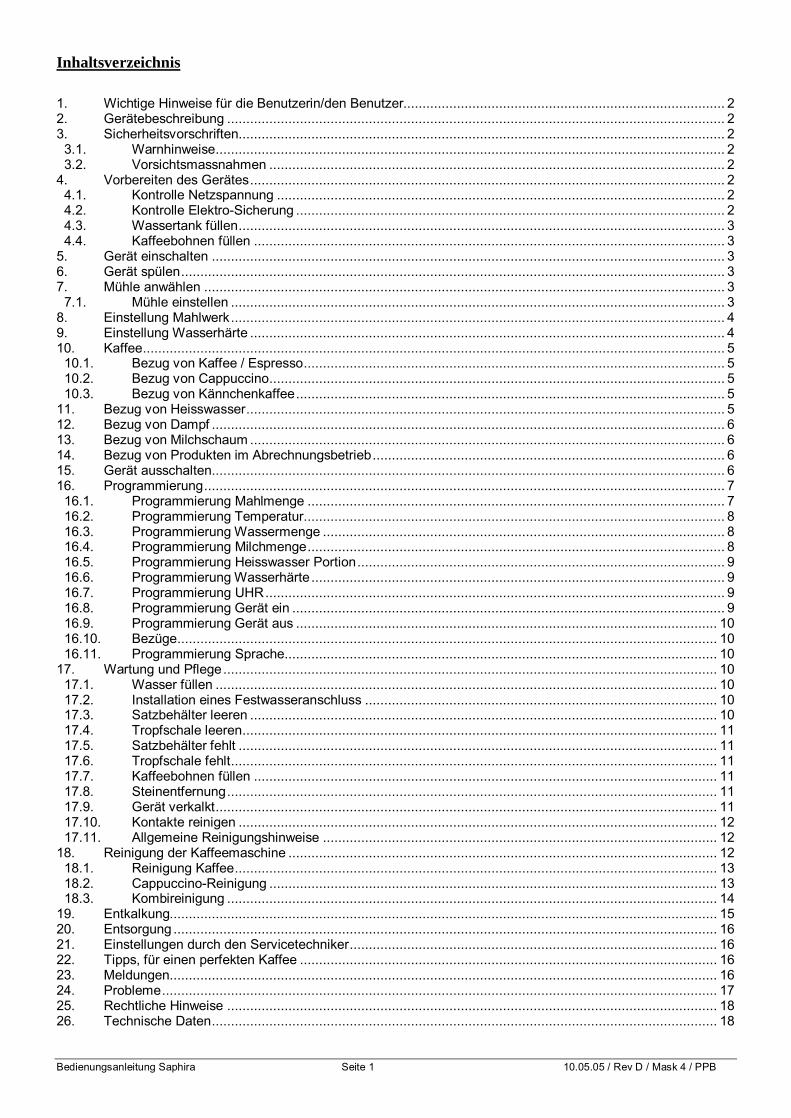
Inhaltsverzeichnis 1. Wichtige Hinweise für die Benutzerin/den Benutzer.................................................................................... 2 2. Gerätebeschreibung .................................................................................................................................. 2 3. Sicherheitsvorschriften............................................................................................................................... 2
3.1. Warnhinweise..................................................................................................................................... 2 3.2. Vorsichtsmassnahmen ....................................................................................................................... 2
4. Vorbereiten des Gerätes............................................................................................................................ 2 4.1. Kontrolle Netzspannung ..................................................................................................................... 2 4.2. Kontrolle Elektro-Sicherung ................................................................................................................ 2 4.3. Wassertank füllen............................................................................................................................... 3 4.4. Kaffeebohnen füllen ........................................................................................................................... 3
5. Gerät einschalten ...................................................................................................................................... 3 6. Gerät spülen.............................................................................................................................................. 3 7. Mühle anwählen ........................................................................................................................................ 3
7.1. Mühle einstellen ................................................................................................................................. 3 8. Einstellung Mahlwerk................................................................................................................................. 4 9. Einstellung Wasserhärte ............................................................................................................................ 4 10. Kaffee........................................................................................................................................................ 5
10.1. Bezug von Kaffee / Espresso.............................................................................................................. 5 10.2. Bezug von Cappuccino....................................................................................................................... 5 10.3. Bezug von Kännchenkaffee................................................................................................................ 5
11. Bezug von Heisswasser............................................................................................................................. 5 12. Bezug von Dampf ...................................................................................................................................... 6 13. Bezug von Milchschaum ............................................................................................................................ 6 14. Bezug von Produkten im Abrechnungsbetrieb............................................................................................ 6 15. Gerät ausschalten...................................................................................................................................... 6 16. Programmierung........................................................................................................................................ 7
16.1. Programmierung Mahlmenge ............................................................................................................. 7 16.2. Programmierung Temperatur.............................................................................................................. 8 16.3. Programmierung Wassermenge ......................................................................................................... 8 16.4. Programmierung Milchmenge............................................................................................................. 8 16.5. Programmierung Heisswasser Portion................................................................................................ 9 16.6. Programmierung Wasserhärte ............................................................................................................ 9 16.7. Programmierung UHR........................................................................................................................ 9 16.8. Programmierung Gerät ein ................................................................................................................. 9 16.9. Programmierung Gerät aus .............................................................................................................. 10 16.10. Bezüge............................................................................................................................................. 10 16.11. Programmierung Sprache................................................................................................................. 10
17. Wartung und Pflege................................................................................................................................. 10 17.1. Wasser füllen ................................................................................................................................... 10 17.2. Installation eines Festwasseranschluss ............................................................................................ 10 17.3. Satzbehälter leeren .......................................................................................................................... 10 17.4. Tropfschale leeren............................................................................................................................ 11 17.5. Satzbehälter fehlt ............................................................................................................................. 11 17.6. Tropfschale fehlt............................................................................................................................... 11 17.7. Kaffeebohnen füllen ......................................................................................................................... 11 17.8. Steinentfernung................................................................................................................................ 11 17.9. Gerät verkalkt................................................................................................................................... 11 17.10. Kontakte reinigen ............................................................................................................................. 12 17.11. Allgemeine Reinigungshinweise ....................................................................................................... 12
18. Reinigung der Kaffeemaschine ................................................................................................................ 12 18.1. Reinigung Kaffee.............................................................................................................................. 13 18.2. Cappuccino-Reinigung ..................................................................................................................... 13 18.3. Kombireinigung ................................................................................................................................ 14
19. Entkalkung............................................................................................................................................... 15 20. Entsorgung .............................................................................................................................................. 16 21. Einstellungen durch den Servicetechniker................................................................................................ 16 22. Tipps, für einen perfekten Kaffee ............................................................................................................. 16 23. Meldungen............................................................................................................................................... 16 24. Probleme................................................................................................................................................. 17 25. Rechtliche Hinweise ................................................................................................................................ 18 26. Technische Daten.................................................................................................................................... 18

Bedienungsanleitung Saphira Seite 2 10.05.05 / Rev D / Mask 4 / PPB
1. Wichtige Hinweise für die Benutzerin/den Benutzer Bevor Sie Ihr neues Gerät in Betrieb nehmen, lesen Sie bitte diese Bedienungsanleitung sorgfältig durch und bewahren Sie diese auf, um auch zukünftig nachschlagen zu können. Sollten Sie weitere Informationen wünschen oder sollten besonders Probleme auftreten, die in dieser Bedienungsanleitung für Sie nicht ausführlich genug behandelt werden, dann fordern Sie bitte die benötigte Auskunft von Ihrem örtlichen Fachhändler oder direkt von Franke AG an.
2. Gerätebeschreibung Die Saphira für den Office- und Kleingastrobereich besticht nicht nur durch ihre moderne Technologie, sondern auch durch viele Features und bereitet auf Wunsch eine oder zwei Tassen Espresso/Kaffee in nur einem Brühvorgang zu. Das Intelligent Pre Brew Aroma System (I.P.B.A.S.©) sorgt für die Ausschöpfung des vollen Kaffeearomas und liefert besten Espresso/Kaffee, immer gekrönt von einer herrlichen Crema. Wahlweise kann Kaffee aus dem einen oder anderen Mahlwerk verarbeitet werden. Die Mischung lässt sich individuell programmieren. Durch Knopfdruck und ohne Tassenverschiebung ist ein Cappuccino-Bezug möglich. Integrierte Spül-, Reinigungs- und Entkalkungsprogramme sorgen für perfekte Sauberkeit auf Knopfdruck.
3. Sicherheitsvorschriften
3.1. Warnhinweise § Kinder erkennen die Gefahren nicht, die beim Umgang mit Elektrogeräten entstehen können;
deshalb Kinder nie unbeaufsichtigt mit Elektrogeräten alleine lassen. § Das Gerät darf nur von instruierten Personen betrieben werden. § Nie ein defektes Gerät oder ein Gerät mit schadhafter Zuleitung in Betrieb nehmen. § Tauchen Sie das Gerät nicht ins Wasser.
3.2. Vorsichtsmassnahmen § Das Gerät nie Witterungseinflüssen (Regen, Schnee, Frost) aussetzen und auch nicht mit nassen
Händen bedienen. § Das Gerät auf eine stabile und waagrechte Ablage stellen. Nie auf heisse oder warme Flächen
(Kochfelder) stellen. § Bei längerer Abwesenheit (Ferien etc.) immer den Netzstecker ziehen. § Vor Reinigungsarbeiten immer zuerst den Netzstecker ziehen. § Beim Herausziehen des Netzsteckers nie an der Zuleitung oder am Gerät selbst zerren. § Nie das Gerät selber reparieren oder öffnen. Reparaturen dürfen nur von autorisierten Servicestellen
mit Originalersatz- und Zubehörteilen durchgeführt werden. § Das Gerät ist über eine Zuleitung mit dem Stromnetz verbunden. Achten Sie darauf, dass niemand
über die Zuleitung stolpert und das Gerät herunterreisst. Kinder und Haustiere fernhalten. § Der Standort des Gerätes so wählen, dass eine gute Luftzirkulation erfolgen kann, um es vor
Ueberhitzungen zu schützen. § Bei Anwendung von säurehaltigen Entkalkungsmitteln allfällige Spritzer und Tropfen auf
empfindlichen Abstellflächen, insbesondere Naturstein- und Holzflächen, sofort entfernen oder entsprechende Vorsichtsmassnahmen treffen.
4. Vorbereiten des Gerätes
4.1. Kontrolle Netzspannung § Das Gerät ist werkseitig auf die richtige Netzspannung eingestellt. Kontrollieren Sie, ob Ihre
Netzspannung mit den Angaben auf dem Typenschild auf der Rückseite des Gerätes übereinstimmt (21).
4.2. Kontrolle Elektro-Sicherung § Kontrollieren Sie, ob die Elektrosicherung entsprechend Ihrem Gerät ausgelegt ist (siehe Kapitel 26).
Bedienungsanleitung Saphira Seite 3 10.05.05 / Rev D / Mask 4 / PPB
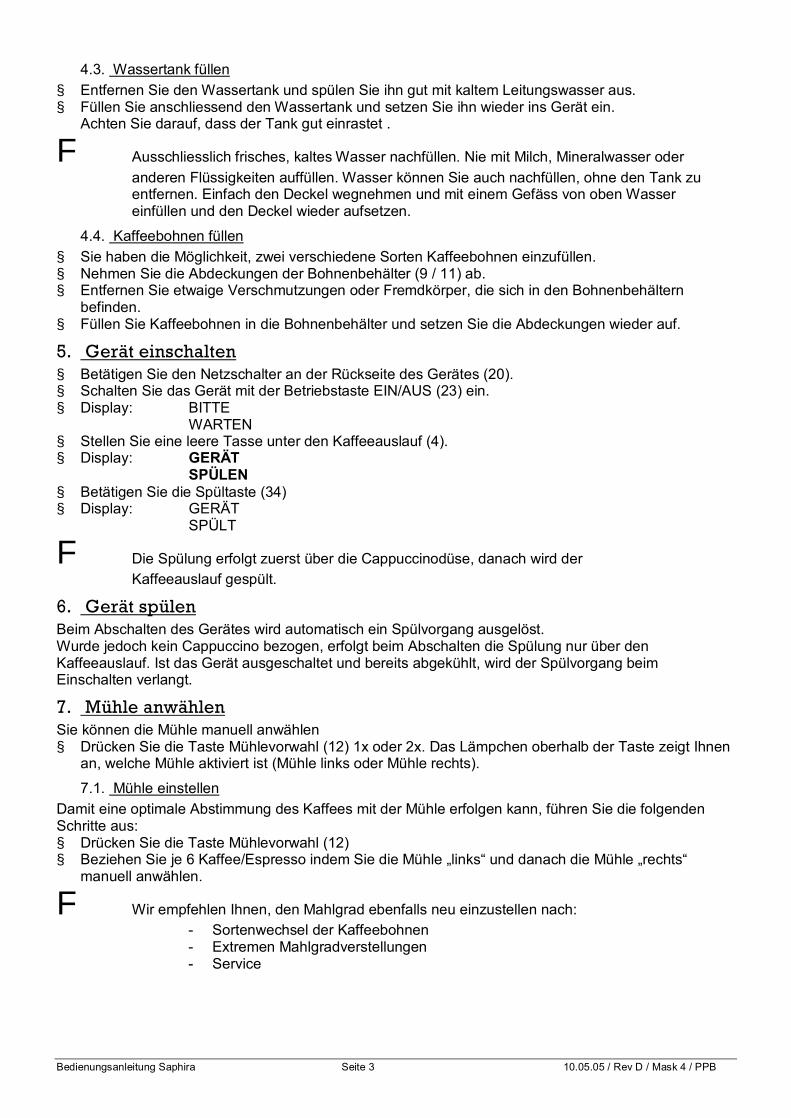
4.3. Wassertank füllen § Entfernen Sie den Wassertank und spülen Sie ihn gut mit kaltem Leitungswasser aus. § Füllen Sie anschliessend den Wassertank und setzen Sie ihn wieder ins Gerät ein.
Achten Sie darauf, dass der Tank gut einrastet .
F Ausschliesslich frisches, kaltes Wasser nachfüllen. Nie mit Milch, Mineralwasser oder anderen Flüssigkeiten auffüllen. Wasser können Sie auch nachfüllen, ohne den Tank zu entfernen. Einfach den Deckel wegnehmen und mit einem Gefäss von oben Wasser einfüllen und den Deckel wieder aufsetzen.
4.4. Kaffeebohnen füllen § Sie haben die Möglichkeit, zwei verschiedene Sorten Kaffeebohnen einzufüllen. § Nehmen Sie die Abdeckungen der Bohnenbehälter (9 / 11) ab. § Entfernen Sie etwaige Verschmutzungen oder Fremdkörper, die sich in den Bohnenbehältern
befinden. § Füllen Sie Kaffeebohnen in die Bohnenbehälter und setzen Sie die Abdeckungen wieder auf.
5. Gerät einschalten § Betätigen Sie den Netzschalter an der Rückseite des Gerätes (20). § Schalten Sie das Gerät mit der Betriebstaste EIN/AUS (23) ein. § Display: BITTE WARTEN § Stellen Sie eine leere Tasse unter den Kaffeeauslauf (4). § Display: GERÄT SPÜLEN § Betätigen Sie die Spültaste (34) § Display: GERÄT SPÜLT
F Die Spülung erfolgt zuerst über die Cappuccinodüse, danach wird der Kaffeeauslauf gespült.
6. Gerät spülen Beim Abschalten des Gerätes wird automatisch ein Spülvorgang ausgelöst. Wurde jedoch kein Cappuccino bezogen, erfolgt beim Abschalten die Spülung nur über den Kaffeeauslauf. Ist das Gerät ausgeschaltet und bereits abgekühlt, wird der Spülvorgang beim Einschalten verlangt.
7. Mühle anwählen Sie können die Mühle manuell anwählen § Drücken Sie die Taste Mühlevorwahl (12) 1x oder 2x. Das Lämpchen oberhalb der Taste zeigt Ihnen
an, welche Mühle aktiviert ist (Mühle links oder Mühle rechts).
7.1. Mühle einstellen Damit eine optimale Abstimmung des Kaffees mit der Mühle erfolgen kann, führen Sie die folgenden Schritte aus: § Drücken Sie die Taste Mühlevorwahl (12) § Beziehen Sie je 6 Kaffee/Espresso indem Sie die Mühle „links“ und danach die Mühle „rechts“
manuell anwählen.
F Wir empfehlen Ihnen, den Mahlgrad ebenfalls neu einzustellen nach: - Sortenwechsel der Kaffeebohnen - Extremen Mahlgradverstellungen - Service
Bedienungsanleitung Saphira Seite 4 10.05.05 / Rev D / Mask 4 / PPB
8. Einstellung Mahlwerk Sie haben die Möglichkeit, das Mahlwerk dem Röstgrad Ihres Kaffees anzupassen. Wir empfehlen Ihnen für;
A dunkle Röstung ð feinere Einstellung helle Röstung ð gröbere Einstellung § Zum Einstellen des Mahlgrades drehen Sie die Einstellringe in die gewünschte Position (Fig.1) § Sie haben folgende Möglichkeiten:
A je kleiner die Punkte, desto feiner die Mahlung je grösser die Punkte, desto gröber die Mahlung
F Der Mahlgrad darf nur bei laufendem Mahlwerk verstellt werden.
9. Einstellung Wasserhärte In dem Gerät wird Wasser erhitzt. Das führt zu einer gebrauchsbedingten Verkalkung, die automatisch im Display angezeigt wird. Das Gerät muss auf die Härte des verwendeten Wassers eingestellt werden. Verwenden Sie das beigelegte Teststäbchen.
F 1° deutscher Härte entspricht 1,79° französischer Härte. Das Gerät verfügt über 5 Härtestufen: WASSERHÄRTE STUFE -- Wasserhärte-Funktion ausgeschaltet WASSERHÄRTE deutscher Wasserhärtegrad 1 - 7° STUFE 1 franz. Wasserhärtegrad 1,79 – 12,53° WASSERHÄRTE deutscher Wasserhärtegrad 8 - 15° STUFE 2 franz. Wasserhärtegrad 14,32 - 26,85° WASSERHÄRTE deutscher Wasserhärtegrad 16 - 23° STUFE 3 franz. Wasserhärtegrad 28,64 - 41,14° WASSERHÄRTE deutscher Wasserhärtegrad 24 - 30° STUFE 4 franz. Wasserhärtegrad 42,96 - 53,7° Das Gerät ist vom Werk aus auf Stufe 3 eingestellt. Diese Einstellung können Sie verändern. Gehen Sie dabei wie folgt vor: § Schalten Sie das Gerät mit der Betriebstaste EIN/AUS (23) ein. § Display: BITTE WARTEN § Drücken Sie die Taste PROG. (26) bis ein akustisches Signal ertönt. § Display: MAHLMEGE EINSTELLEN § Display: PRODUKT WÄHLEN § Drücken Sie die Taste + (27)bis folgende Meldung erscheint: § Display: WASSERHÄRTE STUFE 3 § Drücken Sie die Taste PROG. (26), ein akustisches Signal ertönt und die eingestellte Stufe blinkt. § Durch Drücken der Taste – (28) oder + (27) können Sie die gewünschte Stufe einstellen. Zum
Speichern drücken Sie die Taste PROG. (26) Ein akustisches Signal ertönt. § Display: WASSERHÄRTE STUFE 3 § Drücken Sie die Taste EXIT (30).

Bedienungsanleitung Saphira Seite 5 10.05.05 / Rev D / Mask 4 / PPB
10. Kaffee
10.1. Bezug von Kaffee / Espresso § Das Gerät muss betriebsbereit sein. § Display: PRODUKT WÄHLEN § Stellen Sie 1 Tasse bzw. 2 Tassen unter den Kaffeeauslauf (4) und drücken Sie die gewünschte
Produktetaste (6). Das Vorbrühverfahren (I.P.B.A.S) feuchtet das Kaffeepulver an, unterbricht kurz das Auslaufen und beginnt dann mit dem eigentlichen Brühvorgang.
§ Display: 1 KAFFEE
F Sie können den Bezug vorzeitig durch Drücken einer beliebigen Produktetaste abbrechen. Um ein hervorragendes „Schäumchen“ zu erhalten, können Sie den Kaffeeauslauf (4) individuell Ihren Tassengrössen anpassen.
10.2. Bezug von Cappuccino § Das Gerät muss betriebsbereit sein. § Display: PRODUKT WÄHLEN § Füllen Sie Milch in ein Kännchen und tauchen Sie den Cappuccinoschlauch in die Milch. § Stellen Sie 1 Tasse unter den Kaffeeauslauf und drücken Sie die Produktetaste (Cappuccino). Das
Gerät bereitet zuerst den Milchschaum, dann den Kaffee zu. § Display: 1 CAPPUCCINO
F Sie können den Milchschaum sowie den Kaffee vorzeitig durch erneutes Drücken der Produktetaste abbrechen. 10 Min. nach dem Cappuccino Bezug wird automatisch eine Spülung ausgelöst. Die Spülung wird vorab durch ein akustisches Signal angekündigt.
10.3. Bezug von Kännchenkaffee § Das Gerät muss betriebsbereit sein. § Display: PRODUKT WÄHLEN § Stellen Sie 1 Kännchen unter den Kaffeeauslauf (4) und drücken Sie die Produktetaste
Kännchenkaffee (24). Ihr Kännchenkaffee wird in mehreren Zyklen zubereitet. Die Anzahl der Zyklen wird im Display angezeigt.
§ Display: KäNNCHEN 2
F Sie können den Bezug vorzeitig durch erneutes Drücken der Produktetaste abbrechen.
11. Bezug von Heisswasser § Das Gerät muss betriebsbereit sein. § Display: PRODUKT WÄHLEN § Stellen Sie eine Tasse unter das schwenkbare Auslaufrohr (17) und drücken Sie die Produktetaste
Heisswasser Portion (16 oder 33). § Display: HEISSWASSER PORTION § Der Bezug der programmierten Heisswasserportion stoppt automatisch.
F Sie können den Bezug vorzeitig durch erneutes Drücken der Produktetaste abbrechen.
I Beim Bezug von Wasser kann es anfänglich spritzen. Das schwenkbare Auslaufrohr wird heiss. Vermeiden Sie direkten Hautkontakt.

Bedienungsanleitung Saphira Seite 6 10.05.05 / Rev D / Mask 4 / PPB
12. Bezug von Dampf § Das Gerät muss betriebsbereit sein. § Display: PRODUKT WÄHLEN § Stellen Sie eine Tasse mit der zu erhitzenden Flüssigkeit unter das schwenkbare Auslaufrohr (17)
und drücken Sie die Produktetaste Dampf (15 oder 29). § Display: DAMPF BEZUG
F Zum Beenden des Dampfbezuges drücken Sie die Taste Dampf (15 oder 29).
I Beim Bezug von Dampf kann es anfänglich spritzen. Das schwenkbare Auslaufrohr wird heiss. Vermeiden Sie direkten Hautkontakt
13. Bezug von Milchschaum § Das Gerät muss betriebsbereit sein. § Display: PRODUKT WÄHLEN § Füllen Sie Milch in ein Kännchen und tauchen Sie den Cappuccinoschlauch in die Milch. § Stellen Sie 1 Tasse unter den Kaffeeauslauf (4) und drücken Sie die Produktetaste Milchschaum
(25). Die programmierte Menge wird zubereitet und stoppt automatisch. § Display: MILCHSCHAUM
F Sie können den Bezug vorzeitig durch erneutes Drücken der Produktetaste abbrechen. 10 Min. nach dem Milchbezug wird automatisch eine Spülung ausgelöst. Die Spülung wird vorab durch ein akustisches Signal angekündigt
14. Bezug von Produkten im Abrechnungsbetrieb § Das Gerät muss betriebsbereit sein. § Display (7): PRODUKT WÄHLEN § Display (35): KREDITBETRIEB § Fügen Sie die Karte / Schlüssel in das Zahlungssystem (35) ein oder werfen Sie Münzen in den
Münzprüfer (36) bis das Guthaben dem Produktepreis entspricht. § Display (35): GUTHABEN 2.50 § Stellen Sie die Tasse oder das Gefäss unter den entsprechenden Auslauf (4 / 17) und drücken Sie
die Produktetaste. Das programmierte Produkt wird bei genügendem Guthaben zubereitet und stoppt automatisch.
§ Display (7): (gewähltes Produkt)
F Bei zu geringem Guthaben wird beim drücken der Produktetaste ein Signalton ausgegeben. Erfolgt bei der Produktevorbereitung die Meldung Kaffeebohnen füllen, bleibt das Guthaben bestehen.
15. Gerät ausschalten § Schalten Sie das Gerät mit der Betriebstaste EIN/AUS (23) aus. Beim Ausschalten des Gerätes wird
automatisch eine Spülung ausgelöst.

Bedienungsanleitung Saphira Seite 7 10.05.05 / Rev D / Mask 4 / PPB
16. Programmierung Es können folgende Stufen programmiert werden: a Mahlmenge a Temperatur a Wassermenge a Milchmenge a Heisswasser Portion a Wasserhärte a Uhr a Gerät ein a Gerät aus a Bezüge a Sprache Um in die Programmierebene zu gelangen, müssen zuerst folgende Schritte durchgeführt werden: § Schalten Sie ihr Gerät mit der Betriebstaste EIN/AUS (23) ein. § Drücken Sie die Taste PROG. (26) bis ein akustisches Signal ertönt. § Display: MAHLMENGE EINSTELLEN § Display: PRODUKT WÄHLEN
16.1. Programmierung Mahlmenge § Display: MAHLMENGE EINSTELLEN § Display: PRODUKT WÄHLEN § Drücken Sie die gewünschte Produktetaste. § Display: (gewähltes Produkt) - ..............II..............+ § Durch Drücken der Taste + (27) oder Taste – (28) können Sie die Mahlmenge bestimmen. § Zum Speichern drücken Sie die Taste PROG. (26). § Display: (gewähltes Produkt) <100% >0% Die programmierte Mahlmenge kann nun prozentual auf die Mühle links und rechts verteilt werden;
FBsp: Einstellung <100% >0% programmierte Mahlmenge erfolgt durch Mühle links Einstellung <0% >100% programmierte Mahlmenge erfolgt durch Mühle rechts Einstellung <25% >75% programmierte Mahlmenge erfolgt zu 25% durch Mühle links und zu 75% durch Mühle rechts (Mahlmischung) Einstellung <75% >25% programmierte Mahlmenge erfolgt zu 75% durch Mühle links und zu 25% durch Mühle rechts (Mahlmischung)
§ Durch Drücken der Taste + (27) oder Taste – (28) können Sie die Werte verstellen. § Zum Speichern drücken Sie die Taste PROG. (26). § Display: MAHLMENGE EINSTELLEN § Display: PRODUKT WÄHLEN § Drücken Sie eine weitere Produktetaste, die Taste + (27) um zur nächsten Stufe zu gelangen oder
die Taste EXIT (30) zum Verlassen der Programmierung.
Bedienungsanleitung Saphira Seite 8 10.05.05 / Rev D / Mask 4 / PPB
16.2. Programmierung Temperatur § Die Taste + (27) drücken um zur Stufe TEMPERATUR zu gelangen § Display: TEMPERATUR EINSTELLEN § Display: PRODUKT WÄHLEN § Drücken Sie die gewünschte Produktetaste. § Display: (gewähltes Produkt) TEMP. NORMAL § Wählen Sie mit den Tasten + (27) oder Taste – (28) die gewünschte Temperatur (hoch oder
normal) § Zum Speichern drücken Sie die Taste PROG. (26). § Display: TEMPERATUR EINSTELLEN § Display: PRODUKT WÄHLEN § Drücken Sie eine weitere Produktetaste, die Taste + (27) um zur nächsten Stufe zu gelangen oder
die Taste EXIT (30) zum Verlassen der Programmierung.
16.3. Programmierung Wassermenge § Die Taste + (27) drücken um zur Stufe WASSERMENGE zu gelangen § Display: WASSERMENGE EINSTELLEN § Display: PRODUKT WÄHLEN § Drücken Sie die gewünschte Produktetaste. § Display: (gewähltes Produkt) WASSER 90 ML § Durch Drücken der Taste + (27) oder Taste – (28) können Sie den Wert verstellen. § Zum Speichern drücken Sie die Taste PROG. (26). § Display: WASSERMENGE EINSTELLEN § Display: PRODUKT WÄHLEN § Drücken Sie eine weitere Produktetaste, die Taste + (27) um zur nächsten Stufe zu gelangen oder
die Taste EXIT (30) zum Verlassen der Programmierung.
16.4. Programmierung Milchmenge § Die Taste + (27) drücken um zur Stufe MILCHMENGE zu gelangen § Display: MILCHMENGE EINSTELLEN § Display: PRODUKT WÄHLEN § Drücken Sie die Taste Milchschaum (25) oder Cappuccino (6) § Display: (gewähltes Produkt) 10 SEC. § Durch Drücken der Tasten + (27) oder Taste – (28) können Sie die Zeit verstellen (Bezugszeit von 3-
60 sec.) § Zum Speichern drücken Sie die Taste PROG. (26). § Display: MILCHMENGE EINSTELLEN § Display: PRODUKT WÄHLEN § Drücken Sie eine weitere Produktetaste, die Taste + (27)um zur nächsten Stufe zu gelangen oder
die Taste EXIT (30) zum Verlassen der Programmierung.
Bedienungsanleitung Saphira Seite 9 10.05.05 / Rev D / Mask 4 / PPB
16.5. Programmierung Heisswasser Portion § Die Taste + (27) drücken um zur Stufe HEISSWASSER PORTION zu gelangen § Stellen Sie eine Tasse unter das schwenkbare Auslaufrohr (17). § Display: HEISSWASSER PORTION § Display: HEISSWASSER DRÜCKEN § Display: GENÜGEND HEISSWASSER ? § Display: HEISSWASSER DRÜCKEN § Display: HEISSWASSER PORTION § Display: HEISSWASSER DRÜCKEN § Drücken Sie die Taste + (27) um zur nächsten Stufe zu gelangen oder die Taste EXIT (30) zum
Verlassen der Programmierung.
16.6. Programmierung Wasserhärte § Die Taste + (27) drücken um zur Stufe WASSERHÄRTE zu gelangen § Display: WASSERHÄRTE STUFE 3 § Drücken Sie die Taste PROG. (26) § Durch Drücken der Tasten + (27) oder Taste – (28) können Sie die Wasserhärte einstellen. § Zum Speichern drücken Sie die Taste PROG. (26). § Drücken Sie die Taste + (27) um zur nächsten Stufe zu gelangen oder die Taste EXIT (30) zum
Verlassen der Programmierung.
F Zur Bestimmung der Wasserhärte lesen Sie das Kapitel 9 „Einstellung Wasserhärte“.
16.7. Programmierung UHR Die Programmierung der Uhr ist notwendig, wenn die Funktion „Gerät ein“ benützt wird. § Die Taste + (27) drücken um zur Stufe UHR zu gelangen § Display: UHR --:-- § Drücken Sie die Taste PROG. (26). § Durch Drücken der Tasten + (27) oder Taste – (28) können Sie die Stunden wählen. § Drücken Sie zum Speichern die Taste PROG. (26). § Durch Drücken der Tasten + (27) oder Taste – (28) können Sie die Minuten wählen. § Zum Speichern drücken Sie die Taste PROG. (26). § Drücken Sie die Taste + (27) um zur nächsten Stufe zu gelangen oder die Taste EXIT (30) zum
Verlassen der Programmierung.
16.8. Programmierung Gerät ein Die Programmierung der Uhr ist notwendig, wenn die Funktion „Geräte ein“ benützt wird. § Die Taste + (27) drücken um zur Stufe GERÄT EIN zu gelangen § Display: GERÄT EIN --:-- § Drücken Sie die Taste PROG. (26). § Durch Drücken der Tasten + (27) oder Taste – (28) können Sie die Stunden einstellen. § Zum Speichern drücken Sie die Taste PROG. (26). § Durch Drücken der Tasten + (27) oder Taste – (28) können Sie die Minuten einstellen. § Zum Speichern drücken Sie die Taste PROG. (26). § Drücken Sie die Taste + (27) um zur nächsten Stufe zu gelangen oder die Taste EXIT (30) zum
Verlassen der Programmierung.
F Die Anzeige --:-- bedeutet, dass die Funktion ausgeschaltet ist
Bedienungsanleitung Saphira Seite 10 10.05.05 / Rev D / Mask 4 / PPB
16.9. Programmierung Gerät aus § Die Taste + (27) drücken um zur Stufe GERÄT AUS zu gelangen § Display: GERÄT AUS 5.0 STD. § Drücken Sie die Taste PROG. (26). § Durch Drücken der Tasten + (27) oder Taste – (28) können Sie die Stunden
einstellen(ausgeschaltet, oder 0.5 Std. – 9 Std.). § Zum Speichern drücken Sie die Taste PROG. (26). § Drücken Sie die Taste + (27) um zur nächsten Stufe zu gelangen oder die Taste EXIT (30) zum
Verlassen der Programmierung.
F Das Gerät schaltet nach erreichen der programmierten Zeit ab dem letzten Produktebezug automatisch aus.
16.10. Bezüge § Die Taste + (27) drücken um zur Stufe BEZÜGE zu gelangen § Display: (Total Bezüge X) BEZÜGE § Drücken Sie die gewünschte Produktetaste zur Abfrage der Bezüge. § Drücken Sie die Taste + (27) um zur nächsten Stufe zu gelangen oder die Taste EXIT (30) zum
Verlassen der Programmierung.
F Dampfbezüge können nicht abgefragt werden.
16.11. Programmierung Sprache § Die Taste + (27) drücken um zur Stufe Sprache zu gelangen § Display: SPRACHE (Sprache) § Durch Drücken der Tasten + (27) oder Taste – (28) können Sie die gewünschte Sprache anwählen. § Zum Speichern drücken Sie die Taste PROG. (26). § Drücken Sie die Taste + (27) um zur nächsten Stufe zu gelangen oder die Taste EXIT (30) zum
Verlassen der Programmierung.
17. Wartung und Pflege
17.1. Wasser füllen § Display: WASSERTANK FÜLLEN § Wird diese Meldung angezeigt, kann kein Bezug mehr erfolgen. Füllen Sie Wasser wie unter Punkt
4.3 beschrieben nach.
F Der Wassertank sollte täglich ausgespült und mit frischem Wasser gefüllt werden. Bei Benützung eines Festwasseranschlusses empfehlen wir Ihnen, den Wassertank regelmässig auszuspülen und mit frischem Wasser aufzufüllen.
17.2. Installation eines Festwasseranschluss Lesen Sie dazu die Bedienungsanleitung des Festwasseranschlusses.
17.3. Satzbehälter leeren Der Satzbehälter sammelt den Kaffeesatz. § Display: SATZBEHÄLTER LEEREN § Wird diese Meldung angezeigt, kann kein Bezug mehr erfolgen und der Satzbehälter muss geleert
werden. § Entfernen Sie vorsichtig die Tropfschale (Fig.2), es befindet sich Wasser darin. Entfernen Sie dann
den Satzbehälter (Fig.3).
Bedienungsanleitung Saphira Seite 11 10.05.05 / Rev D / Mask 4 / PPB
17.4. Tropfschale leeren § Display: TROPFSCHALE LEEREN § Wird diese Meldung angezeigt, kann kein Bezug mehr erfolgen und die Tropfschale muss geleert
werden. § Entfernen Sie vorsichtig die Tropfschale, es befindet sich Wasser darin (Fig.2).
17.5. Satzbehälter fehlt § Display: SATZBEHÄLTER FEHLT § Wird diese Meldung angezeigt, ist der Satzbehälter nicht richtig eingesetzt oder fehlt.
17.6. Tropfschale fehlt § Display: TROPFSCHALE FEHLT § Wird diese Meldung angezeigt, ist die Tropfschale nicht richtig eingesetzt worden.
17.7. Kaffeebohnen füllen § Display: KAFFEEBOHNEN FÜLLEN § Füllen Sie Bohnen nach wie unter Kapitel 4.4 beschrieben.
F Die Anzeige KAFFEEBOHNEN FÜLLEN erlischt erst nach einem Kaffeebezug. Wir empfehlen Ihnen von Zeit zu Zeit den Bohnenbehälter vor dem Nachfüllen mit einem trockenen Lappen zu reinigen. Schalten Sie dazu das Gerät mittels der Betriebstaste EIN / AUS (23) aus.
17.8. Steinentfernung § Schalten Sie Ihr Gerät mit der Betriebstaste EIN/AUS (23) aus. § Trennen Sie Ihr Gerät vom Stromnetz (19). § Öffnen Sie die Klapptüre auf der Rückseite des Gerätes (Fig.4). § Drücken Sie die Schieber nach hinten (Fig.5) und nehmen Sie durch drehen den Bohnenbehälter
heraus. (Fig.6). § Entfernen Sie allfällige Bohnen mit dem Staubsauger. § Setzen Sie den Schlüssel auf (Fig.7). § Drehen Sie den Schlüssel im Gegenuhrzeigersinn bis sich der eingeklemmte Stein löst. § Entfernen Sie Pulverreste mit dem Staubsauger. § Setzen Sie nun den Bohnenbehälter auf, drehen Sie den Bohnenbehälter in die Ausgangsposition
und ziehen Sie die Schieber nach vorne bevor Sie die Türe schliessen.
17.9. Gerät verkalkt § Display ENTKALKUNG NOTWENDIG Das Gerät erkennt die Notwendigkeit einer Entkalkung. Sie können weiterhin Kaffee oder Heisswasser/Dampf beziehen. Wir empfehlen Ihnen, die Entkalkung (Kapitel 19) innerhalb der nächsten Tage durchzuführen.

Bedienungsanleitung Saphira Seite 12 10.05.05 / Rev D / Mask 4 / PPB
17.10. Kontakte reinigen § Display TROPFSCHALE LEEREN § Display: KONTAKTE REINIGEN § Entnehmen Sie die Tropfschale (Fig.2) Die Entkalkungsrückstände im Bereich der Kontakte müssen beseitigt werden. Gehen Sie wie folgt vor: § Spülen Sie die Kontaktbefestigungen in der Rinne (B) sowie die Kontakte (A) (Fig.8) mit heissem
Wasser und mit Spülmittel ab. Reinigen Sie anschliessend die Kontaktbefestigungen in der Rinne (B) zusätzlich mit einer Bürste.
17.11. Allgemeine Reinigungshinweise § Nie kratzende Gegenstände oder ätzende Chemikalien zur Reinigung verwenden. § Das Gehäuse innen und aussen mit einem weichen, feuchten Lappen abwischen. § Nach jeder Benutzung das schwenkbare Auslaufrohr reinigen. § Nach dem Aufwärmen von Milch etwas Heisswasser beziehen, um das schwenkbare Auslaufrohr
auch innen zu reinigen. Der Wassertank muss täglich ausgespült und mit frischem Wasser gefüllt werden.
F Bei sichtbarem Kalkansatz im Wassertank können Sie diesen mit einem Handels üblichen Entkalkungsmittel entfernen.
I Entfernen Sie den Wassertank zum Reinigen.
18. Reinigung der Kaffeemaschine Nach 220 Bezügen oder 180 Spülungen muss das Gerät gereinigt werden. § Display GERÄT REINIGEN Sie können weiterhin Kaffee oder Heisswasser/Dampf beziehen. Wir empfehlen Ihnen eines der folgenden Reinigungsprogramme innert Tagesfrist durchzuführen: § Reinigung Kaffee Sie verwenden ausschliesslich Kaffeeprodukte ohne Cappuccinoprodukte. Bei der Reinigung Kaffee wird nur das Kaffeesystem gereinigt (Kapitel 18.1). § Kombireinigung Sie verwenden Kaffee- und Cappuccinoprodukte. Bei der Kombireinigung werden beide Systeme - Kaffee und Milchzuführung - gereinigt (Kapitel 18.3). § Reinigung Cappuccino Bei der Verwendung der Kaffee und Cappuccinoprodukte empfehlen wir Ihnen, das Reinigungsprogramm „Reinigung Cappuccino“ täglich Durchzuführen (Kapitel 18.2)

Bedienungsanleitung Saphira Seite 13 10.05.05 / Rev D / Mask 4 / PPB
18.1. Reinigung Kaffee Der gestartete Reinigungsablauf darf nicht unterbrochen werden. Der Ablauf dauert ca. 15 min. § Schalten Sie das Gerät mit der Betriebstaste EIN/AUS (23) ein. § Drücken Sie die Reinigungstaste (32) bis ein akustisches Signal ertönt. § Display: REINIGUNG WÄHLEN - + § Drücken Sie die Taste + (27) 3x. § Display: KAFFEE REINIGUNG § Drücken Sie die Reinigungstaste (32). § Display: SATZBEHÄLTER LEEREN (Fig.2 und Fig.3) § Display: TABLETTE EINWERFEN (Fig. 9) § Display: REINIGUNG DRüCKEN § Drücken Sie die Reinigungstaste (32). § Display: KAFFEE REINIGUNG § Display: BITTE WARTEN § Die Kaffeereinigung läuft ab. § Display: SATZBEHÄLTER LEEREN (Fig.2 und Fig.3) § Die Cappuccino-Reinigung ist beendet § Display: PRODUKT § WäHLEN
18.2. Cappuccino-Reinigung
I Führen Sie diese Reinigung täglich durch. Der gestartete Reinigungsablauf darf nicht unterbrochen werden. Der Ablauf dauert ca. 5 min. § Schalten Sie das Gerät mit der Betriebstaste EIN/AUS (23) ein. § Drücken Sie die Reinigungstaste (32) bis ein akustisches Signal ertönt. § Display: REINIGUNG WÄHLEN - + § Drücken Sie die Taste + (27). § Display: CAPPUCCINO REINIGUNG § Drücken Sie erneut die Reinigungstaste (32). § Display: REINIGER FÜR CAPPUCCINO § Display: REINIGEN DRÜCKEN
I Stellen Sie ein Gefäss min. 0,5 L unter den Kaffeeauslauf (4). § Füllen Sie ein Gefäss mit ca. 2,5dl frischem Wasser und geben Sie ca. 3 Verschlusskappen des
Cappuccino-Reinigers bei. Tauchen Sie den Cappuccinoschlauch hinein. § Drücken Sie die Reinigungstaste (32). § Display: CAPPUCCINO REINIGUNG § Display: BITTE WARTEN § Die Cappuccino-Reinigung läuft ab
Bedienungsanleitung Saphira Seite 14 10.05.05 / Rev D / Mask 4 / PPB
§ Ein akustisches Signal ertönt. § Display: WASSER FÜR CAPPUCCINO § Display: REINIGEN DRÜCKEN
I Füllen Sie ein Gefäss mit frischem Wasser und tauchen Sie den Cappuccinoschlauch hinein.
§ Drücken Sie die Reinigungstaste (32). § Die Cappuccino-Reinigung läuft ab § Display: CAPPUCCINO REINIGUNG § Display: BITTE WARTEN § Die Cappuccino-Reinigung ist beendet § Display: PRODUKT WäHLEN
18.3. Kombireinigung Der gestartete Reinigungsablauf darf nicht unterbrochen werden. Der Ablauf dauert ca. 20 min. § Schalten Sie das Gerät mit der Betriebstaste EIN/AUS (23) ein. § Drücken Sie die Reinigungstaste (32) bis ein akustisches Signal ertönt. § Display: REINIGUNG WÄHLEN - + § Drücken Sie die Taste + (27) 2x. § Display: KOMBI REINIGUNG § Drücken Sie die Reinigungstaste (32). § Display: SATZBEHÄLTER LEEREN (Fig.2 und Fig.3) § Display: TABLETTE EINWERFEN (Fig. 9) § Display: REINIGER FÜR CAPPUCCINO § Füllen Sie ein Gefäss mit 2.5dl frischem Wasser und geben Sie ca. 3 Verschlusskappen des
Cappuccino-Reinigers bei. Tauchen Sie den Cappuccinoschlauch hinein. § Drücken Sie die Reinigungstaste (32). § Display: KOMBI REINIGUNG § Display: BITTE WARTEN § Die Kombireinigung läuft ab. § Ein akustisches Signal ertönt. § Display: WASSER FÜR CAPPUCCINO § Display: REINIGEN DRÜCKEN
I Füllen Sie ein Gefäss mit frischem Wasser und tauchen Sie den Cappuccinoschlauch hinein.
§ Drücken Sie die Reinigungstaste (32). § Display: KOMBI REINIGUNG § Display: BITTE WARTEN § Die Kombireinigung läuft ab.

Bedienungsanleitung Saphira Seite 15 10.05.05 / Rev D / Mask 4 / PPB
§ Display: SATZBEHÄLTER LEEREN (Fig.2 und Fig.3) § Die Kombi-Reinigung ist beendet § Display: PRODUKT WäHLEN
19. Entkalkung Das Gerät verfügt über ein integriertes Entkalkungsprogramm . Der Vorgang dauert ca. 35 Min.
F Der gestartete Entkalkungsvorgang darf nicht unterbrochen werden. Ist ein Festwasseranschluss am Wassertank befestigt, müssen Sie diesen gemäss dem Beiblatt in der Bedienungsanleitung Festwasseranschlussentfernen und abschalten.
I Bei Anwendung der säurehaltigen Entkalkungsmittel allfällige Spritzer und Tropfen auf empfindlichen Abstellflächen, insbesondere Naturstein- und Holzflächen, sofort entfernen oder die entsprechenden Vorsichtsmassnahmen treffen. § Schalten Sie ihr Gerät mit der Betriebstaste EIN/AUS (23) aus. § Drücken Sie die Taste Entkalken (31) bis ein akustisches Signal ertönt. § Display: TROPFSCHALE LEEREN (Fig.2) § Display: ENTKALKER IN TANK § Display: ENTKALKEN DRUECKEN Lösen Sie 3 Entkalkungstabletten vollständig in 0,7 Liter Wasser in einem Gefäss auf und füllen Sie das Gemisch in den leeren Wassertank.
I Stellen Sie ein genügend grosses Gefäss unter das schwenkbare Auslaufrohr (17) und den Kaffeeauslauf (4). § Drücken Sie die Entkalkungstaste (31) § Display: GERÄT ENTKALKT § Display: BITTE WARTEN § Ein akustisches Signal ertönt. § Display: TROPFSCHALE LEEREN (Fig.2) § Display: WASSERTANK FÜLLEN § Display: ENTKALKEN DRÜCKEN § Drücken Sie die Enkalkungstaste (31) § Das Entkalkungsprogramm läuft ab § Display: GERÄT ENTKALKT § Display: BITTE WARTEN § Ein akustisches Signal ertönt. § Display: TROPFSCHALE LEEREN (Fig.2) § Display: KONTAKTE REINIGEN (Kapitel 17.10 / Fig.8).
Bedienungsanleitung Saphira Seite 16 10.05.05 / Rev D / Mask 4 / PPB
20. Entsorgung Das Produkt ist zwecks sachgerechter Entsorgung dem Fachhändler oder der Firma Franke AG zurückzugeben.
21. Einstellungen durch den Servicetechniker
F Folgende Einstellung/Aenderungen können nur durch den Servicetechniker durch- geführt werden. - Tastenbelegung der Kaffeeprodukte neu anordnen - Verändern der Zyklen bei Bezug „Kännchenkaffee“ - Filterkapazität
22. Tipps, für einen perfekten Kaffee Höhenverstellbarer Kaffeeauslauf Sie können den Kaffeeauslauf Ihren Tassengrössen anpassen Mahlung Lesen Sie dazu das Kapitel 8 „Einstellung Mahlwerk“ Tassen vorwärmen Sie können die Tassen mit Heisswasser oder Dampf vorwärmen. Je kleiner die Kaffeemenge ist, desto wichtiger ist das Vorwärmen. Zucker und Rahm Durch Umrühren in der Tasse entweicht Wärme. Durch Beigabe von Rahm oder Milch aus dem Kühlschrank senkt sich die Temperatur des Kaffees beträchtlich.
23. Meldungen Display Ursache Abhilfe WASSERTANK - Der Tank ist leer - Wasser nachfüllen (13) FüLLEN - Der Wasserstandsanzeiger - Tank leeren, ausspülen und gefüllt im Tank ist verklemmt wieder einsetzen (13) - Der Tank ist verkalkt; der - Tank entnehmen, entkalken, gut aus- Wasserstandsanzeiger ist spülen, auffüllen und wieder einsetzen (13) verklebt KAFFEEBOHNEN - Der Bohnenbehälter ist leer - Bohnen nachfüllen (9/11) FÜLLEN - Obwohl Bohnen nachge- - Eine Tasse Kaffee beziehen. füllt worden sind, erlischt „BOHNEN FÜELLEN“ erlischt erst die Anzeige nicht nach einem Bezug - Ein Stein hat sich - Entfernen Sie den Stein wie festgesetzt unter Kapitel 17.8 „Steinentfernung“ beschrieben SATZBEHÄLTER - Der Satzbehälter ist voll - Schale entfernen, Satzbehälter leeren, LEEREN Schale wieder einsetzen (Fig2/3) - Die Anzeige erlischt trotz - Beim Leeren war die Schale weniger geleertem Satzbehälter als 8 sec. entfernt. Schale für ca. nicht 10 sec. herausziehen und wieder einsetzen (Fig2/3) - Die Anzeige erscheint schon - Gerät eingeschaltet lassen, während nach wenigen Tassen Satzbehälter geleert wird. Rückstellung des Zählers erfolgt nur bei eingeschalteter Maschine
Bedienungsanleitung Saphira Seite 17 10.05.05 / Rev D / Mask 4 / PPB
Display Ursache Abhilfe TROPFSCHALE - Die Schale ist nicht richtig - Schale korrekt einsetzen (Fig2) FEHLT eingerastet TROPFSCHALE - Die Tropfschale ist voll - Schale vorsichtig entfernen, leeren, LEEREN ausspülen und wieder einsetzen (Fig2) - Trotz geleerter Schale - Schale entfernen, Metallkontakte erlischt die Anzeige nicht reinigen siehe Kapitel 17.10 (Fig8) GERÄT - Es sind 220 Bezügen oder - Reinigen gemäss Kapitel 18 durch- REINIGEN 180 Spülungen erfolgt führen - Trotz durchgeführter - Reinigung nochmals durchführen; Reinigung erlischt die diesmal allerdings keine Reinigungs- Anzeige nicht tablette beigeben GERÄT - Das Gerät muss entkalkt - Entkalkung wie in unter Kapitel 19 VERKALKT werden durchführen - Trotz durchgeführter Ent- - Entkalkung nochmals durchführen; kalkung erlischt die Anzeige diesmal allerdings nur mit Wasser, nicht ohne Entkalkungsmittel STÖRUNG - Diverse Ursachen - Kundendienst anrufen
24. Probleme Probleme Ursache Abhilfe Beim Kaffeebezug fliesst - zu feines Pulver - Mahlwerk gröber einstellen (Fig1) der Kaffee nur tropfweise - Lösen Sie ein bis zwei Spül- gänge aus. Ist das Resultat nicht besser, führen Sie eine Reinigung durch gemäss Kapitel 18. Kaffeefluss wird nach dem - zuwenig Pulver im System - eine Tasse Kaffee beziehen Vorbrühen abgebrochen Sehr lautes Geräusch der - Stein in der Mühle - Lesen Sie Kapitel 17.8 Mühle Zuwenig Schaum beim - Cappuccino verstopft - Cappuccino-Reinigung Milchaufschäumen durchführen (lesen Sie Kapitel 18) Konnten die Meldungen und Probleme trotzdem nicht behoben werden, wenden Sie sich bitte an Ihren Kundendienst oder direkt an die Firma Franke AG.
Bedienungsanleitung Saphira Seite 18 10.05.05 / Rev D / Mask 4 / PPB
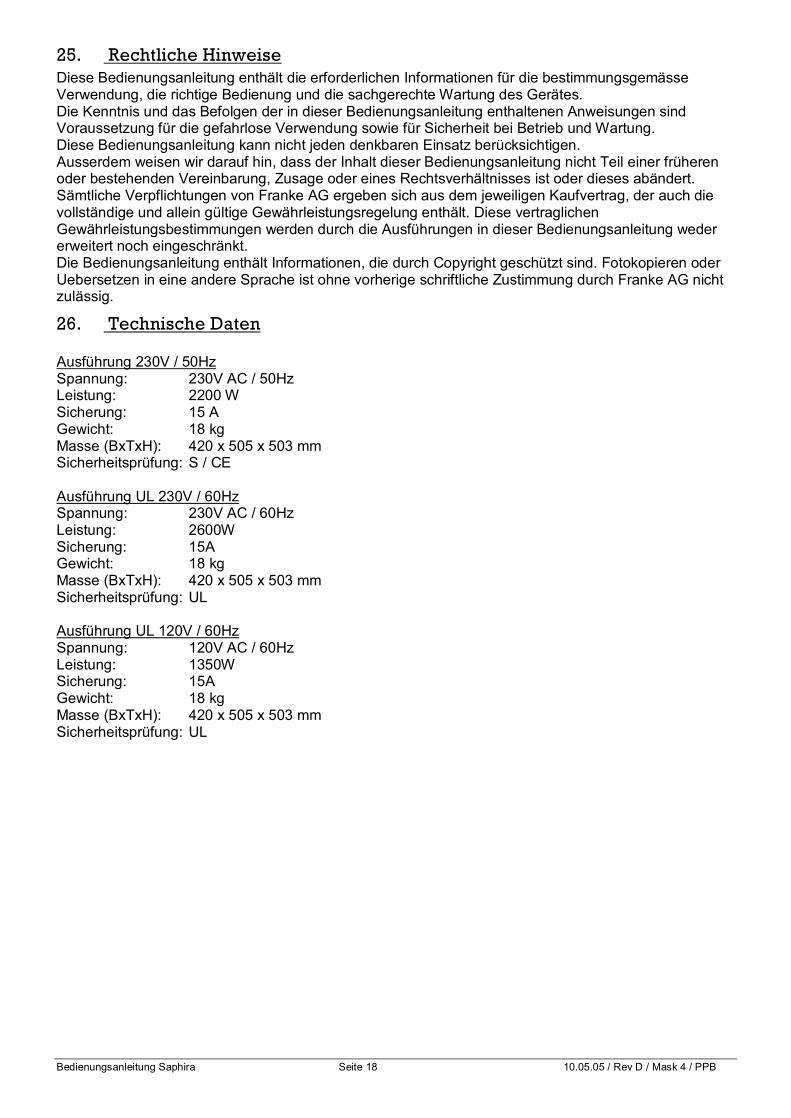
25. Rechtliche Hinweise Diese Bedienungsanleitung enthält die erforderlichen Informationen für die bestimmungsgemässe Verwendung, die richtige Bedienung und die sachgerechte Wartung des Gerätes. Die Kenntnis und das Befolgen der in dieser Bedienungsanleitung enthaltenen Anweisungen sind Voraussetzung für die gefahrlose Verwendung sowie für Sicherheit bei Betrieb und Wartung. Diese Bedienungsanleitung kann nicht jeden denkbaren Einsatz berücksichtigen. Ausserdem weisen wir darauf hin, dass der Inhalt dieser Bedienungsanleitung nicht Teil einer früheren oder bestehenden Vereinbarung, Zusage oder eines Rechtsverhältnisses ist oder dieses abändert. Sämtliche Verpflichtungen von Franke AG ergeben sich aus dem jeweiligen Kaufvertrag, der auch die vollständige und allein gültige Gewährleistungsregelung enthält. Diese vertraglichen Gewährleistungsbestimmungen werden durch die Ausführungen in dieser Bedienungsanleitung weder erweitert noch eingeschränkt. Die Bedienungsanleitung enthält Informationen, die durch Copyright geschützt sind. Fotokopieren oder Uebersetzen in eine andere Sprache ist ohne vorherige schriftliche Zustimmung durch Franke AG nicht zulässig.
26. Technische Daten Ausführung 230V / 50Hz Spannung: 230V AC / 50Hz Leistung: 2200 W Sicherung: 15 A Gewicht: 18 kg Masse (BxTxH): 420 x 505 x 503 mm Sicherheitsprüfung: S / CE Ausführung UL 230V / 60Hz Spannung: 230V AC / 60Hz Leistung: 2600W Sicherung: 15A Gewicht: 18 kg Masse (BxTxH): 420 x 505 x 503 mm Sicherheitsprüfung: UL Ausführung UL 120V / 60Hz Spannung: 120V AC / 60Hz Leistung: 1350W Sicherung: 15A Gewicht: 18 kg Masse (BxTxH): 420 x 505 x 503 mm Sicherheitsprüfung: UL
Mode d’emploi Saphira Page 19 10.05.05 / Rev D / Mask 4 / PPB
Table des matières 1. Remarques importantes à l’attention des utilisateurs et utilisatrices.......................................................... 20 2. Description de l’appareil.......................................................................................................................... 20 3. Prescriptions de sécurité.......................................................................................................................... 20
3.1. Mise en garde .................................................................................................................................. 20 3.2. Mesures de prudence....................................................................................................................... 20
4. Préparation de l’appareil .......................................................................................................................... 20 4.1. Vérification de la tension du réseau .................................................................................................. 20 4.2. Vérification du coupe-circuit électrique.............................................................................................. 20 4.3. Remplissage du réservoir d’eau........................................................................................................ 21 4.4. Remplissage des grains de café....................................................................................................... 21
5. Enclenchement de l’appareil .................................................................................................................... 21 6. Rincer l’appareil....................................................................................................................................... 21 7. Choisir le moulin ...................................................................................................................................... 21
7.1. Régler le moulin ............................................................................................................................... 21 8. Réglage du degré de mouture.................................................................................................................. 22 9. Réglage de la dureté de l’eau .................................................................................................................. 22 10. Café ........................................................................................................................................................ 23
10.1. Préparation de cafés/espresso ......................................................................................................... 23 10.2. Préparation de cappuccino ............................................................................................................... 23 10.3. Préparation de café en pot ............................................................................................................... 23
11. Production d’eau chaude ......................................................................................................................... 23 12. Production de vapeur............................................................................................................................... 24 13. Production de mousse de lait ................................................................................................................... 24 14. Retrait des produits en système de décompte.......................................................................................... 24 15. Déclenchement de l’appareil .................................................................................................................... 24 16. Programmation........................................................................................................................................ 25
16.1. Programmation de la quantité de mouture ........................................................................................ 25 16.2. Programmation de la température .................................................................................................... 26 16.3. Programmation de la quantité d’eau ................................................................................................. 26 16.4. Programmation de la quantité de lait................................................................................................. 26 16.5. Programmation de la portion d’eau chaude....................................................................................... 27 16.6. Programmation de la dureté de l’eau ................................................................................................ 27 16.7. Programmation de l’heure ................................................................................................................ 27 16.8. Programmation mise en marche de l’appareil ................................................................................... 27 16.9. Programmation «appareil éteint» ...................................................................................................... 28 16.10. Prélèvements ................................................................................................................................... 28 16.11. Programmation de la langue............................................................................................................. 28
17. Service et entretien.................................................................................................................................. 28 17.1. Remplir d’eau................................................................................................................................... 28 17.2. Installation d’un branchement à l’eau fixe ......................................................................................... 28 17.3. Vider le bac à marc .......................................................................................................................... 28 17.4. Vider le bac égouttoir........................................................................................................................ 29 17.5. Absence du bac à marc.................................................................................................................... 29 17.6. Absence du bac égouttoir ................................................................................................................. 29 17.7. Remplir de grains de café................................................................................................................. 29 17.8. Extraction de gravier......................................................................................................................... 29 17.9. Appareil détartrage........................................................................................................................... 29 17.10. Nettoyage des contacts .................................................................................................................... 30 17.11. Remarques générales concernant le nettoyage ................................................................................ 30
18. Nettoyage de la machine à cafe............................................................................................................... 30 18.1. Nettoyage du café ............................................................................................................................ 30 18.2. Nettoyage du cappuccino ................................................................................................................. 31 18.3. Nettoyage complet ........................................................................................................................... 32
19. Détartrage ............................................................................................................................................... 33 20. Elimination............................................................................................................................................... 33 21. Réglages effectués par le technicien de service....................................................................................... 33 22. Quelques astuces pour réussir un café parfait.......................................................................................... 34 23. Messages................................................................................................................................................ 34 24. Problèmes ............................................................................................................................................... 35 25. Remarques juridiques.............................................................................................................................. 36 26. Données techniques ................................................................................................................................ 36
Mode d’emploi Saphira Page 20 10.05.05 / Rev D / Mask 4 / PPB
1. Remarques importantes à l’attention des utilisateurs et utilisatrices Veuillez lire attentivement le mode d’emploi avant la première mise en service de l’appareil. Conservez ce mode d’emploi afin de pouvoir le consulter en tout temps. Si vous désirez des informations complémentaires ou si un problème spécifique pour lequel vous ne trouvez pas les explications nécessaires dans ce mode d’emploi devait se présenter, nous vous prions de bien vouloir vous adresser à un spécialiste local ou directement à Franke SA.
2. Description de l’appareil Une technologie moderne ainsi que de nombreuses caractéristiques ne sont pas les seuls atouts qui font de la première Saphira la machine par excellence pour le bureau et la petite gastronomie. Cette petite merveille est ainsi à même de préparer au choix une ou deux tasses d’espresso/café en un seul processus d’échauffement. Le système ingénieux Pre Brew Aroma System (I.P.B.A.S.©) veille à l’épanouissement de la totalité des délicates substances aromatiques du café et permet d’obtenir le meilleur espresso/café couronné d’une superbe mousse crémeuse. Le café peut être moulu par l’un ou par l’autre de ses deux moulins. La programmation du mélange est individuelle. Sur simple pression d’une touche et sans déplacer la tasse, le café se transforme en cappuccino. Des programmes intégrés de rinçage, nettoyage et détartrage, commandés par une touche, assurent une hygiène parfaite de la machine.
3. Prescriptions de sécurité
3.1. Mise en garde § Les enfants ne perçoivent malheureusement pas les dangers qui entourent les appareils électriques;
c’est pourquoi, tenez toujours l’appareil et son cordon d’alimentation hors de la portée des enfants. L’appareil ne peut être utilisé que par des personnes qui en connaissent le maniement.
§ N’utilisez jamais un appareil ou un cordon défectueux. § Ne plongez jamais l’appareil dans l’eau ; danger de court-circuit.
3.2. Mesures de prudence § N’exposez jamais l’appareil aux intempéries (pluie, neige, gel) et ne le manipulez pas avec les mains
mouillées. § Installez l’appareil à un endroit stable et horizontal. Ne le posez jamais sur une surface bouillante ou
chaude (cuisinière). § En cas d’absence prolongée (vacances, etc.) enlevez la prise. § Avant de nettoyer l’appareil, enlevez la prise. § Lorsque vous enlevez la prise, ne tirez jamais au cordon d’alimentation ou à l’appareil. § Ne tentez jamais de réparer l’appareil vous-même. Confiez-le à un spécialiste car lui seul est à
même de délivrer les pièces de rechange et les accessoires d’origine. § L’appareil est connecté au réseau de courant par un cordon de branchement. Veillez à placer le
cordon de sorte que personne ne risque de trébucher et puisse ainsi arracher le cordon de l’appareil. Tenez les enfants et les animaux à distance.
§ Le choix de l’emplacement de l’appareil doit dépendre d’une bonne circulation de l’air pour éviter ainsi une surchauffe de l’appareil.
§ Lors de l’utilisation de détartrants contenant de l’acide, éliminez immédiatement les éclaboussures ou les gouttes de ce produit sur des surfaces délicates telles que pierre naturelle ou bois, ou prenez les mesures de sécurité adéquates.
4. Préparation de l’appareil
4.1. Vérification de la tension du réseau § L’usine procède au réglage de l’appareil à la tension du réseau correcte. Contrôlez si votre secteur
correspond aux indications précisées sur la plaque signalétique qui se trouve au dos de l’appareil (21).
4.2. Vérification du coupe-circuit électrique § Contrôlez que le coupe-circuit électrique soit conforme à votre appareil. (Voir chapitre 26).
Mode d’emploi Saphira Page 21 10.05.05 / Rev D / Mask 4 / PPB
4.3. Remplissage du réservoir d’eau § Retirez le réservoir d’eau et rincez-le soigneusement à l’eau froide du robinet. § Ensuite, remplissez le réservoir d’eau et replacez-le. § Prenez bien garde à ce que le réservoir s’encliquette correctement.
F N’utilisez pour le remplissage du réservoir que de l’eau fraîche et froide. Ne remplissez jamais le réservoir avec du lait, de l’eau minérale ou d’autres liquides. Il est également possible de remplir le réservoir d’eau sans l’extraire de la machine. Pour ce faire, retirez simplement le couvercle et versez l’eau dans le réservoir depuis le haut à l’aide d’une carafe, puis replacez le couvercle sur le réservoir.
4.4. Remplissage des grains de café § Vous avez la possibilité d’utiliser deux sortes différentes de grains de café. § Retirez le couvercle du réservoir à grains de café (9 / 11). § Débarrassez les éventuelles salissures ou impuretés infiltrées dans le bac à grains. § Remplissez le bac à grains avec des grains de café et replacez le couvercle.
5. Enclenchement de l’appareil Actionnez l’interrupteur qui se trouve sur la face arrière de l’appareil (20). Enclanchez l’appareil à l’aide de la touche ON/OFF (23). Display : ATTENDRE S.V.P. Placez une tasse vide sous l’écoulement de café (4). Display : RINCER APPAREIL Actionnez la touche rinçage (34)
F Le rinçage s’effectue d’abord par la buse cappuccino, ensuite par l’écoulement du café. .
6. Rincer l’appareil Le déclenchement de l’appareil provoque un rinçage automatique. Toutefois, si aucun cappuccino n’est débité, le rinçage provoqué par le déclenchement de l’appareil s’effectuera seulement par l’écoulement du café. Une fois l’appareil déclenché et refroidi, le rinçage sera requis au moment du prochain enclenchement de la machine.
7. Choisir le moulin Vous pouvez choisir manuellement le moulin Pressez sur la touche moulin (12) 1x ou 2x. La petite lampe située au-dessus de la touche vous signale quel moulin est activé (moulin gauche ou moulin droite).
7.1. Régler le moulin Afin d’assurer une parfaite complicité entre le café et le moulin, suivez pas à pas les étapes suivantes : § Pressez sur la touche moulin (12) § Débitez successivement 6 cafés/espresso en sélectionnant manuellement d’abord le moulin
„gauche“ puis le moulin „droite“
F Un nouveau réglage du moulin est également recommandé après : - un changement de sorte de grains de café - un dérèglement important du degré de mouture - un service

Mode d’emploi Saphira Page 22 10.05.05 / Rev D / Mask 4 / PPB
8. Réglage du degré de mouture Vous avez la possibilité de régler le degré de mouture de votre café en fonction de sa torréfaction. Pour ce faire, nous vous conseillons de pratiquer de la façon suivante :
A torréfaction foncée ð réglage fin torréfaction claire ð réglage grossier § Afin de régler le degré de mouture, tournez la bague de réglage jusqu’à la position désirée (Fig.1) § Ces deux possibilités vous sont offertes :
A plus le point est petit, plus la mouture est fine plus le point est gros, plus la mouture est grossière
F Le degré de mouture ne peut être réglé que lorsque le moulin tourne.
9. Réglage de la dureté de l’eau L’eau étant chauffée à l’intérieur de l’appareil, un entartrage plus ou moins important s’en suit. Celui-ci dépend bien entendu du degré d’utilisation de la machine. L’état de l’entartrage est indiqué par le display. Le réglage de l’appareil doit correspondre à la dureté de l’eau utilisée. Servez-vous de la baguette ci-jointe pour déterminer la dureté de l’eau.
F 1° dureté allemande correspond à 1,79°de dureté française. L’appareil dispose de 5 degrés de dureté de l’eau : NIVEAU DURE. D’EAU -- fonction dureté de l’eau déclenchée NIVEAU DURE. degré de dureté allemand 1 - 7° D’EAU 1 degré de dureté français 1,79 – 12,53° NIVEAU DURE. degré de dureté allemand 8 - 15° D’EAU 2 degré de dureté français 14,32 - 26,85° NIVEAU DURE. degré de dureté allemand 16 - 23° D’EAU 3 degré de dureté français 28,64 - 41,14° NIVEAU DURE. degré de dureté allemand 24 - 30° D’EAU 4 degré de dureté français 42,96 - 53,7° D’usine, la machine est réglée sur le degré 3. Vous pouvez modifier ce réglage comme suit : § Mettez l’appareil en marche à l’aide de la touche ON/OFF (23). § Display : ATTENDRE S.V.P. § Pressez sur la touche PROG. (26) jusqu’au signal sonore. § Display : REGLER QUA. MOUTURE § Display : CHOISIR PRODUIT § Pressez sur la touche + (27) jusqu’à ce qu’apparaisse : § Display : NIVEAU DURE. D’EAU 3 § Pressez sur la touche PROG. (26), un signal sonore se manifeste et le degré réglé clignote. § En appuyant sur la touche - (28) ou + (27) vous pouvez régler le degré choisi. Pour enregistrer ce
réglage, pressez sur la touche PROG. (26). Un signal sonore se manifeste. § Display : NIVEAU DURE. D’EAU 3 § Pressez sur la touche EXIT (30).

Mode d’emploi Saphira Page 23 10.05.05 / Rev D / Mask 4 / PPB
10. Café
10.1. Préparation de cafés/espresso § L’appareil doit être prêt à fonctionner. § Display : CHOISIR PRODUIT § Placez 1, respectivement 2 tasses sous l’écoulement de café (4) et pressez sur la touche du produit
désiré (6). Le système de préchauffage (I.P.B.A.S) humecte la poudre de café, interrompt rapidement l’écoulement et commence ensuite le véritable processus d’échaudage.
§ Display : 1 CAFE
F Avant la fin du débit, vous avez la possibilité d’interrompre l’opération en pressant sur n’importe quelle touche de produit. Afin d’obtenir une mousse incomparable, vous pouvez adapter la hauteur de l’écoulement du café (4) à la hauteur de vos tasses.
10.2. Préparation de cappuccino § L’appareil doit être prêt à fonctionner. § Display : CHOISIR PRODUIT § Remplissez une petite carafe de lait et plongez le tuyau souple de cappuccino dans le lait. § Placez 1 tasse sous l’écoulement de café et pressez sur la touche de produit (cappuccino). La
machine prépare d’abord la mousse de lait puis le café. § Display : 1 CAPPUCCINO
F Vous avez la possibilité d’interrompre la préparation de la mousse de lait ou celle du café en pressant une nouvelle fois sur la touche de produit.
10 min. après le débit du cappuccino, un rinçage se déclenche automatiquement. Un signal sonore précède le démarrage du rinçage.
10.3. Préparation de café en pot § L’appareil doit être prêt à fonctionner. § Display : CHOISIR PRODUIT § Placez un petit pot sous l’écoulement de café (4) et pressez sur la touche de produit (24). Votre café
en pot va être préparé en plusieurs étapes. Le nombre de ces étapes apparaît sur le display. § Display : POT 2
F Vous avez la possibilité d’interrompre l’opération en pressant une nouvelle fois sur la touche de produit.
11. Production d’eau chaude § L’appareil doit être prêt à fonctionner. § Display : CHOISIR PRODUIT § Placez une tasse sous la buse pivotante d’écoulement eau bouillante/vapeur (17) et pressez sur la
touche de produit portion eau bouillante (16 ou 33). § Display : PORTION EAU CHAUDE § La quantité d’eau bouillante programmée s’écoulera, puis la machine stoppera automatiquement.
F Vous avez la possibilité d’interrompre l’opération en pressant une nouvelle fois sur la touche de produit.
I Le débit d’eau bouillante peut être accompagné au début de giclements. La buse pivotante d’écoulement eau bouillante/vapeur atteint une température élevée. Evitez tout contact avec la peau.

Mode d’emploi Saphira Page 24 10.05.05 / Rev D / Mask 4 / PPB
12. Production de vapeur § L’appareil doit être prêt à fonctionner. § Display : CHOISIR PRODUIT § Placez une tasse contenant le liquide à chauffer sous la buse pivotante eau bouillante/vapeur (17) et
pressez sur la touche de produit vapeur (15 ou 29). § Display : PRELEVEMENT VAPEUR
F Pour arrêter le vapeur, pressez sur la touche vapeur (15 ou 29).
I La production de vapeur peut être accompagnée au début de giclements. La buse pivotante eau bouillante/vapeur atteint une température élevée. Evitez tout contact avec la peau.
13. Production de mousse de lait § L’appareil doit être prêt à fonctionner. § Display : CHOISIR PRODUIT § Remplissez une petite carafe de lait et plongez le tuyau souple de cappuccino dans le lait. § Placez 1 tasse sous l’écoulement de café (4) et pressez sur la touche de produit mousse de lait (25).
La quantité programmée s’écoulera puis la machine stoppera automatiquement. § Display : MOUSSE AU L.
F Vous avez la possibilité d’interrompre l’opération en pressant une nouvelle fois sur la touche de produit.10 min. après le débit de lait, un rinçage est déclenché automatiquement. Un signal sonore précède le démarrage du rinçage.
14. Retrait des produits en système de décompte § L’appareil doit être prêt à fonctionner. § Display (7): CHOISIR PRODUIT § Display (35): SYSTEME CREDIT § Introduisez la carte / clé dans le système de décompte (35) ou mettez la monnaie dans le
monnayeur (36) jusqu’à l’abtention du prix demandé. § Display (35): CREDIT 2.50 § Placez 1, respectivement 2 tasses sous l’écoulement de café (4) et pressez sur la touche du produit
désiré (6). Le produit programmé sera préparé si le crédit et suffisant et s’arrête automatiquement. § Display (7): (Nom produit)
F Si le crédit est insuffisant, la machine dégage un bip sonore au moment où la touche est pressé. Si pendent la préparation du produit le récipient de grains est vide, le crédit ne s’efface
pas.
15. Déclenchement de l’appareil Déclenchez l’appareil au moyen de la touche ON/OFF (23). Au moment du déclenchement de la machine, un rinçage démarre automatiquement.

Mode d’emploi Saphira Page 25 10.05.05 / Rev D / Mask 4 / PPB
16. Programmation Les fonctions suivantes peuvent être sélectionnées: a Quantité de mouture a Température a Quantité d’eau a Quantité de lait a Portion d’eau chaude a Dureté de l’eau a Heure a L’appareil prêt (ON) a L’appareil éteint (OFF) a Prélèvements a Langue Pour atteindre le champ de programmation, vous devez d’abord procéder de la manière suivante : § Enclenchez l’appareil au moyen de la touche ON/OFF (23). § Pressez sur la touche PROG. (26) jusqu’à ce que le signal sonore se manifeste § Display: REGLER QUA. MOUTURE § Display: CHOISIR PRODUIT
16.1. Programmation de la quantité de mouture § Display: REGLER QUA. MOUTURE § Display: CHOISIR PRODUIT § Pressez sur la touche du produit sélectionné. § Display: : (produit sélectionné) - ..............II..............+ § En appuyant sur la touche + (27) ou – (28) vous pouvez régler la quantité de mouture. § Pour enregistrer ce réglage, pressez sur la touche PROG. (26). § Display : (produit sélectionné)
< 100% > 0% Vous pouvez procéder à l’attribution du moulin „gauche“ ou „droite“;
FExeple:Réglage <100% >0% Quantité de mouture réglée, effectué par moulin gauche Réglage <0% >100% Quantité de mouture réglée, effectué par moulin droite Réglage <25% >75% Quantité de mouture réglée, effectué de 25% par le moulin gauche et de 75% du moulin droite (mélange mouture) Réglage <75% >25% Quantité de mouture réglée, effectué de 75% par le moulin gauche et de 25% du moulin droite (mélange mouture)
§ En appuyant sur la touche + (27) ou – (28), vous pouvez modifier cette donnée. § Pour enregistrer ce réglage, pressez sur la touche PROG. (26). § Display: REGLER QUA. MOUTURE § Display: CHOISIR PRODUIT § Pressez sur une autre touche de produit, la touche + (27) afin d’atteindre le degré supérieur ou la
touche EXIT (30) pour quitter la programmation.
Mode d’emploi Saphira Page 26 10.05.05 / Rev D / Mask 4 / PPB
16.2. Programmation de la température § En appuyant sur la touche + (27), vous parvenez à la fonction TEMPERATURE. § Display : REGLER TEMPERATURE § Display: CHOISIR PRODUIT § Pressez sur la touche du produit sélectionné. § Display : (produit sélectionné) TEMP. NORMALE § En appuyant sur la touche + (27) ou – (28) vous pouvez choisir la température (élevée ou normale) § Pour enregistrer ce réglage, pressez sur la touche PROG. (26). § Display : REGLER TEMPERATURE § Display: CHOISIR PRODUIT § Pressez sur une autre touche de produit, la touche + (27) afin d’atteindre le degré supérieur ou la
touche EXIT (30) pour quitter la programmation.
16.3. Programmation de la quantité d’eau § En appuyant sur la touche + (27) vous parvenez à la fonction QUANTITE D’EAU. § Display : REGLER QUANT. EAU § Display: CHOISIR PRODUIT § Pressez sur la touche du produit sélectionné. § Display : (produit sélectionné) EAU 90 ML § En appuyant sur la touche + (27) ou – (28) vous pouvez modifier cette donnée. § Pour enregistrer ce réglage, pressez sur la touche PROG. (26). § Display : REGLER QUANT. EAU § Display: CHOISIR PRODUIT § Pressez sur une autre touche de produit, la touche + (27) afin d’atteindre le degré supérieur ou la
touche EXIT (30) pour quitter la programmation.
16.4. Programmation de la quantité de lait § En appuyant sur la touche + (27) vous parvenez à la fonction QUANTITE DE LAIT. § Display : REGLER QUANT. LAIT § Display: CHOISIR PRODUIT § Pressez sur la touche mousse de lait (25) ou cappuccino (6) § Display : (produit sélectionné) § 10 SEC. § En appuyant sur la touche + (27) ou – (28) vous pouvez modifier cette donnée (temps de débit 3- 60
sec.) § Pour enregistrer ce réglage, pressez sur la touche PROG. (26). § Display : REGLER QUANT. LAIT § Display: CHOISIR PRODUIT § Pressez sur une autre touche de produit, la touche + (27) afin d’atteindre le degré supérieur ou la
touche EXIT (30) pour quitter la programmation.

Mode d’emploi Saphira Page 27 10.05.05 / Rev D / Mask 4 / PPB
16.5. Programmation de la portion d’eau chaude § En appuyant sur la touche + (27), vous parvenez à la fonction PORTION D’EAU CHAUDE. § Placez une tasse sous la buse pivotante eau chaude/vapeur (17). § Display: PORTION EAU CHAUDE § Display: PRESSER EAU CHAUDE § Display: EAU CHAUDE SUFFISANTE ? § Display: PRESSER EAU CHAUDE § Display: PORTION EAU CHAUDE § Display: PRESSER EAU CHAUDE § Pressez sur la touche + (27) afin d’atteindre le degré supérieur ou la touche EXIT (30) pour quitter la
programmation.
16.6. Programmation de la dureté de l’eau § En appuyant sur la touche + (27), vous parvenez à la fonction degré de DURETE DE L’EAU. § Display : NIVEAU DURE. D’EAU 3 § Pressez sur la touche PROG. (26). § En appuyant sur la touche + (27) ou – (28), vous pouvez régler le degré de dureté de l’eau. § Pour enregistrer ce réglage, pressez sur la touche PROG. (26). § Pressez sur la touche + (27) afin d’atteindre le degré supérieur ou la touche EXIT (30) pour quitter la
programmation.
F Afin de déterminer la dureté de l’eau, veuillez consulter le chapitre 9 „Réglage de la dureté de l’eau“.
16.7. Programmation de l’heure La programmation de l’heure est indispensable lorsque la fonction „mise en marche de l’appareil“ est utilisée
§ En appuyant sur la touche + (27), vous parvenez à la fonction réglage de L’HEURE § Display : HEURE --:-- § Pressez sur la touche PROG. (26). § En appuyant sur la touche + (27) ou – (28) vous pouvez régler l’heure. § Pour enregistrer ce réglage, pressez sur la touche PROG. (26). § En appuyant sur la touche + (27) ou – (28) vous pouvez régler les minutes. § Pour enregistrer ce réglage, pressez sur la touche PROG. (26). § Pressez sur la touche + (27) afin d’atteindre le degré supérieur ou la touche EXIT (30) pour quitter la
programmation.
16.8. Programmation mise en marche de l’appareil La programmation de l’heure est indispensable lorsque la fonction „mise en marche de l’appareil“ est utilisée.
§ En appuyant sur la touche + (27), vous parvenez à la fonction APPAREIL ON. § Display : APPAREIL ON --:-- § Pressez sur la touche PROG. (26). § En appuyant sur la touche + (27) ou – (28), vous pouvez régler les heures. § Pour enregistrer ce réglage, pressez sur la touche PROG. (26). § En appuyant sur la touche + (27) ou – (28), vous pouvez régler les minutes. § Pour enregistrer ce réglage, pressez sur la touche PROG. (26). § Pressez sur la touche + (27) afin d’atteindre le degré supérieur ou la touche EXIT (30) pour quitter la
programmation.
F L’affichage --:-- indique que cette fonction est désactivée.
Mode d’emploi Saphira Page 28 10.05.05 / Rev D / Mask 4 / PPB
16.9. Programmation «appareil éteint» § En appuyant sur la touche + (27), vous parvenez à la fonction APPAREIL ETEINT § Display : APPA. ETEINT 5.0 H. § Pressez sur la touche PROG. (26). § En appuyant sur la touche + (27) ou – (28) vous pouvez régler les heures (désactivé, ou 0.5 h. – 9
h.). § Pour enregistrer ce réglage, pressez sur la touche PROG. (26). § Pressez sur la touche + (27) afin d’atteindre le degré supérieur ou la touche EXIT (30) pour quitter la
programmation.
F compté à partir du débit de produit, la machine se déclenchera automatiquement une fois le temps programmé écoulé.
16.10. Prélèvements § En appuyant sur la touche + (27), vous parvenez à la fonction PRELEVEMENTS § Display : (total des prélèvements X) PRELEVEMENTS § Pressez sur la touche du produit sélectionné pour connaître le nombre de produits débités. § Pressez sur la touche + (27) afin d’atteindre le degré supérieur ou la touche EXIT (30) pour quitter la
programmation.
F Le nombre de produits à vapeur débités ne peut être connu.
16.11. Programmation de la langue § En appuyant sur la touche + (27) vous parvenez à la fonction LANGUE. § Display : LANGUE (langue) § En appuyant sur la touche + (27) ou – (28), vous pouvez choisir la langue. § Pour enregistrer ce réglage, pressez sur la touche PROG. (30). § Pressez sur la touche + (27) afin d’atteindre le degré supérieur ou la touche EXIT (30) pour quitter la
programmation.
17. Service et entretien
17.1. Remplir d’eau § Display : REMPLIR EAU § Lorsque que cette indication apparaît, aucun débit ne peut s’effectuer. Remplissez le réservoir d’eau
comme indiqué sous chiffre 4.3.
F Le réservoir d’eau doit être quotidiennement rincé et rempli d’eau fraîche. En cas d’utilisation d’un branchement à l’eau fixe, nous vous recommandons de rincer régulièrement le réservoir d’eau et de le remplir d’eau fraîche.
17.2. Installation d’un branchement à l’eau fixe Consultez à ce sujet le mode d’emploi du branchement à l’eau fixe.
17.3. Vider le bac à marc Le bac récupère le marc de café. § Display : VIDER COLLEC. MARC § Lorsque cette indication apparaît, aucun débit ne peut s’effectuer. Le bac à marc doit être vidé. § Retirez prudemment le bac égouttoir (Fig.2), celui-ci contient de l’eau! Ensuite, retirez le bac à marc
(Fig.3).
Mode d’emploi Saphira Page 29 10.05.05 / Rev D / Mask 4 / PPB
17.4. Vider le bac égouttoir § Display : VIDER BAC § Lorsque cette indication apparaît, aucun débit ne peut s’effectuer. Le bac égouttoir doit être vidé. § Retirez prudemment le bac égouttoir, celui-ci contient de l’eau! (Fig.2).
17.5. Absence du bac à marc § Display : COLLEC. MARC MANQUE § Lorsque cette indication apparaît, le bac à marc fait défaut ou n’est pas installé correctement.
17.6. Absence du bac égouttoir § Display : BAC MANQUE § Lorsque cette indication apparaît, le bac égouttoir fait défaut ou n’est pas installé correctement.
17.7. Remplir de grains de café § Display : REMPLIR GRAINS § Remplissez le réservoir avec des grains de café comme indiqué sous chiffre 4.4.
F L’affichage REMPLIR GRAINS disparaît seulement lorsqu’un café a été débité. Nous vous recommandons de nettoyer de temps en temps le réservoir à grains de café à l’aide d’un chiffon sec. Pour ce faire, déclenchez l’appareil au moyen de la touche de fonction ON/OFF (23).
17.8. Extraction de gravier § Déclenchez l’appareil au moyen de la touche ON/OFF (23). § Déconnectez l’appareil du réseau (19). § Ouvrez la porte battante qui se trouve sur la face arrière de la machine (Fig.4). § Tournez la manette vers le bas (Fig.5) et sortez le bac à grains de café en procédant par rotation
(Fig.6). § Extrayez les grains de café restants à l’aide d’un aspirateur. § Introduisez la clé spécifique (Fig.7). § Tournez la clé dans le sens inverse des aiguilles d’une montre jusqu’à ce que le gravier se libère. § Extrayez les résidus à l’aide d’un aspirateur. § Replacez le bac à grains de café, tournez-le dans sa position initiale et tirez la manette vers l’avant,
puis refermez la porte.
17.9. Appareil détartrage § Display : NECESSITE DETARTAGE L’appareil est à même de déterminer l’opportunité d’un détartrage. Le débit de café ou de l’eau chaude/vapeur reste toutefois possible. Nous vous recommandons de procéder au (chapitre 19) dans les jours qui suivent.

Mode d’emploi Saphira Page 30 10.05.05 / Rev D / Mask 4 / PPB
17.10. Nettoyage des contacts § Display : VIDER BAC § Display : NETTOYER CONTACTS § Retirez le bac égouttoir (Fig.2) Les résidus de calcaire qui se trouvent dans la sphère des contacts doivent être éliminés. Pour ce faire, procédez de la manière suivante : § Rincez les fixations des contacts dans la rainure (B) (Fig.8) ainsi que les contacts (A) à l’eau chaude
additionnée d’un agent de rinçage. Puis, nettoyez à l’aide d’une brosse les fixations des contacts dans la rainure (B).
17.11. Remarques générales concernant le nettoyage § Pour le nettoyage, n’utilisez jamais des objets susceptibles de rayer ou d’érafler ou des produits
chimiques corrosifs. § L’entretien extérieur et intérieur du boîtier s’effectue à l’aide d’un chiffon doux et humide. § Après chaque emploi, nettoyez la buse pivotante. § Après avoir chauffé du lait, débitez une petite quantité d’eau chaude afin de nettoyer également
l’intérieur de la buse amovible. Le réservoir à eau doit être quotidiennement rincé et rempli d’eau fraîche.
F Un dépôt récalcitrant de calcaire dans le réservoir d’eau peut être éliminé à l’aide d’un produit de détartrage disponible dans le commerce.
I Retirez le réservoir à eau pour le nettoyage.
18. Nettoyage de la machine à cafe Après 220 débits ou 180 rinçages, la machine doit être nettoyée. § Display: NETTOYAGE APPAREIL Le débit de café ou de l’eau chaude/vapeur reste toutefois possible. Nous vous conseillons de exécuter un des nettoyages suivantes tous les jours. § Nettoyage café Vous utilisez surtout les produits café sans produit cappuccino. Avec le programme « nettoyage café », seulement le système café est pris en considération par le nettoyage. (chapitre 18.1) § Nettoyage complet Vous utilisez les produits café et cappuccino. Avec le programme « nettoyage complet » les deux systèmes, café et cappuccino sont pris en considération par le nettoyage. (chapitre 18.3) § Nettoyage cappuccino Si vous utilisez les produits café et cappuccino, nous vous conseillons d’effectuer le « nettoyage cappuccino » tous les jours. (chapitre 18.2)
18.1. Nettoyage du café Une fois le programme de nettoyage démarré, il ne doit pas être interrompu. Ce programme dure environ 15 min. § Enclenchez l’appareil à l’aide de la touche de fonction ON/OFF (23). § Pressez sur la touche nettoyage (32) jusqu’à ce que le signal sonore se manifeste. § Display : CHOISIR NETTOYAGE - + § Pressez sur la touche + (27) 3 fois.

Mode d’emploi Saphira Page 31 10.05.05 / Rev D / Mask 4 / PPB
§ Display : NETTOYAGE CAFE § Pressez une nouvelle fois sur la touche nettoyage (32). § Display : VIDER COLLEC. MARC (Fig.2 /3) § Display : AJOUTER PASTILLE (Fig.9) § Display : PRESSER NETTOYAGE § Pressez sur la touche nettoyage (32). § Display : NETTOYAGE CAFE § Display : ATTENDRE S.V.P. § Le programme nettoyage est en fonction. § Display : VIDER COLLEC. MARC (Fig.2 /3) § Le programme nettoyage est fini § Display: CHOISIR PRODUIT
18.2. Nettoyage du cappuccino
I Procédez à ce nettoyage quotidiennement. Une fois le programme de nettoyage démarré, il ne doit pas être interrompu. Ce programme dure environ 5 min. § Enclenchez l’appareil à l’aide de la touche de fonction ON/OFF (23). § Pressez sur la touche nettoyage (32) jusqu’à ce que le signal sonore se manifeste. § Display : CHOISIR NETTOYAGE - + § Pressez sur la touche + (27). § Display : NETTOYAGE CAPPUCCINO § Pressez une nouvelle fois sur la touche nettoyage (32). § Display : DETERGENT POUR CAPPUCCINO § Display : PRESSER NETTOYAGE
I Placez un récipient d’au moins 0,5 l sous l’écoulement de café (4). § Remplissez un récipient d’environ 2,5 dl d’eau fraîche et ajoutez environ 3 bouchons de nettoyant
pour cappuccino. Plongez ensuite le tuyau souple du cappuccino dans ce liquide. § Pressez sur la touche nettoyage (32). § Display: NETTOYAGE CAPPUCINO § Display : ATTENDRE S.V.P. § Le programme nettoyage est en fonction. § Un signal sonore se manifeste. § Display : EAU POUR CAPPUCCINO § Display : PRESSER NETTOYAGE
Mode d’emploi Saphira Page 32 10.05.05 / Rev D / Mask 4 / PPB
I Remplissez un récipient d’eau fraîche et plongez-y le tuyau souple du cappuccino. § Pressez sur la touche nettoyage (32). § Le programme nettoyage est en fonction § Display: NETTOYAGE CAPPUCCINO § Display : ATTENDRE S.V.P. § Le programme nettoyage est fini § Display: CHOISIR PRODUIT
18.3. Nettoyage complet Une fois le programme de nettoyage démarré, il ne doit pas être interrompu. Ce programme dure environ 20 min. § Enclenchez l’appareil à l’aide de la touche de fonction ON/OFF (23). § Pressez sur la touche nettoyage (32) jusqu’à ce que le signal sonore se manifeste. § Display : CHOISIR NETTOYAGE - + § Pressez sur la touche + (27) fois. § Display : NETTOYAGE COMPLET § Pressez sur la touche nettoyage (32). § Display : VIDER COLLEC. MARC (Fig.2 /3) § Display : AJOUTER PASTILLE (Fig.9) § Display : DETERGENT POUR CAPPUCCINO § Remplissez un récipient de 2,5 dl d’eau fraîche et ajoutez environ 3 bouchons de nettoyant pour
cappuccinatore. Plongez le tuyau souple du cappuccino dans ce liquide. § Pressez sur la touche nettoyage (32). § Display : NETTOYAGE COMPLET § Display : ATTENDRE S.V.P. § Le programme nettoyage est en fonction § Un signal sonore se manifeste. § Display : EAU POUR CAPPUCCINO § Display : PRESSER NETTOYAGE
I Remplissez un récipient d’eau fraîche et plongez-y le tuyau souple du cappuccino. § Pressez sur la touche nettoyage (32). § Display : NETTOYAGE COMPLET § Display : ATTENDRE S.V.P. § Le programme nettoyage est en fonction § Display : VIDER COLLEC. MARC (Fig.2 /3) § Le programme nettoyage est fini § Display: CHOISIR PRODUIT

Mode d’emploi Saphira Page 33 10.05.05 / Rev D / Mask 4 / PPB
19. Détartrage L’appareil dispose d’un programme intégré de détartrage. Ce programme dure environ 40 min.
F Une fois le programme démarré, il ne doit pas être interrompu. Si une Prise d'eau fixe est monté sur le conteneur d’eau vous devez l’enlever et débrancher à l’aide de la feuille annexe du mode d’emploi Prise d'eau fixe.
I Lors de l’utilisation de détartrants contenant de l’acide, éliminez immédiatement des surfaces délicates telles que pierre naturelle ou bois, les éclaboussures ou les gouttes de ce produit, ou prenez les mesures de sécurité adéquates. § Débranchez l’appareil à l’aide de la touche de fonction ON/OFF (23). § Pressez sur la touche détartrage (31) jusqu’à ce qu’un signal sonore se manifeste. § Display : VIDER BAC § Display : DETARTRANT DANS RESERVOIR § Display : PRESSER DETARTRER Diluez dans un récipient 3 pastilles pour détartrage dans 0.7 l d’eau et remplissez le réservoir à eau vide de ce liquide.
I Placez un récipient suffisamment grand sous le tuyau souple et l’écoulement du café (4). § Pressez sur la touche détartrage (31). § Display : APPAREIL DETARTRE § Display : ATTENDRE S.V.P. § Un signal sonore se manifeste. § Display : VIDER BAC § Display : REMPLIR EAU § Display : PRESSER DETARTRER § Pressez sur la touche détartrage (31). § La programme detartage marche § Display : APPAREIL DETARTRE § Display : ATTENDRE S.V.P. § Un signal sonore se manifeste. § Display : VIDER BAC NETTOYER CONTACTS (chapitre 17.10 / Fig.8).
20. Elimination Pour l’élimination, le produit est à retourner au commerce spécialisé ou à Franke SA qui s’en chargera en concordance avec les prescriptions en la matière.
21. Réglages effectués par le technicien de service
F Les réglages / modifications suivants ne peuvent être effectués que par le technicien de service. - Modification dans la disposition des fonctions des touches de produits du café. - Modification du cycle dans le débit du „café en pot“ - Capacité du filtre
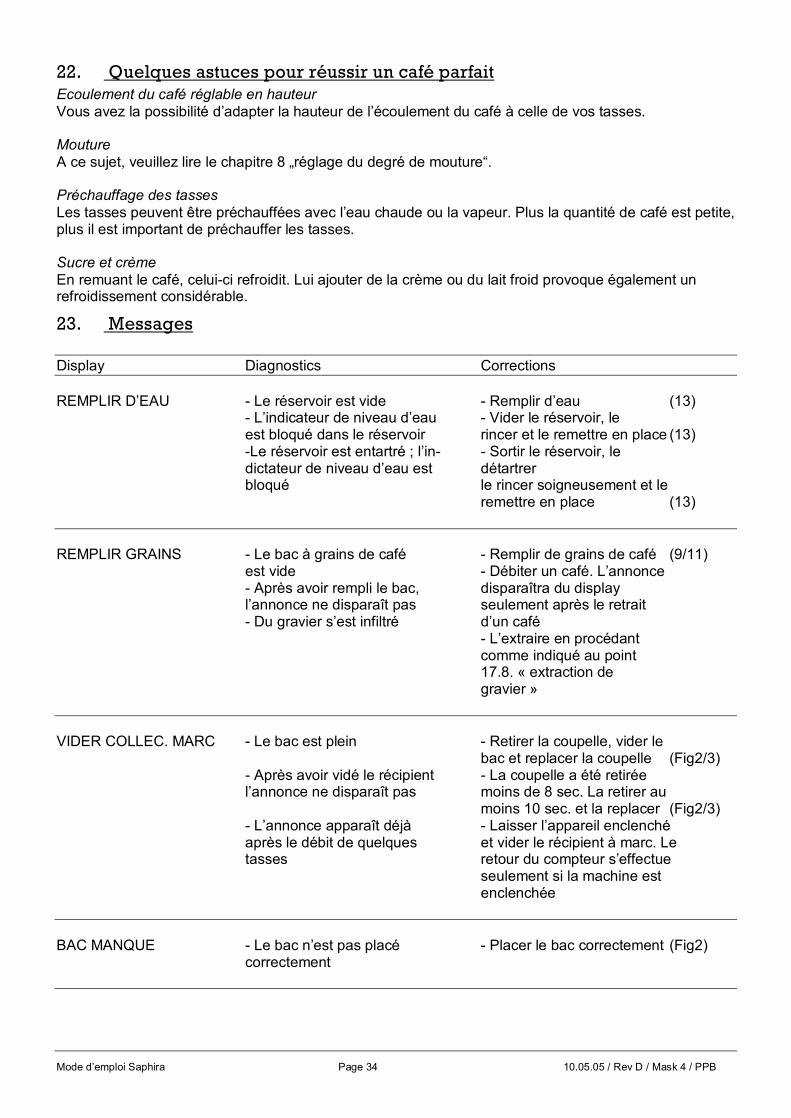
Mode d’emploi Saphira Page 34 10.05.05 / Rev D / Mask 4 / PPB
22. Quelques astuces pour réussir un café parfait Ecoulement du café réglable en hauteur Vous avez la possibilité d’adapter la hauteur de l’écoulement du café à celle de vos tasses. Mouture A ce sujet, veuillez lire le chapitre 8 „réglage du degré de mouture“. Préchauffage des tasses Les tasses peuvent être préchauffées avec l’eau chaude ou la vapeur. Plus la quantité de café est petite, plus il est important de préchauffer les tasses. Sucre et crème En remuant le café, celui-ci refroidit. Lui ajouter de la crème ou du lait froid provoque également un refroidissement considérable.
23. Messages Display Diagnostics Corrections REMPLIR D’EAU - Le réservoir est vide - Remplir d’eau (13) - L’indicateur de niveau d’eau - Vider le réservoir, le est bloqué dans le réservoir rincer et le remettre en place (13) -Le réservoir est entartré ; l’in- - Sortir le réservoir, le dictateur de niveau d’eau est détartrer bloqué le rincer soigneusement et le
remettre en place (13) REMPLIR GRAINS - Le bac à grains de café - Remplir de grains de café (9/11) est vide - Débiter un café. L’annonce - Après avoir rempli le bac, disparaîtra du display l’annonce ne disparaît pas seulement après le retrait - Du gravier s’est infiltré d’un café - L’extraire en procédant comme indiqué au point 17.8. « extraction de gravier » VIDER COLLEC. MARC - Le bac est plein - Retirer la coupelle, vider le bac et replacer la coupelle (Fig2/3) - Après avoir vidé le récipient - La coupelle a été retirée l’annonce ne disparaît pas moins de 8 sec. La retirer au moins 10 sec. et la replacer (Fig2/3) - L’annonce apparaît déjà - Laisser l’appareil enclenché après le débit de quelques et vider le récipient à marc. Le tasses retour du compteur s’effectue seulement si la machine est enclenchée BAC MANQUE - Le bac n’est pas placé - Placer le bac correctement (Fig2) correctement
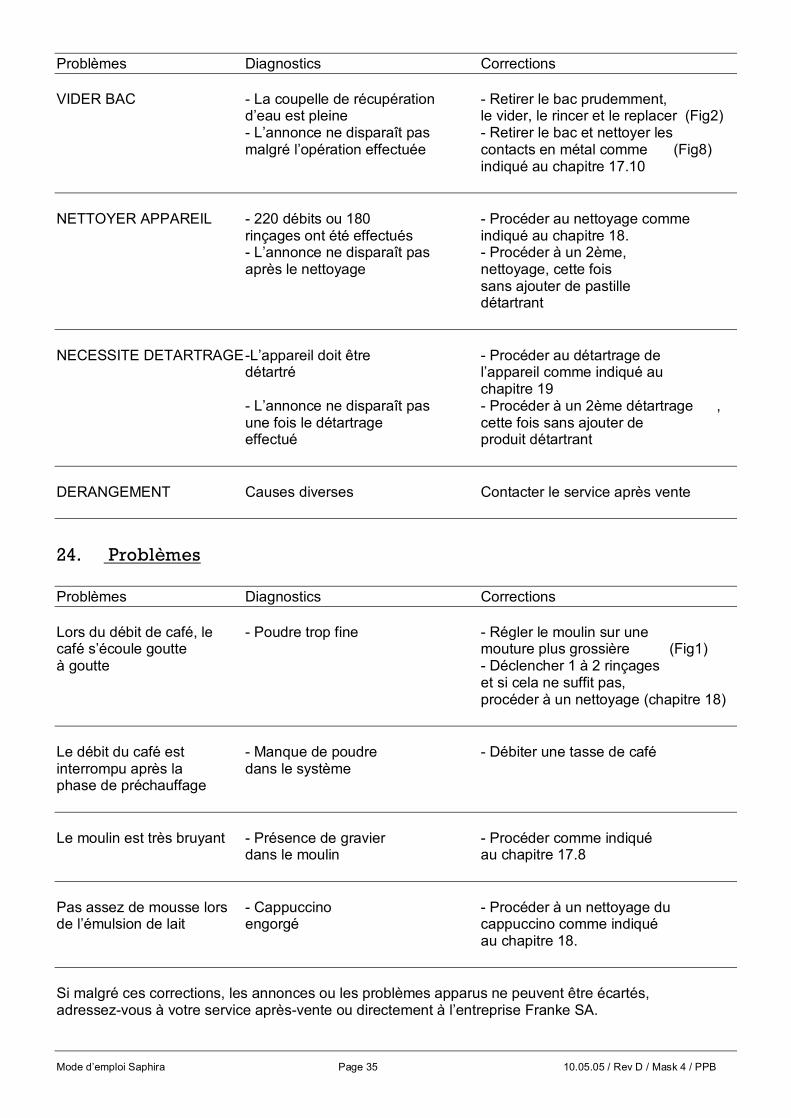
Mode d’emploi Saphira Page 35 10.05.05 / Rev D / Mask 4 / PPB
Problèmes Diagnostics Corrections VIDER BAC - La coupelle de récupération - Retirer le bac prudemment, d’eau est pleine le vider, le rincer et le replacer (Fig2) - L’annonce ne disparaît pas - Retirer le bac et nettoyer les malgré l’opération effectuée contacts en métal comme (Fig8) indiqué au chapitre 17.10 NETTOYER APPAREIL - 220 débits ou 180 - Procéder au nettoyage comme rinçages ont été effectués indiqué au chapitre 18. - L’annonce ne disparaît pas - Procéder à un 2ème, après le nettoyage nettoyage, cette fois sans ajouter de pastille détartrant NECESSITE DETARTRAGE -L’appareil doit être - Procéder au détartrage de détartré l’appareil comme indiqué au chapitre 19 - L’annonce ne disparaît pas - Procéder à un 2ème détartrage , une fois le détartrage cette fois sans ajouter de effectué produit détartrant DERANGEMENT Causes diverses Contacter le service après vente
24. Problèmes Problèmes Diagnostics Corrections Lors du débit de café, le - Poudre trop fine - Régler le moulin sur une café s’écoule goutte mouture plus grossière (Fig1) à goutte - Déclencher 1 à 2 rinçages et si cela ne suffit pas, procéder à un nettoyage (chapitre 18) Le débit du café est - Manque de poudre - Débiter une tasse de café interrompu après la dans le système phase de préchauffage Le moulin est très bruyant - Présence de gravier - Procéder comme indiqué dans le moulin au chapitre 17.8 Pas assez de mousse lors - Cappuccino - Procéder à un nettoyage du de l’émulsion de lait engorgé cappuccino comme indiqué au chapitre 18. Si malgré ces corrections, les annonces ou les problèmes apparus ne peuvent être écartés, adressez-vous à votre service après-vente ou directement à l’entreprise Franke SA.

Mode d’emploi Saphira Page 36 10.05.05 / Rev D / Mask 4 / PPB
25. Remarques juridiques Ce mode d’emploi contient les informations nécessaires à l’usage fonctionnel de l’appareil, son maniement correct ainsi que son entretien approprié. La lecture attentive et la mise en pratique de ce mode d’emploi sont les conditions sine qua non pour un maniement sans danger de l’appareil, ainsi qu’une sécurité optimale de fonctionnement et d’entretien. Ce mode d’emploi n’a pas la prétention de pouvoir considérer chaque application imaginable. En outre, nous attirons votre attention sur le fait que le contenu de ce mode d’emploi n’est ni partie ni modification d’une convention antérieure ou actuelle, d’un engagement ou de conditions juridiques. L’intégralité de l’engagement de Franke SA résulte en le contrat d’achat respectif dont fait également partie le seul règlement valable et complet relatif à la garantie. Ces dispositions de garantie contractuelles ne sont ni élargies ni réduites par l’application des instructions de ce mode d’emploi. Le mode d’emploi contient des informations qui sont protégées par Copyright. Des photocopies ou traductions en une autre langue de ce mode d’emploi ne sont autorisées qu’avec l’accord préalable écrit de Franke SA.
26. Données techniques Modèle 230V / 50Hz Tension : 230V AC Puissance : 2300 W Fusible : 15 A Poids : 18 kg Dimensions (LxPxH): 420 x 505 x 503 mm Contrôle de sécurité: S / CE Modèle UL 230V / 60Hz Tension : 230V AC / 60Hz Puissance : 2600W Fusible : 15A Poids : 18 kg Dimensions (LxPxH): 420 x 505 x 503 mm Contrôle de sécurité: UL Modèle UL 120V / 60Hz Tension : 120V AC / 60Hz Puissance : 1350W Fusible : 15A Poids : 18 kg Dimensions (LxPxH): 420 x 505 x 503 mm Contrôle de sécurité: UL
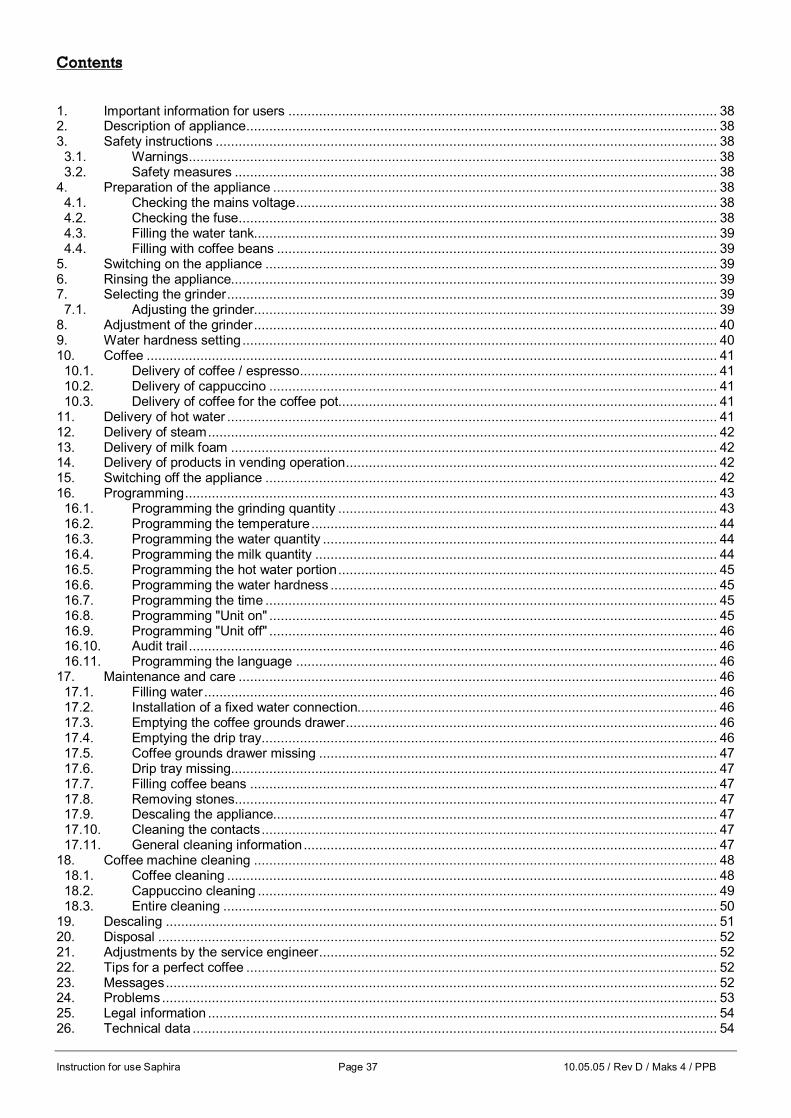
Instruction for use Saphira Page 37 10.05.05 / Rev D / Maks 4 / PPB
Contents 1. Important information for users ................................................................................................................ 38 2. Description of appliance........................................................................................................................... 38 3. Safety instructions ................................................................................................................................... 38
3.1. Warnings.......................................................................................................................................... 38 3.2. Safety measures .............................................................................................................................. 38
4. Preparation of the appliance .................................................................................................................... 38 4.1. Checking the mains voltage.............................................................................................................. 38 4.2. Checking the fuse............................................................................................................................. 38 4.3. Filling the water tank......................................................................................................................... 39 4.4. Filling with coffee beans ................................................................................................................... 39
5. Switching on the appliance ...................................................................................................................... 39 6. Rinsing the appliance............................................................................................................................... 39 7. Selecting the grinder................................................................................................................................ 39
7.1. Adjusting the grinder......................................................................................................................... 39 8. Adjustment of the grinder......................................................................................................................... 40 9. Water hardness setting............................................................................................................................ 40 10. Coffee ..................................................................................................................................................... 41
10.1. Delivery of coffee / espresso............................................................................................................. 41 10.2. Delivery of cappuccino ..................................................................................................................... 41 10.3. Delivery of coffee for the coffee pot................................................................................................... 41
11. Delivery of hot water ................................................................................................................................ 41 12. Delivery of steam..................................................................................................................................... 42 13. Delivery of milk foam ............................................................................................................................... 42 14. Delivery of products in vending operation................................................................................................. 42 15. Switching off the appliance ...................................................................................................................... 42 16. Programming........................................................................................................................................... 43
16.1. Programming the grinding quantity ................................................................................................... 43 16.2. Programming the temperature.......................................................................................................... 44 16.3. Programming the water quantity ....................................................................................................... 44 16.4. Programming the milk quantity ......................................................................................................... 44 16.5. Programming the hot water portion................................................................................................... 45 16.6. Programming the water hardness ..................................................................................................... 45 16.7. Programming the time ...................................................................................................................... 45 16.8. Programming "Unit on" ..................................................................................................................... 45 16.9. Programming "Unit off" ..................................................................................................................... 46 16.10. Audit trail .......................................................................................................................................... 46 16.11. Programming the language .............................................................................................................. 46
17. Maintenance and care ............................................................................................................................. 46 17.1. Filling water...................................................................................................................................... 46 17.2. Installation of a fixed water connection.............................................................................................. 46 17.3. Emptying the coffee grounds drawer................................................................................................. 46 17.4. Emptying the drip tray....................................................................................................................... 46 17.5. Coffee grounds drawer missing ........................................................................................................ 47 17.6. Drip tray missing............................................................................................................................... 47 17.7. Filling coffee beans .......................................................................................................................... 47 17.8. Removing stones.............................................................................................................................. 47 17.9. Descaling the appliance.................................................................................................................... 47 17.10. Cleaning the contacts....................................................................................................................... 47 17.11. General cleaning information............................................................................................................ 47
18. Coffee machine cleaning ......................................................................................................................... 48 18.1. Coffee cleaning ................................................................................................................................ 48 18.2. Cappuccino cleaning ........................................................................................................................ 49 18.3. Entire cleaning ................................................................................................................................. 50
19. Descaling ................................................................................................................................................ 51 20. Disposal .................................................................................................................................................. 52 21. Adjustments by the service engineer........................................................................................................ 52 22. Tips for a perfect coffee ........................................................................................................................... 52 23. Messages................................................................................................................................................ 52 24. Problems................................................................................................................................................. 53 25. Legal information ..................................................................................................................................... 54 26. Technical data ......................................................................................................................................... 54
Instruction for use Saphira Page 38 10.05.05 / Rev D / Maks 4 / PPB
1. Important information for users Before you put your new Unit into operation, please read these operating instructions carefully and keep them safely for future reference. If you require further information or if particular problems occur which are not treated in sufficient detail in these operating instructions, request the required information from your local dealer or directly from Franke AG.
2. Description of appliance The first Saphira for the office sector and small caterers is striking not only in its modern technology but also in many features and, if required, is capable of preparing one or two cups of espresso/coffee in only one brewing operation. The Intelligent Pre Brew Aroma System (I.P.B.A.S.©) brings out the full coffee aroma and gives the best espresso/coffee, always crowned by a wonderful cream. Coffee from either one or the other grinder can be used. Mixing can be individually programmed. A cappuccino can be delivered at the press of a button and without moving a cup. Integrated washing, cleaning and descaling programs ensure perfect cleanliness at the press of a button.
3. Safety instructions
3.1. Warnings § Children are not aware of the dangers involved in handling electrical appliances; they should
therefore never be left unsupervised with electrical appliances. § The Unit may be operated only by instructed persons. § Never put a faulty Unit or an Unit with a damaged supply cable into operation. § Do not immerse the Unit in water.
3.2. Safety measures § Never expose the Unit to weather influences (rain, snow, frost) and do not operate it with wet hands. § Place the Unit on a stable and horizontal surface. Never place on hot or warm surfaces (hobs). § During long absence (holidays, etc.), always pull the mains plug out of the socket. § Before cleaning work, always first pull the mains plug out of the socket. § When pulling out the mains plug, never pull the supply cable or the Unit it self. § Never repair or open the Unit your self. Repairs may be performed only by authorized service centres
using original spare parts and accessories. § The Unit is connected to the power supply by a supply cable. Ensure that no one trips over the
supply cable and pulls down the appliance. Keep children and pets away. § The location of the Unit should be chosen so that there is good air circulation, in order to protect it
from overheating. § When acid-containing descalers are used, any splashes and drops on sensitive surfaces, in
particular natural stone and wood surfaces, should be removed immediately or appropriate precautions should be taken.
4. Preparation of the appliance
4.1. Checking the mains voltage The Unit has been set to the correct mains voltage at the factory. Check whether your mains voltage agrees with the data on the rating plate at the back of the Unit (21).
4.2. Checking the fuse Check whether the fuse is suitable for your Unit(see section 26).
Instruction for use Saphira Page 39 10.05.05 / Rev D / Maks 4 / PPB
4.3. Filling the water tank § Remove the water tank and wash thoroughly with cold water. § Then fill the water tank and replace it in the appliance. Ensure that the tank snaps in properly .
F Fill only with fresh, cold water. Never fill with milk, mineral water or other liquids. You can also fill the tank with water without removing it. Simply remove the cover and pour in water from a vessel from above and replace the lid.
4.4. Filling with coffee beans It is possible to fill the Unit with two different varieties of coffee beans. § Remove the covers of the bean containers (9 /11). § Remove any dirt or foreign bodies present in the bean containers. § Fill the coffee beans into the bean containers and replace the covers.
5. Switching on the appliance Press the mains switch at the back of the Unit (20). Switch on the Unit at the ON/OFF button (23). Display: PLEASE WAIT Place an empty cup under the coffee delivery (4). Display: RINSE UNIT Press the Wash button (34) Display: UNIT RINSING
F The cappuccino nozzle is washed first, followed by the coffee delivery.
6. Rinsing the appliance A wash process is automatically triggered when the Unit is switched off. If no cappuccino was delivered, only the coffee delivery is washed on switching off. Once the Unit has been switched off and is cooled, the rinsing process is requested on switching on.
7. Selecting the grinder You can select a grinder manually Press the Grinder button (12) once or twice. The small lamp above the button indicates which grinder has been activated (left grinder or right grinder).
7.1. Adjusting the grinder To tailor the coffee optimally to the grinder, perform the following steps: § Press the Grinder button (12) § Deliver 6 coffees/espressos each by manually selecting the "left" mill and then the "right" mill.
F We recommend also readjusting the mill after: - Change of coffee bean variety - Extreme adjustments of degree of milling - Service
Instruction for use Saphira Page 40 10.05.05 / Rev D / Maks 4 / PPB
8. Adjustment of the grinder You can adapt the grinder to the degree of roasting of your coffee. We recommend:
A dark roast ð finer setting light roast ð coarser setting To adjust the degree of grinding, turn the adjusting rings to the desired position (Fig.1) You have the following possibilities:
A The smaller the dots, the finer the grinding The larger the dots, the coarser the grinding
F The degree of grinding may be adjusted only with the grinder running.
9. Water hardness setting Water is heated in the appliance. This leads to limescale during use, which is automatically indicated on the display. The Unit must be adjusted to the hardness of the water used. Use the test sticks supplied.
F 1° German hardness corresponds to 1.79° French hardness. The Unit has 5 hardness levels: WATER HARDNESS LEVEL -- Water hardness function switched off WATER HARDNESS German water hardness 1 - 7° LEVEL 1 French water hardness 1.79 – 12.53° WATER HARDNESS German water hardness 8 - 15° LEVEL 2 French water hardness 14.32 - 26.85° WATER HARDNESS German water hardness 16 - 23° LEVEL 3 French water hardness 28.64 - 41.14° WATER HARDNESS German water hardness 24 - 30° LEVEL 4 French water hardness 42.96 - 53.7° The Unit has been set to level 3 at the factory. You can change the setting. To do this, proceed as follows: § Switch on the Unit at the ON/OFF button (23). § Display: PLEASE WAIT § Press the PROG. button (26) until an acoustic signal is heard. § Display: ADJUST COFFEE QTY. § Display: SELECT PRODUCT § Press the + button (27) until the following message appears: § Display: WATER HARDNESS LEVEL 3 § Press the PROG. Button (26); an acoustic signal is heard and the set level flashes. § You can set the desired level by pressing the – (28) or + (27) button. To save the setting, press the
PROG. button (26). An acoustic signal is heard. § Display: WATER HARDNESS LEVEL 3 § Press the EXIT button (30).

Instruction for use Saphira Page 41 10.05.05 / Rev D / Maks 4 / PPB
10. Coffee
10.1. Delivery of coffee / espresso § The Unit must be ready for operation. § Display: SELECT PRODUCT § Place 1 cup or 2 cups under the coffee delivery (4) and press the desired product button (6). The
prebrew process (I.P.B.A.S.) moistens the coffee powder, stops the outflow briefly and then begins with the actual brewing process.
§ Display: 1 COFFEE
F You can stop the delivery prematurely by pressing any coffee product button. To obtain outstanding foam, adapt the coffee delivery (4) to your individual cup size.
10.2. Delivery of cappuccino § The Unit must be ready for operation. § Display: SELECT PRODUCT § Fill a can with milk and dip the cappuccino tube into the milk. § Place 1 cup under the coffee delivery and press the product button (cappuccino). The Unit first
prepares the milk foam and then the coffee. § Display: 1 CAPPUCCINO
F You can stop the milk foam and the coffee prematurely by pressing the product button again. 10 minutes after the cappuccino delivery, washing is automatically triggered. The washing is announced beforehand by an acoustic signal.
10.3. Delivery of coffee for the coffee pot § The Unit must be ready for operation. § Display: SELECT PRODUCT § Place 1 coffee pot under the coffee delivery (4) and press the product button for coffee for the coffee
pot (24). Your coffee for the coffee pot is prepared in several cycles. The number of cycles is shown on the display.
§ Display: POT 2
F You can stop the delivery prematurely by pressing the product button again.
11. Delivery of hot water § The Unit must be ready for operation. § Display: SELECT PRODUCT § Place a cup under the pivotable delivery tube (17) and press the product button portion of hot water
(16 or 33). § Display: HOT WATER PORTION § Delivery of the programmed portion of hot water stops automatically.
F You can stop the delivery prematurely by pressing the product button again.
I When water is being delivered, splashing may occur initially. The pivotable delivery tube becomes hot. Avoid direct skin contact.
Instruction for use Saphira Page 42 10.05.05 / Rev D / Maks 4 / PPB
12. Delivery of steam § The Unit must be ready for operation. § Display: SELECT PRODUCT § Place a cup containing the liquid to be heated under the pivotable delivery tube (17) and press the
product button steam (15 or 29). § Display: STEAM ACTIVE
F To end the steam delivery, press the button steam (15 or 29).
I During delivery of steam, splashes may occur initially. The pivotable delivery tube becomes hot. Avoid direct skin contact.
13. Delivery of milk foam § The Unit must be ready for operation. § Display: SELECT PRODUCT § Fill a pot with milk and dip the cappuccino tube into the milk. § Place 1 cup under the coffee delivery (4) and press the product button milk foam (25). § The programmed amount is prepared and delivery stops automatically. § Display: MILK FOAM
F You can stop the delivery prematurely by pressing the product button again.10 minutes after milk delivery, washing is triggered automatically. The wash is announced beforehand by an acoustic signal.
14. Delivery of products in vending operation § The Unit must be ready for operation. § Display (7): SELECT PRODUCT § Display (35): CREDIT MODUS § Insert Card / Key into the vending system (35), or throw coins into the coin validator (36) until the
credit has reached the price of the product. § Display (35): CREDIT 2.50 § Place 1 cup or 2 cups under the coffee delivery (4) or pivotable delivery tube (17) and press the
desired product button (6). The program product will be dispeused if the credit correspond with the product price. The product stops automatically.
§ Display (7): (select product)
F While pressing a product button there is an accousting signal if the credit is too less. Appears the message „fill coffee beans“ while oreaparing the product, the credit remains.
15. Switching off the appliance § Switch the Unit off at the ON/OFF button (23). When the Unit is switched off, a wash is automatically
triggered.
Instruction for use Saphira Page 43 10.05.05 / Rev D / Maks 4 / PPB
16. Programming The following functions can be programmed: a Coffee quantity a Temperature a Water quantity a Milk quantity a Hot water portion a Water hardness a Time a Unit on a Unit off a Audit trail a Language To enter the programming level, the following steps must first be carried out: § Switch your Unit on with the ON/OFF button (23). § Press the PROG. button (26) until an acoustic signal is heard. § Display: ADJUST COFFEE QTY. § Display: SELECT PRODUCT
16.1. Programming the grinding quantity § Display: ADJUST COFFEE QTY. § Display: SELECT § PRODUCT § Press the desired product button. § Display : (Selected product) - ..............II..............+ § You can determine the grinding quantity by pressing the + (27) or – (28) button. § To save the setting, press the PROG. button (26). § Display: (Selected product)
: 100% : 0% The programmed amount of coffee can be distributed to the left and right grinder per percentage;
FExpl.: Adjust. <100% >0% programmed amount of coffee is made through left grinder Adjust. <0% >100% programmed amount of coffee is made through right grinder Adjust. <25% >70% programmed amount of coffee is made 25% through left grinder and 75% through right grinder (mix) Adjust. <75% >25% programmed amount of coffee is made 75% through left grinder and 25% through right grinder (mix)
§ You can adjust the values by pressing the + (27) or – (28) button. § To save the setting, press the PROG. button (26). § Display: ADJUST COFFEE QTY. § Display: SELECT PRODUCT § Press another product button, the + button (27) to reach the next function or the EXIT button (30) to
exit the programming.

Instruction for use Saphira Page 44 10.05.05 / Rev D / Maks 4 / PPB
16.2. Programming the temperature § Press the + button (27) to reach the TEMPERATURE function. § Display: ADJUST TEMPERATURE § Display: SELECT PRODUCT § Press the desired product button. § Display: (Selected product) TEMP. NORMAL § Select the desired temperature (high or normal) using the + (27) or – (28) button. § To save the setting, press the PROG. button (26). § Display: ADJUST TEMPERATURE § Display: SELECT PRODUCT § Press another product button, the + button (27) to reach the next function or the EXIT button (30) to
exit the programming.
16.3. Programming the water quantity § Press the + button (27) to reach the WATER QUANTITY function. § Display: ADJUST WATER QTY. § Display: SELECT PRODUCT § Press the desired product button. § Display: (Selected product) § WATER 90 ML § You can adjust the value by pressing the + (27) or – (28) button. § To save the setting, press the PROG. button (26). § Display: ADJUST WATER QTY. § Display: SELECT PRODUCT § Press another product button, the + button (26) to reach the next function or the EXIT button (30) to
exit the programming.
16.4. Programming the milk quantity § Press the + button to reach the MILK QUANTITY function. § Display: ADJUST MILK QTY. § Display: SELECT PRODUCT § Press the button milk foam (25) or cappuccino(6) § Display: (Selected product) 10 SEC. § By pressing the + (27) or – (28) button, you can adjust the time (delivery time 3- 60 sec.) § To save the setting, press the PROG. button (26). § Display: ADJUST MILK QTY. § Display: SELECT PRODUCT § Press another product button, the + button (27) to reach the next function or the EXIT button (30) to
exit the programming.
Instruction for use Saphira Page 45 10.05.05 / Rev D / Maks 4 / PPB
16.5. Programming the hot water portion § Press the + button (27) to reach the HOT WATER PORTION function. § Place a cup under the pivotable delivery tube (17). § Display: HOT WATER PORTION § Display: PRESS FOR HOT WATER § Display: ENOUGH HOT WATER ? § Display: PRESS FOR HOT WATER § Display: HOT WATER PORTION § Display: PRESS FOR HOT WATER § Press the + button (27) to reach the next stage or the EXIT button (30) to exit the programming.
16.6. Programming the water hardness § Press the + button (27) to reach the WATER HARDNESS function. § Display: WATER HARDNESS LEVEL 3 § Press the PROG. button (26). § By pressing the + (27) or – (28) button, you can set the water hardness. § To save the setting, press the PROG. button (26). § Press the + button (27) to reach the next function or the EXIT button (30) to exit the programming.
F To determine the water hardness, read Chapter "Setting the water hardness".
16.7. Programming the time The clock has to be programmed if the "Unit on" function is used. § Press the + button (27) to reach the TIME function. § Display: TIME --:-- § Press the PROG. button (26). § By pressing the + (27) or – (28) button, you can select the hour. § To save the setting, press the PROG. button (26). § Press the + (27) or – (28) button to select the minutes. § To save the setting, press the PROG. button (26). § Press the + button (27) to reach the next function or the EXIT button (30) to exit the programming.
16.8. Programming "Unit on" The clock has to be programmed if the "Unit on" function is used. § Press the + button (27) to reach the UNIT ON function. § Display: UNIT ON --:-- § Press the PROG. button (26). § By pressing the + (27) or – (28) button, you can adjust the hour. § To save the setting, press the PROG. button (26). § By pressing the + (27) or – (28) button, you can adjust the minutes. § To save the setting, press the PROG. button (26). § Press the + button (27) to reach the next function or the EXIT button (30)to exit the programming.
F The display --:-- means that the function is switched off

Instruction for use Saphira Page 46 10.05.05 / Rev D / Maks 4 / PPB
16.9. Programming "Unit off" § Press the + button (27) to reach the UNIT OFF function. § Display: UNIT OFF 5.0 HRS § Press the PROG. button (26). § By pressing the + (27) or – (28) button, you can adjust the hours (switched off or 0.5 h - 9 h). § To save the setting, press the PROG. button (26). § Press the + button (27) to reach the next function or the EXIT button (30) to exit the programming.
F The program automatically switches off after reaching the programmed time from the last product delivery.
16.10. Audit trail § Press the + button (27) to reach the AUDIT TRAIL function. § Display: (total deliveries X) AUDIT TRAIL § Press the desired product button to request the deliveries. § Press the + button (27) to reach the next function or the EXIT button (30) to exit the programming.
F Steam audit trail cannot be requested.
16.11. Programming the language § Press the + button (27) to reach the Language function. § Display: LANGUAGE (language) § By pressing the + (27) or – (28) button, you can select the desired language. § To save the setting, press the PROG. button (26). § Press the + button (27) to reach the next function or the EXIT button (30) to exit the programming.
17. Maintenance and care
17.1. Filling water § Display: FILL WATER TANK § If this message appears, no more deliveries can be made. Replenish the water as described under
4.3.
F The water tank should be washed out daily and filled with fresh water. If a fixed water connection is used, we recommend washing out the water tank regularly and filling with fresh water.
17.2. Installation of a fixed water connection Read the operating instructions for the fixed water connection.
17.3. Emptying the coffee grounds drawer The coffee grounds drawer collects the coffee grounds. § Display: EMPTY DRAWER § If this message appears, deliveries can no longer be made and the coffee grounds drawer must be
emptied. § Carefully remove the drip tray (Fig.2), which contains water. Then remove the coffee grounds drawer
(Fig.3).
17.4. Emptying the drip tray § Display: EMPTY DRIP TRAY § If this message appears, deliveries can no longer be made and the drip tray must be emptied. § Carefully remove the drip tray, which contains water (Fig.2).
Instruction for use Saphira Page 47 10.05.05 / Rev D / Maks 4 / PPB
17.5. Coffee grounds drawer missing § Display: DRAWER MISSING § If this message appears, the coffee grounds drawer has not been correctly inserted or is missing.
17.6. Drip tray missing § Display: DRIP TRAY MISSING § If this message appears, the drip tray has not been correctly inserted.
17.7. Filling coffee beans § Display: FILL COFFEE BEANS § Fill the beans as described under chapter 4.4.
F The display FILL COFFEE BEANS goes out only after a coffee delivery. We recommend cleaning the beans container with a dry cloth from time to time before refilling. To do this, switch off the Unit at the ON / OFF button (23).
17.8. Removing stones § Switch off your Unit at the ON/OFF button (23). § Disconnect your Unit from the power supply (19). § Open the hinged door at the back of the Unit(Fig.4). § Press the slide backwards (Fig.5) and remove the beans container by turning (Fig.6). § Remove any beans with a vacuum cleaner. § Mount the key (Fig.7). § Turn the key in the counter clockwise direction until the jammed stone has been released. § Empty powder residues with the vacuum cleaner. § Now mount the beans container, turn the beans container to the starting position and pull the slide
forwards before closing the door.
17.9. Descaling the appliance § Display DECALICIFYING NECESSARY The Unit recognises the necessity of descaling. You can continue to deliver coffee or hot water/steam. We recommend carrying out descaling (Section 19) within the next few days.
17.10. Cleaning the contacts § Display EMPTY DRIP TRAY § Display: CLEAN CONTACTS § Remove the drip tray (Fig.2). The descaling residues in the region of the contacts must be removed. Proceed as follows: § Wash the contact fastenings in the channel (B) (Fig.8) and the contacts (A) with hot water and with a
detergent. Then also clean the contact fastenings in the channel (B) with a brush.
17.11. General cleaning information § Never use abrasive objects or corrosive chemicals for cleaning. § Wipe the inside and outside of the housing with a soft, damp cloth. § Each time after use, clean the pivotable delivery tube. § After warming up milk, deliver a little hot water to clean the inside of the pivotable delivery tube too. The water tank must be washed out daily and filled with fresh water.
F If limescale is visible in the water tank, you can remove this with a commercial descaler.
I Remove the water tank for cleaning.
Instruction for use Saphira Page 48 10.05.05 / Rev D / Maks 4 / PPB
18. Coffee machine cleaning After 220 deliveries or 180 washes, the Unit must be cleaned. § Display CLEAN UNIT You can continue to deliver coffee or hot water/steam. We recommend you to carry out one of the following cleaning programs within a day. Coffee cleaning You select coffee products only, without any use of milk. (Cappuccino) During the cleaning "Coffee" the coffee system will be cleaned only
(Section 18.1). Entire cleaning You select coffee- and cappuccinoproducts.
During the "Combi cleaning" both systems - coffee- and milksupply - will be cleaned (Section 18.3).
Cappuccino cleaning By the use of coffee- and cappuccinoproducts we recommend to carry out
the program "Cleaning Cappuccino" daily (Section 18.2).
18.1. Coffee cleaning Once started, the cleaning procedure may not be stopped. It takes about 15 minutes. § Switch on the Unit at the ON/OFF button (23). § Press the button Clean (32) until an acoustic signal is heard. § Display: SELECT CLEANING - + § Press the + button (27) 3 times. § Display: COFFEE CLEANING § Press the button again Clean (32). § Display: EMPTY DRAWER (Fig.2 and Fig.3) § Display: INSERT TABLET (Fig.9) § Display: PRESS CLEANING § Press the button again Clean (32). § Display: COFFEE CLEANING § Display: PLEASE WAIT § The coffee cleaning works § Display: EMPTY DRAWER (Fig.2 and Fig.3) § The entire cleaning is finished § Display: SELECT PRODUCT

Instruction for use Saphira Page 49 10.05.05 / Rev D / Maks 4 / PPB
18.2. Cappuccino cleaning
I Carry out this cleaning daily. Once started, the cleaning procedure may not be stopped. It takes about 5 minutes. § Switch on the Unit at the ON/OFF button (23). § Press the button Clean (32) until an acoustic signal is heard. § Display: SELECT CLEANING - + § Press the + button (27). § Display: CAPPUCCINO CLEANING § Press the button again Clean (32). § Display: CLEANER FOR CAPPUCCINO § Display: PRESS CLEANING
I Place a min. 0.5 l vessel under the coffee delivery (4). § Fill a vessel with about 2.5 dl of fresh water and add about 3 caps of the cappuccino cleaner. Dip the
cappuccino tube into the vessel. § Press the button Clean (23). § Display: CAPPUCCINO CLEANING § Display: PLEASE WAIT § The cappuccino cleaning works § An acoustic signal is heard. § Display: WATER FOR CAPPUCCINO § Display: PRESS CLEANING
I Fill a vessel with fresh water and dip the cappuccino tube into it. § Press the button Clean (32). § The cappuccino cleaning works § An acoustic signal is heard. § Display: CAPPUCCINO CLEANING § Display: PLEASE WAIT § The cappuccino cleaning is finished § Display: SELECT PRODUCT
Instruction for use Saphira Page 50 10.05.05 / Rev D / Maks 4 / PPB
18.3. Entire cleaning Once started, the cleaning procedure may not be stopped. The procedure takes about 20 minutes. § Switch on the Unit at the ON/OFF button (23). § Press the button Clean (32) until an acoustic signal is heard. § Display: SELECT CLEANING - + § Press the + button (27) twice. § Display: ENTIRE CLEANING § Press the button Clean (32). § Display: EMPTY DRAWER (Fig.2 and Fig.3) § Display: INSERT TABLET (Fig.9) § Display: CLEANER FOR CAPPUCCINO § Fill a vessel with 3 dl of fresh water and add about 5 caps of cappuccino cleaner. Dip the cappuccino
tube into it. § Press the button Clean (32). § Display: ENTIRE CLEANING § Display: PLEASE WAIT § The entire cleaning works § An acoustic signal is heard § Display: WATER FOR CAPPUCCINO § Display: PRESS CLEANING
I Fill a vessel with fresh water and dip the cappuccino tube into it. § Press the button Clean (32). § Display: ENTIRE CLEANING § Display: PLEASE WAIT § The entire cleaning works § Display: EMPTY DRAWER (Fig.2 and Fig.3) § The entire cleaning is finished § Display: SELECT PRODUCT

Instruction for use Saphira Page 51 10.05.05 / Rev D / Maks 4 / PPB
19. Descaling The Unit has an integrated descaling program. The procedure takes about 40 minutes.
F Once started, the descaling procedure may not be stopped. If a fixed water connection is mounted on the watertank, remove and switch it off according to the attached page in the operating manual of the fixed water connection.
I When acid-containing descalers are used, immediately remove any splashes and drops on sensitive surfaces, in particular natural stone and wood surfaces, or take the appropriate precautions. § Switch off your Unit at the ON/OFF button (23). § Press the button Descale (31) until an acoustic signal is heard. § Display: EMPTY DRIP TRAY (Fig.2) § Display: INSERT AGENT IN TANK § Display: PRESS DECALCIFYING Dissolve 3 descaling tablets completely in 0.7 litre of water in a vessel and introduce the mixture into the empty water tank.
I Place a sufficiently large vessel under the pivotable delivery tube (17) and the coffee delivery (4). § Press the button Descale (31) § Display: UNIT DECALCIFYING § Display: PLEASE WAIT § An acoustic signal is heard. § Display: EMPTY DRIP TRAY (Fig.2) § Display: FILL WATER TANK § Display: PRESS DECALCIFYING § Press the button Descale (31) § The descaling works § Display: UNIT DESCALCIFYING § Display: PLEASE WAIT § An acoustic signal is heard. § Display: EMPTY DRIP TRAY § Display: CLEAN CONTACTS (Section 17.10 / Fig.8).

Instruction for use Saphira Page 52 10.05.05 / Rev D / Maks 4 / PPB
20. Disposal The product should be returned to the dealer or to Franke AG for proper disposal.
21. Adjustments by the service engineer
F The following adjustment/modifications may be performed only by the service engineer. - Reassigning buttons of the coffee products - Changing the cycles for delivery of "Coffee for coffee pots" - filter capacity
22. Tips for a perfect coffee Height-adjustable coffee delivery You can adjust the coffee delivery to your cup sizes Grinding See Section 8 "Adjustment of grinder" Preheating cups You can preheat the cups with hot water or steam. The smaller the amount of coffee, the more important is preheating. Sugar and cream Heat escapes when the liquid in the cup is stirred. The temperature of the coffee decreases considerably when cream or milk from the refrigerator is added.
23. Messages Display Cause Remedy FILL WATER TANK - The tank is empty - Refill water (13) - The water level indicator - Empty tank, wash out, fill in the tank has jammed and replace (13) - The tank is incrusted with - Remove tank, descale, wash out limescale; the water level thoroughly, fill and replace (13) indicator is adhering to the tank FILL COFFEE - The beans container is empty - Refill beans (9/11) BEANS - Although beans have been - Deliver a cup of coffee. refilled, the indicator does "FILL BEANS" goes out only not go out after a delivery -A stone has become - Remove the stone as described lodged under 17.8 "Stone removal" EMPTY DRAWER - The dregs container is full. - Remove tray, empty dregs container, replace tray (Fig2/3) - The display does not go out - The tray was removed for less than in spite of the dregs container 8 sec for emptying. Remove tray having been emptied for about 10 sec and replace (Fig2/3) - The display appears after - Leave the Unit switched on only a few cups while emptying the dregs container. The counter is reset only with the machine on
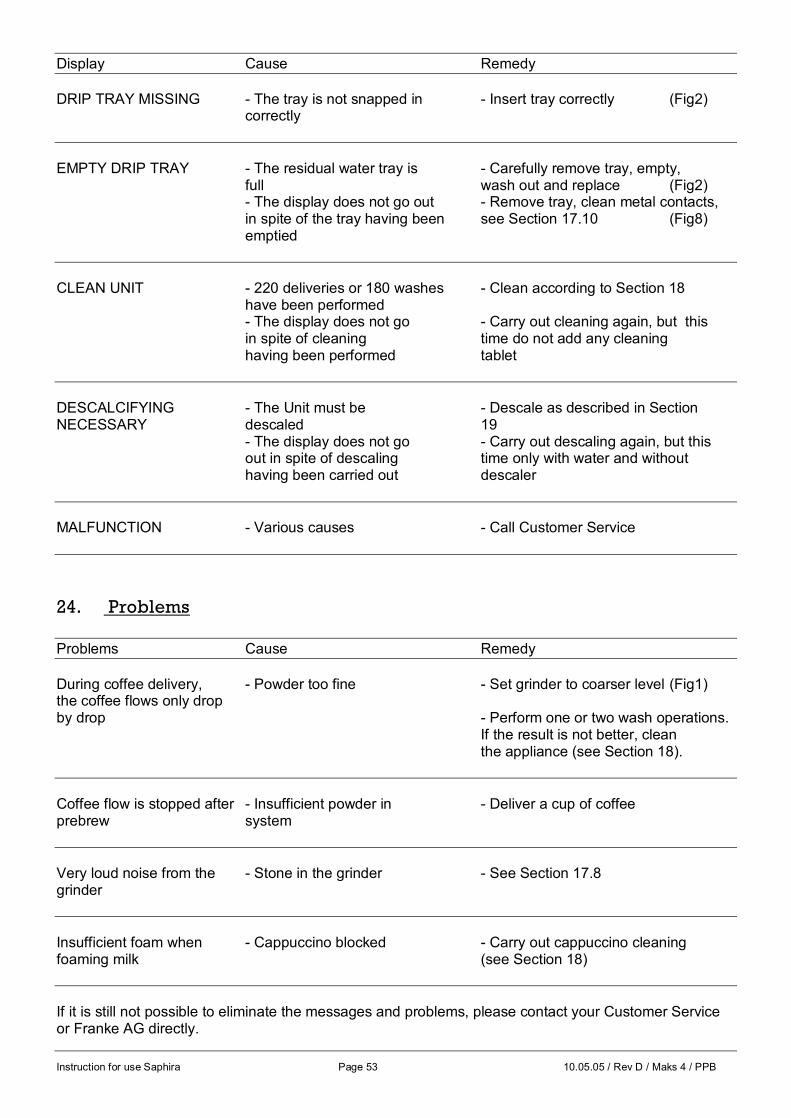
Instruction for use Saphira Page 53 10.05.05 / Rev D / Maks 4 / PPB
Display Cause Remedy DRIP TRAY MISSING - The tray is not snapped in - Insert tray correctly (Fig2) correctly EMPTY DRIP TRAY - The residual water tray is - Carefully remove tray, empty, full wash out and replace (Fig2) - The display does not go out - Remove tray, clean metal contacts, in spite of the tray having been see Section 17.10 (Fig8) emptied CLEAN UNIT - 220 deliveries or 180 washes - Clean according to Section 18 have been performed - The display does not go - Carry out cleaning again, but this in spite of cleaning time do not add any cleaning having been performed tablet DESCALCIFYING - The Unit must be - Descale as described in Section NECESSARY descaled 19 - The display does not go - Carry out descaling again, but this out in spite of descaling time only with water and without having been carried out descaler MALFUNCTION - Various causes - Call Customer Service
24. Problems Problems Cause Remedy During coffee delivery, - Powder too fine - Set grinder to coarser level (Fig1) the coffee flows only drop by drop - Perform one or two wash operations. If the result is not better, clean the appliance (see Section 18). Coffee flow is stopped after - Insufficient powder in - Deliver a cup of coffee prebrew system Very loud noise from the - Stone in the grinder - See Section 17.8 grinder Insufficient foam when - Cappuccino blocked - Carry out cappuccino cleaning foaming milk (see Section 18) If it is still not possible to eliminate the messages and problems, please contact your Customer Service or Franke AG directly.

Instruction for use Saphira Page 54 10.05.05 / Rev D / Maks 4 / PPB
25. Legal information These operating instructions contain the required information for the intended use, correct operation and proper maintenance of the appliance. A knowledge of and compliance with the directions contained in these operating instructions are essential for safe use and for safety during operation and maintenance. These operating instructions cannot cover every possible use. Moreover, we would like to point out that the content of these operating instructions is not part of an earlier or existing agreement or consent or of a legal relationship, nor does it modify this. All obligations on the part of Franke AG arise out of the respective contract of purchase, which also includes the complete and sole valid warranty regulations. These contractual warranty provisions are neither extended nor restricted by the statements in these operating instructions. The operating instructions contain information which is protected by copyright. Photocopies or translation into another language is not permissible without prior written consent from Franke AG.
26. Technical data Model 230V / 50Hz Voltage: 230V AC Power: 2300 W Fuse: 15 A Weight: 18 kg Dimensions (WxDxH): 420 x 505 x 503 mm Safety test : S / CE Model UL 230V / 60Hz Voltage: 230V AC / 60Hz Power: 2600W Fuse: 15A Weight: 18 kg Dimensions (WxDxH): 420 x 505 x 503 mm Safety test: UL Model UL 120V / 60Hz Voltage: 120V AC / 60Hz Power: 1350W Fuse: 15A Weight: 18 kg Dimensions (WxDxH): 420 x 505 x 503 mm Safety test: UL

Art. Nummer: 22642 10.05.05 / Rev D / Mask 4 / PPB
Franke Kaffeemaschinen AG Dorfbachstr. 2
CH-4663 Aarburg Switzerland
Telefon +41 (0) 62 787 31 31
www.km.franke.ch