be inspired – real stories about real owner builders hadden.pdf · be inspired – real stories...
TRANSCRIPT
THE OWNER BUILDER 200 April/May 2017 © www.theownerbuilder.com.au 1
BE I NSPI RED – REAL STORIES ABOUT REAL OWNER BUILDERS
COMPRESSED EARTH BLOCK u TROPICAL EARTHSHIP u HAND POURED FORMBLOCK
200 – APRIL / MAY 2017 $9.50
Our 200th issue!
42 THE OWNER BUILDER 200 April/May 2017 © www.theownerbuilder.com.au
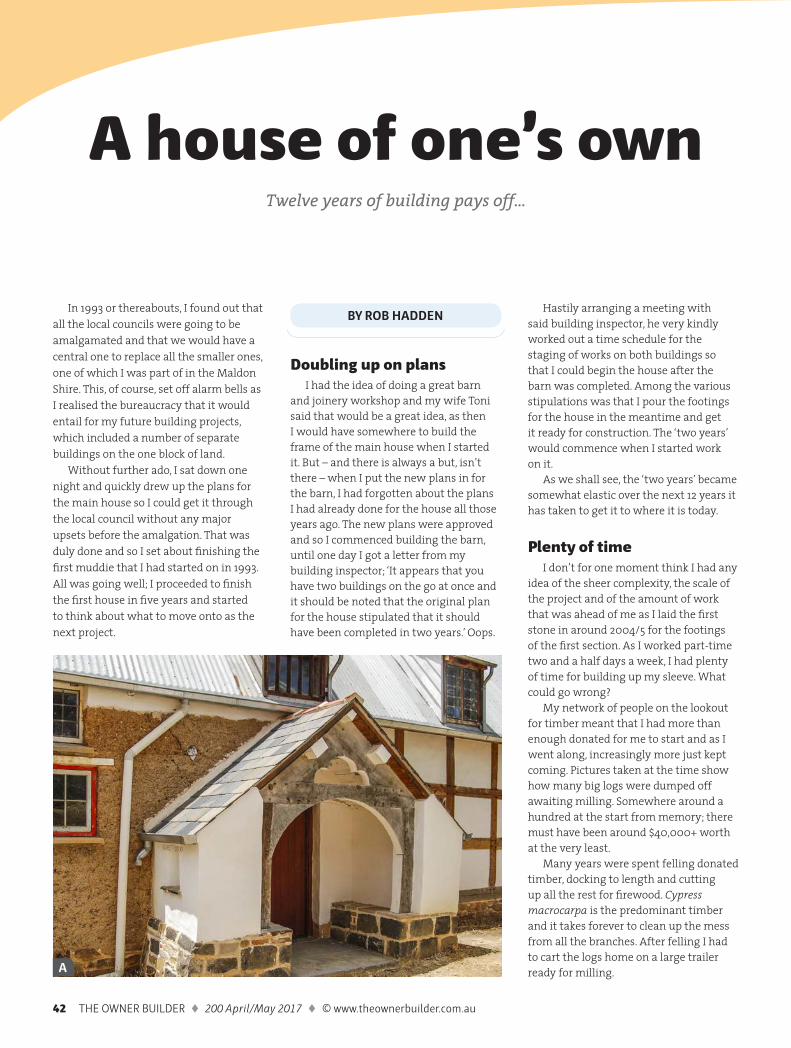
A house of one’s ownTwelve years of building pays off…
Doubling up on plansI had the idea of doing a great barn
and joinery workshop and my wife Toni said that would be a great idea, as then I would have somewhere to build the frame of the main house when I started it. But – and there is always a but, isn’t there – when I put the new plans in for the barn, I had forgotten about the plans I had already done for the house all those years ago. The new plans were approved and so I commenced building the barn, until one day I got a letter from my building inspector; ‘It appears that you have two buildings on the go at once and it should be noted that the original plan for the house stipulated that it should have been completed in two years.’ Oops.
Hastily arranging a meeting with said building inspector, he very kindly worked out a time schedule for the staging of works on both buildings so that I could begin the house after the barn was completed. Among the various stipulations was that I pour the footings for the house in the meantime and get it ready for construction. The ‘two years’ would commence when I started work on it.
As we shall see, the ‘two years’ became somewhat elastic over the next 12 years it has taken to get it to where it is today.
Plenty of timeI don’t for one moment think I had any
idea of the sheer complexity, the scale of the project and of the amount of work that was ahead of me as I laid the first stone in around 2004/5 for the footings of the first section. As I worked part-time two and a half days a week, I had plenty of time for building up my sleeve. What could go wrong?
My network of people on the lookout for timber meant that I had more than enough donated for me to start and as I went along, increasingly more just kept coming. Pictures taken at the time show how many big logs were dumped off awaiting milling. Somewhere around a hundred at the start from memory; there must have been around $40,000+ worth at the very least.
Many years were spent felling donated timber, docking to length and cutting up all the rest for firewood. Cypress macrocarpa is the predominant timber and it takes forever to clean up the mess from all the branches. After felling I had to cart the logs home on a large trailer ready for milling.
In 1993 or thereabouts, I found out that all the local councils were going to be amalgamated and that we would have a central one to replace all the smaller ones, one of which I was part of in the Maldon Shire. This, of course, set off alarm bells as I realised the bureaucracy that it would entail for my future building projects, which included a number of separate buildings on the one block of land.
Without further ado, I sat down one night and quickly drew up the plans for the main house so I could get it through the local council without any major upsets before the amalgation. That was duly done and so I set about finishing the first muddie that I had started on in 1993. All was going well; I proceeded to finish the first house in five years and started to think about what to move onto as the next project.
By ROB HADDEN
A

THE OWNER BUILDER 200 April/May 2017 © www.theownerbuilder.com.au 43
B
44 THE OWNER BUILDER 200 April/May 2017 © www.theownerbuilder.com.au
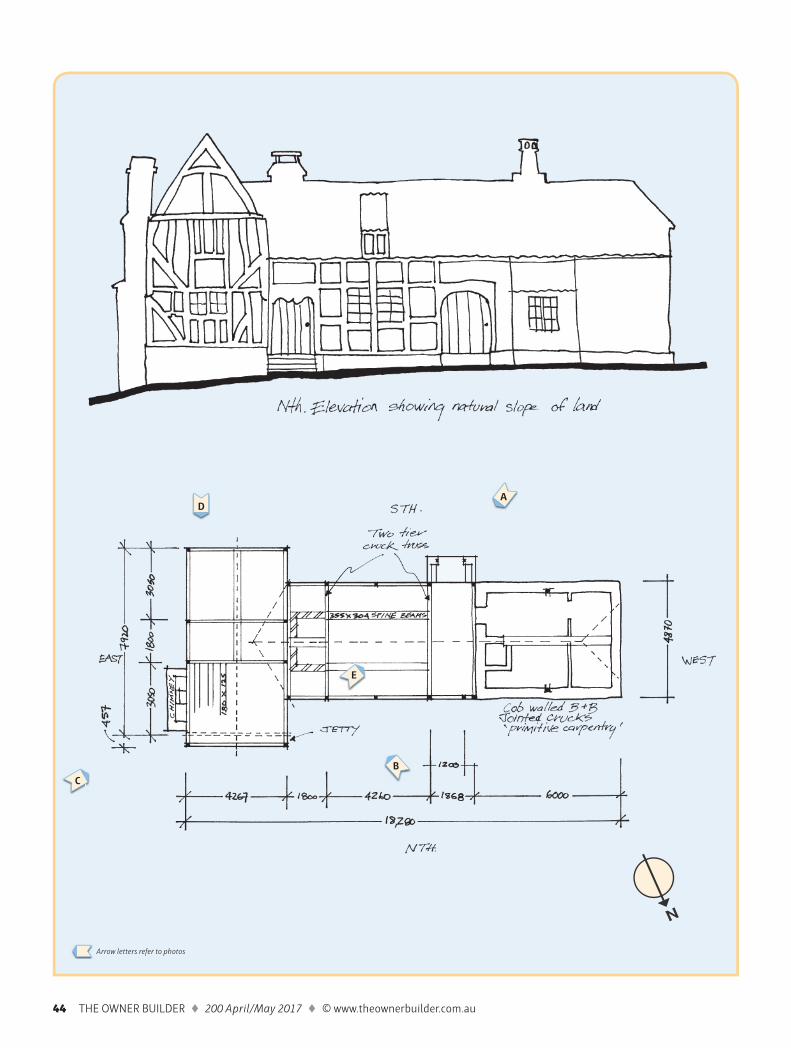
N
AD
CB
E
Arrow letters refer to photos
THE OWNER BUILDER 200 April/May 2017 © www.theownerbuilder.com.au 45
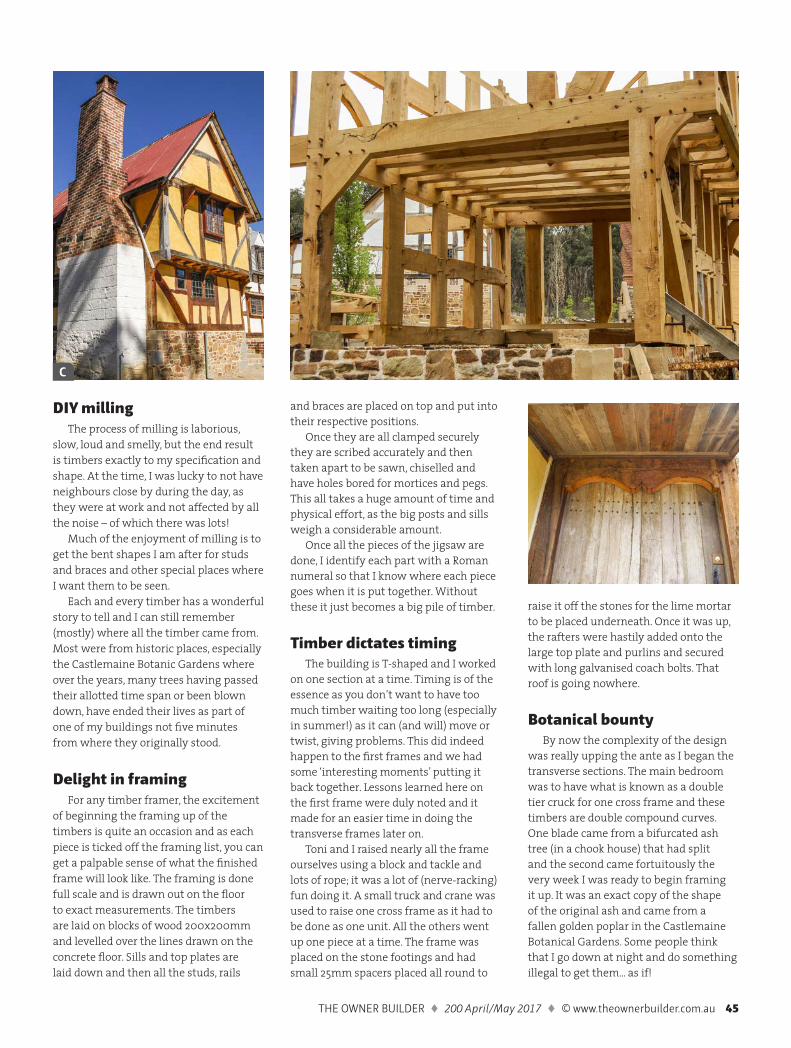
DIY millingThe process of milling is laborious,
slow, loud and smelly, but the end result is timbers exactly to my specification and shape. At the time, I was lucky to not have neighbours close by during the day, as they were at work and not affected by all the noise – of which there was lots!
Much of the enjoyment of milling is to get the bent shapes I am after for studs and braces and other special places where I want them to be seen.
Each and every timber has a wonderful story to tell and I can still remember (mostly) where all the timber came from. Most were from historic places, especially the Castlemaine Botanic Gardens where over the years, many trees having passed their allotted time span or been blown down, have ended their lives as part of one of my buildings not five minutes from where they originally stood.
Delight in framingFor any timber framer, the excitement
of beginning the framing up of the timbers is quite an occasion and as each piece is ticked off the framing list, you can get a palpable sense of what the finished frame will look like. The framing is done full scale and is drawn out on the floor to exact measurements. The timbers are laid on blocks of wood 200x200mm and levelled over the lines drawn on the concrete floor. Sills and top plates are laid down and then all the studs, rails
and braces are placed on top and put into their respective positions.
Once they are all clamped securely they are scribed accurately and then taken apart to be sawn, chiselled and have holes bored for mortices and pegs. This all takes a huge amount of time and physical effort, as the big posts and sills weigh a considerable amount.
Once all the pieces of the jigsaw are done, I identify each part with a Roman numeral so that I know where each piece goes when it is put together. Without these it just becomes a big pile of timber.
Timber dictates timingThe building is T-shaped and I worked
on one section at a time. Timing is of the essence as you don’t want to have too much timber waiting too long (especially in summer!) as it can (and will) move or twist, giving problems. This did indeed happen to the first frames and we had some ‘interesting moments’ putting it back together. Lessons learned here on the first frame were duly noted and it made for an easier time in doing the transverse frames later on.
Toni and I raised nearly all the frame ourselves using a block and tackle and lots of rope; it was a lot of (nerve-racking) fun doing it. A small truck and crane was used to raise one cross frame as it had to be done as one unit. All the others went up one piece at a time. The frame was placed on the stone footings and had small 25mm spacers placed all round to
raise it off the stones for the lime mortar to be placed underneath. Once it was up, the rafters were hastily added onto the large top plate and purlins and secured with long galvanised coach bolts. That roof is going nowhere.
Botanical bountyBy now the complexity of the design
was really upping the ante as I began the transverse sections. The main bedroom was to have what is known as a double tier cruck for one cross frame and these timbers are double compound curves. One blade came from a bifurcated ash tree (in a chook house) that had split and the second came fortuitously the very week I was ready to begin framing it up. It was an exact copy of the shape of the original ash and came from a fallen golden poplar in the Castlemaine Botanical Gardens. Some people think that I go down at night and do something illegal to get them... as if!
C
46 THE OWNER BUILDER 200 April/May 2017 © www.theownerbuilder.com.au
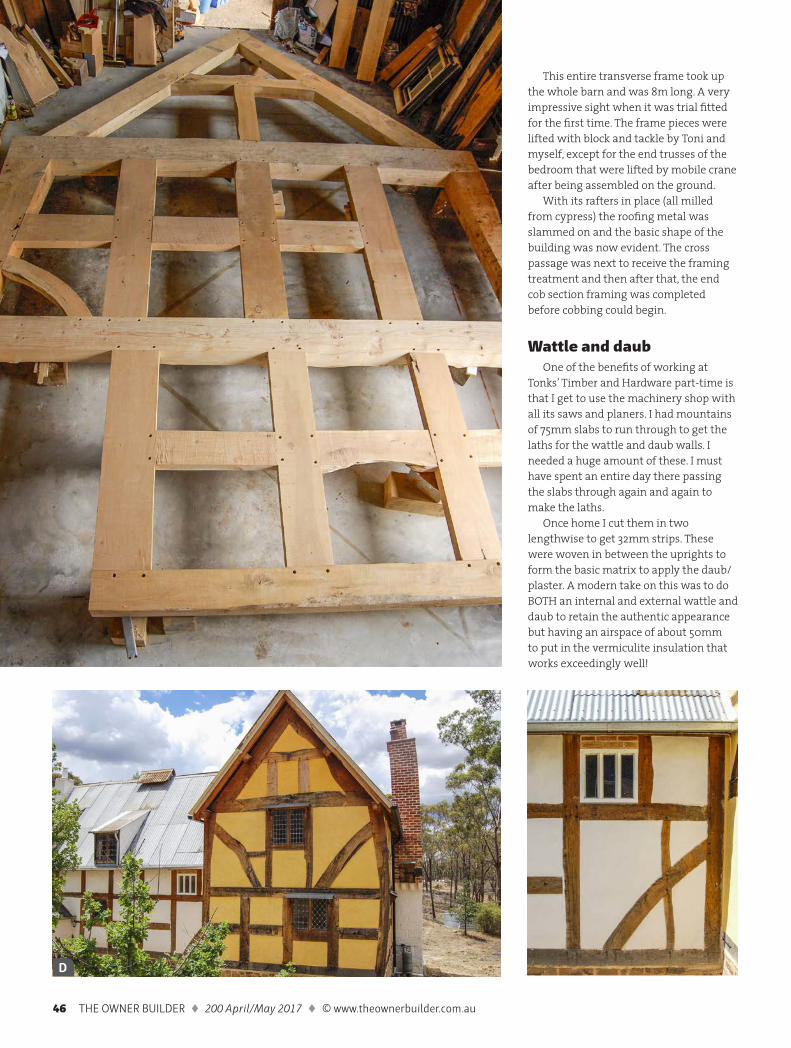
This entire transverse frame took up the whole barn and was 8m long. A very impressive sight when it was trial fitted for the first time. The frame pieces were lifted with block and tackle by Toni and myself, except for the end trusses of the bedroom that were lifted by mobile crane after being assembled on the ground.
With its rafters in place (all milled from cypress) the roofing metal was slammed on and the basic shape of the building was now evident. The cross passage was next to receive the framing treatment and then after that, the end cob section framing was completed before cobbing could begin.
wattle and daubOne of the benefits of working at
Tonks’ Timber and Hardware part-time is that I get to use the machinery shop with all its saws and planers. I had mountains of 75mm slabs to run through to get the laths for the wattle and daub walls. I needed a huge amount of these. I must have spent an entire day there passing the slabs through again and again to make the laths.
Once home I cut them in two lengthwise to get 32mm strips. These were woven in between the uprights to form the basic matrix to apply the daub/plaster. A modern take on this was to do BOTH an internal and external wattle and daub to retain the authentic appearance but having an airspace of about 50mm to put in the vermiculite insulation that works exceedingly well!
D
THE OWNER BUILDER 200 April/May 2017 © www.theownerbuilder.com.au 47
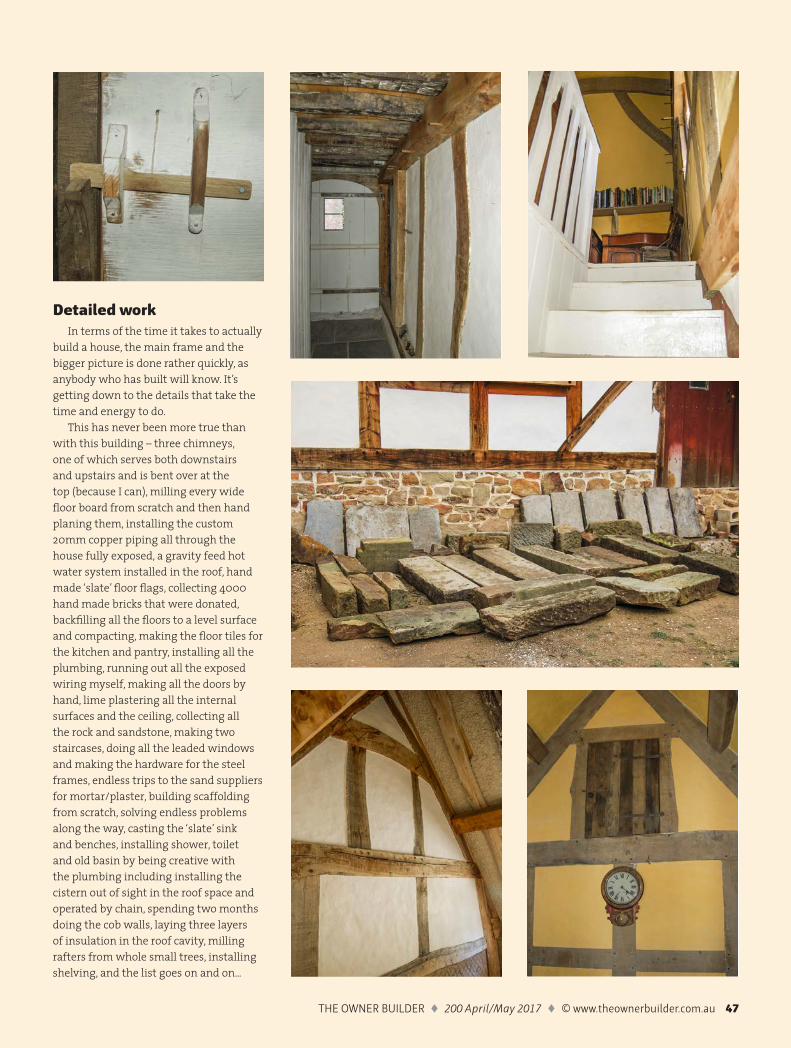
Detailed workIn terms of the time it takes to actually
build a house, the main frame and the bigger picture is done rather quickly, as anybody who has built will know. It’s getting down to the details that take the time and energy to do.
This has never been more true than with this building – three chimneys, one of which serves both downstairs and upstairs and is bent over at the top (because I can), milling every wide floor board from scratch and then hand planing them, installing the custom 20mm copper piping all through the house fully exposed, a gravity feed hot water system installed in the roof, hand made ‘slate’ floor flags, collecting 4000 hand made bricks that were donated, backfilling all the floors to a level surface and compacting, making the floor tiles for the kitchen and pantry, installing all the plumbing, running out all the exposed wiring myself, making all the doors by hand, lime plastering all the internal surfaces and the ceiling, collecting all the rock and sandstone, making two staircases, doing all the leaded windows and making the hardware for the steel frames, endless trips to the sand suppliers for mortar/plaster, building scaffolding from scratch, solving endless problems along the way, casting the ‘slate’ sink and benches, installing shower, toilet and old basin by being creative with the plumbing including installing the cistern out of sight in the roof space and operated by chain, spending two months doing the cob walls, laying three layers of insulation in the roof cavity, milling rafters from whole small trees, installing shelving, and the list goes on and on...
THE OWNER BUILDER 200 April/May 2017 © www.theownerbuilder.com.au 47
48 THE OWNER BUILDER 200 April/May 2017 © www.theownerbuilder.com.au
near the finish lineThe last two years have been the
hardest, with my paid workload increasing exponentially over that time to the point of being full-time now. This caused something of a crisis for me and I decided to stop work on the house until I retire in April, when I can get back to finishing it properly. There is still the cob section to complete (which will be a B&B) and all the landscaping and infrastructure to tie all three buildings together and stop it looking like the perennial building site that it has become.
The journey has been amazing over this time and the learning curve somewhat steep at times, but the challenge to keep it looking vaguely like it did on the plans has veered to the left quite a bit and many things have been altered/resited/not done/added where they weren’t.
An overzealous new building surveyor caused me a lot of grief and stress a few years back because I had not finished on time and he demanded to know why. So I gave him a goodies pack containing all the necessary journal articles on
our place, magazine stories and lots of technical data plus photographic evidence of the handmade nature of the build. He nearly shut the build down but in the end we reached a compromise and I continued.
So here I am, so near the finish line now. We have been in the finished part for nearly a year and it performs very well. Our friend Stuart did a ‘Deemed to Comply’ document of about thirty five pages to present to the building surveyor, as our place could not be done by any of the rating programs. I am pleased to report that it has lived up to all he said.
My magnum opus is nearly done and with the help and support of Toni, we are nearly at the end of this part of the journey. Now, let’s get some plans going for the next few buildings… so much to do and so little time. u
Over the years, Rob’s builds have featured in a many issues, starting way back with TOB 19 May-Aug 1986: 19, 26, 33, 50, 92, 97, 98, 100, 103, 112, 116, 117, 118, 124, 126, 128, 135, 140, 149, 150, 159, 176, 177, 181, 184, 185, 186, 188.
E
THE OWNER BUILDER 200 April/May 2017 © www.theownerbuilder.com.au 49 THE OWNER BUILDER 200 April/May 2017 © www.theownerbuilder.com.au 49
84 THE OWNER BUILDER 200 April/May 2017 © www.theownerbuilder.com.au
9 770728 722003
02
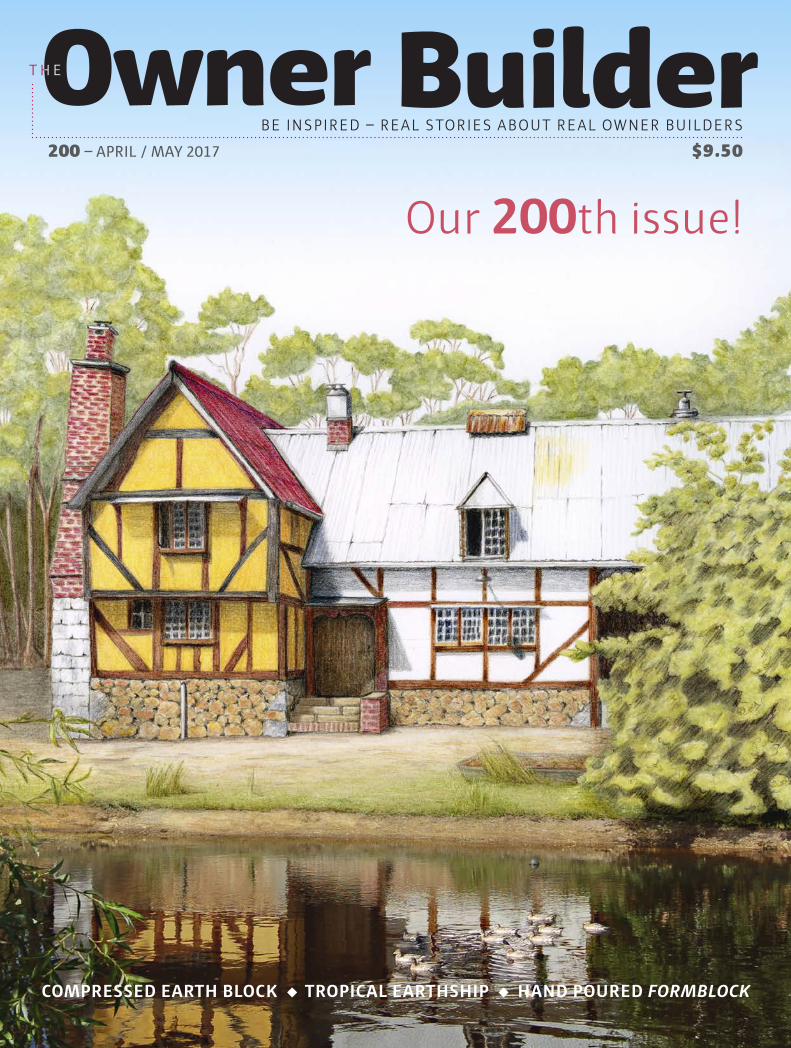
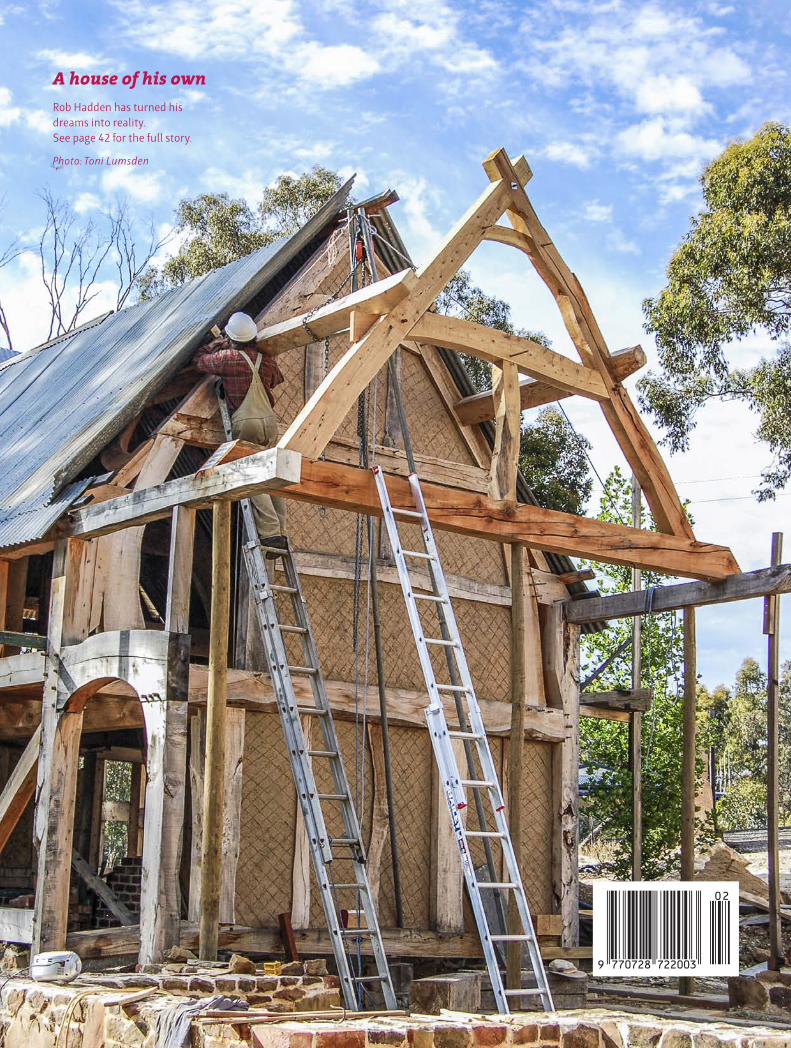
A house of his ownRob Hadden has turned his dreams into reality. See page 42 for the full story.
Photo: Toni Lumsden