bc412 abap dialog programming using enjoy sap controls(1)
DESCRIPTION
BC412 ABAP Dialog Programming Using Enjoy SAP Controls(1)TRANSCRIPT

BC412 ABAP Dialog Programming Using EnjoySAP Controls BC412
R/3 System Release 1.0 02/25/2001
0

BC412 ABAP Dialog Programming Using EnjoySAP Controls ..................................................................................0-1 Copyright ..................................................................................................................................................................0-2
ABAP Workbench ................................................................................................................................................0-4
Course Prerequisites..............................................................................................................................................0-5
Target Group.........................................................................................................................................................0-6
Course Overview.......................................................................................................................................................1-1
Course Goal ..........................................................................................................................................................1-2
Course Objectives .................................................................................................................................................1-3
Course Content......................................................................................................................................................1-4
Overview Diagram - Course Overview.................................................................................................................1-5
Style Conventions used in this Handbook.............................................................................................................1-6
Introduction to the Control Framework ....................................................................................................................2-1
Introduction to the Control Framework: Unit Objectives .....................................................................................2-2
Overview Diagram - BC412 .................................................................................................................................2-3
Introduction to the Control Framework:Overview................................................................................................2-4
Control Framework (CFW) - General Architecture ..............................................................................................2-5
CFW Architecture in Detail ..................................................................................................................................2-6
SAP's GUI Strategy for R/3 ..................................................................................................................................2-7
Custom Controls and ABAP Objects ....................................................................................................................2-8
Custom Controls: Automation Queue ...................................................................................................................2-9
Custom Controls: Events.....................................................................................................................................2-10
Control Framework: Class Hierarchy .................................................................................................................2-11
Introduction to the Control Framework:Controls and Screens............................................................................2-12
Relationship Between Controls and Screens.......................................................................................................2-13
Screen Element Custom Control: Use.................................................................................................................2-14
Creating a Custom Control Area.........................................................................................................................2-15
Creating a Container Control: Proces Flow .......................................................................................................2-16
Creating a Container Control Instance ................................................................................................................2-17
Syntax: Declaring Reference Variables ..............................................................................................................2-18
Information in the Class Builder .........................................................................................................................2-19
Syntax: Creating an Instance (With a Constructor).............................................................................................2-20
Using a Flag Variable..........................................................................................................................................2-21
Creating an EnjoySAP Control Instance: Proces Flow ......................................................................................2-22
Creating an Instance of the SAP Picture Control ................................................................................................2-23
Creating an Instance of the SAP HTML Viewer.................................................................................................2-24
Result: Screen, Container, and EnjoySAP Control ............................................................................................2-25
Introduction to the Control Framework:SAP Picture Control and SAP HTML Viewer.....................................2-26
URL: Pointer to Data ..........................................................................................................................................2-27

URLs for External Data Sources.........................................................................................................................2-28
SAP Controls: Accessing External Data by URL ...............................................................................................2-29
SAP Controls: Accessing Internal Data by URL ................................................................................................2-30
SAP Picture Control: Features ............................................................................................................................2-31
SAP Picture Control: DISPLAY_MODE ...........................................................................................................2-32
SAP HTML Viewer: Features.............................................................................................................................2-33
Introduction to the Control Framework:Changing the Attributes of a Control ...................................................2-34
Displaying Data: Proces Flow............................................................................................................................2-35
Displaying a Picture in the Picture Control.........................................................................................................2-36
Syntax: Calling Instance Methods.......................................................................................................................2-37
Syntax: Reading Instance Attributes ...................................................................................................................2-38
Method Calls and the Automation Queue ...........................................................................................................2-39
Sending the Automation Queue to the GUI: End of PBO..................................................................................2-40
Dependent Method Calls.....................................................................................................................................2-41
Solution: Explicit Flush......................................................................................................................................2-42
Automation Queue: Using the ABAP Debugger.................................................................................................2-43
Automation Queue: Using the Automation Trace...............................................................................................2-44
Destroying Control Instances..............................................................................................................................2-45
Overview: Control Events Overview ..................................................................................................................2-46
Recap: Control Events........................................................................................................................................2-47
Control Events: General Overview .....................................................................................................................2-48
Overview: Control Events - ABAP Objects Events ...........................................................................................2-49
Control Events: Overview...................................................................................................................................2-50
Overview: ABAP Objects Events ......................................................................................................................2-51
Events of ABAP Objects Instances.....................................................................................................................2-52
Events of the SAP Picture Control......................................................................................................................2-53
Events of the SAP HTML Viewer ......................................................................................................................2-54
ABAP Objects: Creating Handler Methods .......................................................................................................2-55
Creating an Event Handler Method:Static Methods............................................................................................2-56
Syntax: Local Classes .........................................................................................................................................2-57
Syntax: Methods of Local Classes ......................................................................................................................2-58
Syntax: Handler Method for an Event.................................................................................................................2-59
ABAP Objects: Registering Handler Methods...................................................................................................2-60
Linking an Event to a Handler Method ...............................................................................................................2-61
Syntax: Linking an Event to a Static Handler Method........................................................................................2-62
Syntax: Linking an Event to an Instance Handler Method..................................................................................2-63
Overview: Control Events - Control Events and the Control Framework..........................................................2-64
Control Events: Overview...................................................................................................................................2-65
Control Events: Automation Control as Filter ....................................................................................................2-66

Control Events: Configuring the Control Framework.........................................................................................2-67
SAP Picture Control Events: Event IDs ..............................................................................................................2-68
SAP HTML Viewer Events: Event IDs ..............................................................................................................2-69
Registering Control Events with the CFW..........................................................................................................2-70
Overview: Control Events - Event Types...........................................................................................................2-71
Event Type: System Event .................................................................................................................................2-72
Event Type: Application Event ..........................................................................................................................2-73
Registering Application Events...........................................................................................................................2-74
Screen and Control:Call Sequence for Application Events.................................................................................2-75
Application Events and Screen Input Checks (1)................................................................................................2-76
Application Events and Screen Input Checks (2)................................................................................................2-77
System Event and set_new_ok_code ..................................................................................................................2-78
Introduction to the Control Framework:Controls and Program Modularization.................................................2-79
Modularization Used So Far ...............................................................................................................................2-80
Other Modularization Possibilities......................................................................................................................2-81
Introduction to the Control Framework: Unit Summary .....................................................................................2-82
Control Framework Basics Exercise 1 ................................................................................................................2-83
Note on the Sample Solutions for Unit 02 ..........................................................................................................2-95
Introduction to the Control Framework Solution Task 1 ...................................................................................2-96
SAP Container ........................................................................................................................................................14-1
SAP Container: Unit Objectives .........................................................................................................................14-2
Overview Diagram BC412..................................................................................................................................14-3
SAP Container Overview:The Container Concept..............................................................................................14-4
Uses for Containers .............................................................................................................................................14-5
SAP Container Classes........................................................................................................................................14-6
Graphical Visualization of Containers ................................................................................................................14-7
Dialog Box Level and Top-Level Container .......................................................................................................14-8
Technical Methods for Attaching SAP Containers .............................................................................................14-9
Visibility and Lifetime of SAP Containers .......................................................................................................14-10
SAP Container Overview:SAP Custom Container Control ..............................................................................14-11
SAP Custom Container: Features......................................................................................................................14-12
Creating an Instance of the SAP Custom Container Control ............................................................................14-13
Relinking an SAP Custom Container................................................................................................................14-14
SAP Container Overview:SAP Dialog Box Container Control ........................................................................14-15
SAP Dialog Box Container: Features................................................................................................................14-16
Creating an Instance of the SAP Dialog Box Container Control ......................................................................14-17
SAP Container Overview:SAP Docking Container Control .............................................................................14-18
SAP Docking Container: Features ....................................................................................................................14-19
SAP Docking Container: Linking to the Screen ...............................................................................................14-20

Creating an Instance of the SAP Docking Container Control ...........................................................................14-21
Reading and Setting Attributes .........................................................................................................................14-22
Relinking an SAP Docking Container ..............................................................................................................14-23
SAP Container Overview:SAP Splitter Container Control ...............................................................................14-24
SAP Splitter Container: Features ......................................................................................................................14-25
SAP Splitter Container: Use..............................................................................................................................14-26
Creating an Instance of the SAP Splitter Container Control .............................................................................14-27
SAP Splitter Container: Finding a Cell Reference ............................................................................................14-28
Reading and Setting Attributes .........................................................................................................................14-29
SAP Container Overview:SAP Easy Splitter Container Control ......................................................................14-30
SAP Easy Splitter Container: Features..............................................................................................................14-31
Creating an Instance of the SAP Easy Splitter Container Control ....................................................................14-32
SAP Easy Splitter Container: Reference Variables for the Cells ......................................................................14-33
SAP Container: Unit Summary.........................................................................................................................14-34
SAP Container Exercise 1.................................................................................................................................14-35
Note on the Sample Solutions for Unit 03 ........................................................................................................14-42
SAP Container Solution Task 1 ........................................................................................................................14-43
SAP Tree Control....................................................................................................................................................28-1
SAP Tree Control: Unit Objectives.....................................................................................................................28-2
Overview Diagram - BC412 ...............................................................................................................................28-3
SAP Tree Control Overview:Introduction - Tree Controls and Their Attributes ................................................28-4
SAP Tree Control................................................................................................................................................28-5
SAP Tree Control: Principal Construction..........................................................................................................28-6
Tree Control Implementation ..............................................................................................................................28-7
Simple Tree: Properties.......................................................................................................................................28-8
Simple Tree: Node Structure...............................................................................................................................28-9
Column Tree: Properties ...................................................................................................................................28-10
Column Tree: Node Structure ...........................................................................................................................28-11
List Tree: Properties..........................................................................................................................................28-12
List Tree: Node Structure..................................................................................................................................28-13
SAP Tree Control Overview:Constructor, Methods, and Events ......................................................................28-14
SAP Tree Control: Communication and Data Flow..........................................................................................28-15
Modeling View of the Tree Classes ..................................................................................................................28-16
Constructor, Methods, and Events : Simple Tree..............................................................................................28-17
Simple Tree: Constructor ..................................................................................................................................28-18
Simple Tree: Method Overview........................................................................................................................28-19
Simple Tree: Event Overview...........................................................................................................................28-20
Constructor, Methods, and Events:Column Tree ..............................................................................................28-21
Column Tree: Constructor.................................................................................................................................28-22

Column Tree: Method Overview ......................................................................................................................28-23
Column Tree: Overview of Modifying Methods...............................................................................................28-24
Column Tree: Event Overview .........................................................................................................................28-25
Constructor, Methods, and Events:List Tree.....................................................................................................28-26
List Tree: Constructor .......................................................................................................................................28-27
List Tree: Method Overview.............................................................................................................................28-28
List Tree: Overview of Modifying Methods .....................................................................................................28-29
List Tree: Event Overview ................................................................................................................................28-30
SAP Tree Control Overview: Creating a Hierarchy..........................................................................................28-31
Simple Tree: Control Data ................................................................................................................................28-32
Line Structure of the Node Table......................................................................................................................28-33
Node Relationships (1)......................................................................................................................................28-34
Node Relationships (2)......................................................................................................................................28-35
Node Relationships (3)......................................................................................................................................28-36
Passing the Node Table to the Frontend............................................................................................................28-37
SAP Tree Control Overview: Data Handling Strategies ...................................................................................28-38
Sending Data on Request From the User ..........................................................................................................28-39
Node Keys.........................................................................................................................................................28-40
Tree Events and Node Keys..............................................................................................................................28-41
Storing Node Information: Strategy A ..............................................................................................................28-42
Storing Node Information: Strategy B ..............................................................................................................28-43
Storing Node Information: Implementation Idea for Strategy B.......................................................................28-44
Example: Flight Bookings Tree ........................................................................................................................28-45
Example: Using the Flight Booking Tree (1): Modularization ........................................................................28-46
Example: Using the Flight Booking Tree (1): Screen Structure ......................................................................28-47
Example: Using the Flight Booking Tree (1): Control Flow............................................................................28-48
Example: Using the Flight Booking Tree (2):...................................................................................................28-49
SAP Tree Control Overview: Item Tables ........................................................................................................28-50
Sending Column or List Items ..........................................................................................................................28-51
Line Structure of the Item Table .......................................................................................................................28-52
Item Names in a Column Tree ..........................................................................................................................28-53
Creating a Column Tree: Sequence..................................................................................................................28-54
Item Names in a List Tree.................................................................................................................................28-55
Creating a List Tree: Sequence .........................................................................................................................28-56
Demonstration Programs for Tree Control Programming.................................................................................28-57
SAP Tree Control: Unit Summary ....................................................................................................................28-58
ALV Grid Control...................................................................................................................................................29-1
ALV Grid Control: Unit Objectives....................................................................................................................29-2
Course Overview Diagram BC412 .....................................................................................................................29-3

ALV Grid Control Overview: Features...............................................................................................................29-4
ALV Grid Control ...............................................................................................................................................29-5
Standard Pushbuttons ..........................................................................................................................................29-6
Features Overview: Technical View...................................................................................................................29-7
ALV Grid Control: Technical View....................................................................................................................29-8
ALV Grid Control: List Data ..............................................................................................................................29-9
Creating List Data and Holding Data ................................................................................................................29-10
ALV Grid Control: The Field Catalog ..............................................................................................................29-11
Functions of the Field Catalog ..........................................................................................................................29-12
Data Descriptions: The Field Catalog ...............................................................................................................29-13
Information in the Field Catalog (Structure) .....................................................................................................29-14
ALV Grid Control: Additional Information......................................................................................................29-15
ALV Grid Control: Function of Additional Information ..................................................................................29-16
Function of Additional Information in Detail ...................................................................................................29-17
Layout Information for the Data Area: Overview.............................................................................................29-18
Layout Information for the Toolbar ..................................................................................................................29-19
Layout Information for the Print List ................................................................................................................29-20
Features Overview: Screen/Print List ...............................................................................................................29-21
Screen Layout of the ALV Grid Control...........................................................................................................29-22
Data Area Layout ..............................................................................................................................................29-23
Print List Layout ...............................................................................................................................................29-24
ALV Grid Control Overview: Method Overview .............................................................................................29-25
Inheritance Hierarchy........................................................................................................................................29-26
ALV Grid Control: Method Overview (1) ........................................................................................................29-27
ALV Grid Control: Elementary Methods..........................................................................................................29-28
The Constructor.................................................................................................................................................29-29
Method SET_TABLE_FOR_FIRST_DISPLAY ..............................................................................................29-30
Method REFRESH_TABLE_DISPLAY ..........................................................................................................29-31
Display Variants................................................................................................................................................29-32
ALV Grid Control: Method Overview (2) ........................................................................................................29-33
ALV Grid Control Overview: Event Overview ................................................................................................29-34
ALV Grid Control: Events ................................................................................................................................29-35
BEFORE_USER_COMMAND and AFTER_USER_COMMAND ................................................................29-36
ALV Grid Control: Print List Events ................................................................................................................29-37
ALV Grid Control Overview: The Field Catalog..............................................................................................29-38
Recap: Functions of the Field Catalog ..............................................................................................................29-39
Overview: Information in the Field Catalog .....................................................................................................29-40
Field Catalog Overview: Information in the Field Catalog in Detail ................................................................29-41
Field Catalog: Column Indicators .....................................................................................................................29-42
Field Catalog: Unit-Specific Formatting...........................................................................................................29-43
Example: Currency Formatting.........................................................................................................................29-44
Field Catalog: Output Properties for Columns..................................................................................................29-45
Field Catalog: Formatting of Column Contents ................................................................................................29-46
Field Catalog: Texts ..........................................................................................................................................29-47
Field Catalog: Technical Column Properties ....................................................................................................29-48
Field Catalog: Other Fields ...............................................................................................................................29-49
Summary: Structure of the Field Catalog..........................................................................................................29-50
Field Catalog Overview: Generating the Field Catalog ....................................................................................29-51
Generating the Field Catalog ............................................................................................................................29-52
Fields of a Single Dictionary Structure .............................................................................................................29-53
Fields of a Dictionary Structure and Local Types.............................................................................................29-54
Fields of Several Dictionary Structures.............................................................................................................29-55
Fields With and Without Dictionary Relationships...........................................................................................29-56
Fields With Local Types Only ..........................................................................................................................29-57
Demo Programs Delivered................................................................................................................................29-58
ALV Grid Control: Unit Summary ...................................................................................................................29-59
Appendix.................................................................................................................................................................30-1
Information on the Global Classes of BC412 .....................................................................................................30-2
BC412 - Table of Contents ...............................................................................................................................34-48
Workbench Edition – Controls Technology......................................................................................................34-53

© SAP AG 1999
BC412 ABAP Dialog Programming Using EnjoySAP Controls
BC412BC412ABAP Dialog Programming
Using EnjoySAP Controls
ABAP Dialog Programming
Using EnjoySAP Controls
System R/3 Release 4.6A November 1999 5003 7214

© SAP AG 1999
ABAP Workbench
ABAP Workbench:Foundations and Concepts
BC400 5 days
Managing ABAPDevelopments Projects
MBC40 2 days
Data TransferBC420 5 days
Techniques of ListProcessing and InfoSet Query
BC405 3 days
SAPscript: Forms Designand Text Management
BC460 3 days
CATT:Test Workbench andComputer Aided Test Tool
CA610 (Rel. 4.0) 2 days
ABAP PerformanceTuning
BC490 3 daysABAP Programming Techniques
BC402 3 days
Programming Database Updates
BC414 3 days
Enhancements and Modifications
BC425 3 days
Recommended supplementary courses are:Business Process TechnologiesCA925, CA926, CA927BC095 (Business Integ. Techn.) BC619 (ALE), BC620, BC621
Level 2
ABAP Objects: Object -Oriented Programming in R/3
BC404 3 days
Form Printing Using SAP Smart Forms
BC470 2 days
ABAP DictionaryBC430 2 days
Dialog Programming using EnjoySAP Controls
BC412 3 daysProgramming User Dialogs
BC410 5 days
Communication Interfaces in ABAP
BC415 2 days
Level 3

© SAP AG 1999
Required:
Sound knowledge of the ABAP Workbench (for example, from course BC400 - 'ABAP Workbench: Concepts and Tools')
ABAP dialog programming knowledge (for example, from course BC410 - 'Programming User Dialogs')
Knowledge of object-oriented programming
Recommended additional courses:
BC402 ABAP Programming Techniques
BC404 ABAP Objects
Course Prerequisites

© SAP AG 1999
Target Group
Participants:Experienced ABAP programmers(with specialization in dialog programming)
Consultants
Project team members
Duration: 2 days
Notes to the participant This course material is not a self-teach program. It is only complete in conjunction with the instructor's explanations. There is space in the course book for you to write your own notes.

(C) SAP AG BC412 1-1
© SAP AG 1999
Course goal
Course objectives
Course content
Course overview diagram
Main business scenario
Contents:
Course Overview

(C) SAP AG BC412 1-2
© SAP AG 1999
This course will prepare you to:
Write user dialogs in ABAP using EnjoySAP controls
Course Goal

(C) SAP AG BC412 1-3
© SAP AG 1999
At the conclusion of this course, you will be able to:
Use the SAP Control Framework
Use EnjoySAP controls
Set the attributes
Pass and receive data
Handle events
Find further information about EnjoySAP controls
Course Objectives

(C) SAP AG BC412 1-4
© SAP AG 1999
Unit 1 Course Overview
Unit 2 Introduction to the Control Framework
Unit 3 SAP Container
Unit 4 SAP Tree Control
Unit 5 ALV Grid Control
Preface
Appendix
Course Content
Exercises and solutions appear at the end of the relevant unit
(C) SAP AG BC412 1-5
© SAP AG 1999
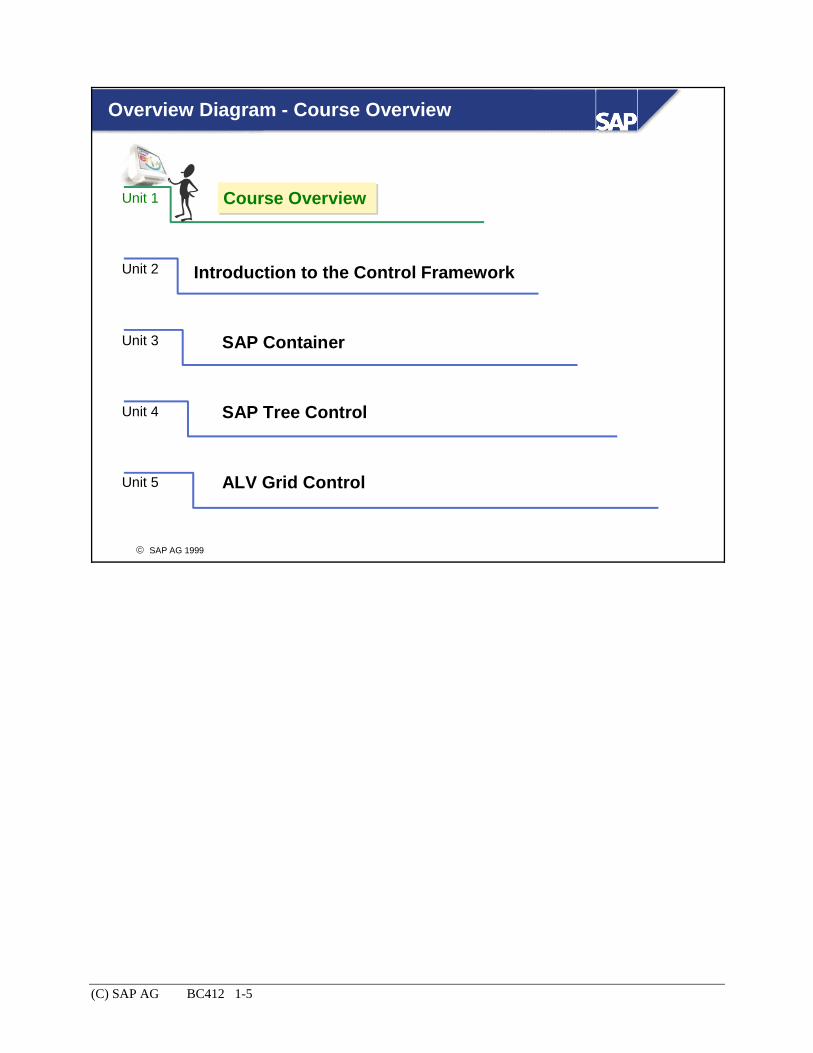
Overview Diagram - Course Overview
Unit 1 Course Overview
Introduction to the Control Framework
SAP Container
SAP Tree Control
ALV Grid Control
Unit 2
Unit 3
Unit 4
Unit 5

(C) SAP AG BC412 1-6
© SAP AG 1999
Style Conventions used in this Handbook
( ABAP code as well as names of ABAP Dictionary objects are printed always using fixed font.
( ABAP key words and names of structures in the ABAP Dictionary are also displayed using CAPITAL letters.
( Names of variables, class components and field names are displayed using lower case letters.
General
Transparencies( ABAP code is always displayed in a blue box.
( Highlighted ABAP coding is always displayed on dark blue box using inverse font: highlightedhighlighted
The general points listed above apply to the notes in this book as well as to the slides. Paths in the online documentation and menu paths in the system appear in italics. Bold and italicized text denotes emphasis. Texts that appear in the user interface of the R/3 System (such as texts on pushbuttons) appear in italics. There is a table of slides, sorted by topic, at the end of the course.

(C) SAP AG BC412 2-1
© SAP AG 1999
Overview: System requirements, CFW architecture
Controls and screens
SAP HTML Viewer and SAP Picture Control
Changing the attributes of a control
Control events
Controls and program modularization
Contents:
Introduction to the Control Framework

(C) SAP AG BC412 2-2
© SAP AG 1999
Describe how the SAP Control Framework works
Display data in a SAP Picture Control and SAP HTML Viewer on a screen
Change the attributes of a control
React to the events of a control
Use selected ABAP Objects statements
At the conclusion of this unit, you will be able to:
Introduction to the Control Framework:Unit Objectives

(C) SAP AG BC412 2-3
© SAP AG 1999
Overview Diagram - BC412
Unit 1 Course Overview
Introduction to the Control Framework
SAP Container
SAP Tree Control
ALV Grid Control
Unit 2
Unit 3
Unit 4
Unit 5
(C) SAP AG BC412 2-4
© SAP AG 1999
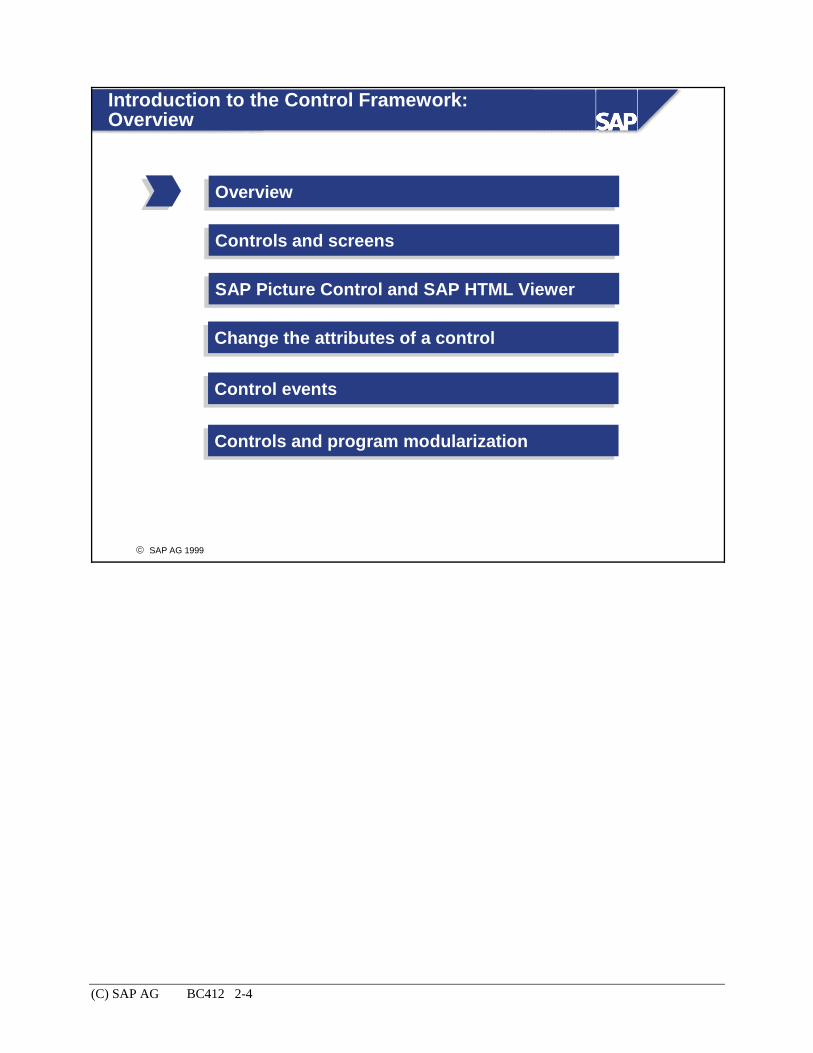
Introduction to the Control Framework:Overview
OverviewOverview
Controls and screensControls and screens
SAP Picture Control and SAP HTML ViewerSAP Picture Control and SAP HTML Viewer
Change the attributes of a control Change the attributes of a control
Control eventsControl events
Controls and program modularizationControls and program modularization
(C) SAP AG BC412 2-5
© SAP AG 1999
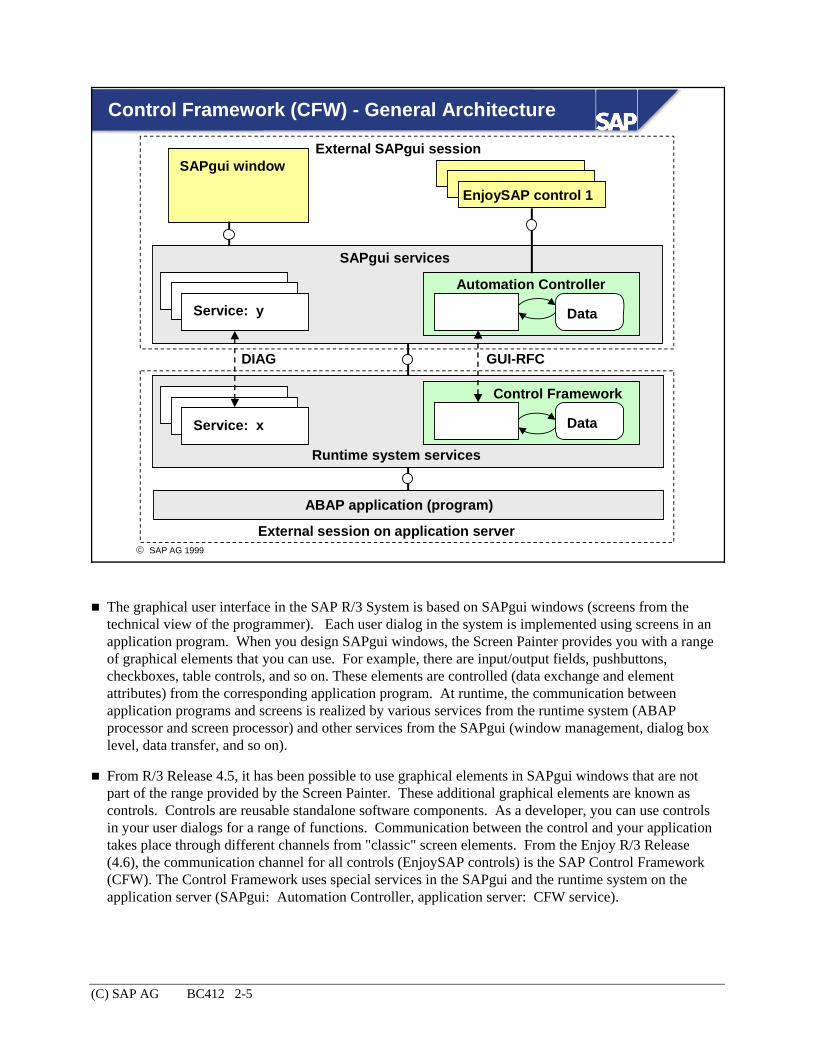
Control Framework (CFW) - General Architecture
ABAP application (program)
Runtime system services
Service: x
Control Framework
SAPgui window
Data
Data
Automation Controller
EnjoySAP control 1
SAPgui services
DIAG GUI-RFC
Service: y
External SAPgui session
External session on application server
The graphical user interface in the SAP R/3 System is based on SAPgui windows (screens from the technical view of the programmer). Each user dialog in the system is implemented using screens in an application program. When you design SAPgui windows, the Screen Painter provides you with a range of graphical elements that you can use. For example, there are input/output fields, pushbuttons, checkboxes, table controls, and so on. These elements are controlled (data exchange and element attributes) from the corresponding application program. At runtime, the communication between application programs and screens is realized by various services from the runtime system (ABAP processor and screen processor) and other services from the SAPgui (window management, dialog box level, data transfer, and so on).
From R/3 Release 4.5, it has been possible to use graphical elements in SAPgui windows that are not part of the range provided by the Screen Painter. These additional graphical elements are known as controls. Controls are reusable standalone software components. As a developer, you can use controls in your user dialogs for a range of functions. Communication between the control and your application takes place through different channels from "classic" screen elements. From the Enjoy R/3 Release (4.6), the communication channel for all controls (EnjoySAP controls) is the SAP Control Framework (CFW). The Control Framework uses special services in the SAPgui and the runtime system on the application server (SAPgui: Automation Controller, application server: CFW service).

(C) SAP AG BC412 2-6
© SAP AG 1999
CFW Architecture in Detail
Control Framework
Automation queue
Beans
SAPgui
GUI-RFC
Instances
Events
Automation Controller
Automation queue
Instances
Events
Java
ActiveX
Automationhandler
OLE
Application server
ABAP Program CFW service
The two services of the Control framework - the CFW service in the runtime system and the Automation Handler in the SAPgui - each control their own data pertaining to a control. A list of all of the instances (EnjoySAP controls) with which they have to communicate The automation queue A list of the events of the EnjoySAP controls that the application program is to handle.
The aim of the Control Framework is to optimize communication between controls and the application program.
EnjoySAP controls are installed on the presentation server, either as Java Beans or ActiveX controls. Communication between the EnjoySAP control instances and the automation handler takes place using the OLE or Java interface in the Automation Controller.

(C) SAP AG BC412 2-7
© SAP AG 1999
SAP's GUI Strategy for R/3
SAP supports diverse frontend platforms
R/3 3.1 R/3 4.0 / 4.5
Windows 32 Bit
JavaApplication
R/3 4.6R/3 3.0
native Mac
native OS/2
native Motif
nativeWindows32 Bitnative Windows 16 Bit
Browserbased
Java Applet-based
Windows16 Bit
Unix / Motif
Mac
OS/2
Browser
Windows
Java
HTMLHTML Template based
SAP GUIfor
SAP offers platform-specific graphical user interfaces.
SAP GUI for the Windows ® environment (or SAP GUI for Windows) for the Microsoft Windows frontend platform.
SAP GUI for the JAVA™ environment (or SAP GUI for Java) for Unix/Motif, Macintosh and OS/2 platforms.
SAP GUI for HTML for any platform on which a web browser can be used.
From Release 4.6, EnjoySAP controls are delivered on the installation CD as ActiveX controls for SAPGUI for Windows and as Java Beans for SAPGUI for Java. They are installed on the frontend when you install the relevant SAPGUI. Both versions of the EnjoySAP controls have the full range of functions and features as described in the documentation.
This does not apply to EnjoySAP controls running under the SAPGUI for HTML. Not all of the EnjoySAP controls are supported, and certain functions (like drag and drop) are not supported. However, the most important controls, such as the ALV Grid Control and the SAP Tree Control are supported. For a list of the EnjoySAP transactions supported in the SAPGUI for HTML, see Solutions / SAP Business Technology / Presentation Client (SAPNet Link Presentation-Clients) in SAPNet.

(C) SAP AG BC412 2-8
© SAP AG 1999
Custom Controls and ABAP Objects
SAPgui
Automation Controller
Instances
EnjoySAP control 1
Application server
ABAP Program
Instances
CFW service
Control Framework
1<cl_gui_x> #1
*1
2<cl_gui_y>
EnjoySAP control 2
#2
*2Automation
handler
Each EnjoySAP control with which an application program communicates is an object (instance) in the sense of object orientation. The communication between the program and the instances is implemented using method calls and the events of the objects.
From Release 4.6, there are proxy classes in the global class library for all controls. These access the Control Framework in a uniform manner and encapsulate the control-specific communication. We call this kind of class a control wrapper.
When you use a control in an ABAP program, there are actually two objects involved. There is an instance in the ABAP program, and an instance of the control at the frontend. The communication between the application program and the control is implemented as follows: The ABAP program always communicates with the proxy object (method calls, setting and retrieving attribute values). The proxy object uses the CFW and executes the corresponding operation on the frontend instance.
When an action comes from the frontend, the CFW directs it to the proxy object, which then communicates with the ABAP program.
The CFW contains a list of the active instances both on the frontend and on the application server.

(C) SAP AG BC412 2-9
© SAP AG 1999
Custom Controls: Automation Queue
SAPgui
Automation Controller
Application server
ABAP Program
CFW service
Control Framework
1<cl_gui_x>
2<cl_gui_y>
Automationhandler
Automation Queue#1: m1, m2, attr1= 5#2: m1, m2, attr1= 11
Automation Queue*1: m1, m2, attr1= 5*2: m1, m2, attr1= 11
FLUSH
EnjoySAP control 1 EnjoySAP control 2
Each communication step between the program and a control involves data transfer over the network between the application server and presentation server. This communication is separate from the communication involving other screen elements, and can therefore cause increased network load. (Remember - screens are always transferred as a whole unit.)
To improve performance, method calls and attribute operations in the Control Framework are collected in the Automation Queue. The contents of the queue are automatically sent to the frontend (flushed) at particular synchronization points. The corresponding operations are then carried out at the frontend. In the same step, all values that had been collected at the frontend are passed back to the application server. As well as these automatic flushes, you can also flush explicitly.

(C) SAP AG BC412 2-10
© SAP AG 1999
Custom Controls: Events
SAPgui
Automation Controller
Application server
ABAP Program
CFW service
Control Framework
1<cl_gui_x>
2<cl_gui_y>
Automationhandler
Events#1: e1, e2, e4#2: e1, e3
Events*1: e1, e2, e4*2: e1, e3
Filter
Events: e1 - e7
Events: e1 - e5
EnjoySAP control 1 EnjoySAP control 2
The control at the frontend can have events, which could be triggered by user actions on the screen. These events are transferred back to the appropriate proxy objects in the ABAP program with the help of the Control Framework. The proxy object then handles the event using the normal event concept of ABAP Objects.
There is a large number of events that each control could trigger. However, as a rule, only a few of these will be relevant for an application program. You can restrict the number of events that is passed back to the proxy objects in the ABAP program by setting a filter in the Control Framework.
Since each event that the Control Framework redirects to a proxy object requires a communication step and data transfer, the filter is an important performance consideration. The initial state of the filter is not to transfer any events. If you want to handle events in your ABAP program, you must construct your own filter.

(C) SAP AG BC412 2-11
© SAP AG 1999
Control Framework: Class Hierarchy
cl_cl_guigui__cfwcfw
cl_cl_guigui__objectobject
cl_cl_guigui__controlcontrol
cl_gui_picture
cl_gui_html_viewer
cl_gui_textedit
cl_gui_tree_control
cl_gui_alv_grid
cl_gui_container
cl_gui_ . . ._container
Component Integration
cl_gui . . .
The proxy objects for EnjoySAP controls are instances of global classes. A global class is a class that has been created using the Class Builder. It is a "public" Repository object, which means that, like ABAP Dictionary objects, it is visible in any program.
All proxy classes for EnjoySAP controls inherit attributes and methods from the classes cl_gui_object and cl_gui_control.
All of the classes used in control programming have the prefix cl_gui. "cl" means that the object is a global class, and "gui" indicates that all of the classes belong to the controls inheritance hierachy.
There is an additional class, cl_gui_cfw, which provides service functions (in the form of methods). These are used extensively in the individual control wrappers, but you can also use them directly in your programs.
You can display individual classes either in the Class Builder or in the Object Navigator. To display the inheritance hierarchy, use the Class Browser.
The classes derived from cl_gui_container are control wrappers with a special function within the Control Framework.
This unit contains details of the tools and syntax for ABAP Objects, the object-oriented extension of ABAP.
(C) SAP AG BC412 2-12
© SAP AG 1999
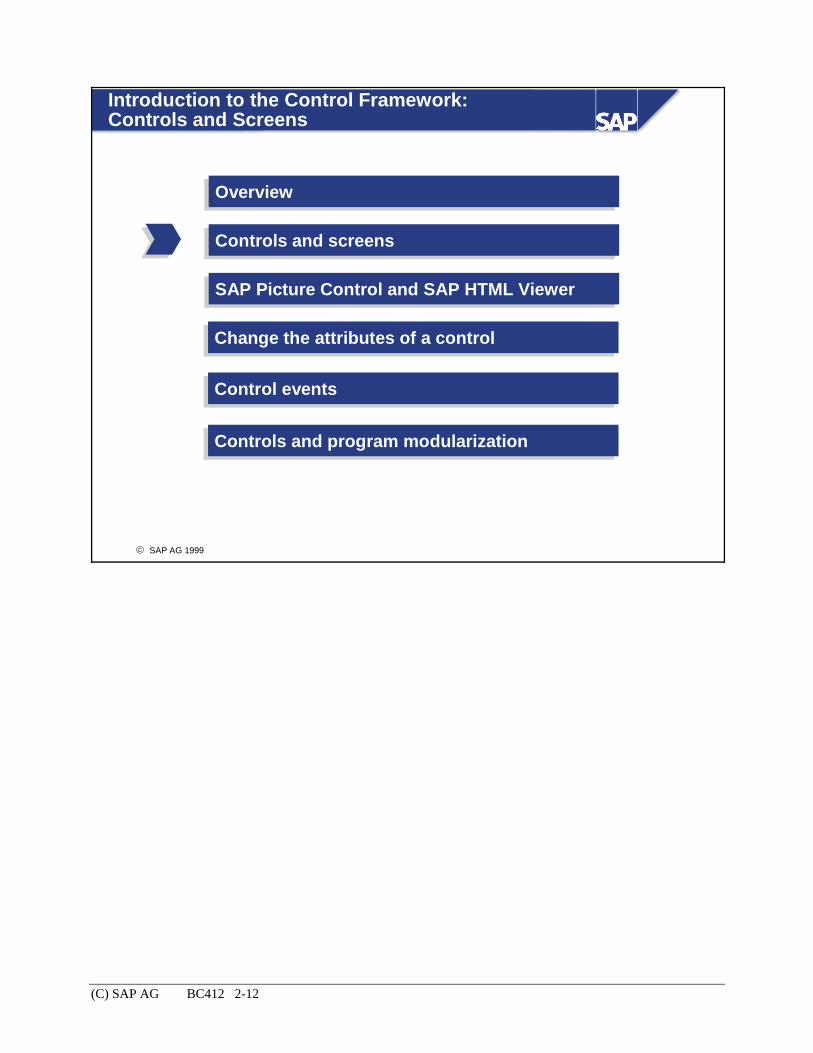
Introduction to the Control Framework:Controls and Screens
OverviewOverview
Controls and screensControls and screens
SAP Picture Control and SAP HTML ViewerSAP Picture Control and SAP HTML Viewer
Change the attributes of a control Change the attributes of a control
Control eventsControl events
Controls and program modularizationControls and program modularization

(C) SAP AG BC412 2-13
© SAP AG 1999
Relationship Between Controls and Screens
ABAP program
Runtime system services
Window
Container control
External SAPgui session
EnjoySAP control
Controlarea
1<cl_gui_xxx_control>1<cl_gui_custom_container>
1 2 3
2 3CALL SCREEN
100.
1
You cannot create a standalone instance of a control at the frontend. You must always have two other components - a screen and a special control called a container control.
The container control attaches a control to a screen. The screen contains a reserved area (like a subscreen area) In your program, you assign an instance of the container control class cl_gui_custom_container to the reserved area on the screen.
Finally, you assign an instance of the control you want to display to the container control instance. The first two steps help to integrate the frontend control into normal screen processing (PBO, PAI, resizing).
Since each frontend control has a proxy instance in the ABAP program, you will be communicating with two ABAP Objects instances and at least one screen. (There is a total of four instances - two in the ABAP program, two at the frontend).
There are other ways of attaching a container instance to a screen. We will look at these in a later unit. In this unit, we will only use the case explained on this page.

(C) SAP AG BC412 2-14
© SAP AG 1999
Screen Element Custom Control: Use
Area
Container control
Picture control
100
If we look at it graphically, attaching an EnjoySAP control to a screen is just like pasting the different areas onto it: First, we define an area in which to display the control. Next, we attach a container control to the area. The container control holds the actual control that we want to use (for example, to display a picture).
We will now look at what you need to do to carry out these three steps in a program.

(C) SAP AG BC412 2-15
© SAP AG 1999
Creating a Custom Control Area
Area
Screen element:Type :CUSTOM CONTROLName : CONTROL_AREA1Resizing Minimum size
vertical : 'X' 10horizontal : 'X' 20
Screen Painter: Layout
C
Elementtoolbar
To reserve a screen area for an EnjoySAP control, start the layout editor in the Screen Painter. The element toolbar at the left-hand edge of the screen contains an icon with the label Custom Control. This works very similarly to the Subscreen function. Choose Custom Control. Define the custom control area on the screen as follows: Define the top left-hand corner of the area by single-clicking. Hold the mouse button down and drag the container area out to the required size. Then release the mouse button.
You can change the size and position of the area at any time by clicking one of the "handles" at the edge of the object and dragging it to its new size. This handling is similar to that of subscreen areas.
Give the screen element a name (in the example: CONTROL_AREA1). The Resizing vertical and Resizing horizontal attributes allow you to specify whether the control area should be resized when the user changes the window size. If you set the attributes, you can specify the minimum size to which the area can be reduced in the Lines min. and Columns min. fields. The maximum size of the area is the size in which you created it.
(C) SAP AG BC412 2-16
© SAP AG 1999
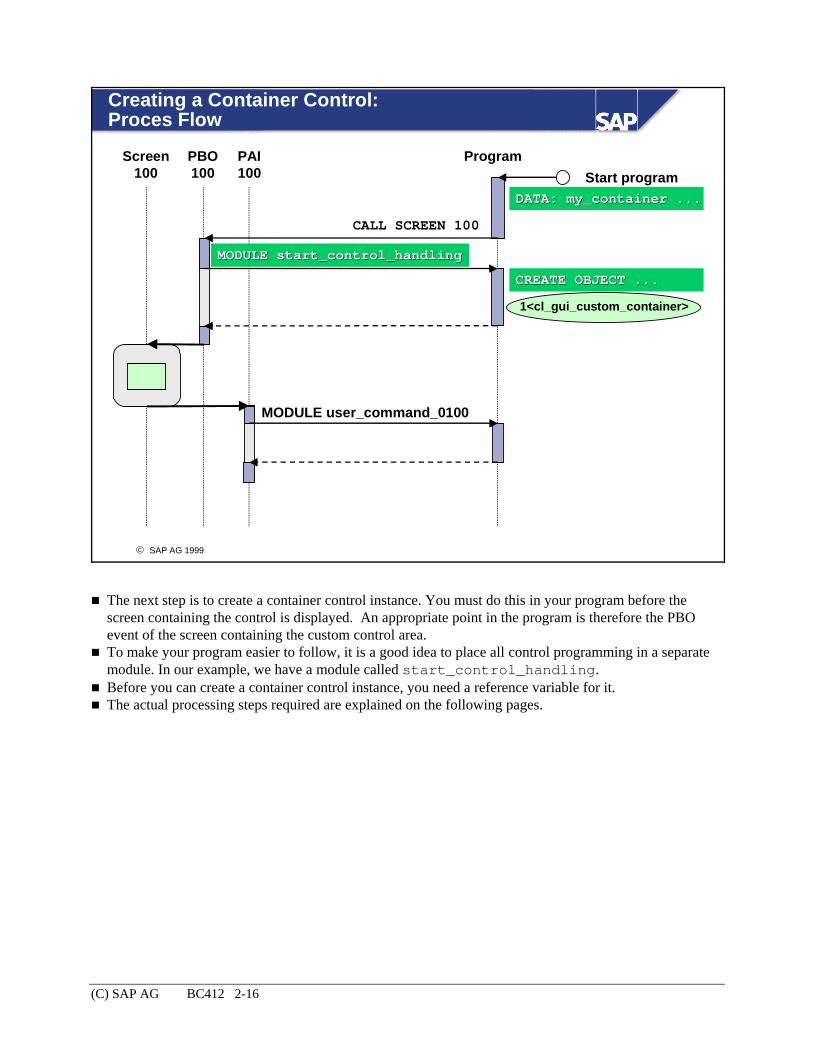
Creating a Container Control: Proces Flow
Screen100
PBO100
ProgramPAI100
MODULE start_control_handling
1<cl_gui_custom_container>
CALL SCREEN 100
Start program
MODULE user_command_0100
CREATE OBJECT ...
DATA: my_container ...DATA:DATA: my_container ...my_container ...
CREATE OBJECT ...CREATE OBJECT ...
MODULE start_control_handlingMODULE start_control_handling
The next step is to create a container control instance. You must do this in your program before the screen containing the control is displayed. An appropriate point in the program is therefore the PBO event of the screen containing the custom control area.
To make your program easier to follow, it is a good idea to place all control programming in a separate module. In our example, we have a module called start_control_handling.
Before you can create a container control instance, you need a reference variable for it. The actual processing steps required are explained on the following pages.

(C) SAP AG BC412 2-17
© SAP AG 1999
Creating a Container Control Instance
* PBO of screen containing CONTROL_AREA1MODULE start_control_handling OUTPUT.
IF first_time IS INITIAL.first_time = 'X'.
* create container object and link to screen areaCREATE OBJECT my_container
EXPORTINGcontainer_name = 'CONTROL_AREA1'
EXCEPTIONSothers = 1.
IF sy-subrc NE 0.MESSAGE a...
ENDIF....
* data declarationsDATA: my_container TYPE REF TO cl_gui_custom_container,
first_time TYPE c....
CREATE OBJECT CREATE OBJECT mymy__containercontainerEXPORTINGEXPORTING
containercontainer__name name = 'CONTROL_AREA1'= 'CONTROL_AREA1'EXCEPTIONSEXCEPTIONS
others others = 1.= 1.
DATA: DATA: mymy__container container TYPE REF TO TYPE REF TO clcl__guigui__customcustom__containercontainer, ,
To create a reference variable for your container control instance, use the DATA statement to create a field that has the type TYPE REF TO cl_gui_custom_container. In our example, we have called it my_container.
You can now create the proxy instance for the container control (instance of class cl_gui_custom_container) using the ABAP statement CREATE OBJECT. This also creates the container control instance at the frontend.
In the EXPORTING parameter container_name of the CREATE OBJECT statement, you specify the name of the custom control area you defined on the screen. In our example, this is CONTROL_AREA1.
The CREATE OBJECT statement allows you to react to errors (exceptions) that may have occurred during the statement (in the same way as the CALL FUNCTION statement). If our CREATE OBJECT statement fails, the most appropriate reaction is a termination (type A) message.
Let us now look in more detail at some of the ABAP Objects syntax used here.

(C) SAP AG BC412 2-18
© SAP AG 1999
Syntax: Declaring Reference Variables
DATA: <variable_name> "
TYPE REF TO "
<class_name>. "
Name of reference variable
Specifies that the variable is an object reference
Name of a class (global or local)
General syntax
Example
DATA: my_container "
TYPE REF TO "
cl_gui_custom_container. "
Name of reference variable
Object reference
Name of a global class
Class Builder
customcontainer
picturecontrol
TYPE REF TOTYPE REF TO
If you write a program that uses instances of classes ("object-oriented programming"), you need a pointer to the objects (instances) that the Basis system creates and administers in main memory. You administer these pointers in your ABAP programs using reference variables.
To create a reference variable in a program, use the DATA statement and assign a name to it. To specify the type of the variable (field), use the addition TYPE REF TO <class_name>. This addition declares a data object that can contain a pointer to an instance. After TYPE REF TO you must specify the name of a class. The reference variable can then contain pointers to instances of that class. For further details about reference variables (static types, dynamic types, and so on), refer to the keyword documentation for the DATA statement.
The class to which you refer when you define a reference variable can be either local or global. The classes used for controls are global classes. They are defined in the Class Builder and can be accessed from any program in the system.

(C) SAP AG BC412 2-19
© SAP AG 1999
Information in the Class Builder
class 1 class 2
Class
Properties
Interfaces
Attributes
Methods
Events
Internal types
Name, description, inherits from, general data, ...
Name, description ...
Name, description, visibility, static/instance, ...
Name, description, visibility, static/instance, ...
Name, description, visibility, static/instance, ...
Name, description, visibility, reference type, ...
Parameters Name, description, type, pass by value, reference type, ...
Exceptions Name, description ...
Parameters Name, description, type, pass by value, reference type, ...
Name
ComponentComponent AttributesAttributes
The Class Builder is one of the tools in the ABAP Workbench (available since Release 4.5A). You use it to create global classes. The following details of a class have to be maintained: Properties Interfaces implemented by the class Attributes (with properties) Methods (with properties and interface) Events (with properties and interface) Internal types used in the class.
The Class Builder is similar in layout to the Function Builder. You define the elements, their properties, types, and interfaces in tables on different tab pages, and write the method implementations in the ABAP Editor (choose Source code or double-click the method name).

(C) SAP AG BC412 2-20
© SAP AG 1999
Syntax: Creating an Instance (With a Constructor)
General syntax
DATA: <object_name> TYPE REF TO <class_name>.
CREATE OBJECT <object_name>
EXPORTING
<parameter_name_1> = <program_value_1>...
<parameter_name_n> = <program_value_n>
EXCEPTIONS
<exception_name_1> = <return_code_1>...
<exception_name_m> = return_code_m>.
CREATE OBJECT my_containerEXPORTING
container_name = 'CONTROL_AREA1'EXCEPTIONS
others = 1.
Example
Interfaceof
constructor
CREATE OBJECTCREATE OBJECT
EXPORTINGEXPORTING
EXCEPTIONSEXCEPTIONS
==
==
==
==
The CREATE OBJECT <object_name> statement creates an instance of the class specified after TYPE REF TO in the definition of the reference variable <object_name>.
If the class that you want to instantiate has a method called constructor, this method is executed automatically when the instance is created. The constructor method can only have IMPORTING parameters and EXCEPTIONS in its interface. You must fill the interface parameters in the CREATE OBJECT statement. In the EXPORTING parameters of the CREATE OBJECT statement, you must specify values for all of the obligatory IMPORTING parameters in the interface of the constructor method.
The syntax of the interface in the call is similar to that for function modules: The names of the interface parameters of the method are on the left-hand side of the expressions in the EXPORTING section. On the right of the equals sign, you specify literals or program variables that you want to pass to the method.
You can assign return codes to the exceptions listed in the interface. Directly after the CREATE OBJECT statement, you can find out the value of the return code from the system field sy-subrc.

(C) SAP AG BC412 2-21
© SAP AG 1999
Using a Flag Variable
Screen100
PBO100
ProgramPAI100
MODULE start_...
1<cl_gui_custom_container>
CALL SCREEN 100
Start program
MODULE user_...
IF first_time IS INITIAL.first_time = 'X'.CREATE OBJECT ...
DATA: my_container ...first_time.Next screen 100Next screen 100
ENDIF.
ENTERENTER
IF first_time IS INITIAL.IF first_time IS INITIAL.first_time = 'X'.first_time = 'X'.
ENDIF.ENDIF.
first_time.first_time.
Since we have chosen to place our control-specific processing within the flow logic of the container screen (the screen on which we are going to display the control), we require a mechanism to ensure that the steps that create the control are only carried out the first time the screen is called, otherwise we would create a new object each time the screen is processed: The statically-defined next screen number of the container screen is usually itself. Each action on the screen that triggers the PAI event, such as pressing ENTER, leads to the screen being processed again after the PAI event has finished. This means that the PBO event runs again, and a new instance would be created.
Any control operations (method calls) processed during PAI would not be displayed on the screen, since another instance would be linked to the container screen in each PBO.
We can stop this happening by using a flag variable. In our example, that is the data object first_time.
It is also perfectly possible to use the object reference itself as a flag as follows: IF my_container IS INITIAL. CREATE OBJECT my_container ... ENDIF.

(C) SAP AG BC412 2-22
© SAP AG 1999
Creating an EnjoySAP Control Instance: Proces Flow
Screen100
PBO100
ProgramPAI100
MODULE start_...
CALL SCREEN 100
Start program
MODULE user_...
IF first_time IS INITIAL.first_time = 'X'.CREATE OBJECT ...
DATA: my_container ...my_picture ...first_time.
ENDIF.
CREATE OBJECT ...CREATE OBJECT ...CREATE OBJECT ...
1<cl_gui_xxx_control>
1<cl_gui_custom_container>
my_my_guigui_control ..._control ...
You create the EnjoySAP control instance in the same way that you created the instance for the container control.
The instance of the EnjoySAP control must be created after the container control instance, but before the screen is sent to the presentation server. It is therefore a good idea to create this instance in the same PBO module that you used for the container control instance.

(C) SAP AG BC412 2-23
© SAP AG 1999
Creating an Instance of the SAP Picture Control
MODULE start_control_handling OUTPUT.IF first_time IS INITIAL.
first_time = 'X'....
* create picture control object and link to container
CREATE OBJECT my_pictureEXPORTING
parent = my_containerEXCEPTIONS
others = 1.
IF sy-subrc NE 0.MESSAGE a...
ENDIF.
* data declarationsDATA: my_container TYPE REF TO cl_gui_custom_container,
first_time TYPE c....
CREATE OBJECT CREATE OBJECT mymy__picturepictureEXPORTINGEXPORTING
parentparent = = mymy__containercontainerEXCEPTIONSEXCEPTIONS
others others = 1.= 1.
mymy__picture picture TYPE REF TO TYPE REF TO clcl__guigui__picturepicture, ,
To create an SAP Picture Control instance, you need a reference variable declared with reference to class cl_gui_picture. In our example, it is called my_picture.
The class cl_gui_picture has a constructor. In the CREATE OBJECT statement, you must fill the parameter PARENT with the reference to the container control instance that you have already created.
If an error occurs when the system tries to create the instance, you should react with a termination (type A) message.
The instance of the SAP Picture Control is linked to the container control whose reference variable you specified as the parent control in the CREATE OBJECT statement. This also links it to the container screen.

(C) SAP AG BC412 2-24
© SAP AG 1999
Creating an Instance of the SAP HTML Viewer
MODULE start_control_handling OUTPUT.IF first_time IS INITIAL.
first_time = 'X'....
* create html viewer object and link to container
CREATE OBJECT my_pictureEXPORTING
parent = my_containerEXCEPTIONS
others = 1.
IF sy-subrc NE 0.MESSAGE a...
ENDIF.
* data declarationsDATA: my_container TYPE REF TO cl_gui_custom_container,
first_time TYPE c....
CREATE OBJECT CREATE OBJECT mymy__htmlhtml__viewerviewerEXPORTINGEXPORTING
parentparent = = mymy__containercontainerEXCEPTIONSEXCEPTIONS
others others = 1.= 1.
mymy__htmlhtml__viewer viewer TYPE REF TO TYPE REF TO clcl__guigui__htmlhtml__viewerviewer, ,
The procedure for creating an instance of the SAP HTML Viewer Control is similar to that for the SAP Picture Control.
You must create the reference variable with reference to class cl_gui_html_viewer.
In the CREATE OBJECT statement, pass the reference to your container control instance in the parent parameter.

(C) SAP AG BC412 2-25
© SAP AG 1999
Result: Screen, Container, and EnjoySAP Control
ABAP program
Runtime system services
Window
External SAPgui session
1<cl_gui_xxx_control>1<cl_gui_custom_container>
2 3CALL SCREEN
100.
1
Empty!?!
Container control
EnjoySAP control
Custom controlarea
The result of the steps up to this point is that we have now created an EnjoySAP control on a screen. However, we have still not seen anything in the SAPgui window, since the controls are not displaying anything. We still need to supply the frontend control with data that it can display.
This will be our next step. However, let us first take a look at the features of the SAP Picture Control and SAP HTML Viewer Control.
(C) SAP AG BC412 2-26
© SAP AG 1999
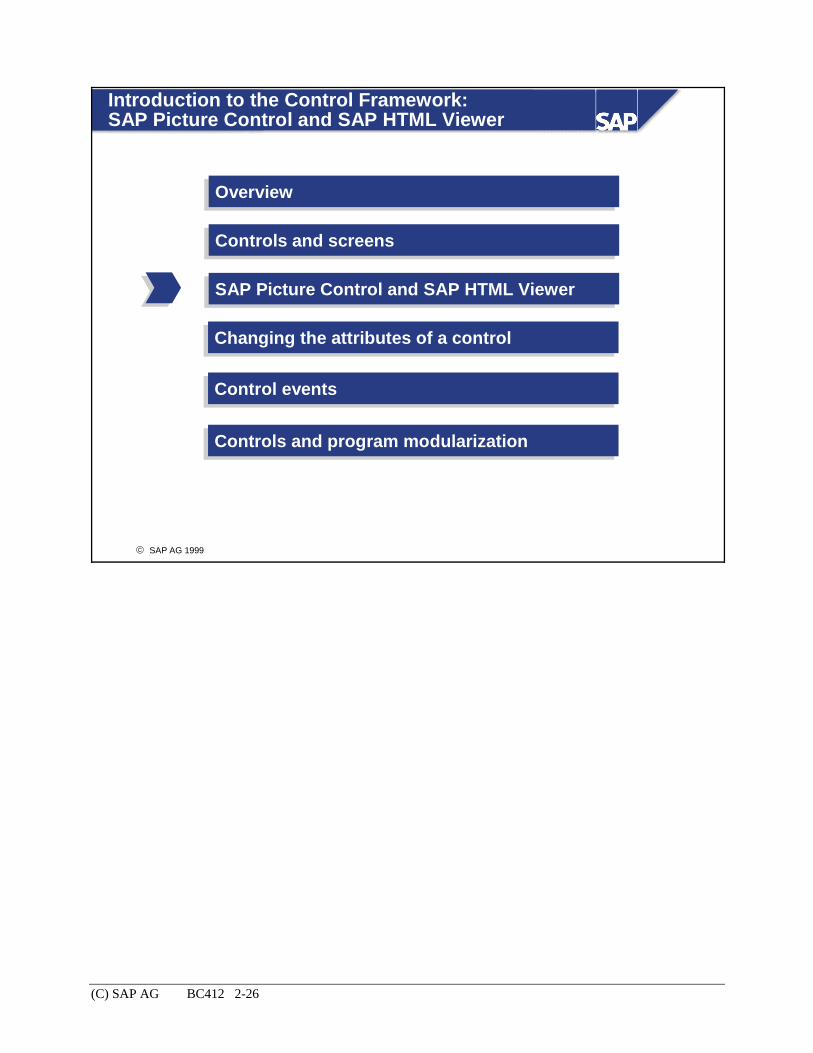
Introduction to the Control Framework:SAP Picture Control and SAP HTML Viewer
OverviewOverview
Controls and screensControls and screens
SAP Picture Control and SAP HTML ViewerSAP Picture Control and SAP HTML Viewer
Changing the attributes of a control Changing the attributes of a control
Control eventsControl events
Controls and program modularizationControls and program modularization

(C) SAP AG BC412 2-27
© SAP AG 1999
URL: Pointer to Data
URL
ABAP program
SAPgui
Screen SAPcontrol
locallocalPC filePC file
BDSBDSR/3R/3 DBDB
R/3 System
FTPFTPserverserver
HTTPHTTPserverserver
External
R/3 DB : R/3 databaseBDS : Business Document ServerR/3 WR : SAP Web Repository
SAP WRSAP WR
Pointer
Both the SAP Picture Control and SAP HTML Viewer Control access the data they display using URLs (uniform resource locators).
URLs point to data sources. In ABAP, you can administer them using a variable with type C. The data can be stored either in the R/3 System or externally. Within the R/3 System, you can save files in the R/3 database as a cluster table, in the Business Document Server (BDS) and in the SAP Web Repository. For details of the BDS, refer to the documentation for class cl_bds_document_sets or the Business Document Navigator section of the SAP Archive Link documentation (Basis ->Basis Services/Communication Interfaces -> SAP Archive Link ->BC-SAP SAP Archive Link -> Information for Everyone -> Business Document Navigator). For further details of the SAP Web Repository (transaction SMW0, or Tools -> Web development -> Web Repository), refer to Basis -> Frontend services -> ITS/WebStudio -> IAC Programming -> Implementing Internet Applications -> WebRFC Programming -> Maintaining Web Objects.
External data sources could be files on your PC (presentation server), shared directories accessible from the PC, or files on an HTTP or FTP server.

(C) SAP AG BC412 2-28
© SAP AG 1999
URLs for External Data Sources
General structure: service://host.domain[:port]/pathname/filename
file://c:/public/pictures/LogonSequence.gif
file://c:/public/htmlpages/home.html
http://www.sap.com/images/Enjoy_new.gif
http://www.sap.com/index.html
ftp://sapserv3/usr/picture.gif
ftp://sapserv3/usr/home.html
Specific addresses:
PC PC
HTTPHTTP
FTPFTP
locationlocation
URLs for external data sources are structured as follows: Name of the service (file for local PC files, http for files on an HTTP server, and ftp for files on an FTP server)
:// followed by the host name.domain name and the port number (if the port number differs from the standard port number).
/directory path/filename

(C) SAP AG BC412 2-29
© SAP AG 1999
SAP Controls: Accessing External Data by URL
Picture controlPicture controlororHTML ViewerHTML Viewer
Screen
SAPgui PC PC
HTTPHTTP
FTPFTP
Access
URL
ABAP program
URL
To display external data in an SAP Picture Control or SAP HTML Viewer Control, you must pass the URL of the data source to the frontend control (using a method call on the proxy object).
The data source is accessed by the frontend control itself.
(C) SAP AG BC412 2-30
© SAP AG 1999
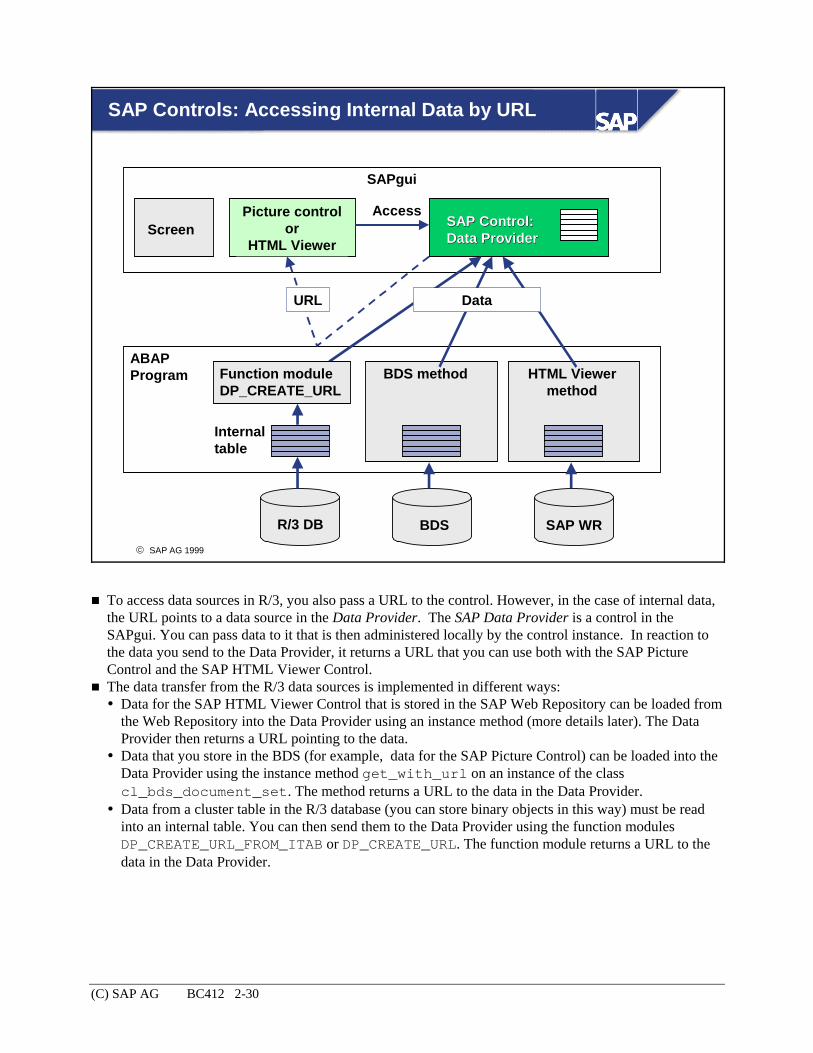
SAP Controls: Accessing Internal Data by URL
Picture controlor
HTML ViewerScreen
SAPgui
R/3 DB BDS SAP WR
ABAP Program
SAP Control:SAP Control:Data ProviderData Provider
Internaltable
BDS method HTML Viewermethod
URL Data
Access
Function moduleDP_CREATE_URL
To access data sources in R/3, you also pass a URL to the control. However, in the case of internal data, the URL points to a data source in the Data Provider. The SAP Data Provider is a control in the SAPgui. You can pass data to it that is then administered locally by the control instance. In reaction to the data you send to the Data Provider, it returns a URL that you can use both with the SAP Picture Control and the SAP HTML Viewer Control.
The data transfer from the R/3 data sources is implemented in different ways: Data for the SAP HTML Viewer Control that is stored in the SAP Web Repository can be loaded from the Web Repository into the Data Provider using an instance method (more details later). The Data Provider then returns a URL pointing to the data.
Data that you store in the BDS (for example, data for the SAP Picture Control) can be loaded into the Data Provider using the instance method get_with_url on an instance of the class cl_bds_document_set. The method returns a URL to the data in the Data Provider.
Data from a cluster table in the R/3 database (you can store binary objects in this way) must be read into an internal table. You can then send them to the Data Provider using the function modules DP_CREATE_URL_FROM_ITAB or DP_CREATE_URL. The function module returns a URL to the data in the Data Provider.

(C) SAP AG BC412 2-31
© SAP AG 1999
SAP Picture Control: Features
Container control
Picturecontrol constructor
load_picture_from_url
load_picture_from_sap_icon
set_3d_border
Enlarge pictureReduce pictureCenter picture. . .
Class: cl_gui_picture
method name
display_context_menu
Legend:
set_display_mode
File format• <...>.gif• <...>.jpg• <...>.bmp
You can use the MIME types GIF (Graphic Interchange Format), JPG (Joint Photographic Experts Group) and BMP (Bitmap) with the SAP Picture Control as well as SAP icons. The corresponding global class is called cl_gui_picture.
You can display pictures with the above MIME types using the method load_picture_from_url. To display an SAP icon, use the method load_picture_from_sap_icon. To stop the current data being displayed, use the clear_picture method.
The methods set_3d_border and set_display_mode (see next page) allow you to change the display attributes of the control.
You can also display context menus and implement drag and drop operations with the SAP Picture Control.
For a full list of the available methods and how to use them, refer to the online documentation for the SAP Picture Control. You will find it under Basis -> Controls & Control Framework -> SAP Picture in the SAP Library.
Details of the events of the control will follow later.

(C) SAP AG BC412 2-32
© SAP AG 1999
SAP Picture Control: DISPLAY_MODE
normal
normal_centerstretch
fit fit_center
DISPLAY_MODE_...
cl_gui_picture
SET_DISPLAY_MODE
The set_display_mode method allows you to determine how the SAP Picture Control displays pictures. The current display mode is always stored in the public instance attribute display_mode. There are five different display modes, corresponding to the five technical values that display_mode can take. For each of these values there is a static constant with a relevant name. The naming convention is display_mode_<mode>). The five values of <mode> are: normal: The picture loaded into the control is displayed in its original size. If the picture is larger than the area occupied by the control, the system provides scrollbars. If it is smaller, unused space remains blank.
normal_center: The picture loaded into the control is displayed in its original size but centered within the control area.
stretch: The picture loaded into the control is always displayed so that it fills the entire control area. The original picture may appear stretched.
fit: The picture loaded into the control is displayed so that it fills the control area, but the length/width ratio is always maintained.
fit_center: Similar to fit, but centered within the control area.

(C) SAP AG BC412 2-33
© SAP AG 1999
SAP HTML Viewer: Features
Container control
HTMLViewer constructor
show_url
show_url_in_browser
get_current_url
BackForwardCopy. . .
Class: cl_gui_html_viewer
method name
track_context_menu
Legend:
load_html_document
load_mime_object
load_data
show_data
set_ui_flag
stop
do_refresh
go_back
go_forward
go_home
File format• <...>.html• <...>.gif• <...>.jpg• <...>.bmp• <...>.doc• <...>.xls• ...
The SAP HTML Viewer is a control developed by SAP for use within the SAPgui. SAP does not have its own Web browser. Instead, the SAP HTML Viewer for Windows 95 and NT 4.0 uses the Microsoft Internet Explorer Webbrowser Control. It supports MS Internet Explorer from Version 4.0. Java Beans are available for all other platforms.
The interface of the SAP HTML Viewer is the same for all platforms, but the available functions differ depending on the HTML browser you are using.
The SAP HTML Viewer allows you to display HTML pages, graphics, or pictures in your transactions. These can either be stored in the database or created at runtime. If the SAP HTML Viewer is supported by your HTML browser, you can also use it as a generic container for Java applets and ActiveX controls, or as a generic viewer for any kind of document (for example, MIME contents).
The following applies to Windows platforms: You can only use the SAP HTML Viewer if you have installed Microsoft Internet Explorer. Internet Explorer is not installed during the SAPgui installation. You need a SAPgui installation with Release 4.6 or higher.
On all other platforms, the Java Bean is installed with the SAPgui. For further information, refer to the online documentation for the SAP HTML viewer. You will find it under Basis -> Controls & Control Framework -> SAP HTML Viewer in the SAP Library.

(C) SAP AG BC412 2-34
© SAP AG 1999
Introduction to the Control Framework:Changing the Attributes of a Control
OverviewOverview
Controls and screensControls and screens
SAP Picture Control and SAP HTML ViewerSAP Picture Control and SAP HTML Viewer
Changing the attributes of a control Changing the attributes of a control
Control eventsControl events
Controls and program modularizationControls and program modularization

(C) SAP AG BC412 2-35
© SAP AG 1999
Displaying Data: Proces Flow
Screen100
PBO100
ProgramPAI100
MODULE start_...
CALL SCREEN 100
Start program
MODULE user_...
IF first_time IS INITIAL.first_time = 'X'.CREATE OBJECT ...
DATA: my_container ......
CALL METHODENDIF.
CREATE OBJECT ...
CALL METHOD ...CALL METHOD ...
1<cl_gui_xxx_control>
1<cl_gui_custom_container>
If you want your frontend control to display data, you must program the data transfer in a PBO module. To do this, you simply call a control-specific method that sends data to the control after you have created your container instance and the instance for the EnjoySAP control.

(C) SAP AG BC412 2-36
© SAP AG 1999
Displaying a Picture in the Picture Control
MODULE start_control_handling OUTPUT.IF first_time IS INITIAL.
first_time = 'X'....
* load picture into picture control object on screen CALL METHOD my_picture->load_picture_from_url
EXPORTINGurl = l_url
IMPORTINGresult = l_result
EXCEPTIONSOTHERS = 1.
IF sy-subrc NE 0.MESSAGE A...
ENDIF.
CASE l_result.WHEN 0.
...WHEN 1.
...
CALL METHOD CALL METHOD mymy__picturepicture-->>loadload__picturepicture__fromfrom__urlurlEXPORTINGEXPORTING
urlurl = l_= l_urlurlIMPORTINGIMPORTING
result result = l_= l_resultresultEXCEPTIONSEXCEPTIONS
others others = 1.= 1.
To display a picture in a SAP Picture Control, use the instance method load_picture_from_url. In the interface of the method, you pass the URL of the data source of the picture to the control. You can find out whether the method was successful or not from the return parameter result and in the form of exceptions.
If the method triggers an exception, you should react with a suitable termination message. The return parameter result is useful for status messages concerning the load operation. For details, refer to the online documentation of the control.
For the SAP HTML Viewer Control, you must use one or more (often two) methods of the control to display data in the browser. This depends on the actual data source. (External data source: show_url, show_url_in_browser, SAP Web Repository: load_html_document, load_mime_object, SAP Data Provider: load_data, show_data).
For further information about the SAP HTML Viewer, refer to the online documentation.

(C) SAP AG BC412 2-37
© SAP AG 1999
Syntax: Calling Instance Methods
General syntax
CALL METHOD <object_name>-><method_name>
EXPORTING
<p01> = <f01> ... <pn1> = <fn1>
IMPORTING
<pn2> = <fn2> ... <pn3> = <fn3>
CHANGING
<pn4> = <fn4> ... <pn5> = <fn5>
RECEIVING
<pn6> = <fn6>
EXCEPTIONS
<ex1> = <rc1> ... <exn> = <rcn>.
<p01> ... <pn7>:<f01> ... <fn7>:<ex1> ... <exn>:<rc1> ... <rcn>:
Interface parameters of the methodActual parameters from calling programNames of the exceptions of the methodReturn code values for the exceptions
CALL METHODCALL METHOD -->>
EXPORTINGEXPORTING
IMPORTINGIMPORTING
CHANGINGCHANGING
RECEIVINGRECEIVING
EXCEPTIONSEXCEPTIONS
== ==
== ==
== ==
==
== ==
Methods are internal procedures within a class. They can access all of the attributes of that class. You can use them to change the state of an object.
Methods have a parameter interface that you can use to pass values to them. The method can also use it to pass values back to the user.
Instance methods can access all of the attributes of a class and can trigger all of its events. You call them using the CALL METHOD statement. The syntax is the same as for the CALL FUNCTION statement. You must specify the name of the method and the object on which you want to execute it. The syntax is: CALL METHOD ref->meth.
ref is a reference variable pointing to the required object, and meth is a method of the class on which the object is based.
You can use RECEIVING to receive a single result value from a method (passed by value). From the point of view of the caller, a method can either return values using IMPORTING and CHANGING parameters, or a single value using RECEIVING, but not both. Consequently, if you use RECEIVING in the interface, you cannot use IMPORTING or CHANGING. Conversely, using IMPORTING or CHANGING precludes you from using RECEIVING.
For a comprehensive syntax, refer to the keyword documentation for CALL METHOD.

(C) SAP AG BC412 2-38
© SAP AG 1999
Syntax: Reading Instance Attributes
General syntax
DATA: <object_name> TYPE REF TO <class_name>,
<attr_var> LIKE <class_name>=><attribute>.
...
CREATE OBJECT <object_name>.
...
* read attribute of the object
<attr_var> = <object_name>-><attribute>.
DATA: my_picture TYPE REF TO cl_gui_picture,display_mode LIKE cl_gui_picture=>display_mode.
...CREATE OBJECT my_picture EXPORTING ......display_mode = my_picture->display_mode.
Example
== -->>
displaydisplay__mode mode = = mymy__picturepicture-->>displaydisplay__modemode..
Attributes are internal data objects within a class. The contents of instance attributes determine the state of a particular object. You create instance attributes using the CREATE OBJECT statement. From outside the class, you can only address them using object references.
When you access them from outside the class, you must use the object component selector -> as follows: Reference->attribute. You can assign the result to a program variable.
Note: You can read the attributes of proxy instances of frontend controls at any time without any problems. However, you should not change the public instance attributes of a proxy object, since the changes are generally not passed to the frontend control. You should only change instance attributes using the methods of the control wrapper. This way, you ensure that they will be passed to the frontend control.

(C) SAP AG BC412 2-39
© SAP AG 1999
Method Calls and the Automation Queue
GUI + Control CFW Control instance ABAP application1<cl_gui_picture>
CALL METHOD ...call_method...set_property...get_property...
Automation Queue
FLUSHFLUSH
flush...flush...
Automation callsAutomation calls
Return values
Return values
Method calls to a proxy instance are not normally executed immediately. Instead, they are buffered in the automation queue of the Control Framework. This is for performance reasons.
The actions are not transferred to the frontend control until a particular Control Framework method called flush is triggered.
In the Control Framework, there is a single automation queue for all controls. When the flush occurs, all of the actions stored for all frontend controls are transferred. You cannot perform a "partial flush" that only applies to a single control.
When the flush takes place, result values are also transferred from the frontend controls back to the Control Framework.

(C) SAP AG BC412 2-40
© SAP AG 1999
Sending the Automation Queue to the GUI: End of PBO
GUI + Control CFW Control instance1<cl_gui_picture>
Method A
ABAP Program
PBO
Method B
Automatic FLUSHAutomatic FLUSHEnd of PBO
At the end of the PBO event of a screen, the runtime services trigger an automatic flush of the automation queue.
If a screen contains subscreens, the automatic flush is only sent once at the end of the "entire PBO", that is, directly before the data is sent to the presentation server. If a screen has one or more subscreens, the flush does not take place until the PBO of the container screen (screen on which the subscreens are displayed) has been processed. The same applies to hierarchically-nested screens (a screen containing a subscreen that itself includes a subscreen). Once again, there is only one flush directly before the SAPgui information is sent.

(C) SAP AG BC412 2-41
© SAP AG 1999
Dependent Method Calls
CALL METHODCALL METHOD clcl__guigui__cfwcfw=>flush=>flushEXCEPTIONSEXCEPTIONS
others = 1.others = 1.
GUI + Control CFW Control instance1<cl_gui_picture>
Method A
ABAP Program
PBO / PAI
Method B
What do I do? Method B needs the results from method A
If you call two instance methods one after the other, and the second method needs results provided by the first, you must ensure that the automation queue is transferred to the frontend after the first method call. You can do this by calling the static method flush of the class cl_gui_cfw.

(C) SAP AG BC412 2-42
© SAP AG 1999
Solution: Explicit Flush
GUI + Control CFW Control instance1<cl_gui_picture>
Method A
ABAP Program
PBO / PAI
Method B
clcl__guigui__cfwcfw=>flush=>flush
If you explicitly trigger a flush in the CFW, all of the data collected in the automation queue up to that point (above: method A) is transferred to the frontend control.
This means that subsequent methods can work with the results of the methods that have already been sent to the frontend. They start a new queue.
Note: You do not always need to use explicit flushes. The automation queue is handled in the Control Framework in such a way that queries for the values of control attributes that can be answered with data that is already in the automation queue can be answered without any communication with the frontend. Example: Suppose method A sets attribute a1 of object O to value v1. If method B of object O is executed and queries the value of a1, the Control Framework will return the value v1 from the automation queue.
It does not make sense to call the flush method of cl_gui_cfw just "for safety" after each method call, since each flush increases the system load and can affect performance. You should only use it where really necessary.

(C) SAP AG BC412 2-43
© SAP AG 1999
Automation Queue: Using the ABAP Debugger
ABAP Debugger
Fields Settings. . .
SettingsSystem debugging . . .. . .
Automation Controller: Always process requests synchronously!
When you use buffered operations to communicate with controls, errors in a method call are not visible until you synchronize the automation queue. It is therefore a good idea to synchronize the automation queue after each method call when you are debugging. You can do this by setting the Automation Controller: Always process requests synchronously option in the Debugger. This calls the static method cl_gui_cfw=>flush after each automation method.
If the error no longer occurs when you run the program in this way, you have called the method cl_gui_cfw=>flush at the wrong point somewhere in your program. You should include appropriate error handling after every method call (query value of sy-subrc). Note that the error handling is normally only processed within Debugging.

(C) SAP AG BC412 2-44
© SAP AG 1999
Automation Queue: Using the Automation Trace
Options. . .. . .
Options
Options
Window!
Mode
Automation. . . . . . . . .Trace level 1 2
Trace file:
OK
front.trc
TraceGeneral Cursor
Switch on
Cancel Apply
!
You can set up a trace for the automation queue. To do this, select Automation in the Trace group of the SAPgui settings. All subsequent calls and their parameters (create object, call method, set/get property, free object) to the automation queue are logged in a trace file.
If an error occurs, it is logged in the trace file (HRESULT error_code).
You can also check the number of synchronizations (times the automation queue is flushed) that your application uses in each PAI/PBO block. You can then eliminate any redundant flushes.
Remember when you follow the method calls in the trace file that the ABAP method names generally differ from the method names in the trace. The method names in the trace are those of the automation calls to the control. Remember too that a single ABAP method call may cause more than one automation method call.

(C) SAP AG BC412 2-45
© SAP AG 1999
Destroying Control Instances
MODULE exit_commands_0100 INPUT.CASE OK_CODE.
WHEN 'EXIT'. " leave program
PERFORM free_control_ressources.
LEAVE PROGRAM.
WHEN 'CANCEL'. " cancel screen processing
PERFORM free_control_ressources.
LEAVE TO SCREEN 0....
ENDMODULE.
FORM free_control_ressources.
CALL METHOD my_control->free.
CALL METHOD my_container->free.
FREE: my_control, my_container.
ENDFORM.
PERFORM PERFORM freefree__controlcontrol__resourcesresources..
PERFORM PERFORM freefree__controlcontrol__resourcesresources..
FORM FORM freefree__controlcontrol__resourcesresources..
CALL METHOD CALL METHOD mymy__controlcontrol-->>freefree..
CALL METHOD CALL METHOD mymy__containercontainer-->>freefree..
FREE: FREE: mymy__controlcontrol, , mymy__containercontainer..
ENDFORM.ENDFORM.
To release the resources occupied by a frontend control, call the instance method free of the control you have finished with.
All control wrappers inherit this method from the class cl_gui_object. You should call this method
At the end of your program In any cases where you know you will no longer require the frontend controls in the course of your program.
By releasing the object references (above, the statement FREE: my_control, my_container.), you ensure that the resources allocated to the proxy objects in your program are released by the garbage collector.

(C) SAP AG BC412 2-46
© SAP AG 1999
Overview: Control EventsOverview
OverviewOverview
Controls and screensControls and screens
SAP Picture Control and SAP HTML ViewerSAP Picture Control and SAP HTML Viewer
Changing the attributes of a control Changing the attributes of a control
Control eventsControl events
Controls and program modularizationControls and program modularization
OverviewOverview
ABAP Objects eventsABAP Objects events
Control events and the Control FrameworkControl events and the Control Framework
Event typesEvent types

(C) SAP AG BC412 2-47
© SAP AG 1999
Recap: Control Events
SAPgui
Automation Controller
Application server
ABAP Program
CFW service
Control Framework
1<cl_gui_x>
2<cl_gui_y>
Automationhandler
Events#1: e1, e2, e4#2: e1, e3
Events*1: e1, e2, e4*2: e1, e3
Filter
Events: e1 - e7
Events: e1 - e5
EnjoySAP control 1 EnjoySAP control 2
EnjoySAP controls can trigger events. The Control Framework directs them to the appropriate proxy objects in your ABAP program. You can then process them using the event concept implemented in ABAP Objects.

(C) SAP AG BC412 2-48
© SAP AG 1999
Control Events: General Overview
GUI +control
Autom.controller
Eventhandler
Services
SAPgui Basis services ABAP application
Event
fcode, ...
ABAP Objects event
An event that is passed from a frontend control passes through various levels. SAPgui/Automation Controller: The event triggered at the frontend is received by the Automation Controller in the SAPgui. The Automation Control passes information about this event to the Basis services of the runtime system in the form of a special function code and some additional data.
Basis Services: The Basis services pass the information on to the proxy class in the ABAP application. ABAP Application: The proxy object in the ABAP application triggers an ABAP Objects event. This informs the components that are registered for the event that the event has occurred.
In each level Certain settings are required for the whole chain to function. Certain settings can be made to affect how the chain works.
The next section explains in more detail what settings you have to make and which you can make.

(C) SAP AG BC412 2-49
© SAP AG 1999
Overview: Control Events -ABAP Objects Events
OverviewOverview
Controls and screensControls and screens
SAP Picture Control and SAP HTML ViewerSAP Picture Control and SAP HTML Viewer
Changing the attributes of a control Changing the attributes of a control
Control eventsControl events
Controls and program modularizationControls and program modularization
OverviewOverview
ABAP Objects eventsABAP Objects events
Control events and the Control FrameworkControl events and the Control Framework
Event typesEvent types

(C) SAP AG BC412 2-50
© SAP AG 1999
Control Events: Overview
GUI +control
Autom.controller
Eventhandler
Services
SAPgui Basis services ABAP application
Event
fcode, ...
ABAP Objects event
First, we will look at the steps necessary to make your application react to events triggered by a proxy object.

(C) SAP AG BC412 2-51
© SAP AG 1999
Overview: ABAP Objects Events
1<cl_gui_picture>
Method name
method_x
method_y
. . .
Instance
ref_1
ref_2
. . .
1<lcl_...2>
List of registered methods of other instancesfor event <event1>
of instance 1<cl_gui_picture>
Event <event1>
1<lcl_...1>
1<lcl_...n>
Method
method_x
method_y
method_n
Basisservice
An object can announce that its state has changed by triggering an event. Other objects can contain handler methods, which are processed when the event occurs. In order for the handler methods of the other instances to be executed, they must be entered in a list in the object that triggers the event.
When the event is triggered, a Basis service takes responsibility for executing the registered methods. In a normal method call, the caller has control of the program and knows what methods it is calling. When an event is triggered, the trigger does not know what methods (if any) will be called. This applies both to the point at which the event is defined and the point at which the event occurs at runtime.

(C) SAP AG BC412 2-52
© SAP AG 1999
Events of ABAP Objects Instances
1<cl_gui_picture>
Method name
method_x
method_y
. . .
Instance
ref_1
ref_2
. . .
1<lcl_...2>
List of registered methods of other instancesfor event <event1>
of instance 1<cl_gui_picture>
Event <event1>
1<lcl_...1>
1<lcl_...n>
Method
method_x
method_y
method_n
Basisservice
If you want to react to events from an EnjoySAP control in your program, you first need to find out what events can be triggered by the object. You can do this in the definition of the proxy class of the control.
You can see this definition in the Class Builder.

(C) SAP AG BC412 2-53
© SAP AG 1999
Events of the SAP Picture Control
class 1 class 2
cl_gui_picture
Events
Click on the picture
Double-click on the picture
Click within the control
Double-click within the control
Events for context menus
Events for drag and dropoperations
ComponentComponent DescriptionDescription
picture_click
picture_dblclick
control_click
control_dblclick
context_menu
ondropcomplete
ParametersParameters
mouse_pos_x mouse_pos_ymouse_pos_x mouse_pos_ymouse_pos_x mouse_pos_ymouse_pos_x mouse_pos_y
...
...
The class for the SAP Picture Control has the following events: Four events are triggered by mouse operations on the control contents or the control area: - picture_click: A single-click on the contents of the control (picture or icon). - picture_dblclick: A double-click on the contents of the control (picture or icon). - control_click: A single-click on the control area (but not on the contents). - control_dblclick: A double-click on the control area (but not on the contents).
Two events are triggered that can be used in conjunction with context menus: context_menu, context_menu_selected.
Four events are used together with drag and drop operations: ondrag, ondrop, ondropcomplete, and ongetflavour.
When the mouse click events are triggered, the position of the mouse when the user clicked is passed in parameters.
Note that you cannot use the single- and double-click events together, since a single-click is always triggered before a double-click. The double-click is then lost when the event is transferred from the frontend.
For further details of the events, refer to the online documentation for the SAP Picture Control.

(C) SAP AG BC412 2-54
© SAP AG 1999
Events of the SAP HTML Viewer
class 1 class 2
cl_gui_html_viewer
Events
Page loaded completely
Application-specificevent
Events for context menus
ComponentComponent DescriptionDescription
navigate_complete
sapevent
ctxmenu_request
ctxmenu_selected
ParametersParameters
url
action frame...
The SAP HTML Viewer Control has four events: navigate_complete: This event is triggered each time a page is fully loaded in the browser. The URL of the page is returned in the parameter url.
sapevent: You can trigger this event in an HTML page using SAPEVENT:<action>?data. The two events ctxmenu_request and ctxmenu_selected, which are both triggered when you use context menus.
For further details of the events, refer to the online documentation for the SAP HTML Viewer Control.

(C) SAP AG BC412 2-55
© SAP AG 1999
ABAP Objects: Creating Handler Methods
1<cl_gui_picture>
Method name
method_x
method_y
. . .
Instance
ref_1
ref_2
. . .
1<lcl_...2>
List of registered methods of other instancesfor event <event1>
of instance 1<cl_gui_picture>
Event <event1>
1<lcl_...1>
1<lcl_...n>
Method
method_x
method_y
method_n
Basisservice
If you want to react to events from EnjoySAP controls, you need to define handler methods that are executed when the event is triggered. We will now look at the steps required to do this.

(C) SAP AG BC412 2-56
© SAP AG 1999
Creating an Event Handler Method:Static Methods
CLASS lcl_event_handler DEFINITION.
PUBLIC SECTION.
CLASS-METHODS: on_picture_click
FOR EVENT picture_click OF cl_gui_picture
IMPORTING mouse_pos_x mouse_pos_y.
...
ENDCLASS.
CLASS lcl_event_handler IMPLEMENTATION.
METHOD on_picture_click.
...
MESSAGE i016(BC412) WITH mouse_pos_x mouse_pos_y.
ENDMETHOD.
...
ENDCLASS.
CLASSCLASS DEFINITIONDEFINITION
CLASSCLASS--METHODS: METHODS: onon__picturepicture__clickclick
FOR EVENTFOR EVENT picturepicture__clickclick OF OF clcl__guigui__picturepicture
IMPORTING IMPORTING mousemouse__pospos_x _x mousemouse__pospos_y_y
ENDCLASSENDCLASS
CLASSCLASS IMPLEMENTATIONIMPLEMENTATION
ENDCLASSENDCLASS
A simple way of creating a handler method is to use a static method of a local class. The graphic shows how to create a static method of a local class that reacts to the event picture_click of an instance of the SAP Picture Control.
The method receives the coordinates of the mouse position from the event and displays an information message (type I) containing the coordinates and a text.
Since methods are components of a class, the graphic shows the method definition within a local class. Let us now look in more detail at the components.

(C) SAP AG BC412 2-57
© SAP AG 1999
Syntax: Local Classes
General syntax
CLASS <class_name> DEFINITION.
[PUBLIC| PROTECTED| PRIVATE] SECTION.
[CLASS-]DATA: ...
[CLASS-]METHODS:...
[CLASS-]EVENTS: ...
...
ENDCLASS.
CLASS <class_name> IMPLEMENTATION>.
METHOD ...
...
ENDMETHOD.
ENDCLASS.
" Class definition
" Visibility sections
" Components in each
" Visibility section
" Implementation of
" methods in the class
CLASSCLASS DEFINITIONDEFINITION
PUBLICPUBLIC PROTECTEDPROTECTED PRIVATEPRIVATE SECTIONSECTION
CLASSCLASS-- DATADATA
METHODSMETHODS
EVENTSEVENTS
ENDCLASSENDCLASS
CLASSCLASS
ENDCLASSENDCLASS
METHODMETHOD
ENDMETHODENDMETHOD
IMPLEMENTATIONIMPLEMENTATION
A class is a template for objects. Classes that you define in ABAP programs are called local classes. A class definition consists of a declaration part (CLASS <...> DEFINITION. ... ENDCLASS.) and an implementation part (CLASS <...> IMPLEMENTATION. ... ENDCLASS.).
The class contains components. All of the components of the class have to be listed in the declaration part of the class. The components define the attributes of the objects in a class. Each component must be declared in one of three visibility sections. The visibility sections define the external interface of the class. Within a class, all of the components are visible. The three visibility sections are:
PUBLIC - All public components of a class are visible to all users and in the class itself. The public components form the external interface of the class. PROTECTED - All protected components of a class are visible to the subclasses of the class and in the class itself. PRIVATE - Private components can only be addressed in the methods of the class in which they are declared.
All of the methods of the class must be implemented in the implementation part of the class. As a rule, your local classes should have the prefix lcl_ For further information, refer to the keyword documentation for the CLASS statement.

(C) SAP AG BC412 2-58
© SAP AG 1999
Syntax: Methods of Local Classes
CLASS <class_name> DEFINITION.
[PUBLIC| PROTECTED| PRIVATE] SECTION.
[CLASS-]METHODS:
<method_name>
IMPORTING <p01> TYPE <type01> ... <pn1> TYPE <typen1>
EXPORTING <pn2> TYPE ...
CHANGING <pn4> TYPE ...
RETURNING VALUE( <p> )
EXCEPTIONS <ex1> ... <exn>.
ENDCLASS.
CLASS <class_name> IMPLEMENTATION.
METHOD <method_name>.
...
ENDMETHOD.
ENDCLASS.
METHODSMETHODS
IMPORTINGIMPORTING
EXPORTINGEXPORTING
CHANGINGCHANGING
RETURNING VALUE(RETURNING VALUE( ))
EXCEPTIONSEXCEPTIONS
METHODMETHOD
ENDMETHOD.ENDMETHOD.
Interface definition
Method implementations
Methods are internal procedures within a class. They can access all of the attributes of a class. Methods have a parameter interface that you can use to pass values to them. The method can also use it to pass values back to the user. You can declare local data types and objects within a method. Local variables and interface parameters (which are handled like local variables) obscure other attributes in the class with identical names.
Instance methods can access all of the attributes of a class and can trigger all of its events. Static methods (declared with CLASS-METHODS) can only access the static attributes of a class, and can only trigger its static events. They can be executed even without there being an instance of the class.
Each method of a class must be implemented in a METHOD ... ENDMETHOD block in the implementation part of the class. You do not have to list the interface parameters in the method implementation, because you have already specified them in the definition.
Like function modules, you can use the RAISE <exception> and MESSAGE RAISING statements to react to errors.
A method with any number of IMPORTING parameters and a single RETURNING parameter is called a functional method. The RETURNING parameter is always passed by value.

(C) SAP AG BC412 2-59
© SAP AG 1999
Syntax: Handler Method for an Event
CLASS <class_name> DEFINITION.
[PUBLIC| PROTECTED| PRIVATE] SECTION.
[CLASS-]METHODS:
<method_name> FOR EVENT <event_name> OF <class_name>
IMPORTING <p1> ... <p1> [SENDER],
<method_name1> ...
ENDCLASS.
CLASS <class_name> IMPLEMENTATION.
METHOD <method_name>.
... " method implementation
ENDMETHOD.
ENDCLASS.
METHODSMETHODS
METHODMETHOD
ENDMETHOD.ENDMETHOD.
FOR EVENTFOR EVENT OFOF
IMPORTINGIMPORTING SENDERSENDER
Any class can contain handler methods for events of other classes. In the declaration part of an event handler method, you must use the FOR EVENT <event_name> OF <class_name> addition. This specifies the event <event_name> of class <class_name> to which the method can react.
When assigning names to event handler methods, you should observe the following rules: ON_<event_name> where <event_name> is the name of the event.
The interface of an event handler method may only contain formal parameters that are defined in the declaration of the corresponding event. The attributes of the parameters are inherited from the event definition. The event handler method does not have to import all of the parameters passed in the RAISE EVENT statement.
All events have an implicit parameter called sender, which you can include in the IMPORTING parameters. This contains an object reference to the object that triggered the event, and hence allows the handler to access the triggering object.
The example contains a static method, declared using CLASS-METHODS. This can run without an instance of the class having to exist.
When you declare an event handler method in the class, the class or its instances are, in principle, able to handle the event.

(C) SAP AG BC412 2-60
© SAP AG 1999
ABAP Objects: Registering Handler Methods
1<cl_gui_picture>
Method name
method_x
method_y
. . .
Instance
ref_1
ref_2
. . .
1<lcl_...2>
List of registered methods of other instancesfor event <event1>
of instance 1<cl_gui_picture>
Event <event1>
1<lcl_...1>
1<lcl_...n>
Method
method_x
method_y
method_n
Basisservice
The last step in event handling is to ensure that the event handler method is executed when the proxy object triggers the event. To do this, you must register the event handler method (of the local class) with the instance that triggers the event.

(C) SAP AG BC412 2-61
© SAP AG 1999
Linking an Event to a Handler Method
CLASS lcl_event_handler DEFINITION.PUBLIC SECTION.
CLASS-METHODS: on_picture_clickFOR EVENT picture_click OF cl_gui_picture...
ENDCLASS.
CLASS lcl_event_handler IMPLEMENTATION.METHOD on_picture_click.
...ENDMETHOD.
ENDCLASS....
CREATE OBJECT my_container ...CREATE OBJECT my_picture ...
SET HANDLER lcl_event_handler=>on_picture_click
FOR my_picture.
SET HANDLER SET HANDLER lcllcl__eventevent__handlerhandler=>=>onon__picturepicture__clickclick
FOR FOR mymy__picturepicture..
What happens?
Who is reactingto whose event?
In order for an event handler method to react to an event, you must specify the triggering object at runtime.
The SET HANDLER statement links a list of handler methods with event triggers. The graphic shows that the static method (not instance-specific) on_picture_click of class lcl_event_handler runs when the instance to which the object reference in my_picture is pointing triggers the event picture_click.

(C) SAP AG BC412 2-62
© SAP AG 1999
Syntax: Linking an Event to a Static Handler Method
DATA: <object_1> TYPE REF TO <class_x>,<object_2> TYPE REF TO <class_x>.
...CLASS <handler_class> DEFINITION.
PUBLIC SECTION.CLASS-METHODS: <on_event_y>
FOR EVENT <event_y> OF <class_x> ......
ENDCLASS....
CREATE OBJECT: <object_1>, <object_2>.
...
SET HANDLER <handler_class>=><on_event_y>
FOR <object_1>.
SET HANDLERSET HANDLER
FORFOR
<on_event_y> is executed when <object_1> triggersthe event
=>=>
<class_x> has an event <event_y>
Static method<on_event_y>can react to event <event_y>
Instance of class<class_x>
CLASSCLASS--
The statement SET HANDLER <handler_class>=><on_event_y> FOR <object_1> specifies that the static method <on_event_y> of class <handler_class> is executed when the instance to which <object_1> is pointing triggers the event <event_y>. <object_1> points to an instance of the class <class_x>, which has the event <event_y>.
The second instance, to which object reference <object_2> is pointing, can also trigger the event <event_y>. However, if it does, the method <on_event_y> of class <event_handler> is not processed, because it is not registered for this instance (no SET HANDLER statement).

(C) SAP AG BC412 2-63
© SAP AG 1999
Syntax: Linking an Event to an Instance Handler Method
DATA: <object_1> TYPE REF TO <class_x>,<object_2> TYPE REF TO <class_x>.
...CLASS <handler_class> DEFINITION.
PUBLIC SECTION.METHODS: <on_event_y>
FOR EVENT <event_y> OF <class_x> ......
ENDCLASS....DATA: <handler_1> TYPE REF TO <handler_class>,
<handler_2> TYPE REF TO <handler_class>....
CREATE OBJECT: <object_1> , <object_2>. CREATE OBJECT: <handler_1>, <handler_2>.
...
SET HANDLER <handler_1>-><on_event_y>
FOR <object_1>.
SET HANDLERSET HANDLER
FORFOR
<on_event_y>of instance <handler_1> is processed for event of <object_1>
-->>
<class_x> has an event <event_y>
Instance method<on_event_y>can react to event <event_y>
Instances of the classes<class_x>,<handler_class>
The statement SET HANDLER <handler_1>-><on_event_y> FOR <object_1> specifies that the instance method <on_event_y> of object <handler_1> is executed when the instance to which <object_1> is pointing triggers the event <event_y>. <object_1> points to an instance of the class <class_x>, which has the event <event_y>.
The second instance, to which object reference <object_2> is pointing, can also trigger the event <event_y>. However, even if the event occurs, there will be no reaction, because no instance is registered for the event (no SET HANDLER statement).
The instance to which <handler_2> is pointing is not involved in event handling. For further information about registering handler methods for events, refer to the keyword documentation for the SET HANDLER statement.

(C) SAP AG BC412 2-64
© SAP AG 1999
Overview: Control Events -Control Events and the Control Framework
OverviewOverview
Controls and screensControls and screens
SAP Picture Control and SAP HTML ViewerSAP Picture Control and SAP HTML Viewer
Changing the attributes of a control Changing the attributes of a control
Control eventsControl events
Controls and program modularizationControls and program modularization
OverviewOverview
ABAP Objects eventsABAP Objects events
Control events and the Control FrameworkControl events and the Control Framework
Event typesEvent types

(C) SAP AG BC412 2-65
© SAP AG 1999
Control Events: Overview
GUI +control
Autom.controller
Eventhandler
Services
SAPgui Basis services ABAP application
event
fcode, ...
ABAP Objects event
The next component that is involved in event processing is the Automation Controller in the SAPgui.

(C) SAP AG BC412 2-66
© SAP AG 1999
Control Events: Automation Control as Filter
EnjoySAP control
Automation Controller
e1 e2 e3 e4 e5 e3 e2
Control events: e1, e2, e3, e4, e5
Registered events
*1: e1, e2, e4
Function code <fcode>
Basis services
The function of the Automation Controller in the SAPgui is to act as a filter for the various control events. The Automation Controller has a list of all events registered for an instance. Only these events are passed from the Automation Controller to the Basis services (in the form of function codes). All other control events that are not registered are filtered out by the Automation Controller.
The list that the Automation Controller administers for each instance must be filled from the ABAP application that is going to handle the control events.
Note that the procedure of filling the list of events that the Automation Controller should direct to the program is also called registering events. However, it is a different process than the event registration we have already seen in ABAP Objects.

(C) SAP AG BC412 2-67
© SAP AG 1999
Control Events: Configuring the Control Framework
EnjoySAP control
Automation Controller
Control events: e1, e2, e3, e4, e5
Registered events
*1: *1: e1, e2, e4e1, e2, e4
Basis services
ABAP program
1<cl_gui_picture>
appl_eventeventid12
4711Internal table
e1e2e4
Method: set_registered_events
You construct the list of events to be registered in the Automation Controller as follows: In the ABAP program, an internal table is constructed containing the technical names (event IDs) of the events you want to register with the Automation Controller.
You then send this internal table to the proxy object of the control using the instance method set_registered_events. The proxy object then places the data in the Automation Queue in the Control Framework (above: Basis services).
When the next synchronization (flush) occurs, the list is automatically sent to the Automation Controller.
In the internal table in the ABAP program, you enter the technical name of the event in the eventid field.
The event IDs for each EnjoySAP control are listed in the definitions of the proxy classes in the Class Builder.

(C) SAP AG BC412 2-68
© SAP AG 1999
SAP Picture Control Events: Event IDs
class 1 class 2
cl_gui_picture
Events
Mouse click...
Double-click...
...
...
Events for context menus
Events fordrag and dropoperations
ComponentComponent DescriptionDescription
picture_click
picture_dblclick
control_click
control_dblclick
context_menu
ondropcomplete
ParametersParameters
mouse_......
...
...
...
...
...
IDID
Class constants:
eventid_picture_click = 2
eventid_picture_dblclick = 3
eventid_control_click = 4
eventid_control_dblclick = 5
...
...
The SAP Picture Control has the following static constants that represent the event IDs: eventid_picture_click for the event picture_click eventid_picture_dblclick for the event picture_dblclick eventid_control_click for the event control_click eventid_control_dblclick for the event control_dblclick eventid_context_menu for the event context_menu eventid_context_menu_selected for the event context_menu_selected
Drag and drop events are treated differently than other events, which are explained here. For further details, refer to the Drag and Drop section of the online documentation SAP Control Framework (SAP Control Framework -> Architecture of the Control Framework -> Event Handling -> Drag and Drop). You will find it under Basis -> Controls & Control Framework -> SAP Control Framework in the SAP Library.

(C) SAP AG BC412 2-69
© SAP AG 1999
SAP HTML Viewer Events: Event IDs
cl_gui_html_viewer
Events
Page complete...
Applicationevent
Events forcontext menus
ComponentComponent DescriptionDescription
navigate_complete
sapevent
ctxmenu_request
ctxmenu_selected
ParametersParameters
url
action frame...
class 1 class 2IDID
Class constants:
m_id_navigate_complete = 2
m_id_sapevent = 1
m_id_ctxmenu_request = 4
m_id_ctxmenu_selected = 3
The SAP HTML Viewer Control has the following static constants that represent the event IDs: m_id_navigate_complete for the event navigate_complete m_id_sapevent for the event sapevent m_id_cxtmenu_request for the event ctxmenu_request m_id_cxtmenu_selected for the event ctxmenu_selected

(C) SAP AG BC412 2-70
© SAP AG 1999
Registering Control Events with the CFW
DATA: it_events TYPE cntl_simple_events, " internal (event) tablewa_events LIKE LINE OF it_events. " work area
* register events:i) picture_clickwa_events-eventid = cl_gui_picture=>eventid_picture_click.
INSERT wa_events INTO TABLE it_events.* ii)control_dblclick
......
CALL METHOD my_picture->set_registered_eventsEXPORTING
events = it_eventsEXCEPTIONS
others = 1.
IF sy-subrc NE 0.* MESSAGE a...
ENDIF.
wawa__eventsevents--eventideventid clcl__guigui__picturepicture=>=>eventideventid__picturepicture__clickclick
INSERT INSERT wawa__events events INTO TABLE INTO TABLE itit__eventsevents
CALL METHOD CALL METHOD mymy__picturepicture-->>setset__registeredregistered__eventseventsEXPORTINGEXPORTINGevents events = = itit__eventsevents
You use the event IDs of the relevant events to construct an internal table that you can then pass to the proxy object in your ABAP application.
To do this, create an internal table (above: it_events) with the data type cntl_simple_events. You also need a work area for the internal table (above: wa_events).
Fill the internal table with the IDs of the events you want to register (eventid field). Call the instance method set_registered_events for the proxy instance, and pass the internal table to the interface parameter events.
Use a termination message to react to any exceptions.

(C) SAP AG BC412 2-71
© SAP AG 1999
Overview: Control Events -Event Types
OverviewOverview
Controls and screensControls and screens
SAP Picture Control and SAP HTML ViewerSAP Picture Control and SAP HTML Viewer
Changing the attributes of a control Changing the attributes of a control
Control eventsControl events
Controls and program modularizationControls and program modularization
OverviewOverview
ABAP Objects eventsABAP Objects events
Control events and the Control FrameworkControl events and the Control Framework
Event typesEvent types

(C) SAP AG BC412 2-72
© SAP AG 1999
Event Type: System Event
GUI +control
Autom.controller
PAI Eventhandler
Services(CFW)
SAPgui Basis services ABAP application
Event
fcode, ...
Control events that you register with the Automation Controller as we have just seen are known as system events.
With system events, the Basis services inform the proxy object about the event directly when the corresponding function code arrives. In reaction, the proxy object triggers the corresponding event in the ABAP application. The screen containing the frontend control is not processed, that is, the PAI event is not triggered. Consequently, no data from other screen elements is transferred back to the program. The event handling is restricted to the "object-oriented world" of the ABAP application.

(C) SAP AG BC412 2-73
© SAP AG 1999
Event Type: Application Event
PAI Eventhandler
Services(CFW)
Basis services ABAP application
cl_gui_cfw=>dispatch
Screen data transport
GUI +control
Autom.controller
SAPgui
Eventfcode, ...
As well as using system events, you can also register a control event with the Control Framework as an application event.
Application events are processed differently from system events. If a control triggers an application event, control is returned to its container screen.
The control triggers the event to the Automation Control The Automation Controller passes the information connected to the event (EXPORTING parameters and function code) to the Basis services on the application server.
The Basis services trigger the PAI event of the container screen. At the beginning of the PAI event, the normal field transport takes place from the screen to the program. Since control is passed back the container screen of the control, the ABAP application determines itself when to pass the control on to the proxy object to complete the event handling. You do this in your application using the method cl_gui_cfw=>dispatch.
As soon as the method cl_gui_cfw=>dispatch is called, the Basis services pass the information about the control event to the proxy object. The proxy event can then trigger the corresponding event on the ABAP side.

(C) SAP AG BC412 2-74
© SAP AG 1999
Registering Application Events
ABAP Program
1<cl_gui_picture>
Internal tablee1e2e4
Method: set_registered_events
appl_eventxxx
* register application event: picture_clickwa_events-eventid = cl_gui_picture=>eventid_picture_click.wa_events-appl_event = 'X'.INSERT wa_events INTO TABLE it_events....
CALL METHOD my_picture->set_registered_eventsEXPORTING
events = it_events...
wawa__eventsevents--applappl__event event = 'X'= 'X'
eventid12
4711
You specify that an event should be an application event when you register it with the CFW. To register an event as an application event, assign the value 'X' to the appl_event column for the relevant line of the internal table that you pass to the proxy object in the set_registered_events method.

(C) SAP AG BC412 2-75
© SAP AG 1999
Screen and Control:Call Sequence for Application Events
ABAP application
m = module
Runtime system services
RS = Runtime system ServiceCFW = Control Framework
Window
SAPgui services
GS = GUI ServiceAC = Automation Controller
External SAPgui session
EnjoySAP control
Function codeFunction code
Check moduleseventhandler
Sequence?Sequence?
Application EventApplication Event
GS1 GSn AC
RS1 RSm CFW
m1 mr
If you use application events in your application, you must specify the order in which you want your own check modules and the event handler methods to run: If you want to process the screen-specific input checks first, then the event handler, you must call the method cl_gui_cfw=>dispatch after the check modules.
Otherwise, you call the method before the check modules.

(C) SAP AG BC412 2-76
© SAP AG 1999
Application Events and Screen Input Checks (1)
PAI Eventhandler
Services(CFW)
Basis services ABAP application
Inputchecks
Question: What do we do if the event handler needs screen data?The screen entries have not yet been checked.
GUI +control+
controller
SAPgui
fcode, ...
dispatch
If you want to run the screen-specific input checks after the event handling, you must remember that you cannot use up-to-date values from the screen, since they are not transported until the relevant check module is processed (FIELD statement).
If you need to use current screen data in the event handler method, you should trigger the event handling after the check modules have run.

(C) SAP AG BC412 2-77
© SAP AG 1999
Application Events and Screen Input Checks (2)
PAI Eventhandler
Services(CFW)
Basis services ABAP application
Inputchecks
GUI +control
SAPgui
eventfcode, ...
MESSAGE e123MESSAGE e123
New input
newnew fcodefcode(new event)(new event)
If you perform the screen-specific checks before the event handling, it is possible for control events to be lost during an error dialog. The frontend control triggers an event that is passed to the application server as an application event. Control returns to the container screen, which processes the screen-specific check modules.
If an error or warning message (MESSAGE Ennn or MESSAGE Wnnn, where nnn is the message number) occurs during a check module, the user can change the entries on the screen and then trigger a different event with a different function code.
The new function code overwrites the function code linked to the event originally triggered by the user. The cl_gui_cfw=>dispatch call then does not lead to the event handling for the first event.
This does not occur if the new function is triggered by a screen element such as a pushbutton or menu entry. The original event is not lost.

(C) SAP AG BC412 2-78
© SAP AG 1999
System Event and set_new_ok_code
GUI +control
controllerPAI Event
handlerServices(CFW)
SAPgui Basis services ABAP application
eventfcode, ...
set_new_ok_codeset_new_ok_code
ok_code
Data transport
If you handle a control event as a system event and want to pass control to the container screen after the event handling, you must use the method cl_gui_cfw=>set_new_ok_code.
You pass a new function code to the ok_code parameter of the method. The system places this in the Basis services, and when the event handling is finished, the PAI of the container screen is triggered with the new function code.
Note that the event handling takes place before any field transport, since the PAI is not triggered until after the event handling.

(C) SAP AG BC412 2-79
© SAP AG 1999
Introduction to the Control Framework:Controls and Program Modularization
OverviewOverview
Controls and screensControls and screens
SAP Picture Control and SAP HTML ViewerSAP Picture Control and SAP HTML Viewer
Changing the attributes of a control Changing the attributes of a control
Control eventsControl events
Controls and program modularizationControls and program modularization

(C) SAP AG BC412 2-80
© SAP AG 1999
Modularization Used So Far
sapbc412d_...: Program
Application and auxiliary data Screen data
my_container 100: Screen
Screen data
my_control event_handler
M1: MODULE MX: MODULE
callscalls calls
Transportcalls
Methods Methods
loc. data
F1: FORM FY: FORMcalls
The procedures we have just seen use event handler methods as a special kind of modularization unit that works similarly to a subroutine in ABAP. If you have encapsulated special functions in subroutines in your program, you will also have called these from the method. This is because the event handlers do not have any data themselves. If you use this method, you are only making restricted use of the possibility offered by object-oriented programming to encapsulate functions and data in instances.
Classes that provide event handlers in this way have no semantics.
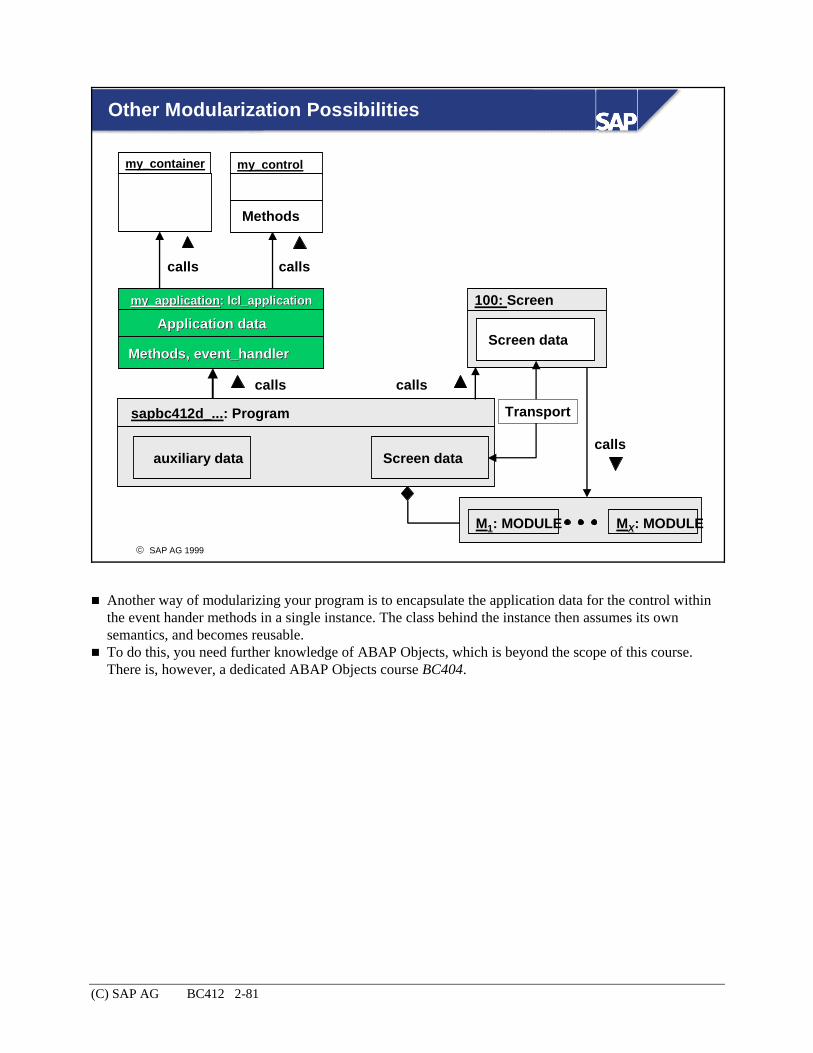
(C) SAP AG BC412 2-81
© SAP AG 1999
Other Modularization Possibilities
sapbc412d_...: Program
auxiliary data Screen data
my_container
100: Screen
Screen data
my_control
M1: MODULE MX: MODULE
calls
calls calls
Transport
Methods
my_applicationmy_application:: lcllcl_application_application
Methods, event_handlerMethods, event_handler
calls calls
Application dataApplication data
Another way of modularizing your program is to encapsulate the application data for the control within the event hander methods in a single instance. The class behind the instance then assumes its own semantics, and becomes reusable.
To do this, you need further knowledge of ABAP Objects, which is beyond the scope of this course. There is, however, a dedicated ABAP Objects course BC404.

(C) SAP AG BC412 2-82
© SAP AG 1999
Describe how the SAP Control Framework works
Display data in a SAP Picture Control and SAP HTML Viewer on a screen
Changing the attributes of a control
React to the events of a control
Use selected ABAP Objects statements
You are now able to:
Introduction to the Control Framework: Unit Summary

(C) SAP AG BC412 2-83
Control Framework Basics Exercise 1
Unit: Introduction to the Control Framework Topic: Controls and Screens
At the conclusion of these exercises, you will be able to:
• Create screen elements of the Custom Control area type in the Screen Painter
• Create and use reference variables for ABAP Objects instances
• Create Container Control and Picture Control instances
• Assign Container Control instances to Custom Control areas
• Link Picture Control instances to containers
• Find information about global classes in the Class Builder
You copy a program template consisting of an ABAP program that calls a screen. This screen has a status with the standard navigation functions.
Having analysed the structure of the template, you create a Custom Control area on the screen of the program. You create a container instance that you link to the Custom Control area, and a Picture Control instance that you assign to the container.
Program: ZBC412_##_CFW_EX1
Template: SAPBC412_BAST_EXERCISE1
Sample solution: SAPBC412_BASS_EXERCISE1
## is your group number
1-1 Copy the program template SAPBC412_BAST_EXERCISE1 with all its subobjects to program ZBC412_##_CFW_EX1, and make yourself familiar with the functions provided by that program.
1-2 On screen 100, create a Custom Control area with the following properties:

(C) SAP AG BC412 2-84
Attribute Value Proposal
Element type Custom Control
Name CONTROL_AREA1
Line Freely definable 2
Column Freely definable 2
Def.Length/
Vis.Length
Freely definable 50
Height Freely definable 11
Resizing on
Min. lines Freely definable 3
Min. columns Freely definable 5
Activate the screen.
1-3 Create a container instance. You do this in a PBO module of screen 100.
1-3-1 Create a reference variable for your container instance (suggested name: ref_container). Use the global class type cl_gui_custom_container.
1-3-2 Create a flag variable (type C, length 1, suggested name: first_time).
1-3-3 Screen 100 has the PBO module init_control_processing. Extend the module to create a Container Control instance when the program is executed for the first time. Pass the name of the Custom Control area you created in interface parameter container_name. Handle all exceptions triggered by the 'constructor' under the special exception other. Terminate program execution if one of the exceptions is triggered. In this context, use dialog message 010 of message class bc412 (message type A).
1-4 Create an instance of the Picture Control. The corresponding source code is also encapsulated in PBO module init_control_processing that is used in 1-3-3 above.
1-4-1 Create a reference variable for your Picture Control instance (suggested name: ref_picture). Use the global class type cl_gui_picture.
1-4-2 Extend the module init_control_processing to create a Picture Control instance when the program is executed for the first time. Pass your Container Control reference to interface parameter parent. Handle all exceptions triggered by the 'constructor' under the special exception other. Terminate program execution if one of the exceptions is triggered. In this context, use dialog message 011 of message class bc412 (message type A).

(C) SAP AG BC412 2-85
1-4 Activate and test your program. If your program runs correctly you see an empty screen (or an empty control area). If your program contains errors, you see the effects of either an 'A message' or of a runtime error.
• Message class bc412 has been set globally for the program (see statement REPORT).
• The pushbuttons on the screen of the template have not yet been assigned a function. You will use them in one of the next exercises.

(C) SAP AG BC412 2-86
Exercise 2
Unit: Introduction to the Control Framework Topic: Changing the Attributes of a Control
At the conclusion of these exercises, you will be able to:
• Change attributes of controls using method calls
• Display data in the Picture Control
Using the first exercise as a starting-point, you will now display an image in your Picture Control instance. The data source you use is the BDS (Business Document Server).
Program: ZBC412_##_CFW_EX2
Template: SAPBC412_BAST_EXERCISE2
Sample solution: SAPBC412_BASS_EXERCISE2
## is your group number
2-1 Copy program template SAPBC412_BAST_EXERCISE2 with all its subobjects to program ZBC412_##_CFW_EX2, or use the solution you created in the last exercise.
2-2 To be able to display an image in your Picture Control instance, you need a URL for that image. For this training course, data objects have been added to the BDS that can be displayed in the Picture Control. Use these objects in your program. You can use function module BC412_BDS_GET_PIC_URL to get a valid URL for an image in the BDS.
2-2-1 Define an ABAP field for the URL with the following properties: ABAP type C, length 80 (suggested name: l_url).
2-2-2 Call the function module BC412_BDS_GET_PIC_URL. This function module encapsulates the technical details for accessing the images contained in the BDS. Set the value of the IMPORT parameter NUMBER to 1 (default value). The EXPORT parameter URL returns a valid URL. This URL is valid as long as the program executes. To keep your code clearly structured, you should use the function module at START-OF-SELECTION before the screen 100 is called.

(C) SAP AG BC412 2-87
Terminate your program if the function module cannot return a valid URL. To do this, use the LEAVE PROGRAM statement.
2-2-3 Make sure that the image for which you now have a URL is displayed in your control instance. To do this, you use the instance method load_picture_from_url of class cl_gui_picture. Handle all exceptions triggered by the 'constructor' under the special exception other. Terminate program execution if one of the exceptions is triggered. In this context, use dialog message 012 of message class bc412 (message type A). If you receive the EXPORT parameter RESULT (ABAP type I), you can use dialog messages 013 and 014 (message class bc412, message type S or I) to indicate whether the attempt to display the image was successful or not.
Note the semantic significance of the value returned (parameter result): 1 = Image loaded successfully, 0 = Image could not be loaded.

(C) SAP AG BC412 2-88
Exercise 3
Unit: Introduction to the Control Framework Topic: Changing the Attributes of a Control
At the conclusion of these exercises, you will be able to:
• Destroy control instances at the frontend
• Release reference variables to proxy objects
• Change control attributes through method calls (controlled through pushbuttons of a screen)
You extend the sample solution you created in the last exercise to destroy all frontend instances before the program is ended. In addition, you allow the user to control the mode in which the image is displayed in the control by means of pushbuttons on the screen.
Program: ZBC412_##_CFW_EX3
Template: SAPBC412_BAST_EXERCISE3
Sample solution: SAPBC412_BASS_EXERCISE3
## is your group number
3-1 Copy the program template SAPBC412_BAST_EXERCISE3 with all its subobjects to program ZBC412_##_CFW_EX3, or use the solution you created in the last exercise.
3-2 Make sure that your frontend control instances are destroyed correctly before the program is ended. To do this, implement the FORM subroutine free_control_ressources. Call the instance method free for each proxy instance, and release the ABAP reference variables. Note: The call and the interface of the subroutine have already been created in your program.
3-3 Make sure that you can change the display mode for your Picture Control instance by using the pushbuttons on screen 100.
3-3-1 Implement the functions 'STRETCH', 'NORMAL', 'NORMAL_CENTER', 'FIT', 'FIT_CENTER' defined by the pushbuttons. The implementation of these functions has been provided for in the PAI module user_command_0100. Use the instance method set_display_mode of class cl_gui_picture. If an exception is triggered when the method is executed, you should issue dialog message 015 of message class bc412 (message type S or I).

(C) SAP AG BC412 2-89
3-3-2 Test the mode in which the control displays the image by resizing the window of the screen.
To set a value for the interface parameter display_mode of method set_display_mode, use the following class constants: display_mode_stretch, display_mode_normal, display_mode_normal_center, display_mode_fit and display_mode_fit_center of class cl_gui_picture.
Access is possible using cl_gui_picture=>display_mode_fit.

(C) SAP AG BC412 2-90
Exercise 3 Optional Parts
At the conclusion of these optional exercises, you will be able to:
• Determine attributes of a frontend control (read access)
You allow the user to display the current display mode of the Picture Control.
Program: same program
Template: as above
Sample solution: SAPBC412_BASS_EXERCISE3A
3-4 Add another pushbutton to screen 100 which, when chosen, displays the current display mode of the Picture Control (as a technical value) in a dialog box.
3-4-1 Create another pushbutton on screen 100 with the following attributes:
Attribut Value Proposal
Element type Pushbutton
Name Freely definable BUT6
Text Freely definable Query mode
Icon Freely definable ICON_INFORMATION
FctCode MODE_INFO
FctType ' ' (<none>)
3-4-2 Implement the associated function (function code MODE_INFO) in the module user_command_0100. Read the attribute display_mode of your Picture Control proxy instance, and save the result in an ABAP field (suggested name: current_mode). Declare the data object in the data declaration part of your program, and type the variable with reference to cl_gui_picture=>display_mode. Output the content of your data object (current_mode) using dialog message 025 (message class bc412, message type I) .

(C) SAP AG BC412 2-91
Exercise 4
Unit: Introduction to the Control Framework Topic: Control Events
At the conclusion of these exercises, you will be able to:
• Define and implement a static method of a local class as an event handler
• Register a static handler method for an ABAP Objects event
• Register control events at the Control Framework
• Find information about control events in the ABAP Workbench
Your task is to allow the user of your program to determine the coordinates of a pixel of the image. The user should be able to do this by clicking the selection button of the mouse on the image. To implement this function, you use a control event.
Program: ZBC412_##_CFW_EX4
Template: SAPBC412_BAST_EXERCISE4
Sample solution: SAPBC412_BASS_EXERCISE4
## is your group number
4-1 Copy the program template SAPBC412_BAST_EXERCISE4 with all its subobjects to program ZBC412_##_CFW_EX4, or use the solution you created in the last exercise.
4-2 Create a local class in your program that contains an event handling method for the event PICTURE_CLICK of your Picture Control instance.
4-2-1 Go to the Class Builder and obtain information on the interface of the event PICTURE_CLICK of class cl_gui_picture.
4-2-2 Define a local class in the data declaration part of your program (suggested name: lcl_event_handler).
4-2-3 The local class should have a public static method which is to be used as the event handling method. Use the CLASS-METHODS statement to define an event handling method for

(C) SAP AG BC412 2-92
the event PICTURE_CLICK of class cl_gui_picture (suggested name: on_picture_click). Define the interface of the method so that it receives the coordinates of the pixel on which the user clicked from the event.
4-2-4 Implement the method in the implementation part of the class. In response to the event, output the coordinates returned using dialog message 016 (message class bc412, message type I).
4-3 Register the static method you created for the event PICTURE_CLICK of your proxy instance for the Picture Control instance at the frontend.
4-3-1 Add the SET HANDLER statement to the PBO module init_control_processing to register the static method for the event of your Picture Control instance.
4-4 Register the control event PICTURE_CLICK of your control instance at the Control Framework.
4-4-1 In the data declaration part of your program, define two additional data objects: - An internal table that you use to pass the events to be registered at the CFW to the instance method set_registered_events of class cl_gui_picture (suggested name for the internal table: it_events), - A work area that you need when you fill the internal table (suggested name: wa_events).
4-4-2 Type the internal table with reference to cntl_simple_events (type of an internal table; type declaration in the ABAP Dictionary; new for Release 4.6). Type the work area so that is has the same row structure as the internal table.
4-4-3 In the Class Builder, inform yourself about the names of the class constants for the control events ( event_ids). You need these names to register the events at the Control Framework.
4-4-4 Fill the internal table with the data for the event PICTURE_CLICK, and register the event at the Control Framework using the instance method set_registered_events. To do this, extend the PBO module init_control_processing. Note: Call the instance method set_registered_events for your Picture Control instance.
4-5 Test your program.
You can use cl_gui_picture=>eventid_picture_click to access class constants.

(C) SAP AG BC412 2-93
(C) SAP AG BC412 2-94
Exercise 4 Optional Parts
At the conclusion of these exercises, you will be able to:
• Define and implement a static method of a class as an event handler
• Register a static handler method for an ABAP Objects event
• Register control events at the Control Framework
• Find information about control events in the ABAP Workbench
Your task is to allow the user of your program to determine the coordinates of a pixel which is in the control area but not in the image area. The user should be able to do this by double-clicking the selection button of the mouse on the control area. To implement this function, you use another control event.
Program: same as above
Template : same as above
Sample solution: SAPBC412_BASS_EXERCISE4A
4-6 Extend your program to show a user double-clicking in the control area outside the image displayed the coordinates of the position on which the mouse was double-clicked.
To do this, use the event CONTROL_DBLCLICK, and perform the same steps for this new event as described in 4-2 to 4-4.
• Use the same local class, and add another public static method for handling CONTROL_DBLCLICK events of your Picture Control instance to this class.
• Use dialog message 017 of message class bc412 (message type I) to respond to the event.

(C) SAP AG BC412 2-95
Note on the Sample Solutions for Unit 02
The sample solutions provided include the statements of the screen flow logic and of the ABAP program parts required in the sample solution.
The exercises of this chapter are sequential so that you extend the program step by step based on the content of each chapter. For better clarity, we did not include the complete source code for each sample solution. Instead, we have applied the following principles:
• The sample solution of the first task is printed completely.
• All subsequent sample solutions that are based on this first one only contain changed or new flow logic, subroutines or modules. The statements you need to add in each case in order to solve the task are printed in bold.
• After the sample solution for the last exercise of this chapter (Exercise 4), you find a complete version of the program developed during the exercises.

(C) SAP AG BC412 6-96
Introduction to the Control Framework Solution Task 1
Unit: Introduction to the Control Framework Topic: Controls and Screens
Sample solution SAPBC412_BASS_EXERCISE1
Screen flow logic SCREEN 100
PROCESS BEFORE OUTPUT. MODULE status_0100. MODULE init_control_processing. PROCESS AFTER INPUT. MODULE exit_command_0100 AT EXIT-COMMAND. MODULE user_command_0100.
ABAP program Data declarations
*&-----------------------------------------------------------------*
*& Report SAPBC412_BASS_EXERCISE1 *
*& *
*&-----------------------------------------------------------------*
REPORT sapbc412_bass_exercise1 MESSAGE-ID bc412. * data declarations * screen specific DATA: ok_code TYPE sy-ucomm, " command field copy_ok_code LIKE ok_code, " copy of ok_code l_answer TYPE c, " return flag (used in " standard user dialogs) * control specific: object references ref_container TYPE REF TO cl_gui_custom_container, ref_picture TYPE REF TO cl_gui_picture,

(C) SAP AG BC412 6-97
* control specific: auxiliary fields first_time TYPE c. " flag (screen + control)
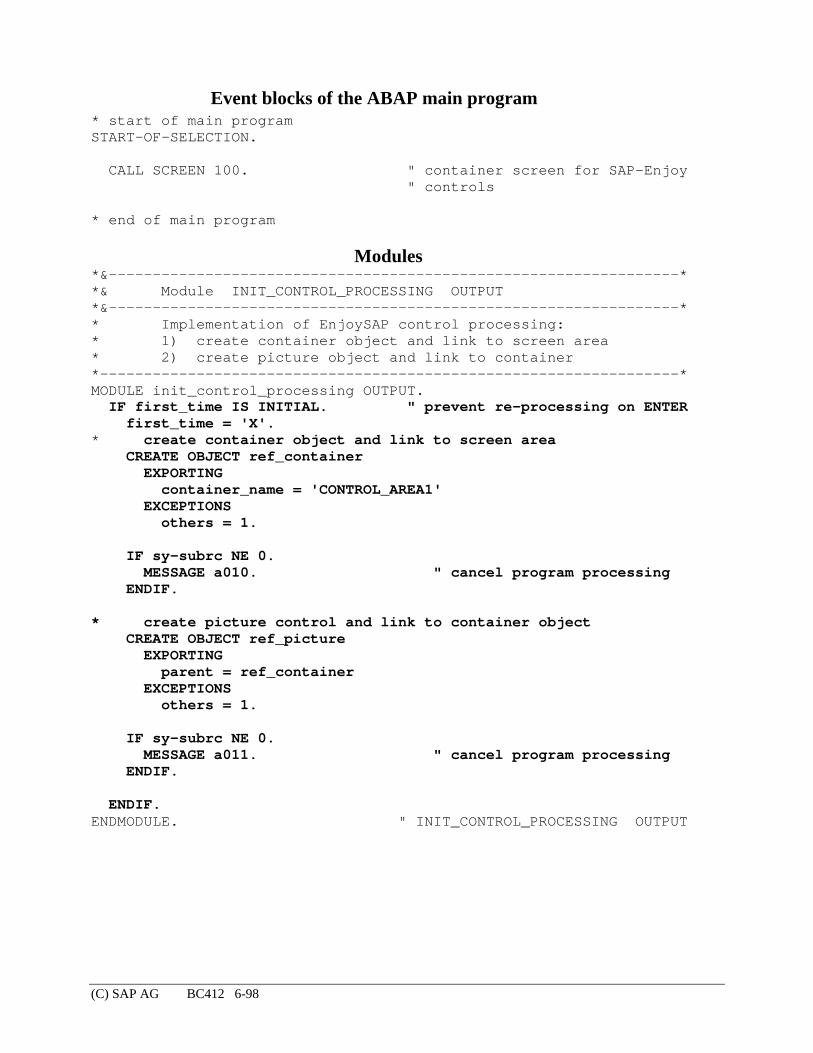
(C) SAP AG BC412 6-98
Event blocks of the ABAP main program * start of main program START-OF-SELECTION. CALL SCREEN 100. " container screen for SAP-Enjoy " controls * end of main program
Modules *&-----------------------------------------------------------------* *& Module INIT_CONTROL_PROCESSING OUTPUT *&-----------------------------------------------------------------* * Implementation of EnjoySAP control processing: * 1) create container object and link to screen area * 2) create picture object and link to container *------------------------------------------------------------------* MODULE init_control_processing OUTPUT. IF first_time IS INITIAL. " prevent re-processing on ENTER first_time = 'X'. * create container object and link to screen area CREATE OBJECT ref_container EXPORTING container_name = 'CONTROL_AREA1' EXCEPTIONS others = 1. IF sy-subrc NE 0. MESSAGE a010. " cancel program processing ENDIF. * create picture control and link to container object CREATE OBJECT ref_picture EXPORTING parent = ref_container EXCEPTIONS others = 1. IF sy-subrc NE 0. MESSAGE a011. " cancel program processing ENDIF. ENDIF. ENDMODULE. " INIT_CONTROL_PROCESSING OUTPUT

(C) SAP AG BC412 6-99
*&-----------------------------------------------------------------* *& Module USER_COMMAND_0100 INPUT *&-----------------------------------------------------------------* * Implementation of user commands of type ' ': * - push buttons on the screen * - GUI functions *------------------------------------------------------------------* MODULE user_command_0100 INPUT. copy_ok_code = ok_code. CLEAR ok_code. CASE copy_ok_code. WHEN 'BACK'. CLEAR l_answer. CALL FUNCTION 'POPUP_TO_CONFIRM_STEP' EXPORTING * DEFAULTOPTION = 'Y' textline1 = text-004 textline2 = text-005 titel = text-007 cancel_display = ' ' IMPORTING answer = l_answer. CASE l_answer. WHEN 'J'. PERFORM free_control_ressources. LEAVE TO SCREEN 0. WHEN 'N'. SET SCREEN sy-dynnr. ENDCASE. WHEN 'STRETCH'. " picture operation: stretch to fit area * to be implemented later WHEN 'NORMAL'. " picture operation: fit to normal size * to be implemented later WHEN 'NORMAL_CENTER'. " picture operation: center normal size * to be implemented later WHEN 'FIT'. " picture operation: zoom picture * to be implemented later WHEN 'FIT_CENTER'. " picture operation: zoom and center * to be implemented later ENDCASE. ENDMODULE. " USER_COMMAND_0100 INPUT *&-----------------------------------------------------------------* *& Module STATUS_0100 OUTPUT *&-----------------------------------------------------------------* * Set GUI for screen 0100 *------------------------------------------------------------------* MODULE status_0100 OUTPUT. SET PF-STATUS 'STATUS_NORM_0100'.

(C) SAP AG BC412 6-100
SET TITLEBAR 'TITLE_NORM_0100'. ENDMODULE. " STATUS_0100 OUTPUT *&-----------------------------------------------------------------* *& Module EXIT_COMMAND_0100 INPUT *&-----------------------------------------------------------------* * Implementation of user commands of type 'E'. *------------------------------------------------------------------* MODULE exit_command_0100 INPUT. CASE ok_code. WHEN 'CANCEL'. " cancel current screen processing CLEAR l_answer. CALL FUNCTION 'POPUP_TO_CONFIRM_STEP' EXPORTING * DEFAULTOPTION = 'Y' textline1 = text-004 textline2 = text-005 titel = text-006 cancel_display = ' ' IMPORTING answer = l_answer. CASE l_answer. WHEN 'J'. PERFORM free_control_ressources. LEAVE TO SCREEN 0. WHEN 'N'. CLEAR ok_code. SET SCREEN sy-dynnr. ENDCASE. WHEN 'EXIT'. " leave program CLEAR l_answer. CALL FUNCTION 'POPUP_TO_CONFIRM_STEP' EXPORTING * DEFAULTOPTION = 'Y' textline1 = text-001 textline2 = text-002 titel = text-003 cancel_display = 'X' IMPORTING answer = l_answer. CASE l_answer. WHEN 'J' OR 'N'. " no data to update PERFORM free_control_ressources. LEAVE PROGRAM. WHEN 'A'. CLEAR ok_code. SET SCREEN sy-dynnr. ENDCASE. ENDCASE. ENDMODULE. " EXIT_COMMAND_0100 INPUT

(C) SAP AG BC412 6-101
Subroutines *&-----------------------------------------------------------------* *& Form free_control_ressources *&-----------------------------------------------------------------* * Here you should implement: Free all control related * ressources. *------------------------------------------------------------------* * no interface *------------------------------------------------------------------* FORM free_control_ressources. * to be implemented later ENDFORM. " free_control_ressources

(C) SAP AG BC412 7-102
Solution for Task 2
Unit: Introduction to the Control Framework Topic: Changing the Attributes of a Control
Sample solution SAPBC412_BASS_EXERCISE2 ABAP program
Data declarations *&-----------------------------------------------------------------* *& Report SAPBC412_BASS_EXERCISE2 * *& * *&-----------------------------------------------------------------* REPORT sapbc412_bass_exercise2 MESSAGE-ID bc412. * data declarations * screen specific DATA: ok_code TYPE sy-ucomm, " command field copy_ok_code LIKE ok_code, " copy of ok_code l_answer TYPE c, " return flag (used in " standard user dialogs) * control specific: object references ref_container TYPE REF TO cl_gui_custom_container, ref_picture TYPE REF TO cl_gui_picture, * control specific: auxiliary fields first_time TYPE c, " flag (screen + control) l_url(80) TYPE c, " URL of picture to be shown l_result TYPE i value 1. " status variable of load_picture " 1 = o.k., 0 = error

(C) SAP AG BC412 7-103
Event blocks of the ABAP main program * start of main program START-OF-SELECTION. CALL FUNCTION 'BC412_BDS_GET_PIC_URL'" fetch URL of first picture * EXPORTING " from BDS * NUMBER = 1 IMPORTING url = l_url EXCEPTIONS OTHERS = 1. IF sy-subrc <> 0. " no picture --> end of program LEAVE PROGRAM. ENDIF. CALL SCREEN 100. " container screen for SAP-Enjoy " controls * end of main program
Modules *&-----------------------------------------------------------------* *& Module INIT_CONTROL_PROCESSING OUTPUT *&-----------------------------------------------------------------* * Implementation of EnjoySAP control processing: * 1) create container object and link to screen area * 2) create picture object and link to container * 3) load picture into picture control *------------------------------------------------------------------* MODULE init_control_processing OUTPUT. IF first_time IS INITIAL. " prevent re-processing on ENTER first_time = 'X'. * create container object and link to screen area CREATE OBJECT ref_container EXPORTING container_name = 'CONTROL_AREA1' EXCEPTIONS others = 1. IF sy-subrc NE 0. MESSAGE a010. " cancel program processing ENDIF. * create picture control and link to container object CREATE OBJECT ref_picture EXPORTING parent = ref_container EXCEPTIONS others = 1. IF sy-subrc NE 0. MESSAGE a011. " cancel programn processing ENDIF.

(C) SAP AG BC412 7-104
* load picture into picture control CALL METHOD ref_picture->load_picture_from_url EXPORTING url = l_url IMPORTING result = l_result EXCEPTIONS OTHERS = 1. IF sy-subrc NE 0. MESSAGE a012. ENDIF. CASE l_result. WHEN 0. " picture not loaded MESSAGE s013. WHEN 1. " load of picture successful MESSAGE s014. ENDCASE. ENDIF. ENDMODULE. " INIT_CONTROL_PROCESSING OUTPUT

(C) SAP AG BC412 8-105
Solution for Task 3
Unit: Introduction to the Control Framework Topic: Changing the Attributes of a Control
Sample solution SAPBC412_BASS_EXERCISE3 ABAP program
Modules *&-----------------------------------------------------------------* *& Module USER_COMMAND_0100 INPUT *&-----------------------------------------------------------------* * Implementation of user commands of type ' ': * - push buttons on screen 100 * - GUI functions *------------------------------------------------------------------* MODULE user_command_0100 INPUT. copy_ok_code = ok_code. CLEAR ok_code. CASE copy_ok_code. WHEN 'BACK'. " back to program, leave screen CLEAR l_answer. CALL FUNCTION 'POPUP_TO_CONFIRM_STEP' EXPORTING * DEFAULTOPTION = 'Y' textline1 = text-004 textline2 = text-005 titel = text-007 cancel_display = ' ' IMPORTING answer = l_answer. CASE l_answer. WHEN 'J'. PERFORM free_control_ressources. LEAVE TO SCREEN 0. WHEN 'N'. SET SCREEN sy-dynnr. ENDCASE.

(C) SAP AG BC412 8-106
WHEN 'STRETCH'. " picture operation: stretch to fit area CALL METHOD ref_picture->set_display_mode EXPORTING display_mode = cl_gui_picture=>display_mode_stretch EXCEPTIONS OTHERS = 1. IF sy-subrc NE 0. MESSAGE s015. ENDIF. WHEN 'NORMAL'. " picture operation: fit to normal size CALL METHOD ref_picture->set_display_mode EXPORTING display_mode = cl_gui_picture=>display_mode_normal EXCEPTIONS OTHERS = 1. IF sy-subrc NE 0. MESSAGE s015. ENDIF. WHEN 'NORMAL_CENTER'. " picture operation: center normal size CALL METHOD ref_picture->set_display_mode EXPORTING display_mode = cl_gui_picture=>display_mode_normal_center EXCEPTIONS OTHERS = 1. IF sy-subrc NE 0. MESSAGE s015. ENDIF. WHEN 'FIT'. " picture operation: zoom picture CALL METHOD ref_picture->set_display_mode EXPORTING display_mode = cl_gui_picture=>display_mode_fit EXCEPTIONS OTHERS = 1. IF sy-subrc NE 0. MESSAGE s015. ENDIF. WHEN 'FIT_CENTER'. " picture operation: zoom and center CALL METHOD ref_picture->set_display_mode EXPORTING display_mode = cl_gui_picture=>display_mode_fit_center EXCEPTIONS OTHERS = 1. IF sy-subrc NE 0. MESSAGE s015. ENDIF. ENDCASE. ENDMODULE. " USER_COMMAND_0100 INPUT

(C) SAP AG BC412 8-107
Subroutines *&-----------------------------------------------------------------* *& Form free_control_ressources *&-----------------------------------------------------------------* * Free all control related ressources. *------------------------------------------------------------------* * no interface *------------------------------------------------------------------* FORM free_control_ressources. CALL METHOD ref_picture->free. CALL METHOD ref_container->free. FREE: ref_picture, ref_container. ENDFORM. " free_control_ressources

(C) SAP AG BC412 9-108
Solution for Task 3: Optional Parts
Unit: Introduction to the Control Framework Topic: Changing the Attributes of a Control
Sample solution SAPBC412_BASS_EXERCISE3A ABAP program
Data declarations *&-----------------------------------------------------------------* *& Report SAPBC412_BASS_EXERCISE3A * *& * *&-----------------------------------------------------------------* REPORT sapbc412_bass_exercise3a MESSAGE-ID bc412. * data declarations * screen specific DATA: ok_code TYPE sy-ucomm, " command field copy_ok_code LIKE ok_code, " copy of ok_code l_answer TYPE c, " return flag (used in " standard user dialogs) * control specific: object references ref_container TYPE REF TO cl_gui_custom_container, ref_picture TYPE REF TO cl_gui_picture, * control specific: auxiliary fields first_time TYPE c, " flag (screen + control) l_url(80) TYPE c, " URL of picture to be shown l_result TYPE i value 1, " status variable of load_picture " 1 = o.k., 0 = error current_mode LIKE cl_gui_picture=>display_mode.

(C) SAP AG BC412 9-109
Modules *&-----------------------------------------------------------------* *& Module USER_COMMAND_0100 INPUT *&-----------------------------------------------------------------* * Implementation of user commands of type ' ': * - push buttons on screen 100 * - GUI functions *------------------------------------------------------------------* MODULE user_command_0100 INPUT. copy_ok_code = ok_code. CLEAR ok_code. CASE copy_ok_code. WHEN 'BACK'. " back to program, leave screen CLEAR l_answer. CALL FUNCTION 'POPUP_TO_CONFIRM_STEP' EXPORTING * DEFAULTOPTION = 'Y' textline1 = text-004 textline2 = text-005 titel = text-007 cancel_display = ' ' IMPORTING answer = l_answer. CASE l_answer. WHEN 'J'. PERFORM free_control_ressources. LEAVE TO SCREEN 0. WHEN 'N'. SET SCREEN sy-dynnr. ENDCASE. WHEN 'STRETCH'. " picture operation: stretch to fit area CALL METHOD ref_picture->set_display_mode EXPORTING display_mode = cl_gui_picture=>display_mode_stretch EXCEPTIONS OTHERS = 1. IF sy-subrc NE 0. MESSAGE s015. ENDIF. WHEN 'NORMAL'. " picture operation: fit normal size CALL METHOD ref_picture->set_display_mode EXPORTING display_mode = cl_gui_picture=>display_mode_normal EXCEPTIONS OTHERS = 1. IF sy-subrc NE 0. MESSAGE s015. ENDIF.

(C) SAP AG BC412 9-110
WHEN 'NORMAL_CENTER'. " picture operation: center normal size CALL METHOD ref_picture->set_display_mode EXPORTING display_mode = cl_gui_picture=>display_mode_normal_center EXCEPTIONS OTHERS = 1. IF sy-subrc NE 0. MESSAGE s015. ENDIF. WHEN 'FIT'. " picture operation: zoom picture CALL METHOD ref_picture->set_display_mode EXPORTING display_mode = cl_gui_picture=>display_mode_fit EXCEPTIONS OTHERS = 1. IF sy-subrc NE 0. MESSAGE s015. ENDIF. WHEN 'FIT_CENTER'. " picture operation: zoom and center CALL METHOD ref_picture->set_display_mode EXPORTING display_mode = cl_gui_picture=>display_mode_fit_center EXCEPTIONS OTHERS = 1. IF sy-subrc NE 0. MESSAGE s015. ENDIF. WHEN 'MODE_INFO'. current_mode = ref_picture->display_mode. MESSAGE i025 WITH current_mode. ENDCASE. ENDMODULE. " USER_COMMAND_0100 INPUT

(C) SAP AG BC412 10-111
Solution for Task 4
Unit: Introduction to the Control Framework Topic: Control Events
Sample solution SAPBC412_BASS_EXERCISE4 ABAP program
Local classes REPORT sapbc412_bass_exercise4 MESSAGE-ID bc412. *------------------------------------------------------------------* * CLASS lcl_event_handler DEFINITION *------------------------------------------------------------------* * Definition of a local class containing event handler * * methods for picture control objects * *------------------------------------------------------------------* CLASS lcl_event_handler DEFINITION. PUBLIC SECTION. CLASS-METHODS: on_picture_click FOR EVENT picture_click OF cl_gui_picture IMPORTING mouse_pos_x mouse_pos_y. ENDCLASS. *------------------------------------------------------------------* * CLASS lcl_event_handler IMPLEMENTATION *------------------------------------------------------------------* * Corresponding class implementation * *------------------------------------------------------------------* CLASS lcl_event_handler IMPLEMENTATION. METHOD on_picture_click. MESSAGE i016 WITH mouse_pos_x mouse_pos_y. ENDMETHOD. ENDCLASS.

(C) SAP AG BC412 10-112
Data declarations * data declarations * screen specific DATA: ok_code TYPE sy-ucomm, " command field copy_ok_code LIKE ok_code, " copy of ok_code l_answer TYPE c, " return flag (used in " standard user dialogs) * control specific: object references ref_container TYPE REF TO cl_gui_custom_container, ref_picture TYPE REF TO cl_gui_picture, * control specific: auxiliary fields first_time TYPE c, " flag (screen + control) l_url(80) TYPE c, " URL of picture to be shown l_result TYPE i value 1, " status variable of load_picture " 1 = o.k., 0 = error current_mode LIKE cl_gui_picture=>display_mode, * event handling it_events TYPE cntl_simple_events, " internal (event) table wa_events LIKE LINE OF it_events. " work area
Modules *&-----------------------------------------------------------------* *& Module INIT_CONTROL_PROCESSING OUTPUT *&-----------------------------------------------------------------* * Implementation of EnjoySAP control processing: * 1) create container object and link to screen area * 2) create picture object and link to container * 3) load picture into picture control * 4) event handling * a) register event PICTURE_CLICK at CFW * b) register event handler method ON_PICTURE_CLICK * for the picture control object *------------------------------------------------------------------* MODULE init_control_processing OUTPUT. IF first_time IS INITIAL. " prevent re-processing on ENTER first_time = 'X'. * create container object and link to screen area CREATE OBJECT ref_container EXPORTING container_name = 'CONTROL_AREA1' EXCEPTIONS others = 1. IF sy-subrc NE 0. MESSAGE a010. " cancel program processing ENDIF.

(C) SAP AG BC412 10-113
* create picture control and link to container object CREATE OBJECT ref_picture EXPORTING parent = ref_container EXCEPTIONS others = 1. IF sy-subrc NE 0. MESSAGE a011. " cancel program processing ENDIF. * load picture into picture control CALL METHOD ref_picture->load_picture_from_url EXPORTING url = l_url IMPORTING result = l_result EXCEPTIONS OTHERS = 1. IF sy-subrc NE 0. MESSAGE a012. ENDIF. CASE l_result. WHEN 0. " picture not loaded MESSAGE s013. WHEN 1. " load of picture successful MESSAGE s014. ENDCASE. * event handling * 1. register events for control framework wa_events-eventid = cl_gui_picture=>eventid_picture_click. wa_events-appl_event = ' '. INSERT wa_events INTO TABLE it_events. CALL METHOD ref_picture->set_registered_events EXPORTING events = it_events EXCEPTIONS OTHERS = 1. IF sy-subrc NE 0. MESSAGE a012. ENDIF. * 2. set event handler for ABAP object instance: ref_picture SET HANDLER lcl_event_handler=>on_picture_click FOR ref_picture. ENDIF. ENDMODULE. " INIT_CONTROL_PROCESSING OUTPUT

(C) SAP AG BC412 11-114
Solution for Task 4: Optional Parts
Unit: Introduction to the Control Framework Topic: Control Events
Sample solution SAPBC412_BASS_EXERCISE4A ABAP program
Local classes REPORT sapbc412_bass_exercise4a MESSAGE-ID bc412. *------------------------------------------------------------------* * CLASS lcl_event_handler DEFINITION *------------------------------------------------------------------* * Definition of a local class containing event handler * * methods for picture control objects * *------------------------------------------------------------------* CLASS lcl_event_handler DEFINITION. PUBLIC SECTION. CLASS-METHODS: on_picture_click FOR EVENT picture_click OF cl_gui_picture IMPORTING mouse_pos_x mouse_pos_y, * -------------------------------------------------------------- on_control_dblclick FOR EVENT control_dblclick OF cl_gui_picture IMPORTING mouse_pos_x mouse_pos_y. ENDCLASS. *------------------------------------------------------------------* * CLASS lcl_event_handler IMPLEMENTATION *------------------------------------------------------------------* * Corresponding class implementation * *------------------------------------------------------------------* CLASS lcl_event_handler IMPLEMENTATION. METHOD on_picture_click. MESSAGE i016 WITH mouse_pos_x mouse_pos_y. ENDMETHOD. METHOD on_control_dblclick. MESSAGE i017 WITH mouse_pos_x mouse_pos_y. ENDMETHOD. ENDCLASS.

(C) SAP AG BC412 11-115
Modules *&-----------------------------------------------------------------* *& Module INIT_CONTROL_PROCESSING OUTPUT *&-----------------------------------------------------------------* * Implementation of EnjoySAP control processing: * 1) create container object and link to screen area * 2) create picture object and link to container * 3) load picture into picture control * 4) event handling * a1) register event PICTURE_CLICK at CFW * a2) register event CONTROL_DBLCLICK at CFW * b1) register event handler method ON_PICTURE_CLICK * for the picture control object * b2) register event handler method ON_CONTROL_DBLCLICK * for the picture control object *------------------------------------------------------------------* MODULE init_control_processing OUTPUT. IF first_time IS INITIAL. " prevent re-processing on ENTER first_time = 'X'. * create container object and link to screen area CREATE OBJECT ref_container EXPORTING container_name = 'CONTROL_AREA1' EXCEPTIONS others = 1. IF sy-subrc NE 0. MESSAGE a010. " cancel program processing ENDIF. * create picture control and link to container object CREATE OBJECT ref_picture EXPORTING parent = ref_container EXCEPTIONS others = 1. IF sy-subrc NE 0. MESSAGE a011. " cancel program processing ENDIF. * load picture into picture control CALL METHOD ref_picture->load_picture_from_url EXPORTING url = l_url IMPORTING result = l_result EXCEPTIONS OTHERS = 1. IF sy-subrc NE 0. MESSAGE a012.

(C) SAP AG BC412 11-116
ENDIF.

(C) SAP AG BC412 11-117
CASE l_result. WHEN 0. " picture not loaded MESSAGE s013. WHEN 1. " load of picture successful MESSAGE s014. ENDCASE. * event handling * 1. register events for control framework wa_events-eventid = cl_gui_picture=>eventid_picture_click. wa_events-appl_event = ' '. INSERT wa_events INTO TABLE it_events. wa_events-eventid = cl_gui_picture=>eventid_control_dblclick. wa_events-appl_event = ' '. INSERT wa_events INTO TABLE it_events. CALL METHOD ref_picture->set_registered_events EXPORTING events = it_events EXCEPTIONS OTHERS = 1. IF sy-subrc NE 0. MESSAGE a012. ENDIF. * 2. set event handler for ABAP object instance: ref_picture SET HANDLER lcl_event_handler=>on_picture_click FOR ref_picture. SET HANDLER lcl_event_handler=>on_control_dblclick FOR ref_picture. ENDIF. ENDMODULE. " INIT_CONTROL_PROCESSING OUTPUT

(C) SAP AG BC412 13-118
Complete Solution for all Tasks
Unit: Introduction to the Control Framework
Sample solution SAPBC412_BASS_EXERCISE
Screen flow logic SCREEN 0100
PROCESS BEFORE OUTPUT. MODULE status_0100. MODULE init_control_processing. PROCESS AFTER INPUT. MODULE exit_command_0100 AT EXIT-COMMAND. MODULE user_command_0100.
ABAP program
Local classes *&-----------------------------------------------------------------* *& Report SAPBC412_BASS_EXERCISE * *& * *&-----------------------------------------------------------------* REPORT sapbc412_bass_exercise MESSAGE-ID bc412. *------------------------------------------------------------------* * CLASS lcl_event_handler DEFINITION *------------------------------------------------------------------* * Definition of a local class containing event handler * * methods for picture control objects * *-----------------------------------------------------_------------* CLASS lcl_event_handler DEFINITION. PUBLIC SECTION. CLASS-METHODS: on_picture_click FOR EVENT picture_click OF cl_gui_picture IMPORTING mouse_pos_x mouse_pos_y, * -------------------------------------------------------------- on_control_dblclick FOR EVENT control_dblclick OF cl_gui_picture IMPORTING mouse_pos_x mouse_pos_y. ENDCLASS.

(C) SAP AG BC412 13-119
*------------------------------------------------------------------* * CLASS lcl_event_handler IMPLEMENTATION *------------------------------------------------------------------* * Corresponding class implementation * *------------------------------------------------------------------* CLASS lcl_event_handler IMPLEMENTATION. METHOD on_picture_click. MESSAGE i016 WITH mouse_pos_x mouse_pos_y. ENDMETHOD. METHOD on_control_dblclick. MESSAGE i017 WITH mouse_pos_x mouse_pos_y. ENDMETHOD. ENDCLASS.
Data declarations * data declarations * screen specific DATA: ok_code TYPE sy-ucomm, " command field copy_ok_code LIKE ok_code, " copy of ok_code l_answer TYPE c, " return flag (used in " standard user dialogs) * control specific: object references ref_container TYPE REF TO cl_gui_custom_container, ref_picture TYPE REF TO cl_gui_picture, * control specific: auxiliary fields first_time TYPE c, " flag (screen + control) l_url(80) TYPE c, " URL of picture to be shown l_result TYPE i value 1, " status variable of load_picture " 1 = o.k., 0 = error current_mode LIKE cl_gui_picture=>display_mode, * event handling it_events TYPE cntl_simple_events, " internal (event) table wa_events LIKE LINE OF it_events. " work area

(C) SAP AG BC412 13-120
Event blocks of the ABAP main program * start of main program START-OF-SELECTION. CALL FUNCTION 'BC412_BDS_GET_PIC_URL'" fetch URL of first picture * EXPORTING " from BDS * NUMBER = 1 IMPORTING url = l_url EXCEPTIONS OTHERS = 1. IF sy-subrc <> 0. " no picture --> end of program LEAVE PROGRAM. ENDIF. CALL SCREEN 100. " container screen for SAP-Enjoy " controls * end of main program
Modules *&-----------------------------------------------------------------* *& Module INIT_CONTROL_PROCESSING OUTPUT *&-----------------------------------------------------------------* * Implementation of EnjoySAP control processing: * 1) create container object and link to screen area * 2) create picture object and link to container * 3) load picture into picture control * 4) event handling * a1) register event PICTURE_CLICK at CFW * a2) register event CONTROL_DBLCLICK at CFW * b1) register event handler method ON_PICTURE_CLICK * for the picture control object * b2) register event handler method ON_CONTROL_DBLCLICK * for the picture control object *------------------------------------------------------------------* MODULE init_control_processing OUTPUT. IF first_time IS INITIAL. " prevent re-processing on ENTER first_time = 'X'. * create container object and link to screen area CREATE OBJECT ref_container EXPORTING container_name = 'CONTROL_AREA1' EXCEPTIONS others = 1. IF sy-subrc NE 0. MESSAGE a010. " cancel program processing ENDIF.

(C) SAP AG BC412 13-121
* create picture control and link to container object CREATE OBJECT ref_picture EXPORTING parent = ref_container EXCEPTIONS others = 1. IF sy-subrc NE 0. MESSAGE a011. " cancel program processing ENDIF. * load picture into picture control CALL METHOD ref_picture->load_picture_from_url EXPORTING url = l_url IMPORTING result = l_result EXCEPTIONS OTHERS = 1. IF sy-subrc NE 0. MESSAGE a012. ENDIF. CASE l_result. WHEN 0. " picture not loaded MESSAGE s013. WHEN 1. " load of picture successful MESSAGE s014. ENDCASE. * event handling * 1. register events for control framework wa_events-eventid = cl_gui_picture=>eventid_picture_click. wa_events-appl_event = ' '. INSERT wa_events INTO TABLE it_events. wa_events-eventid = cl_gui_picture=>eventid_control_dblclick. wa_events-appl_event = ' '. INSERT wa_events INTO TABLE it_events. CALL METHOD ref_picture->set_registered_events EXPORTING events = it_events EXCEPTIONS OTHERS = 1. IF sy-subrc NE 0. MESSAGE a012. ENDIF.
(C) SAP AG BC412 13-122
* 2. set event handler for ABAP object instance: ref_picture SET HANDLER lcl_event_handler=>on_picture_click FOR ref_picture. SET HANDLER lcl_event_handler=>on_control_dblclick FOR ref_picture. ENDIF. ENDMODULE. " INIT_CONTROL_PROCESSING OUTPUT *&-----------------------------------------------------------------* *& Module USER_COMMAND_0100 INPUT *&-----------------------------------------------------------------* * Implementation of user commands of type ' ': * - push buttons on screen 100 * - GUI functions *------------------------------------------------------------------* MODULE user_command_0100 INPUT. copy_ok_code = ok_code. CLEAR ok_code. CASE copy_ok_code. WHEN 'BACK'. " back to program, leave screen CLEAR l_answer. CALL FUNCTION 'POPUP_TO_CONFIRM_STEP' EXPORTING * DEFAULTOPTION = 'Y' textline1 = text-004 textline2 = text-005 titel = text-007 cancel_display = ' ' IMPORTING answer = l_answer. CASE l_answer. WHEN 'J'. PERFORM free_control_ressources. LEAVE TO SCREEN 0. WHEN 'N'. SET SCREEN sy-dynnr. ENDCASE. WHEN 'STRETCH'. " picture operation: stretch to fit area CALL METHOD ref_picture->set_display_mode EXPORTING display_mode = cl_gui_picture=>display_mode_stretch EXCEPTIONS OTHERS = 1. IF sy-subrc NE 0. MESSAGE s015. ENDIF.

(C) SAP AG BC412 13-123
WHEN 'NORMAL'. " picture operation: fit normal size CALL METHOD ref_picture->set_display_mode EXPORTING display_mode = cl_gui_picture=>display_mode_normal EXCEPTIONS OTHERS = 1. IF sy-subrc NE 0. MESSAGE s015. ENDIF. WHEN 'NORMAL_CENTER'. " picture operation: center normal size CALL METHOD ref_picture->set_display_mode EXPORTING display_mode = cl_gui_picture=>display_mode_normal_center EXCEPTIONS OTHERS = 1. IF sy-subrc NE 0. MESSAGE s015. ENDIF. WHEN 'FIT'. " picture operation: zoom picture CALL METHOD ref_picture->set_display_mode EXPORTING display_mode = cl_gui_picture=>display_mode_fit EXCEPTIONS OTHERS = 1. IF sy-subrc NE 0. MESSAGE s015. ENDIF. WHEN 'FIT_CENTER'. " picture operation: zoom and center CALL METHOD ref_picture->set_display_mode EXPORTING display_mode = cl_gui_picture=>display_mode_fit_center EXCEPTIONS OTHERS = 1. IF sy-subrc NE 0. MESSAGE s015. ENDIF. WHEN 'MODE_INFO'. current_mode = ref_picture->display_mode. MESSAGE i025 WITH current_mode. ENDCASE. ENDMODULE. " USER_COMMAND_0100 INPUT *&-----------------------------------------------------------------* *& Module STATUS_0100 OUTPUT *&-----------------------------------------------------------------* * Set GUI for screen 0100 *------------------------------------------------------------------* MODULE status_0100 OUTPUT.

(C) SAP AG BC412 13-124
SET PF-STATUS 'STATUS_NORM_0100'. SET TITLEBAR 'TITLE_NORM_0100'. ENDMODULE. " STATUS_0100 OUTPUT *&-----------------------------------------------------------------* *& Module EXIT_COMMAND_0100 INPUT *&-----------------------------------------------------------------* * Implementation of user commands of type 'E'. *------------------------------------------------------------------* MODULE exit_command_0100 INPUT. CASE ok_code. WHEN 'CANCEL'. " cancel current screen processing CLEAR l_answer. CALL FUNCTION 'POPUP_TO_CONFIRM_STEP' EXPORTING * DEFAULTOPTION = 'Y' textline1 = text-004 textline2 = text-005 titel = text-006 cancel_display = ' ' IMPORTING answer = l_answer. CASE l_answer. WHEN 'J'. PERFORM free_control_ressources. LEAVE TO SCREEN 0. WHEN 'N'. CLEAR ok_code. SET SCREEN sy-dynnr. ENDCASE. WHEN 'EXIT'. " leave program CLEAR l_answer. CALL FUNCTION 'POPUP_TO_CONFIRM_STEP' EXPORTING * DEFAULTOPTION = 'Y' textline1 = text-001 textline2 = text-002 titel = text-003 cancel_display = 'X' IMPORTING answer = l_answer. CASE l_answer. WHEN 'J' OR 'N'. " no data to update PERFORM free_control_ressources. LEAVE PROGRAM. WHEN 'A'. CLEAR ok_code. SET SCREEN sy-dynnr. ENDCASE. ENDCASE. ENDMODULE. " EXIT_COMMAND_0100 INPUT

(C) SAP AG BC412 13-125
Subroutines *&-----------------------------------------------------------------* *& Form free_control_ressources *&-----------------------------------------------------------------* * Free all control related ressources. *------------------------------------------------------------------* * no interface *------------------------------------------------------------------* FORM free_control_ressources. CALL METHOD ref_picture->free. CALL METHOD ref_container->free. FREE: ref_picture, ref_container. ENDFORM. " free_control_ressources
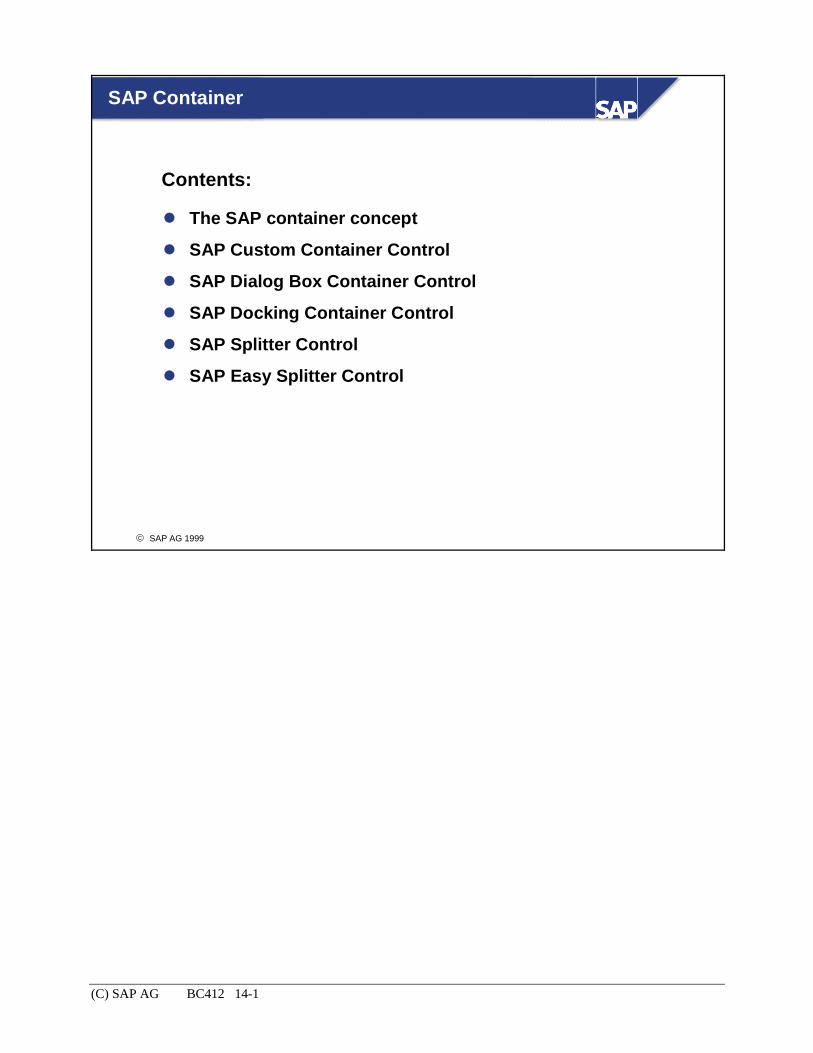
(C) SAP AG BC412 14-1
© SAP AG 1999
The SAP container concept
SAP Custom Container Control
SAP Dialog Box Container Control
SAP Docking Container Control
SAP Splitter Control
SAP Easy Splitter Control
Contents:
SAP Container

(C) SAP AG BC412 14-2
© SAP AG 1999
Explain how SAP containers work in the Control Framework
List the container controls that you can use in the SAP System
Describe the features of each of the container controls
Use SAP container controls
At the conclusion of this unit, you will be able to:
SAP Container: Unit Objectives

(C) SAP AG BC412 14-3
© SAP AG 1999
Overview Diagram BC412
Unit 1 Course Overview
Introduction to the Control Framework
SAP Container
SAP Tree Control
ALV Grid Control
Unit 2
Unit 3
Unit 4
Unit 5

(C) SAP AG BC412 14-4
© SAP AG 1999
SAP Container Overview:The Container Concept
The container conceptThe container concept
SAP Custom Container ControlSAP Custom Container Control
SAP Dialog Box Container ControlSAP Dialog Box Container Control
SAP Docking Container ControlSAP Docking Container Control
SAP Splitter Container ControlSAP Splitter Container Control
SAP Easy Splitter Container ControlSAP Easy Splitter Container Control

(C) SAP AG BC412 14-5
© SAP AG 1999
Uses for Containers
Container Container controlcontrol
Container Container controlcontrol
or
EnjoySAPcontrol
Container control
A SAP container is a control that can accomodate other controls, such as the SAP Tree Control, SAP Picture Control, or the SAP Textedit Control. It maintains the controls in a logical collection, and provides an area in which they can be displayed.
Each control lives in a container. Since containers are themselves controls, you can nest them. Controls within a container are usually displayed in the size of the container itself.

(C) SAP AG BC412 14-6
© SAP AG 1999
SAP Container Classes
cl_gui_control
cl_gui_container
cl_gui_custom_container
cl_gui_dialogbox_container
cl_gui_docking_container
cl_gui_splitter_container
cl_gui_easy_splitter_container
Passes to
Containers are known as the 'parent' of the control that they contain. All SAP containers have a shared parent class with the type cl_gui_control. They are derived from this basic container and thus have a uniform object-oriented interface.
There are five different SAP Containers: SAP Custom Container (global class cl_gui_custom_container) SAP Dialog Box Container (global class cl_gui_dialogbox_container) SAP Docking Container (global class cl_gui_docking_container) SAP Splitter Container (global class cl_gui_splitter_container) SAP Easy Splitter Container (global class cl_gui_easy_splitter_container)

(C) SAP AG BC412 14-7
© SAP AG 1999
Graphical Visualization of Containers
Custom controlarea
Screen Container
(( SAP Custom SAP Custom ContainerContainer
(( SAP Dialog Box SAP Dialog Box ContainerContainer
(( SAP Docking SAP Docking ContainerContainer
(( SAP Splitter SAP Splitter ContainerContainer
(( SAP Easy Splitter SAP Easy Splitter ContainerContainer
You can assign an SAP container to An area on a screen (SAP Custom Container) A entire screen (SAP Docking Container, SAP Dialog Box Container) Another container (SAP Splitter Container, SAP Easy Splitter Container)
The fact that you can nest controls provides further display possibilities.

(C) SAP AG BC412 14-8
© SAP AG 1999
Dialog Box Level and Top-Level Container
Frontend
Appl. server
Dialog box level 2
Dialog box level 1
Dialog box level 0
Call sequence in program
SET/CALL SCREEN 100.
100200
300
CALL SCREEN 200STARTING AT x1 y1.
CALL SCREEN 300STARTING AT x2 y2.
SCREEN9
SCREEN2
SCREEN1
SCREEN0
Top levelcontainer
When you create an instance of a SAP container, you assign it to a dialog box level, which you cannot subsequently change.
A dialog box level is created in ABAP when the CALL SCREEN <screen_no> STARTING AT <left_column_no> <top_row_no> [ENDING AT <right_column_no> <bottom_row_number>].
When you instantiate a container, the class constructor creates the container instances SCREEN0, SCREEN1, ..., SCREEN9. These are assigned to the different dialog box levels. Dialog box level 0 = SCREEN0, level 1 = SCREEN1, ... Dialog box level 9 = SCREEN9.
The container instances SCREEN0, ... , SCREEN9 are called top-level containers. They are used directly as parent controls for the SAP Custom Control, SAP Docking Control, and SAP Dialog Box Control.

(C) SAP AG BC412 14-9
© SAP AG 1999
Technical Methods for Attaching SAP Containers
Internal session
Program
Container
SAPgui
Container
Frontend
Appl. server
SCREEN1
SCREEN0
SCREEN9
Container Container
Top levelcontainer
Screen 100
0100
Abbreviateddisplay
Abbreviated display
Container visible at thefrontend
Container not visible at the frontend
Container destroyed atfrontend
dialog boxlevel 0
dialog boxlevel 1
When you instantiate an SAP container, the top-level containers SCREEN0 to SCREEN9 are created. They are created in the internal session in which the program is running. The SAP container control at the frontend is controlled using the ABAP runtime object you create using the CREATE OBJECT <obj> statement.
When you create the container object in ABAP, the container object is assigned to a top-level container (by default, the current dialog box level). Once a container has been attached to a top-level container, you cannot change the assignment during the program.
The top-level container to which a container is assigned affects its visibility, and hence that of the other controls you display in it.
Controls in a container are only visible when the corresponding container is visible.

(C) SAP AG BC412 14-10
© SAP AG 1999
Visibility and Lifetime of SAP Containers
0100 0100 0100 0200 0100
0100Dialog boxlevel 1
Frontend
CALLSCREEN100
STARTINGAT x1 y1.
LEAVE TOSCREEN
0.
SET/CALLSCREEN200.
SET/CALLSCREEN100.
LEAVEPROGRAM.
Dialog boxlevel 0
CREATEOBJECTmy_cont
EXPORTINGdynnr = 100.
As a rule, a SAP container object at the frontend can be addressed for as long as the program that created the container is active in main memory (for the lifetime of the corresponding internal session). We say that the lifetime of the frontend control is linked to that of the internal session.
The container control is only visible at the frontend on screens with the same dialog box level. Either on the screen with which the container control was created, or On screens to which the container is subsequently assigned (re-linked).
The level in the screen stack to which a screen belongs is irrelevant - the decisive factor is the dialog box level: In the graphic, the container control on screen 100 is assigned to dialog box level 0. The container is visible at the frontend whenever screen 100 appears in dialog box 0 (regardless of whether it is called using SET SCREEN 100 or CALL SCREEN 100 from dialog box level 0).
The container is not visible at the frontend (but still active) if the screen containing it is hidden by another screen at the same dialog box level or if the dialog box level changes up or down.

(C) SAP AG BC412 14-11
© SAP AG 1999
SAP Container Overview:SAP Custom Container Control
The container conceptThe container concept
SAP Custom Container ControlSAP Custom Container Control
SAP Dialog Box Container ControlSAP Dialog Box Container Control
SAP Docking Container ControlSAP Docking Container Control
SAP Splitter Container ControlSAP Splitter Container Control
SAP Easy Splitter Container ControlSAP Easy Splitter Container Control

(C) SAP AG BC412 14-12
© SAP AG 1999
SAP Custom Container: Features
Custom controlarea Properties
( Attached to a reserved area on a screen
( Resizable( Can be used at dialog box
levels 0 to 9( Can be assigned to
another area at runtime (re-link)
Container Container
N Program nameN Screen numberN Name of screen area N Dialog box level
You use the SAP Custom Container Control to attach a control to a reserved area on a screen. You create the area using the Custom Control element in the Screen Painter. The area can be resized. You can assign a Custom Container Control instance to the area. This assigns the container to the screen. The container can be resized if the user changes the size of the SAP window.
The following parameters identify a custom control area uniquely at the CFW: Program name Screen number Name of the area Number of the dialog box level at which the container and screen can be displayed.

(C) SAP AG BC412 14-13
© SAP AG 1999
Creating an Instance of the SAP Custom Container Control
DATA: cust_container TYPE REF TO cl_gui_custom_container....CREATE OBJECT cust_container
EXPORTING* parent = " SCREEN0, ..., SCREEN9* repid = " program name* dynnr = " screen number
container_name = 'AREA1' " area name...
EXCEPTIONSothers = 1.
IF sy-subrc NE 0....
AREA1
Screen element:Name: AREA1Type: Custom Control
100
To create an instance of the SAP Custom Container Control, you need a data object that you declare using TYPE REF TO cl_gui_custom_container.
To create the instance itself, use the statement CREATE OBJECT <object_reference_var>. In the statement, you must pass the relevant parameters to specify the attributes of the container. This is illustrated in the graphic. If you do not assign values to the parameters parent, repid, and dynnr, the system uses the current values at runtime (current dialog box level , current program name, current screen).
You must specify the name of the screen area in which the container should appear in the parameter container_name.
For details of the other interface parameters in the constructor, refer to the online documentation. You can find this under SAP Library -> Basis -> Controls and Control Framework -> SAP Container.

(C) SAP AG BC412 14-14
© SAP AG 1999
Relinking an SAP Custom Container
Custom control
AREA1
Container Container
Screen 100 Screen 200 (same dialog box level)
CALL METHOD container->linkEXPORTING
* repid =dynnr = 200 container = 'AREA2'
EXCEPTIONSothers = 1.
Custom control
AREA2
Before call After call
At runtime, you can assign a custom container instance to a different screen area (with the type Custom Control). The new area can be on the same screen, on another screen in the same program, or even on a screen in a different program.
The screen containing the new area to which you want to link the control can only be displayed in the same dialog box level.
To reassign an instance, you call the method link for the container instance you want to reassign. The method links the container instance to the new screen area and dissolves the link to the old one.

(C) SAP AG BC412 14-15
© SAP AG 1999
SAP Container Overview:SAP Dialog Box Container Control
The container conceptThe container concept
SAP Custom Container ControlSAP Custom Container Control
SAP Dialog Box Container ControlSAP Dialog Box Container Control
SAP Docking Container ControlSAP Docking Container Control
SAP Splitter Container ControlSAP Splitter Container Control
SAP Easy Splitter Container ControlSAP Easy Splitter Container Control

(C) SAP AG BC412 14-16
© SAP AG 1999
SAP Dialog Box Container: Features
Properties( Container is displayed in a
movable modeless dialog box
( Modeless window can have a title
( Container cannot be attached to the screen
( Container can trigger the event close when the user closes the dialog box
Container Container
Window titleWindow title Modelesswindow
Screen
N Program nameN Screen numberN Height and width of areaN Window title
The SAP Dialog Box Container allows you to display controls in a moveable modeless dialog box. You can also display controls in a full screen.
The modeless dialog box can have a title.

(C) SAP AG BC412 14-17
© SAP AG 1999
Creating an Instance of the SAP Dialog Box Container Control
DATA: diabox_container TYPE REF TO cl_gui_dialogbox_container....CREATE OBJECT diabox_container
EXPORTING* dynnr = " screen number* repid = " program name
width = 150height = 150caption = 'Window title' ...
EXCEPTIONSothers = 1.
IF sy-subrc NE 0....
Creates a modeless dialog boxwith the title 'Window title'Window serves as a container
To create an instance of the SAP Dialog Box Container Control, you need a data object that you declare using TYPE REF TO cl_gui_dialogbox_container.
To create the instance itself, use the statement CREATE OBJECT <object_reference_var>. In the statement, you must pass the relevant parameters to specify the attributes of the container. This is illustrated in the graphic. If you do not assign values to the parameters parent, repid, and dynnr, the system uses the current values at runtime (current dialog box level , current program name, current screen).
Use the width and height parameters to specify the size of the dialog box in pixels. The user can also change the size of the dialog box at runtime.
Use the caption parameter to give a title to the dialog box. For details of the other interface parameters in the constructor, refer to the online documentation. You can find this under SAP Library -> Basis -> Controls and Control Framework -> SAP Container.
You can also change the window title at runtime using the instance method set_caption. The control has an event called close. This is triggered when the user tries to close the modeless dialog box. In the event handler method, you can close the window using the instance method free of your dialog box container object (class cl_gui_dialogbox_container).

(C) SAP AG BC412 14-18
© SAP AG 1999
SAP Container Overview:SAP Docking Container Control
The container conceptThe container concept
SAP Custom Container ControlSAP Custom Container Control
SAP Dialog Box Container ControlSAP Dialog Box Container Control
SAP Docking Container ControlSAP Docking Container Control
SAP Splitter Container ControlSAP Splitter Container Control
SAP Easy Splitter Container ControlSAP Easy Splitter Container Control

(C) SAP AG BC412 14-19
© SAP AG 1999
SAP Docking Container: Features
Properties( Container is docked at one
edge of the screen( The user can change the
size of the container area( The space taken up by the
docking container is deducted from the overall space available to the rest of the screen
Container
Dockingcontainer
Availablescreen area
Originalsize of the
window
The SAP Docking Container allows you to attach one or more areas to a screen. You can attach the area to any of the four edges of the screen. The area available to the actual screen is reduced by the space taken up by the docking container.
The user can change the size of the docking container control.

(C) SAP AG BC412 14-20
© SAP AG 1999
SAP Docking Container: Linking to the Screen
Linking options
dock_at_top
dock_at_left dock_at_right
dock_at_bottom
You can attach the container area of a SAP Docking Container Control to any of the four edges of the screen. To set the edge to which you want to attach it, use one of the four static constants dock_at_top, dock_at_bottom, dock_at_left, or dock_at_right.
You determine where to dock the control in the side parameter of the constructor. You can change this assignment at runtime by using the method dock_at. For further details, refer to the online documentation. You can find this under SAP Library -> Basis -> Controls and Control Framework -> SAP Container.

(C) SAP AG BC412 14-21
© SAP AG 1999
Creating an Instance of the SAP Docking Container Control
DATA: dock_container TYPE REF TO cl_gui_docking_container....CREATE OBJECT dock_container
EXPORTINGside = cl_gui_docking_container=>dock_at_left " default
* repid = " program name* dynnr = " screen number
...EXCEPTIONS
others = 1.
IF sy-subrc NE 0....
Creates the container controlat the left-hand edge of screen
To create an instance of the SAP Docking Container Control, you need a data object that you declare using TYPE REF TO cl_gui_docking_container.
To create the instance itself, use the statement CREATE OBJECT <object_reference_var>. In the statement, you must pass the relevant parameters to specify the attributes of the container. This is illustrated in the graphic. If you do not assign values to the parameters parent, repid, and dynnr, the system uses the current values at runtime (current dialog box level , current program name, current screen).
Use the side parameter to determine the side of the screen to which the container will be attached. For details of the other interface parameters in the constructor, refer to the online documentation. You can find this under SAP Library -> Basis -> Controls and Control Framework -> SAP Container.

(C) SAP AG BC412 14-22
© SAP AG 1999
Reading and Setting Attributes
AttributeContact with screen
Width/heightof container
Method namedock_at
get_extension
set_extension
FunctionSets edge of screen to which container is attached
Reads length parameterSets length parameter
The methods shown on the graphic allow you to find out or set the values of attributes of your container control. For further details about how they work and their interface, refer to the online documentation under SAP Library -> Basis -> Controls and Control Framework -> SAP Container.

(C) SAP AG BC412 14-23
© SAP AG 1999
Relinking an SAP Docking Container
container container
Screen 100 Screen 200 (same dialog box level)
CALL METHOD container->linkEXPORTING
* repid =dynnr = 200
* container = EXCEPTIONS
others = 1.
Before call After call
At runtime, you can attach a docking container to another screen at the same dialog box level (re-link it). To do this, use the instance method link. In the interface, you need to specify the new screen number and the name of the program to which it belongs. If you do not set a new program name, the system assumes that the new screen belongs to the same program as the old one.

(C) SAP AG BC412 14-24
© SAP AG 1999
SAP Container Overview:SAP Splitter Container Control
The container conceptThe container concept
SAP Custom Container ControlSAP Custom Container Control
SAP Dialog Box Container ControlSAP Dialog Box Container Control
SAP Docking Container ControlSAP Docking Container Control
SAP Splitter Container ControlSAP Splitter Container Control
SAP Easy Splitter Container ControlSAP Easy Splitter Container Control

(C) SAP AG BC412 14-25
© SAP AG 1999
SAP Splitter Container: Features
1 2 16
2
1
16
Properties( Can be displayed in other
containers( Can be divided into up to
16 x 16 cells( You can display a different
control in each cell( Split bars can be movable
or fixed( You can control the height
and width of the cells from the program
( You can display a frame for the container
The SAP Splitter Container Control allows you to display a group of controls in individual cells. The splitter control regulates the cells and displays them. The user can change the size of the individual cells using split bars. Increasing the size of one cell decreases that of the adjacent cell.
You can make the splitter bars immovable from within your program. You can only place a Splitter Container Control in another container such as a Custom Container or a Docking Container.
You can nest Splitter Control instances. The grid of a Splitter Container Control instance is initially set to 0 x 0. The maximum division is 16 x 16. You can specify the size of the lines and columns either absolutely in pixels or relatively as a percentage. The default setting is relative.

(C) SAP AG BC412 14-26
© SAP AG 1999
SAP Splitter Container: Use
Container
Splitter containerSplitter container
1 2
a0101 a0102
a0201 a0202 2
1
anm Container area in line ncolumn m
a1601 a1602 a1616 16
16
Each area is a containerfor other controls
You can only assign a Splitter Container Control instance to a screen by using another container that is directly attached to the screen.
The cells in a Splitter Container Control serve as container areas for further controls, that is, each is the parent of another control.

(C) SAP AG BC412 14-27
© SAP AG 1999
Creating an Instance of the SAP Splitter Container Control
DATA: split_container TYPE REF TO cl_gui_splitter_container,cust_container TYPE REF TO cl_gui_custom_container.
...CREATE OBJECT split_container
EXPORTINGparent = cust_container
* repid = " program name* dynnr = " screen number
rows = 2columns = 2...
EXCEPTIONSothers = 1.
IF sy-subrc NE 0....
Parameterparent
rows
columns
MeaningReference variable to the relevant container objectNumber of rows in gridNumber of columns in grid
Creates a splitter control instance with a 2 x 2 grid(four cells = four areas for further controls)The splitter container is linkedto a custom container
To create an instance of the SAP Splitter Container Control, you need a data object that you declare using TYPE REF TO cl_gui_splitter_container.
To create the instance itself, use the statement CREATE OBJECT <object_reference_var>. In the statement, you must pass the relevant parameters to specify the attributes of the container. This is illustrated in the graphic. If you do not assign values to the parameters repid and dynnr, the system uses the current values at runtime (current program name, current screen).
Use the rows and columns parameters to specify the number of rows and columns that your grid should have.
Use the parent parameter to assign your splitter control instance to another container. For details of the other interface parameters in the constructor, refer to the online documentation. You can find this under SAP Library -> Basis -> Controls and Control Framework -> SAP Container.

(C) SAP AG BC412 14-28
© SAP AG 1999
SAP Splitter Container: Finding a Cell Reference
DATA: split_container TYPE REF TO cl_gui_splitter_container,area_1_2 TYPE REF TO cl_gui_container.
...CALL METHOD split_container->get_container
EXPORTINGrow = '1'column = '2'
RECEIVINGcontainer = area_1_2.
...
Parameterrows
columns
MeaningRow number in gridColumn number in grid
Returns an object reference tocell (1,2), that is, the first lineand second column of theSAP Splitter Container Control
In order to assign further control instances to the cells of your splitter container, you need object references to the individual cells. To get a reference to a cell, use the instance method get_container. In the method call, use the row and column parameters to specify the cell. The RETURNING parameter container contains a reference to a container instance.

(C) SAP AG BC412 14-29
© SAP AG 1999
Reading and Setting Attributes
AttributeCell
Columns
Column
Rows
Row
Border
Method nameadd_control
remove_control
get_container
get_columns
get_column_mode set_column_mode
get_column_width set_column_width
get_column_sash set_column_sash
get_rows
get_row_mode set_row_mode
get_row_heightset_row_height
get_row_sash set_row_sash
set_border
FunctionAssigns a control to a cellRemoves a control from a cellGets a container reference to a cellReads the number of columnsReads mode for division: absolute/relativeSets mode for division: absolute/relativeReads column widthSets column widthReads mode for splitter bar: fixed/movableSets mode for splitter bar: fixed/movableReads the number of linesReads mode for division: absolute/relativeSets mode for division: absolute/relativeReads line heightSets line heightReads mode for splitter bar: fixed/movableSets mode for splitter bar: fixed/movableSets border display: Yes/no
The methods shown on the graphic allow you to find out or set the values of attributes of your container control. For further details about how they work and their interface, refer to the online documentation under SAP Library -> Basis -> Controls and Control Framework -> SAP Container.

(C) SAP AG BC412 14-30
© SAP AG 1999
SAP Container Overview:SAP Easy Splitter Container Control
The container conceptThe container concept
SAP Custom Container ControlSAP Custom Container Control
SAP Dialog Box Container ControlSAP Dialog Box Container Control
SAP Docking Container ControlSAP Docking Container Control
SAP Splitter Container ControlSAP Splitter Container Control
SAP Easy Splitter Container ControlSAP Easy Splitter Container Control

(C) SAP AG BC412 14-31
© SAP AG 1999
SAP Easy Splitter Container: Features
Properties( Simplified version of
Splitter Container Control( Can be divided into two
cells( Division can be vertical or
horizontal( Can only be placed in
another container control( Split bars can be movable
or fixed( You can control the height
and width of the cells from the program
( You can display a frame for the container
or
The SAP Easy Splitter Container is a simplified version of the SAP Splitter Container with a smaller range of functions. It allows you to display two controls in separate cells of a container area. You can arrange the cells either horizontally or vertically.
You can only use instances of the SAP Easy Splitter Container in other container instances. You can nest Easy Splitter Control instances.

(C) SAP AG BC412 14-32
© SAP AG 1999
Creating an Instance of the SAP Easy Splitter Container Control
DATA: easy_split_container TYPE REF TO cl_gui_easy_splitter_container,
cust_container TYPE REF TO cl_gui_custom_container....CREATE OBJECT easy_split_container
EXPORTINGparent = cust_container
* repid = " program name* dynnr = " screen number
orientation = easy_split_container->orientation_vertical...
EXCEPTIONSothers = 1.
IF sy-subrc NE 0....
Parameterparent
orientation
MeaningReference variable to the relevant container objectorientation_vertical Areas arranged verticallyorientation_horizontal Areas arranged horizontally
Creates an instance of theSAP Easy Splitter ContainerControl with a horizontalsplitter bar. The container is linked to a custom container.
To create an instance of the SAP Easy Splitter Container Control, you need a data object that you declare using TYPE REF TO cl_gui_easy_splitter_container.
To create the instance itself, use the statement CREATE OBJECT <object_reference_var>. In the statement, you must pass the relevant parameters to specify the attributes of the container. This is illustrated in the graphic. If you do not assign values to the parameters repid and dynnr, the system uses the current values at runtime (current program name, current screen).
Use the orientation parameter to specify whether the areas should be arranged horizontally or vertically. You can do this using the class constants cl_gui_easy_splitter_container=>orientation_vertical and cl_gui_easy_splitter_container=>orientation_horizontal.
Use the parent parameter to assign your splitter control instance to another container. For details of the other interface parameters in the constructor, refer to the online documentation. You can find this under SAP Library -> Basis -> Controls and Control Framework -> SAP Container.
To set the position of the splitter bar from your program, use the instance method set_sash_position. For further details, refer to the online documentation.

(C) SAP AG BC412 14-33
© SAP AG 1999
SAP Easy Splitter Container: Reference Variables for the Cells
Container
Easy Splitter ContainerEasy Splitter Container
top_left_container
bottom_right_container
Instance attributesControl 1
Control 2
In order to assign further control instances to the cells of your splitter container, you need object references to the individual cells. These are contained in the instance attributes top_left_container and bottom_right_container.

(C) SAP AG BC412 14-34
© SAP AG 1999
Explain how SAP containers work in the Control Framework
List the container controls that you can use in the SAP System
Describe the features of each of the container controls
Use SAP container controls
You are now able to:
SAP Container: Unit Summary
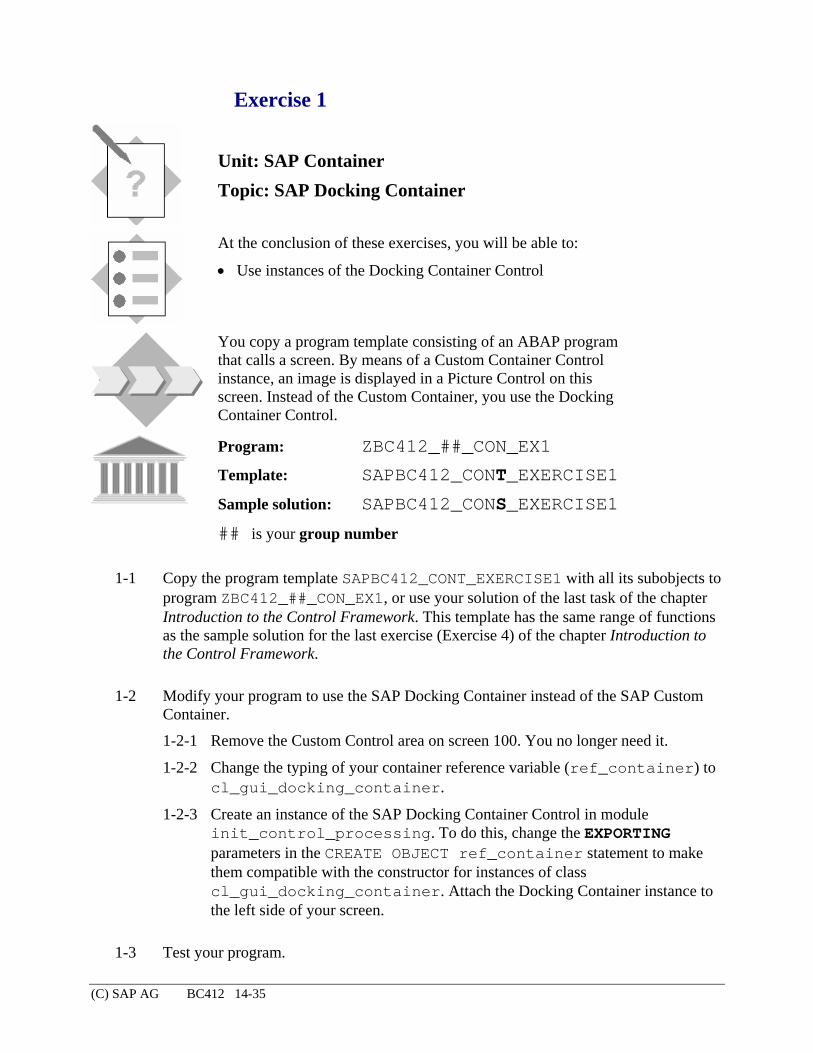
(C) SAP AG BC412 14-35
SAP Container Exercise 1
Unit: SAP Container Topic: SAP Docking Container
At the conclusion of these exercises, you will be able to:
• Use instances of the Docking Container Control
You copy a program template consisting of an ABAP program that calls a screen. By means of a Custom Container Control instance, an image is displayed in a Picture Control on this screen. Instead of the Custom Container, you use the Docking Container Control.
Program: ZBC412_##_CON_EX1
Template: SAPBC412_CONT_EXERCISE1
Sample solution: SAPBC412_CONS_EXERCISE1
## is your group number
1-1 Copy the program template SAPBC412_CONT_EXERCISE1 with all its subobjects to program ZBC412_##_CON_EX1, or use your solution of the last task of the chapter Introduction to the Control Framework. This template has the same range of functions as the sample solution for the last exercise (Exercise 4) of the chapter Introduction to the Control Framework.
1-2 Modify your program to use the SAP Docking Container instead of the SAP Custom Container.
1-2-1 Remove the Custom Control area on screen 100. You no longer need it.
1-2-2 Change the typing of your container reference variable (ref_container) to cl_gui_docking_container.
1-2-3 Create an instance of the SAP Docking Container Control in module init_control_processing. To do this, change the EXPORTING parameters in the CREATE OBJECT ref_container statement to make them compatible with the constructor for instances of class cl_gui_docking_container. Attach the Docking Container instance to the left side of your screen.
1-3 Test your program.
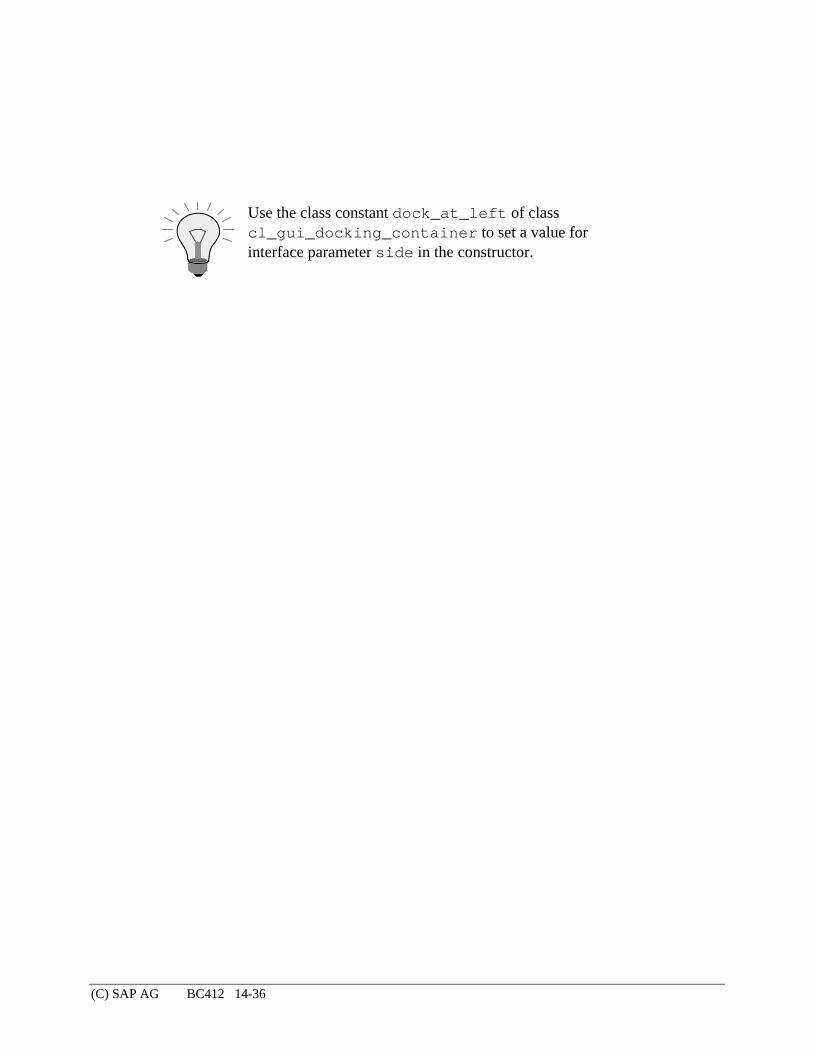
(C) SAP AG BC412 14-36
Use the class constant dock_at_left of class cl_gui_docking_container to set a value for interface parameter side in the constructor.

(C) SAP AG BC412 14-37
Exercise 1: Optional Parts
At the conclusion of these exercises, you will be able to:
• Attach instances of the SAP Docking Container Control to different sides of a screen
Your task is to allow the user of your program to choose whether the Picture Control should appear on the right or on the left side of the screeen.
Program: same program
Template: same program
Sample solution: SAPBC412_CONS_EXERCISE1A
## is your group number
1-4 Allow the user to choose the screen side where the Picture Control should appear by defining a checkbox on the default selection screen of your program.
1-4-1 Add a PARAMETER statement to the data declaration part of your program that you use to create a checkbox on a selection screen (suggested name for the parameter: p_side). Use the addition AS CHECKBOX to display the parameter as a checkbox. Maintain the selection text (suggested text: Attach to right screen side).
1-4-2 Define another variable in the data declaration part that you use to process the parameter (of the selection screen). It should contain the technical name of the screen side to which the control is to be attached (suggested name: docking_side). Type the variable with reference to LIKE cl_gui_docking_container=>dock_at_right.
1-4-3 Process the parameter p_side in module init_control_processing before the container is instantiated: If the parameter p_side has not been selected, assign the value cl_gui_docking_container=>dock_at_left to the variable docking_side; if the parameter has been selected, assign the value cl_gui_docking_container=>dock_at_right.
1-4-4 Use the variable docking_side in the interface of the constructor for the Container instance.
1-5 Test your program.

(C) SAP AG BC412 14-38
You cannot use the instance attribute docking_side of class cl_gui_docking_container to type your program variable docking_side, since this instance attribute has visibility PPROTECTED and not PUBLIC.

(C) SAP AG BC412 14-39
Exercise 2
Unit: SAP Container Topic: SAP Splitter Container Control
At the conclusion of these exercises, you will be able to:
• Generate and configure (organise into cells) instances of the SAP Splitter Container Control
• Determine references to the cells of your Splitter Container instance
• Use the cell references as containers for other EnjoySAP controls
Modify your program so that two images appear side by side on the screen. To do this, you use an SAP Splitter Control instance that consists of two cells. As in the previous exercises, your task is to allow the user to change the Picture Control instance of the right cell using the pushbuttons on the screen. Event handling (PICTURE_CLICK and CONTROL_DBLCICK) should be possible for both Picture Control instances.
Program: ZBC412_##_CON_EX2
Template: SAPBC412_CONT_EXERCISE2
Sample solution: SAPBC412_CONS_EXERCISE2
## is your group number
2-1 Copy the program template SAPBC412_CONT_EXERCISE2 with all its subobjects to program ZBC412_##_CON_EX2. Execute the program copied to make yourself familiar with the functions it provides. The template has the same range of functions as the template for task 1 of this chapter (an image is displayed in a Picture Control that is linked to a Custom Control).
2-2 Since Splitter Container instances must be linked to another container, and the Splitter Container consists of several cells that can contain other control instances, you need some more data objects.
Define the following data objects in the data declaration part of your program:

(C) SAP AG BC412 14-40
• A reference variable for a Splitter Container instance (suggested name: ref_splitter). Type this variable with reference to cl_gui_splitter_container.
• A reference variable for a second Picture Control instance (suggested name: ref_pic_left). Type this variable with reference to cl_gui_picture. To make the source code easier to read, you should rename the reference to the first Picture Control object (suggested name: ref_pic_right).
• Two reference variables for the two cells of your Splitter Container instance (suggested names: cell_1_1 and cell_1_2). Type these variables with reference to cl_gui_container.
• A second variable that contains the URL for the second image you want to display (suggested name: l_url2, ABAP data type C, length 80 characters). To make the source code easier to read, you should rename variable l_url to read l_url1.
2-3 You need a second image for your second Picture Control instance (you can also use the same image in both Picture Control instances). Again, use one of the images added to the BDS for this training course.
2-3-1 Use function module BC412_BDS_GET_PIC_URL to get a valid URL for an image in the BDS. Set the value for the IMPORT parameter number of the function module to 2. Place the URL for the image that you receive from the function module in the data object l_url2. Again, this URL is valid as long as the program executes.
2-4 Extend the PBO module init_control_processing as follows:
2-4-1 Instantiate a Splitter Container object that you link to your Custom Control instance. Your Splitter Container instance should have two horizontally arranged cells (one row, two columns). Issue dialog message 010 (message class bc412, message type A) to respond to exceptions of the constructor. Note that you must have initiated the Custom Container object before.
2-4-2 Determine the references (pointers) to the cells of your Splitter Container instance. To do this, use the instance method get_container of class cl_gui_splitter_container. Note: Since this method does not have exceptions, error handling is not necessary.
2-4-3 Create the two Picture Control instances and use the cell references you determined to link them to the two cells of your Splitter Container instance. Issue dialog message 011 (message class bc412, message type A) to respond to any exceptions of the constructor.
2-4-4 Use the URL variables (l_url1 and l_url2) to load the two images into your Picture Control instances. Use the dialog messages of the previous tasks to respond to exceptions and indicate the status of the image loading process.

(C) SAP AG BC412 14-41
Message Usage
Number Class Type 012 bc412 A Exception 013 bc412 S Not loaded 014 bc412 S Loaded
2-4-5 For both Picture Control instances, register the events PICTURE_CLICK and CONTROL_DBLCLICK at the Control Framework. Execute the method set_registered_events for both Picture Control instances. Use dialog message 012 (message class bc412, message type A) to respond to exceptions.
2-4-6 Register the static handler methods on_picture_click and on_control_dblclick of your local class lcl_event_handler for both Picture Control instances.
2-5 In the PAI module user_command_0100, modify the implementations of the functions STRETCH, NORMAL, NORMAL_CENTER, FIT, FIT_CENTER and MODE_INFO to execute the methods specified there for the Picture Control instance of the right cell of the Splitter Container. To do this, change the name of the Picture Control reference variable into ref_pic_right in all implementations.
2-6 Modify the subroutine free_control_ressources to correctly destroy all control instances created at the frontend. Note that you must execute instance method free in reversed instantiation order.
2-7 Test your program.

(C) SAP AG BC412 14-42
Note on the Sample Solutions for Unit 03
The sample solutions provided include the statements of the screen flow logic and of the ABAP program parts required in the sample solution.
For exercises 1 and 2 of this chapter, we have included the complete source code of the sample solutions. The code sections that you need to add in order to solve the task are printed in bold.
For the solutions of the optional parts of task 1, we have only included those program parts (data declarations and modules) that need to be changed. Again, the code sections that you need to add in order to solve the task are printed in bold.

(C) SAP AG BC412 18-43
SAP Container Solution Task 1
Unit: SAP Container Topic: SAP Docking Container
Sample solution SAPBC412_CONS_EXERCISE1
Screen flow logic SCREEN 100
PROCESS BEFORE OUTPUT. MODULE status_0100. MODULE init_control_processing. PROCESS AFTER INPUT. MODULE exit_command_0100 AT EXIT-COMMAND. MODULE user_command_0100.
ABAP program Local classes
REPORT sapbc412_cons_exercise1 MESSAGE-ID bc412. *------------------------------------------------------------------* * CLASS lcl_event_handler DEFINITION *------------------------------------------------------------------* * Definition of a local class containing event handler * * methods for picture control objects * *------------------------------------------------------------------* CLASS lcl_event_handler DEFINITION. PUBLIC SECTION. CLASS-METHODS: on_picture_click FOR EVENT picture_click OF cl_gui_picture IMPORTING mouse_pos_x mouse_pos_y, * -------------------------------------------------------------- on_control_dblclick FOR EVENT control_dblclick OF cl_gui_picture IMPORTING mouse_pos_x mouse_pos_y. ENDCLASS.

(C) SAP AG BC412 19-44
*------------------------------------------------------------------* * CLASS lcl_event_handler IMPLEMENTATION *------------------------------------------------------------------* * Corresponding class implementation * *------------------------------------------------------------------* CLASS lcl_event_handler IMPLEMENTATION. METHOD on_picture_click. MESSAGE i016 WITH mouse_pos_x mouse_pos_y. ENDMETHOD. METHOD on_control_dblclick. MESSAGE i017 WITH mouse_pos_x mouse_pos_y. ENDMETHOD. ENDCLASS.
Data declarations * data declarations * screen specific DATA: ok_code TYPE sy-ucomm, " command field copy_ok_code LIKE ok_code, " copy of ok_code l_answer TYPE c, " return flag (used in " standard user dialogs) * control specific: object references ref_container TYPE REF TO cl_gui_docking_container, ref_picture TYPE REF TO cl_gui_picture, * control specific: auxiliary fields first_time TYPE c, " flag (screen + control) l_url(80) TYPE c, " URL of picture to be shown l_result TYPE i value 1, " status variable of load_picture " 1 = o.k., 0 = error current_mode LIKE cl_gui_picture=>display_mode, * event handling it_events TYPE cntl_simple_events, " internal (event) table wa_events LIKE LINE OF it_events. " work area
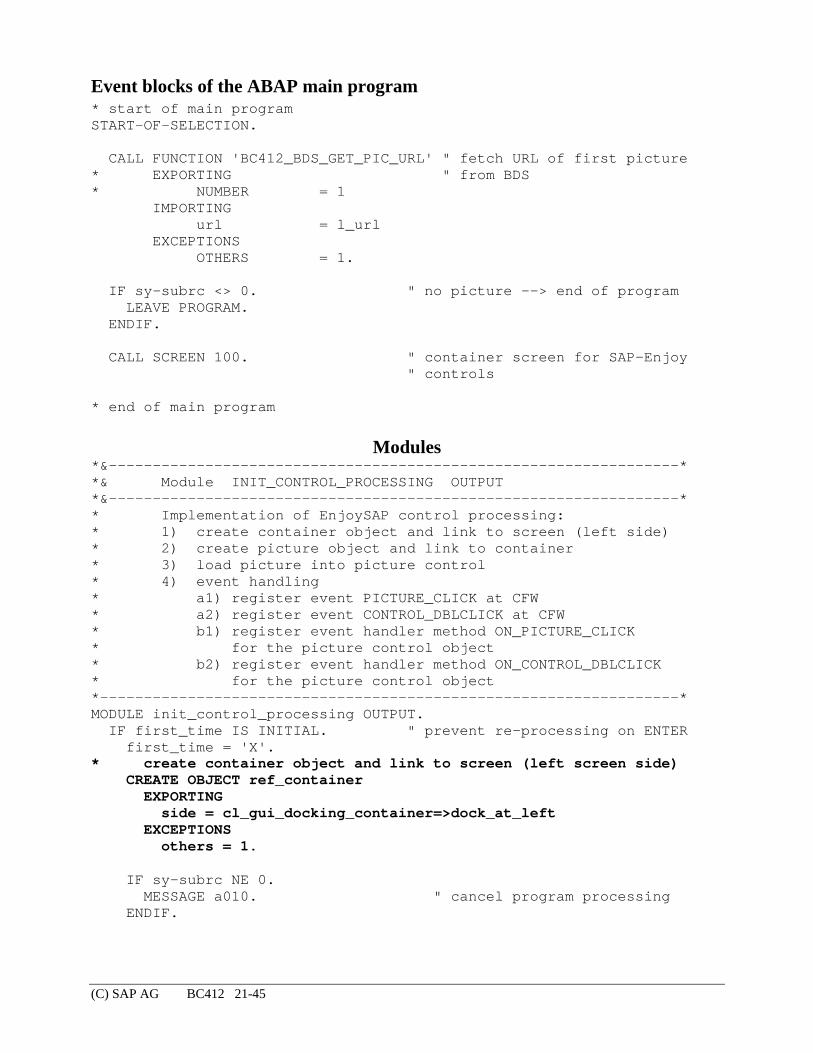
(C) SAP AG BC412 21-45
Event blocks of the ABAP main program * start of main program START-OF-SELECTION. CALL FUNCTION 'BC412_BDS_GET_PIC_URL' " fetch URL of first picture * EXPORTING " from BDS * NUMBER = 1 IMPORTING url = l_url EXCEPTIONS OTHERS = 1. IF sy-subrc <> 0. " no picture --> end of program LEAVE PROGRAM. ENDIF. CALL SCREEN 100. " container screen for SAP-Enjoy " controls * end of main program
Modules *&-----------------------------------------------------------------* *& Module INIT_CONTROL_PROCESSING OUTPUT *&-----------------------------------------------------------------* * Implementation of EnjoySAP control processing: * 1) create container object and link to screen (left side) * 2) create picture object and link to container * 3) load picture into picture control * 4) event handling * a1) register event PICTURE_CLICK at CFW * a2) register event CONTROL_DBLCLICK at CFW * b1) register event handler method ON_PICTURE_CLICK * for the picture control object * b2) register event handler method ON_CONTROL_DBLCLICK * for the picture control object *------------------------------------------------------------------* MODULE init_control_processing OUTPUT. IF first_time IS INITIAL. " prevent re-processing on ENTER first_time = 'X'. * create container object and link to screen (left screen side) CREATE OBJECT ref_container EXPORTING side = cl_gui_docking_container=>dock_at_left EXCEPTIONS others = 1. IF sy-subrc NE 0. MESSAGE a010. " cancel program processing ENDIF.

(C) SAP AG BC412 21-46
* create picture control and link to container object CREATE OBJECT ref_picture EXPORTING parent = ref_container EXCEPTIONS others = 1. IF sy-subrc NE 0. MESSAGE a011. " cancel program processing ENDIF. * load picture into picture control CALL METHOD ref_picture->load_picture_from_url EXPORTING url = l_url IMPORTING result = l_result EXCEPTIONS OTHERS = 1. IF sy-subrc NE 0. MESSAGE a012. ENDIF. CASE l_result. WHEN 0. " picture not loaded MESSAGE s013. WHEN 1. " load of picture successful MESSAGE s014. ENDCASE. * event handling * 1. register events for control framework wa_events-eventid = cl_gui_picture=>eventid_picture_click. wa_events-appl_event = ' '. INSERT wa_events INTO TABLE it_events. wa_events-eventid = cl_gui_picture=>eventid_control_dblclick. wa_events-appl_event = ' '. INSERT wa_events INTO TABLE it_events. CALL METHOD ref_picture->set_registered_events EXPORTING events = it_events EXCEPTIONS OTHERS = 1. IF sy-subrc NE 0. MESSAGE a012. ENDIF.

(C) SAP AG BC412 21-47
* 2. set event handler for ABAP object instance: ref_picture SET HANDLER lcl_event_handler=>on_picture_click FOR ref_picture. SET HANDLER lcl_event_handler=>on_control_dblclick FOR ref_picture. ENDIF. ENDMODULE. " INIT_CONTROL_PROCESSING OUTPUT *&-----------------------------------------------------------------* *& Module USER_COMMAND_0100 INPUT *&-----------------------------------------------------------------* * Implementation of user commands of type ' ': * - push buttons on screen 100 * - GUI functions *------------------------------------------------------------------* MODULE user_command_0100 INPUT. copy_ok_code = ok_code. CLEAR ok_code. CASE copy_ok_code. WHEN 'BACK'. " back to program, leave screen CLEAR l_answer. CALL FUNCTION 'POPUP_TO_CONFIRM_STEP' EXPORTING * DEFAULTOPTION = 'Y' textline1 = text-004 textline2 = text-005 titel = text-007 cancel_display = ' ' IMPORTING answer = l_answer. CASE l_answer. WHEN 'J'. PERFORM free_control_ressources. LEAVE TO SCREEN 0. WHEN 'N'. SET SCREEN sy-dynnr. ENDCASE. WHEN 'STRETCH'. " picture operation: stretch to fit area CALL METHOD ref_picture->set_display_mode EXPORTING display_mode = cl_gui_picture=>display_mode_stretch EXCEPTIONS OTHERS = 1. IF sy-subrc NE 0. MESSAGE s015. ENDIF.

(C) SAP AG BC412 21-48
WHEN 'NORMAL'. " picture operation: fit to normal size CALL METHOD ref_picture->set_display_mode EXPORTING display_mode = cl_gui_picture=>display_mode_normal EXCEPTIONS OTHERS = 1. IF sy-subrc NE 0. MESSAGE s015. ENDIF. WHEN 'NORMAL_CENTER'. " picture operation: center normal size CALL METHOD ref_picture->set_display_mode EXPORTING display_mode = cl_gui_picture=>display_mode_normal_center EXCEPTIONS OTHERS = 1. IF sy-subrc NE 0. MESSAGE s015. ENDIF. WHEN 'FIT'. " picture operation: zoom picture CALL METHOD ref_picture->set_display_mode EXPORTING display_mode = cl_gui_picture=>display_mode_fit EXCEPTIONS OTHERS = 1. IF sy-subrc NE 0. MESSAGE s015. ENDIF. WHEN 'FIT_CENTER'. " picture operation: zoom and center CALL METHOD ref_picture->set_display_mode EXPORTING display_mode = cl_gui_picture=>display_mode_fit_center EXCEPTIONS OTHERS = 1. IF sy-subrc NE 0. MESSAGE s015. ENDIF. WHEN 'MODE_INFO'. current_mode = ref_picture->display_mode. MESSAGE i025 WITH current_mode. ENDCASE. ENDMODULE. " USER_COMMAND_0100 INPUT

(C) SAP AG BC412 21-49
*&-----------------------------------------------------------------* *& Module STATUS_0100 OUTPUT *&-----------------------------------------------------------------* * Set GUI for screen 0100 *------------------------------------------------------------------* MODULE status_0100 OUTPUT. SET PF-STATUS 'STATUS_NORM_0100'. SET TITLEBAR 'TITLE_NORM_0100'. ENDMODULE. " STATUS_0100 OUTPUT *&-----------------------------------------------------------------* *& Module EXIT_COMMAND_0100 INPUT *&-----------------------------------------------------------------* * Implementation of user commands of type 'E'. *------------------------------------------------------------------* MODULE exit_command_0100 INPUT. CASE ok_code. WHEN 'CANCEL'. " cancel current screen processing CLEAR l_answer. CALL FUNCTION 'POPUP_TO_CONFIRM_STEP' EXPORTING * DEFAULTOPTION = 'Y' textline1 = text-004 textline2 = text-005 titel = text-006 cancel_display = ' ' IMPORTING answer = l_answer. CASE l_answer. WHEN 'J'. PERFORM free_control_ressources. LEAVE TO SCREEN 0. WHEN 'N'. CLEAR ok_code. SET SCREEN sy-dynnr. ENDCASE. WHEN 'EXIT'. " leave program CLEAR l_answer. CALL FUNCTION 'POPUP_TO_CONFIRM_STEP' EXPORTING * DEFAULTOPTION = 'Y' textline1 = text-001 textline2 = text-002 titel = text-003 cancel_display = 'X' IMPORTING answer = l_answer. CASE l_answer. WHEN 'J' OR 'N'. " no data to update PERFORM free_control_ressources. LEAVE PROGRAM. WHEN 'A'. CLEAR ok_code.
(C) SAP AG BC412 22-50
SET SCREEN sy-dynnr. ENDCASE. ENDCASE. ENDMODULE. " EXIT_COMMAND_0100 INPUT
Subroutines *&-----------------------------------------------------------------* *& Form free_control_ressources *&-----------------------------------------------------------------* * Free all control related ressources. *------------------------------------------------------------------* * no interface *------------------------------------------------------------------* FORM free_control_ressources. CALL METHOD ref_picture->free. CALL METHOD ref_container->free. FREE: ref_picture, ref_container. ENDFORM. " free_control_ressources

(C) SAP AG BC412 23-51
Solution for the Optional Parts of Task 1
Unit: SAP Container Topic: SAP Docking Container
Sample solution SAPBC412_CONS_EXERCISE1A
ABAP program
Data declarations and selection screen * data declarations * screen specific DATA: ok_code TYPE sy-ucomm, " command field copy_ok_code LIKE ok_code, " copy of ok_code l_answer TYPE c, " return flag (used in " standard user dialogs) * control specific: object references ref_container TYPE REF TO cl_gui_docking_container, ref_picture TYPE REF TO cl_gui_picture, * control specific: auxiliary fields first_time TYPE c, " flag (screen + control) l_url(80) TYPE c, " URL of picture to be shown l_result TYPE i value 1, " status variable of load_picture " 1 = o.k., 0 = error current_mode LIKE cl_gui_picture=>display_mode, docking_side LIKE cl_gui_docking_container=>dock_at_right, * event handling it_events TYPE cntl_simple_events, " internal (event) table wa_events LIKE LINE OF it_events. " work area * selection screen definition PARAMETERS: p_side AS CHECKBOX.

(C) SAP AG BC412 23-52
Modules *&-----------------------------------------------------------------* *& Module INIT_CONTROL_PROCESSING OUTPUT *&-----------------------------------------------------------------* * Implementation of EnjoySAP control processing: * 1) create container object and link to screen (left side) * 2) create picture object and link to container * 3) load picture into picture control * 4) event handling * a1) register event PICTURE_CLICK at CFW * a2) register event CONTROL_DBLCLICK at CFW * b1) register event handler method ON_PICTURE_CLICK * for the picture control object * b2) register event handler method ON_CONTROL_DBLCLICK * for the picture control object *------------------------------------------------------------------* MODULE init_control_processing OUTPUT. IF first_time IS INITIAL. " prevent re-processing on ENTER first_time = 'X'. * create container object and link to screen IF p_side IS INITIAL. docking_side = cl_gui_docking_container=>dock_at_left. ELSE. " dock to right side selected docking_side = cl_gui_docking_container=>dock_at_right. ENDIF.
CREATE OBJECT ref_container EXPORTING side = docking_side EXCEPTIONS others = 1. IF sy-subrc NE 0. MESSAGE a010. " cancel program processing ENDIF. * create picture control and link to container object CREATE OBJECT ref_picture EXPORTING parent = ref_container EXCEPTIONS others = 1. IF sy-subrc NE 0. MESSAGE a011. " cancel program processing ENDIF.

(C) SAP AG BC412 23-53
* load picture into picture control CALL METHOD ref_picture->load_picture_from_url EXPORTING url = l_url IMPORTING result = l_result EXCEPTIONS OTHERS = 1. IF sy-subrc NE 0. MESSAGE a012. ENDIF. CASE l_result. WHEN 0. " picture not loaded MESSAGE s013. WHEN 1. " load of picture successful MESSAGE s014. ENDCASE. * event handling * 1. register events for control framework wa_events-eventid = cl_gui_picture=>eventid_picture_click. wa_events-appl_event = ' '. INSERT wa_events INTO TABLE it_events. wa_events-eventid = cl_gui_picture=>eventid_control_dblclick. wa_events-appl_event = ' '. INSERT wa_events INTO TABLE it_events. CALL METHOD ref_picture->set_registered_events EXPORTING events = it_events EXCEPTIONS OTHERS = 1. IF sy-subrc NE 0. MESSAGE a012. ENDIF. * 2. set event handler for ABAP object instance: ref_picture SET HANDLER lcl_event_handler=>on_picture_click FOR ref_picture. SET HANDLER lcl_event_handler=>on_control_dblclick FOR ref_picture. ENDIF. ENDMODULE. " INIT_CONTROL_PROCESSING OUTPUT

(C) SAP AG BC412 27-54
Solution for Task 2
Unit: SAP Container Topic: SAP Splitter Container
Sample solution SAPBC412_CONS_EXERCISE2
Screen flow logic SCREEN 100
PROCESS BEFORE OUTPUT. MODULE status_0100. MODULE init_control_processing. PROCESS AFTER INPUT. MODULE exit_command_0100 AT EXIT-COMMAND. MODULE user_command_0100.
ABAP program Local classes
REPORT sapbc412_cons_exercise2 MESSAGE-ID bc412. *------------------------------------------------------------------* * CLASS lcl_event_handler DEFINITION *------------------------------------------------------------------* * Definition of a local class containing event handler * * methods for picture control objects * *------------------------------------------------------------------* CLASS lcl_event_handler DEFINITION. PUBLIC SECTION. CLASS-METHODS: on_picture_click FOR EVENT picture_click OF cl_gui_picture IMPORTING mouse_pos_x mouse_pos_y, * -------------------------------------------------------------- on_control_dblclick FOR EVENT control_dblclick OF cl_gui_picture IMPORTING mouse_pos_x mouse_pos_y. ENDCLASS.

(C) SAP AG BC412 27-55
*------------------------------------------------------------------* * CLASS lcl_event_handler IMPLEMENTATION *------------------------------------------------------------------* * Corresponding class implementation * *------------------------------------------------------------------* CLASS lcl_event_handler IMPLEMENTATION. METHOD on_picture_click. MESSAGE i016 WITH mouse_pos_x mouse_pos_y. ENDMETHOD. METHOD on_control_dblclick. MESSAGE i017 WITH mouse_pos_x mouse_pos_y. ENDMETHOD. ENDCLASS.
Data declarations * data declarations * screen specific DATA: ok_code TYPE sy-ucomm, " command field copy_ok_code LIKE ok_code, " copy of ok_code l_answer TYPE c, " return flag (used in " standard user dialogs) * control specific: object references ref_container TYPE REF TO cl_gui_custom_container, ref_splitter TYPE REF TO cl_gui_splitter_container, ref_pic_left TYPE REF TO cl_gui_picture, ref_pic_right TYPE REF TO cl_gui_picture, * object references to splitter control areas cell_1_1 TYPE REF TO cl_gui_container, cell_1_2 TYPE REF TO cl_gui_container, * control specific: auxiliary fields first_time TYPE c, " flag (screen + control) l_url1(80) TYPE c, " URL of picture 1 to be shown l_url2(80) TYPE c, " URL of picture 2 to be shown l_result1 TYPE i value 1, " status variable of load_picture " 1 = o.k., 0 = error l_result2 TYPE i value 1, " status variable of load_picture " 1 = o.k., 0 = error current_mode LIKE cl_gui_picture=>display_mode, * event handling it_events TYPE cntl_simple_events, " internal (event) table wa_events LIKE LINE OF it_events. " work area

(C) SAP AG BC412 27-56
Event blocks of the ABAP main program * start of main program START-OF-SELECTION. CALL FUNCTION 'BC412_BDS_GET_PIC_URL' " fetch URL of first picture * EXPORTING " from BDS * NUMBER = 1 IMPORTING url = l_url1 EXCEPTIONS OTHERS = 1. IF sy-subrc <> 0. " no picture --> end of program LEAVE PROGRAM. ENDIF. CALL FUNCTION 'BC412_BDS_GET_PIC_URL'" fetch URL of second picture EXPORTING " from BDS number = 2 IMPORTING url = l_url2 EXCEPTIONS OTHERS = 1. IF sy-subrc <> 0. " no picture --> end of program LEAVE PROGRAM. ENDIF. CALL SCREEN 100. " container screen for SAP-Enjoy " controls * end of main program

(C) SAP AG BC412 27-57
Modules *&-----------------------------------------------------------------* *& Module INIT_CONTROL_PROCESSING OUTPUT *&-----------------------------------------------------------------* * Implementation of EnjoySAP control processing: * 1) create custom container object and link to screen area * 2) create splitter container object and link to the custom * control object * 3) fetch pointer to splitter control areas * 4) create two picture objects and link to splitter control * areas * 5) load pictures into picture control objects * 6) event handling (for the picture on the left side only) * a1) register event PICTURE_CLICK at CFW * a2) register event CONTROL_DBLCLICK at CFW * b1) register event handler method ON_PICTURE_CLICK * for both picture control objects * b2) register event handler method ON_CONTROL_DBLCLICK * for both picture control objects *------------------------------------------------------------------* MODULE init_control_processing OUTPUT. IF first_time IS INITIAL. " prevent re-processing on ENTER first_time = 'X'. * create custom container object and link to screen area CREATE OBJECT ref_container EXPORTING container_name = 'CONTROL_AREA1' EXCEPTIONS others = 1. IF sy-subrc NE 0. MESSAGE a010. " cancel program processing ENDIF. * create splitter container object and link to custom control CREATE OBJECT ref_splitter EXPORTING parent = ref_container rows = '1' columns = '2' EXCEPTIONS others = 1. IF sy-subrc NE 0. MESSAGE a010. " cancel program processing ENDIF. * fetch pointer to splitter control areas * left cell CALL METHOD ref_splitter->get_container EXPORTING row = '1' column = '1'

(C) SAP AG BC412 27-58
RECEIVING container = cell_1_1. * right cell CALL METHOD ref_splitter->get_container EXPORTING row = '1' column = '2' RECEIVING container = cell_1_2. * create picture control objects and link to cell pointer * picture control object 1 (left cell)
CREATE OBJECT ref_pic_left EXPORTING parent = cell_1_1 EXCEPTIONS others = 1. IF sy-subrc NE 0. MESSAGE a011. " cancel program processing ENDIF. * picture control object 2 (right cell) CREATE OBJECT ref_pic_right EXPORTING parent = cell_1_2 EXCEPTIONS others = 1. IF sy-subrc NE 0. MESSAGE a011. " cancel program processing ENDIF. * load pictures into picture control objects * left cell CALL METHOD ref_pic_left->load_picture_from_url EXPORTING url = l_url1 IMPORTING result = l_result1 EXCEPTIONS OTHERS = 1. IF sy-subrc NE 0. MESSAGE a012. ENDIF. CASE l_result1. WHEN 0. " picture not loaded MESSAGE s013. WHEN 1. " load of picture successful MESSAGE s014.

(C) SAP AG BC412 27-59
ENDCASE.

(C) SAP AG BC412 27-60
* right cell CALL METHOD ref_pic_right->load_picture_from_url EXPORTING url = l_url2 IMPORTING result = l_result2 EXCEPTIONS OTHERS = 1. IF sy-subrc NE 0. MESSAGE a012. ENDIF. CASE l_result2. WHEN 0. " picture not loaded MESSAGE s013. WHEN 1. " load of picture successful MESSAGE s014. ENDCASE. * event handling * 1. register events for control framework wa_events-eventid = cl_gui_picture=>eventid_picture_click. wa_events-appl_event = ' '. INSERT wa_events INTO TABLE it_events. wa_events-eventid = cl_gui_picture=>eventid_control_dblclick. wa_events-appl_event = ' '. INSERT wa_events INTO TABLE it_events. * send event table for picture in left cell to cfw CALL METHOD ref_pic_left->set_registered_events EXPORTING events = it_events EXCEPTIONS OTHERS = 1. IF sy-subrc NE 0. MESSAGE a012. ENDIF. * send event table for picture in right cell to cfw CALL METHOD ref_pic_right->set_registered_events EXPORTING events = it_events EXCEPTIONS OTHERS = 1. IF sy-subrc NE 0. MESSAGE a012. ENDIF.

(C) SAP AG BC412 27-61
* 2. set event handler for ABAP object instance: * ref_pic_left (left cell) SET HANDLER lcl_event_handler=>on_picture_click FOR ref_pic_left. SET HANDLER lcl_event_handler=>on_control_dblclick FOR ref_pic_left. * ref_pic_right (right cell) SET HANDLER lcl_event_handler=>on_picture_click FOR ref_pic_right. SET HANDLER lcl_event_handler=>on_control_dblclick FOR ref_pic_right. ENDIF. ENDMODULE. " INIT_CONTROL_PROCESSING OUTPUT
*&-----------------------------------------------------------------* *& Module USER_COMMAND_0100 INPUT *&-----------------------------------------------------------------* * Implementation of user commands of type ' ': * - push buttons on screen 100 * - GUI functions *------------------------------------------------------------------* MODULE user_command_0100 INPUT. copy_ok_code = ok_code. CLEAR ok_code. CASE copy_ok_code. WHEN 'BACK'. " back to program, leave screen CLEAR l_answer. CALL FUNCTION 'POPUP_TO_CONFIRM_STEP' EXPORTING * DEFAULTOPTION = 'Y' textline1 = text-004 textline2 = text-005 titel = text-007 cancel_display = ' ' IMPORTING answer = l_answer. CASE l_answer. WHEN 'J'. PERFORM free_control_ressources. LEAVE TO SCREEN 0. WHEN 'N'. SET SCREEN sy-dynnr. ENDCASE.

(C) SAP AG BC412 27-62
WHEN 'STRETCH'. " picture operation: stretch to fit area CALL METHOD ref_pic_right->set_display_mode EXPORTING display_mode = cl_gui_picture=>display_mode_stretch EXCEPTIONS OTHERS = 1. IF sy-subrc NE 0. MESSAGE s015. ENDIF. WHEN 'NORMAL'. " picture operation: fit to normal size CALL METHOD ref_pic_right->set_display_mode EXPORTING display_mode = cl_gui_picture=>display_mode_normal EXCEPTIONS OTHERS = 1. IF sy-subrc NE 0. MESSAGE s015. ENDIF. WHEN 'NORMAL_CENTER'. " picture operation: center normal size CALL METHOD ref_pic_right->set_display_mode EXPORTING display_mode = cl_gui_picture=>display_mode_normal_center EXCEPTIONS OTHERS = 1. IF sy-subrc NE 0. MESSAGE s015. ENDIF. WHEN 'FIT'. " picture operation: zoom picture CALL METHOD ref_pic_right->set_display_mode EXPORTING display_mode = cl_gui_picture=>display_mode_fit EXCEPTIONS OTHERS = 1. IF sy-subrc NE 0. MESSAGE s015. ENDIF. WHEN 'FIT_CENTER'. " picture operation: zoom and center CALL METHOD ref_pic_right->set_display_mode EXPORTING display_mode = cl_gui_picture=>display_mode_fit_center EXCEPTIONS OTHERS = 1. IF sy-subrc NE 0. MESSAGE s015. ENDIF. WHEN 'MODE_INFO'. current_mode = ref_pic_right->display_mode. MESSAGE i025 WITH current_mode. ENDCASE.

(C) SAP AG BC412 27-63
ENDMODULE. " USER_COMMAND_0100 INPUT
*&-----------------------------------------------------------------* *& Module STATUS_0100 OUTPUT *&-----------------------------------------------------------------* * Set GUI for screen 0100 *------------------------------------------------------------------* MODULE status_0100 OUTPUT. SET PF-STATUS 'STATUS_NORM_0100'. SET TITLEBAR 'TITLE_NORM_0100'. ENDMODULE. " STATUS_0100 OUTPUT *&-----------------------------------------------------------------* *& Module EXIT_COMMAND_0100 INPUT *&-----------------------------------------------------------------* * Implementation of user commands of type 'E'. *------------------------------------------------------------------* MODULE exit_command_0100 INPUT. CASE ok_code. WHEN 'CANCEL'. " cancel current screen processing CLEAR l_answer. CALL FUNCTION 'POPUP_TO_CONFIRM_STEP' EXPORTING * DEFAULTOPTION = 'Y' textline1 = text-004 textline2 = text-005 titel = text-006 cancel_display = ' ' IMPORTING answer = l_answer. CASE l_answer. WHEN 'J'. PERFORM free_control_ressources. LEAVE TO SCREEN 0. WHEN 'N'. CLEAR ok_code. SET SCREEN sy-dynnr. ENDCASE. WHEN 'EXIT'. " leave program CLEAR l_answer. CALL FUNCTION 'POPUP_TO_CONFIRM_STEP' EXPORTING * DEFAULTOPTION = 'Y' textline1 = text-001 textline2 = text-002 titel = text-003 cancel_display = 'X' IMPORTING answer = l_answer. CASE l_answer. WHEN 'J' OR 'N'. " no data to update

(C) SAP AG BC412 27-64
PERFORM free_control_ressources. LEAVE PROGRAM. WHEN 'A'. CLEAR ok_code. SET SCREEN sy-dynnr. ENDCASE. ENDCASE. ENDMODULE. " EXIT_COMMAND_0100 INPUT
Subroutines *&-----------------------------------------------------------------* *& Form free_control_ressources *&-----------------------------------------------------------------* * Free all control related ressources. *------------------------------------------------------------------* * no interface *------------------------------------------------------------------* FORM free_control_ressources. CALL METHOD ref_pic_left->free. CALL METHOD ref_pic_right->free. CALL METHOD ref_splitter->free. CALL METHOD ref_container->free. FREE: ref_pic_left, ref_pic_right, cell_1_1, cell_1_2, ref_splitter, ref_container. ENDFORM. " free_control_ressources

(C) SAP AG BC412 28-1
© SAP AG 1999
Tree Control types:
Simple tree
Column tree
List tree
Properties
Use
Data handling
Events
Contents:
SAP Tree Control

(C) SAP AG BC412 28-2
© SAP AG 1999
Describe the features of the different tree control variants:
Attributes
Methods
Events
Display data in a tree control:
Create hierarchies
Use additional information (items)
At the conclusion of this unit, you will be able to:
SAP Tree Control: Unit Objectives

(C) SAP AG BC412 28-3
© SAP AG 1999
Overview Diagram - BC412
Unit 1 Course Overview
Introduction to the Control Framework
SAP Container
SAP Tree Control
ALV Grid Control
Unit 2
Unit 3
Unit 4
Unit 5

(C) SAP AG BC412 28-4
© SAP AG 1999
SAP Tree Control Overview:Introduction - Tree Controls and Their Attributes
Introduction: Tree controls and their attributesIntroduction: Tree controls and their attributes
Constructor, methods, and eventsConstructor, methods, and events
Creating a hierarchyCreating a hierarchy
Data handling strategiesData handling strategies
Item tablesItem tables

(C) SAP AG BC412 28-5
© SAP AG 1999
SAP Tree Control
Development class object typesDictionary structuresProgramsSAPBC412_BASD_AREA... SAPBC412_BASD_CALL...
.
.
.Function groupsMessage classes
SAPBC412
BC412: Demo ... BC412: Demo ...
.
.
.
Object name Description Properties
( Data displayed hierarchically in a list
( List can be expanded and collapsed
( User interaction possible
( Can be used as: - Navigation aid- Value list- Item list
The SAP Tree Control is suitable for displaying data in hierarchical structures. You can display the tree in either expanded or collapsed form. It is therefore particularly useful for displaying data in a structured format. You can use it as a Navigation aid Value list Item list.
The SAP Tree Control is a control that displays data. You cannot enter data. However, user interaction is possible with the following components: Individual lines Areas consisting of several lines Elements within lines Title elements
All user actions on components of a tree control trigger control events. On Windows platforms, the SAP Tree Control supports drag and drop and context menus. You cannot print the contents of a SAP Tree Control display in the same way you can an ABAP list.
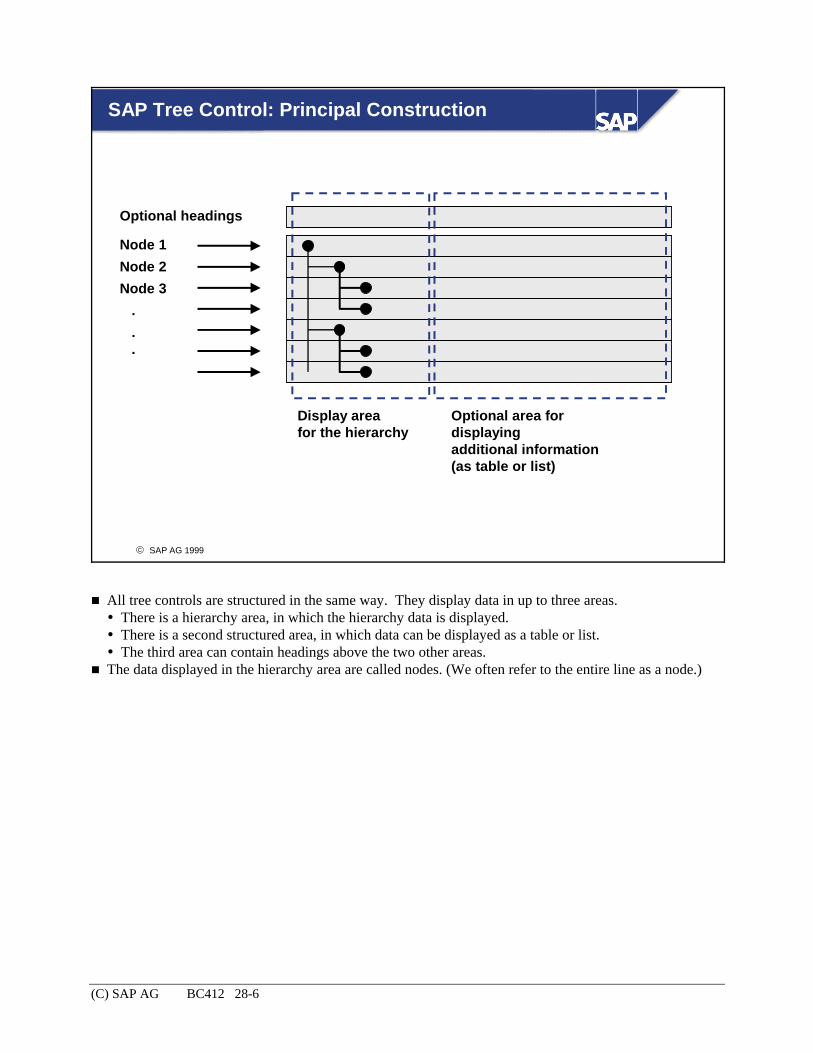
(C) SAP AG BC412 28-6
© SAP AG 1999
SAP Tree Control: Principal Construction
Node 1Node 2Node 3
.
.
.
Display areafor the hierarchy
Optional area for displaying additional information(as table or list)
Optional headings
All tree controls are structured in the same way. They display data in up to three areas. There is a hierarchy area, in which the hierarchy data is displayed. There is a second structured area, in which data can be displayed as a table or list. The third area can contain headings above the two other areas.
The data displayed in the hierarchy area are called nodes. (We often refer to the entire line as a node.)

(C) SAP AG BC412 28-7
© SAP AG 1999
Tree Control Implementation
Additional info
Headings
Unused
( Simple Tree
( Column Tree
( List Tree
cl_gui_simple_tree
cl_gui_column_tree
cl_gui_list_tree
Areas used Control name ABAP class
There are three different tree control implementations. Each one uses the three areas illustrated above differently.
The Simple Tree only uses the hierarchy area. It has no headings, and cannot display any special structured data.
There are two tree control versions that use all three data areas: The Column Tree and the List Tree. Each of these implementations structures its additional information differently.
Each Tree Control implementation has its own class in the class library: cl_gui_simple_tree for the Simple Tree cl_gui_column_tree for the Column Tree cl_gui_list_tree for the List Tree
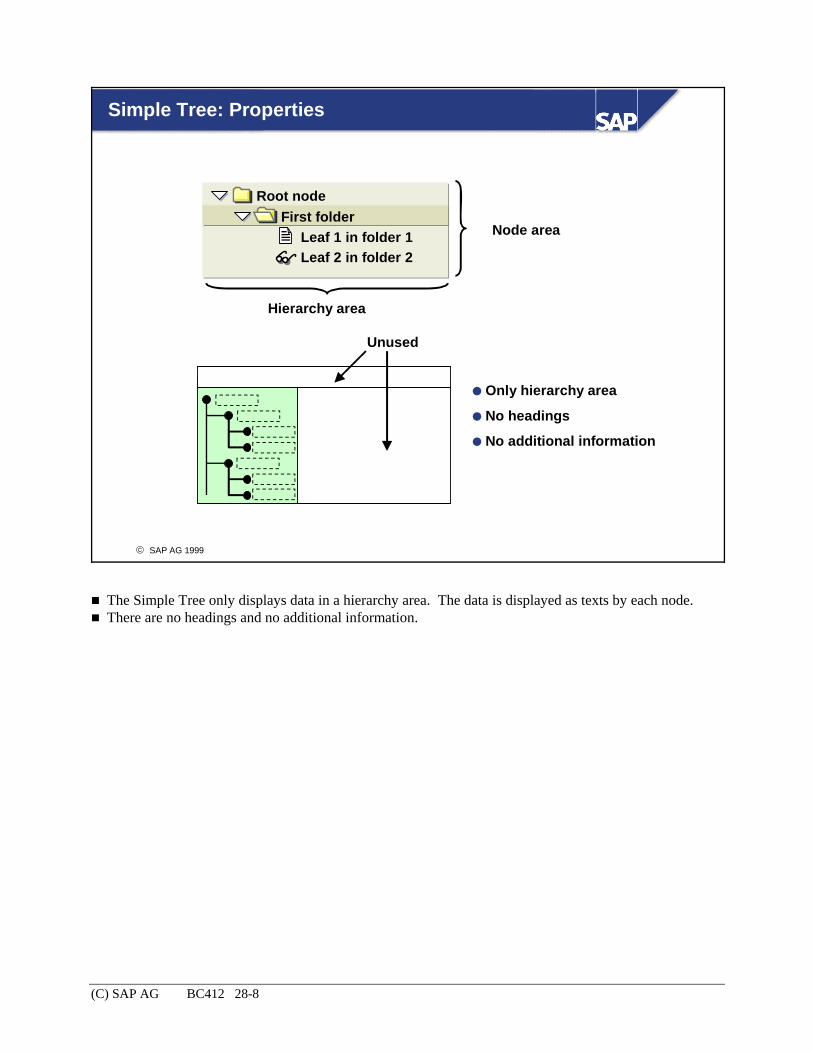
(C) SAP AG BC412 28-8
© SAP AG 1999
Simple Tree: Properties
First folderLeaf 1 in folder 1Leaf 2 in folder 2
Root node
Hierarchy area
Node area
( Only hierarchy area
( No headings
( No additional information
Unused
The Simple Tree only displays data in a hierarchy area. The data is displayed as texts by each node. There are no headings and no additional information.
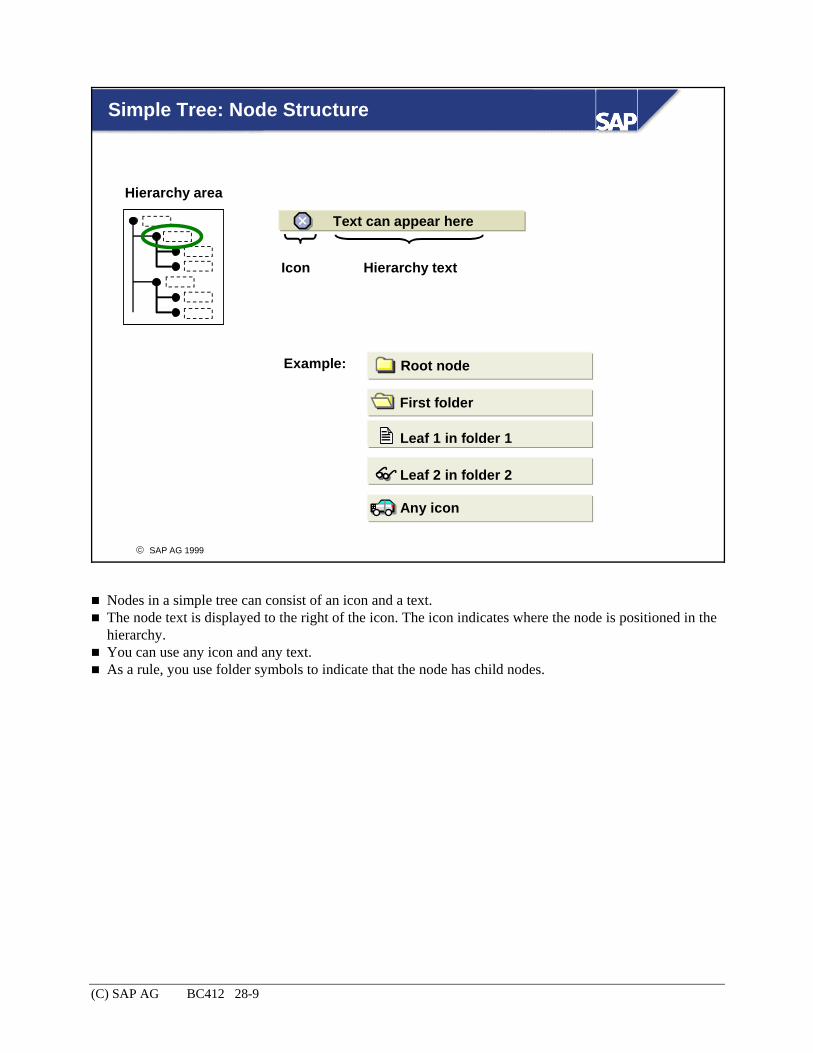
(C) SAP AG BC412 28-9
© SAP AG 1999
Simple Tree: Node Structure
Text can appear here
Icon Hierarchy text
Example:
First folder
Root node
Leaf 1 in folder 1
Leaf 2 in folder 2
Hierarchy area
Any icon
Nodes in a simple tree can consist of an icon and a text. The node text is displayed to the right of the icon. The icon indicates where the node is positioned in the hierarchy.
You can use any icon and any text. As a rule, you use folder symbols to indicate that the node has child nodes.

(C) SAP AG BC412 28-10
© SAP AG 1999
Column Tree: Properties
First folderLeaf 1 in folder 1Leaf 2 in folder 2
Hierarchy headingRoot node
Column 2 Column 3Root text 1 Root text 2
Entry 1 Entry ...
Leaf 2 column 2Leaf 1 column 3Leaf 2 column 3
Hierarchy areaColumn 1
Column areaColumn 2 - column n
Node area
Headings
( Hierarchy area
( Headings
( Additional information as table (columns)
The Column Tree uses the hierarchy area, headings, and the additional information area. The data in the Column Tree is displayed as a table. The contents of the first column are displayed in the hierarchy area. They appear left-justified next to the node.
All of the other columns are displayed in the additional information area. They are aligned vertically (displayed as a table).
Column tree displays can have column headings. You can display more than one column in the hierarchy area (use the method add_hierarchy_column).

(C) SAP AG BC412 28-11
© SAP AG 1999
Column Tree: Node Structure
Icon
Possible column entries (items)
Text
Link
: Icon + text
: Checkbox + icon + text
: Pushbutton with icon + text
: Text as link
Text
Text
Hierarchy
Columns
The nodes in the column tree can contain one icon. You can display items in the columns as follows:
As an icon with text (both are optional) As a checkbox with icon and text (icon and text are optional) As a pushbutton with icon and text (icon and text are optional) As a link (text displayed as hotspot. The mouse pointer changes shape when it is positioned over a link.)
You should not use columns that display all of their items as pushbuttons. Instead, you should display the data as a link.
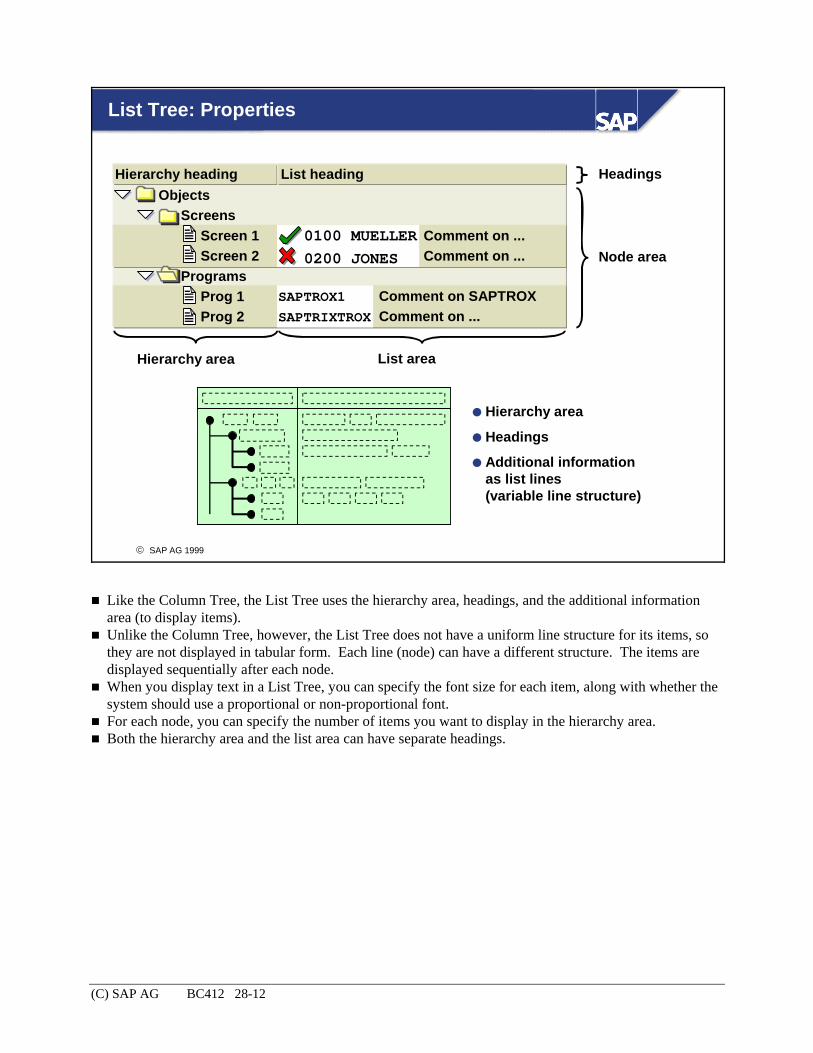
(C) SAP AG BC412 28-12
© SAP AG 1999
List Tree: Properties
ScreensScreen 1Screen 2
ProgramsProg 1Prog 2
Hierarchy headingObjects
List heading
Hierarchy area List area
Node area
Headings
0100 MUELLER0200 JONES
SAPTROX1SAPTRIXTROX
Comment on ...Comment on ...
Comment on SAPTROXComment on ...
( Hierarchy area
( Headings
( Additional information as list lines (variable line structure)
Like the Column Tree, the List Tree uses the hierarchy area, headings, and the additional information area (to display items).
Unlike the Column Tree, however, the List Tree does not have a uniform line structure for its items, so they are not displayed in tabular form. Each line (node) can have a different structure. The items are displayed sequentially after each node.
When you display text in a List Tree, you can specify the font size for each item, along with whether the system should use a proportional or non-proportional font.
For each node, you can specify the number of items you want to display in the hierarchy area. Both the hierarchy area and the list area can have separate headings.

(C) SAP AG BC412 28-13
© SAP AG 1999
List Tree: Node Structure
Possible list entries (items)
Text
Text as link
: Icon + text
: Checkbox + icon + text
: Pushbutton with icon + text
: Link
Text
Text
Icon
Hierarchy
List
The nodes in the column tree can contain one icon. You can display the items of a node as follows:
As an icon with text (both are optional) As a checkbox with icon and text (icon and text are optional) As a pushbutton with icon and text (icon and text are optional) As a link (text displayed as hotspot. The mouse pointer changes shape when it is positioned over a link.)
You should avoid excessive use of pushbuttons. The List Tree allows you to choose between fixed font and proportional font for text items. For items with proportional font, you should use the "Automatic length" attribute.

(C) SAP AG BC412 28-14
© SAP AG 1999
SAP Tree Control Overview:Constructor, Methods, and Events
Introduction: Tree controls and their attributesIntroduction: Tree controls and their attributes
Constructor, methods, and eventsConstructor, methods, and events
Creating a hierarchyCreating a hierarchy
Data handling strategiesData handling strategies
Item tablesItem tables

(C) SAP AG BC412 28-15
© SAP AG 1999
SAP Tree Control: Communication and Data Flow
ABAP program
Tree Control
Application data anddisplay information
Packet of datato be displayed
and/ordisplay
information
Other data
Data fordisplay
Retrieved set,selected nodes
and/ordisplay
information
Displaydata
Methods Events
Element name•Node•Heading•Column item•List item
The control used at the frontend to display a Tree Control only displays the data. The proxy instance in ABAP has no data of its own. Consequently, all of the information necessary to display the tree (texts, icons, pushbuttons, checkboxes, and the descriptions of how they should be displayed) must be administered by the ABAP program that uses the control.
Normally, when a user interacts with a control, you must find out the application data that belongs to the node and its display information in your program.

(C) SAP AG BC412 28-16
© SAP AG 1999
Modeling View of the Tree Classes
cl_gui_control
cl_tree_control_base
cl_gui_simple_tree cl_item_tree_control
cl_gui_column_tree cl_gui_list_tree
The three Tree Control classes cl_gui_simple_tree, cl_gui_column_tree, and cl_gui_list_tree are modeled as follows in the class library: All of the Tree Control classes are derived from cl_tree_control_base, which itself inherits from cl_gui_control.
The class cl_gui_simple_tree inherits directly from cl_tree_control_base. The two classes cl_gui_column_tree and cl_gui_list_tree are subclasses of cl_item_tree_control, which inherits from cl_tree_control_base.
Only the classes cl_gui_simple_tree, cl_gui_column_tree, and cl_gui_list_tree can be instantiated.

(C) SAP AG BC412 28-17
© SAP AG 1999
Constructor, Methods, and Events : Simple Tree
Introduction: Tree controls and their attributesIntroduction: Tree controls and their attributes
Constructor, methods, and eventsConstructor, methods, and events
Creating a hierarchyCreating a hierarchy
Data handling strategiesData handling strategies
Item tablesItem tables
Simple TreeSimple Tree
Column TreeColumn Tree
List TreeList Tree
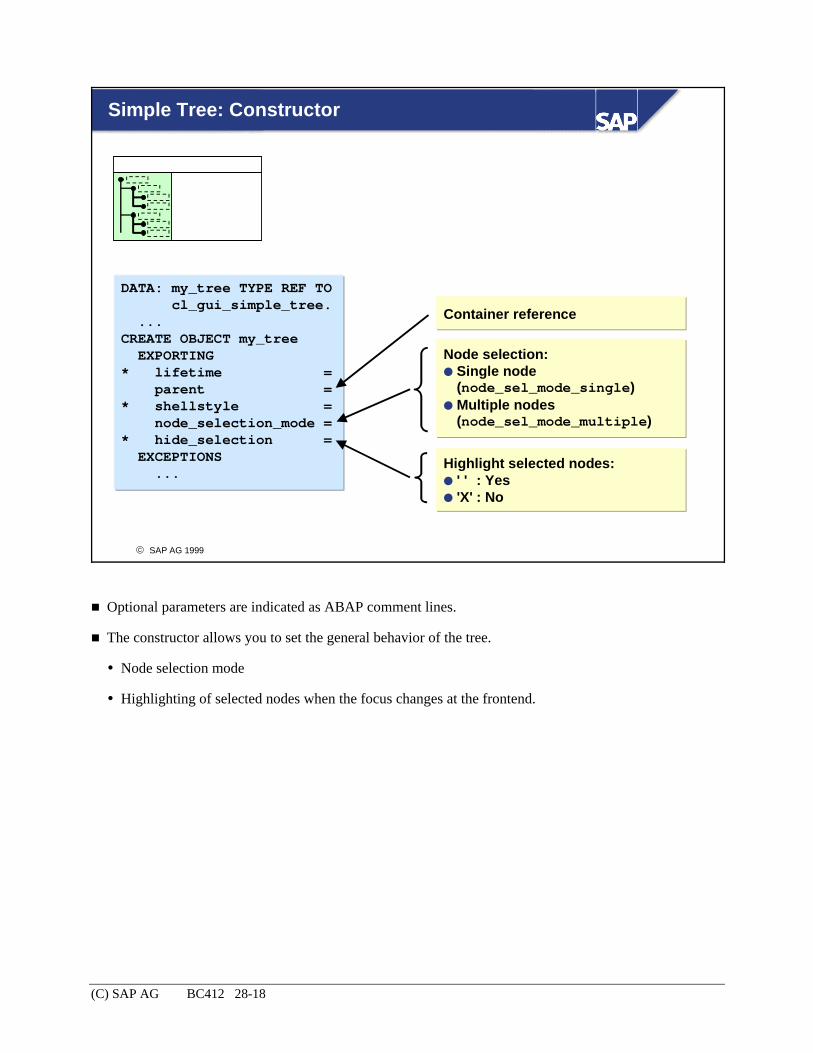
(C) SAP AG BC412 28-18
© SAP AG 1999
Simple Tree: Constructor
DATA: my_tree TYPE REF TOcl_gui_simple_tree.
...CREATE OBJECT my_tree
EXPORTING* lifetime =
parent =* shellstyle =
node_selection_mode =* hide_selection =
EXCEPTIONS...
Container reference
Node selection:( Single node
(node_sel_mode_single)( Multiple nodes
(node_sel_mode_multiple)
Highlight selected nodes:( ' ' : Yes( 'X' : No
Optional parameters are indicated as ABAP comment lines.
The constructor allows you to set the general behavior of the tree.
Node selection mode
Highlighting of selected nodes when the focus changes at the frontend.
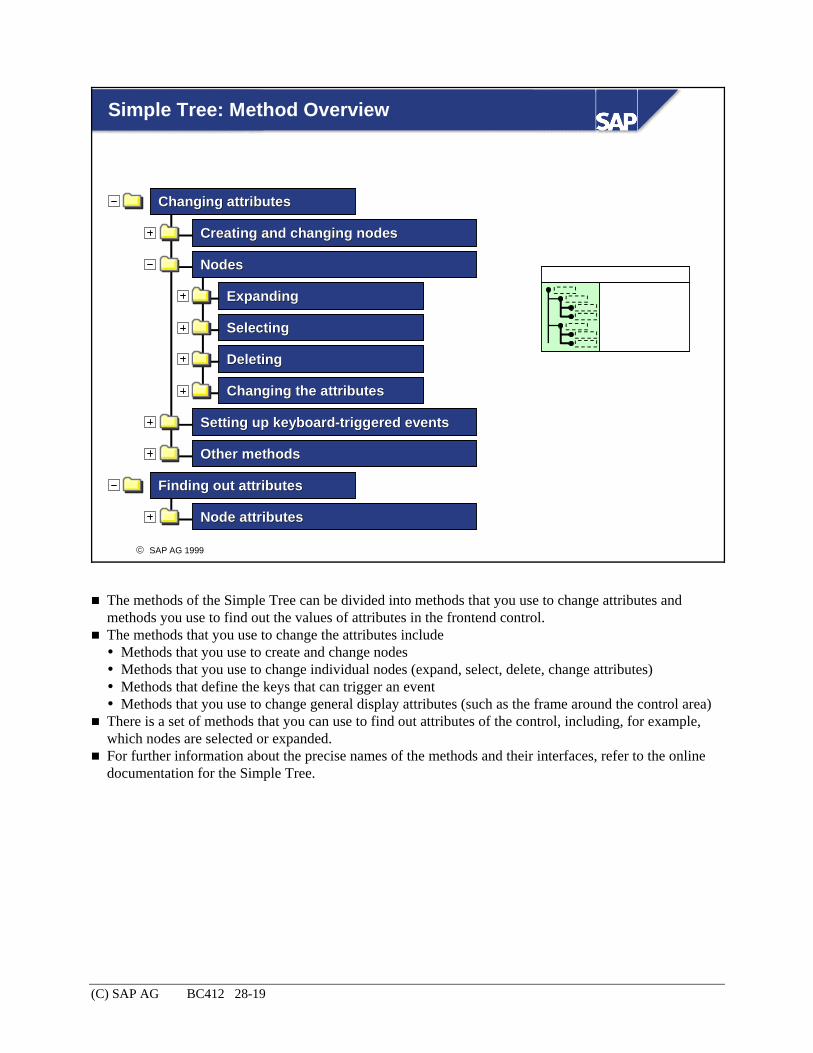
(C) SAP AG BC412 28-19
© SAP AG 1999
Simple Tree: Method Overview
Creating and changing nodesCreating and changing nodes
NodesNodes
Setting up keyboardSetting up keyboard--triggered eventstriggered events
Other methodsOther methods
Changing attributesChanging attributes
Node attributesNode attributes
Finding out attributesFinding out attributes
ExpandingExpanding
SelectingSelecting
DeletingDeleting
Changing the attributesChanging the attributes
The methods of the Simple Tree can be divided into methods that you use to change attributes and methods you use to find out the values of attributes in the frontend control.
The methods that you use to change the attributes include Methods that you use to create and change nodes Methods that you use to change individual nodes (expand, select, delete, change attributes) Methods that define the keys that can trigger an event Methods that you use to change general display attributes (such as the frame around the control area)
There is a set of methods that you can use to find out attributes of the control, including, for example, which nodes are selected or expanded.
For further information about the precise names of the methods and their interfaces, refer to the online documentation for the Simple Tree.

(C) SAP AG BC412 28-20
© SAP AG 1999
Simple Tree: Event Overview
node_double_click
NodesNodes
Context menuContext menu
node_keypress
expand_no_children
selection_changed
Drag and dropDrag and drop
Double-click on a node
Node selected and key pressed
User expanded a node with no contents at frontend
Selected node has changed
The Simple Tree has Events that are triggered by mouse operations on nodes Events that are triggered by drag and drop operations Events that are triggered by context menu operations
For details of the dependencies of the events, detailed information about their interfaces, and the names of their "event IDs", refer to the documentation for the Simple Tree.

(C) SAP AG BC412 28-21
© SAP AG 1999
Constructor, Methods, and Events:Column Tree
Introduction: Tree controls and their attributesIntroduction: Tree controls and their attributes
Constructor, methods, and eventsConstructor, methods, and events
Creating a hierarchyCreating a hierarchy
Data handling strategiesData handling strategies
Item tablesItem tables
Simple TreeSimple Tree
Column TreeColumn Tree
List TreeList Tree

(C) SAP AG BC412 28-22
© SAP AG 1999
Column Tree: Constructor
DATA: my_tree TYPE REF TOcl_gui_column_tree.
...CREATE OBJECT my_tree
EXPORTING* lifetime =
parent =* shellstyle =
node_selection_mode =* hide_selection =
item_selection =hierarchy_column_name = hierarchy_header =
EXCEPTIONS...
Container reference
Node selection:( Single node
(node_sel_mode_single)( Multiple nodes
(node_sel_mode_multiple)
Highlight selected nodes:( ' ' : Yes( 'X' : No
Column items can be selected:( 'X' : Yes( ' ' : No
Column name in hierarchy area
Heading in hierarchy area(structure with type treev_hhdr)
The constructor of the Column Tree allows you to set the following attributes (in addition to those we have already seen for the Simple Tree):
Whether single items can be selected (parameter item_selection)
Technical name of the column to be displayed in the hierarchy area
The heading for the hierarchy area (text and displayed length)

(C) SAP AG BC412 28-23
© SAP AG 1999
Column Tree: Method Overview
Creating, changing, and deletingCreating, changing, and deletingcolumn items and nodescolumn items and nodes
Setting up keyboardSetting up keyboard--triggered eventstriggered events
Other methodsOther methods
Changing attributesChanging attributes
NodesNodes
Finding out attributesFinding out attributes
Column itemsColumn items
NodesNodes
ColumnsColumns
Selected itemSelected item
Width of hierarchy headingWidth of hierarchy heading
ColumnsColumns
As well as the methods for changing and finding out node attributes, the Column Tree has methods that allow you to change or find out attributes of the following tree components: Columns Items Headings
For further information about the precise names of the methods and their interfaces, refer to the online documentation for the Column Tree.

(C) SAP AG BC412 28-24
© SAP AG 1999
Column Tree: Overview of Modifying Methods
Change individual itemsChange individual items
Column itemsColumn items
Select individual itemsSelect individual items
ExpandingExpanding
NodesNodes
SelectingSelecting
DeletingDeleting
Changing the attributesChanging the attributes
Specifying the sequenceSpecifying the sequence
ColumnsColumns
Inserting, changing, deletingInserting, changing, deleting
Change column attributesChange column attributes
Hierarchy heading:Hierarchy heading: Changing the attributesChanging the attributes
Method overview
The item methods can be divided into those that change individual items, and those with which you can select a single item.
For node operations, the Column Tree offers the same methods as the Simple Tree. The following column operations are available:
Changing the column sequence Inserting, changing, and deleting columns Changing column attributes Changing the attributes of the hierarchy heading

(C) SAP AG BC412 28-25
© SAP AG 1999
Column Tree: Event Overview
NodesNodes
Context menuContext menu
Drag and dropDrag and drop
header_click
HeadingsHeadings
item_double_click
Column itemsColumn items
item_keypress
button_click
link_click
checkbox_change
Click on column heading
Click on an item
Item selected and key pressed
Click on a pushbutton
Click on a link
Contents of a checkbox have changed
The Column Tree has the following events in addition to those of the Simple Tree: Mouse click on a column heading Events on items - Keyboard event for selected items - Pushbutton event for item type pushbutton - Click on a link - Click on a checkbox
For details of the dependencies of the events, detailed information about their interfaces, and the names of their "event IDs", refer to the documentation for the Column Tree.

(C) SAP AG BC412 28-26
© SAP AG 1999
Constructor, Methods, and Events:List Tree
Introduction: Tree controls and their attributesIntroduction: Tree controls and their attributes
Constructor, methods, and eventsConstructor, methods, and events
Creating a hierarchyCreating a hierarchy
Data handling strategiesData handling strategies
Item tablesItem tables
Simple TreeSimple Tree
Column TreeColumn Tree
List TreeList Tree

(C) SAP AG BC412 28-27
© SAP AG 1999
List Tree: Constructor
DATA: my_tree TYPE REF TOcl_gui_list_tree.
...CREATE OBJECT my_tree
EXPORTING* lifetime =
parent =* shellstyle =
node_selection_mode =* hide_selection =
item_selection =with_header =hierarchy_header = list_header =
EXCEPTIONS...
Container reference
Node selection:( Single node
(node_sel_mode_single)( Multiple nodes
(node_sel_mode_multiple)
Highlight selected nodes:( ' ' : Yes( 'X' : No
List items can be selected:( 'X' : Yes( ' ' : No
Use column headings( 'X' : Yes( ' ' : No
Heading in hierarchy area(structure with type treev_hhdr)
Heading in list area(structure with type treev_lhdr)
The List Tree allows you to set headings for the hierarchy area and the list area.

(C) SAP AG BC412 28-28
© SAP AG 1999
List Tree: Method Overview
Creating, changing, and deletingCreating, changing, and deletinglist items and nodeslist items and nodes
Setting up keyboardSetting up keyboard--triggered eventstriggered events
Other methodsOther methods
Changing attributesChanging attributes
NodesNodes
Finding out attributesFinding out attributes
List itemsList items
NodesNodes
Hierarchy headingHierarchy heading
Selected itemSelected item
Width of hierarchy headingWidth of hierarchy heading
List headingList heading
The List Tree has the same methods as the Column Tree. For further information about the precise names of the methods and their interfaces, refer to the online documentation for the List Tree.

(C) SAP AG BC412 28-29
© SAP AG 1999
List Tree: Overview of Modifying Methods
Change individual itemsChange individual items
List itemsList items
Select individual itemsSelect individual items
ExpandingExpanding
NodesNodes
SelectingSelecting
DeletingDeleting
Changing the attributesChanging the attributes
Method overview
Since the List Tree displays its additional node information in a list instead of columns, it does not have the methods that apply to columns that the Column Tree has.

(C) SAP AG BC412 28-30
© SAP AG 1999
List Tree: Event Overview
NodesNodes
Context menuContext menu
Drag and dropDrag and drop
header_click
HeadingsHeadings
item_double_click
List itemsList items
item_keypress
button_click
link_click
checkbox_change
Click on column heading
Click on a list item
Item selected and key pressed
Click on a pushbutton
Click on a link
Contents of a checkbox have changed
The List Tree has the same events as the Column Tree. For details of the dependencies of the events, detailed information about their interfaces, and the names of their "event IDs", refer to the documentation for the List Tree.
(C) SAP AG BC412 28-31
© SAP AG 1999
SAP Tree Control Overview: Creating a Hierarchy
Introduction: Tree controls and their attributesIntroduction: Tree controls and their attributes
Constructor, methods, and eventsConstructor, methods, and events
Creating a hierarchyCreating a hierarchy
Data handling strategiesData handling strategies
Item tablesItem tables

(C) SAP AG BC412 28-32
© SAP AG 1999
Simple Tree: Control Data
ABAP program
Tree Control
Application data
Packet ofdata for display
+display
information
Other data
Data for display
DATA: itab TYPE TABLE OF struc.
CALL METHOD my_tree->add_nodesEXPORTING
node_table = itabtable_structure_name = struc
EXCEPTIONS...
Line type of internal table (itab)Structure in ABAP Dictionary
To display hierarchically-related data in a Simple Tree, you must send the texts you want to display to the control along with information about the hierarchy. You use the add_nodes method to do this.
In the add_nodes method, use the node_table parameter to pass an internal table containing the data you want to display.
You must define the internal table with reference to a structure that you have defined in the ABAP Dictionary. You pass the name of this structure using the parameter table_structure_name.

(C) SAP AG BC412 28-33
© SAP AG 1999
Line Structure of the Node Table
treev_node text
SAP structure Freely-defined text field
node_keyrelatkeyrelatshiphiddendisabledisfoldern_imageexp_imagestylelast_hitemno_branchexpanderdragdropid
Structure in the ABAP Dictionary
Line structure for node attributesNode name (must be unique at thef rontend)Name of a node to which the node is relatedType of relationship between node_key and relatkey. Flag: Node invisible yes/noFlag: Node cannot be selected yes/noFlag: Node (folder) can have child nodes yes/noIcon name for non-expanded nodesIcon name for non-expanded nodesNode styleNumber of last list entry in the hierarchy area (List Tree only)Flag: Switch off line linking nodes yes/noFlag: Make '+' sign appear for empty folders yes/noID for drag and drop operations
treev_node
To specify the type of the node table, you first need to create a structure in the ABAP Dictionary. In this structure, you must include the Dictionary structure treev_node (provided by SAP). You can use the fields in this structure to set the attributes of the nodes in the node table.
As well as including treev_node, you must add a field to your structure with the type CHAR. You will use this to pass the node text to the control.
The node_key field contains the technical name under which the node is identified at the frontend. This technical name must be unique within the entire hierarchy.
The three fields node_key, relatkey, and relatship determine the position of the node in the hierarchy.
For each node (node_key) that you send to the control, you must specify its relationship (relatship) to an existing node in the control (relatkey).
The no_branch field has no effect in the new SAP visual design.
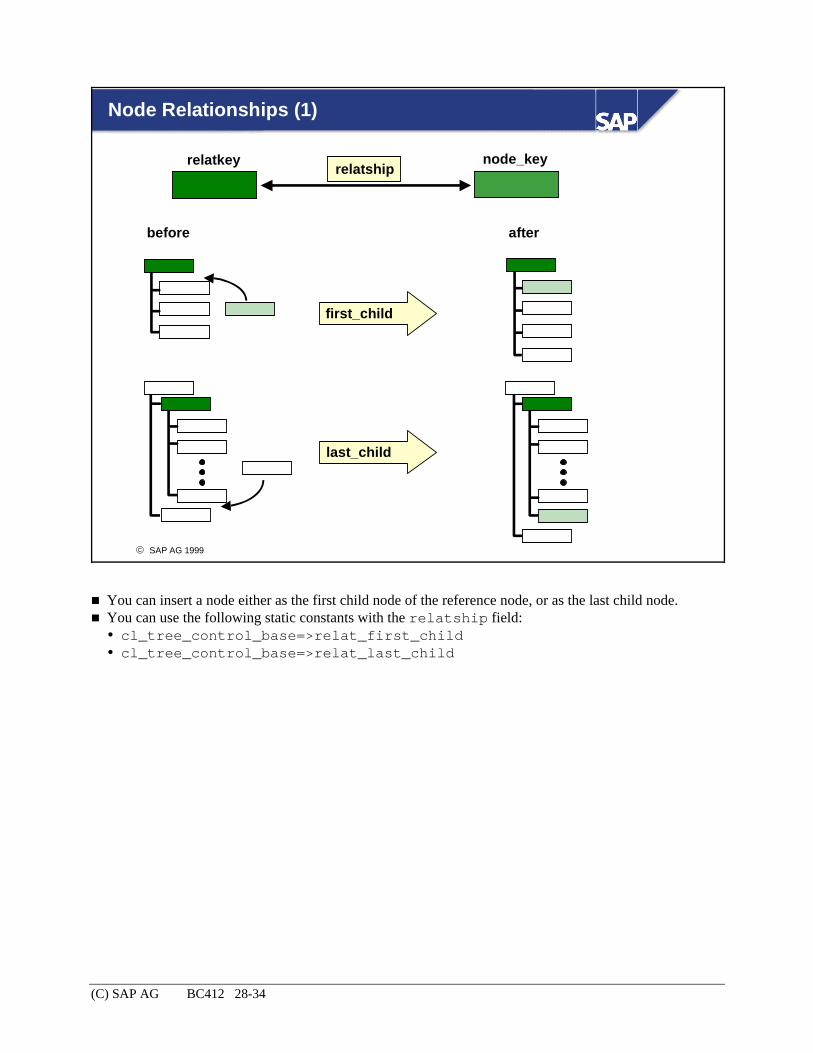
(C) SAP AG BC412 28-34
© SAP AG 1999
Node Relationships (1)
relatkey node_keyrelatship
first_child
last_child
before after
You can insert a node either as the first child node of the reference node, or as the last child node. You can use the following static constants with the relatship field:
cl_tree_control_base=>relat_first_child cl_tree_control_base=>relat_last_child

(C) SAP AG BC412 28-35
© SAP AG 1999
Node Relationships (2)
relatship
prev_sibling
next_sibling
before after
relatkey node_key
You can insert a node directly before or after the reference node at the same hierarchy level. You can use the following static constants with the relatship field:
cl_tree_control_base=>relat_prev_sibling cl_tree_control_base=>relat_next_sibling

(C) SAP AG BC412 28-36
© SAP AG 1999
Node Relationships (3)
relatship
first_sibling
last_sibling
before after
relatkey node_key
You can insert a node as the first or last node in a the hierarchy level of the reference node. You can use the following static constants with the relatship field:
cl_tree_control_base=>relat_first_sibling cl_tree_control_base=>relat_last_sibling

(C) SAP AG BC412 28-37
© SAP AG 1999
Passing the Node Table to the Frontend
first_childfirst_childfirst_child
. . .
. . .
. . .
. . .
node_text_01node_text_10node_text_11node_text_12
node_01node_10node_11node_12
node_01node_01node_01
relatshiprelatship . . .. . . texttextnodenode__keykey relatkeyrelatkey
Nodetable
node_text_01node_text_12node_text_11node_text_10
add_nodes
ABAP program
SAP GUI
You should note the following points when constructing a node table: The entries in the node table are processed at the frontend in the order in which they appear in the internal table (that is, the order in which you filled the table).
This means that the reference node relatkey for a given node node_key must already be declared at the frontend. If you send the reference node to the frontend in the same data packet as the new node, it must occur before the new node in the node table.
For the top-level root node, you must leave the fields relatkey and relatship empty. The relationships specified in the node table are not absolute; they only apply to that particular row of the table.

(C) SAP AG BC412 28-38
© SAP AG 1999
SAP Tree Control Overview: Data Handling Strategies
Introduction: Tree controls and their attributesIntroduction: Tree controls and their attributes
Constructor, methods, and eventsConstructor, methods, and events
Creating a hierarchyCreating a hierarchy
Data handling strategiesData handling strategies
Item tablesItem tables

(C) SAP AG BC412 28-39
© SAP AG 1999
Sending Data on Request From the User
Tree Control(Frontend)
ABAP program+
Basis services
Data for root node
User expandsnode Event: expand_no_children
Data for first hierarchy level
User expandsnode
Event: expand_no_children
Data for next hierarchy levelfor expanded node
Construct controlBasic settings
Read data from DB
Read data from DB
To minimize the amount of data that has to be passed between the frontend and the application server, you should only send data to the tree when the user requests it.
If the user expands a folder, the frontend control reacts as follows: If there is no data at the frontend for the lower-level nodes, the control triggers the event expand_no_children. A node can always be expanded if its EXPANDER attribute has the value 'X'.
If the data has already been sent to the frontend, the control can expand the folder itself.

(C) SAP AG BC412 28-40
© SAP AG 1999
Node Keys
node_key
CHAR 12
Node tablenode_table
Tree Control instance
ABAP program
Internal table with application data for hierarchy level n
Internal table withapplication data for hierarchy level n+1
add_nodes
The structure of the data that you display in the Tree Control is usually determined by the hierarchical structure of the application data you want to display.
You will often read data into an internal table in your program and give the internal table the same key as the underlying database tables.
The node key (node_key field in the node table) for the Tree Control is a character field (type CHAR) with length 12.
The key for the application data that you want to display is normally shorter or longer than the node key. If it is shorter, you will not have any problems, but you must ensure, even if it is longer, that there is a 1-1 relationship between the application keys and the node keys.

(C) SAP AG BC412 28-41
© SAP AG 1999
Tree Events and Node Keys
node_double_click
NodesNodes
node_keypress
expand_no_children
selection_changed
item_double_click
Column itemsColumn items
item_keypress
button_click
link_click
checkbox_change
Context menuContext menu
ABAP program
Tree Control
Convert keyfor applicationdata
Data fordisplay
event
Node Keys
Remember - the Tree Control itself does not manage any application data. Nearly all events return the node key of the node affected by the event. In your ABAP program, you must process this node key to find out which data record is affected.

(C) SAP AG BC412 28-42
© SAP AG 1999
Storing Node Information: Strategy A
Nodekey
Applicationkey
Application data Data for node table
Node tablenode_table
Tree Control instance
ABAP program
add_nodes
Program logic
Aninternaltable
There are various ways of managing node information in your program. Strategy A: Save the node-specific information (at least the node key) in the same internal table as the application data. The node key is then an alternative key for the table entries.

(C) SAP AG BC412 28-43
© SAP AG 1999
Storing Node Information: Strategy B
Application data Applicationkey
Node tablenode_table
Tree Control instance
ABAP program
add_nodes
Internaltableforkeymapping
Nodekey
Program logic
Strategy B: Separate the node information from the application data and store each type of information in a separate table. You need at least one table for the key mapping (application key <--> node key).

(C) SAP AG BC412 28-44
© SAP AG 1999
Storing Node Information: Implementation Idea for Strategy B
Applicationkey
Internal tablefor keymapping
Nodekey
'business_key' 'node_key'
Mapping instance
htab1htab2
insert_nodedelete_nodeget_business_keyget_node_key. . .
Implemented asobject
htab1: Hash table with key: business_key
htab2: Hash table with key: node_key
Service object
You will normally need to access the key mapping table using both application keys and node keys. A good solution in terms of performance is to use two hashed tables. You must maintain both tables in parallel. The advantage of a hash table is a constant access time, regardless of how many table entries there are and which key you use.
It is a good idea to administer the tables in a separate class that encapsulates all of the technical details and which provides the user with methods for key access. This separates the key mapping problem from the actual management of the application data. The auxiliary class that you use for key mapping can also be used for other functions that you want to separate from the tree display itself, such as adding drag and drop functions.

(C) SAP AG BC412 28-45
© SAP AG 1999
Example: Flight Bookings Tree
cl_gui_simple_tree
Flight booking and auxiliary data
lcl_flight_info_tree
Methods that publish informationabout flight data externally
MethodsData
lcl_mapping
Methods
Data forkey mapping
expand_no_childrennode_double_click
node_double_click
Flight bookinghierarchy
( Displays flight booking data in a hierarchy (SCARR, SPFLI,SFLIGHT, SBOOK)
( Reads the data requested by the user from the database and buffers it in the program
( Allows access to the buffered flight data using methods
( Returns the event node_double_click with application key
The BC412 training material contains an example for the model illustrated on the previous graphics: It is implemented as a local class that "wraps" a Simple Tree along with the data displayed in it. The class "wraps" the tree-specific handling and the corresponding application data.
The class administers data from the flight data model used in ABAP training (tables SCARR, SPFLI, SFLIGHT, SBOOK), and displays it in a simple tree.
Each instance of the local class is responsible for managing the data of the nodes that are displayed. The object returns all tree events to the user. However, it first converts the technical node key into the corresponding application key, which is more useful to the application program.

(C) SAP AG BC412 28-46
© SAP AG 1999
Example: Using the Flight Booking Tree (1): Modularization
o1: cl_bc412_flight_info_tree1
Methods that publish informationabout flight data externally
node_double_click
sapbc412...: ABAP program
auxiliary data Screen data
Flight bookingdata
Auxiliarydata
o2: cl_gui_docking_container
0100: Screen
Screen data
lcl_event_handler
on_node_double_click
The graphic illustrates the structure of the example program. It shows which instances communicate with each other, and how each instance is created.

(C) SAP AG BC412 28-47
© SAP AG 1999
Example: Using the Flight Booking Tree (1): Screen Structure
AirlineAmerican Airlines
0017 New York --> San Francisco0046 San Francisco --> New York
Air CanadaAir France
Flight information system Detail information
IDAirlineCurrency
AAAmer...USD
Flight Information System Detail Information
Custom Control areadisplaying
flight booking tree(SCARR, SPFLI, SFLIGHT, SBOOK)
Screen to dock at:SCARR : 0102 SPFLI : 0103SFLIGHT : 0104SBOOK : 0105
Double-click
Airline
Application 1 for the flight booking tree: Split screen: Flight booking tree on the left Detail screen on the right, containing details of the node selected in the tree. The user selects a node by double-clicking it.
The flight booking tree is displayed in a docking container control. The detail screens are implemented as screens. There is one screen for each database table. The screens corresponding to the user's node selection is displayed on the right side (the docking container control is re-linked).

(C) SAP AG BC412 28-48
© SAP AG 1999
Example: Using the Flight Booking Tree (1): Control Flow
Tree Control flight_info_tree my_application Screen
Expand nodethat hasinformation
Expand nodewith noinformation
expand_no_children
Read andbuffer dataSend data
Double-clickon node node_double_click
Get business keynode_double_click
Analyze key (table)Find out detail info.
Send detail info.
PBO 100
The diagram illustrates the control flow when the user interacts with the Tree Control at the frontend.

(C) SAP AG BC412 28-49
© SAP AG 1999
Example: Using the Flight Booking Tree (2):
Flight Information System Detail Information
Custom Control areadisplaying
flight booking tree(SCARR, SPFLI, SFLIGHT)
Custom Control areadisplaying
Booking listin an
ALV Grid Control
Double-click
Same functions: ( Hierarchical display( Data retrieval on
request from user( Data managment
(SCARR, SPFLI, SFLIGHT)
Features:( Booking list displayedfor
selected node:% Bookings for a flight% Bookings for a route% Bookings for an airline
Application 2 for the flight booking tree: Split screen: A flight booking tree on the left containing nodes for the tables SCARR, SPFLI, and SFLIGHT. A detail screen on the right, displaying booking information as a list in the ALV Grid Control. The booking list is filled according to the user's selection in the tree. The user selects a node by double-clicking it.

(C) SAP AG BC412 28-50
© SAP AG 1999
SAP Tree Control Overview: Item Tables
Introduction: Tree controls and their attributesIntroduction: Tree controls and their attributes
Constructor, methods, and eventsConstructor, methods, and events
Creating a hierarchyCreating a hierarchy
Data handling strategiesData handling strategies
Item tablesItem tables

(C) SAP AG BC412 28-51
© SAP AG 1999
Sending Column or List Items
ABAP program
Tree Control
Application data
Data packetfor display
+display
info.
Other data
Data fordisplay
DATA: item_itab TYPE TABLE OF struc.
CALL METHOD my_tree->add_nodes_and_items EXPORTING
node_table = node_itabitem_table = item_itabtable_struc_name = struc
EXCEPTIONS...
Line type of internal table (item_itab)Structure in the ABAP Dictionary
or
1
2
If you want to display data in a Column Tree or List Tree, you need to pass a further table to the control containing data about the items in the control. This is called the item table. You use the add_nodes_and_items method to do this.
In the add_nodes_and_items method, pass the node table in the node_table parameter and the item table in the item_table parameter.
The node table of a Column Tree or List Tree must have the line type treev_node. The item table must have a line type that is based on a structure in the ABAP Dictionary.

(C) SAP AG BC412 28-52
© SAP AG 1999
Line Structure of the Item Table
treev_item text
SAP structure Freely-defined text field
node_keyitem_nameclassdisablededitablehiddenalignmentt_imagechosentogg_rightignore_imagusebgcolorfont, style, length, length_pix
Structure in the ABAP Dictionary
Line structure for node attributesNode name (must be unique at the frontend)Item nameType of entry: Text, checkbox, pushbutton, linkFlag: Item cannot be selected yes/noFlag: Item can be changed yes/noFlag: Entry invisible yes/noAlignment (List Tree only)Icon nameFlag: Checkbox is selected yes/noObsoleteFlag: Do not add width of icons and checkbox field Y/NList Tree only: Flag for background color of an item
treev_item
The structure that you have to create for the line type of the item table in the ABAP Dictionary must include the structure treev_item. This structure is delivered by SAP. You need to add a text field to the structure.
The node_key and item_name fields identify the item uniquely. You assign an item to a node by entering the relevant node key in the node_key field. You can only use the ignore_imag, usebgcolor, length, and length_pix fields with the List Tree.
The values in the class field specify the item type (text, pushbutton, checkbox, link). You can use the following static constants to assign them a type: item_class_text item_class_checkbox item_class_button item_class_link.

(C) SAP AG BC412 28-53
© SAP AG 1999
Item Names in a Column Tree
Item specified by
node_key = 'Node6'item_name = 'Column3'
Item specified by
node_key = 'Node6'item_name = 'Column1'
Node1Node2Node3Node4Node5Node6Node7
Nodename
'Column1' 'Column2' 'Column3' 'Column4'
Column name
In a Column Tree, you specify the name of the column that should contain the item in the item_name field.
You must define the column names before you use them. To define a column, use the add_column method.
Items in the Column Tree are identified by their node name and column name (Coordinate system).

(C) SAP AG BC412 28-54
© SAP AG 1999
Creating a Column Tree: Sequence
1. Create instance
2. Create columns
3. Fill node table
4. Fill item table5. Send data
CREATE OBJECT obj( Assign column name to
hierarchy area (and hierarchy heading) in hierarchy_column_name
CALL METHOD obj->add_column( Column name (name)( Heading (header_text)
CALL METHOD obj->add_nodes_and_items( Node table (node_table)( Item table (item_table)
Furthercolumns
( Define node table with reference to treev_node

(C) SAP AG BC412 28-55
© SAP AG 1999
Item Names in a List Tree
Node1Node2Node3Node4Node5Node6Node7
Nodename
1 2 3 4 51 2
1 2 31
1 2 3 4 51 2 3 4 51
Item names: Items are numbered
Item specified by
node_key = 'Node3'item_name = '2'
Item specified by
node_key = 'Node6'item_name = '1'
The items in a List Tree are numbered sequentially for each node. Therefore, the item_name field contains the number of the item.
You identify items by their node name and item number.

(C) SAP AG BC412 28-56
© SAP AG 1999
Creating a List Tree: Sequence
1. Create instance
2. Fill node table
3. Fill item table4. Send data
CREATE OBJECT obj( Assign optional hierarchy heading
(hierarchy_header)( Assign optional list heading
(list_header)
( Define node table with reference to treev_node( Specify number of items in hierarchy area for each node
(last_hitem = number of last item in the hierarchy area)
CALL METHOD obj->add_nodes_and_items( Node table (node_table)( Item table (item_table)

(C) SAP AG BC412 28-57
© SAP AG 1999
Demonstration Programs for Tree Control Programming
SAPSIMPLE_TREE_CONTROL_DEMO
SAPSIMPLE_TREE_CONTEXT_MEN_DEM
SAPCOLUMN_TREE_CONTROL_DEMO
SAPTLIST_TREE_CONTROL_DEMO
SAPTLIST_TREE_CONTROL_DEMO_HDR
SAPSIMPLE_TREE_DRAG_DROP_DEMO
RSDEMO_DRAG_DROP_TREE_MULTI
RSDEMO_DRAG_DROP_EDIT_TREE
SEU_TREE_CONTROL
SDW4
Program name Development class
SAPSIMPLE_TREE_CONTROL_DEMO: Example program for a simple tree.
SAPSIMPLE_TREE_CONTEXT_MEN_DEM: Example program for using context menus with a simple tree.
SAPCOLUMN_TREE_CONTROL_DEMO: Example program for implementing a column tree.
SAPTLIST_TREE_CONTROL_DEMO: Example program for implementing a list tree.
SAPTLIST_TREE_CONTROL_DEMO_HDR: Example program for implementing a list tree with headings.
SAPSIMPLE_TREE_DRAG_DROP_DEMO: Example program for drag and drop operations with a tree control. It uses two simple tree contorl instances with single line selection.
RSDEMO_DRAG_DROP_TREE_MULTI: Example program for drag and drop operations in Tree Control applications using multiple selection.
RSDEMO_DRAG_DROP_EDIT_TREE: Example for drag and drop operations between a Tree Control and a Textedit Control.

(C) SAP AG BC412 28-58
© SAP AG 1999
Describe the features of the different tree control variants:
Attributes
Methods
Events
Display data in a tree control:
Create hierarchies
Use additional information (items)
You are now able to:
SAP Tree Control: Unit Summary

(C) SAP AG BC412 29-1
© SAP AG 1999
Features
Constructor, methods and events
Data descriptions
Contents:
ALV Grid Control

(C) SAP AG BC412 29-2
© SAP AG 1999
Describe the features of the ALV Grid Control
Display list data in the ALV Grid Control
Read and change properties of the ALV Grid Control
Format print lists with the ALV Grid Control
Generate a field catalog
At the conclusion of this unit, you will be able to:
ALV Grid Control: Unit Objectives

(C) SAP AG BC412 29-4
© SAP AG 1999
ALV Grid Control Overview: Features
FeaturesFeatures
Method overviewMethod overview
Event overviewEvent overview
The field catalogThe field catalog

(C) SAP AG BC412 29-5
© SAP AG 1999
ALV Grid Control
Properties
( Display of non-hierarchical lists
( Typical list functions:- Find- Filter- Sort- Totals/subtotals
( Numerous interfaces:- Report-Report- Mail- Excel/Word- File, ...
( Display variants supported- User-specific and / or global save mode
Air...AAAAAAAALHLHLHLHLH
Flight..17171764
400400400400402
Date2000-01-172000-02-202000-03-112000-05-192000-01-132000-02-162000-03-212000-03-042000-05-28
Price 513,69513,69513,69369,00
1234,561234,561234,561234,561234,56
Curr...USDUSDUSDUSDDEMDEMDEMDEMDEM
The ALV Grid Control is a tool with which you can output non-hierarchical lists in a standardized format. The list data is displayed as a table on the screen.
The ALV Grid Control offers a range of interactive standard list functions that users need frequently (find, sort, filter, calculate totals and subtotals, print, print preview, send list, export list (in different formats), and so on. These functions are implemented in the proxy object class. You as the programmer have the possibility to turn off functions not needed. In most cases the implementations of the standard functions provided by the control are sufficient. However, if required, you can adjust these implementations to meet application-specific needs.
You can add self-defined functions to the toolbar, if necessary. The ALV Grid Control allows users to adjust the layout of lists to meet their individual requirements (for example, they can swap columns, hide columns, set filters for the data to be displayed, calculate totals, and so on). The settings (list customizing) made by a specific user are called a display variant. Display variants can be saved on a user-specific or on a global basis. If such display variants exist for a list, they can be offered to the user for selection. If a display variant is set as the default variant, the associated list is always displayed based on the settings of this variant.

(C) SAP AG BC412 29-6
© SAP AG 1999
Standard Pushbuttons
Display list row details in a dialog box
Sort in ascending order (by columns selected)
Sort in descending order (by columns selected)
Find items in the list
Set filter: determine data to be displayed based on a condition (row selection)
Calculate totals for selected columns
Subtotals
Print, print preview
Transfer data --> spreadsheet, word-processing, local file, send, ...
Display variants: customize column selection, select, change, save variants, and so on
The control toolbar provides the following standard functions: Details: Select a row on the list. If you choose Details, the system displays the content of all list fields (including hidden columns) in a modal list window.
Sort in ascending order: Select one or more columns. If you choose Sort in ascending order, the system sorts the list content by the columns selected. The sort order is determined by the display order of the columns on the screen. If you do not select a column beforehand, the system displays a dialog box on which you can select the column (sort order depends on the order of the columns selected).
Sort in descending order: This function is analogous to Sort in ascending order. Find: You can determine a search term and the search order (columns or rows). Set filter: You can determine the amount of data displayed by defining value selections (SELECT-OPTIONs) for each column (column selection: see Sort in ascending order).
Total: The system calculates totals for the columns selected. Subtotal: This function is analogous to Total. (Note: You can only display subtotals if totals are calculated).
Print: The options available are Print (print dialog ->Print) and Print preview. Export: The options available are Spreadsheet, Word processing, Local file, Send, Office and ABC Analysis.
Display variants: The functions available are Choose display variant, Change display variant, and Manage display variant.
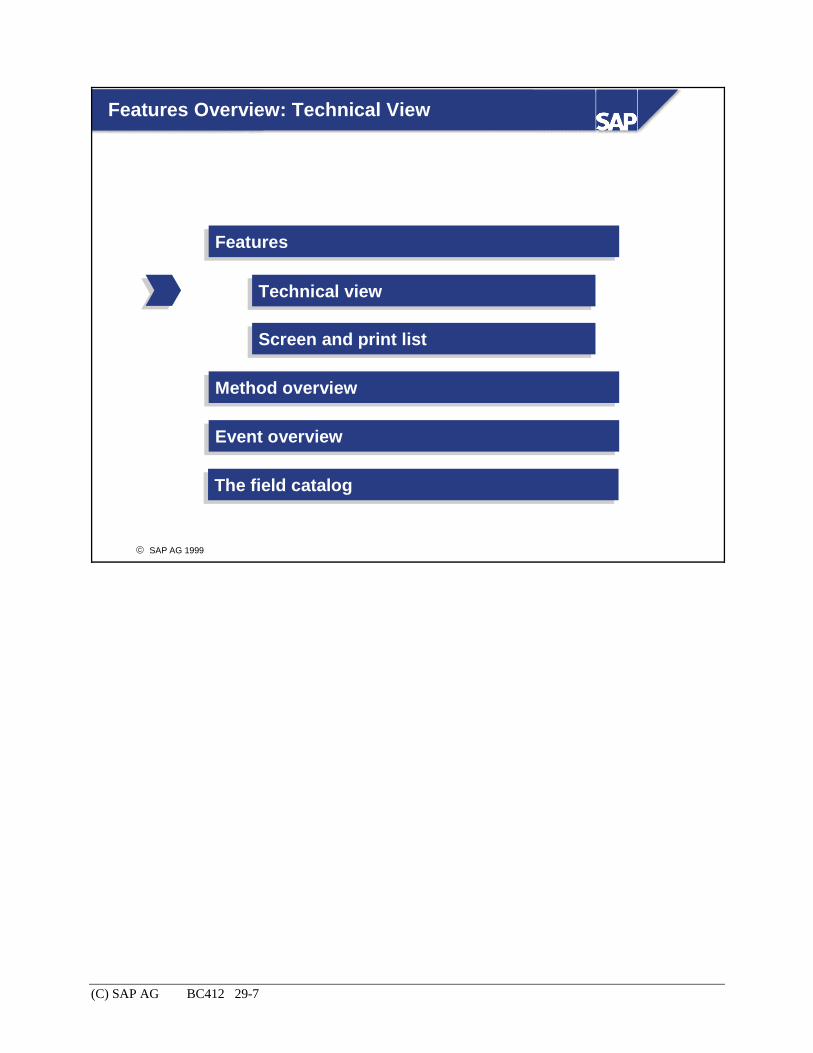
(C) SAP AG BC412 29-7
© SAP AG 1999
Features Overview: Technical View
FeaturesFeatures
Method overviewMethod overview
Event overviewEvent overview
The field catalogThe field catalog
Technical viewTechnical view
Screen and print listScreen and print list

(C) SAP AG BC412 29-8
© SAP AG 1999
ALV Grid Control: Technical View
ABAP program
ALV Grid Control
ALV ALV proxy objectproxy object
Frontend
Application server
List data
Printer/spool
Additional info
Field catalog
The class cl_gui_alv_grid encapsulates the technical details of the communication with the frontend control of the ALV Grid Control.
From a technical point of view, the "wrapper" (cl_gui_alv_grid) does more than encapsulate the dialog with the frontend control, since the proxy objects communicate with three partners: Frontend Grid Control: Display of the list data as a table ABAP program: User Spool system / printer: Output of the list data as an ABAP print list
Communication through the ABAP program - proxy object - ALV Grid Control chain takes place interactively at runtime. The spool system is used for the output of the associated ABAP print lists.
The standard functions provided for screen output and the creation of the ABAP print list are implemented in proxy class cl_gui_alv_grid. The proxy class is an "application wrap" around the technical "wrapper" of the control communication.
ALV proxy objects maintain only a minimum amount of information on the data to be displayed. The data to be displayed and the rules according to which the data is to be displayed (field catalog) must be held in the program in global data objects.

(C) SAP AG BC412 29-9
© SAP AG 1999
ALV Grid Control: List Data
ABAP program
ALV Grid Control
ALV proxy object
Frontend
Application server
Printer/spool
List List datadata Additional info
Field catalog
Data that is to be output on the screen or as an ABAP print list is called list data.

(C) SAP AG BC412 29-10
© SAP AG 1999
Creating List Data and Holding Data
ABAP ABAP programprogram
ALV proxy object
Printer/spoolALV Grid Control
List List datadata
Internal tableInternal table
( Internal table must be a global data object in the program or a class or object attribute
( Sorting (using Grid Control button)is applied to the program data
( Read access for all other standardfunctions of the ALV Grid Control
( Proxy object holds only a pointer to the data object
To display the data in the ALV Grid Control (or print the data using the control), you must pass the data in an internal table to the proxy object.
The proxy object does not have a copy of the data, but maintains a reference to the internal table passed. To improve performance, the proxy object performs all interactive actions in the frontend control (sort, filter, and so on) on the internal table in the calling program. For this reason, the internal table that contains the list data must be declared as global in the program (or as a static variable in a class).
Sort processes in the ALV Grid Control change the state of the internal table in the calling program; all other actions perform only read access to the data.

(C) SAP AG BC412 29-11
© SAP AG 1999
ALV Grid Control: The Field Catalog
ABAP program
ALV Grid Control
ALV proxy object
Frontend
Application server
Printer/spool
List data Additional info
Field catalogField catalog
The field catalog is dealt with in more detail in the following.

(C) SAP AG BC412 29-12
© SAP AG 1999
Functions of the Field Catalog
carrid
AAAZLHQA
fldate
200010102000010520000312
. . .
connid
060317020400. . .
Internal table itab with data Field catalog: column properties
. . .
. . .
. . .
. . .
. . .
Properties of column carridProperties of column connidProperties of column fldateProperties of column . . .
carrid
connid
fldate
. . .
ALV Grid Control / print list
Cont
ent
Properties
The internal table with the data to be displayed that was passed to the proxy object can have any row type which can be chosen as required. So that the proxy object can properly format the data passed during screen output or creation of the print list, the object needs information on how the columns of the internal table are to be presented (properties of the fields of the internal table row type). You use another internal table to pass this information to the proxy object. This internal table is called the field catalog.
For each column of the data table, the field catalog must contain a row that determines the technical properties and additional formatting information of the column.
Depending on the row type of the data table, the field catalog can be generated differently. For row types defined in the ABAP Dictionary, you need only pass the name of the structure in the ABAP Dictionary to the proxy object. The proxy object copies all properties of the fields of the Dictionary structure and generates the field catalog automatically. This is the most common procedure and is called Automatically generated field catalog. If you use other row types, you must use different procedures referred to as Semi-Automatically Generated Field Catalog or Manually Generated Field Catalog. For more details, see the section The Field Catalog of this unit.

(C) SAP AG BC412 29-13
© SAP AG 1999
Data Descriptions: The Field Catalog
LVC_T_FCAT Table type in the ABAP Dictionary for the field catalog
LVC_S_FCAT Row type in the ABAP Dictionary
Properties of column 1
Properties of column 2
Properties of column 3
. . .
Structure
Internal table with column/ field properties
Internal tables that contain field catalogs must be typed with reference to table type LVC_T_FCAT (type of an internal table; defined in the ABAP Dictionary, new for Release 4.6).
Table type LVC_T_FCAT uses the global row type LVC_S_FCAT.
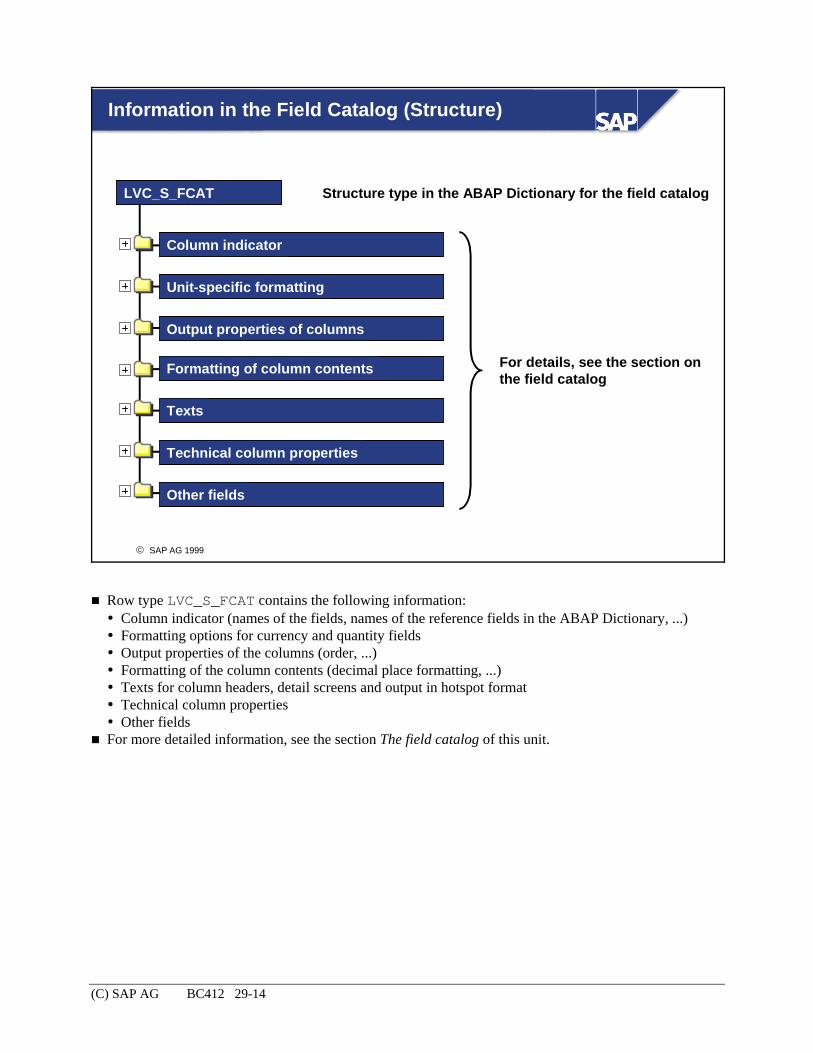
(C) SAP AG BC412 29-14
© SAP AG 1999
Information in the Field Catalog (Structure)
LVC_S_FCAT Structure type in the ABAP Dictionary for the field catalog
Column indicator
Unit-specific formatting
Output properties of columns
Formatting of column contents
Texts
Technical column properties
Other fields
For details, see the section on the field catalog
Row type LVC_S_FCAT contains the following information: Column indicator (names of the fields, names of the reference fields in the ABAP Dictionary, ...) Formatting options for currency and quantity fields Output properties of the columns (order, ...) Formatting of the column contents (decimal place formatting, ...) Texts for column headers, detail screens and output in hotspot format Technical column properties Other fields
For more detailed information, see the section The field catalog of this unit.

(C) SAP AG BC412 29-15
© SAP AG 1999
ALV Grid Control: Additional Information
ABAP program
ALV Grid Control
ALV proxy object
Frontend
Application server
Printer/spool
List data Additional Additional infoinfo
Field catalog
In addition to the list data and the field catalog, you can pass additional information to the proxy object.

(C) SAP AG BC412 29-16
© SAP AG 1999
ALV Grid Control: Function of Additional Information
Controllayout info
Data info
Additional info
( Formatting information for data output(data-independent)
( Rules for data output(data-dependent)
Print listlayout info
The additional information comprises: Layout information - For the frontend control - For the print list
Information that contains the display rules for the data to be output - Sort criteria - Filter criteria - Texts for field groups

(C) SAP AG BC412 29-17
© SAP AG 1999
Function of Additional Information in Detail
ABAP program
ALV proxy object
Printer/spool
Layout info
Data area(grid)
Toolbar Printlist
Sort Filter Field groupsData info
ALV Grid Control
You can use the following data object types to pass additional information to the ALV proxy object: Layout of the frontend control: - Settings for the data area are passed using a structure. - You can use an internal table to control the composition of the toolbar.
Layout of the print list: - You can use the fields of a structure to control parts of the list layout.
You use internal tables to pass information about sort criteria, filter options, and field group texts to the proxy object.
Normally, you do not set up filter and sort criteria manually since they can be changed interactively by the user. The proxy object automatically modifies the associated internal tables in case of user interactions. Sort and filter criteria are usually handled (saved and read) as parts of display variants. You can find more information on the structure of the internal tables for the sort and filter criteria in the online documentation.
If the table to be displayed contains many fields, the user may be overwhelmed by the structure of the dialog boxes for selecting fields (columns) which are presented during interactions. For this reason, you can use the field catalog to group fields into logical groups (field groups). Using an internal table, you can pass texts for the field groups to the proxy object.

(C) SAP AG BC412 29-18
© SAP AG 1999
Layout Information for the Data Area: Overview
LVC_S_LAYO Structure type in the ABAP Dictionary for the control layout
General display options
Grid customizing
Totals options
Exceptions
Interactive control
Drag&Drop control settings
Colors
Optimize column width, title size, ...
Gridlines on/off, column headers off, ...
Totals display before single records yes/no, ...
Indicate with traffic-light symbols yes/no, ...
Detail screen properties, key columns ...
Drag&Drop control settings
List colors
You can influence the control layout using a structure of type LVC_S_LAYO (structure type in the ABAP Dictionary). The structure type LVC_S_LAYO contains the following information: General display options (optimize column width, title size, ...) Grid customizing (horizontal/vertical gridlines on/off, use column headers, ...) Totals options (totals display before single records, ...) Exception handling (use traffic light symbols, ...) Interactive control (properties of the detail screen, ...) Drag&Drop settings Colors (print lists with striped pattern, ...)
For more details, see the online documentation.

(C) SAP AG BC412 29-19
© SAP AG 1999
Layout Information for the Toolbar
UI_FUNCTIONS Table type in the ABAP Dictionary
ui_func (C70) Row type in the ABAP Dictionary: data element
f_code1
f_code2
f_code3
f_code4
( Internal table of type UI_FUNCTION(only one column)
( Contains the function codes of the standard functionsto be disabled (hidden)
Structure
You can control the set of functions that are active in the toolbar using an internal table of type UI_FUNCTIONS (table type in the ABAP Dictionary). Table type UI_FUNCTIONS uses the field ui_func as the row type.
Using the internal table, you can set standard functions to inactive. To do this, you fill the internal table with the function codes of the functions that you want to disable. Inactive functions that have originally be assigned to icons in the toolbar will not be displayed. Inactive functions that have originally be assigned to a menu item are displayed disabled.
To set a value for field ui_func, you should use class constants of the class cl_gui_alv_grid. The class cl_gui_alv_grid has one class constant for each standard function. The class constants each begin with mc_fc_....
To hide the entire toolbar, you can use the field no_toolbar of structure LVC_S_LAYO.

(C) SAP AG BC412 29-20
© SAP AG 1999
Layout Information for the Print List
LVC_S_PRNT Structure type in the ABAP Dictionary: print parameters
reservelns
grpchgedit
prntlstinf
Print output yes/no
Line number for END-OF-PAGE
Group change formatting yes/no
Do not print list info yes/no
Using the fields print, reservelns, grpchedit and prntlsinf of structure LVC_S_PRNT, you can make settings for the print list,
If you set parameter print to value 'X', you can use the ALV Grid Control as the default interface for printing: The table passed is directly formatted as an ABAP print list and placed into the spool; in this context, any interactive screen output is not processed. You do not need this parameter if you print lists interactively using the frontend control.
Using parameter reservelns, you can determine the number of lines required for the page footer (END-OF-PAGE).
Using field grpchgedit, you can determine if you want to print a line after a group change (default setting) or if you want to have a page break (if you want to have a page break, you must set the field to 'X'). The parameter applies for print lists only.
If you set the field prntlstinf to 'X', any settings made interactively such as filter criteria, and the total number of list lines also appear on the print list.
The other fields of the structure are not used for the ALV Grid Control.

(C) SAP AG BC412 29-21
© SAP AG 1999
Features Overview: Screen/Print List
FeaturesFeatures
Method overviewMethod overview
Event overviewEvent overview
The field catalogThe field catalog
Technical viewTechnical view
Screen and print listScreen and print list

(C) SAP AG BC412 29-22
© SAP AG 1999
Screen Layout of the ALV Grid Control
Toolbar
List header
Data display area(grid)
Toolbar( Functions can be hidden( Pushbuttons and menu
options can be added( Functions are triggered
as events
List header( Optional( Single-line
Data area( Further structured
The ALV Grid Control screen consists of three areas: In the header area of the control area, you can display a toolbar. The calling program determines which functions are active. You can hide the toolbar completely.
Below the toolbar, you can display a single-line list header. Below the header is the area in which the list data is displayed (data area).

(C) SAP AG BC412 29-23
© SAP AG 1999
Data Area Layout
Column headers(can be hidden)
Area for keycolumns(fixable)
Area for scrollablecolumns
Scroll barsSelection keys
(optional)
( Colors can be used( Striped patterns can be
used (only print list)( User can select (based
on setting):- Single cells- Entire rows/columns
( Column headers can beused
( Gridlines can be shown/hidden
( Context menus( Drag&Drop( ...
The data area itself also has a structure of its own. The data passed as an internal table is displayed as a table. You can determine if you want to have horizontal and vertical gridlines for the cell structure.
The columns can have headers. You can hide the column headers. If the data table contains more rows and more columns than can be displayed in the control area, horizontal and vertical scroll bars are available to go to a specific list position.
You can logically group columns into key columns and non-key columns. Key columns have another color than non-key columns. Key columns have a fixed position and therefore remain unchanged when the user scrolls horizontally through the list. You can make any column in your data table a key column.
You can define the items users can select. It is possible to select cells (cell areas), entire rows and/or entire columns. Optionally, you can display a selection column as the first column in the data area that can be used to select entire rows.
Drag&Drop operations are supported. The ALV Grid control supports context menu handling. For more information, see the online documentation.

(C) SAP AG BC412 29-24
© SAP AG 1999
Print List Layout
Cover page
Final page
Page 1
Page n
Complete layout Page layout
Page header
Page footer
Page body Page
List properties( List can be organised in pages
- Cover page- Pages - Final pageEach page can be organised in- Page header- Page body- Page footerThis is controlled throughevents and layout informationfor the list
( Subtotals can also be output by means of an event(control levels)
The print list layout is similar to the list layout of "classic" reporting: The list can consist of a logical cover page, a logical final page and any number of other pages in between that contain the actual list data.
In addition to the page body, each page can have a page header and a page footer. The logical organization of the complete list into cover page, pages, final page, and the organization of the individual pages into page header, page body and page footer is made possible by events (details to follow later).

(C) SAP AG BC412 29-25
© SAP AG 1999
ALV Grid Control Overview: Method Overview
FeaturesFeatures
Method overviewMethod overview
Event overviewEvent overview
The field catalogThe field catalog

(C) SAP AG BC412 29-26
© SAP AG 1999
Inheritance Hierarchy
cl_gui_object
cl_gui_control
cl_gui_alv_grid_base
cl_gui_alv_grid
Class cl_gui_alv_grid has the inheritance hierarchy specified. Only class cl_gui_alv_grid is instantiated by applications.

(C) SAP AG BC412 29-27
© SAP AG 1999
ALV Grid Control: Method Overview (1)
ReadRead//change Grid Control propertieschange Grid Control properties
Layout Layout and structure informationand structure information
EventEvent handlinghandling / / function codesfunction codes
Report / Report / report interfacereport interface
ElementaryElementary methodsmethods
OperationsOperations onon / / information aboutinformation about
Filter Filter criteriacriteria
Sort criteriaSort criteria
VariantsVariants
The methods of the ALV Grid Control can be subdivided into: Elementary methods Methods for changing/reading the properties of the Grid Control Methods for changing/reading the layout Methods for operations on filter criteria, sort criteria, and variants Methods for event handling and function code handling Methods for connecting the control to the report-report interface
For details on methods and interfaces, see the online documentation.

(C) SAP AG BC412 29-28
© SAP AG 1999
ALV Grid Control: Elementary Methods
ElementaryElementary methodsmethods
constructor
set_table_for_first_display
refresh_table_display
Link with container, event type, ...
Send data, data descriptions, layout information to control
Inform control that data, data descriptionsor layout have been changed
The ALV Grid Control has three elementary methods: The constructor Method set_table_for_first_display Method refresh_table_display.

(C) SAP AG BC412 29-29
© SAP AG 1999
The Constructor
DATA: my_alv TYPE REF TOcl_gui_alv_grid.
...CREATE OBJECT my_alv
EXPORTING* i_shellstyle =* i_lifetime =
i_parent =* i_appl_events =
EXCEPTIONS...
Container reference
All registered events asapplication events:( ' ' : Yes( 'X' : No
Optional parameters are shown as (ABAP) comments.
The constructor for ALV Grid Control instances has four interface parameters:
i_shellstyle: You use this parameter to determine the general appearance of the control (for details, see the online documentation).
i_lifetime: You use this parameter to influence the lifetime of the frontend control. Possible values are: lifetime_imode (default), lifetime_dynpro (for details, see the online documentation).
i_parent: You use this parameter to pass a container reference.
i_appl_events: You use this parameter to determine if all events of your ALV Grid Control instance should be registered as system events (default) or as application events (value 'X'). The proxy object registers the ALV controls at the Control Framework.
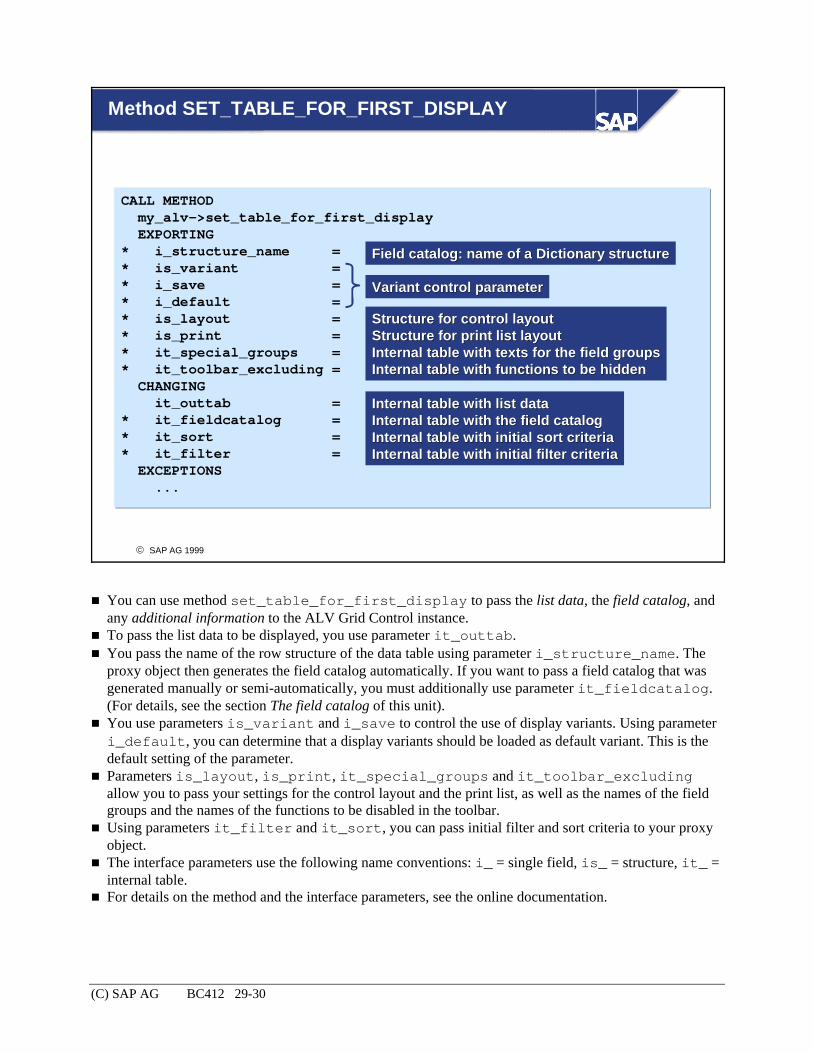
(C) SAP AG BC412 29-30
© SAP AG 1999
Method SET_TABLE_FOR_FIRST_DISPLAY
CALL METHOD my_alv->set_table_for_first_displayEXPORTING
* i_structure_name =* is_variant =* i_save = * i_default =* is_layout =* is_print =* it_special_groups =* it_toolbar_excluding =
CHANGINGit_outtab =
* it_fieldcatalog =* it_sort =* it_filter =
EXCEPTIONS...
VariantVariant controlcontrol parameterparameter
FieldField catalogcatalog: : name of name of a Dictionary a Dictionary structurestructure
Structure Structure for for control layoutcontrol layoutStructureStructure for for printprint listlist layoutlayoutInternalInternal tabletable withwith textstexts for for the field groupsthe field groupsInternalInternal tabletable withwith functions functions to to be hiddenbe hidden
Internal table with list dataInternal table with list dataInternal table with the field catalogInternal table with the field catalogInternal tableInternal table withwith initial initial sort criteriasort criteriaInternal tableInternal table withwith initial initial filter criteriafilter criteria
You can use method set_table_for_first_display to pass the list data, the field catalog, and any additional information to the ALV Grid Control instance.
To pass the list data to be displayed, you use parameter it_outtab. You pass the name of the row structure of the data table using parameter i_structure_name. The proxy object then generates the field catalog automatically. If you want to pass a field catalog that was generated manually or semi-automatically, you must additionally use parameter it_fieldcatalog. (For details, see the section The field catalog of this unit).
You use parameters is_variant and i_save to control the use of display variants. Using parameter i_default, you can determine that a display variants should be loaded as default variant. This is the default setting of the parameter.
Parameters is_layout, is_print, it_special_groups and it_toolbar_excluding allow you to pass your settings for the control layout and the print list, as well as the names of the field groups and the names of the functions to be disabled in the toolbar.
Using parameters it_filter and it_sort, you can pass initial filter and sort criteria to your proxy object.
The interface parameters use the following name conventions: i_ = single field, is_ = structure, it_ = internal table.
For details on the method and the interface parameters, see the online documentation.

(C) SAP AG BC412 29-31
© SAP AG 1999
Method REFRESH_TABLE_DISPLAY
CALL METHOD my_alv->refresh_table_displayEXPORTING
* is_stable =* i_soft_refresh =
.
Refresh with stable columnsRefresh with stable columns//rowsrowsUpdate Update datadata onlyonly, , nono sortsort criteriacriteria, , and and so so onon
Informs proxy object that the
( Content of the internal table with list data and/or
( Data objects for additional information
have changed
Update display at the frontend
If you use method refresh_table_display, the proxy object sends the list data and the display information once more to the frontend control.
Using parameter i_soft_refresh, you can determine that only the data content is to be sent again (filter and sort criteria remain unchanged).
Using the fields of parameter is_stable, you can determine that any scroll positions that may exist should be kept (with reference to rows and columns) when the data is refreshed.
Important: If you change the structure of your data table you have to call method set_table_for_first_display again.

(C) SAP AG BC412 29-32
© SAP AG 1999
Display Variants
is_variant = SPACE.i_save = SPACE.
is_variant = <structure_name>.i_save = SPACE.
is_variant = <structure_name>.i_save = 'U'. " i_save = 'X'. "i_save = 'A'. "
Change current displayvariant
Select and change currentdisplay variant
Select, change and savecurrent display variant
MODE Parameter value in methodSET_TABLE_FOR_FIRST_DISPLAY
Only user-specificOnly globalGlobal and user-specific
DATA: <structure_name> TYPE disvariant.
Using parameters is_variant and i_save, you can determine the behavior of your proxy object with regard to display variant handling.
There are three modes which you can set with the help of these two parameters: The user can change the current display variant: To set this mode, you set both parameters to SPACE (default value).
The user can select and change display variants: To set this mode, you pass a structure of the type disvariant to parameter is_variant in which the field report has the value sy-repid, and set parameter i_save to SPACE.
The user can select, change, and save display variants: To set this mode, you assign the same value to parameter is_variant as with the above mode. The value you assign to parameter i_save allows you to control the user save mode for display variants: - U: The user can save display variants only as user-specific. - X: The user can save display variants only as global. - A: The user can save display variants both as user-specific and as global.

(C) SAP AG BC412 29-33
© SAP AG 1999
ALV Grid Control: Method Overview (2)
ReadRead//change properties of the Grid Controlchange properties of the Grid Control
Layout Layout and structure informationand structure information
Field catalogField catalog
LayoutLayout
FramesFrames
CellsCells
ScrollScroll barsbars
ColumnsColumns
RowsRows
The ALV Grid Control has methods for the following subobjects that allow you to access the properties of these subobjects in change or read mode: Cells Scroll bars Columns Rows
The methods for the layout and the structure information can be subdivided as follows: Methods for the field catalog Methods for the layout Methods for the general control layout (frames)
For details on the method names and the interfaces, see the online documentation.
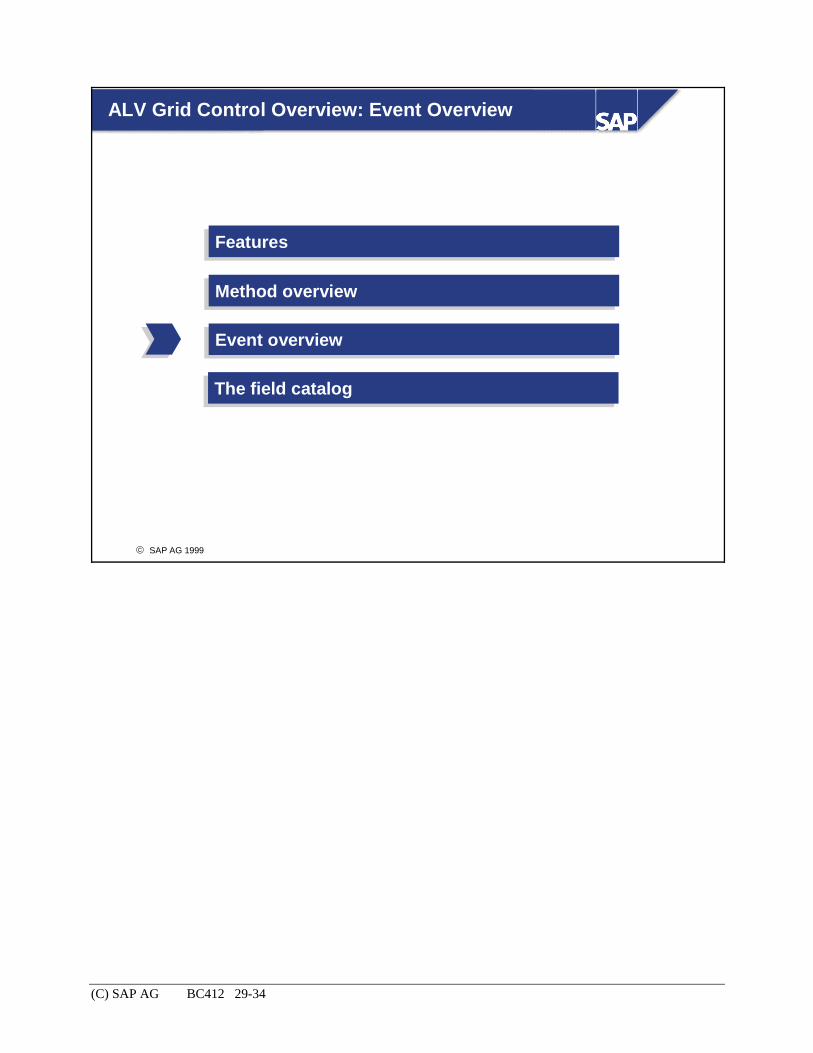
(C) SAP AG BC412 29-34
© SAP AG 1999
ALV Grid Control Overview: Event Overview
FeaturesFeatures
Method overviewMethod overview
Event overviewEvent overview
The field catalogThe field catalog

(C) SAP AG BC412 29-35
© SAP AG 1999
ALV Grid Control: Events
EventsEvents during print list creationduring print list creation
Mouse operationsMouse operations
DragDrag&&DropDrop
Context menusContext menus
UserUser--defined functionsdefined functions
double_click
hotspot_click
before_user_command
user_command
after_user_command
toolbar
menu_button
Double-click on a cell
Click on a cell hotspot
Before execution of a standard function
User-defined function code is triggered
After execution of a standard function
Toolbar is changed
A menu option is changed
The ALV Grid Control has the following event types: Events that mark a specific point during print list creation Events for mouse operations - Double-clicks on a cell - Click on a hotspot of a cell
Events that allow you to - Execute implementations for self-defined functions - Change the process flow of the standard functions
Events for context menus Events for Drag&Drop operations
For details on the event names and interfaces, see the online documentation.

(C) SAP AG BC412 29-36
© SAP AG 1999
BEFORE_USER_COMMAND andAFTER_USER_COMMAND
Frontend control
Proxy instance ABAPprogram
User triggersstandardfunction
Implementation of standard function
beforebefore__useruser__commandcommand
afterafter__useruser__commandcommand
Implementation 1
Implementation 2
The events before_user_command and after_user_command allow you to run self-defined processes directly before and after the execution of a standard function.
You can suppress the standard implementation of a standard function. To achieve this call the instance method set_user_command at the event for before_user_command and pass SPACE to the parameter i_ucomm.

(C) SAP AG BC412 29-37
© SAP AG 1999
ALV Grid Control: Print List Events
Events during print list creationEvents during print list creation
print_end_of_list
print_top_of_list
print_end_of_page
print_top_of_page
subtotal_text
Corresponds to event END-OF-SELECTION for list
Corresponds to event START-OF-SELECTION for list
Corresponds to list event END-OF-PAGE
Corresponds to list event TOP-OF-PAGE
Subtotals texts of suppressed lines
You can use events print_top_of_list, print_end_of_list, print_top_of_page, and print_end_of_page to implement the logical processing steps that correspond to the events START-OF-SELECTION, END-OF-SELECTION, TOP-OF-PAGE and END-OF-PAGE in "classic" reporting.
You can use event subtotal_text to output texts for subtotals lines that are not shown. For more details, see the online documentation.

(C) SAP AG BC412 29-38
© SAP AG 1999
ALV Grid Control Overview: The Field Catalog
FeaturesFeatures
Method overviewMethod overview
Event overviewEvent overview
The field catalogThe field catalog

(C) SAP AG BC412 29-39
© SAP AG 1999
Recap: Functions of the Field Catalog
carrid
AAAZLHQA
fldate
200010102000010520000312
. . .
connid
060317020400. . .
Internal table itab with data Field catalog: column properties
. . .
. . .
. . .
. . .
. . .
Properties of column carridProperties of column connidProperties of column fldateProperties of column . . .
carrid
connid
fldate
. . .
ALV Grid Control / print list
Cont
ent
Properties
Recap: the field catalog is an internal table containing the properties of all columns of the data table.
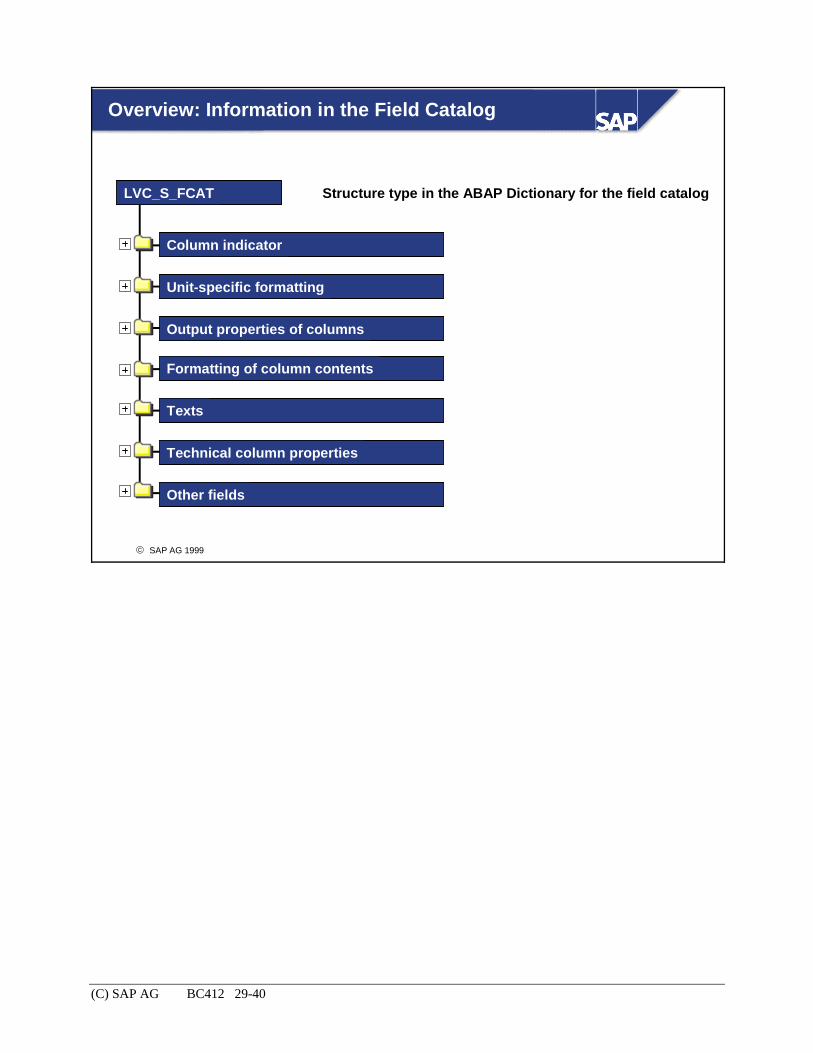
(C) SAP AG BC412 29-40
© SAP AG 1999
Overview: Information in the Field Catalog
LVC_S_FCAT Structure type in the ABAP Dictionary for the field catalog
Column indicator
Unit-specific formatting
Output properties of columns
Formatting of column contents
Texts
Technical column properties
Other fields

(C) SAP AG BC412 29-41
© SAP AG 1999
Field Catalog Overview: Information in the Field Catalog in Detail
FeaturesFeatures
Method overviewMethod overview
Event overviewEvent overview
The field catalogThe field catalog
Information in the field catalog in detailInformation in the field catalog in detail
Generating the field catalogGenerating the field catalog

(C) SAP AG BC412 29-42
© SAP AG 1999
Field Catalog: Column Indicators
Column indicators
fieldname
ref_field
ref_table
Column name in data table
Column with Dictionary reference: field name
Column with Dictionary reference: structure name
Example
carrid
AAAZLHQA
seatsfree
123070
0
. . .
. . .
. . .
. . .
. . .
Internal table itab with data Entries in the field catalog
. . .
. . .
. . .
. . .
. . .
ref_table
SFLIGHT. . .
. . .
ref_field
. . .
. . .
fieldname
CARRID. . .SEATSFREE. . .
The column fieldname in the field catalog contains the names of the data table columns. Each column of the data table has a row in the field catalog.
If a field is typed with reference to the ABAP Dictionary (automatically generated entry in the field catalog), fields ref_field and ref_table contain the names of the reference field and the reference structure.
For more details, see the online documentation.

(C) SAP AG BC412 29-43
© SAP AG 1999
Field Catalog: Unit-Specific Formatting
Unit-specific formatting
cfieldname
currency
qfieldname
quantity
Name of column for currency formatting
Explicit currency ID for entire column
Name of column for unit of measure formatting
Explicit unit of measure for entire column
Currency formatting: If the content of a column is to be formatted based on the formatting options of a currency unit that is contained in another column of the data table, then you must specify the name of the column with the currency units in the field cfieldname.
If all values of a column are to be formatted according to a fixed currency, you must enter the ID of that currency in the column currency.
If a value is assigned to the field currency, entries in the field cfieldname are ignored. Unit of measure formatting:
If the content of a column is to be formatted based on the formatting options of a unit of measure that is contained in another column of the data table, then you must specify the name of the column with the units of measure in the field qfieldname.
If all values of a column are to be formatted according to a fixed unit of measure, you must enter the ID of that unit of measure in the column quantity.
If a value is assigned to the field quantity, entries in the field qfieldname are ignored. For more details, see the online documentation.

(C) SAP AG BC412 29-44
© SAP AG 1999
Example: Currency Formatting
carrid
AAAZ. . .
price
3007000
. . .
. . .
. . .
. . .
. . .
Internal table itab with data Entries in the field catalog
currency
USDITL. . .
cfieldname
. . .CURRENCY. . .
...
. . .
. . .
. . .
. . .
fieldname
CARRID. . .PRICE. . .
Fli...AAAZ. . .
Price300,00
7000. . .
. . .
. . .
. . .
. . .
CurrencyUSDITL. . .
Screen output / printing
The above graphic shows the following: The data table contains the two columns price (amount to be paid for the flight) and currency (currency of price).
The entry currency in field cfieldname for the column price in the field catalog determines that the entries of the column price are formatted according to the currency specified in the column currency (example: USD -> two decimal places, ITL -> no decimal place).
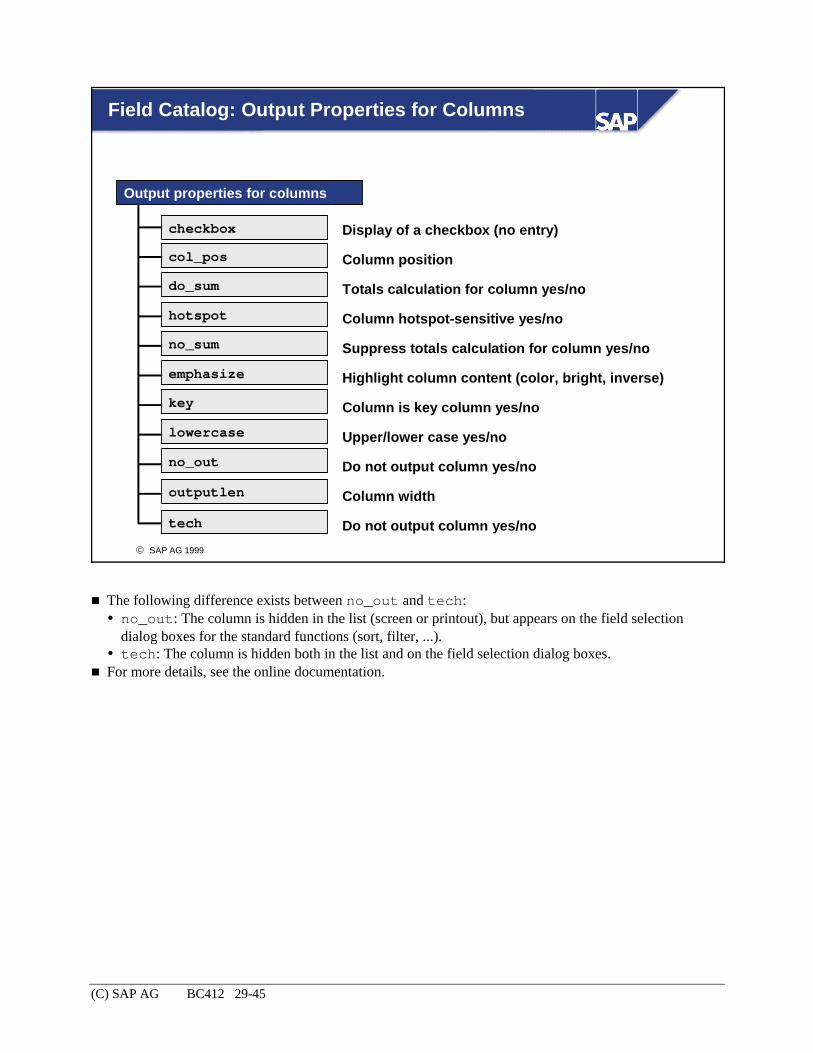
(C) SAP AG BC412 29-45
© SAP AG 1999
Field Catalog: Output Properties for Columns
Output properties for columns
checkbox
col_pos
do_sum
hotspot
Display of a checkbox (no entry)
Column position
Totals calculation for column yes/no
Column hotspot-sensitive yes/no
Suppress totals calculation for column yes/no
Highlight column content (color, bright, inverse)
Column is key column yes/no
Upper/lower case yes/no
Do not output column yes/no
Column width
Do not output column yes/no
no_sum
emphasize
key
lowercase
no_out
outputlen
tech
The following difference exists between no_out and tech: no_out: The column is hidden in the list (screen or printout), but appears on the field selection dialog boxes for the standard functions (sort, filter, ...).
tech: The column is hidden both in the list and on the field selection dialog boxes. For more details, see the online documentation.

(C) SAP AG BC412 29-46
© SAP AG 1999
Field Catalog: Formatting of Column Contents
Formatting of column contents
decimals_o
decmfield
edit_mask
exponent
Number of decimal places (currencies)
Column name in data table for number of dec. places
Analogous to USING EDIT MASK for WRITE
Window exponent for ABAP data type F
Display column content as icon yes/no
Leading zeros yes/no (NUMC)
Adjust column content (' ', 'R', 'L', 'C') (CHAR, NUMC)
Suppress plus/minus signs yes/no
Value 0 ('zero') not output yes/no
Analogous to ROUND for WRITE
Column name in data table for ROUND
Display column content as symbol yes/no
icon
lzero
just
no_sign
no_zero
round
roundfield
symbol
Similar to the formatting options for currency fields, you can use the fields decmfield and decimals_o to define the number of decimal places for numerical fields (ABAP data types P, I, F) either for individual column contents or for all entries of a column.
For more details, see the online documentation.

(C) SAP AG BC412 29-47
© SAP AG 1999
Field Catalog: Texts
Texts
colddictxt
coltext
reptext
scrtext_l
Text selection for column headers ('L', 'M', 'S')
Freely definable text (column header)
Copy from ABAP Dictionary
Long text
Medium text
Short text
Text selection for selection dialog box ('L', 'M', 'S')
Freely definable text (selection dialog box)
Text selection for tooltip ('L', 'M', 'S')
Freely definable text (tooltip)
scrtext_m
scrtext_s
selddictxt
seltext
tipddictxt
tooltip
Similar to the texts of a data element in the ABAP Dictionary, the fields scrtext_l, scrtext_m and scrtext_s can contain three texts of different lengths for columns, selection screens, and tool tips (S = 'short', M = ''middle', L = 'long'). For fields with reference to the Dictionary, the texts are copied from the Dictionary.
By assigning value 'L', 'M' or 'S' to field colddictext, you determine which text is to be used as the column header. Similarly, the values of fields selddictext and tipddictext determine which text is to be displayed on the dialog boxes (interactive standard functions) and as the tool tip.
The fields coltext, seltext and tooltip allow you to use freely definable texts as column headers, dialog box texts and tool tips. If you assign values to these fields, these values override any entries in the fields colddictext, selddictext and tipddictext.
For fields with reference to the Dictionary, the field reptext contains the headers from the data element (used for queries).
For more details, see the online documentation.

(C) SAP AG BC412 29-48
© SAP AG 1999
Field Catalog: Technical Column Properties
Technical column properties
dd_outlen
intlen
rollname
Output length (width) of column
Internal column width
F1 help by data element documentation: name of data element
ABAP data typeinttype
Used for fields without reference to ABAP Dictionary types
For more details, see the online documentation.

(C) SAP AG BC412 29-49
© SAP AG 1999
Field Catalog: Other Fields
Other fields
dragdropid
reprep
sp_group
txt_field
Drag&Drop control
Link of column to report-report interface yes/no
Identifier for field groups
Column name for substitute texts for totals calculation
You can replace numeric fields with a corresponding text using the txt_field field. Example: Suppose column A contains plant numbers, and column B the corresponding long texts.
On the list, you want to display the text instead of the plant number (for example, Hamburg instead of 0001. For column A, the field txt_field must contain the name of column B (txt_field = 'B').
For further details, refer to the online documentation.

(C) SAP AG BC412 29-50
© SAP AG 1999
Summary: Structure of the Field Catalog
Columnname
Dictionaryrelationship Properties
fieldname
ref_field
ref_table
( Unit-specific formatting
( Output Properties for Columns
( Formatting of Column Contents
( Texts
( Technical Column Properties
( Other Fields
F I E L D C A T A L O G
We can divide the fields in the field catalog into three groups according to their use in constructing the field catalog. The field fieldname contains the column name. The fields ref_field and ref_table establish the relationship to any global types (fields of structures in the ABAP Dictionary).
All of the other fields contain values for the attributes of the columns.

(C) SAP AG BC412 29-51
© SAP AG 1999
Field Catalog Overview: Generating the Field Catalog
FeaturesFeatures
Method overviewMethod overview
Event overviewEvent overview
The field catalogThe field catalog
Information in the field catalog in detailInformation in the field catalog in detail
Generating the field catalogGenerating the field catalog

(C) SAP AG BC412 29-52
© SAP AG 1999
Generating the Field Catalog
List data List data List data
Row type of data tablecontains only
Row type of data tablecontains
Row type of data tablecontains only
Fields of a Fields of a singlesingleDictionary structureDictionary structure
Field catalog isField catalog isgeneratedgenerated
automaticallyautomatically
Field catalogField catalogcan be generatedcan be generated
semisemi--automaticallyautomatically
Field catalog Field catalog must be generatedmust be generated
manuallymanually
Fields with local types
Fields of Fields of Dictionary structuresDictionary structures
Fields with local types
(
(
Depending on the row type of the data table, the field catalog is generated according to a different procedure. We have to distinguish between three cases:
Case 1: The row type of the data table is defined in the ABAP Dictionary. Example: Row type SFLIGHT. In this case, all information of the field catalog can be copied from the ABAP Dictionary. This is done independently by the proxy object: The field catalog is generated automatically.
Case 2: The row type of the data table contains fields with types of fields of Dictionary structures and fields with local types. Example: The row type consists of the fields of structure SFLIGHT to which fields with types defined locally in the program have been added. In this case, you can have the entries of the fields with reference to the Dictionary generated automatically, while you must manually add the entries of the other columns to the field catalog (semi-automatic procedure).
Case 3: The row type of the data table contains only fields with local types. In this case, the field catalog must be generated manually. This means that the program that uses the ALV Grid Control must generate the field catalog on its own.

(C) SAP AG BC412 29-53
© SAP AG 1999
Fields of a Single Dictionary Structure
AAAZ. . .
. . .
. . .
. . .
Internal table it_data with list dataRow type: SFLIGHT
3007000
. . .
USDITL. . .
ABAPDictionary
SFLIGHT SPFLI
CALL METHOD my_alv->set_table_for_first_displayEXPORTING
i_structure_name = 'SFLIGHT'...
CHANGINGit_outtab = it_data...
i_i_structurestructure__name name = 'SFLIGHT'= 'SFLIGHT'
itit__outtab outtab = = itit__datadata
If the line type of the data table contains all of the fields in a particular ABAP Dictionary structure, the ALV proxy object can create the field catalog automatically.
To do this, specify the name of the ABAP Dictionary structure that corresponds to the line type of the data table in the i_structure_name parameter of the method set_table_for_first_display.
The proxy object obtains all of the requisite information from the ABAP Dictionary and constructs the field catalog itself.

(C) SAP AG BC412 29-54
© SAP AG 1999
Fields of a Dictionary Structure and Local Types
STRUC
Local ABAP types
Field catalog it_fcat
Cn DDIC Properties
'empty'
ABAP Dictionary
send
fill
CALL METHOD my_alv->set_table_for_first_displayEXPORTING
...CHANGING
...
i_i_structurestructure__name name = 'STRUC'= 'STRUC'
itit__outtab outtab = = itit__datadata
itit__fieldcatalog fieldcatalog = = itit__fcatfcat
Cn = Column name
If the row type of your data table consists of all fields of a single Dictionary structure to which other fields have been added, you can generate the field catalog semi-automatically.
To dothis, you: Declare an internal table for the field catalog
DATA: it_fcat TYPE lvc_t_fcat. Create an entry in the field catalog for each column in your data table that has a type that you defined locally in the program. Enter the column name and define its attributes.
Call the instance method set_table_for_first_display and pass the data table (it_data in the graphic) to the it_outtab parameter, the field catalog (it_fcat) to the it_fieldcatalog parameter, and the name of the ABAP Dictionary structure to the i_structure_name parameter.
The proxy object then generates a full field catalog.

(C) SAP AG BC412 29-55
© SAP AG 1999
Fields of Several Dictionary Structures
ABAP Dictionary
SFLIGHT SPFLI CARRIDCONNIDFLDATEDEPTIMECITY_FCITY_T. . .
CITYFROMCITYTO
SFLIGHTSFLIGHTSFLIGHTSPFLISPFLISPFLI. . .
'empty'
CALL METHOD my_alv->set_table_for_first_display...
CHANGING
...
itit__outtab outtab = = itit__datadata
itit__fieldcatalog fieldcatalog = = itit__fcatfcat
send
Column DDIC Relation PropertiesField catalog it_fcat
fill
You can also generate the field catalog semi-automatically if the fields in the line type of your data table have data types from more than one ABAP Dictionary structure.
To do this, you must: Declare an internal table for the field catalog:
DATA: it_fcat TYPE lvc_t_fcat. Create an entry in the field catalog for each column in your data table. Fill the fieldname and ref_table fields for all of the columns that have the same name as the structure field to which you referred to define their types (fieldname contains the column name, ref_table the name of the reference table). For fields where the column name in the data table is different to the field name in the ABAP Dictionary structure (cityfrom and cityto in the graphic), you must also specify the name of the reference field.
Call the instance method set_table_for_first_display and pass the data table (it_data in the example) to the it_outtab parameter and the field catalog (it_fcat) to the it_fieldcatalog parameter.
The proxy object then creates the full field catalog.

(C) SAP AG BC412 29-56
© SAP AG 1999
Fields With and Without Dictionary Relationships
STRUC
Local ABAP Types
Field catalog it_fcat
Cn DDIC Properties
'empty'
'empty'
CALL METHOD my_alv->set_table_for_first_display...
CHANGING
...
itit__outtab outtab = = itit__datadata
itit__fieldcatalog fieldcatalog = = itit__fcatfcat
ABAP Dictionary
send
fill
Cn = Column name
You can also generate the field catalog semi-automatically if the line type of your data table consists of fields from more than one ABAP Dictionary structure along with additional fields that have types that you defined locally in the program.
To do this, you must: Declare an internal table for the field catalog:
DATA: it_fcat TYPE lvc_t_fcat. Create an entry in the field catalog for each column in your data table. For each column that has an ABAP Dictionary reference, fill the fieldname and ref_table columns (and ref_field if necessary).
For each column in your data table that has a type that you defined locally in the program, create an entry in the field catalog by entering the column name and defining the attributes of the column.
Call the instance method set_table_for_first_display and pass the data table (it_data in the example) to the it_outtab parameter and the field catalog (it_fcat) to the it_fieldcatalog parameter.
The proxy object then generates the full field catalog.

(C) SAP AG BC412 29-57
© SAP AG 1999
Fields With Local Types Only
Local ABAP types
Field catalog it_fcat
Cn DDIC Properties
'empty'
send
fill
CALL METHOD my_alv->set_table_for_first_displayEXPORTING
...CHANGING
...
itit__outtab outtab = = itit__datadata
itit__fieldcatalog fieldcatalog = = itit__fcatfcat
Cn = Column name
If the line type of your data table consists exclusively of data types that you declared locally in the program, you must create the field catalog by hand.
To do this, you must: Declare an internal table for the field catalog:
DATA: it_fcat TYPE lvc_t_fcat. Create an entry in the field catalog for each column in your data table. Enter the column name and define the attributes for the columns.
Call the instance method set_table_for_first_display and pass the data table (it_data in the example) to the it_outtab parameter and the field catalog (it_fcat) to the it_fieldcatalog parameter.

(C) SAP AG BC412 29-58
© SAP AG 1999
Demo Programs Delivered
BCALV_GRID_01BCALV_GRID_02BCALV_GRID_03BCALV_GRID_04BCALV_GRID_05BCALV_GRID_06BCALV_GRID_07BCALV_GRID_08BCALV_GRID_09BCALV_GRID_10
Events for print listsBasic and details lists with one instanceDetail list in modal dialog boxException handling (exceptions / traffic light symbols)Self-defined pushbuttons in the toolbarContext menusSelf-defined menus in the toolbarToolbar menu with standard pushbuttonControl options for display variantsInitial usage of display variants
SLIS
Dev. class Programs Demo for
You can find demo programs for the ALV Grid Control in development class SLIS. This development class is delivered.

(C) SAP AG BC412 29-59
© SAP AG 1999
Describe the features of the ALV Grid Control
Display list data in the ALV Grid Control
Read and change properties of the ALV Grid Control
Format print lists with the ALV Grid Control
Generate a field catalog
Now you are able to:
ALV Grid Control: Unit Summary
(C) SAP AG BC412 30-1
© SAP AG 1999
Information about the global classes used in BC412
Table of contents
Contents:
Appendix

(C) SAP AG BC412 31-2
Information on the Global Classes of BC412 Content This appendix describes the global classes used in the demo programs of training course BC412. Class CL_BC412_PICTURE_1 illustrates the usage of context menus while classes CL_BC412_MAPPING_4_2_TREE and CL_BC412_FLIGHT_INFO_TREE1 are implementations of the flight booking tree described in the unit on the SAP Tree Control.
Overview 1. Information on the Global Classes of BC412
1.1 Content
1.2. Overview
2. Global Class CL_BC412_PICTURE_1
2.1 General Description
2.2 Interface
2.2.1 The Method Constructor
2.2.2 The Method FREE
2.2.3 The Event PICTURE_CLICK
2.3 Context Menus of the Picture Control
2.4 Definition of the Class
2.5 Implementation of the Class
3. Global Class CL_BC412_MAPPING_4_2_TREE
3.1 General Description
3.2 Interface
3.2.1 The Method INSERT_BUSINESS_KEY
3.2.2 The Method DELETE_BUSINESS_KEY
3.2.3 The Method DELETE_TECHNICAL_KEY
3.2.4 The Method GET_BUSINESS_KEY
3.2.5 The Method GET_TECHNICAL_KEY
3.3 Definition of the Class
3.4 Implementation of the Class
4. Global Class CL_BC412_FLIGHT_INFO_TREE1
4.1 General Description
4.2 Interface
4.2.1 The Method CONSTRUCTOR
4.2.2 The Method FREE
4.2.3 The Method GET_SCARR_DETAILS
4.2.4 The Method GET_SPFLI_DETAILS
4.2.5 The Method GET_SFLIGHT_DETAILS

(C) SAP AG BC412 31-3
4.2.6 The Method GET_SBOOK_DETAILS
4.2.7 The Method GET_SCUSTOM_DETAILS
4.2.8 The Event NODE_DOUBLE_CLICK
4.3 Data, Methods, and Events Used Internally in the Class
4.4 Definition of the Class
4.5 Implementation of the Class
5. Global Data Types Used in the ABAP Dictionary
5.1 Table Types
5.1.1 BC412_FUNCTION_ITT
5.1.2 BC412_MAP_HASH1
5.1.3 BC412_MAP_HASH1
5.1.4 BC412_SBOOK_ITT
5.1.5 BC412_SBOOK_NODE_ITT
5.1.6 BC412_SCARR_ITT
5.1.7 BC412_SUSTOM_ITT
5.1.8 BC412_SFLIGHT_ITT
5.1.9 BC412_SPFLI_ITT
5.2 Structure Types
5.2.1 BC412_SIM_TREE_NODE_STRUC
5.3 Data Elements
Global Class CL_BC412_PICTURE_1
General Description The global class CL_BC412_PICTURE_1 is an example of a "wrapper" of a Picture Control instance that has a context menu. Using the options of the context menu, you can determine the display mode (attribute DISPLAY_MODE) of the Picture Control instance. Setting up the context menu and responding to an option chosen is handled independently by each instance. The class has been designed as an example of handling context menus.
Interface The class has two methods - the CONSTRUCTOR and the method FREE – and the event PICTURE_CLICK. With the constructur, you pass the container reference, the URL of the image to be loaded, and texts to be displayed in the context menu. In addition, you can control if you want to handle the event PICTURE_CLICK or not. Using method FREE, you can release the resources of your Picture Control instance at the frontend. The event PICTURE_CLICK is triggered if you click the object displayed in the frontend control.
The Method Constructor The constructor has the following interface:
CREATE OBJECT object
EXPORTING
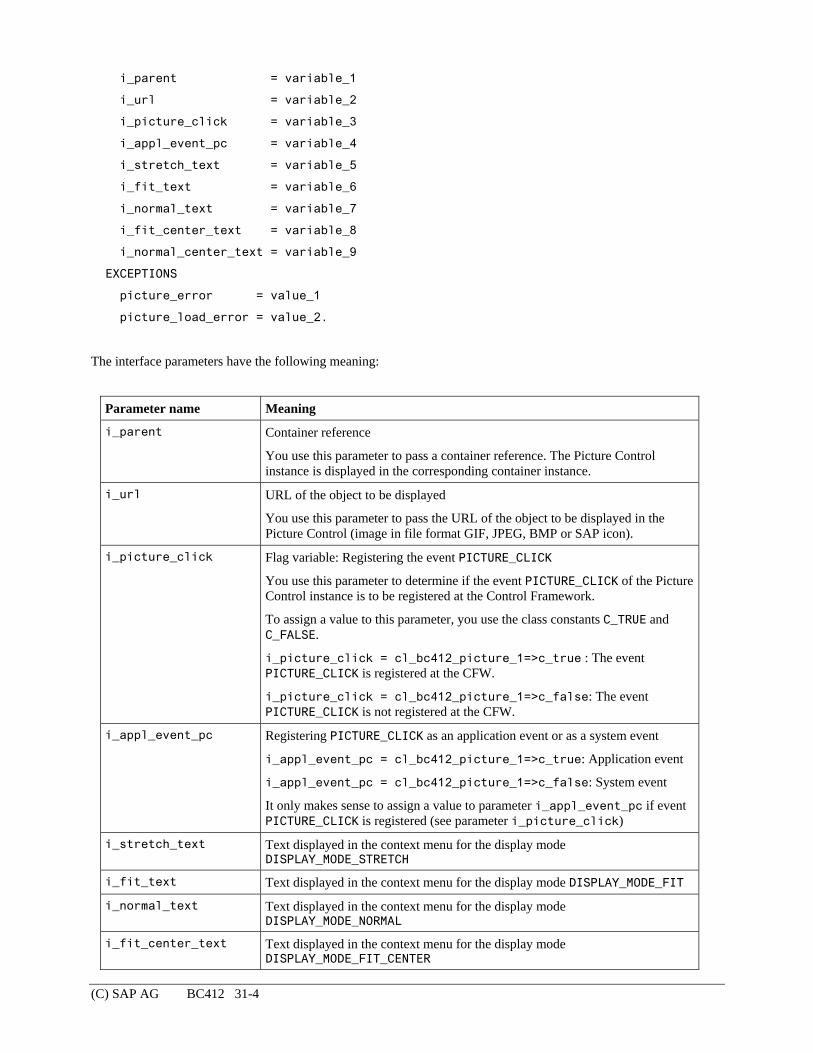
(C) SAP AG BC412 31-4
i_parent = variable_1
i_url = variable_2
i_picture_click = variable_3
i_appl_event_pc = variable_4
i_stretch_text = variable_5
i_fit_text = variable_6
i_normal_text = variable_7
i_fit_center_text = variable_8
i_normal_center_text = variable_9
EXCEPTIONS
picture_error = value_1
picture_load_error = value_2.
The interface parameters have the following meaning:
Parameter name Meaning
i_parent Container reference
You use this parameter to pass a container reference. The Picture Control instance is displayed in the corresponding container instance.
i_url URL of the object to be displayed
You use this parameter to pass the URL of the object to be displayed in the Picture Control (image in file format GIF, JPEG, BMP or SAP icon).
i_picture_click Flag variable: Registering the event PICTURE_CLICK
You use this parameter to determine if the event PICTURE_CLICK of the Picture Control instance is to be registered at the Control Framework.
To assign a value to this parameter, you use the class constants C_TRUE and C_FALSE.
i_picture_click = cl_bc412_picture_1=>c_true : The event PICTURE_CLICK is registered at the CFW.
i_picture_click = cl_bc412_picture_1=>c_false: The event PICTURE_CLICK is not registered at the CFW.
i_appl_event_pc Registering PICTURE_CLICK as an application event or as a system event
i_appl_event_pc = cl_bc412_picture_1=>c_true: Application event
i_appl_event_pc = cl_bc412_picture_1=>c_false: System event
It only makes sense to assign a value to parameter i_appl_event_pc if event PICTURE_CLICK is registered (see parameter i_picture_click)
i_stretch_text Text displayed in the context menu for the display mode DISPLAY_MODE_STRETCH
i_fit_text Text displayed in the context menu for the display mode DISPLAY_MODE_FIT
i_normal_text Text displayed in the context menu for the display mode DISPLAY_MODE_NORMAL
i_fit_center_text Text displayed in the context menu for the display mode DISPLAY_MODE_FIT_CENTER

(C) SAP AG BC412 31-5
i_normal_center_text Text displayed in the context menu for the display mode DISPLAY_MODE_NORMAL_CENTER
The exceptions have the following meaning:
Parameter name Meaning
picture_error Error creating the Picture Control instance
picture_load_error Error loading the data object to be displayed
The Method FREE The method FREE releases all resources used by the instantiated control at the frontend. The only interface parameter is the exception PICTURE_ERROR which indicates that an internal error occurred while the system tried to access the object.
The Event PICTURE_CLICK The event PICTURE_CLICK is triggered if the mouse has been clicked in the data object (image) displayed. The parameters MOUSE_POS_X and MOUSE_POS_Y contain the coordinates of the pixel on which the cursor was positioned at the time the mouse was clicked.
Context Menus of the Picture Control The class CL_BC412_PICTURE_1 supports a context menu for the "wrapped" Picture Control instance. The following steps are required:
• In the constructor, the events CONTEXT_MENU and MENU_SELECTED of the Picture Control instance are registered at the Control Framework (SET_REGISTERED_EVENTS). The methods ON_CONTEXT_MENU and ON_CONTEXT_MENU_SELECTED (visibility PROTECTED) of the class CL_BC412_PICTURE_1 are registered as the handling methods on the ABAP side.
• The context menu is set up dynamically. This means that the system does not generate a static program object (= an interface status of type CONTEXT_MENU must be created in the Screen Painter), but sets up the context menu (function codes + menu texts) at runtime (if requested by the user). Since the function codes and the texts displayed in the menu should always be the same, an internal table (instance attribute IT_FUNCTION) with the menu texts and associated function codes is set up in the constructor.
• If a user requests a context menu on the Picture Control instance, the control triggers the event CONTEXT_MENU. As a result of the two registration steps, the method ON_CONTEXT_MENU is called.
• In the method ON_CONTEXT_MENU, an instance of the type CL_CTMENU is created (CREATE OBJECT). Please note that, for all other EnjoySAP controls, you do not need to create the context menu instance explicitly. All other EnjoySAP controls create a context menu object independently, and pass a reference to this context menu instance through the event interface when the event CONTEXT_MENU is triggered. The options for the menu are sent to the context menu instance (function codes and menu texts are sent using the internal table IT_FUNCTION). You then send the context menu object to the Picture Control instance by calling the method DISPLAY_CONTEXT_MENU of your Picture Control instance. Using the interface of the method, you pass the reference to the context menu object.
• If a user chooses a context menu option, the relevant control triggers the event CONTEXT_MENU_SELECTED. The function code of the function chosen (parameter FCODE) and a reference to the sending object (parameter SENDER; this parameter is not explicitly contained in the interface and is generally transferred for ABAP Objects events) are provided through the interface. As a result of the two registration steps, the method ON_CONTEXT_MENU_SELECTED is called.
• In the method ON_CONTEXT_MENU_SELECTED, the value of the attribute DISPLAY_MODE of the Picture Control instance is determined based on the function code (FCODE) transmitted. This value is then passed to the Picture Control instance using the method SET_DISPLAY_MODE.

(C) SAP AG BC412 31-6
Definition of the Class *" type-pools
TYPE-POOLS:
cntl ." Type definitions used by the Control Framework
*---------------------------------------------------------------------*
* CLASS CL_BC412_PICTURE_1 DEFINITION
*---------------------------------------------------------------------*
* ........ *
*---------------------------------------------------------------------*
CLASS cl_bc412_picture_1 DEFINITION
PUBLIC
FINAL
CREATE PUBLIC .
*----------------------------------------------------------------------
*" public components of class CL_BC412_PICTURE_1
*----------------------------------------------------------------------
PUBLIC SECTION.
*" constants
CONSTANTS:
c_true TYPE bc412_text1 VALUE 'X' ,
c_false TYPE bc412_text1 VALUE ' ' .
*" events
EVENTS:
picture_click
EXPORTING
value(mouse_pos_x) TYPE i
value(mouse_pos_y) TYPE i .
*" methods
METHODS:
constructor
IMPORTING
i_parent TYPE REF TO cl_gui_container
value(i_url) TYPE s_url
value(i_picture_click) TYPE bc412_text1 DEFAULT 'X'
value(i_appl_event_pc) TYPE bc412_text1 DEFAULT 'X'

(C) SAP AG BC412 31-7
value(i_stretch_text) TYPE gui_text DEFAULT 'STRETCH'
value(i_fit_text) TYPE gui_text DEFAULT 'FIT'
value(i_normal_text) TYPE gui_text DEFAULT 'NORMAL'
value(i_fit_center_text) TYPE gui_text DEFAULT 'FIT_CENTER'
value(i_normal_center_text) TYPE gui_text DEFAULT 'NORMAL_CENTER'
EXCEPTIONS
picture_error
picture_load_error ,
*----------------------------------------------------------------------
free
EXCEPTIONS
picture_error .
*----------------------------------------------------------------------
*" protected components of class CL_BC412_PICTURE_1
*----------------------------------------------------------------------
PROTECTED SECTION.
*" instance attributes
DATA:
context_menu_ref TYPE REF TO cl_ctmenu ,
picture_ref TYPE REF TO cl_gui_picture ,
url TYPE s_url ,
it_function TYPE bc412_function_itt .
*" methods
METHODS:
on_picture_click
FOR EVENT picture_click OF cl_gui_picture
IMPORTING
sender
mouse_pos_x
mouse_pos_y ,
*----------------------------------------------------------------------
on_context_menu
FOR EVENT context_menu OF cl_gui_picture
IMPORTING
sender ,
*----------------------------------------------------------------------
on_context_menu_selected
FOR EVENT context_menu_selected OF cl_gui_picture

(C) SAP AG BC412 31-8
IMPORTING
fcode
sender .
Implementation of the Class
METHOD constructor.
* local data
DATA:
l_events TYPE cntl_simple_events,
l_wa_events LIKE LINE OF l_events,
wa_function LIKE LINE OF it_function.
* create picture object
CREATE OBJECT picture_ref
EXPORTING
* LIFETIME =
* SHELLSTYLE =
parent = i_parent
EXCEPTIONS
error = 1.
IF sy-subrc NE 0.
RAISE picture_error.
ENDIF.
* send picture to picture control
CALL METHOD picture_ref->load_picture_from_url
EXPORTING
url = i_url
* RESULT =
EXCEPTIONS
error = 1.
IF sy-subrc NE 0.
RAISE picture_load_error.
ENDIF.
* register events:
IF i_picture_click = c_true.
* picture_click

(C) SAP AG BC412 31-9
l_wa_events-eventid = cl_gui_picture=>eventid_picture_click.
l_wa_events-appl_event = i_appl_event_pc.
INSERT l_wa_events INTO TABLE l_events.
ENDIF.
* context_menu
l_wa_events-eventid = cl_gui_picture=>eventid_context_menu.
l_wa_events-appl_event = ' '.
INSERT l_wa_events INTO TABLE l_events.
* context_menu_selected
l_wa_events-eventid =
cl_gui_picture=>eventid_context_menu_selected.
l_wa_events-appl_event = ' '.
INSERT l_wa_events INTO TABLE l_events.
CALL METHOD picture_ref->set_registered_events
EXPORTING
events = l_events
EXCEPTIONS
cntl_error = 1
cntl_system_error = 2
illegal_event_combination = 3.
IF sy-subrc NE 0.
* to implement
ENDIF.
SET HANDLER on_picture_click FOR picture_ref.
SET HANDLER on_context_menu FOR picture_ref.
SET HANDLER on_context_menu_selected FOR picture_ref.
* store url of picture
url = i_url.
* construct context menu functions in it_functions
wa_function-fcode = 'STRETCH'.
wa_function-text = i_stretch_text.
INSERT wa_function INTO TABLE it_function. " 1.
wa_function-fcode = 'FIT'.
wa_function-text = i_fit_text.
INSERT wa_function INTO TABLE it_function. " 2.
wa_function-fcode = 'NORMAL'.
wa_function-text = i_normal_text.
INSERT wa_function INTO TABLE it_function. " 3.

(C) SAP AG BC412 31-10
wa_function-fcode = 'FIT_CENTER'.
wa_function-text = i_fit_center_text.
INSERT wa_function INTO TABLE it_function. " 4.
wa_function-fcode = 'NORMAL_CENTER'.
wa_function-text = i_normal_center_text.
INSERT wa_function INTO TABLE it_function. " 5.
ENDMETHOD.
*----------------------------------------------------------------------------------
METHOD free.
CALL METHOD picture_ref->free
EXCEPTIONS
cntl_error = 1
cntl_system_error = 2.
IF sy-subrc NE 0.
RAISE picture_error.
ENDIF.
ENDMETHOD.
*----------------------------------------------------------------------------------
METHOD on_picture_click.
RAISE EVENT picture_click
EXPORTING
mouse_pos_x = mouse_pos_x
mouse_pos_y = mouse_pos_y.
ENDMETHOD.
*----------------------------------------------------------------------------------
METHOD on_context_menu.
* local data
DATA: wa_function LIKE LINE OF it_function.
* create context menu object
CREATE OBJECT context_menu_ref.

(C) SAP AG BC412 31-11
* create dynamic context menu
LOOP AT it_function INTO wa_function.
CALL METHOD context_menu_ref->add_function
EXPORTING
fcode = wa_function-fcode
text = wa_function-text.
ENDLOOP.
* display context menu
CALL METHOD sender->display_context_menu
EXPORTING
context_menu = context_menu_ref
EXCEPTIONS
error = 1.
FREE context_menu_ref.
ENDMETHOD.
*----------------------------------------------------------------------------------
METHOD on_context_menu_selected.
* local data
DATA: l_display_mode TYPE i.
CASE fcode.
WHEN 'STRETCH'.
l_display_mode = cl_gui_picture=>display_mode_stretch.
WHEN 'FIT'.
l_display_mode = cl_gui_picture=>display_mode_fit.
WHEN 'NORMAL'.
l_display_mode = cl_gui_picture=>display_mode_normal.
WHEN 'FIT_CENTER'.
l_display_mode = cl_gui_picture=>display_mode_fit_center.
WHEN 'NORMAL_CENTER'.
l_display_mode = cl_gui_picture=>display_mode_normal_center.
ENDCASE.
CALL METHOD sender->set_display_mode
EXPORTING
display_mode = l_display_mode
EXCEPTIONS
error = 1.

(C) SAP AG BC412 32-12
* IF sy-subrc NE 0.
* RAISE error.
* ENDIF.
ENDMETHOD.
Global Class CL_BC412_MAPPING_4_2_TREE
General Description The global class CL_BC412_MAPPING_4_2_TREE is used as an auxiliary class for instances of the class CL_BC412_FLIGHT_INFO_TREE_1 in training course BC412. The class CL_BC412_MAPPING_4_2_TREE illustrates key mapping (key of the application tables displayed in the tree node key).
The instances of the class encapsulate two hash tables that implement key access to the logical mapping table in a manner favorable to performance (constant access time). Entries in the hash tables are generated by passing an application key using the method INSERT_BUSINESS_KEY. The instance subsequently assigns a technical node key and maintains both hash tables simultaneously. The node keys are assigned as values of a counter (which is managed by the object).
The class implements the one-to-one mapping of a key with at most four components to the node keys.
Interface The class has methods for creating key pairs (INSERT_BUSINESS_KEY), for managing key pairs (DELETE_BUSINESS_KEY, DELETE_TECHNICAL_KEY), and for determining the key partner (GET_BUSINESS_KEY, GET_TECHNICAL_KEY).
The Method INSERT_BUSINESS_KEY The method creates a node key for the application key passed.
CALL METHOD inset_business_key
EXPORTING
i_bkey1 = variable1
i_bkey2 = variable2
i_bkey3 = variable3
i_bkey4 = variable4
IMPORTING
e_tkey = variable5
EXCEPTIONS
internal_error = value1
teckey_overflow = value2
invalid_buskey = value3.
The interface parameters have the following meaning:

(C) SAP AG BC412 32-13
Parameter name Meaning
i_bkey1 First key component of the application key
From a semantic point of view, this component has the meaning of an airline ID.
i_bkey1 Second key component of the application key
From a semantic point of view, this component has the meaning of an airline connection number.
i_bkey1 Third key component of the application key
From a semantic point of view, this component has the meaning of a flight date.
i_bkey1 Fourth key component of the application key
From a semantic point of view, this component has the meaning of a booking number for a flight booking.
i_tkey Node key returned
The exceptions have the following meaning:
Parameter name Meaning
internal_error Error accessing the hash table
teckey_overflow Maximum node key that can be assigned has already been assigned
invalid_buskey Application key passed already has a node key
The Method DELETE_BUSINESS_KEY The method DELETE_BUSINESS_KEY has one predefined interface (sample), but no implementation (which must be added as required).
The Method DELETE_TECHNICAL_KEY The method DELETE_TECHNICAL_KEY has one predefined interface (sample), but no implementation (which must be added as required).
The Method GET_BUSINESS_KEY The method GET_BUSINESS_KEY returns the application key for the node key passed.
The interface parameters have the following meaning:
Parameter name Meaning
i_tkey Node key returned
i_bkey1 First key component of the application key
From a semantic point of view, this component has the meaning of an airline ID.
i_bkey1 Second key component of the application key
From a semantic point of view, this component has the meaning of an airline connection number.
i_bkey1 Third key component of the application key

(C) SAP AG BC412 32-14
From a semantic point of view, this component has the meaning of a flight date.
i_bkey1 Fourth key component of the application key
From a semantic point of view, this component has the meaning of a booking number for a flight booking.
The exceptions have the following meaning:
Parameter name Meaning
invalid_teckey Node key passed does not exist.
The Method GET_TECHNICAL_KEY The method GET_TECHNICAL_KEY returns the node key for the application key passed.
The interface parameters have the following meaning:
Parameter name Meaning
i_bkey1 First key component of the application key
From a semantic point of view, this component has the meaning of an airline ID.
i_bkey1 Second key component of the application key
From a semantic point of view, this component has the meaning of an airline connection number.
i_bkey1 Third key component of the application key
From a semantic point of view, this component has the meaning of a flight date.
i_bkey1 Fourth key component of the application key
From a semantic point of view, this component has the meaning of a booking number for a flight booking.
i_tkey Node key returned
The exceptions have the following meaning:
Parameter name Meaning
invalid_buskey Application key passed does not exist.
Definition of the Class *---------------------------------------------------------------------*
* CLASS CL_BC412_MAPPING_4_2_TREE DEFINITION
*---------------------------------------------------------------------*
* ........ *
*---------------------------------------------------------------------*
CLASS cl_bc412_mapping_4_2_tree DEFINITION

(C) SAP AG BC412 32-15
PUBLIC
FINAL
CREATE PUBLIC .
*----------------------------------------------------------------------
*" public components of class CL_BC412_MAPPING_4_2_TREE
*----------------------------------------------------------------------
PUBLIC SECTION.
*" methods
METHODS:
insert_business_key
IMPORTING
value(i_bkey1) TYPE s_carr_id
value(i_bkey2) TYPE s_conn_id
value(i_bkey3) TYPE s_date
value(i_bkey4) TYPE s_book_id
EXPORTING
value(e_tkey) TYPE tv_nodekey
EXCEPTIONS
internal_error
teckey_overflow
invalid_buskey ,
*----------------------------------------------------------------------
delete_business_key
IMPORTING
value(i_bkey1) TYPE s_carr_id
value(i_bkey2) TYPE s_conn_id
value(i_bkey3) TYPE s_date
value(i_bkey4) TYPE s_book_id
EXPORTING
value(e_tkey) TYPE tv_nodekey
EXCEPTIONS
invalid_buskey ,
*----------------------------------------------------------------------
delete_technical_key
IMPORTING
value(i_tkey) TYPE tv_nodekey
EXPORTING
value(e_bkey1) TYPE s_carr_id
value(e_bkey2) TYPE s_conn_id

(C) SAP AG BC412 32-16
value(e_bkey3) TYPE s_date
value(e_bkey4) TYPE s_book_id
EXCEPTIONS
invalid_teckey ,
*----------------------------------------------------------------------
get_business_key
IMPORTING
value(i_tkey) TYPE tv_nodekey
EXPORTING
value(e_bkey1) TYPE s_carr_id
value(e_bkey2) TYPE s_conn_id
value(e_bkey3) TYPE s_date
value(e_bkey4) TYPE s_book_id
EXCEPTIONS
invalid_teckey ,
*----------------------------------------------------------------------
get_technical_key
IMPORTING
value(i_bkey1) TYPE s_carr_id
value(i_bkey2) TYPE s_conn_id
value(i_bkey3) TYPE s_date
value(i_bkey4) TYPE s_book_id
EXPORTING
value(e_tkey) TYPE tv_nodekey
EXCEPTIONS
invalid_buskey .
*---------------------------------------------------------------------- *" protected components of class CL_BC412_MAPPING_4_2_TREE
*----------------------------------------------------------------------
PROTECTED SECTION.
*" types
TYPES:
buskey_1 TYPE s_carr_id ,
buskey_2 TYPE s_conn_id ,
buskey_3 TYPE s_date ,
buskey_4 TYPE s_book_id ,
teckey TYPE tv_nodekey .
*" instance attributes

(C) SAP AG BC412 32-17
DATA:
map1 TYPE bc412_map_hash1 ,
map2 TYPE bc412_map_hash2 .
*---------------------------------------------------------------------- *" private components of class CL_BC412_MAPPING_4_2_TREE
*----------------------------------------------------------------------
PRIVATE SECTION.
*" instance attributes
DATA:
counter TYPE i .
Implementation of the Class METHOD insert_business_key.
* local data
DATA: wa_map TYPE bc412_map_linetype.
* existence check: valid key
READ TABLE map1 WITH TABLE KEY
bkey1 = i_bkey1
bkey2 = i_bkey2
bkey3 = i_bkey3
bkey4 = i_bkey4
TRANSPORTING NO FIELDS.
IF sy-subrc EQ 0. " entry exists already
RAISE invalid_buskey.
ENDIF.
* check for overflow of e_tkey
IF counter GE 999999999999.
RAISE teckey_overflow.
ENDIF.
* note: maximum number to be hadled restricted by data type of
* tv_nodekey (CHAR 12)
* create new entry
ADD 1 TO counter.
wa_map-bkey1 = i_bkey1.

(C) SAP AG BC412 32-18
wa_map-bkey2 = i_bkey2.
wa_map-bkey3 = i_bkey3.
wa_map-bkey4 = i_bkey4.
wa_map-tkey = counter.
e_tkey = counter. " return technical key
INSERT wa_map INTO TABLE map1.
IF sy-subrc NE 0.
RAISE internal_error.
ENDIF.
INSERT wa_map INTO TABLE map2.
IF sy-subrc NE 0.
RAISE internal_error.
ENDIF.
ENDMETHOD.
*----------------------------------------------------------------------
METHOD delete_business_key.
* to be implemented
ENDMETHOD.
*----------------------------------------------------------------------
METHOD delete_technical_key.
* to be implemented
ENDMETHOD.
*----------------------------------------------------------------------
METHOD get_business_key.
* local data
DATA: wa_map TYPE bc412_map_linetype.
* read entry
READ TABLE map2 INTO wa_map WITH TABLE KEY
tkey = i_tkey.
IF sy-subrc NE 0.
RAISE invalid_teckey.
(C) SAP AG BC412 33-19
ENDIF.
e_bkey1 = wa_map-bkey1. " return business key (1)
e_bkey2 = wa_map-bkey2. " return business key (2)
e_bkey3 = wa_map-bkey3. " return business key (3)
e_bkey4 = wa_map-bkey4. " return business key (4)
ENDMETHOD.
*----------------------------------------------------------------------
METHOD get_technical_key.
* local data
DATA: wa_map TYPE bc412_map_linetype.
* read entry
READ TABLE map1 INTO wa_map WITH TABLE KEY
bkey1 = i_bkey1
bkey2 = i_bkey2
bkey3 = i_bkey3
bkey4 = i_bkey4.
IF sy-subrc NE 0.
RAISE invalid_buskey.
ENDIF.
e_tkey = wa_map-tkey. " return technical key
ENDMETHOD.
Global Class CL_BC412_FLIGHT_INFO_TREE1
General Description The class CL_BC412_FLIGHT_INFO_TREE1 presents data of the flight data model (tables SCARR, SPFLI, SFLIGHT, SBOOK) by means of a Simple Tree instance in a hierarchical structure. The instances of the class collect the data (by means of incremental database accesses) (data is read if a user requests data for a node for the first time) and manage the application data read in internal tables. The class provides instance methods with which the users of the class can query the application data for a node. The read depth in the hierarchy can be determined using a parameter passed with the constructor.
Interface The class has:

(C) SAP AG BC412 33-20
• A constructor
• The method FREE to release the resources used by the control at the frontend
• Methods to query application data for a node
• The event node_double_click which is triggered when a node is double-clicked.
The Method CONSTRUCTOR You use the constructor to generate a Tree Control instance for which you create a root node (text: airlines), register events at the CFW and store texts required in the tree. In addition, the constructor instantiates an object of class CL_BC412_MAPPING_4_2_TREE.
Through the interface of the constructor, you pass a container reference (i_container) and three texts, including the text for the root node (I_ROOT_NODE_TEXT) and texts used in the nodes for table SFLIGHT (I_FLIGHT_NODE_TEXT1, I_FLIGHT_NODE_TEXT2). You can use the parameters I_NODE_DOUBLE_CLICK and I_APPL_EVENT_NDC to determine if your instance should trigger the event NODE_DOUBLE_CLICK and if the event should be triggered as an application event or as a system event. Using the parameter I_LEVEL_NO you define the read depth of your instance (the last node level that can be expanded).
CREATE OBJECT object
EXPORTING
i_container = variable_1
i_root_node_text = variable_2
i_flight_node_text1 = variable_3
i_flight_node_text2 = variable 4
i_node_double_click = variable 5
i_appl_event_ndc = variable_6
i_level_no = variable_7
EXCEPTIONS
tree_create_error = value_1
root_create_error = value_2.
The interface parameters have the following meaning:
Parameter name Meaning
i_container Container reference
You use this parameter to pass a container reference. The Tree Control instance is displayed in the corresponding container instance.
i_root_node_text Text for the root node
i_flight_node_text1 Text 1 used in nodes for table SFLIGHT. Pass the text "Number of available seats" (default value: "seats free").
i_flight_node_text2 Text 2 used in nodes for table SFLIGHT. Pass the text "No seats available" (default value: "no seats free").
i_node_double_click Flag variable
You use this parameter to determine if your instance can trigger the event NODE_DOUBLE_CLICK.

(C) SAP AG BC412 33-21
To assign a value to this parameter, you can use the class constants C_TRUE and C_FALSE:
CL_BC412_FLIGHT_INFO_TREE1=>C_TRUE: Instance should trigger event NODE_DOUBLE_CLICK (register at the CFW)
CL_BC412_FLIGHT_INFO_TREE1=>C_FALSE: Instance should not trigger event NODE_DOUBLE_CLICK
i_appl_event_ndc Flag variable
You use this parameter to determine if event NODE_DOUBLE_CLICK should be triggered as an application or as a system event.
CL_BC412_FLIGHT_INFO_TREE1=>C_TRUE: Application event
CL_BC412_FLIGHT_INFO_TREE1=>C_FALSE: System event
i_level_no Read depth of the instance in the hierarchy
To assign a value to the parameter, use the class constants C_LEVEL_x, x = 1, ...4.
C_LEVEL_1: SCARR
C_LEVEL_2: SPFLI
C_LEVEL_3: SFLIGHT
C_LEVEL_4: SBOOK
The exceptions have the following meaning:
Parameter name Meaning
tree_create_error Error creating the Tree Control instance
root_create_error Error creating the root node
The Method FREE
The method FREE is used to release all resources used by the instantiated control at the frontend.
The Method GET_SCARR_DETAILS
Using the method GET_SCARR_DETAILS, you can query detail data for an airline (values of the table fields of the database table at the time the node is read).
Use the parameter I_CARRID to pass the key of the table SCARR. The method returns the relevant table row in parameter E_SCARR. The exception NO_DATA_FOUND is triggered if no entry exists for the key passed.
The Method GET_SPFLI_DETAILS
Using the method GET_SPFLI_DETAILS, you can query detail data for a flight connection (values of the table fields of the database table at the time the node is read).
Use the parameters I_CARRID and I_CONNID to pass the key of the table SPFLI. The method returns the relevant table row in parameter E_SPFLI. The exception NO_DATA_FOUND is triggered if no entry exists for the key passed.

(C) SAP AG BC412 33-22
The Method GET_SFLIGHT_DETAILS
Using the method GET_SFLIGHT_DETAILS, you can query detail data for a flight (values of the table fields of the database table at the time the node is read).
Use the parameters I_CARRID, I_CONNID, and I_FLDATE to pass the key of table SFLIGHT. The method returns the relevant table row in parameter E_SSFLIGHT. The exception NO_DATA_FOUND is triggered if no entry exists for the key passed.
The Method GET_SBOOK_DETAILS
Using the method GET_SBOOK_DETAILS, you can query detail data for a booking (values of the table fields of the database table at the time the node is read).
Use the parameters I_CARRID, I_COONID, I_FLDATE, and I_BOOKID to pass the key of table SBOOK. The method returns the relevant table row in parameter E_SBOOK. The exception NO_DATA_FOUND is triggered if no entry exists for the key passed.
The Method GET_SCUSTOM_DETAILS
Using the method GET_SCUSTOM_DETAILS, you can query detail data for a flight customer (values of the table fields of the database table at the time the SBOOK nodes are read).
Use the parameter I_ID to pass the key of table SCUSTOM. The method returns the relevant table row in parameter E_SCUSTOM. The exception NO_DATA_FOUND is triggered if no entry exists for the key passed.
The Event NODE_DOUBLE_CLICK The event NODE_DOUBLE_CLICK is triggered if a node is double-clicked (if registered). Through the interface of the event, the application key of the node (parameter E_CARRID, E_CONNID, E_FLDATE, E_BOOKID) and the hierarchy level of the node are transmitted (parameter E_LEVEL)
Data, Methods, and Events Used Internally in the Class Each instance of the class buffers the table row assigned to a node displayed at the frontend in the internal tables IT_SCARR, IT_SPFLI, IT_SFLIGHT, IT_SBOOK, and IT_SCUSTOM. These internal tables are filled with data in the method ON_EXPAND_NO_CHILDREN. The method ON_EXPAND_NO_CHILDREN handles the event EXPAND_NO_CHILDREN of the Tree Control instance. If this method is called, the method determines the application key for the node key which is transmitted at the tree event (method GET_BUSINESS_KEY of the instance of class CL_BC412_MAPPING_4_2_TREE). The application key tells the system for which node hierarchically dependent data needs to be read. Database access and node table creation are implemented by means of the methods FILL_SCARR_NODE, FILL_SPLFLI_NODE, FILL_SFLIGHT_NODE, and FILL_SBOOK_NODE.
The method GET_CUSTOMER_NAMES is used by the method FILL_SBOOK_NODE.
Definition of the Class *" type-pools
TYPE-POOLS:
cntl .

(C) SAP AG BC412 33-23
*---------------------------------------------------------------------*
* CLASS CL_BC412_FLIGHT_INFO_TREE1 DEFINITION
*---------------------------------------------------------------------*
* ........ *
*---------------------------------------------------------------------*
CLASS cl_bc412_flight_info_tree1 DEFINITION
PUBLIC
FINAL
CREATE PUBLIC .
*----------------------------------------------------------------------
*" public components of class CL_BC412_FLIGHT_INFO_TREE1
*----------------------------------------------------------------------
PUBLIC SECTION.
*" constants
CONSTANTS:
c_true TYPE bc412_text1 VALUE 'X' ,
c_false TYPE bc412_text1 VALUE ' ' ,
c_text1 TYPE bc412_text36 VALUE 'seats free' ,
c_text2 TYPE bc412_text36 VALUE 'no seats free' ,
c_level_0 TYPE bc412_level VALUE 0 ,
c_level_1 TYPE bc412_level VALUE 1 ,
c_level_2 TYPE bc412_level VALUE 2 ,
c_level_3 TYPE bc412_level VALUE 3 ,
c_level_4 TYPE bc412_level VALUE 4 .
*" events
EVENTS:
node_double_click
EXPORTING
value(e_carrid) TYPE s_carr_id OPTIONAL
value(e_connid) TYPE s_conn_id OPTIONAL
value(e_fldate) TYPE s_date OPTIONAL
value(e_bookid) TYPE s_book_id OPTIONAL
value(e_level) TYPE bc412_level OPTIONAL .
*" methods
METHODS:
constructor

(C) SAP AG BC412 33-24
IMPORTING
i_container TYPE REF TO cl_gui_container
value(i_root_node_text) TYPE bc412_sim_tree_node_struc-text
value(i_flight_node_text1) TYPE bc412_text36
value(i_flight_node_text2) TYPE bc412_text36
value(i_node_double_click) TYPE bc412_text1
value(i_appl_event_ndc) TYPE bc412_text1
value(i_level_no) TYPE bc412_level
EXCEPTIONS
tree_create_error
root_create_error ,
*----------------------------------------------------------------------
free ,
*----------------------------------------------------------------------
get_scarr_details
IMPORTING
value(i_carrid) TYPE s_carr_id
EXPORTING
value(e_scarr) TYPE scarr
EXCEPTIONS
no_data_found ,
*----------------------------------------------------------------------
get_spfli_details
IMPORTING
value(i_carrid) TYPE s_carr_id
value(i_connid) TYPE s_conn_id
EXPORTING
value(e_spfli) TYPE spfli
EXCEPTIONS
no_data_found ,
*----------------------------------------------------------------------
get_sflight_details
IMPORTING
value(i_carrid) TYPE s_carr_id
value(i_connid) TYPE s_conn_id
value(i_fldate) TYPE s_date
EXPORTING
value(e_sflight) TYPE sflight
EXCEPTIONS
no_data_found ,
*----------------------------------------------------------------------
get_sbook_details

(C) SAP AG BC412 33-25
IMPORTING
value(i_carrid) TYPE s_carr_id
value(i_connid) TYPE s_conn_id
value(i_fldate) TYPE s_date
value(i_bookid) TYPE s_book_id
EXPORTING
value(e_sbook) TYPE sbook
EXCEPTIONS
no_data_found ,
*----------------------------------------------------------------------
get_scustom_details
IMPORTING
value(i_id) TYPE s_customer
EXPORTING
value(e_scustom) TYPE scustom
EXCEPTIONS
no_data_found .
*---------------------------------------------------------------------- *" protected components of class CL_BC412_FLIGHT_INFO_TREE1
*----------------------------------------------------------------------
PROTECTED SECTION.
*" instance attributes
DATA:
it_scarr TYPE bc412_scarr_itt ,
it_spfli TYPE bc412_spfli_itt ,
it_sflight TYPE bc412_sflight_itt ,
it_sbook TYPE bc412_sbook_itt ,
it_scustom TYPE bc412_scustom_itt ,
o_simple_tree TYPE REF TO cl_gui_simple_tree ,
o_mapping TYPE REF TO cl_bc412_mapping_4_2_tree ,
sflight_node_text1 TYPE bc412_text36 ,
sflight_node_text2 TYPE bc412_text36 ,
level_no TYPE bc412_level .
*" methods
METHODS:
create_root_node
IMPORTING

(C) SAP AG BC412 33-26
value(i_root_node_text) TYPE bc412_sim_tree_node_struc-text
EXCEPTIONS
root_create_error ,
*----------------------------------------------------------------------
on_expand_no_children
FOR EVENT expand_no_children OF cl_gui_simple_tree
IMPORTING
node_key ,
*----------------------------------------------------------------------
on_node_double_click
FOR EVENT node_double_click OF cl_gui_simple_tree
IMPORTING
node_key ,
*----------------------------------------------------------------------
fill_scarr_node
IMPORTING
value(i_node_key) TYPE tv_nodekey
EXCEPTIONS
mapping_insert_error
node_add_error ,
*----------------------------------------------------------------------
fill_spfli_node
IMPORTING
value(i_node_key) TYPE tv_nodekey
value(i_key1) TYPE s_carr_id
EXCEPTIONS
mapping_insert_error
node_add_error ,
*----------------------------------------------------------------------
fill_sflight_node
IMPORTING
value(i_node_key) TYPE tv_nodekey
value(i_key1) TYPE s_carr_id
value(i_key2) TYPE s_conn_id
EXCEPTIONS
mapping_insert_error
node_add_error ,
*----------------------------------------------------------------------
fill_sbook_node
IMPORTING
value(i_node_key) TYPE tv_nodekey
value(i_key1) TYPE s_carr_id

(C) SAP AG BC412 33-27
value(i_key2) TYPE s_conn_id
value(i_key3) TYPE s_date
EXCEPTIONS
mapping_insert_error
node_add_error ,
*----------------------------------------------------------------------
get_customer_names
CHANGING
i_booking_info TYPE bc412_sbook_node_itt
EXCEPTIONS
data_error .
Implementation of the Class
METHOD constructor.
* local data: internal table with registered eventids
DATA events TYPE cntl_simple_events.
DATA wa_events TYPE cntl_simple_event.
* 1. set current number of levels
level_no = i_level_no.
* 2. create instances for tree control and mapping class
* 2.a. create tree control
CREATE OBJECT o_simple_tree
EXPORTING
* lifetime = cl_gui_simple_tree=>lifetime_imode
parent = i_container
* shellstyle = shellstyle
node_selection_mode = cl_gui_simple_tree=>node_sel_mode_single
* hide_selection = ' '
EXCEPTIONS
lifetime_error = 1
cntl_system_error = 2
create_error = 3
illegal_node_selection_mode = 4
failed = 5.
IF sy-subrc NE 0.
RAISE tree_create_error.
ENDIF.

(C) SAP AG BC412 33-28
* 2.b. create mapping object
CREATE OBJECT o_mapping.
* 3. create ROOT node
CALL METHOD me->create_root_node
EXPORTING
i_root_node_text = i_root_node_text
EXCEPTIONS
root_create_error = 1.
IF sy-subrc NE 0.
RAISE root_create_error.
ENDIF.
* 4. register events
* fill workarea for event registration
* event: node_double_click
IF i_node_double_click = c_true.
wa_events-eventid = cl_gui_simple_tree=>eventid_node_double_click.
wa_events-appl_event = i_appl_event_ndc.
APPEND wa_events TO events.
ENDIF.
* event: expand_no_children
wa_events-eventid = cl_gui_simple_tree=>eventid_expand_no_children.
wa_events-appl_event = c_false.
APPEND wa_events TO events.
* register events
CALL METHOD o_simple_tree->set_registered_events
EXPORTING events = events.
IF i_node_double_click = c_true.
SET HANDLER me->on_node_double_click FOR o_simple_tree.
ENDIF.
SET HANDLER me->on_expand_no_children FOR o_simple_tree.
* 5. store node texts for sflight nodes in instance data
sflight_node_text1 = i_flight_node_text1.
sflight_node_text2 = i_flight_node_text2.

(C) SAP AG BC412 33-29
ENDMETHOD.
*----------------------------------------------------------------------
METHOD free.
CALL METHOD o_simple_tree->free.
FREE: o_simple_tree, o_mapping.
ENDMETHOD.
*----------------------------------------------------------------------
METHOD get_scarr_details.
READ TABLE it_scarr INTO e_scarr WITH TABLE KEY
carrid = i_carrid.
IF sy-subrc NE 0.
RAISE no_data_found.
ENDIF.
ENDMETHOD.
*----------------------------------------------------------------------
METHOD get_spfli_details.
READ TABLE it_spfli INTO e_spfli WITH TABLE KEY
carrid = i_carrid
connid = i_connid.
IF sy-subrc NE 0.
RAISE no_data_found.
ENDIF.
ENDMETHOD.
*----------------------------------------------------------------------
METHOD get_sflight_details.
READ TABLE it_sflight INTO e_sflight WITH TABLE KEY
carrid = i_carrid
connid = i_connid
fldate = i_fldate.
IF sy-subrc NE 0.
RAISE no_data_found.
ENDIF.

(C) SAP AG BC412 33-30
ENDMETHOD.
*----------------------------------------------------------------------
METHOD get_sbook_details.
READ TABLE it_sbook INTO e_sbook WITH TABLE KEY
carrid = i_carrid
connid = i_connid
fldate = i_fldate
bookid = i_bookid.
IF sy-subrc NE 0.
RAISE no_data_found.
ENDIF.
ENDMETHOD.
*----------------------------------------------------------------------
METHOD get_scustom_details.
READ TABLE it_scustom INTO e_scustom WITH TABLE KEY
id = i_id.
IF sy-subrc NE 0.
RAISE no_data_found.
ENDIF.
ENDMETHOD.
*----------------------------------------------------------------------
METHOD create_root_node.
* local node table
DATA: node_table TYPE STANDARD TABLE OF
bc412_sim_tree_node_struc,
wa_node LIKE LINE OF node_table.
* create root node entry
CLEAR wa_node.
wa_node-node_key = 'ROOT'.
* wa_node-relatkey = . " special case, root has no
* wa_node-relatship = . " related entry
wa_node-hidden = ' '. " ' ' = visible, 'X' = invisible
wa_node-disabled = 'X'. " node is not selectable
wa_node-isfolder = 'X'.

(C) SAP AG BC412 33-31
wa_node-n_image = ' '. " use default icon (closed folder)
wa_node-exp_image = ' '. " use default icon (expand folder)
wa_node-style = cl_gui_simple_tree=>style_default.
* wa_node-last_hitem = .
* wa_node-no_branch = .
IF level_no = c_level_0.
wa_node-expander = ' '.
ELSE.
wa_node-expander = 'X'.
ENDIF.
* wa_node-dragdropid = .
wa_node-text = i_root_node_text.
INSERT wa_node INTO TABLE node_table.
CALL METHOD o_simple_tree->add_nodes
EXPORTING
table_structure_name = 'BC412_SIM_TREE_NODE_STRUC'
node_table = node_table
EXCEPTIONS
error_in_node_table = 1
failed = 2
dp_error = 3
table_structure_name_not_found = 4.
IF sy-subrc NE 0.
RAISE root_create_error.
ENDIF.
ENDMETHOD.
*----------------------------------------------------------------------
METHOD on_expand_no_children.
* local data
DATA: BEGIN OF mapping,
carrid TYPE s_carr_id,
connid TYPE s_conn_id,
fldate TYPE s_date,
bookid TYPE s_book_id,
END OF mapping.

(C) SAP AG BC412 33-32
* test for ROOT (special case)
IF node_key = 'ROOT'. " expand root node -> i_scarr
CALL METHOD me->fill_scarr_node
EXPORTING
i_node_key = 'ROOT'
EXCEPTIONS
mapping_insert_error = 1
node_add_error = 2.
IF sy-subrc NE 0.
* open to implement
ENDIF.
ELSE. " any other node to expand
* get business key of selected node
CALL METHOD o_mapping->get_business_key
EXPORTING
i_tkey = node_key
IMPORTING
e_bkey1 = mapping-carrid
e_bkey2 = mapping-connid
e_bkey3 = mapping-fldate
e_bkey4 = mapping-bookid
EXCEPTIONS
invalid_teckey = 1.
IF sy-subrc NE 0.
* open to implement
ENDIF.
IF mapping-connid IS INITIAL. " expand carrier node
" -> i_spfli
CALL METHOD me->fill_spfli_node
EXPORTING
i_node_key = node_key
i_key1 = mapping-carrid
EXCEPTIONS
mapping_insert_error = 1
node_add_error = 2.
IF sy-subrc NE 0.
(C) SAP AG BC412 33-33
* open to implement
ENDIF.
ELSEIF mapping-fldate IS INITIAL. " expand connection node
" -> i_sflight
CALL METHOD me->fill_sflight_node
EXPORTING
i_node_key = node_key
i_key1 = mapping-carrid
i_key2 = mapping-connid
EXCEPTIONS
mapping_insert_error = 1
node_add_error = 2.
IF sy-subrc NE 0.
* open to implement
ENDIF.
ELSEIF mapping-bookid IS INITIAL. " expand flight node
" -> i_sbook
CALL METHOD me->fill_sbook_node
EXPORTING
i_node_key = node_key
i_key1 = mapping-carrid
i_key2 = mapping-connid
i_key3 = mapping-fldate
EXCEPTIONS
mapping_insert_error = 1
node_add_error = 2.
IF sy-subrc NE 0.
* open to implement
ENDIF.
ENDIF.
ENDIF.
ENDMETHOD.
*----------------------------------------------------------------------
METHOD on_node_double_click.
* local data

(C) SAP AG BC412 33-34
DATA:
l_carrid TYPE s_carr_id,
l_connid TYPE s_conn_id,
l_fldate TYPE s_date,
l_bookid TYPE s_book_id,
l_level TYPE bc412_level.
* transform technical key of note (tree control) into business keys
* of the flight model
CALL METHOD o_mapping->get_business_key
EXPORTING
i_tkey = node_key
IMPORTING
e_bkey1 = l_carrid
e_bkey2 = l_connid
e_bkey3 = l_fldate
e_bkey4 = l_bookid
EXCEPTIONS
invalid_teckey = 1.
IF sy-subrc NE 0.
* should not happen
ENDIF.
* determine node level
IF l_connid IS INITIAL. " carrier node selected
l_level = c_level_1.
ELSEIF l_fldate IS INITIAL. " connection node selected
l_level = c_level_2.
ELSEIF l_bookid IS INITIAL. " flight node selected
l_level = c_level_3.
ELSE. " booking node selected
l_level = c_level_4.
ENDIF.
* raise event node_double_click with business key
RAISE EVENT node_double_click
EXPORTING
e_carrid = l_carrid
e_connid = l_connid
e_fldate = l_fldate
e_bookid = l_bookid
e_level = l_level.
ENDMETHOD.

(C) SAP AG BC412 33-35
*----------------------------------------------------------------------
METHOD fill_scarr_node.
* local node table
DATA: node_table TYPE STANDARD TABLE OF
bc412_sim_tree_node_struc,
wa_node LIKE LINE OF node_table,
* handling of internal data table
wa_scarr LIKE LINE OF it_scarr,
* local mapping structure used to construct node_key
BEGIN OF mapping,
carrid TYPE s_carr_id,
connid TYPE s_conn_id,
fldate TYPE s_date,
bookid TYPE s_book_id,
END OF mapping.
* read data from database table scarr:
* note: this method is executed only one time during program run
* it is called the first time the user tries to expand the root
* node. In all other cases the corresponding data has already
* send to the tree control. Thus the event expand_no_children
* is only fired the first time.
SELECT * FROM scarr INTO CORRESPONDING FIELDS OF TABLE it_scarr.
* create node entries
CLEAR: wa_node.
wa_node-hidden = ' '. " ' ' = visible, 'X' = invisible
wa_node-disabled = ' '. " node is selectable
wa_node-isfolder = 'X'.
wa_node-n_image = ' '. " use default icon (closed folder)
wa_node-exp_image = ' '. " use default icon (expand folder)
wa_node-style = cl_gui_simple_tree=>style_default.
* wa_node-last_hitem = .
* wa_node-no_branch = .
IF level_no = c_level_1.
wa_node-expander = ' '.
ELSE.
wa_node-expander = 'X'.
ENDIF.
* wa_node-dragdropid = .

(C) SAP AG BC412 33-36
LOOP AT it_scarr INTO wa_scarr.
CLEAR: mapping.
MOVE-CORRESPONDING wa_scarr TO mapping.
CALL METHOD o_mapping->insert_business_key
EXPORTING
i_bkey1 = mapping-carrid
i_bkey2 = mapping-connid
i_bkey3 = mapping-fldate
i_bkey4 = mapping-bookid
IMPORTING
e_tkey = wa_node-node_key
EXCEPTIONS
internal_error = 1
teckey_overflow = 2
invalid_buskey = 3.
IF sy-subrc NE 0.
RAISE mapping_insert_error.
ENDIF.
wa_node-text = wa_scarr-carrname.
* first entry of sub nodes
wa_node-relatkey = i_node_key.
wa_node-relatship = cl_gui_simple_tree=>relat_last_child.
INSERT wa_node INTO TABLE node_table.
ENDLOOP.
CALL METHOD o_simple_tree->add_nodes
EXPORTING
table_structure_name = 'BC412_SIM_TREE_NODE_STRUC'
node_table = node_table
EXCEPTIONS
error_in_node_table = 1
failed = 2
dp_error = 3
table_structure_name_not_found = 4.
IF sy-subrc NE 0.
RAISE node_add_error.
ENDIF.
ENDMETHOD.

(C) SAP AG BC412 33-37
*----------------------------------------------------------------------
METHOD fill_spfli_node.
* local node table
DATA: node_table TYPE STANDARD TABLE OF
bc412_sim_tree_node_struc,
wa_node LIKE LINE OF node_table,
* local mapping structure used to construct node_key
BEGIN OF mapping,
carrid TYPE s_carr_id,
connid TYPE s_conn_id,
fldate TYPE s_date,
bookid TYPE s_book_id,
END OF mapping,
* local spfli table
li_spfli TYPE SORTED TABLE OF spfli
WITH UNIQUE KEY carrid connid,
* local workarea
wa_spfli LIKE LINE OF it_spfli.
* read data from database table
* remember: the event expand_no_children is only fired if the tree
* control on the frontend has no data to show as children
SELECT * FROM spfli INTO CORRESPONDING FIELDS OF TABLE li_spfli
WHERE carrid = i_key1.
* create node entries
CLEAR: wa_node.
wa_node-hidden = ' '. " ' ' = visible, 'X' = invisible
wa_node-disabled = ' '. " node is selectable
wa_node-isfolder = 'X'.
wa_node-n_image = ' '. " use default icon (closed folder)
wa_node-exp_image = ' '. " use default icon (expand folder)
wa_node-style = cl_gui_simple_tree=>style_default.
* wa_node-last_hitem = .
* wa_node-no_branch = .
IF level_no = c_level_2.
wa_node-expander = ' '.
ELSE.
wa_node-expander = 'X'.

(C) SAP AG BC412 33-38
ENDIF.
* wa_node-dragdropid = .
LOOP AT li_spfli INTO wa_spfli.
CLEAR: mapping.
MOVE-CORRESPONDING wa_spfli TO mapping.
CALL METHOD o_mapping->insert_business_key
EXPORTING
i_bkey1 = mapping-carrid
i_bkey2 = mapping-connid
i_bkey3 = mapping-fldate
i_bkey4 = mapping-bookid
IMPORTING
e_tkey = wa_node-node_key
EXCEPTIONS
internal_error = 1
teckey_overflow = 2
invalid_buskey = 3.
IF sy-subrc NE 0.
RAISE mapping_insert_error.
ENDIF.
CONCATENATE wa_spfli-connid ': ' wa_spfli-cityfrom '--> '
wa_spfli-cityto
INTO wa_node-text SEPARATED BY ' '.
* first entry of sub node -> first child
wa_node-relatkey = i_node_key.
wa_node-relatship = cl_gui_simple_tree=>relat_last_child.
INSERT wa_node INTO TABLE node_table. " fill node table
INSERT wa_spfli INTO TABLE it_spfli. " fill global data table
ENDLOOP.
CALL METHOD o_simple_tree->add_nodes
EXPORTING
table_structure_name = 'BC412_SIM_TREE_NODE_STRUC'
node_table = node_table
EXCEPTIONS
error_in_node_table = 1
failed = 2

(C) SAP AG BC412 33-39
dp_error = 3
table_structure_name_not_found = 4.
IF sy-subrc NE 0.
RAISE node_add_error.
ENDIF.
ENDMETHOD.
*----------------------------------------------------------------------
METHOD fill_sflight_node.
* local node table
DATA: node_table TYPE STANDARD TABLE OF
bc412_sim_tree_node_struc,
wa_node LIKE LINE OF node_table,
* local mapping structure used to construct node_key
BEGIN OF mapping,
carrid TYPE s_carr_id,
connid TYPE s_conn_id,
fldate TYPE s_date,
bookid TYPE s_book_id,
END OF mapping,
* local sflight table
li_sflight TYPE SORTED TABLE OF sflight
WITH UNIQUE KEY carrid connid fldate,
* local workarea
wa_sflight LIKE LINE OF it_sflight,
* auxiliary fields
freeseats(5),
text1(36),
text2(36).
* read database entry corresponding to node to expand
SELECT * FROM sflight INTO CORRESPONDING FIELDS OF TABLE li_sflight
WHERE carrid = i_key1
AND connid = i_key2.
* create node entry
CLEAR: wa_node.
wa_node-hidden = ' '. " ' ' = visible, 'X' = invisible
wa_node-disabled = ' '. " node is selectable

(C) SAP AG BC412 33-40
wa_node-isfolder = 'X'.
wa_node-n_image = ' '. " use default icon (closed folder)
wa_node-exp_image = ' '. " use default icon (expand folder)
wa_node-style = cl_gui_simple_tree=>style_default.
* wa_node-last_hitem = .
* wa_node-no_branch = .
IF level_no = c_level_3.
wa_node-expander = ' '.
ELSE.
wa_node-expander = 'X'.
ENDIF.
* wa_node-dragdropid = .
LOOP AT li_sflight INTO wa_sflight.
CLEAR: mapping, freeseats.
MOVE-CORRESPONDING wa_sflight TO mapping.
CALL METHOD o_mapping->insert_business_key
EXPORTING
i_bkey1 = mapping-carrid
i_bkey2 = mapping-connid
i_bkey3 = mapping-fldate
i_bkey4 = mapping-bookid
IMPORTING
e_tkey = wa_node-node_key
EXCEPTIONS
internal_error = 1
teckey_overflow = 2
invalid_buskey = 3.
IF sy-subrc NE 0.
RAISE mapping_insert_error.
ENDIF.
freeseats = wa_sflight-seatsmax - wa_sflight-seatsocc.
IF freeseats > 0. " still seats to book
WRITE wa_sflight-fldate TO text1.
text2 = sflight_node_text1.
CONCATENATE text1 ': ' freeseats text2
INTO wa_node-text SEPARATED BY ' '.
ELSE. " no free seats

(C) SAP AG BC412 33-41
WRITE wa_sflight-fldate TO text1.
text2 = sflight_node_text2.
CONCATENATE text1 ': ' text2
INTO wa_node-text SEPARATED BY ' '.
ENDIF.
wa_node-relatkey = i_node_key.
wa_node-relatship = cl_gui_simple_tree=>relat_last_child.
INSERT wa_node INTO TABLE node_table. " fill node table
INSERT wa_sflight INTO TABLE it_sflight. " fill global data table
ENDLOOP.
CALL METHOD o_simple_tree->add_nodes
EXPORTING
table_structure_name = 'BC412_SIM_TREE_NODE_STRUC'
node_table = node_table
EXCEPTIONS
error_in_node_table = 1
failed = 2
dp_error = 3
table_structure_name_not_found = 4.
IF sy-subrc NE 0.
RAISE node_add_error.
ENDIF.
ENDMETHOD.
*----------------------------------------------------------------------
METHOD fill_sbook_node.
* local node table
DATA: node_table TYPE STANDARD TABLE OF
bc412_sim_tree_node_struc,
wa_node LIKE LINE OF node_table,
wa_prev_node LIKE wa_node,
* local mapping structure used to construct node_key
BEGIN OF mapping,
carrid TYPE s_carr_id,
connid TYPE s_conn_id,
fldate TYPE s_date,
bookid TYPE s_book_id,

(C) SAP AG BC412 33-42
END OF mapping,
* local workarea
wa_sbook LIKE LINE OF it_sbook,
* local sbook table
li_sbook TYPE bc412_sbook_node_itt,
wa_l_sbook LIKE LINE OF li_sbook,
* auxiliary fields
freeseats(5),
text1(10),
text2(10).
* read database table corresponding to node to expand
SELECT * FROM sbook INTO CORRESPONDING FIELDS OF TABLE li_sbook
WHERE carrid = i_key1
AND connid = i_key2
AND fldate = i_key3.
* get customer names corresponding to names
CALL METHOD get_customer_names
CHANGING
i_booking_info = li_sbook
EXCEPTIONS
data_error = 1.
IF sy-subrc NE 0.
* should not occur: inconsistent data in database tables
ENDIF.
* create node entry
CLEAR: wa_node.
wa_node-hidden = ' '. " ' ' = visible, 'X' = invisible
wa_node-disabled = ' '. " node is selectable
wa_node-isfolder = ' '.
wa_node-n_image = ' '. " use default icon (closed folder)
wa_node-exp_image = ' '. " use default icon (expand folder)
wa_node-style = cl_gui_simple_tree=>style_default.
* wa_node-last_hitem = .
* wa_node-no_branch = .
IF level_no = c_level_4.
wa_node-expander = ' '.
ELSE.

(C) SAP AG BC412 33-43
wa_node-expander = ' '. " always not expandable
ENDIF.
wa_node-expander = ' '.
* wa_node-dragdropid = .
LOOP AT li_sbook INTO wa_l_sbook
WHERE carrid = i_key1
AND connid = i_key2
AND fldate = i_key3.
CLEAR: mapping, freeseats.
MOVE-CORRESPONDING wa_l_sbook TO mapping.
CALL METHOD o_mapping->insert_business_key
EXPORTING
i_bkey1 = mapping-carrid
i_bkey2 = mapping-connid
i_bkey3 = mapping-fldate
i_bkey4 = mapping-bookid
IMPORTING
e_tkey = wa_node-node_key
EXCEPTIONS
internal_error = 1
teckey_overflow = 2
invalid_buskey = 3.
IF sy-subrc NE 0.
RAISE mapping_insert_error.
ENDIF.
wa_node-text = wa_l_sbook-name.
* construct hierarchy
wa_node-relatkey = i_node_key.
wa_node-relatship = cl_gui_simple_tree=>relat_last_child.
INSERT wa_node INTO TABLE node_table. " fill node table
MOVE-CORRESPONDING wa_l_sbook TO wa_sbook.
INSERT wa_sbook INTO TABLE it_sbook. " fill global data table
wa_prev_node = wa_node.
ENDLOOP.
CALL METHOD o_simple_tree->add_nodes

(C) SAP AG BC412 33-44
EXPORTING
table_structure_name = 'BC412_SIM_TREE_NODE_STRUC'
node_table = node_table
EXCEPTIONS
error_in_node_table = 1
failed = 2
dp_error = 3
table_structure_name_not_found = 4.
IF sy-subrc NE 0.
RAISE node_add_error.
ENDIF.
ENDMETHOD.
*----------------------------------------------------------------------
METHOD get_customer_names .
DATA: wa_booking LIKE LINE OF i_booking_info,
wa_scustom LIKE LINE OF it_scustom,
it_cust_no LIKE TABLE OF wa_scustom-id,
li_scustom TYPE TABLE OF scustom.
LOOP AT i_booking_info INTO wa_booking.
READ TABLE it_scustom INTO wa_scustom
WITH TABLE KEY
id = wa_booking-customid.
IF sy-subrc NE 0. " customer not cashed so far
INSERT wa_booking-customid INTO TABLE it_cust_no.
ELSE. " customer already cashed
* copy name and modify booking_node_table
wa_booking-name = wa_scustom-name.
MODIFY TABLE i_booking_info FROM wa_booking.
ENDIF.
ENDLOOP.
* check: database access needed?
READ TABLE it_cust_no INDEX 1 TRANSPORTING NO FIELDS.
IF sy-subrc EQ 0. " new customers to read
* read new customers
SELECT * FROM scustom

(C) SAP AG BC412 34-45
INTO CORRESPONDING FIELDS OF TABLE li_scustom
FOR ALL ENTRIES IN it_cust_no
WHERE id = it_cust_no-table_line.
IF sy-subrc NE 0.
RAISE data_error.
ENDIF.
LOOP AT li_scustom INTO wa_scustom.
* store in global cash table
INSERT wa_scustom INTO TABLE it_scustom.
* add new names to booking_node_table
LOOP AT i_booking_info INTO wa_booking
WHERE customid = wa_scustom-id.
wa_booking-name = wa_scustom-name.
MODIFY TABLE i_booking_info FROM wa_booking.
ENDLOOP.
ENDLOOP.
ELSE.
* nothing to do, because name have already been copied
ENDIF.
ENDMETHOD.
Global Data Types Used in the ABAP Dictionary
Table Types
BC412_FUNCTION_ITT The table type BC412_FUNCTION_ITT has the type STANDARD and uses the row type BC412_FUNCTION_STRUC. The row type consists of the following two fields:
Field name Data element Type
FCODE UI_FUNC CHAR 70
TEXT GUI_TEXT CHAR 40
BC412_MAP_HASH1 The table type BC412_MAP_HASH1 has the type HASH and uses the row type BC412_MAP_LINETYPE. The row type consists of the following fields:

(C) SAP AG BC412 34-46
Field name Data element
BKEY1 S_CARR_ID
BKEY2 S_CONN_ID
BKEY3 S_DATE
BKEY4 S_BOOK_ID
TKEY TV_NODEKEY
The fields BKEY1, BKEY2, BKEY3, and BKEY4 make up the table key.
BC412_MAP_HASH1 The table type BC412_MAP_HASH1 has the type HASH and uses the row type BC412_MAP_LINETYPE. The field TKEY is the table key.
BC412_SBOOK_ITT The table type BC412_SBOOK_ITT has the type SORTED and uses the row type SBOOK. The fields CARRID, CONNID, FLDATE, and BOOKID are key fields.
BC412_SBOOK_NODE_ITT The table type BC412_SBOOK_NODE_ITT has the type STANDARD and uses the row type BC412_SBOOK_NODE_STRUC. The row type includes the structure SBOOK and additionally uses the field NAME (data element S_CUSTNAME).
BC412_SCARR_ITT The table type BC412_SCARR_ITT has the type SORTED and uses the row type SCARR. The field CARRID is a key field.
BC412_SUSTOM_ITT The table type BC412_SCUSTOM_ITT has the type SORTED and uses the row type SCUSTOM. The field ID is a key field.
BC412_SFLIGHT_ITT The table type BC412_SFLIGHT_ITT has the type SORTED and uses the row type SFLIGHT. The fields CARRID, CONNID, and FLDATE are key fields.
BC412_SPFLI_ITT The table type BC412_SPFLI_ITT has the type SORTED and uses the row type SPFLI. The fields CARRID and CONNID are key fields.

(C) SAP AG BC412 34-47
Structure Types
BC412_SIM_TREE_NODE_STRUC The structure type BC412_SIM_TREE_NODE_STRUC includes the structure TREEV_NODE and additionally has the field TEXT (CHAR 120).
Data Elements The following data elements are used:
Data element Type BC412_LEVEL INT2
BC412_TEXT1 CHAR 1
BC412_TEXT36 CHAR 36
BC412_TEXT_DE CHAR 120

(C) SAP AG BC412 34-53
Workbench Edition – Controls Technology
Overview Controls Technology is SAP's new book about controls programming in ABAP.
R/3 Release 4.6 (EnjoySAP) has seen a comprehensive redesign of the user interface of the most important application and Basis transactions in the system. At the center of this initiative is the new controls technology. This book is an introduction to controls programming, containing numerous programming examples and a full programming reference.
About the Authors Controls Technology has been written by the same experienced team of SAP information developers that brought you the successful ABAP/4 Development Workbench Documentation Set in Release 3.0. Controls Technology is the ideal companion to this existing documentation.
Target Group Controls Technology is aimed at ABAP programmers and project managers who are interested in the new features of
the R/3 Basis system in Release 4.6.
Features at a Glance • Four-color printing on high-quality paper
• Over 400 pages of comprehensive documentation
• Easy introduction to controls technology
• Numerous programming examples and illustrations
• Full control programming reference
• An indispensable companion for all ABAP professionals
• Release 4.6A
• Notes on performance optimization
Content Summary • Introduction to control technology
• The Control Framework
• Container controls
• SAP Toolbar Control
• SAP Picture and SAP HTML Viewer
• SAP Textedit Control
• SAP Simple Tree, List Tree, and Column Tree Control
• ALV Grid Control
• Control tutorial

(C) SAP AG BC412 34-54
How to Order: SAP Partners and Customers in Europe SAP customers and partners can order Controls Technology online from the SAP Store (www.sap.com) using material number 500 32 529.
How to Order. SAP Partners and Customers Outside Europe You can order Controls Technology online at www.fatbrain.com
Karl Kessler