bbb series - machdrives user manual.pdf · 3.2 breakout board features 4 axis support for step/dir...
TRANSCRIPT

4 Axis Breakout Board
with VFD Support
User Manual
www.machdrives.com
Doc BBBM Rev 1.1 © 2017 All Rights Reserved
BBB Series
BBB Series User Manual Machdrives Breakout Board for VFD Spindles
BBBM V1.1 2 www.machdrives.com
Notice
This guide is delivered subject to the following conditions and restrictions:
No part of this publication may be reproduced mechanically or electronically in any form without obtaining written permission from machdrives.com
This product contains firmware and other intellectual property that is protected under international law. Copying, disassembly or reverse engineering of this product and its firmware is strictly prohibited.
The text and graphics included in this manual are for the purpose of illustration and reference only. The specifications on which they are based are subject to change without notice.
The Machdrives brand is a trademark of Firestick Pty Ltd.
Microsoft, and Windows are registered trademarks of Microsoft Corporation. Mach3 is a trademark of ArtSoft USA. Machdrives has no affiliation or association with
Mach3 or ArtSoft USA.
Any other trademarks used in this manual are the property of the respective trademark
holder.
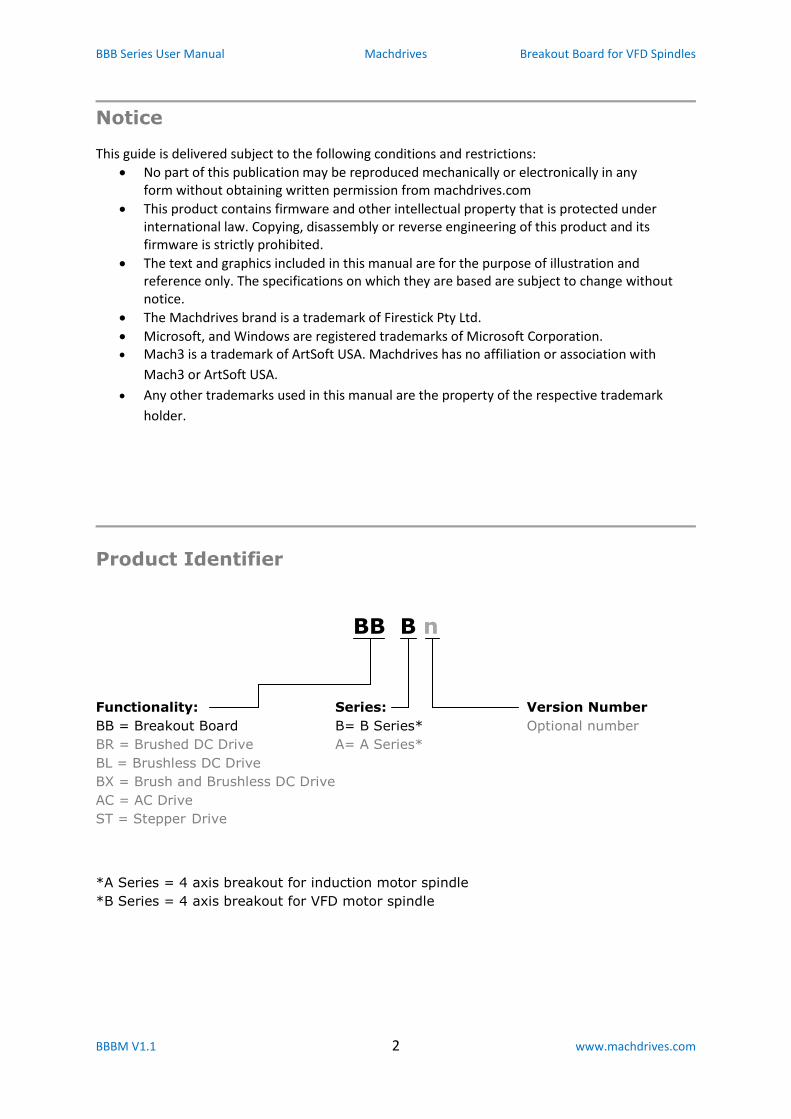
Product Identifier
BB B n
Functionality: Series: Version Number
BB = Breakout Board B= B Series* Optional number
BR = Brushed DC Drive A= A Series*
BL = Brushless DC Drive
BX = Brush and Brushless DC Drive
AC = AC Drive
ST = Stepper Drive
*A Series = 4 axis breakout for induction motor spindle
*B Series = 4 axis breakout for VFD motor spindle
BBB Series User Manual Machdrives Breakout Board for VFD Spindles
BBBM V1.1 3 www.machdrives.com
Document Revision History
Document Name: BBBM
Contact
Website: www.machdrives.com
Support: www.machdrives.com/support.aspx
email: [email protected]
Sales: www.machdrives.com/sales.aspx
stores.ebay.com.au/machdrives/
email: [email protected]
Social Media facebook.com/machdrives
twitter.com/machdrives
Version Date Details
1.1 27-Apr-2017 Initial Release

BBB Series User Manual Machdrives Breakout Board for VFD Spindles
BBBM V1.1 4 www.machdrives.com
CONTENTS
1.0 Safety ................................................................................................................................................................ 6
1.1 Warnings ...................................................................................................................................................... 6
2.0 WARRANTY ....................................................................................................................................................... 6
3.0 INTRODUCTION................................................................................................................................................. 7
3.1 Breakout Board Description ........................................................................................................................ 7
3.2 Breakout Board Features ............................................................................................................................. 7
3.3 Breakout Board Layout ................................................................................................................................. 8
3.4 Jumper Settings ............................................................................................................................................ 8
4.0 INSTALLATION ................................................................................................................................................... 9
4.1 Unpacking the Breakout Board .................................................................................................................... 9
4.2 Environmental Requirements ...................................................................................................................... 9
4.3 Mounting the Breakout Board ................................................................................................................... 10
4.4 Connecting the +12V Supply ...................................................................................................................... 11
4.5 Connecting the E-Stop Switch .................................................................................................................... 12
4.6 Connecting to the PC .................................................................................................................................. 13
4.6.1 Charge Pump/ Enable Overview ......................................................................................................... 14
4.6.2 Configuring the Charge Pump Output ................................................................................................ 14
4.6.3 Configuring the Enable Output ........................................................................................................... 14
4.6.4 Configuring the Error Input ................................................................................................................. 15
4.6.5 Configuring Noise Debounce .............................................................................................................. 15
5.0 CONNECTING MACHDRIVES SERVO DRIVES ................................................................................................... 16
5.1 Connecting BRA Servo drives ..................................................................................................................... 16
5.2 Connecting BRB/BRC Servo drives .............................................................................................................. 16
5.3 Configuring Step/Direction Outputs ........................................................................................................... 17
6.0 CONNECTING NON-MACHDRIVES STEPPER/SERVO DRIVES ........................................................................... 17
7.0 CONNECTING LIMIT/HOME SWITCHES ........................................................................................................... 18
7.1 Connecting BRA Servo Drives .................................................................................................................... 18
7.2 Connecting all Other Stepper/Servo Drives ............................................................................................... 18
7.3 Configuring Limit/Home Switches .............................................................................................................. 18

BBB Series User Manual Machdrives Breakout Board for VFD Spindles
BBBM V1.1 5 www.machdrives.com
8.0 Relay Outputs ................................................................................................................................................. 19
8.1 Configuring Relay Outputs ......................................................................................................................... 19
9.0 Opto Inputs ..................................................................................................................................................... 20
9.1 Configuring Opto Inputs ............................................................................................................................. 20
10.0 VFD Control ................................................................................................................................................... 21
10.1 Connecting the Analogue Input ............................................................................................................... 21
10.2 Configure the VFD to use the Analogue Input.......................................................................................... 21
10.3 Configure the VFD Analogue Input Jumper .............................................................................................. 21
10.4 Connecting the Forward/Reverse Relays ................................................................................................ 22
10.5 Configure the VFD to use the Forward/Reverse Relays ........................................................................... 22
10.6 Setting the Motor Parameters ................................................................................................................. 22
10.7 Configuring Mach3 ................................................................................................................................... 23
10.8 Calibrating the Speed ............................................................................................................................... 23
11.0 LED INDICATORS ........................................................................................................................................... 24
12.0 SPECIFICATIONS ............................................................................................................................................ 25

BBB Series User Manual Machdrives Breakout Board for VFD Spindles
BBBM V1.1 6 www.machdrives.com
1.0 SAFETY
1.1 Warnings
Installation and operation of this product involves the use of software, firmware, electronics
and documentation. Software and firmware can contain bugs, electronic components can
fail and documentation can contain errors. Such defects can cause electrical or mechanical
hazards that could result in property or equipment damage, personal injury or death.
Electrical and mechanical hazards are also present during normal installation and operation
of this product and associated equipment. You and any associated third parties shall be
suitably qualified or experienced to access such risks and ensure this product is installed and
operated safely in accordance with your local regulations and industry best practice.
While every care has been taken in preparation of this manual, it may still contain errors or
omissions. Where the contents of this manual differ from, or conflict with your local
regulations or industry best practice, then your local regulations or industry best practice
shall prevail. If in any doubt please contact Machdrives support for clarification before
proceeding.
Always ensure machine motor power is removed by a mechanical or electromechanical
means before placing any body parts in the path of connected machinery. Never solely rely
on electronics or firmware for safety.
Relay terminal connections and the underside of the circuit board can present an electric
shock hazard if the relay is used to switch high voltages. Make sure the PCB is insulated from
any conductive surfaces with appropriate clearance and creepage distances.
2.0 WARRANTY
This product is warranted to be free of material defects and workmanship and conform to the published specifications. This product is warranted for a period of 12 months from the time of installation, or 18 months from time of shipment, whichever comes first. Products replaced under warranty are covered under the original warranty period. Physical damage or operation of the product outside of the published specifications is not covered by warranty. All warranty claims must obtain a Return Material Authorization (RMA) number before returning the product. Defective products will be repaired or replaced at the manufacturer's sole discretion. The customer is responsible for the cost of returning the product to the manufacturer. The manufacturer is responsible for the cost of returning the product to the customer by standard airmail service. No other warranties, expressed or implied, including a warranty of merchantability and fitness for a particular purpose, extend beyond this warranty.

BBB Series User Manual Machdrives Breakout Board for VFD Spindles
BBBM V1.1 7 www.machdrives.com
3.0 INTRODUCTION
Thank you for choosing Machdrives for your new project. We want your experience to be a positive
one, so please contact support if you have any questions about this product or its use.
This user manual describes the Machdrives BBB breakout board and its commissioning as part of a
CNC machine or similar system. Please read all sections carefully to ensure the best performance of
your system.
3.1 Breakout Board Description
Machdrives BBB breakout board is designed to interface CNC control software running on a personal
computer to CNC hardware such as stepper or servo drives, E-Stop and limit switches, touch probes
and a spindle motor.
The BBB model breakout is specifically designed for machines using air or water cooled spindle
motors controlled via a variable frequency drive (VFD). For machines using induction motor spindles,
the BBA model breakout is recommended.
This breakout board is open frame, giving excellent value for money and is designed to be installed
in an enclosed control cabinet.
A small isolated +12VDC power supply is required to power the logic circuitry and relays.
3.2 Breakout Board Features
4 Axis support for Step/Dir servo and stepper drives.
VFD support. Both analogue 0-10V and PWM.
Connection to control PC over a standard LPT parallel port.
Buffered I/O lines.
Charge pump or simple enable support.
E-Stop switch support
Limit switch support. Can be used with mechanical or inductive proximity switches.
Four 250V 5A general purpose relays.
Three opto-isolated inputs for Touch probe etc
11 LED indicators to simplify setup and trouble shooting.
Digital noise filtering on all control lines.
32 bit ARM CPU with enhanced safety interlock logic.

BBB Series User Manual Machdrives Breakout Board for VFD Spindles
BBBM V1.1 8 www.machdrives.com
3.3 Breakout Board Layout
3.4 Jumper Settings
The breakout board configuration can be changed with the following three jumpers (shown in yellow
above).
A Step/Relay3: Jumper ON (default) - DB25 Pin 8 controls Relay 3
Jumper OFF - DB25 Pin 8 is used for the A Step signal on the 4th axis.
A Dir/Relay4: Jumper ON (default) - DB25 Pin 9 controls Relay 4
Jumper OFF - DB25 Pin 9 is used for the A Dir signal on the 4th axis.
CPump/ : Jumper ON (default) - Charge pump on DB25 Pin 14 is used to enable the board.
Jumper OFF - Low level on DB25 Pin 14 is used to enable the board.

BBB Series User Manual Machdrives Breakout Board for VFD Spindles
BBBM V1.1 9 www.machdrives.com
4.0 INSTALLATION
This chapter covers the physical installation of the breakout board and cable connections.
4.1 Unpacking the Breakout Board
Your BBB breakout board is shipped in anti-static wrapping and, like all electronic
devices, can be damaged or degraded by static electricity. Avoid wearing synthetic
clothing like nylon and polyester and discharge any static electricity by touching an
earthed metal object before unpacking the drive. Where possible wear natural fibers like cotton and
an anti-static wrist strap during installation.
Unpack your board and inspect it for any visible damage. Contact Machdrives support if any issues
are discovered. Do not attempt to install a damaged board.
The serial number is located on the main label on top of the relays. This number identifies your
board and is required for any warranty claims.
4.2 Environmental Requirements
To ensure safe and reliable operation of your board, it is important that it is installed in an
appropriate environment.
Ambient temperature: 0°C to 40°C (32°F to 104°F)
Altitude: Maximum 2,000m (6,000 ft)
Humidity: 90% maximum - non condensing
Atmosphere: No explosive or corrosive gases
Contamination: No wood dust, plasma cutting dust, metal chips etc.
BBB Series User Manual Machdrives Breakout Board for VFD Spindles
BBBM V1.1 10 www.machdrives.com
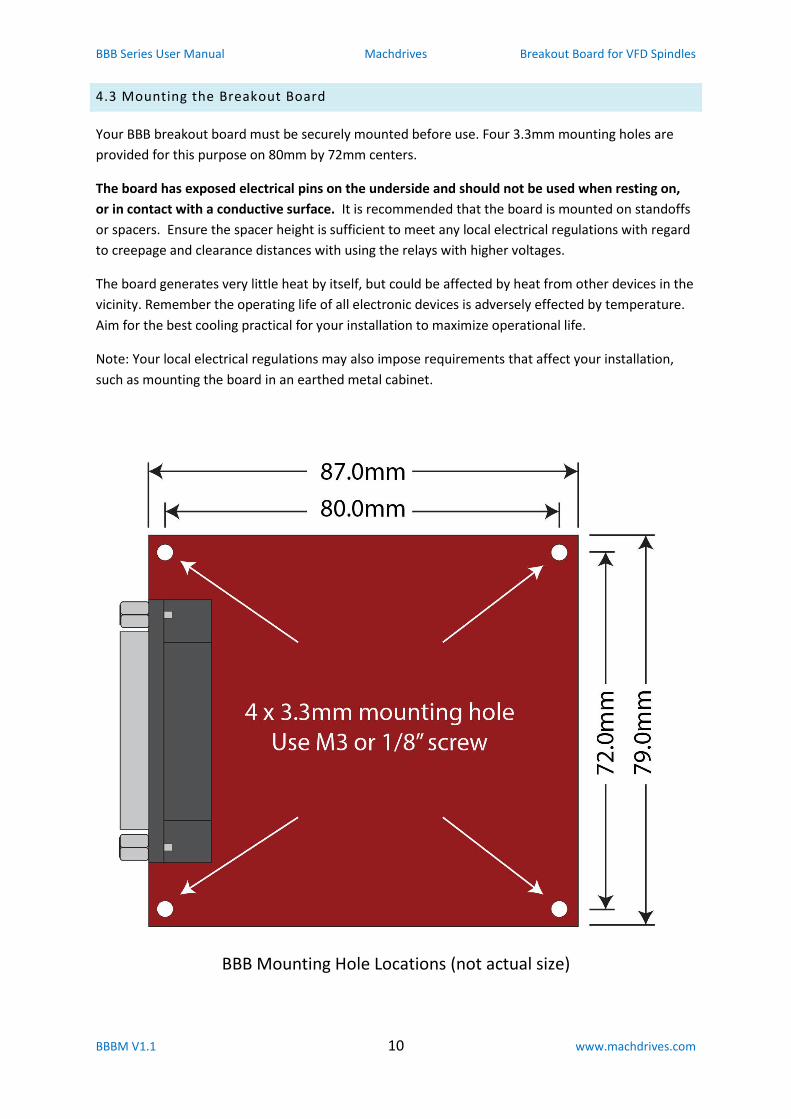
4.3 Mounting the Breakout Board
Your BBB breakout board must be securely mounted before use. Four 3.3mm mounting holes are
provided for this purpose on 80mm by 72mm centers.
The board has exposed electrical pins on the underside and should not be used when resting on,
or in contact with a conductive surface. It is recommended that the board is mounted on standoffs
or spacers. Ensure the spacer height is sufficient to meet any local electrical regulations with regard
to creepage and clearance distances with using the relays with higher voltages.
The board generates very little heat by itself, but could be affected by heat from other devices in the
vicinity. Remember the operating life of all electronic devices is adversely effected by temperature.
Aim for the best cooling practical for your installation to maximize operational life.
Note: Your local electrical regulations may also impose requirements that affect your installation,
such as mounting the board in an earthed metal cabinet.
BBB Mounting Hole Locations (not actual size)

BBB Series User Manual Machdrives Breakout Board for VFD Spindles
BBBM V1.1 11 www.machdrives.com
4.4 Connecting the +12V Supply
A small isolated +12VDC power supply of 200mA capacity or more is required to power the drive
control circuitry and the relays.
Connect the power supply positive to the +12V terminal and the negative to the 0V terminal.
Route the +12V cable well away from motor cables and twist together or use shielded cable for maximum noise immunity. If using a shielded cable, earth the shield at both ends. The green +12V LED will be illuminated when power is being supplied to the board.
The +12V power supply

BBB Series User Manual Machdrives Breakout Board for VFD Spindles
BBBM V1.1 12 www.machdrives.com
4.5 Connecting the E-Stop Switch
An E-Stop input is provided as a safety feature to allow rapid shutdown of all the breakout board
functions. On activation of the E-Stop the following occurs.
All axis motor drives are disabled.
All relays are opened.
The 0-10V spindle control voltage goes to 0V.
The PWM output goes to zero.
An error condition is signaled back to the control PC via the DB25 pin 10 ERROR.
The board cannot be enabled again until the E-Stop condition is cleared. To clear the E-Stop
condition the connection between the Normally Closed (NC) and 0V terminals must be closed.
To activate the E-Stop condition the connection between the NC and 0V terminals must be opened.
If this feature is not used then a jumper wire should be installed across these two terminals.
You should never rely solely on electronics and firmware to stop all machine motion in an
emergency. It is recommended that a double pole E-Stop switch is used and the other pole opens a
latching contactor that removes all power to the machine motor drives and spindle.
The E-Stop functionality should be reserved for emergencies only and should not be used for normal
starting and stopping of the machine.
BBB Series User Manual Machdrives Breakout Board for VFD Spindles
BBBM V1.1 13 www.machdrives.com
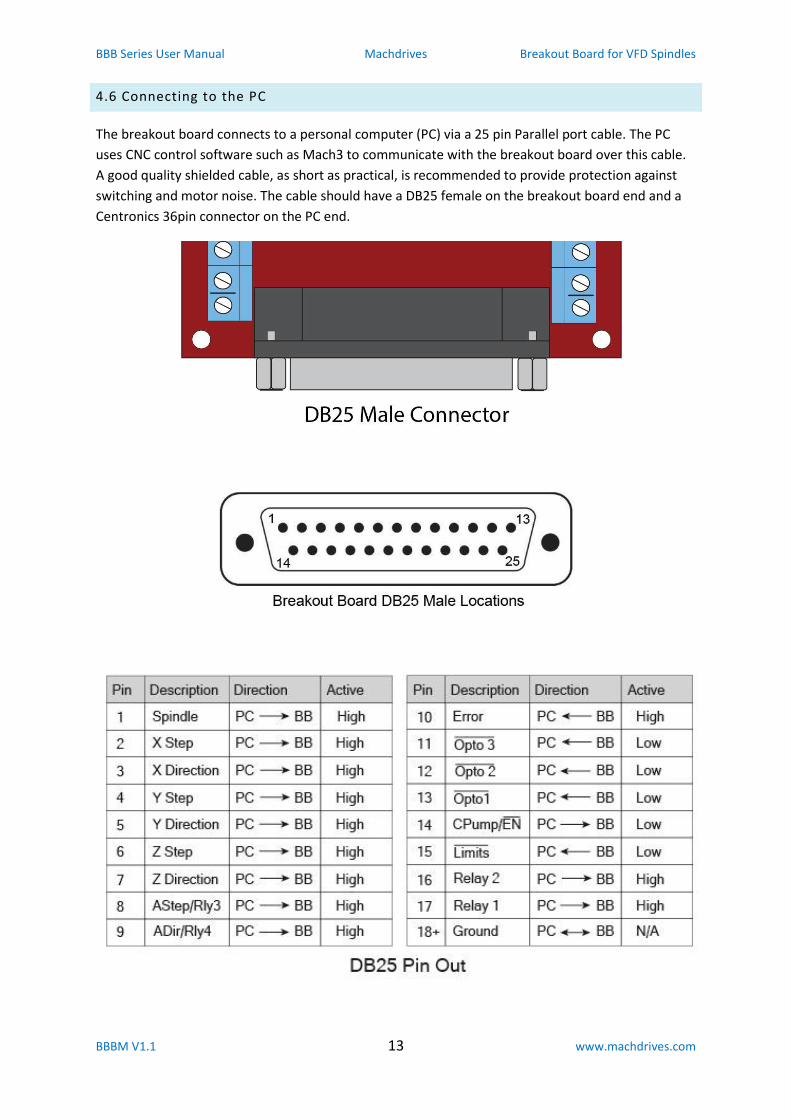
4.6 Connecting to the PC
The breakout board connects to a personal computer (PC) via a 25 pin Parallel port cable. The PC
uses CNC control software such as Mach3 to communicate with the breakout board over this cable.
A good quality shielded cable, as short as practical, is recommended to provide protection against
switching and motor noise. The cable should have a DB25 female on the breakout board end and a
Centronics 36pin connector on the PC end.

BBB Series User Manual Machdrives Breakout Board for VFD Spindles
BBBM V1.1 14 www.machdrives.com
4.6.1 Charge Pump/ Enable Overview
The PC enables and disables the breakout board via the DB25 port pin 14 (CPump/ ). The
enable signal can be a simple logic level change, or preferably a pulse stream from the
charge pump generator. The charge pump signal is preferred as it prevents spurious signals
activating breakout board functions during the controller PC startup and shut down.
4.6.2 Configuring the Charge Pump Output
Make sure the Charge Pump jumper on the breakout board is ON.
Configure the output signal for pin 14 to use the Charge Pump feature and use Active Low as
shown. Check no other output signal is using pin 14.
Make sure that the tick box "Charge Pump on in EStop" under "General Configuration" is
cleared as shown.
Your CNC controller will now send a stream of pulses over pin 14 when it enables the CNC
machine and hold the pin high when the machine is disabled.
The breakout board requires the pulse stream frequency of greater than 5KHz. Mach3
typically outputs a 12.5KHz Charge Pump pulse stream.
4.6.3 Configuring the Enable Output
Note: It is preferred to use Charge Pump Setup. Only use Simple Enable Setup if your CNC
software does not have Charge Pump functionality.
Make sure the Charge Pump jumper on the breakout board is OFF.
Configure the output signal for pin 14 to use Enable 1 and Active Low as shown. Check no
other output signal is using pin 14.

BBB Series User Manual Machdrives Breakout Board for VFD Spindles
BBBM V1.1 15 www.machdrives.com
4.6.4 Configuring the Error Input
The Error input provides a means for the breakout board to notify the controller PC that an
error condition has occurred. This can happen for any of the following reasons.
The user has activated the E-Stop switch
A motor drive has signaled an error condition to the breakout board.
Configure the E-Stop input signal to use pin 10, Active High as shown. Check no other output
signal is using pin 10.
4.6.5 Configuring Noise Debounce
The printer cable between the breakout board and the PC can pick up noise from motors
and switching that may cause false signals. This can be prevented by setting the “Debounce
Interval” in the “Inputs Signal Debouncing/Noise rejection” section on the “General
Configuration” page. A value of 20ms (500 x 40us) works well.

BBB Series User Manual Machdrives Breakout Board for VFD Spindles
BBBM V1.1 16 www.machdrives.com
5.0 CONNECTING MACHDRIVES SERVO DRIVES
This section details connecting and configuring Machdrives brand servo drives. For other brand servo
and stepper drives please see section 6.
5.1 Connecting BRA Servo drives
Machdrives BRA servos have isolated control circuitry, so connecting up is straight forward. All the
signals match exactly in name and polarity. Simply connect up as shown below.
As the BRA drives contain limit switch logic, any limit switches should be connected directly to the
drive limit inputs. See the BRA user manual for more details on setting up limit switches.
5.2 Connecting BRB/BRC Servo drives
Machdrives BRB/BRC servos have isolated control circuitry, so connecting up is straight forward. All
the signals have the same levels and polarity for straight through connection. Simply connect up as
shown below.
The BRB/BRC drives do not contain limit switch logic so any limit switches should be connected to
the breakout board input as detailed in chapter 7.

BBB Series User Manual Machdrives Breakout Board for VFD Spindles
BBBM V1.1 17 www.machdrives.com
5.3 Configuring Step/Direction Outputs
Both the Step and Direction signals are active high and should be configured as show below. A step
occurs on the low to high transition of the step signal. A low on the Dir pin indicates axis movement
in the positive direction, a high indicates movement in the negative direction. If an axis is not used
then make sure a cross appears in the "Enabled" column. Unused axis pins can be used as general
purpose outputs.
The A axis shares pin 8 and 9 with relays 3 and 4. Both cannot be used at the same time. Make sure
the jumpers on the board match the software configuration .
6.0 CONNECTING NON-MACHDRIVES STEPPER/SERVO DRIVES
On most other brand drives the control circuitry shares the same ground as the power switches and
motor, therefore opto-couplers are used to isolate the individual signals. Connection is as shown
below. For drives with no ALM output simply leave the input unconnected.
Configuring the Step/Dir outputs in software is the same as shown in section 5.3.

BBB Series User Manual Machdrives Breakout Board for VFD Spindles
BBBM V1.1 18 www.machdrives.com
7.0 CONNECTING LIMIT/HOME SWITCHES
This section details connecting and configuring Limit/Home switches.
7.1 Connecting BRA Servo Drives
BRA series servo drives incorporate built in limit switch logic so any limit switches should be
connected directly to the drive. The drive output is then connected to the breakout board
input as shown in section 5.1
7.2 Connecting all Other Stepper/Servo Drives
The Limits input is active low and is pulled up to +5V internally with a 4K7 resistor. If this feature is
not required it should be left unconnected. To signal a limit condition the input should be activated
by pulling it low. Either Normally Open (NO) or Normally Closed (NC) limit switches can be used as
shown below.
7.3 Configuring Limit/Home Switches
All limit and home inputs are passed in to Mach3 on pin 15. This input is active low, with a low level
indicating a limit or home position has been reached. The example below shows limits and home
configured for the X, Y and Z axes with the A axis not being used.
BBB Series User Manual Machdrives Breakout Board for VFD Spindles
BBBM V1.1 19 www.machdrives.com
8.0 RELAY OUTPUTS
The BBB breakout board includes four relays for general purpose output. Relays 1 and 2 are always
available, while relays 3 and 4 share signal lines with A axis Step and Dir signals. The respective
jumpers must be ON for relay 3 and 4 to operate.
All relay contacts are normally open (NO) and are rated at 250VAC 5A each. If high voltages are
connected to the relay terminals then the exposed electrical pins on the underside of the board
present an electrocution hazard. The board should not be used when resting on, or in contact
with a conductive surface. It is recommended that the board is mounted on standoffs or spacers.
Ensure the spacer height is sufficient to meet any local electrical regulations with regard to creepage
and clearance distances.
The relays can be used for any purpose such as ON/OFF control of spindle motor, coolant pump,
vacuum etc. If the switched load can exceed the 5A relay rating then the relay should be used to
switch a higher current device such as a contactor or solid state relay.
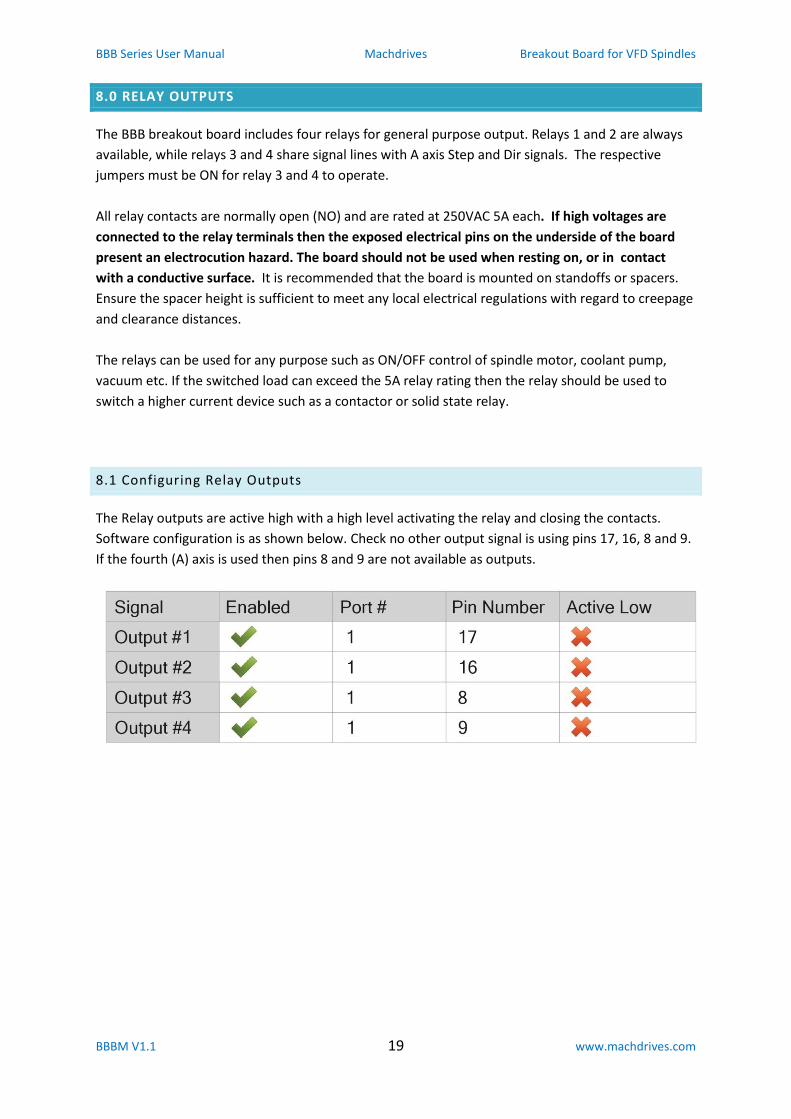
8.1 Configuring Relay Outputs
The Relay outputs are active high with a high level activating the relay and closing the contacts.
Software configuration is as shown below. Check no other output signal is using pins 17, 16, 8 and 9.
If the fourth (A) axis is used then pins 8 and 9 are not available as outputs.

BBB Series User Manual Machdrives Breakout Board for VFD Spindles
BBBM V1.1 20 www.machdrives.com
9.0 OPTO INPUTS
There are three general purpose isolated inputs that
can be used to signal ON/OFF conditions to the PC
controller such as a touch probe for zeroing of Z axis.
Inputs are active when the plus terminal is positive
with respect to the negative terminal by 5V. If higher
voltages are to be used, an additional series resistor
should be added to limit the ON current to around
8mA. For 12V use a 820R series resistor and for 24V
a 2K2 series resistor is recommended.
9.1 Configuring Opto Inputs
The general purpose isolated inputs are available on pins 13, 12 and 11. These are active low and can
be used to signal an input condition change to the PC controller. The example below shows how to
configure Opto 1 input (pin 13) as a touch probe for zeroing the Z axis.

BBB Series User Manual Machdrives Breakout Board for VFD Spindles
BBBM V1.1 21 www.machdrives.com
10.0 VFD CONTROL
IMPORTANT: Make sure your motor is setup and running correctly (direction/speed) using the VFD
front panel manual controls before attempting to control the motor from the breakout board.
The breakout board can control a variable frequency drive that is typically used to drive an air or
water cooled spindle motor. The board outputs an isolated analogue 0 to +10V voltage to control
the speed of the motor according to the G-Code "S" command.
The VFD circuitry on the breakout board is opto-isolated to eliminate any electrical interference
from the drive affecting other board functions.
The examples in this section use Mach3 as the PC controller software and a Chinese HY inverter as
the VFD. Other software and inverters will be different, but the principles will be similar.
10.1 Connecting the Analogue Input
Most VFDs are designed to allow connection of an external potentiometer to manually control the
speed. The VFD manual will normally show a diagram with the ends of the potentiometer connected
to an analogue +10V and 0V terminal, and the wiper connected back to an analogue input. On the
HY inverters the +10V is called "10V" or "VR", the 0V is called "ACM" and the voltage input is called
"VI". The BBB breakout board uses these connections to emulate the potentiometer and control the
inverter's speed. Connect the breakout to the inverter as shown below.
10.2 Configure the VFD to use the Analogue Input
By default the VFD uses the front panel controls to adjust the motor speed. The following
parameters need to be set to switch speed control over to the analogue input.
PD002 = 1 Use external potentiometer for speed control
PD070 = 0 Analogue input range is 0-10V (default)
10.3 Configure the VFD Analogue Input Jumper
In addition to the parameter changes above the HY inverter requires a jumper change to use the
external potentiometer. Jumper J1 is located on the right hand side of the control terminal block
and must be changed from pins 2-3 (VR) to pins 1-2 (VI).
BBB Series User Manual Machdrives Breakout Board for VFD Spindles
BBBM V1.1 22 www.machdrives.com
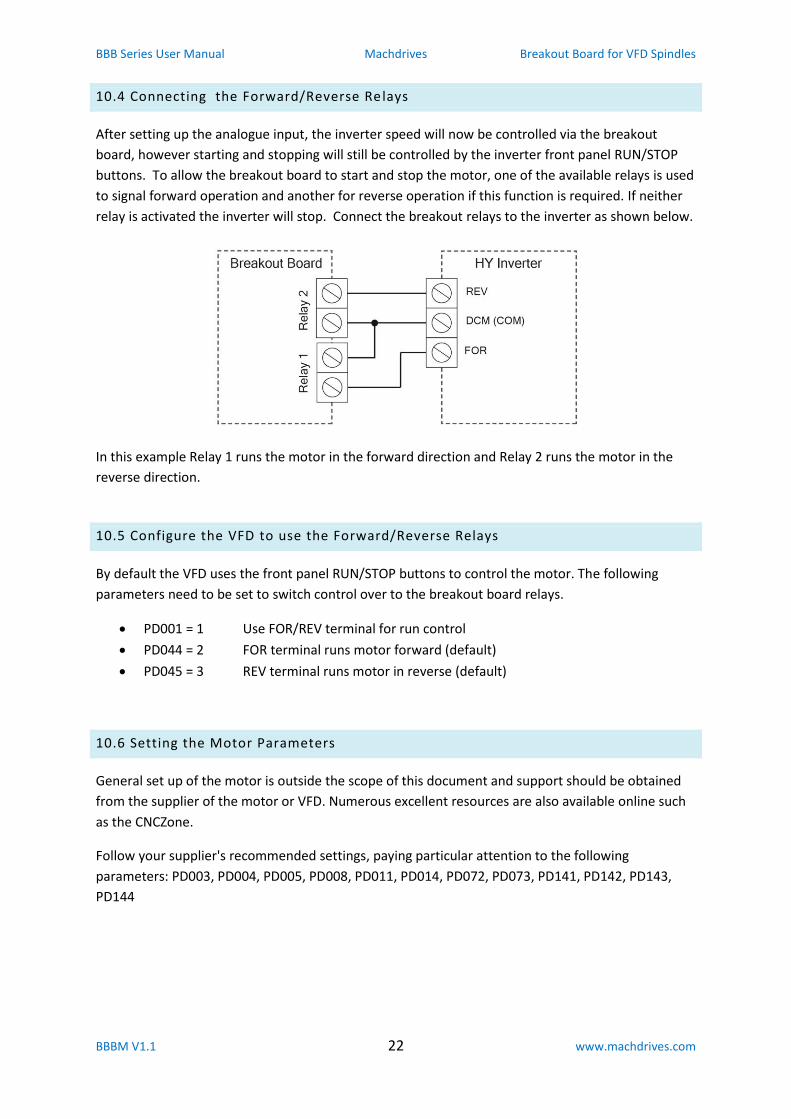
10.4 Connecting the Forward/Reverse Relays
After setting up the analogue input, the inverter speed will now be controlled via the breakout
board, however starting and stopping will still be controlled by the inverter front panel RUN/STOP
buttons. To allow the breakout board to start and stop the motor, one of the available relays is used
to signal forward operation and another for reverse operation if this function is required. If neither
relay is activated the inverter will stop. Connect the breakout relays to the inverter as shown below.
In this example Relay 1 runs the motor in the forward direction and Relay 2 runs the motor in the
reverse direction.
10.5 Configure the VFD to use the Forward/Reverse Relays
By default the VFD uses the front panel RUN/STOP buttons to control the motor. The following
parameters need to be set to switch control over to the breakout board relays.
PD001 = 1 Use FOR/REV terminal for run control
PD044 = 2 FOR terminal runs motor forward (default)
PD045 = 3 REV terminal runs motor in reverse (default)
10.6 Setting the Motor Parameters
General set up of the motor is outside the scope of this document and support should be obtained
from the supplier of the motor or VFD. Numerous excellent resources are also available online such
as the CNCZone.
Follow your supplier's recommended settings, paying particular attention to the following
parameters: PD003, PD004, PD005, PD008, PD011, PD014, PD072, PD073, PD141, PD142, PD143,
PD144

BBB Series User Manual Machdrives Breakout Board for VFD Spindles
BBBM V1.1 23 www.machdrives.com
10.7 Configuring Mach3
Mach3 controls the spindle speed by outputting a Pulse Width Modulated (PWM) signal with duty
cycle from 0 to 100% corresponding to 0-100% of configured speed.
Configure the spindle on the "Motor Outputs" screen to use pin 1, active high as shown below.
Configure the relays to control forward and reverse on the "Spindle Setup" screen. Set Clockwise
(CW) to use Output # 1 and CCW to use Output # 2. Check that the "Disable Spindle Relays" box is
cleared.
Configure the "Motor Control" section on the "Spindle Setup" screen. Tick "Use Spindle Motor
Output" and tick "PWM Control". Set the "PWMBase Freq" to "7". Note: The PWM base frequency
must be between 3Hz and 12Hz with 7Hz being the recommended value.
Configure the "Pulley Selection" on the "Spindle Pulleys" screen. Choose pulley number 1 and set the
"Max Speed" to your spindle maximum RPM i.e. "24000". Set the Ratio to "1"
10.8 Calibrating the Speed
The breakout board has a speed calibration trimpot "VR1" to allow accurate matching of the spindle
speed to the G-Code specified value. Before starting calibration check that the trimpot is centered in
its range of travel. Write and run a small G-Code test program to set the spindle to half speed. This
example assumes a full speed of 24,000 RPM
S12000 (Speed 12,000 RPM)
M3 (Start VFD is forward direction)
G4 P30 (Wait for 30 seconds)
M5 (Stop the VFD)
M30 (End program and rewind)
While the motor is running at half speed adjust the trimpot until the digital display on the VFD shows
the correct RPM. Note: The VFD display can be switched between Frequency/AMPS/RPM by pressing
the >> key on the front panel.
Your VFD is now set up and calibrated. Remember in your G-Code to always issue the "S" code to set
the speed BEFORE issuing the "M3" code to start the inverter. If the "M3" code is issued first Mach3
will use the speed setting from the previous operation which may not give the intended result.

BBB Series User Manual Machdrives Breakout Board for VFD Spindles
BBBM V1.1 24 www.machdrives.com
11.0 LED INDICATORS
Your BBB breakout board has 11 LED indicators to simplify set up and diagnosis.
The LED are either green, red or blue. Each color signifies a different type of indicator.
Green: Normal operation. All green LEDS must be ON for normal operation.
Red: Abnormal condition. All red LEDS must be OFF for normal operation.
Blue: Informative only.
The following table describes the meaning of each LED when illuminated.
LEDs Color Notes
+12V Green +12VDC is present.
Enable Green The breakout board functionality is enabled.
Error Red The breakout board is signaling an error condition to the PC
Red The breakout board is signaling a limit switch activation to the PC
Relay1 Blue Relay 1 is activated and the contacts are closed.
Relay2 Blue Relay 2 is activated and the contacts are closed.
Relay3 Blue Relay 3 is activated and the contacts are closed.
Relay4 Blue Relay 4 is activated and the contacts are closed.
In1 Blue Opto-coupled Input 1 is active.
In2 Blue Opto-coupled Input 2 is active.
In3 Blue Opto-coupled Input 3 is active.
BBB Series User Manual Machdrives Breakout Board for VFD Spindles
BBBM V1.1 25 www.machdrives.com
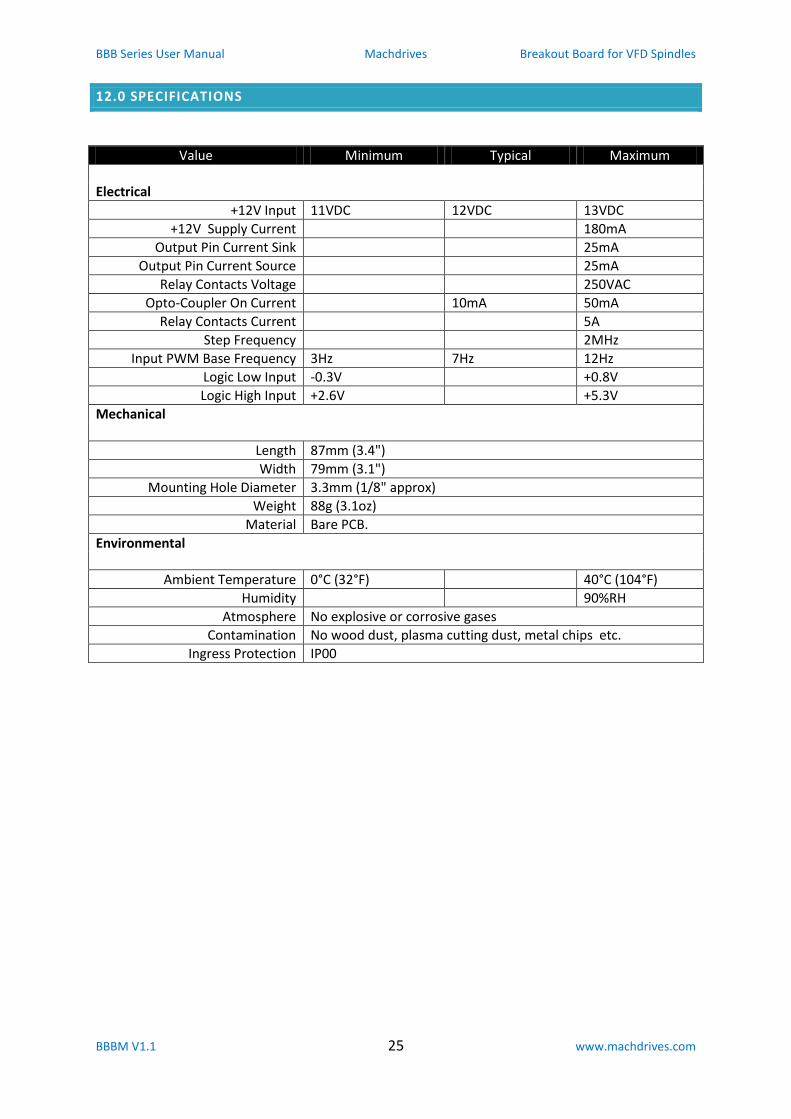
12.0 SPECIFICATIONS
Value Minimum Typical Maximum
Electrical
+12V Input 11VDC 12VDC 13VDC
+12V Supply Current 180mA
Output Pin Current Sink 25mA
Output Pin Current Source 25mA
Relay Contacts Voltage 250VAC
Opto-Coupler On Current 10mA 50mA
Relay Contacts Current 5A
Step Frequency 2MHz
Input PWM Base Frequency 3Hz 7Hz 12Hz
Logic Low Input -0.3V +0.8V
Logic High Input +2.6V +5.3V
Mechanical
Length 87mm (3.4")
Width 79mm (3.1")
Mounting Hole Diameter 3.3mm (1/8" approx)
Weight 88g (3.1oz)
Material Bare PCB.
Environmental
Ambient Temperature 0°C (32°F) 40°C (104°F)
Humidity 90%RH
Atmosphere No explosive or corrosive gases
Contamination No wood dust, plasma cutting dust, metal chips etc.
Ingress Protection IP00