bbasic toolsasic tools - hobbicomanuals.hobbico.com/top/top-monkote-instructions.pdf · bbasic...
TRANSCRIPT

Top Flite MonoKote is a thin, clear, protective fi lm witha pigmented adhesive on the back specially formulated formodel airplanes. MonoKote is applied with a Top Flite sealing iron. Heat from the iron shrinksthe fi lm while simultaneously activating the adhesive tightly bonding it to your model. WhenMonoKote is not heated, the adhesive is not sticky. The adhesive side has a clear, protectivebacking that must be removed before application.
NOTE: MonoKote is best-suited for medium-size models in the 2 lb. [1000g] range and up. Smaller/lighter models may be more suitable for MonoKote’s lighter, low-heat/low-shrink cousin EconoKote (though EconoKote may be used on larger models, too).
One of MonoKote’s best qualities is its ability to resist creep. Creep is when overlapping seams, edges or trim lines pull apart during the moment that the adhesive is soft and the fi lm is shrinking. This results in wavy trim lines and seams that can be seen on planes fi nished with inferior covering.
BASIC TOOLSBASIC TOOLSTop Flite offers several useful tools and accessories for perfecting your covering job, but we’ll keep it simple and show you how to achieve a quality, durable fi nish with the bare essentials, which are: a Sealing Iron with a protective Hot Sock iron cover and a Trim Seal Tool for applying covering to tight corners and nooks-and-crannies. Don’t skip the iron cover—a Hot Sock slightly cushions the shoe of the iron, distributes heat evenly and allows the iron to smoothly glide over the covering. A couple of Hot Socks may be needed if covering a large model. Other typical shop tools required are scissors, a hobby knife (or two!) with plenty of new, sharp #11 blades, single-edge razor blades, a straightedge and a clear and clean workbench with a cutting mat. Finally, CA debonder is effective in wiping off residual pigment that occasionally gets deposited during the covering process.
A small platform and weight (such as a plastic bag fi lled with shot) are also indispensable for supporting parts off your workbench and holding them down. The box shown is a home-made wood stand with a foam top, but a cardboard box and a small bath towel will also do.
®
PREPARE THE MODELPREPARE THE MODELA covering job’s worst enemy is a poorly-fi nished model with rough surfaces, gaps or uneven edges – MonoKote usually won’t hide these blemishes and sometimes seams to magnify them – especially darker colors such as black and insignia blue. When preparing a model for MonoKote, sand all surfaces smooth and even with progressively fi ner grades of sandpaper. No need to go any fi ner than 400-grit. Use compressed air or a shop-vac with a brush attachment (or both!) to remove all dust and particles just before covering.
A covering job’s next-worst enemies are wrinkles and air bubbles. These instructions will show you how to pre-tension MonoKote to prevent wrinkles and seal it to the wood to minimize air bubbles.
SET YOUR IRON TEMPERATURESET YOUR IRON TEMPERATUREFor MonoKote, most of the time you’ll want the Trim Seal Tool set to Hi, but occasionally Lo may be better. For the Sealing Iron, begin with a dial setting of about 2 to 2-1/4. “Medium” heat (around 300°F measured on the surface of the cover sock) is usually best. This will allow the covering to adequately shrink while not causing excess air bubbles that cannot be worked out. As the covering job progresses, adjust the heat to suit your preferences.
APPLY THE COVERINGAPPLY THE COVERINGNOTE: The covering techniques demonstrated in the following pages can be applied to all parts of the model including the fuselage, tail and control surfaces. A fully-sheeted wing is shown, but the techniques for covering an open-framework wing are the same except where noted.
APPLY INITIAL TRIM PIECESAPPLY INITIAL TRIM PIECESTaking care of small details fi rst may seem tedious now, but in the end results in a faster covering job that is thoroughly sealed and looks better.
Begin by sealing corners and inconspicuous areas such as the
aileron cutouts in the wing that the main sheets of covering
won’t be as easy to reach.
1. Cut an oversize piece for the inboard aileron cutout and remove the backing – a hobby blade may be used to pick-and-peel the backing at one of the corners.
If, during the covering procedure, you forget which side has the adhesive, you can look at the covering
in the glare of your room lighting. The adhesive side will be dull and the top, outside will be shiny. If
you still can’t tell which is the top you can lightly touch your iron to the one side of the covering near
the edge; if the covering sticks that’s the bottom, if the covering doesn’t stick that’s the top.

2. Fold a crease near one end of the piece of covering, then use your Trim Seal Tool to iron it down into the corner.
3. Use the sealing iron to iron the piece down.
Overlapping the edges of different pieces of covering thoroughly
seals the covering to the part. There are instances where it’s
best to underlap trim pieces, or overlap larger pieces, or both
as shown below:
4. Use a single-edge razor blade or a hobby knife to trim the covering the desired distance from the surface (1/8” [3mm] is typical). You can make a cutting
guide like the one shown in the photo from a balsa or hardwood stick.
5. Slit the covering at each corner to fold it over.
6. Use your Trim Seal Tool to iron the edges down to the wing.

7. Use the same techniques to seal the aileron cut out at the other end of the wing.
The less-accessible parts of the wing are taken care of, so now it’s
time to apply the main pieces of top and bottom covering. Take one
last second to make sure the wing and your workbench are free from
dust and debris.
APPLY THE MAIN COVERINGAPPLY THE MAIN COVERING1. Partially unroll a segment of MonoKote and place the wing over top of it for cutting the bottom covering—remember; the clear, protective backing is on the adhesive side, so be certain to lay your parts out and cut the covering accordingly. Here, the MonoKote is rolled out adhesive side up with bottom of the wing facing down. This will be the piece for the bottom of the wing. You can use a felt-tip pen to draw the pattern directly on the fi lm and cut along the lines, or use the wing itself as a pattern for cutting the covering as shown. There are occasions where one or the other method is best. Be certain to cut the covering oversize (about 3” around the tip and 2” everywhere else) for positioning and handling – especially around the wing tip where you’ll need a “handle” to hold and pull the covering.
2. Flip the wing over, double-check one last time for dust or contaminants, then peel the backing from the fi lm and lay it over the bottom of the wing.
This is called the “inside-out” technique—the fi lm is fi rst applied to
the middle of the part, then heated and pulled as we work outward.
When the fi lm is heated it softens, so it can be stretched while at the
same time it’s shrinking. The result is “pre tensioned” fi lm that will be
exceptionally tight (and wrinkle-free!) when the process is completed.
3. Starting in the middle, use the iron to bond the fi lm to the wing while applying tension as you move the iron along. Press down on the iron to bond the fi lm to the wood. If you are working with a wing that has open structure, perform the same procedure, only bond the covering to the main spar (or at the back of the leading edge sheeting over the main spar if your wing has “D-tube” sheeting from the leading edge back to the main spar).
4. Rotate the wing and perform the same procedure working from the middle out toward the tip.
Now the MonoKote is bonded only to the middle of the wing. Time to
work from the middle toward the leading edge and then toward the
trailing edge.
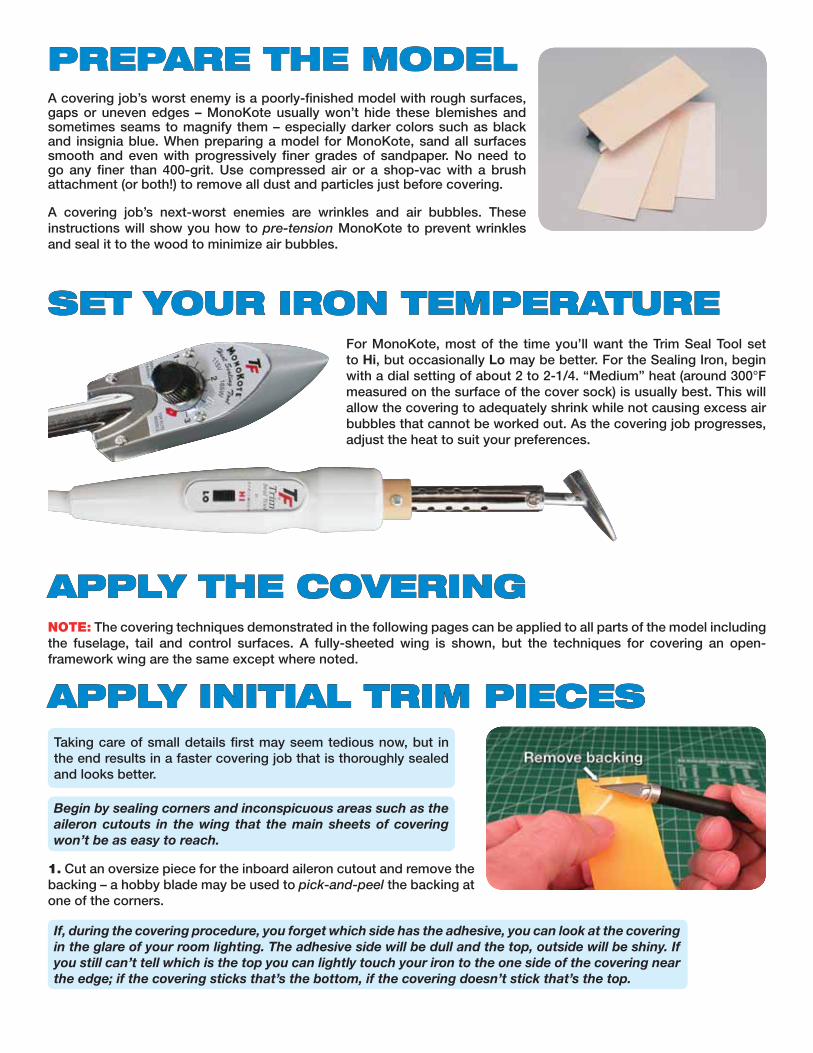
5. Going back to the middle, work the iron in a zig-zag pattern. Move the iron back-and-forth while gliding it toward the leading edge, pulling the fi lm to keep it under tension—you’re simultaneously stretching the fi lm while it is trying to shrink, thus laying it down tight. If working with an open-structure wing, skip the zig-zag procedure, but apply tension and bond the covering directly to the leading edge, and then to the trailing edge.
6. Now move the iron over to the next spot and perform the same procedure, pulling the fi lm while moving the iron back-and-fourth in a zig-zag pattern working toward the leading edge.
7. Perform the zig-zag technique to bond the covering from the middle of the wing all the way toward the trailing edge.
NOTE: If, as you proceed, you continuously notice air bubbles
or “blisters” that appear in the covering on top of the wood,
you can go back over the spot with more pressure on the iron
to force the blisters out. If they won’t go away try a little less
heat. Over areas of the model that may be hardened with glue,
there is no way for expanding air to dissolve back into the
wood. In these areas, the only remedy may be to poke tiny vent
holes in the covering with the tip of a #11 blade.
8. The wing tips will be fi nished later, but for now, pull the covering and bond it around the tip just enough to detect the tip’s outline. Final, complete wrapping of the tip will be done later.
Let’s start trimming, sealing and closing up loose edges so it will be
easier to handle the wing for working on the wing tip later…

SEAL AND FINISHSEAL AND FINISHTHE BOTTOM COVERINGTHE BOTTOM COVERING1. You can slit the covering up from the corner (left), or use a straightedge to trim the covering past the end of the wing in the aileron cutout (right).
2. Pull and seal the covering down over the trailing edges.
3. Seal the covering to the end of the wing at the aileron cut out.
4. Cut excess covering at the trailing edge.
5. Make sure all the cut edges are thoroughly sealed down.
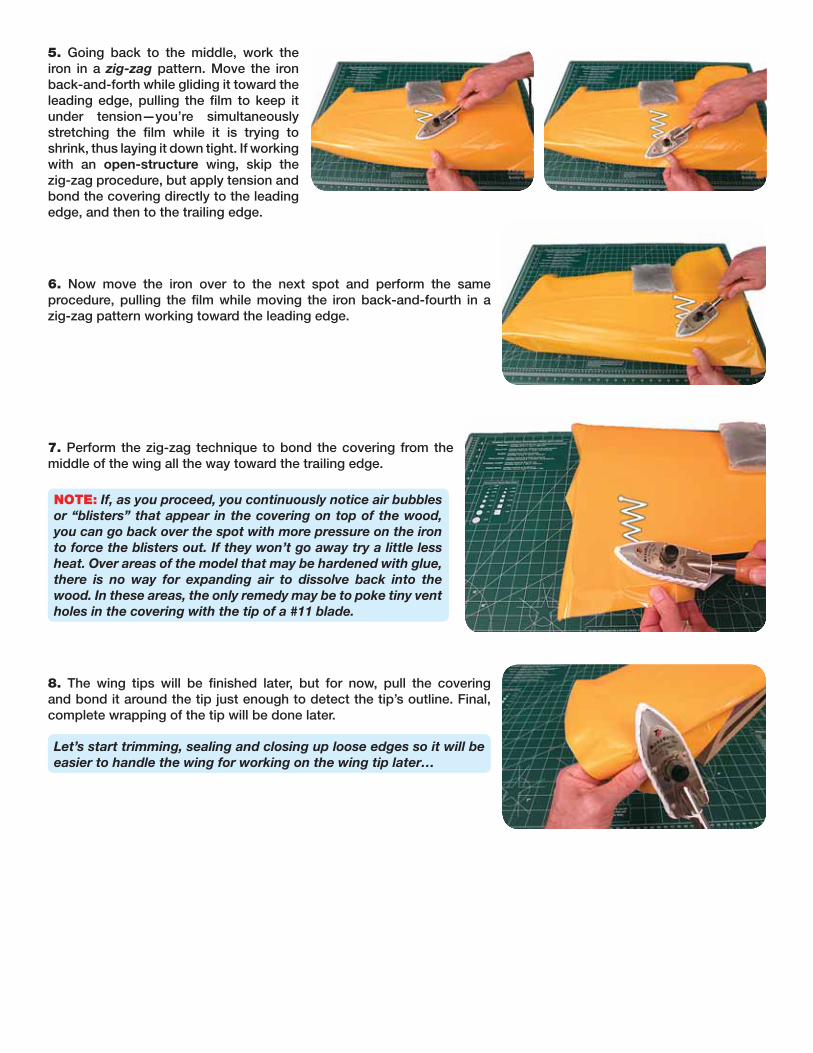
6. Pull and wrap the covering around the leading edge of the wing for a suitable overlap between the top and bottom pieces—about a 1/8” [3mm] overlap is usually desirable for medium-size models, so wrap the bottom covering up over the leading edge about that much.
FINISH THE WING TIP AND ROOTFINISH THE WING TIP AND ROOTNow it’s time to tackle the wing tip. Wing tips are actually pretty easy with the right tools and techniques. You’ll need to elevate the wing from your workbench and use weights to securely hold it down while you pull on the fi lm. This is where the box and bag of shot comes in handy.
1. Pull on a small area of the covering while you touch the iron to it. The iron softens and shrinks the covering allowing you to pull the wrinkles out. Depending on the radius and sharpness of the tip, more heat may be required to wrap the covering all the way around. Just work with the covering and stretch it as much as it allows.
2. If you need to wrap the covering further or remove remaining wrinkles, move onto your Trim Seal tool focusing on smaller areas. Pull on the covering while touching the heel of the iron to the area causing the wrinkles to disappear. Hold and pull the covering for a few seconds after removing the iron so the covering will cool and stay put. Work all the way around the tip in small increments wrapping around the top as far as needed. As you can see, we were able to wrap the bottom covering way more than halfway around the top.

There are two methods for trimming the covering from around the tip and the leading edge…
A. You can peel the covering back to the point where it is to be trimmed…
…then cut along the crease (a single-edge razor blade usually works best here)…
B. Or, you can apply 1/8” [3mm] masking tape to the wing and use it as a guide for cutting.
Either way, the result should be the bottom covering tightly wrapped up and around the top of the wing with a clean, even-cut edge.
Either of the above two methods also works when cutting the second (top) layer of covering over the fi rst
(bottom). If using the masking tape technique, use care not to cut into the fi rst layer. A brand new, fresh, sharp
blade helps the most.
3. Go back over the cut edge to make sure it is thoroughly sealed down.
Let’s fi nish up the root end of the wing…
4. Roughly cut off some of the excess covering from the root of the wing just so you can handle and work with what remains.

5. Use your trimming guide to trim the covering the desired overhang – approximately 1/8” [3mm] is suitable in most areas such as this.
6. Cut small “petals” into the overhang material around curved edges – the tighter the curve the smaller the petal.
7. Use your Trim Seal Tool to lightly pull and seal each petal to the end of the wing.
8. Examine the entire piece, looking for any areas not shrunk or bonded to the wing. Use your covering iron to repair any areas found.
The bottom of the wing is fi nished. The top is covered the same way.
APPLYING TRIMAPPLYING TRIMUse your creativity to make patterns for cutting trim colors and graphics; you can make stencils cut from thin cardstock or manila folder material, use graphic cutting tools or a simple straightedge. The 2 in the example below was cut from MonoKote with a template made from manila folder material.
When applying MonoKote over MonoKote, graphics are best applied wet with window cleaner. The solution is then squeegeed out and allowed to dry overnight. This procedure usually eliminates any air bubbles that would have formed between the two layers if the trim had been applied dry.
1. Wet the adhesive side of the trim piece with window cleaner.
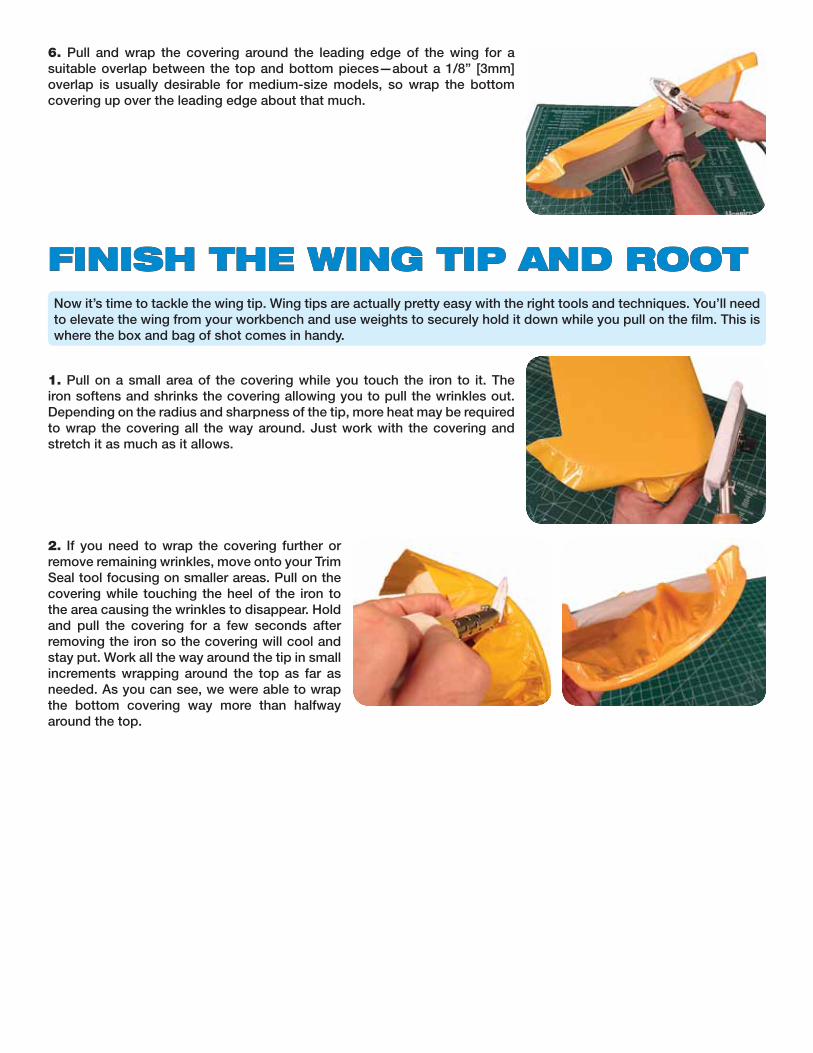
2. Position the graphic, then wipe away most of the solution with a paper towel.
3. Use a piece of soft balsa to thoroughly squeegee out all of the solution. Allow to dry at least overnight – 24 hours or more is even better.
4. After all residual solution has evaporated from between the graphic and the main layer of MonoKote you must iron it down with medium heat.
FINISH THE SERVO HATCHFINISH THE SERVO HATCHMaterial over hatches and other openings should also be cut oversize
so excess MonoKote can be ironed down inside the edges to provide a
fi nished opening and a good seal.
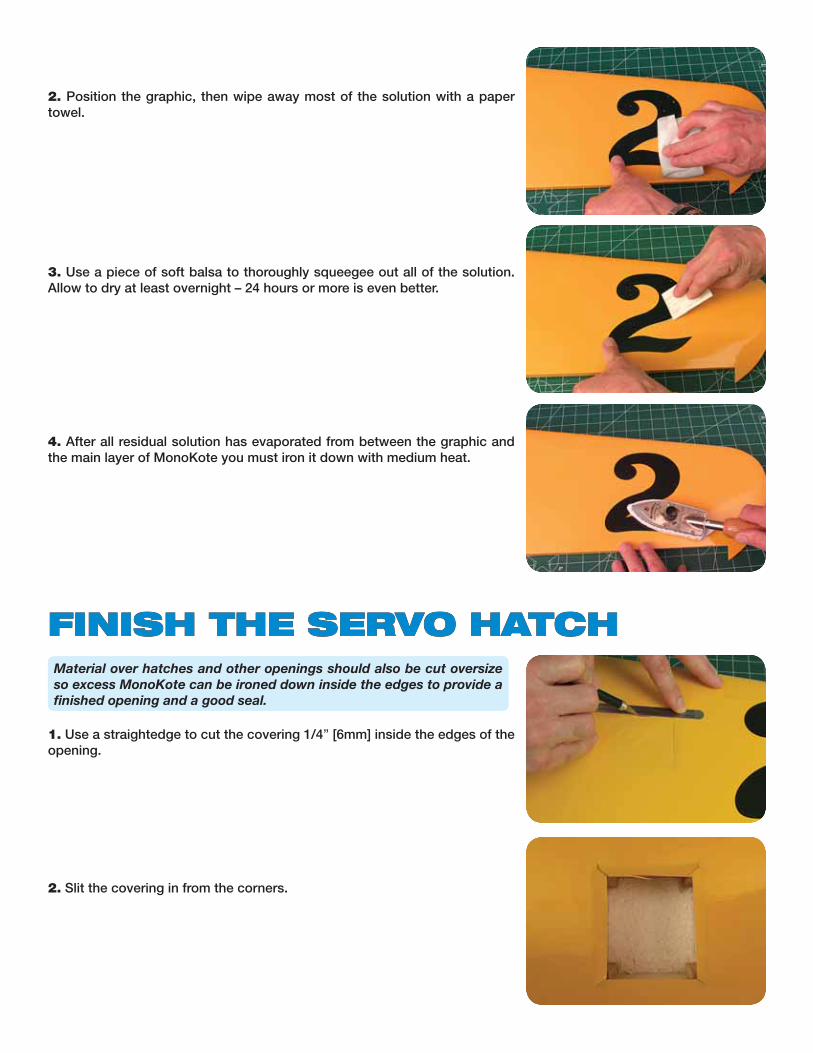
1. Use a straightedge to cut the covering 1/4” [6mm] inside the edges of the opening.
2. Slit the covering in from the corners.

3. If the corners are rounded like the one in this wing, cut “petals” the same as the around the root of the wing.
4. Use your Trim Seal Tool to iron the covering down around and inside the edges of the opening.
5. Because the corners of this hatch opening are rounded, we switched to the rounded shoe of the Trim Seal Tool to iron the little petals down.
6. For the aileron hatch cover, iron a piece of oversize covering into place.
7. Use a straightedge to trim the edges of the covering just enough to provide a little “wrap-around” under the bottom of the hatch.

8. Because the corners of the hatch cover are rounded, the “petal” technique was used here again.
9. Cut the opening for the servo arm and iron the covering down around the inside for a thoroughly sealed hatch.
10. When covering tail surfaces that have open structure, expanding air trapped inside causes the fi lm to expand, not allowing it to tighten. To eliminate this problem you can cut air passage holes through the ribs and a fi nal vent hole in an inconspicuous area*, or puncture small vent holes in the covering on the bottom of the part. The pinholes will almost disappear when the covering is tightened for the fi nal time.
* This procedure may be performed only on larger models that can accommodate holes without compromising the integrity of the structure.
EXPERT TIPSEXPERT TIPS● To conserve #11 blades and maintain cutting precision, use two hobby knives for
your covering job – one knife with a blade for cutting only on the cutting mat (or workbench)and another knife with a blade for cutting only on the model. When rough-cutting pieces of coveringover the cutting mat a new, perfectly sharp blade usually isn’t necessary, so that blade will last longer. Butwhen cutting covering on the model, precision is required so you’ll need the sharper blade that’s been used less. When the blade for cutting on the model becomes dull replace it with a new one and cycle the old one through the other blade, or set it aside for other cutting.
● Well-done seams are preferable to wrinkles that couldn’t be removed because the radius of a curve was too small or the area on the model was too irregular to cover with one piece. Size-up your covering skills and
learn the limitations of MonoKote to come up with the best plan for each piece of covering you apply.
● The exact color of MonoKote may vary slightly from one production run to another. To make sure all the covering on your model matches, purchase all the covering from the same place at
the same time to increase the likelihood that it came from the same production run. Save leftover scraps of covering for patches or repairs that will perfectly match the original covering. If building an extraordinarily large model it may be prudent to purchase a spare roll of MonoKote exclusively for the purpose of making large repairs.
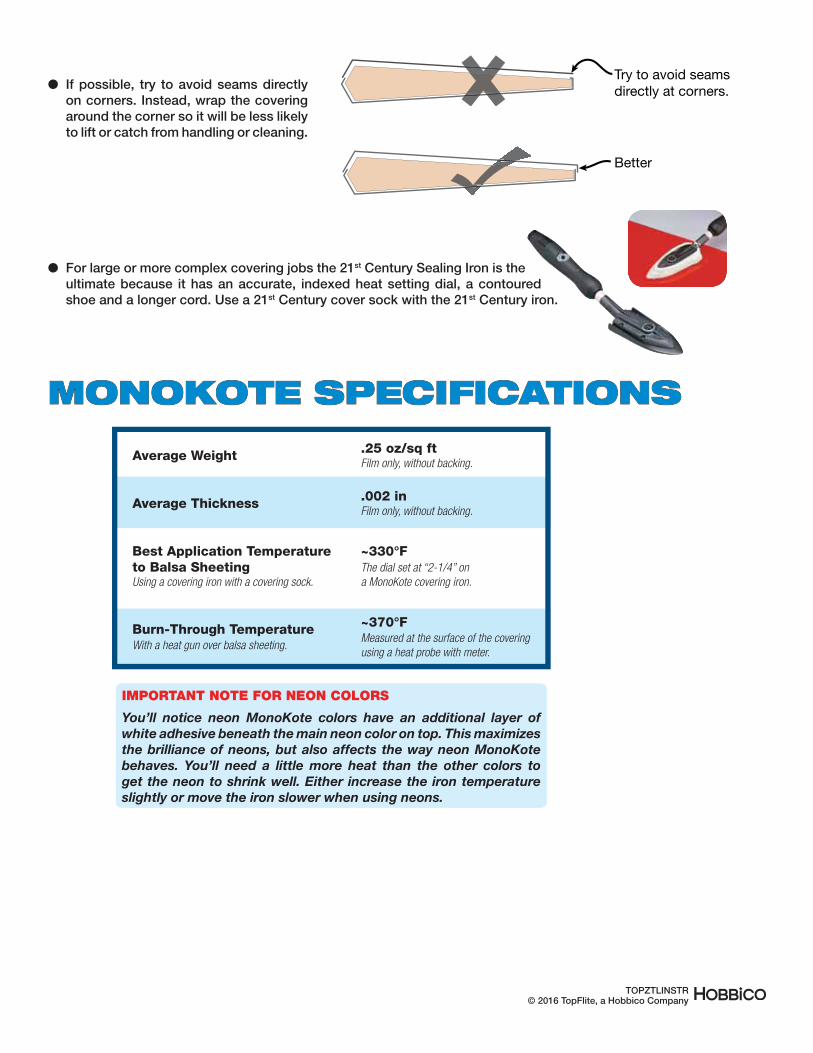
● If possible, try to avoid seams directly on corners. Instead, wrap the covering around the corner so it will be less likely to lift or catch from handling or cleaning.
● For large or more complex covering jobs the 21st Century Sealing Iron is the ultimate because it has an accurate, indexed heat setting dial, a contoured shoe and a longer cord. Use a 21st Century cover sock with the 21st Century iron.
MONOKOTE SPECIFICATIONSMONOKOTE SPECIFICATIONS
Try to avoid seamsdirectly at corners.
Better
Average Weight
Average Thickness
Using a covering iron with a covering sock.
Best Application Temperatureto Balsa Sheeting
With a heat gun over balsa sheeting.
Burn-Through Temperature
Film only, without backing.
.25 oz/sq ft
Film only, without backing.
.002 in
The dial set at “2-1/4” on
a MonoKote covering iron.
~330°F
Measured at the surface of the covering
using a heat probe with meter.
~370°F
© 2016 TopFlite, a Hobbico CompanyTOPZTLINSTR
IMPORTANT NOTE FOR NEON COLORS
You’ll notice neon MonoKote colors have an additional layer of
white adhesive beneath the main neon color on top. This maximizes
the brilliance of neons, but also affects the way neon MonoKote
behaves. You’ll need a little more heat than the other colors to
get the neon to shrink well. Either increase the iron temperature
slightly or move the iron slower when using neons.