bb - facet jewelry making - jewelry making start to finish · 2017-05-02 · making chain mail...
TRANSCRIPT

FIND INSPIRATION EVERYWHERE!Crossing cultures rope p.6
Frogs on lily pads bracelet p.9
Cambriana pendant p.12A DIGITAL
SUPPLEMENT TO BEAD&BUTTON
MAGAZINE
BBextraSUBSCRIBER EXCLUSIVE • APRIL 2017
Create thisfun floralbracelet
FacetJewelry.com/BeadAndButton
MAKE A SPARKLINGBUTTERFLY NECKLACE
EXPAND YOUR BEADING SKILLSKUMIHIMO | PEYOTE STITCHRIGHT-ANGLE WEAVE | WIRE WRAPPINGFRENCH BEADED FLOWERS
16 JEWELRY PROJECTS FOR SPRING
• Say what?!? YOUR GUIDE to beading’s weird and wonderful words p. 18
• From the mine to the market: A gemstone’s journey p. 20
• Wire + beads: Spring blossom bouquet p. 82
plus!
and more!
>>
Get two looks with a reversible pendant p. 30
p. 46
p. 26
A BRACELET FOR ALL SEASONSp.3

>>
welcome
Visit Bead&Button’s new website, FacetJewelry.com, for free projects,
videos, blogs, galleries, designchallenges, and more, all updated daily.
Seasonal celebration bracelet ....................................... p. 3
Crossing cultures rope .................................................. p. 6
Frogs on lily pads bracelet ............................................ p. 9
Cambriana pendant .....................................................p. 12
Get inspired by the amazing world around you!
Editor, Bead&[email protected]
When we ask our readers where they get ideas for their beadwork, the single most frequent answer is “Mother Nature.” No surprise, I suppose — you needn’t look far to find amazing colors, structures, and compositions of shapes and forms. Whether it’s a beautiful sunrise, creatures great and small, or ancient remains, the natural world is ripe with fleeting beauty for us to capture in our designs. A less common source of inspiration, but one that is no less powerful, is the social fabric of our lives. Memories of loved ones, words of wisdom, political statements, and even concepts of social justice or world peace can be the foundation of a moving and meaningful piece of jewelry or beaded sculpture. In this issue of B&B Extra, you’ll find four pieces that reflect the beauty of our planet, in both earnest and whimsical ways. I hope you enjoy them as much as we do. Happy beading!
The natural world
is ripe with fleet-
ing beauty for us
to capture in our
beaded designs.
Contents
This logo is for use on masthead only. Do not use less than 100% of full size.
ADVERTISING
Corporate Advertising Director Ann E. Smith
Advertising Sales Lori Schneider
Ad Services Representatives Melissa Valuch, Nanette Hackbarth
B&B Extra is published bimonthly by Kalmbach Publishing Co., 21027 Crossroads Circle, P.O. Box 1612, Waukesha, WI 53187-1612
Editor Julia Gerlach
Senior Art Director Lisa A. Bergman
Associate Editors Connie Whittaker, Diane Jolie
Contributing Editor Cindy Crain Newman
Editorial Assistant Lora Groszkiewicz
Graphic Designer Lisa M. Schroeder
Photographer Bill Zuback
Illustrator Kellie Jaeger
Editorial Director Diane M. Bacha
© 2017 Kalmbach Publishing Co. All rights reserved. This publication may not be reproduced in part or in whole without written permission from the publisher. The designs in B&B Extra are for your personal enjoyment. They may not be taught or sold without permission.
Find an assortment of free projects, such as these lively pearl earrings by Glenda Paunonen.
FREE VIDEO: Follow along with Steven James as he demonstrates how to make this enameled ring.
Learn new techniques, like how to turn a pretty piece of shibori silk into a gorgeous, ruffled necklace.
FREE VIDEO: Get started making chain mail jewelry with the European 4-in-1 weave.

© 2017 Kalmbach Publishing Co. This material may not be reproduced in any form without permission from the publisher.
April 2017 3
SEASONAL CELEBRATIONdesigned by Michele Klous
DIFFICULTY
right-angle weave / bead weaving

abc
d
8 mm Candy bead
8 x 5 mm DiamonDuo
4 mm rose montée
150 seed bead
4 mm Es-o Mini bead
2 mm fire-polished bead
ab
c
d a
b
cd
April 2017 4
materials purple/blue bracelet 6½ in. (16.5 cm)
• 11 8 mm Preciosa two-hole
Candy beads (matte silver)
• 66 8 x 5 mm DiamonDuos
(pastel Burgundy)
• 10 4 mm (SS20) rose
montées (crystal AB)
• 72 2 mm fire-polished beads
(cranberry mirror)
• 88 4 mm Es-o Mini beads
(pastel Montana)
• 1 g 150 seed beads
(Toho 509, higher metallic
purple/green iris)
• 4 4 x 6 mm oval jump rings
• 1 2-hole bar clasp
• beading needles, #12
• nylon beading thread, size D
• 2 pairs of chainnose, flat-
nose, and/or bentnose pliers
aqua bracelet colors
• 8 mm Preciosa two-hole
Candy beads (matte gold)
• 8 x 5 mm DiamonDuos
(pastel blue zircon)
• 4 mm (SS20) rose montées
(crystal)
• 2 mm fire-polished beads
(transparent Champagne)
• Es-o Mini beads (pastel
aqua)
• 150 seed beads
(Toho 143, Ceylon aqua)
mint/bronze bracelet
• 8 mm two-hole Tipp beads
(chalk green luster)
• 8 x 5 mm DiamonDuos
(bronze)
• 4 mm (SS20) rose montées
(crystal AB)
• 2 mm fire-polished beads
(dark bronze)
• Es-o Mini beads (cream
airy pearl)
• 150 seed beads
(Toho PF557, permanent
finish galvanized starlight)
Throughout this project, pick up all two–hole beads and rose montées faceup. Pick up the DiamonDuos from the lower tip, either on the right or left side, per the instructions.
BRACELET BAND1) On 3 yd. (2.7 m) of thread, pick up an 8 mm Candy bead, a 150 seed bead, three DiamonDuos (left side), and a 150, and sew through the open hole of the Candy bead (figure 1, a–b). Pick up a 150, three DiamonDuos (left side), and a 150, and sew through the first hole of the Candy bead again (b–c). Retrace the thread path (not shown in the figure for clarity), and sew through the first 150, three DiamonDuos, 150, and the other hole of the Candy bead (c–d). This completes the first Candy motif.2) Pick up three 150s, a rose montée, three 150s, a Candy bead (left hole, from the top), and three 150s, and sew through the other channel of the rose montée, making sure all the beads are faceup and correctly aligned (figure 2, a–b). Pick up three 150s, and sew through the previous Candy bead (b–c). Retrace the
Whether you’re dressing up or dressing down, you’ll want to wear this pretty bracelet. So get inspired by the changes in the seasons and make one for every occasion.
FIGURE 1
FIGURE 4
FIGURE 5
FIGURE 3
FIGURE 2
thread path (not shown in the figure for clarity), and continue through the next three 150s, rose montée, three 150s, and Candy bead (c–d). This completes the first X motif.3) Sewing through the newly-added Candy bead, work another Candy motif, but pick up the DiamonDuos from the right side instead of the left side (figure 3).4) Work another X motif, but pick up the Candy bead from the bottom edge instead of the top (figure 4).5) Continue alternating Candy motifs and X motifs until you have 11 Candy beads and 10 rose montees.6) Pick up three 150s, a 2 mm fire–polished bead, and three 150s, and sew through the last Candy bead again (figure 5, a–b). Retrace the thread path (not shown in the figure for clarity), and sew through the beadwork to exit the fire–polished bead (b–c). Pick up two 150s, a 2 mm, and two 150s, and sew through the open hole of the adjacent DiamonDuo (c–d).
materials continued on page 5
a
b
c
d
a
bc
d a
b
c
a
b
cde
f
gh
i
j
April 2017 5
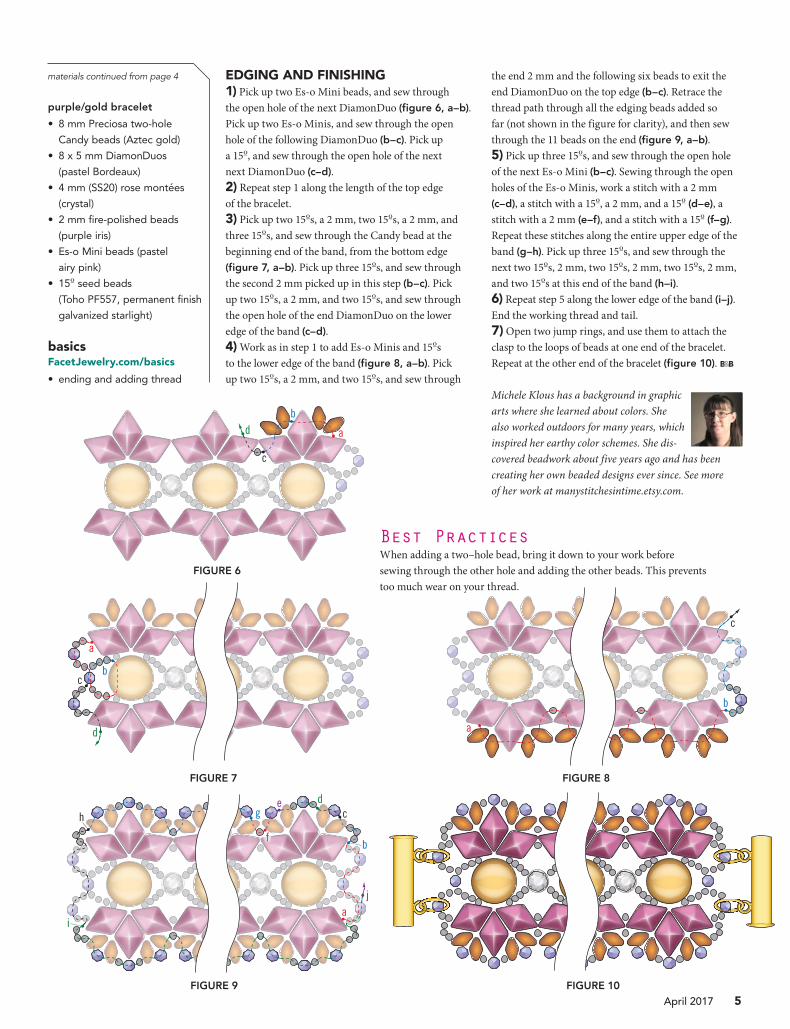
EDGING AND FINISHING1) Pick up two Es-o Mini beads, and sew through the open hole of the next DiamonDuo (figure 6, a–b). Pick up two Es-o Minis, and sew through the open hole of the following DiamonDuo (b–c). Pick up a 150, and sew through the open hole of the next next DiamonDuo (c–d).2) Repeat step 1 along the length of the top edge of the bracelet.3) Pick up two 150s, a 2 mm, two 150s, a 2 mm, and three 150s, and sew through the Candy bead at the beginning end of the band, from the bottom edge (figure 7, a–b). Pick up three 150s, and sew through the second 2 mm picked up in this step (b–c). Pick up two 150s, a 2 mm, and two 150s, and sew through the open hole of the end DiamonDuo on the lower edge of the band (c–d).4) Work as in step 1 to add Es-o Minis and 150s to the lower edge of the band (figure 8, a–b). Pick up two 150s, a 2 mm, and two 150s, and sew through
purple/gold bracelet
• 8 mm Preciosa two-hole
Candy beads (Aztec gold)
• 8 x 5 mm DiamonDuos
(pastel Bordeaux)
• 4 mm (SS20) rose montées
(crystal)
• 2 mm fire-polished beads
(purple iris)
• Es-o Mini beads (pastel
airy pink)
• 150 seed beads
(Toho PF557, permanent finish
galvanized starlight)
basicsFacetJewelry.com/basics
• ending and adding thread
FIGURE 6
FIGURE 8FIGURE 7
FIGURE 9 FIGURE 10
materials continued from page 4 the end 2 mm and the following six beads to exit the end DiamonDuo on the top edge (b–c). Retrace the thread path through all the edging beads added so far (not shown in the figure for clarity), and then sew through the 11 beads on the end (figure 9, a–b).5) Pick up three 150s, and sew through the open hole of the next Es-o Mini (b–c). Sewing through the open holes of the Es-o Minis, work a stitch with a 2 mm (c–d), a stitch with a 150, a 2 mm, and a 150 (d–e), a stitch with a 2 mm (e–f), and a stitch with a 150 (f–g). Repeat these stitches along the entire upper edge of the band (g–h). Pick up three 150s, and sew through the next two 150s, 2 mm, two 150s, 2 mm, two 150s, 2 mm, and two 150s at this end of the band (h–i).6) Repeat step 5 along the lower edge of the band (i–j). End the working thread and tail. 7) Open two jump rings, and use them to attach the clasp to the loops of beads at one end of the bracelet. Repeat at the other end of the bracelet (figure 10). B&B
Michele Klous has a background in graphic arts where she learned about colors. She also worked outdoors for many years, which inspired her earthy color schemes. She dis-covered beadwork about five years ago and has been creating her own beaded designs ever since. See more of her work at manystitchesintime.etsy.com.
Best Practices When adding a two–hole bead, bring it down to your work before sewing through the other hole and adding the other beads. This prevents too much wear on your thread.

© 2017 Kalmbach Publishing Co. This material may not be reproduced in any form without permission from the publisher.
April 2017 6
CROSSING CULTURES ROPEdesigned by Christine Vazquez
DIFFICULTY
bead weaving

a
b c
a
b
c
d
a
b
c
d
110 seed bead
3 x 5 mm Rulla bead
April 2017 7
materials cranberry necklace 20 in. (51 cm) including 2½-in. (6.4 cm) clasp
• 110 3 x 5 mm Rulla beads
(jet red luster)
• 7 g 110 seed beads (Miyuki
313, cranberry gold luster)
• 2 22 x 14 mm bead caps
(flourish petal, brass)
• 2 8 mm glass beads
• 1 lobster claw clasp
• 1 4 mm jump ring
• 6 in. (16 cm) 20- or
22-gauge wire
• Fireline, 8 lb. test
• beading needles, #10
• chainnose pliers
• roundnose pliers
• wire cutters
topaz necklace 24 in. (61 cm) including 2-in. (5 cm) clasp
• 104 5 x 5 mm Tila beads
(transparent topaz AB)
• 9 g 110 seed beads (Toho
PF560, permanent finish
galvanized sea foam)
• 2 6 mm copper beads
• 2 8 x 5 mm rondelles
beads (brown goldstone)
• 1 toggle clasp
• 2 bead tips
• 1 6 mm jump ring
• Fireline, 8 lb. test
• beading needles, #10
• chainnose pliers
• roundnose pliers
basicsFacetJewelry.com/basics
• ladder stitch: making a
ladder, forming a ring
• conditioning thread
• ending and adding thread
• opening & closing jump rings
• wrapped loops
I call this stitch “Mir,” the modern Russian-language word for peace. The two-hole beads cross back and forth, just as beading crosses all cultures.
ROPE1) On a comfortable length of conditioned thread, pick up two 110 seed beads, leaving a 6-in. (15 cm) tail. Sew through both beads again, and position them side by side. Continue working in ladder stitch to make a lad-der that is four 110s long, and form the ladder into a ring by sewing through the first and last beads again. 2) Pick up a Rulla bead, and sew down through the open hole of the Rulla and the opposite 110 in the ring (figure 1, a–b). Sew up through an adjacent 110 (b–c).3) Pick up three 110s and a Rulla, and sew down through the open hole of the same Rulla (figure 2,
a–b). Pick up three 110s, sew down through the oppo-site 110 in the ring (b–c), and sew up through the adja-cent 110 in the ring and the corresponding hole of the Rulla above them (c–d).4) Pick up three 110s and a Rulla, and sew down through the open hole of the same Rulla (figure 3,
a–b). Pick up three 110s, and sew down through the other hole of the Rulla your thread exited at the start of this step (b–c). Sew up through three adjacent stacked 110s and the corresponding hole of the Rulla above them (c–d). At this point, you should have three Rulla
beads stacked on one another, crossing each other at 90-degree angles.
best practices When adding a two-hole bead, bring it down to your work before sewing through the other hole and adding the other beads. This prevents too much wear on your thread.
5) Repeat step 4 to the desired length. 6) End the working thread and tail.
FINISHING OPTIONSTurn your rope into a necklace by adding a clasp in one of the following ways — or devise your own method.
Bead cap and wire option (cranberry necklace)1) Cut a 3-in. (7.6 cm) piece of wire, and make a hook about 1 in. (2.5 cm) from one end. Slide the end Rulla bead into the hook, and then wrap the short end of the wire around the wire stem, as in a wrapped loop.2) String a bead cap and accent bead onto the wire, and make another wrapped loop. 3) Use a jump ring to attach the wrapped loop to a clasp.4) Repeat steps 1–3 at the other end of the necklace.
Experiment with two-hole beads by combining them with seed beads in a new stitch with elements of spiral, ladder, square stitch, and daisy chain.
FIGURE 1
FIGURE 3FIGURE 2

April 2017 8
Bead tip option (copper necklace)1) Add a new, doubled thread at one end of the rope, and exit an end bead.2) Pick up one or two accent beads and a clam shell bead tip, sewing from the outside of the bead tip to the inside.3) Pick up an 110 seed bead, and sew back through the bead tip and accent beads. Sew into the end of the rope, entering it through the opposite bead hole or stack from where you exited in step 1. Retrace the thread path a few times, and end the thread. Use chainnose pliers to close the bead tip.4) Use roundnose pliers to loop the tab of the bead tip around a jump ring, and then attach the jump ring to a clasp.5) Repeat steps 1–4 at the other end of the necklace. B&B
Christine Vazquez lives outside Pittsburgh, Pennsylvania, and is a former architectural drafter. She started beading about eight years ago after travelling out West where she became intrigued with Native American beadwork. She also enjoys lampworking. Contact her at [email protected].
DESIGN OPTIONS
Adjust your seed bead counts to fit the
accent beads
Replace the seed beads with bugle
beads
Add a second set of beads for a different
look
Use 80 seed beads instead of 110s
Alternate tile and Rulla beads for more texture
This stitch has a lot of potential for experimenting with various beads to create different textures and looks. A few suggestions:
• Try it with bar, tile, or brick beads. • Some of the two-hole beads work well with 110 seed beads; others work better
with 110 cylinders, like Delicas or Aikos. Alternatively, try 80s instead of 110s.• SuperDuos and crescent beads do not work well, as their shapes do not nestle
together properly. • You can also replace the seed beads with bugle beads.• When using beads other than Rullas, (tiles or Tilas, for example), the number
of seed beads may vary. The stack of seed beads should be the height of the other bead type, such as four or five 110s for tiles.
• Add a second set of beads on every other repeat of step 4 for a more complex look.
• Try mixing two types of two-hole beads, like Rullas and Tilas. Adjust the seed bead counts accordingly.
• Try using four-hole QuadraTile beads in place of a ladder ring to start.

© 2017 Kalmbach Publishing Co. This material may not be reproduced in any form without permission from the publisher.
April 2017 9
FROGS ON LILY PADS BRACELETdesigned by Thomasin Alyxander
DIFFICULTY
bead weaving
WHEN YOU LOOK
CLOSELY, YOU’LL
SEE — EACH UNIT
REALLY LOOKS LIKE
A TINY FROG!

a
b c
d
a
b
c
a
b
c a
b c
6 mm honeycomb bead, color A
6 mm honeycomb bead, color B
2.5 x 5 mm SuperDuo bead
2 mm fire-polished bead
110 seed bead
150 seed bead
a
d
b
c e
April 2017 10
materials bronze bracelet 61⁄2 in. (16.5 cm)
• 6 mm two-hole
honeycomb beads
- 29 color A (pale gold)
- 12 color B (bronze)
• 24 2.5 x 5 mm SuperDuo
beads (amber sliperit)
• 24 2 mm fire-polished beads
(dark bronze)
• 1 g 110 seed beads (Miyuki
591, ivory pearl Ceylon)
• 2 g 150 seed beads (Toho
994, gold-lined rainbow
crystal)
• 4 4 x 6 mm oval jump rings
• 1 2-strand box clasp
• nylon beading thread, size D
• thread conditioner
• beading needles, #12
• 2 pairs of chainnose, flat-
nose, and/or bentnose pliers
green bracelet colors
• 6 mm two-hole
honeycomb beads
- color A (pastel olivine)
- color B (pastel cream)
• 2.5 x 5 mm SuperDuo beads
(chalk green luster light)
• 2 mm fire-polished beads
(fern mirror)
• 110 seed beads (Miyuki 527,
buttercream Ceylon)
• 150 seed beads (Miyuki 277,
lime-lined crystal AB)
blue bracelet colors
• 6 mm two-hole
honeycomb beads
- color A (pastel petrol)
- color B (pastel aqua)
• 2.5 x 5 mm SuperDuo beads
(opal aqua)
• 2 mm fire-polished beads
(mirror teal)
• 110 seed beads (Toho 2117,
milky silver-lined aqua)
• 150 seed beads (Miyuki 1555,
sparkle dark aqua green-
lined crystal)
basicsFacetJewelry.com/basics
• conditioning thread
• attaching a stop bead
• ending and adding thread
• opening and closing
jump rings
BRACELET1) On a comfortable length of conditioned thread, attach a stop bead, leaving a 12-in. (30 cm) tail. Pick up one each of the following: color A honeycomb bead, 110 seed bead, A, 150 seed bead, 110, and 150, and sew through the open hole of the second A. Pick up five 150s, and sew through the open hole in the first A. Pick up a 150, 110, and 150, and sew through the other hole of the same A the thread is exiting (figure 1, a–b). Sew through the following 110, A, 150, 110, 150, A, five 150s, and A (b–c).2) Pick up one each of the follow-ing: 150, 110, 2 mm fire-polished bead, 150, color B honeycomb bead, 150, 2 mm, 110, and 150. Position
these beads across both As, sew through the opposite A (outer hole) (figure 2, a–b), and continue through the next five 150s, A, 150, 110, 150, A, 110, and A as shown (b–c). The new beads form the body and front legs of the first “frog.”3) Pick up a SuperDuo and three 150s, and sew through the open hole of the same SuperDuo and the open hole of the B (figure 3, a–b). Pick up a SuperDuo and three 150s, and sew through the open hole of the same SuperDuo (b–c). Sew through the nearest A, 110, A, SuperDuo, three 150s, SuperDuo, B, and SuperDuo (c–d). This com-pletes the hind legs of the first frog.4) Pick up an 110, a SuperDuo, a B, a SuperDuo, and an 110, sew
through the adjacent SuperDuo, B, and SuperDuo (figure 4, a–b), and continue through the 110, SuperDuo, B, and SuperDuo just added (b–c). These SuperDuos form the hind legs of the next frog.5) Pick up three 150s, and sew through the open hole of the same SuperDuo (figure 5, a–b). Pick up an A, 110, and A, and sew through the open hole of the adjacent SuperDuo (b–c). Pick up three 150s, and sew through the other hole of this SuperDuo (c–d). Sew through the next B, SuperDuo, three 150s, SuperDuo, A, 110, and A (d–e). Position the B so that it lays above and on top of the two As added in this step.6) Pick up a 150, 110, and 150, and
Pair two-hole honeycomb beads with seed beads and SuperDuos to make a whimsical yet classy bracelet featuring stylized “frogs” resting on “lily pads.”
FIGURE 1
FIGURE 3
FIGURE 2
FIGURE 4 FIGURE 5

a b
c
d
ea
c
ba
cb
a b
c
d
e
a b
c
a
dc
b
a
b
c
26Stitched
Elements
Thomasin Alyxander
ENDLESS JEWELRY POSSIBILITIES
26Stitched
Includes:• Clear, precise instructions take you through each project step by step• Tons of options so you can pick elements to suit your mood — and your schedule• New and exciting ways to use the latest bead shapes
It’s that easy!Stitch. Combine.Connect.
9 7 8 1 6 2 7 0 0 2 0 5 9
5 2 2 9 9ISBN 978-1-62700-205-9
0 6 4 4 6 5 1 7 8 6 1 2
67861
www.JewelryandBeadingStore.com
$22.99CAN $23.99
Learn to makethese simplecomponentsand discover
countless jewelry options!
Use seed beads, crystals, the latest shaped beads, and more as you learn to create 26 different
components. Then connect those components — one style
or many — in quick and easy ways for stunning results. The possibilities are endless!
26 QU
ICK
STITCH
ED ELEM
ENTS
ALY
XA
ND
ER
BKS-67861-CV1,4.indd 1 6/26/15 2:41 PM
April 2017 11
sew through the open hole of the same A (figure 6, a–b). Pick up a 150, A, and 150, and sew through the open hole of the adjacent A (b–c). Pick up a 150, 110, and 150, and sew through the other hole of the same A (c–d). Sew through the beadwork as shown to exit the other hole of the A your thread is exiting, going in the opposite direction (d–e).7) Pick up a 150, 110, 2 mm, and 150, and sew through the open hole of the adjacent B (figure 7, a–b). Pick up a 150, 2 mm, 110, and 150, and sew through the adjacent A, 150, and A (b–c). The beads added in this step form the front legs of the second frog.8) Pick up four 150s, and sew through the open hole of the same A (figure 8, a–b). Pick up four 150s, sew through the other hole
of the same A, and continue through the first four 150s added in this step and the A (b–c). 9) Pick up a 150, A, 150, 110, and 150, and sew through the open hole of the A just picked up (figure 9,
a–b). Pick up an 110, A, 150, 110, and 150, and sew through the open hole of the A just picked up (b–c). Pick up a 150, and sew through the A your thread exited at the start of this step (c–d). Sew through the first 150 and A picked up in this step (d–e). The three end As should be connected in a triangular shape.10) Pick up one each of the follow-ing: 150, 110, 2 mm, 150, B, 150, 2 mm, 110, and 150. Position the beads across the two end As, and sew through the opposite A (outer hole), 150, A, 150, and A (figure 10,
a–b). Continue through the lower layer 150, 110, 150, A, 110, and A
(b–c). This forms the body and front legs of the next frog. 11) Repeat steps 3–10, until you have completed five pairs of frogs and the first frog of one more pair. End and add thread as needed. Repeat steps 3–5 once more. (If you alter the length, be sure to end with step 5 before moving on.)
note The best place to add thread is between steps 7 and 8. With the old thread, sew back through the front legs of the adja-cent frog, and end the thread. Add a new thread, and proceed with steps 8–10. After you have added another frog, you can weave the new thread’s tail in and end it in the new frog’s front legs.
FIGURE 7 FIGURE 9FIGURE 6 FIGURE 8
FIGURE 10 FIGURE 11 FIGURE 12
FINISHING1) Pick up a 150, 110, and 150, and sew through the open hole of the same A (figure 11, a–b). Pick up five 150s, and sew through the open hole of the other end A (b–c). Pick up a 150, 110, and 150, and sew through the other hole of the same A and the next 110, A, 150, 110, 150, A, five 150s, and A (c–d).2) Pick up a 150, 110, 2 mm, and 150, and sew through the open hole of the end B (figure 12, a–b). Pick up a 150, 2 mm, 110, and 150, and sew through the adjacent A (outer hole) and five 150s (b–c). End the working thread and tail.3) Use two jump rings to attach half of the two-strand clasp to each end loop of five 150s. Or, to use a single-strand clasp, use a single jump ring at each end. B&B
Thomasin Alyxander manages a bead store in Windsor, California. She is the author of 26 Quick-Stitched Elements. Contact her at [email protected] or visit ubeadquitous.com.

© 2017 Kalmbach Publishing Co. This material may not be reproduced in any form without permission from the publisher.
April 2017 12
CAMBRIANAPENDANT
designed by Debora Hodoyer
DIFFICULTY
bead weaving

April 2017 13
materials blue/black pendant 13 ⁄4 in. (4.5 cm)
• 1 16 mm Swarovski rivoli
(Bermuda)
• 8 4 x 8 mm Chilli beads
(Preciosa opaque jet silver)
• 8 4 x 8 mm Piggy beads
(opaque black)
• 3 6 mm fire-polished beads
(purple)
• 2 4 mm fire-polished beads
(metallic suede light green)
• 4 g 2.5 x 5 mm SuperDuo
beads (pearl coat steel blue)
• 1 g 4 mm O-beads (magic
green)
• 1 g 80 seed beads (Toho
4514, turquoise blue Picasso)
• 1 g 110 seed beads (Toho
4514, turquoise blue Picasso)
• 1 g 150 seed beads (Miyuki
181, galvanized silver)
• Fireline, 8 lb. test
• beading needles, #12
purple pendant colors
• 16 mm rivoli (tanzanite)
• 4 x 8 mm Chilli beads
(Preciosa opaque jet silver)
• 4 x 8 mm Piggy beads
(transparent purple)
• 6 mm fire-polished beads
(purple)
• 4 mm fire-polished beads
(opaque iris purple)
• 2.5 x 5 mm SuperDuo
beads (opal violet)
• 4 mm O-beads (magic
green)
• 80 seed beads (Toho
1204, opaque light blue
amethyst marbled)
• 110 seed beads (Miyuki
9286, light-purple lined AB)
1) On 4 ft. (1.2 m) of thread and leaving a 6-in. (15 cm) tail, pick up a repeating pattern of a 150 seed bead and a SuperDuo bead 14 times. Sew through all the beads again to form a ring. Tie a square knot with the tail and the working thread, and sew through the next 150 and the open hole of the next SuperDuo (photo a).2) Pick up a SuperDuo, and sew through the open hole of the next SuperDuo (photo b). Repeat this stitch 13 times to complete the round, and step up through the open hole of the first SuperDuo added in this round (photo c).3) Pick up a SuperDuo, and sew through the open hole of the next
SuperDuo. Repeat this stitch 13 times to complete the round, and step up through the open hole of the first SuperDuo added in this round (photo d).4) Pick up an 80 seed bead, and sew through the open hole of the next SuperDuo. Pick up a 150, and sew through the open hole of the following SuperDuo (photo e). Repeat these two stitches six times to complete the round, retrace the thread path to cinch up the beads, and exit an 80 (photo f).5) Position the rivoli faceup in the center of the beadwork. Sew through the beads in this round again to tighten the beadwork, and then sew through the beadwork to
exit an 80. Step up through the outer hole of the next SuperDuo (photo g).6) Work embellishment rounds as follows:Round 1: Pick up a 150, an 110 seed bead, and a 150, and sew through the corresponding hole of the next SuperDuo in the same round to make a picot (photo h). Repeat this stitch 13 times to complete the round (photo i), and sew through the adjacent hole of the next SuperDuo, which is behind the first picot added in this round (photo j).
tip Tie an occasional half-hitch knot in each round to help achieve tighter tension.
Get inspired by the ancient animal fossils of the Cambrian Period with this unique modern Baroque-style pendant made with Chilli and Piggy beads.
a
d
g
b
e
h
c
f
i
j
Materials continued on page 14

• 150 seed beads (Miyuki 256
transparent rainbow lilac)
basicsFacetJewelry.com/basics
• square knot
• half-hitch knot
• ending thread
April 2017 14
Round 2: Pick up two O-beads, one 6 mm fire-polished bead, and two O-beads. Skip the next SuperDuo in the round, and sew through the following SuperDuo (photo k). Repeat this stitch twice (photo l). Work four more stitches, but for each stitch, pick up an O-bead, a Piggy bead (convex side, bottom hole), a Chilli bead (convex side, bottom hole), a Chilli (concave side, bottom hole), a Piggy (concave side, bottom hole), and an O-bead. Step up through the first O-bead picked up in this round (photo m).Round 3: Pick up an 80, and sew through the next 6 mm. Pick up an 80, skip the next O-bead, and sew through the next two O-beads (photo n). Repeat these stitches two more times, sewing through only one O-bead after the last stitch (photo o). Pick up an O-bead, and sew through the open holes of the next Piggy and Chilli beads (photo
p). Pick up a SuperDuo, and sew through the open holes of the next
k
n q
u
l
o
r
v
m
p
s
w
t
x
y
Chilli and Piggy beads (photo q). Repeat the last two stitches three times (photo r), and then pick up an O-bead, and sew through the next O-bead and 80 (photo s).7) Sewing though the 80s in the previous round, work five stitches: one stitch with five 110s; one stitch with a 4 mm fire-polished bead; one stitch with an 110, three 80s, and an 110; one stitch with a 4 mm; and one stitch with five 110s (photo t). 8) Pick up a 150, skip the next O- bead, and sew through the following O-bead (photo u). Reverse, and sew back through the same 150. Retrace the previous thread path across all three 6 mms at the top of the pen-dant, exiting the opposite end 80 (photo v).9) Work as in step 8 to add a 150 on this side of the 6 mms (photo w), and sew back through the beads to exit the center 80 above the center 6 mm (photo x).10) Pick up an 110, six 150s, and an 110, and sew through the 80 your
thread is exiting, going in the same direction to form a loop (photo y). Retrace the thread path several times, and end the working thread and tail. B&B
Debora Hodoyer was born and raised in Sardinia, the second largest island in the middle of the Mediterranean Sea, and a land rich in history, culture, and traditions. She has always been involved in various artistic disci-plines and loves travelling. Contact her at [email protected] or visit crownofstones.etsy.com or facebook.com/crownofstones.
Materials continued from page 13